StoneGate SG-250/SG-200 Quick Start GuideStonesoft Corporation Stonesoft Inc. Stonesoft Corporation...
25
StoneGate SG-250/SG-200 Quick Start Guide 1 StoneGate SG-250/SG-200 Quick Start Guide
Transcript of StoneGate SG-250/SG-200 Quick Start GuideStonesoft Corporation Stonesoft Inc. Stonesoft Corporation...

StoneGate
SG-250/SG-200
Quick Start Guide
StoneGate SG-250/SG-200 Quick Start Guide 1

Copyright © 2001–2005 Stonesoft Corp. Stonesoft Corp. All rights reserved. No part of this book may be reproduced or transmitted in any form or by any means, electronic or mechanical, including photocopying, recording, or by any information storage and retrieval system, without permission in writing from Stonesoft Corporation.
Stonesoft Corporation Stonesoft Inc. Stonesoft CorporationItälahdenkatu 22 A South Terraces, Suite 1000 90 Cecil Street, #13-01FIN-00210 Helsinki 115 Perimeter Center Place 069531 SingaporeFinland Atlanta, GA 30346 USA
Trademarks and PatentsStonesoft, the Stonesoft logo, StoneBeat, FullCluster, ServerCluster, StoneGate, and WebCluster are trademarks or registered trademarks of Stonesoft Corporation in the United States and/or other countries. Multi-link technology, multi-link VPN, and the StoneGate clustering technology-as well as other technologies included in StoneGate-are protected by patents or pending patent applications in the U.S. and other countries.Sun™, Sun Microsystems™, the Sun™ Logo, Solaris™, and Java™ are trademarks or registered trademarks of Sun Microsystems, Inc. in the United States and other countries. All SPARC™ trademarks are used under license and are trademarks or registered trademarks of SPARC International, Inc. in the United States and other countries. Products bearing SPARC trademarks are based upon an architecture developed by Sun Microsystems, Inc.Windows®, Windows NT®, and Microsoft® are trademarks or registered trademarks of Microsoft Corporation in the United States and/or other countries.Linux™ is a registered trademark of Linus Torvalds.Syntax™ is a registered trademark of Linotype-Hell AG and/or its subsidiaries.All other trademarks or registered trademarks are property of their respective owners.The products described in this documentation are also protected by one or more of U.S. Patents and European Patents: U.S. Patent No. 6,650,621, European Patents No. 1065844, 1289202, and may be protected by other U.S. Patents, foreign patents, or pending applications.
DisclaimerAlthough every precaution has been taken to prepare these materials, Stonesoft assumes no responsibility for errors, omissions, or resulting damages from the use of the information contained herein. All IP addresses in these materials were chosen at random and are used for illustrative purposes only. They are not intended to represent the IP addresses of any specific individual or organization.THESE MATERIALS ARE PROVIDED "AS-IS." STONESOFT MAKES NO WARRANTIES, EXPRESS OR IMPLIED, AS TO, THE INFORMATION CONTAINED HEREIN. IN ADDITION, STONESOFT MAKES NO EXPRESS OR IMPLIED WARRANTIES OF MERCHANTABILITY OR FITNESS FOR A PARTICULAR PURPOSE OR USE WITH RESPECT THE INFORMATION OR TECHNIQUES CONTAINED IN THESE MATERIALS. IN NO EVENT SHALL STONESOFT BE LIABLE FOR ANY INDIRECT, SPECIAL, CONSEQUENTIAL OR INCIDENTAL DAMAGES, INCLUDING, BUT NOT LIMITED TO, LOST PROFITS OR LOSS OR DAMAGE TO DATA ARISING FROM THE USE OF THESE MATERIALS, EVEN IF ADVISED IN ADVANCE OF THE POSSIBILITY OF SUCH DAMAGES.
Revision: SGHGS-250/200_100_16/03/2005
2

Introduction
1. IntroductionThank you for choosing Stonesoft’s StoneGate™ High Availability Firewall and VPN. The StoneGate security appliances are optimized for the most demanding network environments, yet easy to deploy, easy to use and centrally managed, making them extremely cost-effective. The product family includes a range of appliances from small office/branch office systems to high-end enterprise firewall and VPN gateways.The following firewall/VPN devices are available:• SG-3000/SGS-3000• SG-1000/SGS-1000• SG-570/SGS-570• SG-500/SGS-500• SG-250/SGS-250• SG-200/SGV-200/SGS-200• A “V” designator (for example, SGV-200) indicates that particular
model is customized for operating a VPN only.• An “S” designator (e.g., SGS-500) indicates that that particular model
is customized for operating a Single Site installation (SGS).
Note – The SG-250 and the SG-200 appliance families are treated as the same in this installation guide as are the SGV models. When settings for the SG-250 appliance family differ from the SG-200, or SGV models from SG models, they are stated separately.
ILLUSTRATION 1 SG-250
StoneGate SG-250/SG-200 Quick Start Guide 3

ILLUSTRATION 2 SG-200/SGV-200/SGS-200
This guide is designed to show you how to set up quickly the device. Then more detail is given in order to familiarize you better with the SG-250/SG-200.• Section 2. Before You Begin, on page 5, gives recommendations on how
to ensure proper operation of the device.• Section 3. Initial Configuration, on page 7, describes how to initially
configure the device so that you can continue the installation with the StoneGate Installation Guide.
• Section 4. Device Introduction, on page 19, gives an introduction to the device features in more detail.
• Section 5. System Safety, on page 22, lists safety precautions you must be aware of.
• Section 6. System Specifications, on page 24, describes the system specifications in more detail.
4

Before You Begin
2. Before You BeginYou should inspect the box the Stonesoft SG-250/SG-200 was shipped in and note if it was damaged in any way. If the device itself shows damage you should file a damage claim with the carrier who delivered it. Likewise, you should confirm that the Stonesoft anti-tamper tape on the chassis is intact.Decide on a suitable location for the Stonesoft SG-250/SG-200. It should be situated in a clean, dust-free area that is well ventilated. Avoid areas where heat, electrical noise, and electromagnetic fields are generated. You will also need it placed near a grounded power outlet. It is recommended to use a regulating uninterruptible power supply (UPS) to protect the device from power surges, voltage spikes and to keep your system operating in case of a power failure.
2.1 SGS-Specific InformationWith StoneGate Appliance Solution for Single Site you get one POS (Proof-Of-Serial number) attached to the appliance, that combines the licenses of the Local StoneGate Management Center (SMC) and the StoneGate Appliance. The local SMC can manage a single gateway or a cluster on that one site. The SMC needs to be installed on hardware of its own (see the specifications below). Should you want to install a cluster, you need to select same type of appliance for additional nodes, as you have purchased for this initial setup (e.g., SG-200, SG-500-50, SG-500-100).
Technical Specifications of the SMCThe latest hardware requirements and recommended platform hardware for this edition of StoneGate can be found on our website at http://www.stonesoft.com/products/StoneGate/Technical_Requirements.
Basic Management System Hardware RequirementsManagement Server: Pentium II processor or higher recommended (suggested minimum processor speed is 500 MHz) or equivalent on a non-Intel platformsLog Server: Pentium III processor or higher is recommended (suggested minimum processor speed is 700 MHz) or equivalent on a non-Intel platform.• A mouse or pointing device (for GUI only)
StoneGate SG-250/SG-200 Quick Start Guide 5

• SVGA (800x600) display or higher (for GUI only)• 256 MB RAM minimum (512 MB recommended, for larger
installations 1 GB recommended)• Disk space of Management Server database: 50 MB recommended• Disk space of Log Server database (minimum suggested):
• For evaluation use: 4 GB• For normal use: 20 GB (separate hard disk recommended)• For direct archiving with high volumes: separate disk for archive files, 80
GB or greater
Operating SystemsStoneGate Management System supports the following operating systems and versions - detailed information about supported versions and service packs can be found at http://www.stonesoft.com/products/StoneGate/Technical_Requirements:• Microsoft® Windows® XP (U.S. English)• Microsoft Windows 2000 (U.S. English)• Windows NT® 4.0 (U.S. English)• Red Hat® Linux®• Sun. Solaris
6

Initial Configuration
3. Initial ConfigurationYour StoneGate SG-250/SG-200 comes pre-loaded with StoneGate engine software. However, before a security policy can be loaded on the device you have to perform the initial engine configuration. For SGS models you also need to install the Management Server before you can proceed with the initial engine configuration.
3.1 Configuration OverviewThe initial engine configuration involves the following steps:1. Installing the Management Server (for SGS only!)2. Defining the firewall on the Management Server3. Saving the initial configuration4. Connecting the cables5. Setting up a terminal6. Starting up the device7. Performing the initial using the configuration wizard
3.2 Installing the Management ServerThis step is only done for the Single Site Solution (SGS). If you are not using SGS skip this step and continue with the next one Section 3.3 Defining Firewalls on the Management Server, on page 7.Install the Management Server, the Log Server(s), and the GUI client. The detailed installation instructions can be found in the StoneGate Installation Guide. For more thorough explanation on using StoneGate, please refer to the StoneGate Administrator’s Guide and the Administrator’s Reference.After installing the Management Server for SGS continue on to the next step Section 3.3 Defining Firewalls on the Management Server, on page 7.
3.3 Defining Firewalls on the Management ServerBefore the engine can be configured the corresponding firewall or firewall cluster element must be defined on the Management Server. For more information, see Chapter 5, Defining a Single Firewall or Firewall Cluster in the StoneGate Installation Guide.
StoneGate SG-250/SG-200 Quick Start Guide 7

Caution – Due to memory constraints, SG-250/SG-200-class appliances lack enough free swap space to pass the Free Swap Space test that is enabled by default when defining firewall clusters. Therefore, you need to disable the Free Swap Space test in the Management Server before installing the security policy on to a cluster of appliances. In the StoneGate Control Panel, open up the appliance cluster's properties, then Tester Settings and disable the Free Swap Space test.
3.4 Saving the Initial ConfigurationAfter the firewall or firewall cluster element has been defined on the Management Server, the initial configuration data must be generated. This initial configuration data includes the key fingerprint and the one-time password for contacting the Management Server.
▼ To generate initial configuration information:1. Start the StoneGate GUI, the Control Panel appears.
ILLUSTRATION 3 StoneGate Control Panel
2. On the control panel, right-click on the name of the firewall and click Save Initial Configuration. The Select a Directory window appears.
8

Initial Configuration
ILLUSTRATION 4 Select a Directory Window
3. Choose the directory where you want to save the initial configuration data and click OK. The Operation Completed window appears.
ILLUSTRATION 5 Operation Competed Window
4. Write down the one-time password. The person who performs the initial configuration on the engine will need it.
Note – Other important information, such as the Management Server SSL Key Fingerprint, is stored in the initial configuration data that you saved earlier.
5. If you will not be performing the engine configuration personally, send the initial configuration data, including the one-time password, to the person who will perform the configuration.
Caution – Send this information in a secure way!
3.5 Connecting the CablesIf unsure where to make the proper connection for the SG-250 device refer to Illustration 16. For the SG-200/SGV-200/SGS-200 device refer to Illustration 17.
StoneGate SG-250/SG-200 Quick Start Guide 9

▼ To connect the cables:1. Connect the network cables to the LAN ports.2. Connect the console cable to the serial port.3. Connect the power cable.
3.6 Setting up a TerminalBecause the StoneGate device has no keyboard, mouse, or display adapter, you must use a separate machine, such as a laptop, as a terminal.
▼ To set up a terminal:1. Plug the serial port cable leading from the serial port (6) of the
device into the corresponding serial port on your terminal machine.
2. Start a terminal program, such as HyperTerminal, on the terminal machine. (HyperTerminal is included, by default, in Microsoft Windows, but it is also possible to use other programs.)
3. Define a new connection. Illustration 6 shows how this is done in HyperTerminal.
ILLUSTRATION 6 New Connection
4. Choose to connect through the serial port (e.g. COM1). Illustration 7 shows how this looks in HyperTerminal.
10

Initial Configuration
ILLUSTRATION 7 Connect To Window
5. Set the port settings as follows:• Bits per second: 9600• Data bits: 8• Parity: None• Stop bits: 1
Illustration 8 shows how this looks in HyperTerminal.
StoneGate SG-250/SG-200 Quick Start Guide 11
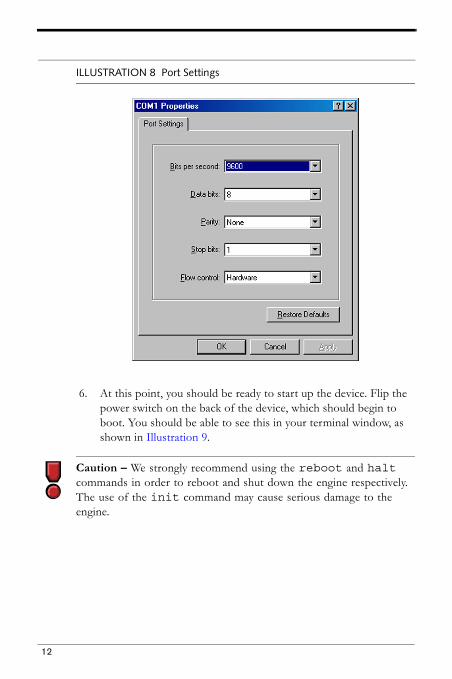
ILLUSTRATION 8 Port Settings
6. At this point, you should be ready to start up the device. Flip the power switch on the back of the device, which should begin to boot. You should be able to see this in your terminal window, as shown in Illustration 9.
Caution – We strongly recommend using the reboot and halt commands in order to reboot and shut down the engine respectively. The use of the init command may cause serious damage to the engine.
12

Initial Configuration
ILLUSTRATION 9 Device Booting
3.7 Performing the Initial ConfigurationBy this point, you should have done the following:• defined the firewall on the Management Server, • saved the initial configuration information• connected cables• set up a terminal• started up the device
Now you are ready to perform the initial configuration.
▼ To start the initial configuration:1. Once the device has fully booted, you should see the Engine
Configuration Wizard, as shown in Illustration 10.
StoneGate SG-250/SG-200 Quick Start Guide 13

ILLUSTRATION 10 Engine Configuration Wizard
2. Choose Next. The Configure OS settings screen is displayed.
Note – It is not possible to use the import feature because the device has no floppy drive.
3.7.1 Configuring OS Settings
ILLUSTRATION 11 Configure OS Settings Screen
▼ To configure OS settings:
Note – It is not possible to change the keyboard layout—this setting is irrelevant because the device has no keyboard.
1. Configure the timezone:1.1 In the Configure OS Settings window, highlight the Local timezone
line and press ENTER.
14
Initial Configuration
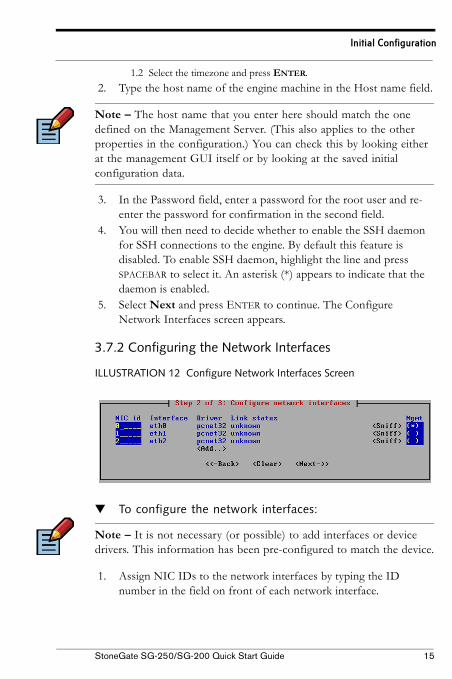
1.2 Select the timezone and press ENTER.2. Type the host name of the engine machine in the Host name field.
Note – The host name that you enter here should match the one defined on the Management Server. (This also applies to the other properties in the configuration.) You can check this by looking either at the management GUI itself or by looking at the saved initial configuration data.
3. In the Password field, enter a password for the root user and re-enter the password for confirmation in the second field.
4. You will then need to decide whether to enable the SSH daemon for SSH connections to the engine. By default this feature is disabled. To enable SSH daemon, highlight the line and press SPACEBAR to select it. An asterisk (*) appears to indicate that the daemon is enabled.
5. Select Next and press ENTER to continue. The Configure Network Interfaces screen appears.
3.7.2 Configuring the Network Interfaces
ILLUSTRATION 12 Configure Network Interfaces Screen
▼ To configure the network interfaces:
Note – It is not necessary (or possible) to add interfaces or device drivers. This information has been pre-configured to match the device.
1. Assign NIC IDs to the network interfaces by typing the ID number in the field on front of each network interface.
StoneGate SG-250/SG-200 Quick Start Guide 15

Tip: The Sniff option can be used for troubleshooting the network interfaces. Select Sniff on an interface to run network sniffer on that interface.
2. To define the Management interface, highlight the interface’s Mgmt column and press SPACEBAR to select it. An asterisk (*) appears to indicate the management interface.
3. Highlight Next and press ENTER to continue. The Prepare for Management Contact screen appears.
3.7.3 Contacting the Management Server
ILLUSTRATION 13 Prepare for Management Contact Screen
▼ To contact the Management Server1. Select the Switch to initial configuration checkbox to activate an
initial configuration. Tip: If you run the sg-reconfigure command later, you can choose to:
• switch to an initial configuration by selecting the checkbox.• use the current configuration by unselecting the checkbox. In this case,
the currently active security policy will remain active. All other changes (host name, time zone, SSH daemon, NIC mapping, management contact, etc.) will take effect after pressing the Finish button.
2. Define the IP address used for the management connections to the firewall node.
16

Initial Configuration
• Dynamic IP Address: Select Obtain node IP address from a DHCP server and then continue on with after the Static IP-only steps. The DHCP server will automatically assign the IP address and netmask.
• Static IP Address: Select Enter node IP address manually and then continue below for the Static IP-only steps. The IP address must be the same as specified control IP address in the firewall element on the Management Server.
3. (Static IP-only) Next, define the netmask for the IP address used for the management connections to the firewall node. For this example, we are using the netmask 255.255.255.0.
4. (Static IP-only) Define the address of the default gateway needed for the firewall engine to contact the Management Server. If the engine and the Management Server are on the same network, you can leave this line empty.
5. Highlight Contact Management Server and press SPACEBAR to enable the initial connection to the Management Server. During this contact, the trust relationship is established between the engine and the Management Server. An asterisk (*) indicates that the option is active.
6. In the One-time password field, enter the password for contacting the Management Server. The password is engine-specific and can be used only for one initial connection to the Management Server.
7. Optionally, enter the Management Server certificate’s fingerprint for verification.
8. To complete the configuration, highlight Finish and press ENTER.
3.7.4 Verifying Management ConnectionsIf the initial Management Server contact was selected, the firewall engine tries to connect to the Management Server. If the initial management contact fails for some reason, the configuration can be started again with the sg-reconfigure command.If the firewall cannot communicate with the Management Server and you receive a “connection refused” error message. Make sure that the one-time password is correct and the Management Server IP address is reachable from the node.After a successful Management Server contact, the firewall engine installation is complete and ready for security policy upload from the
StoneGate SG-250/SG-200 Quick Start Guide 17

Management system. This is displayed in the GUI Control Panel; the node’s status has changed from Unknown to Not Configured (no security policy is installed yet), and the connection state is Connected indicating that the Management Server is able to connect to the node. For more information on creating and installing a security policy, please see the StoneGate Administrator’s Guide.
Caution – Do not forget to to disable the Free Swap Space test in the Management Server if you configure the appliances in a cluster.
18

Device Introduction
4. Device Introduction
4.1 OverviewThe Stonesoft SG-250/SG-200 is a high quality network security device designed for use in branch offices and other locations that do not have full-time technical staff. Each Stonesoft SG-250/SG-200 is designed for maximum reliability and minimal maintenance.SGS can be used as a single site FW/VPN solution. The Management Server SW needs to be installed on a seperate HW server.
Caution – Never open the device chassis! There are no user serviceable parts inside. Opening the chassis will also void your warranty.
4.2 Front Panel
Description of the SG-250 front panelShown in Illustration 14 is the front panel of the SG-250.
ILLUSTRATION 14 Front Panel of the SG-250
The following parts are located on the front of the SG-200/SGV-200/SGS-200:1. Power indicator LED2. Status indicator LED3. Network link indicator LEDs4. Network activity indicator LEDs
Description of the SG-200/SGV-200/SGS-200 front panelShown in Illustration 15 is the front panel of the SG-200/SGV-200/SGS-200.
1
2
3
4
1
2
3
4
StoneGate SG-250/SG-200 Quick Start Guide 19

ILLUSTRATION 15 Front Panel of the SG-200/SGV-200/SGS-200
The following parts are located on the front of the SG-200/SGV-200/SGS-200:1. Power indicator LED2. Status indicator LED3. Network activity indicator LEDs4. Network link indicator LEDs
4.3 Back Panel
Description of the SG-250 back panelShown in Illustration 16 is the back panel of the SG-250.
ILLUSTRATION 16 Back Panel of the SG-250
The following parts are located on the back of the device:1. Power supply input (12V, 3A, 36W)2. RS-232 serial port connector (DB9)3. LAN ports (4) RJ-45 Ethernet connectors
Description of the SG-200/SGV-200/SGS-200 back panelShown in Illustration 17 is the back panel of the SG-200/SGV-200/SGS-200.
ILLUSTRATION 17 Back Panel of the SG-200/SGV-200/SGS-200
1
2
3
4
1 23
1 2 3
20

Device Introduction
The following parts are located on the back of the device:1. RS-232 serial port connector2. LAN ports (3) RJ-45 Ethernet connectors3. Power supply input (DC 5V, 3A)
StoneGate SG-250/SG-200 Quick Start Guide 21

5. System SafetyThe following safety information and procedures should be followed whenever working with electronic equipment. However, please be advised that StoneGate Appliances are not end-user serviceable, and you should never open the appliance chassis for any reason. Doing so will void any hardware warranty that may be associated with your appliance.
5.1 Electrical Safety PrecautionsBasic electrical safety precautions should be followed to protect yourself from harm and the Stonesoft SG-250/SG-200 from damage:• Be aware of the locations of the power on/off switch as well as the
room's emergency power-off switch, disconnection switch, or electrical outlet. If an electrical accident occurs, you can then quickly cut power to the system.
• Do not work alone when working with high voltage components. • Use only one hand when working with powered-on electrical
equipment. This is to avoid making a complete circuit, which will cause electrical shock. Use extreme caution when using metal tools, which can easily damage any electrical components or circuit boards they come into contact with.
• Do not use mats designed to decrease electrostatic discharge as protection from electrical shock. Instead, use rubber mats that have been specifically designed as electrical insulators.
• The power supply cord must include a grounding plug and must be plugged into a grounded electrical outlet.
Caution – Never open the device chassis! There are no user serviceable parts inside. The chassis must be in place to ensure proper cooling. Opening the chassis will also void your warranty.
5.2 General Safety PrecautionsFollow these rules to ensure general safety:• Keep the area around the Stonesoft SG-250/SG-200 clean and free of
clutter.• We recommend using a regulating uninterruptible power supply (UPS)
to protect the device from power surges, voltage spikes, and to keep your system operating in case of a power failure.
22

System Safety
5.3 ESD PrecautionsElectrostatic discharge (ESD) is generated by two objects with different electrical charges coming into contact with each other. An electrical discharge is created to neutralize this difference, which can damage electronic components and printed circuit boards. Use a grounded wrist strap designed to prevent electrostatic discharge.
Note – It is highly recommended to use a UPS (Uninterruptible Power Supply) in critical environments with your StoneGate appliance. If after a brief power outage your StoneGate appliance only partially starts up (for example, the power light is on, but the NIC LEDs are off and the appliance does not connect) turn the appliance off for five seconds and then back on. This will resolve the power issues.
5.4 Operating PrecautionsCare must be taken to assure that the chassis cover is in place when the SG-250/SG-200 is operating to ensure proper cooling. Out of warranty damage to the SG-250/SG-200 system can occur if this practice is not strictly followed.We strongly recommend using the reboot and halt commands in order to reboot and shut down the engine respectively. The use of the init command may cause serious damage to the engine.
StoneGate SG-250/SG-200 Quick Start Guide 23

6. System SpecificationsThis section describes the hardware you should have in your product kit. It includes a description of all external parts on the appliance as well as the significant internal parts.
6.1 Included ItemsYour box should include the following hardware: 1. SG Device (1 each)2. Power Cord/Power Adapter3. Network Cables4. Console Cable5. Quick Start Guide (1 each)If your box has missing or damaged parts be sure to inform us as soon as possible. You should confirm that the Stonesoft anti-tamper tape on the chassis is intact. Refer to the warranty for more information.
6.2 Hardware SpecificationsSee Table 1 for more information.
TABLE 1 Hardware Specifications
Specifications SG-250 SG-200
CPU Board VIA C3 400A MHz NS Geode GX1-300MHz
Memory 128 MB on board 128 MB on board
Storage Device Compact Flash Compact Flash
Compact Flash 256 MB 256 MB
Ethernet Port 4 x Realtek RTL8139C 10/100 3 x Realtek RTL8139C 10/100
Serial Port 1 x DB9 1 x DB9
LEDs Ethernet ACT/LINK, Power, Status
Ethernet ACT/LINK, Power, Status
24

System Specifications
Power Supply External Switching Power Adapter, +12V, 3A, 100-240V, 50-60 Hz
External Switching Power Adapter, 100-240V, 50-60 Hz
Dimensions Width: 290 mm (11.6 in.) Height: 43 mm (1.72 in.) Depth: 157 mm (6.26 in.)
Width: 210 mm (8.4 in.) Height: 30 mm (1.2 in.) Depth: 157 mm (6.26 in.)
Weight 1.4 kg (3.08 lb.) 0.97 kg (2.12 lb.)
Operating Temperature
0–40ºC 5–40ºC
Humidity 5–95% RH, non-condensing 5–95% RH, non-condensing
Storage Environment -20–70ºC. 5–95% RH, non-condensing
0–70ºC. 5–95% RH, non-condensing
Certification CE/FCC Class B CE/FCC/CB
Specifications SG-250 SG-200
StoneGate SG-250/SG-200 Quick Start Guide 25