STIHL HLA 56
20
STIHL HLA 56 Instruction Manual 2 - 19
Transcript of STIHL HLA 56
STIHL HLA 56
Instruction Manual2 - 19
Contents1 Introduction................................................. 22 Guide to Using this Manual.........................23 Overview..................................................... 34 Safety Precautions......................................35 Preparing Hedge Trimmer for Operation.... 96 Charging the Battery, LEDs........................ 97 Assembling the Hedge Trimmer................. 98 Removing and Fitting the Battery..............109 Switching the Hedge Trimmer On/Off....... 1010 Testing the Hedge Trimmer and Battery...1011 Operating the Hedge Trimmer.................. 1112 After Finishing Work..................................1213 Transporting..............................................1214 Storing.......................................................1315 Cleaning....................................................1316 Maintenance............................................. 1417 Repairing...................................................1418 Troubleshooting........................................ 1419 Specifications............................................1520 Spare Parts and Accessories....................1621 Disposal.................................................... 1622 EC Declaration of Conformity................... 1623 General Power Tool Safety Warnings.......17
1 IntroductionDear Customer,
Thank you for choosing STIHL. We develop andmanufacture our quality products to meet ourcustomers’ requirements. The products aredesigned for reliability even under extreme con‐ditions.
STIHL also stands for premium service quality.Our dealers guarantee competent advice andinstruction as well as comprehensive servicesupport.
STIHL expressly commit themselves to a sus‐tainable and responsible handling of naturalresources. This user manual is intended to helpyou use your STIHL product safely and in anenvironmentally friendly manner over a longservice life.
We thank you for your confidence in us and hopeyou will enjoy working with your STIHL product.
Dr. Nikolas Stihl
IMPORTANT! READ BEFORE USING ANDKEEP IN A SAFE PLACE FOR REFERENCE.
2 Guide to Using this Manual2.1 Applicable DocumentsLocal safety regulations apply.► In addition to this instruction manual, read,
understand and keep the following documents:– STIHL AK battery safety information– STIHL AL 101, 300, 500 charger instruction
manual– Safety information for STIHL batteries and
products with built-in battery:www.stihl.com/safety-data-sheets
2.2 Warning Notices in Text
DANGER■ This notice refers to risks which result in seri‐
ous or fatal injury.► Serious or fatal injuries can be avoided by
taking the precautions mentioned.
WARNING■ This notice refers to risks which can result in
serious or fatal injury.► Serious or fatal injuries can be avoided by
taking the precautions mentioned.
NOTICE
■ This notice refers to risks which can result indamage to property.► Damage to property can be avoided by tak‐
ing the precautions mentioned.
2.3 Symbols in TextThis symbol refers to a chapter in thisinstruction manual.
English
2 0458-816-8321-B
© AN
DR
EAS STIHL AG
& Co. KG
20210458-816-8321-B. VA0.K21.
Printed on chlorine-free paperPrinting inks contain vegetable oils, paper can be recycled.
Translation of Original Instruction M
anual0000008623_005_G
B
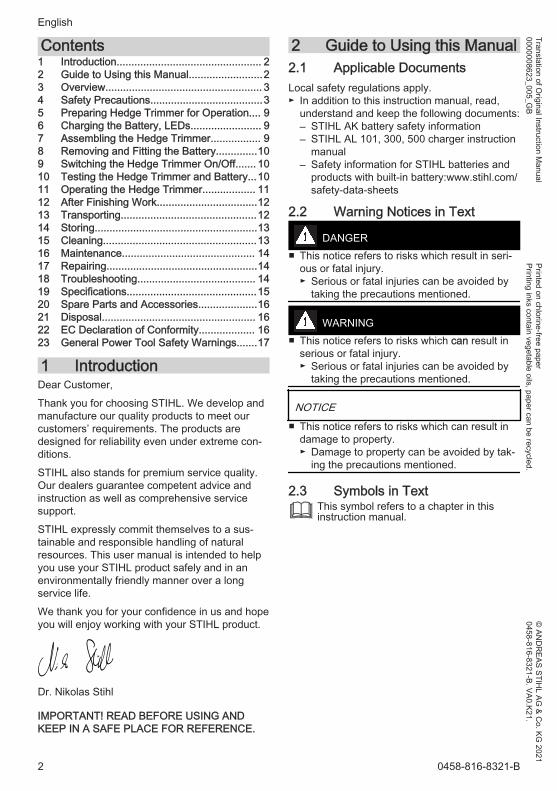
3 Overview3.1 Hedge Trimmer and Battery
1
10
13
11
12
23
814
15
5
6
7
4
9#
16 1718
#
0000-GXX-7601-A0
1 ShaftConnects all components.
2 Loop HandleFor holding and controlling the trimmer.
3 Handle HoseFor holding and controlling the trimmer.
4 Coupling SleeveConnects shaft to cutter bar.
5 Wing ScrewSecures cutter bar to shaft.
6 Lock ButtonLocks cutter bar in position.
7 Swivel HandleServes to adjust angle of cutter bar.
8 Cutting BladesPerform the cutting action.
9 Blade ScabbardHelps protect user from contact with the cut‐ting blades.
10 Carrying RingFor attaching carrying system.
11 Release SlideUnlocks the trigger.
12 TriggerSwitches the trimmer on and off.
13 Control HandleFor operating, holding and controlling thehedge trimmer.
14 Locking LeverSecures the battery in the battery compart‐ment.
15 Battery CompartmentAccommodates the battery.
16 BatterySupplies power to the hedge trimmer.
17 LEDsIndicate battery’s state of charge and mal‐functions.
18 ButtonActivates the LEDs on the battery.
# Rating Label with Serial Number
3.2 SymbolsThe symbols which may be on the long-reachhedge trimmer and battery have the followingmeanings:
This symbol indicates the direction therelease slide has to be pushed in.This symbol indicates that the cutterblade must be attached.1 LED emits red light. The battery istoo warm or too cold.
4 LEDs flash red. There is a fault in thebattery.
LWA Guaranteed sound power level inaccordance with Directive 2000/14/ECin dB(A) for the purpose of comparingthe sound emissions of products.
The information next to the symbol indi‐cates the energy content of the batteryaccording to the cell manufacturer’s specifi‐cation. The energy content available inoperation is lower.Do not dispose of the product with domes‐tic waste.
4 Safety Precautions4.1 Warning SymbolsMeanings of warning signs and labels on thelong-reach hedge trimmer or battery:
Observe safety notices and take thenecessary precautions.
3 Overview English
0458-816-8321-B 3
Read, understand and keep the UserManual.
Wear safety glasses and a hard hat.
Wear safety boots.
Wear work gloves.
Do not touch moving cutting blades.
Maintain a safe distance.
Protect the hedge trimmer from rainand moisture.
Remove the battery during breaks inwork, transport, storage, maintenanceor repair.
Protect battery from heat and fire.
Protect the battery from rain and mois‐ture and do not immerse it in liquids.
Observe the permitted battery temper‐ature range.
4.2 Intended UseThe STIHL HLA 56 hedge trimmer is designedfor cutting low growing shrubs, high hedges, highshrubs, high bushes and high scrub.
The hedge trimmer must not be used in the rain.
A STIHL AK battery supplies the hedge trimmerwith power.
WARNING■ Batteries not explicitly approved for the hedge
trimmer by STIHL may cause a fire or explo‐
sion. This can result in serious or fatal injuriesand damage to property.► Use the hedge trimmer with a STIHL AK
battery.■ Using the hedge trimmer or the battery for pur‐
poses for which they were not designed mayresult in serious or fatal injuries and damageto property.► Use the hedge trimmer as described in this
instruction manual.► Use the battery as described in the STIHL
AK instruction manual.
4.3 The Operator
WARNING■ Users without adequate training or instruction
cannot recognize or assess the risks involvedin using the hedge trimmer and battery. Theuser or other persons may sustain serious orfatal injuries.
► Read, understand and save theinstruction manual.
► If the hedge trimmer or battery is passed onto another person: Always give them theinstruction manual.
► Make sure the user meets the followingrequirements:– The user must be rested.– The user must be in good physical con‐
dition and mental health to operate andwork with the hedge trimmer and bat‐tery. If the user’s physical, sensory ormental ability is restricted, he or shemay work only under the supervision ofor as instructed by a responsible per‐son.
– The user is able to recognize andassess the risks involved in using thehedge trimmer and battery.
– The user must be of legal age or isbeing trained in a trade under supervi‐sion in accordance with national rulesand regulations.
– The user has received instruction from aSTIHL servicing dealer or other experi‐enced user before working with thehedge trimmer for the first time.
– The user must not be under the influ‐ence of alcohol, medication or drugs.
► If you have any queries: Contact a STIHLservicing dealer for assistance.
English 4 Safety Precautions
4 0458-816-8321-B
4.4 Clothing and equipment
WARNING■ Long hair may be pulled into the long-reach
hedge trimmer during operation. This mayresult in serious injury to the user.► Tie up and confine long hair above your
shoulders.■ Objects can be thrown at high speed during
operation. This may result in injury to the user.► Wear close-fitting safety glasses.
Suitable safety glasses are tested inaccordance with EN 166 or nationalregulations and available commer‐cially with the corresponding mark‐ing.
► Wear a long-sleeved, close-fitting top andlong trousers.
■ Falling objects can cause head injuries.► wear a hard hat.
■ Dust can be whipped up during operation.Whipped up dust can damage the respiratorypassages and cause allergic reactions.► If dust is generated: Wear a dust respirator
mask.■ Unsuitable clothing may snag on wood, thick‐
ets or the long-reach hedge trimmer. Usersnot wearing suitable clothing are at risk of seri‐ous injury.► Wear close-fitting clothing.► Remove scarves and jewelry.
■ Wearing unsuitable footwear may cause theuser to slip. This may result in injury to theuser.
► Wear sturdy, closed-toed footwearwith high-grip soles.
■ The user may come into contact with the cut‐ting blades during cleaning or servicing. Thismay result in injury to the user.
► Wear work gloves made from resist‐ant material.
4.5 Work Area and Surroundings4.5.1 Hedge trimmer
WARNING■ Bystanders, children and animals cannot rec‐
ognize or assess the dangers of the hedgetrimmer or flying debris. Bystanders, children
and animals may be seriously injured anddamage to property may occur.
► Do not allow bystanders,children or animals within 5meters of the work area.
► Maintain a clearance of 5 meters fromobjects.
► Do not leave the hedge trimmer unatten‐ded.
► Make sure that children cannot play withthe hedge trimmer.
■ The hedge trimmer is not waterproof. Workingin the rain or a damp location may result in anelectric shock. This can result in injuries to theuser and may damage the hedge trimmer.
► Do not work in the rain or a damplocation.
■ Electrical components of the hedge trimmercan produce sparks. Sparks may cause a fireor an explosion in an easily combustible orexplosive environment. This can result in seri‐ous or fatal injuries and damage to property.► Do not work in an easily combustible or
explosive environment.
4.5.2 Battery
WARNING■ Bystanders, children and animals cannot rec‐
ognize or assess the dangers of the battery.Bystanders, children and animals may be seri‐ously injured.► Keep bystanders, children and animals
away from the work area.► Do not leave the battery unattended.► Make sure that children cannot play with
the battery.■ The battery is not protected against all ambi‐
ent conditions. If the battery is exposed to cer‐tain ambient conditions, it may catch fire orexplode. This can result in serious injuries anddamage to property.
► Protect battery from heat and fire.► Do not throw the battery into a fire.
► Use and store the battery at temper‐atures between ‑ 10 °C and + 50 °C.
► Protect the battery from rain anddamp – do not immerse it in fluids.
4 Safety Precautions English
0458-816-8321-B 5
► Keep battery away from metallic objects.► Do not expose battery to high pressure.► Do not expose battery to microwaves.► Protect battery from chemicals and salts.
4.6 Safe Condition4.6.1 Long-reach hedge trimmerThe long-reach hedge trimmer is in a safe condi‐tion if the following points are observed:– The long-reach hedge trimmer is not dam‐
aged.– The long-reach hedge trimmer is clean.– The controls function properly and have not
been modified.– The cutting blades are correctly fitted.– Only original STIHL accessories designed for
this long-reach hedge trimmer are fitted.– The accessories are correctly attached.
WARNING■ If not in safe condition, components may no
longer operate correctly and safety devicesmay be disabled. This may result in serous orfatal injury to people.► Work only with an undamaged long-reach
hedge trimmer.► If the long-reach hedge trimmer is dirty:
Clean the long-reach hedge trimmer.► Do not modify the long-reach hedge trim‐
mer.► If the controls do not function properly: Do
not work with the long-reach hedge trim‐mer.
► Only fit original STIHL accessoriesdesigned for this long-reach hedge trimmer.
► Attach accessories as described in thisUser Manual or in the User Manual for theaccessories.
► Never insert objects into the openings ofthe long-reach hedge trimmer.
► Replace worn or damaged labels.► If you have any doubts, be sure to consult a
STIHL dealer.
4.6.2 Cutting BladesThe cutting blades are in a safe condition if thefollowing points are observed:– Cutting blades are undamaged.– Cutting blades are not deformed.– Cutting blades move freely.– Cutting blades are properly sharpened.– Cutting blades have no burrs.
WARNING■ If they are in an unsafe condition, parts of the
cutting blades may come off and be thrown athigh speed. This can result in serious injuries.► Work only with undamaged cutting blades.► Make sure the cutting blades are properly
sharpened and deburred.► If you have any queries: Contact your
STIHL servicing dealer.
4.6.3 BatteryThe battery is in safe condition when the follow‐ing conditions are met:– The battery is not damaged.– The battery is clean and dry.– The battery is working and has not been modi‐
fied.
WARNING■ The battery cannot function safely if it is not in
safe condition. There is a risk of serious injuryto persons.► Use an undamaged and functioning battery.► Do not charge a damaged or defective bat‐
tery.► If the battery is dirty or wet: clean the bat‐
tery and allow it to dry.► Do not modify the battery.► Do not insert objects into the apertures in
the battery.► Never connect the battery terminals to met‐
allic objects and cause a short circuit.► Do not open the battery.► Replace worn or damaged warning signs.
■ Fluid may leak from a damaged battery. If thefluid contacts the skin or eyes, this may causeirritation.► Avoid contact with the fluid.► In the event of contact with the skin: wash
the affected areas with plenty of soap andwater.
► In the event of contact with the eyes: rinsethe eyes with plenty of water for at least 15minutes and seek medical attention.
■ A damaged or defective battery may emit anunusual odour, smoke or catch fire. This mayresult in serious or fatal injury to people anddamage to property.► If the battery emits an unusual odour or
smoke: do not use the battery and keep itaway from flammable materials.
► If the battery catches fire: try to extinguishthe battery using a fire extinguisher orwater.
English 4 Safety Precautions
6 0458-816-8321-B

4.7 Working
WARNING■ In certain situations, the user may no longer
be able to concentrate on their work. This mayresult in the user stumbling, falling and suffer‐ing serious injury.► Keep calm and plan your work.► If light and visibility are poor: Do not work
with the long-reach hedge trimmer.► Operate the long-reach hedge trimmer
alone.► Watch out for obstacles.► Work standing on the ground and keep your
balance. If you have to work at a height:Use a mobile elevating work platform orsecure scaffolding.
► If you start feeling fatigue: Take a break.■ Working above shoulder height can cause fati‐
gue sooner. This may result in serious injury tothe user.► Work above shoulder height for short peri‐
ods only.► Take breaks.
■ If the moving cutting blade makes contact witha hard object it can be brought to a suddenstop. The reactive forces that occur can causethe user to lose control of the long-reachhedge trimmer and be seriously injured.► Hold the long-reach hedge trimmer firmly
with both hands.► Before starting work, check hedge for hard
objects and remove any such objects.■ The moving cutting blades can cut the user.
This may result in serious injury to the user.► Do not touch moving cutting blades.► If the cutting blades are blocked by
an object: Switch off the long-reachhedge trimmer and remove the bat‐tery. before clearing the jam.
■ If the behavior of the long-reach hedge trim‐mer changes during operation or feelsunusual, it may no longer be in a safe condi‐tion. This may result in serious injury to peopleand damage to property.► Stop working, remove the battery and con‐
sult a STIHL dealer.■ Vibrations may occur while using the long-
reach hedge trimmer.► Wear gloves.
► Take breaks.► If signs of a circulatory disturbance occur:
Consult a doctor.
■ Note that the cutting blades continue to run forabout 1 second after you release the trigger.The moving cutting blades may cut the user.They may cause serious injury to persons.► Wait until the cutting blades come to a com‐
plete standstill.■ In an emergency, the user may start to panic
and forget to take off the carrying system. Thismay result in serious injury to the user.► Practice taking off the carrying system.
DANGER■ Working near live electric cables may result in
accidental contact with and damage to the cut‐ting blades. This may result in serious or fatalinjury to the user.
► Maintain a clearance of15 meters from live cables.
4.8 Transporting4.8.1 Hedge Trimmer
WARNING■ The hedge trimmer may turn over or shift dur‐
ing transport. This may result in personal inju‐ries and damage to property.
► Remove the battery.
► Fit the blade scabbard so that it completelycovers the cutting blades.
► Secure the hedge trimmer with lashingstraps or a net to prevent it turning over andmoving.
4.8.2 Battery
WARNING■ The battery is not protected against all ambi‐
ent conditions. The battery may be damaged ifit is exposed to certain ambient conditions anddamage to property may occur.► Never transport a damaged battery.► Store the battery in non-conductive packag‐
ing.■ The battery may turn over or shift during trans‐
port. This may result in personal injuries anddamage to property.► Pack the battery in packaging in such a way
that it cannot move.► Secure the packaging so that it cannot
move.
4 Safety Precautions English
0458-816-8321-B 7
4.9 Storing4.9.1 Hedge trimmer
WARNING■ Children are not aware of and cannot assess
the dangers of the hedge trimmer and can beseriously injured.
► Remove the battery.
► Fit the blade scabbard so that it completelycovers the cutting blades.
► Store the hedge trimmer out of the reach ofchildren.
■ Dampness can corrode the electrical contactson the hedge trimmer and metal components.The hedge trimmer may be damaged.
► Remove the battery.
► Store the hedge trimmer in a clean and drycondition.
■ If electric cables or pipes are embedded in thewall, they may be damaged when the wallbracket is mounted on the wall. Contact withelectric cables can result in an electric shock.This can result in serious injuries and damageto property.► Check that there are no electric cables or
pipes embedded in the wall.■ If the wall bracket is not mounted to the wall
as described in this instruction manual, it orthe hedge trimmer may come off the wall andfall to the ground. This may result in personalinjuries and damage to property.► Mount the wall bracket to the wall as descri‐
bed in this instruction manual.
4.9.2 Battery
WARNING■ Children are not aware of and cannot assess
the dangers of the battery and can be seri‐ously injured.► Store the battery out of the reach of chil‐
dren.■ The battery is not protected against all ambi‐
ent conditions. The battery may be damaged ifit is exposed to certain ambient conditions.► Store the battery in a clean and dry condi‐
tion.► Store the battery in an enclosed location.
► Store the battery separately from the hedgetrimmer and charger.
► Store the battery in non-conductive packag‐ing.
► Store the battery at temperaturesbetween -10°C and +50°C.
4.10 Cleaning, Maintenance andRepair
WARNING■ The long-reach hedge trimmer may start unin‐
tentionally if the battery is left in place duringcleaning, maintenance or repair operations.This may result in serious injury to people anddamage to property.
► Remove the battery.
■ Aggressive cleaning agents, a water jet orpointed objects can damage the long-reachhedge trimmer, cutting blades and the battery.If the long-reach hedge trimmer, cutting bladesor battery are not cleaned correctly, compo‐nents may no longer function properly orsafety devices may be rendered inoperative.They may cause serious injury to persons.► Clean the long-reach hedge trimmer, cut‐
ting blades and battery as described in thisUser Manual.
■ If the long-reach hedge trimmer, cutting bladesor battery are not serviced or repaired cor‐rectly, components may no longer functionproperly or safety devices may be renderedinoperative. This may result in serous or fatalinjury to people.► Do not attempt to service or repair the long-
reach hedge trimmer or battery.► If the long-reach hedge trimmer or the bat‐
tery require servicing or repairs: Contactyour STIHL dealer for assistance.
► Maintain the cutting blades as described inthis User Manual.
■ The user may be cut while cleaning or servic‐ing the sharp cutting blades. This may result ininjury to the user.
► Wear work gloves made from resist‐ant material.
English 4 Safety Precautions
8 0458-816-8321-B

5 Preparing Hedge Trimmerfor Operation
5.1 Preparing the Long-ReachHedge Trimmer for Operation
The following steps must be performed beforecommencing work:► Ensure that the following components are in
safe condition:– Long-reach hedge trimmer, 4.6.1.– Cutting blades, 4.6.2.– Battery, 4.6.3.
► Check the battery, 10.2.► Charge the battery fully as described in the
User Manual for the STIHL AL 101, 300, 500chargers.
► Clean the long-reach hedge trimmer, 15.1.► Mount the cutting blades, 7.1.► Mount the loop handle, 7.2.► Check the controls, 10.1.► If you cannot carry out these steps: Do not use
the long-reach hedge trimmer and contactyour STIHL dealer for assistance.
6 Charging the Battery, LEDs6.1 Charging the BatteryThe charging time depends on several factors,e.g. temperature of the battery or the ambienttemperature. The actual charging time may differfrom the specified charging time. For specifiedcharging times see www.stihl.com/charging-times.► Recharge the battery fully as described in the
instruction manual for the STIHL AL 101, 300,500 chargers.
6.2 State of Charge
1
0000-GXX
-0629-A0
20-40%
40-60%
60-80%
80-100%
0-20%
► Press the button (1).The LEDs (5) glow green for about 5 secondsand indicate the state of charge.
► If the LED on the right flashes green: Chargethe battery.
6.3 LEDs on BatteryThe LEDs can show the state of charge or mal‐functions. The LEDs can glow or flash green orred.
The state of charge is indicated when the LEDsglow or flash green.► If the LEDs glow or flash red: Troubleshooting,
18.There is a malfunction in hedge trimmer orbattery.
7 Assembling the HedgeTrimmer
7.1 Mount the Cutter Bar► Switch off the long-reach hedge trimmer and
remove the battery.► Fit the blade scabbard so that it completely
covers the cutting blades.
2
1
5
3 4
0000
-GXX
-760
3-A0
► Line up the coupling sleeve (1) and cutter bar(2) so that the groove (3) and lug (4) faceupwards.
► Push the cutter bar (2) into the coupling sleeve(1).
► Turn the wing screw (5) clockwise and tightenit until firm.
7.2 Mounting the Loop Handle► Switch off the long-reach hedge trimmer and
remove the battery.
7
4
6
1 122
5
3
7
0000
-GXX
-651
6-A1
► Fit the clamp (4) in the loop handle (3).► Place the loop handle (3) with clamp (4) on the
shaft (5).► Fit the washers (2) on the screws (1).► Press the clamp (6) against the shaft (5).
5 Preparing Hedge Trimmer for Operation English
0458-816-8321-B 9

► Insert the screws (1) through holes in the loophandle (3) and clamps (4 and 6).
► Screw on and firmly tighten the nuts (7).
8 Removing and Fitting theBattery
8.1 Fitting the Battery
1
2
3
0000
-GXX
-652
1-A0
► Insert the battery (1) in the battery compart‐ment (2) and press it home until you hear aclick.The cooling slots (3) are still visible and thebattery (1) is held securely in the battery com‐partment (2). There is no electrical contactbetween the hedge trimmer and battery (1).
► Push the battery (1) into the battery compart‐ment (2) as far as stop.The battery (1) engages with a second clickand the cooling slots (3) are no longer visible.
8.2 Removing the Battery► Lay the hedge trimmer on a level surface.► Hold one hand in front of the battery compart‐
ment to ensure the battery (2) does not fallout.
2
1
0000
-GXX
-651
8-A0
► Depress the locking lever (1).The battery (2) is unlocked and can beremoved.
9 Switching the Hedge Trim‐mer On/Off
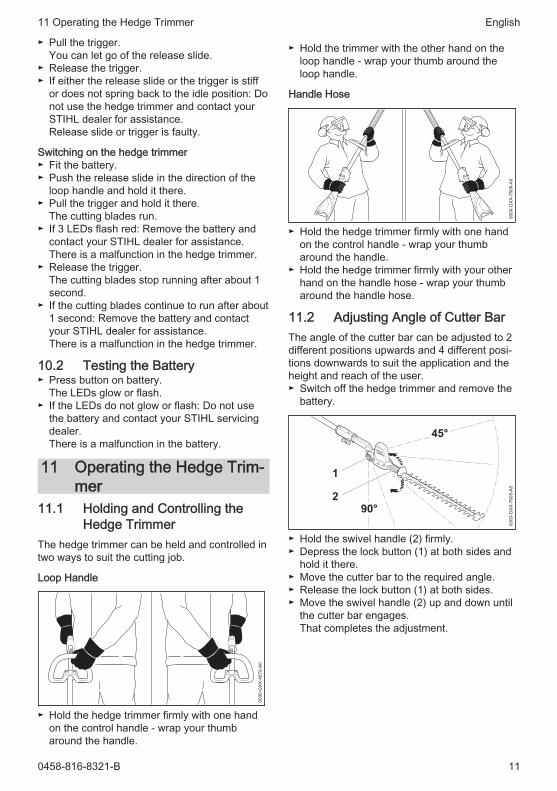
9.1 Switching On► Hold the hedge trimmer firmly with one hand
on the control handle - wrap your thumbaround the handle.
► Hold the hedge trimmer firmly with your otherhand on the loop handle or handle hose - wrapyour thumb around the loop handle or handlehose.
1
2
0000
-GXX
-760
4-A0
► Push the release slide (1) in the direction ofthe cutting blades with your thumb and hold itthere.
► Pull the trigger (2) with your index finger andhold it there. You can let go of the releaseslide (1).The motor accelerates and the cutting bladesrun.
9.2 Switching Off► Release the trigger.► Wait for the cutting blades to come to a com‐
plete standstill after about 1 second.► If the cutting blades continue to run after about
1 second: Remove the battery and contactyour STIHL dealer for assistance.There is a malfunction in the hedge trimmer.
10 Testing the Hedge Trimmerand Battery
10.1 Checking the ControlsRelease slide and trigger► Remove the battery.► Attempt to pull the trigger lever without operat‐
ing the release slide.► If the trigger can be pulled: Do not use the
hedge trimmer and contact your STIHL dealerfor assistance.The release slide has a malfunction.
► Push the release slide in the direction of thecutting blades with your thumb and hold itthere.
English 8 Removing and Fitting the Battery
10 0458-816-8321-B
► Pull the trigger.You can let go of the release slide.
► Release the trigger.► If either the release slide or the trigger is stiff
or does not spring back to the idle position: Donot use the hedge trimmer and contact yourSTIHL dealer for assistance.Release slide or trigger is faulty.
Switching on the hedge trimmer► Fit the battery.► Push the release slide in the direction of the
loop handle and hold it there.► Pull the trigger and hold it there.
The cutting blades run.► If 3 LEDs flash red: Remove the battery and
contact your STIHL dealer for assistance.There is a malfunction in the hedge trimmer.
► Release the trigger.The cutting blades stop running after about 1second.
► If the cutting blades continue to run after about1 second: Remove the battery and contactyour STIHL dealer for assistance.There is a malfunction in the hedge trimmer.
10.2 Testing the Battery► Press button on battery.
The LEDs glow or flash.► If the LEDs do not glow or flash: Do not use
the battery and contact your STIHL servicingdealer.There is a malfunction in the battery.
11 Operating the Hedge Trim‐mer
11.1 Holding and Controlling theHedge Trimmer
The hedge trimmer can be held and controlled intwo ways to suit the cutting job.
Loop Handle
0000-GXX-4570-A0
► Hold the hedge trimmer firmly with one handon the control handle - wrap your thumbaround the handle.
► Hold the trimmer with the other hand on theloop handle - wrap your thumb around theloop handle.
Handle Hose
0000-GXX-7606-A0
► Hold the hedge trimmer firmly with one handon the control handle - wrap your thumbaround the handle.
► Hold the hedge trimmer firmly with your otherhand on the handle hose - wrap your thumbaround the handle hose.
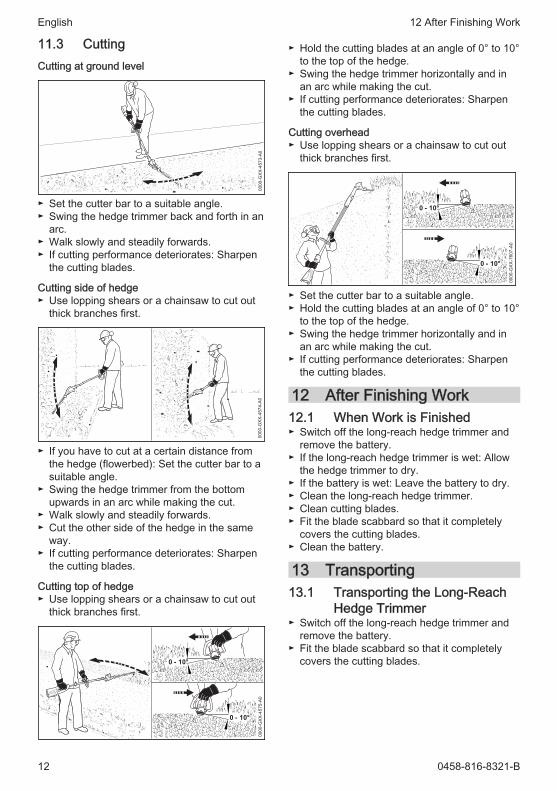
11.2 Adjusting Angle of Cutter BarThe angle of the cutter bar can be adjusted to 2different positions upwards and 4 different posi‐tions downwards to suit the application and theheight and reach of the user.► Switch off the hedge trimmer and remove the
battery.
1
90°
45°
20000-GXX-7605-A0
► Hold the swivel handle (2) firmly.► Depress the lock button (1) at both sides and
hold it there.► Move the cutter bar to the required angle.► Release the lock button (1) at both sides.► Move the swivel handle (2) up and down until
the cutter bar engages.That completes the adjustment.
11 Operating the Hedge Trimmer English
0458-816-8321-B 11
11.3 CuttingCutting at ground level
0000-GXX-4573-A0
► Set the cutter bar to a suitable angle.► Swing the hedge trimmer back and forth in an
arc.► Walk slowly and steadily forwards.► If cutting performance deteriorates: Sharpen
the cutting blades.
Cutting side of hedge► Use lopping shears or a chainsaw to cut out
thick branches first.
0000-GXX-4574-A0
► If you have to cut at a certain distance fromthe hedge (flowerbed): Set the cutter bar to asuitable angle.
► Swing the hedge trimmer from the bottomupwards in an arc while making the cut.
► Walk slowly and steadily forwards.► Cut the other side of the hedge in the same
way.► If cutting performance deteriorates: Sharpen
the cutting blades.
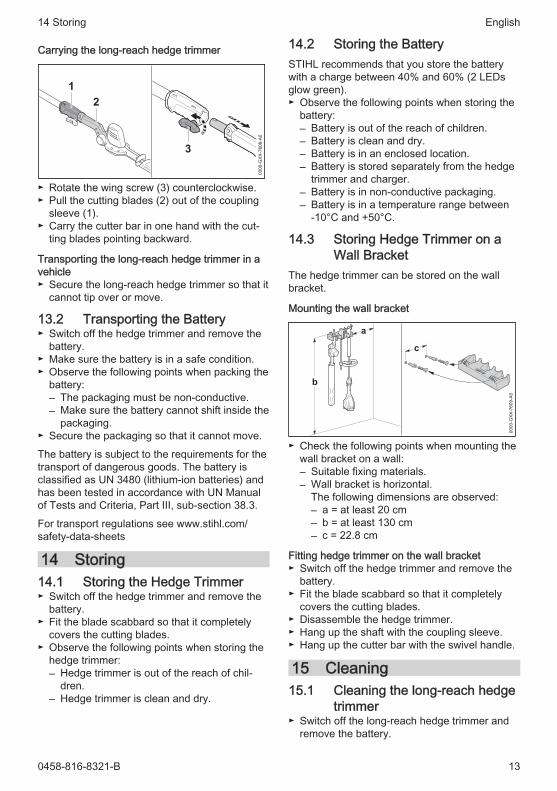
Cutting top of hedge► Use lopping shears or a chainsaw to cut out
thick branches first.
0000-GXX-4575-A0
► Hold the cutting blades at an angle of 0° to 10°to the top of the hedge.
► Swing the hedge trimmer horizontally and inan arc while making the cut.
► If cutting performance deteriorates: Sharpenthe cutting blades.
Cutting overhead► Use lopping shears or a chainsaw to cut out
thick branches first.
0000-GXX-7607-A0
► Set the cutter bar to a suitable angle.► Hold the cutting blades at an angle of 0° to 10°
to the top of the hedge.► Swing the hedge trimmer horizontally and in
an arc while making the cut.► If cutting performance deteriorates: Sharpen
the cutting blades.
12 After Finishing Work12.1 When Work is Finished► Switch off the long-reach hedge trimmer and
remove the battery.► If the long-reach hedge trimmer is wet: Allow
the hedge trimmer to dry.► If the battery is wet: Leave the battery to dry.► Clean the long-reach hedge trimmer.► Clean cutting blades.► Fit the blade scabbard so that it completely
covers the cutting blades.► Clean the battery.
13 Transporting13.1 Transporting the Long-Reach
Hedge Trimmer► Switch off the long-reach hedge trimmer and
remove the battery.► Fit the blade scabbard so that it completely
covers the cutting blades.
English 12 After Finishing Work
12 0458-816-8321-B
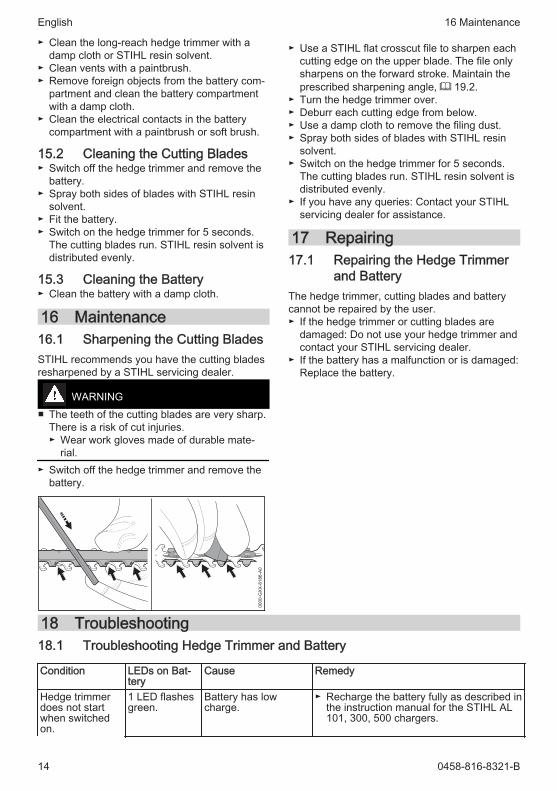
Carrying the long-reach hedge trimmer
21
3
0000
-GXX
-760
8-A0
► Rotate the wing screw (3) counterclockwise.► Pull the cutting blades (2) out of the coupling
sleeve (1).► Carry the cutter bar in one hand with the cut‐
ting blades pointing backward.
Transporting the long-reach hedge trimmer in avehicle► Secure the long-reach hedge trimmer so that it
cannot tip over or move.
13.2 Transporting the Battery► Switch off the hedge trimmer and remove the
battery.► Make sure the battery is in a safe condition.► Observe the following points when packing the
battery:– The packaging must be non-conductive.– Make sure the battery cannot shift inside the
packaging.► Secure the packaging so that it cannot move.
The battery is subject to the requirements for thetransport of dangerous goods. The battery isclassified as UN 3480 (lithium-ion batteries) andhas been tested in accordance with UN Manualof Tests and Criteria, Part III, sub-section 38.3.
For transport regulations see www.stihl.com/safety-data-sheets
14 Storing14.1 Storing the Hedge Trimmer► Switch off the hedge trimmer and remove the
battery.► Fit the blade scabbard so that it completely
covers the cutting blades.► Observe the following points when storing the
hedge trimmer:– Hedge trimmer is out of the reach of chil‐
dren.– Hedge trimmer is clean and dry.
14.2 Storing the BatterySTIHL recommends that you store the batterywith a charge between 40% and 60% (2 LEDsglow green).► Observe the following points when storing the
battery:– Battery is out of the reach of children.– Battery is clean and dry.– Battery is in an enclosed location.– Battery is stored separately from the hedge
trimmer and charger.– Battery is in non-conductive packaging.– Battery is in a temperature range between
-10°C and +50°C.
14.3 Storing Hedge Trimmer on aWall Bracket
The hedge trimmer can be stored on the wallbracket.
Mounting the wall bracket
c
a
b
0000
-GXX
-760
9-A0
► Check the following points when mounting thewall bracket on a wall:– Suitable fixing materials.– Wall bracket is horizontal.
The following dimensions are observed:– a = at least 20 cm– b = at least 130 cm– c = 22.8 cm
Fitting hedge trimmer on the wall bracket► Switch off the hedge trimmer and remove the
battery.► Fit the blade scabbard so that it completely
covers the cutting blades.► Disassemble the hedge trimmer.► Hang up the shaft with the coupling sleeve.► Hang up the cutter bar with the swivel handle.
15 Cleaning15.1 Cleaning the long-reach hedge
trimmer► Switch off the long-reach hedge trimmer and
remove the battery.
14 Storing English
0458-816-8321-B 13
► Clean the long-reach hedge trimmer with adamp cloth or STIHL resin solvent.
► Clean vents with a paintbrush.► Remove foreign objects from the battery com‐
partment and clean the battery compartmentwith a damp cloth.
► Clean the electrical contacts in the batterycompartment with a paintbrush or soft brush.
15.2 Cleaning the Cutting Blades► Switch off the hedge trimmer and remove the
battery.► Spray both sides of blades with STIHL resin
solvent.► Fit the battery.► Switch on the hedge trimmer for 5 seconds.
The cutting blades run. STIHL resin solvent isdistributed evenly.
15.3 Cleaning the Battery► Clean the battery with a damp cloth.
16 Maintenance16.1 Sharpening the Cutting BladesSTIHL recommends you have the cutting bladesresharpened by a STIHL servicing dealer.
WARNING■ The teeth of the cutting blades are very sharp.
There is a risk of cut injuries.► Wear work gloves made of durable mate‐
rial.► Switch off the hedge trimmer and remove the
battery.
0000
-GXX
-818
6-A0
► Use a STIHL flat crosscut file to sharpen eachcutting edge on the upper blade. The file onlysharpens on the forward stroke. Maintain theprescribed sharpening angle, 19.2.
► Turn the hedge trimmer over.► Deburr each cutting edge from below.► Use a damp cloth to remove the filing dust.► Spray both sides of blades with STIHL resin
solvent.► Switch on the hedge trimmer for 5 seconds.
The cutting blades run. STIHL resin solvent isdistributed evenly.
► If you have any queries: Contact your STIHLservicing dealer for assistance.
17 Repairing17.1 Repairing the Hedge Trimmer
and BatteryThe hedge trimmer, cutting blades and batterycannot be repaired by the user.► If the hedge trimmer or cutting blades are
damaged: Do not use your hedge trimmer andcontact your STIHL servicing dealer.
► If the battery has a malfunction or is damaged:Replace the battery.
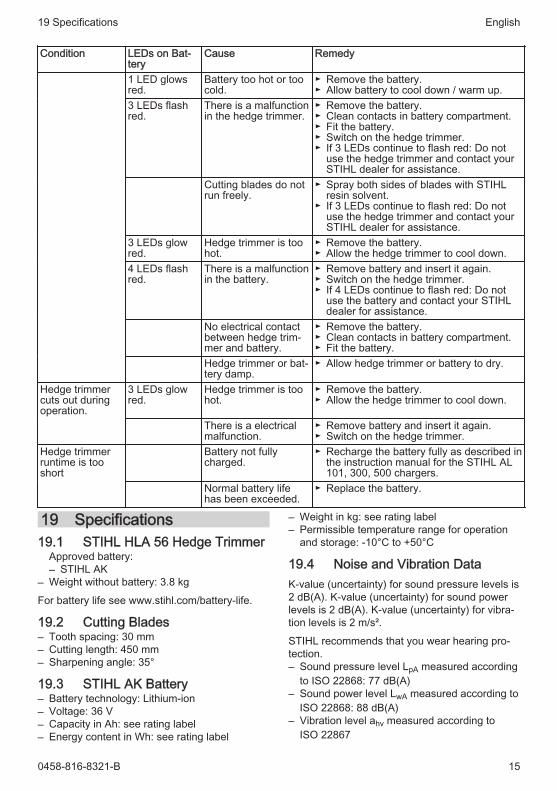
18 Troubleshooting18.1 Troubleshooting Hedge Trimmer and Battery
Condition LEDs on Bat‐tery
Cause Remedy
Hedge trimmerdoes not startwhen switchedon.
1 LED flashesgreen.
Battery has lowcharge.
► Recharge the battery fully as described inthe instruction manual for the STIHL AL101, 300, 500 chargers.
English 16 Maintenance
14 0458-816-8321-B
Condition LEDs on Bat‐tery
Cause Remedy
1 LED glowsred.
Battery too hot or toocold.
► Remove the battery.► Allow battery to cool down / warm up.
3 LEDs flashred.
There is a malfunctionin the hedge trimmer.
► Remove the battery.► Clean contacts in battery compartment.► Fit the battery.► Switch on the hedge trimmer.► If 3 LEDs continue to flash red: Do not
use the hedge trimmer and contact yourSTIHL dealer for assistance.
Cutting blades do notrun freely.
► Spray both sides of blades with STIHLresin solvent.
► If 3 LEDs continue to flash red: Do notuse the hedge trimmer and contact yourSTIHL dealer for assistance.
3 LEDs glowred.
Hedge trimmer is toohot.
► Remove the battery.► Allow the hedge trimmer to cool down.
4 LEDs flashred.
There is a malfunctionin the battery.
► Remove battery and insert it again.► Switch on the hedge trimmer.► If 4 LEDs continue to flash red: Do not
use the battery and contact your STIHLdealer for assistance.
No electrical contactbetween hedge trim‐mer and battery.
► Remove the battery.► Clean contacts in battery compartment.► Fit the battery.
Hedge trimmer or bat‐tery damp.
► Allow hedge trimmer or battery to dry.
Hedge trimmercuts out duringoperation.
3 LEDs glowred.
Hedge trimmer is toohot.
► Remove the battery.► Allow the hedge trimmer to cool down.
There is a electricalmalfunction.
► Remove battery and insert it again.► Switch on the hedge trimmer.
Hedge trimmerruntime is tooshort
Battery not fullycharged.
► Recharge the battery fully as described inthe instruction manual for the STIHL AL101, 300, 500 chargers.
Normal battery lifehas been exceeded.
► Replace the battery.
19 Specifications19.1 STIHL HLA 56 Hedge Trimmer
Approved battery:– STIHL AK
– Weight without battery: 3.8 kg
For battery life see www.stihl.com/battery-life.
19.2 Cutting Blades– Tooth spacing: 30 mm– Cutting length: 450 mm– Sharpening angle: 35°
19.3 STIHL AK Battery– Battery technology: Lithium-ion– Voltage: 36 V– Capacity in Ah: see rating label– Energy content in Wh: see rating label
– Weight in kg: see rating label– Permissible temperature range for operation
and storage: -10°C to +50°C
19.4 Noise and Vibration DataK-value (uncertainty) for sound pressure levels is2 dB(A). K-value (uncertainty) for sound powerlevels is 2 dB(A). K-value (uncertainty) for vibra‐tion levels is 2 m/s².
STIHL recommends that you wear hearing pro‐tection.– Sound pressure level LpA measured according
to ISO 22868: 77 dB(A)– Sound power level LwA measured according to
ISO 22868: 88 dB(A)– Vibration level ahv measured according to
ISO 22867
19 Specifications English
0458-816-8321-B 15

– Control handle: < 1.5 m/s²– Loop handle: 1.5 m/s²– Handle hose: 1.5 m/s²
The vibration values quoted above have beenmeasured according to a standardized test pro‐cedure and may be used to compare electricpower tools. Depending on the type of usage,the vibrations that actually occur may differ fromthe values quoted. The vibration values quotedmay be used for an initial assessment of theuser's exposure to vibrations. The actual expo‐sure to vibrations has to be estimated. This proc‐ess may also take into account times duringwhich the electric power tool is switched off andtimes during which it is switched on but runningoff load.
Information on compliance with Vibration Direc‐tive 2002/44/EC is available at www.stihl.com/vib.
19.5 REACHREACH is an EC regulation and stands for theRegistration, Evaluation, Authorisation andRestriction of Chemical substances.
For information on compliance with the REACHregulation see www.stihl.com/reach.
20 Spare Parts and Accesso‐ries
20.1 Spare parts and accessoriesThese symbols indicate original STIHLspare parts and original STIHL acces‐sories.
STIHL recommends the use of original STIHLspare parts and accessories.
Despite ongoing market observation, STIHL isunable to judge the reliability, safety and suitabil‐ity of other manufacturers' spare parts andaccessories; accordingly, STIHL cannot warrantfor the use of those parts.
Original STIHL spare parts and original STIHLaccessories are available from STIHL dealers.
21 Disposal21.1 Disposing of the Hedge Trim‐
mer and BatteryContact the local authorities or your STIHLdealer for information on disposal.
Improper disposal can be harmful to health andpollute the environment.
► Take STIHL products including packaging to asuitable collection point for recycling in accord‐ance with local regulations.
► Do not dispose with domestic waste.
22 EC Declaration of Con‐formity
22.1 STIHL HLA 56 Hedge TrimmerANDREAS STIHL AG & Co. KGBadstraße 115D-71336 Waiblingen
Germany
declare under our sole responsibility that– Category: Cordless long-reach hedge trimmer– Manufacturer's brand: STIHL– Model: HLA 56– Serial identification: HA01
conforms to the relevant provisions of Directives2011/65/EU, 2006/42/EC, 2014/30/EU and2000/14/EC and has been developed and manu‐factured in compliance with the following stand‐ards in the versions valid on the date of produc‐tion: EN 55014-1, EN 55014-2, EN 60745-1, tak‐ing account of EN ISO 10517 andEN 60745-2-15
Applied conformity assessment procedure inaccordance with Directive 2000/14/EC, Annex V.– Measured sound power level: 88 dB(A)– Guaranteed sound power level: 90 dB(A)
The technical documents are stored atANDREAS STIHL AG & Co. KG Produktzulas‐sung.
The year of manufacture, country of manufactureand serial number are shown on the long-reachhedge trimmer.
Done at Waiblingen, 15.07.2021
ANDREAS STIHL AG & Co. KG
pp
Dr. Jürgen Hoffmann, Director Product Certifica‐tion & Regulatory Affairs
English 20 Spare Parts and Accessories
16 0458-816-8321-B
23 General Power Tool SafetyWarnings
23.1 IntroductionThis chapter reproduces the pre-formulated, gen‐eral safety precautions specified in theIEC 62841 standard for hand-held motor-oper‐ated electric tools.
STIHL is obliged to publish these texts.
The safety precautions and warnings on avoidingan electric shock given under “Electrical Safety”do not apply to STIHL cordless products.
WARNING■ Read all safety warnings, instructions, illustra‐
tions and specifications provided with thispower tool. Failure to follow all instructions lis‐ted below may result in electric shock, fireand/or serious injury. Save all warnings andinstructions for future reference.
The term "electric power tool" in the safety warn‐ings refers to mains-operated (corded) powertools or battery-operated (cordless) power tools.
23.2 Work area safetya)Keep work area clean and well lit. Cluttered or
dark areas invite accidents.b)Do not operate power tools in explosive
atmospheres, such as in the presence of flam‐mable liquids, gases or dust. Power tools cre‐ate sparks which may ignite the dust or fumes.
c) Keep children and bystanders away whileoperating a power tool. Distractions can causeyou to lose control.
23.3 Electrical safetya)Power tool plugs must match the outlet. Never
modify the plug in any way. Do not use anyadapter plugs with earthed (grounded) powertools.Unmodified plugs and matching outletswill reduce risk of electric shock.
b)Avoid body contact with earthed or groundedsurfaces, such as pipes, radiators, ranges andrefrigerators. There is an increased risk ofelectric shock if your body is earthed or groun‐ded.
c) Do not expose power tools to rain or wet con‐ditions. Water entering a power tool willincrease the risk of electric shock.
d)Do not abuse the cord. Never use the cord forcarrying, pulling or unplugging the power tool.
Keep cord away from heat, oil, sharp edges ormoving parts. Damaged or entangled cordsincrease the risk of electric shock.
e)When operating a power tool outdoors, use anextension cord suitable for outdoor use. Use ofa cord suitable for outdoor use reduces therisk of electric shock.
f) If operating a power tool in a damp location isunavoidable, use a residual current device(RCD) protected supply. Use of an RCDreduces the risk of electric shock.
23.4 Personal safetya)Stay alert, watch what you are doing and use
common sense when operating a power tool.Do not use a power tool while you are tired orunder the influence of drugs, alcohol or medi‐cation. A moment of inattention while operat‐ing power tools may result in serious personalinjury.
b)Use personal protective equipment. Alwayswear eye protection. Protective equipmentsuch as a dust mask, non-skid safety shoes,hard hat or hearing protection used for appro‐priate conditions will reduce personal injuries.
c) Prevent unintentional starting. Ensure theswitch is in the off-position before connectingto power source and/or battery pack, pickingup or carrying the tool. Carrying power toolswith your finger on the switch or energisingpower tools that have the switch on invitesaccidents.
d)Remove any adjusting key or wrench beforeturning the power tool on. A wrench or a keyleft attached to a rotating part of the power toolmay result in personal injury.
e)Do not overreach. Keep proper footing andbalance at all times. This enables better con‐trol of the power tool in unexpected situations.
f) Dress properly. Do not wear loose clothing orjewellery. Keep your hair and clothing awayfrom moving parts. Loose clothes, jewellery orlong hair can be caught in moving parts.
g) If devices are provided for the connection ofdust extraction and collection facillities, ensurethese are connected and properly used. Useof dust collection can reduce dust-related haz‐ards.
h)Do not let familiarity gained from frequent useof tools allow you to become complacent andignore tool safety principles. A careless actioncan cause severe injury within a fraction of asecond.
23 General Power Tool Safety Warnings English
0458-816-8321-B 17

23.5 Power tool use and carea)Do not force the power tool. Use the correct
power tool for your application. The correctpower tool will do the job better and safer atthe rate for which it was designed.
b)Do not use the power tool if the switch doesnot turn it on and off. Any power tool that can‐not be controlled with the switch is dangerousand must be repaired.
c) Disconnect the plug from the power sourceand/or remove the battery pack, if detachable,from the power tool before making any adjust‐ments, changing accessories, or storing powertools. Such preventive safety measuresreduce the risk of starting the power tool acci‐dentally.
d)Store idle power tools out of the reach of chil‐dren and do not allow persons unfamiliar withthe power tool or these instructions to operatethe power tool. Power tools are dangerous inthe hands of untrained users.
e)Maintain power tools and accessories. Checkfor misalignment or binding of moving parts,breakage of parts and any other condition thatmay affect the power tool’s operation. If dam‐aged, have the power tool repaired beforeuse. Many accidents are caused by poorlymaintained power tools.
f) Keep cutting tools sharp and clean. Properlymaintained cutting tools with sharp cuttingedges are less likely to bind and are easier tocontrol.
g)Use the power tool, accessories and tool bitsetc. in accordance with these instructions, tak‐ing into account the working conditions andthe work to be performed. Use of the powertool for operations different from those inten‐ded could result in a hazardous situation.
h)Keep handles and grasping surfaces dry,clean and free from oil and grease. Slipperyhandles and grasping surfaces do not allow forsafe handling and control of the tool in unex‐pected situations.
23.6 Battery tool use and carea)Recharge only with the charger specified by
the manufacturer. A charger that is suitable forone type of battery pack may create a risk offire when used with another battery pack.
b)Use power tools only with specifically designa‐ted battery packs. Use of any other batterypacks may create a risk of injury and fire.
c) When battery pack is not in use, keep it awayfrom other metal objects, like paper clips,coins, keys, nails, screws or other small metalobjects, that can make a connection from oneterminal to another. Shorting the battery termi‐nals together may cause burns or a fire.
d)Under abusive conditions, liquid may be ejec‐ted from the battery; avoid contact. If contactaccidentally occurs, flush with water. If liquidcontacts eyes, additionally seek medical help.Liquid ejected from the battery may cause irri‐tation or burns.
e)Do not use a battery pack or tool that is dam‐aged or modified. Damaged or modified bat‐teries may exhibit unpredictable behaviourresulting in fire, explosion or risk of injury.
f) Do not expose a battery pack or tool to fire orexcessive temperature. Exposure to fire ortemperature above 130 °C may cause explo‐sion.
g)Follow all charging instructions and do notcharge the battery pack or tool outside thetemperature range specified in the instruc‐tions. Charging improperly or at temperaturesoutside the specified range may damage thebattery and increase the risk of fire.
23.7 Servicea)Have your power tool serviced by a qualified
repair person using only identical replacementparts. This will ensure that the safety of thepower tool is maintained.
b)Never service damaged battery packs. Serviceof battery packs should only be performed bythe manufacturer or authorized service provid‐ers.
23.8 Hedge trimmer safety warningsSafety instructions for hedge trimmersa)Keep all parts of the body away from the
blade. Do not remove cut material or holdmaterial to be cut when blades are moving.Blades continue to move after the switch isturned off. A moment of inattention while oper‐ating the hedge trimmer may result in seriouspersonal injury.
b)Carry the hedge trimmer by the handle withthe blade stopped and taking care not to oper‐ate any power switch. Proper carrying of thehedge trimmer will decrease the risk of inad‐vertent starting and resultant personal injuryfrom the blades.
English 23 General Power Tool Safety Warnings
18 0458-816-8321-B
c) When transporting or storing the hedge trim‐mer, always fit the blade cover. Proper han‐dling of the hedge trimmer will decrease therisk of personal injury from the blades.
d)When clearing jammed material or servicingthe unit, make sure all power switches are offand the power cord is disconnected. Unexpec‐ted actuation of the hedge trimmer while clear‐ing jammed material or servicing may result inserious personal injury.
e)Hold the hedge trimmer by insulated grippingsurfaces only, because the blade may contacthidden wiring or its own cord. Blades contact‐ing a "live" wire may make exposed metalparts of the hedge trimmer "live" and couldgive the operator an electric shock.
f) Keep all power cords and cables away fromcutting area. Power cords or cables may behidden in hedges or bushes and can be acci‐dentally cut by the blade.
g)Do not use the hedge trimmer in bad weatherconditions, especially when there is a risk oflightning. This decreases the risk of beingstruck by lightning.
23 General Power Tool Safety Warnings English
0458-816-8321-B 19

www.stihl.com
*04588168321B*
*04588168321B*
0458-816-8321-B
0458
-816
-832
1-B