Steampunk Necklace - kelibudesign.com · 6 Copyright© 2016 KeLibu™ All Rights Reserved Assembly...
6
Transcript of Steampunk Necklace - kelibudesign.com · 6 Copyright© 2016 KeLibu™ All Rights Reserved Assembly...


3
Copyright© 2016 KeLibu™ All Rights Reserved
Steampunk Necklace Your step-by-step tutorial for making a Steampunk Necklace
Designed to fit 18 inch dolls. The steampunk movement is built on Victorian science fiction and fashion. As such, steampunk fashion uses
the Victorian and Edwardian eras as a basis and builds from there. No steampunk outfit would be complete
without some fashionable accessories. Using this tutorial, you can make a cool steampunk necklace to dress
up any steampunk outfit!
Check out the KeLibu Steampunk Separates collection, for mix-and-match Steampunk Separates patterns.
Supplies:
3 inch by 2 inch piece of light weight leather or vinyl
14 inches of chain, plus matching jump rings and clasp
3 x ¼ inch jump rings plus 3 x 1/8 inch eyelets, washers, and eyelet setter OR
3 x ¼ inch jump rings plus 3 x ¼ inch rivets and rivet setter OR
3 small, D-ring hasp buckles (used for purse making), 3 mini brads and an awl
Small pliers and wire cutter (optional)
Glue such as Craft Goop
Trim and embellishments
Pattern Piece

4
Copyright© 2016 KeLibu™ All Rights Reserved
Sample Supplies
I find many of my Steampunk embellishments and supplies in the scrapbooking section of my local craft store. I also
frequently purchase items from Etsy stores that sell jewellery or purse making supplies. I’ve given three suggestions for
attaching the chain to your leather necklace piece:
Don’t feel that you have to limit your choices to the ones I’ve show though!
You will need chain, a clasp and jump rings for this project. I got mine in the jewellery section of my local craft store.
Antique gold/brass, copper or pewter work best for steampunk projects. There are many different things you can use to
embellish your necklace. These are just some of the embellishments I like to use on my steampunk projects:
Although I did not use any trim on the examples shown in this tutorial, this necklace would look great with lace or
something similar around the edge of it.
Buttons, Decorative Brads and Mini
Brads
Embellishments Chain and Lobster Clasps
Eyelets, Washers and Jump Rings Rivets and Jump Rings D-Ring Hasp Buckles and Mini
Brads

5
Copyright© 2016 KeLibu™ All Rights Reserved
Printing
Print this pattern piece and check to make sure that the scale is right! When printed, the square in the corner of the pages with the pattern pieces will measure 1 inch square. The scaling on your printer should be set at 100% for US letter size paper (8 1/2" by 11"). Carefully cut the pieces out, making sure to cut on the outer black line This tutorial intended for personal use, not for large-scale commercial purposes or manufacturing. You may sell items that you make personally by using this pattern, but you may not mass produce them. You may not resell this pattern in part or in its entirety. If you have any questions, please email [email protected]. KeLibu is not affiliated with American Girl®, Mattel®, Our Generation®, Battat®, Maplelea®, Maplelea Girls®, Avonlea Traditions Inc.®, Journey Girls®, Toys R Us®, With Heart and Soul®, Kidz N Cats®, Maru and Friends®, Maru & Friends® LLC, A Girl for All Time®, Daughters of History Ltd. or any doll/toy company. If you have any questions concerning this pattern, please feel free to contact me at [email protected].
6
Copyright© 2016 KeLibu™ All Rights Reserved
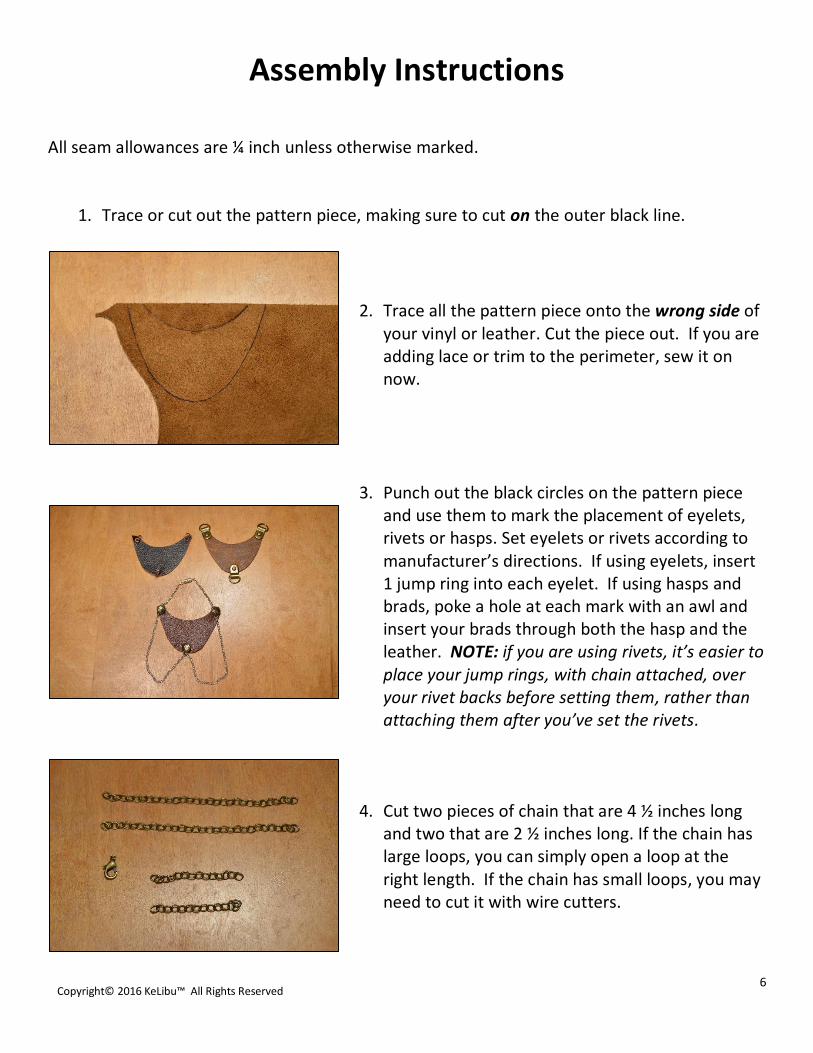
Assembly Instructions All seam allowances are ¼ inch unless otherwise marked.
1. Trace or cut out the pattern piece, making sure to cut on the outer black line.
2. Trace all the pattern piece onto the wrong side of your vinyl or leather. Cut the piece out. If you are adding lace or trim to the perimeter, sew it on now.
3. Punch out the black circles on the pattern piece and use them to mark the placement of eyelets, rivets or hasps. Set eyelets or rivets according to manufacturer’s directions. If using eyelets, insert 1 jump ring into each eyelet. If using hasps and brads, poke a hole at each mark with an awl and insert your brads through both the hasp and the leather. NOTE: if you are using rivets, it’s easier to place your jump rings, with chain attached, over your rivet backs before setting them, rather than attaching them after you’ve set the rivets.
4. Cut two pieces of chain that are 4 ½ inches long and two that are 2 ½ inches long. If the chain has large loops, you can simply open a loop at the right length. If the chain has small loops, you may need to cut it with wire cutters.

7
Copyright© 2016 KeLibu™ All Rights Reserved
5. One end of each of the longer pieces of chain gets
attached to the lower hasp/jump ring. If your chain has small loops, you may need to use a small jump ring to attach it. The other end of the long chain pieces get attached to top hasp/jump rings. One end of each shorter chain piece gets attached to one of the top hasp/jump rings. Add your clasp to the other end of one of the shorter pieces.
6. Embellish any way you like! Some of the embellishments shown here were attached using mini brads. The remainder were glued in place using Craft Goop.
You’ve Finished the Steampunk Necklace!