Starting Screen Printing
12
Starting up in Screenprinting Product Information SERICOL Basic screenprinting consists of a frame onto which a mesh is stretched on one face, hinged to a baseboard, and a flexible squeegee which forces the ink through the clear areas of the mesh and onto the substrate positioned on the baseboard. Frames can be made from wood, light steel or aluminium and vary in price according to their type and size. A wooden frame is the type most people start with. A 32cm x 42cm frame will print an area of 24cm x 32cm and is an ideal size to begin with. It is absolutely crucial that the frame should be strong and rigid and the corners fixed at right angles otherwise both the screen and stencil will be unstable, making colour registration when printing impossible. Nowadays a huge range of quality materials is available, frames are readily available from Sericol in wood or metal and, although dearer, a good aluminium frame will give years of service and is less likely to warp or bow. Covering the Frame with Mesh Sericol offers a frame covering service through each of its Customer Service Centres. Any frame size or type can be supplied, stretched with mesh of your choice. As a beginner, if you wish to stretch your own frames, just follow the basic guidelines here. Cut the mesh to size, allowing an approximate 3cm overlap on each side of the frame. When attaching the fabric, staple through a thin strip of card to avoid tearing the mesh. Staple from the centre of one side of the screen towards each corner, pulling the fabric tight as you work. Put the staples at an angle across the side of the frame. Repeat the process along the opposite side of the frame so that the mesh is tightly stretched across the width of the frame. Secure the other sides in the same way. Use scissors or a sharp knife to trim off any surplus mesh around the edges of the frame. The alternative to stapling the mesh, and now the norm by commercial printers, is to use an adhesive to fix the mesh to the frame. It is particularly important to produce a strong permanent bond between the mesh and the frame, and a variety of special screen mounting adhesives exist. The main groups are reaction adhesives and contact adhesives, both of which employ a catalyst plus a base. ‘Serifix’ is the Sericol brand name for this type of adhesive and any stretched frames supplied by them would use this method of attaching mesh to frame. It is often more cost effective to use a trade supplier to stretch your frames, however if you wish to produce your own the following section will give you the basic information to choose the right mesh for your work. Correct Mesh Selection Choosing the right mesh to suit a particular job can be just as critical as choosing the right ink. The primary purpose of the mesh is to support the stencil, but beyond that the choice of mesh has considerable influence on print definition, ink usage, and stencil durability. Sericol are distributors for the Saati range of precision woven screen fabrics. Their entire range is made from synthetic materials, each with its own unique properties and uses. There are three main types of material currently used by screen printers - monofilament nylon, polyester and, to a lesser extent, multifilament polyester. Because of their different properties, each material has its own particular uses. Monofilament nylon Nylon is a strong, flexible and extremely resilient material. But for one failing, it would be an ideal material for screen mesh; it absorbs water and is therefore affected by changes in humidity. Nylon, however, is well suited for printing on uneven surfaces, its high elasticity allows it to deform over irregular surfaces.
Transcript of Starting Screen Printing
Starting up in Screenprinting
Product Information SERICOL
Basic screenprinting consists of a frame onto which a mesh isstretched on one face, hinged to a baseboard, and a flexible squeegeewhich forces the ink through the clear areas of the mesh and onto thesubstrate positioned on the baseboard.
Frames can be made from wood, light steel or aluminium and vary inprice according to their type and size. A wooden frame is the typemost people start with. A 32cm x 42cm frame will print an area of24cm x 32cm and is an ideal size to begin with.
It is absolutely crucial that the frame should be strong and rigid andthe corners fixed at right angles otherwise both the screen and stencilwill be unstable, making colour registration when printing impossible.Nowadays a huge range of quality materials is available, frames arereadily available from Sericol in wood or metal and, although dearer, agood aluminium frame will give years of service and is less likely towarp or bow.
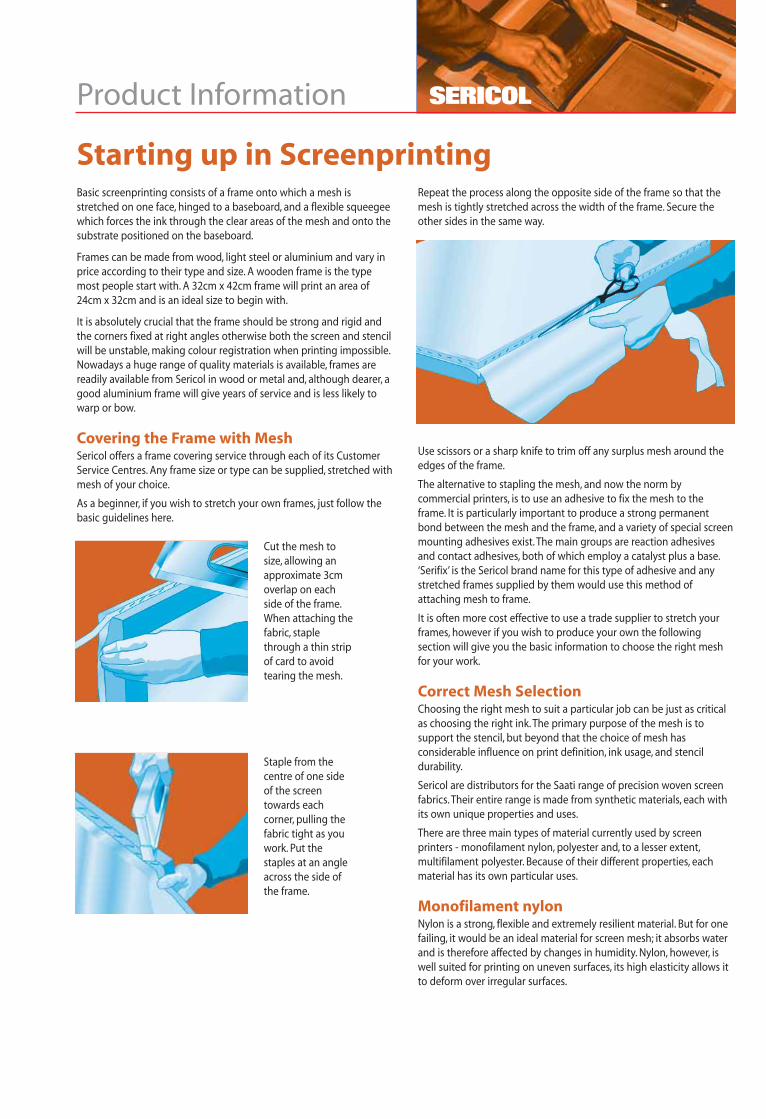
Covering the Frame with MeshSericol offers a frame covering service through each of its CustomerService Centres. Any frame size or type can be supplied, stretched withmesh of your choice.
As a beginner, if you wish to stretch your own frames, just follow thebasic guidelines here.
Cut the mesh to size, allowing an approximate 3cm overlap on each side of the frame.When attaching the fabric, staple through a thin strip of card to avoid tearing the mesh.
Staple from the centre of one side of the screen towards each corner, pulling the fabric tight as you work. Put the staples at an angle across the side of the frame.
Repeat the process along the opposite side of the frame so that themesh is tightly stretched across the width of the frame. Secure theother sides in the same way.
Use scissors or a sharp knife to trim off any surplus mesh around theedges of the frame.
The alternative to stapling the mesh, and now the norm bycommercial printers, is to use an adhesive to fix the mesh to theframe. It is particularly important to produce a strong permanentbond between the mesh and the frame, and a variety of special screenmounting adhesives exist. The main groups are reaction adhesivesand contact adhesives, both of which employ a catalyst plus a base.‘Serifix’ is the Sericol brand name for this type of adhesive and anystretched frames supplied by them would use this method ofattaching mesh to frame.
It is often more cost effective to use a trade supplier to stretch yourframes, however if you wish to produce your own the followingsection will give you the basic information to choose the right meshfor your work.
Correct Mesh SelectionChoosing the right mesh to suit a particular job can be just as criticalas choosing the right ink. The primary purpose of the mesh is tosupport the stencil, but beyond that the choice of mesh hasconsiderable influence on print definition, ink usage, and stencildurability.
Sericol are distributors for the Saati range of precision woven screenfabrics. Their entire range is made from synthetic materials, each withits own unique properties and uses.
There are three main types of material currently used by screenprinters - monofilament nylon, polyester and, to a lesser extent,multifilament polyester. Because of their different properties, eachmaterial has its own particular uses.
Monofilament nylonNylon is a strong, flexible and extremely resilient material. But for onefailing, it would be an ideal material for screen mesh; it absorbs waterand is therefore affected by changes in humidity. Nylon, however, iswell suited for printing on uneven surfaces, its high elasticity allows itto deform over irregular surfaces.
Multifilament polyesterIn a multifilament polyester mesh, each thread consists of tightlytwisted polyester filaments. These tend to have slightly irregular meshopenings and so the final print definition is not as high as withmonofilament mesh.
Monofilament polyesterPolyester is considerably more stable than nylon. It is resilient butsufficiently flexible to cope with the normal irregularities of mostsubstrates.
About 80% of all screen printing applications rely on monofilamentpolyester and the type made by Saati is called Saatilene. It is almostthe ‘universal’ mesh, as it is hardly affected by changes in climaticconditions.
Saatilene Hitech can maintain much higher tensions and has greaterdimensional stability than ordinary Saatilene. Hitech comes into itsown when very close tolerance printing is called for.
Fabric identificationSaati fabrics are identified by a series of codes in the following way:
Brand name / Mesh count / Thread diameter / Mesh colour / Weave
for example: Saatilene 140.34UOP - but what does it mean?
Mesh countThe number following the brand name is the mesh count. This refersto the number of threads per centimetre, e.g. 90, 120, 165 etc..
Thread diameterAchieving a good stencil relies on keeping the stencil proud of themesh. Therefore for direct stencils, thinner grades of mesh arepreferable. Indirect and capillary stencils can usually achieve this onany grade of mesh, as the film thickness can be selected to suit themesh.
The number following the mesh count number indicates the threaddiameter used to weave the fabric:
120.40 = 40 micron thread diameter120.34 = 34 micron thread diameter120.31 = 31 micron thread diameter
These would equate to HD (Heavy Duty), T (Thin Thread Weave) and S(Twill Weave) respectively. There is a trend towards using thinnerfabrics with the benefit that the stencil has better edge definition andtherefore a higher quality print can be obtained.
Mesh colourThe letter following the thread thickness indicates the mesh colour:
W = White/Undyed fabricUO = Dyed Ultra Orange fabric
Why should the colour be important? The colour actually has asignificant effect on stencil exposure. If a direct stencil is produced ona white fabric, during exposure UV light passing through will bescattered in all directions as it meets the mesh filaments. This leads toundercutting and filling in of fine detail areas and a subsequent poorprint quality.
This problem is solved by dyeing the fabric. The colour, ultra-orange,has been carefully selected to absorb around 85 per cent of the UVradiation, rather than reflect or transmit it.
For indirect stencils, such as Autotype’s Five-Star, the colour of themesh is immaterial. Where stencils are produced on the mesh, i.e.emulsions or capillary systems, ultra-orange is recommended. It isworth remembering that when exposing a stencil on dyed mesh, theexposure times must be increased by anything up to 50 per cent.
Fabrics with a mesh count of 62 or finer are readily available dyedultra-orange; coarser fabrics are usually supplied in white only.
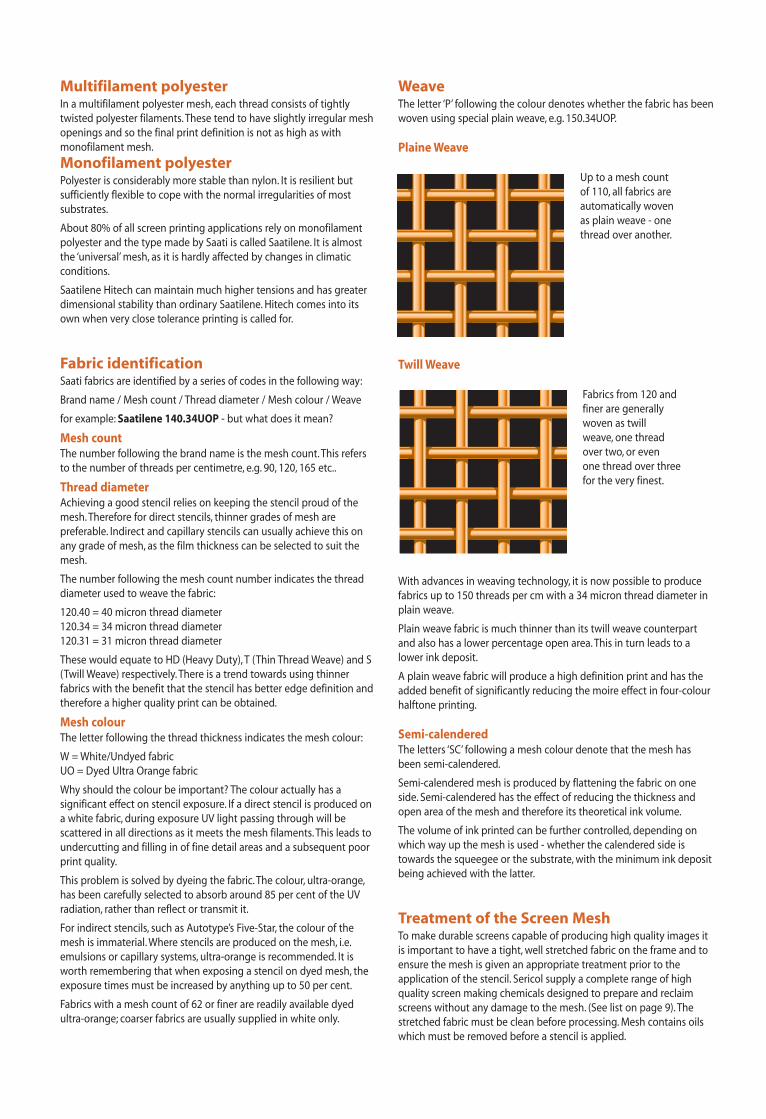
WeaveThe letter ‘P’ following the colour denotes whether the fabric has beenwoven using special plain weave, e.g. 150.34UOP.
Plaine Weave
Up to a mesh count of 110, all fabrics are automatically woven as plain weave - one thread over another.
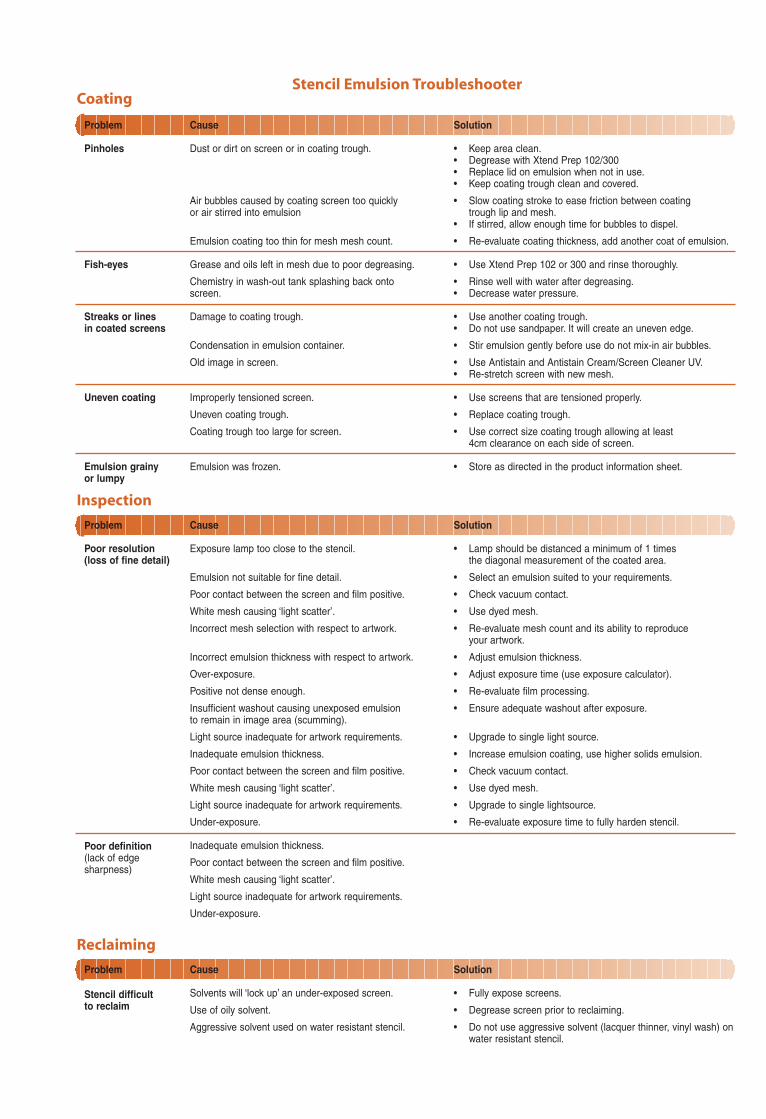
Twill Weave
Fabrics from 120 and finer are generally woven as twill weave, one thread over two, or even one thread over three for the very finest.
With advances in weaving technology, it is now possible to producefabrics up to 150 threads per cm with a 34 micron thread diameter inplain weave.
Plain weave fabric is much thinner than its twill weave counterpartand also has a lower percentage open area. This in turn leads to alower ink deposit.
A plain weave fabric will produce a high definition print and has theadded benefit of significantly reducing the moire effect in four-colourhalftone printing.
Semi-calenderedThe letters ‘SC’ following a mesh colour denote that the mesh hasbeen semi-calendered.
Semi-calendered mesh is produced by flattening the fabric on oneside. Semi-calendered has the effect of reducing the thickness andopen area of the mesh and therefore its theoretical ink volume.
The volume of ink printed can be further controlled, depending onwhich way up the mesh is used - whether the calendered side istowards the squeegee or the substrate, with the minimum ink depositbeing achieved with the latter.
Treatment of the Screen MeshTo make durable screens capable of producing high quality images itis important to have a tight, well stretched fabric on the frame and toensure the mesh is given an appropriate treatment prior to theapplication of the stencil. Sericol supply a complete range of highquality screen making chemicals designed to prepare and reclaimscreens without any damage to the mesh. (See list on page 9). Thestretched fabric must be clean before processing. Mesh contains oilswhich must be removed before a stencil is applied.
Stencil Emulsion TroubleshooterCoating
Problem Cause Solution
Pinholes Dust or dirt on screen or in coating trough. • Keep area clean.• Degrease with Xtend Prep 102/300• Replace lid on emulsion when not in use.• Keep coating trough clean and covered.
Air bubbles caused by coating screen too quickly • Slow coating stroke to ease friction between coating or air stirred into emulsion trough lip and mesh.
• If stirred, allow enough time for bubbles to dispel.
Emulsion coating too thin for mesh mesh count. • Re-evaluate coating thickness, add another coat of emulsion.
Fish-eyes Grease and oils left in mesh due to poor degreasing. • Use Xtend Prep 102 or 300 and rinse thoroughly.
Chemistry in wash-out tank splashing back onto • Rinse well with water after degreasing.screen. • Decrease water pressure.
Streaks or lines Damage to coating trough. • Use another coating trough.in coated screens • Do not use sandpaper. It will create an uneven edge.
Condensation in emulsion container. • Stir emulsion gently before use do not mix-in air bubbles.
Old image in screen. • Use Antistain and Antistain Cream/Screen Cleaner UV.• Re-stretch screen with new mesh.
Uneven coating Improperly tensioned screen. • Use screens that are tensioned properly.
Uneven coating trough. • Replace coating trough.
Coating trough too large for screen. • Use correct size coating trough allowing at least 4cm clearance on each side of screen.
Emulsion grainy Emulsion was frozen. • Store as directed in the product information sheet.or lumpy
Inspection
Problem Cause Solution
Poor resolution Exposure lamp too close to the stencil. • Lamp should be distanced a minimum of 1 times (loss of fine detail) the diagonal measurement of the coated area.
Emulsion not suitable for fine detail. • Select an emulsion suited to your requirements.
Poor contact between the screen and film positive. • Check vacuum contact.
White mesh causing ‘light scatter’. • Use dyed mesh.
Incorrect mesh selection with respect to artwork. • Re-evaluate mesh count and its ability to reproduce your artwork.
Incorrect emulsion thickness with respect to artwork. • Adjust emulsion thickness.
Over-exposure. • Adjust exposure time (use exposure calculator).
Positive not dense enough. • Re-evaluate film processing.
Insufficient washout causing unexposed emulsion • Ensure adequate washout after exposure.to remain in image area (scumming).
Light source inadequate for artwork requirements. • Upgrade to single light source.
Inadequate emulsion thickness. • Increase emulsion coating, use higher solids emulsion.
Poor contact between the screen and film positive. • Check vacuum contact.
White mesh causing ‘light scatter’. • Use dyed mesh.
Light source inadequate for artwork requirements. • Upgrade to single lightsource.
Under-exposure. • Re-evaluate exposure time to fully harden stencil.
Inadequate emulsion thickness.
Poor contact between the screen and film positive.
White mesh causing ‘light scatter’.
Light source inadequate for artwork requirements.
Under-exposure.
Reclaiming
Problem Cause Solution
Solvents will ‘lock up’ an under-exposed screen. • Fully expose screens.
Use of oily solvent. • Degrease screen prior to reclaiming.
Aggressive solvent used on water resistant stencil. • Do not use aggressive solvent (lacquer thinner, vinyl wash) onwater resistant stencil.
Poor definition(lack of edge sharpness)
Stencil difficultto reclaim

To help get started the following chart lists just some of the inks in theSericol range.
Sericol produce a full range of solvent-based, water-based, plastisoland UV curing inks - suitable for all aplications.
Trichromatic Texiscreen TexopaqueInk Range Colorstar CS Seristar SX Colorjet CO Polyplast PY Multijet LO Plastijet TG MattPlast MG Aqua AJ Classic OP MultiTran XM Nylobag NBFinish Satin Gloss Matt High Gloss High Gloss High Gloss Matt – – – –
Substrates
Poster papers * ° * ° ° ° ° ° ° ° °Coated papers * * * * * ° * ° ° ° °Boards * * * ° ° ° ° ° ° ° °Wood * * * ° ° ° ° ° ° ° °‘Polyart’ * * ° ° ° ° ° ° ° ° °‘Tyvek’ * ° ° ° ° ° ° ° ° ° °PVC ° ° ° * * ° * ° ° ° °Polstyrene ° ° ° ° * * * ° ° ° °Polycarbonate ° ° ° * * * * * ° ° °Acrylic sheet ° ° ° * * ° * ° ° ° °ABS ° ° ° * ° ° * ° ° ° °CAB ° ° ° * ° ° * ° ° ° °Fluted polyolefin ° ° ° ° ° ° ° ° ° ° °Sheet polypropylene ° ° ° ° ° ° ° ° ° ° °Injection moulded polyolefin ° ° ° ° ° ° ° ° ° ° °100% Cotton ° ° ° ° ° ° ° • • • • • • • • • • • •
50/50 Cotton/polyester ° ° ° ° ° ° ° • • • • • • • • • • • •
Polyester ° ° ° ° ° ° ° • • • • • • • • • †
Acrylic fabric ° ° ° ° ° ° ° • • • • • • • • • †
Nylon ° ° ° ° ° ° ° • • • ° • • • †
Colour Range
PANTONE® Matching System – Yes – Yes Yes – Yes Yes Yes – –
Seritone Matching System Yes Yes Yes Yes Yes – Yes – – – –
Lead-free line colours 27 34 26 29 14 – 27 – – – –
Lead containing alternatives 4 – 5 6 – – 4 – – – –
Fluorescents – – – – – – – 5 5 – –
Transparents – – – 3 – – – 15 7 – –
Metallics – – 2 2 – – 2 2 – – –
Trichromatics – – – Yes – – – Yes Yes Yes –
Extra lightfast (EL) – – – – – 4 – – – – –
Opaque – – – – – – – 1 – – –
Extra Opaques – – – – – – – – 24 14 14
Opaque Fluorescents – – – – – – – – 5 5 5
Paper & Board Plastic Textile
• • • Outstanding • • Excellent • Good * Recommended ° Not Recommended † Two Pack System
For full information on any Sericol ink range visit www.sericol.com
There are three distinct stencil types in use currently: Indirect Film,Capillary Direct Film and Direct Emulsions; each of these is differentand requires a different treatment technique.
Treatment can essentially be subdivided into three: degreasing andcleaning, abrading, wetting-out the mesh.
Degrease and CleanA solvent/detergent combination such as Serisolve can be used tocombat oils and atmospheric contamination as the screen can besprayed afterwards with water to disperse, remove and wash awaycompletely such contamination. Ink residues of previous print runs area major cause of screen soiling, in which case the use of Serisolve isvital. Its solvent/detergent combination absorbs into the ink, makingwashout far more effective. For extremely difficult stains and residuesit may be necessary to use Seripaste, a powerful alkaline cleaningpaste, in conjunction with Serisolve.
Degreasing the mesh:The mesh must be conditioned to degrease it and provide a key for the stencil. The type of conditioner used here is rubbed on with a cloth and heat dried.
AbrasionIndirect film stencils require adhesion to the mesh surface so that thebacking film can be easily removed during processing, leaving thegelatine image on the mesh, and they must have good adhesion tothe mesh throughout the print run. Adhesion is assisted by gentlyabrading the mesh to matt its surface and provide a surface intowhich the stencil can key. Using too coarse an abrasive will result in anover-roughened, weakened mesh and abrasive particles could becomewedged in the mesh openings causing adhesion or printing faults.
Seriprep 101 contains a specially selected fine abrasive in conjunctionwith a detergent blend to give just the right amount of key.
WettingA characteristic of polyester mesh is that even when fully degreased itis naturally hydrophobic, that is, water repellent. Stencils on the otherhand are hydrophilic - water attracting.
Abrasion of the mesh does help in this regard but it is far moreeffective to chemically convert the surface from water repellent towater attracting. Chemical conversion is an important feature ofproducts such as Seriprep 102, Seriprep 300 and Universal Mesh Prep.
Screen FillingTo prevent ink seeping between frame and mesh outside the stencilarea, screen filler or tape should be used to seal the inside edges andunderside of the frame.
The SqueegeeThis is the basic printing tool and consists of a polyurethane blade setin a metal or wooden handle. Various types are available, designed forhand or machine printing. The length of the squeegee is determinedby the inside width of the frame, though it should allow for a clearanceat both ends of the blade to facilitate a smooth printing action. Tomaintain a straight 90° printing edge on a squeegee, which isadequate enough for most purposes, grind the blade along a sheet ofemery paper using a perpendicular piece of wood as a guide rail.
StencilsScreen printing is a stencil process and is based on the principle ofblocking out areas of mesh in order to prevent ink passing throughwhile leaving clear open areas which do allow ink through. There aretwo basic types of stencil, direct and indirect. Direct stencils are madeon the mesh, while indirect stencils are processed separately andadhered to the mesh at a later stage. The third type is capillary, whichis a combination of both types.
Direct StencilsThe most basic direct stencil is a block-out substance on the mesh. Todo this, trace the design which you want lightly on to the mesh. Thearea which you do not wish to print is then blocked out with a screenfiller. It can be applied by brush, card or finger, depending on thetexture you want. This leaves the open design ready for printing. Makesure the printing ink is the reverse of the type of filler used. Forinstance, if you used a water-based filler you must use a solvent-basedink. Any pin holes which occur in the blocked-out areas can easily befilled in.
Most commercial printers and those with a mercury vapour lamp willnowadays use a Direct Photostencil Emulsion such as Dirasol® fromSericol.
These are coated directly on to the mesh on the frame, dried andexposed to a light source, with a film positive or other mask to blockthe light. Once correctly exposed the stencil is washed gently withwater and the masked areas washed out to allow ink to pass throughthe mesh. This type of stencil is very durable and high quality prints onquite long print runs are easily achievable.
Hand Cut StencilsIndirect stencils are made away from the screen, separate from themesh.
Hand-cut stencil films are available under different trade names butthey all share the common qualities of producing good qualityimages. Most of them consist of a thin coating of stencil material on atemporary support such as transparent paper or transparent plasticwhich allows the design to show through, thus facilitating cutting.Peeling is simple and areas removed accidentally are easily replaced.Some types are water-based and these are easily affixed to the screenby wet sponge or soft squeegee. Others employ a mixture of waterand methylated spirits, and the third type are attached to the screenby ironing them on.
The method of making the stencils for all types is quite simple.Position the stencil film/paper over the design with its backing sheetunderneath. Using a stencil knife, cut away the design from the toplayer only. Care must be taken not to cut too heavily as the backingsheet can be dented and this will affect adhesion of the stencil to themesh. Peel the areas away which you wish to print, using your knife tolift the cut edges. Place the completed stencil on a piece of cardslightly smaller than the inside dimensions of the frame. Lay the frameover it, ensuring that the film is in contact with the underside of themesh and positioned centrally. Using two pads of soft cloth, wet onewith the recommended adhering liquid and wipe a small portion withone stroke and dry immediately with the other pad, using a lightrubbing motion until all liquid has evaporated. Continue over thewhole stencil area, working in one direction only to avoid wrinkling.When the stencil is dry, slowly pull away the backing sheet from theupturned frame.
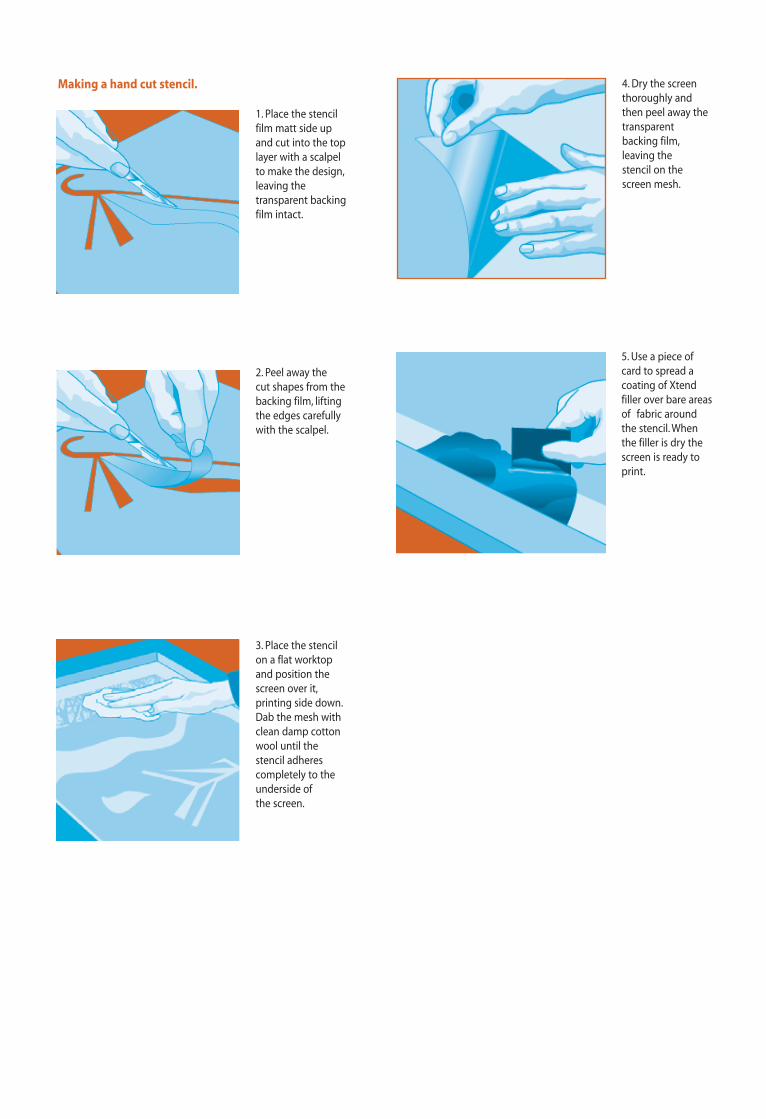
Making a hand cut stencil.
1. Place the stencil film matt side up and cut into the top layer with a scalpel to make the design,leaving the transparent backing film intact.
2. Peel away the cut shapes from the backing film, lifting the edges carefully with the scalpel.
3. Place the stencil on a flat worktop and position the screen over it,printing side down.Dab the mesh with clean damp cotton wool until the stencil adheres completely to the underside of the screen.
4. Dry the screen thoroughly and then peel away the transparent backing film,leaving the stencil on the screen mesh.
5. Use a piece of card to spread a coating of Xtendfiller over bare areasof fabric around the stencil. Whenthe filler is dry the screen is ready toprint.

Xtend Screen Preparation Products
Screenfix - Screen Mounting AdhesiveAn advanced 2-pack screen mounting adhesive for optimum adhesionto all frame types. Combines extended pot life and excellent brushingproperties with fast cut out time and resistance to solvents.
Prep® 101 - Mesh Preparation PasteThe safe and labour-saving pre-treatment of new mesh for use withindirect stencil films. Combines surface abrasion with degreasing,suitable for all mesh. One treatment only is necessary, use Prep 102before second and subsequent stencils.
Prep® 102 - Degreasing and Emulsifying ConcentrateThe ideal mesh pre-treatment for direct emulsions, capillary anddirect/indirect films, on both new and used screens. Equally suitablewith indirect stencil films on screens originally treated with Prep 101.Ensures consistent adhesion, eliminates static, fisheyes and pinholes.
Prep® 300 - Sprayable Degreasing ConcentrateA water miscible degreaser primarily designed for automatic screencleaning machines and manual spray application to large screens, butwhich can also be applied by sponge. Prep 300 will effectively removeall greases and similar contaminants from all meshes. On polyestermeshes it will in addition impart anti-static properties.
Filler WR - Water Resistant Screen FillerA simply applied, solvent soluble screen filler for masking and spottingout water resistant stencils. Highly flexible and durable in use. Can beused with water-based graphic inks when used in conjunction withSerisolve Aqua as a screen cleaner.
Sericure - Stencil Waterproofing AgentA reliable and fast acting chemical hardener for the production ofextra water-resistant stencils.
Dirasol Super Hardener - Post Hardening SystemA two-pack chemical system for post hardening all Dirasol emulsions.Post hardening further cross-links the previously exposed emulsionproducing stencils which have maximum resistance to solvent andwater-based inks, as well as improved abrasion resistance.
Protolac - Edge Protection LacquerA two-pack product for permanent protection of the stretched frame.It can also be used either as a stencil mask or as a stencil reinforcer.Incorporates a separate base and hardener, simply mixed in equalquantities, and easily applied using a brush.
Xtend Screen Reclaiming Products
Strip Powder® - Stencil Decoating ConcentrateA highly effective and economical stencil decoating concentrate thatdoes not react with hard water, thus ensuring that the activeingredients remain fully in solution to attack the stencil.
Strip® Liquid - Stencil Decoating ConcentrateA stencil decoating concentrate particularly formulated for use inautomatic screen cleaning machines. As a liquid, there are no solidcontaminants to block or corrode the machine spray jets and it iseasily dilutable with water before use. When diluted 1 to 20 it isequivalent in performance to a 1% Seristrip Powder solution.
Xtend Screen Cleaning Products
Screen Cleaner SV - Active Screen CleanerA unique blend of active solvents with an emulsifying detergent.Removes ink residues prior to stencil decoating and assists in screenreclaiming/cleaning.
Screen Cleaner HF - Active Screen CleanerApplications as Serisolve. Incorporates a carefully selected blend ofenvironmentally safer, cyclohexanone-free, low-odour solvents. Its highflashpoint/low evaporation rate ensures optimum economy in use.
Screen Cleaner MC - Active Screen CleanerActive screen cleaner formulated for rapid and effective removal of allsolvent, water-based and UV ink residues in automatic screen cleaningmachines. Its high flashpoint/low evaporation rate ensures optimumeconomy in use.
Screen Cleaner AquaA low solvent-containing water-based screen cleaner designed torapidly remove water-based graphic inks, without removing Serifil WRscreen filler.
Antistain Paste - Alkaline Cleaning PasteThe multipurpose cleaner - degreases screen and removes ghostimates caused by stencil and ink residues. Degreases and chemicallyroughens aluminium frames; prepares rotary screens, copper rollersand gravure cylinders.
Antistain Rapid - Alkaline Stain RemoverA one-pack stain remover for the rapid cleaning of ink stains from alltypes of mesh. Its uniform consistency makes it easy to apply andensures no separation in the container, thereby guaranteeingoptimum performance at all times.
Antistain - Diazo Stain RemoverDiazo stain remover. Can be used to optimise and accelerate theperformance of SeriClean in the removal of ink stains. Antistain Ultra isfast acting with a gel structure for non-drip application.
Antistain Cream - Non-Alkaline Stain Remover (patented)Non-alkaline product designed to remove all types of ink stain.Combines significant safety advantages and, in combination withAntistain, excellent all-round performance.
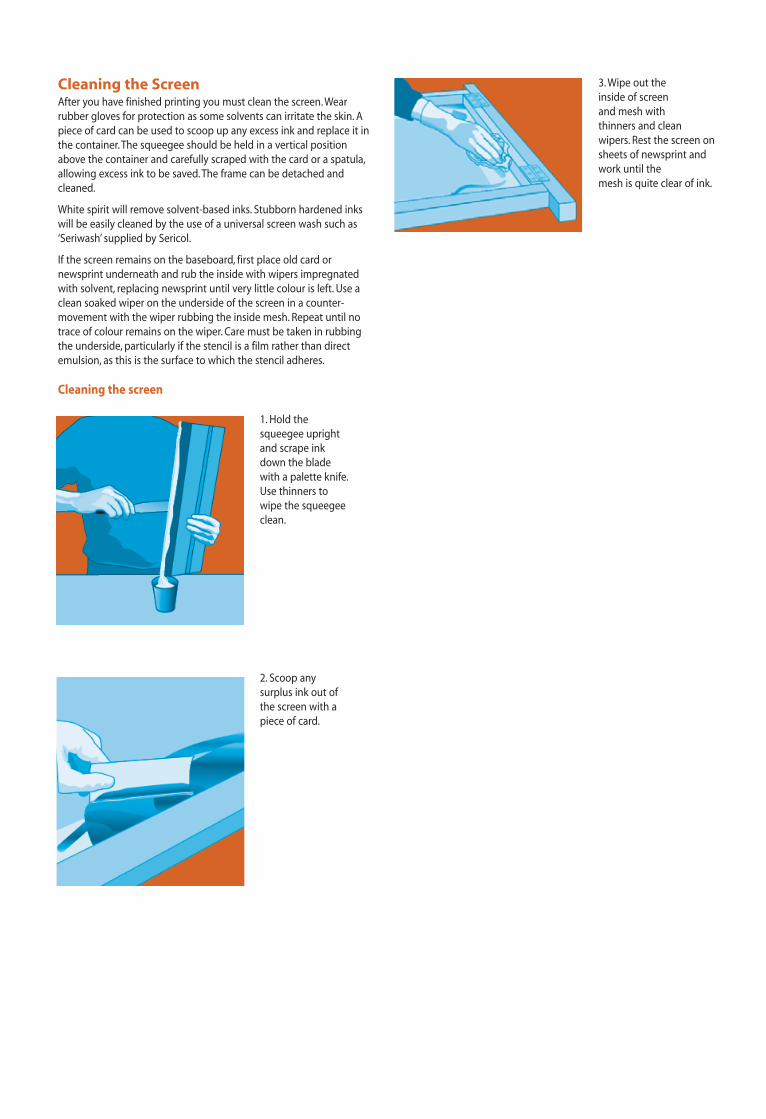
Cleaning the ScreenAfter you have finished printing you must clean the screen. Wearrubber gloves for protection as some solvents can irritate the skin. Apiece of card can be used to scoop up any excess ink and replace it inthe container. The squeegee should be held in a vertical positionabove the container and carefully scraped with the card or a spatula,allowing excess ink to be saved. The frame can be detached andcleaned.
White spirit will remove solvent-based inks. Stubborn hardened inkswill be easily cleaned by the use of a universal screen wash such as‘Seriwash’ supplied by Sericol.
If the screen remains on the baseboard, first place old card ornewsprint underneath and rub the inside with wipers impregnatedwith solvent, replacing newsprint until very little colour is left. Use aclean soaked wiper on the underside of the screen in a counter-movement with the wiper rubbing the inside mesh. Repeat until notrace of colour remains on the wiper. Care must be taken in rubbingthe underside, particularly if the stencil is a film rather than directemulsion, as this is the surface to which the stencil adheres.
Cleaning the screen
1. Hold the squeegee upright and scrape ink down the blade with a palette knife.Use thinners to wipe the squeegee clean.
2. Scoop any surplus ink out of the screen with a piece of card.
3. Wipe out the inside of screen and mesh with thinners and cleanwipers. Rest the screen onsheets of newsprint and work until the mesh is quite clear of ink.
PhotostencilsA photostencil is light sensitive so that exposure to ultraviolet lighthardens the surface, causing it to become impervious to either solventor water. The stencil material is exposed to UV light through a positive.A positive image is one which is literally the opposite of a negative.That is to say, the printing images are opaque rather than transparent.These are carried on a transparent base to allow light through to theparts of the stencil which become hard on final processing. Whenwashed, the soft stencil areas (those which have not been exposed tolight because of the opaque image) wash away so that the image isclearly defined. This principle applies to all photostencils whether theyare coated directly onto the screen or processed away from the screenand fixed on later. There is a third process, a combination of these two,in which an indirect film is impregnated into the mesh.
Direct PhotostencilsThe mesh on the frame is coated with the photosensitive emulsionand, after drying, is exposed to a light source through a positivetransparency.
The areas of the positive which are opaque and which are to berepresented in print protect the emulsion so that it remains soft andcan be washed away. Those areas which are exposed to the light arehardened so that they become impervious to ink.
Preparing a direct photostencil
1. Fill a coating trough with light-sensitive emulsion. Draw the trough up the screen at an angle to lay an even coating of emulsion on the mesh.
2. Dry off the coated screen in a dark room. Place the photo-positive on the exposure unit with the image reading the right way round as youlook at it.
3. Position the light-sensitive screen over the positive. Close the exposure unit and expose the screen to ultraviolet light for the right length of time.
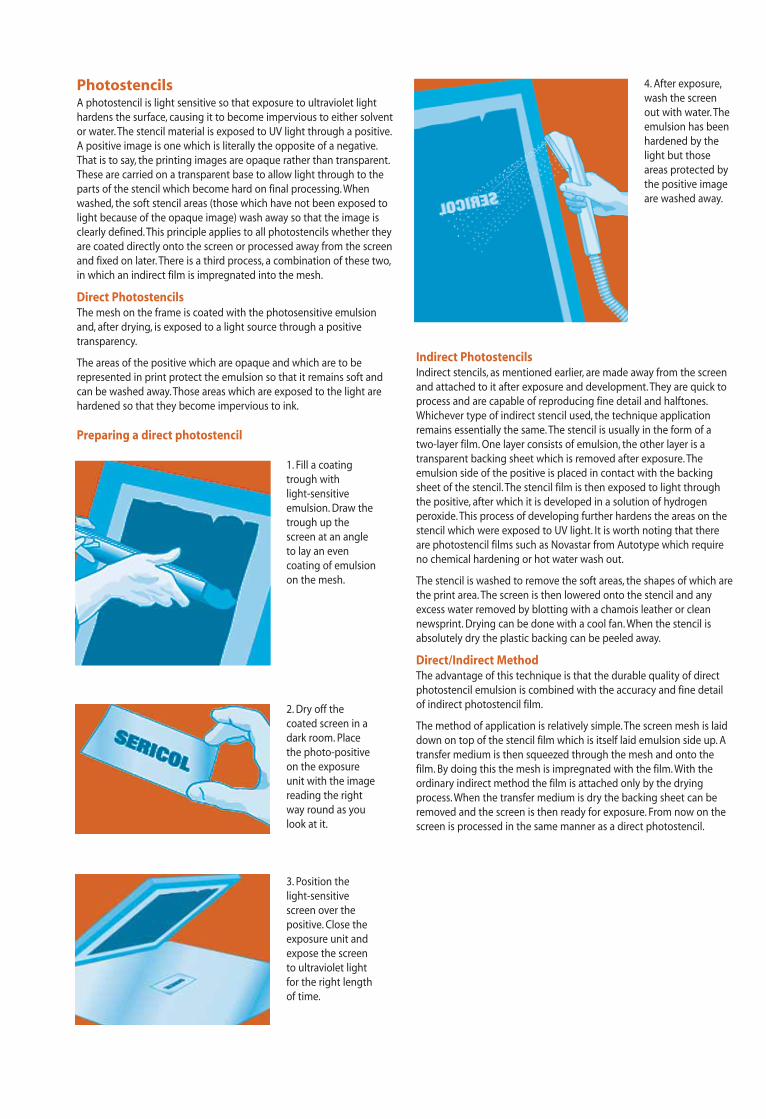
4. After exposure,wash the screen out with water. The emulsion has been hardened by the light but those areas protected by the positive image are washed away.
Indirect PhotostencilsIndirect stencils, as mentioned earlier, are made away from the screenand attached to it after exposure and development. They are quick toprocess and are capable of reproducing fine detail and halftones.Whichever type of indirect stencil used, the technique applicationremains essentially the same. The stencil is usually in the form of atwo-layer film. One layer consists of emulsion, the other layer is atransparent backing sheet which is removed after exposure. Theemulsion side of the positive is placed in contact with the backingsheet of the stencil. The stencil film is then exposed to light throughthe positive, after which it is developed in a solution of hydrogenperoxide. This process of developing further hardens the areas on thestencil which were exposed to UV light. It is worth noting that thereare photostencil films such as Novastar from Autotype which requireno chemical hardening or hot water wash out.
The stencil is washed to remove the soft areas, the shapes of which arethe print area. The screen is then lowered onto the stencil and anyexcess water removed by blotting with a chamois leather or cleannewsprint. Drying can be done with a cool fan. When the stencil isabsolutely dry the plastic backing can be peeled away.
Direct/Indirect MethodThe advantage of this technique is that the durable quality of directphotostencil emulsion is combined with the accuracy and fine detailof indirect photostencil film.
The method of application is relatively simple. The screen mesh is laiddown on top of the stencil film which is itself laid emulsion side up. Atransfer medium is then squeezed through the mesh and onto thefilm. By doing this the mesh is impregnated with the film. With theordinary indirect method the film is attached only by the dryingprocess. When the transfer medium is dry the backing sheet can beremoved and the screen is then ready for exposure. From now on thescreen is processed in the same manner as a direct photostencil.
The Printing TableAt its most basic the frame can be hinged to a flat piece of blockboardlarge enough to hold the material being printed, registration beingenabled by sticking tabs to the baseboard to locate the material in thesame place for each print.
The HingebarThere are many suppliers of ‘basic entry’ screen printing equipment(see list on page 10) but it is also possible to get a reasonable resultwith a good frame and a pair of hinges screwed to a good flat boardand utilising a low tack adhesive to hold the stock to the base boardwhilst printing.
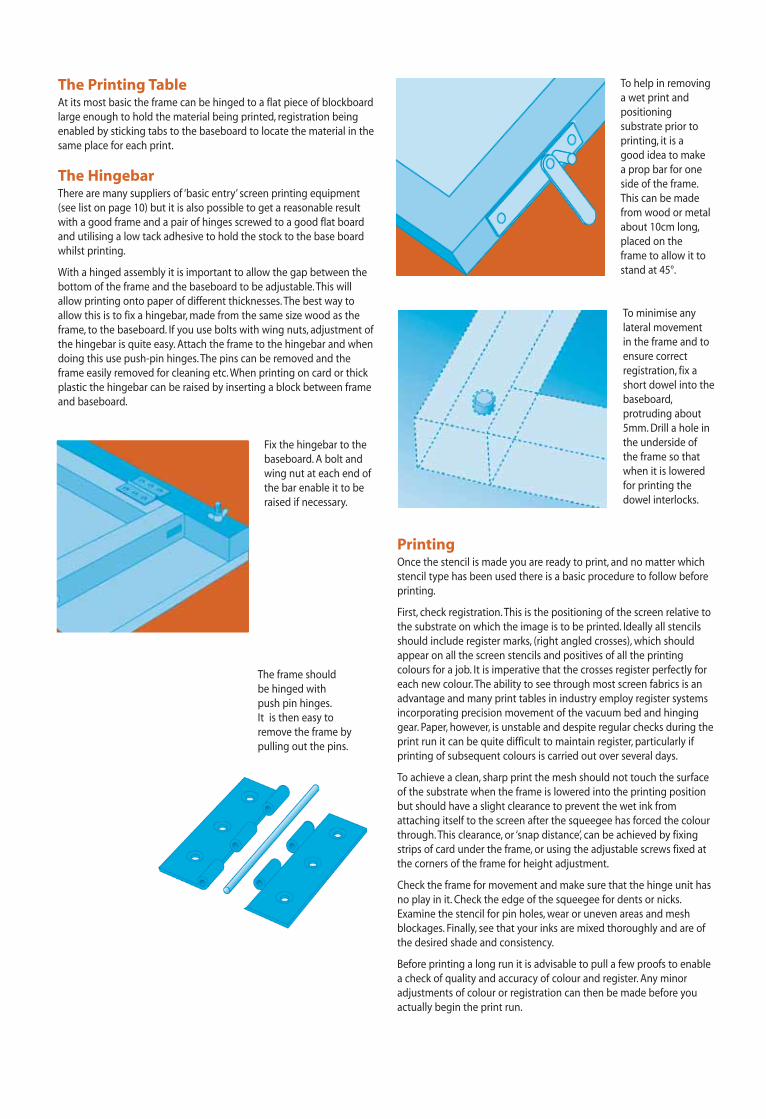
With a hinged assembly it is important to allow the gap between thebottom of the frame and the baseboard to be adjustable. This willallow printing onto paper of different thicknesses. The best way toallow this is to fix a hingebar, made from the same size wood as theframe, to the baseboard. If you use bolts with wing nuts, adjustment ofthe hingebar is quite easy. Attach the frame to the hingebar and whendoing this use push-pin hinges. The pins can be removed and theframe easily removed for cleaning etc. When printing on card or thickplastic the hingebar can be raised by inserting a block between frameand baseboard.
Fix the hingebar to thebaseboard. A bolt andwing nut at each end ofthe bar enable it to beraised if necessary.
The frame should be hinged with push pin hinges.It is then easy to remove the frame bypulling out the pins.
To help in removing a wet print and positioning substrate prior to printing, it is a good idea to make a prop bar for one side of the frame.This can be made from wood or metal about 10cm long,placed on the frame to allow it to stand at 45°.
To minimise any lateral movement in the frame and to ensure correct registration, fix a short dowel into the baseboard,protruding about 5mm. Drill a hole in the underside of the frame so that when it is lowered for printing the dowel interlocks.
PrintingOnce the stencil is made you are ready to print, and no matter whichstencil type has been used there is a basic procedure to follow beforeprinting.
First, check registration. This is the positioning of the screen relative tothe substrate on which the image is to be printed. Ideally all stencilsshould include register marks, (right angled crosses), which shouldappear on all the screen stencils and positives of all the printingcolours for a job. It is imperative that the crosses register perfectly foreach new colour. The ability to see through most screen fabrics is anadvantage and many print tables in industry employ register systemsincorporating precision movement of the vacuum bed and hinginggear. Paper, however, is unstable and despite regular checks during theprint run it can be quite difficult to maintain register, particularly ifprinting of subsequent colours is carried out over several days.
To achieve a clean, sharp print the mesh should not touch the surfaceof the substrate when the frame is lowered into the printing positionbut should have a slight clearance to prevent the wet ink fromattaching itself to the screen after the squeegee has forced the colourthrough. This clearance, or ‘snap distance’, can be achieved by fixingstrips of card under the frame, or using the adjustable screws fixed atthe corners of the frame for height adjustment.
Check the frame for movement and make sure that the hinge unit hasno play in it. Check the edge of the squeegee for dents or nicks.Examine the stencil for pin holes, wear or uneven areas and meshblockages. Finally, see that your inks are mixed thoroughly and are ofthe desired shade and consistency.
Before printing a long run it is advisable to pull a few proofs to enablea check of quality and accuracy of colour and register. Any minoradjustments of colour or registration can then be made before youactually begin the print run.
The printing process is relatively simple. Raise the screen and placestock against the registration guides. Then lower the screen on to thebaseboard or table. Pour ink into the screen at one end so that it isspread evenly from one side of the frame to the other. Position thesqueegee behind the colour and close to the frame. Then, standing atthe opposite end, pull at an angle of about 45° towards you,maintaining a constant speed and without altering the angle of theblade. Look for the speed that the mesh snaps away from the printsurface following the passage of the squeegee. If the print is slow inreleasing the screen mesh, then adjustment must be made to theheight of the frame and the squeegee angle altered. As a rough guide,a pull at angles close to horizontal gives a heavy deposit of ink,increasing possibility of the print sticking to the mesh and causinglack of edge definition. A pull at too vertical an angle puts down a verythin, uneven layer of colour and may cause the squeegee to judder.
After the squeegee is pulled down the length of the frame, raise thescreen slightly and push the squeegee and ink towards the back of thescreen. This will deposit a flood coating of ink which ensures anadequate ink deposit for the next pull. Finally, remove the print andplace it in a drying rack.
The screen mesh must on no account come into contact with theprinting paper when the frame is laid down upon it prior to printing.There should be a gap of about 0.5cm between the mesh and thepaper. Generally the only exception to this rule would be whenprinting fleece fabrics.When you are printing you should pull the squeegee towards you atan angle of about 45°.
The most complex image to print is one which incorporatescontinuous tones. The only way that this can be done is by breakingthe tonal image down into dots, the darker areas of the print beingmade up of larger dots, and the light areas consisting of smaller dotswhich allow more of the paper to show through. To achieve thistranslation from a solid tone to a system of dots, the image which youwant to print is usually output on an imagesetter as an ‘Halftone’.
When the process has been completed you will have a positive imageon film from which a direct or indirect stencil can be made.
If you want to produce multicoloured images incorporating halftones,you will again have to use a process camera. The camera is able toseparate the colours so that halftones are printed through fourseparate colours of process cyan, magenta, yellow and black which,when overprinted, make a composite four colour picture.
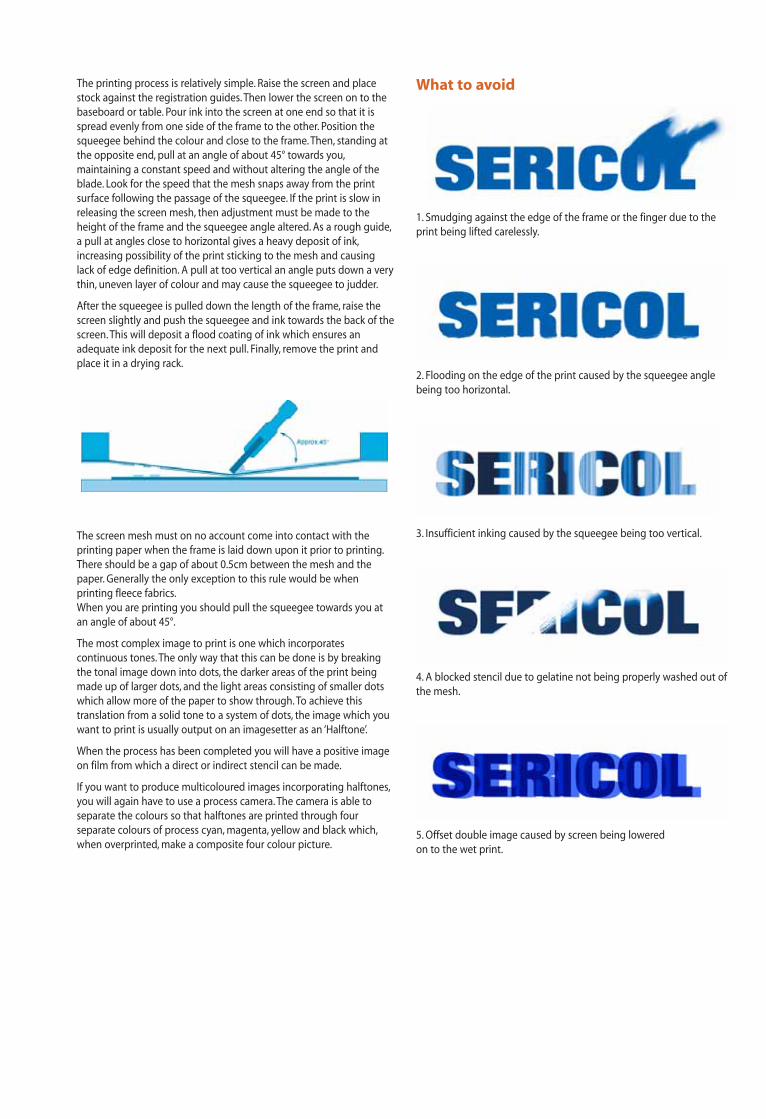
What to avoid
1. Smudging against the edge of the frame or the finger due to theprint being lifted carelessly.
2. Flooding on the edge of the print caused by the squeegee anglebeing too horizontal.
3. Insufficient inking caused by the squeegee being too vertical.
4. A blocked stencil due to gelatine not being properly washed out ofthe mesh.
5. Offset double image caused by screen being lowered on to the wet print.
The information and recommendations contained in this Product Information sheet, as well as technical advice otherwise given by representatives of our Company, whether verbally or in writing, are based onour present knowledge and believed to be accurate. However, no guarantee regarding their accuracy is given as we cannot cover or anticipate every possible application of our products and becausemanufacturing methods, printing stocks and other materials vary. For the same reason our products are sold without warranty and on condition that users shall make their own tests to satisfy themselves thatthey will meet fully their particular requirements. Our policy of continuous product improvement might make some of the information contained in this Product Information sheet out of date and users arerequested to ensure that they follow current recommendations.
FUJIFILM SERICOL UK LIMITEDPysons Road Broadstairs Kent CT10 2LE United KingdomTel: (01843) 866668 Fax: (01843) 872184
Export Sales Pysons Road Broadstairs Kent CT10 2LE United KingdomTel: +44 (0)1843 866668 Fax: +44 (0)1843 872122Email: [email protected]
UK Sales Tel: (01992) 782619 Fax: (01992) 782602Email: [email protected]
Customer Service Centres Tel: 0845 084 89 89
Technical Helpline Tel: 0845 770 80 70 www.fujifilmsericol.comwww.fujifilmsericol.com
PRINTED IN ENGLAND 0995/F7
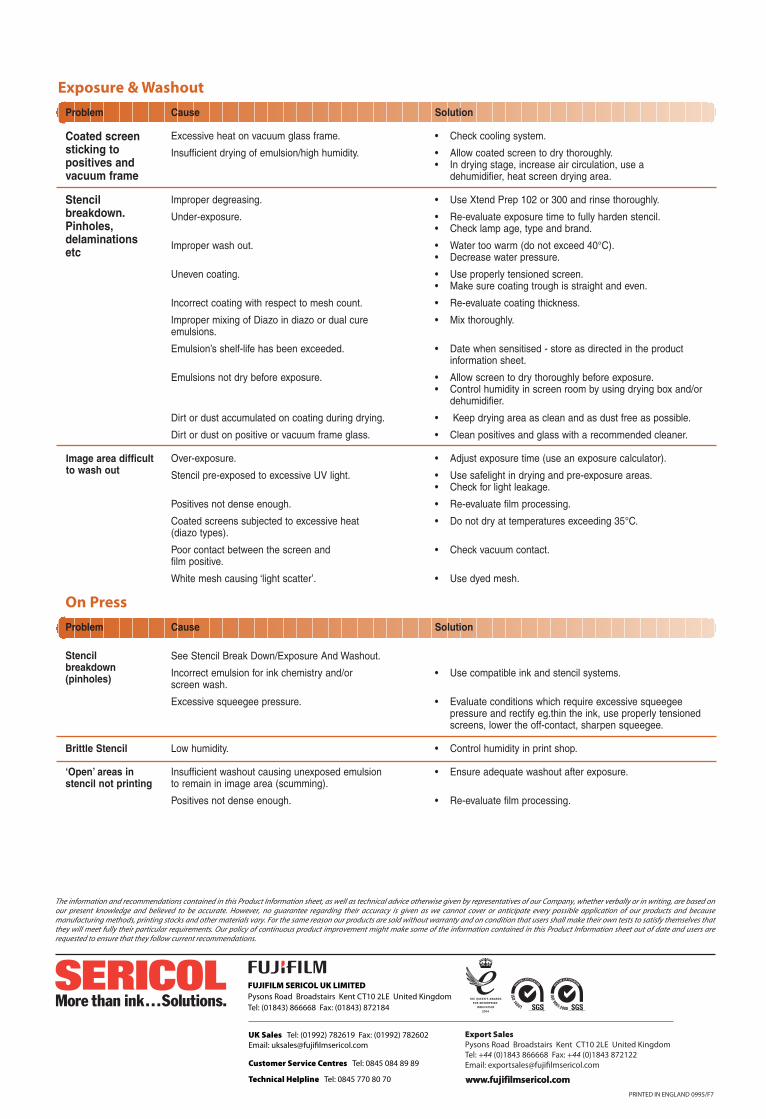
Exposure & Washout
Problem Cause Solution
Excessive heat on vacuum glass frame. • Check cooling system.
Insufficient drying of emulsion/high humidity. • Allow coated screen to dry thoroughly.• In drying stage, increase air circulation, use a
dehumidifier, heat screen drying area.
Improper degreasing. • Use Xtend Prep 102 or 300 and rinse thoroughly.
Under-exposure. • Re-evaluate exposure time to fully harden stencil.• Check lamp age, type and brand.
Improper wash out. • Water too warm (do not exceed 40°C).• Decrease water pressure.
Uneven coating. • Use properly tensioned screen.• Make sure coating trough is straight and even.
Incorrect coating with respect to mesh count. • Re-evaluate coating thickness.
Improper mixing of Diazo in diazo or dual cure • Mix thoroughly.emulsions.
Emulsion’s shelf-life has been exceeded. • Date when sensitised - store as directed in the product information sheet.
Emulsions not dry before exposure. • Allow screen to dry thoroughly before exposure.• Control humidity in screen room by using drying box and/or
dehumidifier.
Dirt or dust accumulated on coating during drying. • Keep drying area as clean and as dust free as possible.
Dirt or dust on positive or vacuum frame glass. • Clean positives and glass with a recommended cleaner.
Over-exposure. • Adjust exposure time (use an exposure calculator).
Stencil pre-exposed to excessive UV light. • Use safelight in drying and pre-exposure areas.• Check for light leakage.
Positives not dense enough. • Re-evaluate film processing.
Coated screens subjected to excessive heat • Do not dry at temperatures exceeding 35°C.(diazo types).
Poor contact between the screen and • Check vacuum contact.film positive.
White mesh causing ‘light scatter’. • Use dyed mesh.
On Press
Problem Cause Solution
See Stencil Break Down/Exposure And Washout.
Incorrect emulsion for ink chemistry and/or • Use compatible ink and stencil systems.screen wash.
Excessive squeegee pressure. • Evaluate conditions which require excessive squeegee pressure and rectify eg.thin the ink, use properly tensioned screens, lower the off-contact, sharpen squeegee.
Brittle Stencil Low humidity. • Control humidity in print shop.
‘Open’ areas in Insufficient washout causing unexposed emulsion • Ensure adequate washout after exposure.stencil not printing to remain in image area (scumming).
Positives not dense enough. • Re-evaluate film processing.
Coated screensticking topositives andvacuum frame
Stencilbreakdown.Pinholes,delaminationsetc
Image area difficultto wash out
Stencilbreakdown(pinholes)