Starry Night Version 5.7 Features · Starry Night 5.7 Quick Start Guide to New Features Space...
13
Starry Night 5.7 Quick Start Guide to New Features Starry Night Version 5.7 Features What’s new and how to use them! New Features Overview 1. Space Missions (Probe Paths) 2. 3-D Object Models 3. Advanced Telescope Control panel 4. Google Maps Integration 5. Zip/Postal code look-up 6. Searchable Locations 7. Planner 8. Clear Sky Clock 9. Computer Controlled Focuser Support 10. Nebula Outlines 11. Field-of-View-Indicators for DSLR (digital) cameras and much more… 1. Space Missions (Probe Paths) [Enthusiast, Pro, Pro Plus, Middle School and High School] Follow the actual path of a space probe’s orbit through the solar system in Starry Night. The space probe’s past, current and future paths can be drawn onscreen. Explore interplanetary space missions and relive some of the spectacular views seen by the following space probes: Voyager 1 and 2 Pioneer 10 and 11 Galileo Cassini and Huygens Mars Express Page 1 of 13
Transcript of Starry Night Version 5.7 Features · Starry Night 5.7 Quick Start Guide to New Features Space...
Starry Night 5.7 Quick Start Guide to New Features
Starry Night Version 5.7 Features What’s new and how to use them! New Features Overview
1. Space Missions (Probe Paths)2. 3-D Object Models3. Advanced Telescope Control panel4. Google Maps Integration5. Zip/Postal code look-up6. Searchable Locations7. Planner8. Clear Sky Clock9. Computer Controlled Focuser Support10. Nebula Outlines11. Field-of-View-Indicators for DSLR (digital) cameras and much more…
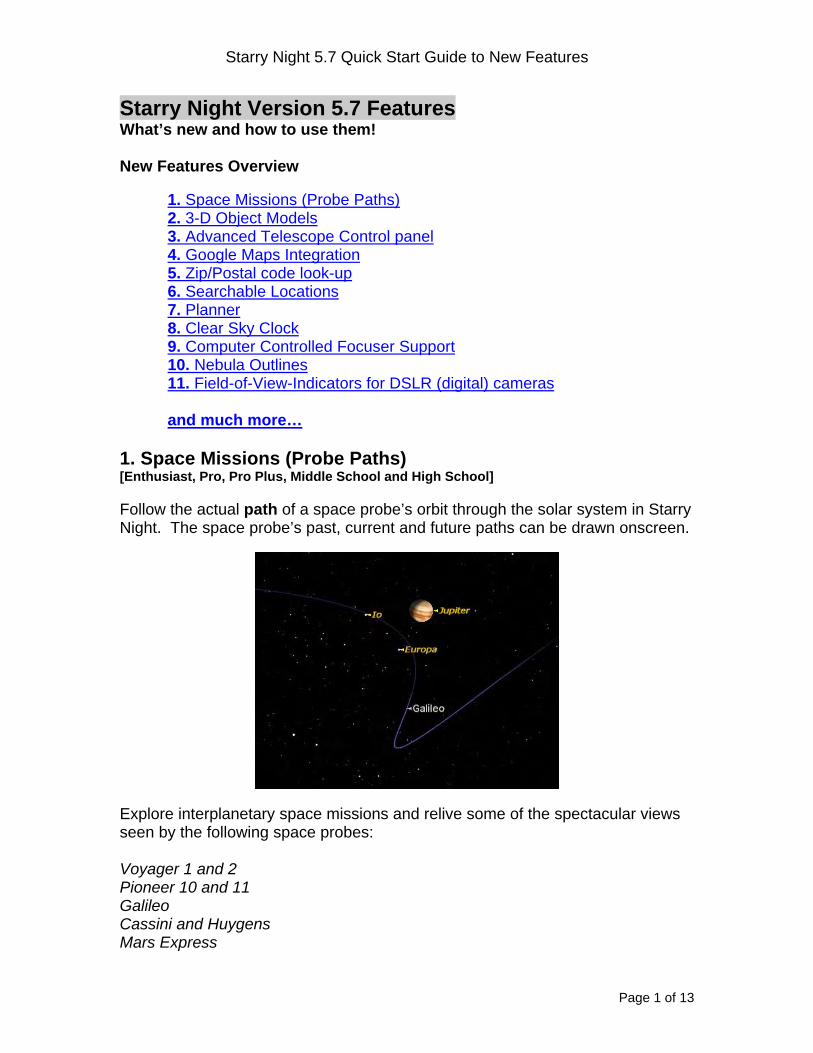
1. Space Missions (Probe Paths) [Enthusiast, Pro, Pro Plus, Middle School and High School]
Follow the actual path of a space probe’s orbit through the solar system in Starry Night. The space probe’s past, current and future paths can be drawn onscreen.
Explore interplanetary space missions and relive some of the spectacular views seen by the following space probes: Voyager 1 and 2 Pioneer 10 and 11 Galileo Cassini and Huygens Mars Express
Page 1 of 13
Starry Night 5.7 Quick Start Guide to New Features
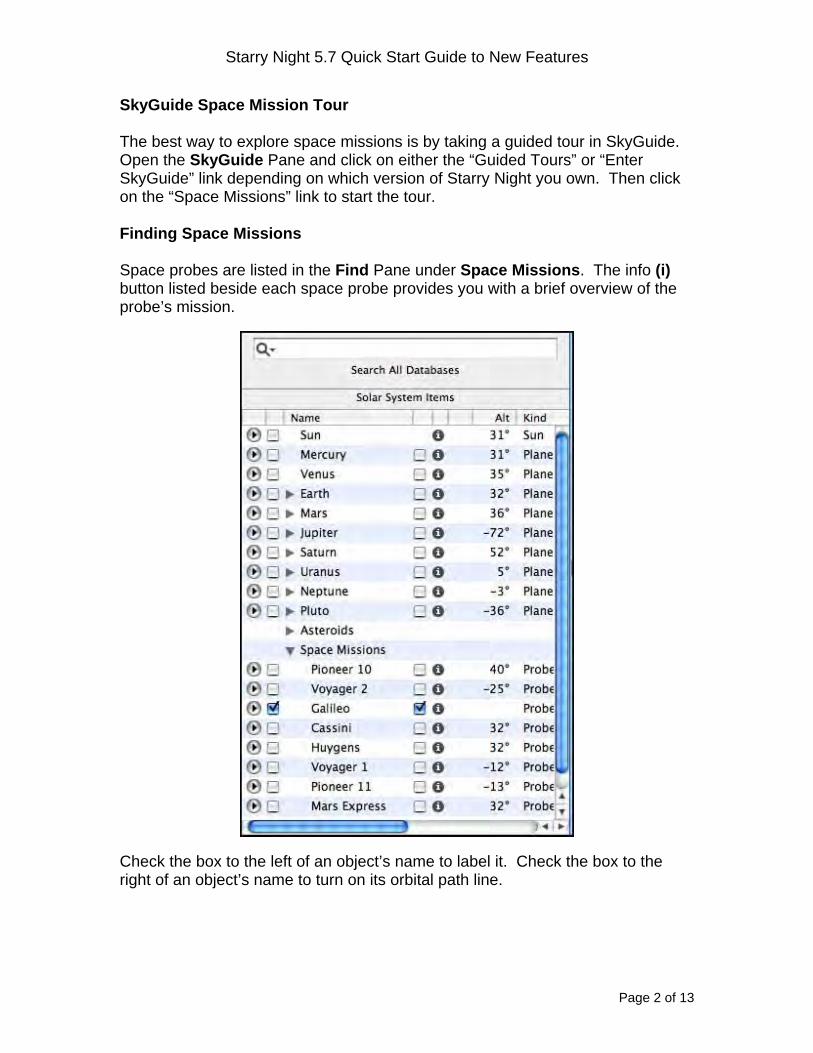
SkyGuide Space Mission Tour The best way to explore space missions is by taking a guided tour in SkyGuide. Open the SkyGuide Pane and click on either the “Guided Tours” or “Enter SkyGuide” link depending on which version of Starry Night you own. Then click on the “Space Missions” link to start the tour. Finding Space Missions Space probes are listed in the Find Pane under Space Missions. The info (i) button listed beside each space probe provides you with a brief overview of the probe’s mission.
Check the box to the left of an object’s name to label it. Check the box to the right of an object’s name to turn on its orbital path line.
Page 2 of 13

Starry Night 5.7 Quick Start Guide to New Features
Space Mission Options To modify the appearance of a space probe’s path, click on the Options Pane and expand the Solar System layer. Then place your mouse cursor over the words “Space Missions” – the Space Missions Options button will come up - click on it.
Clicking the Space Missions Options button will bring up the Space Missions dialog box. From here you have several options:
Path Colour: Allows you to select the color of the probe’s orbit. Draw full path: Draws the past, current and future path of the object’s orbit. If left unchecked, only the past and current path is drawn. Dim future path: Dims the future path of the object’s orbit. Note: Orbital paths are also depth queued, meaning that the further away a line segment is away from your “eye” the dimmer it will appear.
Page 3 of 13

Starry Night 5.7 Quick Start Guide to New Features
2. 3-D Object Models [Enthusiast, Pro, Pro Plus, Middle School and High School] Starry Night now supports 3DS models, allowing for the display of irregularly shaped 3-dimensional objects such as spacecraft or small planetary moons and asteroids.
How are 3DS Models used in Starry Night?
Objects in Starry Night that have a 3DS model associated with them will draw using the model instead of the usual 2D image. You can associate a 3DS model you have downloaded yourself with almost any Solar System object (e.g. satellites, space probes, asteroids etc.)
The following models are included in Starry Night:
Spacecraft Pioneer 10 and 11 Cassini Huygens probe Galileo
Asteroids Annefrank Braille Bacchus
Page 4 of 13
Starry Night 5.7 Quick Start Guide to New Features
How do I view the sample 3D models?
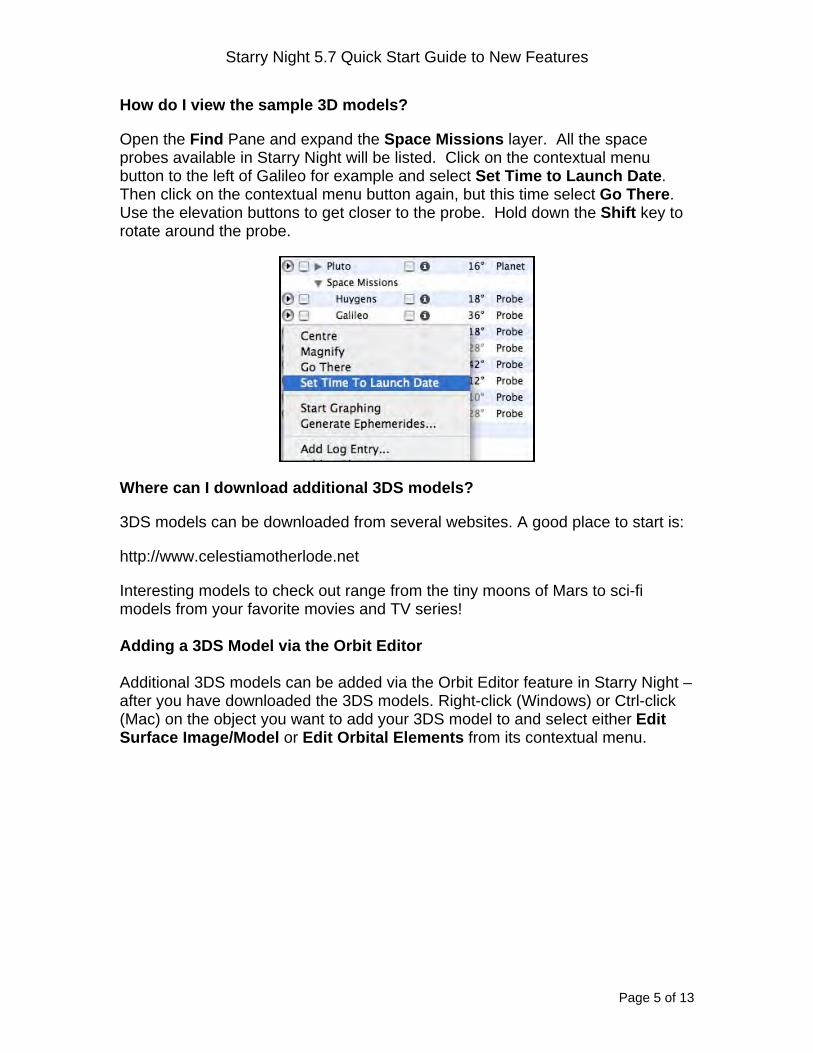
Open the Find Pane and expand the Space Missions layer. All the space probes available in Starry Night will be listed. Click on the contextual menu button to the left of Galileo for example and select Set Time to Launch Date. Then click on the contextual menu button again, but this time select Go There. Use the elevation buttons to get closer to the probe. Hold down the Shift key to rotate around the probe.
Where can I download additional 3DS models?
3DS models can be downloaded from several websites. A good place to start is:
http://www.celestiamotherlode.net
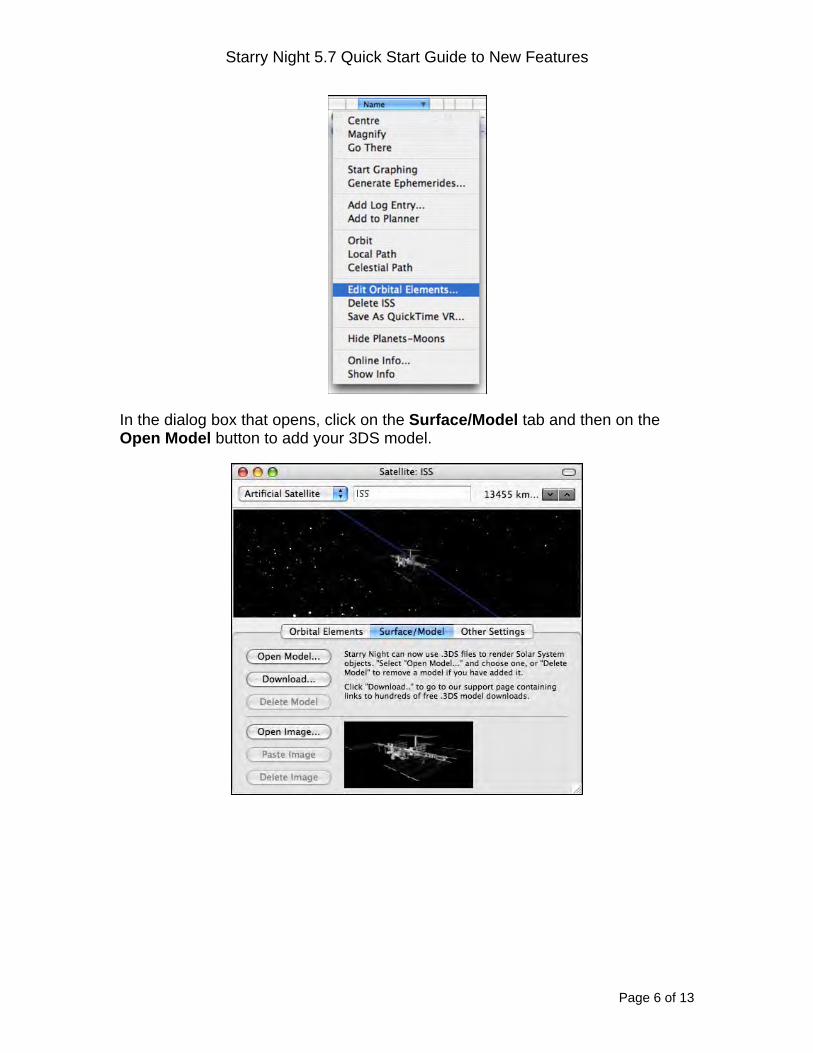
Interesting models to check out range from the tiny moons of Mars to sci-fi models from your favorite movies and TV series! Adding a 3DS Model via the Orbit Editor Additional 3DS models can be added via the Orbit Editor feature in Starry Night – after you have downloaded the 3DS models. Right-click (Windows) or Ctrl-click (Mac) on the object you want to add your 3DS model to and select either Edit Surface Image/Model or Edit Orbital Elements from its contextual menu.
Page 5 of 13
Starry Night 5.7 Quick Start Guide to New Features
In the dialog box that opens, click on the Surface/Model tab and then on the Open Model button to add your 3DS model.
Page 6 of 13

Starry Night 5.7 Quick Start Guide to New Features
3. Advanced Telescope Control Panel [Pro, Pro Plus and High School]
Allows more precise control of robotic telescopes with 'nudge' control and telescope slew limits.
4. Google Maps Integration (Internet connection required) [Enthusiast, Pro, Pro Plus, Middle School and High School] Right-click (Windows) or Ctrl-click (Mac) on any location on Earth while hovering and select Google Map from the contextual menu to open a Google Map for that precise location.
Page 7 of 13
Starry Night 5.7 Quick Start Guide to New Features
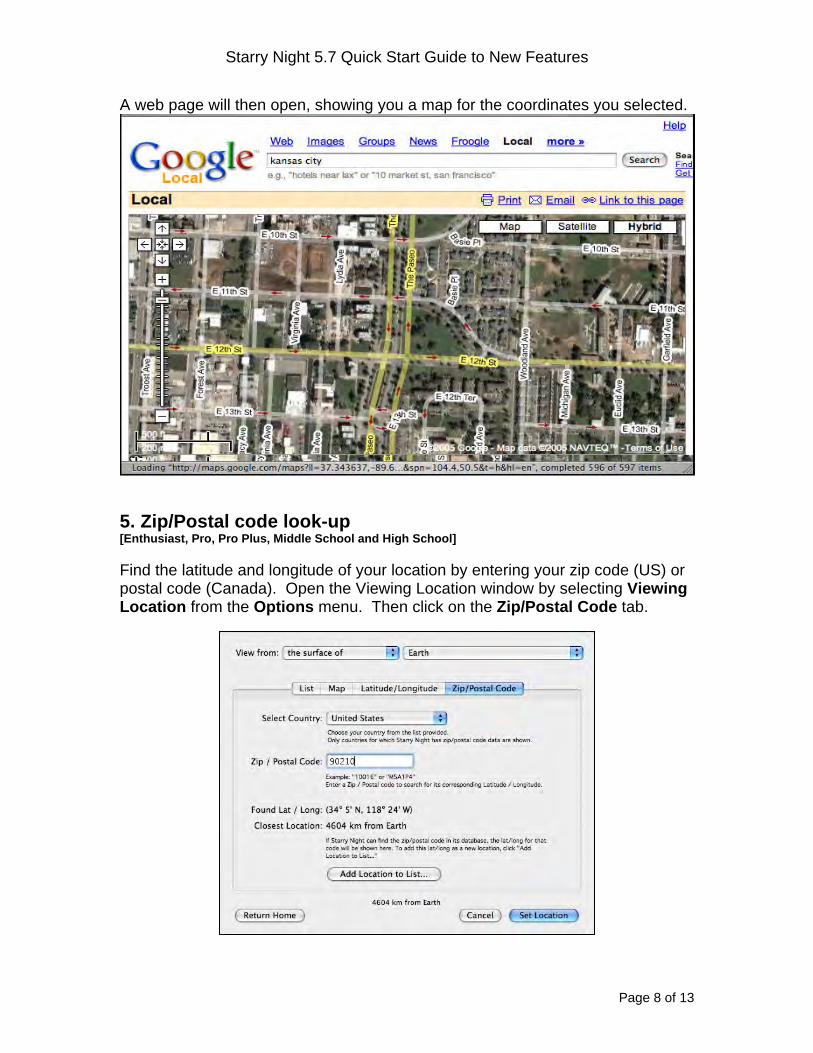
A web page will then open, showing you a map for the coordinates you selected.
5. Zip/Postal code look-up [Enthusiast, Pro, Pro Plus, Middle School and High School] Find the latitude and longitude of your location by entering your zip code (US) or postal code (Canada). Open the Viewing Location window by selecting Viewing Location from the Options menu. Then click on the Zip/Postal Code tab.
Page 8 of 13
Starry Night 5.7 Quick Start Guide to New Features
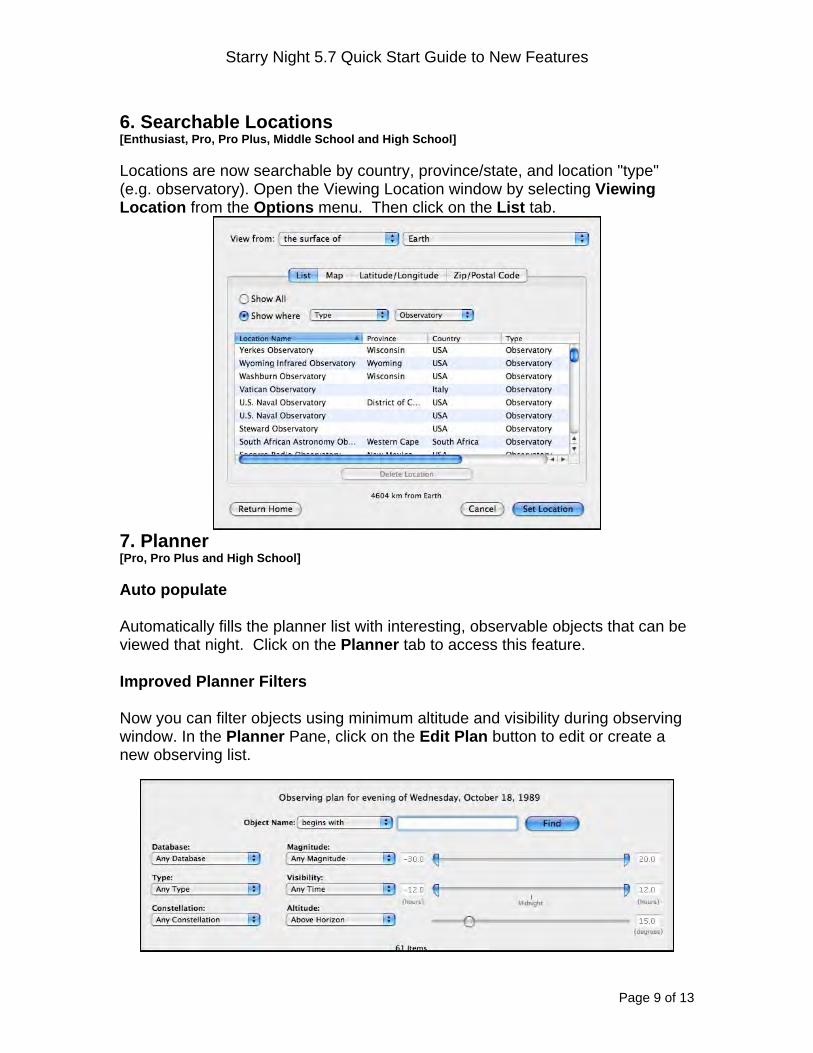
6. Searchable Locations [Enthusiast, Pro, Pro Plus, Middle School and High School] Locations are now searchable by country, province/state, and location "type" (e.g. observatory). Open the Viewing Location window by selecting Viewing Location from the Options menu. Then click on the List tab.
7. Planner [Pro, Pro Plus and High School] Auto populate Automatically fills the planner list with interesting, observable objects that can be viewed that night. Click on the Planner tab to access this feature. Improved Planner Filters Now you can filter objects using minimum altitude and visibility during observing window. In the Planner Pane, click on the Edit Plan button to edit or create a new observing list.
Page 9 of 13
Starry Night 5.7 Quick Start Guide to New Features
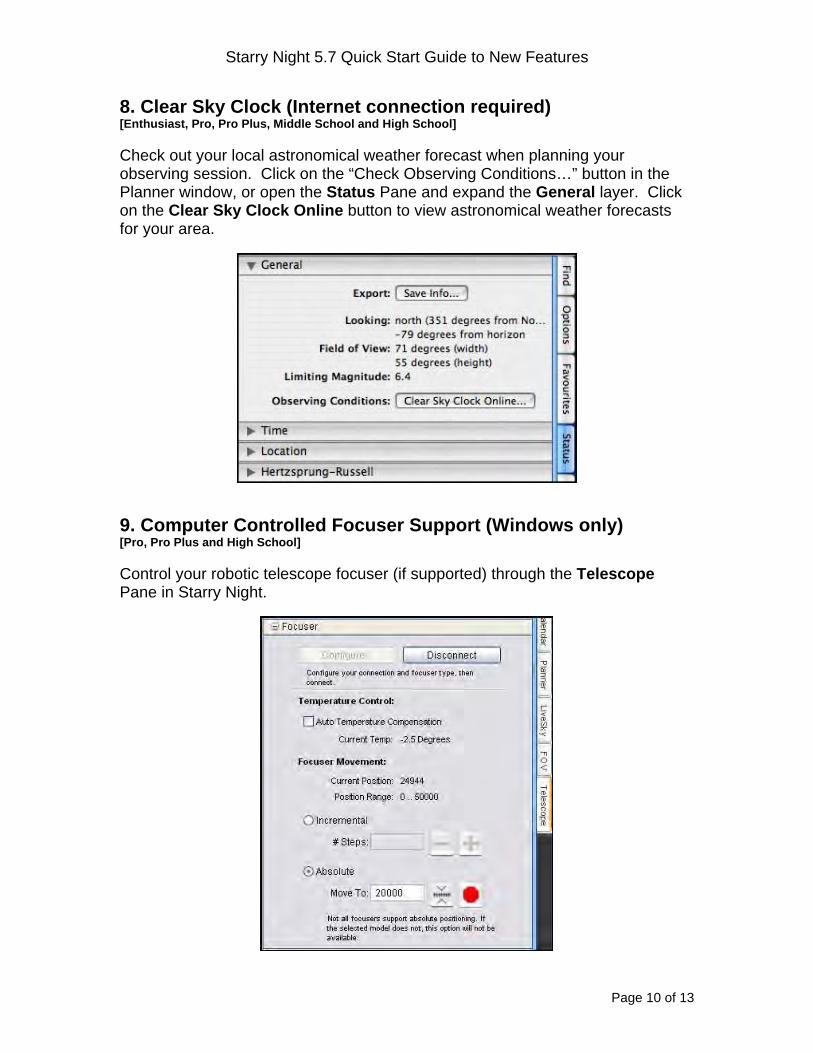
8. Clear Sky Clock (Internet connection required) [Enthusiast, Pro, Pro Plus, Middle School and High School] Check out your local astronomical weather forecast when planning your observing session. Click on the “Check Observing Conditions…” button in the Planner window, or open the Status Pane and expand the General layer. Click on the Clear Sky Clock Online button to view astronomical weather forecasts for your area.
9. Computer Controlled Focuser Support (Windows only) [Pro, Pro Plus and High School] Control your robotic telescope focuser (if supported) through the Telescope Pane in Starry Night.
Page 10 of 13
Starry Night 5.7 Quick Start Guide to New Features
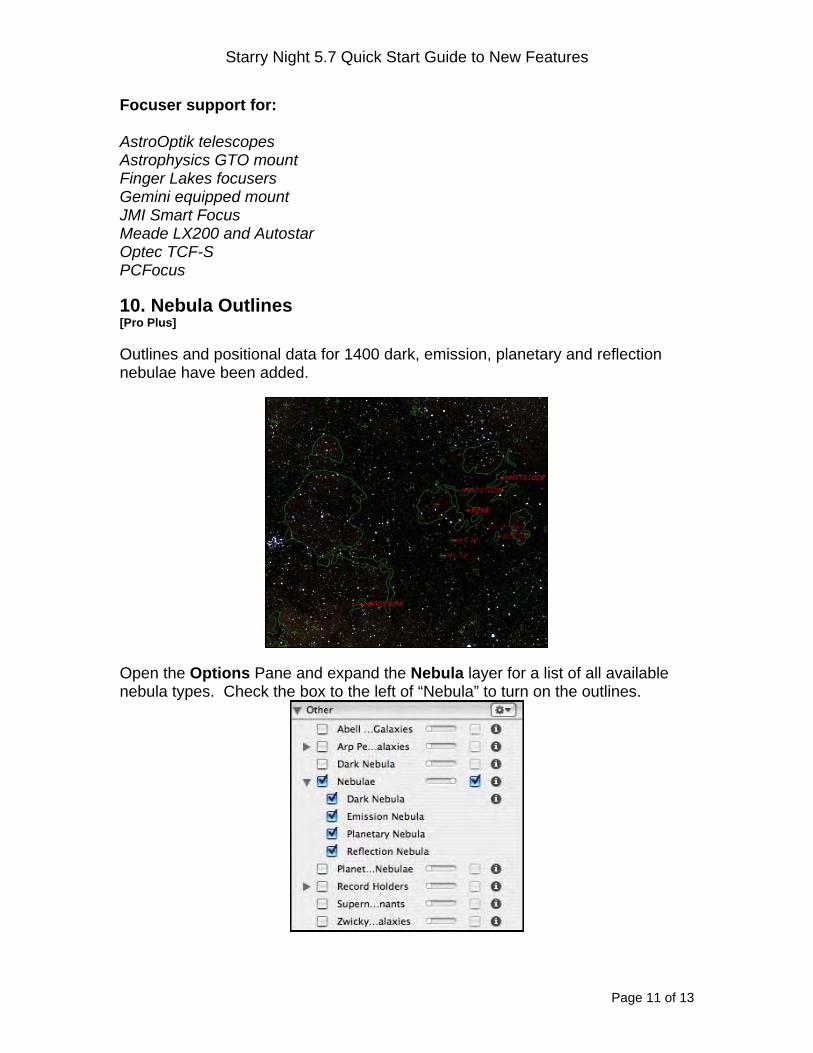
Focuser support for: AstroOptik telescopes Astrophysics GTO mount Finger Lakes focusers Gemini equipped mount JMI Smart Focus Meade LX200 and Autostar Optec TCF-S PCFocus 10. Nebula Outlines [Pro Plus] Outlines and positional data for 1400 dark, emission, planetary and reflection nebulae have been added.
Open the Options Pane and expand the Nebula layer for a list of all available nebula types. Check the box to the left of “Nebula” to turn on the outlines.
Page 11 of 13

Starry Night 5.7 Quick Start Guide to New Features
11. Field-of-View-Indicators (FOV) [Pro, Pro Plus and High School] Support for DSLR (digital) cameras Digital cameras can now be added to Starry Night. A list of popular cameras has been added to the Equipment List database. To access the Equipment List, select Equipment List from the Edit menu. In the window that opens, select “DSLRs” from the upper left drop down menu. Click on the Add button to select a DSLR camera from the equipment database or click the New button to add a new camera.
FOV Position Angle FOV’s can now be rotated directly onscreen. Click-hold and drag the rotation (+) icon above “Position Angle”.
Page 12 of 13
Starry Night 5.7 Quick Start Guide to New Features
Other Features Improved Digital Settings Circles Support [Pro, Pro Plus and High School] For non-motorized telescopes such as: Orion SkyQuest IntelliScope, NGCMAX, Lumicon Sky Vector, Discovery Digital Star Finder, Orion SkyWizard III, and Celestron Advanced Astromaster. Default Equipment Database [Pro, Pro Plus and High School] For CCDs, telescopes, binoculars, and eyepieces added. Choose FOV indicators from a database of over 200 Orion, Meade, Celestron and Vixen scopes, binoculars, and SBIG, Apogee, FLI and Starlight Express CCD chips. Improved Ephemeris Generator [Pro, Pro Plus and High School] Now allows minimum altitude to be set. Star Cluster Catalogs [Pro Plus] With positional data for 1700 globular and open clusters. Improved Toolbar [Enthusiast, Pro, Pro Plus, Middle School and High School] Now shows Zenith button.
Page 13 of 13