Standard Turntable Best Practice Check-ListStandard Turntable . Best Practice Check-List . Revised...
7
Standard Turntable Best Practice Check-List Revised 7/30/2019 15206 Ceres Avenue Fontana, CA 92335 (866) 796-5975 www.carousel-usa.com Proprietary Information Carousel USA has proprietary rights on the information in this document. It is forbidden to copy, duplicate or disclose the information herein, in whole or in part, or make use of the information, unless permission has been previously obtained, in writing, from Carousel USA.
Transcript of Standard Turntable Best Practice Check-ListStandard Turntable . Best Practice Check-List . Revised...
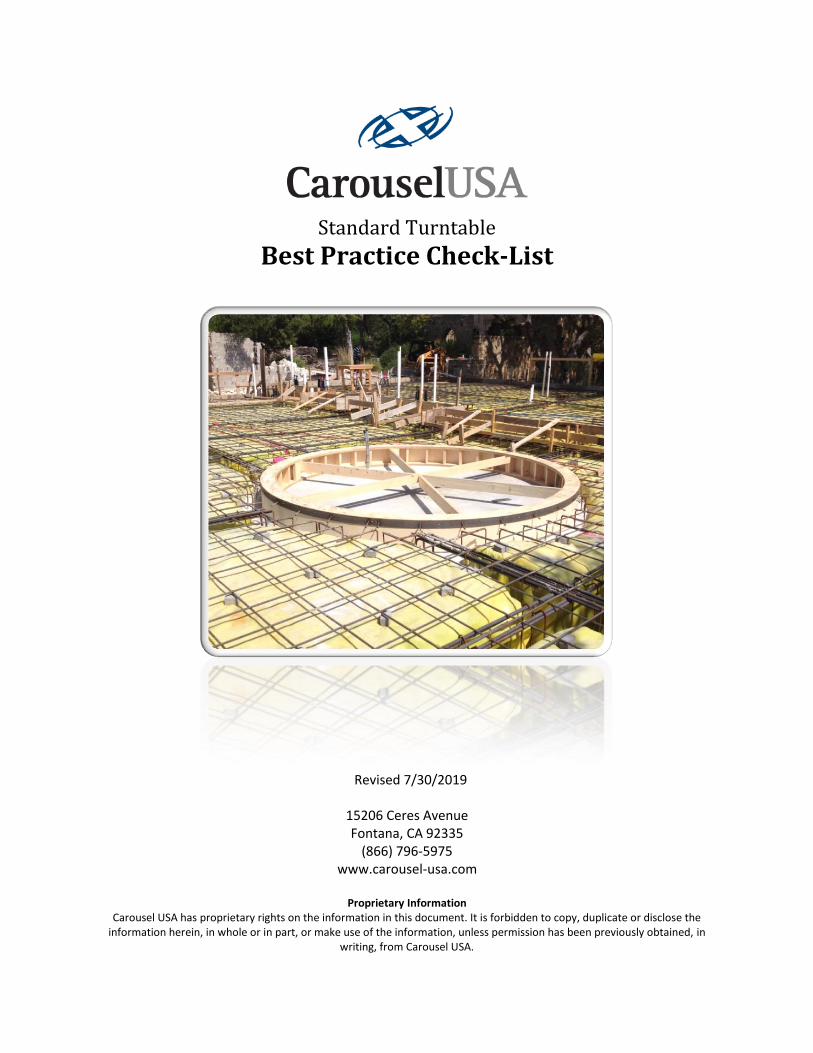
Standard Turntable
Best Practice Check-List
Revised 7/30/2019
15206 Ceres Avenue Fontana, CA 92335
(866) 796-5975www.carousel-usa.com
Proprietary Information Carousel USA has proprietary rights on the information in this document. It is forbidden to copy, duplicate or disclose the
information herein, in whole or in part, or make use of the information, unless permission has been previously obtained, in writing, from Carousel USA.
TURNTABLE OPERATION AND MAINTENANCE MANUAL
Table of Contents
1. INTRODUCTION ............................................................................................................................................. 1
2. PREPARING THE CONCRETE PIT: .................................................................................................................... 1
A. GENERAL INFO ...................................................................................................................................................... 1
B. THE “PERFECT PIT EDGE”........................................................................................................................................ 2
3. ELECTRICAL REQUIREMENTS: ........................................................................................................................ 2
4. SHIPPING: ...................................................................................................................................................... 3
5. SITE REVIEW: ................................................................................................................................................. 3
6. ON INSTALLATION DAY: ................................................................................................................................. 4
1. Introduction
This “Best Practice Check List for Turntable Installations” addresses common questions
and concerns that come with turntable installations. The notes here may not all
pertain to your specific installation but the information should prove helpful in
understanding the requirements and installation of the equipment.
2. Preparing the concrete pit:
A. General Info
CUSA turntables are supported by inverted casters which are adjusted to a
precise height during the installation, using a 360 degree laser. As a result, the
concrete pit need not be perfectly flat but it is important that the concrete be
kept within (+-1/4) of the specified pit depth.
The casters and center pivot bearing will be anchored to the concrete floor
using 3.5” x 3/8” wedge anchors. Whenever possible, it’s best to route
conduits, plumbing etc. at depths of 3.5” below the support slab, or in
locations in which anchors are not to be used.
The final look of the installation is highly (if not completely!) dependent on the
consistency of the gap and elevation between the turntable and the adjacent
non-rotating floor. From our experience, we have found that forming a perfect
circle to a precise diameter and then pouring concrete that is perfectly flat
Page 1 of 4www.carousel-usa.com
15206 Ceres Avenue, Fontana, California 92335(866) 796-5975
Page 2 of 4www.carousel-usa.com
15206 Ceres Avenue, Fontana, California 92335(866) 796-5975
TURNTABLE OPERATION AND MAINTENANCE MANUAL
around that circle is quite difficult and very few concrete sub-contractors
succeed in doing so on a consistent basis.
CUSA must be made aware slope, prior to shipment of the equipment.
Installation on a slope requires specialized leveling equipment that we do not
normally travel with due to its size and weight.
CUSA turntables can be installed on a slope (up to 7 degrees) matching the
grade of the surrounding concrete/surface. If you wish to install your turntable
on a grade, special conditions and arrangements are required:
The pit floor must match the grade of the surrounding driveway concrete. The
edge must rest on a plane as the flat turntable will not follow any contours.
B. The “Perfect Pit Edge”
We have developed the following technique which we believe to be the easiest and
most consistent way of producing a perfect pit edge. Request further documentation
for details, but the general step-by-step is described below.
1. Form the pit in either of the following 2 ways:
a. Pour a curb wall, 3.5” shorter than the finished floor.
b. At the pit edge, leave a void 3.5” deep and 10” wide.
2. We install the turntable.
3. CUSA can provide a metal angle trim ring (optional item) to be installed by your
concrete crew, around the turntable using threaded studs, epoxied into the pit
curb. Please note that we ship the rings LARGER than needed. This is done so
that you can trim the last piece so that it fits PERFECTLY to your desired size and
application. PLEASE trim the needed amount.
4. At this point the ring can be adjusted easily to maintain a 3/8” gap and perfect
elevation using the turntable as a reference.
5. Hand pack mortar in the void beneath the trim ring (as/if needed).
6. Proceed to pour the concrete floor, or fill the void, creating a perfect gap and
elevation.
3. Electrical Requirements:
¾” ID conduit is recommend to be run from the motor location in the pit to the
planned location of the supplied control panel. If motion controls are to be
installed, 2 conduits will be required.
99% of motor failures are caused by water entering the motor through the
conduit. Please ensure that the conduit is dry and watertight.
TURNTABLE OPERATION AND MAINTENANCE MANUAL
The control panel requires a 200-240V single phase input. Our drive motors are 3
phase however. Inside the control box is a Variable Frequency Drive (VFD), and
part of its purpose is to convert the single phase power supply input into 3 phase
power to supply the drive motor.
Our control panel is designed to be sited such that the electrical
connections/wires are 50’ in length or less. Longer runs are possible, but not
recommended without the use of VFD power cable (shielded) or other
compensating factors.
If the control panel is not within eyesight of the turntable, an external antenna
will be required between the control box and the turntable room. The antenna
can be installed behind a drop ceiling, on the wall or in a soffit. If an external
antenna is required please contact CUSA for available antenna options to best fit
your needs. The antenna can then be provided in advance or on the day of
installation.
4. Shipping:
Equipment will be delivered by commercial carriers, unless installation is located
in Southern California.
Prior to shipment, you will receive tracking information from the carrier, as well
as the expected delivery day. Please use the carrier’s web site to confirm all
information and to stay abreast of any changes in schedules.
On delivery day, you will need to have access to a forklift, with a minimum rating
of 5,000 lbs, as well as extended forks (7’ is ideal). The equipment is in large and
heavy containers.
Place equipment adjacent to the turntable pit(s), ensuring that if subject to
water/rain that the cases are covered with plastic and in a secure location.
5. Site review:
1. We strongly recommend submitting photos of your pit prior to the arrival of
our installation crew. If there are any critical issues that will affect your
installation, we can often point them out prior to our arrival.
2. We also recommend taking this time to verify that the pit is completely flat
and poured to the correct depth. It’s much less expensive to do this before we
come!
Page 3 of 4www.carousel-usa.com
15206 Ceres Avenue, Fontana, California 92335(866) 796-5975
TURNTABLE OPERATION AND MAINTENANCE MANUAL
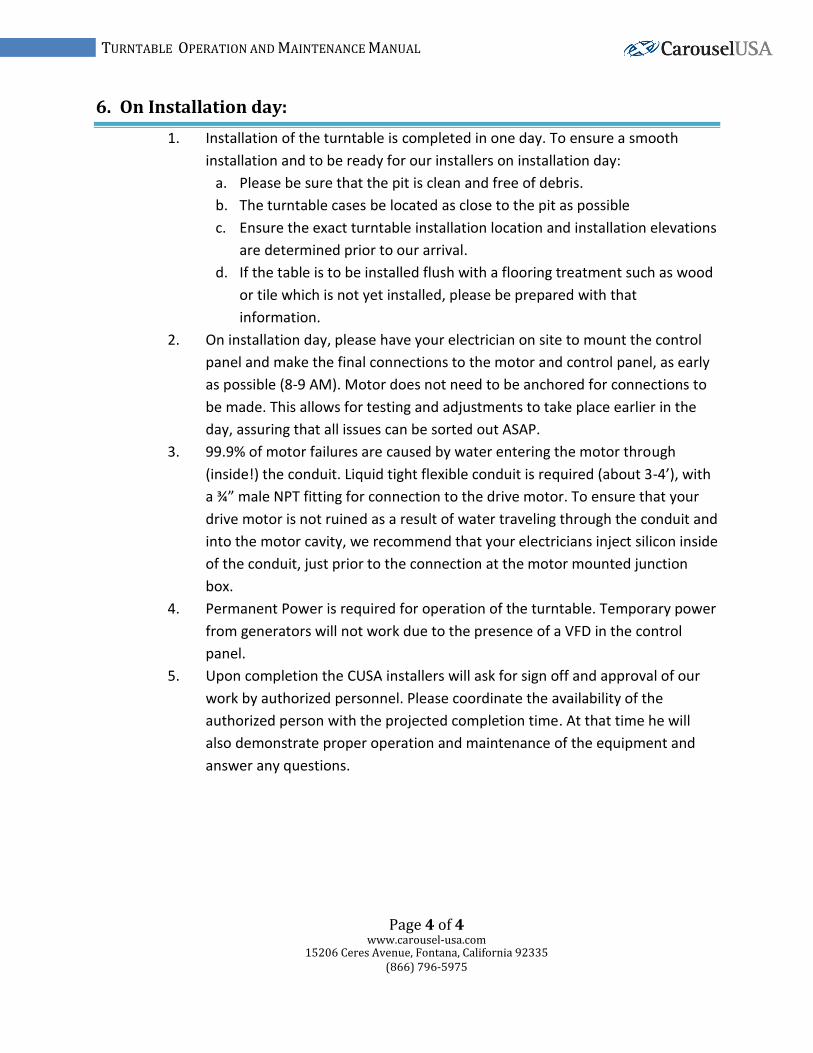
6. On Installation day:
1. Installation of the turntable is completed in one day. To ensure a smooth
installation and to be ready for our installers on installation day:
a. Please be sure that the pit is clean and free of debris.
b. The turntable cases be located as close to the pit as possible
c. Ensure the exact turntable installation location and installation elevations
are determined prior to our arrival.
d. If the table is to be installed flush with a flooring treatment such as wood
or tile which is not yet installed, please be prepared with that
information.
2. On installation day, please have your electrician on site to mount the control
panel and make the final connections to the motor and control panel, as early
as possible (8-9 AM). Motor does not need to be anchored for connections to
be made. This allows for testing and adjustments to take place earlier in the
day, assuring that all issues can be sorted out ASAP.
3. 99.9% of motor failures are caused by water entering the motor through
(inside!) the conduit. Liquid tight flexible conduit is required (about 3-4’), with
a ¾” male NPT fitting for connection to the drive motor. To ensure that your
drive motor is not ruined as a result of water traveling through the conduit and
into the motor cavity, we recommend that your electricians inject silicon inside
of the conduit, just prior to the connection at the motor mounted junction
box.
4. Permanent Power is required for operation of the turntable. Temporary power
from generators will not work due to the presence of a VFD in the control
panel.
5. Upon completion the CUSA installers will ask for sign off and approval of our
work by authorized personnel. Please coordinate the availability of the
authorized person with the projected completion time. At that time he will
also demonstrate proper operation and maintenance of the equipment and
answer any questions.
Page 4 of 4www.carousel-usa.com
15206 Ceres Avenue, Fontana, California 92335(866) 796-5975
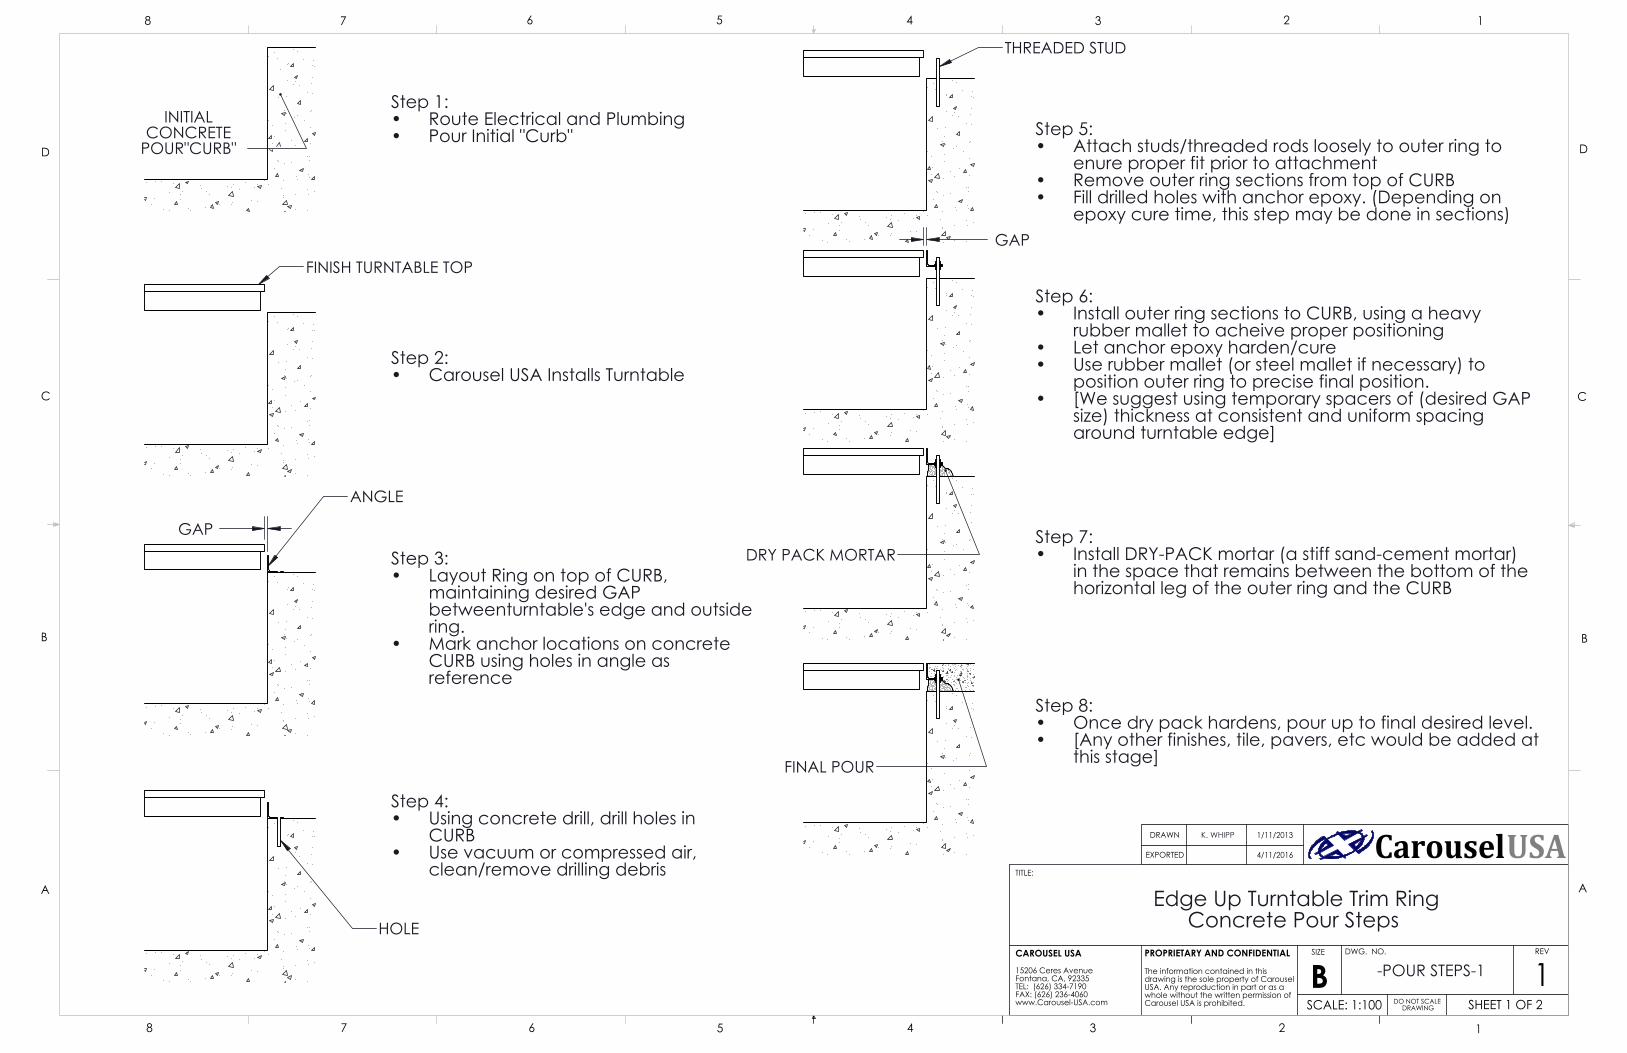
INITIAL CONCRETE
POUR"CURB"
FINISH TURNTABLE TOP
GAP
ANGLE
THREADED STUD
GAP
DRY PACK MORTAR
HOLE
FINAL POUR
Step 8: Once dry pack hardens, pour up to final desired level.•[Any other finishes, tile, pavers, etc would be added at•this stage]
Step 6: Install outer ring sections to CURB, using a heavy•rubber mallet to acheive proper positioningLet anchor epoxy harden/cure•Use rubber mallet (or steel mallet if necessary) to•position outer ring to precise final position.[We suggest using temporary spacers of (desired GAP•size) thickness at consistent and uniform spacingaround turntable edge]
Step 5: Attach studs/threaded rods loosely to outer ring to•enure proper fit prior to attachmentRemove outer ring sections from top of CURB•Fill drilled holes with anchor epoxy. (Depending on•epoxy cure time, this step may be done in sections)
Step 1: Route Electrical and Plumbing•Pour Initial "Curb"•
Step 2: Carousel USA Installs Turntable•
Step 3: Layout Ring on top of CURB,•maintaining desired GAPbetweenturntable's edge and outsidering.Mark anchor locations on concrete•CURB using holes in angle asreference
Step 4:Using concrete drill, drill holes in•CURBUse vacuum or compressed air,•clean/remove drilling debris
Step 7: Install DRY-PACK mortar (a stiff sand-cement mortar)•in the space that remains between the bottom of thehorizontal leg of the outer ring and the CURB
D
C
B
AA
B
C
D
12345678
8 7 6 5 4 3 2 1
PROPRIETARY AND CONFIDENTIAL
The information contained in this drawing is the sole property of Carousel USA. Any reproduction in part or as a whole without the written permission of Carousel USA is prohibited.
DRAWN
CAROUSEL USA
15206 Ceres Avenue Fontana, CA, 92335TEL: (626) 334-7190FAX: (626) 236-4060 www.Carousel-USA.com
SIZE
BDWG. NO. REV
SCALE: 1:100
1/11/2013
SHEET 1 OF 2
1
CarouselUSA
DO NOT SCALE DRAWING
Edge Up Turntable Trim RingConcrete Pour Steps
K. WHIPP
-POUR STEPS-1
TITLE:
4/11/2016EXPORTED
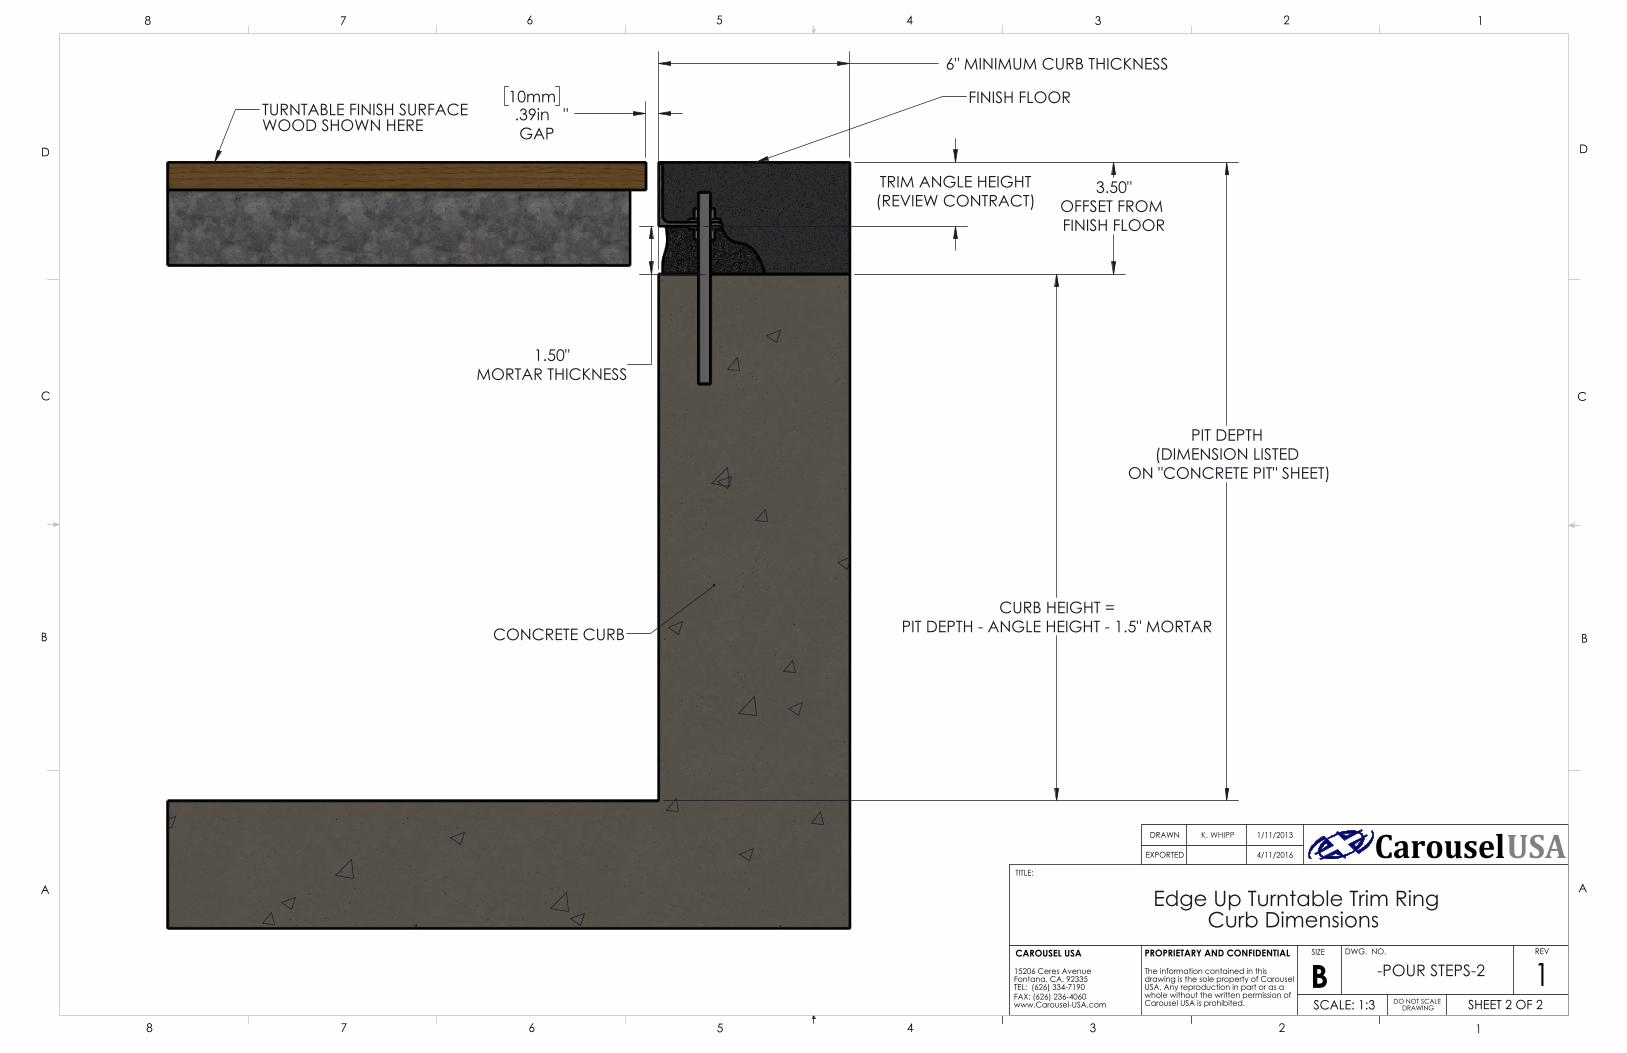
TRIM ANGLE HEIGHT(REVIEW CONTRACT)
6" MINIMUM CURB THICKNESS
1.50"MORTAR THICKNESS
CURB HEIGHT =PIT DEPTH - ANGLE HEIGHT - 1.5" MORTAR
PIT DEPTH(DIMENSION LISTED
ON "CONCRETE PIT" SHEET)
10mm.39in " GAP
3.50"OFFSET FROM FINISH FLOOR
FINISH FLOORTURNTABLE FINISH SURFACEWOOD SHOWN HERE
CONCRETE CURB
D
C
B
AA
B
C
D
12345678
8 7 6 5 4 3 2 1
PROPRIETARY AND CONFIDENTIAL
The information contained in this drawing is the sole property of Carousel USA. Any reproduction in part or as a whole without the written permission of Carousel USA is prohibited.
DRAWN
CAROUSEL USA SIZE
BDWG. NO. REV
SCALE: 1:3
1/11/2013
SHEET 2 OF 2
1
CarouselUSA
DO NOT SCALE DRAWING
Edge Up Turntable Trim RingCurb Dimensions
K. WHIPP
-POUR STEPS-2
TITLE:
4/11/2016EXPORTED
15206 Ceres Avenue Fontana, CA, 92335TEL: (626) 334-7190FAX: (626) 236-4060 www.Carousel-USA.com