STAKINGLAB Pool Software User Manual
9
STAKINGLAB Pool Software User Manual Our software is an unique in the direction to achieve our vision is create a market place for all crypto investors to achieve all their objectives starting from firsthand information about any new ICOs, platform to buy and sell, POS and community building and mind sharing. This platform would serve as a single place to project owners to kick off their crowd sourcing to achieve their project mission. The purpose of this documentation is to inform you with different option available for your use. You must ensure you are using the correct URL i.e. https://pool.stakinglab.io/#home On the landing page, you have several options to familiarize yourself. You can click on “Coins” to know our shortlisted coins for staking and “Master Nodes” option will give you information about our master node coins. StakingLab.io
Transcript of STAKINGLAB Pool Software User Manual

STAKINGLAB Pool Software User Manual Our software is an unique in the direction to achieve our vision is create a market place for all crypto investors to achieve all their objectives starting from firsthand information about any new ICOs, platform to buy and sell, POS and community building and mind sharing. This platform would serve as a single place to project owners to kick off their crowd sourcing to achieve their project mission.
The purpose of this documentation is to inform you with different option available for your use. You must ensure you are using the correct URL i.e. https://pool.stakinglab.io/#home
On the landing page, you have several options to familiarize yourself. You can click on “Coins” to know our shortlisted coins for staking and “Master Nodes” option will give you information about our master node coins.
StakingLab.io

1. LOGIN You need to click on “My Account” to register yourself on this platform. On the subsequent screen, click on Sign Up as highlighted below:
1.1. Fill up the required details like Email, Username, password and then click on “Sign Up”. Do not miss to click on “I’m not a Robot”.
1.2. Once you click on SIGN UP, you will receive a confirmation email on your registered email id. You just need to click the URL mentioned in the email to validate it and you would be able to login.
StakingLab.io

1.3. Upon login, you would see rich set of options to help you achieve your staking needs
Let’s explore different options and their
2. USAGE. 2.1. Dashboard would give you a consolidated view of your investment in different pools, current value in
USD and BTC, total deposits and withdrawals, your referrals and finally the rewards
StakingLab.io
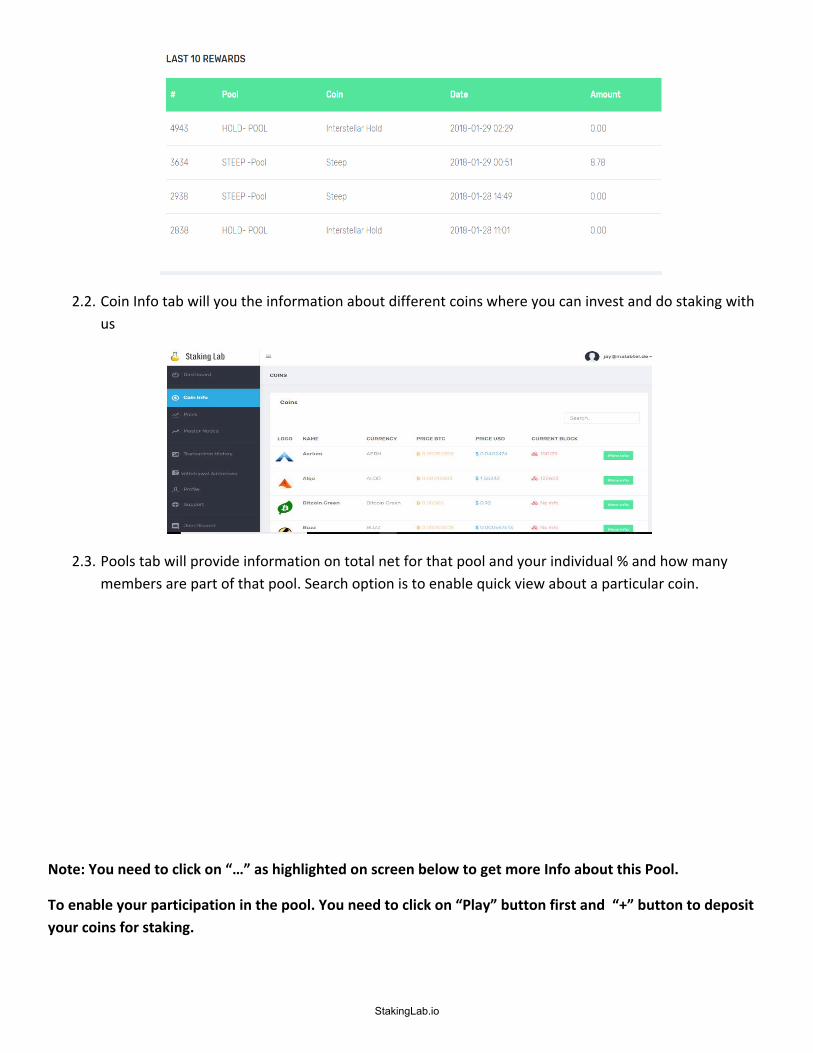
2.2. Coin Info tab will you the information about different coins where you can invest and do staking with us
2.3. Pools tab will provide information on total net for that pool and your individual % and how many members are part of that pool. Search option is to enable quick view about a particular coin.
Note: You need to click on “…” as highlighted on screen below to get more Info about this Pool.
To enable your participation in the pool. You need to click on “Play” button first and “+” button to deposit your coins for staking.
StakingLab.io

2.4. Once you click on deposit button, you would get the deposit address to which you need to send your
coins for pooling. Once you send the coins, complete this form by entering correct transaction id and amount of coins that we would receive post deducting the transaction cost by your exchange
Note: You must enter correct address while transferring the coins from your exchange wallet. Also the Transaction ID and amount must match. You must enter the amount after deducted the transaction fee that your exchange takes. Please understand the software validates the transaction id with the amount we receive, hence if there is any difference in the amount, it won’t match with that transaction id and the transaction would not be successful automatically, to ease up this process send full amounts like 100 coins instead of 100.89
2.5. The transaction will reflect in your staking lab account as soon as it is confirmed by blockchain. 2.6. Your coins will be included for staking in next available slot for staking
3. 2FA 3.1. To Enable 2FA with Google Authenticator click on your Username in the upper right corner and go to
Account Setting
StakingLab.io
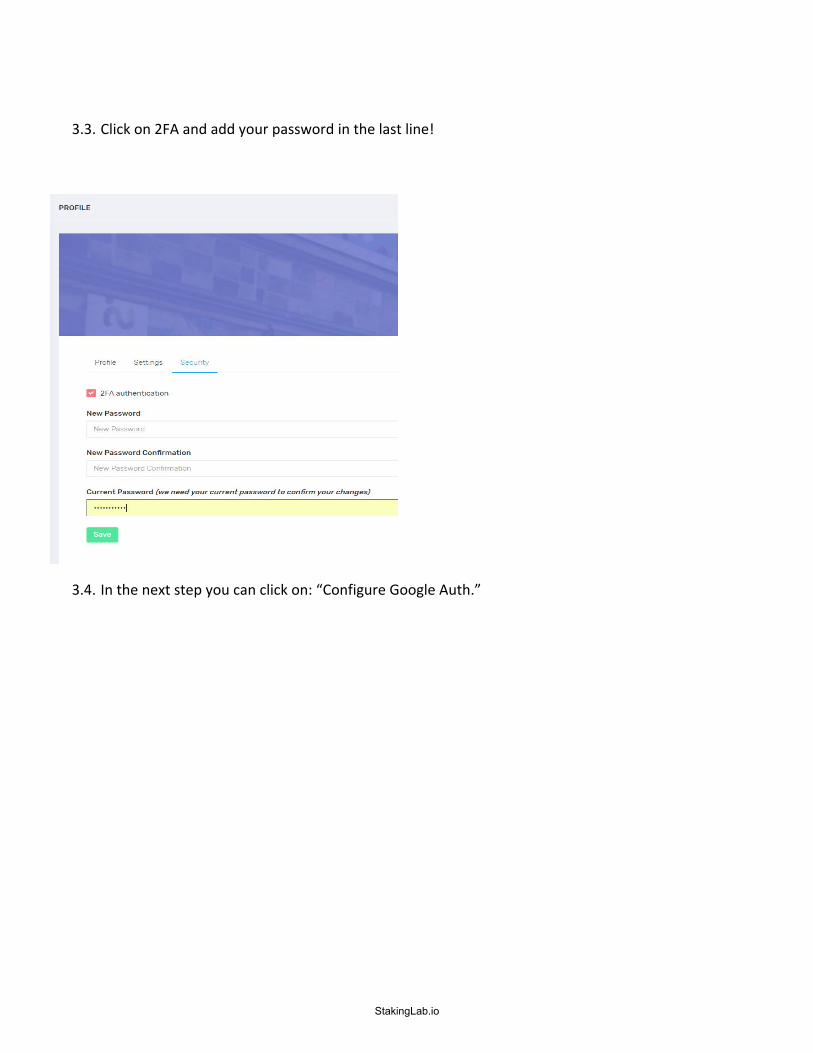
3.3. Click on 2FA and add your password in the last line!
3.4. In the next step you can click on: “Configure Google Auth.”
StakingLab.io

3.5. Now you’ll see the QR code to Scan with your Smartphone to link our software with your google
authenticator app.
3.6. Now Google Auth. Is enabled and your account secured:
StakingLab.io

StakingLab.io
~ Staking Lab
PROFILE
Profi .e Settings Secunty
r.lil 2FA authentication
New Passward
New Password
New Passward Cantirrnation
New Passward Con ~ rmat1or
Current Password (we need your current password to confirm your changes)
Curref't Passward
-
Admin
Durchstreichen