Staff Workstation Model 795 - 3Mmultimedia.3m.com/mws/media/427386O/staff-workstation...equipment...
44
Staff Workstation Model 795 Staff Guide Library Systems 3M Center, Building 225-4N-14 St. Paul, Minnesota 55144-1000 www.3M.com/library Copyright © 2002, 2004, 2005 3M. All rights reserved. 78-8123-9058-7 Rev. C
Transcript of Staff Workstation Model 795 - 3Mmultimedia.3m.com/mws/media/427386O/staff-workstation...equipment...

Staff Workstation Model 795
Staff Guide
Library Systems 3M Center, Building 225-4N-14
St. Paul, Minnesota 55144-1000 www.3M.com/library
Copyright © 2002, 2004, 2005 3M. All rights reserved.
78-8123-9058-7 Rev. C

© 2005 3M. All rights reserved.
3M™ Staff Workstation Model 795 Staff Guide
3M, Staff Workstation, D8 RFID tag, and Tattle-Tape Security Strip are trademarks of 3M.

Table of Contents
Safety and Compliance Information................... 1
Intended Use Statement......................................................................... 1 Safety Messages..................................................................................... 2
Safety Message Format..................................................................... 2 Safety Messages for the Staff Workstation........................................ 3
Safety Labels........................................................................................... 5 Explanation of Labels and Symbols................................................... 5 Safety Label Replacement................................................................. 5 Safety Label Locations....................................................................... 6
EMC Compliance USA and Canada ...................................................... 7 FCC Radio Frequency Rules and Regulations.................................. 7 FCC Intentional Radiator Certification ............................................... 7 Industry Canada Radio Frequency Rules and Regulations............... 7
EMC Compliance Europe....................................................................... 7
Introduction ........................................................ 8
Staff Workstation Configurations ......................................................... 9 Standard Configuration ...................................................................... 9 Local Configuration ............................................................................ 9 Remote Configuration ........................................................................ 9
RFID Tags versus Barcodes................................................................ 10 About D8 Security ................................................................................ 10 Conversion Software............................................................................ 10 Components.......................................................................................... 10
Electronics Enclosure with computer ............................................... 10 Memory Card Drive .......................................................................... 11 Workstation Upper Unit .................................................................... 11 Keyboard Wedge (Standard Configuration only) ............................. 11 Software Wedge (Local and Remote Configurations only).............. 12
Using the KVM Switch...................................... 13
Using the Keyboard.............................................................................. 13 Using the Select.................................................................................... 13
Startup Procedure ............................................ 14
Exit/Shut Down Procedure ............................... 15
Standard Configuration ....................................................................... 15 Local Configuration.............................................................................. 16 Remote Configuration.......................................................................... 16

Processing Items.............................................. 17
Standard Configuration ....................................................................... 17 Local and Remote Configurations...................................................... 19
Item Placement ................................................ 21
Placement of Bar-coded Items............................................................ 22 Placement of Bar-coded Items (Parallel Barcodes) .......................... 23 Placement of Items with RFID Tags (Correct) ................................... 24 Placement of Items with RFID Tags (Warnings)................................ 25 Placement of Items with RFID Tags (Incorrect)................................. 26
Operations ........................................................ 27
Check-In or Checkout .......................................................................... 29 Secure/Un-secure Only and Send ID Only ......................................... 30 Number of Items (if enabled) ............................................................... 31 Verify...................................................................................................... 31
Staff Settings.................................................... 32
Adjusting the Sound Volume .............................................................. 33 Setting the Language for the User Interface...................................... 34 Using the Autosize setting .................................................................. 35 Using the Always on Top setting........................................................ 35 Search Lists (All Configurations)........................................................ 36
Lists, Digital Data Manager (DDM), and Memory Cards ................. 36 To Begin Using Lists ........................................................................ 36 Enabling and Disabling Search Lists ............................................... 37 Viewing Database Information ......................................................... 37
Appendix........................................................... 38
Items That Don’t Fit on the Deck (Standard Configuration only) ... 38 Sets ........................................................................................................ 38 No Activity ............................................................................................. 38 Running Conversion Software on the Staff Workstation ................. 38 Inserting a Memory Card ..................................................................... 40 Removing a Memory Card ................................................................... 40

1
Safety and Compliance Information We provide important safety information and warnings to assist you in understanding and avoiding potential harm to yourself and possible damage to equipment during the installation and use of the 3M Staff Workstation Model 795.
Although this manual describes many potential hazards that you may encounter during the installation and operation of this product, we cannot predict all of the possible hazards and this list should not be a substitute for your judgment and experience.
Before you install and use this equipment, please read and observe all safety information and instructions in this manual.
If you are unsure about any part of this installation or of the potential hazards discussed, please contact your supervisor immediately.
Intended Use Statement The Staff Workstation is designed and tested for use in processing library materials with various types of 3M™ Tattle-Tape™ Security Strips, barcodes, and 3M™ RFID Tags.
The product has not been tested or proven safe for other uses.

2
Safety Messages We include safety messages and safety labels in this manual to help you protect your safety and the safety of others. This section contains important information to help you recognize and understand these safety messages.
NOTE: BEFORE YOU PROCEED WITH THE INSTALLATION, PLEASE READ ALL SAFETY MESSAGES.
Safety Message Format Safety messages are designed to alert you to potential hazards that can cause personal injury to you or others. They can also indicate the possibility of property damage.
Each safety message box contains a safety alert symbol ( ); one of three signal words: DANGER, WARNING, or CAUTION; and a safety message. The signal words and symbols, and their meanings, are shown below.
In addition to the symbols and words explained previously, each safety message:
Identifies the hazard. Describes what you can and should do to avoid the risk of exposure to the hazard.
Describes the probable consequences of not avoiding the hazard.
DANGER means you and/or someone else WILL be KILLED or SERIOUSLY HURT if you do not follow these instructions.
The sa
The s
WARNING means you and/or someone else MAY be KILLED or SERIOUSLY HURT if you do not follow these instructions.
CAUTION means you and/or someone else MAY be HURT or property damage may result if you do not follow these instructions.
The s
DANGER fety message is in this box.
WARNING afety message is in this box.
CAUTION afety message is in this box.

3
Safety Messages for the Staff Workstation The following safety messages appear in this manual:
DANGER This equipment contains high voltage. Risk of electric shock. Do not remove protective panels. Only certified 3M technicians should service this equipment.
Make sure power is off before disconnecting monitor. If power is not off, the monitor will be damaged.
WARNING Possibility of personal injury. The operation of the Staff Workstation involves repeated body movements. To minimize any possibility of injury, avoid prolonged repetitive movements, rest when becoming fatigued, and, when possible, alternate job functions with other people. Avoid any awkward reaching for library items.
WARNING Possibility of counter top mounted Staff Workstations tipping over. Ensure that the on-counter mounting skirt is secured to the counter top with 3M Command Adhesive strips.
WARNING Danger of explosion if internal lithium battery is incorrectly replaced. Replace the battery only with the same or equivalent type recommended by the manufacturer. Dispose of used batteries according to the manufacturer’s instructions.
WARNING Dispose of this product and components according to the manufacturer’s directions and local disposal regulations to avoid hazards and harm to the environment.
CAUTION This product contains laser devices. Do not allow the scanner laser beam to reflect off a shiny, mirror-like surface into anyone’s eyes. Observe the labels on the unit.

4
CAUTION Possibility of personal injury. The Staff Workstation weighs 70 pounds (32 Kg). Attempting to lift the Staff Workstation may cause personal injury. To avoid any possibility of injury, the Staff Workstation should be lifted by more than one person. The Staff Workstation should be lifted more with the leg muscles and less with back and arm muscles.
CAUTION Using controls or adjustments or performing procedures other than those specified herein may result in hazardous laser light exposure.
CAUTION Flickering or color variations may occur on CRT-type monitors placed in proximity to the Staff Workstation due to its electromagnetic properties. Maintain a separation of at least 18 in. to 48 in. (457 mm to 1,219 mm) between CRT-type monitors and the Staff Workstation. The required separation distance varies depending on the type of monitor and the environment around the Staff Workstation.
In most cases, LCD-type monitors do not exhibit any type of flickering, or color variations, when placed in close proximity to the Staff Workstation.

5
Safety Labels We include safety labels on the devices for your safety and the safety of others. Safety labels are designed to alert you to potential hazards associated with a piece of equipment that can cause personal injury to you or others. Safety labels can also indicate the possibility of property damage.
Please read all safety labels.
Explanation of Labels and Symbols
Each safety label contains a safety alert symbol ( ); one of three signal words: DANGER, WARNING, or CAUTION; a pictorial showing the nature of the hazard; and a safety message.
The signal words and symbols, and their meanings, are shown below:
DANGER means you and/or someone else WILL be KILLED or SERIOUSLY HURT if you do not follow these instructions.
WARNING means you and/or someone else MAY be KILLED or SERIOUSLY HURT if you do not follow these instructions.
The following labels may also be applied to the equipment:
Refer to accompanying documents.
Risk of electric shock. Refer all servicing to manufacturer.
Safety Label Replacement We consider safety labels to be an important part of all devices. Safety labels should be replaced immediately if they become hard to read.
If any of the safety labels are missing or cannot be read, please contact 3M Library Systems Technical Service for a replacement label (651-733-0175).

6
Safety Label Locations
LASER APERTURE
795_UG_019
This product complies with 21 CFR Subchapter J, IEC 60825-1:1977 and EN 60825-1:1996
110 W2.5/1.5 A50/60 Hz100-120V/200-240 V~
3M Library SystemsSt. Paul, Minnesota 55144-1000
Model 795 Staff Workstation
S/N:
L
0678
BACKLIGHT CONTAINS MERCURY,
DISPOSE ACCORDING TO LOCAL,
STATE, AND FEDERAL LAWS
Figure 1: Safety Label Locations

7
EMC Compliance USA and Canada
FCC Radio Frequency Rules and Regulations This equipment has been tested and found to comply with the limits for a Class A device, pursuant to Part 15 of the FCC Rules. These limits are designed to provide reasonable protection against harmful interference when the equipment is operated in a commercial environment. This equipment generates, uses, and can emit radiated radio frequency energy and, if not installed and used in accordance with the instruction manual, may cause harmful interference to radio communications. Operation of this equipment in a residential area is likely to cause harmful interference in which case the user will be required to correct the interference at his own expense.
FCC Intentional Radiator Certification This equipment contains an intentional radiator approved by the FCC under the FCC ID number shown above. This device complies with Part 15 of the FCC Rules. Operation is subject to the following two conditions: (1) this device may not cause harmful interference, and (2) this device must accept any interference received, including interference that may cause undesired operation.
FCC ID: DGF-LSD795
NO MODIFICATIONS. Modifications to this device shall not be made without the written consent of The 3M Company. Unauthorized modifications may void the authority granted under Federal Communications Commission Rules permitting the operation of this device.
Industry Canada Radio Frequency Rules and Regulations This Class A digital apparatus meets all requirements of the Canadian Interference-Causing Equipment Regulations.
Cet appareil numerique de la classe A respecte toutes les exigences du Reglement sur le materiel brouilleur du Canada.
CANADA: Pending
Operation is subject to the following two conditions: (1) this device may not cause interference, and (2) this device must accept any interference received, including interference that may cause undesired operation of the device.
EMC Compliance Europe This equipment complies with the requirements of the RTTE and EMC directives.

8
Introduction The 3M™ Staff Workstation consolidates a number of library functions to enable staff to process items identified by either RFID tags or barcodes.
The workstation reads item identification information from existing media and passes it to the library terminal connected to the library circulation system. The system secures and un-secures 3M Tattle-Tape™ Security Strips and D8 RFID tags in items as required.
The Staff Workstation can:
Check-in and Check-out – Send ID to circulation and secure or un-secure the item.
Secure/Un-secure – Change the status of an item’s security setting without sending the ID to the circulation system.
Send ID – Send the item identifier read from the RFID tag or barcode to the library circulation system.
Verify – Indicate if a 3M™ Tattle-Tape security strip is present.This function is not available for security provided by D8 RFID tags.
Read Tags – Read and display the RFID tag information. The workstation can be set up to match its intended functional requirements, whether as a backroom check-in unit or as a front counter/utility machine that checks items in and out and occasionally is used for special processing of items.
CAUTION Flickering or color variations may occur on CRT-type monitors placed in proximity to the Staff Workstation due to its electromagnetic properties. Maintain a separation of at least 18 in. to 48 in. (457 mm to 1,219 mm) between CRT-type monitors and the Staff Workstation upper unit. The required separation distance varies depending on the type of monitor and the environment around the Staff Workstation.
In most cases, LCD-type monitors do not exhibit any type of flickering, or color variations, when placed in close proximity to the Staff Workstation.

9
Staff Workstation Configurations There are three Staff Workstation configurations. Please note your system's configuration. Certain information in this guide is specific to configuration. This is noted throughout the guide.
Standard Configuration In this configuration, the main user interface controls the functions of the Staff Workstation. The circulation system software runs on the library computer. The Staff Workstation computer and the library computer communicate through a hardware wedge.
HardwareWedge
LibraryComputer
ElectronicsEnclosure
Upper Unit
Local Configuration In this configuration, the Companion user interface (shown below) controls the functions of the Staff Workstation.
The Companion user interface has several helpful options, including “always on top” and “autosize.” Always on top keeps the Companion user interface visible on the screen regardless of other applications being used, and autosize shrinks the Companion user interface while not in use to free screen space for other uses (as shown below).
Your library’s circulation system software and the Companion user interface software are installed on the Staff Workstation computer.
ElectronicsEnclosure
Upper Unit
Monitor Options:1. Customer supplied
2. 12-inch LCD touchscreen (mounted on upper unit)
3. 15-inch standalone LCD monitor
Remote Configuration In this configuration, the Companion user interface (shown below) controls the functions of the Staff Workstation. Your library’s circulation system software and the Companion software are installed on the library computer. The library computer and the Staff Workstation computer communicate through a network connection.
ElectronicsEnclosure
Upper Unit
KVMSwitch
Box
LibraryComputerNetwork
Connection

10
RFID Tags versus Barcodes Both barcodes and RFID tags provide item identification information to the library circulation system. In addition, RFID tags can carry information about the type of media being processed, which enables the workstation to inhibit harmful security operations on magnetic materials.
About D8 Security The Staff Workstation reliably enables and disables the 3M™ RFID D8 tag security feature. It does not, however, provide feedback when the tag’s security status changes. The “thump” you hear when an item is processed is associated with Tattle-Tape strip security only, not D8 tag security. A library item with a secure D8 tag, however, will trigger an alarm when the item passes through an RFID detection system.
Conversion Software As an option, the workstation can also be used to convert bar-coded items to RFID technology.
A related product, the 3M™ Conversion Station, uses software that converts bar-coded items to RFID technology. The same conversion software used in the Conversion Station can be run on the Staff Workstation and used to convert items. Refer to Running Conversion Software on the Staff Workstation on page 38.
The conversion software programs identification information onto a 3M™ RFID Tag. The touchscreen monitor shows where the RFID Tag should be applied to the book or other media.
Components The 3M™ Staff Workstation consists of the following components:
Electronics Enclosure with computer The Electronics Enclosure (Figure 2) contains the computer and the power switch for the Staff Workstation. Communications and other cables are routed through the back of the enclosure.
Figure 2: Electronics Enclosure

Memory Card Drive The memory card drive (Figure 3) is used to access memory cards containing the memory card database, which contains Search Lists and other information.
Figure 3: Memory Card Drive
Workstation Upper Unit The workstation upper unit (Figure 4) can be set on the counter top and moved as needed or permanently installed in-counter so that the deck surface is flush with the counter top.
The upper unit consists of the:
Deck (a), where item barcodes are scanned, digital tags are read, and security is turned on and off
Barcode scanner (b) used for scanning barcodes on library items
Touchscreen monitor (c) (optional). The Staff Workstation also includes a keyboard and mouse (not shown).
Figure 4: Workstation Upper Unit
A diagnostic program for the touchscreen monitor is included with the Staff Workstation. Refer to the 3M Staff Workstation Model 795 Administrator's Guide for the procedure to calibrate the touchscreen.
Keyboard Wedge (Standard Configuration only) A keyboard wedge (a) may be installed on your Staff Workstation. The keyboard wedge sends information from the Staff Workstation to the library circulation system. A light pen (b) may be connected to the keyboard wedge. The light pen scans barcodes on materials that require special processing, such as materials that cannot be scanned by the barcode scanner mounted on the Staff Workstation.
Fig
a
ure 5: Keybo
b
ard Wedge and Ligh
b
ca
11
t Pen

12
Software Wedge (Local and Remote Configurations only) The software wedge is part of the Companion user interface and is responsible for sending ID information from barcodes or RFID Tags to the library circulation system. It works similarly to a hardware wedge, sending ID information to the currently active application. Normally this is your library circulation system.
If the software wedge is unable to determine which application to send the ID information to, it prompts you with the Select Target Application window. If this happens, select the target application from this window and click OK.
If the target application is not active, you have to start the application in order to select it.
Select Target Application window
You can also configure the software wedge to always send ID information to a specific application. The Staff Workstation always sends ID information to the selected target application when the checkbox next to Always send IDs to the selected application is selected and the selected target application is currently active. If the target application is not active when an item is processed on the Staff Workstation, you are prompted to select an application in the Select Target Application window.
If you need to change the target application, follow these steps:
1 Start the target application. Normally, this is the library circulation system.
2 Start the Companion UI (refer to Startup Procedure on page 14).
3 Press Ctrl+Alt+t to display the Select Target Application window.
4 Select the desired target application from the list in the window. If you want the software wedge to always send ID information to the same application, select Always send ID's to the same application as shown in the figure above. This configuration causes ID information to always be sent to the same application, regardless other applications.
If you want the software wedge to send information to whatever application has the focus, deselect Always send ID's to the same application. In this case, if the Companion UI has the focus, you are prompted to select a target application. Otherwise, the application that has the focus receives the ID information.
5 Click OK.
If the Companion UI is automatically brought to the focus, for example, to confirm a transaction, the focus is automatically returned to the application that previously had the focus.

13
Using the KVM Switch The KVM switch, which is used for remote configurations only, allows the Staff Workstation and a library computer to share one monitor, mouse, and keyboard.
The KVM switch box is typically configured as follows:
Computer 1 represents the library computer. Computer 2 represents the Staff Workstation computer.
Using the Keyboard Press the Ctrl key twice in rapid succession to change
the selected computer.
Using the Select Press the Select button on the front of the KVM switch
box to change the selected computer.
The indicator lights on the front of the KVM switch show which computer has keyboard/monitor/mouse control. The "On Line" light indicates that the corresponding computer is connected to the KVM switch. The "Selected" light indicates that the corresponding computer has keyboard/mouse/monitor control.
Select button
KVM switch
KVM switch indicator lights

14
Startup Procedure To apply power to the Staff Workstation:
Move the On/Off switch located on the front of the cabinet to the On position. (Figure 6).
Only 3M-trained service technicians should remove the cover of the unit.
Standard Configuration
The main user interface appears on the screen after you apply power to the Staff Workstation. The software takes a few seconds to load.
Local Configuration
The Companion user interface appears on the screen after you apply power to the Staff Workstation. The software takes a few seconds to load.
Remote Configuration
Make sure the KVM switch is set to the library computer.
Double-click on the desktop to start the Companion user interface (UI). The Companion UI can also be set to start automatically.
Figure 6: Staff W
On/off switch
orkstation cabinet
15
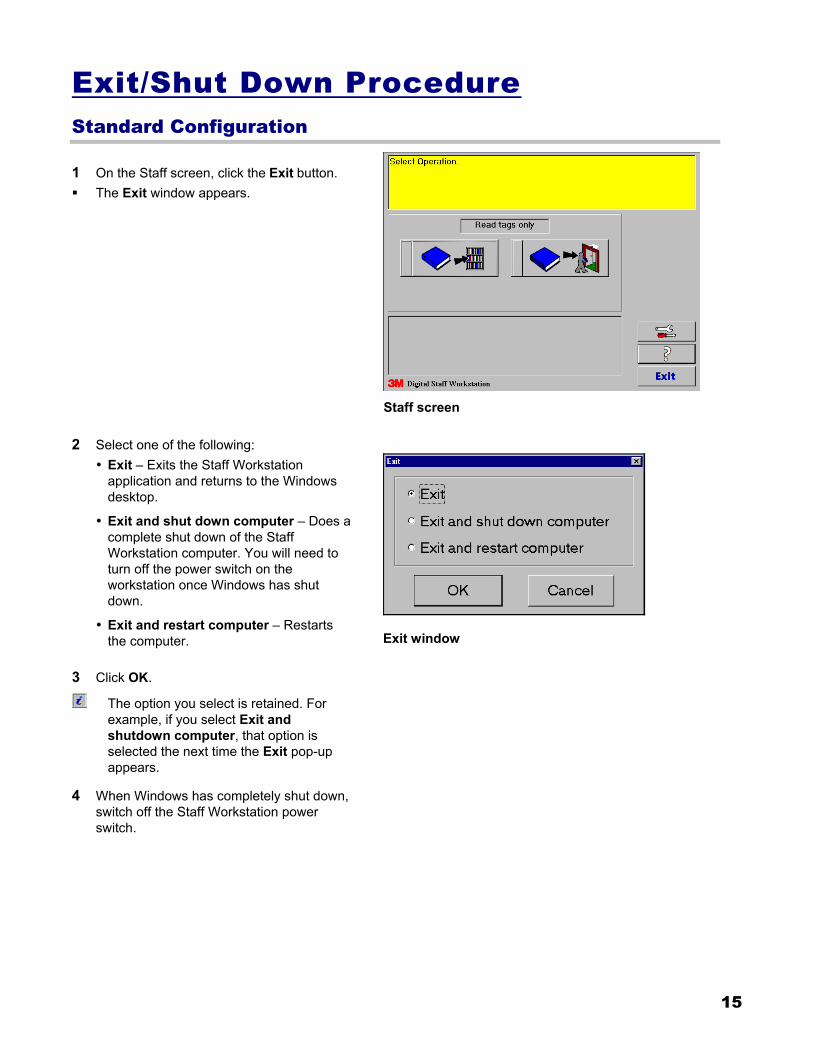
Exit/Shut Down Procedure Standard Configuration
1 On the Staff screen, click the Exit button. The Exit window appears.
2 Select one of the following: • Exit – Exits the Staff Workstation
application and returns to the Windows desktop.
• Exit and shut down computer – Does a complete shut down of the Staff Workstation computer. You will need to turn off the power switch on the workstation once Windows has shut down.
• Exit and restart computer – Restarts the computer.
3 Click OK.
The option you select is retained. For example, if you select Exit and shutdown computer, that option is selected the next time the Exit pop-up appears.
4 When Windows has completely shut down, switch off the Staff Workstation power switch.
Staff screen
Exit window

16
Local Configuration
1 Click Exit in the Operations menu of the Companion user interface.
2 Click Shutdown in the Windows Start menu.
3 Click Shutdown the computer, then click Yes.
4 When Windows has completely shut down, switch off the Staff Workstation power switch.
Companion UI - Operations menu
Remote Configuration
1 Make sure the KVM switch is set to the library computer.
2 Click Exit in the Operations menu of the Companion user interface (UI).
3 Press the Ctrl key twice quickly to toggle the KVM switch to the Staff Workstation computer.
4 Click Shutdown in the Windows Start menu.
5 Click Shutdown the computer and then click Yes.
6 When Windows has completely shut down, switch off the Staff Workstation power switch.

Processing Items The following procedures allow you to process items using the Staff Workstation. The procedures vary according to your Staff Workstation's configuration. Refer to the appropriate procedure for your configuration:
Standard configuration Local and Remote configurations
Standard Configuration Use the following procedure to process items using the Staff Workstation - Standard configuration.
1 Select the Operation, either check-in (a) or checkout (b)
2 Select the Number of Items to Process (if enabled). If the library Administrator has
configured the workstation to display Number of Items buttons, select the number of items to process.
If no Number of Items buttons appear, the default setting (one item at a time) is in effect and you cannot select the number of items to process.
3 Follow the Instructions. Instructions appear in the Message area. In this example, “Present Items.”
Continued on next page…
a
b2
317

18
When a confirmation for an action is required, a button appears on the right side of the message area. The example to the right shows a case where the edge sensors are covered and a confirmation is required for the SECURE action. The Check-in button is the default action so the user can press the Enter key on the keyboard to select it or touch the Check-in button on the screen.
4 Place the Item on the Deck.
Place the book or other item on the deck in the correct position for processing (Figure 7). See Item Placement on page 21.
Figure 7: Correct Position For Processing
4
The system checks for a RFID tag or barcode.
If an RFID tag is present, the workstation reads the tag.
If an RFID tag is not present, the workstation goes into scan mode, which means the barcode scanner is turned on after a short delay and the workstation reads the barcode.
5 If you are using Tattle-Tape strips for security, you will hear one of the following sounds: A thump, indicating an item was secured or unsecured
A beep, indicating that the security strip was not secured or un-secured (for example, for a video).
An error or warning sound, indicating an error or warning
6 Remove the item and place the next item on the deck for processing. After you hear the thump or beep sound, remove the item and place the next item on the deck. If an error/warning sound occurs, follow the on-screen instructions.
7 To continue processing items, repeat Steps 4 - 6 above.

Local and Remote Configurations Use the following procedure to process items using the Staff Workstation - Local and Remote configurations.
Check-in/Check-out The check-in and check-out functions send IDs to the circulation system and secure, or un-secure the item. Check-in (a) and check-out (b) may be selected using the buttons to the right, or through the Operation menu.
If you configured the Administrative Settings to not allow choices (e.g., Check-in only or Check-out only), only one of these buttons appears.
1 Select the operation. The primary operations are check-in and check-out.
Select the Check-In (a) or Check-Out (b) button.
You can use hotkeys to select the check-in and check-out buttons. Hotkeys have been assigned in the Companion software adminstrative settings. Refer to the Staff Workstation Model 795 Adminstrator's Guide for further information on hotkeys.
2 Select the number of items to process in the Items menu (if enabled).
3 Follow the Instructions. Instructions appear in the Message area, such as “Present Items.”
When a confirmation for an action is required, a button appears on the right side of the message area. The example to the right shows a case where the edge sensors are covered and a confirmation is required for the SECURE action. The Check-in button is the default action so the user can press the Enter key on the keyboard to select it or select the Check-in button on the screen.
Continued on next page…
Check-in
Compan
Check-in
b
a
19
and Check-out buttons
ion UI Staff screen - Item menu
message in the Companion UI screen.

20
4 Place the Item on the Deck.
Place the book or other item on the deck in the correct position for processing (shown at right). See Item Placement on page 21.
Correct Position For Processing
The system checks for an RFID tag or barcode.
If an RFID tag is present, the workstation reads the tag. If an RFID tag is not present, the workstation goes into scan mode,
which means the barcode scanner is turned on after a short delay and the workstation reads the barcode.
Depending on the configuration of the software wedge, you are prompted to select a target application in the Select Target Application window to the right. This determines which application receives the item ID, or other information. To set the target application, refer to Software Wedge (Local and Remote Configurations only) on page 12 of this guide.
Select Target Application window
5 If you are using Tattle-Tape strips for security, you will hear one of the following sounds: A thump, indicating an item was secured or unsecured
A beep, indicating that the security strip was not secured or un-secured (for example, for a video)
An error or warning sound, indicating an error or warning
6 Remove the item and place the next item on the deck for processing. After you hear the thump sound or beep sound, remove the item and place the next item on the deck. If an error/warning sound occurs, follow the on-screen instructions.
7 To continue processing items, repeat Steps 4 - 6 above.

Item Placement There are six sensors on the workstation deck. Sensors 6 and 1 are “edge sensors.” Sensors 5, 4, 3, and 2 are “inner (or non-edge) sensors.”
Correct Placement Items correctly placed on the deck must be (Figure 8):
Touching the back wall (a) (for books, the spine should be touching the back wall),
Within (inside of) the edge sensors on the deck (b), and
Covering at least two adjacent inner sensors (c).
65 4 3 2
1
Figure 8: Correct placement on deck (top view)
Oversize Items If the item cannot fit between the edge sensors, on-screen instructions enable you to process the item.
Refer to the following pages for examples of correct and incorrect placement of bar-coded items and items with RFID Tags.
a
bc
21

22
Placement of Bar-coded Items
Correct Placement
forBarcoded Items
Incorrect Placementfor
Barcoded Items
795 OG 001
Patron CardMove Item to Back Wall
CD Move Item Under Scan Line
Scanner and barcshown above.
Book
ode placement in your library may be different than

23
Placement of Bar-coded Items (Parallel Barcodes)
Correct Placement for
Barcoded ItemsIncorrect Placement for
Barcoded Items
Patron Card
CD
Move Book Left
Move Book Left and to Back Wall
Book Move Book Left

24
Placement of Items with RFID Tags (Correct)
Covering two adjacentnon-edge sensors left Covering three adjacent
non-edge sensors left
Covering two adjacentnon-edge sensors center
Covering three adjacentnon-edge sensors right
For books, the spine or binding must be against the back wall o
Covering two adjacent non-edge sensors right
f the deck.

25
Placement of Items with RFID Tags (Warnings)
Oversize Book − Left Oversize Book − Right
Oversize Book Covering Deck
Oversize books produce a warning sound. On-screen instructions assist you in processing the items in this case.

26
Placement of Items with RFID Tags (Incorrect)
Move Item to Back Wall Move Item to Back Wall
Edge Condition
Covering Only One Sensor
For books, the spine or binding must be against the back wall of the deck.

Operations The standard user interface is factory set to display the Check-in and Check-out buttons, the Settings button, the Ve fy button, and the Help button. The library Admin trator may choose to change the configuration setting
1 Mess
2 Curr
3
4
5
6
7
8
9
10
11
12
13
14 Item
riis
s and may select additional functions.
Standard user inte
age area Displays instructions, conditions, and messages th“Present Items” or “Select Operation.” May also cowhen needed; for example, to confirm that an item
ent Operation Provides a description of the current operation; forSecure Only, Un-secure Only, or Send ID Only.
Check-In Press to place the Staff Workstation in “check-in” mitem (if appropriate) and send the item ID to the lib
Check-Out Press to place the Staff Workstation in “check-out”secure an item (if appropriate) and send the item I
Security Turns the security function on and off. (Companio
Send ID Turns the Send ID function on and off. When on, thsystem. (Companion UI menu item)
One Item Causes the Staff Workstation to expect one item to(Companion UI menu item)
Two Items Causes the Staff Workstation to expect two items t(Companion UI menu item)
Three Items Causes the Staff Workstation to expect three items(Companion UI menu item)
Verify Turns the verify function on or off. When you selecturned on (Companion UI menu item)
Settings Accesses the sound volume setting, version informadministrative settings. Accesses languages and ACompanion user interface.
Help Accesses on-line help topics for the Staff Workstat
Exit Displays the Exit dialog box.
information Displays specific item status information, error feedabout hardware devices, such as the tag reader anmessages can be cleared pressing the Enter key.
3
1
2
4
rface
at prompt thentain a button should be se
example, Ch
ode. This allrary circulatio
mode. This aD to the librar
n UI menu it
e item ID is s
process at a
o process at
to process a
t Verify, the s
ation, langualways on To
ion.
back messad barcode sc
7
5
6 14 11 12 138
10
9
27
user, such as that appears only cured or un-secured.
eck-In, Check-Out,
ows you to secure an n system.
llows you to un-y circulation system.
em)
ent to the circulation
time
a time.
t a time
ecurity strip verifier is
ges, and the p feature in the
ges, and information anner. Some

28
The Companion user interface (UI) for the Staff Workstation allows you to perform the same functions as the standard user interface.
The Companion UI uses a software program called a software wedge to send keyboard input and item IDs to the circulation system.
Refer to the Staff Workstation Model 795 Administrator's Guide for information on administrative settings.
Messages Messages appear in the message area in the Standard UI and Companion UI. When a confirmation for an action is required, a button appears on the right side of the message area, as shown in the figure to the right. The button that appears is the default action, so you can press the Enter key on the keyboard, touch the button, or click to select it.
23
5
The menu selections that appear in the Compare selected in the Administrative Settings w
through the Settings icon on the Staff W
The Staffcircu
Com
Chec
anion indow
orks
4
Compan Workslation s
panion
k-in me
user int that is
tation de
1
14
ion user interface (UI) allowstation from the same computeoftware.
UI Staff screen menus
ssage in the Companion UI sc
9
erface (UI) accessed
sktop.
11
you r tha
reen
1
to control the t runs the
10
76
8
11
.
29
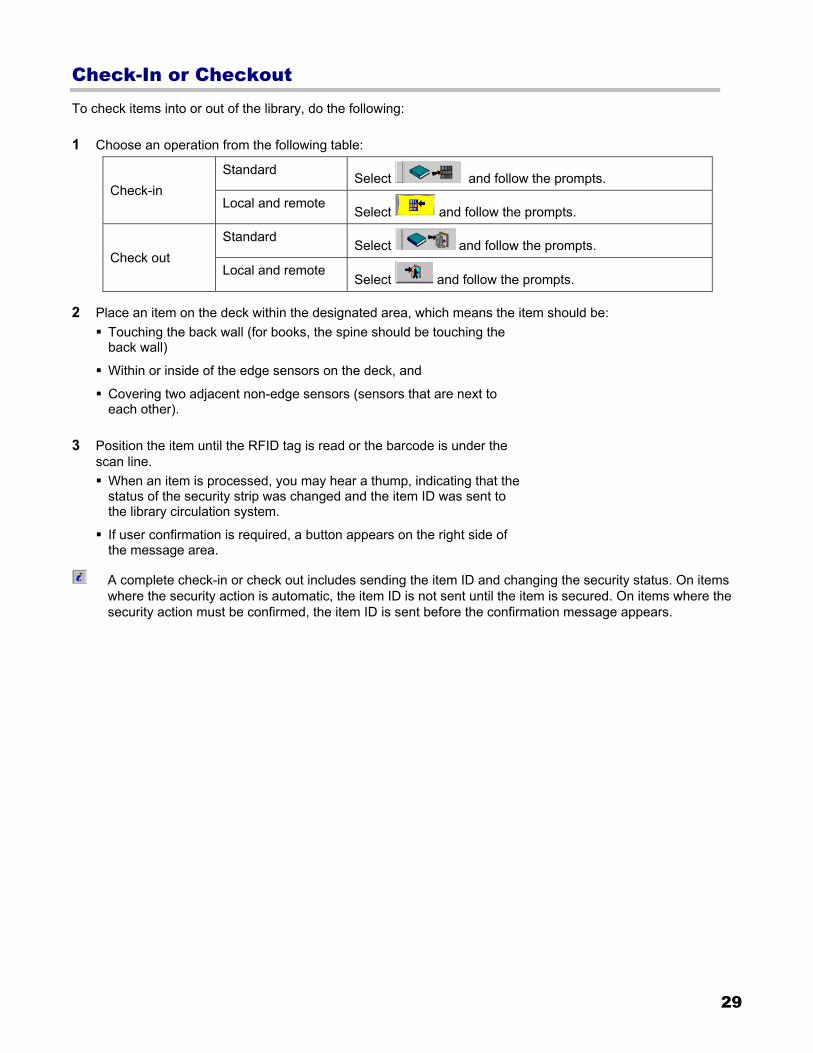
Check-In or Checkout To check items into or out of the library, do the following:
1 Choose an operation from the following table:
Standard Select and follow the prompts. Check-in
Local and remote Select and follow the prompts.
Standard Select and follow the prompts. Check out
Local and remote Select and follow the prompts.
2 Place an item on the deck within the designated area, which means the item should be: Touching the back wall (for books, the spine should be touching the back wall)
Within or inside of the edge sensors on the deck, and
Covering two adjacent non-edge sensors (sensors that are next to each other).
3 Position the item until the RFID tag is read or the barcode is under the scan line. When an item is processed, you may hear a thump, indicating that the status of the security strip was changed and the item ID was sent to the library circulation system.
If user confirmation is required, a button appears on the right side of the message area.
A complete check-in or check out includes sending the item ID and changing the security status. On items where the security action is automatic, the item ID is not sent until the item is secured. On items where the security action must be confirmed, the item ID is sent before the confirmation message appears.
30
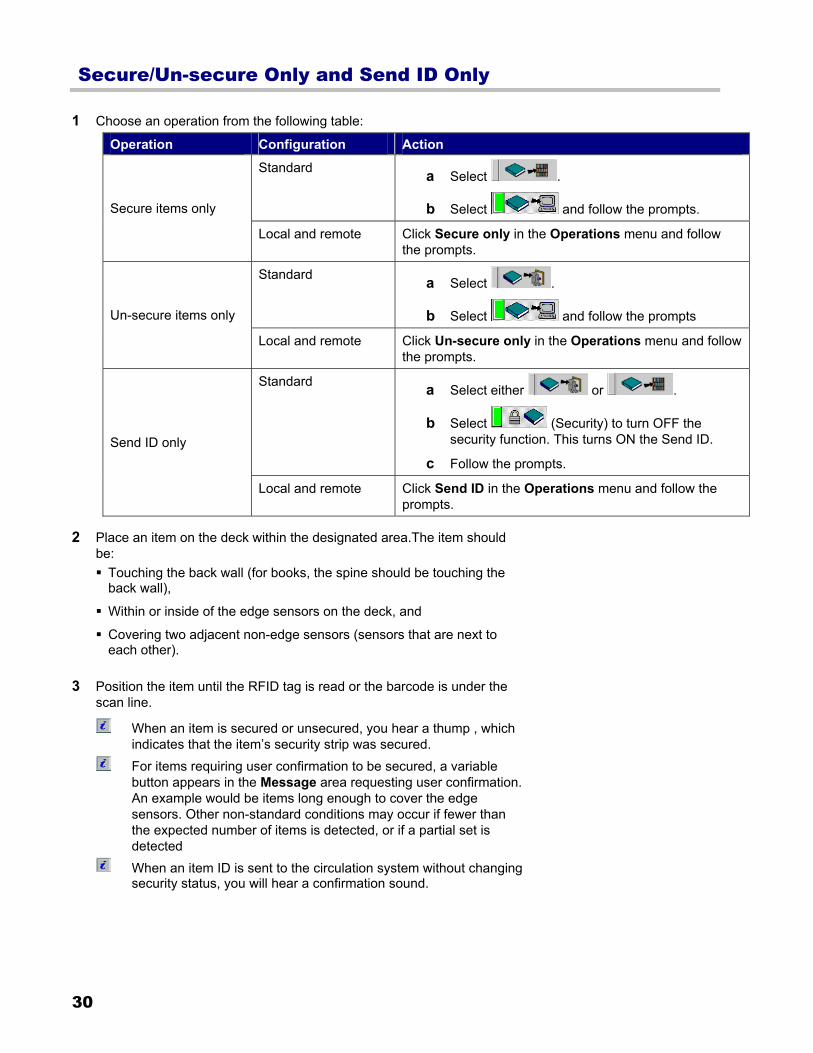
Secure/Un-secure Only and Send ID Only
1 Choose an operation from the following table:
Operation Configuration Action
Standard a Select .
b Select and follow the prompts. Secure items only
Local and remote Click Secure only in the Operations menu and follow the prompts.
Standard a Select .
b Select and follow the prompts Un-secure items only
Local and remote Click Un-secure only in the Operations menu and follow the prompts.
Standard a Select either or .
b Select (Security) to turn OFF the security function. This turns ON the Send ID.
c Follow the prompts. Send ID only
Local and remote Click Send ID in the Operations menu and follow the prompts.
2 Place an item on the deck within the designated area.The item should be: Touching the back wall (for books, the spine should be touching the back wall),
Within or inside of the edge sensors on the deck, and
Covering two adjacent non-edge sensors (sensors that are next to each other).
3 Position the item until the RFID tag is read or the barcode is under the scan line.
When an item is secured or unsecured, you hear a thump , which indicates that the item’s security strip was secured.
For items requiring user confirmation to be secured, a variable button appears in the Message area requesting user confirmation. An example would be items long enough to cover the edge sensors. Other non-standard conditions may occur if fewer than the expected number of items is detected, or if a partial set is detected
When an item ID is sent to the circulation system without changing security status, you will hear a confirmation sound.

31
Number of Items (if enabled)
To select the number of items to process at one time For the Standard configuration:
Select the appropriate item number button:
(to process one item)
(to process two items)
(to process three items) For Local and Remote configurations with the Companion UI:
Click the desired number of items in the Items menu. The number appears in the menu bar next to Items.
The factory default setting is one item at a time with no number of items buttons appearing on the Staff screen. The library Administrator can adjust the total number of items to process at one time, as well as which buttons appear (if any).
Companion UI - Item menu
Verify The verifier detects when an item with a secured Tattle-Tape security strip is placed on the workstation. When the verifier detects a secured security strip in an item, a green light located on the back wall of the workstation deck is turned ON. Otherwise, the green light is OFF.
This function works with security strips only. It does not apply to D8 tags.
To turn verify functions on and off: For the Standard configuration:
Select or de-select the button. This turns the Verify function ON or OFF.
For Local and Remote Configurations:
Click On or Off in the Verify menu. The selection appears in the menu bar next to Verify.
The factory default setting for Verify is User Choice - ON. This means the Verify function is ON by default and you are allowed to turn the function ON or OFF. The library Administrator can configure the Verify function through administrative settings to be ON or OFF by default, without user choice. In this case, neither
the button, nor the Verify menu appear on the Standard, or Local and Remote configurations.
Companion UI - Verify menu

32
Staff Settings Library personnel have access to various configuration settings in the Staff Settings window.
At the Staff Settings screen you can:
Adjust the sound volume (a) View the software version information (b) Access the password-protected
Administrative settings (c) (if you are a library Administrator)
Access on-line help topics (d) Language selection (e) Access search lists (f) Access database information (g) Set Autosize feature (h) Set Always on Top feature (i)
Use the following menu selections to configure the Companion user interface (UI) to your library's needs. The menu selections that appear in the Companion UI are selected in the Administrative Settings window, which is accessed through the Staff Settings window in the Staff Workstation software.
Companion UI Settings menu – use to turn the Autosize and Always on top functions on or off (ON = checked, OFF = not checked). You can also use the Settings menu to select a different Language for the Companion user interface.
The
Co
Accessing Administrative Settings requires a passwor3M area of the Windows registry. Refer to the 3M™ StafAdministrator's Guide for further information.
To access the Staff Settings window:
Standard Configuration: On the Staff screen, select thebutton. The Staff Settings screen appears.
Local Configuration: On the Windows desktop, doublebutton. The Staff Settings screen appears.
c
Staff Settings window
mpanion UI Staff screen - Settings menu
d and access to the f Workstation
-click the
d
a
b
e
f
ge
h
i
d
c

33
Remote Configuration: Press the Ctrl key on the keyboard twice to toggle the KVM switch to Staff Workstation computer.
On the Windows desktop, double-click the button. The Staff Settings screen appears.
Adjusting the Sound Volume For Standard Configuration:
1 Click the Sound Volume button. A sound volume adjustment pop-up appears.
2 Adjust the sound volume by using the mouse to drag the volume adjustment bar (up or down) to the desired setting. You can also press the Up and Down arrow keys on the keyboard to adjust the setting.
3 Click the Close button.
For Local and Remote Configurations:
1 Click the Volume icon in the Windows taskbar. The volume control appears.
2 Adjust the sound volume by using the mouse to drag the volume adjustment bar (up or down) to the desired setting. You can also use the Up and Down arrow keys to adjust the volume
3 Click Exit in the Options menu to close the master volume control window.
Volume Control
Soft ModerateLoud (Default)

34
Setting the Language for the User Interface For the Standard Configuration:
1 Click the button in the Language field that corresponds to the desired language. This controls the language that appears on the Staff Workstation screens.
The Language field appears in the Staff Settings window only when more than one language has been selected through the Administrative Settings window.
2 Click the OK button in the Staff Settings window.
The languages that appear in the Staff Settings window can be changed through the Administrative Settings window (refer to the Staff Workstation Model 795 Administrator’s Guide).
Staff Settings window
For Local and Remote Configurations:
1 From the Settings menu, click Language.
2 From the Language list, select one of the supported languages.
The text in the Companion UI appears in the selected language. Select the language for the menus an
Companion UI.
1
2
d messages on the

35
Using the Autosize setting
If you select Autosize The Companion UI always shrinks to show only the Check-in button and Checkout button when another application is being used.
Click the double arrow button to view the full Companion UI.
The Companion remains in Autosize mode until you deselect it in the Settings menu.
If you do not select Autosize The Companion UI stays full size, with the menu visible.
Click Always on Top in the Settings menu.
Click the double arrow button to view the full Companion UI.
Using the Always on Top setting
If you select Always on top The Companion UI is always visible on the screen.
You can still use the Minimize button to remove the Companion UI from the screen.
If you do not select Always on top The Companion UI is not necessarily always visible on the screen when it is running. However, it is represented in the taskbar at the bottom of the screen.
Click Always on Top in the Settings menu.
If an error or confirmation message appears, the Companion UI remains on top until the Confirm button is pressed or the item is removed.
Refer to the 3M™ Staff Workstation Model 795 Administrator’s Guide for information on Administrative Settings.

36
Search Lists (All Configurations) A search list is a list of items the library would like to find. Search lists can include missing or lost items, items that are on hold, or items to be removed from circulation or “weeded.” Several search lists can be active at the same time. Messages appear on the Staff screen for any items found on active search lists.
If the Search List feature of the Staff Workstation software is enabled, the application automatically checks to see if the item being processed is on one of the search lists you have selected. If it is, you are notified of the list on which it is included.
The Search Lists field appears in the Staff Settings window only when Search Lists are enabled and a database location is designated through the Administrative Settings window.
The Staff Workstation software provides the option of using search lists to find library items.
Lists, Digital Data Manager (DDM), and Memory Cards The DDM software package processes the order lists and search lists you extracted from your library’s circulation system and exports them to a memory card. You load the memory card into the Staff Workstation memory card drive and use the lists on the memory card as a basis for searching.
Some libraries may elect to export their search lists onto the unit’s hard drive.
For more information on lists, see Exporting Lists using DDM on page 36. For more information on memory cards, see Inserting a Memory Card on page 40 and Removing a Memory Card on page 40.
To Begin Using Lists Before you can use search lists to identify items, you must first export the lists from your library’s circulation system to a memory card using Digital Data Manager (DDM).
Exporting Lists using DDM For detailed instructions on installing the DDM software and exporting lists to a memory card using DDM, refer to a separate document, the 3M™ Digital Data Manager Owner’s Manual.
If you do not use the List feature to perform searching for items, you do not need to export lists using DDM and there is no need for a memory card.

37
Enabling and Disabling Search Lists Search lists appear in the Search List window for the Memory Card Database. The Search List window allows you to enable and disable search lists. To view
the Search Lists window, click in the Staff Settings window.
Click the check boxes next to search lists to enable and disable them. A red check mark indicates that the list is enabled.
A notification appears in a message box on the screen when an item included in an enabled search list is processed. The notification states that the item is on a search list.
The search list feature is not available if search list processing is disabled. to the Staff Workstation Model 795 Administrator's Guide for information on enabling search lists.
Search Lists window
Viewing Database Information The Database Information window allows you to review the attributes of the Memory Card Database, such as what lists exist in the database and the number of items in specific lists.
The Database Information window is available whenever a valid database location has been set. Refer to the user guide for the 3M equipment you are using for further information.
Database Information window

38
Appendix Items That Don’t Fit on the Deck (Standard Configuration only) If an item does not fit on the deck, you can still process the item using the light pen.
To process an item using the light pen, move the tip of the light pen across the surface of the item’s barcode. The item’s identification information is passed on to the library circulation system.
Sets A set is two or more items, with or without a case and with the same item identifier, that is always checked in, or checked out together.
The workstation can be set up (by the Administrator) to automatically process whole or partial sets of items (parts of a set that are detected at the same time).
If the workstation has been configured to process whole sets only and a partial set is detected, user confirmation is required to process the set.
No Activity If there is no activity on the workstation for a period of time defined by the administrative settings, the workstation reverts to its default operation; for example, Read Tags Only, Check-in, or Check-out.
Running Conversion Software on the Staff Workstation You can run the conversion software on the Staff Workstation, but you need to exit the Staff Workstation application and then start the Conversion Station application.
For Standard Configuration:
1 To exit the Staff Workstation application: At the Staff screen, select the Exit button > Exit > OK.
2 To start the conversion software: Click the Conversion Station icon on the desktop. or
At the Windows desktop, select Start > Programs > 3M Library Systems > 3M Conversion Station > 3M Conversion Station. The Conversion Station software takes a few seconds to load.

39
For Local and Remote Configurations:
1 To exit the Staff Workstation application: Click Exit in the Operations menu.
2 If you are using the Remote configuration, use the KVM switch to change the selected computer to the Staff Workstation computer.
3 To start the conversion software: Click the Conversion Station icon on the desktop. or
At the Windows desktop, select Start > Programs > 3M Library Systems > 3M Conversion Station > 3M Conversion Station. The Conversion Station software takes a few seconds to load.
For details on using the conversion software, refer to the 3M Conversion Software Staff Guide (for Staff users) and the 3M Conversion Software Administrator’s Guide (for Administrators).

40
Inserting a Memory Card Ensure that the memory card is properly oriented and then insert it into the memory card drive.
Removing a Memory Card Always use the following procedure to remove the memory card from the memory card drive.
CAUTION DO NOT remove a memory card while the activity light on the memory card drive is flashing.
If you remove the memory card before the activity light stops flashing, you may corrupt the data files on the memory card, making it impossible to read the data. If this happens, you may have to use Windows to reformat the memory card.
Wait until the activity light on the memory card drive stops flashing.
For Remote Configuration:
If you're using the Remote configuration, use the KVM switch to change the selected computer to the Staff Workstation computer.
1 From the Windows Desktop, double-click My Computer.
2 Right click on the Removable Drive icon in the My Computer window. A pop-up menu appears.
3 On the pop-up menu, click Eject.
If you see the following error message, click Continue. This does not affect the data on the memory card.
4 Wait for ten seconds.
5 Remove the memory card.
Cannot Unmount Volume window