
SR7 Server Board User’s ManualSR7 Server Board User’s Manual Rev. 1.0 Release Date: June 10,...
86
SR7 Server Board User’s Manual Rev. 1.0 Release Date: June 10, 2002
Transcript of SR7 Server Board User’s ManualSR7 Server Board User’s Manual Rev. 1.0 Release Date: June 10,...
SR7 Server Board User’s Manual
Rev. 1.0
Release Date: June 10, 2002

Notice The information in this publication is provided on an “AS IS” basis and represents no commitment of any kind. Akom disclaims any warranties of merchantability and fitness for any particular purpose. Akom shall not be liable for technical or editorial omissions made herein; nor for incidental or consequential damages resulting from the performance or use of this material. The information in this publication is subject to change without prior notice. Akom is without obligation to notify any person of such changes. All brand/product names and registered trademarks appearing in this publication are the properties of their respective holders. No part of this publication may be reproduced in any form or by any means without prior written consent from Akom Technology Corporation. Copyright 2002 Akom Technology Corporation. All Rights Reserved. � Contact Information Akom Technology Corporation Web Site: http://www.akom.com Email: [email protected]

Federal Communications Commission Statement
This equipment has been tested and found to comply with the limits for a Class B digital device, pursuant to Part 15 of the FCC rules. These limits are designed to provide reasonable protection against harmful interference when the equipment is operated in a residential installation. This equipment generates, uses and can radiate radio frequency energy and, if not installed and used in accordance with the instruction manual, may cause harmful interference to radio communications. However, there is no guarantee that interference will not occur in a particular installation. If this equipment does cause harmful interference to radio or television reception, which can be determined by turning the equipment off and on, the user is encouraged to try to correct the interference by one or more of the following measures:
l Reorient or relocate the receiving antenna. l Increase the separation between the equipment and the
receiver. l Connect the equipment into an outlet on a circuit different from
that to which the receiver is connected. l Consult the dealer or an experienced radio TV technician for
help. $ Caution
l The changes or modifications not expressly approved by the party responsible for compliance could void the user's authority to operate the equipment.
l Shielded interface cables must be used in order to comply with the emission limits.

T a b l e o f C o n t e n t s
1 Product Overview .............................................................. 1
1.1 Introduction .................................................................. 1 1.2 Specifications ................................................................ 2 1.3 Intelligence ................................................................... 4 1.4 Package Checklist .......................................................... 5
2 Hardware Setup................................................................. 6 2.1 Before Getting Started.................................................... 6 2.2 Board Layout................................................................. 7 2.3 Processor...................................................................... 8
2.3.1 Installing the Retention Mechanism ........................... 9 2.3.2 Installing the CPU ..................................................11 2.3.3 Installing the Heatsink/Fan Assembly .......................12
2.4 System Memory............................................................13 2.4.1 Installing the Memory Modules ................................14
2.5 PCI Slots......................................................................15 2.6 Jumper Settings............................................................16
2.6.1 Jumper Settings for Processor .................................16 2.6.2 Jumper Settings for Clearing CMOS..........................17
2.7 Connectors/Headers/Ports..............................................18 2.7.1 IDE Disk Drive Connector........................................18 2.7.2 Floppy Disk Drive Connector....................................20 2.7.3 ATX Power Connector .............................................21 2.7.4 RJ-45 Gigabit LAN Port ...........................................22 2.7.5 Serial Ports ...........................................................24 2.7.6 Parallel Port...........................................................24 2.7.7 Keyboard and Mouse Ports ......................................25 2.7.8 USB Ports .............................................................26 2.7.9 Fan Headers ..........................................................27 2.7.10 System Management Bus Header.............................28 2.7.11 Front Panel LED and Switch Connectors ....................28 2.7.12 POST Code Display.................................................30 2.7.13 Internal Power-on and Reset Buttons........................31
3 BIOS Setup Utility............................................................ 32 3.1 Setup Main Menu ..........................................................33 3.2 SoftMenu III Setup .......................................................33 3.3 Standard CMOS Features ...............................................36 3.4 Advanced BIOS Features................................................40 3.5 Advanced Chipset Features ............................................44 3.6 Integrated Peripherals ...................................................47 3.7 Power Management Setup..............................................52

3.8 PnP/PCI Configurations..................................................55 3.9 PC Health Status...........................................................57 3.10 Load Fail-Safe Defaults ..............................................58 3.11 Load Optimized Defaults ............................................58 3.12 Set Password............................................................58 3.13 Save & Exit Setup .....................................................59 3.14 Exit Without Saving ...................................................59
4 Software Installation....................................................... 60 4.1 Installing the SiS IDE driver for Windows 2000.................61
4.1.1 SiS IDE Utility .......................................................63 4.2 Installing RAID Driver for Windows 2000 .........................66
4.2.1 Verifying Installation ..............................................68 4.3 Installing Driver in the process of Windows 2000 installation 68 4.4 Setting Disk Arrays .......................................................70 4.5 Installing Broadcom Gigabit Ethernet Driver.....................71 4.6 Installing the Hardware Doctor Utility ..............................73
4.6.1 Hardware Doctor User Interface...............................75 Appendix A BIOS Update ...................................................... 77
Appendix B POST Codes ........................................................ 78

User’s Manual
1
1 Product Overview
1.1 Introduction
Special considerations on the increasing demand for high storage capacity and network bandwidth, the Akom AK-SR7 server board comes with up to ten independent IDE channels and a Gigabit LAN port (1000 Mbps copper connection over Category 5 cabling). This SR7 Pentium 4-based server board with powerful productivity is optimized for network storage applications such as NAS sever, Media-streaming server, Video-on-Demand server, Video-streaming server, Multi-media server, Web-hosting sever and cache server. Based on the SiS645DX/961B chipset, this server board supports the latest generation of Socket-478 Intel Pentium 4 processors with 512K L2 cache on 0.13 micro process. The communications between the north bridge and south bridge are over a new 16-bit wide bus clocked at 266MHz, which provides a bandwidth of 533 MB/s called “MuTIOL”. Three onboard DDR SDRAM DIMM sockets supports PC1600/ PC2000/PC2700 DDR SDRAM DIMMs, allowing for system memory expansion up to 3GB. In addition to two independent IDE channels a main board conventionally supports, eight additional IDE channels are integrated on the board. All the on-board IDE channels are ATA-133 compliant, allowing for connection with up to 20 IDE disk drives. With RAID configuration software, the installed disks are allowed for RAID application for higher throughput and fault tolerance. A PCI-66MHz equivalent bus, dubbed Alpha-Bus, acts as a proprietary highway to cyberspace. Doubling the bandwidth of the PCI-33MHz bus, Alpha-Bus is intended for exclusive use with a built-in Broadcom Gigabit LAN port to increase network throughput while offloading the PCI-33MHz bus traffic, which makes the system performance dramatically boosted. It runs on the Category-5 cable and thus the user can save money from costly re-wiring for migration to Gigabit speeds. Other features such as SoftMenu, debug port display, PCI bus arbitration logic are implemented by an ASIC, AC2001, offering much add-on value to the user. All these most advanced technologies and value-added features incorporated into this board make SR7 an easy-to-use, reliable, high-performance server board. For those demanding users who depend on the fast, efficient flow of information and need for data redundancy and high volume, AK-SR7 server board provides a best cost-effective solution.

SR7 Server Board
2
1.2 Specifications
Chipset
l SiS 645DX DDR333 North Bridge l SiS 961B MuTIOL Media IO South Bridge
Processor
The server board supports a single Intel Willamette/Northwood Pentium 4 processor (in a 478-pin package) with 400/533MHz system bus. l 1.4 GHz ~ 2.53 GHz with 256MB/512MB L2 cache or future
processors System Memory
The board is equipped with 3 DIMM sockets supporting the following memory features: l 2.5V 184-pin 200/266/333MHz DDR SDRAM DIMMs l Up to 3 unbuffered DDR200/266/333 DIMMs l Maximum system memory: 3GB using 200/266MHz DDR
SDRAM DIMMs IDE Support
The IDE controller on SiS961 supports: l 2 independent IDE channels l Ultra DMA 66/100/133 and PIO mode 3, 4 l ATAPI CD-ROM, LS120 and ZIP
8 additional independent IDE channels coexist the main board’s standard IDE ports, providing the following features: l 8 additional independent IDE channels supported l Ultra DMA 66/100/133 supported l RAID 0, 1, 0+1 for data mirroring and stripping applications

User’s Manual
3
LAN Support
l A Gigabit Ethernet LAN port (10/100/1000 Mbps copper connection)
l High network performance via Alpha-Bus at 32bit/66MHz l Dual high speed on-chip RISC processors l 1000 BASET full duplex MAC l Low 1.2 voltage CMOS with 5V tolerant PCI I/Os
Alpha Bus
l Independent of the onboard PCI-33 bus l A high-throughput PCI-66 MHz bus that is directly attached to
North bridge l Exclusive use with the built-in Gigabit Ethernet so as to
effectively break the network bandwidth bottleneck Onboard I/O Ports/headers/Connectors
l 10 IDE connectors l 1 floppy connector l 3 fan headers l 1 Gigabit Ethernet LAN port l 2 serial ports l 1 standard/ECP/EEP DB-25 parallel port l 2 USB ports l 1 PS/2 mouse port l 1 PS/2 keyboard port
BIOS Support
l PhoenixAward Plug and Play BIOS supports APM and DMI l SoftMemu technology for CPU parameter setting l 2 Mbit Flash memory for easy BIOS updates
Expansion Slots
l 2 PCI 2.2 32-bit PCI bus slots

SR7 Server Board
4
Value-added ASIC – AC2001
l 2-to-4 PCI bus master arbitration expansion l SoftMenu technology for jumpless CPU setting l Debug port with 2-digit 7-segment LED decoders/drivers
Form Factor
l ATX, 12 inches by 9.6 inches (30.48 cm by 24.38 cm)
1.3 Intelligence
System Health Monitor
The server board is capable of monitoring a variety of system health statuses: CPU/system temperatures, CPU voltages and fan speed. When an out of range value is detected, an alarm will sound. This can alert the user that some measure may be need as a precaution against any damage or unstable system operation. CPU Overheat Precaution
The server board has the capability of CPU temperature monitor. If a CPU warning temperature or shutdown temperature has been set in the BIOS Setup, once the CPU temperature exceeds the limit value defined in the BIOS, the system will alert the user or automatically power off. This can prevent from any possible damages to the on-board components. System Boot Diagnostic Display
Once the system is initiated, the hardware components are tested by the BIOS. At the same time, the sequential POST (Power On Self Test) codes will be shown on the on-board LEDs; the display of the codes will help the user out of the headache of hardware troubleshooting.

User’s Manual
5
1.4 Package Checklist
The server board package contains the following items. If any of these items is missing or damaged, please contact your dealer or sales representative for assistance. þ The Akom AK-SR7 server board
þ One Akom Installation CD
þ One RM (Retention Mechanism) kit for supporting CPU heatsink/fan cooling module
þ Six 40-pin/80-conductor IDE cables of 45 cm
þ Four 40-pin/80-conductor IDE cables of 60 cm
þ One floppy disk ribbon cable
þ One back panel I/O shield
þ One PCI VGA card
þ Two power supply splitters

SR7 Server Board
6
2 Hardware Setup
2.1 Before Getting Started
The following issues call for special attention: 1. Make sure any of the items in your product package is not missing
or damaged.
2. Do not plug the power supply into a wall outlet until you have completed all the steps of building your system and ready to turn it on.
3. Unplug your system power cord from the wall outlet beforehand whenever you want to install or remove any hardware components onto or from the board.
4. Consult the user’s manual to make sure each of the on-board jumpers is correctly set for the first time you power on your system.
5. Computer parts are sensitive to static electricity. Always ground yourself before handling the parts.
6. Select the correct power voltage input for your system before you power it on.
7. On a flat surface should you proceed with assembly or disassembly of your system.
User’s Manual
7
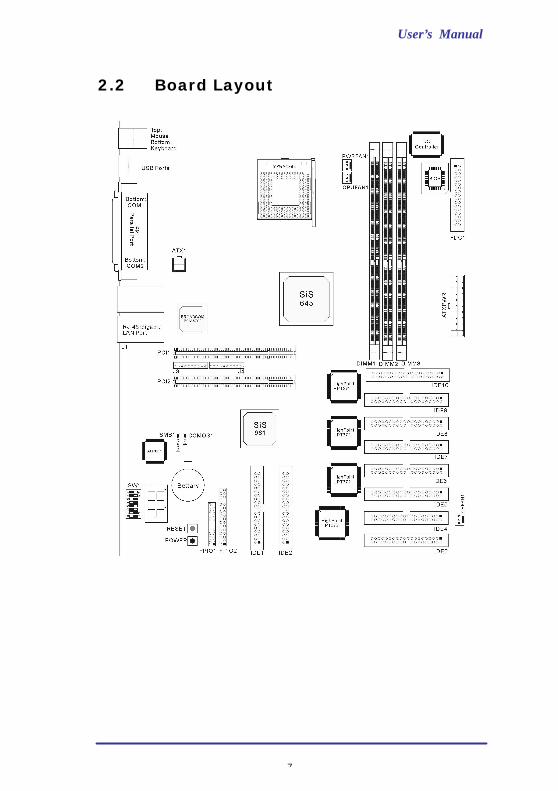
2.2 Board Layout

SR7 Server Board
8
2.3 Processor
The server board is equipped with a 478-pin Zero Insertion Force (ZIF) socket. This socket is designed for easy insertion or removal of an Intel Pentium 4 processor. Intel Pentium 4 processors use Netburst micro-architecture that features hyper pipelined technology, a rapid execution engine, a 400/533MHz system bus and execution trace cache. The following table lists the supported Intel Pentium 4 processors.
Processor Speed System Bus Cache Size
2.53 GHz 533 MHz 512 KB
2.40B GHz 533 MHz 512 KB
2.40 GHz 400 MHz 512 KB
2.26 GHz 533 MHz 512 KB
2.20 GHz 400 MHz 512 KB
2.0A GHz 400 MHz 512 KB
2.0 GHz 400 MHz 256 KB
1.90 GHz 400 MHz 256 KB
1.80A GHz 400 MHz 512 KB
1.80 GHz 400 MHz 256 KB
1.70 GHz 400 MHz 256 KB
1.60A GHz 400 MHz 512 KB
1.60 GHz 400 MHz 256 KB
1.5 GHz 400 MHz 256 KB
1.4 GHz 400 MHz 256 KB
User’s Manual
9
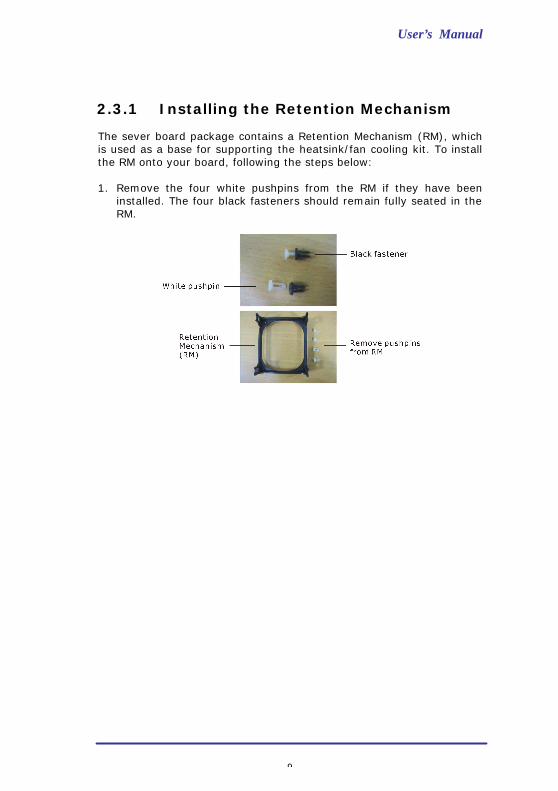
2.3.1 Installing the Retention Mechanism
The sever board package contains a Retention Mechanism (RM), which is used as a base for supporting the heatsink/fan cooling kit. To install the RM onto your board, following the steps below: 1. Remove the four white pushpins from the RM if they have been
installed. The four black fasteners should remain fully seated in the RM.

SR7 Server Board
10
2. The four black fasteners should remain fully seated in the RM.
3. Locate the CPU heatsink/fan base mounting holes on the board and
place the RM onto the board with the four black fastens aligned with the respective mounting holes.
4. Gently press down the black fasteners into the holes until they snap
into place.
5. Insert the white pushpins onto the black fasteners and press them
down firmly to secure the RM on the board.

User’s Manual
11
2.3.2 Installing the CPU
The ZIF socket has a keying mechanism to prevent improper CPU installation. If you cannot easily insert the CPU, verify that the gold marking (pin 1) of the CPU is mated with the pin 1 position of the socket. To install the CPU, do the following: 1. Apply a small amount of sideways force to free the lever from its
retaining tab. Once the lever is released, raise the lever as far as it will go.
2. Align the golden marking on the CPU with the pin 1 position of the
socket, and then seat the CPU squarely into the socket.
3. Push the lever down until it locks into place.
SR7 Server Board
12
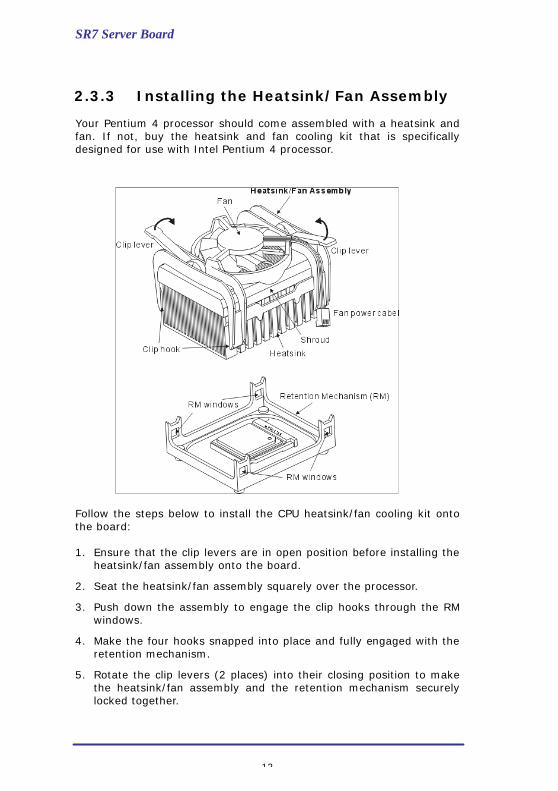
2.3.3 Installing the Heatsink/Fan Assembly
Your Pentium 4 processor should come assembled with a heatsink and fan. If not, buy the heatsink and fan cooling kit that is specifically designed for use with Intel Pentium 4 processor.
Follow the steps below to install the CPU heatsink/fan cooling kit onto the board: 1. Ensure that the clip levers are in open position before installing the
heatsink/fan assembly onto the board.
2. Seat the heatsink/fan assembly squarely over the processor.
3. Push down the assembly to engage the clip hooks through the RM windows.
4. Make the four hooks snapped into place and fully engaged with the retention mechanism.
5. Rotate the clip levers (2 places) into their closing position to make the heatsink/fan assembly and the retention mechanism securely locked together.

User’s Manual
13
6. Attach the fan power cable to the CPUFAN1 header on the board. This header is keyed and you can only attach the cable in one way.
$ Caution
A CPU cooling solution should be maintained; otherwise, overheating may damage the components and the board.
2.4 System Memory
The server board is equipped with three 184-pin DIMM (Dual Inline Memory Module) sockets that support unbuffered non-ECC DDR 200/266/333 SDRAM memory modules, also known as PC1600/PC2100/PC2700 DIMMs. Superior to the conventional PC66/100/133 SDRAM technology, DDR SDRAM can do two operations per computer’s clock cycle, thereby doubling the bandwidth over the corresponding single-data-rate SDRAM. In appearance, DDR DIMMs are different from the conventional SDRAM DIMMs in the number of edge conducts and keying mechanism. The DIMM sockets on the board are keyed for DDR DIMMs only and they are not mechanically compatible with the SDRM DIMM sticks.

SR7 Server Board
14
2.4.1 Installing the Memory Modules
Follow the steps below to install the DDR DIMMs: 1. Press the clips at both ends of the socket outwards.
2. Align the notch of the DIMM stick with the key of the socket.
3. Seat the DIMM stick squarely into the socket.
4. The clips at both ends will snap inwards to hold the DIMM stick in place.
$ Caution
We recommend that you use the DDR DIMMs of the same type and install the first memory stick in socket 1 and the second in socket 2 and so on.
The following table lists the supported DIMM configurations.
DIMM Socket DIMM Capacity Memory Range
Socket 1 (Bank 0 & 1) 64MB, 128MB, 256MB, 512MB, 1024MB
64MB ~ 1GB
Socket 2 (Bank 2 & 3) 64MB, 128MB, 256MB, 512MB, 1024MB
64MB ~ 1GB
Socket 3 (Bank 4 & 5) 64MB, 128MB, 256MB, 512MB, 1024MB
64MB ~ 1GB
Total system memory supported (If using PC2700 memory sticks)
64MB ~ 2GB
Total system memory supported (If using PC1600/2100 memory sticks)
64MB ~ 3GB (max.)

User’s Manual
15
2.5 PCI Slots
The server board is equipped with 2 PCI slots for future system expansion. The slots support VGA cards, LAN cards, etc. that comply with PCI specifications. $ Caution
The length of the add-in card installed in either of the PCI slots is limited to 16 cm to avoid interference with the memory sockets and IDE cables.

SR7 Server Board
16
2.6 Jumper Settings
2.6.1 Jumper Settings for Processor
The SW1 DIP switch on the board is for factory use only. Leave this jumper on its default setting. This server board features SoftMenu technology that provides a jumperless way for CPU settings. You can enter the BIOS Setup and adjust the CPU parameters in the SoftMenu page.

User’s Manual
17
2.6.2 Jumper Settings for Clearing CMOS
If your CMOS data becomes corrupted, or you forgot the password, or for any other reason you are unable to boot up the system, you can reconfigure your system with the default values stored in the ROM BIOS. To restore the BIOS default values, do the following: 1. Power off the system and unplug the power cord from the wall
outlet.
2. Remove the on-board battery.
3. Locate the CCMOS1 jumper on the board.
4. Set the CCMOS1 jumper to pins 2-3 for a few seconds.
5. Set the jumper back to its default setting, pins 1-2.
6. Put the battery back onto the board.
7. Plug the system power cord and power on your system.
SR7 Server Board
18
2.7 Connectors/Headers/Ports
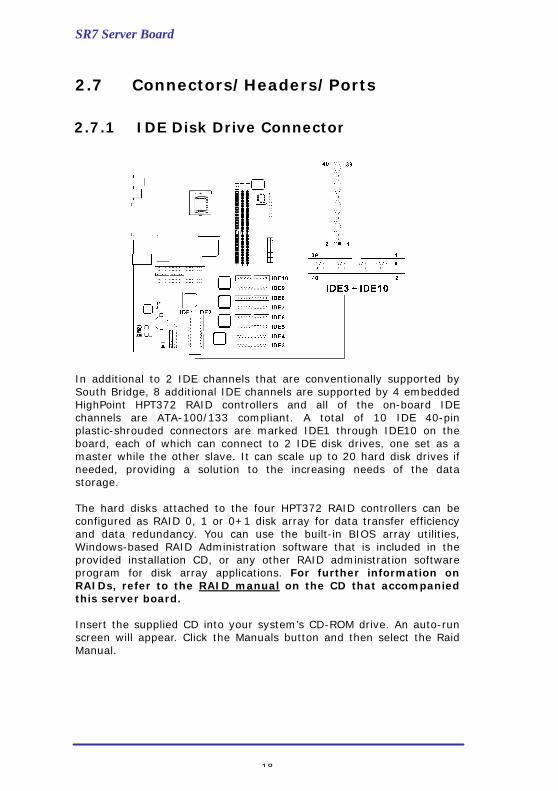
2.7.1 IDE Disk Drive Connector
In additional to 2 IDE channels that are conventionally supported by South Bridge, 8 additional IDE channels are supported by 4 embedded HighPoint HPT372 RAID controllers and all of the on-board IDE channels are ATA-100/133 compliant. A total of 10 IDE 40-pin plastic-shrouded connectors are marked IDE1 through IDE10 on the board, each of which can connect to 2 IDE disk drives, one set as a master while the other slave. It can scale up to 20 hard disk drives if needed, providing a solution to the increasing needs of the data storage. The hard disks attached to the four HPT372 RAID controllers can be configured as RAID 0, 1 or 0+1 disk array for data transfer efficiency and data redundancy. You can use the built-in BIOS array utilities, Windows-based RAID Administration software that is included in the provided installation CD, or any other RAID administration software program for disk array applications. For further information on RAIDs, refer to the RAID manual on the CD that accompanied this server board. Insert the supplied CD into your system’s CD-ROM drive. An auto-run screen will appear. Click the Manuals button and then select the Raid Manual.
User’s Manual
19
$ Caution
The on-board RAID controllers support ATA hard disk drives only. Do not connect any ATAPI devices (CD-ROM, LS-120, MO, or removable media drives) to the HPT-372 controller-supported IDE connectors.
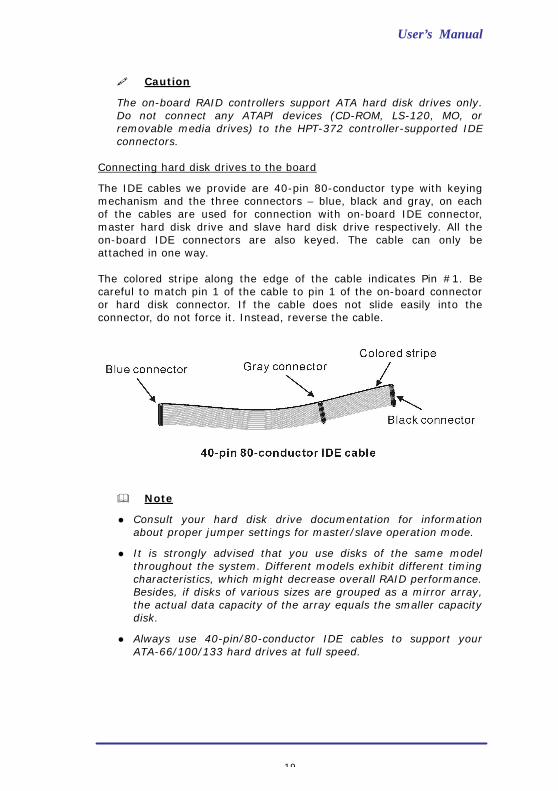
Connecting hard disk drives to the board
The IDE cables we provide are 40-pin 80-conductor type with keying mechanism and the three connectors – blue, black and gray, on each of the cables are used for connection with on-board IDE connector, master hard disk drive and slave hard disk drive respectively. All the on-board IDE connectors are also keyed. The cable can only be attached in one way. The colored stripe along the edge of the cable indicates Pin #1. Be careful to match pin 1 of the cable to pin 1 of the on-board connector or hard disk connector. If the cable does not slide easily into the connector, do not force it. Instead, reverse the cable.
& Note
l Consult your hard disk drive documentation for information about proper jumper settings for master/slave operation mode.
l It is strongly advised that you use disks of the same model throughout the system. Different models exhibit different timing characteristics, which might decrease overall RAID performance. Besides, if disks of various sizes are grouped as a mirror array, the actual data capacity of the array equals the smaller capacity disk.
l Always use 40-pin/80-conductor IDE cables to support your ATA-66/100/133 hard drives at full speed.

SR7 Server Board
20
2.7.2 Floppy Disk Drive Connector
The server board is equipped with a 34-pin FDD connector that supports two floppy disk drives of 360K, 720K, 1.2M, 1.44M or 2.88M. The provided FDD ribbon cable is keyed. It can only be attached to the FDD shrouded connector in one way. It will be very apparent where the cable can be plugged in. Connect one end of the FDD cable to the FDC1 connector and the other end to your first floppy disk drive. If you want to install a second floppy disk drive in your system, have the drive connected with the in-between connector on the FDD cable.

User’s Manual
21
2.7.3 ATX Power Connector
To assure proper system operation, an adequate power supply should be used with the board. The 20-pin ATXPWR1 connector is used for main power supply while the 4-pin ATX1 connector for auxiliary power supply. Use only ATX12V compliant power supplies with the board. ATX12V power supplies have an additional power plug that provides required supplemental power for the Intel Pentium 4 processor. You have to connect both the 20-pin and 4-pin plugs of the ATX12V power supply to the respective connectors on the board, otherwise the board will not boot. Both the connectors are keyed. It is be very apparent where the power cable can be plugged in.
& Note
The server board requires a minimum of 300 Watt power supply. A 350 Watt power supply is recommended to ensure that sufficient power is provided when the system is fully loaded.

SR7 Server Board
22
2.7.4 RJ-45 Gigabit LAN Port
A Broadcom BCM5703C 10/100/1000Base-T Ethernet LAN controller is built in to support a Gigabit LAN port. In the conventional architecture the network functional is built on a PCI-33 bus that is shared by many other PCI devices. This always results in bandwidth insufficiency and network throughput bottleneck. To make a breakthrough, the AK-SR7 server board takes advantage of an independent bus – Alpha Bus, which is directly attached to North Bridge. Alpha-Bus at 32bit/66MHz is intended for exclusive use with the onboard LAN port, which enables broadband communications and high network performance. It runs on the same Category-5 cable that makes up most of the network infrastructure in the building today, letting you enjoy the Gigabit speeds without costly cable replacement.
LED Indicators Two LEDs on the Gigabit LAN port are used as indicators to provide information about LAN status. Gigabit LAN LEDs Color/Status Description
Link/Activity LED Off indicates the link to the LAN port has failed or the port is not switched on.
Solid Yellow indicates the LAN port is in active status.
Blinking Yellow indicates data is being transmitted/received on the port.
User’s Manual
23
Gigabit LAN LEDs Color/Status Description
Speed LED Off indicates the link to the port is operational at 10Mbp.
Orange indicates the link to the port is operational at 100Mbp.
Green indicates the link to the port is operational at 1000Mbp.
Connecting to external LAN LEDs
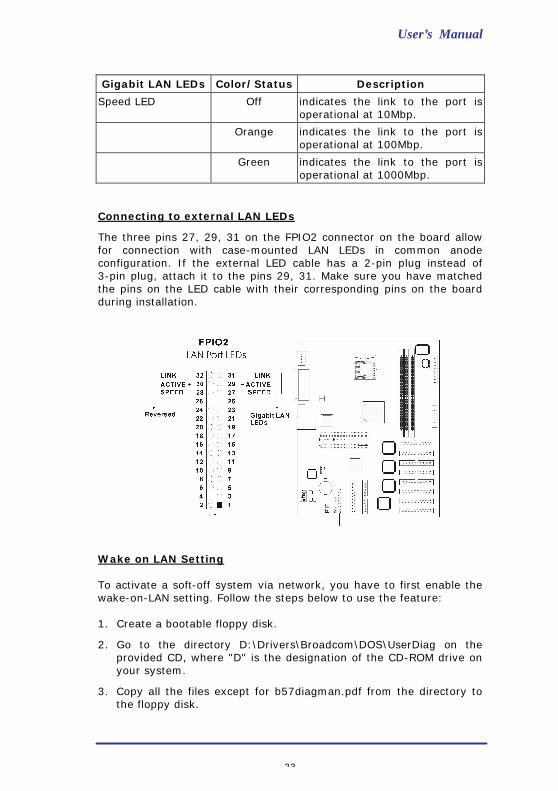
The three pins 27, 29, 31 on the FPIO2 connector on the board allow for connection with case-mounted LAN LEDs in common anode configuration. If the external LED cable has a 2-pin plug instead of 3-pin plug, attach it to the pins 29, 31. Make sure you have matched the pins on the LED cable with their corresponding pins on the board during installation.
Wake on LAN Setting To activate a soft-off system via network, you have to first enable the wake-on-LAN setting. Follow the steps below to use the feature: 1. Create a bootable floppy disk.
2. Go to the directory D:\Drivers\Broadcom\DOS\UserDiag on the provided CD, where "D" is the designation of the CD-ROM drive on your system.
3. Copy all the files except for b57diagman.pdf from the directory to the floppy disk.

SR7 Server Board
24
4. Power on your computer and run the BIOS Setup to change the boot priority items in the “Advanced BIOS Features” page. Select the setting Floppy for the First Boot Device, and then exit the Setup with saving the changes.
5. Turn off the system and insert the floppy disk into the floppy drive, and then power on the system.
6. At the A:\ prompt, type in “b57diag –w 1” to enable the wake-up feature of the Broadcom LAN port.
7. Restart your system and enter the Setup. Set the “Wake-Up by PCI Card/LAN” item to Enabled in the PM Wake Up Event submenu and then exit the Setup with saving the changes.
2.7.5 Serial Ports
The server board supports two serial ports (Teal), which are used for connection with modems, serial printers, mouse and other serial devices. The I/O address of these two ports can be assigned in the BIOS Setup.
2.7.6 Parallel Port
One 25-pin D-Sub parallel port (Burgundy), also called LPT port, is located on the double deck back panel. In the BIOS Setup, this port can be set to Standard, EPP, ECP or EPP+ECP mode.

User’s Manual
25
2.7.7 Keyboard and Mouse Ports
PS/2 keyboard and mouse connectors are located on the back panel. The keyboard is supported in the bottom PS/2 connector (purple) while the mouse is supported in the top PS/2 connector (green).

SR7 Server Board
26
2.7.8 USB Ports
The server board provides two USB (Universal Serial Bus) ports (black), which are located on the double deck back panel. USB allows data exchange between your computer and a wide range of peripherals such as scanner, digital camera, joystick, etc. To use the USB ports, your operating system must support the feature and be installed with proper drivers. Refer to your operating system’s documentation for more information.
User’s Manual
27
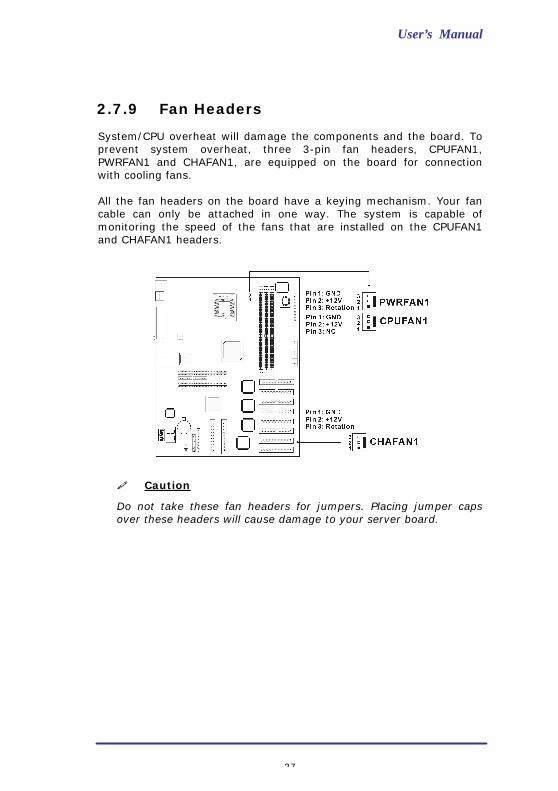
2.7.9 Fan Headers
System/CPU overheat will damage the components and the board. To prevent system overheat, three 3-pin fan headers, CPUFAN1, PWRFAN1 and CHAFAN1, are equipped on the board for connection with cooling fans. All the fan headers on the board have a keying mechanism. Your fan cable can only be attached in one way. The system is capable of monitoring the speed of the fans that are installed on the CPUFAN1 and CHAFAN1 headers. $ Caution
Do not take these fan headers for jumpers. Placing jumper caps over these headers will cause damage to your server board.
SR7 Server Board
28
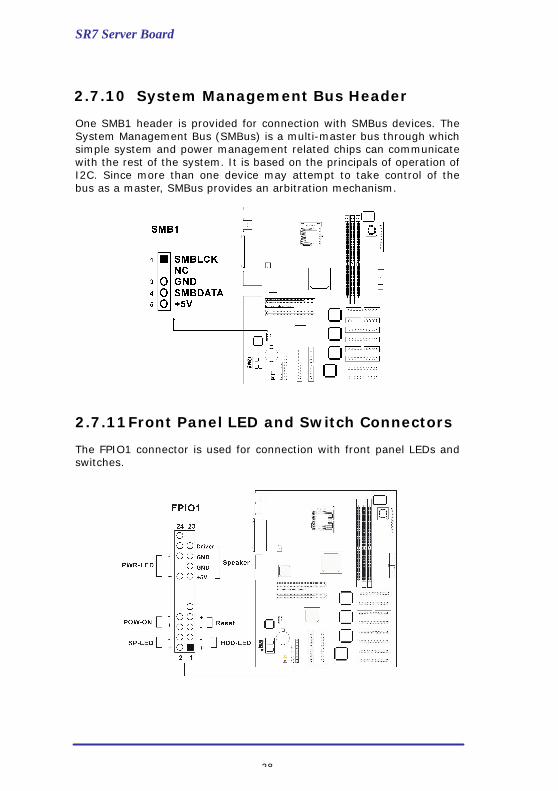
2.7.10 System Management Bus Header
One SMB1 header is provided for connection with SMBus devices. The System Management Bus (SMBus) is a multi-master bus through which simple system and power management related chips can communicate with the rest of the system. It is based on the principals of operation of I2C. Since more than one device may attempt to take control of the bus as a master, SMBus provides an arbitration mechanism.
2.7.11 Front Panel LED and Switch Connectors
The FPIO1 connector is used for connection with front panel LEDs and switches.
User’s Manual
29
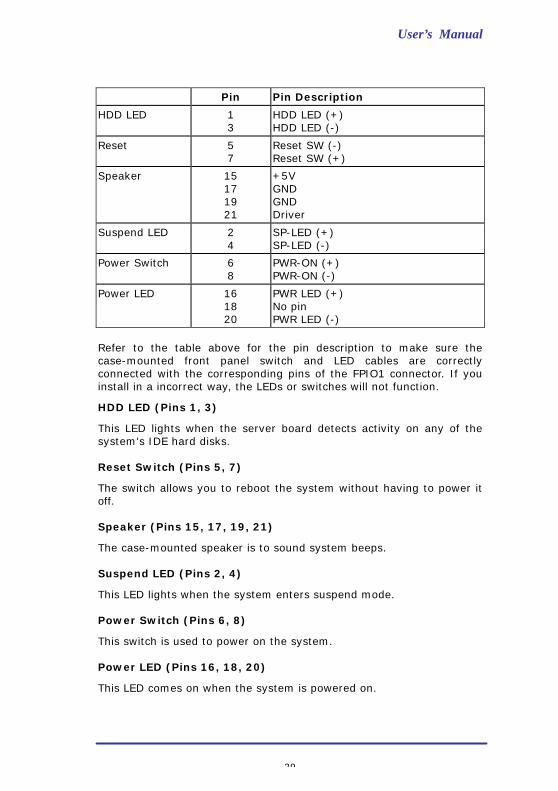
Pin Pin Description
HDD LED
1 3
HDD LED (+) HDD LED (-)
Reset 5 7
Reset SW (-) Reset SW (+)
Speaker 15 17 19 21
+5V GND GND Driver
Suspend LED 2 4
SP-LED (+) SP-LED (-)
Power Switch 6 8
PWR-ON (+) PWR-ON (-)
Power LED 16 18 20
PWR LED (+) No pin PWR LED (-)
Refer to the table above for the pin description to make sure the case-mounted front panel switch and LED cables are correctly connected with the corresponding pins of the FPIO1 connector. If you install in a incorrect way, the LEDs or switches will not function.
HDD LED (Pins 1, 3)
This LED lights when the server board detects activity on any of the system's IDE hard disks. Reset Switch (Pins 5, 7)
The switch allows you to reboot the system without having to power it off. Speaker (Pins 15, 17, 19, 21)
The case-mounted speaker is to sound system beeps. Suspend LED (Pins 2, 4)
This LED lights when the system enters suspend mode. Power Switch (Pins 6, 8)
This switch is used to power on the system. Power LED (Pins 16, 18, 20)
This LED comes on when the system is powered on.

SR7 Server Board
30
POST Codes Display
Note: The decimal point at thebottom right to either of thedigits is always dim.
Example:F F -> Boot Attempt
2.7.12 POST Code Display
During the POST (Power On Self Test), the BIOS generates diagnostic progress codes (POST codes) to I/O port 80h. If the POST fails, execution stops and the last POST code generated is left at port 80h. The AC2001 chip is embedded on the board to decode the port and the on-board two-digit seven-segment LEDs act as a medium for real-time display of the contents of the port at system start-up. This code is useful for determining the point where an error occurred. With POST code display, the user can easily locate a hardware problem and find a solution in a possibly short time.

User’s Manual
31
2.7.13 Internal Power-on and Reset Buttons
The on-board power (brown) and reset (yellow) buttons having the same functions with those of the external case mounted-in power and reset buttons are provided to the user for more convenience when system testing task being conducted.

SR7 Server Board
32
3 BIOS Setup Utility
This chapter provides a description of BIOS Setup program and is intended to guide you through the process of configuring your system using Setup. The Basic Input/Output System (BIOS) is the software that is built into a Read Only Memory (ROM) chip. The function of the BIOS is to initialize the server board hardware and other peripherals, and load the operating system. The Setup program allows users to modify the system configuration. This configuration information is stored in battery-backed RAM so that the information can be retained when the system power is turned off. Once you power on the system, the BIOS is immediately activated The BIOS reads the system information contained in the CMOS and begins the process of checking out the system and configuring it. During this POST (Power On Self Test) period, the following message will appear on the screen: Press DEL to enter SETUP If the message disappear before you respond, you can restart the system by pressing the Reset button or by simultaneously pressing <Ctrl>, <Alt>, <Del> keys. When you press the Del button, the Setup main menu screen will appear. & Note
The BIOS Setup screens/settings appearing in the following sections are for reference only. Your version may not be identical to the screen figures because of version difference.
User’s Manual
33
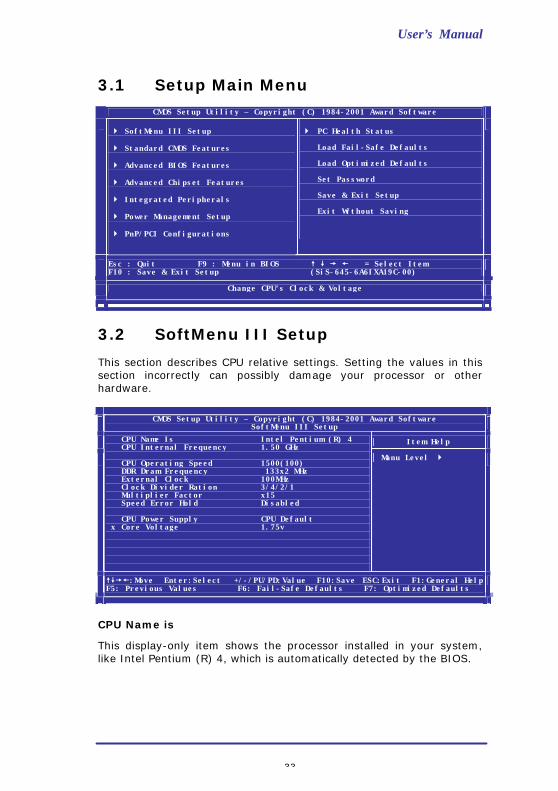
3.1 Setup Main Menu
CMOS Setup Utility – Copyright (C) 1984-2001 Award Software } SoftMenu III Setup
} Standard CMOS Features
} Advanced BIOS Features
} Advanced Chipset Features
} Integrated Peripherals
} Power Management Setup
} PnP/PCI Configurations
} PC Health Status
Load Fail-Safe Defaults
Load Optimized Defaults
Set Password
Save & Exit Setup
Exit Without Saving
Esc : Quit F9 : Menu in BIOS � � � � = Select Item F10 : Save & Exit Setup (SiS-645-6A6IXA19C-00)
Change CPU’s Clock & Voltage
3.2 SoftMenu III Setup
This section describes CPU relative settings. Setting the values in this section incorrectly can possibly damage your processor or other hardware. CMOS Setup Utility – Copyright (C) 1984-2001 Award Software
SoftMenu III Setup
Item Help
CPU Name Is Intel Pentium (R) 4 CPU Internal Frequency 1.50 GHz CPU Operating Speed 1500(100) DDR Dram Frequency 133x2 MHz External Clock 100MHz Clock Divider Ration 3/4/2/1 Multiplier Factor x15 Speed Error Hold Disabled CPU Power Supply CPU Default x Core Voltage 1.75v
Manu Level }
����:Move Enter:Select +/-/PU/PD:Value F10:Save ESC:Exit F1:General Help F5: Previous Values F6: Fail-Safe Defaults F7: Optimized Defaults
CPU Name is
This display-only item shows the processor installed in your system, like Intel Pentium (R) 4, which is automatically detected by the BIOS.
SR7 Server Board
34
CPU Internal Frequency
This display-only item indicates the true internal CPU clock speed. CPU Operating Speed
This category allows you to select the operating speed of your processor directly. When this item is set to User Define, you can decide the CPU operating speed by adjusting the external clock speed and multiplier in the appropriate fields. The other settings in this field will make the External Clock, Multiplier Factor and Speed Error Hold fields locked out. DDR Dram Frequency
This item is display-only. The value is determined by a combination of the following settings.
l External Clock This item allows you to select the CPU external clock speed. l Clock Divider Ratio This item allows the user to set a divider used on the CPU external clock to determine the speed of the DDR SDRAM, AGP and PCI bus. For examples:
Options DDR SDRAM AGP PCI
3/3/2/1 CPU external bus x 3/3
CPU external bus x 2/3
CPU external bus x 1/3
48/80/30/15 CPU external bus x 80/48
CPU external bus x 30/48
CPU external bus x 15/48
We recommend you use the following settings: CPU external clock DDR Dram
frequency Divider ratio
100MHz 100MHz(200MHz) 3/3/2/1
100MHz 133MHz(266MHz) 3/4/2/1
100MHz 166MHz(333MHz) 48/80/30/15
133MHz 100MHz(200MHz) 4/3/2/1
133MHz 133MHz(266MHz) 4/4/2/1
133MHz 166MHz(333MHz) 4/5/2/1 l Multiplier Factor This item allows the user to select the bus clock multiplier.
User’s Manual
35
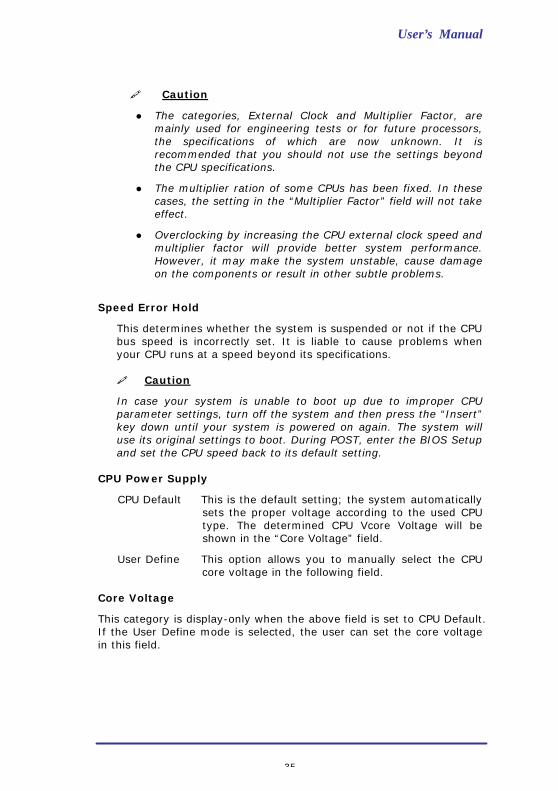
$ Caution
l The categories, External Clock and Multiplier Factor, are mainly used for engineering tests or for future processors, the specifications of which are now unknown. It is recommended that you should not use the settings beyond the CPU specifications.
l The multiplier ration of some CPUs has been fixed. In these cases, the setting in the “Multiplier Factor” field will not take effect.
l Overclocking by increasing the CPU external clock speed and multiplier factor will provide better system performance. However, it may make the system unstable, cause damage on the components or result in other subtle problems.
Speed Error Hold
This determines whether the system is suspended or not if the CPU bus speed is incorrectly set. It is liable to cause problems when your CPU runs at a speed beyond its specifications. $ Caution
In case your system is unable to boot up due to improper CPU parameter settings, turn off the system and then press the “Insert” key down until your system is powered on again. The system will use its original settings to boot. During POST, enter the BIOS Setup and set the CPU speed back to its default setting.
CPU Power Supply
CPU Default This is the default setting; the system automatically sets the proper voltage according to the used CPU type. The determined CPU Vcore Voltage will be shown in the “Core Voltage” field.
User Define This option allows you to manually select the CPU core voltage in the following field.
Core Voltage
This category is display-only when the above field is set to CPU Default. If the User Define mode is selected, the user can set the core voltage in this field.
SR7 Server Board
36
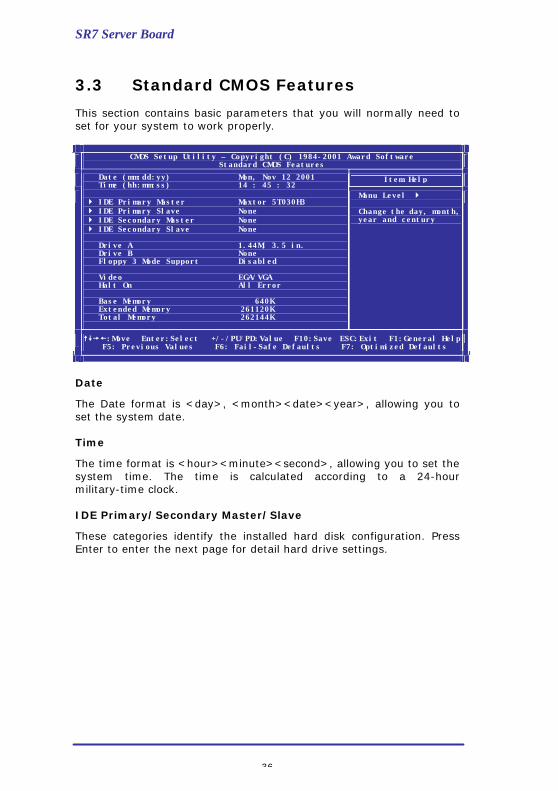
3.3 Standard CMOS Features
This section contains basic parameters that you will normally need to set for your system to work properly. CMOS Setup Utility – Copyright (C) 1984-2001 Award Software
Standard CMOS Features
Item Help
Date (mm:dd:yy) Mon, Nov 12 2001 Time (hh:mm:ss) 14 : 45 : 32 } IDE Primary Master Maxtor 5T030H3 } IDE Primary Slave None } IDE Secondary Master None } IDE Secondary Slave None Drive A 1.44M, 3.5 in. Drive B None Floppy 3 Mode Support Disabled Video EGA/VGA Halt On All Error Base Memory 640K Extended Memory 261120K Total Memory 262144K
Manu Level } Change the day, month, year and century
����:Move Enter:Select +/-/PU/PD:Value F10:Save ESC:Exit F1:General Help F5: Previous Values F6: Fail-Safe Defaults F7: Optimized Defaults
Date
The Date format is <day>, <month><date><year>, allowing you to set the system date. Time
The time format is <hour><minute><second>, allowing you to set the system time. The time is calculated according to a 24-hour military-time clock. IDE Primary/Secondary Master/Slave
These categories identify the installed hard disk configuration. Press Enter to enter the next page for detail hard drive settings.

User’s Manual
37
CMOS Setup Utility – Copyright (C) 1984-2001 Award Software
IDE Primary Master
Item Help
IDE HDD Auto-Detection Press Enter IDE Primary Master Auto Access Mode Auto Capacity 30737 MB Cylinder 59554 Head 16 Precomp 0 Landing Zone 59553 Sector 63
Manu Level }} To auto-detect the HDD’s size, head...on this channel
����:Move Enter:Select +/-/PU/PD:Value F10:Save ESC:Exit F1:General Help F5: Previous Values F6: Fail-Safe Defaults F7: Optimized Defaults
IDE HDD Auto-Detection
Press Enter to proceed with the hard disk auto-detection task. IDE Primary/Secondary Master/Slave
We recommend the setting of Auto; the BIOS will detect the parameters of the installed hard disks automatically. If the detection task is successfully completed, the detected values of the hard disk will be shown in the appropriate fields below.
l Access Mode Some operating systems cannot support hard disk drives larger than 528MB and require that you select a specific access mode. Only if you choose an option except for Auto, the sequent items are allowed for further setting. Options: Auto (default), CHS, LBA, Large Auto
The BIOS will auto-detect the access mode of the installed hard disk drive. CHS (Normal Mode)
If you select this mode, the maximum accessible HDD size will be 528 MB even though its physical size may be greater than that. CHS stands for cylinder, head, sector; the maximum number of the three parameters is 1024, 16 and 63 respectively. These parameters are used in hard disk geometry specifications. In this mode, there is no translation done at the BIOS level.

SR7 Server Board
38
LBA (Logical Block Addressing)
For modern high capacity hard disk drives that use Int13h extensions, only logical block address is used. The addressing in both CHS and Large mode is done in terms of cylinder, head and sector numbers. Instead of the addressing way both CHS and Large modes use, LBA involves a totally new way of addressing sectors. The number of cylinders, heads & sectors shown in its submenu may not be the number physically contained in the HDD. & Note
To use LBA, your operating system needs to support Int13h extensions. Large Mode (ECHS)
Some IDE HDDs contain more than 1024 cylinders without LBA support. The user can select this mode to support these kinds of HDDs. This mode adds a translation step that changes the way the geometry appears in order to break the 528 MB bottleneck, but the addressing is still done in terms of cylinder, head and sector numbers. l Capacity This field shows the approximate capacity of the disk drive. Usually, the capacity size is slightly greater than that of a formatted disk given by a disk checking program.
l Cylinder The field shows the number of cylinders for the hard disk. l Head The field shows the number of read/write heads the disk. l Precomp Some older hard disks use the same number of sectors per track, including both the inner and outer tracks and required that an adjustment be made when writing the inside tracks. This field shows the track number at which this compensation was to begin. l Landing Zone Landing zone is an area where no data is placed and the heads will be placed for landings. This field shows the landing zone for the drives that don’t have auto-parking. l Sector This field shows the number of sectors on each track (cylinder and head combination).
User’s Manual
39
Drive A/Drive B
This is used to identify the type of drive A/drive B that has been installed in the system. Options: None, 360K, 5.25 in, 1.2M, 5.25 in, 720K, 3.5 in, 1.44M, 3.5 in, 2.88M, 3.5 in Floppy 3 Mode Support
The floppy 3 mode is a Japanese standard floppy drive mode. This standard stores 1.2MB on a 3.5" diskette instead of 1.44MB. Options: Disabled (default), Drive A, Drive B, Both Video
Used to select the type of video adapter for your system monitor. Options: EGA/VGA (default), CGA 40, CGA 80 and MONO Halt On
Used to determine whether the computer will stop or not if an error is detected during power up.
No errors The system boot will not be stopped for any error that may be detected.
All errors Whenever the BIOS detects a non-fatal error the system boot will be stopped and you will be prompted.
All, But Keyboard The system boot will not stop for a keyboard error; it will stop for all other errors.
All, But Diskette The system boot will not stop for a disk error; it will stop for all other errors.
All, But Disk/Key The system boot will not stop for a keyboard or disk error; it will stop for all other errors.
Base Memory
The BIOS determines the amount of base (or conventional) memory installed in the system. The value of the base memory is typically 512K for systems with 512K memory installed on the board, or 640K for systems with 640K or more memory installed on the board.

SR7 Server Board
40
Extended Memory
This is the amount of memory located above 1MB in the CPU’s memory address map. The BIOS determines how much extended memory is present during POST. Total Memory
The field shows the total memory in the system.
3.4 Advanced BIOS Features
This section contains some advanced features for controlling the behavior of your system. Certain settings here, if enabled, will improve the performance of your system. CMOS Setup Utility – Copyright (C) 1984-2001 Award Software
Advanced BIOS Features
Item Help
Virus Warning Disabled CPU L1 & L2 Cache Enabled CPU L2 Cache ECC Checking Enabled Quick Power On Self Test Enabled First Boot Device Floppy Second Boot Device HDD-0 Third Boot Device LS120 Boot Other Device Enabled Swap Floppy Seek Disabled Boot Up Floppy Seek Disabled Boot Up NumLock Status On Typematic Rate Setting Enabled - Typematic Rate 30 Chars/Sec - Typematic Delay 250 Msce Security Option Setup OS Select For DRAM > 64MB Non-OS2 HDD S.M.A.R.T. Capability Disabled Report No FDD For WIN 95 No Video BIOS Shadow Enabled Delay IDE Initial 0 Sec(s) Small Logo(EPA) Show Disabled
Manu Level } Allows you to choose the VIRUS warning feature for IDE Hard Disk boot sector protection. If this function is enabled and someone attempt to write data into this area , BIOS will show a warning message on screen and alarm beep
����:Move Enter:Select +/-/PU/PD:Value F10:Save ESC:Exit F1:General Help F5: Previous Values F6: Fail-Safe Defaults F7: Optimized Defaults

User’s Manual
41
Virus Warning
By default, this item is disabled. When enabled, the BIOS will monitor the boot sector. If any attempt to write to this area is made, the BIOS will give you a warning message. & Note
Many disk diagnostic programs that access the boot sector table can trigger a warning message. If you will be running such a program, it is recommended that you disable Virus Warning beforehand.
CPU L1 & L2 Cache
By default, this item is enabled. Most systems today have L1 and L2 cache, therefore it is recommended that you leave this field on its default setting for performance increase. Disabling this item will impact the system performance. CPU L2 Cache ECC Checking
By default, this feature is enabled; single-bit errors in data stored in the L2 cache will be detected and corrected while double-bit errors will be also detected but not corrected. Quick Power On Self Test
This category speeds up Power On Self Test (POST) after you power up the computer. If it is set to Enabled, BIOS will shorten or skip some check items during POST. First Boot Device/Second Boot Device/Third Boot Device
The BIOS will load the operating system from the disk drives in the sequence according to the settings in these categories. Options: Floppy, LS120, HDD-0, SCSI, CDROM, HDD-1, HDD-2, HDD-3, ZIP100, LAN, Disabled Boot Other Device
When enabled (default), the BIOS will try to search for other devices, if it fails to load the operating system from the device specified in the preceding fields. Swap Floppy Drive
By default, this feature is disabled. When enabled, it will swap the logical arrangement of floppy drives, meaning that the first drive conventionally mapped as drive A will be took for drive B without the bother of opening up the case to do it physically.
SR7 Server Board
42
Boot Up Floppy Seek
By default, this feature is disabled. When this field is set to Enabled, the BIOS will check for a floppy drive while booting up. Boot Up NumLock Status
This item decides the functionality of the numeric keypad at start-up. By default, this item is set to On; the numeric keypad will function in the numeric mode (for typing out numbers). If your preference is to use the numeric keypad for cursor controlling, set this item to Off. Typematic Rate Setting
This item enables you to control the keystroke repeat rate when you depress a key continuously. When enabled (default), you can manually adjust the settings in the following two fields; otherwise, the BIOS uses the default setting and the following two fields are locked out. Typematic Rate (Chars/Sec)
Used to set the rate at which the keyboard will repeat the keystroke if you press it continuously. This setting will work only if Typematic Rate Setting is enabled. Options: 6, 8, 10,12, 15, 20, 24, 30 (default) Typematic Delay (Msec)
Used to select the delay, in milliseconds, before the keyboard automatically repeats the keystroke that you have pressed continuously. This setting will work only if Typematic Rate Setting is enabled. Options: 250 (default), 500, 750, 1000. Security Option
This option will work only if you have created a password through the Set Password field in the BIOS Setup main menu. The setting controls the access to the system and BIOS Setup.
System The BIOS will ask for the password each time the system boots up and access to Setup is attempted. If the correct password is not entered at the prompt, the system will not boot and access to BIOS Setup will also be denied.
Setup The password is only required for access to the BIOS Setup. The system will boot, but access to BIOS Setup will be denied if the correct password is not entered at the prompt.
User’s Manual
43
& Note
l To disable security, select Set Password in the Setup main menu and then you will be prompted for a password. Type in nothing but press <Enter>. The message showing password disabled will appear. Save the changes and exit the BIOS and then you can enter the system without the password entered.
l If you forget the password and the system failed to boot, you have to go through a tedious process of opening the case, adjusting the jumper for clearing the CMOS and resetting the previous BIOS options. It is recommended that you keep your password in a safety place.
OS Select For DRAM >64MB
When the system memory is more than 64MB in size, older version of OS/2 differs from other operating systems (OS) in the way it manages the RAM. If you use this type of OS, set this item to OS/2, otherwise, leave it on its default, Non-OS2. HDD S.M.A.R.T. Capability
The serverboard supports SMART (Self-Monitoring, Analysis and Reporting Technology) which is a reliability prediction technology for hard disk drives. The SMART-supported drives will issue a warning message to the system prior to the drive failure so that the user can backup the data before any data loss. By default, this item is disabled. If your hard disk drives support SMART, set this item to Enabled. Report No FDD For WIN 95
If you are using Windows 95 without a floppy disk drive, select Yes, otherwise, leave this item on its default setting - No. Video BIOS Shadow
By default, this feature is enabled; the video BIOS will be copied to RAM for quicker access. Relay IDE Initial
Some IDE devices may not be able to spin up fast enough for the BIOS to detect them during the booting up process. This setting is used to delay the initialization of such IDE devices during boot-up. Leave it on its default – 0, if possible, for faster system booting. But if one or more of your IDE devices fail to initialize while booting, increase the value of this setting until they all initialize properly.

SR7 Server Board
44
Small Logo(EPA) Show
By default, this item is disabled. When set to enabled, the EPA logo will appear during system boot-up.
3.5 Advanced Chipset Features
Most of the settings in this section are associated with fine-tuning control over the system cache, memory, and I/O buses for system performance optimization. However, some of the settings have the potential to disturb your system. If you do not fully understand what the selected setting will result in, it is usually best to leave the item at its default setting. CMOS Setup Utility – Copyright (C) 1984-2001 Award Software
Advanced Chipset Features
Item Help
Advanced DRAM Control 1 Press Enter Prefetch Caching Disabled Memory Hole at 15M-16M Disabled Graphic Window WR Combin Enabled
Manu Level }
����:Move Enter:Select +/-/PU/PD:Value F10:Save ESC:Exit F1:General Help F5: Previous Values F6: Fail-Safe Defaults F7: Optimized Defaults
Advanced DRAM Control 1
Move your cursor to this category and press Enter to enter its submenu.

User’s Manual
45
CMOS Setup Utility – Copyright (C) 1984-2001 Award Software
Advanced DRAM Control 1
Item Help
System Performance Normal Mode x - DDR RAS Precharge Time 3T x - DDR RAS to CAS Delay 3T x - DDR Write Recovery Time 2T x - Timing Constraint Cntl Slow x - GW Write Mask AGP Request Enabled CAS Latency Setting 2.5T Dram Driving Strength Auto x PMOS Driving Rating 4.0x x NMOS Driving Rating 3.5x
Manu Level }
����:Move Enter:Select +/-/PU/PD:Value F10:Save ESC:Exit F1:General Help F5: Previous Values F6: Fail-Safe Defaults F7: Optimized Defaults
l System Performance When this item is set to Manual Mode, the subsequent fields are allowed for further setting. Options: Normal Mode (default), Fast Mode, Turbo Mode, Ultra Mode, Manual Mode, Safe Mode
l DDR RAS Precharge Time Select the number of CPU clocks allocated for the Row Address Strobe (RAS#) signal to accumulate its charge before the DRAM is refreshed. If insufficient time is set, refresh may be incomplete and the DRAM may fail to retain data.
l DDR RAS to CAS Delay This item allows you to tweak the delay between the two signals that control the RAS and CAS. The selected number dictates how many CPU clock cycles the memory needs in order to prepare for another access. The setting 3 is normal, but decreasing to 2 might speed up performance. As usual, if this results in any instability, change it back to 3. Options: 3T, 2T, 4T
l DDR Write Recovery Time This item determines the number of clock cycles that will occur from the last valid write operation to the earliest time a new Precharge command can be asserted to the same bank. Options: 2T (default), 1T
l Timing Contraint Cntl The field determines timing constraint control on DDR SDRAM back-to-back write commands which are issued to different ranks.

SR7 Server Board
46
Options: Slow (default), Normal
l GW Write Mask AGP Request The default is Enabled; a graphic window write operation will forbid AGP device to access memory until this write operation is finished. When disabled, AGP request can access memory as usual.
CAS Latency Setting
This controls the time delay that passes before the SDRAM starts to carry out a read command after receiving it. Options: 2T, 2.5T (default), 3T Dram Driving Strength
By default, this item is set to Auto. When set to Manual, the following two fields are allowed for further setting. Options: Auto (default), Manual PMOS Driving Rating
The options range from 0.5x to 4.0x in an increment of 0.5. NMOS Driving Rating
The options range from 0.5x to 4.0x in an increment of 0.5. Prefetch Caching
Used to enable or disable (default) PCI slave control prefetch caching. Memory Hole at 15M-16M
Some interface cards will map their ROM address to 15M-16M. This item allows you to set aside this memory space for these cards. This item should be disabled unless you have a card that requires the particular memory addresses. Options: Disabled (default), Enabled Graphic Window WR Combin
By default, this item is enabled; the register that defines the starting address of the graphic windows for GUI (Graphic Unit Interface) is enabled.

User’s Manual
47
3.6 Integrated Peripherals
This section discusses settings that control your system's integrated peripherals. These settings are used to enable or disable integrated peripheral support, and set the various resources they use. CMOS Setup Utility – Copyright (C) 1984-2001 Award Software
Integrated Peripherals
Item Help
} SIS OnChip IDE Device Press Enter } Onboard SupperIO Device Press Enter USB Controller Enabled - USB Keyboard Support OS IDE HDD Block Mode Enabled Onboard HPT A Controller Enabled Onboard HPT B,C,D Controller Enabled Onboard LAN Controller Enabled Init Display First PCI Slot AGP Auto Calibration Enabled IDE Access Interface Embedded Bus USB1 Access Interface Embedded Bus USB0 Access INterface Embedded Bus
Manu Level }
����:Move Enter:Select +/-/PU/PD:Value F10:Save ESC:Exit F1:General Help F5: Previous Values F6: Fail-Safe Defaults F7: Optimized Defaults
SIS OnChip IDE Device
Move the cursor to this field and press Enter. A submenu looks like the following figure will appear allowing for further setting. CMOS Setup Utility – Copyright (C) 1984-2001 Award Software
SIS OnChip IDE Device
Item Help
Internal PCI/IDE Both - IDE Burst Mode Enabled - IDE Primary Master PIO Auto - IDE Primary Slave PIO Auto - IDE Secondary Master PIO Auto - IDE Secondary Slave PIO Auto - Primary Master Ultra DMA Auto - Primary Slave Ultra DMA Auto - Secondary Master Ultra DMA Auto - Secondary Slave Ultra DMA Auto
Manu Level }
����:Move Enter:Select +/-/PU/PD:Value F10:Save ESC:Exit F1:General Help F5: Previous Values F6: Fail-Safe Defaults F7: Optimized Defaults

SR7 Server Board
48
Internal PCI/IDE
Used to enable or disable either of the IDE channels supported by the SIS on-chip IDE controller. Options: Disabled, Primary, Secondary, Both (default). Depending on the setting in this field, the corresponding items below will be available for further setting. If no disk drive is attached to an IDE channel, disabling the channel can free an IRQ for other use. IDE Burst Mode
When this item is enabled, the latency between each drive read/write cycle will be reduced but this may cause instability in IDE subsystems that cannot support such fast performance. If any disk drive error occurs, set this item to Disabled. IDE Primary/Secondary Master/Slave PIO
These IDE PIO (Programmed Input/Output) categories allow you to set a PIO mode for each of the four IDE devices. The options ranging from Modes 0 through 4, which primarily differ in timing, provide successively increased performance. Normally, you should leave it as Auto and let the BIOS auto-detect the IDE drive's PIO mode. Primary/Secondary Master/Slave Ultra DMA
UDMA is a DMA data transfer protocol that utilizes ATA commands and the ATA bus to allow DMA commands to transfer data at a maximum burst rate. Normally, you should leave it as Auto and let the BIOS auto-detect the optimal data transfer rate for each IDE device. You should only disable it for troubleshooting purposes. Options: Disabled, Auto (default)

User’s Manual
49
Onboard Super IO Device
Move the cursor to this field and press Enter. A submenu looks like the following figure will appear. CMOS Setup Utility – Copyright (C) 1984-2001 Award Software
Onboard SuperIO Device
Item Help
Onboard FDD Controller Enabled Onboard Serial Port 1 3F8/IRQ4 Onboard Serial Port 2 2F8/IRQ3 Onboard Parallel Port 378/ IRQ7 Parallel Port Mode SPP x - EPP Mode Select EPP1.7 x - ECP Mode Use DMA 3
Manu Level }}
����:Move Enter:Select +/-/PU/PD:Value F10:Save ESC:Exit F1:General Help F5: Previous Values F6: Fail-Safe Defaults F7: Optimized Defaults
Onboard FDD Controller
This is used to enable (default) or disable the onboard floppy disk controller. If you install an add-in FDC or the system has no floppy drive, set this item to Disabled. Onboard Serial Port 1/Port2
The fields allow you to select an address and corresponding IRQ for the first and second serial ports. The options are: Disabled, 3F8/IRQ4, 2F8/IRQ3, 3E8/IRQ4, 2E8/IRQ3, Auto. The default setting for serial port 1 and port 2 are 3F8/IRQ4 and 2F8/IRQ3 respectively. Onboard Parallel Port
This is used to enable or disable the onboard parallel port. It require you to select an address and corresponding IRQ to enable this item. Options: Disabled, 378/IRQ7 (default), 278/IRQ5, 3BC/IRQ7. Parallel Port Mode
Select an operating mode for the parallel port. The options are: SSP (default), EPP, ECP, ECP+EPP. SSP (Stand Parallel Port) allows normal speed operation but in one direction only. EPP (Extended Parallel Port) allows the port to operate in bi-directional mode. ECP (Extended Capabilities Port) allows the port to operate in bi-directional DMA mode. EPP + ECP allows normal speed in a bi-directional mode.
SR7 Server Board
50
EPP Mode Select
This field is available for setting only if Parallel Port Mode is set to EPP or ECP+EPP. Options: EPP 1.9, EPP 1.7 (default) ECP Mode Use DMA
This field is available for setting only if Parallel Port Mode is set to ECP or ECP+EPP. Options: 1, 2, 3 (default) USB Controller
Leave this item on its default setting - Enabled, if your system contains a Universal Serial Bus (USB) controller and you have USB peripherals. If you wish to use an additional USB controller with better performance, disable this item. USB Keyboard Support
This item is available for setting only if USB Controller is enabled. Select OS, if your operating system supports a USB keyboard, otherwise, set it to BIOS. Options: OS (default), BIOS IDE HDD Block Mode
Block mode allows the grouping of multiple read or write commands over the IDE/ATA interface so that they can be handled on a single interrupt for performance enhancement. By default, this mode is enabled, allowing the system to perform accesses to the hard disk in block mode. What this means is that more than one sector can be transferred on each interrupt. Newer drives mostly support this mode. If you experience lockups or problems with your hard disk or other peripherals, disable it. Onboard HPT A Controller
Enable (default) or disable the first on-board disk array controller. Only if this field is enabled, the hard disk drives attached to IDE 3 and IDE 4 connectors will work. Onboard HPT B,C,D Controller
Enable (default) or disable the second/third/forth on-board disk array controllers. Only if this field is enabled, the hard disk drives attached to IDE 5 ~ IDE 10 connectors will work. Onboard LAN Controller
Enable (default) or disable the on-board Gigabit LAN controller. Only if this field is enabled, the Gigabit LAN port will work.

User’s Manual
51
Init Display First
Used to decide if the AGP video display or the PCI display is initialized first during system boot-up. When set to AGP, AGP display becomes the primary display. Options: PCI Slot (default), AGP IDE Access Interface
Select the access interface your IDE devices use. Options: Embedded Bus (default), PCI Bus USB1 Access Interface
Select the access interface your USB1 devices use. Options: Embedded Bus (default), PCI Bus USB0 Access Interface
Select the access interface your USB0 devices use. Options: Embedded Bus (default), PCI Bus

SR7 Server Board
52
3.7 Power Management Setup
Power management is used to reduce the power consumption of systems when someone walks away from their PC or stops using it after a period of time, by sending the hardware into a "sleep mode" of sorts. CMOS Setup Utility – Copyright (C) 1984-2001 Award Software
Power Management Setup
Item Help
ACPI Suspend Type S1(PowerOn-Suspend) MODEM Use IRQ AUTO HDD Off After Disabled Power Button Override Instant Off Power State Resume Control Always Off } PM Wake Up Events Press Enter
Manu Level }
����:Move Enter:Select +/-/PU/PD:Value F10:Save ESC:Exit F1:General Help F5: Previous Values F6: Fail-Safe Defaults F7: Optimized Defaults
ACPI Suspend Type
The options: S1 (Power On Suspend, default), S3 (Suspend To RAM) MODEM Use IRQ
By default, this item is set to Auto; the BIOS will automatically assign an IRQ for your modem, if there is one in your system. You may specify a IRQ manually. Options: Auto (default), 3, 4, 5, 7, 9, 10, 11 HDD Off After
By default, this item is disabled. Instead, you can set a time ranging from 1 Min through 15 Min. After the set time period of drive inactivity, the hard disk drive powers down while all other devices remain active. Power Button Override
The default is Instant Off; power button acts like a normal ATX power button, i.e. push one time and all power shut down. When set to Delay 4 Sec., pushing the power button more than 4 seconds will shut down the system.

User’s Manual
53
Power State Resume Control
Always Off When power resumes from an AC power failure, the system’s power is off.
Turn On When power resumes from an AC power failure, the system will automatically power on.
Keep Pre-State When power resumes from an AC power failure, the system will return to the last power state.
PM Wake Up Events
Move the cursor to this field and press Enter to enter the submenu. In the PM Wake Up Events submenu, you may disable activity monitoring of some common I/O events and interrupt requests so they do not wake up the system. CMOS Setup Utility – Copyright (C) 1984-2001 Award Software
PM Wake Up Events
Item Help
IRQ [3-7,9-15], NMI Enabled IRQ 8 Break Suspend Disabled Power On by Ring Disabled Wake-Up by PCI Card/LAN Disabled USB Port Wake Up Control Disabled KB Power On Password Enter Resume by Alarm Disabled x - Month Alarm NA x - Date (of Month) Alarm 0 x - Time (hh:mm:ss) Alarm 0 46 0
Manu Level }
����:Move Enter:Select +/-/PU/PD:Value F10:Save ESC:Exit F1:General Help F5: Previous Values F6: Fail-Safe Defaults F7: Optimized Defaults
IRQ [3-7 9-15], NMI
By default, this item is enabled; any activity from an IRQ among IRQ3-IRQ7, IRQ9-IRQ15 will wake up the powered-down system. IRQ 8 Break Suspend
You can Enable or Disable monitoring of IRQ8 (the Real Time Clock) so it does not awaken the system from Suspend mode. Power On by Ring
The default is Disabled. When enabled, any event from the external modem ring will power on the system.

SR7 Server Board
54
Wake-Up by PCI Card/LAN
The default is Disabled. To use the remote wake-up function, enable this item. Take note that you have to use the PCI LAN card that supports PME (Power Management Event) to use this function. USB Port Wake Up Control
By default, this is disabled. When enabled, any activity on a USB port will awaken the system. KB Power ON Password
To use a password to wake up the system, move the cursor to this field and press Enter. Enter a password that is not more than 8 characters. Type in exactly the same password again to confirm, and then press Enter. Resume by Alarm
The default is Disabled. When enabled, you can set the month, date and time in the subsequent fields. On the set date and time, the system will be powered on automatically. Month Alarm/Date (of Month) Alarm/Time (hh:mm:ss) Alarm
Set the time in these fields at the set time you would like the system to power on automatically.

User’s Manual
55
3.8 PnP/PCI Configurations
This section deals specifically with the PCI bus and Plug and Play (PnP) settings. It covers some advanced settings and it is highly recommended that only experienced users should make any changes to the default settings. CMOS Setup Utility – Copyright (C) 1984-2001 Award Software
PnP/PCI Configurations
Item Help
Force Update ESCD Disabled Resources Controlled By Auto(ESCD) x - IRQ Resources Press Enter PCI/VGA Palette Snoop Disabled Allocate IRQ to VGA Enabled Allocate IRQ to USB Enabled PIRQ_0 Use IRQ No. Auto PIRQ_1 Use IRQ No. Auto PIRQ_2 Use IRQ No. Auto PIRQ_3 Use IRQ No. Auto
Manu Level } Default is Disabled. Select Enabled to reset Extended System Configuration Data (ESCD) when you exit Setup if you have installed a new add-on and the system reconfiguration has caused such a serious conflict that the OS cannot boot
����:Move Enter:Select +/-/PU/PD:Value F10:Save ESC:Exit F1:General Help F5: Previous Values F6: Fail-Safe Defaults F7: Optimized Defaults
Force Update ESCD
ESCD stands for "Extended System Configuration Data" where resource information is stored on a system that uses Plug and Play. Normally, you leave this field Disabled. If you have installed a new add-on card and the system reconfiguration results in system boot failure, enable this item to update ESCD. Resources Controlled By
The default is Auto(ESCD). The Award Plug and Play BIOS will automatically allocate the resources and the subsequent field, IRQ Resources, will be locked out. When set to Manual, you can move the cursor to the IRQ Resources field and then press Enter for manually resource setting. IRQ Resources
Press Enter to enter the submenu.

SR7 Server Board
56
IRQ-3/4/5/7/9/10/11/12/14/15 assigned to
Options: PCI Device, Reserved CMOS Setup Utility – Copyright (C) 1984-2001 Award Software
- IRQ Resources
Item Help
IRQ-3 assigned to PCI Device IRQ-4 assigned to PCI Device IRQ-5 assigned to PCI Device IRQ-7 assigned to PCI Device IRQ-9 assigned to PCI Device IRQ-10 assigned to PCI Device IRQ-11 assigned to PCI Device IRQ-12 assigned to PCI Device IRQ-14 assigned to PCI Device IRQ-15 assigned to PCI Device
Manu Level } Legacy ISA for devices compliant with the original PC AT bus specification, PCI/ISA PnP for devices compliant with the Plug and Play standard whether designed for PCI or ISA bus architecture
����:Move Enter:Select +/-/PU/PD:Value F10:Save ESC:Exit F1:General Help F5: Previous Values F6: Fail-Safe Defaults F7: Optimized Defaults
PCI/VGA Palette Snoop
Non-standard VGA display adapters such as graphics accelerators or MPEG video cards may not show colors properly. Enabling this item may correct this problem, otherwise leave this setting on its default setting, Disabled. Allocate IRQ to VGA
By default, this item is enabled, allowing you to assign IRQ to VGA. If your system is not connected with the VGA device, disable this item to release the IRQ. Allocate IRQ to USB
By default, this item is enabled, allowing you to assign IRQ to USB. If your system is not connected with the USB device, disable this item to release the IRQ. PIRQ_0/1/2/3 Use IRQ No.
When set to Auto, the system will automatically assign an IRQ for the PCI devices. When set to Manual, you can specify an IRQ for the PCI device. Options: Auto (default), 3, 4, 5, 7, 9, 10, 11, 12, 14, 15
User’s Manual
57
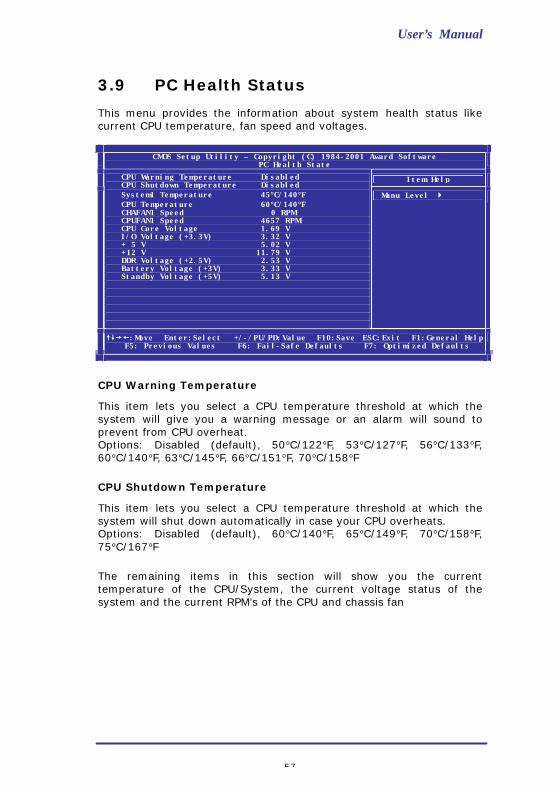
3.9 PC Health Status
This menu provides the information about system health status like current CPU temperature, fan speed and voltages. CMOS Setup Utility – Copyright (C) 1984-2001 Award Software
PC Health State
Item Help
CPU Warning Temperature Disabled CPU Shutdown Temperature Disabled System1 Temperature 45°C/140°F CPU Temperature 60°C/140°F CHAFAN1 Speed 0 RPM CPUFAN1 Speed 4657 RPM CPU Core Voltage 1.69 V I/O Voltage (+3.3V) 3.32 V + 5 V 5.02 V + 12 V 11.79 V DDR Voltage (+2.5V) 2.53 V Battery Voltage (+3V) 3.33 V Standby Voltage (+5V) 5.13 V
Manu Level }
����:Move Enter:Select +/-/PU/PD:Value F10:Save ESC:Exit F1:General Help F5: Previous Values F6: Fail-Safe Defaults F7: Optimized Defaults
CPU Warning Temperature
This item lets you select a CPU temperature threshold at which the system will give you a warning message or an alarm will sound to prevent from CPU overheat. Options: Disabled (default), 50°C/122°F, 53°C/127°F, 56°C/133°F, 60°C/140°F, 63°C/145°F, 66°C/151°F, 70°C/158°F CPU Shutdown Temperature
This item lets you select a CPU temperature threshold at which the system will shut down automatically in case your CPU overheats. Options: Disabled (default), 60°C/140°F, 65°C/149°F, 70°C/158°F, 75°C/167°F The remaining items in this section will show you the current temperature of the CPU/System, the current voltage status of the system and the current RPM’s of the CPU and chassis fan

SR7 Server Board
58
3.10 Load Fail-Safe Defaults
The option allows you to replace most of the current BIOS settings with the predefined settings that are permanently stored in the BIOS ROM. These settings are not used for system performance enhancement; they are intended to put the system as stable a state as possible. You should make this selection only if hardware problems arise and your system becomes unstable. Highlight this option in the Setup Main Menu and press Enter. The following message will appear. Load Fail-Safe Defaults (Y/N)? N Type Y and press Enter to proceed. The default settings will be loaded. 3.11 Load Optimized Defaults
The option allows you to load the factory setting that are intended to put the system into what designers consider an optimal state. You can use this option when starting up the system for the first time to get it closest to what you think an optimal state for best system performance. Highlight this option in the Setup Main Menu and press Enter. The following message will appear. Load Fail-Safe Defaults (Y/N)? N Type Y and press Enter to proceed. The default settings will be loaded. 3.12 Set Password
If you want to protect your system and BIOS Setup from unauthorized entry, you can set a password with the“System” or “Setup” option selected for the “Security” field in the Advanced BIOS Features. To set a password, highlight this option and press Enter in the Main Menu. The message below will appear.
Enter Password Type in the password, which is allowed for up to eight characters, and press Enter. When being prompted for password confirmation, type in exactly the same password and press Enter.
User’s Manual
59
To delete or disable the password function, highlight “Set Password” and press <Enter> in the Main Menu. When being prompted for password setting entry, type in nothing but press <Enter>. The following message will appear confirming the password has been disabled.
Password Disabled After a password has been enabled, the system will be protected from unauthorized users with two security levels, System and Setup. If security is set to System, the password is required for entry to both the system and Setup. The user that has entered the correct password is authorized for access to system and Setup. If security is set to Setup, the password is required only for entry to Setup. 3.13 Save & Exit Setup
When all the changes have been made, highlight “Save & Exit Setup”and press <Enter>. The message below will appear:
Save to CMOS and Exit (Y/N)? Y Type “Y” and press <Enter>. The modifications you have made will be written into the CMOS memory. The system will be reconfigured according to the new settings when it reboots. 3.14 Exit Without Saving
If you do not want to save the changes you have made, highlight this item and press <Enter>. The message below will appear:
Quit Without Saving (Y/N)? Y Type “Y” and press <Enter>. The system will restart based on the previous settings.

SR7 Server Board
60
4 Software Installation
The sever board package contains an Installation CD, which mainly includes manuals, drivers and utilities. To view the detailed contents of the CD, insert the CD into your system’s CD ROM drive. An auto-run screen will appear. If not, run setup.exe under the root directory of the CD as shown in the following screen, where "D:" is the designation of the CD-ROM drive on your system.
User’s Manual
61
4.1 Installing the SiS IDE driver for Windows 2000
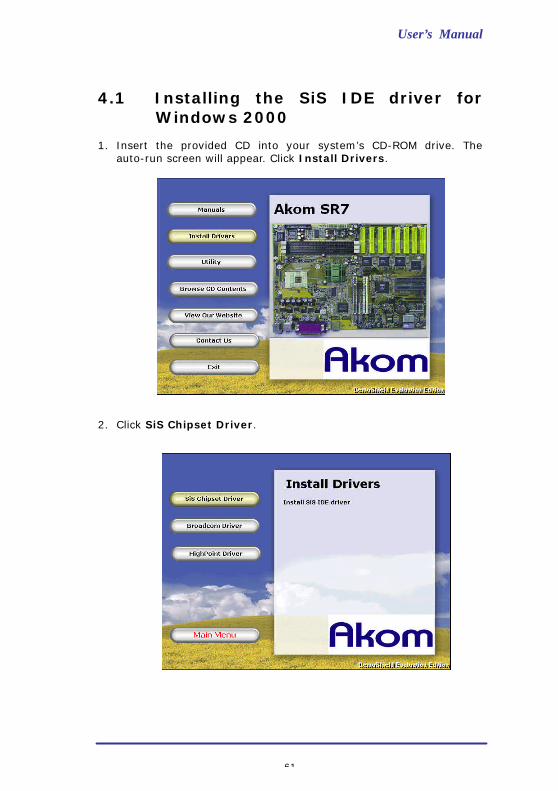
1. Insert the provided CD into your system’s CD-ROM drive. The auto-run screen will appear. Click Install Drivers.
2. Click SiS Chipset Driver.

SR7 Server Board
62
3. Click Next.
4. By default, both the Windows 2000 IDE driver and IDE Utility items
have been selected for installation. If you do not want to install the IDE Utility, click on the Install IDE Utility check box to disable it and then click Next. The selected program will be installed.

User’s Manual
63
4. Reboot your system to have the settings take effect.
4.1.1 SiS IDE Utility
The SiS IDE utility is a user-friendly interface for providing the information about the IDE devices attached to SiS South Bridge IDE channels. If you have selected SiS IDE utility along with IDE driver in course of the installation, you can use the interface by clicking Start -> Programs -> IDEUtil -> SISIDE.

SR7 Server Board
64
Click on the General tab, the connection status of the installed hard disk drives will be shown.
Click on the Device tab, the information about the installed devices will be displayed.

User’s Manual
65
The Driver screen shows the information such as driver version and vendor.

SR7 Server Board
66
4.2 Installing RAID Driver for Windows 2000
The IDE RAID driver must be installed before the HP372 RAID controllers can be used with your Windows 2000 system. The four on-board RAID controllers will be sequentially detected and accordingly the installation procedure will be performed four times. 1. Start your Windows 2000 system and log in. You must have
Network Administrator privileges to install the driver software.
2. The Found New Hardware Wizard window is displayed. Click Next.
3. In the Install Hardware Device Drivers window, click Search for a
suitable driver for my device (recommended), then click Next.
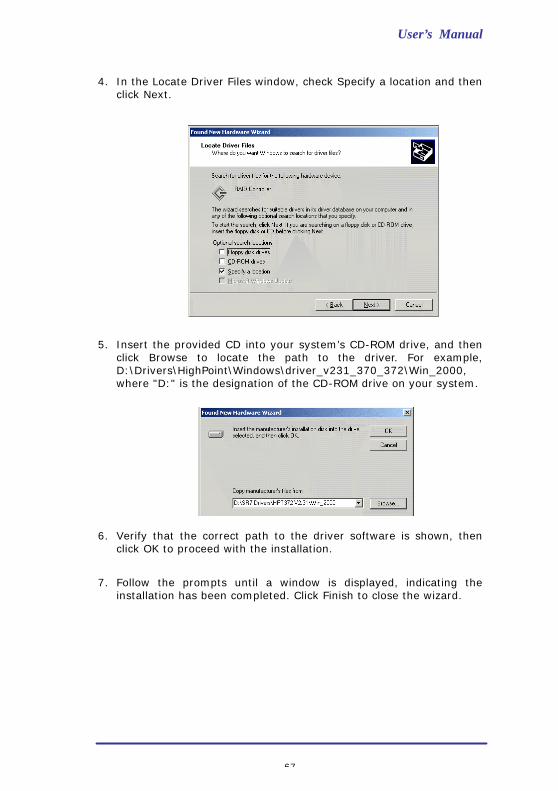
User’s Manual
67
4. In the Locate Driver Files window, check Specify a location and then click Next.
5. Insert the provided CD into your system’s CD-ROM drive, and then click Browse to locate the path to the driver. For example, D:\Drivers\HighPoint\Windows\driver_v231_370_372\Win_2000, where "D:" is the designation of the CD-ROM drive on your system.
6. Verify that the correct path to the driver software is shown, then
click OK to proceed with the installation.
7. Follow the prompts until a window is displayed, indicating the
installation has been completed. Click Finish to close the wizard.

SR7 Server Board
68
4.2.1 Verifying Installation
When the driver has been successfully installed and the computer restarts, 1. Right-click the My Computer icon on desktop, and then click
Property.
2. Click Hardware and then Device Manager.
If there appears HPT372 UDMA/ATA133 RAID Controller items and no exclamation marks or question marks on their left, it means that the drivers have been successfully installed.
4.3 Installing Driver in the process of Windows 2000 installation
If you want to install the Windows operating system on a HPT372 RAID controller-supported disk, the disk must be recognizable to your computer system first. In the beginning of the Windows installation, you have to use HighPoint-supplied floppy disk to install the RAID driver.
1. During the system boot, enter the appropriate BIOS RAID configuration utility to specify a disk as the bootable disk. Take note that you have to always choose the first disk among those attached to the HPT372 RAID controllers as the boot disk.
User’s Manual
69
2. To install Windows from CD-ROM, enter the BIOS Setup and select the option CD-ROM for the First Boot Device item. Save the changes and Exit Setup.
3. Power on the computer system and insert the Windows installation CD into your system’s CD-ROM drive. The system will boot from the CD-ROM.
4. Upon entering the Windows installation screen, read carefully the messages shown in the status bar at the bottom of the screen. The following message appears:
Press F6 if you need to install a third party SCSI or RAID driver...
5. Press F6. The on-screen message reads Setup is inspecting your computer’s hardware configuration.
6. Press S to specify additional devices.
7. An on-screen message prompting you to insert the manufacturer-supplied disk appears.
8. Insert the HighPoint HPT372 driver floppy into your floppy disk drive and then press Enter.
9. Use the arrow keys to select the desired driver and press Enter.
10. Follow the prompts to complete the installation of the HPT372 IDE RAID controller driver.
11. Having had the driver installed, continue the Windows installation. You will be allowed to install the Windows operating system on the HPT372 controller-supported disk.

SR7 Server Board
70
4.4 Setting Disk Arrays
The disks attached to the on-board RAID controllers are allowed for RAID 0, 1, 0+1 configuration with the built-in BIOS RAID configuration utilities or the provided Windows-based RAID Administration software. For the information on how to set disk arrays, refer to the RAID Manual in PDF format in the provided CD. 1. Insert the CD into your system’s CD-ROM drive. The auto-run
screen will appear. Click Manuals.
2. Click Raid Manual and then click English in the right panel.

User’s Manual
71
4.5 Installing Broadcom Gigabit Ethernet Driver
For detail information on Broadcom Gigabit Ethernet driver installation, refer to the Broadcom Gigabit NIC manual contained in the provided CD. You can as well locate the desired Broadcom Gigabit driver in the provided CD by going to the directory \Drivers\Broadcom. 1. Insert the provided CD into your system’s CD-ROM drive. The
auto-run screen will appear. Click Manual.
2. Click Broadcom Gigabit NIC Manual.

SR7 Server Board
72
3. A network browser-interfaced file is open. Click Installing the
Software.
4. Select the desired driver by clicking the appropriate link for the detail information on the driver installation.

User’s Manual
73
4.6 Installing the Hardware Doctor Utility
A hardware diagnostic utility, Hardware Doctor, is contained in the provided CD. It is capable of protecting system hardware by monitoring several critical hardware conditions such as power supply voltage, temperature of CPU and system, and speed of CPU and system fans. It also allows you to manually set a range for the items to be monitored. If the detected values are over or under the set range, a warning message will pop-up. The utility can also be configured so that a beeping alarm will sound whenever an error occurs. We recommend that you use the default settings, which are ideal for keeping the system in good working condition. To install the utility, follow the steps below: 1. Insert the CD into your system’s CD-ROM drive. The auto-run
screen will appear. Click the “Winbond Hardware Doctor” button.
2. When InstallShield Wizard appears, click next.

SR7 Server Board
74
3. Follow the prompts to proceed with the installation.
4. When completing the installation, you have to reboot the system to have the settings take effect.

User’s Manual
75
4.6.1 Hardware Doctor User Interface
After completion of the hardware doctor utility installation, restart the system and then click Start -> Programs -> Winbond -> Hardware Doctor to enter the utility. Hardware Doctor main screen
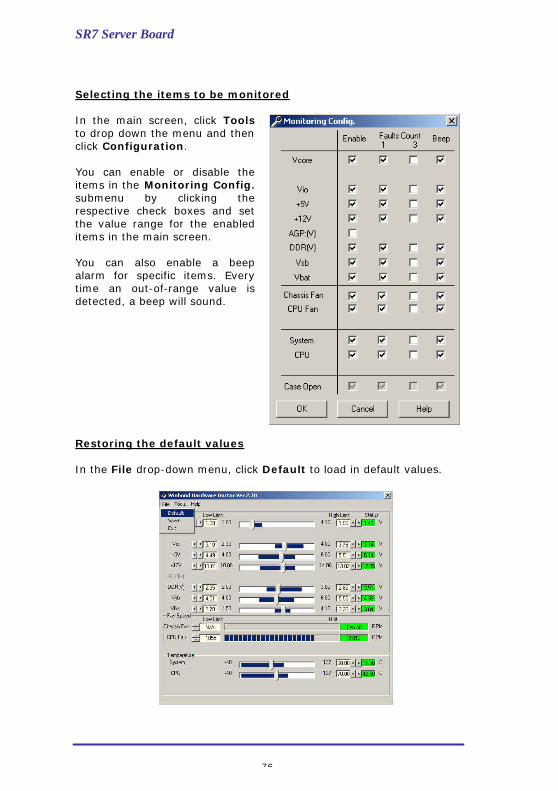
SR7 Server Board
76
Selecting the items to be monitored In the main screen, click Tools to drop down the menu and then click Configuration. You can enable or disable the items in the Monitoring Config. submenu by clicking the respective check boxes and set the value range for the enabled items in the main screen. You can also enable a beep alarm for specific items. Every time an out-of-range value is detected, a beep will sound. Restoring the default values In the File drop-down menu, click Default to load in default values.

User’s Manual
77
Appendix A BIOS Update
To update the BIOS, you will need a new version of BIOS file and a flash utility, awdflash.exe. You can download the needed files from our web site at http://www.akom.com. The files on the web site are normally compressed. You have to unzip the compressed files prior to flashing the BIOS. To update the BIOS, do the following: 1. Double-click the compressed BIOS file and it will self-extract to a
binary file (.bin file).
2. Create a bootable floppy disk.
3. Save the BIOS binary file along with the flash utility program to the floppy disk.
4. Power on your computer and run the BIOS Setup utility to change the boot priority items in the “Advanced BIOS Features” section. Select the option Floppy for the First Boot Device item and then exit the Setup with saving the changes.
5. Turn off the system and insert the floppy disk into the floppy drive, and then power on the system.
6. At the A:\ prompt, type in “awdflash bios.bin /cc /cd /cp /py /sn /cks /r” and press Enter. “awdflash” is the flash utility program name; “.bin” is the BIOS binary file you want to load in to the system. You should type in the exact BIOS file name. It is strongly recommended that you use the parameters that follow the BIOS binary file name as mentioned when updating the BIOS.
$ Caution
l New BIOS may provide support for new peripherals, improvements in performance, or fixes for known bugs. However, unsuccessful BISO flash will cause system boot failure.
l Run the BIOS flash utility only under real-mode DOS.

SR7 Server Board
78
Appendix B POST Codes
The following table lists POST Diagnostic Codes and provides a brief description of each.
Code Description of POST Operation
CF Test CMOS R/W functionality
C0 Early chipset initialization: - Disable shadow RAM - Disable L2 cache (socket 7 or below) - Program basic chipset registers
C1 Detect memory - Auto-detection of DRAM size, type and ECC. - Auto-detection of L2 cache (socket 7 or below)
C3 Expand compressed BIOS code to DRAM
C5 Call chipset hook to copy BIOS back to E000 & F000 shadow RAM
01 Expand the Xgroup codes locating in physical address 1000:0
03 Initial Superio_Early_Init switch
05 1. Blank out screen 2. Clear CMOS error flag
07 1. 8042 interface 2. Initialize 8042 self-test
08 1. Test special keyboard controller for Winbond 977 series Super I/O chips.
2. Enable keyboard interface.
0A 1. Disable PS/2 mouse interface (optional). 2. Auto detect ports for keyboard & mouse followed by a
port & interface swap (optional). 3. Reset keyboard for Winbond 977 series Super I/O chips.
0B-0Dh Reserved
0E Test F000h segment shadow to see whether it is R/W-able or not. If test fails, keep beeping the speaker.
10 Auto detect flash type to load appropriate flash R/W codes into the run time area in F000 for ESCD & DMI support.
12 Use walking 1’s algorithm to check out interface in CMOS circuitry. Also set real-time clock power status, and then check for override.

User’s Manual
79
Code Description of POST Operation
14 Program chipset default values into chipset. Chipset default values are MODBINable by OEM customers.
16 Initial Early_Init_Onboard_Generator switch
18 Detect CPU information including brand, SMI type (Cyrix or Intel) and CPU level (586 or 686).
1B Initial interrupts vector table. If no special specified, all H/W interrupts are directed to SPURIOUS_INT_HDLR & S/W interrupts to SPURIOUS_soft_HDLR.
1D Initial EARLY_PM_INIT switch.
1F Load keyboard matrix (notebook platform)
21 HPM initialization (notebook platform)
23 1. Check validity of RTC value: e.g. a value of 5Ah is an invalid value for RTC minute.
2. Load CMOS settings into BIOS stack. If CMOS checksum fails, use default value instead.
3. Prepare BIOS resource map for PCI & PnP use. If ESCD is valid, take into consideration of the ESCD’s legacy information.
4. Onboard clock generator initialization. Disable respective clock resource to empty PCI & DIMM slots.
5. Early PCI initialization: - Enumerate PCI bus number - Assign memory & I/O resource - Search for a valid VGA device & VGA BIOS, and put it
into C000:0.
27 Initialize INT 09 buffer
29 1. Program CPU internal MTRR (P6 & PII) for 0-640K memory address.
2. Initialize the APIC for Pentium class CPU. 3. Program early chipset according to CMOS setup.
Example: onboard IDE controller. 4. Measure CPU speed. 5. Invoke video BIOS.
2D 1. Initialize multi-language 2. Put information on screen display, including Award title,
CPU type, CPU speed … .
33 Reset keyboard except Winbond 977 series Super I/O chips.
3C Test 8254
3E Test 8259 interrupt mask bits for channel 1.
40 Test 8259 interrupt mask bits for channel 2.
43 Test 8259 functionality.
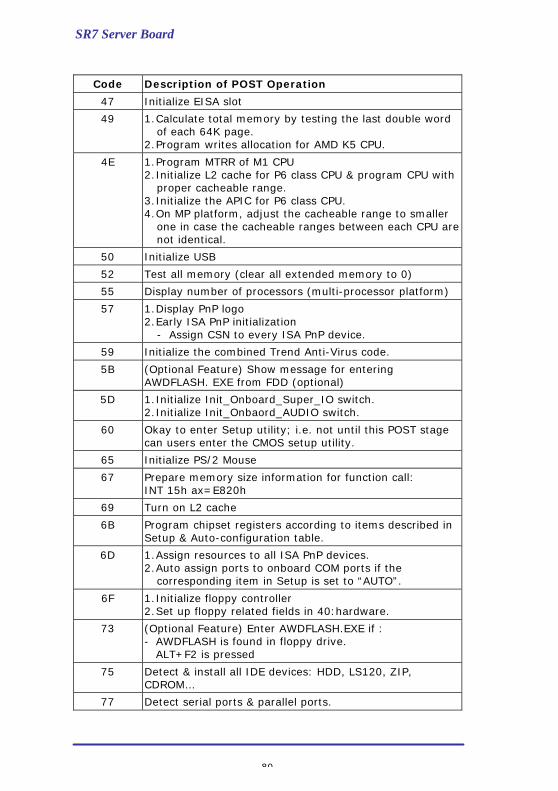
SR7 Server Board
80
Code Description of POST Operation
47 Initialize EISA slot
49 1. Calculate total memory by testing the last double word of each 64K page.
2. Program writes allocation for AMD K5 CPU.
4E 1. Program MTRR of M1 CPU 2. Initialize L2 cache for P6 class CPU & program CPU with
proper cacheable range. 3. Initialize the APIC for P6 class CPU. 4. On MP platform, adjust the cacheable range to smaller
one in case the cacheable ranges between each CPU are not identical.
50 Initialize USB
52 Test all memory (clear all extended memory to 0)
55 Display number of processors (multi-processor platform)
57 1. Display PnP logo 2. Early ISA PnP initialization
- Assign CSN to every ISA PnP device.
59 Initialize the combined Trend Anti-Virus code.
5B (Optional Feature) Show message for entering AWDFLASH. EXE from FDD (optional)
5D 1. Initialize Init_Onboard_Super_IO switch. 2. Initialize Init_Onbaord_AUDIO switch.
60 Okay to enter Setup utility; i.e. not until this POST stage can users enter the CMOS setup utility.
65 Initialize PS/2 Mouse
67 Prepare memory size information for function call: INT 15h ax=E820h
69 Turn on L2 cache
6B Program chipset registers according to items described in Setup & Auto-configuration table.
6D 1. Assign resources to all ISA PnP devices. 2. Auto assign ports to onboard COM ports if the
corresponding item in Setup is set to “AUTO”.
6F 1. Initialize floppy controller 2. Set up floppy related fields in 40:hardware.
73 (Optional Feature) Enter AWDFLASH.EXE if : - AWDFLASH is found in floppy drive. ALT+F2 is pressed
75 Detect & install all IDE devices: HDD, LS120, ZIP, CDROM…
77 Detect serial ports & parallel ports.

User’s Manual
81
Code Description of POST Operation
7A Detect & install co-processor
7F 1. Switch back to text mode if full screen logo is supported. - If errors occur, report errors & wait for keys - If no errors occur or F1 key is pressed to continue: Clear EPA or customization logo.
82 1. Call chipset power management hook. 2. Recover the text fond used by EPA logo (not for full
screen logo) 3. If password is set, ask for password.
83 Save all data in stack back to CMOS
84 Initialize ISA PnP boot devices
85 1. USB final Initialization 2. NET PC: Build SYSID structure 3. Switch screen back to text mode 4. Set up ACPI table at top of memory. 5. Invoke ISA adapter ROMs 6. Assign IRQs to PCI devices 7. Initialize APM 8. Clear noise of IRQs.
93 Read HDD boot sector information for Trend Anti-Virus code
94 1. Enable L2 cache 2. Program boot up speed 3. Chipset final initialization. 4. Power management final initialization 5. Clear screen & display summary table 6. Program K6 write allocation 7. Program P6 class write combining
95 1. Program daylight saving 2. Update keyboard LED & typematic rate
96 1. Build MP table 2. Build & update ESCD 3. Set CMOS century to 20h or 19h 4. Load CMOS time into DOS timer tick 5. Build MSIRQ routing table.
FF Boot attempt (INT 19h)