
SQL Server Setup - using SQL Server authentication
16
1 Revision 1 - 10/04/2014 SQL Server Setup - using SQL Server authentication If there are users on the network, which are not Windows administrators or administrators on the SQL Server, you need to log in using SQL Server authentication, ie. with username and password. !! IMPORTANT !! 1. Using SQL Server Authentication (database users) is the only username + password solution AgroSoft supports. All other solutions (Windows groups, users with different rights, etc.) will not be setup by AgroSoft and there will not be any support for those solutions. 2. In the following procedure the Windows server may need a restart! 3. This document assumes that there is an existing SQL Server 2012 (Express) installed on the server. SQL Server 2012 Management Studio If there is no SQL Server 2012 Management Studio on the machine where the SQL Server is installed, then download and install it. It can be downloaded from here: Link , or installed via the AgroSoft CD/DVD.
Transcript of SQL Server Setup - using SQL Server authentication

1
Revision 1 - 10/04/2014
SQL Server Setup
- using SQL Server authentication
If there are users on the network, which are not Windows administrators or
administrators on the SQL Server, you need to log in using SQL Server
authentication, ie. with username and password.
!! IMPORTANT !!
1. Using SQL Server Authentication (database users) is the only username
+ password solution AgroSoft supports. All other solutions (Windows
groups, users with different rights, etc.) will not be setup by AgroSoft
and there will not be any support for those solutions.
2. In the following procedure the Windows server may need a restart!
3. This document assumes that there is an existing SQL Server 2012
(Express) installed on the server.
SQL Server 2012 Management Studio
If there is no SQL Server 2012 Management Studio on the machine where
the SQL Server is installed, then download and install it. It can be downloaded
from here: Link , or installed via the AgroSoft CD/DVD.

2
SQL Server Configuration Manager
Open the SQL Server Configuration Manager located here: Start → All
Programs → Microsoft SQL Server 2012 → Configuration Tools. Expand
the SQL Server Network Configuration node, select Protocols for
AGROSOFT_SQLEXPR (or the entity you want to connect to from
WinXXX.Net) and double-click TCP / IP on the right side.
In the window that pops up, make sure that Enabled is set to Yes.
Press OK and close the SQL Server Configuration Manager.

3
Setup SQL Server Authentication (database users)
Open SQL Server 2012 Management Studio and right click on the
AGROSOFT_SQLEXPR instance (or the instance you want to connect to from
WinXXX.Net) and select Properties.

4
Select Security on the left side, and then select SQL Server and Windows
Authentication mode under Server authentication on the right side. Press
OK.

5
Navigate to Logins, as shown in the picture. Right-click Logins and click on
New Login...

6
Select General on the left side. Enter AgroSoft as Login name and select SQL
Server authentication. Set Password and Confirm password to 12345
and uncheck the Enforce password policy.
7
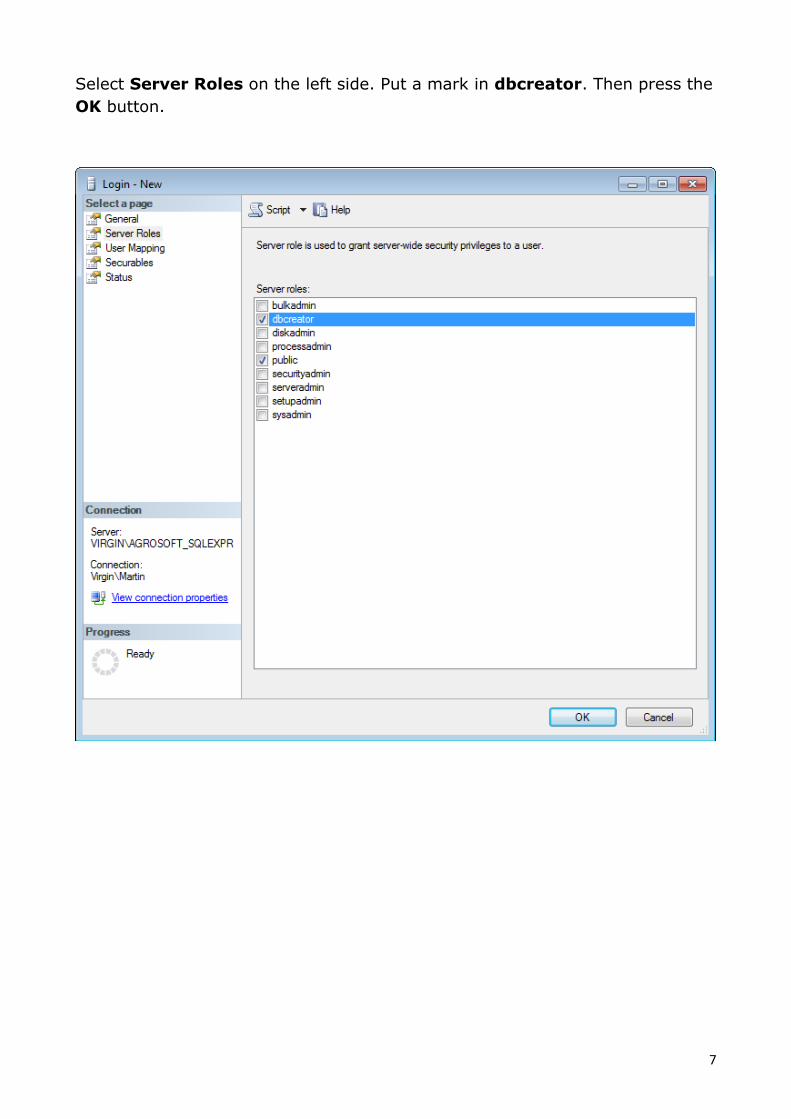
Select Server Roles on the left side. Put a mark in dbcreator. Then press the
OK button.

8
If an administrator started an AgroSoft program (WinOpti.Net, WinPig.Net or
WinVet.Net) before creating the AgroSoft user, default AgroSoft databases will
already exist, but the Owner of those databases will be the administrator
Windows user and not the AgroSoft database user.
The following database ownership change must be applied to all AgroSoft
databases (AgroSoftText, AgroSoftWinOpti, AgroSoftWinPig,
AgroSoftWinVet etc.). The example below uses the AgroSoftText database.
Navigate to the default database AgroSoftText, as shown in the picture.
Right-click the database and click on Properties...

9
Select Files on the left side. Press the ‘…’ button in order to find a new owner.
Press the Browse… button.

10
Put a mark in the AgroSoft user. Then press the OK buttons 3 times.
Repeat this ownership change for all other AgroSoft databases!
When all AgroSoft databases has had their ownership set, you can close the
Microsoft SQL Server Management Studio.
NOTICE: The SQL Server must be restarted for all the changes to take effect.
Open the SQL Server Configuration Manager located here: Start → All
Programs → Microsoft SQL Server 2012 → Configuration Tools.
Right-click on the SQL Server (AGROSOFT_SQLEXPR) and click on Restart.
11
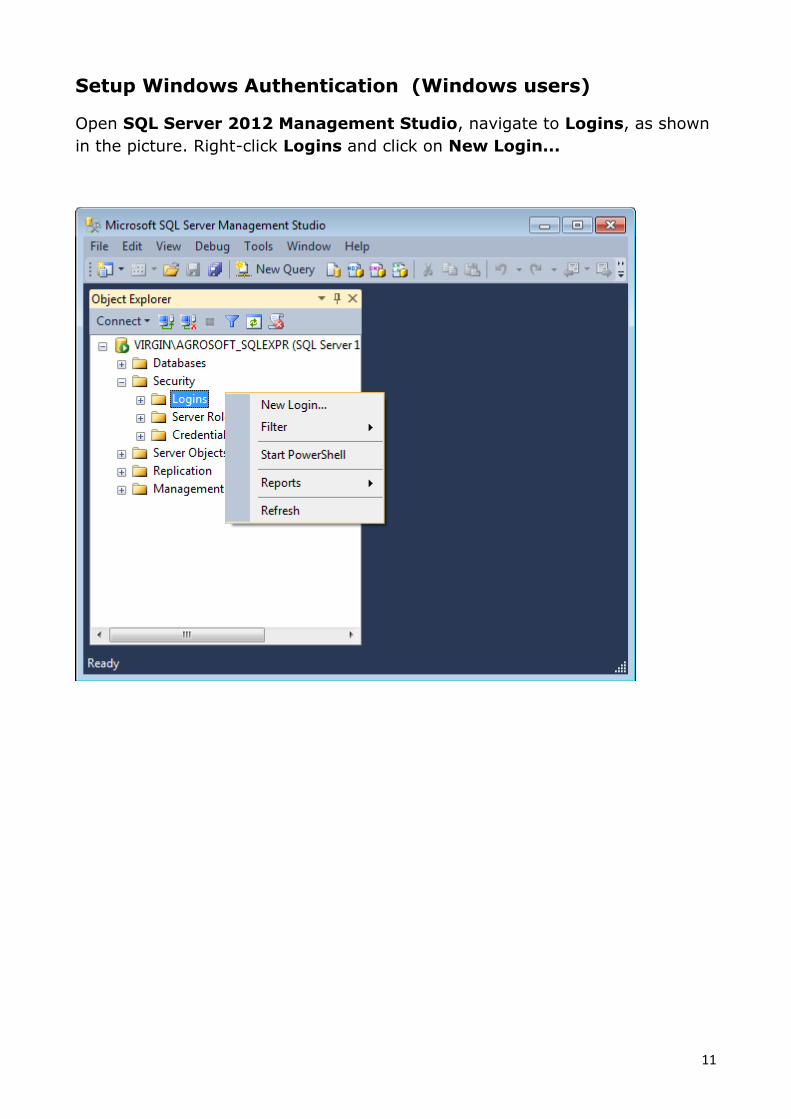
Setup Windows Authentication (Windows users)
Open SQL Server 2012 Management Studio, navigate to Logins, as shown
in the picture. Right-click Logins and click on New Login...

12
Select General on the left side and press the Search... button to the upper
right.
Press the Advanced... button to the bottom left.

13
Make sure that the window is in the right domain by checking the From this
location field. If not press the Locations... button and choose the right
domain.
Press the Find Now button and select the Windows user you wish to give
database rights in the Search results below. Press OK until you return to the
Login – New window.

14
Choose User Mapping on the left. For each database the user needs access
to, put a checkmark next to the database and then a checkmark in db_owner
as shown below.
All users running AgroSoft programs needs db_owner rights on the
AgroSoftText database!

15
WinOpti.Net, WinPig.Net & WinVet.Net
Without administrator rights
When you start the program up for the first time, and you do not have
administrator rights on the network, then the following window will appear:
Select or enter the current server + instance name under Server name.
Under Database login, set a mark in Use database login and fill in the fields
with username AgroSoft and password 12345. If you have chosen a different
username and / or password, they must be filled in instead.
Press the Test Connection button to see if the connection to the database
server is working. If it tests okay, press the OK button.

16
With administrator rights
When you start the program for the first time and you have network
administrator rights, you must modify the program's settings, so that other
users also can open the program. A network administrator can log on to a
database server without using the username and password!
Open the program and choose General → Administration → Settings.
Put a mark in UseDB login.
Username and Password are default set to AgroSoft and 12345 respectively.
If you have chosen a different username and / or password, then they must be
entered instead.
Press Ok and restart the program.


![Using&MS&SQL&Server&with&Coldfusion&and&Plesk& Adjust&&fieldsasfollows:& &server&name:&&sql1.upj.pitt.edu& Use&&SQL&Authentication& Username:&&[username&you&created&above]& Password:&&[password&you&madeabove]&](https://static.fdocuments.net/doc/165x107/5ace20ec7f8b9a93268e69d9/usingmssqlserverwithc-adjustfieldsasfollows-servernamesql1upjpittedu-usesqlauthentication.jpg)