SpringSource Tool Suite 2.9dist.springsource.com/release/STS/doc/STS-installation... ·...
16
INSTALLATION INSTRUCTIONS www.springsource.com SpringSource Tool Suite 2.9.2 - Installation Instructions - Martin Lippert 2.9.2 May 24, 2012 Updated for 2.9.2.RELEASE
Transcript of SpringSource Tool Suite 2.9dist.springsource.com/release/STS/doc/STS-installation... ·...

INSTALLATION INSTRUCTIONS
www.springsource.com
SpringSource Tool Suite
2.9.2
- Installation Instructions -
Martin Lippert 2.9.2 May 24, 2012 Updated for 2.9.2.RELEASE

INSTALLATION INSTRUCTIONS
www.springsource.com
DISTRIBUTION INSTALLATION ..................................................................................... 3
Preparing the Installer on Windows XP, Vista and 7 ...................................................... 3
Preparing the Installer on Mac OS X ........................................................................... 3
Preparing the Installer on Linux ................................................................................... 4
Running the STS Installer ........................................................................................... 5
UPDATE SITE INSTALLATION ....................................................................................... 7
Installing from the Release Update Site ........................................................................ 7
Installing from the Milestone Update Site ................................................................... 10
Installing from the Nightly Snapshot Update Site ......................................................... 13
EXTENSION INSTALLATION ...................................................................................... 16
Installing Extensions from the STS Dashboard ............................................................. 16

INSTALLATION INSTRUCTIONS
www.springsource.com
DISTRIBUTION INSTALLATION Preparing the Installer on Windows XP, Vista and 7 Download the STS executable installer (*.exe) from the STS download page. Once downloaded, please double-click the installer to launch the installation process.
Follow the on-screen instructions to finish the installation. See “Running the STS Installer”.
If you downloaded the ZIP archive please do not use the extraction utility that comes with Windows as it has been reported that this is causing problems during extraction. Instead please use the free 7-Zip utility.
Please make sure to download and install STS versions that match your JDK installation. See the following table for your reference:
STS download Windows JDK
springsource-tool-suite-2.9.2.RELEASE-e3.7.2-win32-installer.exe or springsource-tool-suite-2.9.2.RELEASE-e3.7.2-win32.zip
32-bit 32-bit
springsource-tool-suite-2.9.2.RELEASE-e3.7.2-win32-installer.exe or
springsource-tool-suite-2.9.2.RELEASE-e3.7.2-win32.zip
64-bit 32-bit
springsource-tool-suite-2.9.2.RELEASE-e3.7.2-win32-x86_64-installer.exe or
springsource-tool-suite-2.9.2.RELEASE-e3.7.2-win32-x86_64.zip
64-bit 64-bit
Preparing the Installer on Mac OS X Download the STS Mac OS disk image (*.dmg) from the STS download page. Once downloaded, please mount the disk image by double-clicking on the downloaded dmg file. Open the volume named 'SpringSource' and double-click on the installer to launch the installation.
Follow the on-screen instructions to finish the installation. See “Running the STS Installer”.
See the following table for an overview of available Mac OS X packages. Although we still provide a Carbon-based package for older versions of Mac OS X, we strongly recommend a Cocoa-based version for Leopard, Snow Leopard or Lion.
Once you installed STS on Mac OS X, you don’t need to configure the matching (32bit or 64bit) JDK manually, STS will pick the right one automatically and you can run both versions on your Mac OS X system. So choosing between the 32bit and 64bit versions of STS is mostly a matter of how much memory you would like to spend for the JVM running STS.
STS download Mac OS X JDK
springsource-tool-suite-2.9.2.RELEASE-e3.7.2-macosx-cocoa-installer.dmg or Cocoa 32-bit

INSTALLATION INSTRUCTIONS
www.springsource.com
springsource-tool-suite-2.9.2.RELEASE-e3.7.2-macosx-cocoa.tar-gz
springsource-tool-suite-2.9.2.RELEASE-e3.7.2-macosx-cocoa-x86_64-installer.dmg or springsource-tool-suite-2.9.2.RELEASE-e3.7.2-macosx-cocoa-x86_64.tar.gz
Cocoa 64-bit
springsource-tool-suite-2.9.2.RELEASE-e3.7.2-macosx-carbon- installer.exe or
springsource-tool-suite-2.9.2.RELEASE-e3.7.2-macosx-carbon.tar.gz
Carbon 32-bit
Preparing the Installer on Linux Download the STS self-extracting shell script (*.sh) that matches your OS and machine architecture from the STS download page.
Please make sure to download and install STS versions that match your JDK installation. See the following table for your reference:
STS download Linux JDK
springsource-tool-suite-2.9.2.RELEASE-e3.7.2-linux-gtk-installer.sh or springsource-tool-suite-2.9.2.RELEASE-e3.7.2-linux-gtk.tar.gz
32-bit 32-bit
springsource-tool-suite-2.9.2.RELEASE-e3.7.2-linux-gtk-x86_64-installer.sh or
springsource-tool-suite-2.9.2.RELEASE-e3.7.2-linux-gtk-x86_64.tar.gz
64-bit 64-bit
If you downloaded the installer version (instead of the tar.gz file), launch the installation by running the following command in a terminal session:
$ sh springsource-tool-suite-2.9.2.RELEASE-e3.7.2-linux-gtk-installer.sh
*******************************************************************************
* SpringSource Tool Suite 2.9.2.RELEASE *
* Installer *
*******************************************************************************
preparing the installer...
... done
starting UI installer. please follow instructions on screen...
Follow the on-screen instructions to finish the installation. See “Running the STS Installer”.
INSTALLATION INSTRUCTIONS
www.springsource.com
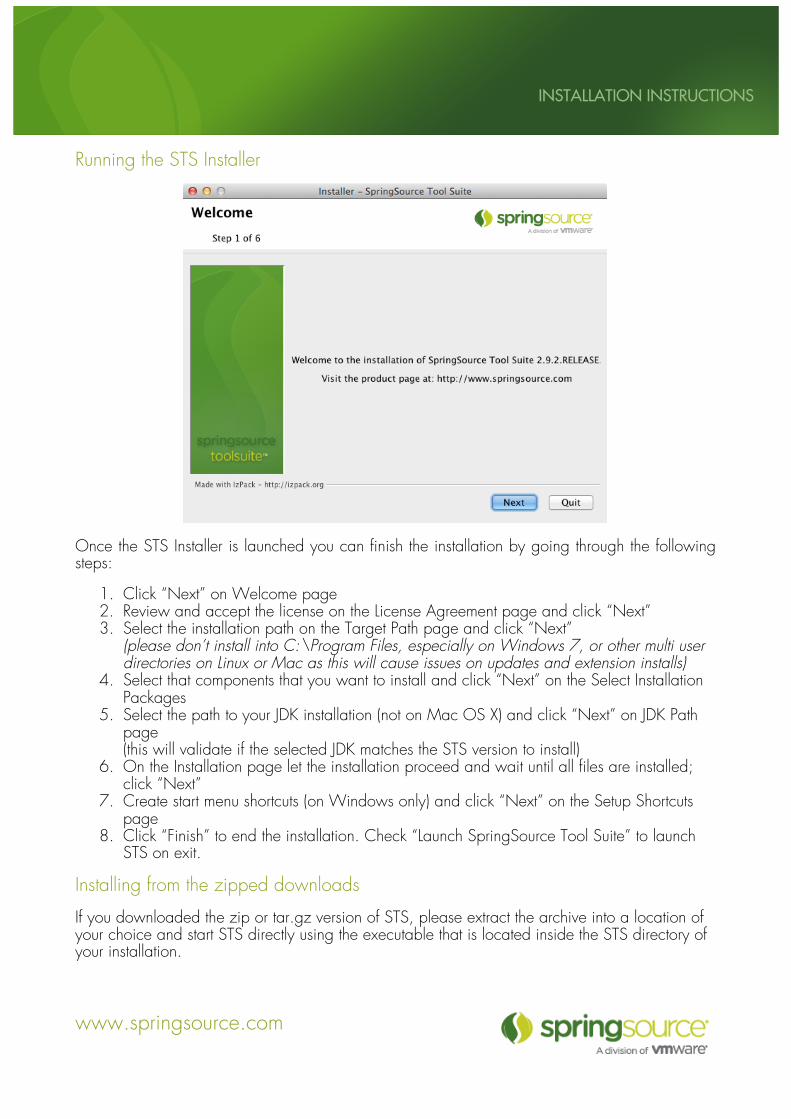
Running the STS Installer
Once the STS Installer is launched you can finish the installation by going through the following steps:
1. Click “Next” on Welcome page 2. Review and accept the license on the License Agreement page and click “Next” 3. Select the installation path on the Target Path page and click “Next”
(please don’t install into C:\Program Files, especially on Windows 7, or other multi user directories on Linux or Mac as this will cause issues on updates and extension installs)
4. Select that components that you want to install and click “Next” on the Select Installation Packages
5. Select the path to your JDK installation (not on Mac OS X) and click “Next” on JDK Path page (this will validate if the selected JDK matches the STS version to install)
6. On the Installation page let the installation proceed and wait until all files are installed; click “Next”
7. Create start menu shortcuts (on Windows only) and click “Next” on the Setup Shortcuts page
8. Click “Finish” to end the installation. Check “Launch SpringSource Tool Suite” to launch STS on exit.
Installing from the zipped downloads If you downloaded the zip or tar.gz version of STS, please extract the archive into a location of your choice and start STS directly using the executable that is located inside the STS directory of your installation.

INSTALLATION INSTRUCTIONS
www.springsource.com
You might need to configure the JDK path to run STS manually by adding the –vm argument to the command line, appended by the path to the javaw executable of your JDK installation.
INSTALLATION INSTRUCTIONS
www.springsource.com
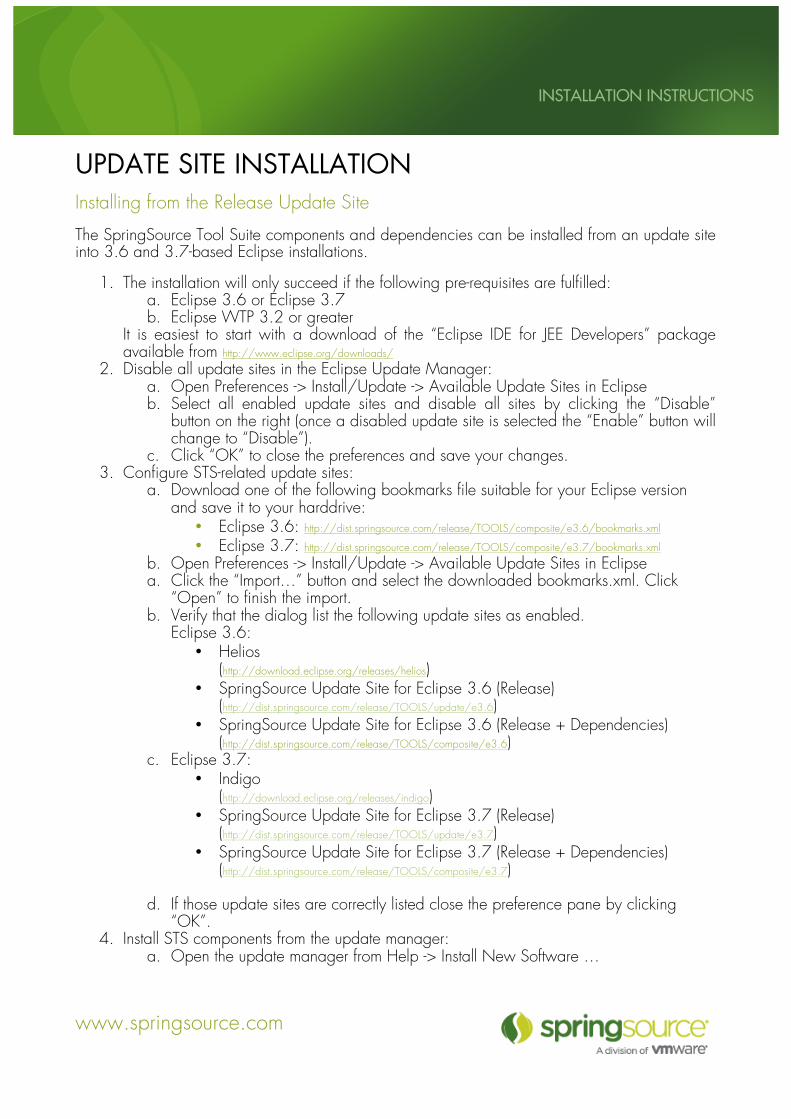
UPDATE SITE INSTALLATION Installing from the Release Update Site The SpringSource Tool Suite components and dependencies can be installed from an update site into 3.6 and 3.7-based Eclipse installations.
1. The installation will only succeed if the following pre-requisites are fulfilled: a. Eclipse 3.6 or Eclipse 3.7 b. Eclipse WTP 3.2 or greater
It is easiest to start with a download of the “Eclipse IDE for JEE Developers” package available from http://www.eclipse.org/downloads/
2. Disable all update sites in the Eclipse Update Manager: a. Open Preferences -> Install/Update -> Available Update Sites in Eclipse b. Select all enabled update sites and disable all sites by clicking the “Disable”
button on the right (once a disabled update site is selected the “Enable” button will change to “Disable”).
c. Click “OK” to close the preferences and save your changes. 3. Configure STS-related update sites:
a. Download one of the following bookmarks file suitable for your Eclipse version and save it to your harddrive:
• Eclipse 3.6: http://dist.springsource.com/release/TOOLS/composite/e3.6/bookmarks.xml • Eclipse 3.7: http://dist.springsource.com/release/TOOLS/composite/e3.7/bookmarks.xml
b. Open Preferences -> Install/Update -> Available Update Sites in Eclipse a. Click the “Import…” button and select the downloaded bookmarks.xml. Click
“Open” to finish the import. b. Verify that the dialog list the following update sites as enabled.
Eclipse 3.6: • Helios
(http://download.eclipse.org/releases/helios) • SpringSource Update Site for Eclipse 3.6 (Release)
(http://dist.springsource.com/release/TOOLS/update/e3.6) • SpringSource Update Site for Eclipse 3.6 (Release + Dependencies)
(http://dist.springsource.com/release/TOOLS/composite/e3.6) c. Eclipse 3.7:
• Indigo (http://download.eclipse.org/releases/indigo)
• SpringSource Update Site for Eclipse 3.7 (Release) (http://dist.springsource.com/release/TOOLS/update/e3.7)
• SpringSource Update Site for Eclipse 3.7 (Release + Dependencies) (http://dist.springsource.com/release/TOOLS/composite/e3.7)
d. If those update sites are correctly listed close the preference pane by clicking
“OK”. 4. Install STS components from the update manager:
a. Open the update manager from Help -> Install New Software …
INSTALLATION INSTRUCTIONS
www.springsource.com
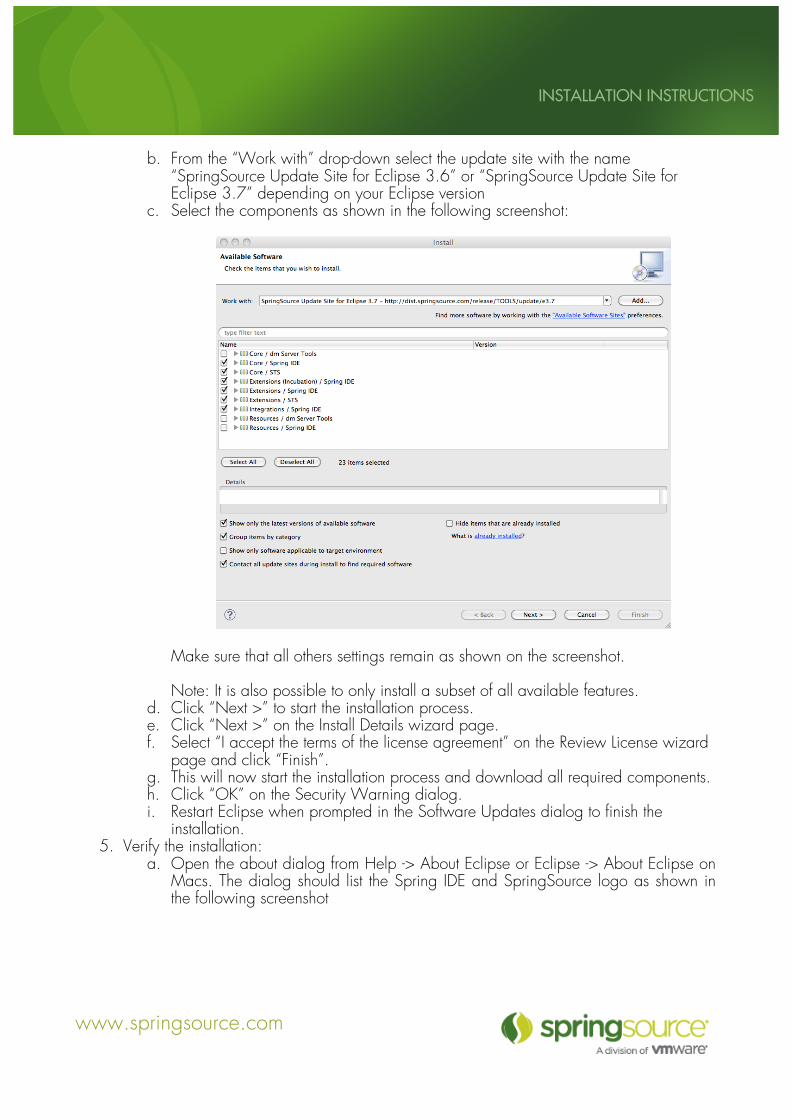
b. From the “Work with” drop-down select the update site with the name “SpringSource Update Site for Eclipse 3.6” or “SpringSource Update Site for Eclipse 3.7” depending on your Eclipse version
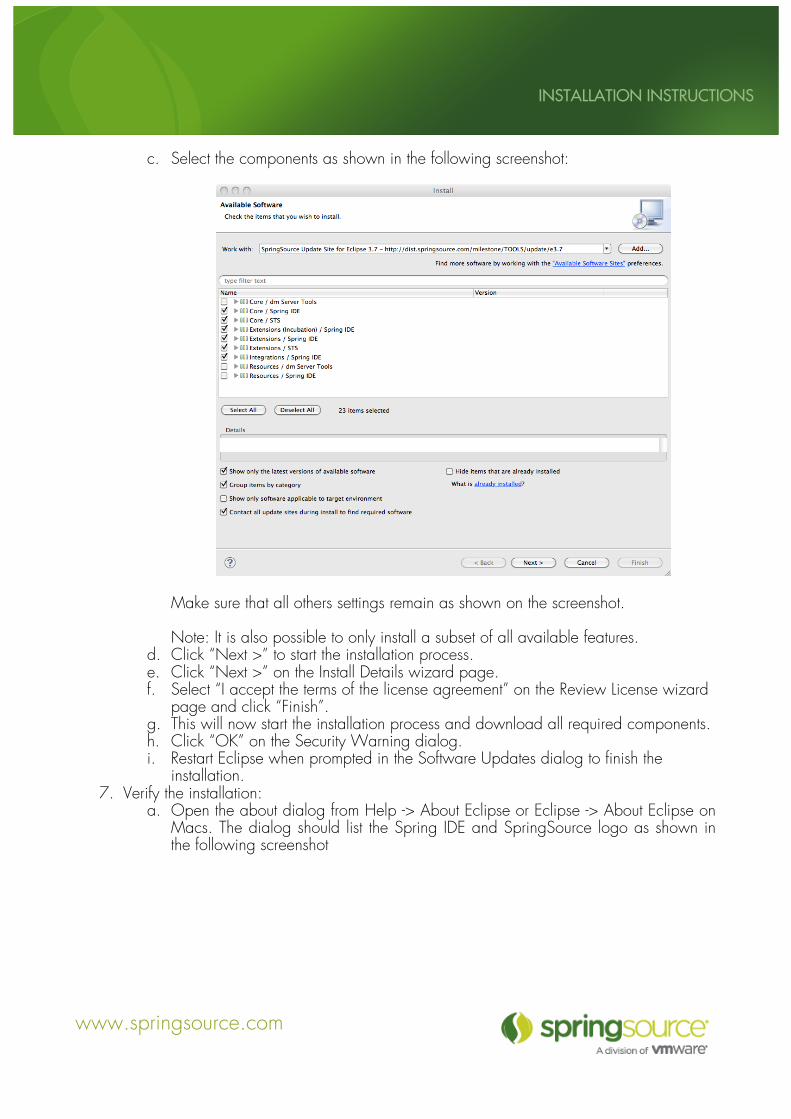
c. Select the components as shown in the following screenshot:
Make sure that all others settings remain as shown on the screenshot. Note: It is also possible to only install a subset of all available features.
d. Click “Next >” to start the installation process. e. Click “Next >” on the Install Details wizard page. f. Select “I accept the terms of the license agreement” on the Review License wizard
page and click “Finish”. g. This will now start the installation process and download all required components. h. Click “OK” on the Security Warning dialog. i. Restart Eclipse when prompted in the Software Updates dialog to finish the
installation. 5. Verify the installation:
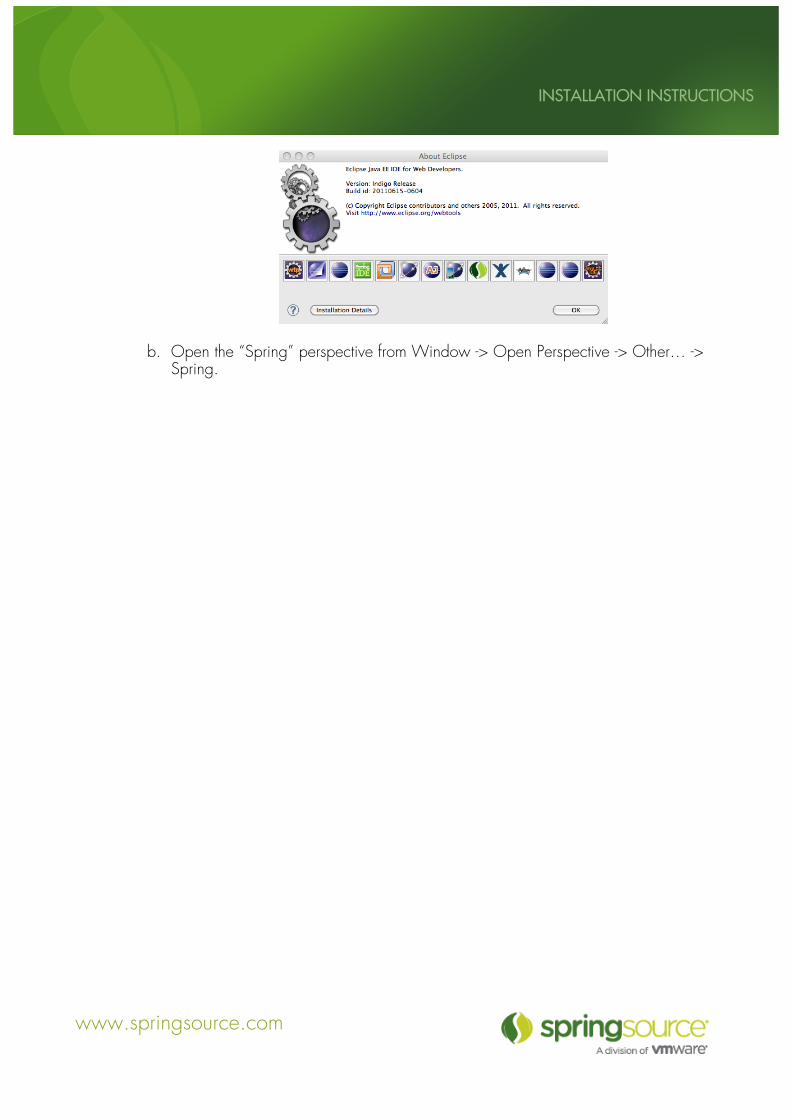
a. Open the about dialog from Help -> About Eclipse or Eclipse -> About Eclipse on Macs. The dialog should list the Spring IDE and SpringSource logo as shown in the following screenshot

INSTALLATION INSTRUCTIONS
www.springsource.com
b. Open the “Spring” perspective from Window -> Open Perspective -> Other… -> Spring.

INSTALLATION INSTRUCTIONS
www.springsource.com
Installing from the Milestone Update Site The SpringSource Tool Suite components and dependencies can be installed from an update site into 3.6 and 3.7-based Eclipse installations.
4. The installation will only succeed if the following pre-requisites are fulfilled: a. Eclipse 3.6 or Eclipse 3.7 b. Eclipse WTP 3.2 or greater
It is easiest to start with a download of the “Eclipse IDE for JEE Developers” package available from http://www.eclipse.org/downloads/
5. Disable all update sites in the Eclipse Update Manager: a. Open Preferences -> Install/Update -> Available Update Sites in Eclipse b. Select all enabled update sites and disable all sites by clicking the “Disable”
button on the right (once a disabled update site is selected the “Enable” button will change to “Disable”).
c. Click “OK” to close the preferences and save your changes. 6. Configure STS-related update sites:
a. Download one of the following bookmarks file suitable for your Eclipse version and save it to your harddrive:
• Eclipse 3.6: http://dist.springsource.com/milestone/TOOLS/composite/e3.6/bookmarks.xml • Eclipse 3.7: http://dist.springsource.com/milestone/TOOLS/composite/e3.7/bookmarks.xml
b. Open Preferences -> Install/Update -> Available Update Sites in Eclipse e. Click the “Import…” button and select the downloaded bookmarks.xml. Click
“Open” to finish the import. f. Verify that the dialog list the following update sites as enabled.
Eclipse 3.6: • Helios
(http://download.eclipse.org/releases/helios) • SpringSource Update Site for Eclipse 3.6 (Milestone)
(http://dist.springsource.com/milestone/TOOLS/update/e3.6) • SpringSource Update Site for Eclipse 3.6 (Milestone + Dependencies)
(http://dist.springsource.com/milestone/TOOLS/composite/e3.6) g. Eclipse 3.7:
• Indigo (http://download.eclipse.org/releases/indigo)
• SpringSource Update Site for Eclipse 3.6 (Milestone) (http://dist.springsource.com/milestone/TOOLS/update/e3.7)
• SpringSource Update Site for Eclipse 3.6 (Milestone + Dependencies) (http://dist.springsource.com/milestone/TOOLS/composite/e3.7)
h. If those update sites are correctly listed close the preference pane by clicking
“OK”. 6. Install STS components from the update manager:
a. Open the update manager from Help -> Install New Software … b. From the “Work with” drop-down select the update site with the name
“SpringSource Update Site for Eclipse 3.6” or “SpringSource Update Site for Eclipse 3.7” depending on your Eclipse version
INSTALLATION INSTRUCTIONS
www.springsource.com
c. Select the components as shown in the following screenshot:
Make sure that all others settings remain as shown on the screenshot. Note: It is also possible to only install a subset of all available features.
d. Click “Next >” to start the installation process. e. Click “Next >” on the Install Details wizard page. f. Select “I accept the terms of the license agreement” on the Review License wizard
page and click “Finish”. g. This will now start the installation process and download all required components. h. Click “OK” on the Security Warning dialog. i. Restart Eclipse when prompted in the Software Updates dialog to finish the
installation. 7. Verify the installation:
a. Open the about dialog from Help -> About Eclipse or Eclipse -> About Eclipse on Macs. The dialog should list the Spring IDE and SpringSource logo as shown in the following screenshot

INSTALLATION INSTRUCTIONS
www.springsource.com
b. Open the “Spring” perspective from Window -> Open Perspective -> Other… -> Spring.
INSTALLATION INSTRUCTIONS
www.springsource.com
Installing from the Nightly Snapshot Update Site The SpringSource Tool Suite can be installed and – if already installed – updated to nightly snapshots. Updating to nightly snapshots allows installing into Eclipse 3.6 and 3.7.
7. The installation will only succeed if the following pre-requisites are fulfilled: a. Eclipse 3.6, or Eclipse 3.7 b. Eclipse WTP 3.2 or greater
It is easiest to start with a download of the “Eclipse IDE for JEE Developers” package available from http://www.eclipse.org/downloads/
8. Disable all update sites in the Eclipse Update Manager: a. Open Preferences -> Install/Update -> Available Update Sites in Eclipse b. Select all enabled update sites and disable all sites by clicking the “Disable”
button on the right (once a disabled update site is selected the “Enable” button will change to “Disable”).
c. Click “OK” to close the preferences and save your changes. 9. Configure STS-related update sites:
a. Download one of the following bookmarks file suitable for your Eclipse version and save it to your harddrive:
• Eclipse 3.6: http://dist.springsource.com/snapshot/TOOLS/composite/e3.6/bookmarks.xml • Eclipse 3.7: http://dist.springsource.com/snapshot/TOOLS/composite/e3.7/bookmarks.xml
b. Open Preferences -> Install/Update -> Available Update Sites in Eclipse i. Click the “Import…” button and select the downloaded bookmarks.xml. Click
“Open” to finish the import. j. Verify that the dialog list the following update sites as enabled.
Eclipse 3.6: • Helios
(http://download.eclipse.org/releases/helios) • SpringSource Update Site for Eclipse 3.6 (Snapshot)
(http://dist.springsource.com/snapshot/TOOLS/update/e3.6) • SpringSource Update Site for Eclipse 3.6 (Snapshot + Dependencies)
(http://dist.springsource.com/snapshot/TOOLS/composite/e3.6) Eclipse 3.7:
• Indigo (http://download.eclipse.org/releases/indigo)
• SpringSource Update Site for Eclipse 3.7 (Snapshot) (http://dist.springsource.com/snapshot/TOOLS/update/e3.7)
• SpringSource Update Site for Eclipse 3.7 (Snapshot + Dependencies) (http://dist.springsource.com/snapshot/TOOLS/composite/e3.7)
k. If those update sites are correctly listed close the preference pane by clicking “OK”.
8. Install STS components from the update manager: a. Open the update manager from Help -> Install New Software … b. From the “Work with” drop-down select the update site with the name
“SpringSource Update Site for Eclipse 3.6” or “SpringSource Update Site for Eclipse 3.7” depending on your Eclipse version
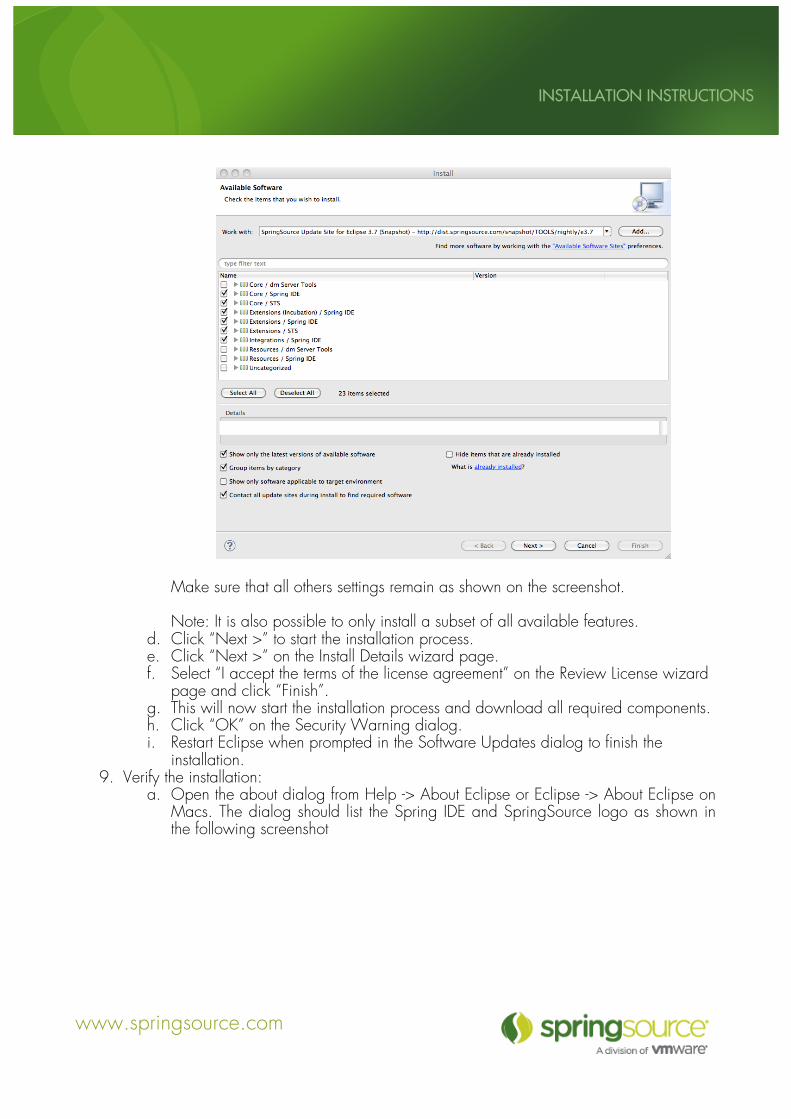
c. Select the components as shown in the following screenshot:
INSTALLATION INSTRUCTIONS
www.springsource.com
Make sure that all others settings remain as shown on the screenshot. Note: It is also possible to only install a subset of all available features.
d. Click “Next >” to start the installation process. e. Click “Next >” on the Install Details wizard page. f. Select “I accept the terms of the license agreement” on the Review License wizard
page and click “Finish”. g. This will now start the installation process and download all required components. h. Click “OK” on the Security Warning dialog. i. Restart Eclipse when prompted in the Software Updates dialog to finish the
installation. 9. Verify the installation:
a. Open the about dialog from Help -> About Eclipse or Eclipse -> About Eclipse on Macs. The dialog should list the Spring IDE and SpringSource logo as shown in the following screenshot
INSTALLATION INSTRUCTIONS
www.springsource.com
b. Open the “Spring” perspective from Window -> Open Perspective -> Other… -> Spring.
INSTALLATION INSTRUCTIONS
www.springsource.com
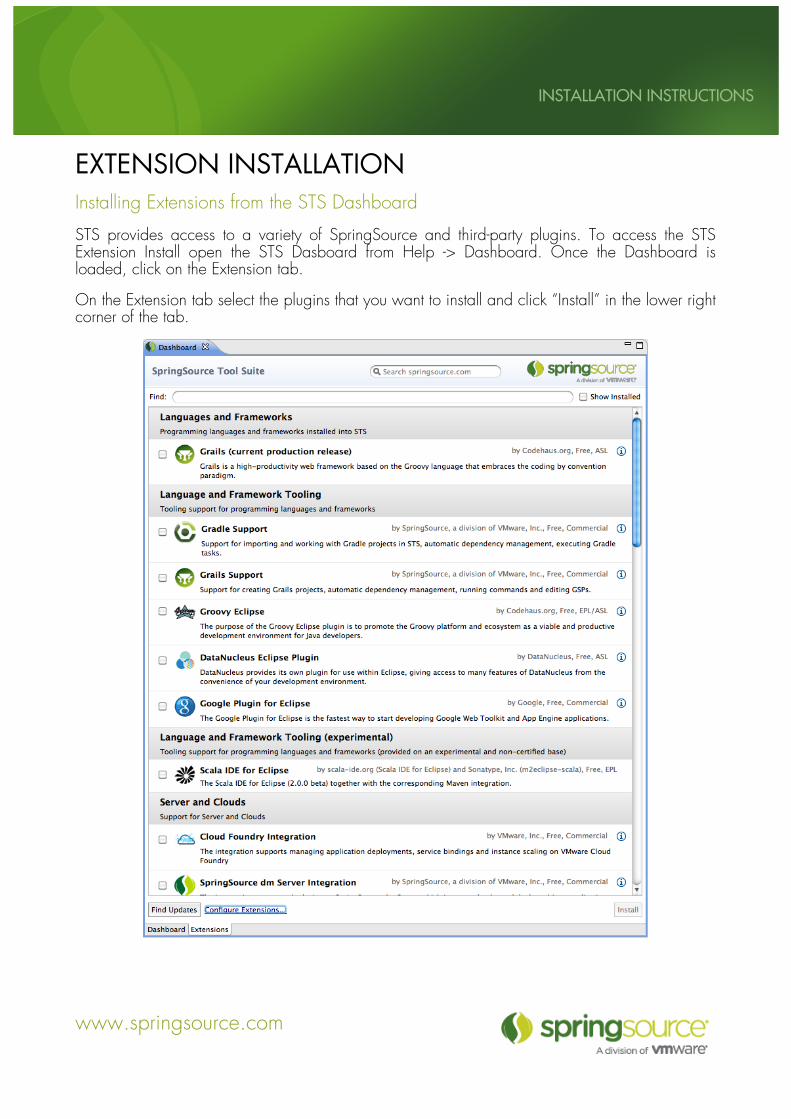
EXTENSION INSTALLATION Installing Extensions from the STS Dashboard STS provides access to a variety of SpringSource and third-party plugins. To access the STS Extension Install open the STS Dasboard from Help -> Dashboard. Once the Dashboard is loaded, click on the Extension tab.
On the Extension tab select the plugins that you want to install and click “Install” in the lower right corner of the tab.