Spring & Fall PLANTING GUIDE
12
1. Plant Right Away Soak roots of bareroot trees, shrubs and roses for several hours before planting. Soak strawberries and perennials 1/2 hour. If you can’t plant immediately, see No. 4. 2. Protect Plant Roots Don’t expose roots to air or sun—keep covered with wet burlap or towels. 3. Planting Tips Dig a hole wide enough to hold the roots without crowding and deep enough to set stock at the same depth it grew in the nursery. Trim damaged roots before planting. If the ground is hard, break up the soil at the bottom of the hole and add a little topsoil. Position the stock and add several inches of soil. Firm soil gently to remove air pockets, then water. When water has soaked in, add remaining soil and water again. Water frequently the first year and mulch. Since all fruit varieties (named cultivars such as Red Delicious apple, Reliance peach, etc.) are grafted, the planting depth should be carefully monitored. The graft or bud union (enlarged trunk area located 4-8 inches above the roots) should be planted so that the union is 2-3 inches above the soil line after settling. If planted deeper, the varietal section above the union will produce its own roots and become a full-size tree. 4. If Planting is Delayed BEFORE PLANTING IN THE GAR- DEN: You may heel-in trees and shrubs by digging a trench in a shady spot and temporarily planting the roots under 6 inches of moist soil. IF AREA IS NOT READY FOR PLANT- ING: Sprinkle roots of trees, shrubs and roses with water, rewrap and store in a cool basement or unheated garage. Do not allow the stock to freeze. Plant as soon as possible. Store strawberries and bareroot peren- nials in a spare refrigerator (not used for fresh produce) or in an unheated area or basement until conditions are right for planting. Wrap roots in damp paper toweling and cover with a plastic bag to prevent drying. Keep bulbs and onion sets at 50°F. Store potted plants on a sunny windowsill or in an outdoor area protected from direct sun or frost. Remove the cardboard sleeve and water well until planting conditions improve. If potatoes show mold, spread them out to dry in an airy room. 5. Prune the Stock Most stock is pruned before shipping to avoid damage in transit, so only minor pruning is needed. Remove crossed limbs and broken branches. 6. Keep Watering! One tree or shrub may bud and leaf out quickly, while another will take much lon- ger. This is normal. Keep watering on a weekly basis if adequate rainfall of 1 inch a week isn’t received. If in doubt, lightly scratch the bark with your fingernail. If the wood is green, the plant is alive. Easy Steps to Planting Nursery Stock Spring & Fall PLANTING GUIDE GEN-PG-S14.indd 1 12/17/2013 9:46:53 AM
Transcript of Spring & Fall PLANTING GUIDE

1. Plant Right Away Soak roots of bareroot trees, shrubs and
roses for several hours before planting. Soak strawberries and perennials 1/2 hour. If you can’t plant immediately, see No. 4.
2. Protect Plant Roots Don’t expose roots to air or sun—keep covered with wet burlap or towels.
3. Planting Tips Dig a hole wide enough to hold the roots
without crowding and deep enough to set stock at the same depth it grew in the nursery. Trim damaged roots before planting. If the ground is hard, break up the soil at the bottom of the hole and add a little topsoil. Position the stock and add several inches of soil. Firm soil gently to remove air pockets, then water. When water has soaked in, add remaining soil and water again. Water frequently the first year and mulch.
Since all fruit varieties (named cultivars such as Red Delicious apple, Reliance peach, etc.) are grafted, the planting depth should be carefully monitored. The graft or bud union (enlarged trunk area located 4-8 inches above the roots) should be planted so that the union is 2-3 inches above the soil line after settling. If planted deeper, the varietal section above the union will produce its own roots and become a full-size tree.
4. If Planting is Delayed BEFORE PLANTING IN THE GAR-
DEN: You may heel-in trees and shrubs
by digging a trench in a shady spot and temporarily planting the roots under 6 inches of moist soil.
IF AREA IS NOT READY FOR PLANT-ING: Sprinkle roots of trees, shrubs and roses with water, rewrap and store in a cool basement or unheated garage. Do not allow the stock to freeze. Plant as soon as possible.
Store strawberries and bareroot peren-nials in a spare refrigerator (not used for fresh produce) or in an unheated area or basement until conditions are right for planting. Wrap roots in damp paper toweling and cover with a plastic bag to prevent drying. Keep bulbs and onion sets at 50°F. Store potted plants on a sunny windowsill or in an outdoor area protected from direct sun or frost. Remove the cardboard sleeve and water well until planting conditions improve. If potatoes show mold, spread them out to dry in an airy room.
5. Prune the Stock Most stock is pruned before shipping to
avoid damage in transit, so only minor pruning is needed. Remove crossed limbs and broken branches.
6. Keep Watering! One tree or shrub may bud and leaf out
quickly, while another will take much lon-ger. This is normal. Keep watering on a weekly basis if adequate rainfall of 1 inch a week isn’t received. If in doubt, lightly scratch the bark with your fingernail. If the wood is green, the plant is alive.
Easy Steps to Planting Nursery Stock
Spring & Fall
PLANTINGGUIDE
GEN-PG-S14.indd 1 12/17/2013 9:46:53 AM

2
ARTICHOKESJerusalem—Cut the tubers into pieces so that each knob has part of the main tuber attached. 4-6 weeks before the last frost date, plant the knobs 3-5 inches deep and 18-24 inches apart in rows 36-42 inches apart. Tubers are ready for digging after the tops are killed by frost. Cut tops with a mower and dig like pota-toes or leave in the ground and harvest throughout the winter. Freezing won’t hurt the tubers, but a heavy straw mulch will keep the ground from freezing and make digging easier.
ASPARAGUSPlant 12-18 inches apart in spring or fall. Prepare a trench 8 inches deep. Spread the crowns over the soil and cover them with 2 inches of soil. Gradually fill the trench with soil as the plants grow. (If your soil is clay or heavy, you may wish to add compost.) If planting in fall, fill the trench in completely. Each spring, apply 3-5 pounds of fertilizer per 100 square feet. Work into the soil before growth starts. Repeat application after the har-vest is complete. Cut the tops back and mulch in late fall to help prevent deep freezing and sudden changes in soil tem-perature. Limit the first harvest to one or two cuttings by mid June of the second year. A full crop can be harvested the third year after planting, when the spears are 6-10 inches tall. (If planting 2-year crowns, you should harvest a good supply the second year.) Harvest for 6-8 weeks only, or until about the first of July in the North. When harvesting, snap off or cut spears at ground level to avoid injuring new growth.
BULBSWe recommend planting your bulbs as soon as possible after they arrive. If plant-ing must be delayed, open bulb bags to allow air circulation and place in a cool (45-55°F) location, away from direct sun-light. Do not place bulbs where they can freeze.
An excellent option for bulb storage is a spare refrigerator, though you should avoid storing your bulbs with fruit. The
fruit emits ethylene gas which can be harmful to your bulbs.
Your bulbs will flourish in most types of well-drained soil. If your soil is sandy, plant bulbs 1 inch deeper than the recom-mendation on the bag label. If your soil is heavy clay, plant bulbs 1 inch shallower than the label recommends. The addition of light organic matter such as peat moss, leaf mold or compost will improve your soil and provide better drainage. After planting the bulbs, tamp the soil with your hands to eliminate any air pockets. Water thoroughly. Hardy bulbs, such as tulips and daffodils, do not need to be lifted in the fall, but a covering of mulch will help protect the bulbs in colder climates.
Important Note—Leave the foliage on all your bulbs after they bloom. Allow the foliage to turn yellow and wither natu-rally. The leaves provide nourishment to the bulbs for next season’s blooms.
Note for Pink Daffodils—When pink daffodils first unfold, the trumpet is a lovely apricot-yellow color that gradually changes to a soft pink. It is important to plant this variety in a shaded or partially shaded area, since the trumpet color fades in full sun.
In colder climates, tender bulbs such as gladiolus, cannas, dahlias or calla lilies that are planted in the spring, must be lifted in the fall. You may lift your bulbs prior to a killing frost or as soon as the frost has blackened the foliage. Dig up the bulbs gently, being careful not to cut or damage them. Cannas and dahlias can also be overwintered in zones 5-7 by covering with a 3- to 4-inch thick layer of mulch.
Store them in a well-ventilated, frost-free area until the foliage has dried up. Remove the dried foliage and place your bulbs in an unsealed paper bag, old nylon stocking or a shallow, plastic-lined box with a blanket of peat moss or vermiculite.
Summer-flowering tender bulbs require winter storage temperatures between 45-60°F. An ideal storage location would be the vegetable compartment of a refrigerator or an unheated garage or basement. Most modern basements aren’t cool enough for winter bulb storage.
GEN-PG-S14.indd 2 12/17/2013 9:46:53 AM

3
EVERGREENSEvergreens do best in fertile, well-drained soil and prefer slightly acidic conditions—a soil with a pH level range of 5.8-6.8.
Provide some form of temporary shade for newly planted evergreens to help keep the sun from scorching and drying them out. This is the leading cause of young tree loss. Water well, 1-2 gallons every 2 days for 2 weeks, then once every 7-10 days if adequate rainfall of 1 inch a week isn’t received. Prune juniper and cedar in summer; pine and spruce in May or June before new growth hardens.
FRUIT TREESPlant fruit trees as advised in the general planting directions on page 1, following the spacing recommendations from the Fruit Planting Chart on this page.
This spacing, less than 50 feet apart, ensures good pollination. Even trees that are self-fruitful bear heavier crops when a second variety is planted nearby.
Proper planting depth is also critical. The graft or bud union (swollen area on the trunk, about 4-6 inches above the roots of all fruit trees) must be 1-2 inches above the soil surface (after settling). With dwarf- and Li’l-BIG™-size trees, perma-nent staking is mandatory immediately after planting. Use our patented Tree Support System, which lasts a lifetime and is very easy to install, or drive a 6-7 inch stake at least 18 inches into the ground near the tree and attach the trunk to it. If you use twine, tie it loosely to prevent girdling.
Additionally, young fruit trees are sub-ject to damage during winter months from foraging rabbits. Until year four, the lower 18-24 inches of the trunk require a protective barrier during winter.
As your trees grow, prune in early spring, removing crossed or injured limbs and any branches which rub against each other. This allows light into the center of the tree. Don’t cut short spurs from the main stem since these bear first fruit.
The general rule is to prune less during the juvenile or early years, removing
only the limbs that compete with desired limbs. Apple and pear varieties with a natural upright habit should have their limbs spread to a 60-degree angle.
Starting in year five, prune out shaded or crowded limbs annually in late winter. Never leave stubs; cut limbs where they connect with the trunk or other limbs you want to keep.
Regular spraying stops insects before they can damage your crop. Apply dor-mant oil before buds begin to swell. Spray trees with liquid fruit tree spray when flower petals fall. Make follow-up applications every 10 days or so until the harvest nears.
With proper care, fruit trees will remain productive for many years. To maximize their productivity and quality, thin excess fruit each year. For apples and pears, remove one fruit per cluster. For peaches, nectarines, plums and apricots, leave only one fruit per 8-10 inches of limb space. Do this just after the flower petals have fallen or when tiny fruits become visible.
FRUIT PLANTING CHART Planting Approx. Years to Avg. Variety Distance Height Bearing Yield Li’l-BIG™ Apple 6 Ft. 5-7 Ft. 2-3 .5 Bu. Std. Apple 25-35 Ft. 20-25 Ft. 4-5 10-20 Bu. Semi-Dwf. Apricot 10-14 Ft. 12-14 Ft. 3-5 2-4 Bu. Std. Apricot 15-20 Ft. 15-20 Ft. 5-7 3-5 Bu. Bush Cherry 5 Ft. 4-8 Ft. 2-3 1-2 Qts. Dwarf Cherry 5-7 Ft. 6-7 Ft. 2-5 Bu. Dwf. Pie Cherry 10 Ft. 10-15 Ft. 2-3 1-2 Bu. Std. Pie Cherry 25 Ft. 15-20 Ft. 3-4 2-5 Bu. Std. Swt. Cherry 25 Ft. 25 Ft. 4-6 3-7 Bu. Std. Nectarine 15-20 Ft. 15-20 Ft. 3-4 3-8 Bu. Semi-Dwf. Nectarine 10-15 Ft. 12-14 Ft. 2-3 1-3 Bu. Semi-Dwf. Peach 10 Ft. 12-14 Ft. 2-3 2-5 Bu. Std. Peach 15-20 Ft. 20 Ft. 4-5 3-8 Bu. Semi-Dwf. Pear 10-15 Ft. 8-15 Ft. 3-4 2-3 Bu. Std. Pear 20-25 Ft. 20-30 Ft. 4-7 4-8 Bu. Semi-Dwf. Plum 10 Ft. 12-14 Ft. 2-3 1-2 Bu. Std. Plum 15-20 Ft. 15-25 Ft. 3-4 2-4 Bu.
GEN-PG-S14.indd 3 12/17/2013 9:46:53 AM

4
GARLICGarlic is adaptable to a wide range of soil types, but prefers well-drained soil high in organic matter. Plant hardneck types in late fall. Softnecks can be planted in early spring or fall, depending on your location. Just before planting, break bulbs apart into cloves, making sure not to let the cloves dry out. Plant cloves with pointed end up at least an inch deep (2 inches for Elephant Garlic) and 4 inches apart. After planting, a layer of mulch may be added to help retain moisture and maintain soil temperature. The tops will begin to die back as garlic reaches its peak maturity. Recommended harvest time is when most, but not all, of the foliage has died back. Hang your garlic up in a cool dry place for at least 2 weeks to allow it to cure. It can then be stored in mesh bags in a dark, cool, low humidity area.
HEDGESDig a trench 12-18 inches wide, setting plants in a straight line or an offset zigzag pattern at the depth they grew in the nurs-ery row. (An offset pattern will give you a thicker, fuller hedge but may require 1/3 more plants.) To stimulate branch-ing, pinch off the ends of each new shoot. When new growth reaches 10-12 inches, trim it back several inches. Hedges should be trimmed several times a season. If a hedge is doing well, only minor pruning is needed—particularly if you favor an informal appearance. Be sure to prune the top narrower than the bottom so that the bottom gets sun. Prune flowering hedges, such as lilacs and spirea, after they have finished blooming. Hydrangeas, on the other hand, should be pruned later in sum-mer, removing only the stems that have already flowered.
HORSERADISHHorseradish thrives in sun or shade but can become invasive in rich soil; keep it in an out-of-the-way corner. Plant cuttings 3-4 inches below the surface and 8 inches apart
in rows that are 16 inches apart. Keep the soil evenly moist during the growing sea-son. Your crop will be ready to harvest in 2 years. Harvest large roots after frost, leav-ing the smaller roots for the next harvest.
HOUSEPLANTS/PATIO PLANTS
Remove your houseplant from its packaging immediately and place in a bright window out of direct sunlight. Water as needed. After several days, sun-loving plants may be placed in direct sunlight. Don’t be surprised if some plants lose their leaves due to shipping stress—they are not dying. Keep your plant in its original pot until it has had time to recover from shipping stress and produces two new leaves. Watch watering needs closely while your plant is in a small pot. When repotting, place into a larger pot and water thoroughly. Avoid moving your plant into a very large pot until it is ready or root rot will likely result.
Most houseplants or patio plants thrive on a monthly application of water-soluble plant food. Be sure to follow the feeding directions on the package.
Before freezing weather (below 29°F) arrives, winterize patio plants. Angel Trumpets and Elephant Ears should be brought into your home. If this is not possi-ble, an unheated garage or cool basement would also work. Withhold fertilizer, and water just enough to keep the soil slightly moist. In spring, when the danger of frost has passed, return the containers to their outdoor location and water thoroughly.
When night temperatures drop below 50°F in early fall, plants such as citrus, dwarf banana, dwarf fig, dwarf pomegranate, Mediterranean Olive, Coffee and Sweet Leaf Plant need to be moved indoors. Provide as much sun as possible; a south- or west-fac-ing window is ideal. Avoid areas that would expose your plants to hot dry air, such as near heat registers. Growth will slow down in wintertime. Withhold fertilizer at this time and only water as needed. Return to a patio setting once danger of frost has passed in late spring.
GEN-PG-S14.indd 4 12/17/2013 9:46:53 AM

NUT PLANTING CHART Planting Approx. Years to Average Variety Distance Height Bearing Yield Almond 25 Ft. 15-20 Ft. 3-7 12-15 Lbs. Butternut 40-50 Ft. 40-60 Ft. 10-15 50-100 Lbs. Chestnut 40 Ft. 40-60 Ft. 7+ 30-40 Lbs. Hazelnut 15 Ft. 15 Ft. 3-4 20-30 Lbs. Hickory 40-50 Ft. 60 Ft. 7-10 25-50 Lbs. Pecan 50 Ft. 40-75 Ft. 10-15 50-100 Lbs. Walnut, Blk. 40-50 Ft. 50-75 Ft. 10-20 50-100 Lbs. Walnut, Eng. 40-50 Ft. 40-60 Ft. 6-8 50-100 Lbs.
NUT TREESFollow the general planting directions on page 1 and space as directed in the chart below. Nut trees thrive in full sun and well-drained soil. You can control the few pests and diseases that trouble them with liquid fruit tree spray. Most nut trees are self-fruitful, but the male and female flowers don’t always develop at the same time. For best results, plant nut trees in groups of two or more of like variety within 50 feet to increase their chances of pollination. Those not self-fruitful need a pollinator planted nearby. Test harvested nuts for soundness by placing in a bucket of water. Save only those that sink to the bottom. Dry and store in a cool place. Shelled nuts can be frozen up to a year.
ONIONSSets—Plant sets as soon as the ground can be worked. One pint will plant 25 feet at 1-2 inches deep and 3-4 inches apart. Plants—Plant in early spring, approxi-mately 1 inch deep and 5 inches apart. Onions are ready to harvest when 3/4 of the top has fallen over. After digging, leave bulbs in the garden to cure for a few days until roots are brittle. Spread out on newspaper in a dry, dark spot for 2-3 weeks. Then remove dirt and papery skin. Cut tops 1 1/2 inches above the bulb. Store bulbs in mesh bags in a cool, airy spot. Use those with thick necks first as they are likely to be the first to spoil.
Shallots—Plant sets 1-2 inches deep and 4-6 inches apart. When foliage starts to
5
wither, dig bulbs and cure 2-3 weeks before storing like onions.
PERENNIALS &GROUND COVERS
Perennials come back year after year if left undisturbed. Some do not bloom the first year but develop roots and foliage to support flowers the next year and after. The illustration below shows typical plant-ing depths. The packaging your perenni-als come in will have detailed instructions for planting depth and spacing.
Set irises and yuccas with roots barely covered with soil (#1). Plant peonies, lilies of the valley and hostas with buds 1-2 inches below the surface of the soil (#2). Set plants with a distinct crown with the crown even with the soil surface (#3). Plant those without a distinct crown, that look like a chunk of root, 1 inch deep. If you can’t tell which end is up, lay the root on its side (#4).
Perennials require little care after plant-ing. Mulching helps keep weeds down and retains soil moisture. Fall-planted perennials should be mulched heavily to prevent frost damage. Remove faded and dying flow-ers often to prolong the plant’s flowering period. Most perennials need to be divided every 3-5 years to rejuvenate the plant as it spreads. Ground covers are a special breed of low-growing plant often used on banks and slopes where it’s difficult to mow.
Potted Perennials—When you receive your potted perennials, you might find that some of the leaves are yellow or dried. That does not mean the plants are dead. As long as the root system is healthy, upper foliage will soon regenerate.
Soil Level
#1 #2 #3 #4
Setting Perennials
GEN-PG-S14.indd 5 12/17/2013 9:46:53 AM

6
Remove your perennial from the pot it was shipped in by lightly squeezing or tapping medium. Cut or tear off the bottom third of the root ball. Use a trowel or knife to then score a vertical indentation on all four sides of the root ball. This helps the roots to grow directly into the surrounding soil rather than staying in the potting soil they are grown in.
Ground Covers—Ground cover plants prefer deeply worked, properly fertilized soil that is free of weeds.
To create the most natural effect, stagger your ground cover plants so individual plants aren’t lined up like ranks of sol-diers. When planting on a slope, stagger the plant arrangement and follow the contour of the slope. Leave a depression around each plant as a natural basin to hold water.
Spread a 1-2 inch layer of mulch over the area surrounding the plants, being careful not to bury them. This helps to retain moisture in the soil and retard weed growth. Maintain the mulch cover-ing until your ground cover plants have spread over the entire planting area.
POTATOESMany varieties of potatoes produce large seed with many growth buds called eyes. In order to achieve greater yields, these larger whole seed potatoes (2" or more in diameter) may be cut into pieces. Be sure that each potato seed piece has at least one or two eyes, cut into sections and allow them to air dry at room temperature for 2-4 days prior to planting.
Potatoes do best in well-drained, well-cultivated, rich soil. Dig a shallow trench about 4 inches wide and 6-8 inches deep. Place cut seed pieces in the trench 8-10 inches apart, and cover with 3 inches of soil. Continue to mound soil about half-way up the stem of the plant as it grows. Ensure that there is enough soil over the forming potatoes so that they do not push out of the hill and get exposed to light. Keep rows weeded, but do not cultivate
too deeply and irrigate weekly during dry periods. Harvest young potatoes when-ever tubers are large enough to eat, usually 7-8 weeks after planting. Do not dig up the entire plant. Instead, dig care-fully around the plant and remove large tubers. The smaller tubers can continue to grow. Dig for winter storage when plant tops begin to dry. Take care not to bruise the skin. Dry for 2-3 hours, then store in a cool, dark, well-ventilated spot.
ROSESSoak bareroot roses in water for several hours before planting. Plant in a sunny, well-drained spot in early spring. Place
the joint or bud union 1 inch above the ground in warm regions and up to 2 inches below the ground in cold areas. Mound 8-10 inches of soil around the top of the plant and leave until new growth appears (see illustration above). This pro-tects the bud union, where most canes originate, and helps roots get established before top growth begins.
Once new growth appears, carefully remove the soil mound and add mulch. A 2- to 4-inch layer conserves moisture and helps keep weeds down. Water to supply the equivalent of 1 inch of rain weekly, soaking soil to a depth of 8-10 inches. Fertilize after pruning in early spring and just before plants bloom. An additional feeding should be given as one flowering period ends to stimulate the next one. However, in cold climates, roses should not be fed after August.
Prune just before new growth begins, as the buds begin to swell. Hold off prun-ing until danger of frost has passed or newly trimmed tips may be killed. (NOTE:
Planting Roses
10"
GEN-PG-S14.indd 6 12/17/2013 9:46:53 AM

7
Climbing roses are the exception. They benefit from a light pruning immediately after flowering.)
When pruning roses, remove 1/3 to 1/2 of the previous year’s growth. Trim off suckers (canes emerging from the roots) as they appear. Remove any damaged branches and work to open the plant up so air and sunlight can reach the center (see illustration below). Additional prun-ing may be needed in cold climates.
To improve production, remove flowers as they fade. To keep climbers blooming, prune just above the first five-leaf grouping when the first flush of flowers has faded. Roses need winter protection in northern regions. Mound dirt, leaves or straw over plants or cover with rose cones after a couple of good, hard frosts. (The ground should be frozen to a depth of 2 inches before cones are added.) Lay climbers on the ground and cover with heavy mulch.
TREESFollow the general planting directions
on page 1. Varieties that grow taller than 50 feet are best located at least 30 feet from the street and the house. Larger varieties look best alone; smaller ones are more appealing planted in clusters of two or three. After planting, trunks can be wrapped to protect the bark from sun, wind, insects, rodents and deer. This is best done in fall and should be removed the following spring. Wrap the tree from the ground to the crotch of the first major branches. Most trees are pruned before shipment to avoid damage in transit. However, they may need some additional pruning. Prune out crossed limbs and remove broken or injured branches by trimming just outside the branch “collar”—the small, raised area around the branch where it grows from the main stem.
SHRUBSFollow the general planting directions on page 1. Give shrubs room to grow by setting them rather far apart unless you want to form a dense, upright hedge. It’s better to allow too much room than too little since cramped quarters will cause shrubs to lose their natural shape. Set shrubs far enough from the house so that they won’t touch the walls when mature. This avoids a cluttered look in the landscape and, more importantly, protects the health of the plants. It permits air to circulate freely, lessen-ing the chance of disease. Never plant directly under the drip line of a roof where shrubs could be damaged by falling icicles or snow. Avoid planting under overhangs where the plants won’t get sufficient mois-ture. Don’t place a shrub in an exposed site if it’s a variety that needs shelter from winter winds. Most shrubs need very little pruning—just enough to maintain the basic shape of the bush and to keep deadwood trimmed out. Shrubs should not be pruned straight across the top because this spoils their natural habit of growth. Lightly prune early-blooming shrubs immediately after they finish flowering. Midseason and late bloomers can be pruned in late fall after flowering or in early spring.
Proper Pruning for Roses
Remove deadwood, weak and twiggybranches and any crossed branches
In cold climates, reduce bushto half the size it was in fall
GEN-PG-S14.indd 7 12/17/2013 9:46:53 AM
8
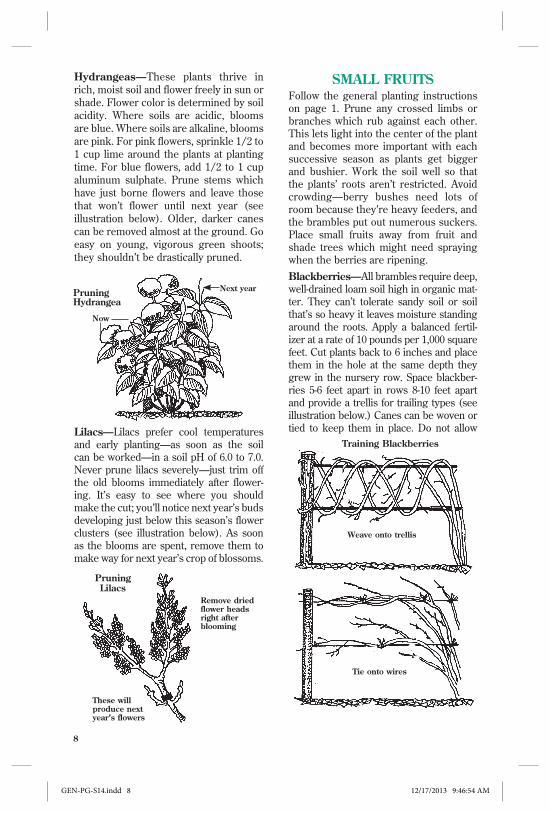
SMALL FRUITSFollow the general planting instructions on page 1. Prune any crossed limbs or branches which rub against each other. This lets light into the center of the plant and becomes more important with each successive season as plants get bigger and bushier. Work the soil well so that the plants’ roots aren’t restricted. Avoid crowding—berry bushes need lots of room because they’re heavy feeders, and the brambles put out numerous suckers. Place small fruits away from fruit and shade trees which might need spraying when the berries are ripening.Blackberries—All brambles require deep, well-drained loam soil high in organic mat-ter. They can’t tolerate sandy soil or soil that’s so heavy it leaves moisture standing around the roots. Apply a balanced fertil-izer at a rate of 10 pounds per 1,000 square feet. Cut plants back to 6 inches and place them in the hole at the same depth they grew in the nursery row. Space blackber-ries 5-6 feet apart in rows 8-10 feet apart and provide a trellis for trailing types (see illustration below.) Canes can be woven or tied to keep them in place. Do not allow
Hydrangeas—These plants thrive in rich, moist soil and flower freely in sun or shade. Flower color is determined by soil acidity. Where soils are acidic, blooms are blue. Where soils are alkaline, blooms are pink. For pink flowers, sprinkle 1/2 to 1 cup lime around the plants at planting time. For blue flowers, add 1/2 to 1 cup aluminum sulphate. Prune stems which have just borne flowers and leave those that won’t flower until next year (see illustration below). Older, darker canes can be removed almost at the ground. Go easy on young, vigorous green shoots; they shouldn’t be drastically pruned.
Lilacs—Lilacs prefer cool temperatures and early planting—as soon as the soil can be worked—in a soil pH of 6.0 to 7.0. Never prune lilacs severely—just trim off the old blooms immediately after flower-ing. It’s easy to see where you should make the cut; you’ll notice next year’s buds developing just below this season’s flower clusters (see illustration below). As soon as the blooms are spent, remove them to make way for next year’s crop of blossoms.
PruningLilacs
These willproduce nextyear’s flowers
Remove driedflower headsright afterblooming
Training Blackberries
Weave onto trellis
Tie onto wires
PruningHydrangea
Now
Next year
GEN-PG-S14.indd 8 12/17/2013 9:46:54 AM

canes to set fruit the first year. Water heav-ily and mulch to reduce weeds. Thick lay-ers of shredded bark, leaves, wood chips and hay make excellent mulches for any type of berry. Blueberries—Blueberries must be plant- ed where they have full sun most of the day and acidic soil (a pH of 4.5-5.5) that’s well-drained, porous and high in organic matter. The plants have shallow root systems and must be irrigated. A heavy mulch will help retain soil moisture and keep the roots cool. Prune off half of the top growth and space plants 4-5 feet apart in rows 8-10 feet apart. Incorporate plenty of organic matter in and around the plant-ing holes. Control weeds with mulch instead of cultivation.
In cold climates, blueberries benefit from a thick layer of mulch during the winter. Prune for fewer but larger berries by removing old branches; fruit is produced on year-old wood. Boysenberries—Set plants 6 feet apart in rows 8 feet apart. Mulch with straw or com-post. Culture is the same as for blackber-ries. Plants can be left to trail on the ground the first season. In the fall, after growth has stopped, prune back half of new growth. Cover with additional mulch just before the ground freezes. When vines begin to bud, build a three-wire trellis with the top wire 5 feet high and the bottom wire 2 feet above the ground. Weave vines onto the trellis in a fan shape. Remove small canes and prune long ones to fit. Do not cultivate. Cut out old canes and destroy them after the harvest.
Pruning Blueberries
Cut outworn old
wood
Cut outtwiggystems
Cut outweak
laterals
Cut outheavy old stems
Pruning Grapevines
Beforepruning
Afterpruning
Cranberries—Grow this ground cover-like plant in an environment similar to blueberries, spacing the plants 3 feet apart. While the plants do not need to be grown in a bog, they do prefer plentiful moisture. Cover the plants when frost threatens in the spring to prevent damage to flowers or fruits.Currants, Gooseberries and Josta-berries—These plants do best in rich soil that is cool and moist but has good drain-age. Plant 5 feet apart, in rows 8 feet apart, in full sun where summers are mild and in a partially shaded location where summers are hot and dry. Trim stems back by 2/3 after planting. Prune in spring after flower-ing. Fruit is produced on older wood—in the fall, remove any wood more than 3 years old. Elderberries—Elderberries thrive in moist, heavy soil and do not tolerate drier conditions. Plant 7-20 feet apart in full sun. Plants grow 12-14 feet tall; some pruning is necessary to maintain size and shape. Berries are produced on the end of the current season’s growth.
Grapes—Grapes thrive in fertile, well-drained soil. Choose a site that offers protection from wind and late frost. If possible, run vines east/west to reduce shade cast by the trellis. Work in fair amounts of compost before planting but don’t overfertilize. Set the plants 8 feet apart in rows 10 feet apart. For the first year, main stems should be allowed to grow unchecked, and vines should be trained on a trellis using two support wires. Prune in winter when dormant but before the weather becomes too cold.
9
GEN-PG-S14.indd 9 12/17/2013 9:46:54 AM

10
Canes that have borne fruit should be pruned back sharply (see illustration on p. 9). Remove old canes coming from the main stem and leave four new canes (shoots that started to grow the previous spring). The new canes should be cut back to 6 or 8 inches and 3 or 4 buds. These buds, found at the joints, produce the new shoots that bear leaves and grapes the following summer. Four of these new shoots will be used to repeat the same fruiting and pruning process the follow-ing winter.
Goji Berries—Plants do best in well-drained soil with moderate fertility. They will tolerate almost any soil type except for wet, soggy soil. Plant 5-8 feet apart in full sun to partial shade. Prune heavily in the fall to maintain plant and increase fruit production. Plants will typically begin bearing fruit after their 2nd or 3rd grow-ing season.
Hardy Figs—This pest-free plant does best in moist, well-drained soil and full sun. Space plants 10 feet apart. North of zone 6, figs may be grown in pots. Bring potted figs indoors during winter months. North of zone 7, plants may die back to the ground unless protected by mulch for the winter.
Honeyberries—Plants do best in moderately drained, moist soil. Mulch to retain moisture. Plant in full sun where summers are mild; in par-tial shade where summers are hot and dry. Set plants 4-5 feet apart, fertilize and mulch annually, and prune to maintain shape. It is best to plant at least two varieties as cross-pollination is required to produce fruit.Kiwis—Plant in any well-drained soil, mulch to retain moisture and keep plants shaded during the hot part of the day until well established. This is a fruiting vine that requires support, like a trellis similar to one you’d use for grapes, only stronger. (See illustration at right.) Endposts should be 4-6 inches in diameter and 6-8 feet tall, with strong wires stretched between them. Place a temporary stake the height of the trellis next to each plant.The first season’s growth should be tied to this stake and allowed to grow to the top of the trellis (see A). Remove suckers and all but four lateral branches cut back to 18 inches, directing the plant’s energy toward a single
trunk. After the vine reaches a top wire, cut it back 3-6 inches to just above a plump bud. This causes the central vine to split and grow into a Y shape. Train lateral growth to wires but don’t allow the two new leaders to twine around the wire supports (see B).Once trained to a trellis, prune your kiwi regu-larly. In late winter or early spring, trim away 3-year-old branches (those that have finished a second year of fruiting) and any damaged or twisted wood. Keep fruiting laterals pruned to 12 buds. You should also prune where neces-sary to keep branches 2 feet above the ground. Hardy kiwi generally begin bearing 3-10 years after planting. The Issai and Arctic Beauty vari-eties bear within 4-7 years if properly pruned.
Mulberries—Mulberries prefer a damp location in fertile, loam soil. Add a gener-ous helping of organic matter to the site before planting and work it in well. Male and female flowers are produced on sepa-rate trees, so it is best to plant in groups of three to five to ensure proper pollination. Set plants 15 feet apart or 3 feet apart for a hedge. Water frequently the first few years,
Kiwi Trellis System
6'
A.
B.
3'
6-8'
GEN-PG-S14.indd 10 12/17/2013 9:46:54 AM

Rhubarb—Plant divisions in spring, spac-ing plants 3 feet apart in fertile soil. Position crowns 3-4 inches below the soil surface (see illustration below). Water heavily, culti-vate regularly and feed generously the first year. Stalks can be lightly harvested the second year. After that, they may be pulled during a 6-week period from early spring until early summer. Plants can be mowed, dug and divided in either fall or spring.
Rhubarb Planting Depth
3-4"
Crown
11
Head backor pinch
Pruning Black Raspberries
especially during fruit development. Mulberries grow 25-40 feet tall and bear 4-5 years after planting. Pawpaws—Plant pawpaws in a fertile, moist location where they will have plenty of room to grow; the trees can reach 30 feet in height. Pawpaws do best in full sun but will tolerate partial shade. Plant two or more for best pollination. Little mainte-nance is required. Simply water during dry spells and fertilize each spring. Harvest when fruit is soft and coppery brown to almost black.Persimmons—These trees can grow to 30 feet or more, so be sure to give them lots of room. Plant in full sun, dig-ging a deep hole so the taproot fits without curling. Curling or crowding the taproot can kill the tree. Fertilize and mulch each spring. Water during dry periods. Prune out suckers as they appear. Persimmons do not ripen until late in the fall. The crop is best harvested after a frost, when the fruit is softened and slightly creased.
Raspberries—Raspberries are a bramble fruit and should be cultivated as you would blackberries. Plants are more erect, however, and still benefit greatly from a simple trellis. Space red and yellow variet-ies 2 feet apart in rows 6 feet apart; blacks and purples 3 feet apart in rows 8 feet apart. (NOTE: Plant blacks and reds 300 feet apart to prevent the spread of disease.) Except in
the case of fall-bearing types, new canes don’t produce fruit and put out few, if any, branch-es. Little thinning is needed until plants have been in the ground for a few years.
When thinning brambles, leave the thickest canes and remove the thinnest (see illustration above.) Prune red and yellow raspberries back
Pruning Red Raspberries
Pulloutsuckers
to 8-12 buds on a cane, leaving the thickest canes at least 4-6 inches apart in the spring. Remove the fruiting canes after harvest. Prune blacks and purples when new growth starts in the spring, leaving 10-15 buds per cane and four-five canes per clump. Encourage branch-ing by pinching back the tips of black rasp-berry plants in late summer (see illustration below.) With reds, remove suckers rather than canes from original plants.
Saskatoon Blueberries—Native to North America, this hardy shrub provides blue-berry-like fruit in harsher climates and drier, more alkaline soils than true blue-berries. Plant in full sun to partial shade and water regularly for best fruit produc-tion. Prune only to maintain an attractive shape or to remove crowded or damaged branches.
GEN-PG-S14.indd 11 12/17/2013 9:46:54 AM

VEGETABLE PLANTSIf your vegetable seedlings arrive on a cloudy day, plant them right away. If it is hot and sunny, wait to set the plants out until late afternoon or early evening, dig-ging to the correct depth and spacing for each. Fill the holes with water and let it soak in. This first soaking gives the roots plenty of moisture to get seedlings off to a good start. Set the plants in the holes and firm the soil around them to remove air pockets. Leave a slight depression around each plant to collect and hold moisture; water well. If temperatures still dip below freezing at night, protect newly planted seedlings by covering them with protective caps or floating row covers.
VINESPlant vines a minimum distance of 1 foot from the house to ensure adequate air cir-culation. After they’re planted, cut them back and stake them securely. Lightly firm the soil around the roots and fertil-ize after new growth appears. Remember
that climbing vines need plenty of water and well-drained soil. Bittersweet—This vine does well in poor soil and full sun to shade. Both a male and female plant must be planted for fruiting to occur. Great for fences, rock piles or old trees.
Clematis—A key essential to establish-ing your clematis plant is to make sure the root system is kept cool. A sunny location where roots can grow under a cool cover-ing, such as other perennials, mulch or a large flat rock is ideal. Deep planting—about a half inch deeper than it was grown in the nursery—encourages extra-strong root development. Frequent, thorough watering stimulates vigorous growth.
Honeysuckle—This twining vine needs full to partial sun and a sturdy support such as a fence. Prune in spring, remov-ing deadwood or broken vines.
Hops—Lay root cuttings on their side in a 6-inch trench, covering them with 2 inches of soil. Gradually fill in trench as the vine grows. Keep well watered.
Silver Lace—Another twining type, this adapts to most conditions. Provide good support and prune in late fall or early spring.
Trumpet—Place in full sun and secure to a support. This vine can take 3-7 years to bloom after planting. Prune vigorously in spring, as it flowers on new growth.
Wisteria—Wisteria prefers slightly acid-ic, organic soil and flowers 3-5 years after planting. Provide a sturdy support and trim back aggressive growth during the summer. Regular pruning in spring encourages formation of flower spurs.
WINDBREAKSPlant windbreaks to the north and west of the area you’re planning to shelter. The first row should be planted 100-150 feet away from the house or building to be protected. Follow the general planting directions on page 1. Trees will grow two to three times faster if weeds are kept down the first 2 years.
Strawberries—Strawberries need well-worked soil with good drainage and plenty of organic matter. Add 1 pound of fertilizer per 100 square feet. Plant so that the crown is even with the surface of the soil and make sure all the roots are covered.
Junebearing strawberries produce a single crop. Everbearers produce one crop during the regular strawberry season and another smaller one later in fall, plus a few fruits in between. Day neutrals are the truest everbearers, producing fruit spring, summer and fall.
Set strawberries 15-24 inches apart, water well and mulch with straw. Remove blos-soms from Junebearers the first year. Remove everbearer and day-neutral blos-soms until July 1, then allow the plants to set fruit. This allows the plants to become established so they’ll set far more berries the second year than they ordinarily would have. Water them well, keeping the top 2 inches of soil evenly moist all season long. Protect in cold climates with a winter mulch.
© 2014 Scarlet Tanager LLC, d/b/a Gurney’s Seed and Nursery Co. All rights reserved. Printed in the U.S.A. GEN -PG-S14
GEN-PG-S14.indd 12 12/17/2013 9:46:54 AM