Spot 5 User Guide
73
Spot 5.0 User Guide Copyright © 2010 Spot Software BV Admiraal de Ruyterweg 3 1057 JT Amsterdam The Netherlands May 2010
-
Upload
maria-dolores-gonzalez -
Category
Documents
-
view
63 -
download
0
Transcript of Spot 5 User Guide

Spot 5.0
User Guide
Copyright © 2010
Spot Software BV
Admiraal de Ruyterweg 3
1057 JT Amsterdam
The Netherlands
May 2010

2 Spot 5.0 User Guide
Copyright © 2010 Mark Raishbrook/Spot Software BV, Holland
TABLE OF CONTENTS
GETTING STARTED WITH SPOT ............................................................................................................................................ 5
INSTALLATION .............................................................................................................................................................................. 5
SYSTEM REQUIREMENTS ................................................................................................................................................................. 5
SCREEN LAYOUT ........................................................................................................................................................................... 6
TOOLBARS AND STATUS BAR ........................................................................................................................................................... 7
BASIC NAVIGATION ....................................................................................................................................................................... 9
Moving between subtitles ................................................................................................................................................... 9
Moving to the start and end of a file................................................................................................................................... 9
Navigating quickly through a file ........................................................................................................................................ 9
Moving to a specific subtitle ............................................................................................................................................... 9
EDITING AND FORMATTING SUBTITLES ............................................................................................................................. 10
FORMATTING SUBTITLES .............................................................................................................................................................. 10
Aligning subtitles horizontally ........................................................................................................................................... 10
Aligning subtitles vertically ............................................................................................................................................... 10
Italicising subtitles ............................................................................................................................................................. 10
Adding comments to subtitles ........................................................................................................................................... 11
Adding outlines to subtitles ............................................................................................................................................... 11
SUBTITLE EDITING FUNCTIONS ....................................................................................................................................................... 12
Inserting subtitles .............................................................................................................................................................. 12
Deleting subtitles............................................................................................................................................................... 12
Merging two subtitles ....................................................................................................................................................... 12
Splitting subtitles ............................................................................................................................................................... 12
Splitting and merging subtitles ......................................................................................................................................... 12
Copying subtitles ............................................................................................................................................................... 12
Locking subtitles ................................................................................................................................................................ 12
TEXT EDITING FUNCTIONS ............................................................................................................................................................. 13
Deleting text ...................................................................................................................................................................... 13
Moving words between rows ............................................................................................................................................ 13
Swapping lines one and two ............................................................................................................................................. 13
Toggling text between upper, mixed and lowercase......................................................................................................... 13
Compressing text ............................................................................................................................................................... 13
Using colours ..................................................................................................................................................................... 13
AutoReplace and AutoFormat ........................................................................................................................................... 14
UNDO ...................................................................................................................................................................................... 15
QUICK VIEW .............................................................................................................................................................................. 15
CAPTURING AND EDITING CUES ........................................................................................................................................ 17
CAPTURING CUES ........................................................................................................................................................................ 17
Grabbing cues in Edit mode .............................................................................................................................................. 17
Spotting with the spacebar in Rehearse mode .................................................................................................................. 17
EDITING CUES ............................................................................................................................................................................ 18
Editing the in and out cue ................................................................................................................................................. 18
Deleting cues ..................................................................................................................................................................... 19

3 Spot 5.0 User Guide
Copyright © 2010 Mark Raishbrook/Spot Software BV, Holland
Recalculating cues ............................................................................................................................................................. 19
Offsetting cues .................................................................................................................................................................. 19
Controlling Cue Behaviour ................................................................................................................................................. 20
Converting cues between video formats ........................................................................................................................... 21
CHECKING AND PROOFING SUBTITLES ............................................................................................................................... 22
USING THE CHECKS MENU ............................................................................................................................................................ 22
AUTOCHECK .............................................................................................................................................................................. 23
REPORT VIEW ............................................................................................................................................................................ 23
SPELL CHECK AND THESAURUS ....................................................................................................................................................... 24
WEB SEARCH ............................................................................................................................................................................. 24
WORKING WITH PROFILES ................................................................................................................................................. 25
WORKING WITH FILES ........................................................................................................................................................ 26
DEFAULT FILE FOLDERS ................................................................................................................................................................ 26
OPENING AND IMPORTING FILES .................................................................................................................................................... 26
Opening files ..................................................................................................................................................................... 26
Importing files ................................................................................................................................................................... 29
Importing only text or cues ............................................................................................................................................... 29
SAVING AND EXPORTING FILES ....................................................................................................................................................... 30
Saving files ........................................................................................................................................................................ 30
Exporting files .................................................................................................................................................................... 30
Exporting bitmap files ....................................................................................................................................................... 33
AUTORECOVER AND TIMED BACKUPS .............................................................................................................................................. 37
AutoRecover ...................................................................................................................................................................... 37
Timed Backups .................................................................................................................................................................. 37
SPLITTING FILES .......................................................................................................................................................................... 39
COPYING SUBTITLES FROM EXISTING FILES ........................................................................................................................................ 39
WORKING WITH MEDIA FILES ............................................................................................................................................ 40
OPENING MEDIA FILES ................................................................................................................................................................. 40
SYNCING MEDIA FILES .................................................................................................................................................................. 40
CONTROLLING MEDIA PLAYBACK .................................................................................................................................................... 41
Using the video toolbar ..................................................................................................................................................... 41
Using the keyboard ........................................................................................................................................................... 43
SETTING VIDEO AND AUDIO PREFERENCES....................................................................................................................................... 44
General .............................................................................................................................................................................. 44
Media Control ................................................................................................................................................................... 45
Audio ................................................................................................................................................................................. 45
Thumbnails ........................................................................................................................................................................ 45
AUDIO WAVEFORM DISPLAY .......................................................................................................................................................... 47
DISPLAY SETTINGS ...................................................................................................................................................................... 49
BURNING SUBTITLES TO VIDEO.......................................................................................................................................... 50
USING THE ENCODER .................................................................................................................................................................. 50
USING QUICK ENCODE ................................................................................................................................................................ 51
ADVANCED ENCODER SETTINGS ..................................................................................................................................................... 51

4 Spot 5.0 User Guide
Copyright © 2010 Mark Raishbrook/Spot Software BV, Holland
OTHER TOOLS AND PROCEDURES ...................................................................................................................................... 53
NOTEBOOK ............................................................................................................................................................................... 53
MEASUREMENT CONVERTER ......................................................................................................................................................... 54
SCRIPT MANAGER ...................................................................................................................................................................... 55
Script Manager export options.......................................................................................................................................... 56
TRANSLATION ............................................................................................................................................................................ 57
KARAOKE .................................................................................................................................................................................. 58
Creating karaoke subtitles ................................................................................................................................................ 58
Removing karaoke subtitles .............................................................................................................................................. 60
Checking karaoke subtitles ................................................................................................................................................ 60
Reapplying karaoke subtitles ............................................................................................................................................ 60
SHOT CUT DETECTION .................................................................................................................................................................. 61
TIMECODE CALCULATOR ............................................................................................................................................................... 63
SPOT 5.0 DATA AND LOG FILES .......................................................................................................................................... 64
FREQUENTLY ASKED QUESTIONS ....................................................................................................................................... 65
REFERENCE ........................................................................................................................................................................ 65

5 Spot 5.0 User Guide
Copyright © 2010 Mark Raishbrook/Spot Software BV, Holland
Getting started with Spot
Installation
Open the file setup.exe to install Spot and follow the on-screen instructions. Make sure your dongle is connected
to your computer before starting the program and that it remains connected throughout the current session.
The first time you run Spot you will be asked to activate the product using your product key. This is a unique 35-
character identifier that will have been provided to you after purchasing the program. When asked for the key,
make sure you are connected to the Internet, enter the 35 character code and click OK.
Spot will start once the key has been validated.
You will be asked to enter your product key each time you install and run the program for the first time on a new
machine, so make sure you keep it safe. You are allowed a maximum of five activations. In other words, you may
install Spot up to five times on different computers.
System requirements
256 MB of RAM
2 GB available hard disk space (if bitmap export required)
32 MB graphics card capable of displaying 32-bit colour at 1024 x 600 (minimum resolution)
Sound card
Windows XP, Windows Vista or Windows 7.
To capture video to your hard disk, you will require either:
A compatible video capture card; or
an MPEG or similar encoder
To subtitle from VHS, you will also require:
A compatible video capture card (with WDM DirectX driver)
An Adrienne timecode reader board

6 Spot 5.0 User Guide
Copyright © 2010 Mark Raishbrook/Spot Software BV, Holland
Screen layout
You can resize the main window by dragging the sides or corners of the window with the mouse. As you do so,
the video window will resize accordingly. The video window can be undocked by clicking its icon on the main
toolbar.
Selecting the option REMEMBER MAIN WINDOW SIZE AND POSITION in the OPTIONS, GENERAL window will store the size
and coordinates of the main window and restore them the next time you start Spot. Click the DEFAULT button on
the right of this option to restore the window to its default size.
The subtitle toolbar and view bar can be hidden by selecting the appropriate option in the OPTIONS, CUSTOMISE
window. You can also turn colour coding on and off for the previous and next subtitles.
The audio waveform can be hidden or displayed by clicking its icon on the main toolbar.
Subtitle
edit area
Previous subtitle
Next subtitle
Main toolbar
Audio waveform
Video window
Video control panel
Internal timecode
Subtitle
toolbar
Font toolbar
Status bar
Current subtitle
Duration
guide
Subtitle overlaid
on video
View bar
Previous subtitle duration guide
Next subtitle
duration guide

7 Spot 5.0 User Guide
Copyright © 2010 Mark Raishbrook/Spot Software BV, Holland
Toolbars and status bar
Main toolbar
By default, large icons are displayed in the main toolbar. Small icons can be displayed instead by deselecting the option SHOW LARGE ICONS IN THE MAIN TOOLBAR in the OPTIONS, CUSTOMISE window.
Subtitle toolbar
The subtitle toolbar can be hidden by selecting HIDE SUBTITLE TOOLBAR in the OPTIONS, CUSTOMISE window.
Font toolbar
Status bar
Spelling
Open file
Save file
Email file
Find
Replace
Go To
Quick View
Rehearse
Notebook
Script manager
Measurement converter
Bitmap export
New file
Checks
Save or delete profile
Profile properties
Display settings
Safe area
Aspect
ratio
Float video
Audio waveform
Thumbnails
Sync video
with subtitles
Align centre
Cut
Paste
Copy
Undo
Align left
Align right
Insert before
Delete
Split and merge
Outline
Merge
Split
Italics
Insert after
Colour
Grab in cue
Grab out cue
Manage comments
Current profile
Edit font name
Edit area width
Subtitle and spell check language
Edit font size
Subtitles in file
Frame rate
Character set
Average characters per line
Video window size
Insert/overtype

8 Spot 5.0 User Guide
Copyright © 2010 Mark Raishbrook/Spot Software BV, Holland
Subtitle edit area
The subtitle edit area is where you type and edit subtitles and their in and out cues. It also displays information
about the current subtitle and any comments that may be attached to it.
Using the TAB key
While the cursor is flashing in the main edit area, press the TAB key:
once to move to the in cue
twice to move to the duration field
three times to move to the out cue
four times to move to the comment field
five times to move back to the subtitle text
Use SHIFT+TAB to move in the reverse direction. Pressing the ESC key from any of these fields will take you back to the main edit area.
Subtitle number
Comment
Out cue
In cue
Duration
Lines in subtitle
Row
Safe area override
Outline
Characters in lines one and two
Required reading speed
Maximum ideal duration
Colour-coded duration
One second tick marks
Minimum ideal duration

9 Spot 5.0 User Guide
Copyright © 2010 Mark Raishbrook/Spot Software BV, Holland
Basic navigation
Moving between subtitles
Use the PAGE UP and PAGE DOWN keys to move to the previous and next subtitle. Clicking the previous and next
subtitle boxes has the same effect.
Moving to the start and end of a file
Press CTRL+PAGE UP to jump to the first subtitle in the file and CTRL+PAGE DOWN to jump to the last subtitle.
Navigating quickly through a file
Drag or click within the vertical scroll bar on the far right of the main screen.
Moving to a specific subtitle
Press F5 to open the GO TO window. Type the number in the ENTER SUBTITLE NUMBER box and hit ENTER or click GO
TO.
To find a subtitle with a specific in cue, click
TIME CODE in the GO TO WHAT box, enter the
time code you are searching for in the ENTER
TIME CODE box and hit ENTER or click GO TO.
Leave the ENTER TIME CODE box blank and hit
ENTER or click GO TO to move to the first
subtitle that does not have an in or out cue
assigned to it.
To find subtitles with specific formatting,
select the type of formatting from the GO TO
WHAT box, then use the NEXT and PREVIOUS buttons to navigate through the file.
For example, to find the next left-aligned subtitle in the current file, click ALIGNMENT in the GO TO WHAT box, select
LEFT from the SUBTITLE ALIGNMENT box and click NEXT.

10 Spot 5.0 User Guide
Copyright © 2010 Mark Raishbrook/Spot Software BV, Holland
Editing and formatting subtitles
Formatting subtitles
Aligning subtitles horizontally
Press the F2 key to toggle the horizontal alignment of subtitles. Pressing F2 with a left aligned subtitle, for example, centres that subtitle. Pressing F2 again aligns it to the right. Use Quick View to change the alignment of a group of subtitles or all the subtitles in a file. Press SHIFT+F2 to toggle the alignment of an individual line (ENABLE INDIVIDUAL LINE ALIGNMENT must be selected
under TOOLS, OPTIONS, TEXT EDITING). Although the alignment in the edit area will remain the same, the preview in
the video window will reflect the change.
Lines can be indented (e.g. for closed caption work) by pressing CTRL+ALT+RIGHT. Press CTRL+ALT+LEFT to remove indenting. You can also shift subtitles left and right in one percent steps using SHIFT+ALT+LEFT/RIGHT. Use Quick View to change the horizontal alignment of a group of subtitles.
Aligning subtitles vertically
Press CTRL+ALT+UP/DOWN to raise or lower subtitles. Use CTRL+ALT+1, CTRL+ALT+2 and CTRL+ALT+3 to position
subtitles at the top, centre or bottom of the screen. Subtitles can be shifted up and down in one percent steps
using SHIFT+ALT+UP/DOWN.
Sometimes you might need to align a subtitle at the bottom of the screen with information such as the speaker’s
name at the top of the screen. To do this, type the text for the top row, press ENTER and type the first line of the
subtitle text. Next, press HOME to move to the start of the line and then continue to press ENTER until the first
row snaps to the top of the screen.
Use Quick View to change the vertical alignment of a group of subtitles.
Italicising subtitles
Italics can be applied either to whole subtitles or to individual words and phrases. Press F3 to italicise a whole subtitle. To remove italic formatting, press F3 again. To add italics to single words or phrases, select the text you wish to italicise and press F3 or CTRL+I. Italicised subtitles will appear in italics in both the main edit area and the video window. Single italicised words or phrases will only appear in italics in the video window; in the main subtitle area, angled brackets will mark the start and end of the italicised selection. You should not leave a space between an italic marker and the word or punctuation mark immediately before or after it. Use Quick View to add or remove italics from a group of subtitles.

11 Spot 5.0 User Guide
Copyright © 2010 Mark Raishbrook/Spot Software BV, Holland
Adding comments to subtitles
"Invisible" comments can be attached to individual subtitles. To add a comment to a subtitle:
Press SHIFT+TAB from the main edit area or click directly in the comment field.
Type your comment.
Press the TAB key to return to the main edit area.
Use the Manage Comments window (SUBTITLE, COMMENTS or on the subtitle toolbar) to keep track of the
comments in a file, and to print, delete, copy or save comments. You can force the Manage Comments window
to remains always on top or to act like a standard window by selecting the appropriate option under TOOLS,
OPTIONS, CUSTOMISE, ALWAYS ON-TOP.
To move to a commented subtitle, double-click the comment or press CTRL+G.
To delete a comment from a subtitle, select the comment in the Manage Comments window and press
DELETE. Clearing the comment from the comment field in the main edit area has the same effect.
Comments can be printed out or saved by selecting the appropriate command from the Comments menu.
The comment field in the subtitle edit area has two sizes (normal and large), as well as two font sizes (small and
large), and can contain an unlimited number of characters. Note that not all file formats support comments (e.g.
text files) and some of those that do are restricted to a certain number of characters.
Comment fields for the previous and next subtitles can be turned on or off by clicking Show Previous/Next
Comment Fields.
When importing the current file into Script Manager, all comments are considered to be the names of
characters.
Adding outlines to subtitles
To add outlining to a subtitle, press CTRL+G. Notice that the OL indicator is now active.
To remove outlining from a subtitle, press CTRL+G again. Notice that the OL indicator is now inactive.
The default outline type can be changed under Tools, Options,
Text Editing, Outline to any of the following:
None
Boxed outline
Ghost boxed outline
Stripe outline
Ghost stripe outline
Switching to GHOST BOXED OUTLINE, for example, means that every
time you press CTRL+G, a "Ghost boxed outline" code will be invisibly added to the whole subtitle.
Not all types of outlining are visible in the video window.
Not all subtitle file formats support outlining.
Use Quick View to add or remove outlining to or from a group of subtitles.

12 Spot 5.0 User Guide
Copyright © 2010 Mark Raishbrook/Spot Software BV, Holland
Subtitle editing functions
Inserting subtitles
To insert a subtitle before the current subtitle, click the INSERT SUBTITLE BEFORE button on the subtitle toolbar or
press CTRL+F5. A new subtitle will be inserted immediately before the current subtitle.
To insert a subtitle after the current subtitle, click the INSERT SUBTITLE AFTER button on the subtitle toolbar or
press SHIFT+F5. A new subtitle will be inserted immediately before the current subtitle.
Deleting subtitles
Click the DELETE SUBTITLE button on the toolbar or press CTRL+F6 to delete the current subtitle.
A range of subtitles can be deleted using Quick View or the DELETE RANGE window (CTRL+F6).
Merging two subtitles
To merge the current subtitle with the next subtitle, click the MERGE SUBTITLE button on the toolbar or press
CTRL+F7. The newly merged subtitle will inherit the out cue of the second subtitle.
Splitting subtitles
To split the current subtitle into two subtitles, place the cursor at the point where you wish the split to take
place, then click the SPLIT SUBTITLE button on the toolbar or press CTRL+F8.
If the subtitle you are splitting contains valid in and out cues which fall outside the current timecode, the in and
out cues of both subtitles will be based, where possible, on the amount of text in each subtitle.
If the subtitle you are splitting contains valid in and out cues which fall within the current timecode, the in cue of
the newly created subtitle will be set to the current timecode, with the two subtitles separated by the default
interval.
Splitting and merging subtitles
To split and merge the current subtitle, click the SPLIT AND MERGE SUBTITLE button on the toolbar or press CTRL+F9
or select Split and Merge from the Subtitle menu. The current subtitle will be split at the cursor; the text to the
right of the cursor will be merged with the next subtitle.
Copying subtitles
Use Quick View to copy subtitles.
Locking subtitles
Documents can be protected by disabling text and cue editing, subtitle insertion and other editing functions in
the DISABLE window (EDIT, DISABLE).

13 Spot 5.0 User Guide
Copyright © 2010 Mark Raishbrook/Spot Software BV, Holland
Text editing functions
Deleting text
To delete a word, move the cursor to the start of the word and press CTRL+DEL.
To delete a line, press CTRL+Y.
To delete all the text in a subtitle, press CTRL+SHIFT+DEL .
Moving words between rows
Use ALT+UP ARROW to move the word at the start of line two to the end of line one.
Use ALT+DOWN ARROW to move the word at the end of line one to the start of line two.
TOOLS, OPTIONS, TEXT EDITING lets you change the position the cursor needs to be in for these actions to work.
You can use the mouse to drag and drop text within the subtitle edit area by selecting this option in the TOOLS,
OPTIONS, TEXT EDITING window. The same window lets you hide the mouse cursor whilst typing.
Swapping lines one and two
Press CTRL+F2.
Toggling text between upper, mixed and lowercase
Select the text you wish to change. Press CTRL+L once, twice or three times.
Compressing text
Press CTRL+T to remove all hard carriage returns from the text in a subtitle and force a “best fit”.
Using colours
To use colours, you must select ENABLE COLOUR SUPPORT under TOOLS, OPTIONS, TEXT EDITING. The colour can be set
for individual words by using the following shortcuts:
Red = RIGHT CTRL+1, Green = RIGHT CTRL+2, Yellow = RIGHT CTRL+3, Blue = RIGHT CTRL+4, Magenta = RIGHT CTRL+5,
Cyan = RIGHT CTRL+6.
On some systems the colour flags will appear in the edit area as right-angled lines, on others as boxes or parallel
vertical lines. Whatever the appearance, please bear in mind that all flags count as a space.
You can add colours to whole lines by using the key combinations SHIFT+ALT+1 to SHIFT+ALT+6.

14 Spot 5.0 User Guide
Copyright © 2010 Mark Raishbrook/Spot Software BV, Holland
AutoReplace and AutoFormat
AutoReplace (TOOLS, AUTOREPLACE) takes the stress out of getting "Mississippi" right for the eighth time or re-
typing frequently used words or phrases. It also ensures naming consistency throughout your files, avoiding
errors that the spell checker will not detect (Johny Knoxville, Johhny Knoxville, Johnny Knoxvill, etc.).
To add an AutoReplace entry:
Type the shorthand form of the word or phrase in the Replace box.
Type the actual word or phrase in the With box.
Press the Enter key or click the Add button.
Continue in this fashion until you have added all the entries you want.
The new AutoReplace entry is displayed in the list. Typing the short form of the word or phrase in Spot's subtitle edit field will replace it with the actual word or phrase whenever you press the spacebar or type a punctuation mark.
To delete an AutoReplace entry:
Select the entry from the list.
Click the DELETE button.
To turn off AutoReplace, uncheck the TURN ON AUTOREPLACE option.
Words can be added to AutoReplace directly from the subtitle edit area by pressing CTRL+W while the insertion
point is within the word to add.
Smart ellipses, smart quotes and en/em dashes are not supported in many subtitle file formats. AutoFormat
replaces these characters with their simple forms whenever you run an F9 check, move between subtitles or
click the FORMAT NOW button.

15 Spot 5.0 User Guide
Copyright © 2010 Mark Raishbrook/Spot Software BV, Holland
Undo
Press CTRL+Z to reverse an operation carried out on the current subtitle (cue changes, text editing and
formatting, etc.) or the current file (merge, delete, insert, etc).
The undo flag is reset when moving between subtitles unless the ENABLE FULL UNDO option has been selected in
the Tools, Options, General tab. In this case, the undo flag is only reset when the main Spot window loses the
focus (i.e. when opening another window within the program) .
Notebook has unlimited undo and redo.
Quick View
The Quick View window (CTRL+Q or SUBTITLE, QUICK VIEW) lets you apply changes to a group or range of subtitles.
It also allows you to copy subtitles from other files.
Select the subtitles you want to format (click while holding down the CTRL key to select multiple individual
subtitles or click while holding down the SHIFT key to select a continuous range) and then either click the
appropriate command on the toolbar, select it from the SUBTITLE menu or right click the list and select it from the
pop-up menu.
Clicking on each column header will sort the list in ascending order based on that data item but will not affect
the current subtitle file. This might prove useful as a quick means of checking for empty or untimed subtitles

16 Spot 5.0 User Guide
Copyright © 2010 Mark Raishbrook/Spot Software BV, Holland
(click the SUBTITLE or CUES column), for example, or listing subtitles in italics, subtitles with outlines, etc. Clicking a
header a second time will sort the list based on that item data in descending order.
To copy subtitles from an existing subtitle file, click FILE, OPEN AS READ-ONLY and select the file you want to open.
The Quick View window will split into two panes, with the subtitles from the file you have just opened displayed
in the bottom pane (the size of the panes can be adjusted by moving the splitter in the middle of the window).
To copy subtitles into the current file, select the subtitles to copy, then either a) drag them into the desired
position in the top pane or b) press CTRL+C, select the insertion point in the top pane and press CTRL+V. You can
also copy subtitles from an existing file using FILE, MERGE, MULTIPLE SUBTITLES.
The contents of the window can be printed out or saved as a CSV text file by clicking File, Print or File, Save.

17 Spot 5.0 User Guide
Copyright © 2010 Mark Raishbrook/Spot Software BV, Holland
Capturing and editing cues
Capturing cues
There are two ways to capture cues in Spot: you can time a file "live" with the spacebar whilst in Rehearse
mode, or you can grab in and out cues using the mouse or keyboard whilst in Edit mode.
Grabbing cues in Edit mode
Press SHIFT+ENTER or F11 to grab the in cue and SHIFT+INS or F12 to grab the out cue. Clicking on the
subtitle toolbar has the same effect. You can choose to use ENTER and INS without SHIFT by selecting this option
in the VIDEO, MEDIA PREFERENCES, MEDIA CONTROL window.
CTRL+ENTER also grabs the in cue whilst simultaneously “locking” the last out cue to within the default interval of
in cue. If the out cue of the last subtitle is 10:26:07:13, for example, and the video timecode is
10:26:08:04,pressing CTRL+ENTER will:
Set the in cue for the current subtitle to 10:26:08:04.
Set the last out cue to 10:26:08:01, i.e. the current in cue minus the default interval.
In similar fashion, CTRL+INS grabs the out cue whilst simultaneously locking the next in cue.
Spotting with the spacebar in Rehearse mode
Switch to Rehearse mode if necessary (press F8 or click REHEARSE on the VIEW bar). Press and hold down the spacebar to bring in a subtitle. Notice that the subtitle duration indicator
beneath the main edit area starts to move. Release the spacebar when you want the subtitle to come out. Ideally, the duration indicator will now lie
in between the two ideal duration indicators.
If you make a mistake and want to re-subtitle one or more subtitles, you can use any of the following methods:
Position the video at the point at which you wish to start re-subtitling, press and hold down the CTRL key
and continue subtitling as normal. Holding the CTRL key down overrides any cues that have already been
assigned.
Switch to Edit mode (F8), move to the subtitle where you wish to begin re-subtitling, and then press
ALT+BACKSPACE. This will delete all cues forward of (and including) the current subtitle.
Press the BACKSPACE key once for every subtitle you want to re-spot. This method is particularly useful if
you have brought a subtitle in too early and still have time to react.
AutoRecover and timed backups are disabled in Rehearse mode. If you plan on leaving Spot unattended for a long period of time, you should switch to Edit mode first.

18 Spot 5.0 User Guide
Copyright © 2010 Mark Raishbrook/Spot Software BV, Holland
Editing cues
Editing the in and out cue
To edit the current subtitle's in cue:
Press SHIFT+F11 or the TAB key to move the cursor to the in cue field. If the cue contains a valid
timecode, part or all of the cue will be highlighted depending on the settings you have selected under
TOOLS, OPTIONS, CUE EDIT, WHEN MOVING TO VALID CUES.
Type the new in cue or use the UP and DOWN arrow keys to increase or decrease the in cue by one frame
at a time. If you hold down the SHIFT key while pressing the UP or DOWN keys, the cue you are editing will
be increased or decreased by 6 frames; holding down the CTRL key will increase or decrease the cue by
11 frames; holding down both the SHIFT and CTRL keys will increase or decrease the cue by 16 frames.
If the previous subtitle contains a valid out cue, moving to the current subtitle's in cue field will cause it to adopt
the last subtitle's out cue plus the default subtitle interval. For example, if the last subtitle's out cue is
00:10:34:12 and the default interval is set to three frames, the current subtitle's in cue will display 00:10:34:15.
You can turn this feature off by deselecting the CALCULATE IN CUE option in the TOOLS, OPTIONS, CUE EDIT window.
To edit the current subtitle's out cue:
Press SHIFT+F12 or the TAB key three times to move the cursor to the out cue field. If the cue contains a
valid timecode, part or all of the cue will be highlighted depending on the settings you have selected
under TOOLS, OPTIONS, CUE EDIT, WHEN MOVING TO VALID CUES.
Type the new out cue or use the UP and DOWN keys to increase or decrease the out cue by one frame at
a time. If you hold down the SHIFT key while pressing the UP or DOWN keys, the cue you are editing will
be increased or decreased by 6 frames; holding down the CTRL key will increase or decrease the cue by
11 frames; and holding down both the SHIFT and CTRL keys will increase or decrease the cue by 16
frames.
If the in cue contains a valid time code, Spot automatically calculates the out cue for you. This is based on the
amount of text in the current subtitle or the default duration setting if the caption is empty. For example, if the
current subtitle's in cue is 00:10:34:16 and the text in the subtitle requires two seconds to be read, the out cue
will be set to 00:10:36:16. If no text is present, the default subtitle duration will be used instead. Similarly, if the
in cue field is empty but the previous subtitle contains a valid out cue, Spot will calculate the in and out cue of
the current subtitle. You can turn both these features off by deselecting the TOOLS, OPTIONS, CUE EDIT, WHEN
MOVING TO EMPTY OUT CUE, CALCULATE IN AND OUT CUE option.
The keyboard can be used to change the in or out cue without moving to the in or out cue field.
Press SHIFT+ADD to increase the in cue by one frame
Press SHIFT+SUBTRACT to decrease the in cue by one frame
Press CTRL+ADD to increase the out cue by one frame
Press CTRL+SUBTRACT to decrease the out cue by one frame

19 Spot 5.0 User Guide
Copyright © 2010 Mark Raishbrook/Spot Software BV, Holland
Deleting cues
To delete the current in or out cue, press CTRL+SHIFT+F11 or CTRL+SHIFT+F12. Alternately, move to the cue and
press DELETE.
To delete both the in and out cues, press SHIFT+DEL.
To delete all cues forward of (and including) the current subtitle,
press ALT+BACKSPACE or choose DELETE CUES FROM THIS POINT
FORWARD from the CUES menu.
To delete all the cues in the current file, CHOOSE DELETE ALL CUES
from the CUES menu.
To delete a range of cues (e.g. from subtitle 35 to subtitle 89) use the Delete Range window (SHIFT+F6)
Recalculating cues
To recalculate the out cue, press CTRL+F12.
If the current subtitle contains a valid in cue, recalculating the out cue will set this to the in cue plus the time
needed to read the subtitle. If the subtitle does not contain text, the out cue will be set to the in cue plus the
default subtitle duration.
For example, if a subtitle contains text that requires three seconds to be read and the in cue is set to
01:10:03:19, the recalculated out cue will be 01:10:06:19. If the subtitle does not contain text and the default
duration setting is two seconds, the recalculated out cue will be 01:10:05:19.
Out cues can be recalculated even if the in cue is empty. In this case, Spot first calculates the in cue time for the
current subtitle (based on previous subtitle's out cue and the default interval setting) and then recalculates the
out cue.
To recalculate the in cue, press CTRL+F11.
Recalculating a subtitle's in cue works in similar fashion to out cue recalculation. For example, if a subtitle
contains text that requires three seconds to be read and its out cue is set to 01:10:03:19, the recalculated in cue
will be 01:10:00:19. If the subtitle does not contain text and the default duration setting is two seconds, the
recalculated in cue will be 01:10:01:19.
Offsetting cues
Press CTRL+J or choose Cues, Offset to open the Offset Cues window.
There are three ways of adjusting the cues in a file:
Base on new in time
Manually adjust the offset
Continue from last out cue
Note that pressing the BACKSPACE key while in Rehearse mode will erase the cues for the previous subtitle and prepare for it to be retimed. You should only use this method if spotting live with the spacebar.
20 Spot 5.0 User Guide
Copyright © 2010 Mark Raishbrook/Spot Software BV, Holland
Base on new in time
Choose this option when retiming a file against a new master. If the first
subtitle has an in cue of 10:00:27:12 and the new in time is set to
00:32:57:15, all cues in the file will be recut by 09:27:29:22. Select the
“Proportional offset” option if the difference between the old and new
cues is non-linear (e.g. if the new master is PAL and the file was originally
timed as NTSC).
Manually adjust offset
This method is most useful if you spot using the spacebar method and want to compensate for the small delay
that occurs between deciding to capture a cue and actually pressing the spacebar to capture it.
Continue from last out cue
Select this method when a file contains a break in timecode (e.g. the start of a reel) but a new master requires
the timecode to be continuous.
Controlling cue behaviour
Select Cue Editing from the Tools, Options window to specify how Spot behaves when editing cues.
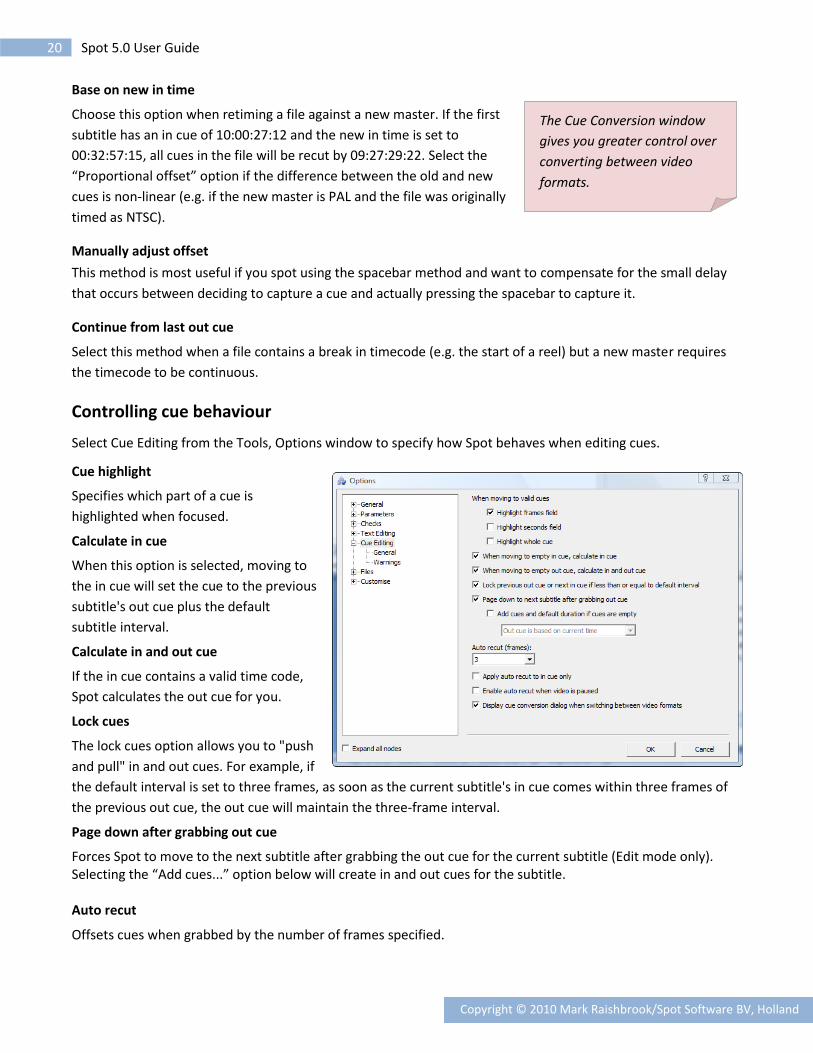
Cue highlight
Specifies which part of a cue is
highlighted when focused.
Calculate in cue
When this option is selected, moving to
the in cue will set the cue to the previous
subtitle's out cue plus the default
subtitle interval.
Calculate in and out cue
If the in cue contains a valid time code,
Spot calculates the out cue for you.
Lock cues
The lock cues option allows you to "push
and pull" in and out cues. For example, if
the default interval is set to three frames, as soon as the current subtitle's in cue comes within three frames of
the previous out cue, the out cue will maintain the three-frame interval.
Page down after grabbing out cue
Forces Spot to move to the next subtitle after grabbing the out cue for the current subtitle (Edit mode only). Selecting the “Add cues...” option below will create in and out cues for the subtitle. Auto recut
Offsets cues when grabbed by the number of frames specified.
The Cue Conversion window
gives you greater control over
converting between video
formats.

21 Spot 5.0 User Guide
Copyright © 2010 Mark Raishbrook/Spot Software BV, Holland
Converting cues between video formats
Sometimes you may have to subtitle a file that was originally timed against a video with a different timecode
format. Use the Cue Conversion window (SHIFT+F8 or select Convert from the Cues menu) to convert between
different video standards.
On the Conversion tab, select “Telecined masters” as the
conversion type and choose the formats to convert from and
to. If the original master was PAL, for example, and the new
video is NTSC non-drop (30 fps), you need to select PAL to NTSC
NDF.
Set the “Start of programme” field to match the hour at which
the file begins, click the OK button and the file will be
converted from PAL to NTSC NDF.
After converting, switch to Rehearse mode to check that the
file is in sync with the new video. If it isn’t (the original master
might have been running at a slightly slower speed, for
example), you may have to adjust the coefficients used to carry
out the conversion. These are listed on the Advanced tab.

22 Spot 5.0 User Guide
Copyright © 2010 Mark Raishbrook/Spot Software BV, Holland
Checking and proofing subtitles
Using the Checks menu
The Checks menu performs global checks on a subtitle file starting at the current subtitle (which means you
need to move to the start of the file to check every subtitle). You can run a single check such as “Check for
invalid cues” by using the respective shortcut or run a group of checks simultaneously by pressing F9. You
configure which checks to include in this group in the TOOLS, OPTIONS, CHECKS, ON RUN ALL CHECKS INCLUDE window.
The checks and their respective shortcuts are listed below.
Too many rows (SHIFT+CTRL+F1)
Searches for subtitles that contain more rows than the TOOLS, OPTIONS,
PARAMETERS, MAXIMUM LINES PER SUBTITLE setting.
Too many characters in line (SHIFT+CTRL+F2)
Searches for lines containing more characters than the TOOLS, OPTIONS,
PARAMETERS, MAXIMUM CHARACTERS PER LINE setting.
Safe area override (SHIFT+CTRL+F3)
Searches for subtitles whose width overrides the left or right subtitle margins. This is not the same as the TOO
MANY CHARACTERS IN LINE check.
Invalid cues (SHIFT+CTRL+F4)
Searches for invalid cues: out cue less than in cue, in cue less than previous out cue, malformed cue, etc.
Duration too short/long (SHIFT+CTRL+F5)
Searches for subtitles whose duration is less than the TOOLS, OPTIONS, PARAMETERS, MINIMUM DURATION setting or
greater than the TOOLS, OPTIONS, PARAMETERS, MAXIMUM DURATION setting.
Cues not set (SHIFT+CTRL+F6)
Searches for empty in or out cues.
Reading speed (SHIFT+CTRL+F7)
Searches for subtitles whose required reading speed is greater than the TOOLS, OPTIONS, PARAMETERS, READING
SPEED setting.
Invalid interval (SHIFT+CTRL+F8)
The invalid interval check carries out two slightly different checks.
An F9 checks stops on a
subtitle which contains an
error. Press Shift+F9 to ignore
the current subtitle and
continue checking the file.

23 Spot 5.0 User Guide
Copyright © 2010 Mark Raishbrook/Spot Software BV, Holland
First, it searches for intervals between subtitles that are less than the TOOLS, OPTIONS, PARAMETERS, DEFAULT
INTERVAL setting.
Second, it looks for intervals between subtitles which are greater than the default interval but less than or equal
to the TOOLS, OPTIONS, PARAMETERS, INVALID INTERVAL THRESHOLD setting.
In either case, selecting TOOLS, OPTIONS, CHECKS, FORCE DEFAULT INTERVAL WHEN RUNNING INVALID INTERVAL CHECK will
replace the incorrect interval with the default interval.
Empty subtitles (SHIFT+CTRL+F9)
Searches the file for subtitles that do not contain any text.
Raised subtitles (no shortcut)
Searches the file for subtitles which have been raised.
AutoCheck
This is a background process that carries out the checks selected under TOOLS, OPTIONS, CHECKS, AUTOCHECK.
Report View
Report View serves two purposes: it gives you immediate feedback on subtitle errors and provides detailed
statistical information on the current file. Press CTRL+R or click the Report tab to switch to Report View.
The types of error listed on the Errors tab are based on the checks selected under TOOLS, OPTIONS, CHECKS, ON RUN
ALL CHECKS (in similar fashion to the F9 check). To add or remove an error type, click the properties icon on the
far right of the tab.
Clicking an error in the list selects that subtitle as the current subtitle. For example, clicking the first occurrence
of “Inconsistent in cue” as shown above will force Spot to jump to subtitle 25. Because the list is not updated
automatically as you edit subtitles, click the first icon on the Error tab if you want to refresh the list.
The error and statistics lists can be saved to file or sent to the printer by clicking the appropriate icon.
Press CTRL+R again or click the Edit tab to leave Report View.

24 Spot 5.0 User Guide
Copyright © 2010 Mark Raishbrook/Spot Software BV, Holland
Spell check and thesaurus
Spot uses Microsoft Office Word to perform spell checking and find synonyms. You must therefore have a
version of Word installed on your system for the spell check and thesaurus to work.
Spell checking a subtitle file
Press F4 to spell check the current file. Spot will open Microsoft Office Word, paste the contents of the file into a
blank document and start a spell check. When you have finished spell checking, the file is copied back into Spot.
Spelling suggestions and synonyms
You can get spelling suggestions or find synonyms for a word by right-clicking it in the subtitle edit area and
selecting Look Up, Synonyms or Look Up, Spelling Suggestions.
Set the language used by the spell checker and thesaurus from Spot’s language bar.
Web search
The Internet is a useful tool for checking names, references and other details. You can look up a word on the
Internet directly from within Spot by right-clicking it in the edit area and selecting Web Search followed by the
Internet site you want to open – Babylon, One
Look, Google, Yahoo, Wikipedia,
Dictionary.com or Thesaurus.com. If you
prefer to use the keyboard rather than the
mouse, press CTRL+ALT+4 for Babylon,
CTRL+ALT+5 for One Look, CTRL+ALT+6 for
Google, CTRL+ALT+7 for Yahoo, CTRL+ALT+8 for
Wikipedia, CTRL+ALT+9 for Dictionary OR CTRL+
ALT+0 for Thesaurus.
The portal through which the search is
executed can be changed in the Options,
Customise, Web Search window. If you live in
Holland, for example, you might want to
search for a word on www.google.nl rather
than the default www.google.com. You do this by changing the Google search string to
http://www.google.nl/search?q=$K, where $K represents the word sent from Spot to the search engine. You can
reset the default search string for all search engines by pressing the corresponding Default button.

25 Spot 5.0 User Guide
Copyright © 2010 Mark Raishbrook/Spot Software BV, Holland
Working with profiles
Different clients require different settings. Instead of manually having to change font sizes, frame rates and
other options when switching between clients, you can create a custom profile for each of them. Click the Edit
Profile button on the toolbar (or click File, Profile, Edit) to open the Profile Settings window.
The name of the currently selected profile is displayed in the title of the window. In the image above, for example, we are editing the default profile settings.
Once you’ve set up your first profile, you’ll probably want to change the name to something other than Default. Click OK in the Profile Settings window to save the changes, then back in Spot’s main window click the Save Profile button on the toolbar (or click File, Profile, Save) and type the new profile name in the Save Profile window. The new profile will be added to the dropdown profile list on the left of the font toolbar. Selecting a profile from the list will load the settings associated with that profile. If the profile is linked to a display settings file, the corresponding display settings configuration file will also be loaded.
You do not need to keep saving a profile after editing it as all changes are saved when you click the OK button.
To delete a profile, click the Delete Profile button on the toolbar (or click File, Profile, Delete).
If you are upgrading from a previous version of Spot, your old style settings data file (datafont.dat) will be automatically converted to the new profile format (profiles.dat).

26 Spot 5.0 User Guide
Copyright © 2010 Mark Raishbrook/Spot Software BV, Holland
Working with files
Default file folders
You can tell Spot which folders to open or save files in by choosing the appropriate option in the Tools, Options,
General window.
Default subtitle open/save folder
Selecting a default subtitle open/save folder forces Spot to navigate to that folder whenever you open or save a
file. If you leave the field blank, the initial directory in the open and save dialogs will be the current Windows
folder.
Remember last File Open and File Save As location
Selecting this option will force Spot to open a file in the same folder used in the last file open operation and save
a file in the same folder used in the last file save operation.
Opening and importing files
There are two ways of opening a subtitle file in Spot: File, Open or File, Import.
Spot’s internal file format (SPT) and four of the most common subtitle file formats (Screen Subtitling Systems
PAC files, ScanTitling 890 files, EBU STL files and text files) are opened from the File, Open menu. These files can
be saved without the need to change format. Other file formats (DVD text files, SubRip text files, closed caption
files, etc) are opened from the File, Import window. These files must either be saved as one of the four main file
types or exported via the File, Export window.
Opening files
To open any of the common subtitle file types listed above:
Press CTRL+O, choose Open from the File menu, or click the File Open button on the standard toolbar.
The Open subtitle file dialog will appear.
Select the type of file you want to open from the Files of type box.
Select the file you want to open and then click OK, or double-click the file.
When you open a PAC file, Spot prompts you for the file language. If you always open the same language files,
you can turn the prompt off under Tools, Options, Files, File Types, PAC.

27 Spot 5.0 User Guide
Copyright © 2010 Mark Raishbrook/Spot Software BV, Holland
When opening text files, you are asked to provide certain information regarding the file as shown below.
File language
Select the language used in the file from the list at the top left of the window.
File encoding
If the file is a non-Unicode text file, you need to select the encoding format used from the Encoding list in the
middle of the window. If you are unsure how the file was encoded, scroll through the list and use the Preview
pane on the right of the window to help you.
File layout
Text files may be unformatted (containing only text, in other words) or structured (i.e. containing cues and other
data laid out in a particular fashion).
If the file you are opening is unformatted, select this option in the Layout frame and click OK to import the file.
If the file contains timecode and other data, click the Options button, select the layout used, and click OK to
import the file.

28 Spot 5.0 User Guide
Copyright © 2010 Mark Raishbrook/Spot Software BV, Holland
Supported text file formats
Text files with the following layouts are supported by Spot. See Tools, Options, Files for more information.
Native formats
00:10:23:09 00:10:26:14
Sample two line
subtitle text
341 00:10:23:09 00:10:26:14
Sample two line
subtitle text
341 00:10:23:09 Sample two line
00:10:26:14 subtitle text
00:10:23:09 Sample two line
00:10:26:14 subtitle text
Custom formats
[0001]
01:00:52:16
01:00:56:08
Line One
Line Two
Line One
Line Two
@SHOW 01:00:52:16 01:00:56:08
2779 3548
1 0 0 0 0 0
Line One
Line Two
0001 01:00:52:16 01:00:56:08 Line One
Line Two
TITLE
1 01005216/01005608 Line One
Line Two
On-screen caption code
1
39.6
52.10
13.4
This is some text
00:00:53:14 00:00:56:17 Line one<P>and line two
00:00:53:14 00:00:56:17 Line one//and line two

29 Spot 5.0 User Guide
Copyright © 2010 Mark Raishbrook/Spot Software BV, Holland
Importing files
To import other file types, click File, Import to open the Import window. You can import 18 different file formats:
Caption Inc CIN file
CaptionMaker ASCII text file
Closed caption text file
SDI Media Group formatted text file
Greek DreamWorks file (obsolete)
Hoek en Sonépouse voice-over text file
MicroDVD SUB file
PMWin OVR file
Screen Subtitling Systems RAC file
Screen Subtitling Systems structured ASCII file
Softni text file
Sonic DVD Creator script file
Spruce Maestro STL file
SubRip SRT file
Tab-separated DVD script file
Texas Instruments DLP Cinema XML file
Titra theatrical file
Windows Media Player SAMI caption file
Select the appropriate format from the list, click OK to open the import dialog, then navigate to and select the
file you want to import. If the file you are importing is in a different language or timecode format from the
current Spot settings, select the option “Confirm file language” and/or “Confirm video standard” before
importing the file.
Importing only text or cues
Sometimes you may want to import only the text or cues from a subtitle file and ignore other information. To do
this, use the File, Merge menu.
Merge text as subtitles
Replaces all subtitle text with the text from the selected file. Cues and comments in the current file remain
untouched.
Merge text as comments
Imports all the subtitles from the selected file and stores them in the comment field. Subtitles and cues in the
current file remain untouched.
Merge cues and text as comments
Imports all the subtitles and cues from the selected file. Subtitles are stored in the comment field. Subtitles in
the current file remain untouched.

30 Spot 5.0 User Guide
Copyright © 2010 Mark Raishbrook/Spot Software BV, Holland
Saving and exporting files
Just as there are two ways of opening a subtitle file in Spot, there are always two ways of saving a file: File, Save
or File, Export.
Saving files
Files can be saved in SPT (Spot’s internal format), PAC (Screen Subtitling Systems), 890 (ScanTitling), STL
(European Broadcast Union) and text format. You can configure various options for saving these files in the
Tools, Options, Files, File Types window. For example, you can set whether the EBU file you are saving is for
teletext or open subtitles, whether to use double height text and so on.
Exporting files
To export other file types, click File, Export to open the Export window. You can export 20 different file formats:
Adobe Encore CS3 text file
Avid DS Nitris text file. Click the Options button to configure how the file is exported.
Caption Inc CIN file. Click the Options button to configure how the file is exported.
Cheetah CAP file
DVD and Blu-ray authoring systems (see EXPORTING BITMAP FILES below)
FAB shortform text file. Click the Options button to configure how the file is exported.
Flash XML file
Formatted text file. Click the Options button to configure how the file is exported.
Gelula RTF file
Hoek en Sonépouse voice-over text file. Click the Options button to configure how the file is exported.
MicroDVD sub file
Microsoft Excel CSV file. Click the Options button to configure how the file is exported.
Rough and ready text export. Click the Options button to configure how the file is exported.
Sonic DVD Creator script file
Sonya Friedman tab-delimited text file
Spruce Maestro STL file
SubRip SRT file. Click the Options button to configure how the file is exported.
Texas Instruments DLP Cinema XML files
Theatrical spotting list. Click the Options button to configure how the file is exported.
Titra theatrical files
Windows Media Player SAMI caption files
Select the appropriate format from the list and click OK to open the export dialog. Navigate to the location in
which to export the file, give the file the name you want and then click the Save button.
The export formats listed below have their own unique export window.

31 Spot 5.0 User Guide
Copyright © 2010 Mark Raishbrook/Spot Software BV, Holland
Spruce Maestro files
Selecting Spruce Maestro STL file from the export list and clicking OK opens the Spruce Maestro Text Export
window. This window lets you configure the global header properties for the STL file as shown below.
After setting the relevant properties, click the Browse button (…) to select a name and location for the STL file,
then click OK to export the file.
Texas Instruments DLP Cinema XML files
Selecting Texas Instruments DLP Cinema XML file from the export list and clicking OK opens the DLP Cinema
Export window.
32 Spot 5.0 User Guide
Copyright © 2010 Mark Raishbrook/Spot Software BV, Holland
Spot can create DCI-compliant 2D or 3D subtitle files.
For 3D files, you need to assign offsets to each subtitle (the Z depth value). You can do this manually using the X
offset slider or you can import a previously prepared list of offsets using the Load Z Offsets button. Spot will
generate two XML files, one for the left eye (Filename_Left.xml) and one for the right eye (Filename_Right.xml).
The Z depth values in the second file are created automatically by Spot based on the values in the first file. If the
Z offset slider is disabled, make sure you have selected “3D” from the “File type” dropdown list.
If the “Inherit” option is selected when manually setting the Z offset, you only need to set the offset for
subsequent subtitles when the Z offset value changes. For example, if you set the offset for subtitle 1 to 0.39,
subtitle 2 will inherit this value when you move to it using Page Down or the dropdown subtitle list.
If you have a range of Z values for a 3D movie, you can import these by clicking the Load Z Range button. Spot
will check each subtitle against the Z range values and match the Z offset. A warning is displayed if a subtitle
spans various Z depths.
To grab the current frame from the video, click the button on the right of the “Inherit” option. Clicking the <<
button the right of the grab frame button will shrink the size of the DLP Cinema Export window allowing you to
work in the main Spot window if required.
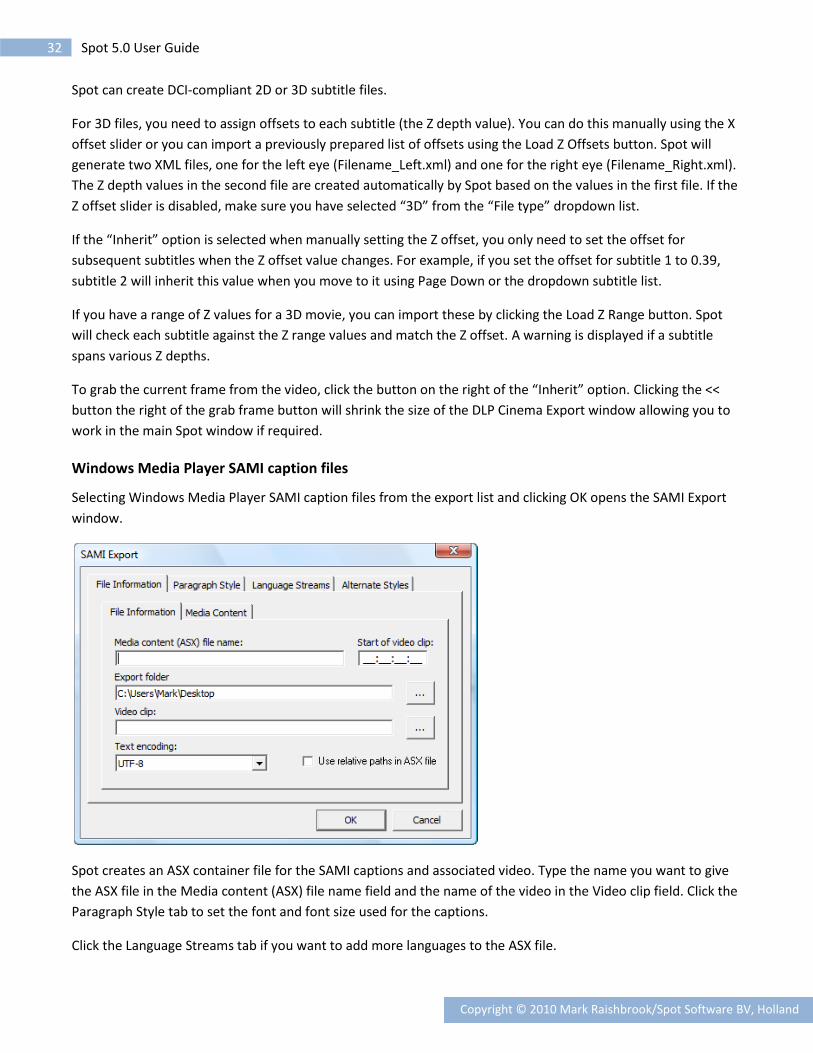
Windows Media Player SAMI caption files
Selecting Windows Media Player SAMI caption files from the export list and clicking OK opens the SAMI Export
window.
Spot creates an ASX container file for the SAMI captions and associated video. Type the name you want to give
the ASX file in the Media content (ASX) file name field and the name of the video in the Video clip field. Click the
Paragraph Style tab to set the font and font size used for the captions.
Click the Language Streams tab if you want to add more languages to the ASX file.

33 Spot 5.0 User Guide
Copyright © 2010 Mark Raishbrook/Spot Software BV, Holland
Exporting bitmap files
To create subtitles for Spot’s subtitle encoder, DVD or Blu-ray authoring systems, you need to provide subtitles
in the form of bitmaps (subpictures) rather than text. Click CTRL+D or select FILE, EXPORT BITMAPS to open the
Bitmap Export window.
The window is divided into three sections.
Export tab
The EXPORT tab is where you specify general file information such as the target system and the name of the
bitmap stream.
The first item that needs setting is the target system as this determines which options and formats are available
for creating the bitmaps. Next, choose where to export the bitmaps to by selecting a previously used location
from the dropdown Export folder list or navigating to a folder using the Browse button. Type a name for the
index file for this bitmap stream in the Index file name field (note that
the Bitmap stream root name field changes automatically to reflect the
index file name) and select which subtitles to export from the Export
dropdown list. You will normally export the whole file.
If you do not want to export blank subtitles (and there are not many
reasons why you would), tick the Do not render empty subtitles box.
An index file includes information such
as the size, position and location of
the actual subtitle bitmaps. Without
this file, the authoring system would
not be able to locate the bitmaps.

34 Spot 5.0 User Guide
Copyright © 2010 Mark Raishbrook/Spot Software BV, Holland
Format tab
The FORMAT tab allows you to set the type, size and appearance of the subtitle bitmaps.
You can select a bitmap size (PAL, NTSC, Fit to subtitle, HD 720 or HD 1080) from the Image type dropdown list
or create a custom size. If you choose the Fit to subtitle option, bitmaps will be cropped to the size of the
subtitle rather than the size shown in the Target width and Target height fields (use the Padding dropdown to
add extra space to the start and end of subtitles). Note, however, that you must still provide a valid width and
height; if you don’t, the bitmaps will not be positioned correctly by the authoring system.
The Format list may be disabled depending on the target system
you have chosen. A Spot subtitle stream creates its own proprietary
bitmaps and you therefore cannot set the bitmap format. Other
systems might only support BMP, TIFF or PNG files with a particular
bit-depth, so you should check with your client to find out which
format is required.
The options available in the Font frame also vary depending on the
chosen target system. For DVD systems, bitmaps are limited to a maximum of four colours. This means that only
the first six font effect options may be applied to the subtitle (none, heavy smoothing, medium smoothing, light
smoothing, 1-pixel inner border or 2-pixel inner border). No colour restrictions apply to Blu-ray, HD or Spot
subtitle streams, so the other six font effects (anti-aliasing, bevelled anti-aliasing, blur 1, blur 2, blur 3 and
subsampled) may also be used.
Whenever any of the options on the Format tab are changed, the preview window at the bottom of the screen is updated to reflect these changes. Left or right click the preview window to zoom in or out.

35 Spot 5.0 User Guide
Copyright © 2010 Mark Raishbrook/Spot Software BV, Holland
If one of the blur font effects is selected, you can choose to add a drop shadow to the subtitle. This option is
disabled for all other font effects.
Four options are available for the subsampled font effect only: PASSES (the number of Gaussian blurs to apply to
the bitmap), FORMAT (the type of blurring to use), CONTRAST (the subtitle text contrast) and ALPHA CORRECT.
If you want to add outlining to subtitles, choose one of the options from the SUBTITLE OUTLINING list (note that the
opacity of the outlining cannot be selected for four-colour target systems). The height of the outlining is
controlled using the VERTICAL PADDING dropdown list.
The table below summarises the various format options available for different target systems. Note that some
target systems may support more than one type of bitmap; you should find out from your client the exact
format required for their particular system.
Target System Image type Bitmap format Font effect
CMX 3600 Any 8 or 32-bit PNG Any
DTS-CSS Any Monochrome BMP None
Final Cut Pro Any 8 or 32-bit PNG Any
NetBlender DoStudio Any 8 or 32-bit PNG Any
Panasonic Any 8 or 24-bit BMP or TIFF 1 to 6 only
Philips Fit to subtitle 8 or 24-bit BMP or TIFF 1 to 6 only
Pinnacle Impression Any 8 or 24-bit BMP or TIFF 1 to 6 only
Sonic Creator Any 8 or 24-bit BMP or TIFF 1 to 6 only
Sonic Scenarist Any 8-bit or 24-bit BMP 1 to 6 only
Sonic Scenarist Blu-ray Any 8 or 32-bit PNG Any
Spot subtitle stream Any 32-bit BMP Any
Spruce Maestro Any 8 or 24-bit BMP or TIFF 1 to 6 only
Toshiba Fit to subtitle 8 or 24-bit BMP or TIFF 1 to 6 only

36 Spot 5.0 User Guide
Copyright © 2010 Mark Raishbrook/Spot Software BV, Holland
Advanced tab
Use the ADVANCED tab to set positioning and other information.
The baseline defines the bottom-most vertical position of the last line in a subtitle including all descenders. This
value should never exceed the height of the bitmap (or part of the subtitle will be invisible) and should normally
be set to 90% of the bitmap height.
Leading is used to control the vertical spacing between subtitle lines, whereas kerning sets the horizontal
distance between individual characters. The colour mapping and contrast fields apply to DVD bitmaps only.
Check with your client to find out what settings are required.
If you want Spot to warn you of any errors it encounters while creating the bitmaps, tick the ERROR LOGGING box
and select any of the options below.
Fortunately you do not have to set all the options in the bitmap export window every time you export a subtitle
stream. When the Export button is clicked, the current configuration is saved. You can also save and load
different setups using the Open and Save buttons or click the Use Current button to match the bitmap export
settings to the current display settings.
37 Spot 5.0 User Guide
Copyright © 2010 Mark Raishbrook/Spot Software BV, Holland
AutoRecover and timed backups
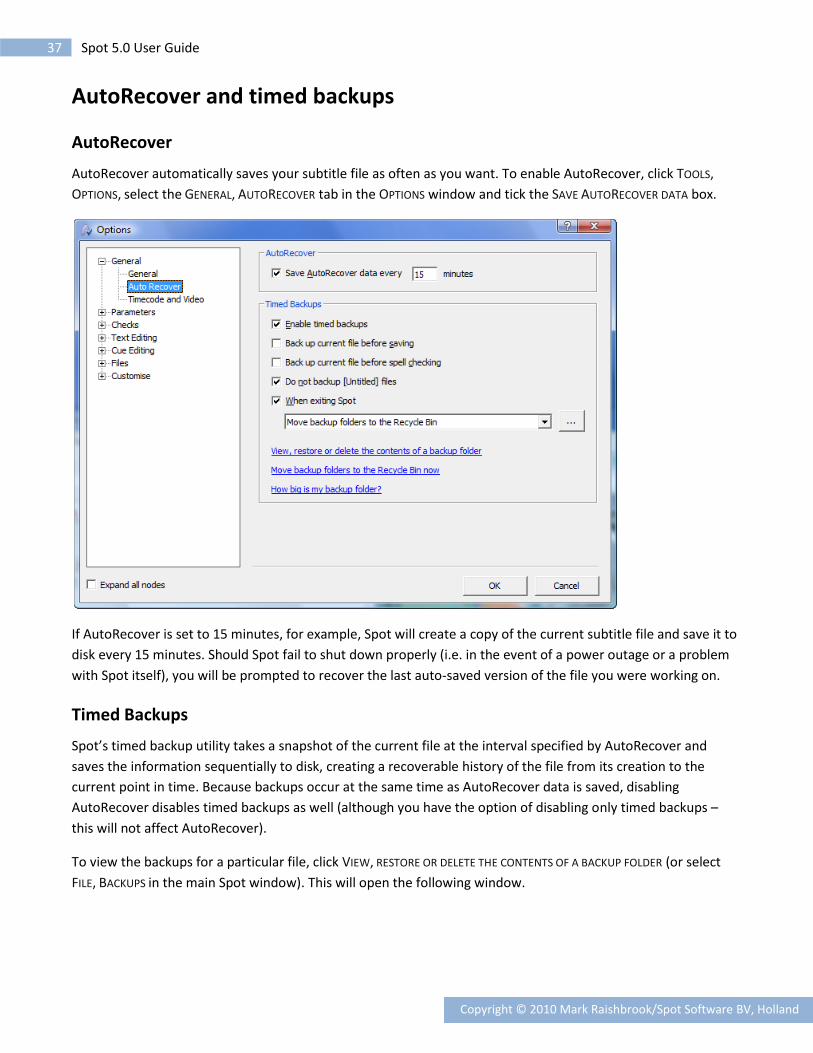
AutoRecover
AutoRecover automatically saves your subtitle file as often as you want. To enable AutoRecover, click TOOLS,
OPTIONS, select the GENERAL, AUTORECOVER tab in the OPTIONS window and tick the SAVE AUTORECOVER DATA box.
If AutoRecover is set to 15 minutes, for example, Spot will create a copy of the current subtitle file and save it to
disk every 15 minutes. Should Spot fail to shut down properly (i.e. in the event of a power outage or a problem
with Spot itself), you will be prompted to recover the last auto-saved version of the file you were working on.
Timed Backups
Spot’s timed backup utility takes a snapshot of the current file at the interval specified by AutoRecover and
saves the information sequentially to disk, creating a recoverable history of the file from its creation to the
current point in time. Because backups occur at the same time as AutoRecover data is saved, disabling
AutoRecover disables timed backups as well (although you have the option of disabling only timed backups –
this will not affect AutoRecover).
To view the backups for a particular file, click VIEW, RESTORE OR DELETE THE CONTENTS OF A BACKUP FOLDER (or select
FILE, BACKUPS in the main Spot window). This will open the following window.

38 Spot 5.0 User Guide
Copyright © 2010 Mark Raishbrook/Spot Software BV, Holland
The FILES IN FOLDER list on the left of the window displays all of the backups for the current file together with the
time and date each backup was created (the first file in the list was created at 20:49 on 26th April 2010). Click a
file to view its contents in the FILE DATA pane on the right. To restore a file from the list, click it once and then
click the RESTORE button.
The amount of data stored in your backup folder will obviously increase over time (you can find out how much
disk space is being used by clicking HOW BIG IS MY BACKUP FOLDER?). The WHEN EXITING SPOT option lets you control
what happens to your backup folders when Spot closes: nothing (i.e. the option is unselected); they are moved
to the Recycle Bin; they are moved to a location you specify; they are permanently deleted. We recommend
moving the backup files to a different location (a folder on your network, for example, or an external hard drive
or other device) as this will ensure that your backups are safe and that your disk does not run out of physical
space.

39 Spot 5.0 User Guide
Copyright © 2010 Mark Raishbrook/Spot Software BV, Holland
Splitting files
Sometimes you might want to split a subtitle file into two or more files. To do this, Select FILE, SPLIT.
When selecting split points (by clicking the box to the left of each subtitle), bear in mind that a selected subtitle
will become the first subtitle in the new file. In the screen shot above, for example, four new subtitle files will be
created starting at subtitle 1, subtitle 87, subtitle 215 and subtitle 414. Each file will be given the name you
choose in the Split File Root Name dialog box plus a numeric suffix( _1, _2, _3, etc.) and the extension .spt. The
right-hand column shows the in cue for each subtitle.
Copying subtitles from existing files
Use Quick View (CTRL+Q) to open an existing subtitle file. In the Quick View window, click File, Open As Read-
Only, select the file you want to open and press OK. The Quick View window will split into two panes, with the
subtitles from the file you have just opened displayed in the bottom pane (the size of the panes can be adjusted
by moving the splitter in the middle of the window). To copy subtitles from the existing file into the current file,
select the subtitles to copy, then either a) drag them into the desired position in the top pane or b) press CTRL+C,
select the insertion point in the top pane and press CTRL+V.

40 Spot 5.0 User Guide
Copyright © 2010 Mark Raishbrook/Spot Software BV, Holland
Working with media files
Opening media files
Click the rightmost button on the video toolbar (see below) or press F7 to bring up the SELECT MEDIA SOURCE
window. You can open video files (MPEG-1, MPEG-2, AVI, WMV, MOV, M2V, MP4,VOB), audio files (WAV, MP3,
WMA), or separate video and audio files, provided you have the necessary decoder filters installed on your
system. If a file does not open, responds sluggishly or has its video and audio out of sync, you should consider
installing a quality media decoder such as ffdshow.
After selecting the file, you need to set the frame rate using the dropdown list in the VIDEO STANDARD window (for
MPEG-1 and MPEG-2 files, Spot will retrieve this information automatically) and then click the OK button. If for
any reason you choose the wrong frame rate, click the arrow on the right of the open media button on the video
toolbar, select DELETE MEDIA FORMAT FLAG, and then reopen the file.
Once the file has loaded, it will start playing automatically (this behaviour can be changed in the VIDEO, MEDIA
PREFERENCES window). If you are working with a new media file, you may want to pause the video at this point
and generate internal timecode for the file.
Syncing media files
If you want Spot’s internal timecode clock to run in sync with the burnt-in timecode (BITC) on a video, you need
to sync the two the first time you open the video file.
To do this:
Move to the first frame in the video file. Click the OFFSET TIMECODE button on the video toolbar. Type the BITC displayed on the video in the text box. Click OK.
To check that the file does not contain any dropped frames, move to the end of the video. Spot's internal
timecode display (in the centre of the video status panel) should match the BITC. If it doesn't, one or more
frames have been lost during encoding. To find these frames and correct the timecode:
Drag the video position slider to the halfway mark. If the timecode is still out, drag it to the quarter mark.
Continue in this fashion (1/2, 1/4, 1/8, 1/16, etc.) until Spot's internal timecode matches the BITC. Move forward one second/frame at a time until you find the missing frame. Ensure the video is positioned on the missing frame. For example, BITC reads 10:21:02:18, Spot's
timecode reads 10:21:02:17. Click the OFFSET TIMECODE button. Type the BITC displayed on the video in the offset text box (10:21:02:18 in this example). Click OK.

41 Spot 5.0 User Guide
Copyright © 2010 Mark Raishbrook/Spot Software BV, Holland
If the media file you are subtitling does not contain BITC, you can simply ignore the internal timecode and time
the file starting at midnight (00:00:00:00), recutting later if necessary.
You only need to perform sync operations once. After assigning timecode to a file, you will be prompted to save
the data when quitting a session (you can also manually save the data at any time by clicking the open media
button and selecting SAVE DATA TO DISK). A file with the same name as the video file plus a .tcd extension will be
created. For example, if your video file is called Ryan PAL.mpg, the timecode file will be named Ryan
PAL.mpg.tcd. The next time Spot opens the video, it searches for and loads the corresponding .tcd file.
Controlling media playback
You can use the keyboard or mouse to navigate through a media file.
Using the video toolbar
Each command is explained in more detail below. Indented levels denote buttons with sub-menus (shown by the
small black arrow to the right of the button in the picture above).
Play
Play forwards at normal speed.
Pause
Pause playback.
Replay sequence
Replay the last three seconds (default). The default setting can be changed in the VIDEO, MEDIA PREFERENCES window.
Rewind
Run backwards at twice normal speed (no audio). If the pause button is depressed, jump backwards in one second intervals.
Fast forward
Run forwards at twice normal speed (with audio). If the pause button is depressed, jump forwards in one second intervals.
Play
Pause
Replay sequence
Rewind
Frame back
Frame forward
Fast forward
Find last shot cut
Find next shot cut
Jump to in cue
Jump to out cue
Offset timecode
Quick encode
Open media file

42 Spot 5.0 User Guide
Copyright © 2010 Mark Raishbrook/Spot Software BV, Holland
Frame back
Slow motion backwards (± 7 fps, no audio). If the pause button is depressed, jump backwards one frame.
Frame forward
Slow motion forwards (± 7 fps, with audio). If the pause button is depressed, jump forwards one frame.
Jump to last shot cut
Move backwards through the file to the last shot cut entry.
Find last timecode offset
Move backwards through the file to the last timecode offset.
Jump to in cue
Jump to the position within the video file relative to the current subtitle's in cue.
Jump to out cue
Jump to the position within the video file relative to the current subtitle's out cue.
Jump to next shot cut
Move forwards through the file to the next shot cut entry.
Find next timecode offset
Move forwards through the file to the next timecode offset.
Offset timecode
Open the offset timecode window.
Open media file
Open a media file. The button displays the name of the current media file while the mouse is hovering over it.
Load timecode file
Load a .tcd timecode file. Note that Spot will look for an associated .tcd file when opening a digital video file, so it will not normally be necessary to keep reopening timecode files when restarting a session.
Load shot change file
Load an .scd shot change file generated by SpotCut (see below).
Export shot change data
Export current shot change data in text format.
Save data to disk
Save current timecode and shot cut data to disk. Spot will automatically save this data at the end of each session (or prompt you to save), but it might be wise to save at regular intervals anyway.
Close video
Closes the current video file
Delete video format flag
Deletes the video frame rate file, allowing you to reopen the file with a different frame rate.
Recently opened media file list
A list of recently opened media files. Clicking a file in the list will open it.

43 Spot 5.0 User Guide
Copyright © 2010 Mark Raishbrook/Spot Software BV, Holland
Using the keyboard
The default keys for controlling media playback are shown below. All are user-configurable (VIDEO, MEDIA
PREFERENCES).
Holding down a key will cause it to repeat, so holding down the frame back key with the pause button
depressed, for example, will allow you to move in apparent slow motion backwards (or at normal speed,
depending on your computer); holding down the fast forward key with the pause button depressed will move
you forwards through the file at upwards of 250 fps. The NumLock key must be on for these key strokes to work.
The CTRL+B key combination allows you to toggle the audio balance between full left, full right and centred.
Decrease playback speed (100% – 10%)
Frame back
Play/pause
Last shot cut
Start of video
End of video
Go to out cue/ Grab out cue
Toggle shot cut
Replay sequence
Rewind
Increase playback
speed (10% - 100%)
Fast forward
Replay from last play position
Frame forward
Next shot cut
Go to in cue/ Grab in cue

44 Spot 5.0 User Guide
Copyright © 2010 Mark Raishbrook/Spot Software BV, Holland
Setting Video and Audio Preferences
The MEDIA PREFERENCES window (VIDEO, MEDIA PREFERENCES) lets you customise the way Spot handles media files
and set various options. It is divided into four sections: GENERAL, MEDIA CONTROL, AUDIO and THUMBNAILS.
General
When you press F7 or click the OPEN MEDIA button on the video toolbar, the SELECT MEDIA SOURCE dialog will open
in the folder specified in the MEDIA FOLDER field.
Ticking the SYNC VIDEO TO SUBTITLES WHEN IN EDIT
MODE box forces the video or audio source to
jump to the current subtitle when navigating
through a subtitle file. This option can also be
set using the OPTIONS, QUICK OPTIONS menu.
WMV and MPEG files may contain embedded
timecode. If you want Spot to attempt to read
the timecode in these files, select this option.
Note that for MPEG files Spot will read only the
first timecode in the file.
The VMR9 render option forces Spot to draw
subtitles directly into the video stream rather
than overlay subtitles on the video window. If
subtitles do not appear, tick the RGB32 COLOUR
SPACE box and reopen the video. Some systems
may not update subtitles drawn this way when
the video is paused. If this happens, select the
FORCE FRAME REFRESH WHEN PAUSED option. When running a quick encoding session, you might find that in a two-
line subtitle the first line is drawn one frame before the second line. To correct this, tick the RENDER ALL LINES
BEFORE DISPLAYING box.
Selecting the SHOW SUBTITLE DATA IN FULLSCREEN MODE option tells Spot to display information about the current
subtitle in the top left corner of the video when running in fullscreen mode as shown below.
Subtitle number
In cue
Out cue
Duration
Timecode

45 Spot 5.0 User Guide
Copyright © 2010 Mark Raishbrook/Spot Software BV, Holland
Media Control
The MEDIA CONTROL tab lets you customise the keys
used to control media file.
The OFFSET fields let you jump to within a certain
number of frames of a shot cut rather than directly to
the shot cut itself. This might be useful if a client
requires subtitles to come in one frame after a shot
cut, for example.
The SWITCH TO REHEARSE/EDIT WHEN PRESSING PLAY/PAUSE
option lets you toggle between rehearse and edit
modes with a single key press. Pressing the play
button will put Spot into rehearse mode and start
video playback; pressing the pause button will put
Spot into edit mode and pause the video.
Audio
The Audio tab sets options for the audio waveform display. See the next topic for more information.
Thumbnails
In order to use Spot's thumbnail feature, you
need to enable thumbnail support.
The AFTER SELECTING THE CURRENT FRAME option
applies only when used in conjunction with the
ALT+LEFT/RIGHT and ALT+ENTER/INS combination.
You can set the thumbnail window to
automatically update itself whenever you press
the video pause button. If you would rather
manually update the window, set the WHEN
PRESSING THE PAUSE BUTTON option to DO NOT
UPDATE THUMBNAILS and hit the PAUSE BREAK key to
force the thumbnails to be redrawn.
If you find that the thumbnails update too
slowly, selecting the RUN THUMBNAILS IN SEPARATE
VIDEO WINDOW option might help.

46 Spot 5.0 User Guide
Copyright © 2010 Mark Raishbrook/Spot Software BV, Holland
Back in Spot's main screen, you need to click the SHOW/HIDE THUMBNAILS button on the far right of the toolbar to
bring up the thumbnail window. The window can be dragged around the screen and positioned where you like
(and will remember where it was the next time you open it).
The window displays the current video frame in the middle (highlighted by a white box), the previous seven
frames and the next seven frames (only two are shown in the screen shot above). To select a target frame (in all
probability a shot cut), use the ALT+LEFT/RIGHT arrow keys. You'll notice that two things happen when you do
this:
A lighter box moves left or right along the thumbnail window
The video in Spot's main screen reflects the current position within the thumbnail window. In other
words, if you press ALT+LEFT arrow twice, the video will rewind two frames.
You can now do one of several things:
Press ALT+ENTER to set the current in cue to the target frame.
Press ALT+INS to set the current out cue to the target frame.
Press CTRL+ENTER to set the current in cue to the target frame and simultaneously fix the previous
subtitle's out cue (i.e. set it to current in cue - default interval).
If you have set the "After selecting the current frame" option in the Video Setup, Thumbnail window to "Update
Thumbnails", pressing ALT+ENTER or ALT+INS will cause the thumbnails to update automatically. To change this
behaviour, select "Erase thumbnails" instead.
Current frame
Original frame
Currently selected frame

47 Spot 5.0 User Guide
Copyright © 2010 Mark Raishbrook/Spot Software BV, Holland
Audio waveform display
Use the button third from the right on Spot’s to hide/show the audio waveform display.
Before this will display anything useful, you need to process the audio data in the media file you are working
with. To do this, select PREFERENCES from the VIDEO menu to open the MEDIA PREFERENCES window and then click
the AUDIO tab.
Audio data
If you want Spot to process media files automatically every time you open a new file, select the PROCESS AUDIO
DATA WHEN FIRST OPENING A VIDEO FILE option. It takes approximately one second per minute of video to extract the
audio data, so a 90-minute film should take around one and a half minutes to complete.
If you are working with an unprocessed media file, click the PROCESS NOW button (this option will be greyed out if
no media file is open).
Audio pre-processing needs to be done only once per video: Spot will prompt you to save the data to disk when
quitting the current session or opening a new media file.
Show/hide audio waveform

48 Spot 5.0 User Guide
Copyright © 2010 Mark Raishbrook/Spot Software BV, Holland
Audio waveform display
These options allow you to customise the appearance and position of the waveform and the data displayed
within it. They are also accessible by clicking the [. .] button on the right of the waveform display.
Selecting or unselecting FLOATING WAVEFORM DISPLAY allows you to dock and undock the waveform. Undocking the
waveform window means you can size the display any way you want, drag it around the screen and position it
where it suits you best.
You can also display the previous, current and next subtitles on the waveform and show/hide the timecode
markers. When you hover the mouse over the left or right edge of the current subtitle, the cursor will change to
an east-west arrow. This means you can change the in or out cue (depending on whether the cursor is over the
left or right edge) by dragging the mouse left or right. To abort the operation, press the Esc key and the subtitles
will snap back to their original position. To lock subtitles (i.e. prevent the current subtitle’s cues overriding the
previous/next subtitle’s cues), hold down the Shift key while dragging the mouse (note that this will lock
subtitles regardless of the intervals between them).
You can click anywhere within the waveform to jump to that position in the video file. SHIFT + LEFT CLICK will set
the current in cue; SHIFT + RIGHT CLICK will set the current out cue.
The waveform view can be set to mono, stereo, left channel or right channel only. The latter might be useful if
LTC is recorded on one of the audio channels.
Use the slider on the right of the waveform to zoom in and out.
Audio Scrub
If you are using the audio display to find the start of speech, you should disable this option as the waveform is
more accurate.
Current subtitle
Previous subtitle
Next subtitle
Out cue drag area
In cue drag area
Current frame
Zoom
Options

49 Spot 5.0 User Guide
Copyright © 2010 Mark Raishbrook/Spot Software BV, Holland
Display Settings
The size, position and appearance of the subtitles in the video preview window (and, by extension, the subtitles
burnt to video in a quick encoding session) are dictated by your current display settings. Press F6 or select
VIDEO, WINDOW, ADJUST DISPLAY SETTINGS to open the DISPLAY SETTINGS window.
Click the ADVANCED tab to set up your display (for obvious reasons, many
of the settings are identical to those in the Bitmap Export window).
Target video format
Sets the broadcast format for the current subtitle file. For most private
subtitlers in Europe, this will normally be PAL. Any changes you make
here will also change the size of the video window.
Aspect ratio
Sets the aspect ratio (letterboxing) for the video. The options are 4:3 or
16:9.
Font settings
Sets the font, font size, font spacing (kerning) and line spacing (leading)
options for the target video.
Positioning
Sets the left and right margins, ceiling (top margin) and baseline (bottom
margin) for subtitles
Other
Sets the colours used for the subtitle text, border and background. These
settings are “decorative” rather than functional and are ignored when a
subtitle file is exported. To add colours to words or subtitles, see the
Using colours topic.
Just as you may require more than one client profile, you may also
require several different display setting configurations (or share your display settings with another Spot user). To
save the current configuration, click the SAVE CURRENT SETTINGS AS button on the GENERAL tab. To load a saved
configuration, click LOAD DISPLAY SETTINGS FILE on the GENERAL tab or right-click the video window and select PRESET
DISPLAY SETTINGS.
Display settings can be linked to a profile and automatically loaded when the profile is loaded.

50 Spot 5.0 User Guide
Copyright © 2010 Mark Raishbrook/Spot Software BV, Holland
Burning subtitles to video
Using the Encoder
You can burn subtitles into a video stream and output the result in MPEG-1, MPEG-2 or FLV (Flash) format using
the encoder (TOOLS, ENCODER). Burning subtitles is a five-step process.
1. Select the source video. If a video file is loaded in Spot, the file will already be listed.
2. Select the output folder. This is where the output video will be stored. The name given to the encoded
video is based on the current subtitle file name plus the extension .mpg (or .flv if you are creating a Flash
video file).
3. Select the subtitle stream. You will be prompted to create a new subtitle stream from the current
subtitle file or open an existing subtitle stream. Information on creating subtitle streams is covered in
the Exporting Bitmap Files topic.
Spot attempts to simplify the process of creating a subtitle stream by filling in most of the fields in the
Bitmap Export window based on your current display settings.
If you omit the name of the subtitle stream, Spot will ask you if you want to convert the file without
adding subtitles. This may be useful if you simply want to upsample or convert an existing video file.
4. Select the output format. There are six preset formats (MPEG-1 PAL/NTSC VCD, MPEG-1 PAL/NTSC
SVCD, MPEG-2 PAL/NTSC DVD) and four user-definable formats (MPEG-1, MPEG-2 PS, MPEG-2 TS and
Flash Video). The size of the preset formats cannot be changed.
5. Set encoding options in the Advanced Encoder Settings window.
Click the Encode button to start the burning process.
1. Select source video
2. Select output folder
3. Select subtitle stream
4. Select output format
5. Set encoding options

51 Spot 5.0 User Guide
Copyright © 2010 Mark Raishbrook/Spot Software BV, Holland
Using Quick Encode
Quick Encode lets you burn subtitles to video with one click without the need to offset cues or create subtitle
bitmap streams .
Before quick encoding, you must make sure that:
1. The subtitle file you want to encode is loaded in Spot.
2. The video source file is open in Spot.
3. The option “Use VMR9 to render subtitles” was selected in the VIDEO, PREFERENCES window
before you opened the source video. If it wasn’t, open the video again.
4. You have set the desired video and audio settings in the Advanced Encoder Settings window.
When you are ready to encode, click the Quick Encode button on the video toolbar (if the button is
disabled, then check points 2 and 3 above). Type the name of the output file in the Save Video File dialog and
select the format and size of the video from the Files of Type list. The options are MPEG-1 full size, MPEG-1 half
size, MPEG-2 full size, MPEG-2 half size, Flash video full size and Flash video half size. Full size here means the
video size specified in the DISPLAY SETTINGS window. Your current display settings also set the font, font size and
margins used to render the subtitles on the video.
Once you’ve clicked the SAVE button, Spot will switch to rehearse mode and begin the encoding process. Note
that encoding starts at the current point in the video file so press the / key on the numerical keypad if you want
to encode from the beginning of the video. Click the Quick Encode button at any time to interrupt encoding.
If you notice that some two-line subtitles in the encoded video have the first line rendered one frame before the
second line, select the RENDER ALL LINES BEFORE DISPLAYING option in the VIDEO, PREFERENCES window. This will add
some overhead to the encoding process and as a result you may have to change the SUBTITLE SYNC DELAY setting in
the ADVANCED ENCODER SETTINGS window.
Advanced encoder settings
Video and audio
The video and audio tabs let you control the frame rate, bitrate, bitrate mode, audio format and sampling rate
of the output video file. A higher bitrate will result in a higher quality but larger video file.
Upsample video when required
Selecting this option will resize the source video to the target output video size, allowing for much higher quality
subtitles as it enables them to be drawn at the correct size and not stretched. The INTERPOLATION option specifies
the method used to resize the video (from Nearest neighbour, lowest quality, to Cubic +, highest quality). The
INTERLACING and FIELD PROCESSING options should only be changed by users with advanced technical knowledge.

52 Spot 5.0 User Guide
Copyright © 2010 Mark Raishbrook/Spot Software BV, Holland
Overlay BITC on video
Select this option if you want to overlay timecode window
on the output video. The window is centred on the image;
its vertical position is set using the Y POSITION dropdown.
Overlay spoiler image on video
Lets you overlay a spoiler image on the output video. Click
the SELECT IMAGE button to select the image and use the
IMAGE OPACITY slider to set its transparency.
Output separate audio and video streams
Outputs the video as two separate streams: one video, one
audio.
Maximum encoding speed
Encodes the video as quickly as possible. Unselect this
option only if you are encountering encoding problems.
Auto-offset subtitles
Offsets subtitle cues to midnight. A video that was subtitled
with a starting timecode of 10:00:00:00, for example, will
only display the first subtitle at least ten hours into the video. As the encoder starts from 00:00:00:00, subtitles
need to be recut to appear at the correct time.
Show filters
Pops up a list of the filters used to encode the video before encoding. This is only useful for debugging.
Subtitle sync delay
There is an inherent delay in the encoding graph of approximately four frames. Use the Subtitle sync delay
dropdown to compensate for this delay.
Clicking OK to close the window and save the current configuration for future use.
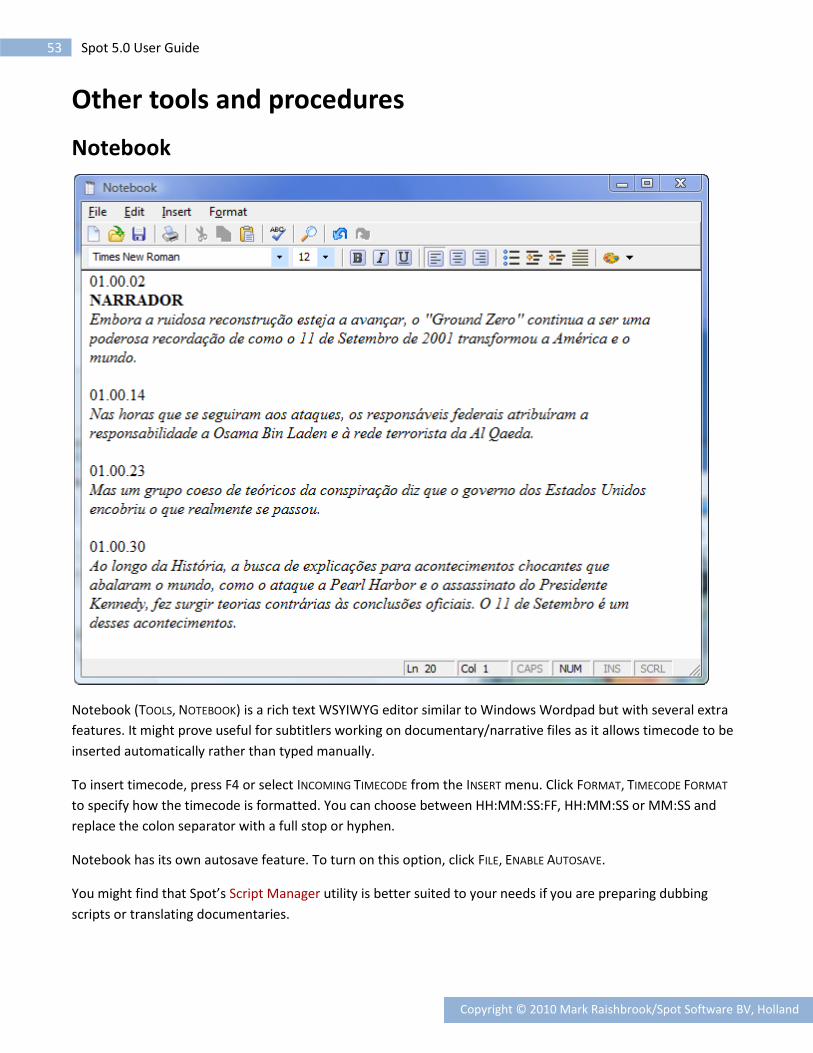
53 Spot 5.0 User Guide
Copyright © 2010 Mark Raishbrook/Spot Software BV, Holland
Other tools and procedures
Notebook
Notebook (TOOLS, NOTEBOOK) is a rich text WSYIWYG editor similar to Windows Wordpad but with several extra
features. It might prove useful for subtitlers working on documentary/narrative files as it allows timecode to be
inserted automatically rather than typed manually.
To insert timecode, press F4 or select INCOMING TIMECODE from the INSERT menu. Click FORMAT, TIMECODE FORMAT
to specify how the timecode is formatted. You can choose between HH:MM:SS:FF, HH:MM:SS or MM:SS and
replace the colon separator with a full stop or hyphen.
Notebook has its own autosave feature. To turn on this option, click FILE, ENABLE AUTOSAVE.
You might find that Spot’s Script Manager utility is better suited to your needs if you are preparing dubbing
scripts or translating documentaries.

54 Spot 5.0 User Guide
Copyright © 2010 Mark Raishbrook/Spot Software BV, Holland
Measurement converter
To convert a measurement:
Select MEASUREMENT CONVERTER from the TOOLS menu.
In the MEASUREMENT CONVERTER window, choose the type of conversion you wish to make from the
CATEGORY list.
Set the degree of accuracy required using the DECIMAL and FORMAT options.
Select the units to convert from and to from the CONVERT FROM and CONVERT TO lists. The converter
predicts which unit to convert to whenever the unit in CONVERT FROM list is changed.
Type the figure to convert in the FROM VALUE box, then press ENTER or click CONVERT.
The correctly converted measurement will appear in the TO VALUE box. To copy this figure into the subtitle you
are working on, choose COPY. The converter will close and the converted measurement will be copied into the
current subtitle.

55 Spot 5.0 User Guide
Copyright © 2010 Mark Raishbrook/Spot Software BV, Holland
Script Manager
Script Manager (TOOLS, SCRIPT MANAGER) is a tool for preparing scripts for language dubbing. You can either
create a script and characters from scratch or import the current subtitle file into Script Manager. If you choose
the latter approach, character names are retrieved from the comment fields. In this example, we will create a
script from scratch.
The first thing to do is create a new character by clicking SCRIPT, CHARACTER, ADD CHARACTER or pressing F5. In the
ADD CHARACTER window, give the character a name, a role (leading or secondary) and assign it a gender, and click
OK. The new character’s name will appear in the character list at the top left of the Script Manager window.
Now type the character’s line in the text box and add the in time and out time for the line, either by pressing F11
and F12 or by clicking the in and out buttons on the toolbar. Once the line is complete, press Page Down to add
it to the script in the bottom half of the window and clear the text box ready for a new line.
You can create all the characters at once or whenever a new character occurs in the script. If you have a
complete list of characters, select the appropriate name from the character list whenever the speaker changes.
Characters can be edited by clicking the CHARACTER DATA tab and double-clicking the character’s name.
To edit a line in the script, just select it in the script list or move to it using PAGE DOWN and PAGE UP.
Once the script is complete, you might want to set one or more export options before exporting the script in
HTML format. Click FILE, EXPORT OPTIONS to open the options window.
Character list. Click to select
an existing character when
adding a new line.
This is where you type the lines for the different
characters in the script. The length of text is unlimited
and can be bold, underlined or in italics.
The in and out times for the current line.
Script view shows the
characters in the script,
their lines and in times
for their lines.
Character view lists the
characters in the script
and the total number of
lines spoken by each.

56 Spot 5.0 User Guide
Copyright © 2010 Mark Raishbrook/Spot Software BV, Holland
Script Manager export options
The export options window is split into two sections: GENERAL and SCRIPT HEADER.
Characters
The Characters frame lets you choose which characters to include in the script: all or just those selected in the
list. It also sets other options, such as the formatting applied to the character name and whether to omit the
name of the character in consecutive lines.
Script format
The Layout dropdown determines the format of the exported file: script style, in which characters are listed on
the left and their cues on the right, or documentary style, in which characters and text are both left-aligned .
The timecode format for cue in times can be set to HH:MM:SS:FF (e.g. 10:23:15:04), HH:MM:SS (e.g. 10:23:15)
or MM:SS (e.g. 23:15). If either of these last two options are selected, you can additionally specify whether to
add a + or ++ sign to show the approximate the frame position.
Script header
Select the fields to include in the script header by ticking the appropriate box. Note that the text for each field’s
sub-items is user-definable.
Your final script can be exported in HTML or Microsoft Excel CSV format. To export to HTML (the recommended
file type as all formatting is retained), press Ctrl+E or click the Internet button on the toolbar. If you have not yet
filled in the properties for the current file, the Properties window will prompt you to add this information before
exporting.

57 Spot 5.0 User Guide
Copyright © 2010 Mark Raishbrook/Spot Software BV, Holland
Translation
You can translate a word, sentence, subtitle or complete subtitle file using the translate tool (TOOLS, TRANSLATE).
Select what to translate from the dropdown list (text in the text field, the current subtitle or the current subtitle
file), and then choose the source and target languages. Next, select where to store the translation: in the text
box at the bottom of the window, or in the comment or subtitle fields in the main Spot window (be aware that
the last two options will overwrite any existing content). Click the OK button when you are ready.
If you are translating between languages that belong to different codepages (e.g. from English to Hebrew) and
are storing the result in the subtitle or comment field, Spot will prompt to change the selected codepage for the
current subtitle file if the WARN IF CODEPAGES CONFLICT option is selected.
The translation tool uses Google’s translation engine and, as a result, requires an active Internet connection.
Translating a whole file may take several minutes to complete depending on the size of the file and your Internet
connection speed.
Certain characters, such as apostrophes or italic markers, may return from Google in the form of escape codes
(e.g. \u003c or \u0026lt;). Although Spot will attempt to convert these codes, it may not always be successful, in
which case you may want to add the escape code and the corresponding character to AutoReplace.

58 Spot 5.0 User Guide
Copyright © 2010 Mark Raishbrook/Spot Software BV, Holland
Karaoke
Creating karaoke subtitles can be a tedious and time-consuming business. Although you may still have to fine-
tune the timing of certain subtitles, Spot’s karaoke tool (CTRL+K or SUBTITLE, KARAOKE ) considerably speeds up the
whole process.
Creating karaoke subtitles
Before adding a karaoke effect to a song, you need to type and time the lyrics in the same way that you create
subtitles for a regular video file. Once the song has been subtitled, press CTRL+K to open the KARAOKE window
and follow the steps below.
1. Select CREATE KARAOKE SUBTITLES from the ACTION list.
2. Ensure that all the subtitles in the file are selected in the FROM SUBTITLE and TO SUBTITLE fields.
3. Choose the highlight method: the current word or a sweeping effect from left to right.
4. Tick the AUTOTIME SUBTITLES box.
5. Set the karaoke subtitle interval. This is the interval between the karaoke subtitles that make up
a single line (or stanza as Spot calls it) and should normally be set to zero.
6. Set the pre-roll and end-roll times. Pre-roll is the amount of time the subtitle appears before the
first karaoke effect is applied. The end-roll time determines how much extra weight is given to
the last karaoke subtitle in the line. Pre-roll subtitles should never be deleted as they flag the
start of a karaoke stanza.
7. Click OK.
Each subtitle will be split into multiple subtitles based on the number of words it contains. Curly braces
represent the highlighted words. The following two lines from “Oh! Darling” by the Beatles illustrate both this
and the way the pre-roll and end-roll functions work.

59 Spot 5.0 User Guide
Copyright © 2010 Mark Raishbrook/Spot Software BV, Holland
Before adding karaoke effect (2 subtitles)
1 00:02:01:10 00:02:04:00 02:15
When you told me
2 00:02:05:03 00:02:09:00 03:22
You didn't need me anymore
After adding karaoke effect (11 subtitles)
1 00:02:01:05 00:02:01:10 00:05
When you told me
2 00:02:01:10 00:02:02:00 00:15
{When} you told me
3 00:02:02:00 00:02:02:15 00:15
When {you} told me
4 00:02:02:15 00:02:03:05 00:15
When you {told} me
5 00:02:03:05 00:02:04:00 00:20
When you told {me}
6 00:02:04:23 00:02:05:03 00:05
You didn't need me anymore
7 00:02:05:03 00:02:05:23 00:20
{You} didn't need me anymore
8 00:02:05:23 00:02:06:16 00:18
You {didn't} need me anymore
9 00:02:06:16 00:02:07:09 00:18
You didn't {need} me anymore
10 00:02:07:09 00:02:08:02 00:18
You didn't need {me} anymore
11 00:02:08:02 00:02:09:00 00:23
You didn't need me {anymore}
Pre-roll subtitle starts 5 frames before the first karaoke subtitle
Last karaoke subtitle lasts 15 frames plus the end roll-time
Each karaoke subtitle except the last has a duration of 15 frames
Pre-roll subtitle starts 5 frames before the first karaoke subtitle
Last karaoke subtitle lasts 15 frames plus the end roll-time
Each karaoke subtitle except the first and last has a duration of 18 frames. 2 extra frames, the remainder after
dividing the subtitle, are added to the duration of the first karaoke subtitle.

60 Spot 5.0 User Guide
Copyright © 2010 Mark Raishbrook/Spot Software BV, Holland
Removing karaoke subtitles
For various reasons you may want to remove the karaoke effect from subtitles. To do this, select REMOVE KARAOKE
SUBTITLES from the Action list, select the desired subtitle range using the FROM SUBTITLE and TO SUBTITLE fields, click
OK and the subtitles will be restored to their pre-karaoke state. You can also use the [< >] button to select a
particular stanza.
Checking karaoke subtitles
Select CHECK KARAOKE SUBTITLES from the ACTION list, select which checks to perform and click OK. The karaoke
window will remain open during checking to allow you to make any necessary corrections.
Check stanza continuity
Checks that the different subtitles that make up one stanza are all the same length.
Check interval between stanzas
Checks that the interval between stanzas is not less than the default subtitle interval.
Check interval between subtitles
Checks that the interval between subtitles that make up one stanza is zero.
Check for subtitles lasting less than…
Checks for subtitles lasting less than the number of frames in the dropdown list.
Reapplying karaoke subtitles
You might wish to reapply a karaoke effect to subtitles if you have retimed the start or end of a stanza, or made
changes to the subtitle text. To do this, select REAPPLY KARAOKE SUBTITLES from the Action list, select the desired
subtitle range using the FROM SUBTITLE and TO SUBTITLE fields, and click OK.

61 Spot 5.0 User Guide
Copyright © 2010 Mark Raishbrook/Spot Software BV, Holland
Shot cut detection
Pre-processed shot cut detection is carried out using a separate application, SpotCut. The setup file for the
program is located in the [SPOT INSTALL]\SPOTCUT folder.
The program is simple to use. Select the video file or files to process using the ADD FILES button, set your options
(see below), then click the Start button. Files are normally processed 10 times faster than real time.
Shot cut sensitivity
Specifies how much of a change between two frames causes the current frame to be flagged as a shot cut. You
should generally leave this set to normal, although for videos containing a lot of fast action sequences you might
want to experiment with a lower sensitivity setting.
Colour space
Unless the program cannot process a particular file, leave this setting on Auto.
Binary output format
Some video files have their first frame encoded twice. To prevent this causing frame numbering errors in Spot,
select the SAMPLE COMPENSATED option.
Readable output format
Sets the format of the readable shot cut data.

62 Spot 5.0 User Guide
Copyright © 2010 Mark Raishbrook/Spot Software BV, Holland
Once the video has been processed, the shot cut data is saved to disk in the same folder as the video. The name
of the file is identical to the name of the video file but with the extension ".scd". If the video file were
MyMpeg.mpg, for example, the resultant shot cut data file would be named MyMpeg.mpg.scd. The .scd file is in
binary format and can only be read by Spot.
Back in Spot, you need to load the .scd file. To do this, click the small black arrow to the right of the Open Video
File button and select "Load shot cut file".
Navigate to the location of the .scd file and open it. Note that this operation only has to be carried out once per
video as the shot cut data will be saved as part of the .tcd file.
You can now navigate between the previous and next shot cuts in the video using the numpad keys 1 and 3. This
is particularly helpful when used in conjunction with the Ctrl+Enter key combination to grab the current in cue
and fix the previous subtitle's out cue.

63 Spot 5.0 User Guide
Copyright © 2010 Mark Raishbrook/Spot Software BV, Holland
Timecode calculator
Spot's timecode calculator (TOOLS, TIMECODE CALCULATOR) lets you convert, add, subtract, multiply or divide
timecode in a variety of SMPTE formats, including PAL, NTSC DF, NTSC NDF and custom formats.
To carry out a calculation:
Select the desired SMPTE format from the format tabs along the top of the window.
Enter the first timecode.
Press TAB to move to the operator field and select the operator.
Press TAB again and enter the second timecode.
Press the ENTER key.
The result of the calculation will be displayed in the result box and added to the history log. The calculation will
also be displayed in frame format on the status bar at the bottom of the window, with timecode two shown as a
percentage of timecode one in the right-hand corner.
Results can be copied to the current in or out cue in the main Spot window by pressing F11 or F12. Conversely,
the current video timecode can be copied to the first or second timecode fields by pressing F5 or F8; if no
timecode is present, the in cue of the current subtitle will be copied instead.
To convert between SMPTE formats, select the CONVERT CUES WHEN SWITCHING BETWEEN SMPTE FORMATS option.
This will convert the value in both timecode fields when a different format tab is clicked. If the currently selected
format is NTSC NDF and the value in the first timecode field is 10:24:00:00, for example, clicking the NTSC DF tab
will convert 10:24:00:00 to 10:24:37:14.
To specify a custom frame rate, click EDIT, USER FRAME RATE, type the number of frames per second in the USER
FRAME RATE window and click OK.
16 and 35 mm formats
Calculations are carried out in feet and frames rather than HH:MM:SS:FF format, so you need to insert a hyphen
between the feet and frame fields.
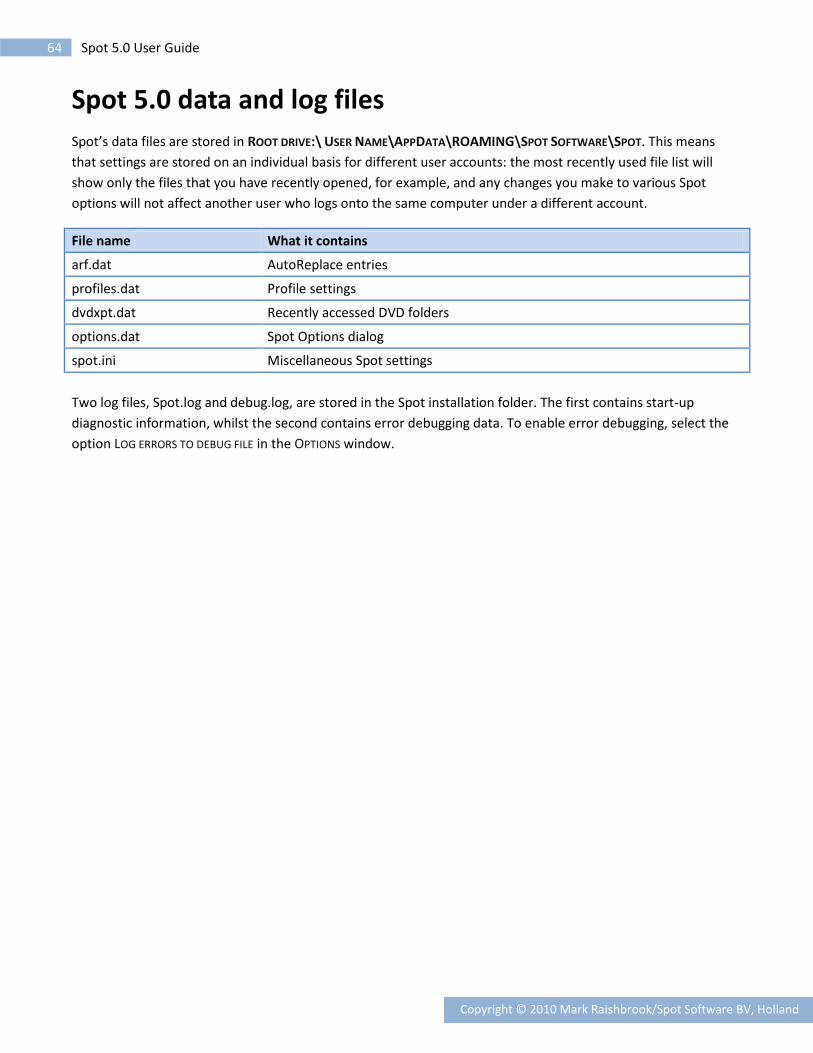
64 Spot 5.0 User Guide
Copyright © 2010 Mark Raishbrook/Spot Software BV, Holland
Spot 5.0 data and log files
Spot’s data files are stored in ROOT DRIVE:\ USER NAME\APPDATA\ROAMING\SPOT SOFTWARE\SPOT. This means
that settings are stored on an individual basis for different user accounts: the most recently used file list will
show only the files that you have recently opened, for example, and any changes you make to various Spot
options will not affect another user who logs onto the same computer under a different account.
File name What it contains
arf.dat AutoReplace entries
profiles.dat Profile settings
dvdxpt.dat Recently accessed DVD folders
options.dat Spot Options dialog
spot.ini Miscellaneous Spot settings
Two log files, Spot.log and debug.log, are stored in the Spot installation folder. The first contains start-up
diagnostic information, whilst the second contains error debugging data. To enable error debugging, select the
option LOG ERRORS TO DEBUG FILE in the OPTIONS window.

65 Spot 5.0 User Guide
Copyright © 2010 Mark Raishbrook/Spot Software BV, Holland
Frequently Asked Questions
General
The spell checker isn’t working
Spot uses Microsoft Word to spell check subtitles so if a version of Word is not installed on your computer, you
cannot use the spell checker or the thesaurus.
If you do have Word installed and the spell checker is still not working, make sure you have the correct language
selected in Spot’s language bar above the video window.
I can’t type in capitals
Select TOOLS, OPTIONS, CHECKS, AUTO CHECK and turn off the CORRECT TWO INITIAL CAPITALS option.
I can’t raise subtitles using Ctrl+Alt+Up/Down
If nothing happens when you press Ctrl+Alt+Up/Down, then another program on your computer, usually the
software installed by your graphics card, has most likely hijacked the key combination. You need to find out
which program is the culprit and then change or disable the key sequence.
Spot adds a space between letters in abbreviations such as U. S. A.
Select TOOLS, OPTIONS, CHECKS, AUTO CHECK and turn off the INSERT SPACE AFTER PUNCTUATION option.
How do I set a fixed number of characters per line?
Select SET CHARACTERS PER LINE WIDTH from the SUBTITLE menu. Setting a figure of 36, for example, will ensure that
only a maximum of 36 characters are allowed per line. Note that as the only way to set the maximum number of
characters per line is by using a fixed width font (i.e. a font in which each letter shares the same width), Spot will
change the current screen font to Courier New. This will not affect the target broadcast font.
There is a more elegant approach that lets you keep Arial 16 as the edit font. Change the edit line width to a
figure that sets the CPL value on the status bar to approximately 36 (e.g. 5000). Because Arial is a proportional
font, this does not guarantee that you won’t be able to type more than 36 characters in a line but it will prevent
it from happening most of the time. As you work, keep an eye on the two line length indicators above the
current subtitle: if they turn red, one of the lines in the subtitle is too long. When you’ve finished working on
your file, a TOO MANY CHARACTERS IN LINE check (or switching to Report view) will pick up any warnings you may
have missed.
How do I tell Spot where to store by backups?
Spot creates the backup folder for you. You manage all the backups from the OPTIONS, AUTO RECOVER window.
I can’t find the recut or master recut windows
The recut and master recut windows have been combined into a single OFFSET window. You can access it from
the CUES menu or by pressing CTRL+J.

66 Spot 5.0 User Guide
Copyright © 2010 Mark Raishbrook/Spot Software BV, Holland
Video and audio
I selected the wrong frame rate when I opened a video file
Click the small black arrow on the right of the OPEN MEDIA FILE button on the video toolbar, select DELETE VIDEO
FORMAT FLAG and then reopen the video.
A video file won’t open/ doesn’t play properly/is out of sync with the audio
Although it’s possible that the video file you are trying to open is corrupt, a more likely explanation is that your
system does not have the correct video decoders installed and therefore cannot render the video correctly. The
default decoders installed by Windows will not let you play back MOV or MPEG-2 files, for example, and may
cause problems when attempting to play other video formats, such as WMV or MP4. To work around this
problem, installed a good quality decoder such as ffdshow and configure it to decode the most common video
formats. There are several diagnostic tools available on the Internet, such as GraphEditPlus, which will help you
identify the decoder which is causing the problem.
Subtitles in the video preview window are boxed
If you are running Spot on Windows Vista or Windows 7 and have not selected the USE VMR9 TO RENDER SUBTITLES
option in the VIDEO, PREFERENCES window, navigate to the Spot install folder, right-click the file spot.exe, select
Properties, then turn on the option "Turn off desktop composition" on the Compatibility tab.
How can I increase the size of the video window?
The video window is automatically resized whenever you change the size of Spot’s main window. If you
maximise Spot, you will maximise the video window.

67 Spot 5.0 User Guide
Copyright © 2010 Mark Raishbrook/Spot Software BV, Holland
Reference
Keyboard shortcuts by key
Key Function
F1 Help
F2 Align subtitle left, right or centre
Shift+F2 Force current line left, right or centre
Ctrl+F2 Swap lines
Shift+Ctrl+F2 Check for too many rows
F3 Italicise whole subtitle
Shift+Ctrl+F3 Check for margin override
F4 Spell check file
Ctrl+F4 Translate
Shift+F4 Thesaurus
Shift+Ctrl+F4 Check for invalid cues
F5 Go to subtitle number
Ctrl+F5 Insert subtitle before
Shift+F5 Insert subtitle after
Shift+Ctrl+F5 Check for duration too short/long
F6 Adjust display settings
Shift+F6 Delete Range
Ctrl+F6 Delete Subtitle
Shift+Ctrl+F6 Check for cues not set
F7 Open media file
Shift+F7 Full-screen video
Ctrl+F7 Merge current and next subtitle
Shift+Ctrl+F7 Check for insufficient reading speed
F8 Rehearse
Shift+F8 Cue conversion
Ctrl+F8 Split subtitle at insertion point
Shift+Ctrl+F8 Check for default interval override
F9 Run all checks
Shift+F9 Continue checks from next subtitle
Shift+Ctrl+F9 Check for empty subtitles
F11 Grab in cue
Shift+F11 Edit in cue
Ctrl+F11 Recalculate in cue
Shift+Ctrl+F11 Delete in cue
F12 Grab out cue

68 Spot 5.0 User Guide
Copyright © 2010 Mark Raishbrook/Spot Software BV, Holland
Shift+F12 Edit out cue
Ctrl+F12 Recalculate out cue
Shift+Ctrl+F12 Delete out cue
Ctrl+A Select all
Ctrl+B Toggle audio balance left, right, stereo
Ctrl+C Copy
Ctrl+D Bitmap export
Ctrl+E File, Export
Ctrl+F Find
Ctrl+G Subtitle outline
Ctrl+H Replace
Ctrl+I Italicise single word
Ctrl+J Offset cues
Ctrl+K Karaoke
Ctrl+L Toggle case
Ctrl+M Manage comments
Ctrl+N New file
Ctrl+O Open file
Ctrl+P Print
Ctrl+Q Quick View
Ctrl+R Report View
Ctrl+S Save file
Ctrl+T Best fit
Ctrl+U Find subtitle at current video position
Ctrl+V Paste
Ctrl+W Add word to AutoReplace
Ctrl+X Cut
Ctrl+Y Delete line
Ctrl+Z Undo last action
Page Up Move to previous subtitle
Ctrl+Page uP Move to start of file
Page Down Move to next subtitle
Ctrl+Page Down Move to end of file
Shift+Add Increase in cue by one frame
Shift+Subtract Decrease in cue by one frame
Ctrl+Add Increase out cue by one frame
Ctrl+Subtract Decrease out cue by one frame
Shift+Del Delete in and out cues
Ctrl+Del Delete word
Shift+Ctrl+Del Delete all text in subtitle

69 Spot 5.0 User Guide
Copyright © 2010 Mark Raishbrook/Spot Software BV, Holland
Alt+Up/Ctrl+Up Move word up
Alt+Down/Ctrl+Down Move word down
Alt+Left Select thumbnail left
Alt+Right Select thumbnail right
Shift+Alt+Up/Down Shift subtitles up/down in 1% increments
Shift+Alt+Left/Right Shift subtitle left/right in 1% increments
Ctrl+Alt+Up Move row up
Ctrl+Alt+Down Move row down
Ctrl+Alt+Right Add indent
Ctrl+Alt+Left Remove indent
Ctrl+Alt+1 Align subtitle top of screen
Ctrl+Alt+2 Align subtitle middle of screen
Ctrl+Alt+3 Align subtitle bottom of screen
Ctrl+Enter Grab in cue and lock last out cue
Ctrl/Shift + Ctrl+0 to 9 Insert special characters
Alt+0 to 9 Insert custom characters
Alt+Backspace Delete all cues forward of and including current subtitle
Backspace Respot last subtitle
Right Ctrl+7/ Shift+Alt+0 White subtitle text
Right Ctrl+1 / Shift+Alt+1 Red subtitle text 1
Right Ctrl+2 / Shift+Alt+2 Green subtitle text
Right Ctrl+3 / Shift+Alt+3 Yellow subtitle text
Right Ctrl+4 / Shift+Alt+4 Blue subtitle text
Right Ctrl+5 / Shift+Alt+5 Magenta subtitle text
Right Ctrl+6 / Shift+Alt+6 Cyan subtitle text
1 Go to last shot cut
2 Replay sequence
Alt+2 Replay sequence “forward”
3 Go to next shot cut
4 Frame back
5 Play/pause
6 Frame forward
7 Rewind
8 Replay from last play position
9 Fast forward
Enter / Shift+Enter Jump to in cue / Grab in cue2
1 For this and the following five items, the Shift + Alt + number combination affects individual lines. Use Ctrl + number for
individual words. 2 The default behaviour of the Enter and Shift+Enter keys is set under Video, Media Preferences.

70 Spot 5.0 User Guide
Copyright © 2010 Mark Raishbrook/Spot Software BV, Holland
Ins / Shift+Ins Jump to out cue / Grab out cue3
/ Go to start of video
* Go to end of video
Del Toggle shot cut marker
Keyboard shortcuts by function
Subtitle functions
Key Function
Ctrl+F5 Insert subtitle
Shift+F6 Delete Range
Ctrl+F6 Delete Subtitle
Ctrl+F7 Merge current and next subtitle
Ctrl+F8 Split subtitle at insertion point
Ctrl+F9 Split current subtitle and merge with next
Ctrl+Q Quick View
Page Up Move to previous subtitle
Page Down Move to next subtitle
Ctrl+Page Up Move to first subtitle
Ctrl+Page Down Move to last subtitle
Ctrl+A Select all subtitles and view in Quick View
Text editing functions
Key Function
Ctrl/Shift + Ctrl+0 to 9 Insert special characters
Alt+0 to 9 Insert custom characters
F2 Align all text left, right or centre
Shift+F2 Force current line left, right or centre
Ctrl+F2 Swap lines
F3 Italicise whole subtitle
Ctrl+C Copy
Ctrl+E File, Export
Ctrl+F Find
Ctrl+G Subtitle outline
Ctrl+H Replace
Ctrl+I Italicise single word
Ctrl+L Toggle case
Ctrl+T Best fit
3 The default behaviour of the Ins and Shift+Ins keys is set under Video, Media Preferences.

71 Spot 5.0 User Guide
Copyright © 2010 Mark Raishbrook/Spot Software BV, Holland
Ctrl+V Paste
Ctrl+W Add word to AutoReplace
Ctrl+X Cut
Ctrl+Y Delete line
Ctrl+Z Undo last action
Ctrl+Del Delete word
Shift+Ctrl+Del Delete all text in subtitle
Alt+Up/Ctrl+Up Move word up
Alt+Down/Ctrl+Down Move word down
Ctrl+Alt+Up Move row up
Ctrl+Alt+Down Move row down
Shift+Alt+Up/Down Shift subtitles up/down in 1% increments
Shift+Alt+Left/Right Shift subtitle left/right in 1% increments
Ctrl+Alt+Right Add indent
Ctrl+Alt+Left Remove indent
Ctrl+Alt+1 Align text with top of screen
Ctrl+Alt+2 Align text with middle of screen
Ctrl+Alt+3 Align text with bottom of screen
Right Ctrl+1 / Shift+Alt+1 Red subtitle text
Right Ctrl+2 / Shift+Alt+2 Green subtitle text
Right Ctrl+3 / Shift+Alt+3 Yellow subtitle text
Right Ctrl+4 / Shift+Alt+4 Blue subtitle text
Right Ctrl+5 / Shift+Alt+5 Magenta subtitle text
Right Ctrl+6 / Shift+Alt+6 Cyan subtitle text
Del Toggle shot cut marker
Cue editing functions
Key Function
Shift+F8 Cue conversion
F11 Grab in cue
Shift+F11 Edit in cue
Ctrl+F11 Recalculate in cue
Shift+Ctrl+F11 Delete in cue
F12 Grab out cue
Shift+F12 Edit out cue
Ctrl+F12 Recalculate out cue
Shift+Ctrl+F12 Delete out cue
Ctrl+J Offset cues
Ctrl+M Measurement converter

72 Spot 5.0 User Guide
Copyright © 2010 Mark Raishbrook/Spot Software BV, Holland
Shift+Add Increase in cue by one frame
Shift+Subtract Decrease in cue by one frame
Ctrl+Add Increase out cue by one frame
Ctrl+Subtract Decrease out cue by one frame
Shift+Del Delete in and out cues
Ctrl+Enter Grab in cue and lock last out cue
Alt+Backspace Delete all cues forward of and including current subtitle
Backspace Respot last subtitle
Enter / Shift+Enter Jump to in cue / Grab in cue
Ins / Shift+Ins Jump to out cue / Grab out cue
Video control
Key Function
F7 Open media file
Shift+F7 Full-screen video
Ctrl+B Toggle audio balance left, right, stereo
Ctrl+U Find subtitle at current video position
Alt+Left Select thumbnail left
Alt+Right Select thumbnail right
1 Go to last shot cut
2/Alt+2 Replay sequence/Replay sequence “forward”
3 Go to next shot cut
4 Frame back
5 Play/pause
6 Frame forward
7 Rewind
8 Replay from last play position
9 Fast forward
Enter / Shift+Enter Jump to in cue / Grab in cue
Ins / Shift+Ins Jump to out cue / Grab out cue
/ Go to start of digital video
* Go to end of digital video
Del Toggle shot cut marker
Proofing functions
Key Function
Shift+Ctrl+F2 Check for too many rows
Shift+Ctrl+F3 Check for margin override
F4 Spell check file

73 Spot 5.0 User Guide
Copyright © 2010 Mark Raishbrook/Spot Software BV, Holland
Shift+F4 Thesaurus
Shift+Ctrl+F4 Check for invalid cues
Shift+Ctrl+F5 Check for duration too short/long
Shift+Ctrl+F6 Check for cues not set
Shift+Ctrl+F7 Check for insufficient reading speed
Shift+Ctrl+F8 Check for default interval override
F9 Run all checks
Shift+F9 Continue checks from next subtitle
Shift+Ctrl+F9 Check for empty subtitles
Ctrl+R Report view
File functions
Key Function
F1 Help
Ctrl+E File, Export
Ctrl+N New file
Ctrl+O Open file
Ctrl+P Print
Ctrl+S Save file
Miscellaneous
Key Function
Ctrl+F4 Translate
F6 Adjust display settings
Shift+F5 Preset display settings
F8 Rehearse
Ctrl+D Bitmap export