Spoofing and Man-in-the-Middle Attackspages.mtu.edu/~xinlwang/itseed/labs/Spoof_MiTM.pdf · This...
12
1 | Page Spoofing and Man-in-the-Middle Attacks Date Assigned: mm/dd/yyyy Time Due: mm/dd/yyyy by hh:mm Educational Objectives This lab will introduce you to both ARP spoofing and man-in-the-middle attacks and how they are carried out within a networked environment. Lab Environment The following machines are needed to conduct this lab: CentOS Linux, CentOS6.4 Backtrack 5, BT5R3 Windows 7, Win7 Fedora 18, FC18 All computers must be networked and accessible to each other. Summary When you connect to a computer you often take for granted the protocols used to find the destination machine. In a LAN the method of resolving an IP address to a MAC to send a packet to its destination is by ARP (Address Resolution Protocol). In this lab you will learn how to poison victims ARP cache and passively sniff connections. Before software can be used to poison an ARP cache you must first do some preliminary exercises to better understand how to use and manipulate your ARP cache. Once you understand ARP and how your ARP cache is utilized, the next few exercises use ARP poison to sniff and attack connections. The first exercise is to understand a powerful tool used to perform ARP poison and various LAN attacks. This tool is Ettercap. Next you will be passively and actively sniffing a connection between two victim machines. After completing these exercises you will have a good understanding of how man-in-the-middle attacks occur. Background What is ARP? Address Resolution Protocol (ARP) is a protocol for mapping an Internet Protocol address (IP address) to a physical machine address that is recognized in the local network. For example, in IP Version 4, the most common level of IP in use today, an address is 32 bits long. In an Ethernet local area network, however, addresses for attached devices are 48 bits long. (The physical machine address is also known as a Media Access Control or MAC address.) A table, usually
Transcript of Spoofing and Man-in-the-Middle Attackspages.mtu.edu/~xinlwang/itseed/labs/Spoof_MiTM.pdf · This...

1 | P a g e
Spoofing and Man-in-the-Middle Attacks
Date Assigned: mm/dd/yyyy
Time Due: mm/dd/yyyy by hh:mm
Educational Objectives
This lab will introduce you to both ARP spoofing and man-in-the-middle attacks and how they
are carried out within a networked environment.
Lab Environment
The following machines are needed to conduct this lab:
CentOS Linux, CentOS6.4
Backtrack 5, BT5R3
Windows 7, Win7
Fedora 18, FC18
All computers must be networked and accessible to each other.
Summary
When you connect to a computer you often take for granted the protocols used to find the
destination machine. In a LAN the method of resolving an IP address to a MAC to send a packet
to its destination is by ARP (Address Resolution Protocol).
In this lab you will learn how to poison victims ARP cache and passively sniff connections.
Before software can be used to poison an ARP cache you must first do some preliminary
exercises to better understand how to use and manipulate your ARP cache. Once you understand
ARP and how your ARP cache is utilized, the next few exercises use ARP poison to sniff and
attack connections. The first exercise is to understand a powerful tool used to perform ARP
poison and various LAN attacks. This tool is Ettercap. Next you will be passively and actively
sniffing a connection between two victim machines. After completing these exercises you will
have a good understanding of how man-in-the-middle attacks occur.
Background
What is ARP?
Address Resolution Protocol (ARP) is a protocol for mapping an Internet Protocol address (IP
address) to a physical machine address that is recognized in the local network. For example, in IP
Version 4, the most common level of IP in use today, an address is 32 bits long. In an Ethernet
local area network, however, addresses for attached devices are 48 bits long. (The physical
machine address is also known as a Media Access Control or MAC address.) A table, usually
2 | P a g e
called the ARP cache, is used to maintain a correlation between each MAC address and its
corresponding IP address. ARP provides the protocol rules for making this correlation and
providing address conversion in both directions.
How ARP Works?
When an incoming packet destined for a host machine on a particular local area network arrives
at a gateway, the gateway asks the ARP program to find a physical host or MAC address that
matches the IP address. The ARP program looks in the ARP cache and, if it finds the address,
provides it so that the packet can be converted to the right packet length and format and sent to
the machine. If no entry is found for the IP address, ARP broadcasts a request packet in a special
format to all the machines on the LAN to see if one machine knows that it has that IP address
associated with it. A machine that recognizes the IP address as its own returns a reply indicating
so. The ARP program updates the ARP cache for future reference and then sends the packet to
the MAC address that replied. Since protocol details differ for each type of local area network,
there are separate ARP Requests for Comments (RFC) for Ethernet, ATM, Fiber Distributed-
Data Interface, and other protocols. There is a Reverse ARP (RARP) for host machines that don't
know their IP address. RARP enables them to request their IP address from the gateway's ARP
cache.
What is ARP poison and a man in the middle attack?
The Address Resolution Protocol serves the function of determining the mapping between IP
addresses and MAC hardware addresses on local networks. For example, a host that wants to
send a message to IP address 10.0.0.2 on the local network sends a broadcast ARP packet that
requests the MAC for that IP. The host that owns the IP 10.0.0.2 returns an ARP reply packet
with its MAC address. The requesting host then sends the message, and stores the IP-to-MAC
mapping for future packets.
In order to minimize network traffic, ARP implementations update their cache of ARP-to-IP
mappings whenever an ARP request or reply is received. If the MAC address reported in the
packet for the given IP has changed, the new value will overwrite the old one in the cache. ARP
replies are unicast packets directed at one machine, and cause only that machine to update its
cache.
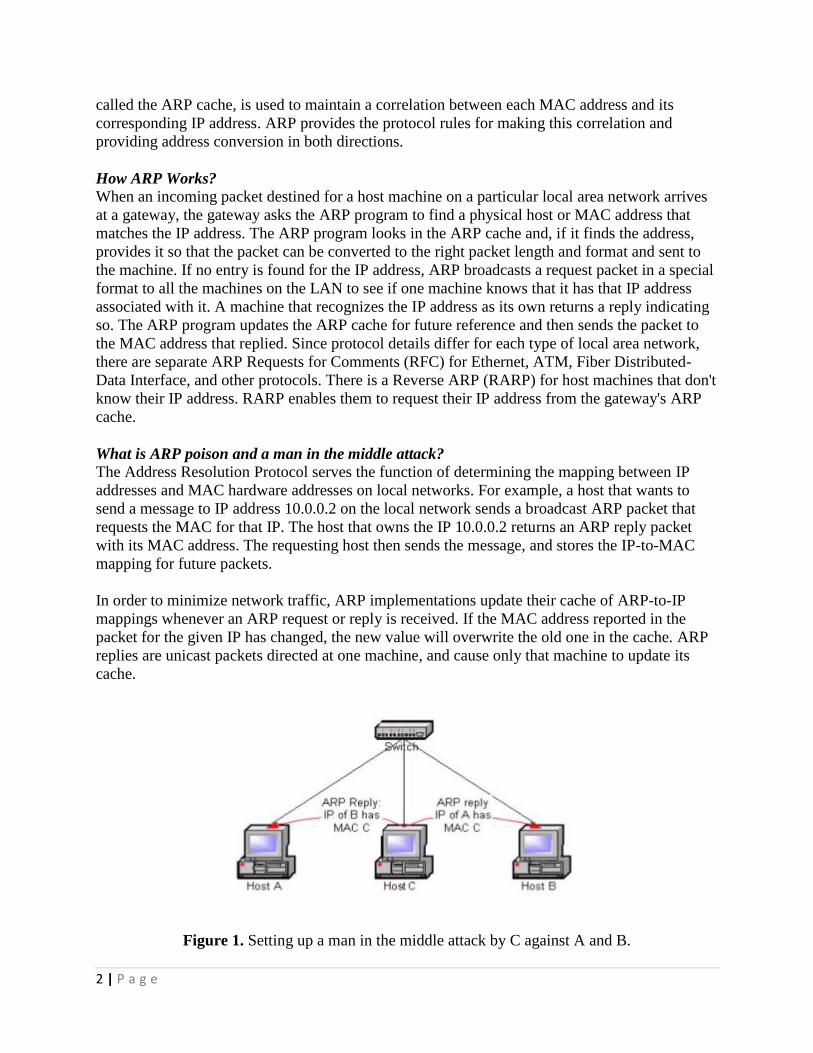
Figure 1. Setting up a man in the middle attack by C against A and B.

3 | P a g e
The particular kind of ARP attack examined in this lab is the use of ARP reply packets to
perform cache poisoning. This attack makes possible many sorts of man-in-the-middle attacks.
Consider an example depicted in Figure 1. The attacker, Host C, sends an ARP reply to B stating
that A’s IP maps to C’s MAC address, and another ARP reply to A stating that B’s IP maps to
C’s MAC address. Since ARP is a stateless protocol, hosts A and B assume that they sent an
ARP request at some point in the past and update their ARP caches with this new information.
Figure 2. Computer C performs a man in the middle attack against A and B.
Now, when A tries to send a packet to B it will go to C instead. Host C can use this unique
position to forward the packets on to the correct host and monitor or modify them as they pass
through C (Figure 2). This man in the middle attack allows C to monitor or modify telnet
sessions, read mail passing over Post Office Protocol (POP) or SMTP, intercept SSH
negotiations, monitor and display Web usage, and commit many other malicious activities.
The ARP cache poisoning attack can be used against all machines in the same broadcast domain
as the attacker. Hence, it works over hubs, bridges, and switches, but not across routers. An
attacker can, in fact, poison the ARP cache of the router itself, but the router won't pass the ARP
packets along to its other links. Switches with port security features that bind MAC addresses to
individual ports do not prevent this attack since no MAC addresses are actually changed. The
attack occurs at a higher network layer, the IP layer, which the switch does not monitor.
The tool that was used in demonstrating and testing the effectiveness of these attacks was
Ettercap. Developed as an open source project, Ettercap provides both a menu based and
command line tool to perform ARP cache poisoning and man in the middle attacks against
switched networks (among other things).
What is Ettercap?
(http://Ettercap.sourceforge.net/)

4 | P a g e
Ettercap is a multi-functional packet sniffer/interceptor/logger that works on switched LANs. It
allows the active and passive dissection of numerous protocols, including ciphered ones, such as
SSH1, and includes features for network and host analysis.
Section 0: Setup and installation
0.1: Installing Ettercap
Ettercap should be installed on your BT5R3 machine – however you can place it on another
machine such as FC18 is you wish:
# yum install ettercap
# yum install ettercap-common
# yum install ettercap-gtk
Test Ettercap
# ettercap -v
If your installation completed successfully, you will be able to see “Ettercap NG-0.7.3”.
0.2: Checking the FTP servers
Now you have to make sure that you have a FTP server installed and running on your
CENTOS6.4 machine.
# yum search ftpd
# yum install vsftpd
Start ftp: # /etc/init.d/vsftpd start
Test this using 127.0.0.1
0.3: Telnet Server 7
Make sure the TELNET server is installed on your Windows 7 machine, and is running:
Start Telnet service C:\> tlntsvr.exe /service
Note: If Telnet service is not installed please install using the following steps
Control Panel -> Programs and Features -> Turn Windows features on or off -> Telnet
Server

5 | P a g e
0.4: Telnet Server CENTOS6.4
Make sure the TELNET server is installed on your CENTOS6.4 machine, and is running:
#yum search telnet
#yum install telnet_server telnet
#/etc/init.d/xinetd start
0.5: Wireshark CENTOS6.4 and BT5R3
Check to make certain that both Operating Systems have Wireshark installed.
# yum install wireshark-gnome
Section 1: ARP
By now you should have a clear understanding of what ARP is and how it works. Now you will
get a chance to learn more about this protocol and how to hack it, by doing some exercises. In
the first exercise you will learn how to read your own ARP cache in Linux (Windows is very
similar) and how to modify it. After learning the basic OS commands to control your ARP cache,
you will use the program Ettercap to poison other computer’s caches on the network.
Before doing the lab it is important to understand which machine is being used in each situation.
Each of the machines hardware addresses will be identified by the following notation
a:b:c:d:e:f. Make sure you substitute the appropriate hardware address when you see the
notation a:b:c:d:e:f.
1.1 Getting to Know ARP and ARP Tables
1) First you are going to observe the initial state of your ARP cache.
Open up a terminal in you CENTOS6.4 machine
# arp
If the entry is blank, then think about when exactly does a computer start sending out ARP
packets to discover hosts on the network.
2) Now you are going to observe as entries are added to the ARP cache.
On the CENTOS6.4 machine:
First start the program Wireshark to capture ARP packets.
Make certain that Wireshark will stop the capture after 30 packets and then capture.
Next you are going to ping the BT5R3 machine from the terminal
If the Wireshark program did not already stop capturing packets then click on < stop >

6 | P a g e
Review the captured ARP packets in Wireshark
Next check the ARP cache in the CENTOS6.4 machine
Next you are going to ping the Win7 machine
Next check the ARP cache in the CENTOS6.4 machine
Q1.1.1: What did you see after typing “ARP”? Why is this?
3) Finally before you move on to the next part of the lab, make a table of each machine’s IP
address and its corresponding hardware address.
Table 1. IP addresses and hardware addresses
Computer IP Address Hardware Address
BT5R3
CENTOS6.4
Windows 7
4) In addition to just observing the ARP cache, the ARP cache can be manipulated with the
“ARP” command. The ARP command also allows the user to manually enter in IP to hardware
address mappings.
Although on a large network this would require a lot of labor, it is an easy way for networks with
static IP addresses to defeat ARP poison attempts by hackers. By adding the ARP entry
manually, it becomes static and cannot be changed except by the owner of the computer. Let’s
work with some of these other commands now.
On the CENTOS6.4 machine:
Use the “ARP” help feature and look through the possible options.
# yum install man
# man arp
Next edit the cache manually by deleting the BT5R3 entry
Q.1.1.2: What command did you use to delete the entry?
Make certain to verify the new ARP cache
Next edit the cache manually be adding back the deleted BT5R3 computer so that its address is
static
7 | P a g e
Q.1.1.3: What command did you use to manually add the entry?
Make certain to verify the ARP cache again
The static entry should be identified by the flag ‘CM’
Q1.1.4: What is the significance of ‘CM’? Make certain that you provide a detailed
response.
Finally remove the static entry
1.2. Using ARP
1) Now you are going to test to see what happens when an IP address is mapped to the
wrong hardware address. Before you use an ARP poison program to do this, you are
going to do this manually.
2) In the following commands below, make sure to set the hardware address for the BT5R3
to the wrong address.
3) Make certain to verify the ARP cache again Cd
The static entry should be identified by the flag ‘CM’
4) When completed, try to ping the BT5R3 machine from CENTOS6.4
Q1.2.1 What happened when the machine was pinged? Why did this happen?
Section 2: Ettercap
2.1. Creating FTP Access
1) For the next few exercises you are going to use the BT5R3 machine as the attacking machine
and the Win7 machine and CENTOS6.4 machine to communicate with each other using various
ports. These machines will be the unknowing victims within the network.
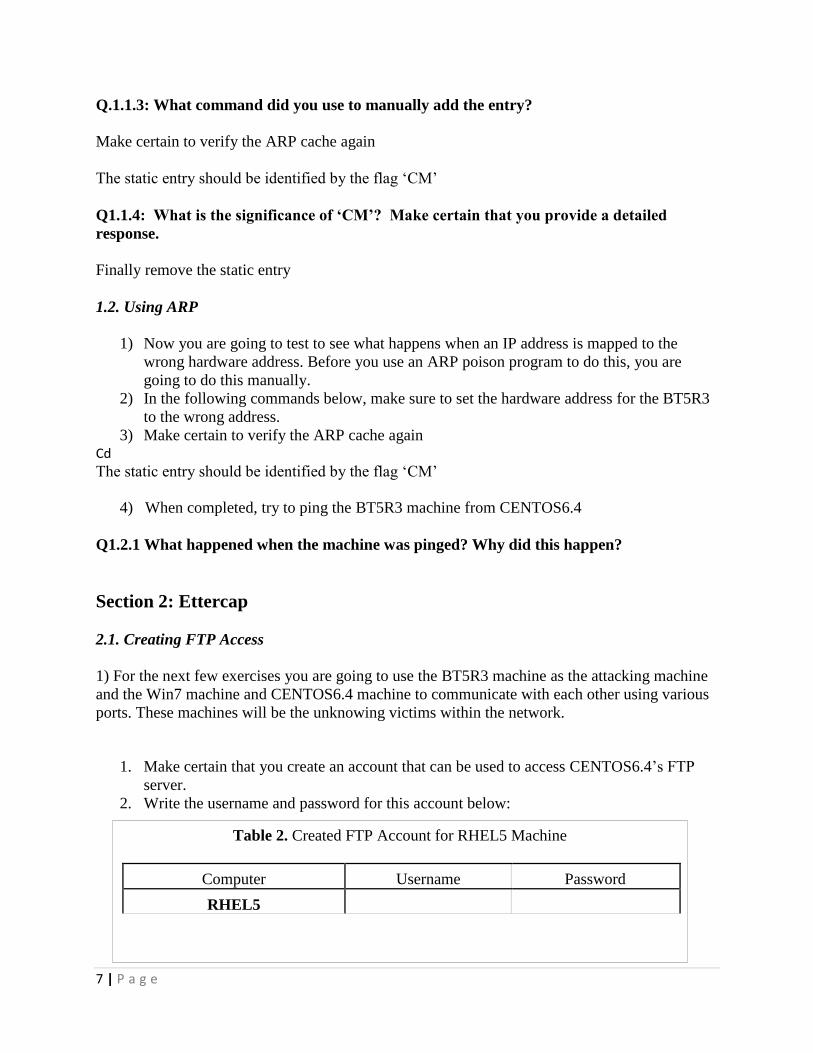
1. Make certain that you create an account that can be used to access CENTOS6.4’s FTP
server.
2. Write the username and password for this account below:
Table 2. Created FTP Account for RHEL5 Machine
Computer Username Password
RHEL5

8 | P a g e
3. Also on CENTOS6.4, create a simple text file named no_protection.txt within the
/var/ftp/pub directory. This file will be used to transfer from CENTOS6.4 to Win7 via
FTP.
# cd /var/ftp/pub
# echo [YOURMTUUSERID] > no_protection.txt
2.2. Getting to Know Ettercap
When Ettercap is started, it first probes the network to see all of the hosts that are on the
network. It does this by sending out ARP request packets for each host IP address on the network
(network determined by net mask of the host). Only the IP addresses that have hosts on them will
reply giving the attacker a good indication of who is on the network. Why does this work so
well? Because each host on the network must have ARP enabled so that the network will work
properly.
Although Ettercap is best used by command-line, for this introductory use, we will use the
program’s GUI interface.
Start Ettercap 0.7.3 on your BT5R3 machine, type
#ettercap -G
at a command prompt window. You should see the following screen:
Figure 3 Ettercap GUI

9 | P a g e
Let’s see how Ettercap scans your addresses.
On your CENTOS6.4 machine:
Open Wireshark
Start capture
On your BT5R3 machine using the Ettercap application:
Note: Do not scan the entire network!!! Conduct a quick scan (i.e. set the net mask to 255.255.255.0.) to only scan class C range:
Select Options
Netmask
Type 255.255.255.0
Or place your hosts on file → save → browse to file when selecting host list
1. Select Sniff - Unified Sniffing using the Ethernet port that is assigned to your BT5R3
machine (i.e. eth0)
2. Then Hosts - Scan for hosts (**is using subnet to scan and not host file)
3. Once Ettercap is done scanning stop the Wireshark packet capture
4. Make certain to notice how Wireshark views the Ettercap scan.
Q.2.2.1: How could you use software to detect that Ettercap is being run on your network?
Remember to give a detailed response.
2.3. Using Ettercap Passively to Sniff a Connection
Now you are going to use the skills you learned in the previous section to perform a man in the
middle attack on a connection. For this scenario a user on the Win7 machine will attempt to login
to the ftp server on the CENTOS6.4 machine. Unknown to the victim, the attacker on the BT5R3
machine will be in the middle of the connection watching and logging the actions of the
victim(s).
First you must use Ettercap to select the victim machines and ARP poison them.
On the BT5R3 Ettercap GUI:
Check the host list and select RHEL 5 and Win7 as the two targets
Hosts – Host list
Select CENTOS6.4 IP – Add to Target 1
Select Win7 IP – Add to Target 2
Select Start->Start Sniffing
Conduct the man-in-the-middle by selecting Mitm->ARP poisoning – Sniff remote
connections
Once this is complete select View->Connections

10 | P a g e
Now that the ARP poison has taken place between the two targets, conduct the following:
On the Win7 machine:
Open a terminal if one isn’t already open
Show its ARP cache
On the CENTOS6.4 machine:
Open a terminal if one isn’t already open
Show its ARP cache
Q.2.3.1: What did you see different about the ARP cache on the two virtual machines
compared to before?
2.4. Displaying Ettercap’s Abilities to Conduct Man-in-the-Middle Attack
To illustrate how Ettercap can conduct a man-in-the-middle attack, you will be logging into
RHEL’s FTP server from Win7.
Before this takes place, make certain that you start another Wireshark session on the BT5R3
machine to help you clearly see all of the packets involved in the attack.
On the BT5R3 machine:
Open Wireshark if it is already not open
Set capture for 300 packets
Start the packet capture
On the Win7 machine:
In the terminal ftp into the CENTOS6.4 machine
At the prompt enter the user name and then password for the user created earlier
Type in a few commands to create data to see
Also before you exit download the new text file of (no_protection.txt) to the Win7
machine
On the BT5R3 machine:
Stop Wireshark capture if it has not stopped already
Open up Wireshark and look at the packets from the ftp session
By looking at the IP address it seems as though the connection is going from the original
source to the original destination
On one of these same packets open up the Ethernet part and look at the hardware
addresses
Make certain to view an ftp packet and its source and destination hardware address
Q2.4.1: What did you notice about the packets hardware address compared to its IP
address? How would software looking to detect this attack fail?

11 | P a g e
Q2.4.2: Were you able to get the userid and password using Ettercap?
2.5. Using Ettercap Actively to Disrupt a Connection
Ettercap also has a wide variety of methods to disrupt a connection. Using the existing FTP
connection that has been established between the Win7 and CENTOS6.4 machine, attempt to
inject data or a file into this connection on either or both victim computers.
Q.2.5.1: Were you successful? Why or why not?
Now go ahead and “kill” the FTP connection between the victim’s machines. Once completed,
you should be able to view that the connection was broken from the Win7 machine that
established the FTP connection to the CENTOS6.4 machine.
Q.2.5.2: How would you proceed to avoid an attacker from being able to shut down
computer connections such as FTP between CENTOS6.4 and Win7? Make certain to be
specific in order to demonstrate your knowledge on this topic.
Optional ~ Section 3: Create your own MiTM (3 Bonus Points)
There is more than one way to use Ettercap along with other programs to implement a MiTM
attack(ie. Hunt). You are encouraged to try other types of MiTM attacks and programs and then
write up a small summary of what you did along with how you would protect against this attack.
Also include screenshots validating MiTM attack.
Section 4: General Questions
Q4.1. Any corrections or general comments about this lab?
Q4.2. How long did it take you to complete this lab?
Q4.3. On a scale of 1-10 (with 1 being easy and 10 being difficult) how would you rate this
lab?

12 | P a g e
Answer Sheet
Q.1.1.1: What did you see after typing “ARP”? Why is this?
Q.1.1.2: What command did you use to delete the entry?
Q.1.1.3: What command did you use to manually add the entry?
Q.1.1.4: What is the significance of ‘CM’? Make certain that you provide a detailed
response.
Q1.2.1 What happened when the machine was pinged? Why did this happen?
Q.2.2.1: How could you use software to detect that Ettercap is being run on your network?
Remember to give a detailed response.
Q.2.3.1: What did you see different about the ARP cache on the two virtual machines
compared to before? Make certain to explain your answer to demonstrate your knowledge
on this topic.
Q2.4.1: What did you notice about the packets hardware address compared to its IP
address? How would software looking to detect this attack fail?
Q2.4.2: Were you able to get the userid and password on the BT5R3 machine using
Ettercap?
Q.2.5.1: Were you successful? Why or why not?
Q.2.5.2: How would you proceed to avoid an attacker from being able to shut down
computer connections such as FTP between CENTOS6.4 and Win7? Make certain to be
specific in order to demonstrate your knowledge on this topic.