
Spider Project Professional - Spider Management Technologies
359
i S S S p p p i i i d d d e e e r r r P P P r r r o o o j j j e e e c c c t t t P P P r r r o o o f f f e e e s s s s s s i i i o o o n n n a a a l l l U U s s e e r r G G u u i i d d e e
Transcript of Spider Project Professional - Spider Management Technologies

i
SSSpppiiidddeeerrr PPPrrrooojjjeeecccttt PPPrrrooofffeeessssssiiiooonnnaaalll
UUsseerr GGuuiiddee

ii
1. Main Window .............................................................................................................................. 1 1.1. Main Window ....................................................................................................................................................1 1.2. Main Window Menu .........................................................................................................................................2
2. Project .......................................................................................................................................... 4 2.1. Project Data .......................................................................................................................................................4 2.2. Open a Project ...................................................................................................................................................5 2.3. Save Project .......................................................................................................................................................5 2.4. Save Project with a Different Code and/or Version Number ........................................................................5 2.5. Save Project without Cost.................................................................................................................................5 2.6. Create New Project ...........................................................................................................................................6 2.7. Project Baseline .................................................................................................................................................7 2.8. Project Shortcut Menu......................................................................................................................................7 2.9. Comparing Projects ..........................................................................................................................................7 2.10. Projects Comparison Setup Dialog Window...................................................................................................8 2.11. Hide Project Comparison .................................................................................................................................9 2.12. Inserting a Project as a Subphase ....................................................................................................................9 2.13. Project Properties Dialog Window ..................................................................................................................9 2.14. Projects and Documents Dialog Window ......................................................................................................10 2.15. Change Project Data Date ..............................................................................................................................12 2.16. Target Finish....................................................................................................................................................12 2.17. Project Target Finish Setup............................................................................................................................12 2.18. Storage..............................................................................................................................................................12 2.19. Storage Properties Dialog Window................................................................................................................12
3. Object ......................................................................................................................................... 14 3.1. Object ...............................................................................................................................................................14 3.2. Internal Database ............................................................................................................................................14 3.3. Objects List Dialog Window...........................................................................................................................14 3.4. Object Properties Dialog Window .................................................................................................................14 3.5. Choose Objects Dialog Window.....................................................................................................................14 3.6. Adding Objects ................................................................................................................................................15 3.7. Delete Object....................................................................................................................................................15 3.8. List ....................................................................................................................................................................15 3.9. List with Sort Option, List with Sort and Search Options...........................................................................16
4. Project Presentations ................................................................................................................ 17 4.1. Project Views ...................................................................................................................................................17 4.2. Activity and Resource Gantts.........................................................................................................................17
4.2.1. Working with Gantt Charts ......................................................................................................................17 4.2.2. Gantt Diagram Shortcut Menu .................................................................................................................19 4.2.3. Gantt Chart Column Shortcut Menu.........................................................................................................19 4.2.4. Scaling Tool .............................................................................................................................................20 4.2.5. Activity Gantt ...........................................................................................................................................20 4.2.6. Resource Gantt .........................................................................................................................................28
4.3. Work Breakdown Structure...........................................................................................................................36 4.3.1. WBS .........................................................................................................................................................36 4.3.2. Work Breakdown Structure Main Menu ..................................................................................................36 4.3.3. WBS, OBS AND PBS Options Dialog Window......................................................................................38
4.4. Organizational Breakdown Structure ...........................................................................................................38 4.4.1. OBS ..........................................................................................................................................................38 4.4.2. Organizational Breakdown Structure Main Menu....................................................................................39 4.4.3. WBS, OBS AND PBS Options Dialog Window......................................................................................42
4.5. Activity Network .............................................................................................................................................43 4.5.1. Activity Network......................................................................................................................................43 4.5.2. Activity Network Main Menu ..................................................................................................................44 4.5.3. Activity Network Options Dialog Window..............................................................................................46 4.5.4. Activity Network Shortcut Menu .............................................................................................................46 4.5.5. Graphical Presentation of Activities and Phases in Activity Network .....................................................46 4.5.6. Presentation Level in Activity Network ...................................................................................................47
iii
4.5.7. Show Level Dialog Window in Activity Network ...................................................................................47 4.5.8. Shape Setup Dialog Window....................................................................................................................47
4.6. Linear Diagram ...............................................................................................................................................48 4.6.1. Linear Diagram.........................................................................................................................................48 4.6.2. Linear Diagram Main Menu.....................................................................................................................49 4.6.3. Linear Diagram Options Dialog Window.................................................................................................51 4.6.4. Linear Diagram Print Preview Window ...................................................................................................52 4.6.5. X-axis Setup Dialog Window...................................................................................................................53
5. Breakdown Structures.............................................................................................................. 54 5.1. WBS Definition................................................................................................................................................54 5.2. OBS Definition.................................................................................................................................................54 5.3. Create Breakdown Structures........................................................................................................................54 5.4. Full Structure...................................................................................................................................................54 5.5. Project Structures List Dialog Window.........................................................................................................55 5.6. Structure Properties Dialog Window ............................................................................................................56
6. Phases ......................................................................................................................................... 57 6.1. Phase Properties Dialog Window...................................................................................................................57 6.2. Edit Phase in Activity Gantt...........................................................................................................................58 6.3. Update Phase by Selected Project ..................................................................................................................58 6.4. Convert Phase to Activity ...............................................................................................................................58 6.5. Phases in Activity Gantt..................................................................................................................................58
6.5.1. Add phase in Activity Gantt .....................................................................................................................58 6.6. Edit Phase in Activity Gantt...........................................................................................................................59
6.6.1. Delete Phase in Activity Gantt .................................................................................................................59 6.6.2. Phase Shortcut Menu in Activity Gantt ....................................................................................................59 6.6.3. Shortcut Menu of Group of Selected Phases in Activity Gantt ................................................................61
6.7. Update Phase by Selected Project ..................................................................................................................62 6.7.1. Copy Phase in Activity Gantt ...................................................................................................................62 6.7.2. Move Phase in Activity Gantt ..................................................................................................................63
6.8. Convert Phase to Activity ...............................................................................................................................63 6.9. Phases in Breakdown Structures ...................................................................................................................63
6.9.1. Add Phase in WBS View .........................................................................................................................63 6.9.2. Edit Phases in WBS View ........................................................................................................................64 6.9.3. Delete Phase in WBS................................................................................................................................64 6.9.4. Phase Shortcut Menu in WBS View.........................................................................................................64 6.9.5. Exclude Phase from WBS in WBS View.................................................................................................64
6.10. Phases in Activity Network.............................................................................................................................65 6.10.1. Add Phase in Activity Network................................................................................................................65 6.10.2. Edit Phase in Activity Network ................................................................................................................65 6.10.3. Delete Phase in Activity Network ............................................................................................................65 6.10.4. Phase Shortcut Menu in Activity Network...............................................................................................66 6.10.5. Move Phase in Activity Network .............................................................................................................66
7. Activities..................................................................................................................................... 67 7.1. Activity .............................................................................................................................................................67 7.2. Activities Table ................................................................................................................................................67 7.3. Activity Properties Dialog Window ...............................................................................................................69 7.4. DPH Activity Type ..........................................................................................................................................72 7.5. ASAP (As Soon As Possible)...........................................................................................................................73 7.6. ALAP (As Late As Possible) ...........................................................................................................................73 7.7. NET (Not Earlier Than)..................................................................................................................................73 7.8. NLT (Not Later Than) ....................................................................................................................................73 7.9. Activity Group Properties Dialog Window ...................................................................................................73 7.10. Interruptible Activities....................................................................................................................................73 7.11. Add New Activity in Activities Table.............................................................................................................74 7.12. Edit Activity in Activities Table .....................................................................................................................75 7.13. Delete Activity in Activities Table..................................................................................................................75 7.14. Activities in Activity Gantt .............................................................................................................................75
7.14.1. Add New Activity in Activity Gantt.........................................................................................................75 7.14.2. Edit Activity in Activity Gantt .................................................................................................................75

iv
7.14.3. Delete Activity in Activity Gantt..............................................................................................................76 7.14.4. Activity Shortcut Menu in Activity Gantt ................................................................................................76 7.14.5. Shortcut Menu of Group of Selected Activities in Activity Gantt............................................................77 7.14.6. Copy Activity in Activity Gantt ...............................................................................................................78 7.14.7. Move Activity in Activity Gantt...............................................................................................................79 7.14.8. Convert Activity to Phase.........................................................................................................................79 7.14.9. Change Activity and Phase Dialog window .............................................................................................79
7.15. Activities in Activity Network ........................................................................................................................80 7.15.1. Add New Activity in Activity Network....................................................................................................80 7.15.2. Edit Activity in Activity Network ............................................................................................................81 7.15.3. Delete Activity in Activity Network ........................................................................................................81 7.15.4. Activity Shortcut Menu in Activity Network ...........................................................................................81 7.15.5. Shortcut Menu of Highlighted Activities in Activity Network ................................................................81 7.15.6. Move Activity in Activity Network..........................................................................................................81
8. Calendars ................................................................................................................................... 83 8.1. Project Calendars............................................................................................................................................83 8.2. Calendars Table...............................................................................................................................................83 8.3. Weeks Table.....................................................................................................................................................84 8.4. Calendar Exceptions Table.............................................................................................................................85 8.5. Calendar Properties Dialog window..............................................................................................................85 8.6. Creating Project Calendars............................................................................................................................86 8.7. Week Properties Dialog window ....................................................................................................................86 8.8. Calendar Exception Properties Dialog window............................................................................................87
9. Links........................................................................................................................................... 89 9.1. Links Table ......................................................................................................................................................89 9.2. Link Properties Dialog Window.....................................................................................................................89 9.3. Creating New Links ........................................................................................................................................90 9.4. Edit Link in Links Table.................................................................................................................................90 9.5. Delete Link in the Links Table .......................................................................................................................91 9.6. Lag ....................................................................................................................................................................91 9.7. Finish – Start....................................................................................................................................................91 9.8. Finish – Finish..................................................................................................................................................92 9.9. Start – Finish....................................................................................................................................................92 9.10. Start – Start .....................................................................................................................................................92 9.11. Diagram of Preceding and Succeeding Activities .........................................................................................92
9.11.1. Links Diagram..........................................................................................................................................92 9.11.2. Links Diagram Shortcut Menu .................................................................................................................93 9.11.3. Activity Shortcut Menu in Links Diagram ...............................................................................................93
10. Resources ................................................................................................................................... 94 10.1. Resource ...........................................................................................................................................................94 10.2. Resources Table...............................................................................................................................................94 10.3. Resource Properties Dialog Window .............................................................................................................95 10.4. Add Resource in Resources Table..................................................................................................................97 10.5. Edit Resource in Resources Table..................................................................................................................98 10.6. Delete Resource in Resources Table ..............................................................................................................98 10.7. Search for Resource Overloads......................................................................................................................98 10.8. Overloaded Resources Dialog Window .........................................................................................................99 10.9. Resources in Resource Gantt..........................................................................................................................99
10.9.1. Add Resource in Resource Gantt..............................................................................................................99 10.9.2. Edit Rsource in Resource Gantt..............................................................................................................100 10.9.3. Delete Resource in Resource Gantt ........................................................................................................100 10.9.4. Resource Shortcut Menu in Resource Gantt...........................................................................................100 10.9.5. Shortcut Menu of Group of Selected Resources in Resource Gantt .......................................................101 10.9.6. Move Resource in Resource Gantt .........................................................................................................101
11. Departments ............................................................................................................................ 102 11.1. Department Properties Dialog Window ......................................................................................................102 11.2. Departments in Resource Gantt...................................................................................................................103
11.2.1. Add Department in Resource Gantt........................................................................................................103

v
11.2.2. Edit Department in Resource Gantt........................................................................................................103 11.2.3. Delete Department in Resource Gantt ....................................................................................................103 11.2.4. Department Shortcut Menu in Resource Gantt.......................................................................................104 11.2.5. Shortcut Menu of Group of Selected Departments in Resource Gantt ...................................................105 11.2.6. Move Department in Resource Gantt .....................................................................................................105
11.3. Departments in OBS .....................................................................................................................................105 11.3.1. Add Department in OBS View...............................................................................................................105 11.3.2. Edit Department in OBS View ...............................................................................................................105 11.3.3. Delete Department in OBS View ...........................................................................................................106 11.3.4. Department Shortcut Menu in OBS View..............................................................................................106 11.3.5. Exclude Department from OBS..............................................................................................................106
12. Multi-resources........................................................................................................................ 107 12.1. Multi-resource ...............................................................................................................................................107 12.2. Multi-resource Properties Dialog Window .................................................................................................107 12.3. Add Multi-resource in Multi-resources Table ............................................................................................108 12.4. Edit Multi-resource Properties in Multi-resources Table..........................................................................108 12.5. Delete Multi-resource in Multi-resources Table.........................................................................................108
13. Resource Skills......................................................................................................................... 109 13.1. Resource skills ...............................................................................................................................................109 13.2. Resource Skills Table ....................................................................................................................................109 13.3. Resource Skill Properties Dialog Window ..................................................................................................109 13.4. Add Resource Skills in Resource Skills Table.............................................................................................110 13.5. Edit Resource Skills in Resource Skills Table.............................................................................................111 13.6. Delete Resource Skills in Resource Skills Table .........................................................................................111
14. Teams ....................................................................................................................................... 112 14.1. Team...............................................................................................................................................................112 14.2. Team Assignment Monitoring Dialog Window ..........................................................................................112 14.3. Team Assignment Properties Dialog Window ............................................................................................113 14.4. Team Assignment to a Group of Activities Dialog window .......................................................................114 14.5. Team Shortcut Menu in Activity Gantt.......................................................................................................114
15. Assignments ............................................................................................................................. 115 15.1. Assignment.....................................................................................................................................................115 15.2. Resource Assignments Table ........................................................................................................................115 15.3. Replace Assignments.....................................................................................................................................117 15.4. Replace Assignments Dialog Window .........................................................................................................117 15.5. Fixed Assignment Cost..................................................................................................................................118 15.6. Work Load.....................................................................................................................................................118 15.7. Resource-Hours .............................................................................................................................................118 15.8. Assignment Shortcut Menu in Resource Gantt Diagram ..........................................................................118 15.9. Resource Assignments...................................................................................................................................119
15.9.1. Resources Assignment in Activities Table .............................................................................................119 15.9.2. Resource Assignment Properties Dialog Window..................................................................................119 15.9.3. Resource Assignment to a Group of Activities Dialog Window............................................................120 15.9.4. Resources Assignment in Activity Gantt................................................................................................121 15.9.5. Resource Assignment Shortcut Menu in Activity Gantt ........................................................................121 15.9.6. Resources Assignment in Activity Network...........................................................................................122 15.9.7. Resource Assignment to a Group of Activities Dialog Window............................................................122
15.10. Multi-resource Assignments .........................................................................................................................123 15.10.1. Multi-resource Assignment in Activities Table......................................................................................123 15.10.2. Multi-resource Assignment Properties Dialog Window.........................................................................123 15.10.3. Multi-resource Assignment to a Group of Activities Dialog window....................................................124 15.10.4. Multi-resource Assignment in Activity Gantt ........................................................................................125 15.10.5. Multi-Resource Assignment Shortcut Menu in Activity Gantt ..............................................................126 15.10.6. Multi-resource Assignment in Activity Network ...................................................................................126
15.11. Resource Skill Assignments..........................................................................................................................126 15.11.1. Resource Skill Assignment in Activities Table ......................................................................................126 15.11.2. Resource Skill Assignment Properties Dialog Window .........................................................................127 15.11.3. Resource skill Assignment to a Group of Activities Dialog window.....................................................127

vi
15.11.4. Resource Skill Assignment in Activity Gantt.........................................................................................128 15.11.5. Resource Skills Assignment in Activity Network ..................................................................................128 15.11.6. Resource Skill Assignments in Resource Gantt Shortcut Menu.............................................................129 15.11.7. Fixing Resource Skill Assignments........................................................................................................129
15.12. Team Assignments.........................................................................................................................................129 15.13. Team Assignment Properties Dialog Window ............................................................................................129 15.14. Team Assignment to a Group of Activities Dialog Window ......................................................................130 15.15. Team Shortcut Menu in Activity Gantt.......................................................................................................131
16. Excluded Objects..................................................................................................................... 132 16.1. Excluded Structure Objects .........................................................................................................................132 16.2. Exclude Activity from WBS .........................................................................................................................132 16.3. Exclude Resource from OBS in Resource Gantt ........................................................................................132 16.4. Exclude Phase from WBS in Activity Gantt ...............................................................................................133 16.5. Exclude Department from OBS in Resource Gantt ...................................................................................133
17. Cost Components .................................................................................................................... 134 17.1. Cost Components...........................................................................................................................................134 17.2. Cost Components Table................................................................................................................................135 17.3. Cost Component Properties Dialog Window ..............................................................................................136 17.4. Add Cost Component in Cost Components Table......................................................................................137 17.5. Edit Cost Component in Cost Components Table......................................................................................138 17.6. Delete Cost Component in Cost Components Table ..................................................................................138
18. Materials .................................................................................................................................. 139 18.1. Material..........................................................................................................................................................139 18.2. Materials Table..............................................................................................................................................139 18.3. Material Properties Dialog Window............................................................................................................140 18.4. Add Material in the Materials Table ...........................................................................................................141 18.5. Edit Material in the Materials Table ...........................................................................................................141 18.6. Delete Material in the Materials Table........................................................................................................142
19. Material and Cost Component Consumptions..................................................................... 143 19.1. Cost Components Standard Page.................................................................................................................143 19.2. Materials Standard Page ..............................................................................................................................144 19.3. Fixed Material Consumption and Fixed Cost Component Expenditure..................................................145 19.4. Profile of Fixed Material Consumption (or Cost Component Expenditure)............................................146 19.5. Material Consumption Setup in Activity Gantt..........................................................................................146 19.6. Material Consumption Setup in Resource Gantt .......................................................................................147 19.7. Material Consumption Setup in Activities Table .......................................................................................147 19.8. Material Consumption Setup in Resources Table ......................................................................................148 19.9. Material Consumption Setup in Assignments Table..................................................................................149 19.10. Material Consumption Setup in Activity Network.....................................................................................149 19.11. Costs Setup in Activity Gantt .......................................................................................................................150 19.12. Costs Setup in Resource Gantt.....................................................................................................................151 19.13. Costs Setup in Activities Table.....................................................................................................................151 19.14. Costs Setup in Resources Table....................................................................................................................152 19.15. Costs Setup in Materials Table ....................................................................................................................153 19.16. Assignment Cost Setup .................................................................................................................................153 19.17. Costs Setup in Activity Network ..................................................................................................................154
20. Scheduling................................................................................................................................ 155 20.1. Performing Schedule Calculation ................................................................................................................155 20.2. Scheduling Options Dialog Window ............................................................................................................155 20.3. Choose Objects for Leveling Dialog Window .............................................................................................157 20.4. Structures List Dialog Window....................................................................................................................157 20.5. Work Load Calculation for All Activity Assignments with Preset Duration and Productivity .............158
21. Filters........................................................................................................................................ 159 21.1. Filters..............................................................................................................................................................159 21.2. Filters Dialog Window ..................................................................................................................................160

vii
21.3. Simple Filter Dialog Window .......................................................................................................................161 21.4. Complex Filter Dialog Window....................................................................................................................161
22. Formulae .................................................................................................................................. 163 22.1. Formulae ........................................................................................................................................................163 22.2. Formulae Creation Dialog Window.............................................................................................................163 22.3. Formula Creation Dialog Window...............................................................................................................164 22.4. Mathematical Operators...............................................................................................................................164 22.5. Functions........................................................................................................................................................165
23. Centers ..................................................................................................................................... 167 23.1. Centers ...........................................................................................................................................................167 23.2. Resource Centers Table ................................................................................................................................167 23.3. Resource Center Properties Dialog Window ..............................................................................................168 23.4. Cost Centers Table ........................................................................................................................................168 23.5. Cost Center Properties Dialog Window ......................................................................................................169 23.6. Material Centers Table .................................................................................................................................170 23.7. Material Center Properties Dialog Window ...............................................................................................171
24. Cost periods ............................................................................................................................. 172 24.1. Cost Periods ...................................................................................................................................................172 24.2. Cost Component Periods Properties Dialog Window ................................................................................173 24.3. Material Cost Period Properties Dialog Window.......................................................................................174 24.4. Resource Cost Period Properties Dialog Window ......................................................................................174
25. Overtimes................................................................................................................................. 176 25.1. Overtime.........................................................................................................................................................176 25.2. Overtime Properties Dialog Window...........................................................................................................176
26. Risk Analysis ........................................................................................................................... 178 26.1. Risk Analysis..................................................................................................................................................178 26.2. Success Probabilities Trends ........................................................................................................................179 26.3. Success Probability Calculation Dialog Window........................................................................................181
27. Monitoring of Project Execution ........................................................................................... 183 27.1. Monitoring Project Performance.................................................................................................................183 27.2. Monitoring .....................................................................................................................................................184
27.2.1. Monitoring Table....................................................................................................................................184 27.2.2. Add Phase to Monitoring Table (Include in Monitoring) Dialog Window ............................................186 27.2.3. Include in Monitoring (Add Activities to Monitoring Table) Dialog Window ......................................186 27.2.4. Activity Monitoring Dialog Window .....................................................................................................187 27.2.5. Resource Assignment Monitoring Dialog Window................................................................................188
27.3. Team Assignment Monitoring Dialog Window ..........................................................................................189 27.4. Performance Archive ....................................................................................................................................190
27.4.1. Performance Archive..............................................................................................................................190 27.4.2. Actual Period Properties Dialog Window ..............................................................................................191 27.4.3. Import Performance Data from Another Project ....................................................................................192 27.4.4. Update Actual Material Consumption in Performance Archive.............................................................193 27.4.5. Update Actual Cost Component Expenditure in Performance Archive .................................................193
28. Documents, Tables and Reference-Books............................................................................. 195 28.1. Notes Standard Page .....................................................................................................................................195 28.2. Documents......................................................................................................................................................195
28.2.1. Working with Documents.......................................................................................................................195 28.2.2. General Document..................................................................................................................................197 28.2.3. Create Reference-book from Project Table ............................................................................................197 28.2.4. Open a Document...................................................................................................................................197 28.2.5. Create New Document ...........................................................................................................................197 28.2.6. Save Document.......................................................................................................................................198 28.2.7. Document Properties Dialog Window....................................................................................................198 28.2.8. Document Shortcut Menu.......................................................................................................................199

viii
28.2.9. Data Transfer between Documents.........................................................................................................200 28.2.10. Data Transfer Options Dialog Window..................................................................................................200
28.3. Tables .............................................................................................................................................................201 28.3.1. Working with Tables ..............................................................................................................................201 28.3.2. Table Setup Dialog Window ..................................................................................................................203 28.3.3. Table Row Shortcut Menu......................................................................................................................203 28.3.4. Table Column Shortcut Menu ................................................................................................................204 28.3.5. Column Codes ........................................................................................................................................204 28.3.6. Column Properties Dialog Window .......................................................................................................205 28.3.7. Delete Table Column..............................................................................................................................207 28.3.8. Empty Table Column Shortcut Menu.....................................................................................................207 28.3.9. Table Cell Shortcut Menu ......................................................................................................................207 28.3.10. Fields Available Dialog Window ...........................................................................................................207 28.3.11. User Columns Properties Dialog Window .............................................................................................208 28.3.12. User Columns Properties Dialog Window .............................................................................................209
28.4. Reference Books ............................................................................................................................................209 28.4.1. Choosing Objects from Reference-book Dialog Window......................................................................209 28.4.2. Cost Components Reference-book .........................................................................................................210 28.4.3. 'Materials' Reference-book .....................................................................................................................210 28.4.4. 'Resources' Reference-book....................................................................................................................211 28.4.5. 'Multi-resources' Reference-book...........................................................................................................212 28.4.6. Multi-resource Properties in Reference-books Dialog Window.............................................................213 28.4.7. 'Resource Skill' Reference-book.............................................................................................................214 28.4.8. Resource Skill Properties in Reference-book Dialog Box......................................................................214 28.4.9. Resource Assignment Productivities Reference-book............................................................................215 28.4.10. Resource Assignment Work Loads Reference-book ..............................................................................215 28.4.11. 'Resource Assignment Cost and Materials Requirements' Reference-book ...........................................216 28.4.12. 'Resource Assignment Cost and Materials Requirements' (per Volume unit) Reference-book..............216 28.4.13. 'Resource Assignment Cost and Materials Requirements' (Fixed per Quantity) Reference-book..........217 28.4.14. Corporate Reference Books....................................................................................................................218
29. Reports and Diagrams ............................................................................................................ 220 29.1. General Reports and Diagrams....................................................................................................................220
29.1.1. Reports ...................................................................................................................................................220 29.1.2. Report Parameters Wizard......................................................................................................................222 29.1.3. Diagrams and Histograms in Gantt Diagrams ........................................................................................225 29.1.4. Diagram Settings Dialog Window..........................................................................................................227 29.1.5. Diagram Properties Dialog Window ......................................................................................................229
29.2. Earned Value Analysis..................................................................................................................................230 29.2.1. Earned Value Analysis ...........................................................................................................................230
29.3. Success Probabilities Trends ........................................................................................................................232 29.3.1. Success Probabilities Report Settings Dialog Window ..........................................................................232 29.3.2. Success Probabilities Diagram Options Dialog Window .......................................................................235
29.4. Variance Trends ............................................................................................................................................237 29.5. Project Truncation ........................................................................................................................................237
29.5.1. Project Truncation by Period Dialog Window .......................................................................................237 30. Report Templates.................................................................................................................... 238
30.1. Report Template............................................................................................................................................238 30.2. Report Version and Period Dialog Window................................................................................................238 30.3. General Report Templates ...........................................................................................................................238
30.3.1. Standard Report Templates ....................................................................................................................238 31. Scripts....................................................................................................................................... 240
31.1. Scripts Table ..................................................................................................................................................240 31.2. Script Dialog Window...................................................................................................................................240 31.3. Insert Command Dialog Window ................................................................................................................241 31.4. Script Command Arguments Dialog Window ............................................................................................242 31.5. Script History Dialog Window .....................................................................................................................243 31.6. Script Commands..........................................................................................................................................243
31.6.1. About Script Commands ........................................................................................................................243 31.6.2. CLOSE ...................................................................................................................................................244

ix
31.6.3. CREATEDOCDB ..................................................................................................................................244 31.6.4. CREATEDOCTEXT..............................................................................................................................244 31.6.5. CREATEDOCHTML.............................................................................................................................244 31.6.6. CREATEDOCNEW...............................................................................................................................245 31.6.7. CREATEPROJDB..................................................................................................................................245 31.6.8. CREATEPROJFILE...............................................................................................................................245 31.6.9. CREATEPROJMPX ..............................................................................................................................245 31.6.10. CREATEPROJMSP ...............................................................................................................................246 31.6.11. CREATEPROJNEW ..............................................................................................................................246 31.6.12. CREATEPROJP3E ................................................................................................................................246 31.6.13. DOCAPPLYCOLUMNS .......................................................................................................................246 31.6.14. DOCAPPLYCURRPROJ.......................................................................................................................246 31.6.15. DOCAPPLYDOC ..................................................................................................................................247 31.6.16. DOCAPPLYPROJ..................................................................................................................................247 31.6.17. DOCAPPLYPROJTAB..........................................................................................................................247 31.6.18. DOCCLOSE...........................................................................................................................................248 31.6.19. DOCDBEXPORT ..................................................................................................................................248 31.6.20. DOCFILEEXPORT................................................................................................................................248 31.6.21. DOCHTMLEXPORT.............................................................................................................................248 31.6.22. DOCRUNFORMULA............................................................................................................................249 31.6.23. DOCSAVE .............................................................................................................................................249 31.6.24. DOCSAVEAS........................................................................................................................................249 31.6.25. DOCSETKEYFIELD.............................................................................................................................249 31.6.26. DOCSETPROP ......................................................................................................................................249 31.6.27. DOCTEXTEXPORT..............................................................................................................................250 31.6.28. OPENDOC.............................................................................................................................................250 31.6.29. OPENPROJ ............................................................................................................................................250 31.6.30. PROJAPPLYREF...................................................................................................................................251 31.6.31. PROJAPPLYREFTAB...........................................................................................................................251 31.6.32. PROJCALCCOST..................................................................................................................................251 31.6.33. PROJCALCPROB..................................................................................................................................251 31.6.34. PROJCALCRES.....................................................................................................................................252 31.6.35. PROJCALCRISK...................................................................................................................................252 31.6.36. PROJCALCSCHED...............................................................................................................................252 31.6.37. PROJCALCSCHEDRES........................................................................................................................252 31.6.38. PROJCLOSE..........................................................................................................................................252 31.6.39. PROJCOMPAREBASEPROJ................................................................................................................252 31.6.40. PROJCOMPAREPROJ ..........................................................................................................................252 31.6.41. PROJCOPYPHASEASPROJ .................................................................................................................253 31.6.42. PROJDBEXPORT..................................................................................................................................253 31.6.43. PROJDELCOMPARE............................................................................................................................253 31.6.44. PROJDELPROB ....................................................................................................................................253 31.6.45. PROJDELRISK......................................................................................................................................253 31.6.46. PROJEVACALCPFOPER .....................................................................................................................253 31.6.47. PROJEVACALCPFPHASE...................................................................................................................254 31.6.48. PROJEVACALCPFWBS.......................................................................................................................254 31.6.49. PROJFILEEXPORT...............................................................................................................................254 31.6.50. PROJFOLDOPER..................................................................................................................................254 31.6.51. PROJFOLDRES.....................................................................................................................................254 31.6.52. PROJIMPORTFACT .............................................................................................................................255 31.6.53. PROJINSPROJASPHASE .....................................................................................................................255 31.6.54. PROJINSPROJASPHASEDOWN.........................................................................................................255 31.6.55. PROJMAKEEVAREPOPER .................................................................................................................255 31.6.56. PROJMAKEEVAREPPHASE...............................................................................................................256 31.6.57. PROJMAKEEVAREPWBS...................................................................................................................256 31.6.58. PROJMAKESPENDREPDEPT .............................................................................................................256 31.6.59. PROJMAKESPENDREPDEPTPATT ...................................................................................................256 31.6.60. PROJMAKESPENDREPOBS ...............................................................................................................257 31.6.61. PROJMAKESPENDREPOBSPATT .....................................................................................................257 31.6.62. PROJMAKESPENDREPOPER.............................................................................................................257 31.6.63. PROJMAKESPENDREPOPERPATT...................................................................................................257 31.6.64. PROJMAKESPENDREPPHASE ..........................................................................................................258 31.6.65. PROJMAKESPENDREPPHASEPATT.................................................................................................258

x
31.6.66. PROJMAKESPENDREPRES................................................................................................................258 31.6.67. PROJMAKESPENDREPWBS ..............................................................................................................258 31.6.68. PROJMAKETRENDREPASSIGN........................................................................................................258 31.6.69. PROJMONITORAPPLY .......................................................................................................................259 31.6.70. PROJMONITORDBEXPORT ...............................................................................................................259 31.6.71. PROJMONITORDBIMPORT ...............................................................................................................259 31.6.72. PROJMONITORFILEEXPORT ............................................................................................................259 31.6.73. PROJMONITORFILEIMPORT.............................................................................................................259 31.6.74. PROJMPXEXPORT ..............................................................................................................................259 31.6.75. PROJMSPEXPORT ...............................................................................................................................260 31.6.76. PROJP3EEXPORT ................................................................................................................................260 31.6.77. PROJRUNFORMULATAB...................................................................................................................260 31.6.78. PROJSAVE ............................................................................................................................................261 31.6.79. PROJSAVEAS .......................................................................................................................................261 31.6.80. PROJSENDFTP .....................................................................................................................................261 31.6.81. PROJSETBASEPROJ ............................................................................................................................261 31.6.82. PROJSETCOMPARE ............................................................................................................................262 31.6.83. PROJSETCOMPARECOMMON..........................................................................................................262 31.6.84. PROJSETCOMPARECOMMONALL ..................................................................................................262 31.6.85. PROJSETCOMPARECOST ..................................................................................................................262 31.6.86. PROJSETCOMPARECOSTALL ..........................................................................................................263 31.6.87. PROJSETCOMPARECOSTCENT........................................................................................................263 31.6.88. PROJSETCOMPARECOSTCENTALL ................................................................................................263 31.6.89. PROJSETCOMPAREMAT ...................................................................................................................263 31.6.90. PROJSETCOMPAREMATALL............................................................................................................263 31.6.91. PROJSETCOMPAREMATCENT .........................................................................................................263 31.6.92. PROJSETCOMPAREMATCENTALL .................................................................................................264 31.6.93. PROJSETEVAREP................................................................................................................................264 31.6.94. PROJSETEVAREPCOMMON..............................................................................................................264 31.6.95. PROJSETEVAREPCOST......................................................................................................................264 31.6.96. PROJSETEVAREPCOSTCENT............................................................................................................265 31.6.97. PROJSETEVAREPMAT .......................................................................................................................265 31.6.98. PROJSETEVAREPMATCENT.............................................................................................................265 31.6.99. PROJSETGANTTOPER........................................................................................................................265 31.6.100. PROJSETGANTTRES...........................................................................................................................266 31.6.101. PROJSETMONITORFILEIMPORT......................................................................................................266 31.6.102. PROJSETMPXEXPORT .......................................................................................................................266 31.6.103. PROJSETOPTPROJ...............................................................................................................................267 31.6.104. PROJSETP3EEXPORT .........................................................................................................................267 31.6.105. PROJSETPESSPROJ .............................................................................................................................267 31.6.106. PROJSETPRECPROJ ............................................................................................................................267 31.6.107. PROJSETPROBPROJ............................................................................................................................268 31.6.108. PROJSETPROP......................................................................................................................................268 31.6.109. PROJSETRISK ......................................................................................................................................268 31.6.110. PROJSETRISKCOMMON ....................................................................................................................269 31.6.111. PROJSETRISKCOST ............................................................................................................................269 31.6.112. PROJSETRISKCOSTCENT..................................................................................................................269 31.6.113. PROJSETRISKMAT..............................................................................................................................269 31.6.114. PROJSETRISKMATCENT ...................................................................................................................270 31.6.115. PROJSETSCHED ..................................................................................................................................270 31.6.116. PROJSETSCHEDCOST ........................................................................................................................271 31.6.117. PROJSETSCHEDCOSTCENT..............................................................................................................271 31.6.118. PROJSETSCHEDMAT..........................................................................................................................271 31.6.119. PROJSETSCHEDMATCENT ...............................................................................................................271 31.6.120. PROJSETSCHEDRES ...........................................................................................................................272 31.6.121. PROJSETSCHEDRESALL ...................................................................................................................272 31.6.122. PROJSETSPENDREP............................................................................................................................272 31.6.123. PROJSETSPENDREPADDCOLUMN..................................................................................................273 31.6.124. PROJSETSPENDREPCOLRESET........................................................................................................273 31.6.125. PROJSETSPENDREPCOMMON .........................................................................................................273 31.6.126. PROJSETSPENDREPCOMMONALL..................................................................................................274 31.6.127. PROJSETSPENDREPCOST .................................................................................................................274 31.6.128. PROJSETSPENDREPCOSTALL..........................................................................................................274

xi
31.6.129. PROJSETSPENDREPCOSTCENT .......................................................................................................274 31.6.130. PROJSETSPENDREPCOSTCENTALL ...............................................................................................274 31.6.131. PROJSETSPENDREPMAT...................................................................................................................274 31.6.132. PROJSETSPENDREPMATALL ...........................................................................................................275 31.6.133. PROJSETSPENDREPMATCENT ........................................................................................................275 31.6.134. PROJSETSPENDREPMATCENTALL.................................................................................................275 31.6.135. PROJSETSPENDREPPAR....................................................................................................................275 31.6.136. PROJSETSPENDREPRES ....................................................................................................................276 31.6.137. PROJSETSPENDREPRESALL.............................................................................................................276 31.6.138. PROJSETSPENDREPRESCENT..........................................................................................................276 31.6.139. PROJSETSPENDREPRESCENTALL ..................................................................................................276 31.6.140. PROJSETSPENDREPRESCENTCOMMON........................................................................................277 31.6.141. PROJSETSPENDREPRESCOMMON ..................................................................................................277 31.6.142. PROJSETSPENDRESET.......................................................................................................................277 31.6.143. PROJSETTRENDREPCOMMON.........................................................................................................277 31.6.144. PROJSETTRENDREPCOMMONALL.................................................................................................278 31.6.145. PROJSETTRENDREPCOST.................................................................................................................278 31.6.146. PROJSETTRENDREPCOSTALL .........................................................................................................278 31.6.147. PROJSETTRENDREPCOSTCENT ......................................................................................................278 31.6.148. PROJSETTRENDREPCOSTCENTALL...............................................................................................278 31.6.149. PROJSETTRENDREPMAT ..................................................................................................................278 31.6.150. PROJSETTRENDREPMATALL ..........................................................................................................279 31.6.151. PROJSETTRENDREPMATCENT........................................................................................................279 31.6.152. PROJSETTRENDREPMATCENTALL ................................................................................................279 31.6.153. PROJTABDBEXPORT..........................................................................................................................279 31.6.154. PROJTABDOCCOPY............................................................................................................................280 31.6.155. PROJTABFILEEXPORT.......................................................................................................................280 31.6.156. PROJTABHTMLEXPORT....................................................................................................................281 31.6.157. PROJTABTEXTEXPORT.....................................................................................................................282 31.6.158. PROJVERINC........................................................................................................................................283 31.6.159. RECEIVEPROJFTP...............................................................................................................................283 31.6.160. SAVEALL..............................................................................................................................................283 31.6.161. SETCOPYPROJ.....................................................................................................................................283 31.6.162. SETCURRDOC......................................................................................................................................284 31.6.163. SETCURRPROJ.....................................................................................................................................284 31.6.164. SETDISTRPROJ....................................................................................................................................284 31.6.165. SETDOCAPPLY....................................................................................................................................285 31.6.166. SETFILEEXPIMP..................................................................................................................................285
32. Signals ...................................................................................................................................... 285 32.1. Signals.............................................................................................................................................................285 32.2. Signals Table..................................................................................................................................................286 32.3. Signal Properties Dialog Window ................................................................................................................286 32.4. Interval Properties Dialog Window.............................................................................................................286
33. Group Work on the Project ................................................................................................... 288 33.1. Group Work on the Project..........................................................................................................................288 33.2. User Properties Dialog Window...................................................................................................................288 33.3. Add Users.......................................................................................................................................................289 33.4. Edit User Properties......................................................................................................................................289 33.5. Delete a User ..................................................................................................................................................289
34. Access Rights ........................................................................................................................... 291 34.1. Access Rights Properties Dialog Window ...................................................................................................291 34.2. User Identification.........................................................................................................................................292 34.3. Change Password Dialog Window...............................................................................................................292
35. Project Portfolio ...................................................................................................................... 293 35.1. Project Portfolio ............................................................................................................................................293 35.2. Workıng with Project Portfolios ..................................................................................................................293 35.3. Project Portfolio Properties Dialog Window ..............................................................................................294 35.4. Project Properties in a Portfolio Dialog Window .......................................................................................294

xii
35.5. Resource Assignments to Projects ...............................................................................................................295 35.6. Project Registry Table ..................................................................................................................................295 35.7. Project Portfolios Shortcut Menu ................................................................................................................296 35.8. Multiproject Properties in a Portfolio Dialog Window..............................................................................296 35.9. Multiprojects in Portfolios Shortcut Menu .................................................................................................298 35.10. Project in a Portfolio Shortcut Menu ..........................................................................................................298 35.11. Project Gantt .................................................................................................................................................299
35.11.1. Project Gantt...........................................................................................................................................299 35.11.2. Project Gantt Options Dialog Window...................................................................................................299 35.11.3. Project Gantt Main Menu .......................................................................................................................300 35.11.4. Project Gantt Tools Panel.......................................................................................................................302 35.11.5. Workıng wıth Project Gantt Diagrams ...................................................................................................303
35.12. PBS .................................................................................................................................................................304 35.12.1. Hierarchical Structure of Projects...........................................................................................................304 35.12.2. PBS.........................................................................................................................................................304 35.12.3. Pbs Tools Panel ......................................................................................................................................305 35.12.4. Hierarchy of Projects Main Menu ..........................................................................................................305 35.12.5. Multiprojects in Hierarchy of Projects (PBS) Shortcut Menu ................................................................306 35.12.6. Projects Shortcut Menu in PBS ..............................................................................................................306
36. Data Export-Import................................................................................................................ 308 36.1. Import / Export from Files Dialog Window................................................................................................308 36.2. Spider Project File Export into MPX-File Dialog Window .......................................................................309 36.3. Table Export Options Dialog Window ........................................................................................................309 36.4. Project Import-Export ..................................................................................................................................310
36.4.1. Create Project from Database .................................................................................................................310 36.4.2. Create Project from MS Project Database ..............................................................................................311 36.4.3. Create Project from Primavera P3E Database ........................................................................................311 36.4.4. Create Project from CSV and MPX Files...............................................................................................311 36.4.5. Export Project to Database .....................................................................................................................312 36.4.6. Export Project to Primavera P3e Database.............................................................................................312 36.4.7. Export Project to MS Project..................................................................................................................312 36.4.8. Export Project to CSV-Files...................................................................................................................313 36.4.9. Export Project to MPX-file ....................................................................................................................313
36.5. Document Import-Export.............................................................................................................................313 36.5.1. Create Document from Database............................................................................................................313 36.5.2. Import Document from File....................................................................................................................314 36.5.3. Export Project Table to Database ...........................................................................................................314 36.5.4. Exporting Tables into Files ....................................................................................................................315
36.6. Monitoring Data Import-Export..................................................................................................................315 36.6.1. Performance Data Import Options Dialog Window ...............................................................................315 36.6.2. Import Performance Data from Database ...............................................................................................315 36.6.3. Import Performance Data from Files......................................................................................................315 36.6.4. Export Performance Data to Database....................................................................................................316 36.6.5. Export Performance Data to Files ..........................................................................................................316
36.7. Working with Databases...............................................................................................................................316 36.7.1. Create Document from Database Dialog Window .................................................................................316 36.7.2. Create Project from Database Dialog Window.......................................................................................317 36.7.3. Export Project to Database Dialog Window...........................................................................................318 36.7.4. Export Document to Database Dialog Window .....................................................................................319 36.7.5. Export Performance Data to Database Dialog Window .........................................................................319 36.7.6. Import Performance Data from Database Dialog Window.....................................................................320 36.7.7. Export to Database .................................................................................................................................321
37. Exchange of Projects via the Internet ................................................................................... 323 37.1. Project Exchange Using Ftp-servers............................................................................................................323 37.2. Ftp-servers Setup...........................................................................................................................................323 37.3. Upload (Send) Project / Portfolio to Ftp-server..........................................................................................324 37.4. Import Project from Ftp-server ...................................................................................................................324 37.5. Filters for Projects on Ftp-server Dialog Window .....................................................................................326 37.6. Filters for Projects on Ftp-server Properties Dialog Window...................................................................326

xiii
38. E-mail ....................................................................................................................................... 327 38.1. Send E-mail....................................................................................................................................................327 38.2. Sending E-mails Dialog Window..................................................................................................................327
39. Attached Documents ............................................................................................................... 328 39.1. Attach Document...........................................................................................................................................328 39.2. Attach Folder .................................................................................................................................................328 39.3. Insert Object Dialog Window.......................................................................................................................329 39.4. ‘OLE-object and Folder’ Standard Page ....................................................................................................329
40. Printing .................................................................................................................................... 331 40.1. Print Preview Window..................................................................................................................................331 40.2. Print Properties Dialog Window..................................................................................................................331 40.3. Print Templates .............................................................................................................................................332 40.4. Print Template Properties Dialog Window.................................................................................................332 40.5. Print Patterns Table......................................................................................................................................333
41. Options ..................................................................................................................................... 334 41.1. Spider Project Parameters Dialog Window ................................................................................................334 41.2. Color Setup Dialog Window.........................................................................................................................335 41.3. Color Selection Dialog Window ...................................................................................................................336 41.4. Object Color Dialog Window .......................................................................................................................336 41.5. Fonts Setup Dialog Window .........................................................................................................................336 41.6. Printer and Page Setup Dialog Window......................................................................................................337 41.7. Time Scale Dialog Window...........................................................................................................................338 41.8. Template Dialog Dindow ..............................................................................................................................338 41.9. Replication Options Dialog Window ...........................................................................................................339 41.10. Column Name Postfixes Setup .....................................................................................................................339
42. Miscellaneous........................................................................................................................... 341 42.1. Help ................................................................................................................................................................341 42.2. Priority ...........................................................................................................................................................341 42.3. Type ................................................................................................................................................................341 42.4. Float................................................................................................................................................................341 42.5. Keyboard Hot Keys.......................................................................................................................................342 42.6. Cursor Types .................................................................................................................................................343 42.7. Dialog Windows.............................................................................................................................................343 42.8. Text Object Dialog Window .........................................................................................................................343 42.9. Search and Replace Dialog Window............................................................................................................344 42.10. Mini-Calendar Dialog Window....................................................................................................................345 42.11. ANSI Codes....................................................................................................................................................345 42.12. Journal of Actions .........................................................................................................................................345 42.13. Protocol Table................................................................................................................................................346

Main Window
1
1. Main Window 1.1. Main Window
Main program window consists of three parts. Left part (Projects) contains icons, titles and version numbers of all opened projects. Window’s central part shows code and title of selected project and contains data and views of corresponding project. They are basically grouped as: Diagrams: Activity Gantt, Resource Gantt, WBS Chart, OBS Chart, Activity Network, Linear Diagram Costs: Cost Components, Cost Centers, Cost Component Periods, Activities: Activities, Links Resources: Resources, Multi-resources, Resource skills, Resource Centers, Resource Periods, Overtiems, Resource Production. Assignments: Resource Assignments, Multi resource Assignments, Resource Skill Assignments, Team Assignments. Materials: Materials, Material Centers, Material Periods, Material Sets.
Calendars: Calendars, Weeks, Calendar Exceptions. Performance: Monitoring, Performance Archive., Group Work: Users, Access Rights,
Filters Formulae Scripts: Filters, Formulas, Scripts. Templates: Report Templates, EVA Report Templates, Trend Report Templates, Print Templates, Variance Report Templates. Other: Passport, Corporate Reference-books, Success Probability Trends, Variance Trends, Protocol of Actions, User Fields, Signals If the current project is a portfolio of projects following items will also be available: Diagrams: Project Gantt Assignments: Resource Assignments to projects Other:Project Register Window’s right part (Documents) contains list of codes and titles of opened documents. Documents of different types have specific icons. To select a project or document click its name with a left mouse button. Icon of selected item will be highlighted with grey color. Double click opens project or document in a new window. To move between opened windows press F6 (go to next window) or Ctrl-F6 (go to previous window). F5 key maximizes or restores active window size.

Main Window
2
1.2. Main Window Menu Contains following items: File
Create Project – New – creates new project file; From CSV-Files – creates project from CSV-files; From Data Base – creates project from database; From MPX-file -creates project from MPX-files; From MS Project Data Base – creates project from MS Project database. From Primavera Data Base – exports current project to Primavera P3e database. Version 3 and Version 4 options are available.
Create Document – New – creates new document file; From File – creates document from CSV-files; From Data Base – creates project from database;
Create Portfolio – New – creates new portfolio file; From CSV-Files – creates document from CSV-files; From Data Base – creates project from database;
Open – invokes projects and documents dialog window, where you can select a file to open; Download from FTP server – lets receive files from FTP server; Save All – saves all opened projects and documents; Script
Create – opens script creation dialog window to create edit and save scripts without opening a project or document; Execute from File – allows to choose and execute a previously saved script; Execute Favourite Script – executes the script, which was previously created and chosen as favourite.
Exit – shuts down the program. If you have unsaved projects or documents, you will be prompted to save them (or quit without saving, or cancel exit). This menu also contains the list of documents and projects which were opened lately or working. "P" symbol is put before projects and "d" symbol before documents
Options Parameters – lets you customize Spider Project options in the options dialog window; Colors – lets you customize colors in the colors dialog window; Fonts – lets you customize fonts in the fonts dialog window; Printer and Page – lets you customize paper size, orientation and margins in the page setup dialog window, as well as to define default printer and sep its properties; Log Setup – invokes log setup window. Replication – opens a dialog window of replication properties, where you can set options for deletion of unused project objects during copying and distribution of projects; FTP-servers – lets you add, delete and edit ftp-server accounts properties.
Window Close All – closes all opened documents and activates Main Window
Main Window
3
Cascade – arranges all opened projects and documents windows on the screen to make all of them visible even partially. Tile – arranges all opened projects and documents windows on the screen to make them no overlapping. Next Window – makes next opened window active. Previous Window – makes previous opened window active. Maximize/Restore – maximizes opened window size on the screen or restores it to original size. Maximize/Restore All – maximizes all opened windows size on the screen or restores them to original size. Main Window – makes main window active. List of opened projects and documents: project (or document) name; project (or document) code; for opened projects – type of data window. E.g
MyProject [Code1] Activity Gantt
• Project 2 [Code3] Multi-resources Reference-book [Ref1]
Active window is marked with a dot.
Help and Support Spider Project Help – opens help document. Project Scheduling Technique - opens a PDF document, which provides help about Project Scheduling techniques written by V.I.Liberzon. Data Base Structure - opens a PDF document with the list of tables and communications between them. Technical Support E-Mail - allows sending an E-mail to address [email protected] via Outlook Express to receive technical support. Information and News – opens the internet address http://www.spiderproject.ru/aboutus_e.php via default internet browser to access latest news and information about Spider Project Management Technologies. Installation Instruction – shows installation instructions, minimum and optimum system requirements. Spider Project Update Site – allows updating current version of software. Note that Program must be closed before applying updates. About – displays brief information about current Spider Project program version and Spider Management Technologies.
Project
4
2. Project
2.1. Project Data Project Data Corresponding Table or Dialog window
Cost Components Cost Components Table Cost Centers Cost Centers Table Cost Component Periods Cost Component Periods Table Activities Activities Table Links Links Table Resources Resources Table Multi-resources Multi-resources Table Resource Skills Resource Skills Table Resource Centers Resource Centers Table Resource Periods Resource Periods table Overtimes Overtime Table Resource Production Resource Production Table Assignments Assignments Table Multiresource Assignments Multiresource Assignments Table Resource Skill Assignments Resource Skill Assignments Table Team Assignments Team Assignments Table Materials Materials Table Material Centers Material Centers Table Material Periods Material Periods table Material Sets Material Sets Table Calendars Calendars Table Weeks Weeks Table Calendar Exceptions Calendar Exceptions Table Monitoring Monitoring Table Performance Archive Performance Archive Table Users Users Table Access Rights Access Rights Table Filters Filters Table Formulas Formulae Table Scripts scripts table Report Templates Report Templates Table

Project
5
EVA Report Templates EVA report templates table Trend Report Templates Trend Report Templates Table Print Templates Print Templates Variance Report Templates Variance Report Templates Table Corporate Reference-books Corporate Reference-books Table Protocol of Actions Protocol of Actions Table Success Probability Trends Success Probability Trends Table Variance Trends Variance Trends Table User Fields User fields Table Signals Signals Table
2.2. Open a Project To open an existing project, select Open from File menu in main program window or click Open icon on main window toolbar or press F12 as a hot key. projects and documents dialog window will be invoked. Select project’s Code / Name and Version from corresponding lists and click Open. This will open the selected project on its activity Gantt and its name/icon will appear in the left part of main program window.
If the project, which was attempted to be opened has at least one manager password specified (see Users table), user identification will be prompted. During user identification process, you will be requested to choose user name and to enter password.
Note that: An opened project cannot be opened twice at a time.
2.3. Save Project To save projects in any window (except main program window), click Save icon on window toolbar, or select Save from Project menu.
To save projects in main program window, invoke Project shortcut menu by right clicking on project’s icon/name in the left part of main program window, and select Save.
Project will be saved without any changes on its code or version number.
2.4. Save Project with a Different Code and/or Version Number A project can be saved with changes in its code and/or version number.
To perform this, select item Save As from Project menu in any project table. Or invoke project shortcut menu in main program window by right clicking on the project’s name, and select Save As.
Projects and documents dialog window will be invoked to edit project code and versions. After editing and clicking OK button, project will be saved with its new code or version.
If there is already a project with the same code or version, corresponding message ‘A project or document with this code already exists in the storage! Overwrite?’ will appear. Clicking OK button confirms overwriting; clicking Cancel rejects it.
Note That: If overwriting was cancelled, Save as command should be repeated. Specify different project code or version, or select different Storage.
Saving project to different storage
Use Save As command, to save the project to a different storage. In the invoked dialog window, select new storage name from Storage list and click OK.
2.5. Save Project without Cost It is useful to save project without cost data when you need to present project to person who do not need or should be unaware of project budget. To save project to new version without cost components, costs of activities, materials and resource work:
1. Open required project;

Project
6
2. In any project window (except Linear Diagram) goto menu Project -> Save without Cost; or Invoke project shortcut menu on project icon (in left window area - Projects) in Main program window with a right mouse button click and select Save without Cost;
3. You will be prompted to save current project version first. Press OK to save current project and continue or press Cancel to stop action.
4. Projects and documents dialog window will appear (if you pressed OK on the previous step). Enter code and/or version number of new project file and press OK. You initial project will be saved without cost data to a new project version or with a new code.
2.6. Create New Project Creation of a new project starts with defining its properties. To create a new project select Project -> Create Project -> New from Spider Project main window menu. In opened project properties dialog window define:
- Project name in Name field; different projects can have the same name; - Project code that will correspond to project file name. Project codes should be unique. - Project version number; - Comments to current project version can be entered in field Notes; - Current time in field Data Date; - Target finish date; - Information about baseline project – its code, version number and storage location.
When you press OK button, Activity Gantt diagram of new project will open. By default new project contains:
- One work breakdown structure (with a status of Responsibility structure), consisting of one phase with one activity; - One organizational breakdown structure (with a status of Responsibility structure), consisting of one department; - One cost component; - One calendar; - Two weeks: blank and 40-hours working week; - Project Data Date is equal to current time; target finish date equals to data dare plus one month (by default);

Project
7
- One user, ‘Project Administrator’ with ‘Administrator access rights’, corresponding to full access rights to all project objects. Administrator access rights cannot be changed; and user ‘Project Administrator’ cannot be deleted.
You can create unlimited number of projects in Spider Project. Each project can have up to 676 versions (with the same project code). If you need to have more than 676 project versions, the project code should be changed. Note that: You cannot create a project with the same name and code as opened project.
2.7. Project Baseline Project version to be used for comparing and execution calculation (calculation and analysis of actual project variance from scheduled) is called Baseline. During project execution, any approved by management project version might be used as Baseline.
Set up Baseline in main program window, in activity gantt, resource gantt, or in any project table.
To set up Baseline in main program window, click with the right mouse button project icon/name in the left part of the window to invoke project shortcut menu and select Properties. project properties dialog window will be invoked to change project Baseline.
To set up Baseline in other windows, (except Linear Diagram window) select Properties from Project menu. Project properties dialog window will be invoked to change project Baseline.
2.8. Project Shortcut Menu Project shortcut menu can be invoked in Main program window by right mouse button click on project icon in the left window area (Projects).
- Properties – opens project properties dialog window; - Passport – opens the project passport window. - Data – contains list of project data. Selecting each item opens corresponding dialog window or table for review and
edit. - Views – contains list of project views. - Monitoring – opens monitoring table. - Send Notifications – sends the information about beginning and end of works in phases and activities, to managers
which are assingned to the phases and resources.Te quantity of days, for which the managers and resources should be informed, must be defined in the project properties dialog window and in the user properties dialog window and resource properties window. It is necessary to indicate e-mail addresses and to activate and define the option to Notify managers / resources about works if less than…days left.
- Save – saves project. - Save as – opens projects and documents dialog window; lets save opened project with different code, version number
or to different Storage folder. Save Without Cost – saves project without costs data, deleting activity, material and resource costs.
- Check Data Integrity – achieves testing correctness and consistency of the information of project. Create Standard Reference-Book – opens create standard reference-books dialog window , which allows creating reference-books, on the basis of the calculated or actual information of the projects. - Export
Into CSV-files – saves active project as text files of CSV format. Into Data Base – saves active project to DBF file (see Project Export to Database for details); Into MPX-file – saves active project to MPX file format . Into MS Project – exports current project to MS Project and opens it; Primavera database – exports current project to Primavera P3e database. Version 3 and 4 are available.
- Upload to FTP-Server – opens dialog window of FTP servers; select desired FTP server and press Send to send project. - Send by E-mail – sends the current project via e-mail. - Close – closes current project file and removes project icon from the main program window
2.9. Comparing Projects Allows comparing active project with their baselines or with other projects to find date and cost differences.

Project
8
Project version being compared is called Current. Project version being compared with, is called Original.
Project comparison can be done in activity gantt or resource gantt by selecting items With Baseline or With Other Project from Comparison menu.
If With Baseline is selected, active project will be compared with project baseline. When With Other Project option is selected, projects and documents dialog window will be invoked to select code and version of the project being compared with. Click OK to finalize selection.
The following Gantt table columns contain activities and assignments comparison results:
- Original Duration (Duration Hours [Original] column) is activity duration (or assignment activity duration) in original version;
- Original Total Cost (Total Cost [Original] column) is activity cost (or cost of work of resource that has been assigned to this activity) in original version;
- Original Resource Hours (Resource Hours [Original] column) are resource hours assigned to perform this activity in original version;
- Original Start (Start [Original] column) is date the activity starts (or the date working period begins for resource assigned to this activity) in original version;
- Original Finish (Finish [Original] column) is date the activity finishes (or date working period ends for resource assigned to this activity) in original version;
- Original Volume (Volume [Original] column) is activity volume (or part of activity volume performed by resource) in original version;
- OCWP (Original Cost of Work Performed) (OCWP) is activity cost in original version;
- OCV (Original Cost Variance) (OCV) is variance in actual activity cost in comparison with original version. It equals to difference between OCWP and actual activity cost in current version (Total Cost [Actual] column)
- Completion Variance (Completion Variance, Days column) is difference between dates of ASAP activity (or assignment) finish in current and original versions (in days);
- Start Variance, Days is the difference between dates of ASAP activity (or resource assigned) start in current and original versions (in days);
- Duration Variance, Days is the difference between activity (or assigned resource work) duration in current and original versions (in days).
If the listed columns are not seen, invoke Column shortcut menu, and select Show Columns. Fields available dialog window will be invoked to select Comparison (on the right side). When the list of fields appears, select field(s) to be inserted into table and click OK.
Materials cost and consumption can also be reflected in Gantt table. For this, select Materials on the right side of fields available dialog window, and select Original as materials expense type below.
After comparison is finished, objects (phases, activities, departments, and resources) of original version are shown as gray shadows in gantt charts.
2.10. Projects Comparison Setup Dialog Window
While comparing projects, in this dialog window set up the activity fields, on which the comparison will be performed.
Select the group of fields, from the very left side of the dialog window, among the following ones: General, Cost components, Cost centers, Materials, Material centers and Material sets. For each group, available fields' list will represent the ones available within this group. First highlight the required fields (by which ones the comparison will be realized) and then, include them, to the Fields for comparison list on the right, by using >> button. To remove any fields from the Fields for comparison list, highlight them and, click << button.
To decide which group of fields will be involved in comparison, check on the object names in the list below the frame. Comparison will not be performed by the objects that are checked off.
Show this window before comparison option sets up whether this dialog window will be shown before comparison is started. If this option was checked off, select Comparison -> Comparison Setup from Gantt diagram menu to invoke this dialog window.

Project
9
2.11. Hide Project Comparison After the comparison, objects (phases, activities, departments, and resources) of original version are shown as gray shadows as default in gantt charts.
Project comparison can be hidden by selecting Hide Comparison from Comparison menu.
2.12. Inserting a Project as a Subphase You can insert a standalone project as a subphase of the current project phase. Do following steps:
- Open Activity Gantt and invoke shortcut menu on the phase (with right mouse button click on corresponding phase row number), that should be parent to the being inserted;
- Select item Insert Project as New Phase and choose option: - One Level Lower – choose this option to add a project as a subphase of the current phase. New phase will be
placed next to the phase selected with right mouse button. - The Same Level - choose this option to add a project as a phase of the project. New phase will be placed on the
same level of WBS as the phase selected with right mouse button. Phase of the first level cannot be added. - Select a project to insert as subphase to the current project in projects and documents dialog window) and press OK
button; - Specify additional options in opened Change Activity and Phase dialog window:
- How activities and phases codes of the inserted project should be changed; - How activities volumes or durations, materials costs and expenditures of cost components of the inserted
project should be changed (i.e., multiplied by coefficient) - How activities and phases codes of the original project should be changed.
During update, resources, materials, cost components, multi-resources, resource skills and other objects of both projects are combined while nonexistent objects are added to the main (original) project. Uniqueness of objects’ codes is checked automatically. Total quantity of both projects objects’ units is set to maximum value in the main project.
2.13. Project Properties Dialog Window Allows setting up project properties: project Name, Code, Version, Storage, Data Date, Target Finish, Notes, as well as the following:
If Show hours and minutes option is selected, in corresponding table cells and fields of project dialog windows, date and time will be displayed both. If not selected - only date.
Code, Version and Storage of project portfolio, and Baseline, are displayed in corresponding fields. If the portfolio of projects has already been collected in the multiproject (see Working with portfolios) code and the version of portfolio will be filled in the given window automatically.

Project
10
If it is required only to change storage, without changing code and version, it is necessary to double click in Storage floor and to choose the necessary storage from the opened list.
In Project Portfolio frame the portfolio whose structure includes the given project is selected by using Change button (only Professional and Desktop versions support portfolios).
The project portfolio is underlined in given window to calculate the project schedule in view of other portfolio projects (for this, in scheduling settings without resource restrictions dialog window and in scheduling settings with resource restrictions dialog window it is necessary to include the corresponding option to Consider Portfolio Schedule).
Number of linked OLE-objects contains number of other applications documents attached to the project.
To set up minimum activity float, use Activity is critical if its float is not greater than… field. Minimum activity float makes the activity critical, when reached. If you leave field empty or enter the value 0 (zero), all activities with no float will be considered critical.
Code and name of manager, who opened active project are reflected in Current User field in the bottom of the dialog window.
In Notify managers about works if less than … days left field, how many days before it is necessary to notify users at the beginning and the end of phases to which manager is assigned can be set.
In Notify resources about works if less than … days left field, how many days before it is necessary to notify resources on the beginning and end of activities to which they are assigned can be set.
If it is needed to Send notifications, it is necessary to choose corresponding item in activity gantt main menu or in the menu of any other project representations. Before sending, it is necessary to make sure, that in user properties dialog window and in resource properties dialog window, e-mail addresses of users, to whom notifications should be send, are set.
To edit the properties of a previously saved project, choose Project -> Properties from any project window or cause shortcut menu on project pictogram in main program window and choose Properties.
2.14. Projects and Documents Dialog Window
Allows opening and saving documents and projects and contains the following fields and options:
Object group option: Projects or Documents. Each group contains storages by default.
Projects group contains the following storages:
- Working;

Project
11
- Fragment Library; and
- Centre.
Documents group contains the following storages:
- Reference-books;
- Reports; and
- Other.
Storage frame contains storages list. Each storage has its path to files (disk location). To change path, click Properties button and edit storage properties in the invoked storage properties dialog window.
To create a new storage, use Add button. Storage properties dialog window will be invoked to select new storage’s name and path to files.
Note that: properties dialog window will be opened automatically for newly created object only if you have selected to Open properties for new created objects in the spider project parameters dialog window. Otherwise newly created object will be saved with default parameters.
To delete storage, click Remove button. Files contained in the removed storage will not be deleted from the project. Standard storages cannot be removed.
Type/Code/Name is the list of project or document codes and names.
Version/Date is the list of highlighted document’s / project’s versions and its last update dates.
Search allows finding projects or documents from list by realizing a search by code or name.
Reverse version order option allows sorting document / project version numbers in descending order.
Code is the text field with document/project code Code is a sequence of characters, unique for each document/project. Code is made of letters, numbers, and special characters (#$%&@_-~) without spaces, and is case sensitive.
Version is the text field with document/project version.
Notes - text field to view comments to the highlighted document / project version (if there are any).
Close window on document opening option – if selected – closes the dialog window after Open button is clicked.
Open opens selected document / project from the highlighted storage.

Project
12
Delete deletes highlighted document / project from storage. Corresponding warning message will appear if the document is already in use: Cannot delete project or document while it is open.
Close closes the dialog window without any changes in documents /projects.
Help invokes context help.
2.15. Change Project Data Date Data Date - the point in time that separates actual (historical) data from future (scheduled) data.
Project data date is set up in project properties dialog window invoked by one of the following methods:
- Select Properties from Project menu in any project window; or
- In main program window invoke project shortcut menu with the right mouse button click on project icon/name in the left part of the window, and select Properties.
In the invoked Project Properties dialog window, set up current date and time in the Data Date field. You can enter required date and time manually in the ‘DD.MM.YYYY HH:MM’ (e.g. 01.04.2003 08:00) or double click on the Data Date field and select required date and time in the opened calendar window.
Note that: recalculate the project schedule after time and/or date changes
Project date and time is changed automatically after entering performance data into performance archive.
2.16. Target Finish The date that work is planned (targeted) to finish on a schedule activity.
2.17. Project Target Finish Setup Target finish is set up in project properties dialog window invoked by one of the following methods:
- Select Properties from Project menu in any program window (if Project menu exists there); or
- In main program window, invoke project shortcut menu with the right mouse button click on project icon/name in the left part of the window, and select Properties.
In the invoked project properties dialog window, set up target finish in Target Finish field.
2.18. Storage Storage is a directory where documents and projects are located. You can set up storage name and full path to files location in storage properties dialog window for several storages.
For example, "Working" is the storage name and d:\spider\projects\ is the directory path to storage location. Alternatively, \\host\d\Spider\archive where host is the computer name in local network, and Spider\archive reflects file location.
By default, the following standard storages exist in the software and can not be deleted:
- Working;
- Fragment Library;
- Centre;
- Reference-books;
- Reports; and
- Other.
Set up and edit storage properties in storage properties dialog window .
There is a Backup folder inside each storage. If Create Backup Copy option is activated in spider project parameters dialog window, previous version of every project file will be saved in Backup folder with each file Save.
2.19. Storage Properties Dialog Window
Allows editing storage properties and contains the following fields:

Project
13
Name is text field with storage name.
Path to files contains full path (disk or network location) of storage files.
You can enter full path to the directory directly in the field or by clicking Choose, then selecting the directory for the storage and pressing Open button.

Object
14
3. Object
3.1. Object Spider Project works with different objects, such as activities, phases, resources, materials, links, cost components, resource skills, multi-resources, and departments. All objects have certain characteristics, or properties. E.g., activities are characterized by duration, name, code, links with other activities, resources assigned to its execution. At the same time resource is characterized by activity it was assigned. You can view and edit characteristics of objects in properties dialog windows, specific for object types. These dialog windows can be generally called from shortcut menus (item Properties), that in turn are invoked with a right mouse button click on the object (or in tables – on object row number).
3.2. Internal Database All program objects are stored in internal database. Each object property corresponds to a database field.
Internal database is a table where each column is a database field. When new user-defined is added to any project table, new database field is automatically added to internal database.
For example, Activity object has Duration property. In database, duration will be saved in Duration database field with other properties of corresponding activity.
To ensure unique identification for database fields and object properties, the following has been decided by default:
- Each database field has Name and Code. Database field (column) names can be the same, but codes should be unique within a table.
Set up field Name and Code in Column Properties dialog window invoked in any project table by double click on column header.
3.3. Objects List Dialog Window Contains list of similar objects, such as project activities. Box name reflects object type or list purpose.
Contains a list to select one or several objects. List can be sorted by code or by name, according to the search option made below the list.
The dialog window also contains OK and Cancel buttons to confirm or cancel action respectively.
3.4. Object Properties Dialog Window Generally, object properties dialog window consists of several pages with groups of object properties. As a rule, dialog window name consists of object type, object name and object code (e.g. ‘Activity Activity1 (code 1)’). With opened object dialog window properties, you can view properties of another object of the same type if you select another one from the list. E.g., Materials Table contains a list of all materials; double click on one of them to open dialog window of its properties; leaving dialog window opened click on another material from the list – dialog window will display properties of material, selected last. Similarly, you can move between different activities properties’ dialog windows in Activities Table, Activity Gantt and so on. Dialog windows of object properties contain buttons OK, Cancel, Apply and Help:
- OK – applies changes made and closes dialog window; - Cancel – allows to discard changes and close dialog window; - Apply - applies changes made and leaves dialog window opened; it is useful if changes to several object are to be made; - Help – displays current object help window.
3.5. Choose Objects Dialog Window Allows selecting objects from lists previously sorted by type or with filters.

Object
15
Type is a field selected by clicking Select type field button. Select from the list containing all selected type objects given in the field below.
In By type frame, click All option if objects in the list on the left (for example, Resources in Resources selecting dialog window) do not need to be sorted by type. Click Selected type only option to sort objects in the list so that only selected type objects are shown.
In By filter frame, click All option if objects in the list on the left do not need to be filtered. And click Selected filter only option to filter objects in the list through highlighted filter.
If both options are activated (when you select Selected type only and Selected filter only simultaneously) only objects fitting both criteria will be shown in the list.
3.6. Adding Objects When selecting Add or New in shortcut menus, user makes decision to add an object to the project. This invokes object properties dialog window with preset default parameters in corresponding fields. You can edit these properties or keep defaults and press Enter to save the new object. If you press Cancel button, the new object will not be added to project.
Note that: Properties dialog window will be opened automatically for newly created object only if you have selected to Open properties for new created objects in the spider project parameters dialog window. Otherwise newly created object will be saved with default parameters.
3.7. Delete Object If one object is being deleted you will be prompted to confirm intention to delete it (object name and code will be given). Deleting a phase (department) will also delete all comprising subphases (departments) and activities (resources) with corresponding assignments. Deleting a resource will also delete all its assignments and remove it from the list of all departments, resource skills, multi-resources, cost and resource centers. Deleting an activity will also delete all its assignments and links, and remove it from the list of all phases. Deleting a material will also delete it from all assignments, remove it from the list of all material and cost centers. Deleting a cost component will also delete it from all assignments and cost centers. If several objects are being deleted you will be prompted to confirm intention to delete a group of objects. Note that phase of the first level cannot be deleted.
3.8. List There are two types of lists in Spider Project Software: for single choices and for multiple choices of elements from the list.

Object
16
While highlighting elements in list, you will either be allowed to highlight only one element (single element highlighting) or as many as you want (multiple elements highlighting).
To highlight multiple elements, left click element’s name in the list, as you would highlight a single element. In the lists, allowing multiple element highlighting, all clicked elements will stay highlighted. In the list allowing single element highlighting, highlighting will slide from one element to the other.
To cancel highlighting of the element, simply click once again on its name in the list.
3.9. List with Sort Option, List with Sort and Search Options List with sort option is a list with objects sorted in alphabetical order (For example, Fields list, Objects list, etc.). All lists of that type have Name and Code search options on the bottom . If you select Code option, objects in the list will be sorted by codes, and if you select Name option, objects in the list will be sorted by names.
List with sort and search options is a list with sort option and a text field added in the bottom of it. To find an object in the list, start typing its name in the Search text field. While text is being typed in, list will be automatically moving closer to desired object name.

Spider Project User GuideProject Presentations
17
4. Project Presentations
4.1. Project Views Project views allows project to be presented in following ways:
- Activity Gantt;
- Resource Gantt;
- WBS (Work Breakdown Structure);
- OBS (Organizational Breakdown Structure);
- Activity Network; and
- Linear Diagram.
Also an additional Project gantt exists in Spider project software to represent project portfolios.
4.2. Activity and Resource Gantts
4.2.1. Working with Gantt Charts Spider Project has two Gantt charts: - Activity Gantt - Resource Gantt. Gantt diagrams consist of two parts: work breakdown structure (WBS) or organizational breakdown structure (OBS) in table view and graphic view. Current structure can be changed: use project structures list dialog window (select WBS or OBS from Properties menu) to switch between structures, create and edit project work breakdown structures (when invoked in Activity Gantt) and organizational breakdown structures (when invoked in Resource Gantt). Use general rules to view and edit table part of diagrams. Gantt diagrams tables have following peculiarities:
- Specific toolbars (see Activity Gantt toolbar and Resource Gantt toolbar); - Specific menus (see Activity Gantt main menu and Resource Gantt main menu).
You can customize view of diagrams in table part: press "+" next to corresponding row number to see details (e.g. activities assignments, resources assignments) and "–" to hide details. To show desired columns in table part use Show Columns command from the shortcut menu (invoked with right mouse button click on columns name) or from Edit menu.You can save order of columns, their width and names to configuration file (*.stc): choose menu item Gantt - > Save Configuration. Load Configuration – restores configuration from file (*.stc); all columns created by user (and not described in configuration file) in current structure will be hidden (See. Working with Tables for further details). Objects of the same type (i.e. phases, or activities, or resources, or assignments) can be selected with left mouse button click on corresponding row numbers while holfind Ctrl button pressed. Bars displayed with different colors in graphic area of diagrams represent total resource and department work time periods (in Resource Gantt) or phases and activities duration (in Activity Gantt); bars start at ASAP Start dates and finish at ASAP Finish dates. To view or change properties of phases, department, activities, resource or assignments in Gantt diagrams invoke shortcut menu with a right mouse button click on corresponding object row number and select Properties or double click on corresponding object row number or bar in graphic area. Following shortcut menus are available: Gantts diagram shortcut menu Phase shortcut menu in Activity Gantt Shortcut menu of group of phases in Activity Gantt Activity shortcut menu in Activity Gantt Shortcut menu of group of activities in Activity Gantt Assignment shortcut menu in Activity Gantt Assignment shortcut menu in Resource Gantt Resource Skill shortcut menu in Activity Gantt Multi-resource shortcut menu in Activity Gantt

Spider Project User GuideProject Presentations
18
Department shortcut menu in Resource Gantt Shortcut menu of group of department in Resource Gantt Resource shortcut menu in Resource Gantt Shortcut menu of group of resources in Resource Gantt You can add or delete resources in Resource Gantt: invoke shortcut menu with a right mouse button click on corresponding resource row number and select New Resource or Delete. If you choose to add a new resource - resource properties dialog window for this resource would appear. You can also add or delete departments: invoke shortcut menu with a right mouse button click on corresponding department row number and select New Department or Delete. New departments can be created on The Same Level of organizational breakdown structure (with respect to department where shortcut menu was invoked) or One Level Lower (new department would become subordinate with respect to department where shortcut menu was invoked)– select desired option from menu. If you choose to add new department - department properties dialog window for this department would appear. Editing phase and activities structure in Activity Gantt (i.e. work breakdown structure) is performed mostly the same way. To add activity open shortcut menu with a right mouse button click on activity row number, choose New Activity, set initial data in activities properties dialog window, and press OK. Default activity duration is 5 days, and default volume is 100 units. To delete activity click with a right mouse button on activity row number and choose Delete from the shortcut menu. To add a phase open shortcut menu with a right mouse button click on phase row number, choose New Phase and select position of new phase in WBS with respect to the current phase: One Level Lower or The Same Level. To delete a phase click its row number with a right mouse button and choose Delete from the shortcut menu. Note that: all activities of deleted phase will be also deleted from the project. In graphic area of Activity Gantt links between activities are displayed with arrows from lower side of proceeding to upper side of succeeding activities. Links of Start-Start and Start-Finish types are drawn from left sides of activity bars and links of Finish-Finish and Finish-Start – from right sides. In graphic area of Activity Gantt, you can perform following actions:
- Establishing a new link between two activities. To do this, move mouse pointer to the bar of predecessor activity in
logical relationship between two activities. After cursor changes to cursor of link press left mouse button and move cursor to the second (successor) activity and then release mouse button. link properties dialog window will appear for a newly established link (only if you have selected to Open properties for new created objects in the Spider Project Parameters Dialog window, Otherwise, new link will be saved with default parameters).
- Deleting or editing an existing link. To do this, move mouse pointer to the bar of predecessor activity in logical
relationship between two activities. After cursor changes to cursor of link press left mouse button and move cursor to the second (successor) activity and release mouse button. Shortcut menu will be invoked for existing link. This shortcut menu consists of two items: Properties – opens link properties dialog window, and Delete – removes current link.
- Changing activity duration. To do this, move mouse pointer to the end of activity bar. After cursor changes to cursor of duration, press left mouse button and change activity duration. This action can only be performed for activities of Duration type.
- Set Start Not Earlier Than constraints on activity performance schedule (planned activity start date cannot be earlier than the date set). Move mouse pointer to the beginning of activity; after cursor changes to not earlier than cursor press left mouse button and move activity bar.
Gantt diagram graphic area heading represents the time scale, which can be edited in time scale dialog window, which is invoked either by double click or right mouse click on it. Mouse cursor changes its appearance in graphic area of Gantt diagram to following types of cursors:
- Not earlier than – on the left side of activity; - Duration – on the right side of activity; - Link (Spider) – on activity bar.
You can view, create and edit different centers from menu Project -> Data -> Material Centers / Resource Centers / Cost Centers in corresponding tables (Material Centers Table, Resource Centers Table, and Cost Centers Table)

Spider Project User GuideProject Presentations
19
Different calculations can be performed from Gantt diagrams: - Scheduling; - Resource constrained scheduling; - Resource peak load; - Calculations of costs, material consumption and resource work load; - Phase, departments and resources dates. (See Gantts diagram main window and toolbar descriptions.
Different diagrams and histograms can be placed in the lower part of Gantt diagrams, e.g. resource work load diagram, diagrams of costs and material consumption, earned value analysis diagrams, resource overloads bar, success probability trends. Diagrams can be drawn for whole project or separate project phases and activities. Go to menu Reports -> General reports -> Diagram to create diagram for whole project. Diagram details can be specified in opened Diagram settings dialog window. To create diagram for selected phase or activity invoke corresponding shortcut menu with right mouse button click on corresponding row number, select General reports -> Diagram and specify diagram details. Success probability trends diagram and earned value analysis diagram can also be created for whole project or separate project phases and activities: select menu Reports -> Success probability trends -> Diagram (or Reports -> Earned value analysis -> Diagram). You can customize view of created diagrams, edit content and delete diagrams. To perform these actions invoke diagram shortcut menu with a right mouse button click on diagram and select:
- Properties – to customize view of created diagrams in properties dialog window; - Contents – to specify content to display on the diagram in Diagram settings dialog window; - Delete – to remove the diagram.
Note that: Opened baseline project version (if it was opened), should be saved, before creating earned value analysis diagram. Resource overloads bar is displayed for all resources of the whole project: select Reports -> Resource overloads bar. See Reports for detailed description of reports in Gantt diagrams.
4.2.2. Gantt Diagram Shortcut Menu Is invoked by right clicking on Gantt diagram, where there is no activity or resource and contains the following options:
Insert Text invokes text object dialog window to edit text to be inserted in Gantt diagram.
Insert Picture invokes standard file opening dialog window. Find file with the picture to be inserted and select Open to insert it in Gantt diagram.
Note That: only BMP formatted (The standard Bit-Mapped graphics format used in the Windows environment.By convention, graphics files in the BMP format end with a .BMP extension.) files can be inserted. If file of an invalid type will be prompted to insert, a corresponding error message will appear.
Right click on inserted object invokes shortcut menu with the following options: Insert Text, Insert Picture, and Delete Object.
Delete Object deletes the corresponding object from diagram. Object itself will not be deleted from its location, it will only be removed from the project.
4.2.3. Gantt Chart Column Shortcut Menu Column shortcut menu in the table part of activity gantt and resource gantt can be invoked with a double click on column header and contains the following options:
- Show columns - opens Fields' list dialog window where you can select column(s) to place before the column on which shortcut menu was invoked;
- Hide column - hides selected column (the field is not actually erased from the database);
- Autofit column - automatically sets selected column width according to its content;
- Properties - opens Print pattern properties dialog window ;
- Search / Replace - allows searching for and/or replacing the text entered in Find text field of invoked Search dialog window in the current column or entire table;

Spider Project User GuideProject Presentations
20
- Repeat Search / Replace - repeats search or replace with the settings of previously performed Search / Replace starting from the next cell;
- Sort hierarchically by column - sorts rows by selected column in ascending order with existing phase hierarchy taken into consideration. Note that you would not be able to undo current action with standard Undo option! That's why we recommend to generate WBS codes before you perform sorting in Gantt chart. In this case you would be able to restore original phases and activities order according to WBS codes. To generate WBS codes goto menu Gantt -> Generate WBS codes (in activity gantt or resource gantt).
- Filter by values filters the selected column by the selected fields among the frame Conditions on the right side of the invoked box. Previous selected filters can be cancelled by clicking in the option box Cancel Previous Filter
- New field - creates new user field and opens Column properties dialog window
- Delete field - deletes field from internal database.
- Note that only user defined fields can be deleted.
4.2.4. Scaling Tool
Scaling tool is an interactive tool that smoothly changes scale for diagrams or any objects shown in graphic part of the window. Scale icon is displayed on each window toolbar (in WBS , OBS and PBS toolbars, only if Tree type is selected).
To change the scale of diagram left click scale pointer and drag it to left or right. Alternatively, you can press to the left or right arrow buttons on the Scaling tool to change the scale of your diagram. Minimum scale corresponds to the most left pointer position and the maximum - corresponds to the most right.
4.2.5. Activity Gantt
4.2.5.1. Activity Gantt
Activity Gantt is the main project view where initial data on project activities, phases, and assignments can be entered. Activity Gantt window opens first when you open or create project file. By default new project contains following objects in Activity Gantt:
- One activity named ‘Activity 1’ with 5 days duration; - One ‘No Name’ phase, including Activity 1.
You can change current work breakdown structure (WBS) of the project in WBS dialog window: select item Project from the main menu and choose WBS. Displayed structure contains all assigned resources, multi-resources, teams and resource skills to activities. You can add, delete and convert activities and phases in Activity Gantt. To add activity open shortcut menu with a right mouse button click on activity row number, choose New Activity, set initial data in activities properties dialog window, and press OK. Default activity duration is 5 days, and default volume is 100 units. To delete activity click with a right mouse button on activity row number and choose Delete from the shortcut menu. To convert an activity to phase, select Convert to Phase from the shortcut menu invoked for corresponding activity. New phase will inherit former activity name and code (if the last one was unique) and contain former activity with corresponding assignments. Project phases can be added and deleted almost the same way as activities. To add a phase open shortcut menu with a right mouse button click on phase row number, choose New Phase and select position of new phase in WBS with respect to the current phase: One Level Lower or The Same Level. To delete a phase click its row number with a right mouse button and choose Delete from the shortcut menu. Note that: all activities of deleted phase will also be deleted from the project. To convert a phase to an activity (this action can be performed with a phase containing one activity only) select Convert to Activity option from the shortcut menu invoked on phase row number. New activity will inherit name and code (if the last one was unique) from the former phase and all assignments of activity comprising former phase.

Spider Project User GuideProject Presentations
21
In graphic area of Activity Gantt, you can perform following actions: - Establishing a new link between two activities. To do this, move the mouse pointer to the bar of predecessor activity in
logical relationship between two activities. After cursor changes to cursor of link press left mouse button and move cursor to the second (successor) activity and then release mouse button. link properties dialog window will appear for a newly established link (only if you have selected to Open properties for new created objects in the Spider Project Parameters Dialog window; Otherwise, new link will be saved with default parameters and you can edit its properties later).
- Deleting or editing an existing link. To do this move mouse pointer to the bar of predecessor activity in logical
relationship between two activities. After cursor changes to cursor of link press left mouse button and move cursor to the second (successor) activity and release mouse button. Shortcut menu will be invoked for existing link. This shortcut menu consists of two items: Properties – opens link properties dialog window, and Delete – removes current link.
- Changing the duration of an activity. To do, this move the mouse pointer to the end of activity bar. After, the cursor will change to cursor of duration, then press left mouse button and change activity duration. This action can be only performed for activities of the Duration type.
- Set Start Not Earlier Than constraints on activity performance schedule (planned activity start date cannot be earlier than the date set). Move mouse pointer to the beginning of activity; after cursor changes to not earlier than cursor press left mouse button and move activity bar.
You can change Properties of activities, phases and assignments in Activity Gantt from the shortcut menu, invoked on row number of corresponding object. Description of possible actions, available in Activity Gantt and Resource Gantt see in Gantts diagram Description.
4.2.5.2. Activity Gantt Options Dialog Window
Lets you specify options for Activity Gantt diagram. Frame Show contains following checkboxes:
- ALAP Schedule – displays/hides bars (displayed as rectangles with no fill), corresponding to activities and phases ALAP Start and Finish.
- Horizontal Grid, Vertical Grid – displays/hides grid in graphic area of Activity Gantt; - Data on Diagram – displays/hides information next to activities and phases bars. By default activities and phases Name
is displayed. You can press Select button and select different field to be displayed. Frame Hide lets you hide certain type of project data in Activity Gantt:
- Activities; - Phases;

Spider Project User GuideProject Presentations
22
- Links; - Milestones; - Multi-Resources and Skills; - Idle Assignments; checking this box hides assignments of resources and multi-resource not participating in activity
execution. ‘Idle’ means that the resource assignment has scheduled quantity (column Quantity [Scheduled]) and remaining duration (column Duration, Hours [Remaining]) equal to zero. Idle assignments can exist in teams and resource skills if resources were not assigned to activity execution after schedule calculation.
- All but assignments; checking this box hides all project phases and activities; only resources assignments would be displayed. Phase and activity names are displayed in table area of Activity Gantt in columns Activity Name for the report ‘Gantt of Assignments’ and Phase Name for the report ‘Gantt of Assignments’.
- Keep as it is – makes no changes in displayed levels of Activity Gantt; - Expand to:
- Assignments – unhide assignments, i.e. all project phases and activities with corresponding assignments would be displayed;
- Activities – displays only project phases and activities; - Level – displays work breakdown structure up to specified level of hierarchy; activity assignments will be
hidden. Frame Columns contain checkbox Default order and width to restore default order and width of columns in table area of Activity Gantt. To change height of rows you can define Number of rows in cells. If you select two and more rows per cell, additional information (specified in field Data on Diagram of the frame Show) would be displayed above activities and phases bars. Hierarchic indent size – lets you set indent in hierarchy of department, resources and assignments. 10 is set by default (2 - 20). Time Scale Setup button opens time scale dialog window where you can set up the period for diagram presentation.
4.2.5.3. Columns of Activity Gantt Table - Level – phase level in work breakdown structure; - Code – A sequence of characters that should be unique for each project object type. Code is made up by letters, figures
and special characters (#$%&@_-~) without spaces and is case sensitive. - Name – full object name. - Activity Name for the report ‘Gantt of Assignments’ – activity name, shown for the first resource, assigned to activity
execution. It is useful to display this column when only assignments are shown in Activity Gantt (enabled option the All but assignments’ in frame Hide of activity gantt options dialog window).
- Phase Name for the report ‘Gantt of Assignments’ - phase name, shown for the first resource, assigned to execution of the first phase activity. It is useful to display this column when only assignments are shown in Activity Gantt (enabled option the All but assignments’ in frame Hide of activity gantt options dialog window).
- Type DPH defines DPH type of activity or assignment – duration, productivity, hammock or milestone. For resource skills, their type (By Quantity or By Productivity) is shown in this field. For phases and multi-resources the field is left blank.
- Type – default field for organizing of data transfer from reference-books for changing of objects’ properties. - Interruptability – defines, whether splits in activity performance are enabled or not (i.e., ‘Yes’ or ‘No’). Resource
assignments inherit this parameter from corresponding activities. - ASAP, ALAP - preferable time of activity performance – either ‘as soon as possible’ or ‘as late as possible’. Resource
assignments inherit this parameter from corresponding activities. - Variable Work Load and Number – defines, whether work load coefficients and number of resources are to be
estimated in schedule calculation (i.e., ‘Yes’ or ‘No’); - Folder - full path to attached folder, that may be used to store files with referential information for current object.
Double click on the cell in this column allows defining the folder path or open the folder (if its path has already been defined).
- OLE objects; icon defines whether documents of other applications (Word, Excel etc.) are attached to the document. Double click on this field opens dialog window of corresponding object properties on OLE objects and Folder page.

Spider Project User GuideProject Presentations
23
- Notes - A field that lets users to provide an object with notes and explanations. Double click on this field opens corresponding object properties dialog window on Notes page.
- Short name – should an object have too long name, you can set shorter name as alternative to full name. - Unique Assignment Code - Unique code, automatically generated according to activity code, resource code and
Assignment Index, connected by underline symbol; - Assignment Index - editable number to be added to assignment Code to ensure its uniqueness to activity several times
(for example, the same resource as part of different resource skills or multi-resources assigned to activity). - Manager – list of users’ codes, separated by commas. These managers participate in group work on the project
(distribution and consolidation of project phases and subphases); - Start – activity start date or assigned resource work start date. If an activity has not actually started, this field would be
equal to Start [ASAP]. If activity is already being executed and performance data is added to monitoring, this field would be equal to Start [Actual].
- Finish – activity finish date or assigned resource work finish date. If an activity has not actually finished, this field would be equal to Finish [ASAP]. If activity has already been executed and performance data has been added to monitoring, this field would be equal to Finish [Actual].
- Duration, Days [Remaining] – remaining activity duration or assigned resource work duration in days according to calculated schedule; for phases: Duration, Days [Remaining] is a value calculated as phase Duration, Hours [Remaining] divided by mean working day according to phase calendar;
- Duration, Hours [Remaining] – remaining activity duration or assigned resource work duration in hours according to calculated schedule; for phases Duration, Hours [Remaining] is calculated since the start of first activity comprising phase till the end of the last activity less duration of non-working periods.
- Duration, Hours [Actual] - total actual phase, activity or assigned resource work duration in hours according to included performance data;
- Duration, Hours [Cumulative] – sum of actual and remaining activity duration or assigned resource work duration in hours;
- Number of Working Days [Remaining] – a whole number of working days, required to complete activity (phase, resource assignment) according to the current schedule calculated; the number of days is rounded up; a day is counted as working if it contains at least one second of working time.
- Volume [Remaining] – remaining activity work volume or part of work to be performed by the resource. - Volume [Actual] - actual work volume performed or part of work performed by the resource according to included
performance data; - Volume [Cumulative] – sum of actual and remaining activity volume; - Volume unit –activity units (e.g.,’m2’, ‘pieces’); - Total Cost [Remaining] – remaining activity cost; - Float, hours; Float, days – activity or resource assignment float duration in hours or days. - Quantity [Scheduled] – estimated number of resources, required for activity execution; - Quantity- user assigned number of resources for activity execution; - Quantity [Minimal] – minimal number of resources assigned to activity execution; this value can be entered for
assignments with Variable quantity and Work load enabled in the assignment properties dialog window. Minimal quantity value participates in calculation of resources quantity, assigned to activity (Quantity [Scheduled])
- Calendar –calendar code, according to which phase, activity is executed or resource is executing activity. - Productivity – productivity of one resource unit per hour (i.e. number of activity volume units, that current resource can
execute per hour) - Work Load – work load of one resource unit, assigned to activity execution. Work load is set in percent of resource
working time that the resource is to spend on activity execution. By default work load is equal to 100%. - Work Load [Scheduled] – calculated work load coefficient for one resource unit, assigned to activity execution. If
resource is assigned to activity execution as part of multi-resource, its scheduled work load would be equal to resource work load multiplied by multi-resource work load;
- Work Load [Minimal] – minimal work load coefficient for one resource unit, assigned to activity execution; this value can be entered for assignments with Variable quantity and Work load enabled in the assignment properties dialog window. Minimal Work Load value participates in calculation of resources quantity, assigned to activity (Work Load [Scheduled])
- Total Duration of Teams, hours; Total Duration of Teams, days – total duration (in hours or days) of work time of all teams, assigned to activity.

Spider Project User GuideProject Presentations
24
- Volume Percent [for Teams] – percent of activity work, performed by the team assigned; - Priority – defines the order of phases and activities performance and resources assignment in resource constrained
scheduling. Activities and phases with higher priority (i.e., greater value) are performed earlier; resources with higher priority are assigned earlier.
- Start [ASAP] (as soon as possible) – the earliest possible point in time on which activity can start or assigned resource can start work, based on the network logic and any schedule constraints. ASAP Start dates can change as the project progresses and changes are made to the project plan.
- Finish [ASAP] (as soon as possible) - the earliest possible point in time on which activity can finish or assigned resource can finish work, based on the network logic and any schedule constraints. ASAP Finish dates can change as the project progresses and changes are made to the project plan.
- Start [ALAP] (as late as possible) – the latest possible point in time on which an activity may begin or assigned resource may start work without delaying the project finish date.
- Finish [ALAP] (as late as possible) – the latest possible point in time on which an activity can be completed or assigned resource finish work without delaying the project finish date.
- Start [Actual], Finish [Actual] – activity (assigned resource work) actual start and finish dates according to included performance data;
- Start [NET], Finish [NLT] –constraint on the start (not earlier than) and finish (not later than) dates of activity execution. You can set or change dates in these fields by direct entering or in Calendar dialog window (invoked by double click).
- Total Cost [Actual] - actual cost of work performed (or resource work) according to included performance data; - Total Cost [Cumulative] – equals to actual cost plus remaining cost; - Start [Critical], Finish [Critical], Total Cost [Critical] – critical activity (or phase, or assignment) start, finish dates
and total cost; these values are used in risk analysis; - Start [Buffer], Finish [Buffer] – buffer values, used in risk analysis; buffer equals to difference between critical and
remaining (ASAP) values; - Total Cost [Buffer] - difference between critical and remaining cost; - Finish [Target], Total Cost [Target] – defined activity target finish date and total cost; these values are required for
estimation of probabilities in success probabilities calculation; - Finish [Target Probability] – probability of completing the activity up to target finish date; - Total Cost [Probability] - probability of meeting activity target total cost; - Start [Original]; Finish [Original] – activity start and finish dates in original project version (see projects comparison
for details); - Duration, Hours [Original]; Volume [Original]; Total Cost [Original] – activity duration (in hours), volume (in
corresponding units) and total cost in original project version (see projects comparison for details); - Completion Variance, Days – difference in ASAP finish dates of current and original project versions’ activities (or
assignments) in days (see projects comparison for details); - OCWP – Original Cost of Work Performed, cost of work performed according to original project version; - OCV – Original Cost Variance, variance of performed work cost in comparison to original project version. Equals to
difference between OCWP and actual cost of work performed (Total Cost [Actual]); - Resource-Hours [Remaining] – remaining planned volume of resource-hours of phases, activities and resource
assignments (in resource-hours). ‘Assignment resource-hours’ can be calculated as assignment duration multiplied by resource work load and multiplied by the number of assigned resources. ‘Activity resource-hours’ can be calculated as sum of all corresponding assignments’ resource-hours
- Resource-Hours [Actual] - actual volume of resource-hours of phases, activities and resource assignments (in resource-hours).
- Resource-Hours [Cumulative] – sum of actual and remaining resource-hours; - User defined fields; - Fields with fixed, remaining and actual consumption of all materials (and material centers) and expenditures of cost
components (and cost centers); their profiles.
4.2.5.4. Activity Gantt Main Menu Project
Spider Project User GuideProject Presentations
25
WBS – allows to switch between work breakdown structures, to create new and edit existing project WBS in project structures list dialog window. Properties – opens project properties dialog window for review and edit. Passport – opens project passport window. Data – contains list of project data. Selecting each item opens corresponding dialog window or table for review and edit. Views – contains list of project views. Monitoring – opens monitoring table. Send Notifications – sends the information about beginning and end of works in phases and activities, to managers responsible for the phases and to assigned resources. The number of days, for which the managers and resources should be informed before, must be defined in the project properties dialog window and in the user properties dialog window and resource properties window. It is necessary to indicate e-mail addresses and to activate and define the option to Notify managers / resources about works if less than…days left. Next View, Previous View– lets move between left toolbar buttons, corresponding to project data and views. Open (F12) – opens projects and documents dialog window; Save (Ctrl +S)– saves project. Save As – opens projects and documents dialog window; lets save opened project with different code, version number or to different Storage folder. Save Without Costs – saves project without costs data deleting activity, material and resource costs. Check Data Integrity – achieves testing correctness and consistency of the information of project. Create Standard Reference-Book – opens create standard reference-books dialog window , which allows creating reference-books, on the basis of the calculated or actual information of the projects. Export –
Into CSV-files – saves active project as text files of CSV format. Into Data Base – saves active project to DBF file (see Project Export to Database for details); Into MPX-file – saves active project to MPX file format . Into MS Project – exports current project to MS Project and opens it; Primavera database – exports current project to Primavera P3e database. Version 3 and Version 4 options are available.
Upload to FTP-Server – opens FTP servers dialog window; select desired FTP server and press Send to send project. Send by E-mail – sends the current project via e-mail. Close – closes current project file and removes project icon from the main window.
Gantt Print Preview – opens print preview window. Options – opens Activity Gantt diagram options dialog window, where you can customize diagram view in graphic area. Load Configuration – restores order of columns, their width in table area and time scale in graphic area from configuration file (*.stc); all columns created by user (and not described in configuration file) in current project will be hidden and can be unhidden later through Show Columns (Ins) command from the shortcut menu (invoked with right mouse button click on columns name) or from main menu Edit item. Save Configuration – saves order of columns, their width in table area and time scale in graphic area to configuration file (*.stc). Export Table to file – exports the table part of the Gantt diagram of activities into the CSV (Comma Separated Value) type files or HTML. Export Table to Data Base – exports table to data base. Export Table to Excel – exports table to excel. Export Table to CSV-file – exports to CSV or HTML file Copy as a new Document – copies table of gantt as a new reference-book.
Edit

Spider Project User GuideProject Presentations
26
Undo Last Action – undoes last action. Protocol of Actions – opens protocol of actions table. Formulae – opens dialog window to create, edit and apply of formulas. Script Create – opens Script dialog window where you can enter, edit and execute scripts; Execute from File – lets you execute script stored in text file.
Execute– lets you execute a script from the list of previously created ones. Execute Favourite Script– lets you execute the script, which was previously created and chosen as
favourite. Show Columns –opens fields' list dialog window; lets you select hidden columns (fields) to display before active one. Hide Column – hides selected columns (these columns are not actually deleted from internal database). Autofit All Columns – resizes all columns in order to make their contents available to be seen completely. Search / Replace – opens Search dialog window and starts context string search; Repeat Search / Replace – repeats search of context string starting current cell. Copy – copies selected rows or cells to the clipboard. Cut – puts selected rows or cells to the clipboard. Objects are actually deleted from Activity Gantt only after Paste command. Paste – inserts objects from the clipboard: to current work breakdown structure or to selected cell. You can Paste copied (or cut) activities and phases to selected phase: - One Level Lower – choose this option to insert phase as a subphase of the current phase (or activity of current
phase). New phase will be placed next to selected. - The Same Level - choose this option to insert phase of the project on the same level of WBS as the selected
phase. Phase of the first level cannot be added. Select all – selects all rows of Activity Gantt.
Filter Apply – opens dialog window where you can create, edit and apply filters. Filter by Selected Rows – allows filtering out contents of table by the selected rows from the filters dialog window. Restore – abolishes the action of the used filter.
Calculations Scheduling Options – opens dialog window where you can specify scheduling options. Scheduling – performs schedule calculation not taking into account any existing resources constraints. Resource Constrained Scheduling – performs resource constrained scheduling, i.e. taking into account availability of required amount of resources, materials and financing. Cost and Materials Calculation Options – calculates Cost and Materials Calculation – calculates (recalculates) costs, materials requirements and resources work load according to current schedule. Calculations EVA Columns – calculates EVA and then displays calculated parameters values in corresponding gantt columns (preliminary in cost calculation settings dialog window it is necessary to select corresponding option to Calculate EVA columns). Calculations Resource Center Columns – calculates values in Resource Centers (Quantity) and Resource Centers (Workload) columns (preliminary in cost calculation settings dialog window it is necessary to select corresponding option to Callculate columns in Resource Center frame). Resource Peak Work Load - calculates (recalculates) resources work load on activities assignments. Phase, Department and Resource Dates – calculates phases start and finish dates; calculates dates of work start and finish for departments and resources. Risk Analysis Options – opens dialog window where you can specify options of risk analysis. Risk Analysis – performs risk analysis; risk analysis setup dialog window is invoked first.

Spider Project User GuideProject Presentations
27
Success Probability Calculation – opens dialog window (the same as in risk analysis) and performs probabilities calculation of meeting target goals in Project Parameter Probability frame. Recreate Success Probability Trends – recreates success probability trends on the set of projects selected in select projects dialog window. Hide Risk Analysis Results – undoes performed risk analysis. Clear Success Probabilities Fields – clears data in field [Probability].
Report Reports and Diagrams Templates:
Table – opens report templates list window where you can choose report template for table report. Diagram – opens report templates list window where you can choose report template to create a diagram.
General Reports and Diagrams: Table – creates report on the whole project data; opens Report settings dialog window. Diagram – draws diagram on the whole project data in the lower part of Activity Gantt; opens Diagram settings dialog window.
EVA Reports and Diagrams Templates: Table – opens a dialog window with the list of EVA reports templates to choose the template on which the new table report will be created Diagram – opens a dialog window with the list of EVA reports templates to choose the template on which
the new diagram will be created Earned Value Analysis:
Table – creates earned value analysis report; opens earned value analysis report properties dialog window first. Diagram – draws earned value analysis diagram in the lower part of Activity Gantt; opens earned value analysis diagram properties dialog window first.
Success Probability Trends Templates: Table – opens a dialog window with the list of Success probability trends reports templates to choose the template on which the new table report will be created Diagram – opens a dialog window with the list of Success probability trends reports templates to choose
the template on which the new diagram will be created Success Probability Trends:
Table – creates success probability trends report on the whole project data; opens success probability trends report properties dialog window first. Diagram – draws success probability trends diagram in the lower part of Activity Gantt; opens success probability trends diagram properties first.
Variance Trends Templates: Table – opens a dialog window with the list of variance trends reports templates to choose the template on which the new table report will be created Diagram – opens a dialog window with the list of variance trends reports templates to choose the template on which the new diagram will be created
Variance Trends: Table – opens variance trends report settings dialog window to create a new table report for project. Diagram – opens variance trends settings dialog window to create a new diagram for project.
Resource Overloads Bar – reflects the diagram of the Resource Overloads of the project (Searching for resource overloads). Resource Overloads Report – creates a table of report on the Resource Overloads. In the report besides the overloaded resources activities to which these resources were assigned are also available to see. Project Truncation – invokes the truncate project by period dialog window to set the period during which it is necessary to obtain project truncation.
Comparison With Baseline – performs comparison of opened project with its baseline project version.

Spider Project User GuideProject Presentations
28
With Other Project – performs comparison of opened project with another project selected in projects and documents dialog window. Recreate Variance Trends – recreates variance trends on the set of projects selected in select projects dialog window. Hide Comparison – undoes comparison. Comparison Setup – opens dialog window and lets customize project comparison.
Window Close All – closes all opened documents and activates Main Window Cascade – arranges all opened projects and documents windows on the screen to make all of them visible even partially. Tile – arranges all opened projects and documents windows on the screen to make them no overlapping. Next Window – makes next opened window active. Previous Window – makes previous opened window active. Maximize/Restore – maximizes opened window size on the screen or restores it to original size. Maximize/Restore All – maximizes all opened windows size on the screen or restores them to original size. Main Window – makes main window active. List of opened projects and documents: project (or document) name; project (or document) code; for opened projects – type of data window. E.g. MyProject [Code1] Activity Gantt
• Project 2 [Code3] Multi-resources Reference-book [Ref1]
Active window is marked with a dot.
Help and Support Spider Project Help – opens help document. Project Scheduling Technique - opens a PDF document, which provides help about Project Scheduling techniques written by V.I.Liberzon. Data Base Structure - opens a PDF document with the list of tables and communications between them. Technical Support E-Mail - allows sending an E-mail to address [email protected] via Outlook Express to receive technical support. Information and News – opens the internet address http://www.spiderproject.ru/aboutus_e.php via default internet browser to access latest news and information about Spider Project Management Technologies. Installation Instruction – shows installation instructions, minimum and optimum system requirements. Spider Project Update Site – allows updating current version of software. Note that Program must be closed before applying updates. About – displays brief information about current Spider Project program version and Spider Management Technologies.
4.2.6. Resource Gantt
4.2.6.1. Resource Gantt
Resource Gantt diagram is a project view where working calendar of resources assigned to activities execution is displayed. You can switch between different organizational breakdown structures in Resource Gantt diagram: go to main menu and select Project -> OBS, choose desired structure from the list in opened dialog window and press Switch to. Bars displayed in graphic area of the diagram represent total resource and department work-time periods; bars start at ASAP Start dates and finish at ASAP Finish dates.

Spider Project User GuideProject Presentations
29
You can add or delete resources in Resource Gantt: invoke shortcut menu with a right mouse button click on corresponding resource row number and select New Resource or Delete. If you choose to add new resource - resource properties dialog window for this resource would appear. You can change assignments of a particular or several resources for another resource, multi-resource or resource skill. To change assignments select appropriate resources, invoke shortcut menu and select Replace Assignment by option. Select new assignment from the list of all assignments available. The list varies depending on selection you made: Resources, Multi-Resources, or Resource Skills. To learn more, see Replacing Assignment. You can also add or delete departments: invoke shortcut menu with a right mouse button click on corresponding department row number and select New Department or Delete. New departments can be created on The Same Level of organizational breakdown structure (with respect to department where shortcut menu was invoked) or One Level Lower (new department would become subordinate with respect to department where shortcut menu was invoked)– select desired option from menu. If you choose to add new department - department properties dialog window for this department would appear. To view or change properties of department, resource or assignments invoke shortcut menu with a right mouse button click on corresponding object row number and select Properties or double click on corresponding object row number. See Gantts diagrams Description for more details on available actions in Resource Gantt diagram.
4.2.6.2. Resource Gantt Options Dialog Window
Allows setting up resource gantt diagram options.
Show frame contains the following options:
- ALAP Schedule switches on resources and departments presentation in accordance with ALAP Start and ALAP Finish dates as empty boxes.
- Horizontal Grid and Vertical Grid switch on and off horizontal and vertical grids.
- Data on diagram allows selecting what data to show in Gantt diagram. Click Select button to change data choice. Data is presented next to activities and resources graphical presentations. Name is shown by default.
Hide frame contains the following options:
- Resources sets whether to show resources
- Departments sets whether to show departments
- Links sets whether to show links
- Milestones sets whether to show milestone assignments in resource gantt.
- Multi-resources and Skills – sets whether to show multi-resources and resource skill in resource gantt.
- Idle Assignments option, if selected, hides idle resource assignments. Resource assignment is considered idle if its scheduled quantity (Quantity [Scheduled] column) and actual time (Duration, Hours [Actual] column) both equal zero. Idle assignments appear in skills. After scheduling, not all resource included in skills, are used to perform activity. There
Spider Project User GuideProject Presentations
30
might be different reasons for such situations. For example, if some resource in skill was assigned to an activity, but later on was used for another activity with higher priority, this resource would be considered ‘idle’ for the activity.
- All but assignments – sets to show assignments only;
Keep as it is, if selected, keeps the same level of OBS.
- Keep as it is / Expand to:
- Assignments expands resource structure in resource gantt to assignments so that departments, resources, and assignments are presented.
- Resources expands resource structure to resources, so that departments and resources are presented.
- Level activates field to enter presentation level number. If non-existing level is entered, a corresponding message will appear.
Columns frame contains Default order and width option to set up default columns set.
To change height of rows you can define Number of rows in cells. If you select two and more rows per cell, additional information (specified in field Data on Diagram of the frame Show) would be displayed above resources and department bars.
Hierarchic indent size – lets you set indent in hierarchy of department, resources and assignments. 10 is set by default (2 - 20).
Time Scale Setup button opens time scale dialog window where you can set up the time frame for diagram presentation.
4.2.6.3. Resource Gantt Main Menu Project
OBS – allows to switch between organizational breakdown structures, to create new and edit existing project OBS in project structures list dialog window. Properties – opens project properties dialog window for review and edit. Passport – opens project passport window. Data – contains list of project data. Selecting each item opens corresponding dialog window or table for review and edit. Views – contains list of project views. Monitoring – opens monitoring table. Send Notifications – sends the information about beginning and end of works in phases and activities, to managers responsible for the phases and to assigned resources. The number of days, for which the managers and resources should be informed before, must be defined in the project properties dialog window and in the user properties dialog window and resource properties window. It is necessary to indicate e-mail addresses and to activate and define the option to Notify managers / resources about works if less than…days left. Next View, Previous View– lets move between left toolbar buttons, corresponding to project data and views. Open (F12) – opens projects and documents dialog window; Save (Ctrl +S)– saves project. Save As – opens projects and documents dialog window; lets save opened project with different code, version number or to different Storage folder. Save Without Costs – saves project without costs data deleting activity, material and resource costs. Check Data Integrity – achieves testing correctness and consistency of the information of project. Create Standard Reference-Book – opens create standard reference-books dialog window , which allows creating reference-books, on the basis of the calculated or actual information of the projects. Export –
Into CSV-files – saves active project as text files of CSV format. Into Data Base – saves active project to DBF file (see Project Export to Database for details); Into MPX-file – saves active project to MPX file format . Into MS Project – exports current project to MS Project and opens it; Primavera database – exports current project to Primavera P3e database. Version 3 and Version 4 options are available.

Spider Project User GuideProject Presentations
31
Upload to FTP-Server – opens FTP servers dialog window; select desired FTP server and press Send to send project. Send by E-mail – sends the current project via e-mail. Close – closes current project file and removes project icon from the main window.
Gantt Print Preview – opens print preview window. Options – opens Activity Gantt diagram options dialog window, where you can customize diagram view in graphic area. Load Configuration – restores order of columns, their width in table area and time scale in graphic area from configuration file (*.stc); all columns created by user (and not described in configuration file) in current project will be hidden and can be unhidden later through Show Columns( Ins) command from the shortcut menu (invoked with right mouse button click on columns name) or from main menu Edit item. Save Configuration – saves order of columns, their width in table area and time scale in graphic area to configuration file (*.stc). Export Table to file – exports the table part of the resources Gantt into the CSV (Comma Separated Value) type files or HTML. Export Table to Data Base – exports table to data base. Export Table to Excel – exports table to excel. Export Table to CSV-file – exports to CSV or HTML file.delete Copy as a new Document – copies table of gantt as a new reference-book.
Edit
Undo Last Action – undoes last action. Protocol of Actions – opens protocol of actions table. Formulae – opens dialog window to create, edit and apply of formulas. Script Create – opens Script dialog window where you can enter, edit and execute scripts; Execute from File – lets you execute script stored in text file.
Execute– lets you execute a script from the list of previously created ones. Execute Favourite Script– lets you execute the script, which was previously created and chosen as
favourite. Show Columns –opens fields' list dialog window; lets you select hidden columns (fields) to display before active one. Hide Column – hides selected columns (these columns are not actually deleted from internal database). Autofit All Columns – resizes all columns in order to make their contents available to be seen completely. Search / Replace – opens Search dialog window and starts context string search; Repeat Search / Replace – repeats search of context string starting current cell. Copy – copies selected rows or cells to the clipboard. Cut – puts selected rows or cells to the clipboard. Objects are actually deleted from Activity Gantt only after Paste command. Paste – inserts objects from the clipboard: to current work breakdown structure or to selected cell. You can Paste copied (or cut) activities and phases to selected phase: - One Level Lower – choose this option to insert phase as a subphase of the current phase (or activity of current
phase). New phase will be placed next to selected. - The Same Level - choose this option to insert phase of the project on the same level of WBS as the selected
phase. Phase of the first level cannot be added. Select all – selects all rows of Activity Gantt.
Filter Apply – opens filters dialog window where you can create, edit and apply filters. Filter by Selected Rows – allows filtering out contents of table by the selected rows from the filters dialog window.

Spider Project User GuideProject Presentations
32
Restore – abolishes the action of the used filter.
Calculations Scheduling Options – opens dialog window where you can specify scheduling options. Scheduling – performs schedule calculation not taking into account any existing resources constraints. Resource Constrained Scheduling – performs resource constrained scheduling, i.e. taking into account availability of required amount of resources, materials and financing. Cost and Materials Calculation Options – calculates Cost and Materials Calculation – calculates (recalculates) costs, materials requirements and resources work load according to current schedule. Calculations EVA Columns – calculates EVA and then displays calculated parameters values in corresponding gantt columns (preliminary in cost calculation settings dialog window it is necessary to select corresponding option to Calculate EVA columns). Calculations Resource Center Columns – calculates values in Resource Centers (Quantity) and Resource Centers (Workload) columns (preliminary in cost calculation settings dialog window it is necessary to select corresponding option to Callculate columns in Resource Center frame). Resource Peak Work Load - calculates (recalculates) resources work load on activities assignments. Phase, Department and Resource Dates – calculates phases start and finish dates; calculates dates of work start and finish for departments and resources. Risk Analysis Options – opens dialog window where you can specify options of risk analysis. Risk Analysis – performs risk analysis; risk analysis setup dialog window is invoked first. Success Probability Calculation – opens dialog window (the same as in risk analysis) and performs probabilities calculation of meeting target goals in Project Parameter Probability frame. Recreate Success Probability Trends – recreates success probability trends on the set of projects selected in select projects dialog window. Hide Risk Analysis Results – undoes performed risk analysis. Clear Success Probabilities Fields – clears data in field [Probability].
Report Reports and Diagrams Templates:
Table – opens report templates list window where you can choose report template for table report. Diagram – opens report templates list window where you can choose report template to create a diagram.
General Reports and Diagrams: Table – creates report on the whole project data; opens Report settings dialog window. Diagram – draws diagram on the whole project data in the lower part of Activity Gantt; opens diagram settings dialog window.
EVA Reports and Diagrams Templates: Table – opens a dialog window with the list of EVA reports templates to choose the template on which the new table report will be created Diagram – opens a dialog window with the list of EVA reports templates to choose the template on which
the new diagram will be created Earned Value Analysis:
Table – creates earned value analysis report; opens earned value analysis report properties dialog window first. Diagram – draws earned value analysis diagram in the lower part of Activity Gantt; opens earned value analysis diagram properties dialog window first.
Success Probability Trends Templates: Table – opens a dialog window with the list of Success probability trends reports templates to choose the template on which the new table report will be created Diagram – opens a dialog window with the list of Success probability trends reports templates to choose
the template on which the new diagram will be created Success Probability Trends:

Spider Project User GuideProject Presentations
33
Table – creates success probability trends report on the whole project data; opens success probability trends report properties dialog window first. Diagram – draws success probability trends diagram in the lower part of Activity Gantt; opens success probability trends properties dialog window first.
Variance Trends Templates: Table – opens a dialog window with the list of variance trends reports templates to choose the template on which the new table report will be created Diagram – opens a dialog window with the list of variance trends reports templates to choose the template on which the new diagram will be created
Variance Trends: Table – opens variance trends report settings dialog window to create a new table report for project. Diagram – opens variance trends diagram settings dialog window to create a new diagram for project.
Resource Overloads Bar – reflects the diagram of the Resource Overloads of the project (see Searching for resource overloads). Resource Overloads Report – creates a table of report on the Resource Overloads. In the report besides the overloaded resources activities to which these resources were assigned are also available to see. Project Truncation – invokes the truncate project by period dialog window to set the period during which it is necessary to obtain project truncation.
Comparison With Baseline – performs comparison of opened project with its baseline project version. With Other Project – performs comparison of opened project with another project selected in projects and documents dialog window. Recreate Variance Trends – recreates variance trends on the set of projects selected in select projects dialog window. Hide Comparison – undoes comparison. Comparison Setup – opens dialog window and allows to customize project comparison.
Window Close All – closes all opened documents and activates Main Window Cascade – arranges all opened projects and documents windows on the screen to make all of them visible even partially. Tile – arranges all opened projects and documents windows on the screen to make them no overlapping. Next Window – makes next opened window active. Previous Window – makes previous opened window active. Maximize/Restore – maximizes opened window size on the screen or restores it to original size. Maximize/Restore All – maximizes all opened windows size on the screen or restores them to original size. Main Window – makes main window active. List of opened projects and documents: project (or document) name; project (or document) code; for opened projects – type of data window. E.g. MyProject [Code1] Activity Gantt
• Project 2 [Code3] Multi-resources Reference-book [Ref1]
Active window is marked with a dot.
Help and Support Spider Project Help – opens help document. Project Scheduling Technique - opens a PDF document, which provides help about Project Scheduling techniques written by V.I.Liberzon. Data Base Structure - opens a PDF document with the list of tables and communications between them.

Spider Project User GuideProject Presentations
34
Technical Support E-Mail - allows sending an E-mail to address [email protected] via Outlook Express to receive technical support. Information and News – opens the internet address http://www.spiderproject.ru/aboutus_e.php via default internet browser to access latest news and information about Spider Project Management Technologies. Installation Instruction – shows installation instructions, minimum and optimum system requirements. Spider Project Update Site – allows updating current version of software. Note that Program must be closed before applying updates. About – displays brief information about current Spider Project program version and Spider Management Technologies.
4.2.6.4. Columns of Resource Gantt Table - Level – department level in organizational breakdown structure; - Code – A sequence of characters that should be unique for each project object type. Code is made up by letters, figures
and special characters (#$%&@_-~) without spaces and is case sensitive. - Name – full object name. - Type DPH defines DPH type of activity, to which resource is assigned – duration, productivity, hammock or milestone; - Type – default field for organizing of data transfer from reference-books for changing of objects’ properties. - Interruptability – defines, whether splits in activity performance are enabled or not (i.e., ‘Yes’ or ‘No’). Resource
assignments inherit this parameter from corresponding activities. - ASAP, ALAP - preferable time of activity performance – either ‘as soon as possible’ or ‘as late as possible’. Resource
assignments inherit this parameter from corresponding activities. - Variable Work Load and Number – defines, whether work load coefficients and number of resources are to be
estimated in schedule calculation (i.e., ‘Yes’ or ‘No’); - Folder - full path to attached folder, that may be used to store files with referential information for current object.
Double click on the cell in this column allows defining the folder path or open the folder (if its path has already been defined).
- OLE objects; icon defines whether documents of other applications (Word, Excel etc.) are attached to the document. Double click on this field opens dialog window of corresponding object properties on OLE objects and Folder page.
- Notes - A field that lets users to provide an object with notes and explanations. Double click on this field opens dialog window of corresponding object properties on Notes page.
- Short name – should an object have too long name, you can set shorter name as alternative to full name. - Unique Assignment Code - Unique code, automatically generated according to activity code, resource code and
Assignment Index, connected by underline symbol; - Assignment Index - editable number to be added to assignment Code to ensure its uniqueness to activity several times
(for example, the same resource as part of different resource skills or multi-resources assigned to activity). - Start –resource work start date. If an activity has not actually started, this field would be equal to Start [ASAP]. If
activity is already being executed and performance data is added to monitoring, this field would be equal to Start [Actual].
- Finish –resource work finish date. If an activity has not actually finished, this field would be equal to Finish [ASAP]. If activity has already been executed and performance data has been added to monitoring, this field would be equal to Finish [Actual].
- Duration, Days [Remaining] – remaining resource work duration in days according to calculated schedule; - Duration, Hours [Remaining] – remaining resource work duration in hours according to calculated schedule; - Number of Working Days [Remaining] – a whole number of working days, required to complete department or
resource assignment work according to the current schedule calculated; the number of days is rounded up; a day is counted as working if it contains at least one second of working time.
- Duration, Hours [Actual] - total resource work duration in hours according to included performance data; - Duration, Hours [Cumulative] – sum of actual and remaining resource work duration in hours; - Volume [Remaining] – remaining part of work to be performed by the resource. - Volume [Actual] - actual part of work performed by the resource according to included performance data; - Volume [Cumulative] – sum of actual and remaining activity volume;

Spider Project User GuideProject Presentations
35
- Volume unit –activity units (e.g.,’m2’, ‘pieces’); - Total Cost [Remaining] – remaining resource work cost; - Float, hours; Float, days –resource assignment float duration in hours or days. - Quantity [Scheduled] – estimated number of resources, required for activity execution; - Quantity- user assigned number of resources for activity execution; - Quantity [Minimal] – minimal number of resources assigned to activity execution; this value can be entered for
assignments with Variable quantity and Work load enabled in the assignment properties dialog window. Minimal quantity value participates in calculation of resources quantity, assigned to activity (Quantity [Scheduled])
- Calendar –calendar code, according to which resource is executing the activity. - Productivity – productivity of one resource unit per hour (i.e. number of activity volume units, that current resource can
execute per hour) - Work Load – work load of one resource unit, assigned to activity execution. Work load is set in percent of resource
working time that the resource is to spend on activity execution. By default work load is equal to 100%. - Work Load [Scheduled] – calculated work load coefficient for one resource unit, assigned to activity execution. If
resource is assigned to activity execution as part of multi-resource, its scheduled work load would be equal to resource work load multiplied by multi-resource work load;
- Work Load [Minimal] – minimal work load coefficient for one resource unit, assigned to activity execution; this value can be entered for assignments with Variable quantity and Work load enabled in the assignment properties dialog window. Minimal Work Load value participates in calculation of resources quantity, assigned to activity (Work Load [Scheduled])
- Priority – defines the order of resources assignment in resource constrained scheduling. Resources with higher priority are assigned earlier.
- Start [ASAP] (as soon as possible) – the earliest possible point in time on which resource can start work, based on the network logic and any schedule constraints. ASAP Start dates can change as the project progresses and changes are made to the project plan.
- Finish [ASAP] (as soon as possible) - the earliest possible point in time on which resource can finish work, based on the network logic and any schedule constraints. ASAP Finish dates can change as the project progresses and changes are made to the project plan.
- Start [ALAP] (as late as possible) – the latest possible point in time on which resource may start work without delaying the project finish date.
- Finish [ALAP] (as late as possible) – the latest possible point in time on which resource may finish work without delaying the project finish date.
- Start [Actual], Finish [Actual] –resource work actual start and finish dates according to included performance data; - Start [NET], Finish [NLT] – constraint on the start (not earlier than) and finish (not later than) dates of activity
execution, to which resource is assigned. - Total Cost [Actual] - actual cost of resource work according to included performance data; - Total Cost [Cumulative] – equals to actual cost plus remaining cost; - Start [Critical], Finish [Critical], Total Cost [Critical] – critical assignment start, finish dates and total cost; these
values are used in risk analysis; - Start [Buffer], Finish [Buffer] – buffer values, used in risk analysis; buffer equals to difference between critical and
remaining (ASAP) values; - Total Cost [Buffer] - difference between critical and remaining cost; - Finish [Target], Total Cost [Target] – defined assignment target finish date and total cost; these values are required for
estimation of probabilities in success probabilities calculation; - Finish [Target Probability] – probability of completing the resource work up to target finish date; - Total Cost [Probability] - probability of meeting the resource work target total cost; - Start [Original]; Finish [Original] – resource work start and finish dates in original project version (see projects
comparison for details); - Duration, Hours [Original]; Volume [Original]; Total Cost [Original] – resource work duration (in hours), volume (in
corresponding units) and total cost in original project version (see projects comparison for details); - Completion Variance, Days – difference in ASAP finish dates of current and original project versions’ assignments in
days (see projects comparison for details); - OCWP – Original Cost of Work Performed, cost of work performed according to original project version;
Spider Project User GuideProject Presentations
36
- OCV – Original Cost Variance, variance of performed work cost in comparison to original project version. Equals to difference between OCWP and actual cost of work performed (Total Cost [Actual]);
- Resource-Hours [Remaining] – remaining planned volume of resource-hours of resource assignments (in resource-hours). ‘Assignment resource-hours’ can be calculated as assignment duration multiplied by resource work load and multiplied by the number of assigned resources. ‘Activity resource-hours’ can be calculated as sum of all corresponding assignments’ resource-hours
- Resource-Hours [Actual] - actual volume of resource-hours of resource assignments (in resource-hours). - Resource-Hours [Cumulative] – sum of actual and remaining resource-hours; - User defined fields; - Fields with fixed, remaining and actual consumption of all materials (and material centers) and expenditures of cost
components (and cost centers); their profiles.
4.3. Work Breakdown Structure
4.3.1. WBS
Helps to present current WBS (Work Breakdown Structure)
Phases are shown as boxes in WBS view. Phase Name (and / or other phase data set up in template) is present in the box, in tree mode and next to the corresponding box, in hierarchy mode. Phases are located level by level: top level is the project phase; levels below are phases of the second level, third level, and so on.
Each level has its own background color, which can be changed from main program window by clicking Colors icon on the toolbar. Color setup dialog window will be invoked to select Gantt Hierarchy (background) from Group list on the left and change the colors of corresponding levels from Item lists.
Phases contain sub-phases. All same-level sub-phases are located in one row with the corresponding parent phase located one level above and centered relatively to its sub-phases. Arrows are drawn from the parent phase to its sub-phases. To move phase within a level, drag and drop phase box to its new location.
Double clicking on the phase box invokes phase properties dialog window.
Edit diagram layout in diagram options dialog window, invoked by selecting item Options from Diagram menu. Set up graphical presentation of WBS (Type) - Hierarchy or Tree.
When As Is field is selected, graphical presentation will be presented as it exists .If level of detail for the presentation is needed to be defined, enter the lowest level number (to be presented in diagram), after selecting To Level option. For example, if ‘2’ is entered, phases of 1st and 2nd levels will be shown.
Phase shortcut menu, which can be invoked by right clicking on it, contains the following options:
- Properties; to edit phase properties
- Reports and Diagrams Templates; to create general reports(on templates) for phases
- General Reports and Diagrams; to create general reports for phases
- New Phase to add a new phase one level lower or of the same level; and
- Delete to delete the phase.
4.3.2. Work Breakdown Structure Main Menu Project
WBS – lets switch between work breakdown structures, create new and edit existing project WBS in project structures list dialog window. Properties – opens project properties dialog window for review and edit. Passport – opens project passport window. Data – contains list of project data. Selecting each item opens corresponding dialog window or table for review and edit.

Spider Project User GuideProject Presentations
37
Views – contains list of project views. Monitoring – opens monitoring table. Send Notifications – sends the information about beginning and end of works in phases and activities, to managers responsible for the phases and to assigned resources. The number of days, for which the managers and resources should be informed before, must be defined in the project properties dialog window and in the user properties dialog window and resource properties window. It is necessary to indicate e-mail addresses and to activate and define the option to Notify managers / resources about works if less than…days left. Open (F12) – opens projects and documents dialog window; Save – saves project. Save as – opens projects and documents dialog window; lets save opened project with different code, version number or to different Storage folder. Save Without Costs – saves project without costs data deleting activities, materials, resources costs. Check Data Integrity – achieves testing correctness and consistency of the information of project. Export –
Into CSV-files – saves active project as text files of CSV format. Into Data Base – saves active project to DBF file (see Project Export to Database for details); Into MPX-file – saves active project to MPX file format . Into MS Project – exports current project to MS Project and opens it; Primavera database – exports current project to Primavera P3e database. Version 3 and Version 4 options are available.
Upload to FTP-Server – opens dialog window of FTP servers; select desired FTP server and press Send to send project. Send by E-mail – sends the current project via e-mail. Close – closes current project file and removes project icon from the main window.
Diagram Print Preview – opens print preview window. Options – opens Activity Network options dialog window, where you can specify type of arrows and level of work breakdown structure to be displayed. Template – opens template dialog window and lets you customize text displayed in activities boxes.
Edit Undo Last Action – undoes last action. Protocol of Actions – opens protocol of actions table.
Window Close All – closes all opened documents and activates Main Window Cascade – arranges all opened projects and documents windows on the screen to make all of them visible even partially. Tile – arranges all opened projects and documents windows on the screen to make them no overlapping. Next Window – makes next opened window active. Previous Window – makes previous opened window active. Maximize/Restore – maximizes opened window size on the screen or restores it to original size. Maximize/Restore All – maximizes all opened windows size on the screen or restores them to original size. Main Window – makes main window active. List of opened projects and documents: project (or document) name; project (or document) code; for opened projects – type of data window. E.g
MyProject [Code1] Activity Gantt
• Project 2 [Code3] Multi-resources

Spider Project User GuideProject Presentations
38
Reference-book [Ref1] Active window is marked with a dot.
Help and Support Spider Project Help – opens help document. Project Scheduling Technique - opens a PDF document, which provides help about Project Scheduling techniques written by V.I.Liberzon. Data Base Structure - opens a PDF document with the list of tables and communications between them. Technical Support E-Mail - allows sending an E-mail to address [email protected] via Outlook Express to receive technical support. Information and News – opens the internet address http://www.spiderproject.ru/aboutus_e.php via default internet browser to access latest news and information about Spider Project Management Technologies. Installation Instruction – shows installation instructions, minimum and optimum system requirements. Spider Project Update Site – allows updating current version of software. Note that Program must be closed before applying updates. About – displays brief information about current Spider Project program version and Spider Management Technologies.
4.3.3. WBS, OBS AND PBS Options Dialog Window
Allows setting up WBS type, and lowest structure detail level of presentation in OBS (Organizational Breakdown Structure) WBS (Work Breakdown Structure) or PBS (Project Breakdown Structure)
Select between Hierarchy and Tree options.
In To Level field enter the lowest level number to be presented in diagram. For example, if ‘2’ is entered, only phases of 1st and 2nd levels will be shown. If ‘0’ is entered, all structure levels will be shown)
4.4. Organizational Breakdown Structure
4.4.1. OBS
OBS displays organizational resource structure. Each department is represented by a rectangle with information specified in the template. To view (edit) OBS template in template dialog window press Template button on the toolbar or select menu Diagram -> Template. Departments are displayed according to organizational hierarchy and are connected by arrows; colors of rectangles represent departments’ level. You can define colors in dialog window from main program window menu Options -> Colors. Double click on department’s rectangle opens its properties dialog window; right mouse button click invokes shortcut menu. To select (highlight) several departments press and hold Ctrl button and click with left mouse button on desired departments’ rectangles. To change order of departments of the same level point to department rectangle with left mouse button and drug it to new location.

Spider Project User GuideProject Presentations
39
You can display all departments or departments up to certain level: press Options button on the toolbar (or select menu Diagram -> Options) and specify the largest departments’ level to display (zero displays all departments).
4.4.2. Organizational Breakdown Structure Main Menu Project
OBS – allows to switch between organizational breakdown structures, to create new and edit existing project OBS in project structures list dialog window. Properties – opens project properties dialog window for review and edit. Passport – opens project passport window. Data – contains list of project data. Selecting each item opens corresponding dialog window or table for review and edit. Views – contains list of project views. Monitoring – opens monitoring table. Send Notifications – sends the information about beginning and end of works in phases and activities, to managers responsible for the phases and to assigned resources. The number of days, for which the managers and resources should be informed before, must be defined in the project properties dialog window and in the user properties dialog window and resource properties window. It is necessary to indicate e-mail addresses and to activate and define the option to Notify managers / resources about works if less than…days left. Next View, Previous View– lets move between left toolbar buttons, corresponding to project data and views. Open (F12) – opens projects and documents dialog window; Save (Ctrl +S)– saves project. Save As – opens projects and documents dialog window; lets save opened project with different code, version number or to different Storage folder. Save Without Costs – saves project without costs data deleting activity, material and resource costs. Check Data Integrity – achieves testing correctness and consistency of the information of project. Create Standard Reference-Book – opens create standard reference-books dialog window , which allows creating reference-books, on the basis of the calculated or actual information of the projects. Export –
Into CSV-files – saves active project as text files of CSV format. Into Data Base – saves active project to DBF file (see Project Export to Database for details); Into MPX-file – saves active project to MPX file format . Into MS Project – exports current project to MS Project and opens it; Primavera database – exports current project to Primavera P3e database. Version 3 and Version 4 options are available.
Upload to FTP-Server – opens dialog window of FTP servers; select desired FTP server and press Send to send project. Send by E-mail – sends the current project via e-mail. Close – closes current project file and removes project icon from the main window.
Diagram Print Preview – opens print preview window. Options – opens Activity Gantt diagram options dialog window, where you can customize diagram view in graphic area. Template – opens templates dialog window to set up a template that could later be used for automatic text changes in activities, phases, and departments
Edit Undo Last Action – undoes last action. Protocol of Actions – opens protocol of actions table. Formulae – opens dialog window to create, edit and apply of formulas. Script Create – opens Script dialog window where you can enter, edit and execute scripts;

Spider Project User GuideProject Presentations
40
Execute from File – lets you execute script stored in text file. Execute– lets you execute a script from the list of previously created ones. Execute Favourite Script– lets you execute the script, which was previously created and chosen as
favourite. Show Columns –opens fields' list dialog window; lets you select hidden columns (fields) to display before active one. Hide Column – hides selected columns (these columns are not actually deleted from internal database). Autofit All Columns – resizes all columns in order to make their contents available to be seen completely. Search / Replace – opens Search dialog window and starts context string search; Repeat Search / Replace – repeats search of context string starting current cell. Copy – copies selected rows or cells to the clipboard. Cut – puts selected rows or cells to the clipboard. Objects are actually deleted from Activity Gantt only after Paste command. Paste – inserts objects from the clipboard: to current work breakdown structure or to selected cell. You can Paste copied (or cut) activities and phases to selected phase: - One Level Lower – choose this option to insert phase as a subphase of the current phase (or activity of current
phase). New phase will be placed next to selected. - The Same Level - choose this option to insert phase of the project on the same level of WBS as the selected
phase. Phase of the first level cannot be added. Select all – selects all rows of Activity Gantt.
Filter Apply – opens dialog window where you can create, edit and apply filters. Filter by Selected Rows – allows filtering out contents of table by the selected rows from the filter dialog window Restore – abolishes the action of the used filter.
Calculations Scheduling Options – opens dialog window where you can specify scheduling options. Scheduling – performs schedule calculation not taking into account any existing resources constraints. Resource Constrained Scheduling – performs resource constrained scheduling, i.e. taking into account availability of required amount of resources, materials and financing. Cost and Materials Calculation Options – calculates Cost and Materials Calculation – calculates (recalculates) costs, materials requirements and resources work load according to current schedule. Calculations EVA Columns – calculates EVA and then displays calculated parameters values in corresponding gantt columns (preliminary in cost calculation settings dialog window it is necessary to select corresponding option to Calculate EVA columns). Calculations Resource Center Columns – calculates values in Resource Centers (Quantity) and Resource Centers (Workload) columns (preliminary in cost calculation settings dialog window it is necessary to select corresponding option to Callculate columns in Resource Center frame). Resource Peak Work Load - calculates (recalculates) resources work load on activities assignments. Phase, Department and Resource Dates – calculates phases start and finish dates; calculates dates of work start and finish for departments and resources. Risk Analysis Options – opens risk analysis dialog window where you can specify options of risk analysis. Risk Analysis – performs risk analysis; risk analysis setup dialog window is invoked first. Success Probability Calculation – opens a dialog window (same as in risk analysis) and performs probabilities calculation of meeting target goals in Project Parameter Probability frame. Recreate Success Probability Trends – recreates success probability trends on the set of projects selected in select projects dialog window. Hide Risk Analysis Results – undoes performed risk analysis. Clear Success Probabilities Fields – clears data in field [Probability].
Report

Spider Project User GuideProject Presentations
41
Reports and Diagrams Templates: Table – opens report templates list window where you can choose report template for table report. Diagram – opens report templates list window where you can choose report template to create a diagram.
General Reports and Diagrams: Table – creates report on the whole project data; opens report settings dialog window. Diagram – draws diagram on the whole project data in the lower part of Activity Gantt; opens Diagram settings dialog window.
EVA Reports and Diagrams Templates: Table – opens a dialog window with the list of EVA reports templates to choose the template on which the new table report will be created Diagram – opens a dialog window with the list of EVA reports templates to choose the template on which
the new diagram will be created Earned Value Analysis:
Table – creates earned value analysis report; opens earned value analysis report properties dialog window first. Diagram – draws earned value analysis diagram in the lower part of Activity Gantt; opens earned value analysis diagram properties dialog window first.
Success Probability Trends Templates: Table – opens a dialog window with the list of Success probability trends reports templates to choose the template on which the new table report will be created Diagram – opens a dialog window with the list of Success probability trends reports templates to choose
the template on which the new diagram will be created Success Probability Trends:
Table – creates success probability trends report on the whole project data; opens success probability trends report properties dialog window first. Diagram – draws success probability trends diagram in the lower part of Activity Gantt; opens success probability trends properties dialog window first.
Variance Trends Templates: Table – opens a dialog window with the list of variance trends reports templates to choose the template on which the new table report will be created Diagram – opens a dialog window with the list of variance trends reports templates to choose the template on which the new diagram will be created
Variance Trends: Table – opens variance trends settings dialog window to create a new table report for project. Diagram – opens variance trends settings dialog window to create a new diagram for project.
Resource Overloads Bar – reflects the diagram of the Resource Overloads of the project (Searching for resource overloads
Resource Overloads Report – creates a table of report on the Resource Overloads. In the report besides the overloaded resources activities to which these resources were assigned are also available to see. Project Truncation – invokes the truncate project by period dialog window to set the period during which it is necessary to obtain project truncation.
Comparison With Baseline – performs comparison of opened project with its baseline project version. With Other Project – performs comparison of opened project with another project selected in projects and documents dialog window. Recreate Variance Trends – recreates variance trends on the set of projects selected in select projects dialog window. Hide Comparison – undoes comparison. Comparison Setup – opens dialog window and lets customize project comparison.
Window Close All – closes all opened documents and activates Main Window

Spider Project User GuideProject Presentations
42
Cascade – arranges all opened projects and documents windows on the screen to make all of them visible even partially. Tile – arranges all opened projects and documents windows on the screen to make them no overlapping. Next Window – makes next opened window active. Previous Window – makes previous opened window active. Maximize/Restore – maximizes opened window size on the screen or restores it to original size. Maximize/Restore All – maximizes all opened windows size on the screen or restores them to original size. Main Window – makes main window active. List of opened projects and documents: project (or document) name; project (or document) code; for opened projects – type of data window. E.g. MyProject [Code1] Activity Gantt
• Project 2 [Code3] Multi-resources Reference-book [Ref1]
Active window is marked with a dot.
Help and Support Spider Project Help – opens help document. Project Scheduling Technique - opens a PDF document, which provides help about Project Scheduling techniques written by V.I.Liberzon. Data Base Structure - opens a PDF document with the list of tables and communications between them. Technical Support E-Mail - allows sending an E-mail to address [email protected] via Outlook Express to receive technical support. Information and News – opens the internet address http://www.spiderproject.ru/aboutus_e.php via default internet browser to access latest news and information about Spider Project Management Technologies. Installation Instruction – shows installation instructions, minimum and optimum system requirements. Spider Project Update Site – allows updating current version of software. Note that Program must be closed before applying updates. About – displays brief information about current Spider Project program version and Spider Management Technologies.
4.4.3. WBS, OBS AND PBS Options Dialog Window
Allows setting up WBS type, and lowest structure detail level of presentation in OBS (Organizational Breakdown Structure) WBS (Work Breakdown Structure) or PBS (Project Breakdown Structure)
Select between Hierarchy and Tree options.
In To Level field enter the lowest level number to be presented in diagram. For example, if ‘2’ is entered, only phases of 1st and 2nd levels will be shown. If ‘0’ is entered, all structure levels will be shown)

Spider Project User GuideProject Presentations
43
4.5. Activity Network
4.5.1. Activity Network
Activity Network displays phases and activities according to current work breakdown structure. You can change current WBS in project structures dialog window: choose menu Project -> WBS and select desired structure to be displayed. Each activity is displayed as a box (you can customize color and shape of activities boxes through shortcut menu invoked with right mouse button click on corresponding boxes). To move activity bar across diagram click with left mouse button on the grey rectangle in the upper part of bar and drag it to desired place. Completed activities are dashed crosswise, while partially completed activities are crossed from upper left to lower right bar angle. Activity links are displayed as arrows. Outdoing links are drawn from upper sides of activity bars and incoming – to lower sides of bars. Links from start and to start of activities are drawn from left sides of activities bars; links from finish and to finish of activities are drawn from right sides of activities bars.
To display project phases on Activity Diagram press Show WBS button on the toolbar (or select menu Diagram -> Show WBS). Phases are displayed as rectangles with corresponding activities inside. To move phase bar across diagram click with left mouse button on phase name and drag it to desired place. Moved phases and activities are positioned across the grid, which can be displayed pressing Show / Hide Grid button (or select menu Diagram -> Options and check Show Grid box). To highlight one or several activities click on desired activities with left mouse button keeping Ctrl keyboard button pressed. Multiple clicks highlight or undo highlight of activity bar. To move activity from one phase to another first enable phase display (press Show WBS button on the toolbar or select menu Diagram -> Show WBS), then select activity by left mouse button (point to rectangle in the upper bar part) with Shift keyboard button pressed, drag with mouse cursor to desired phase and release Shift and mouse buttons. Double click on activity bar (or phase) invokes activity properties dialog window (or phase properties dialog window)

Spider Project User GuideProject Presentations
44
- To establish new link between activities perform a left click with mouse on preceding activity and keep mouse button pressed until succeeding activity. Later you can specify link properties in opened dialog window. To edit or delete link repeat this action (as if you wished to create link) and select from opened shortcut menu Properties or Delete. Note that properties dialog window will be opened automatically for newly created object only if you have selected to Open properties for new created objects in the Spider Project Parameters Dialog window. Otherwise, newly created object will be saved with default parameters and you can edit them later
You can create or delete phases, subphases and activities in Activity Network diagram: - To create new phase activity invoke phase shortcut menu with a right mouse button click on corresponding phase
name, select New Activity set properties in opened activity properties dialog window and press OK. Note that properties dialog window will be opened automatically for newly created object only if you have selected to Open properties for new created objects in the Spider Project Parameters Dialog window. Otherwise, newly created object will be saved with default parameters and you can edit them later
- To create subphase inside phase invoke phase shortcut menu with a right mouse button click on corresponding phase name, select New Phase, set properties in opened phase properties dialog window and press OK.
- To delete phase, subphase or activity invoke shortcut menu on corresponding object and select Delete. You can customize the view of an Activity Network diagram:
- To specify colors of activity bars and phase rectangles select shortcut menu Color for corresponding object; - To change shape of activities bars select Shape from shortcut menu of the corresponding object by right clicking on it. - Main menu Diagram -> Template opens template dialog window and lets you customize text displayed in activities
bars. - To hide or display activities on diagram press Show/Hide Activities button on the toolbar. - To hide or display phases on diagram press Show/Hide Phases button on the toolbar. - You can quickly find and highlight desired activity: press Highlight button on the toolbar –activities list dialog window
will open and let you choose activities (highlight on diagram). Selected activity will be positioned in the center of diagram window. Button Cancel Highlight undoes selection of activities.
-
4.5.2. Activity Network Main Menu Project
WBS – lets switch between work breakdown structures, create new and edit existing project WBS in project structures list dialog window. Properties – opens project properties dialog window for review and edit. Passport – opens project passport window. Data – contains list of project data. Selecting each item opens corresponding dialog window or table for review and edit. Views – contains list of project views. Monitoring – opens monitoring table. Send Notifications – sends the information about beginning and end of works in phases and activities, to managers responsible for the phases and to assigned resources. The number of days, for which the managers and resources should be informed before, must be defined in the project properties dialog window and in the user properties dialog window and resource properties window. It is necessary to indicate e-mail addresses and to activate and define the option to Notify managers / resources about works if less than…days left. Open (F12) – opens projects and documents dialog window; Save – saves project. Save as – opens projects and documents dialog window; lets save opened project with different code, version number or to different Storage folder. Save Without Costs – saves project without costs data deleting activities, materials, resources costs. Check Data Integrity – achieves testing correctness and consistency of the information of project. Create Standard Reference-Book – opens create standard reference-books dialog window , which allows creating reference-books, on the basis of the calculated or actual information of the projects. Export –
Into CSV-files – saves active project as text files of CSV format.

Spider Project User GuideProject Presentations
45
Into Data Base – saves active project to DBF file (see Project Export to Database for details); Into MPX-file – saves active project to MPX file format . Into MS Project – exports current project to MS Project and opens it; Primavera database – exports exports current project to Primavera P3e database. Version 3 and Version 4 options are available.
Upload to FTP-Server – opens dialog window of FTP servers; select desired FTP server and press Send to send project. Send by E-mail – sends the current project via e-mail. Close – closes current project file and removes project icon from the main window.
Diagram Print Preview – opens print preview window. Options – opens Activity Network options dialog window, where you can specify details of diagram, level of activities to be displayed. Template – opens template dialog window and lets you customize text displayed in activities windows. Activities Only – displays only project activities and hides corresponding phases. Dispose Activities by WBS – arranges activities according to current work breakdown structure. Corresponding phases become hidden. Show WBS – displays complete work breakdown structure, including phases and activities.
Edit Undo Last Action – undoes last action. Protocol of Actions – opens protocol of actions table. Highlight – opens activities list dialog window and lets you choose which activities will be selected (highlighted on diagram). Selected activity will be positioned in the center of diagram window. Cancel Highlight – undoes selection of activities.
Filter Apply – opens dialog window where you can create, edit and apply filters. Filter by Selected Rows – allows filtering out contents of table by the selected rows from the filters dialog window. Restore – abolishes the action of the used filter.
Window Close All – closes all opened documents and activates Main Window Cascade – arranges all opened projects and documents windows on the screen to make all of them visible even partially. Tile – arranges all opened projects and documents windows on the screen to make them no overlapping. Next Window – makes next opened window active. Previous Window – makes previous opened window active. Maximize/Restore – maximizes opened window size on the screen or restores it to original size. Maximize/Restore All – maximizes all opened windows size on the screen or restores them to original size. Main Window – makes main window active. List of opened projects and documents: project (or document) name; project (or document) code; for opened projects – type of data window. E.g
MyProject [Code1] Activity Gantt
• Project 2 [Code3] Multi-resources Reference-book [Ref1]
Active window is marked with a dot.

Spider Project User GuideProject Presentations
46
Help and Support Spider Project Help – opens help document. Project Scheduling Technique - opens a PDF document, which provides help about Project Scheduling techniques written by V.I.Liberzon. Data Base Structure - opens a PDF document with the list of tables and communications between them. Technical Support E-Mail - allows sending an E-mail to address [email protected] via Outlook Express to receive technical support. Information and News – opens the internet address http://www.spiderproject.ru/aboutus_e.php via default internet browser to access latest news and information about Spider Project Management Technologies. Installation Instruction – shows installation instructions, minimum and optimum system requirements. Spider Project Update Site – allows updating current version of software. Note that Program must be closed before applying updates. About – displays brief information about current Spider Project program version and Spider Management Technologies.
4.5.3. Activity Network Options Dialog Window
Is invoked by clicking Options icon on activity network toolbar or by selecting Options from Diagram menu in Activity Network and allows setting up options for Activity Network presentation. It contains the following options and fields:
- Show Activities, Show Phases, and Show Grid - buttons to select whether activities, phases, and grid will be shown in Activity Network window.
- Show Level sets up level of presentation for the main structure phase. With number increased, structure is shown one level deeper. Show Level can be defined in WBS view only.
- Compress option, switched on, locates phases and activities the way so there is no space between them.
4.5.4. Activity Network Shortcut Menu Is invoked by right clicking on the parts of window where there is no activity, and contains one choice:
New Activity adds a new activity to the main structure phase. Set up new activity properties in the invoked activity properties dialog window.
Note that: properties dialog window will be opened automatically for newly created activity only if you have selected to open properties for new created objects in the spider project parameters dialog window. Otherwise newly created activity will be saved with default parameters.
4.5.5. Graphical Presentation of Activities and Phases in Activity Network
There are three ways to present work structure in Activity Network:
- Activities only (Activities Only);
- Activities structure by phases (Dispose Activities by WBS);
- Full activities structure with phases (Show WBS).
Activities only

Spider Project User GuideProject Presentations
47
In horizontal direction, activities are presented in diagram according to links between them. Each activity is moved by one grid step from its preceding activities. In vertical direction, activities are moved down by one grid step from each other and are presented in diagram according to their order in project activities list.
Dispose Activities by WBS
In horizontal direction, activities are presented the same way as in Activities Only. In vertical direction, activities are presented in accordance with their belonging to phases. Main phase activities are shown first. Activities of main phase sub-phases are shown one grid step lower and so on.
Show WBS
In horizontal direction, activities are presented the same way as in Activities Only, but they are included into rectangles each representing phase. The rectangles are spread out vertically according to phases’ relative connection.
Note That: Same-level phases of are not located on one horizontal level, but are shifted in vertical direction.
4.5.6. Presentation Level in Activity Network Sets up level of presentation for the phase of any level in Activity Network including main phase. With number increased, structure is shown one level deeper. All sub-phases located lower than entered number will not be shown in diagram. If you enter a number higher than the lowest phase in diagram, no changes will be reflected after. Show Level can be defined in WBS view only.
4.5.7. Show Level Dialog Window in Activity Network
Sets up level of presentation of phases in Activity Network and contains Show Level field and Compress option.
Enter level number in Show Level field. With number increased, structure is shown one level deeper. Show Level can be defined in WBS view only.
Compress option, switched on, locates phases and activities the way so there is no space between them.
4.5.8. Shape Setup Dialog Window
Allows editing shapes of graphical elements in activity network or links diagram, and contains the following:
- List of shapes is choice of three shapes to graphically present activity in diagram: rectangle, oval, and octahedron. After clicking OK button, all highlighted elements will be changed to the selected shape.
- Default sets up activity shape (rectangle by default in Activity Network).

Spider Project User GuideProject Presentations
48
4.6. Linear Diagram
4.6.1. Linear Diagram
Is a compact and clear way to present project execution schedule. This option is unique for Spider Project Software. Diagram clearly shows completion dependence on certain activity types according to their position in project metric.
Project metric is shown on X-axis [Metric] (in horizontal direction) of Linear Diagram and time is shown on Axis Y [Time] (in vertical direction). Linear Diagram contains two parts:
- Diagram of dependence of activities dates from their location in project metric (top part of diagram); and
- Location of different activities types in project metric (bottom part).
Project metric is set up by user. Usually these are user-defined fields setting up work start and finish dates. Set up project metric in linear diagram options dialog window.
If linear diagram has already been set up for open project, invoke Linear Diagram Options dialog window by clicking Options icon on Linear Diagram toolbar or by selecting Options from Diagram menu in Linear Diagram window.
If linear diagram has not been set up yet, double click on Linear Diagram icon in main program window to invoke Linear Diagram Options dialog window.

Spider Project User GuideProject Presentations
49
Linear Diagram Options dialog window allows selecting activities types. Select activity or phase types to be presented in the diagram in Not Shown list and using >> button to move them to Shown list.
Move types in the opposite direction, from Shown to Not Shown list, by using << button. Switch between Activity Types and Phase Types by selecting corresponding option above the lists.
Any activity or phase field can be used as Type field. By default, standard type field is used as Type field. Select field to be Type field from a drop-down list in Field Used as Type field.
To import type names from reference-books with matching Type and TypeName fields, click Names from Reference-book.
Select line type and line color to represent highlighted activity or phase type in Linear Diagram by selecting desired line type directly in Linear Diagram Options dialog window and desired color in the invoked Color dialog window.
Select dates and metric interval for Linear Diagram. If Whole Project option is selected, dates and metric interval will be set up automatically.
Time per second field is intended for setting up diagram’s animation speed. Animation starts with click on Animate icon on Linear Diagram toolbar. Animation builds the diagram according to project schedule and shows project execution in time.
When a rectangle with the left mouse button is drawn in diagram window, the selected area will be enlarged to the size of the
window to allow viewing any project part in detail. To come back to original diagram presentation, click Default Scale icon on the toolbar.
4.6.2. Linear Diagram Main Menu Project
Properties – opens project properties dialog window for review and edit. Passport – opens project passport window. Data – contains list of project data. Selecting each item opens corresponding dialog window or table for review and edit. Views – contains list of project views. Monitoring – opens monitoring table. Send Notifications – sends the information about beginning and end of works in phases and activities, to managers which are assingned to the phases and resources. The quantity of days, for which the managers and resources should be informed, must be defined in the project properties dialog window and in user properties dialog window and resource properties dialog window. It is necessary to indicate e-mail addresses and to activate and define the option to Notify managers / resources about works if less than…days left.

Spider Project User GuideProject Presentations
50
Open – invokes projects and documents dialog window for browsing and opening projects or documents, saved on disks. Save – saves project. Save as – opens projects and documents dialog window; lets save opened project with different code, version number or to different Storage folder. Save Without Costs – saves project without costs data, deleting activity, material and resource costs. Check Data Integrity – achieves testing correctness and consistency of the information of project. Create Standard Reference-Book – opens create standard reference-books dialog window , which allows creating reference-books, on the basis of the calculated or actual information of the projects. Export –
Into CSV-files – saves active project as text files of CSV format. Into Data Base – saves active project to DBF file (see Project Export to Database for details); Into MPX-file – saves active project to MPX file format . Into MS Project – exports current project to MS Project and opens it; Primavera database – exports current project to Primavera P3e database. Version 3 and Version 4 options are available. Upload to FTP-Server – opens dialog window of FTP servers; select desired FTP server and press Send to send project.
Send by E-mail – sends the current project via e-mail. Close – closes current project file and removes project icon from the main window.
Diagram Print Preview – opens print preview window. Options – opens linear diagram options dialog window, where you can customize diagram view.
Edit Undo Last Action – undoes last action. Protocol of Actions – opens protocol of actions table. Default Scale – restores default scale of linear diagram; Animate / Pause – starts / pauses displaying dynamics of project progress.
Window Close All – closes all opened documents and activates Main Window Cascade – arranges all opened projects and documents windows on the screen to make all of them visible even partially. Tile – arranges all opened projects and documents windows on the screen to make them no overlapping. Next Window – makes next opened window active. Previous Window – makes previous opened window active. Maximize/Restore – maximizes opened window size on the screen or restores it to original size. Maximize/Restore All – maximizes all opened windows size on the screen or restores them to original size. Main Window – makes main window active. List of opened projects and documents: project (or document) name; project (or document) code; for opened projects – type of data window. E.g. MyProject [Code1] Activity Gantt
• Project 2 [Code3] Multi-resources Reference-book [Ref1]
Active window is marked with a dot.
Help and Support Spider Project Help – opens help document.

Spider Project User GuideProject Presentations
51
Project Scheduling Technique - opens a PDF document, which provides help about Project Scheduling techniques written by V.I.Liberzon. Data Base Structure - opens a PDF document with the list of tables and communications between them. Technical Support E-Mail - allows to send an E-mail to address [email protected] via Outlook Express to receive technical support. Information and News – opens the internet address http://www.spiderproject.ru/aboutus_e.php via default internet browser to access latest news and information about Spider Project Management Technologies. Installation Instruction – shows installation instructions, minimum and optimum system requirements. Spider Project Update Site – allows updating current version of software. Note that Program must be closed before applying updates. About – displays brief information about current Spider Project program version and Spider Management Technologies.
4.6.3. Linear Diagram Options Dialog Window
Allows setting up linear diagram properties and contains the following options:
- Activity Types and Phase Types options allow selecting whether activity types or phase types will be shown in Not Shown and Shown lists below.
- Field used as type is drop-down list of activity types to select a type to be used as Type field.
- Not Shown list contains all activities or phases not reflected in Linear Diagram.
- Shown list contains all activities or phases reflected in Linear Diagram.
- >> and << buttons allow moving activities or phases between Shown and Not Shown lists. Highlight the phases to be moved with left mouse button click and use >> and << buttons to move them between lists.
- Names from Reference-book button selects field types importing from document where Type and TypeName fields exist.
- Appearance frame contains:
- Name field reflects activity or phase name highlighted in Shown list.
- Line Type choice and Color choice set up line type and line color of highlighted activity or phase presentation in Linear Diagram.

Spider Project User GuideProject Presentations
52
- Animation frame contains Time per second drop-down list allowing selecting project time to correspond to one second of animated project presentation.
- Axis Y [Time] frame contains From and To text fields to set up project time interval to be reflected on diagram vertical axis Y. Double click in the fields invokes mini-calendar dialog window to set date and time. If whole project is desired to be reflected in Linear Diagram, click Whole Project button. Time interval will be calculated automatically.
- Activity field for X-axis frame contains Start and End drop-down lists of all user-defined activity fields from activities table to set up start and finish points for all lines in Linear Diagram.
- X-axis [Metric] frame contains From and To text fields to set up project metric interval to be reflected on diagram horizontal X-axis. Setup button invokes X-axis setup dialog window.
- OK closes the dialog window saving all the changes made.
- Cancel closes the dialog window without saving the changes.
- Help invokes context help.
4.6.4. Linear Diagram Print Preview Window
Allows seeing how Linear Diagram will look on paper when printed. The following buttons are displayed on the toolbar:
context help invokes context help.
Print prints Linear Diagram.
Properties invokes Print properties dialog window to set up Title, footers and headers.
Drop-down list allows selecting Linear diagram scale in print preview window and when printed.

Spider Project User GuideProject Presentations
53
4.6.5. X-axis Setup Dialog Window
Allows setting up X-axis properties in Linear Diagram.
Axis X is text field to type in X-axis name to appear in Linear Diagram. If field if left empty, name will be combined from Start and Finish field names set up in Linear Diagram Options dialog window.
Markers frame contains two marker options: Numbers or Text. Selected marker style will appear on X-axis in Linear Diagram.
Numbers-Text list contains pairs of number-text type. Each number has its corresponding word, and vice versa.
To add new pair to the list, enter number and its corresponding text in the fields below the list, and click New button.
To edit a pair, highlight it in the list, and change its number and text in the fields below the list.
To delete pair from the list, highlight it and click Delete.
Click OK when finished.
Example 1. X-axis name is ‘X-axis’ and markers are of Numbers type:
Example 2. Markers are of Text type, and list contains two elements:
- 0 – zero
- 10 – ten.

Breakdown Structures
54
5. Breakdown Structures
5.1. WBS Definition Work Breakdown Structure is a deliverable-oriented hierarchical decomposition of the work to be executed by the project team to accomplish the project objectives and create the required deliverables. It organizes and defines the total scope of the project. Each descending level represents an increasingly detailed definition of the project work. The WBS is decomposed into workpackages. The deliverable orientation of the hierarchy includes both internal and external deliverables. (PMBOK 3rd Edition)
Activity is a component of work performed during the course of a project. Phase is a collection of logically related project activities, usually culminating in the completion of a major deliverable. Project Phases are mainly completed sequentially but can overlap in some project situations. Phases can be subdivided to subphases and then components. The lowest level phases (called work packages) are comprised of activities. This hierarchy, if the project portions of the project are divided into phases, is contained in the work breakdown structure. A project phase is a component of a project life cycle. A project phase is not a project management process group.
5.2. OBS Definition Organizational Breakdown Structure is a hierarchically organized depiction of the project organization arranged so as to realte the work packages to the performing organizational units. Also it can be defined as the structure of functional subordination of project resources resulted from project scope decomposition.
Level by level, OBS reflects more detailed resource structure description in the project.
Resource is the lowest level of resource hierarchical structure. Structure element combining several resources is called Department.
5.3. Create Breakdown Structures You can create work breakdown structures and organizational breakdown structures in all project views except Linear Diagram. Creating Work Breakdown Structures. You can create work breakdown structures in project structures list dialog window, which can be invoked from:
- Activity Gantt - WBS (work breakdown structure) - Activity Network
Choose menu Project -> WBS. Creating Organizational Breakdown Structures. You can create work breakdown structures in project structures list dialog window, which can be invoked from:
- Activity Gantt - OBS (organizational breakdown structure)
Choose menu Project -> OBS.
5.4. Full Structure Full Work Breakdown Structure (WBS) includes all project activities and all phases, created in this WBS (i.e., contains no excluded objects). Full Organizational Breakdown Structure (OBS) includes all project resources and all departments, created in this OBS (i.e., contains no excluded objects). You can create several WBS and OBS in one project. It allows different approaches for project assessment (e.g. from the point of view of the performing organization, customer, project life cycle, etc.). Usually following approaches are used for breakdown structure creation:
- Project life-cycle;

Breakdown Structures
55
- Project product components; - Functional approach; - Geographical approach.
Among different WB Structures and OB Structures, at least one breakdown structure (of each type) must be full. This is essential for proper total cost and material consumption calculations. Note that different WBS (or OBS) may contain different phases (or departments). So, breakdown structure will be considered as "full", if it contains no excluded objects from this structure.
5.5. Project Structures List Dialog Window
Project structures list dialog window to can be used to view, create and edit project work breakdown structures (when invoked in Activity Gantt) organizational breakdown structures (when invoked in Resource Gantt) and project breakdown structures (when invoked from projects portfolio)
The structures list is presented in list form with two columns: Properties and Name (Code). In column Properties attributes of structure are displayed: - attribute Full; - attribute Responsible. Frame Create Structure contains buttons to create, copy and update structures: - New button opens structure properties dialog window to deifne its properties, then creates another structure consisting
only from operations of the project, but not grouped on phases / departments. - Copy Filtered button allows to create structure in view of the filter applied to WBS allocated in the given window. - Button Copy Filtered allows creating structure in view of the filter applied to gantt diagram structure selected in the given
window. - Button Copy allows creating new structure as a full copy of the structure selected in the list of project structures. - With buttons Create by codes and Create by codes from structure create structure by codes dialog window will be invoked to choose fields, by which sequences the new structure will be grouped. Create by codes will allow to group structure on codes of selected fields. Create by codes from structure will allow to group new structure on values of structure phase fields selected in given window, and in Code floor structure code of initial structure on which fields of phases is grouped will be displayed.
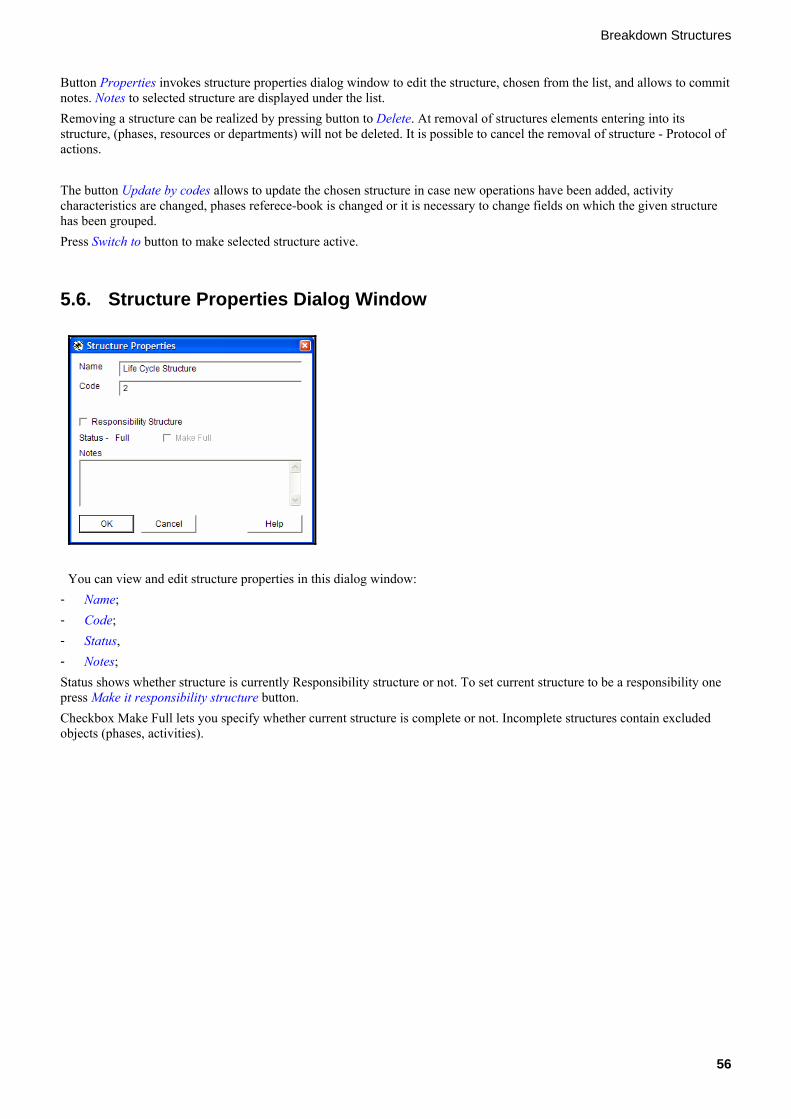
Breakdown Structures
56
Button Properties invokes structure properties dialog window to edit the structure, chosen from the list, and allows to commit notes. Notes to selected structure are displayed under the list. Removing a structure can be realized by pressing button to Delete. At removal of structures elements entering into its structure, (phases, resources or departments) will not be deleted. It is possible to cancel the removal of structure - Protocol of actions. The button Update by codes allows to update the chosen structure in case new operations have been added, activity characteristics are changed, phases referece-book is changed or it is necessary to change fields on which the given structure has been grouped. Press Switch to button to make selected structure active.
5.6. Structure Properties Dialog Window
You can view and edit structure properties in this dialog window:
- Name; - Code; - Status, - Notes; Status shows whether structure is currently Responsibility structure or not. To set current structure to be a responsibility one press Make it responsibility structure button. Checkbox Make Full lets you specify whether current structure is complete or not. Incomplete structures contain excluded objects (phases, activities).

Phase
57
6. Phases
6.1. Phase Properties Dialog Window Dialog window contains pages: Data, Activities, Phases, Notes standard page, and OLE-objects and Folder standard page. Page Data
- Name - phase title. - Code - A sequence of characters that should be unique for each project phase. Code is made up by letters, figures and
special characters (#$%&@_-~) without spaces and is case sensitive. - Type – default field for organizing of data transfer from reference-books for changing of phase properties. - Short Name – phase short name; - Priority – defines the order of phases performance in resource constrained scheduling. Phases with higher priority (i.e.,
greater value) are performed earlier. - Calendar - calendar, used for estimation of phase duration in days. To change phase calendar press Choose button,
select desired calendar from the list and press OK. - ASAP Start (as soon as possible) – the earliest possible point in time on which phase can start, based on the network
logic and any schedule constraints. ASAP Start dates can change as the project progresses and changes are made to the project plan.
- ASAP Finish (as soon as possible) - the earliest possible point in time on which phase can finish, based on the network logic and any schedule constraints. ASAP Finish dates can change as the project progresses and changes are made to the project plan.
- ALAP Start (as late as possible) – the latest possible point in time on which a phase may begin without delaying the project finish date.
- ALAP Finish (as late as possible) – the latest possible point in time on which a phase can be completed without delaying the project finish date.
- Level – phase level in Work Breakdown Structure (WBS). - Bar color – opens bar color dialog window for phase on Activity Gantt diagram. - Calculate Variance Trends – allows to receive the table report or the diagram on variance trends after comparison of
the current project version with base version. - Sum Volumes – allows to summarize operation volumes which are a part of the given phase. The total volume will be
displayed at line with the phase after calculation of expenses. - Managers – list of persons, participating in management of current project phase. In group work on project, each phase
can have one or several managers, one of them must be responsible for this project phase performance. Actuality of project information is maintained through distribution and consolidation of subprojects List of managers can be edited with Add and Delete buttons. Each phase have a responsible manager, assigned by Responsible button. Responsible manager is listed first and his or her name is marked with an asterisk. Consolidation of subprojects is performed from Outbox folder (or FTP server) of responsible managers. Other managers will only receive project data after distribution of subprojects. Outbox (for consolidation) and Inbox (for distribution) folders (or FTP server name) are set for each manager in Users Table.
Page Activities
Included activities - list of phase activities, actually participating in project. - New – adds new activity to phase. - Properties – displays properties window of selected activity. - Delete – deletes selected activity from the project. - Exclude – moves selected activity to the list of excluded activities.
Excluded activities - list of excluded activities. - Include – allows including selected activity to current work breakdown structure. - Properties – displays properties window of selected activity.

Phase
58
- Delete - deletes selected excluded activity from the project. Page Sub-Phases
- New – adds new subphase to phases. - Delete – deletes selected subphases from project. - Exclude – excludes selected sub-phases from structure (phases cannot be excluded from structure of the responsibility
as it should be full). At exception of sub-phases from current structure, objects of the bottom hierarchy (activity) level of are excluded, and empty sub-phases can be removed from structure. The excluded objects can be included in current structure subsequently.
6.2. Edit Phase in Activity Gantt To edit phase in Activity Gantt:
1. Invoke Phase Properties dialog window by one of the following methods:
- Double click phase row number with the left mouse button; or
- Select Properties from Phase shortcut menu invoked with the right mouse button click on phase row number.
2. Edit phase properties such as Code, Name, Calendar, Managers, and others in the invoked dialog window, and click OK when finished.
Alternatively, phase properties can be edited directly in table part of activity gantt. To perform this, double click a corresponding cell, edit contents, and press Enter key on the keyboard.
To cancel the last action performed select menu item Edit -> Undo last action or press button (see Undo for more details).
6.3. Update Phase by Selected Project Use this option to replace a certain phase with another project. To update project phase:
1. Open the main project, corresponding to the phase being updated (replaced). 2. Activate Activity Gantt. 3. Select a project in the main Window that should replace a phase in the main project. 4. In Activity Gantt of the main project select the phase to be replaced and invoke shortcut menu on its row number;
choose Update phase by project from the shortcut menu. During update, all activities of the current main project phase are replaced with activities from selected project. Activity links in updated phase are restored according to their codes only for activities existing in selected project. Resources, materials, cost components, multi-resources, resource skills and other objects of both projects are combined while nonexistent objects are added to the main project. Uniqueness of objects’ codes is checked automatically. Total quantity of both projects objects’ units is set to maximum value in the main project.
6.4. Convert Phase to Activity A project phase containing not more than one activity can be converted to activity. To perform that, invoke Phase shortcut menu with the right mouse button click on phase row number in activity gantt and select Convert to Activity.
When phase is converted to activity:
- A new activity is added in the same phase in WBS as original phase;
- Name, Code, Type, Priority, Calendar, and Notes of original phase are used for the new activity; Duration and Volume are set up by default as for any new activity.
6.5. Phases in Activity Gantt
6.5.1. Add phase in Activity Gantt To add phase in Activity Gantt:
1. Invoke Phase shortcut menu with the right mouse button click on phase row number.

Phase
59
2. Select New Phase –> One Level Lower or The Same Level.
3. In the invoked Phase properties dialog window, set up new phase properties such as Name, Code, Type, select Calendar and Managers. ASAP Start, ASAP Finish, ALAP Start, and ALAP Finish dates are automatically set up equaled to the current project time. Note that properties dialog window will be opened automatically for newly created phase only if you have selected to Open properties for new created objects in the spider project parameters dialog window. Otherwise newly created phase will be saved with default parameters and you can edit its properties in Phase properties dialog window, invoked with right mouse button click on corresponding phase row number.
To cancel the last action performed select menu item Edit -> Undo last action or press button (see Undo for more details)
6.6. Edit Phase in Activity Gantt To edit phase in Activity Gantt:
3. Invoke Phase Properties dialog window by one of the following methods:
- Double click phase row number with the left mouse button; or
- Select Properties from Phase shortcut menu invoked with the right mouse button click on phase row number.
4. Edit phase properties such as Code, Name, Calendar, Managers, and others in the invoked dialog window, and click OK when finished.
Alternatively, phase properties can be edited directly in table part of Activity Gantt. To perform this, double click a corresponding cell, edit contents, and press Enter key on the keyboard.
To cancel the last action performed select menu item Edit -> Undo last action or press button (see Undo for more details).
6.6.1. Delete Phase in Activity Gantt To delete phase in Activity Gantt, follow one of the following methods:
- Invoke Phase shortcut menu with the right mouse button click on phase row number in table part of activity gantt and select Delete, or
- Highlight phase with the left mouse button click on phase row number and press Delete key on the keyboard.
When you confirm deletion, program will delete the phase. All activities included in the phase, will be deleted from the project, as well.
If several phases are highlighted, all of them will be deleted from the project. To perform this, hold Ctrl key and click row numbers of phases you would like to delete – they will stay highlighted in gray – and follow one of the above-described methods. Confirm group of objects deletion when a corresponding message appears.
To cancel the last action performed select menu item Edit -> Undo last action or press button (see Undo for more details).
6.6.2. Phase Shortcut Menu in Activity Gantt Shortcut menu is invoked with right mouse click on phase row number in table area or on phase bar in the graph area of Activity Gantt diagram:
- Properties - opens phase properties dialog window . - Bar color - opens bar color dialog window for phase on Activity Gantt diagram. - Monitoring – adds a phase to monitoring table. In opened dialog window you can set a period for monitoring and
phase activity options. - Reports and Diagrams Templates:
- Table – opens report templates list window where you can choose report template for table report. - Diagram – opens report templates list window where you can choose report template to create a diagram.
- General Reports and Diagrams: - Table – opens report settings dialog window to create report on selected phase;

Phase
60
- Diagram – opens diagram settings dialog window to create diagram on selected phase; - EVA Reports and Diagrams Templates:
- Table – opens report templates list window where you can choose report template for EVA table report - Diagram – opens report templates list window where you can choose report template to create EVA diagram.
- Earned Value Analysis: - Table – creates earned value analysis. In opened dialog window you can set properties for report. - Diagram – creates earned value analysis diagram of current phase. In opened dialog window you can
customize diagram properties. - Success Probability Trends Templates
- Table – opens report templates list window where you can choose report template for success probability trends table report
- Diagram – opens report templates list window where you can choose report template to create success probability trends diagram.
- Success Probability Trends: - Table – creates success probability trends report on selected phase. You can customize report properties in
opened Success probabilities diagram options dialog window. - Diagram – adds diagram of success probability trends to Activity Gantt diagram window. In opened dialog
window you can customize diagram properties. - Variance Trends Templates: - Table – opens report templates list window where you can choose report template for variance trends table report
- Diagram – opens report templates list window where you can choose report template to create variance trends diagram.
- Variance Trends: - Table – creates variance trends report on selected phase. You can customize report properties in opened
variance trends diagram options dialog window. - Diagram – adds diagram of variance trends to activity Gantt diagram window. In opened dialog window, you
can customize diagram properties. - Update phase by selected project – replaces selected phase with another project. You must first select a project in the
main window If two projects are incompatible (for example, have different number of work breakdown structures) you will receive corresponding error message.
- Copy phase as new project – creates a new project from selected phase. - Insert project as new phase:
- One Level Lower – choose this option to add a project (selected in projects and documents dialog window) as a subphase of the current phase. New phase will be placed next to the phase selected with right mouse button.
- The Same Level – choose this option to add a project (selected in projects and documents dialog window) as a phase of the project. New phase will be placed on the same level of WBS as the phase selected with right mouse button. Phase of the first level cannot be added.
- Distribute Subprojects – distributes subprojects to managers, assigned to phases. - Consolidate Subprojects – consolidates subprojects from phase managers. - Exclude – moves a phase to the list of excluded objects. - Include:
- One Level Lower – choose this option to insert a phase or activity, selected in excluded objects dialog window, inside current phase. Inserted objects will be listed first within the phase.
- The Same Level – choose this option to insert phase or activity, selected in excluded objects dialog window, on the same level of WBS. Objects will be placed next to the current phase. Objects on the first level cannot be inserted.
- Copy – copies selected phase to the clipboard. - Cut – puts selected phase to the clipboard. You can insert a phase from the clipboard on the same or one level lower in
WBS. - Paste

Phase
61
- One Level Lower – inserts activities or phase (with corresponding activities) from the clipboard inside the current phase.
- The Same Level - inserts activities or phase (with corresponding activities) from the clipboard on the same level of WBS. Phase cannot be inserted to the first level of WBS.
- Convert to Activity –converts current phase to activity. This action can be performed with a phase containing one activity only. New activity will inherit name and code (if the last one was unique) from the former phase and all assignments of activity comprising former phase.
- Convert to Phase- converts selected phases to phases by adding a new operation into the selected phase. - New phase
- One Level Lower - adds new subphase to the current phase. - The Same Level – adds new phase on the same level of WBS as the current phase. Another first level phase
cannot be added. - New Activity – adds new activity to the current phase. - Delete - deletes current phase from the project.
6.6.3. Shortcut Menu of Group of Selected Phases in Activity Gantt If several phases are selected this shortcut menu can be invoked with a right mouse button click on phases row number in table area or phase bar in graphic area of Activity Gantt. Contains following items:
- Bar color – lets you customize color of selected phases bars in graphic area of Phase Gantt through object color dialog window;
- Roll Up / Expand – toggles between only phases and phases with activities views. - Monitoring – adds phases to monitoring table through Include in Monitoring dialog window. Define time period of
performance to include in monitoring and press OK button. All planned activity assignments will be inserted in monitoring table; work breakdown structure is preserved.
- Reports and Diagrams Templates: - Table – opens Report templates list window where you can choose report template for table report. - Diagram – opens Report templates list window where you can choose report template to create a diagram.
- General Reports and Diagrams – - Table – opens Report settings dialog window to create report on selected phases; - Diagram – opens Diagram settings dialog window to create diagram of selected phases.
- EVA Reports and Diagram Templates - Table – opens a dialog window with the list of templates to create a report on templates for selected phases; - Diagram – opens a dialog window with the list of templates to create a diagram on templates for selected
phases. - Earned Value Analysis
- Table – creates earned value analysis. In opened dialog window you can set properties for report. - Diagram – creates earned value analysis diagram of current phases. In opened dialog window you can
customize properties of diagram. - Success Probability Trends Templates
- Table – opens a dialog window with the list of templates to create a report on templates for selected phases. - Diagram – opens a dialog window with the list of templates to create a diagram on templates for selected phases.
- Success Probability Trends - Table – creates success probability trends report on selected phases. You can customize report properties in
opened Success probabilities diagram options dialog window. - Diagram – adds diagram of success probability trends to Phases Gantt diagram window. In opened dialog
window you can customize properties of diagram. - Variance Trends Templates
- Table – opens variance trends reports on templates dialog window to create table report on phases.
Phase
62
- Diagram – opens variance trends diagrams on templates dialog window to create diagram on phases. - Variance Trends - Table – creates variance trends report on phases. - Diagram – creates variance trends diagram on phases - Exclude – moves selected phases to the list of excluded objects. - Copy – copies selected phases to the clipboard. - Cut – puts selected phases to the clipboard. You can later insert these phases from the clipboard inside certain phase or
on the same level of WBS as the phase, on which shortcut menu was invoked. - Convert to Phase –converts selected phases to phases by adding a new operation into the selected phase. - Delete - deletes selected phases from the project.
6.7. Update Phase by Selected Project Use this option to replace a certain phase with another project. To update project phase:
1. Open the main project, corresponding to the phase being updated (replaced). 2. Activate Activity Gantt. 3. Select a project in the main Window that should replace a phase in the main project. 4. In Activity Gantt of the main project select the phase to be replaced and invoke shortcut menu on its row number;
choose Update phase by project from the shortcut menu. During update, all activities of the current main project phase are replaced with activities from selected project. Activity links in updated phase are restored according to their codes only for activities existing in selected project. Resources, materials, cost components, multi-resources, resource skills and other objects of both projects are combined while nonexistent objects are added to the main project. Uniqueness of objects’ codes is checked automatically. Total quantity of both projects objects’ units is set to maximum value in the main project.
6.7.1. Copy Phase in Activity Gantt To copy a phase in Activity Gantt:
1. Select phases by clicking the row numbers, while holding Ctrl key. Selected phases will be highlighted in gray. A block can contain objects of the same type only.
2. Invoke Phase shortcut menu with the right mouse button click on of the highlighted row numbers and select Copy. Highlighted phases will be copied on clipboard.
3. If copied phase(s) are needed to be inserted inside another phase, invoke phase shortcut menu in the phase where you want to paste the copied phase, and select Paste ->One Level Lower.
If copied phase(s) need to be inserted on the same level with another phase, invoke Phase shortcut menu and select Paste ->The Same Level. In result, copied phases will be inserted behind the highlighted phase. If the phase is of the first level, a corresponding message will appear.
In order to maintain codes uniqueness, Change Activity and Phase Dialog window will be invoked to allow changing codes or multiply the copied element. Otherwise, original phase will have the same code as the pasted phase. Or, as an option, you can multiply phase parameters to a coefficient, if you use original phase as sub-phase. Change Activity and Phase Dialog window contains the following fields:
- Replace from field indicates number of code symbol starting with which the code will be changed. And the text shown in symbol by field will be the new initial to replace the old one. For example, if original code of activity or phase was 1020 and, as it is shown in the example window, it is requested to replace from 3rd symbol by 50, a new code will become 1050.
- Add prefix sets up prefix that would be added in front of all phase codes.
- Add postfix sets up postfix that would be added in the end of all phase codes.
- Multiply by coefficient means that old phase’s volumes; activities durations, costs, and material consumption will be multiplied to this coefficient (equals 1 by default).

Phase
63
6.7.2. Move Phase in Activity Gantt To move phase to another level in Activity Gantt, perform the following: 1. Highlight phases by holding Ctrl key and clicking with left mouse button phase row numbers.
2. Invoke Phase shortcut menu with the right mouse button click on one of highlighted row numbers, and select Cut. Cut activities will be placed on clipboard.
3. Invoke Phase shortcut menu with the right mouse button click on phase where you want to move cut phases. Select Paste –> One Level Lower or The Same Level. (Note That: Phase(s) cannot be moved from or to first level).
Note That: If option Paste is selected from Activity shortcut menu, cut phases will be inserted in the phase where the activity is located.
Note That: Phase cannot be moved within the same level.
To cancel the last action performed select menu item Edit -> Undo last action or press button (see Undo for more details).
6.8. Convert Phase to Activity A project phase containing not more than one activity can be converted to activity. To perform that, invoke Phase shortcut menu with the right mouse button click on phase row number in activity gantt and select Convert to Activity.
When phase is converted to activity:
- A new activity is added in the same phase in WBS as original phase;
- Name, Code, Type, Priority, Calendar, and Notes of original phase are used for the new activity; Duration and Volume are set up by default as for any new activity.
6.9. Phases in Breakdown Structures
6.9.1. Add Phase in WBS View To add up new phase in WBS:
1. Invoke Phase shortcut menu with the right mouse button click on phase box.
2. Select New Phase –> One Level Lower or The Same Level.
3. In the invoked Phase properties dialog window, set up new phase properties such as Name, Code, Type, select Calendar and Managers. ASAP Start, ASAP Finish, ALAP Start, and ALAP Finish dates will automatically be set up equaling to the current project time. Note that properties dialog window will be opened automatically for newly created phase only if you have selected to Open properties for new created objects in the spider project parameters dialog window. Otherwise newly created phase
Phase
64
will be saved with default parameters and you can edit its properties in Phase properties dialog window, invoked with right mouse button click on corresponding phase row number.
4. Click OK.
To cancel the last action performed select menu item Edit -> Undo last action or press button (see Undo for more details).
6.9.2. Edit Phases in WBS View To edit phase in WBS:
1. Invoke Phase Properties dialog window by one of the following methods:
- Double click phase box with the left mouse button; or
- Select Properties from Phase shortcut menu invoked with the right mouse button click on phase box.
2. Edit phase properties such as Code, Name, Calendar, ASAP Start, ASAP Finish, ALAP Start, and ALAP Finish dates, Managers, and others in the invoked dialog window, and click OK when finished.
To cancel the last action performed select menu item Edit -> Undo last action or press button (see Undo for more details).
6.9.3. Delete Phase in WBS To delete phase in WBS, invoke Phase shortcut menu with the right mouse button click on phase box and select Delete.
When you confirm deletion, program will delete the phase. All activities included in the phase, will be deleted from the project, as well.
To cancel the last action performed select menu item Edit -> Undo last action or press button (see Undo for more details).
6.9.4. Phase Shortcut Menu in WBS View Phase shortcut menu can be invoked with a right mouse button click on phase bar.
- Properties – opens phase properties dialog window; - New Phase – adds a new phase (i.e., subphase) to the current one.
Note that properties dialog window will be opened automatically for newly created object only if you have selected to Open properties for new created objects in the Spider Project Parameters Dialog window. Otherwise, newly created object will be saved with default parameters and you can edit them later
- Delete - deletes current phase from the project. - Also General Reports and Diagrams and Reports and Diagrams Templates can be generated via shortcut menu.
6.9.5. Exclude Phase from WBS in WBS View Excluding phases from Work Breakdown Structure (WBS) does not actually delete phases from the project – phases are only removed from current WBS and added to the list of excluded phases. To exclude single phase from WBS:
1. Make desired WBS ‘incomplete’: open structures list dialog window (menu Project -> WBS), select the required WBS with left mouse button, press Properties button and uncheck box Make Full in opened structure properties dialog window. Press OK button to confirm action.
2. Switch to desired WBS: select WBS in structures list dialog window with left mouse button and press Switch to button;
3. Invoke shortcut menu (with a right mouse button click on phase row number) on phase to be removed from WBS and select Exclude.
To exclude several phases from WBS: 1. Repeat actions 1 and 2 if needed; 2. Select desired phases to be removed with left mouse button click on corresponding phases’ row numbers keeping
CTRL button pressed;

Phase
65
3. Invoke shortcut menu (with a right mouse button click on phase row number) on one of the phases to be removed from WBS and select Exclude.
6.10. Phases in Activity Network
6.10.1. Add Phase in Activity Network To add new phase in Activity Network:
1. In Activity Network window, click icon on Activity Network toolbar to switch on Show WBS option, which allows phases to be represented in diagram.
Invoke Phase shortcut menu with the right mouse button click on phase box. If phases are not seen in Activity Network, click
icon on Activity Network toolbar to switch on Show WBS icon, which allows phases to be presented in diagram.
2. Select New Phase option.
3. In the invoked Phase properties dialog window, set up new phase properties such as Name, Code, Type, select Calendar and Managers. ASAP Start, ASAP Finish, ALAP Start, and ALAP Finish dates will automatically be set up equaling to the current project time. Note that properties dialog window will be opened automatically for newly created phase only if you have selected to Open properties for new created objects in the spider project parameters dialog window. Otherwise newly created phase will be saved with default parameters and you can edit its properties in Phase properties dialog window, invoked with right mouse button click on corresponding phase row number.
4. To cancel the last action performed select menu item Edit -> Undo last action or press button (see Undo for more details).
6.10.2. Edit Phase in Activity Network To edit phase in Activity Network:
1. Invoke Phase Properties dialog window by one of the following methods:
- Double click phase box with the left mouse button; or
Select Properties from Phase shortcut menu invoked with the right mouse button click on phase box. . If phases are not seen
in Activity Network, click icon on Activity Network toolbar to switch on Show WBS option, which allows phases to be presented in diagram.
2. Edit phase properties such as Code, Name, Calendar, ASAP Start, ASAP Finish, ALAP Start, and ALAP Finish dates, Managers, and others in the invoked dialog window, and click OK when finished.
To cancel the last action performed select menu item Edit -> Undo last action or press button (see Undo for more details).
6.10.3. Delete Phase in Activity Network To delete phase in Activity Network:
1. In Activity Network window, click icon on Activity Network toolbar to switch on Show WBS option, which allows phases to be presented in diagram.
2. Invoke Phase shortcut menu with the right mouse button click on phase box and select Delete. If phases are not seen in
Activity Network, click icon on Activity Network toolbar to switch on Show WBS option, which allows phases to be presented in diagram.
When you confirm deletion, program will delete the phase. All activities included in the phase, will be deleted from the project, as well.
To cancel the last action performed select menu item Edit -> Undo last action or press button (see Undo for more details).
Phase
66
6.10.4. Phase Shortcut Menu in Activity Network Is invoked with the right mouse button click on phase box in Activity Network (can be invoked only in Show WBS mode) and contains the following options:
- Properties invokes phase properties dialog window.
- Roll Up / Expand toggles between only phases and phases with activities views.
- Bar Color invokes object color dialog window allowing setting up phase box color. If several boxes are highlighted simultaneously, color editing will be applied to all of them.
- Show Level option invokes ‘Show Level’ dialog window setting up level of presentation of the main structure phase. With number increased, structure is shown one level deeper. Show Level can be defined in WBS view only. Compress option, switched on, locates phases and activities the way so there is no space between them.
- New Activity adds a new activity to active phase.
- New Phase adds new sub-phase to active phase.
- Delete deletes phase from the project. If several phases are highlighted, all of them will be deleted from the diagram and from the project.
To cancel the last action performed select menu item Edit -> Undo last action or press button (see Undo for more details).
6.10.5. Move Phase in Activity Network To move phase in Activity Network, simply drag phase box with the left mouse button and drop it where you want to move
it. All the links in Activity Network will be automatically updated. If phases are not seen in Activity Network, click icon on Activity Network toolbar to switch on Show WBS option, which allows phases to be presented in diagram.
To cancel the last action performed select menu item Edit -> Undo last action or press button (see Undo for more details).

Activity
67
7. Activities
7.1. Activity A component of work performed during the course of a project. Activity is the lowest level of work breakdown structure element to which resources, cost components and materials can be assigned.
7.2. Activities Table
Activities Table contains a list of project activities with following columns (fields):
- Code –A sequence of characters that should be unique for each project activity. Code is made up by letters, figures and special characters (#$%&@_-~) without spaces and is case sensitive.
- Name – full activity name. - Type DPH defines DPH activity type – duration, productivity, hammock or milestone. - Type – default field for organizing of data transfer from reference-books for changing of activity properties. Activities
with similar characteristics (e.g. sharing materials consumption, having the same cost components) can have the same Type. E.g., activity ‘construction of brick wall’ can have type ‘BRICK_WALLS’, or ‘BW’.
- Interruptability – defines, whether splits in activity performance are enabled or not. - ASAP, ALAP preferable time of activity performance – either ‘as soon as possible’ or ‘as late as possible’. - Folder - full path to attached folder, that may be used to store files with referential information for current object.
Double click on the cell in this column allows defining the folder path or open the folder (if its path has already been defined).
- OLE objects; icon defines whether documents of other applications (Word, Excel etc.) are attached to an activity. Double click on this field opens activity properties dialog window on OLE objects and Folder page.
- Notes - A field that lets users to provide an activity with notes and explanations. - Short name – should activity have too long name, you can set shorter name as alternative to full names. - Start – activity start date. If an activity has not actually started, this field would be equal to Start [ASAP]. If activity is
already being executed and performance data is added to monitoring, this field would be equal to Start [Actual]. - Finish – activity finish date. If an activity has not actually finished, this field would be equal to Finish [ASAP]. If
activity has already been executed and performance data has been added to monitoring, this field would be equal to Finish [Actual].
- Duration, Days [Remaining] – remaining activity duration in days according to calculated schedule; - Duration, Hours [Remaining] – remaining activity duration in hours according to calculated schedule; - Volume [Remaining] – remaining work volume in corresponding units. - Volume unit –activity units (e.g.,’m2’, ‘pieces’); - Total Cost [Remaining] – remaining activity cost; - Float, hours; Float, days – activity float duration in hours or days. - Calendar –calendar code, according to which activity is executed. - Number of Working Days [Remaining] – a whole number of working days, required to complete activity according to
the current schedule calculated; the number of days is rounded up; a day is counted as working if it contains at least one second of working time.
- Priority – defines the order of activities performance in resource constrained scheduling. Activities with higher priority (i.e., greater value) are performed earlier.
- Total Duration of Teams (hours), Total Duration of Teams (days) – total duration (in hours or days) of work time of all teams, assigned to activity.
- Start [ASAP] (as soon as possible) – the earliest possible point in time on which activity can start, based on the network logic and any schedule constraints. ASAP Start dates can change as the project progresses and changes are made to the project plan.

Activity
68
- Finish [ASAP] (as soon as possible) - the earliest possible point in time on which activity can finish, based on the network logic and any schedule constraints. ASAP Finish dates can change as the project progresses and changes are made to the project plan.
- Start [ALAP] (as late as possible) – the latest possible point in time on which an activity may begin without delaying the project finish date.
- Finish [ALAP] (as late as possible) – the latest possible point in time on which an activity can be completed without delaying the project finish date.
- Start [Actual], Finish [Actual] – activity actual start and finish dates according to included performance data; - Start [NET], Finish [NLT] –constraint on the start (not earlier than) and finish (not later than) dates of activity
execution. You can set or change dates in these fields by direct entering or in Calendar dialog window (invoked by double click).
- Duration, Hours [Actual] - total actual activity duration in hours according to included performance data; - Volume [Actual] - actual work volume performed (in corresponding units) according to included performance data; - Total Cost [Actual] - actual cost of work performed according to included performance data; - Total Cost [Cumulative] – equals to actual cost plus remaining cost; - Start [Critical], Finish [Critical], Total Cost [Critical] – critical activity start, finish dates and total cost; these values
are used in risk analysis; - Start [Buffer], Finish [Buffer], Total Cost [Buffer] – buffer values, used in risk analysis; - Finish [Target], Total Cost [Target] – defined activity target finish date and total cost; - Finish [Target Probability] – probability of completing the activity up to target finish date; - Total Cost [Probability] - probability of meeting activity target total cost; - Start [Original]; Finish [Original] – activity start and finish dates in original project version (see projects comparison
for details); - Duration, Hours [Original]; Volume [Original]; Total Cost [Original] – activity duration (in hours), volume (in
corresponding units) and total cost in original project version (see projects comparison for details); - Completion Variance, Days – difference in ASAP finish dates of current and original project versions’ activities (or
assignments) in days (see projects comparison for details); - OCWP – Original Cost of Work Performed, cost of work performed according to original project version; - OCV – Original Cost Variance, variance of performed work cost in comparison to original project version. Equals to
difference between OCWP and actual cost of work performed (Total Cost [Actual]); - User defined fields; - Fields with fixed, remaining and actual consumption of all materials (and material centers) and expenditures of cost
components (and cost centers) their profiles. To add an activity in Activities Table:
1. Press Insert button, or invoke row shortcut menu and choose New, or select menu item Edit -> New;
2. New activity properties dialog window would appear; enter activity details and press OK. Note that properties dialog window will be opened automatically for newly created object only if you have selected to Open properties for new created objects in the Spider Project Parameters Dialog window. Otherwise, newly created object will be saved with default parameters and you can edit them later. To edit existing activity properties double click on corresponding activity row number, or invoke shortcut menu on corresponding activity and choose Properties. To delete an activity in Activities Table: select activity row with left mouse button click and press Delete button, or invoke shortcut menu and choose Delete, or select menu item Edit -> Delete. Note that: To delete several activities select desired rows with left mouse button clicks (keeping Ctrl button pressed) first, then perform one of the actions, described above for deleting of single activity. (See general description of tables in Spider Project for common rules of working with tables).
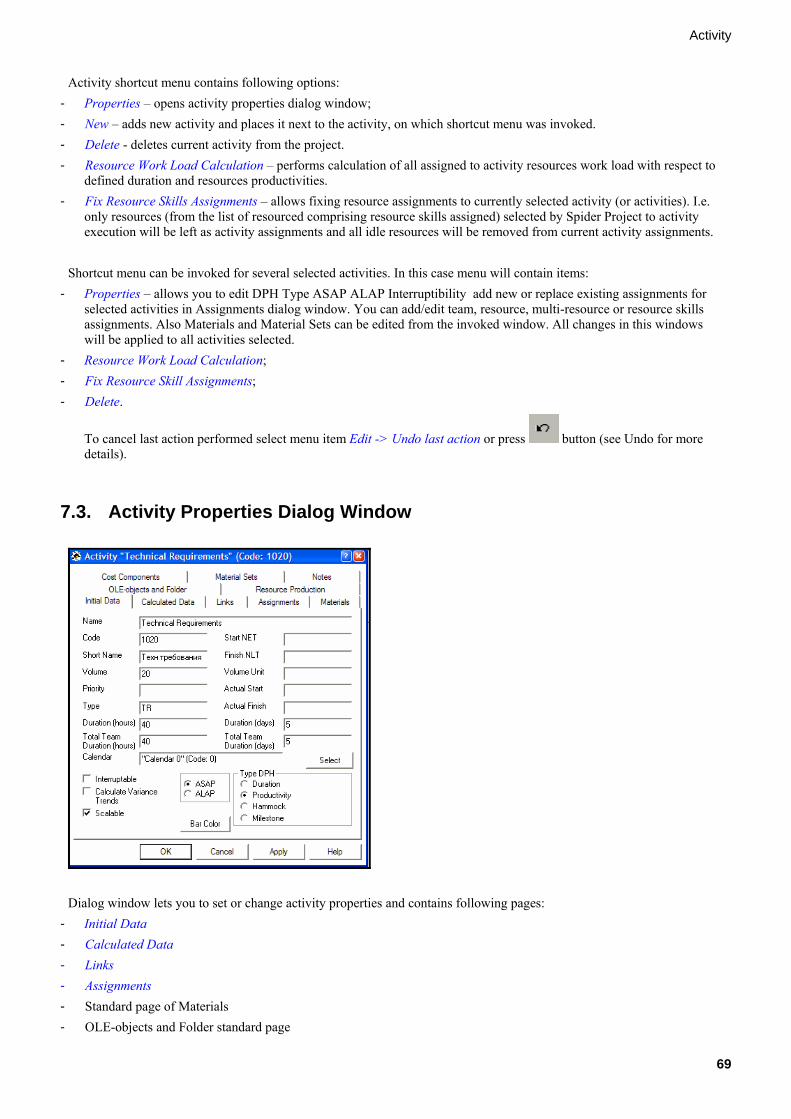
Activity
69
Activity shortcut menu contains following options: - Properties – opens activity properties dialog window; - New – adds new activity and places it next to the activity, on which shortcut menu was invoked. - Delete - deletes current activity from the project. - Resource Work Load Calculation – performs calculation of all assigned to activity resources work load with respect to
defined duration and resources productivities. - Fix Resource Skills Assignments – allows fixing resource assignments to currently selected activity (or activities). I.e.
only resources (from the list of resourced comprising resource skills assigned) selected by Spider Project to activity execution will be left as activity assignments and all idle resources will be removed from current activity assignments.
Shortcut menu can be invoked for several selected activities. In this case menu will contain items:
- Properties – allows you to edit DPH Type ASAP ALAP Interruptibility add new or replace existing assignments for selected activities in Assignments dialog window. You can add/edit team, resource, multi-resource or resource skills assignments. Also Materials and Material Sets can be edited from the invoked window. All changes in this windows will be applied to all activities selected.
- Resource Work Load Calculation; - Fix Resource Skill Assignments; - Delete.
To cancel last action performed select menu item Edit -> Undo last action or press button (see Undo for more details).
7.3. Activity Properties Dialog Window
Dialog window lets you to set or change activity properties and contains following pages:
- Initial Data - Calculated Data - Links - Assignments - Standard page of Materials - OLE-objects and Folder standard page

Activity
70
- Resource Production - Standard page of Cost Components - Standard page of Material Sets - Standard Page of Notes Initial Data Page - Name – full activity name. - Code –A sequence of characters that should be unique for each project activity. Code is made up by letters, figures and
special characters (#$%&@_-~) without spaces and is case sensitive. - Short Name – should activity have too long name, you can set shorter name as alternative to full names. - Volume – total work volume in corresponding units. E.g., activity ‘Construction of railroad’ may have volume,
expressed in meters. - Volume Unit – you can set units for activity in this field (e.g.,’m2’, ‘pieces’) - Priority – defines the order of activities performance in resource constrained scheduling. Activities with higher priority
(i.e., greater value) are performed earlier. - Type – default field for organizing of data transfer from reference-books for changing of activity properties. Activities
with similar characteristics (e.g. sharing material consumption, having the same cost components) can have the same type. E.g., activity ‘construction of brick wall’ can have type ‘BRICK_WALLS’, or ‘BW’.
- Duration (hours), Duration (days) – total activity duration in hours or days - Total Team Duration (hours), Total Team Duration (days) – total duration (in hours or days) of work time of all teams,
assigned to activity. If more than one team is assigned to activity you can set activity duration in one of Total Team Duration fields (in hours, or in days). Duration of activity with one team assigned corresponds to Total Team Duration of this team and can be set in either fields of Duration or Total Team Duration.
- Start NET, Finish NLT – you can set or change dates of ‘not earlier than start and ‘not later than finish dates in these fields either by direct entering or in Calendar dialog window (invoked by double click).
- Actual Start, Actual Finish – activity actual start and finish dates - Calendar – this field enables to set a calendar for activity performance. To change current activity calendar press Select
button, select required calendar from the list and press OK. - Checkbox ASAP, ALAP lets you choose preferable time of activity performance – either ‘as soon as possible’ or ‘as
late as possible’. - Frame Type DPH lets you choose DPH activity type – Duration, Productivity, Hammock or Milestone. - Interruptable – checking this box enables splits in activity performance. - Calculate Variance Trends – allows to receive the table report or the diagram on variance trends after comparison of
current project version with base version. - Scalable – at an insert of projects or copying activities, multiplication of volumes, durations and expenditures on the
activities (set in activity properties dialog window) occurs only for the operations with this attribute Page Calculated Data
- ASAP Start (as soon as possible) – the earliest possible point in time on which activity can start, based on the network logic and any schedule constraints. ASAP Start dates can change as the project progresses and changes are made to the project plan.
- ASAP Finish (as soon as possible) - the earliest possible point in time on which activity can finish, based on the network logic and any schedule constraints. ASAP Finish dates can change as the project progresses and changes are made to the project plan.
- ALAP Start (as late as possible) – the latest possible point in time on which an activity may begin without delaying the project finish date.
- ALAP Finish (as late as possible) – the latest possible point in time on which an activity can be completed without delaying the project finish date.
- Float (hours), Float (days) – possible float duration in hours or days. - Actual Volume – volume of activity work performed - Actual Duration – actual activity duration

Activity
71
Page Links Consists of two similar areas: Preceding Activities and Succeeding Activities – to display lists of preceding and succeeding activities as referred to established logical relationships to/from the current activity. You can add new or delete existing activities from the list with the aid of Add and Delete buttons in corresponding area (i.e., to add preceding activity press Add button in the upper area - Preceding Activities; to delete succeeding activity select desired activity with a left mouse button in the lower area - Succeeding Activities and press Delete button). When you press Add button activities list dialog window appears; select required activity, press OK and set link properties in invoked dialog window. You can view and customize link in link properties dialog window: select desired preceding or succeeding activity with a left mouse button and press Properties button. You can move to preceding or succeeding activity by selected desired activity in the list and pressing Go button. Thus it is possible to move across the chain of linked activities. Each passage to another activity displays its properties in dialog window and highlights this activity in Activity Gantt (network diagram or Activities Table). Type, Calendar and Lag are displayed under the list of activities (if the list consists of more than one activity – these properties are displayed for activity, selected with a mouse click). To plot preceding and succeeding activities diagram (links diagram) press Diagram button. Page Assignments You can view and edit activity resources assignments on this page. List of assignments shows type (Team, Multi-resource, Resource Skill or Resource), code and name for each activity assignment. Team assignment is displayed first in the list with its structure organized hierarchically with indents. E.g., team may contain multi-resources that in turn consist of resources. In this case multi-resources will be displayed with indents regarding to team and resources – with indent regarding to parent multi-resources. List of assignments contains all existing activity assignments with notes, specific for assignment type:
- Resource assignments (‘Resource’, resource name, resource code) - Multi-resource assignments (‘Multi-resource’, multi-resource name, multi-resource code) - Skill assignments (‘Skill’, skill name, skill code) - Team assignments (‘Team’, team name, team code)
Team assignments are shown first in the list. Assignments comprising corresponding team assignments are shown next. Each activity assignment type has a certain set of fields displayed below the list of assignments. Select assignment with a left mouse button to view or edit these fields:
- Duration, Volume – these fields are displayed for selected team assignments; - Quantity, Productivity, Type, Work Load - are displayed for selected multi-resource assignments; - Type (‘By Quantity’ or ‘By Productivity’), Quantity (for ‘By Quantity’ type resource skills) or Productivity (for ‘By
Productivity’ type resource skills) - are displayed for selected resource skill assignments; - Quantity, Productivity, Priority, Work Load, Type, Scheduled Quantity, Calendar, Fixed Cost, Resource-hours,
Remaining Cost - these fields are displayed for selected resource assignments. You can add assignments to activity with the help of buttons in the Add frame. The set of available buttons in the frame (Resource, Multi-resource, Skill or Team) depends upon the selected parent object in the list of assignments:
- all buttons are available when Team is selected from the list; - all except Skill button are available when skill is selected; - all except Skill and Multi-resource buttons are available when multi-resource is selected.
To add Team, Multi-resource, Resource Skill of resources or Resource press corresponding button: - Team button assigns new team for activity execution and adds it to assignments hierarchy; - Resource Skill button opens a dialog window for selecting skills (or skills) to be assigned – select required skill(s) and
press OK. Selecting one skill opens properties dialog window for the resource skill being assigned where required type (‘By Quantity’ or ‘By Productivity’) and quantity (for ‘By Quantity’ type) or productivity (for ‘By Productivity’ type) can be set. Selecting several skills automatically sets skill assignment type to ‘By Quantity’ and quantity equal to one for all newly added skills (you can edit these assignments later if required).

Activity
72
- Multi-resource button opens a dialog window for selecting multi-resource (or multi-resources) to be assigned – select required multi-resource(s) and press OK. Selecting one multi-resource opens properties dialog window for the multi-resource being assigned where required quantity, productivity and other characteristics can be set. With box Variable quantity and Work Load checked quantity of multi-resource is automatically set to minimal value = 1. Selecting several multi-resources automatically sets quantity equal to ‘1’ for all newly added multi-resources (you can edit these assignments later if required).
- Resource button adds new resource to assignments hierarchy depending on the parent object selected – to Team, Multi-resource or Skill assignments. Pressing Resource button opens a dialog window for selecting resource (or resources) to be assigned – select required resource(s) and press OK. Selecting one resource opens properties dialog window for the resource being assigned where required quantity, productivity and other characteristics can be set. Selecting several resources automatically sets quantity equal to one for all newly added resources (you can edit these assignments later if required).
Button Properties invokes a dialog window specific to selected assignment type: Dialog window of resource assignment properties; Dialog window of multi-resource assignment properties; Dialog window of skill assignment properties; Dialog window of team assignment properties. You can delete selected assignment from the list by pressing Delete button. (Note that only assignments would be deleted; all multi-resources and comprising resources are not deleted from the project) Press Calculate Work Load button to calculate work load of all assigned resources with preset activity duration and assignments productivity. To calculate productivity of selected resource from the list press Calculate Productivity button. Following formula is used for calculations: Volume [Remaining] / (Duration [Remaining] X Work Load [Remaining] X Quantity [Scheduled]). It is recommended to edit Multi-resources and Skill components in corresponding tables (Multi-resources and Resource skills) and not on particular activity assignments. Such approach lets you develop required number of Multi-resources and Skills of desired composition, assign them to activities and change their composition globally in the project (on all activities) if needed (See multi-resources properties dialog window, resource skills properties dialog window Page Resource Production This page lets you view and edit resourced, produced (consumed) on current activity. To add new resource to the list press Add button, select required item(s) from the total list of project resources and press OK. Amount of resource units produced (i.e. positive value) or consumed (i.e. negative value) is set in the field Quantity for resource, selected with a left mouse button click. You can specify either resource is produced (consumed) at the beginning or at the end of activity by checking corresponding boxes At Start or At Finish. To delete resource from the list of produced resources press Delete button.
7.4. DPH Activity Type Project activities can be one of four types:
- Duration;
- Productivity;
- Hammock; and
- Milestone.
Activity of Duration type: duration is the most basic activity information when activity is included into schedule. Duration does not depend on resources assigned to activity.
Activity of Productivity type: initial data for this activity type is its volume and assignments productivity. Activity duration is calculated during scheduling.
Activity of Hammock type is activity that is active between events. Duration of Hammock is defined between the moment when all conditions to start the hammock are met and the moment when all conditions to end the hammock are met. Conditions for Hammock start and finish are set up by links coming to its start and its finish and by target dates (NET Start and NLT Finish).

Activity
73
Activity of Milestone type is activity of zero duration used to reflect certain event that is important to control project execution.
7.5. ASAP (As Soon As Possible) Is the scheduling method when date of event is scheduled as early as possible with other project conditions met.
7.6. ALAP (As Late As Possible) Is the scheduling method, when date of event is scheduled as late as possible without delaying the project finish date.
7.7. NET (Not Earlier Than) Is a target date of the earliest activity start date. During scheduling condition to start activity not earlier than the target date becomes an active constrain. Activity NET Start is represented by triangle in Gantt diagram.
7.8. NLT (Not Later Than) Is target date of the latest possible activity finish date. During scheduling, program attempts to finish activity earlier (not later than) this date. If this increases the project duration, then NLT date is ignored.
In activity gantt, NLT activity finish date is shown as triangle.
7.9. Activity Group Properties Dialog Window
Properties dialog window of a group of activities allows editing certain properties of selected activities. To invoke this dialog window select several activities in Activities Table or Activity Gantt, click with a right mouse button on one of selected rows and choose Properties from opened dialog window.
In current dialog window you can:
- set DPH activity type – Duration, Productivity, Hammock or Milestone for selected activities;
- set method of schedule calculation for these activities – ASAP or ALAP;
- set whether these activities should be Interruptible or Not Interruptible (see Interruptible activities for details on this option).
- assign calendars to this group of activities.
7.10. Interruptible Activities In scheduling, activities interrupting might be allowed. Click Interruptible in Initial Data page of Activity properties dialog window. During scheduling process, activity might be interrupted if there are not enough resources to continue it, or the same resource is needed for activity with higher priority.

Activity
74
If Interruptible option was not selected, resource assigned to activity cannot be used for other activities before this activity is finished. If several teams are assigned to activity, interruption can be done within one-team work only.
Note That: Even uninterruptible activity with several teams will have interruptions between different teams work.
For example:
Activity1 has priority ‘1’ and Resource1 assigned to it. This activity is Interruptible.
Activity3 has priority ‘2’, and Resource1 is also assigned to it.
If – when performing Resource Constrained Scheduling –Allow performance interruptions option in Scheduling Options dialog window is filled in, the resulting schedule will be as in the graph above: Activity1 was interrupted because of non-sufficient Resource1 which was sent to Activity3 (with higher priority). Then Activity1 was continued.
Using interruptible activity helps to have optimized schedules. If Allow performance interruptions option had been switched off in the example, you would get the following schedule:
7.11. Add New Activity in Activities Table To add activity in Activities Table:
1. Press Insert key on the keyboard; or invoke shortcut menu with the right mouse button click on row number, and select New or select item New from Edit menu in Activities table.
2. In the invoked activity properties dialog window, set up the following new activity properties:
Code;
Name;
Volume (equals 100.00 by default);
Duration (equals 5 days or 40 hours by default); and
DPH Type (Duration by default).
Note that: properties dialog window will be opened automatically for newly created activities only if you have selected to Open properties for new created objects in the spider project parameters dialog window. Otherwise newly created activity will be saved with default parameters and you will have to invoke Activity dialog window by double click on new activity row number (or by selecting Properties from shortcut menu invoked with a right mouse button click on new activity row number)
3. Click OK.

Activity
75
7.12. Edit Activity in Activities Table Editing activity properties such as Code, Name, Duration, DPH Type, and others directly in cells of Activities table, or in activity properties dialog window are possible options.
To edit directly in cells, double click on cell where you want to make the change, edit contents, and press Enter.
To invoke Activity Properties dialog window, invoke row shortcut menu with the right mouse button click on row number (or with double click on row number) and select Properties.
7.13. Delete Activity in Activities Table To delete an activity in Activities Table, follow one of the following methods:
1. Invoke shortcut menu with the right mouse click on row number. Select Delete; or
2. Highlight activity with the left mouse button click on its row number and press Del key on the keyboard; or
3. Highlight activity with the left mouse button click on the row number and select Delete from Edit menu.
To delete several activities simultaneously, hold Ctrl key, and click row numbers of activities to be deleted – they will stay highlighted in gray – and follow one of the above-described methods. Shortcut menu will have Delete option only. Confirm group of objects deletion when a corresponding message appears.
To cancel the last action performed select menu item Edit -> Undo last action or press button (see Undo for more details).
For further information see working with tables.
7.14. Activities in Activity Gantt
7.14.1. Add New Activity in Activity Gantt To add activity to Activity Gantt:
1. Invoke activity shortcut menu with the right mouse button click on row number in table part of Activity Gantt. Ins key can be used as keyboard preference.
2. Select New.
3. In the invoked activity properties dialog window, set up the following new activity properties:
Code;
Name;
Volume (equals 100.00 by default);
Duration (equals 5 days or 40 hours by default); and
DPH Type (Duration by default).
Note that: properties dialog window will be opened automatically for newly created activity only if you have selected to Open properties for new created objects in the spider project parameters dialog window. Otherwise newly created activity will be saved with default parameters and you will have to invoke Activity dialog window by double click on new activity row number (or by selecting Properties from shortcut menu invoked with a right mouse button click on new activity row number)
4. Click OK.
7.14.2. Edit Activity in Activity Gantt Editing activity properties such as Code, Name, Duration, DPH Type, and others directly in cells of table part of Activity Gantt, or in activity properties dialog window are possible options.
To edit directly in cells, double click on cell where you want to make the change, edit contents, and press Enter.
To invoke Activity Properties dialog window, invoke row shortcut menu with the right mouse button click on row number (or with double click on row number) and select Properties.

Activity
76
7.14.3. Delete Activity in Activity Gantt To delete activity in Activity Gantt, invoke shortcut menu by right clicking on the activity box then select Delete item or with left mouse button highlight activity (click on the corresponding row number), and press Del keyboard button.
To delete several activities simultaneously, hold Ctrl key and click row numbers of activities to be deleted. They will be highlighted in gray. Click one of the highlighted row numbers with the right mouse button to invoke shortcut menu. Shortcut menu will have Delete option only. Select it and confirm group of objects deletion when a corresponding message appears.
To cancel the last action performed select menu item Edit -> Undo last action or press button (see Undo for more details).
7.14.4. Activity Shortcut Menu in Activity Gantt Activity shortcut menu can be invoked with a right mouse button click on activity row number in table area or activity bar in graphic area of Activity Gantt. Contains following items:
- Properties – opens activity properties dialog window; - Bar color – lets you customize color of activity bar in graphic area of Activity Gantt through object color dialog
window; - Filter –
Preceding and Succeeding – displays on only the chosen activity and all the activities connected to it. To cancel the applied filter, it is necessary to choose in the activity gantt main menu items Filter -> Restore. - Monitoring – adds activity to monitoring table through Include in Monitoring dialog window. Define time period of activity performance to include in monitoring and press OK button. All planned activity assignments will be inserted in monitoring table; work breakdown structure is preserved – i.e. all phases corresponding to current activity will be inserted also. - Resource Work Load Calculation – performs calculation of all assigned to activity resources work load with respect to
defined duration and resources productivities. - Fix Resource Skill Assignments – allows fixing resource assignments to currently selected activity (or activities). I.e.
only resources (from the list of resourced comprising resource skills assigned) selected by Spider Project to activity execution will be left as activity assignments and all idle resources will be removed from current activity assignments.
- . Reports and Diagrams Templates: - Table – opens Report templates list window where you can choose report template for table report. - Diagram – opens Report templates list window where you can choose report template to create a diagram.
- General Reports and Diagrams – - Table – opens Report settings dialog window to create report on selected activity; - Diagram – opens Diagram settings dialog window to create diagram of selected activity.
- EVA Reports and Diagram Templates - Table – opens a dialog window with the list of templates to create a report on templates for selected activity; - Diagram – opens a dialog window with the list of templates to create a diagram on templates for selected
activity. - Earned Value Analysis
- Table – creates earned value analysis. In opened dialog window you can set properties for report. - Diagram – creates earned value analysis diagram of current activity. In opened dialog window you can
customize properties of diagram. - Success Probability Trends Templates
- Table – opens a dialog window with the list of templates to create a report on templates for selected activity; - Diagram – opens a dialog window with the list of templates to create a diagram on templates for selected activity.
- Success Probability Trends - Table – creates success probability trends report on selected activity. You can customize report properties in
opened Success probabilities diagram options dialog window.

Activity
77
- Diagram – adds diagram of success probability trends to Activity Gantt diagram window. In opened dialog window you can customize properties of diagram.
- Variance Trends Templates - Table – opens variance trends reports on templates dialog window to create table report on activity. - Diagram – opens variance trends diagrams on templates dialog window to create diagram on activity.
- Variance Trends - Table – creates variance trends report on activity. - Diagram – creates variance trends diagram on activity - Exclude – moves current activity to the list of excluded objects. - Include – lets insert a phase or activity, selected in excluded objects dialog window, into WBS. - Copy – copies selected activity to the clipboard. - Cut – puts selected activity to the clipboard. You can later insert activity from the clipboard inside certain phase or next
to certain activity. - Paste - inserts activities from the clipboard next to the activity, on which shortcut menu was invoked, or places them
first inside phase, on which shortcut menu was invoked. - Convert to phase – converts current activity to phase; - New Activity – adds new activity and places it next to the activity, on which shortcut menu was invoked.
Note that properties dialog window will be opened automatically for newly created object only if you have selected to Open properties for new created objects in the Spider Project Parameters Dialog window. Otherwise, newly created object will be saved with default parameters and you can edit them later
- Delete - deletes current activity from the project.
7.14.5. Shortcut Menu of Group of Selected Activities in Activity Gantt Shortcut menu can be invoked with a right mouse button click on activity row number in table area or activity bar in graphic area of Activity Gantt. Contains following items:
- Properties – opens the common properties window containing Data; Assignments; Materials; Cost Components; and Material Sets. Any changes will be made here are applied to all selected activities.
- Bar color – lets you customize color of selected activities bars in graphic area of Activity Gantt through object color dialog window;
- Filter – Preceding and Succeeding – displays on only the chosen activities and all the activities connected to them. To
cancel the applied filter, it is necessary to choose in the activity gantt main menu items Filter -> Restore. - Roll Up / Expand – toggles between only activities and activities with assignments views. - Monitoring – adds activities to monitoring table through Include in Monitoring dialog window. Define time period of
activity performance to include in monitoring and press OK button. All planned activity assignments will be inserted in monitoring table; work breakdown structure is preserved – i.e. all phases corresponding to current activity will be inserted also.
- Reports and Diagrams Templates: - Table – opens Report templates list window where you can choose report template for table report. - Diagram – opens Report templates list window where you can choose report template to create a diagram.
- General Reports and Diagrams – - Table – opens Report settings dialog window to create report on selected activity; - Diagram – opens Diagram settings dialog window to create diagram of selected activity.
- EVA Reports and Diagram Templates - Table – opens a dialog window with the list of templates to create a report on templates for selected activity; - Diagram – opens a dialog window with the list of templates to create a diagram on templates for selected
activity. - Earned Value Analysis

Activity
78
- Table – creates earned value analysis. In opened dialog window you can set properties for report. - Diagram – creates earned value analysis diagram of current activity. In opened dialog window you can
customize properties of diagram. - Success Probability Trends Templates
- Table – opens a dialog window with the list of templates to create a report on templates for selected activity; - Diagram – opens a dialog window with the list of templates to create a diagram on templates for selected activity.
- Variance Trends Templates - Table – opens variance trends reports on templates dialog window to create table report on selected activities. - Diagram – opens variance trends diagrams on templates dialog window to create diagram on selected activities.
- Variance Trends - Table – creates variance trends report on selected activities. - Diagram – creates variance trends diagram on selected activities.
- Resource Work Load Calculation – performs calculation of all assigned to activity resources work load with respect to
defined duration and resources productivities. - Fix Resource Skill Assignments – allows fixing resource assignments to currently selected activities. I.e. only resources
(from the list of resourced comprising resource skills assigned) selected by Spider Project to activity execution will be left as activity assignments and all idle resources will be removed from current activity assignments.
- Exclude – moves selected activities to the list of excluded objects. - Copy – copies selected activities to the clipboard. - Cut – puts selected activities to the clipboard. You can later insert these activities from the clipboard inside certain
phase or next to certain activity. - Convert to Phase – converts selected activities to phases. - Delete - deletes selected activities from the project.
7.14.6. Copy Activity in Activity Gantt
Activities can be copied from one phase to another only in Activity Gantt. To perform that:
1. Select activities by clicking row numbers, while holding Ctrl key. Selected activities will stay highlighted in gray.
2. Invoke Activity shortcut menu with the right mouse button click on one of the highlighted row numbers and select Copy. Highlighted activities will be copied on clipboard.
3. If you want to insert copied activity inside a phase, invoke Phase shortcut menu on the phase inside of which you want to copy the activity, and select Paste ->One Level Lower.
If copied activities need to be inserted on the same level as a certain phase, invoke Phase shortcut menu and select Paste ->The Same Level. In result, copied phases will be inserted behind the highlighted phase. if the phase is first-level phase, a corresponding message will appear.
If you want to insert (paste) activity after another activity, invoke Activity shortcut menu by clicking its row number and select Paste.
In order to maintain element codes uniqueness, Change Activity and Phase Dialog window will be invoked to allow you to change codes or multiply the copied element. Otherwise, original activity will have the same code as the pasted activity. Or, as an option, you can multiply activity parameters to a coefficient, if you use original activity as sub-phase. Change Activity and Phase Dialog window contains the following fields:
- Replace from field indicates number of code symbol starting with which the code will be changed. And the text shown in symbol by field will be the new initial to replace the old code. For example, if original code of activity or phase was 1020 and, as it is shown in the example window, it is requested to Replace from 3rd symbol by 50, a new code will become 1050.
- Add prefix sets up prefix that would be added in front of all activity codes.
- Add postfix sets up postfix that would be added in the end of all activity codes.

Activity
79
- Multiply by coefficient means that old activities’ volumes; activities durations, costs, and material consumption will be multiplied to this coefficient (equals 1 by default).
7.14.7. Move Activity in Activity Gantt To move activity from one phase to another in Activity Gantt: 1. Highlight activities by holding Ctrl key and clicking row numbers of corresponding rows with the left mouse button.
2. Invoke shortcut menu with the right mouse button click on one of highlighted row numbers and select Cut. Note That: Cut activities will not be directly removed, but first will be placed on clipboard.
3. Invoke phase shortcut menu with the right mouse button click on phase row number where the cut activities will be moved, and select Paste –> One Level Lower or The Same Level. Note That: Activity cannot be moved from or to the first level.
To insert / paste activity after another activity, invoke activity shortcut menu by clicking its row number and select Paste.
To cancel the last action performed select menu item Edit -> Undo last action or press button (see Undo for more details).
7.14.8. Convert Activity to Phase Any project activity can be converted to a phase. To perform that, invoke Activity shortcut menu with the right mouse button click on activity row number in activity gantt and select Convert to Phase.
When activity is converted to phase:
- A phase is added on the same level in WBS as the activity;
- Name, Code, Type, Priority, and Notes of original activity are used for the new phase;
- An activity with Name and Code as of original activity is created inside the new phase.
7.14.9. Change Activity and Phase Dialog window This dialog window is used to assure the uniqueness of activity and phase codes in both original project (destination) and in project being copied as phase (source) when a ‘standalone’ project is being inserted as a phase into the project.

Activity
80
Change of codes is customized in Copied activity and phase codes and Original activity and phase codes frames (Note these changes apply only to the current project and do not affect source project file):
1. Copied activity and phase codes frame – refers to the project that is being inserted as phase (source).
Replace from .. symbol - indicates starting position in activity/phase codes to change code from. Text, entered into by field will replace the old code. For example, if activity code in the source project was ‘1020’ (in the project being inserted) and, as it is shown in the example window, it is requested to Replace from 3 symbol by 50 - the resulting code would be ‘1050’ (in the current project) after insertion.
Add prefix sets up prefix to be added to all inserted activity/phase codes.
Add postfix sets up postfix to be added to all inserted activity/phase codes.
In Copied activity volume, duration, cost and material expenditure frame, coefficient Multiply by means that volumes, durations, and expenditures in the source project (being inserted) would be multiplied to this coefficient (equals 1 by default) after insertion into the current project.
2. Original activity and phase codes frame – refers to the current project, where another project is inserted to (destination). If you use only these parameters (leaving fields in the Copied activity and phase codes frame blank) – codes in the project being copied (source) as phase to the current project would be preserved and codes in the current project (destination) would be changed.
Replace from .. symbol - indicates starting position in activity/phase codes to change code from. Text, entered into by field will replace the current code. For example, if original activity or phase code (in the current project) was ‘1020’ and it is requested to Replace from 3 symbol by 50, the resulting code would be ‘1050’ (in the current project) after insertion.
Add prefix sets up prefix to be added to all activity/phase codes in the current project (codes in the inserted phase would be preserved from the inserted source project).
Add postfix sets up postfix to be added to all activity/phase codes in the current project (codes in the inserted phase would be preserved from the inserted source project).
7.15. Activities in Activity Network
7.15.1. Add New Activity in Activity Network To add new activity in Activity Network:
1. In Activity Network window, click icon on activity network toolbar to switch on Show WBS option to see phases in the window.
2. Invoke phase shortcut menu by right clicking on the phase box, to which new activity is being added.
3. Select New Activity.
4. In the invoked activity properties dialog window, set up the following new activity properties:
Code;

Activity
81
Name;
Volume (100.00 by default);
Duration (5 days or 40 hours by default); and
DPH Type (Duration by default).
Note that: properties dialog window will be opened automatically for newly created activity only if you have selected to Open properties for new created objects in the spider project parameters dialog window. Otherwise newly created activity will be saved with default parameters.
5. Click OK.
7.15.2. Edit Activity in Activity Network Editing activity properties such as Code, Name, Duration, DPH Type, and others in activity properties dialog window is possible.
To invoke Activity Properties dialog window, invoke activity shortcut menu with the right mouse button click on activity box (or with double click on activity box) and select Properties.
If activities are not shown in Activity Network, click Show/Hide Activities icon on Activity Network toolbar.
7.15.3. Delete Activity in Activity Network To delete activity in Activity Network, invoke activity shortcut menu with the right mouse click on activity box and select Delete option from invoked menu or highlight the activity box with Ctrl button on keyboard and left mouse click together, and then use Del button on keyboard.
To delete several activities simultaneously, hold Ctrl key and click boxes of activities you would like to delete. They will stay highlighted in different color. Click one of highlighted activity boxes with the right mouse button to invoke shortcut menu. Shortcut menu will have Delete option only. Select it and confirm group of objects deletion when a corresponding message appears.
To cancel the last action performed select menu item Edit -> Undo last action or press button (see Undo for more details).
7.15.4. Activity Shortcut Menu in Activity Network Is invoked with the right mouse button click on activity box in Activity Network and contains the following options:
- Properties invokes activity properties dialog window.
- Bar Color invokes object color dialog window allowing setting up activity box color. If several activity boxes are highlighted simultaneously, color editing will be applied to all of them.
- Shape changes activity box shape in shapes dialog window. If several activity boxes are highlighted simultaneously, shape editing will be applied to all of them.
- Delete deletes activity from the project. If several activity boxes are highlighted, all of them will be deleted from the diagram and from the project.
To cancel the last action performed select menu item Edit -> Undo last action or press button (see Undo for more details).
7.15.5. Shortcut Menu of Highlighted Activities in Activity Network When several activities are highlighted in Activity Network, Activity shortcut menu contains the following options:
- Bar Color invokes Object Color dialog window to up activity box color for all highlighted activities.
- Shape changes activity box shape for all highlighted activities in the invoked Shapes dialog window.
- Delete deletes all highlighted activities from Activity Network and from the project.
7.15.6. Move Activity in Activity Network To move activity from one phase to another in activity network:
1. Click gray (by default) area on the top of activity box with the left mouse button.

Activity
82
2. Drag and drop activity to its new location.
To cancel the last action performed select menu item Edit -> Undo last action or press button (see Undo for more details).

Calendar
83
8. Calendars
8.1. Project Calendars All activities, resources, phases, departments and links can have individual calendars. - Activity calendar defines time periods when activity can be performed; - Resource calendar defines time periods when resource can be engaged on activity execution; - Phase and Department calendars are used for calculation of work duration in days according to formula: working
duration in hours divided by mean working day according to phase/department calendar. - Link calendar serves for calculation of link lag. Teams have no special calendars. Team calendar is calculated as intercept of activity calendar and team resources calendars. Each project has main calendar, which is used as default calendar for newly created objects. To set properties of main calendar:
1. Open Calendars Table; 2. Select calendar that should be main, invoke shortcut menu with right mouse button on calendar row number and
choose Properties; 3. Press Make Main button; ensure that Status of the calendar becomes ‘Main’; 4. Press OK button.
Defining calendar properties consists of two parts: setting standard calendar week and identifying periods (exception periods) when work should be performed according to other week calendars. You can create unlimited number of calendars. To edit calendar properties open Calendars Table from main program window or from menu item Project -> Data -> Calendars.
8.2. Calendars Table
Contains all project calendars data and contains the following columns (fields) by default:
- Code is a sequence of characters, unique for each calendar. Code is made of letters, numbers, and special characters (#$%&@_-~) without spaces, and is case sensitive.
- Name is a calendar name.
- Average Working day in Hours is mean working day in main calendar week. It equals total number of working hours divided to number of working days in main week.
- Number of Working days is number of working days in main calendar week. A day is considered a working day if at least one minute of it was used as working period.
- Total Number of working hours is total number of working periods in week (in hours).
- Notes contains comments to calendar (if any). Double click on the cell invokes Calendar properties dialog window opened on notes standard page.
- Main shows if calendar is selected as main calendar.
- Main Week Code is code of main week.
- Main Week Name is name of main week
- MN (Monday), TU (Tuesday), WN (Wednesday), TH (Thursday), FR (Friday), ST (Saturday), and SU (Sunday) are fields containing number of working periods for corresponding day of main week.
- User-defined columns.
Working with this table is made by the general rules, identical for all tables of the project.
Calendar shortcut menu
Calendar shortcut menu is invoked with the right mouse button click on calendar row number and contains the following options:

Calendar
84
- Properties invokes Calendar properties dialog window allowing you editing calendar properties.
- New allows creating new calendar by evoking Calendar properties dialog window and adds new row in Calendars table. Note that properties dialog window will be opened automatically for newly created calendar only if you have selected to Open properties for new created objects in the spider project parameters dialog window. Otherwise newly created calendar will be saved with default parameters and you can edit its properties in Calendar properties dialog window, invoked with right mouse button click on corresponding week row number.
- Delete deletes highlighted calendar and a corresponding row in Calendars table.
When several rows are highlighted simultaneously, shortcut menu contains Delete option only.
To cancel the last action performed select menu item Edit -> Undo last action or press button (see Undo for more details).
8.3. Weeks Table
Weeks table contains all project weeks' data and has following columns (fields) by default:
- Code is a sequence of characters, unique for each week. Code is made of letters, numbers, and special characters (#$%&@_-~) without spaces, and is case sensitive.
- Name is a week name.
- Average Working Day in Hours is mean working day of the week. It equals total number of working hours divided to number of working days in the week.
- Number of Working Days is number of working days in the week. A day is considered a working day if at least one minute in that day was a working period.
- Total Number of Working Hours is total number of working periods in the week (in hours).
- Working Day Beginning by Default is field used to conveniently edit working periods in the table. By default, working day start is 8 A.M. When value in this column is changed, start time will not automatically change in work schedule by day columns (1-Monday, 2-Tuesday, etc.). To update start time in these columns, reenter total number of working periods in 1-MN, 2-TU, and other columns.
- Notes contains comments to the week (if any). Double click on the cell invokes Week properties dialog window opened on notes standard page.
- MN (Monday), TU (Tuesday), WN (Wednesday), TH (Thursday), FR (Friday), ST (Saturday), and SU (Sunday) columns contain number of working hours for a corresponding day of the week. Changes made in this column will change total working period duration for corresponding day.
- 1-Monday, 2-Tuesday, 3-Wednesday, 4-Thursday, 5-Friday, 6-Saturday, and 7-Sunday columns contain working period's schedules for a corresponding day of the week. If there are several working periods in one day, use semicolon to separate them; and use a dash to separate working period start time and finish time (for example, 8:00-13:00; 14:00-19:00).
- User-defined columns.
Row shortcut menu
Row shortcut menu is invoked with the right mouse button click on row number and contains the following options:
- Properties invokes Week properties dialog window to edit week properties.
- New allows creating new week by evoking Week properties dialog window and adds new row in Weeks table. Note that properties dialog window will be opened automatically for newly created week only if you have selected to Open properties for new created objects in the spider project parameters dialog window. Otherwise newly created week will be saved with default parameters and you can edit its properties in Week properties dialog window, invoked with right mouse button click on corresponding week row number.
- Delete deletes highlighted week and a corresponding row in the table.
When several rows are highlighted simultaneously, shortcut menu contains Delete option only.

Calendar
85
To cancel the last action performed select menu item Edit -> Undo last action or press button (see Undo for more details).
Working with this table is made by the general rules, identical for all tables of the project.
8.4. Calendar Exceptions Table Calendar Exceptions are periods different from working periods of the calendar. Calendar Exceptions can be specific to the calendar (for example, vacation of manager) or general for all calendars (statutory holidays).
Calendar Exceptions table contains all project calendar exceptions data and contains the following columns (fields) by default:
- Code is a sequence of characters, unique for each calendar exception. Code is made of letters, numbers, and special characters (#$%&@_-~) without spaces, and is case sensitive.
- Name is calendar exception name.
- Notes contains comments to calendar exception (if any).
- Double click in the cell will invoke Calendar Exception properties dialog window opened on the notes standard page.
- Start is calendar exception period start date.
- Finish is calendar exception period finish date.
- Week Code is calendar exception week code.
- Week Name is calendar exception week name.
- User-defined fields.
Working with this table is made by the general rules, identical for all tables of the project.
Calendar Exception shortcut menu
Row shortcut menu in Calendar Exceptions table contains the following options:
- Properties invokes Calendar Exception properties dialog window to edit calendar exception properties.
- Assign to All Calendars adds highlighted calendar exception(s) to all project calendars.
New allows creating new calendar exception by evoking Calendar Exception properties dialog window and adds new row in Calendar Exceptions table. Note that properties dialog window will be opened automatically for newly created Calendar Exception only if you have selected to Open properties for new objects in the spider project parameters dialog window. Otherwise newly created Calendar Exception will be saved with default parameters and you will have to invoke Calendar Exception dialog window by double click on new Calendar Exception row number (or by selecting Properties from shortcut menu invoked with a right mouse button click on new Calendar Exception row number)
- Delete deletes highlighted calendar exception and a corresponding row in the table.
To cancel the last action performed select menu item Edit -> Undo last action or press button (see Undo for more details).
When several rows are highlighted simultaneously, shortcut menu contains Assign to All Calendars and Delete options.
8.5. Calendar Properties Dialog window This dialog window can be invoked by double clicking on corresponding table row number in calendars table and allows setting up calendar properties in Name, Code, Status, Main week, Exceptions, and Week fields. It contains Data page and notes standard page. You can also invoke this dialog window from row shortcut menu of calendars by selecting Properties item.

Calendar
86
Data page
This page contains calendar’s Name, Code, and Status.
Status field indicates whether calendar is the main project calendar. Main calendar is used as default calendar for newly-created objects: activities, phases, links, etc. To make an active calendar main, click Make Main button.
Main Week frame contains main week properties. To select the main week, click Select button. Dialog window which contains all project weeks will be invoked. Once you have chosen the main week, its properties will be shown in Main Week frame.
Exceptions frame contains a list of periods with different working weeks (usually blank weeks with "0" (zero) working hours per week). Previously added calendar exceptions can be assigned to calendars by clicking Add button and selecting the calendar exception from the list and finalizing by OK button. Several exceptions can be assigned to calendars. To assign all exceptions to the calendar press Select All.
Unselect All button executes the command to unselect all exceptions. To add a new calendar exception, click New and select required calendar exception period from the list of existing periods (which were previously created in calendar exceptions table). You can edit calendar exception properties such as Name, Code, Start, Finish dates, and others. Highlight calendar exception, and click Properties button to edit properties in invoked calendar exception properties dialog window. To remove selected the calendar exception from current calendar, click Delete (calendar exception will not be actually deleted from calendar exceptions table).
Note That: changes made to calendar exception period affect its properties in the project globally (as if you changed calendar exception in calendar exceptions table).
8.6. Creating Project Calendars To create new project calendars:
1. Open Calendars Table by double click on its icon in main program window
2. Add new row in Calendars table (working with tables). Calendar Properties dialog window will be invoked. Set up new calendar’s Code, Name, Work week, and Exceptions, if needed, and click OK to add new calendar to the project.
Note that properties dialog window will be opened automatically for newly created object only if you have selected to Open properties for new created objects in the spider project parameters dialog window. Otherwise newly created object will be saved with default parameters.
8.7. Week Properties Dialog window Allows editing week properties and is invoked with the right mouse button click on row number in weeks table. Contains Data page and notes standard page.

Calendar
87
Data page
- Name is a week name.
- Code is a sequence of characters, unique for each project week. Code is made of letters, numbers, and special characters (#$%&@_-~) without spaces, and is case sensitive.
- Working hours (total) is the total number of working periods in the week (in hours).
- Number of Working days is the number of working days. A day is considered a working day if at least one minute of it was a working period.
- Average Working day in hours is calculated by dividing Working hours (total) to Number of Working days.
- Working day beginning by default is the beginning working time for all working days in hour format. Enter this option if every working day begins at the same time.
- MN (Monday), TU (Tuesday), WN (Wednesday), TH (Thursday), FR (Friday), ST (Saturday), and SU (Sunday) are fields for day-by-day working periods entry. If there are several working periods in a working day, separate them with semicolon; and use dash to separate working period start and finish time. For example, 8:00 - 13:00; 14:00 - 19:00.
Note that: working periods within one day must be ordered in ascending mode; periods must not overlap.
8.8. Calendar Exception Properties Dialog window
Sets up calendar exception properties and contains Data page and notes standard page.
Data page

Calendar
88
- Name is the name of calendar exception.
- Code is the sequence of characters, unique for each calendar exception. Code is made of letters, numbers, and special characters (#$%&@_-~) without spaces, and is case sensitive.
- Start is the start date of calendar exception.
- Finish is the finish date of calendar exception.
Double click in the fields invokes mini-calendar dialog window to simplify date and time entry.
To select week type, click Select button. Select one of the weeks in the invoked Weeks dialog window and click OK.

Link
89
9. Links
9.1. Links Table
Contains properties of links between project activities in the following standard columns (fields) for each link:
- Code of preceding activity.
- Code of succeeding activity.
- Name of preceding activity.
- Name of succeeding activity.
- Notes contain comments to the link. Double click in the cell invokes link properties dialog window opened on notes standard page.
- Type sets up link type from reference-books. Double click in the cell invokes link properties dialog window opened on the Data page, where link type may be changed by selecting it from the list.
- Lag Type indicates type of lag: either Time or Volume.
- Lag contains lag value.
- Lag Unit sets up lag measurement unit (Hours or Days for Time lag). Lag unit can be changed in Link properties dialog window invoked by double click in Lag Unit cell.
- Lag Calendar is a drop-down list of lag calendar codes.
- Link Type indicates how strong the link is, out of two options: Not Earlier Than or Strict. Severity switches from one type to another with double click in the cell.
- User-defined fields (columns).
Working with this table is made by the general rules, identical for all tables of the project.
Link row shortcut menu
Shortcut menu in Links table which is invoked by right clicking on row number contains the following options:
- Bar Color defines the color of the link which will be shown in gantt charts.
- Properties invokes link properties dialog window to edit link properties.
- Delete deletes highlighted link and its corresponding row from Links table.
To cancel the last action performed, select items Edit -> Undo last action from the menu or press button (see Undo for more details).
When several rows are highlighted simultaneously, shortcut menu contains only Delete option.
Since user is not allowed to add new rows in Links table, Add option is absent in shortcut menus.
9.2. Link Properties Dialog Window This page is a member of object properties dialog windows with Data and notes standard pages.
Data page
From Activity and To Activity are the text fields for reflecting preceding and succeeding activities’ names.
Properties buttons located on the right of these text fields invoke activity properties dialog window for preceding and succeeding activities, accordingly.
Finish - Start, Finish - Finish, Start - Start, Start - Finish are the choices to set up Link Type.
Time and Volume are the measurement type choices for lag . If the link is of Finish – Start or Finish – Finish type, Volume option will not be available.
In Lag frame, enter the lag amount and select lag measurement unit:
- Days or Hours if lag is of Time measurement type; and

Link
90
- Volume Units or Percent of Volume if lag is of Volume measurement type.
Calendar contains link to calendar used for lag of Time measurement type calculation. To select another calendar, click Select on the right. In the invoked window select calendar from the list and click OK.
If lag is of Volume type, Select button will not be available. You can realize a search of calendars by name or by code.
Strong Link option, prohibits increasing lag between activities in resource constrained scheduling.
Bar Color option defines the color of the link which will be shown in gantt charts.
Notes page
- Notes contain any comments to link.
9.3. Creating New Links To create a new link for an activity, set up its preceding and succeeding activities. This can be done in Activity Gantt or in activity network by moving mouse pointer from the bar of predecessor activity, in logical relationship between two activities.
After cursor changes to cursor of link press left mouse button and move cursor to the second (successor) activity and release mouse button. link properties dialog window will be invoked to enter link properties.
Note that: properties dialog window will be opened automatically for newly created link only if you have selected to Open properties for new created objects in the spider project parameters dialog window. Otherwise newly created link will be saved with default parameters.
If a link between these two activities already exists, a shortcut menu with Properties and Delete options will appear. Selecting Properties will invoke link properties dialog window. Delete button will delete the existing link.
Activities would be re-arranged according to the links established only after project schedule is recalculated.
To cancel the last action performed, select Edit -> Undo last action from the menu or press button (see Undo for more details).
Note That: it is not possible to create a link from activity to itself, and while create a link between activities if there is already a link between them in opposite direction; a corresponding error message will appear.
9.4. Edit Link in Links Table To edit link properties in Links Table:
1. Invoke Link properties dialog window by one of the following methods:
- Double click link row number with the left mouse button; or
- Select Properties from Link shortcut menu invoked with the right mouse button click on link row number.
2. Edit link properties such as From Activity, To Activity, Link Type, Lag Type, Lag duration / Lag Volume and others in the invoked dialog window and click OK when finished.

Link
91
Alternatively, link properties can be edited directly in cells of Links table. To perform this, double click a corresponding cell, edit contents, and press Enter key on the keyboard.
To cancel the last action performed select menu item Edit -> Undo last action or press button (see Undo for more details).
Working with this table is made by the general rules, identical for all tables of the project.
9.5. Delete Link in the Links Table To delete link in Links Table, follow one of the following methods:
- Invoke Link shortcut menu with the right mouse button click on link row number and select Delete, or
- Highlight link with the left mouse button click on link row number and press Delete key on the keyboard; or
- Highlight link with the left mouse button click on link row number and select Delete from Edit menu.
If several links are highlighted simultaneously, all of them will be deleted from the project. To perform this, hold Ctrl key and click row numbers of links you would like to delete – they will stay highlighted in gray –and follow one of the above-described methods. Confirm group of objects deletion when a corresponding message appears.
To cancel the last action performed select menu item Edit -> Undo last action or press button (see Undo for more details).
9.6. Lag In addition to the type of logical relationship (link) between activities (Finish - Start, Finish - Finish, Start - Finish or Start - Start) you can specify lag:
- Time lag - time period between the moment when dependency requirements (preceding event) are accomplished and succeeding event (e.g. succeeding activity start or finish) may occur;
- Volume lag - specifies the amount of work that should be done on preceding activity to allow the following activity to start.
Lag can be positive (delay) or negative (lead). Lag is a modification of a logical relationship that directs a delay in the successor activity. A negative lead is equivalent to a positive lag.
Time Lag
Has different meaning for each type of link between activities:
For Finish-Start link type: sets up time interval (according to its own calendar) between preceding activity finish and current activity start.
For Finish-Finish link type: sets up time interval (according to its own calendar) between preceding activity finish and current activity finish.
For Start-Start link type: sets up time interval (according to its own calendar) between preceding activity start and current activity start.
For Start-Finish link type: sets up time interval (according to its own calendar) between preceding activity start and current activity finish.
Lag Calendar can be specified in Link Properties dialog window.
Volume Lag
Is set up for Start-Start and Start-Finish link types only. Means that next activity can only start after a set-up lag volume is accomplished for current activity.
9.7. Finish – Start Finish-to-Start — is the logical relationship (link) between activities when preceding activity must be completed before the start of the succeeding activity.
Other logical relationships between activities:

Link
92
Finish-to-Finish — is the logical relationship between activities when preceding activity must be completed before the completion of the succeeding activity.
Start-to-Finish — is the logical relationship between activities when preceding activity must be started before the completion of the succeeding activity.
Start-to-Start — is the logical relationship between activities when preceding activity must be started before the start of the succeeding activity.
9.8. Finish – Finish Finish-to-Finish — is the logical relationship (link) between activities when preceding activity must be completed before the completion of the succeeding activity.
Other logical relationships between activities:
Finish-to-Start — is the logical relationship between activities when preceding activity must be completed before the start of the succeeding activity.
Start-to-Finish — is the logical relationship between activities when preceding activity must be started before the completion of the succeeding activity.
Start-to-Start — is the logical relationship between activities when preceding activity must be started before the start of the succeeding activity.
9.9. Start – Finish Start-to-Finish — is logical relationship (link) between activities when preceding activity must be started before the completion of the succeeding activity.
Other logical relationships between activities:
Finish-to-Start — is the logical relationship between activities when preceding activity must be completed before the start of the succeeding activity.
Finish-to-Finish — is the logical relationship between activities when preceding activity must be completed before the completion of the succeeding activity.
Start-to-Start — is the logical relationship between activities when preceding activity must be started before the start of the succeeding activity.
9.10. Start – Start Start-to-Start — is the logical relationship (link) between activities when preceding activity must be started before the start of the succeeding activity.
Other logical relationships between activities:
Finish-to-Start — is the logical relationship between activities when preceding activity must be completed before the start of the succeeding activity.
Finish-to-Finish — is the logical relationship between activities when preceding activity must be completed before the completion of the succeeding activity.
Start-to-Finish — is the logical relationship between activities when preceding activity must be started before the completion of the succeeding activity.
9.11. Diagram of Preceding and Succeeding Activities
9.11.1. Links Diagram Shows links for the activity with its preceding and succeeding activities. To invoke the window, in activity properties dialog window select Links page and click Diagram button, in the bottom.

Link
93
For further information on working with links diagram, see Activity Network.
Right clicking on window parts, where there is no activity invokes links diagram shortcut menu containing Create Preceding Activity and Create Succeeding Activity options.
Right clicking on activity boxes invokes activity shortcut menu in links diagram containing Properties, Bar Color, Shape, and Delete options.
- Properties invokes activity properties dialog window.
- Bar Color invokes object color dialog window allows to set up activity box color in the diagram. If several activity boxes are highlighted simultaneously, selected color will be applied to all of them.
- Shape changes the shape of activity boxes in shapes dialog window. If several activity boxes are highlighted simultaneously, selected shape will be applied to all of them.
Delete deletes the activity from the project. If several activity boxes are highlighted simultaneously, all of them will be deleted from diagram and from the project. To cancel the last action performed select menu item Edit -> Undo last action or
press button (see Undo for more details).
9.11.2. Links Diagram Shortcut Menu Is invoked by right clicking on the parts of links diagram where there is no activity, and contains two choices as follows:
Create Preceding Activity adds a new activity preceding the highlighted activity indicated in the dialog window header. Set up new activity properties in the invoked link properties dialog window.
Create Succeeding Activity adds a new activity succeeding the highlighted activity indicated in the dialog window header. Set up new activity properties in the invoked link properties dialog window.
Note that: properties dialog window will be opened automatically for newly created activity only if you have selected to open properties for new created objects in the spider project parameters dialog window. Otherwise newly created activity will be saved with default parameters. To edit properties of new activity double click on corresponding box or select Properties from shortcut menu invoked with a right mouse button click on corresponding activity box.
9.11.3. Activity Shortcut Menu in Links Diagram Is invoked with the right mouse button click on activity box in links diagram.
Links Diagram window is invoked by clicking Diagram button on the bottom of Links page in activity properties dialog window.
The shortcut menu contains the following options:
- Properties invokes activity properties dialog window.
- Bar Color invokes object color dialog window allows setting up activity box color in the diagram. If several activity boxes are highlighted simultaneously, selected color will be applied to all of them.
- Shape changes activity box shape in shapes dialog window. If several activity boxes are highlighted simultaneously, selected shape will be applied to all of them.
- Delete deletes the activity from the project. If several activity boxes are highlighted simultaneously, all of them will be deleted from diagram and from the project.
To cancel the last action performed select menu item Edit -> Undo last action or press button (see Undo for more details).

Resource
94
10. Resources
10.1. Resource Resources are skilled human resources (specific disciplines either individually or in crews or teams), equipment, services, supplies, commodities, materiel, budgets, or funds. Resources are used to perform activities in the project. There are resources of renewable and non-renewable type. Renewable resources are resources available to be used after they were already used on activity. For example, grader, crane, worker or driver. These resources are called Resources in Spider Project.
Non-renewable resources are resources used up on one activity. For example, bricks, concrete, energy. These resources are called Materials in Spider Project.
To perform activity, resource should be assigned to it. Use Activity properties dialog window to assign resource to activity.
10.2. Resources Table
Includes all project resources data and contains the following columns (fields) by default:
- Code is a sequence of characters, unique for each resource. Code is made of letters, numbers, and special characters (#$%&@_-~) without spaces, and is case sensitive.
- Name is resource name.
- Type is resource type usually used in connection with reference-books.
- Notes contains comments to material (if any). Double click in the cell invokes Resource properties dialog window opened on notes standard page.
- Folder is a field containing full path to attached folder.
- OLE objects field contains icon if any other applications documents are attached to the material. Double click in the cell invokes Resource properties dialog window opened on the OLE-objects and Folder standard page.
- Short Name contains shorter resource name.
- Quantity is available resource quantity.
- Quantity [Scheduled] is maximum resource quantity to be used in the project at the current moment.
- Calendar is calendar code the resource operates under.
- Total Cost [Remaining] is remaining scheduled cost of work of all resource units in the project.
- Total Cost [Actual] is actual cost of work of all resource units in the project.
- Total Cost [Cumulative] is total cost of work of all resource units in the project (equals to Total Cost [Remaining] + Total Cost [Actual]).
- Duration, Hours [Remaining] is remaining resource work duration (according to its own calendar) in the whole project, in hours.
- Duration, Days [Remaining] is remaining resource work duration (according to its own calendar) in the whole project, in days.
- Duration, Hours [Actual] is actual resource work duration in the whole project, in hours.
- Start is resource work start date.
- Finish is resource work finish date.
- Float, Days and Float, Hours resource reserve in days and hours, respectively.
- Start [ASAP] is as soon as possible start date resource starts working in remaining part of the project.
- Finish [ASAP] is as soon as possible finish date of resource work in the project.
- Start [ALAP] is as late as possible start date resource starts working in remaining part of the project.
- Finish [ALAP] is as late as possible finish date of resource work in the project.

Resource
95
- Start [Actual] is actual start date of resource work in the project.
- Finish [Actual] is actual finish date of resource work in the project.
- User-defined fields.
In addition, there are fields containing cost components expenditures and material consumption for one-hour resource work, as well as scheduled and actual expenditures of resource by materials, Material centers, Cost components, and Cost centers included in Resources table.
Note That: Starting with Version 8 of Spider Project, Initial Amount field was eliminated. When opening projects saved in the older versions of the programs, a milestone with Initial Amount name will be added into main phases of OBS and WBS in the projects. This milestone will have fixed cost component expense in the amount of initial amount.
Working with this table is made by the general rules, identical for all tables of the project.
Resource shortcut menu
Resource shortcut menu is invoked with the right mouse button click on resource row number and contains the following options:
- Properties invokes Resource properties dialog window to edit resource properties.
New allows creating new resource by evoking Resource properties dialog window and adds new row in Resources table. Note that properties dialog window will be opened automatically for newly created resource only if you have selected to Open properties for new created objects in the spider project parameters dialog window. Otherwise newly created resource will be saved with default parameters and you will have to invoke Resource dialog window by double click on new resource row number (or by selecting Properties from shortcut menu invoked with a right mouse button click on new resource row number)
- Delete deletes highlighted resource and a corresponding row in Resources table.
When several rows are highlighted simultaneously, shortcut menu contains Replace Assignment by and Delete options.
- Replace Assignments by allows selecting new assignment to replace existing one(s). Select new assignment from the list of all assignments available. The list varies depending on selection you made: Resources, Multi-Resources, or Resource Skills. To learn more, see Replacing Assignment.
To cancel the last action performed select menu item Edit -> Undo last action or press button (see Undo for more details).
10.3. Resource Properties Dialog Window
Resource
96
Dialog window of Resource Properties lets view and edit properties of resources. Dialog window consists of following pages: Data, Assignments, Materials standard page, Cost Components standard page, Material Sets, Resource Production, Cost Periods, Overtime, Resource Centers, Notes standard page , OLE-objects and Folder standard page. Page Data
- Name –name of resource; - Code – A sequence of characters that should be unique for each project resource. Code is made up by letters, figures
and special characters (#$%&@_-~) without spaces and is case sensitive. - Short Name – you can define short name for the resource; - Type – default field for organizing of data transfer from reference-books. Corresponds to current resource type. - Quantity – available quantity of current resource; - Calendar – calendar, according to which the resource can execute activities. To change resource calendar press select
button and select required calendar in the list. - Start; Finish – start and finish dates of resource work in the project; - ASAP Start, ASAP Finish – start and finish dates of resource assignment, calculated according to ASAP method, i.e.
dates are scheduled as soon as possible keeping all constraints satisfied. - ALAP Start, ALAP Finish – start and finish dates of resource assignment, calculated according to ALAP method, i.e.
dates are scheduled as late as possible without delaying the project finish date. - Float (hours) - resource assignment float in hours. - Float (days) - resource assignment float in days. - Duration, hours; Duration, days – remaining scheduled duration of resource work in the project in hours and in days. - Actual Start - actual start of resource work in the project; - Actual Finish - actual finish of resource work in the project; - Scheduled Quantity – estimated maximal number of resource units, required for project execution; - Actual Duration – actual duration of resource work in the project in hours; - E-mail address – a resource‘s e-mail address of a for sending notifications - Notify before start and finish of the works – selecting this option will allow to notify a resource at the beginning and at
the end of works on operations to which it is appointed. - Bar Color – defines the bar color of the resource in chart.
Page Assignments Lets you control resource assignments to activities. List contains all activities, to which the resource is assigned. Group of fields below activities list present summary of resource assignment:
- Quantity – number of resource units, assigned to activity execution; - Type - default field for organizing of data transfer from reference-books; - Priority – priority of assignment (is used for resources belonging to resource skills) - defines the order of resources
assignment in resource constrained scheduling. Resources with higher priority (i.e., greater value) are assigned first; - Calendar – calendar code on which the resource assigned to activity execution works. - Resource Hours – resource labor expenditures assigned to activity execution in resource-hours. - Productivity – productivity of one resource unit per hour (i.e. number of activity volume units that current resource can
execute per hour) - Work Load – work load of one resource unit in percent of total resource working time that the resource is to spend on
activity execution. By default, workload is equal to 100%. - Scheduled Quantity - estimated number of resource units, required to perform activity. - Remaining Cost – estimated remaining cost of resource work on current activity assignment; - Fixed Cost – fixed cost of resource work on current activity assignment; To view or edit resource assignment on an activity select required activity and press Properties button. To remove assignment of the resource select required activity and press, Delete button.

Resource
97
Page Resource Production Use Resource Production option for modeling of available resources quantity at certain time periods. For example hiring or firing people, buying or production of equipment. Resource can be produced (or consumed) on activities. You can set for individual resource a list of activities that produce/spend current resource:
1. Press Add button; 2. Select required activity from the list of project activities; 3. Press OK. 4. Set amount of resource units produced (i.e. positive value) or consumed (i.e. negative value) in the field Quantity
for selected activity; 5. Specify whether resource is produced (consumed) at the beginning or at the end of activity by checking
corresponding boxes At Start or At Finish. 6. Press OK to save changes made and close dialog window or press Apply to apply changes and leave dialog window
opened. Note that: To change resource quantity you can also include dummy activities (producing or consuming resources) to project WBS (work breakdown structure). To cancel resource production on certain activities select corresponding activities in the list and press Delete. Page Cost Periods You can create and edit resource cost periods on this page. The list of cost periods contains starting date and time of all existing cost periods for the current resource. Button Add lets you add new cost period. By default, starting date for new cost period is set equal to the current date (with time 00:00), the next created period starting date would be tomorrow and so on. Note that properties dialog window will be opened automatically for newly created cost period only if you have selected to Open properties for new created objects in the Spider Project Parameters Dialog window. Otherwise, newly created object will be saved with default parameters and you can edit them later. Button Properties lets you edit cost period properties in the resource cost period properties dialog window: cost period starting date and time; per hour cost of assigned cost component(s), consumed by the current resource. Button Delete lets you delete selected cost period. Page Overtime You can create and edit resource overtime periods on this page. The list of Overtimes contains existing overtime periods’ names and codes for the current resource. Button Add lets you add new overtime period. Note you can only add overtime periods previously defined in the Overtime table. Button Properties lets you edit overtime period properties in the overtime properties dialog window: overtime name, code and overtime calendar. Button Delete lets you delete selected overtime. Page Resource Centers On the given page it is possible to include a resource in resource center’s structure, existing in the project. For this it is necessary to select with left mouse button one or several centers and to activate option to Include into center, located in the left bottom part of window (if resource is not needed in center ‘s structure this option should not be selected).
10.4. Add Resource in Resources Table
To add resource in Resources Table:
1. Invoke new Resource Properties dialog window by one of the following methods:
Resource
98
- Select New from Resource shortcut menu invoked with the right mouse button click on resource row number; or
- Hit Insert key on the keyboard; or
- Click on empty gray area below the table with the right mouse button and select New option in the invoked shortcut menu.
Note that properties dialog window will be opened automatically for newly created resource only if you have selected to Open properties for new created objects in the spider project parameters dialog window. Otherwise newly created resource will be saved with default parameters and you will have to invoke resource properties dialog window by double click on new resource row number (or by selecting Properties from shortcut menu invoked with a right mouse button click on new resource row number)
2. Set up new resource properties such as Name, Code, Type, and Quantity (equals 1 by default) and click OK when finished.
To cancel the last action performed select menu item Edit -> Undo last action or press button (see Undo for more details).
10.5. Edit Resource in Resources Table To edit resource properties in Resources Table:
1. Invoke Resource Properties dialog window by one of the following methods:
- Double click resource row number with the left mouse button; or
- Select Properties from Resource shortcut menu invoked with the right mouse button click on resource row number.
2. Edit resource properties such as Code, Name, Short Name, Type, Quantity, and others in the invoked dialog window and click OK when finished.
3. Alternatively, resource properties can be edited directly in cells of Resources table. To perform this, double click a corresponding cell, edit contents, and press Enter key on the keyboard.
To cancel the last action performed select menu item Edit -> Undo last action or press button (see Undo for more details).
Working with this table is made by the general rules, identical for all tables of the project.
10.6. Delete Resource in Resources Table To delete resource in Resources table, follow one of the following methods:
- Invoke Resource shortcut menu with the right mouse button click on resource row number and select Delete; or
- Highlight resource with the left mouse button click on resource row number and hit Delete key on the keyboard; or
- Highlight resource with the left mouse button click on resource row number and select Delete from Edit menu.
If several resources are highlighted simultaneously, all of them will be deleted from the project. To perform this, hold Ctrl key and click row numbers of resources you would like to delete – they will stay highlighted in gray –and follow one of the above-described methods. Confirm group of objects deletion when a corresponding message appears.
To cancel the last action performed select menu item Edit -> Undo last action or press button (see Undo for more details).
10.7. Search for Resource Overloads To search for resource overloads:
1. Open activity gantt or resource gantt.
2. Select Resource Overloads Bar from Report menu.
3. Click Resource Peak Work Load icon on the toolbar. Resource Load bar will appear in the bottom of Gantt chart. Green color on the bar represents resources working in normal load. Red color represents overloaded resources.
4. With the right mouse button, click on a red area and invoke the shortcut menu containing Search for Resource Overloads and Delete Diagram options.

Resource
99
5. Select Search for Resource Overloads option to invoke Resource Overloads dialog window containing list of resources overloaded in the period. Period is specified in Start and Finish fields. Clicking Filter Activities button will show only activities in which the overloaded resources were used (activity gantt) or the highlighted resource and its assignments (resource gantt). To restore full Gantt chart, select Restore from Filter menu in Gantt chart.
10.8. Overloaded Resources Dialog Window
Contains list of overloaded resources for the moment of time pointed with cursor during search for overloads. Period start and finish date and time are shown in the top part of dialog window, in Period from and to fields.
Close and Filter Activities buttons are located below the list. In activity gantt, clicking Filter Activities button will show only activities in which the overloaded resources were used.
In resource gantt, clicking Filter Assignments button will show only the resource highlighted in the list in Resource Overloads Dialog window, and its assignments.
To restore full Gantt chart, select Restore from Filter menu in Gantt chart.
Click Close to close the dialog window.
10.9. Resources in Resource Gantt
10.9.1. Add Resource in Resource Gantt To add new resource in Resource Gantt:
1. Invoke new Resource Properties dialog window by one of the following methods:
- Select New from Resource shortcut menu invoked with the right mouse button click on resource row number; or
- Hit Insert key on the keyboard; or
- Click on empty gray area below the table with the right mouse button and select New option in the invoked shortcut menu.
Note That: properties dialog window will be opened automatically for newly created resource only if you have selected to Open properties for new created objects in the spider project parameters dialog window. Otherwise newly created resource will be saved with default parameters and you will have to invoke resource properties dialog window by double click on new resource row number (or by selecting Properties from shortcut menu invoked with a right mouse button click on new resource row number)
2. Set up new resource properties such as Code, Name, Type and Quantity (equals 1 by default), and click OK when finished.
To cancel the last action performed select menu item Edit -> Undo last action or press button (see Undo for more details).
Resource
100
10.9.2. Edit Rsource in Resource Gantt To edit resource in Resource Gantt:
1. Invoke Resource Properties dialog window by one of the following methods:
- Double click resource row number with the left mouse button; or
- Select Properties from Resource shortcut menu invoked with the right mouse button click on resource row number.
2. Edit resource properties such as Code, Name, Short Name, Type, Quantity, and others in the invoked dialog window and click OK when finished.
Alternatively, resource properties can be edited directly in table part of resource gantt. To perform this, double click a corresponding cell, edit contents, and press Enter key on the keyboard.
To cancel the last action performed select menu item Edit -> Undo last action or press button (see Undo for more details).
10.9.3. Delete Resource in Resource Gantt To delete resource in Resource Gantt, follow one of the following methods:
- Invoke Resource shortcut menu with the right mouse button click on resource row number and select Delete; or
- Highlight resource with the left mouse button click on resource row number and hit Delete key on the keyboard; or
- Highlight resource with the left mouse button click on resource row number and select Delete from Edit menu.
When you confirm deletion, the program will delete resource.
If several resources are highlighted simultaneously, all of them will be deleted from the project. To perform this, hold Ctrl key and click row numbers of resources you would like to delete – they will stay highlighted in gray –and follow one of the above-described methods. Confirm group of objects deletion when a corresponding message appears.
To cancel the last action performed select menu item Edit -> Undo last action or press button (see Undo for more details).
10.9.4. Resource Shortcut Menu in Resource Gantt Resource shortcut menu can be invoked with a right mouse button click on resource row number in table area or resource bar in graphic area of Resource Gantt. Contains following items:
- Properties – opens resource properties dialog window; - Bar color – lets you customize color of resource bar in graphic area of Resource Gantt through object color dialog
window; - Reports and Diagrams Templates:
- Table – opens report templates list window where you can choose report template for table report. - Diagram – opens report templates list window where you can choose report template to create a diagram.
- General Reports and Diagrams: - Table - opens Report settings dialog window to create report on selected resource; - Diagram - opens Diagram settings dialog window to create diagram of selected resource;
- Exclude – moves current resource to the list of excluded objects. - Include – lets insert a department and/or resource, selected in excluded objects dialog window, next to the resource, on
which shortcut menu was invoked. - Cut – puts selected resource to the clipboard. You can later insert resource from the clipboard inside another
department or next to certain resource. - Paste - inserts resources from the clipboard next to the resource, on which shortcut menu was invoked, or inserts
departments from the clipboard inside the department, on which shortcut menu was invoked. Note that properties dialog window will be opened automatically for newly created object only if you have selected to Open properties for new created objects in the Spider Project Parameters Dialog window. Otherwise, newly created object will be saved with default parameters and you can edit them later

Resource
101
- New Resource - lets add a new resource on the same level of OBS as resource, on which shortcut menu was invoked, new resource will be placed next to the resource, on which shortcut menu was invoked.
- Replace Assignments by... – lets replace all assignments of the current resource with a different resource, resource skill or multi-resource through replacing assignments dialog window;
- Convert to Department – converts the selected resource(s) to departments. - Delete - deletes current resource from the project with all corresponding assignments.
You can perform actions on a group of selected resources through group shortcut menu: change Properties, Bar color, Roll Up / Expand corresponding assignments; Exclude / Include, Cut, Delete resources or Replace assignments by… for selected resource. Reports and Diagrams Templates and General Reports and Diagrams are also available to be generated.
10.9.5. Shortcut Menu of Group of Selected Resources in Resource Gantt If several resources are selected this shortcut menu can be invoked with a right mouse button click on resource row number in table area or resource bar in graphic area of Resource Gantt. Contains following items:
- Properties – opens a common properties window for the selected elements. Contains: Materials Cost Components and Materials Sets. Any changes in these fields will be applied to all selected elements.
- Bar color – lets you customize color of selected resources bars in graphic area of Resource Gantt through object color dialog window;
- Roll Up / Expand – toggles between only resources and resources with activities views. - Exclude – moves selected resources to the list of excluded objects. - Copy – copies selected resources to the clipboard. - Cut – puts selected resources to the clipboard. You can later insert these resources from the clipboard inside certain
department or next to certain resource. - Replace assignments by – lets replace all assignments of currently selected resources with a different resource, resource
skill or multi-resource through replace assignments dialog window; - Convert to Department– converts selected resources into department. - Delete - deletes selected resources from the project. - Also Reports and Diagrams Templates and General Reports and Diagrams can be generated via this menu.
10.9.6. Move Resource in Resource Gantt To move resource from one department to another in Resource Gantt: 1. Highlight resource(s) by holding Ctrl key and clicking with left mouse button resource row numbers you want to move.
2. Invoke shortcut menu with the right mouse button click on one of the highlighted row numbers, and select Cut. Cut resources will be placed on clipboard.
3. Invoke Department shortcut menu with the right mouse button click on department row number where you want to move the cut resources, and select Paste –> One Level Lower or The Same Level. (Note That: Resource cannot be moved onto the first level, and the first-level object cannot be moved or deleted. A corresponding warning message will appear when you attempt to perform these operations.)
If you want to insert resource just after another resource, invoke Resource shortcut menu by clicking its row number, and select Paste.
To cancel the last action performed select menu item Edit -> Undo last action or press button (see Undo for more details).

Multi-Resource
102
11. Departments
11.1. Department Properties Dialog Window
Dialog window allows you to set department properties and contains following pages: Data, Resources, Departments, Notes standard page, OLE-objects and Folder standard page. Page Data
- Name – department’s name. - Code - A sequence of characters that should be unique for each project department. Code is made up by letters, figures
and special characters (#$%&@_-~) without spaces and is case sensitive. - Type – default field for organization of data transfer from reference-books for changing department properties. - Short Name – department’s short name. - Calendar– Calendar, used for calculation of department work duration in days. To change current department calendar
press Select button and choose one from the list of available calendars. - ASAP Start (as soon as possible) – the earliest possible point in time on which resources comprising current department
can start working. ASAP Start dates can change as the project progresses and changes are made to the project plan. - ASAP Finish (as soon as possible) - the earliest possible point in time on which resources comprising current
department can finish working. ASAP Finish dates can change as the project progresses and changes are made to the project plan.
- ALAP Start (as late as possible) – the latest possible point in time on which resources comprising current department may start working.
- ALAP Finish (as late as possible) – he latest possible point in time on which resources comprising current department may finish working.
- Level – level of current department in organizational breakdown structure. - Sum Volumes – allows to summarize the volumes, which are carried out by a resource, as a part of department. The
total volume will be displayed only after the calculation of expenses. - Bar Color – defines the bar color of the department in graphical part of the Resource Gantt.
Page Resources - Included Resources - list of resources comprising current department. - New – adds new resource to department. - Properties – displays properties window of selected department.

Multi-Resource
103
- Delete – deletes selected department from the project. - Exclude – moves selected department to the list of excluded objects.
- Excluded Resources - list of resources excluded from organizational breakdown structure. - Include – lets include selected resource to current organizational breakdown structure. - Properties – displays properties window of selected excluded resource. - Delete – deletes selected excluded resource from the project.
Page Departments
- New – adds a new department to current departments. - Delete – deletes selected department from project. - Exclude – moves department to the list of excluded objects (removes department from current organizational
breakdown structure). To exclude any department from the list responsibility structure must be full.
11.2. Departments in Resource Gantt
11.2.1. Add Department in Resource Gantt To add department in Resource Gantt:
1. Invoke Department shortcut menu with the right mouse button click on its row number.
2. Select New Department –> One Level Lower or The Same Level.
3. In the invoked Department properties dialog window, set up new department properties such as Name, Code, and Type. ASAP Start, ASAP Finish, ALAP Start, and ALAP Finish dates are automatically set up equaling to the current project time. Note that properties dialog window will be opened automatically for newly created department only if you have selected to Open properties for new created objects in the spider project parameters dialog window. Otherwise newly created department will be saved with default parameters and you can edit its properties in Department properties dialog window, invoked with right mouse button click on corresponding department row number.
To cancel the last action performed select menu item Edit -> Undo last action or press button (see Undo for more details).
11.2.2. Edit Department in Resource Gantt To edit department properties in Resource Gantt:
1. Invoke Department Properties dialog window by one of the following algorithms:
- Double click department row number in table part of resource gantt; or
- Select Properties from Department shortcut menu invoked with the right mouse button click on department row number.
2. Edit department properties such as Code, Name, Type, Calendar, and others in the invoked dialog window and click OK when finished.
Alternatively, department properties can be edited directly in table part of resource gantt. To perform this, double click a corresponding cell, edit contents, and press Enter key on the keyboard.
To cancel the last action performed select menu item Edit -> Undo last action or press button (see Undo for more details).
11.2.3. Delete Department in Resource Gantt To delete department in Resource Gantt, follow one of the following methods:

Multi-Resource
104
- Invoke Department shortcut menu with the right mouse button click on department row number in table part of resource gantt and select Delete; or
- Highlight department with the left mouse button click on department row number and press Delete key on the keyboard.
When you confirm deletion, program will delete department. All resources included in the department will be deleted from the project, as well.
If you highlight several departments, all of them will be deleted from the project. To perform this, hold Ctrl key and click row numbers of departments you would like to delete – they will stay highlighted in gray –and follow one of the above-described methods. Confirm group of objects deletion when a corresponding message appears.
To cancel the last action performed select menu item Edit -> Undo last action or press button (see Undo for more details).
11.2.4. Department Shortcut Menu in Resource Gantt Department shortcut menu can be invoked with a right mouse button click on department row number in table area or department bar in graphic area of Resource Gantt. Contains following items:
- Properties – opens department properties dialog window; - Bar color – lets you customize color of department bar in graphic area of Resource Gantt through object color dialog
window; - Reports and Diagrams Templates:
- Table– opens report templates list window where you can choose report template for table report. - Diagram – opens report templates list window where you can choose report template to create a diagram.
- General Reports and Diagrams: - Table - opens Report settings dialog window to create report on selected department; - Diagram - opens Diagram settings dialog window to create diagram of selected department;
- Exclude – moves current department to the list of excluded objects. - Include –
- One Level Lower - lets insert a department and/or resource, selected in excluded objects dialog window, inside department, on which shortcut menu was invoked.
- The Same Level - lets insert a department and/or resource, selected in excluded objects dialog window, on the same level of OBS as department, on which shortcut menu was invoked.
- Cut – puts selected department to the clipboard. You can later insert department from the clipboard inside another department or next to certain department.
- Paste - - One Level Lower - lets insert a department and/or resource from the clipboard inside the department, on which
shortcut menu was invoked. - The Same Level - lets insert a department and/or resource from the clipboard on the same level of OBS as
department, on which shortcut menu was invoked. - Convert to Department – converts department into another department. - New Department
- One Level Lower – lets add a new department inside department, on which shortcut menu was invoked. - The Same Level - lets add a new department on the same level of OBS as department, on which shortcut menu
was invoked. - New Resource – adds a new resource to the current department; - Delete - deletes current department from the project. Note that properties dialog window will be opened automatically for newly created object only if you have selected to Open properties for new created objects in the Spider Project Parameters Dialog window. Otherwise, newly created object will be saved with default parameters and you can edit them later
Multi-Resource
105
11.2.5. Shortcut Menu of Group of Selected Departments in Resource Gantt If several departments are selected this shortcut menu can be invoked with a right mouse button click on department row number in table area or department bar in graphic area of Resource Gantt. Contains following items:
- Bar color – lets you customize color of selected departments bars in graphic area of Resource Gantt through object color dialog window;
- Roll Up / Expand – toggles between only departments and departments with resources views. - Exclude – moves selected departments to the list of excluded objects. - Cut – puts selected departments to the clipboard. You can later insert these departments from the clipboard inside
certain department or on the same level of OBS as department, on which shortcut menu was invoked. - Convert to Department – converts selected departments to other departments - Delete - deletes selected departments from the project. - Also Reports and Diagrams Templates and General Reports and Diagrams can be generated via this menu.
11.2.6. Move Department in Resource Gantt To move a department to another level in Resource Gantt, perform the following: 1. Highlight departments by holding Ctrl key and clicking with the left mouse button on department row numbers.
2. Invoke Department shortcut menu with the right mouse button click on one of the highlighted row numbers and select Cut. Cut departments will be put on clipboard.
3. Invoke Department shortcut menu once more with the right mouse button click on the department where you want to move the cut departments. Select Paste –> One Level Lower or The Same Level. (Note That: department(s) cannot be moved from or to the first level).
Note That: If option Paste is selected from Resource shortcut menu, the cut departments will be inserted inside the department where the resource is located.
Note That: Department cannot be moved within the same level.
To cancel the last action performed select menu item Edit -> Undo last action or press button (see Undo for more details).
11.3. Departments in OBS
11.3.1. Add Department in OBS View To add a new department in OBS:
1. Invoke Department shortcut menu by the right mouse button click on department box.
2. Select New Department –> One Level Lower or The Same Level.
3. In the invoked Department properties dialog window, set up new department properties such as Name, Code, and Type. ASAP Start, ASAP Finish, ALAP Start, and ALAP Finish dates will automatically be set up equaling to the current project time. Note that properties dialog window will be opened automatically for newly created department only if you have selected to Open properties for new created objects in the spider project parameters dialog window. Otherwise newly created department will be saved with default parameters and you can edit its properties in Department properties dialog window, invoked with right mouse button click on corresponding department row number.
4. Click OK.
To cancel the last action performed select menu item Edit -> Undo last action or press button (see Undo for more details).
11.3.2. Edit Department in OBS View To edit department properties in OBS:
1. Invoke Department Properties dialog window by one of the following methods:

Multi-Resource
106
- Double click department box in diagram; or
- Select Properties from Department shortcut menu invoked with the right mouse button click on department box in diagram.
- Edit department properties such as Code, Name, Calendar, Type, ASAP Start, ASAP Finish, ALAP Start, and ALAP Finish dates, and others in the invoked dialog window.
2. Click OK when finished.
To cancel the last action performed select menu item Edit -> Undo last action or press button (see Undo for more details).
11.3.3. Delete Department in OBS View To delete department in OBS, invoke Department shortcut menu with the right mouse button click on department box and select Delete.
When you confirm deletion, program will delete the department. All resources included in the department, will be deleted from the project, as well.
To cancel the last action performed select menu item Edit -> Undo last action or press button (see Undo for more details).
11.3.4. Department Shortcut Menu in OBS View Department shortcut menu can be invoked with a right mouse button click on department bar in organizational breakdown structure window. Contains following items:
- Properties – allows customizing selected department’s properties through department properties dialog window; - Reports and Diagrams Templates; to create general table reports on corresponding department on previously saved
template (diagrams can only be created in Gantt charts)
- General Reports and Diagrams; allows to create general table reports on corresponding department (diagrams can only be created in Gantt charts)
- New Department– creates new department as subordinate to the department, on which shortcut menu was invoked; One Level Lower – creates new department which is of the same level with the corresponding one. The Same Level – creates new department which is one level lower than the corresponding one.
- Delete - deletes selected department from the project.
11.3.5. Exclude Department from OBS Excluding department from organizational breakdown structure (OBS) does not actually delete department from the project – it is added to the list of excluded departments. To exclude department from OBS:
1. Make desired OBS ‘incomplete’: open structures list dialog window (menu Project -> OBS), select OBS with left mouse button, press Properties button and uncheck box Make Full in opened structure properties dialog window. Press OK button to confirm action.
2. Switch to desired OBS: select OBS in structures list dialog window with left mouse button and press Switch to button;
3. Invoke shortcut menu (with a right mouse button click on department bar) on department to be removed from OBS and select Exclude.
To exclude several departments from WBS: 1. Repeat actions 1 and 2 if needed; 2. Select desired departments to be removed with left mouse button click on corresponding departments’ bars keeping
CTRL button pressed; 3. Invoke shortcut menu (with a right mouse button click on department bar) on one of the departments to be
removed from OBS and select Exclude.

Multi-Resource
107
12. Multi-resources
12.1. Multi-resource Multi-resource – is a steady group of resources that can work together only. Thus, multi-resources can be assigned to an activity as part of one team only. Examples of multi-resources:
- Excavator and operator; - Brigade; - Crew.
12.2. Multi-resource Properties Dialog Window
Multi-resource properties dialog window enables to view and edit information on current multi-resource, its composition (participants), update multi-resource assignments. This dialog window contains several pages: Data, Participants, Notes standard page, and OLE-objects and Folder standard page. Page Data Lets to set multi-resources Name, unique Code and Type.
- Code - A sequence of characters that should be unique for each multi-resource. Code is made up by letters, figures and special characters (#$%&@_-~) without spaces and is case sensitive.
- Type - default field for organizing of data transfer from reference-books for changing of object properties. Page Participants Contains a list of resources comprising current multi-resource. For each resource its name. code and units quantity in multi-resource are displayed.
- Quantity – sets number of resource units in multi-resource; - Add – lets you add new resources to multi-resource. Pressing Add button invokes dialog window with a list of project
resources. You can select one or several desired resources from the list with left mouse button and press OK. Note that the same resource cannot be added twice to one multi-resource.
- Delete – removes selected resource from current multi-resource composition. - Update content – enables update current multi-resource assignments globally in the project with new multi-resource
properties and composition. Note that historical project data cannot be updated, i.e. in ongoing project with included performance data updating of multi-resources properties would not affect data before the project data date. Current multi-resource activity assignments are updated with following peculiarities:

Multi-Resource
108
- Multi-resource assignments (quantity and composition of comprising resources) are not changed for completed activities;
- Multi-resource assignments (quantity and composition of comprising resources) are changed for uncompleted activities if resources comprising current multi-resource have not actually participated in activity execution. Otherwise, if resources have already been involved on activity, their composition and quantity assigned would be updated for further activity execution only (if resource was completely removed from the multi-resource its name would still exist in the list of activities assignments with quantity set to zero).
12.3. Add Multi-resource in Multi-resources Table To add new multi-resource in the Multi-resources Table:
1. Press Ins keyboard button, Invoke shortcut menu with a right mouse button and choose New
Or click on empty gray area below the table with the right mouse button and select New option in the invoked shortcut menu.
2. Multi-resource properties dialog window will be opened. Note that: properties dialog window will be opened automatically for newly created material only if you have selected to Open properties for new created objects in the Spider Project Parameters Dialog window. Otherwise newly created material will be saved with default parameters and you will have to invoke Multi-resource Properties dialog window by double click on new multi-resource row number (or by selecting Properties from shortcut menu invoked with a right mouse button click on new material row number) 3. Set all necessary properties for the new multi-resource and press OK.
In addition, you can create new multi-resource from the main menu of Multi-resources Table: choose Edit, than New and execute steps 2 and 3.
To cancel last action performed select menu item Edit -> Undo last action or press button (see Undo for more details).
12.4. Edit Multi-resource Properties in Multi-resources Table You can view and edit multi-resources properties either directly in the Multi-resources Table or in multi-resource properties dialog window. Properties dialog window can be activated from shortcut menu (item Properties), that in turn is invoked with a right mouse button click on multi-resource row number. In addition, you can double click on multi-resource row number. To edit multi-resource properties in the Multi-resources Table double click with left mouse button on desired value, type new and press Enter. See Working with Tables for detailed information.
To cancel last action performed select menu item Edit -> Undo last action or press button (see Undo for more details).
12.5. Delete Multi-resource in Multi-resources Table You can delete multi-resource in the Multi-resources Table with one of the following methods:
1. Invoke shortcut menu by right clicking on corresponding multi-resource row number and select Delete. 2. Select (highlight) desired multi-resource in table with a left mouse button click on corresponding multi-resource
row number and press Del on the keyboard. 3. Select (highlight) desired multi-resource in table with a left mouse button click on corresponding multi-resource
row number, enter main menu Edit and select Delete. 4. To delete several multi-resources first select all desired multi-resources with left mouse button clicks on
corresponding row numbers keeping Ctrl button pressed. Selected multi-resources can be deleted with either of 1, 2 or 3 methods.
To cancel last action performed select menu item Edit -> Undo last action or press button (see Undo for more details).

Resource Skill
109
13. Resource Skills
13.1. Resource skills Resources and/or multi-resources are organized as resource skills in case they can be assigned to activity execution as alternatives even with different productivities, costs and other characteristics. When a resource skill is assigned to an activity execution, total quantity (or productivity) of comprising resources (and/or multi-resources) is specified. Spider Project automatically selects resources (or multi-resources) to be assigned to activity in order to fulfill all restrictions. User preset priorities of resources (multi-resources) are also taken into consideration: resources (multi-resources) with lower priority would be assigned to activity execution in case they are only available in required time period.
13.2. Resource Skills Table
Contains resource skills properties in the following columns (fields):
- Code is a sequence of characters, unique for each resource skill. Code is made of letters, numbers, and special characters (#$%&@_-~) without spaces, and is case sensitive.
- Name is the name of resource skill.
- Folder field contains path to folder attached to resource skill.
- OLE Objects field contains icon if the skill has other applications documents attached to it. Double click in the cell invokes resource skill properties dialog window opened on the OLE-objects and folder standard page.
- Notes contain comments to resource skill. Double click in the cell invokes Resource skills properties dialog window opened on notes standard page.
- User-defined columns (fields).
Working with this table is made by the general rules, identical for all tables of the project.
Resource skill row shortcut menu
Row shortcut menu in Resource Skills table which is invoked by right clicking on the row number, contains the following options:
- Properties invokes resource skills properties dialog window to edit properties.
- New creates a new resource skill with default options.
- Delete deletes all assignments in highlighted resource skill and their corresponding rows from resource skills table.
- Replace Assignment by allows selecting new assignment to replace existing one(s). Select new assignment from the list of all assignments available. The list varies depending on selection you made: Resources, Multi-Resources, or Resource Skills. To learn more, see Replacing Assignment.
- Update Content allows updating contents and assignments properties of highlighted resource skill.
- Delete Assignments deletes all assignments in highlighted resource skill, but resource skill itself remains in the project and Resource Skills table.
To cancel the last action performed select menu item Edit -> Undo last action or press button (see Undo for more details).
When several rows are highlighted simultaneously, shortcut menu contains the following options: Replace Assignment by, Update Content, Delete Assignments, and Delete.
13.3. Resource Skill Properties Dialog Window Dialog window of resource skills properties enables to view and edit information on current resource skill and contains several pages: Data, Participants, Notes standard page, and OLE-objects and Folder standard page.

Resource Skill
110
Page Data
- Name - resource skill full name. - Code - A sequence of characters that should be unique for each multi-resource. Code is made up by letters, figures and
special characters (#$%&@_-~) without spaces and is case sensitive. - Type – type of the resource skill. - Type DPH – shows that if the DPH type of the resource skill is calculated By Quantity or By Productivity.
Page Participants. Contains a list of resources and multi-resources comprising current resource skill. List also contain resources comprising multi-resources. For each item following details are displayed: type (resource or multi-resource); its name, code and priority.
- Add frame – contain two buttons: - Resource - lets you add new resources to resource skill; - Multi-Resource - lets you add new multi-resources to resource skill;
Pressing these buttons invokes dialog window with a list of project resources (or multi-resource). You can select one or several desired resources (or multi-resource) from the list with left mouse button and press OK. Note that the same resource (or multi-resource) cannot be added twice to one resource skill.
- Delete – removes selected resource (or multi-resource) from current resource skill composition. - Update content – enables update current resource skill assignments globally in the project with new properties and
composition. Note that historical project data cannot be updated, i.e. in ongoing project with included performance data updating of resource skill properties would not affect data before the project data date. Current resource skill activity assignments are updated with following peculiarities:
- resource skill assignments are not changed for completed activities; - resource skill assignments are changed for uncompleted activities only if resources comprising current
resource skill have not actually participated in activity execution. Otherwise, if resources have already been involved on activity, their composition and quantity assigned would not be updated for further activity execution (even if resource was completely removed from multi-resource or resource skill - assignments of this resource would not be removed; you can delete such assignments only manually with subsequent lost of material consumed and cost components spent on these assignments).
- Delete skill assignments – removes all current resource skill assignments from the project. - Priority – defines the order of current resource (multi-resource) assignment in resource constrained scheduling.
Resources (multi-resources) with higher priority (i.e., greater value) are assigned first. To view/change priority first select resource (multi-resource) from the list with left mouse button click.
13.4. Add Resource Skills in Resource Skills Table To add new resource skill to Resource Skills Table:

Resource Skill
111
1. Invoke new Resource Skill Properties dialog window by one of the following methods:
- Select New from shortcut menu invoked with the right mouse button click on material row number; or
- Hit Insert key on the keyboard; or
- Click on empty gray area below the table with the right mouse button and select New option in the invoked shortcut menu.
Note that properties dialog window will be opened automatically for newly created resource skill only if you have selected to Open properties for new created objects in the spider project parameters dialog window. Otherwise newly created resource skill will be saved with default parameters and you will have to invoke Resource Skills Properties dialog window by double click on new resource center row number (or by selecting Properties from shortcut menu invoked with a right mouse button click on new resource skill row number)
2. Set up resource skill properties in the invoked Resource Skill properties dialog window and click OK.
To cancel the last action performed select menu item Edit -> Undo last action or press button (see Undo for more details).
13.5. Edit Resource Skills in Resource Skills Table To edit resource skills properties in Resource Skills Table:
1. Invoke Resource skill properties dialog window by one of the following methods:
- Double click resource skill row number with the left mouse button; or
- Select Properties from Resource skill shortcut menu invoked with the right mouse button click on Resource skill row number.
2. Edit Resource skill properties such as Code, Name, Short Name, Type, Quantity, and others in the invoked dialog window, and click OK when finished.
Alternatively, resource skills properties can be edited directly in cells of Resource skills table. To perform this, double click a corresponding cell, edit contents, and press Enter key on the keyboard.
To cancel the last action performed select menu item Edit -> Undo last action or press button (see Undo for more details).
To learn more about working with Resource skills table, see working with tables.
13.6. Delete Resource Skills in Resource Skills Table To delete resource skills in Resource skills Table follow one of the following methods:
- Invoke Resource skill shortcut menu with the right mouse button click on resource skill row number and select Delete; or
- Highlight Resource skill with the left mouse button click on resource skill row number and press Delete key on the keyboard; or
- Highlight resource skill with the left mouse button click on resource skill row number and select Delete from Edit menu.
When several resource skills are highlighted, all of them will be deleted from the project. To perform this, hold Ctrl key and click row numbers of resource skills you would like to delete – they will stay highlighted in gray –and follow one of the above-described methods. Confirm group of objects deletion when a corresponding message appears.
To cancel the last action performed select menu item Edit -> Undo last action or press button (see Undo for more details).

Team
112
14. Teams
14.1. Team Team is a group of resources that work together on activity assignment. Teams can be assigned to activities independently. In different time periods different teams can be engaged in activity performance what makes it possible to model shift work.
14.2. Team Assignment Monitoring Dialog Window
You can view and edit performance data of a team assigned to activity execution in this dialog window. Title of dialog window contains team name and the name of activity, to which the team was assigned. Page Data Activity – name and code of activity, to which the team was assigned; Team – name and code of assigned team; Responsible – name of person responsible for activity execution; Start; Finish – beginning and ending of monitored period (for which performance data is entered). You can edit dates in these fields directly (click once with left mouse button, enter date and time in the following format: ‘DD.MM.YYYY HH.SS’ and press Enter) or double click on the cell and select required date and time in opened calendar window. Example of date and time cell value: 13.03.2003 08:00.
Frame Volume: Before – scheduled part of activity volume (in activity volume units), that the team is assigned to perform (prior to the Start date of monitoring period); Done – actual volume of activity that the team performed during the monitored period. By default, part of activity volume, scheduled for the team for monitored period, is displayed in this field. You can correct this value according to actual volume, performed by the team. Remaining - remaining part of activity volume (in activity volume units). By default, part of activity volume, remaining after the monitored period, is displayed in this field. You can correct this value according to actually remaining volume that the team would have to perform. Frame Duration: Before – scheduled time (in hours) that the team is assigned to spend on activity execution (prior to theStart date of monitored period); Done – actual resource-hours, spent by the team on activity execution. Note that the value of actual resource-hours participate in automatic calculation of assignments’ cost (e.g. resources that consume materials per hour of their work or spend cost components per hour of their work). By

Team
113
default, scheduled duration of team work for monitored period is displayed in this field. You can correct this value according to actual resource-hours, spent by the team on activity execution. Remaining - remaining duration of team work in hours. By default, scheduled duration of remaining team work is displayed in this field. You can correct this value according to actually remaining duration of team work in hours.
Page Assignments Page Assignments contains a list of resources, multi-resources and resource skills – assigned to activity execution as part of current team. You can view and edit properties of monitored resources assignment (also for resources comprising multi-resources and resource skills): select required resource from the list and press Properties button. To delete resource, multi-resource or resource skill assignments from monitoring (e.g. excluding resources that have not actually participated in activity execution during monitored period) – select required object and press Delete button. Note that deleted objects are excluded from current monitored period only. Dialog window contains buttons OK, Cancel, Apply and Help:
- OK – applies changes made and closes dialog window; - Cancel – allows to discard changes and close dialog window; - Apply - applies changes made and leaves dialog window opened; it is useful if changes to several object are to be made; - Help – displays current object help window.
14.3. Team Assignment Properties Dialog Window
You can set properties of team assignment in this dialog window. Team assignment dialog window consists of following pages: Data, Assignments, Notes standard page, Page Data:
- Name, Code – these fields set team name and code; - Fixed – checking this box lets current team to perform only part of activity’s volume or duration.
You can assign team to carry out part of Productivity type activity work in two ways: - In activity volume units: choose Fixed Activity Volume Unit option and specify amount of work to be
performed by current team in correspondent units in Volume field; - In percent of total activity work: choose Fixed Activity Volume Percent option and specify percent of work to
be performed by current team. Note that these checkboxes are disabled for all types of activities but Productivity.
To assign team to carry out part of Duration type activity specify duration in hours (field Duration (hours)) or in days (field Duration (days)) that the team should be engaged in activity performance. If you leave box Fixed unchecked activity teams would be assigned volume or duration automatically.

Team
114
Hammock and Milestone type activities do not have Fixed option. - ASAP Start, ASAP Finish – start and finish dates of assigned team work, calculated according to ASAP method, i.e.
dates are scheduled as soon as possible keeping all constraints satisfied. - ALAP Start, ALAP Finish – start and finish dates of assigned team work, calculated according to ALAP method, i.e.
dates are scheduled as late as possible without delaying the project finish date. - Float (hours) - activity assignment float in hours. - Float (days) - activity assignment float in days.
Page Assignments. Contains list of team resource skills, multi-resource and resources – assigned to activity execution. To add new resource(s), multi-resource(s) or resource skill(s) press the corresponding button in Add frame: Resource, Multi-Resource or Resource Skill. You can delete selected object from the list with Delete button or view its properties. Pressing Properties button invokes corresponding resource skill assignment properties dialog window, multi-resource assignment properties or resource assignment properties.
14.4. Team Assignment to a Group of Activities Dialog window
This dialog window allows you to assign a team to a group of (selected) activities.
- Name, Code – new team name and code; - Fixed – this option allows you to assign a team to a part of activity work volume or duration.
Activities of Productivity type allow assignment to a part of activity volume in percent or in volume units (that may be specific to each activity). To assign a team to execution of a fixed activity volume: check Fixed and Fixed Activity Volume Unit boxes and define volume in field Volume. To assign a team to a part of activity volume in percent check Fixed and Fixed Activity Volume Percent boxes and define value in field %. For activities of Duration type, you can assign a team to participate in part of activity duration execution: check box Fixed and set required Duration (hours) value. If box Fixed is unchecked, all assigned teams will participate in activity execution according to schedule calculated by Spider Project.
14.5. Team Shortcut Menu in Activity Gantt Team Shortcut Menu can be invoked with right mouse button click on row number corresponding to a team.
- Properties – opens team assignment properties dialog window; - Delete – deletes current team assignment. Note that at least one team must be assigned to activity.

Assignment
115
15. Assignments
15.1. Assignment Resource assignment to activity execution.
15.2. Resource Assignments Table
Resource Assignments Table contains list of all resources assignments to activities. By default, contains following columns (fields):
- Code of Activity – code of activity to which current assignment was made; - Code of Resource – code of resource, assigned to activity; - Name of Activity – name of activity to which current assignment was made; - Name of Resource – name of resource, assigned to activity; - Variable Work Load and Number – defines whether coefficient of work load and number of assigned resources should
be calculated during schedule calculation; - Type DPH defines DPH activity type – duration, productivity, hammock or milestone. - Type – default field for organizing of data transfer from reference-books for changing of activity properties. Activities
with similar characteristics (e.g. sharing materials consumption, having the same cost components) can have the same Type. E.g., activity ‘construction of brick wall’ can have type ‘BRICK_WALLS’, or ‘BW’.
- Interruptability – defines, whether splits in activity performance are enabled or not. - ASAP, ALAP preferable time of activity performance – either ‘as soon as possible’ or ‘as late as possible’. - Folder - full path to attached folder, that may be used to store files with referential information for current assignment.
Double click on the cell in this column allows defining the folder path or open the folder (if its path has already been defined).
- OLE objects; icon defines whether documents of other applications (Word, Excel etc.) are attached to an assignment. Double click on this field opens resource assignment properties dialog window on OLE objects and Folder page.
- Notes - A field that lets users to provide an assignment with notes and explanations. Double click on this field opens resource assignment properties dialog window on Notes page.
- Unique Assignment Code - Unique code, automatically generated according to activity code, resource code and Index, connected by underline symbol;
- Assignment Index - editable number to be added to assignment Code to ensure its uniqueness to activity several times (for example, the same resource as part of different resource skills or multi-resources assigned to activity).
- Start – date, when assigned resource starts to execute the activity. If an activity has not actually started, this field would be equal to Start [ASAP]. If activity is already being executed and performance data is added to monitoring, this field would be equal to Start [Actual].
- Finish - date, when assigned resource finishes working on the activity. If an activity has not actually finished, this field would be equal to Finish [ASAP]. If activity has already been executed and performance data has been added to monitoring, this field would be equal to Finish [Actual].
- Duration, Days [Remaining] – remaining duration of resource work in days according to calculated schedule; - Duration, Hours [Remaining] – remaining duration of resource work in hours according to calculated schedule; - Volume [Remaining] – remaining work volume (in corresponding units) that the resource should perform. - Volume unit –activity units (e.g.,’m2’, ‘pieces’); - Total Cost [Remaining] – remaining costs of assigned resource work; include all cost components; - Float, hours; Float, days – assignment float duration in hours or days. - Quantity [Scheduled] – estimated number of resources, required for activity execution; - Quantity- user assigned number of resources for activity execution;

Assignment
116
- Quantity [Minimal] – minimal number of resources assigned to activity execution; this value can be entered for assignments with Variable quantity and Work load enabled in the assignment properties dialog window. Minimal quantity value participates in calculation of resources quantity, assigned to activity (Quantity [Scheduled])
- Productivity – productivity of one resource unit per hour (i.e. number of activity volume units, that current resource can execute per hour)
- Work Load – work load of one resource unit, assigned to activity execution. Work load is set in percent of resource working time that the resource is to spend on activity execution. By default work load is equal to 100%.
- Work Load [Scheduled] – calculated work load coefficient for one resource unit, assigned to activity execution. If resource is assigned to activity execution as part of multi-resource, its scheduled work load would be equal to resource work load multiplied by multi-resource work load;
- Priority – defines the order of resources use on activity execution in resource constrained scheduling. Resources with higher priority (i.e., greater value) are assigned first.
- Start [ASAP] (as soon as possible) – the earliest possible point in time on which resource can start to perform activity, based on the network logic and any schedule constraints. ASAP Start dates can change as the project progresses and changes are made to the project plan.
- Finish [ASAP] (as soon as possible) - the earliest possible point in time on which the resource can finish to perform the activity, based on the network logic and any schedule constraints. ASAP Finish dates can change as the project progresses and changes are made to the project plan.
- Start [ALAP] (as late as possible) – the latest possible point in time on which the resource can start to perform the activity without delaying the project finish date.
- Finish [ALAP] (as late as possible) – the latest possible point in time on which the resource can finish to perform the activity without delaying the project finish date.
- Start [Actual], Finish [Actual] – actual dates on which the resource started and finished activity execution according to included performance data;
- Start [NET], Finish [NLT] –constraint on the start (not earlier than) and finish (not later than) dates of activity execution, to which resource is assigned.
- Duration, Hours [Actual] - total actual activity duration in hours according to included performance data; - Volume [Actual] - actual activity work volume performed (in corresponding units) according to included performance
data; - Total Cost [Actual] - actual cost of resource work on the activity execution according to included performance data; - Total Cost [Cumulative] – equals to actual cost plus remaining cost; - Start [Critical], Finish [Critical], Total Cost [Critical] – critical activity start, finish dates and total cost; these values
are used in risk analysis; - Start [Buffer], Finish [Buffer], Total Cost [Buffer] – buffer values, used in risk analysis; - Start [Original]; Finish [Original] –start and finish dates of resource work on activity execution in original project
version (see projects comparison for details); - Duration, Hours [Original]; Volume [Original]; Total Cost [Original] – duration of resource work (in hours), volume
that the resource is to perform (in corresponding units) and total cost resource work in original project version (see projects comparison for details);
- Completion Variance, Days – difference in ASAP finish dates of the resource work in current and original project versions in days (see projects comparison for details);
- OCWP – Original Cost of Work Performed, cost of resource work performed according to original project version; - OCV – Original Cost Variance, variance of resource work cost in comparison to original project version. Equals to
difference between OCWP and actual cost of resource work (Total Cost [Actual]); - User defined fields; - Fields with fixed, remaining and actual consumption of all materials (and material centers) and expenditures of cost
components (and cost centers); their profiles. To delete an assignment in assignments table: select assignment row with left mouse button click and press Delete button, or invoke shortcut menu by right clicking on row number and choose item to Delete, or select menu items Edit -> Delete.

Assignment
117
Note that: To delete several assignments select desired rows with left mouse button clicks (keep Ctrl button pressed) first, then perform one of the actions, described above for deleting of single assignment. To edit existing assignment properties double click on corresponding activity row number, or invoke shortcut menu by right clicking on row number and choose item Properties. Shortcut menu for table rows contains following options:
- Properties – to view or edit properties of selected assignments in resource assignment properties dialog window; - Delete – deletes current resource from the project with all corresponding assignments. - You can perform actions on a group of selected resources through group shortcut menu: change Delete resources or
Replace assignments by for selected resource. Replace assignments by. – lets replace all assignments of the current resource with a different resource, resource skill or multi-resource through Replacing Assignments dialog window;
See general description of tables in Spider Project for common rules of working with tables.
15.3. Replace Assignments
The current assignment of resource, multi-resource, or resource skill can be replaced. To replace all assignments of resource, multi-resource, or resource skill, go to a corresponding table. To replace certain activity assignments, go to Gantt diagram, invoke row shortcut menu on resource, multi-resource, or resource skill row in Resource Gantt, or on assignment
or activity row in Activity Gantt, and select Replace Assignment by option. To have this option you must click on expand to assignments option icon on Resource Gantt toolbar and then right click on the row number of a resource, multi-resource, or resource skill.
Replace Assignments dialog window will be invoked. Select assignment you want to replace with from the list of assignments available. The list would vary depending on selected option: Resources, Multi-Resources, or Resource Skills. You can also edit assignment properties such as Quantity, Productivity, Work Load, Fixed Expenditure, and Expenditure per Hour (for materials and cost components).
15.4. Replace Assignments Dialog Window
Allows selecting new assignment to replace existing one(s).
You can change assignments of a particular or several resources, multi-resources or resource skills for another resource, multi-resource or resource skill. To change assignments, select appropriate resources (multi-resources or resource skills),

Assignment
118
invoke shortcut menu and select new assignment from the list of all assignments available. The list varies depending on selection you made: Resources, Multi-Resources, or Resource Skills.
One or several assignments can be replaces with one assignment at a time. If several assignments are replaced each of them will be replaced with a new assignment chosen (even for one activity).
You can replace assignments of one type only at a time, e.g. one or several resources – with one resource/multi-resource/resource skill.
In Values frame, edit highlighted (i.e. selected) assignment values such as Quantity, Productivity, Work Load, Fixed Consumption, Consumption per Hour and Consumption per Volume Unit. Choose from Leave as it is, Multiply by and Make equal options. Leave as it is option will leave assignment’s values as they were. Multiply by option will multiply old values of assignment parameters to the numbers you enter in the corresponding fields. Make equal option makes new assignment values equal the numbers you have entered in the corresponding fields.
15.5. Fixed Assignment Cost Fixed Assignment Cost is cost of resource assigned to activity that does not depend on its duration or volume.
If resource is assigned to activity in quantity exceeding one, Fixed Assignment Cost will refer to resources assigned. For example, if 10 workers are assigned to activity, Fixed Assignment Cost will be a sum of 10 worker costs.
15.6. Work Load Work load is a resource assignment characteristic that sets up resource work time in percent, according to its calendar, that resource must spend on activity execution. Work load is defined by activity requirements, not by resource work load on other assignments.
Work load is included in calculation of scheduled cost of resource work, which is a product one-hour resource work cost multiplied by activity duration for the activity this resource was assigned to, and multiplied by coefficient of assignment work load.
Resource work cost = Activity Duration * One-hour resource work cost * Work Load.
15.7. Resource-Hours Resource-hours equal to the period (in hours) resource spends on activity execution.
Assignment resource-hours equal to resource work load multiplied by assignment duration and multiplied by the number of resources assigned.
Activity resource-hours equal to the sum of all assignment resource-hours for all assignments in activity.
15.8. Assignment Shortcut Menu in Resource Gantt Diagram
Is invoked with the right mouse button click on resource assignment row number in table part of Resource Gantt or on assignment’s graphical presentation in Resource Gantt.
Contains the following options:
- Properties invokes Assignment Properties dialog window.
- Replace Assignments by…– lets replace all assignments with a different ones through Replace assignments dialog window;
- Delete deletes assignment from the project.
When several assignment rows are highlighted simultaneously, all of them will be deleted from the project.
To perform this, hold Ctrl key and click assignment row numbers to be deleted. They will stay highlighted in gray. Click with the right mouse button one of the highlighted row numbers and shortcut menu containing Replace Assignments by and Delete options will be invoked. Select Delete and confirm group of objects deletion when a corresponding message appears.

Assignment
119
15.9. Resource Assignments
15.9.1. Resources Assignment in Activities Table To assign resource to activity in Activities Table:
1. Invoke Activity Properties dialog window with double click on activity row number (or select Properties from Activity shortcut menu invoked with the right mouse button click on activity row number.)
2. Open Assignments page.
3. Click Resource button. This will invoke Resources dialog window containing list of all project resources. If you select one resource from the list and click OK, Resource Assignment properties dialog window will be invoked. Set up new resource assignment properties in that dialog window. If you check on Variable quantity and work load option, minimal quantity of ‘1’ will be set up by default.
4. If you highlight several resources simultaneously in Resources dialog window, Resource Assignment properties dialog window will not open, and all highlighted resources will be set up equaling to 1.
5. To include new resource assignment data to the project, click OK in Activity Properties dialog window. All resources assigned to activity, will automatically be added to Assignments table.
Edit properties of newly assigned resource directly in the bottom of Assignments page of Activity Properties dialog window. Or – when resource is highlighted – click Properties and Resource Assignment properties dialog window will be invoked.
To delete resource assigned to activity: highlight it in the list on Assignments page of Activity Properties dialog window, and click Delete. After you confirm deletion, resource assignment will be deleted from the project, but resource will remain in.
To cancel the last action performed select menu item Edit -> Undo last action or press button (see Undo for more details).
15.9.2. Resource Assignment Properties Dialog Window
Dialog window of Activity Resource Assignment Properties lets to view and edit assignment properties of resources assigned to activity. Consists of the following pages: Data, Materials standard page, Cost Components standard page , Materials standard page Notes standard page , and OLE-objects and Folder standard page. Page Data
- Activity, Resource – text fields, displaying names of activity and resource assigned to this activity. - Button Properties, situated to the right of Activity and Resource fields, allows opening of corresponding dialog windows
of activity properties and resource properties. - Code – Unique code, automatically generated according to activity code, resource code and Index, connected by
underline symbol.
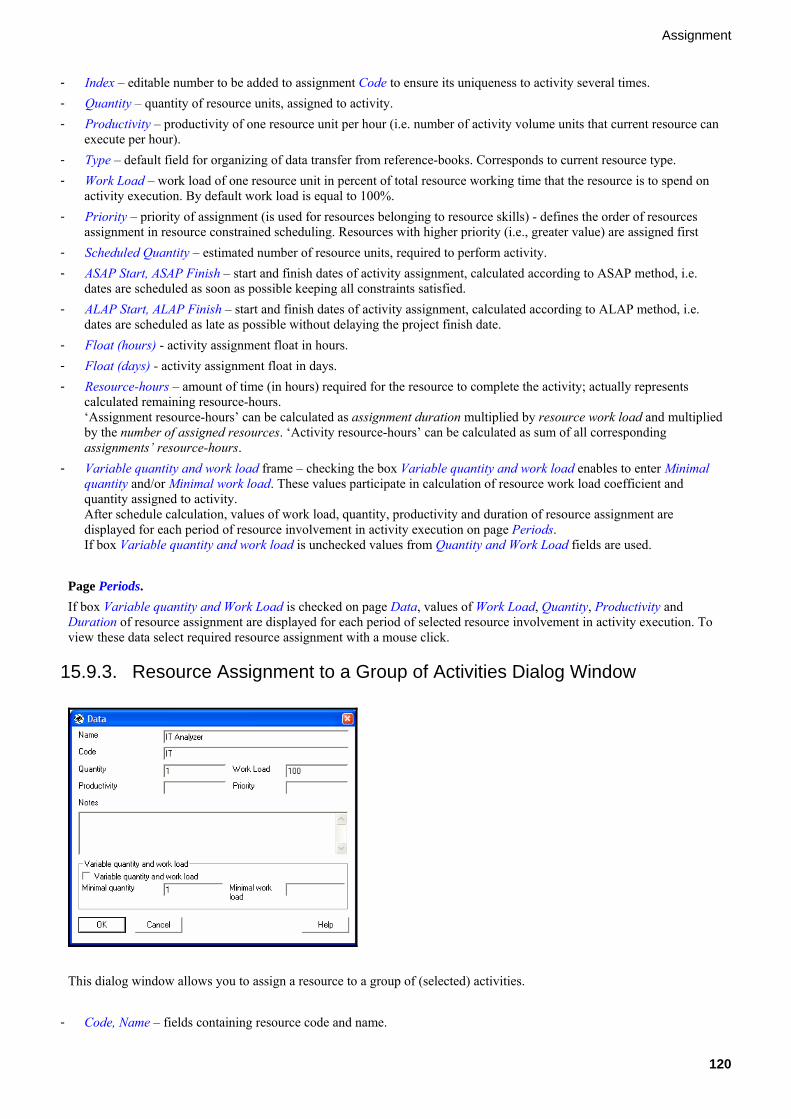
Assignment
120
- Index – editable number to be added to assignment Code to ensure its uniqueness to activity several times. - Quantity – quantity of resource units, assigned to activity. - Productivity – productivity of one resource unit per hour (i.e. number of activity volume units that current resource can
execute per hour). - Type – default field for organizing of data transfer from reference-books. Corresponds to current resource type. - Work Load – work load of one resource unit in percent of total resource working time that the resource is to spend on
activity execution. By default work load is equal to 100%. - Priority – priority of assignment (is used for resources belonging to resource skills) - defines the order of resources
assignment in resource constrained scheduling. Resources with higher priority (i.e., greater value) are assigned first - Scheduled Quantity – estimated number of resource units, required to perform activity. - ASAP Start, ASAP Finish – start and finish dates of activity assignment, calculated according to ASAP method, i.e.
dates are scheduled as soon as possible keeping all constraints satisfied. - ALAP Start, ALAP Finish – start and finish dates of activity assignment, calculated according to ALAP method, i.e.
dates are scheduled as late as possible without delaying the project finish date. - Float (hours) - activity assignment float in hours. - Float (days) - activity assignment float in days. - Resource-hours – amount of time (in hours) required for the resource to complete the activity; actually represents
calculated remaining resource-hours. ‘Assignment resource-hours’ can be calculated as assignment duration multiplied by resource work load and multiplied by the number of assigned resources. ‘Activity resource-hours’ can be calculated as sum of all corresponding assignments’ resource-hours.
- Variable quantity and work load frame – checking the box Variable quantity and work load enables to enter Minimal quantity and/or Minimal work load. These values participate in calculation of resource work load coefficient and quantity assigned to activity. After schedule calculation, values of work load, quantity, productivity and duration of resource assignment are displayed for each period of resource involvement in activity execution on page Periods. If box Variable quantity and work load is unchecked values from Quantity and Work Load fields are used.
Page Periods. If box Variable quantity and Work Load is checked on page Data, values of Work Load, Quantity, Productivity and Duration of resource assignment are displayed for each period of selected resource involvement in activity execution. To view these data select required resource assignment with a mouse click.
15.9.3. Resource Assignment to a Group of Activities Dialog Window
This dialog window allows you to assign a resource to a group of (selected) activities.
- Code, Name – fields containing resource code and name.

Assignment
121
- Quantity – quantity of resource units, assigned to activity. - Productivity – productivity of one resource unit per hour (i.e. number of activity volume units that current resource can
execute per hour). - Work Load – work load of one resource unit in percent of total resource working time that the resource is to spend on
activity execution. By default work load is equal to 100%. - Priority – priority of assignment (is used for resources belonging to resource skills) - defines the order of resources
assignment in resource constrained scheduling. Resources with higher priority (i.e., greater value) are assigned first; - Notes – allows you to enter notes to current assignment; - Variable quantity and Work load frame – checking box Variable quantity and Work load enables entering of Minimal
quantity and/or Minimal Work load. These values participate in calculation of resource work load coefficient and quantity assigned to activity. After schedule calculation, values of workload, quantity, productivity and duration of resource assignment are displayed for each period of resource involvement in activity execution on page Periods. If box Variable quantity and work load is unchecked values from Quantity and Work Load fields are used.
15.9.4. Resources Assignment in Activity Gantt To assign resource to activity in Activity Gantt:
1. Invoke activity properties dialog window with double click on activity row number (or select Properties from activity shortcut menu invoked with the right mouse button click on activity row number.)
2. Open Assignments page.
3. Click Resource button. This will invoke resources dialog window containing list of all project resources. If you select one resource from the list and click OK, resource assignment properties dialog window will be invoked. Set up new resource assignment properties in that dialog window. If you check on Variable quantity and work load option, minimal quantity of ‘1’ will be set up by default.
4. If you highlight several resources simultaneously in Resources dialog window, Resource Assignment properties dialog window will not open, and all highlighted resources will be set up equal to 1.
5. To include new resource assignment data to the project, click OK in Activity Properties dialog window. All resources assigned to activity, will automatically be added to assignments table.
Edit properties of newly assigned resource directly in the bottom of Assignments page of Activity Properties dialog window. Or (when resource is highlighted) click Properties and resource assignment properties dialog window will be invoked.
To delete resources assigned to activity: highlight it in the list, on Assignments page of the Activity Properties dialog window and click Delete. After you confirm deletion, resource assignment will be deleted from the project, but the resource will remain in.
To delete resource assignment from activity gantt, select Expand to Assignments by clicking icon on activity gantt toolbar. Assignments will become shown in activity gantt. Select assignment you want to delete, invoke Assignment shortcut menu with the right mouse button click on the row number, and select Delete.
To cancel the last action performed select menu item Edit -> Undo last action or press button (see Undo for more details).
15.9.5. Resource Assignment Shortcut Menu in Activity Gantt
Is invoked with the right mouse button click on resource assignment row number in the table part of Activity Gantt or on assignment’s graphical presentation in Activity Gantt.
Contains the following options:
- Properties invokes Assignment Properties dialog window.
- Replace assignments by... – allows to replace all assignments with a different resource, resource skill or multi-resource through replace assignments dialog window;
- Delete deletes assignment from the project. When several assignment rows are highlighted simultaneously, all of them will be deleted from the project.

Assignment
122
To delete several assignments, hold Ctrl key and click assignment row numbers to be deleted. They will stay highlighted in gray. Click with the right mouse button one of the highlighted row numbers and shortcut menu containing Replace Assignment by… and Delete options will be invoked. Select Delete and confirm group of objects deletion when a corresponding message appears.
To cancel last action performed select menu item Edit -> Undo last action or press button (see Undo for more details).
15.9.6. Resources Assignment in Activity Network To assign a resource in Activity Network:
1. Invoke Activity shortcut menu with the right mouse button click on activity box and select Properties, or simply double click activity box. Activity Properties dialog window will be invoked. If activities are not shown in Activity Network,
click Show/Hide Activities icon on Activity Network toolbar.
2. Open Assignments page.
3. Click Resource button. This will invoke Resources dialog window containing list of all project resources. If you select one resource from the list and click OK, Resource Assignment properties dialog window will be invoked. Set up new resource assignment properties in that dialog window. If you check on Variable quantity and work load option, minimal quantity of ‘1’ will be set up by default.
4. If you highlight several resources simultaneously in Resources dialog window, Resource Assignment properties dialog window will not open, and all highlighted resources will be set up equaling to 1.
5. To include new resource assignment data to the project, click OK in Activity Properties dialog window. All resources assigned to activity, will automatically be added to Assignments table.
Edit properties of newly assigned resource directly in the bottom of Assignments page of Activity Properties dialog window. Or – when resource is highlighted – click Properties and Resource Assignment properties dialog window will be invoked.
To delete resource assigned to activity, highlight it in the list on Assignments page of Activity Properties dialog window and click Delete. After you confirm deletion, resource assignment will be deleted from the project, but the resource will remain in.
To cancel the last action performed select menu item Edit -> Undo last action or press button (see Undo for more details).
15.9.7. Resource Assignment to a Group of Activities Dialog Window
Dialog window of Resource Assignment to a Group of Activities lets you make assignments simultaneously to a group of activities. This option is especially useful to add the same assignment to several activities or to replace assignments.

Assignment
123
Dialog window contains a list of currently made assignments in this dialog window for selected group of activities (existing individual activity assignments are not shown) – Type and Code of assigned teams, resources, multi-resources and resource skills. Each time you open this dialog window (even repeatedly for the same group of activities) the list will be shown empty until you add assignments.
Frame Add contains buttons, allowing you to add Resources, Multi-resources, Resource skills and Teams, to the list of common assignments. Additional parameters can be set in opened dialog window after selecting of assignment type: team dialog window, resource dialog window, multi-resource dialog window and resource skill dialog window. Button Properties allows you to view and edit properties of the object selected from the list. Delete button removes assignment from the list. Frame Method allows you to choose desired method of adding assignments to the group of activities:
- Add new – adds assignments from the list to existing activities assignments (i.e., keeps existing and adds new). Note that assignments are identified according to their codes and only assignments with missing codes are added
- Replace all – removes existing activities assignments and replaces them with assignments currenly entered to the list. Note that: assignments already involved in activity execution can not be deleted and thus ‘replaced’.
15.10. Multi-resource Assignments
15.10.1. Multi-resource Assignment in Activities Table To assign multi-resource:
1. Open activity properties dialog window either with double click on corresponding activity row number or select Properties from the shortcut menu (invoked with a right mouse button click on corresponding activity row number);
2. Open page Assignments; 3. Pressing Multi-resource button opens a dialog window for selecting multi-resource (or multi-resources) to be
assigned – select required multi-resource(s) and press OK. Selecting one multi-resource opens properties dialog window for the multi-resource being assigned where required quantity, productivity and other characteristics can be set. With box Variable quantity and work load checked quantity of multi-resource is automatically set to minimal value = 1. Selecting several multi-resources automatically sets quantity equal to ‘1’ for all newly added multi-resources (you can edit these assignments later if required).
4. Press: OK button to save added multi-resources and close dialog window; Apply - to save added multi-resources and leave dialog window opened; Cancel – not to save changes.
You can delete selected assignment from the list by pressing Delete button. (Note that only assignments would be deleted; all multi-resources and comprising resources are not deleted from the project) You can view and change multi-resource assignment properties in dialog window (double click on corresponding multi-resource assignment row number or select Properties from the shortcut menu invoked with a right mouse button click on corresponding multi-resource assignment row number).
15.10.2. Multi-resource Assignment Properties Dialog Window Multi-resource assignment properties dialog window is invoked for multi-resources assigned to activities from activity properties dialog window. Dialog window consists of following pages: Data, Components, Notes standard page, OLE-objects and Folder standard page.

Assignment
124
Page Data
- Name – text fields, displaying names of multi-resource assigned to this activity. - Code – multi-resource’s code. - Quantity – quantity of multi-resource units, assigned to activity. - Type – default field for organizing of data transfer from reference-books. - Productivity – is the productivity of a multi-resource per hour. Duration of Productivity type activity is calculated
according to multi-resource productivity (ignoring productivities of comprising resources); if productivity for multi-resource were not set it would be equal to sum of productivities of comprising resources.
- Work Load – work load of one multi-resource unit in percent of total multi-resource working time that the multi-resource is to spend on activity execution.
- Scheduled quantity – estimated number of multi-resource units, required to perform activity. - Priority – priority of assignment (is used for multi-resources belonging to resource skills) - defines the order of
resources assignment in resource constrained scheduling. Resources with higher priority (i.e., greater value) are assigned first
- Variable quantity and Work load frame – checking box Variable quantity and work load enables entering of Minimal quantity and/or Minimal work load. These values participate in calculation of multi-resource work load coefficient and quantity assigned to activity and define the allowed range for these parameters. After schedule calculation, values of workload, quantity, productivity and duration of multi-resource assignment are displayed for each period of multi-resource involvement in activity execution on page Periods. If box Variable quantity and work load is unchecked values from Quantity and Work Load fields are used.
Page Assignments
Contains a List of resources, comprising current multi-resource. - Resource button allows adding new resource(s) to the current multi-resource assignment. Note that adding resources to
multi-resource assignment affects current assignment only and do not change composition of multi-resource globally in the project (i.e. in the Multi-resources table and other assignments).
- Properties – invokes selected resource assignment properties dialog window. - Delete – press this button to delete selected resource from assignment to current activity. Page Notes - Comments can be added to current Multi-resource Assignment on this page
15.10.3. Multi-resource Assignment to a Group of Activities Dialog window This dialog window allows you to assign a multi-resource to a group of (selected) activities.

Assignment
125
- Code, Name – fields contain multi-resource code and name. - Quantity – quantity of multi-resource units, assigned to activity. - Productivity – is the productivity of one multi-resource unit per hour (i.e. number of activity volume units that current
multi-resource can execute per hour). Duration of Productivity type activity is calculated according to multi-resource productivity (ignoring productivities of comprising resources); if productivity for multi-resource were not set it would be equal to sum of productivities of comprising resources.
- Work Load – work load of one multi-resource unit in percent of total resource working time that the resource is to spend on activity execution. By default, workload is equal to 100%.
- Priority – priority of assignment (is used for resources belonging to resource skills) - defines the order of resources assignment in resource constrained scheduling. Resources with higher priority (i.e., greater value) are assigned first;
- Notes – allows you to enter notes to current assignment; - Variable quantity and Work load frame – checking the box Variable quantity and Work load enables entering of
Minimal quantity and/or Minimal Work load. These values participate in calculation of multi-resource workload coefficient and quantity assigned to activity. After schedule calculation, values of workload, quantity, productivity and duration of resource assignment are displayed for each period of resource involvement in activity execution on page Periods. If box Variable quantity and work load is unchecked values from Quantity and Workload fields are used.
15.10.4. Multi-resource Assignment in Activity Gantt To assign multi-resource do following:
1. Open activity properties dialog window either with double click on corresponding activity row number or select Properties from the shortcut menu (invoked with a right mouse button click on corresponding activity row number);
2. Open page Assignments; 3. Pressing Multi-resource button opens a dialog window for selecting multi-resource (or multi-resources) to be
assigned – select required multi-resource(s) and press OK. Selecting one multi-resource opens properties dialog window for the multi-resource being assigned where required quantity, productivity and other characteristics can be set. With box Variable quantity and work load checked quantity of multi-resource is automatically set to minimal value = 1. Selecting several multi-resources automatically sets quantity equal to ‘1’ for all newly added multi-resources (you can edit these assignments later if required).
4. Press: OK button to save added multi-resources and close dialog window; Apply - to save added multi-resources and leave dialog window opened; Cancel – not to save changes.
You can delete selected assignment from the list by pressing Delete button. (Note that only assignments would be deleted; all multi-resources and comprising resources are not deleted from the project) You can view and change multi-resource assignment properties in dialog window (double click on corresponding multi-resource assignment row number or select Properties from the shortcut menu invoked with a right mouse button click on corresponding multi-resource assignment row number).

Assignment
126
15.10.5. Multi-Resource Assignment Shortcut Menu in Activity Gantt Multi-Resource Shortcut Menu can be invoked with right mouse button click on row number corresponding to a multi-resource.
- Properties – opens multi-resource assignment properties dialog window; - Replace assignments by… – lets replace all assignments of the current multi-resource with a different multi-resource,
resource, or resource skill through replace assignments dialog window; - Delete – deletes current multi-resource assignment.
15.10.6. Multi-resource Assignment in Activity Network To assign multi-resource do following:
1. Open activity properties dialog window with double click on corresponding activity bar or select Properties from the shortcut menu (invoked with a right mouse button click on corresponding activity bar). If no activities are
displays in Activity Network diagram – ensure that button Show / Hide activities on the toolbar is unselected; 2. Open page Assignments; 3. Pressing Multi-resource button opens a dialog window for selecting multi-resource (or multi-resources) to be
assigned – select required multi-resource(s) and press OK. Selecting one multi-resource opens properties dialog window for the multi-resource being assigned where required quantity, productivity and other characteristics can be set. With box Variable quantity and work load checked quantity of multi-resource is automatically set to minimal value = 1. Selecting several multi-resources automatically sets quantity equal to ‘1’ for all newly added multi-resources (you can edit these assignments later if required).
4. Press: OK button to save added multi-resources and close dialog window; Apply - to save added multi-resources and leave dialog window opened; Cancel – not to save changes.
You can delete selected assignment from the list by pressing Delete button. (Note that only assignments would be deleted; all multi-resources and comprising resources are not deleted from the project) You can view and change multi-resource assignment properties in dialog window (perform steps 1 and 2).
15.11. Resource Skill Assignments
15.11.1. Resource Skill Assignment in Activities Table To assign resource skill in Activities Table, perform the following:
1. Invoke Activity Properties dialog window with double click on activity row number (or select Properties from Activity shortcut menu invoked with the right mouse button click on activity row number.)
2. Open Assignments page.
3. Click Resource Skill button. This will invoke Resource skills dialog window containing list of all resource skills available. If you select one resource skill from the list and click OK, Resource Skill Assignment dialog window will be invoked.
4. If several resource skills are highlighted simultaneously in Resource skills dialog window, Resource skill Assignment properties dialog window will not open, and all highlighted resource skills will automatically be set up in quantity of 1.
5. To include new resource skill assignment data to the project, click OK in Activity Properties dialog window. All resource skills assigned to activity will automatically be added to Assignments table.
Change properties of newly assigned resource skill directly in the bottom of Assignments page of Activity Properties dialog window. Or – when resource skill is highlighted –click Properties to invoke Resource Skill Assignment dialog window.
To delete resource skill assigned to activity, highlight it in the list on Assignments page of Activity Properties dialog window and click Delete. After you confirm deletion, resource skill assignment will be deleted from the project, but the resource skill will remain in.
To cancel the last action performed select menu item Edit -> Undo last action or press button (see Undo for more details).

Assignment
127
15.11.2. Resource Skill Assignment Properties Dialog Window
You can set properties of resource skill assignment in this dialog window. Resource skill assignment dialog window consists of following pages: Data, Components, Notes standard page. Page Data:
- Name, Code, Type – these fields set resource skill name, code and type; - Frame Type DPH lets to choose between two types of resource skill assignment:
- By Quantity – checking this box determines the program to search available resources in amount, specified in Quantity field, among resources, comprising the skill;
- By Productivity - checking this box determines the program to search available resources with adequate productivity (specified in Productivity field) among resources, comprising the skill. Checking By Quantity box enables Quantity field, while checking By Productivity box - enables Productivity field and lets to edit corresponding figures.
Page Participants. Contains the list of multi-resources and resources, comprising current resource skill. To add new resource or multi-resource to the current resource skill assignment, press Resource or Multi-resource buttons to select new component. Note that changes made to the composition of resource skill on particular assignment would affect neither resource skill composition in the Resource Skills Table, nor on other assignments. You can remove selected multi-resources or resources from current assignment of resource skill – select required item and press Delete button. Update Content updates the content of all assignments of the selected resource skill. Priority Resources (multi-resources) with higher priority of assignment (i.e. larger number of priority) are scheduled to activity execution first (if they are not busy on others, e.g. higher priority, activities). Priority of resources (multi-resources) assignments to current activity refers to current activity only. When resource skill is assigned to activity execution, priorities of comprising resources (multi-resources) are initially set to values specified for this resource skill. You can later change priorities of resources (multi-resources) assignments manually for each activity.
15.11.3. Resource skill Assignment to a Group of Activities Dialog window This dialog window allows you to assign a resource skill to a group of (selected) activities.
- Code, Name – fields contain resource skill code and name. - Quantity – is the quantity of the resource skills. - Frame Resource Skill DPH Type lets choose between two types of resource skill assignment:
- By Quantity – checking this box determines the program to search available resources in amount, specified in Quantity field, among resources, comprising the skill;

Assignment
128
- By Productivity - checking this box determines the program to search available resources with adequate productivity (specified in Productivity field) among resources, comprising the skill. Checking By Quantity box enables Quantity field, while checking By Productivity box - enables Productivity field and lets edit corresponding figures.
- Notes – allows you to enter notes to current assignment;
15.11.4. Resource Skill Assignment in Activity Gantt To assign resource skill in activity gantt, perform the following:
1. Invoke Activity Properties dialog window with double click on activity row number (or select Properties from Activity shortcut menu invoked with the right mouse button click on activity row number.)
2. Open Assignments page.
3. Click Resource Skill button. This will invoke Resource skills dialog window containing list of all resource skills available. If you select one resource skill from the list and click OK, Resource Skill Assignment dialog window will be invoked. Set up new resource skill assignment properties in that dialog window.
4. If several resource skills are highlighted simultaneously in Resource skills dialog window, Resource skill Assignment properties dialog window will not open, and all highlighted resource skills will automatically be set up in quantity of 1.
5. To include new resource skill assignment data to the project, click OK in Activity Properties dialog window. All resource skills assigned to activity will automatically be added to Resource Skills table.
Change quantity of resource skill directly in the bottom of Assignments page of Activity Properties dialog window. Or – when resource skill is highlighted –click Properties to invoke Resource Skill Assignment dialog window.
To delete resource skill assigned to activity, highlight it in the list on Assignments page of Activity Properties dialog window and click Delete. After you confirm deletion, resource skill assignment will be deleted from the project, but the resource skill will remain in the project.
To delete resource skill assignment from activity gantt, select Expand to Assignments by clicking icon on activity gantt toolbar. Assignments will be shown. Highlight resource assignment to be deleted, invoke Assignment shortcut menu with the right mouse button click on its row number, and select Delete.
To cancel the last action performed select menu item Edit -> Undo last action or press button (see Undo for more details).
15.11.5. Resource Skills Assignment in Activity Network To assign resource skill in Activity Network, perform the following:
1. Invoke Activity shortcut menu with the right mouse button click on activity box, and select Properties, or simply double click activity box. Activity Properties dialog window will be invoked. If activities are not shown in Activity Network,
click Show/Hide Activities icon on Activity Network toolbar.
2. Open Assignments page.
3. Click Resource Skill button. This will invoke Resource Skills dialog window containing list of all resource skills available. If you select one resource skill from the list and click OK, Resource Skill Assignment dialog window will be invoked. Set up new resource skill assignment properties such as Name, Quantity, Resource Skill Type and others in that dialog window.

Assignment
129
4. If several resource skills are highlighted simultaneously in Resource Skills dialog window, Resource Skill Assignment dialog window will not open, and all resource skills will automatically be set up in quantity of 1.
5. To include new resource assignment data to the project, click OK in Activity Properties dialog window. All resource skills assigned will automatically be added to Resource Skills table.
Change resource skill value in the bottom of Assignments page of Activity Properties dialog window. Or – when resource skill is highlighted –click Properties to invoke Resource skill Assignment dialog window.
To delete resource skill assigned to activity, highlight it in the list on Assignments page of Activity Properties dialog window and click Delete. After you confirm deletion, resource skill assignment will be deleted from the project, but the resource skill will remain in the project.
To cancel the last action performed select menu item Edit -> Undo last action or press button (see Undo for more details).
15.11.6. Resource Skill Assignments in Resource Gantt Shortcut Menu Is invoked with the right mouse button click on multi-resource assignment row number in activity gantt and contains the following options:
- Properties invokes Assignment properties dialog window.
- Replace Assignment by…allows selecting new assignment to replace existing one(s). Select new assignment from the list of all assignments available. The list varies depending on selection you made: Resources, Multi-Resources, or Resource Skills. To learn more, see Replacing Assignment.
- Delete deletes multi-resource assignment. To cancel assignment deletion, see Undo.
15.11.7. Fixing Resource Skill Assignments When a Resource skill is assigned to activity, the program during scheduling chooses which of resources included in the skill will work on this activity. Resources with higher priority are used first, and when no other constrains are active, the less-costly resources are used first.
If the resulting schedule meets time, cost and other active constrains, assigned resources can be fixed to the activity. This would prevent changing resource assignments inside skill in later project changes.
To perform this, invoke Activity shortcut menu and select "Fix Resource Skill Assingments" then "Are you sure you want to fix assignments resource skills Activitiy-corresponding activity name- (Code:-corresponding acitiviy code-)?" message will appear. After you confirm resource skill assignment, resources in the skill become included into assignments list for this activity team; and unused skill assignments are deleted from this activity.
15.12. Team Assignments
15.13. Team Assignment Properties Dialog Window

Assignment
130
You can set properties of team assignment in this dialog window. Team assignment dialog window consists of following pages: Data, Assignments, Notes standard page, Page Data:
- Name, Code – these fields set team name and code; - Fixed – checking this box lets current team to perform only part of activity’s volume or duration.
You can assign team to carry out part of Productivity type activity work in two ways: - In activity volume units: choose Fixed Activity Volume Unit option and specify amount of work to be
performed by current team in correspondent units in Volume field; - In percent of total activity work: choose Fixed Activity Volume Percent option and specify percent of work to
be performed by current team. Note that these checkboxes are disabled for all types of activities but Productivity.
To assign team to carry out part of Duration type activity specify duration in hours (field Duration (hours)) or in days (field Duration (days)) that the team should be engaged in activity performance. If you leave box Fixed unchecked activity teams would be assigned volume or duration automatically. Hammock and Milestone type activities do not have Fixed option.
- ASAP Start, ASAP Finish – start and finish dates of assigned team work, calculated according to ASAP method, i.e. dates are scheduled as soon as possible keeping all constraints satisfied.
- ALAP Start, ALAP Finish – start and finish dates of assigned team work, calculated according to ALAP method, i.e. dates are scheduled as late as possible without delaying the project finish date.
- Float (hours) - activity assignment float in hours. - Float (days) - activity assignment float in days.
Page Assignments Contains list of team resource skills, multi-resource and resources – assigned to activity execution. To add new resource(s), multi-resource(s) or resource skill(s) press the corresponding button in Add frame: Resource, Multi-Resource or Resource Skill. You can delete selected object from the list with Delete button or view its properties. Pressing Properties button invokes corresponding resource skill assignment properties dialog window, multi-resource assignment properties or resource assignment properties.
15.14. Team Assignment to a Group of Activities Dialog Window
This dialog window allows you to assign a team to a group of (selected) activities.
- Name, Code – new team name and code; - Fixed – this option allows you to assign a team to a part of activity work volume or duration.
Activities of Productivity type allow assignment to a part of activity volume in percent or in volume units (that may be specific to each activity). To assign a team to execution of a fixed activity volume: check Fixed and Fixed Activity Volume Unit boxes and define volume in field Volume. To assign a team to a part of activity volume in percent check Fixed and Fixed Activity Volume Percent boxes and define value in field %.

Assignment
131
For activities of Duration type, you can assign a team to participate in part of activity duration execution: check box Fixed and set required Duration (hours) value. If box Fixed is unchecked, all assigned teams will participate in activity execution according to schedule calculated by Spider Project.
15.15. Team Shortcut Menu in Activity Gantt Team Shortcut Menu can be invoked with right mouse button click on row number corresponding to a team.
- Properties – opens team assignment properties dialog window; - Delete – deletes current team assignment. Note that at least one team must be assigned to activity.

Excluded Objects
132
16. Excluded Objects
16.1. Excluded Structure Objects Project work breakdown structures (WBS) and organizational breakdown structures (OBS) can be full (i.e., containing all objects such as phases, activities, departments, resources etc.) or ‘incomplete’. Part of objects is not presented in incomplete structures. Such objects are called "excluded ". However, excluded objects are not reflected in incomplete structures they can influence schedule calculation. Costs of excluded objects (e.g., costs of materials consumed) are not included in the total cost of corresponding phases. For example, resources assigned to activities, excluded from a structure, will take part in resource constrained scheduling but their costs would not be included in the total cost of main phase.
16.2. Exclude Activity from WBS Excluding activities from Work Breakdown Structure (WBS) does not actually delete activities from the project – activities are only removed from current WBS and added to the list of excluded activities. To exclude single activity from WBS in Activity Gantt:
1. Make desired WBS ‘incomplete’: open structures list dialog window (menu Project -> WBS), select the required WBS with left mouse button, press Properties button and uncheck box Make Full in opened structure properties dialog window. Press OK button to confirm action.
2. Switch to desired WBS: select WBS in structures list dialog window with left mouse button and press Switch to button;
3. Invoke shortcut menu (with a right mouse button click on activity row number) on activity to be removed from WBS and select Exclude.
To exclude several activities from WBS: 1. Repeat actions 1 and 2 if needed; 2. Select desired activities to be removed with left mouse button click on corresponding activity row numbers
keeping CTRL button pressed; 3. Invoke shortcut menu (with a right mouse button click on activity row number) on one of the activities to be
removed from WBS and select Exclude.
16.3. Exclude Resource from OBS in Resource Gantt Excluding resource from organizational breakdown structure (OBS) does not actually delete resource from the project – it is added to the list of excluded resources. To exclude resource from OBS in Resource Gantt:
1. Make desired OBS ‘incomplete’: open structures list dialog window (menu Project -> OBS), select the required OBS with left mouse button, press Properties button and uncheck box Make Full in opened structure properties dialog window. Press OK button to confirm action.
2. Switch to desired OBS: select OBS in structures list dialog window with left mouse button and press Switch to button;
3. Invoke shortcut menu (with a right mouse button click on corresponding resource row number) on resource to be removed from OBS and select Exclude.
To exclude several resources from WBS: 1. Repeat actions 1 and 2 if needed; 2. Select desired resources to be removed with left mouse button click on corresponding resource row numbers
keeping CTRL button pressed; 3. Invoke shortcut menu (with a right mouse button click on corresponding resources row numbers) on one of the
resources to be removed from OBS and select Exclude.

Excluded Objects
133
16.4. Exclude Phase from WBS in Activity Gantt Excluding phases from Work Breakdown Structure (WBS) does not actually delete phases from the project – phases are only removed from current WBS and added to the list of excluded phases. To exclude single phase from WBS in Activity Gantt:
1. Make desired WBS ‘incomplete’: open structures list dialog window (menu Project -> WBS), select the required WBS with left mouse button, press Properties button and uncheck box Make Full in opened structure properties dialog window. Press OK button to confirm action.
2. Switch to desired WBS: select WBS in structures list dialog window with left mouse button and press Switch to button;
3. Invoke shortcut menu (with a right mouse button click on phase row number) on phase to be removed from WBS and select Exclude.
To exclude several phases from WBS: 1. Repeat actions 1 and 2 if needed; 2. Select desired phases to be removed with left mouse button click on corresponding phases’ row numbers keeping
CTRL button pressed; 3. Invoke shortcut menu (with a right mouse button click on phase row number) on one of the phases to be removed
from WBS and select Exclude.
16.5. Exclude Department from OBS in Resource Gantt Excluding department from organizational breakdown structure (OBS) does not actually delete department from the project – it will only be added to the list of excluded departments. To exclude department from OBS:
1. Make desired OBS ‘incomplete’: open structures list dialog window (menu Project -> OBS), select the corresponding OBS with left mouse button, press Properties button and uncheck box Make Full in opened structure properties dialog window. Press OK button to confirm action.
2. Switch to desired OBS: select OBS in structures list dialog window with left mouse button and press Switch to button;
3. Invoke shortcut menu (with a right mouse button click on corresponding department row number) on department to be removed from OBS and select Exclude.
To exclude several departments from WBS: 1. Repeat actions 1 and 2 if needed; 2. Select desired departments to be removed with left mouse button click on corresponding departments’ row
numbers keeping CTRL button pressed; 3. Invoke shortcut menu (with a right mouse button click on corresponding department’s row numbers) on one of the
departments to be removed from OBS and select Exclude.
Cost Component
134
17. Cost Components
17.1. Cost Components In many projects it is important not just to calculate project expenditures, but to manage them in different currencies or different units. Some projects, along with expenditures, might have revenues, which should be accounted separately from expenditures. In Spider Project you can have unlimited number of cost components and manage them separately in accordance with the project needs.
To add new cost component, open Cost Components table, press Insert key on the keyboard, click on empty gray area below the table with the right mouse button and select New option in the invoked shortcut menu or invoke Row shortcut menu by clicking with the right mouse button on row number and select New.
Cost component has the following parameters:
- Name is a cost component name.
- Code is a sequence of characters, unique for each cost component. Code is made of letters, numbers, and special characters (#$%&@_-~) without spaces, and is case sensitive.
- Name for Columns is cost component name to be shown in table columns.
For example, there are fixed costs columns in Activities table. These columns headers will be taken from Name for Columns field of a corresponding cost component. If the field is left blank, headers will use cost component Name.
- Type is the type of Cost Component
- Unit Cost is relative cost component value (rate).
Use ‘0’ unit cost to exclude the cost component from costs calculations. Use negative unit cost value to reflect project revenues. Cost component unit cost may change in project life cycle - see Cost periods for more details.
Cost components might be gathered into groups called Cost Centers to obtain the sum of several cost components with their unit costs taken into consideration. For example Cost Center Equipment&Materials may include two cost components: Equipment_Cost and Materials_Cost.
Different cost components may have different unit costs e.g. be expressed in different currencies. Thus, you can account for expenses and revenues in different currencies and obtain project budget value in different currencies as well.
For example, you can buy materials in Dollars and Euro and account these expenses in cost components (e.g., Materials_USD and Materials_EUR) with unit costs, reflecting currency rate. These cost components may be included into one or several cost centers (e.g. Materials_Cost; Total_Project_Costs) to obtain all materials cost. If you wish to calculate budget in USD, cost components for expenses in Dollars must have unit cost equal to 1; cost components for expenses in Euro will have unit cost equal to USD/Euro cross rate (e.g., 1.1). Thus, if your activity spends two materials with $50 (cost component Materials_USD with unit cost 1) and €50 (cost component Materials_EUR with unit cost 1.1) costs, total materials cost will be calculated as $105 in cost center including both cost components (50*1+50*1.1=105).
To recalculate your project budget in different currency you can selected cost component corresponding to the currency of report required, invoke shortcut menu on this cost component and choose Translate to unit. Unit cost of selected cost component will be set to 1 (and all Cost periods' unit costs of selected cost component will be set to 1 as well) and unit costs of all other cost components (and their cost periods' unit costs) will be recalculated accordingly. E.g. for two cost components Materials_USD (with unit cost 1) and Materials_EUR (with unit cost 1.1) Translating to Materials_EUR unit will recalculate Materials_EUR unit cost to 1 and Materials_USD unit cost to 0.91 (=1/1.1). Correspondingly, cost center containing these two cost components expressed expenses in Dollars before Translation and will express expenses in Euro after such Translation.
After you invoke shortcut menu on certain cost component and choose Translate to unit you will be prompted to enter Correction factor before recalculation is being performed. Correction factor - is a multiplier for all unit costs (and cost periods' unit costs); correction factor is a fractional number. I.e. if you set correction factor to 2, unit cost of selected cost component (the one you invoked shortcut menu on) and its cost periods' unit costs will be set to 2; unit costs for other cost components and their cost periods will be calculated accordingly. By default correction factor is 1.
Note That: values of unit costs are presented according to the Number of digits after decimal point set in Spider Project parameters dialog window.
Note That: after Translate to unit recalculation is performed, 'missing' cost periods will be automatically added to all cost components and unit cost for these cost periods will be calculated. 'Missing' - means cost periods with starting date existing for one cost component and non-existing for another.

Cost Component
135
Note That: Translate to unit recalculation will take effect only after recalculation of project costs.
Note That: if you set correction factor equals to zero, unit costs for all cost components and cost periods will be set to zero after recalculation and you will loose all your unit cost data after if the project be saved.
Modeling of project financing
In Spider Project, project financing modeling can be done using negative value for fixed part of activity cost component. Once financing is set up, start Resource Constrained Scheduling with financing constrain, by selecting Cost Component to level option from Scheduling Options dialog window (for Resource Constrained Scheduling).
Using this tool, find optimal financing scheme allowing finishing the project on time and find payback time.
17.2. Cost Components Table
Contains cost components data. When the project is first created, one cost component with code ‘1’, ‘Cost Component 1’ name, and unit cost equaling 1, is added to Cost Components table.
Cost components table contains the following standard fields (columns) for each cost component:
- Code is a sequence of characters, unique for each cost component. Code is made of letters, numbers, and special characters (#$%&@_-~) without spaces, and is case sensitive.
- Name is a cost component name.
- Name for Columns is alternative cost component name to be shown in table columns.
For example, there are fixed costs columns in Activities table. These columns headers will be taken from Name for Columns field of a corresponding cost component. If the field is left blank, headers will use cost component Name.
- Notes contains comments to cost component (if any). Double click in the cell invokes Cost Component properties dialog window opened on notes standard page.
- Folder is a field containing full path to attached folder. Invoke Folder shortcut menu with the right mouse button click in cells, containing:
- Select simplifies folder path entry evoking standard browsing window (or double click on cell).
- Edit allows path editing directly in cell (or press Enter key on the keyboard when the cell to edit is highlighted).
- Open opens attached folder.
- OLE objects field contains icon if any other applications documents are attached to cost component. Double click in the cell invokes Cost Component properties dialog window opened on the OLE-objects and Folder standard page.
- Unit Cost is coefficient to use when cost component is included in total project expenditures and calculations.
- Consumption is the quantity of specific cost components spent in the project(it is reflected after conducting of calculating the expenses)
- Income is the quantity of incomes of specific cost component in the project(it is reflected after conducting of calculating the expenses)
- Total is the total quantity of incomes and expenditures of specific cost component in the project(it is reflected after conducting of calculating the expenses)
- Discount Rate is assigned if it will be used with conducting of calculating the scale of economic effectiveness(see the cost calculations and economic indices.)
- User-defined fields.
Note That: Starting with Version 8 of Spider Project, Initial Amount field was eliminated. When opening projects saved in the older program versions, a milestone with Initial Amount name will be added in OBS and WBS main phases. This milestone will have fixed cost component expense in the amount of Initial Amount.
Working with this table is made by the general rules, identical for all tables of the project.
Cost Component shortcut menu
Cost component shortcut menu is invoked with the right mouse button click on cost component row number and contains the following options:

Cost Component
136
- Properties invokes Cost component properties dialog window to edit cost component properties.
- New allows creating new cost component by evoking Cost component properties dialog window and adds new row in Cost components table.
- Delete deletes highlighted cost component and a corresponding row in Cost components table.
When several rows are highlighted simultaneously, shortcut menu contains Delete option only.
- Convert to unit. Unit cost of selected cost component will be set to 1 (and all cost periods' unit costs of selected cost component will be set to 1 as well) and unit costs of all other cost components (and their cost periods' unit costs) will be recalculated accordingly. E.g. for two cost components Materials_USD (with unit cost 1) and Materials_EUR (with unit cost 1.1) Converting to Materials_EUR unit will recalculate Materials_EUR unit cost to 1 and Materials_USD unit cost to 0.91 (=1/1.1). Correspondingly, cost center containing these two cost components expressed expenses in Dollars before Convertion and will express expenses in Euro after such convertion.
After you invoke shortcut menu on certain cost component and choose Convert to unit you will be prompted to enter Correction factor before recalculation is being performed. Correction factor - is a multiplier for all unit costs (and cost periods' unit costs); correction factor is a fractional number. I.e. if you set correction factor to 2, unit cost of selected cost component (the one you invoked shortcut menu on) and its cost periods' unit costs will be set to 2; unit costs for other cost components and their cost periods will be calculated accordingly. By default correction factor is 1.
Note That: values of unit costs are presented according to the Number of digits after decimal point set in Spider Project parameters dialog window.
Note That: after Convert to unit recalculation is performed, 'missing' cost periods will be automatically added to all cost components and unit cost for these cost periods will be calculated. 'Missing' - means cost periods with starting date existing for one cost component and non-existing for another.
Note That: if you set correction factor equal to zero, unit costs for all cost components and cost periods will be set to zero after recalculation!
To cancel the last action performed select menu item Edit -> Undo last action or press button (see Undo for more details).
17.3. Cost Component Properties Dialog Window
Is an Object properties dialog window containing the following pages: Data page, Cost Centers Page, Notes standard page, and OLE-objects and Folder standard page and Cost Periods page. Data page
- Name is cost component name.
- Code is a sequence of characters, unique for each cost component. Code is made of letters, numbers, and special characters (# $ % & @ _ - ~) without spaces, and is case sensitive.

Cost Component
137
- Name for Columns is a cost component name to be shown in costs table columns. If there are fixed costs columns in Activities table, headers of these columns will be taken from Name for Columns for the field of a corresponding cost component. If the field is left blank, headers will use cost component Name.
- Unit Cost is coefficient to use when cost component is included in total project expenses and calculations. Use ‘0’ Unit Cost to exclude the cost component from final project calculations. Use negative Unit Cost value to show that this cost component is related to project revenues.
- Discount Rate is set for use at calculation of expenses and economic parameters.
- Type the type of cost component usually used for communication with reference-books.
If the budget of the project is converted to unit (see Cost components) by any cost component unit cost of some cost components can be left without change. For this purpose in the given window it is necessary to select option Not (to) convert to unit. Within the frame Formula it is possible to assign formulas by which the expenditure of this cost component will be calculated. For this it is necessary to mark the option to Calculate by formula. After marking this option Edit button will be activated in order to edit formulas. By pressing this button create formulae dialog window will be invoked. Note that: Starting with Version 8 of Spider Project, Initial Amount field was eliminated. When opening projects saved in the older program versions, a milestone with Initial Amount name will be added in OBS and WBS main phases. This milestone will have fixed cost component expense for Initial Amount. Cost Periods Page You can create and edit cost periods for current cost component on this page. List of cost periods contains all defined cost periods for current cost component. Each row contains date and time of corresponding cost period start and unit cost of this cost component. Therefore, you can set appropriate unit cost of cost component for a certain period; this period is defined by its starting date and time and will last till next cost period start. E.g., you can create a list of Euro to US dollar rate estimates to reflect currency rate changes to the cost of activities, materials and/or assignments. Add button allows you to create new cost period. Note that properties dialog window will be opened automatically for newly created cost period only if you have selected to Open properties for new created objects in the Spider Project Parameters Dialog window. Otherwise, newly created cost period will be saved with default parameters and you can edit them later. Properties button opens cost period properties dialog window where you can edit cost period starting date and time and unit cost of corresponding cost component for this period. Delete button deletes selected cost period.
17.4. Add Cost Component in Cost Components Table To add new cost component in Cost Components Table:
1. Invoke new Cost Component properties dialog window by one of the following methods:
- Select New from shortcut menu invoked with the right mouse button click on material row number; or
- Hit Insert key on the keyboard; or
- Click on empty gray area below the table with the right mouse button and select New option in the invoked shortcut menu.
Note that properties dialog window will be opened automatically for newly created cost component only if you have selected to Open properties for new created objects in the spider project parameters dialog window. Otherwise newly created cost component will be saved with default parameters and you will have to invoke Cost Component Properties dialog window by double click on new cost component row number (or by selecting Properties from shortcut menu invoked with a right mouse button click on new cost component row number)
2. Set up new cost component properties such as Code, Name, Name for Columns, and Unit Cost (a coefficient used when cost component is included in total project expenditures) and click OK.
To cancel the last action performed select menu item Edit -> Undo last action or press button (see Undo for more details).
Cost Component
138
17.5. Edit Cost Component in Cost Components Table To edit cost component properties in Cost Components Table:
1. Invoke Cost Component properties dialog window by one of the following methods:
- Double click cost component row number; or
- Select Properties from Cost Component shortcut menu invoked with the right mouse button click on row number.
1. Edit cost component properties such as Code, Name, Name for Columns, and Unit Cost in the invoked dialog window, and click OK.
Alternatively, cost component properties can be edited directly in cells of Cost Components table. To perform this, double click a corresponding cell, edit contents, and press Enter key on the keyboard.
To cancel the last action performed select menu item Edit -> Undo last action or press button (see Undo for more details).
Working with this table is made by the general rules, identical for all tables of the project.
17.6. Delete Cost Component in Cost Components Table To delete cost component from Cost Components Table, follow one of the following methods:
- Invoke Cost Component shortcut menu with the right mouse button click on cost component row number and select Delete; or
- Highlight cost component with the left mouse button click on row number and press Delete key on the keyboard; or
- Highlight cost component with the left mouse button click on cost component row number and select Delete from Edit menu.
When several cost components are highlighted simultaneously, all of them will be deleted from the project. To perform this, hold Ctrl key and click row numbers of cost components you would like to delete – they will stay highlighted in gray –and follow one of the above-described methods. Confirm group of objects deletion when a corresponding message appears.
To cancel the last action performed select menu item Edit -> Undo last action or press button (see Undo for more details).
Material
139
18. Materials
18.1. Material Material is a nonrenewable resource. Examples of materials: concrete, bricks, wire, sand.
You can modulate materials production (delivery) by setting up negative material consumption.
Material consumption can be set up for:
- Activities;
- Resources; and
- Resource Assignments.
Materials production modeling
In Spider Project, you can modulate materials production (delivery) by setting up negative material consumption for activity. By setting up materials production, Resource Constrained Scheduling can be performed by material constrains (select Materials option in Scheduling Options dialog window for Resource Constrained Scheduling).
You can also optimize delivery scheme to optimize project finish dates.
18.2. Materials Table
Includes all project materials data and contains the following columns (fields) by default:
- Code is a sequence of characters, unique for each material. Code is made of letters, numbers, and special characters (#$%&@_-~) without spaces, and is case sensitive. .
- Name is material name.
- Name for Columns is material name to be reflected in table column headers. If this field remains empty, material Name will be reflected in columns.
- Notes contains comments to material (if any). Double click in the cell invokes Material properties dialog window opened on notes standard page.
- Folder is a field containing full path to attached folder. Invoke Folder shortcut menu with the right mouse button click in cells, containing:
- Select simplifies folder path entry evoking standard browsing window (or double click on cell).
- Edit allows path editing directly in cell (or press Enter key on the keyboard when the cell to edit is highlighted).
- Open opens attached folder.
- OLE objects field contains icon if any other applications documents are attached to the material. Double click in the cell invokes Material properties dialog window opened on the OLE-objects and Folder standard page.
- Unit
- Consumption
- Supply
- Total
- Discrete Consumption
- Backload Consumption
- User-defined fields.
Material unit costs by all cost components are also included in Materials table.
Note That: Starting with Version 8 of Spider Project Software, Initial Amount field was eliminated. When opening projects saved in the older program versions, a milestone with Initial Amount name will be added in OBS and WBS main phases. This milestone will have fixed cost component expense in the amount of Initial Amount.
Working with this table is made by the general rules, identical for all tables of the project.

Material
140
Materials shortcut menu
Material shortcut menu is invoked with the right mouse button click on material row number and contains the following options:
- Properties invokes Material properties dialog window to edit material properties.
New allows creating new material by evoking Material properties dialog window and adds new row in Materials table. Note that properties dialog window will be opened automatically for newly created material only if you have selected to Open properties for new created objects in the spider project parameters dialog window. Otherwise newly created material will be saved with default parameters and you will have to invoke Material dialog window by double click on new material row number (or by selecting Properties from shortcut menu invoked with a right mouse button click on new material row number)
- Delete deletes highlighted material and a corresponding row in Materials table.
When several rows are highlighted simultaneously, shortcut menu contains Delete option only.
To cancel the last action performed select menu item Edit -> Undo last action or press button (see Undo for more details).
18.3. Material Properties Dialog Window
Is dialog window allowing editing material properties. Contains the following pages: Data, , Cost components, Cost Centers Material Centers Notes standard page, and OLE-objects and Folder standard page and Cost Periods Data page
- Name is material name.
- Code is a sequence of characters, unique for each material. Code is made of letters, numbers, and special characters (#$%&@_-~) without spaces, and is case sensitive.
- Name for Columns is material name to be reflected in table column headers. If this field remains empty, material Name will be reflected in columns.
- Unit is unit for the material. For example, cubic meter, kilometer, square meter, liter, etc.
Note that: Starting with Version 8 of Spider Project, Initial Amount field was eliminated. When opening projects saved in the older program versions, a milestone with Initial Amount name will be added in OBS and WBS main phases. This milestone will have fixed cost component expense for Initial Amount.
Discrete material consumption There are materials that can be spent only discretely - by whole values. For example, bricks. "Stacking of a wall" material "Brick" can be used for operations only by whole values. To spend 2, 5 bricks is impossible. For such materials, it is

Material
141
necessary to establish Discrete Consumption. Thus, the software will consider that the material can be spent by pieces at schedule calculations and at generating reports. Depending on a material, the consumption of 1, 5 units can mean or the charge of one unit, or two. The second button-switch (Backload Consumption sets the way of expenditure in such cases). Selecting this option approximates the charge in the smaller party, accordingly, unselecting - in greater. Note that: For the materials spent discretely, it is necessary to set only integers fixed and actual. If the user will set the fractional charge, the program will automatically approximate it at schedule calculations and at generating reports. Per hour consumptions, can be set by fractional numbers.
Cost Periods page You can create and edit material cost periods on this page. The list of cost periods contains starting date and time of all existing cost periods for the current resource. Button Add lets you add new cost period. By default, starting date for new cost period is set equal to the current date (with time 00:00), the next created period starting date would be tomorrow and so on. Note that properties dialog window will be opened automatically for newly created cost period only if you have selected to Open properties for new created objects in the Spider Project Parameters Dialog window. Otherwise, newly created object will be saved with default parameters and you can edit them later. Button Properties lets you edit cost period properties in the material cost period properties dialog window: cost period starting date and time; per hour cost of assigned cost component(s), consumed by the current material. Button Delete lets you delete selected cost period.
18.4. Add Material in the Materials Table To add new material to Materials table:
1. Invoke new Material Properties dialog window by one of the following methods:
- Select New from shortcut menu invoked with the right mouse button click on material row number; or
- Hit Insert key on the keyboard; or
- Click on empty gray area below the table with the right mouse button and select New option in the invoked shortcut menu.
Note that properties dialog window will be opened automatically for newly created material only if you have selected to Open properties for new created objects in the spider project parameters dialog window. Otherwise newly created material will be saved with default parameters and you will have to invoke Material Properties dialog window by double click on new material row number (or by selecting Properties from shortcut menu invoked with a right mouse button click on new material row number)
2. Set up new material properties, such as Name, Code, and others, and click OK when finished.
To cancel the last action performed select menu item Edit -> Undo last action or press button (see Undo for more details).
18.5. Edit Material in the Materials Table To edit material properties in Materials Table:
1. Invoke Material properties dialog window by one of the following methods:
- Double click material row number with the left mouse button; or
- Select Properties from Material shortcut menu invoked with the right mouse button click on material row number.
2. Edit material properties such as Code, Name, Short Name, Type, Quantity, and others in the invoked dialog window, and click OK when finished.
Alternatively, material properties can be edited directly in cells of Materials table. To perform this, double click a corresponding cell, edit contents, and press Enter key on the keyboard.
To cancel the last action performed select menu item Edit -> Undo last action or press button (see Undo for more details).
Material
142
To learn more about working with Materials table, see working with tables.
18.6. Delete Material in the Materials Table To delete material in Materials Table, follow one of the following methods:
- Invoke Material shortcut menu with the right mouse button click on material row number and select Delete; or
- Highlight material with the left mouse button click on its row number and press Delete key on the keyboard; or
- Highlight material with the left mouse button click on its row number and select Delete from Edit menu.
If several materials are highlighted simultaneously, all of them will be deleted from the project. To perform this, hold Ctrl key and click row numbers of materials you would like to delete – they will stay highlighted in gray –and follow one of the above-described methods. Confirm group of objects deletion when a corresponding message appears.
To cancel the last action performed select menu item Edit -> Undo last action or press button (see Undo for more details).

Material and Cost Component Consumptions
143
19. Material and Cost Component Consumptions
19.1. Cost Components Standard Page
Is included to Object properties dialog windows and allows editing costs properties. It contains:
- Add button invokes Cost Components properties dialog window containing list of all cost components available. Select one or several cost components from the list and click OK. You will be returned to Cost Components page.
- List contains list of all cost components assigned to object.
- Fields located below the list vary depending on the edited object. (To delete cost component from the list, leave the fields empty.)
In Activity properties dialog window
Fixed Cost (component) is Activity fixed cost, in units of highlighted cost component.
Fixed Cost (all components) is total activity fixed cost by all cost components (with their unit cost taken into consideration).
Hour Cost (component) is cost of one hour of activity duration, in units of highlighted cost component.
Hour Cost (all components) is total cost of one hour of activity duration by all cost components (with their unit cost taken into consideration).
Volume Unit Cost (component) shows cost of unit of scheduled volume of operation in terms of the cost component chosen in the list.
Volume Unit Cost (all components) shows total cost of unit of scheduled volume of operation on all cost components in view of cost of their units.
Remaining Cost (component) is remaining activity cost, in units of highlighted cost component.
Remaining Cost (all components) is total remaining activity cost by all cost components (with their unit cost taken into consideration).
Profile (component) – shows the charge of the chosen cost component in the beginning and the end of the period
Actual Cost (component) – is displayed after entering the monitoring information into the project and shows the actual charge of a cost component.
In Resource properties dialog window
Hour Cost (component) is cost of one hour of activity duration, in units of highlighted cost component.
Hour Cost (all components) is total cost of one hour of activity duration by all cost components (with their unit cost taken into consideration).

Material and Cost Component Consumptions
144
Remaining Cost (component) is remaining resource cost, in units of highlighted cost component.
Remaining Cost (all components) is total remaining resource cost by all cost components (with their unit cost taken into consideration).
Actual Cost (component) – is displayed after entering the monitoring information into the project and shows the actual charge of a cost component a resource.
In Material properties dialog window
Unit cost (component) is cost of one unit of material, in units of highlighted cost component.
Unit cost (all components) is total cost of one unit of material by all cost components.
In Assignment properties dialog window
Fixed Cost (component) is Assignment fixed cost, in units of highlighted cost component.
Fixed Cost (all components) is total assignment fixed cost by all cost components (with their unit cost taken into consideration).
Hour Cost (component) is cost of one hour of assignment duration, in units of highlighted cost component.
Hour Cost (all components) is total cost of one-hour of assignment duration by all cost components (with their unit cost taken into consideration).
Volume Unit Cost (component) – shows cost of unit of scheduled volume of the operation which are carried out by the appointed resource, in terms of the cost component chosen in the list.
Volume Unit Cost (all components) – shows total cost of unit of scheduled volume of the operation which are carried out by the appointed resource, on all cost components in view of cost of their units.
Remaining cost (component) is remaining assignment cost, in units of highlighted cost component.
Remaining cost (all components) is total remaining assignment cost by all cost components (with their unit cost taken into consideration).
Actual Cost (component) – is displayed after entering the monitoring information into the project and shows the actual charge of a cost component.
Note That: Do not mix resource per hour cost component expenditure (set up in Resources table) with per hour assignment (i.e. per hour cost of resource assigned to certain activity) cost component expenditure (set up in Assignments table). The same resource might have different costs for different activities. If a resource has the same cost per hour on all activities performed, set up cost per hour expenditure for resource in resources table. If resource per hour cost differs for different activities – you can specify these per hour expenditures in Assignments table.
19.2. Materials Standard Page

Material and Cost Component Consumptions
145
This page is a member of object properties dialog window and allows adding, editing, and deleting material consumptions for activities, assignments, or resources.
- List contains the list of all materials assigned.
- Add allows to select a new material from materials list dialog window. Select material from the list and click OK.
- Fields in the bottom of window set up material consumption. If several materials are assigned, material consumption fields correspond to the highlighted material.
To delete a material (remove it from current assignment), leave fields for material consumption empty or enter value "0" (zero).
Material consumption fields vary, depending on object properties dialog window, where the Materials standard page is opened:
In Activity properties dialog window
Fixed - stands for fixed material consumption for highlighted activity, which do not depend on its volume, duration and assigned resources.
Consumption per Hour - material consumption for one hour work of the activity.
Per Volume Unit - expenditure of material for the unit of planned operation volume.
Remaining - remaining material consumption for the activity.
Profile - material consumption profile for the activity.
Actual - actually consumed amount of materials for the activity.
In Resource properties dialog window
Consumption per Hour- material consumption for the one hour work of resource.
Remaining - remaining material consumption for the resource.
Actual - actually consumed amount of materials for the resource.
In Assignment properties dialog window
Fixed - fixed material consumption by the resource, assigned to activity, which does not depend neither on volume of resource work performed, nor on the work duration.
Consumption per Hour - material consumption for one-hour work of the resource, assigned to activity.
Per Volume Unit - expenditure of the material, for the unit of the planned volume of operation.
Remaining - remaining material consumption for assignment.
Actual - actually consumed amount of materials for assignment.
Note That: materials requirements for one hour of resource work, set up in resources table, and materials requirements for one-hour work of resource assigned to activity, set up in assignments table are not the same. The same resource might require different amount of materials in different activities. In that case, enter into assignments table material consumptions for one-hour work of resource assigned to this activity. If resource requires the same amount of materials per hour, independent on activity performed, set up material consumption for this resource in resources table.
19.3. Fixed Material Consumption and Fixed Cost Component Expenditure Fixed material consumption (or fixed cost component expenditure) for activity is expense that does depend neither on activity properties, nor on resources assigned to activity. Fixed cost consumption expenditure on activity is also called Activity Fixed Cost.
Fixed material consumption or fixed cost component expenditure for resource assigned to activity is expenditure that does depend neither on resource duration, nor on resource work volume.

Material and Cost Component Consumptions
146
19.4. Profile of Fixed Material Consumption (or Cost Component Expenditure)
When setting up Fixed part of material consumption or Cost Component expenditure on an activity, consumption (expenditure) for the start and the end of the period can be shown separately. Use Profile for these purposes.
Profile contains two values separated with semicolon: material consumption (or cost component expenditure) for the start and the end of the period , respectively.
For example, there is activity of 10-day duration. Set up its fixed cost component expenditure as 20. Set up a profile as 5;10 in the invoked dialog window. This means activity spends 5 units in the beginning, 10 units at the end, and the remaining 5 units will be distributed in the following way:
1. If only one team is assigned to activity, these 5 units will be evenly distributed for whole activity duration.
2. If two or more teams are assigned to activity, firstly they will be distributed between the teams based on their work volumes (or their work duration – depending on activity DPH type) then expenditure will be evenly distributed at each team work interval according to their calendars.
19.5. Material Consumption Setup in Activity Gantt
Setting up material consumption for activity
1. Invoke Activity Properties dialog window with double click on activity row number (or select Properties from Activity shortcut menu invoked with the right mouse button click on activity row number.)
2. Open Materials page.
3. Click Add button. This will invoke Materials dialog window containing list of all materials available. Select one or several materials from the list and click OK. You will be returned to Materials page. Set up the following properties for new material(s) consumption in the bottom of the page:
- Fixed.
- Consumption per hour.
- Per Volume Unit
- Profile.
4. Click OK.
Alternatively, material consumption for activity can be edited directly in cells of table part of activity gantt. To perform this, double click on corresponding cell, edit contents, and press Enter key on the keyboard.
Setting up material consumption for assignment
1. Invoke Activity Properties dialog window with double click on activity row number (or select Properties from Activity shortcut menu invoked with the right mouse button click on activity row number.)
2. Open Assignments page.
3. Click Resource button. This will invoke Resources dialog window containing list of all project resources. If you select one resource from the list and click OK, Resource Assignment properties dialog window will be invoked.
4. Open Materials page and click Add button. This will invoke Materials dialog window containing list of all materials available. Select one or several materials from the list and click OK. You will be returned to Materials page. Set up the following properties for new material(s) consumption in the bottom of the page:
- Assignment fixed cost.
- Consumption per hour
- Per Volume Unit
5. Click OK.
Note That: Material consumption by resource cannot be edited directly in cells of table part of activity gantt.
To cancel the last action performed select menu item Edit -> Undo last action or press button (see Undo for more details).

Material and Cost Component Consumptions
147
19.6. Material Consumption Setup in Resource Gantt
Setting up material consumption for one-hour work of resource
1. Invoke Resource Properties dialog window with double click on resource row number in table part of resource gantt (or select Properties from Resource shortcut menu invoked with the right mouse button click on resource row number.)
2. Open Materials page.
3. Click Add button. This will invoke Materials dialog window containing list of all materials available. From the list, select only materials that spent their resource during one-hour work and click OK. You will be returned to Materials page. Set up Consumption per hour for new material(s) consumption in the bottom of the page.
4. Click OK.
Setting up material consumption for assignment
1. Invoke Resource Assignment properties dialog window with double click on assignment row number (or select Properties from Assignment shortcut menu invoked with the right mouse button click on assignment row number.) If
assignments are not shown in resource gantt, click Expand to Assignments icon on resource gantt toolbar.
2. Open Materials page and click Add button. This will invoke Materials dialog window containing list of all materials available. Select one or several materials from the list and click OK. You will be returned to Materials page. Set up the following properties for new material(s) consumption in the bottom of the page:
- Consumption per hour.
3. Click OK.
Note That: Material consumption by resource or by assignment can be edited directly in table part of resource gantt.
Note That: Material consumption by activity cannot be edited in resource gantt.
To cancel the last action performed select menu item Edit -> Undo last action or press button (see Undo for more details).
19.7. Material Consumption Setup in Activities Table
Setting up material consumption for activity
1. Invoke Activity Properties dialog window with double click on activity row number (or select Properties from Activity shortcut menu invoked with the right mouse button click on activity row number.)
2. Open Materials page.
3. Click Add button. This will invoke Materials dialog window containing list of all materials available. Select one or several materials from the list and click OK. You will be returned to Materials page. Set up the following properties for new material(s) consumption in the bottom of the page:
- Fixed cost.
- Consumption per hour.
- Remaining
- Profile.
- Actual
4. Click OK.
Alternatively, material consumption and profile can be edited directly in cells of Activities table. To perform this, double click on corresponding cell, edit contents, and press Enter on the keyboard.
Material and Cost Component Consumptions
148
Setting material consumption for assignment
1. Invoke Activity Properties dialog window with double click on activity row number (or select Properties from Activity shortcut menu invoked with the right mouse button click on activity row number.)
2. Open Assignments page.
3. Click Resource button. This will invoke Resources dialog window containing list of all project resources. If you select one resource from the list and click OK, Resource Assignment properties dialog window will be invoked.
4. Open Materials page and click Add button. This will invoke Materials dialog window containing list of all materials available. Select one or several materials from the list and click OK. You will be returned to Materials page. Set up the following properties for new material(s) consumption in the bottom of the page:
- Fixed cost.
- Consumption per hour.
- Per Volume Unit
5. Click OK.
Note That: Material consumption by resource cannot be edited directly in cells of Activity table.
To cancel the last action performed select menu item Edit -> Undo last action or press button (see Undo for more details).
19.8. Material Consumption Setup in Resources Table
Setting up material consumption for one-hour work of resource
1. Invoke Resource Properties dialog window with double click on resource row number (or select Properties from Resource shortcut menu invoked with the right mouse button click on resource row number.)
2. Open Materials page.
3. Click Add button. This will invoke Materials dialog window containing list of all materials available. Select one or several materials from the list and click OK. You will be returned to Materials page. Set up the following properties for new material(s) consumption in the bottom of the page:
Consumption per hour.
4. Click OK.
Alternatively, material consumption for resource can be edited directly in cells of Resources table. To perform this, double click on corresponding cell, edit contents, and press Enter key on the keyboard.
Setting up material consumption for assignment
1. Invoke Resource Properties dialog window with double click on resource row number (or select Properties from Resource shortcut menu invoked with the right mouse button click on resource row number.)
2. Open Assignments page.
3. Select assignment you need to set up material consumption for. Click Properties button. Resource Assignment properties dialog window will be invoked.
4. Open Materials page and click Add button. This will invoke Materials dialog window containing list of all materials available. Select one or several materials from the list and click OK. You will be returned to Materials page. Set up the following properties for new material(s) consumption in the bottom of the page:
- Fixed cost.
- Consumption per hour is consumption of this material during one hour of this activity.
- Per Volume Unit
5. Click OK.
Note That: Material consumption by activity cannot be edited directly in resources table.

Material and Cost Component Consumptions
149
To cancel the last action performed select menu item Edit -> Undo last action or press button (see Undo for more details).
19.9. Material Consumption Setup in Assignments Table
Setting up material consumption for assignment
1. Invoke Resource Assignment properties dialog window with double click on assignment row number (or select Properties from Assignment shortcut menu invoked with the right mouse button click on assignment row number.)
2. Open Materials page and click Add button. This will invoke Materials dialog window containing list of all materials available. Select one or several materials from the list and click OK. You will be returned to Materials page. Set up the following properties for new material(s) consumption in the bottom of the page:
- Fixed cost
- Consumption per hour
- Per Volume Unit.
3. Click OK.
Alternatively, material consumption for assignment can be edited directly in cells of Assignments table. To perform this, double click on corresponding cell, edit contents, and press Enter key on the keyboard.
Note That: Material consumption by activity or by resource cannot be edited directly in Assignments table.
To cancel the last action performed select menu item Edit -> Undo last action or press button (see Undo for more details).
19.10. Material Consumption Setup in Activity Network
Setting up material consumption for activity
1. Invoke Activity shortcut menu with the right mouse button click on activity box and select Properties, or simply double click activity box. Activity Properties dialog window will be invoked. If activities are not shown in Activity Network,
click Show/Hide Activities icon on Activity Network toolbar.
2. Open Materials page.
3. Click Add button. This will invoke Materials dialog window containing list of all materials available. Select one or several materials from the list and click OK. You will be returned to Materials page. Set up the following properties for new material(s) consumption in the bottom of the page:
- Fixed cost.
- Consumption per hour.
- Per Volume Unit
- Profile.
4. Click OK.
Setting up material consumption for assignment
1. Invoke Activity shortcut menu with the right mouse button click on activity box and select Properties, or simply double click activity box. Activity Properties dialog window will be invoked. If activities are not shown in Activity Network,
click Show/Hide Activities icon on Activity Network toolbar.
2. Open Assignments page.
3. Click Resource button. This will invoke Resources dialog window containing list of all project resources. If you select one resource from the list and click OK, Resource Assignment properties dialog window will be invoked.

Material and Cost Component Consumptions
150
4. Open Materials page and click Add button. This will invoke Materials dialog window containing list of all materials available. Select one or several materials from the list and click OK. You will be returned to Materials page. Set up the following properties for new material(s) consumption in the bottom of the page:
- Fixed cost
- Consumption per hour.
- Per Volume Unit
5. Click OK.
Note That: Material consumption by resource cannot be edited directly in Activity Network.
To cancel the last action performed select menu item Edit -> Undo last action or press button (see Undo for more details).
19.11. Costs Setup in Activity Gantt
Activity cost setup
1. Invoke Activity Properties dialog window with double click on activity row number (or select Properties from Activity shortcut menu invoked with the right mouse button click on activity row number.)
2. Open Cost components page.
3. Click Add button. This will invoke Cost components dialog window containing list of all cost components available. Select one or several cost components from the list and click OK. You will be returned to Cost components page. Set up the following properties for new cost component(s) in the bottom of the page:
- Fixed Cost;
- Hour Cost; and
- Volume Unit Cost
- Profile.
4. Click OK.
Alternatively, cost component for activity can be edited directly in cells of table part of activity gantt. To perform this, double click a corresponding cell, edit contents, and press Enter key on the keyboard.
Assignment cost setup
To set up cost component for resources assigned to activity:
1. Invoke Activity Properties dialog window with double click on activity row number in table part of activity gantt (or select Properties from Activity shortcut menu invoked with the right mouse button click on activity row number.)
2. Open Assignments page and select resource to set up cost for. (Note That: Resources in list on Assignments page start with Resource word).
3. Click Properties button. This will invoke Resource Assignment properties dialog window.
4. Open Cost Components page and click Add button. This will invoke Cost Components dialog window containing the list of all cost components available. Select one or several cost components from the list and click OK. You will be returned to Cost Components page. Set up the following properties for new cost component(s) in the bottom of the page:
- Assignment fixed cost; and
- Hour Cost
- Volume Unit Cost.
5. Click OK.
Note That: Cost of resources and materials cannot be edited directly in cells of table part of activity gantt.
There is more convenient way of setting up assignment fixed cost.

Material and Cost Component Consumptions
151
1. Click Expand to Assignments icon on activity gantt toolbar to make assignments be seen in activity gantt.
2. Invoke Assignment properties dialog window with double click on assignment row number or by selecting Properties from Assignment shortcut menu invoked with the right mouse button click on assignment row number.
3. Open Cost Components page and click Add button. This will invoke Cost Components dialog window containing the list of all cost components available. Select one or several cost components from the list and click OK. You will be returned to Cost Components page. Set up the following properties for new cost component(s) in the bottom of the page:
- Assignment fixed cost; and
- Hour Cost
- Volume Unit Cost.
4. Click OK
Alternatively, cost can be set up directly in cells of table part of activity gantt. To perform this, double click a corresponding cell, edit contents, and press Enter key on the keyboard.
Note That: Resources and materials cost cannot be edited directly in cells of table part of activity gantt.
To cancel the last action performed select menu item Edit -> Undo last action or press button (see Undo for more details).
19.12. Costs Setup in Resource Gantt Cost setup for one-hour work of resource
1. Invoke Resource Properties dialog window with double click on resource row number (or select Properties from Resource shortcut menu invoked with the right mouse button click on resource row number.)
2. Open Cost Components page and click Add button. This will invoke Cost Components dialog window containing the list of all cost components available. Select one or several cost components from the list and click OK. You will be returned to Cost Components page. Set up the following properties for new cost component(s) in the bottom of the page:
- Hour Cost
3. Click OK.
Assignment cost setup
1. Click Expand to Assignments icon on resource gantt toolbar to make assignments be seen in resource gantt.
2. Invoke Assignment properties dialog window by double click on assignment row number or by selecting Properties from Assignment shortcut menu invoked with the right mouse button click on assignment row number.
3. Open Cost Components page and click Add button. This will invoke Cost Components dialog window containing the list of all cost components available. Select one or several cost components from the list and click OK. You will be returned to Cost Components page. Set up the following properties for new cost component(s) in the bottom of the page:
- Assignment fixed cost; and
- Hour Cost.
4. Click OK
Alternatively, cost components can be set up directly in cells of table part of resource gantt. To perform this, double click a corresponding cell, edit contents, and press Enter key on the keyboard.
Note That: Activities and materials costs cannot be edited directly in cells of table part of resource gantt.
To cancel the last action performed select menu item Edit -> Undo last action or press button (see Undo for more details).
19.13. Costs Setup in Activities Table Activity cost setup
1. Invoke Activity Properties dialog window with double click on activity row number (or select Properties from Activity shortcut menu invoked with the right mouse button click on activity row number.)

Material and Cost Component Consumptions
152
2. Open Cost Components page.
3. Click Add button. This will invoke Cost Components dialog window containing list of all cost components available. Select one or several cost components from the list and click OK. You will be returned to Cost Components page. Set up the following properties for new cost component(s) in the bottom of the page:
- Fixed Cost;
- Hour Cost; and
- Volume Unit Cost
- Profile.
3. Click OK.
Alternatively, cost components and profile can be edited directly in cells of Activities table. To perform this, double click a corresponding cell, edit contents, and press Enter key on the keyboard.
Assignment cost setup
To set up cost component for resources assigned to activity:
1. Invoke Activity Properties dialog window with double click on activity row number (or select Properties from Activity shortcut menu invoked with the right mouse button click on activity row number.)
2. Open Assignments page and select resource to set up cost for. (Note That: Resources in list on Assignments page start with the word "Resource").
3. Click Properties button. This will invoke Resource Assignment properties dialog window.
4. Open Cost Components page and click Add button. This will invoke Cost Components dialog window containing list of all cost components available. Select one or several cost components from the list and click OK. You will be returned to Cost Components page. Set up the following properties for new cost component(s) in the bottom of the page:
- Fixed cost; and
- Hour Cost.
- Volume Unit Cost
5. Click OK.
Note That: Resources and materials cost cannot be edited directly in cells of Activities table.
To cancel the last action performed select menu item Edit -> Undo last action or press button (see Undo for more details).
19.14. Costs Setup in Resources Table
Resources Cost Setup
5. Invoke Resource properties dialog window with double click on resource row number (or select Properties from Resource shortcut menu invoked with the right mouse button click on row number.)
6. Open Cost components page.
7. Click Add button. This will invoke Cost components dialog window containing list of all cost components available. Select one or several cost components from the list and click OK. You will be returned to Cost components page. Set up the following properties for new cost component(s) in the bottom of the page:
- Hour cost is cost component to be used to calculate this resource cost. Resource consumption per hour might be used here.
8. Click OK.
Resource Assignment Cost Setup
To set up cost for resources assigned to activity:
9. Invoke Resource properties dialog window with double click on resource row number (or select Properties from Resource shortcut menu invoked with the right mouse button click on row number.)
10. Open Assignments page. It contains list of all activities for which this resource was assigned. Highlight one of them.

Material and Cost Component Consumptions
153
11. Click Properties button. This will invoke Resource Assignment properties dialog window.
12. Open Cost components page.
13. Click Add button. This will invoke Cost components dialog window containing list of all cost components available. Select one or several cost components from the list and click OK. You will be returned to Cost components page. Set up the following properties for new cost component(s) in the bottom of the page:
- Fixed cost; and
- Hour Cost
- Volume Unit Cost.
14. Click OK.
Note That: Activities and materials costs cannot be set up directly in resources table.
To cancel the last action performed select menu item Edit -> Undo last action or press button (see Undo for more details).
19.15. Costs Setup in Materials Table
Materials cost setup
15. Invoke Material properties dialog window with double click on material row number (or select Properties from Material shortcut menu invoked with the right mouse button click on row number.)
16. Open Cost components page.
17. Click Add button. This will invoke Cost components dialog window containing list of all cost components available. Select one or several cost components from the list and click OK. You will be returned to Cost components page. Set up the following properties for new cost component(s) in the bottom of the page:
- Unit cost is cost component to be used to calculate this material cost. Actual material unit cost might be used here.
18. Click OK.
Note That: Resources, activities, and assignments costs cannot be set up directly in Materials table.
To cancel the last action performed select menu item Edit -> Undo last action or press button (see Undo for more details).
19.16. Assignment Cost Setup Assignment cost setup
To set up cost component for resources assigned to activity:
19. Invoke Resource Assignment properties dialog window with double click on assignment row number (or select Properties from Assignment shortcut menu invoked with the right mouse button click on assignment row number.)
20. Open Cost Components page and click Add button. This will invoke Cost Components dialog window containing the list of all cost components available. Select one or several cost components from the list and click OK. You will be returned to Cost Components page. Set up the following properties for new cost component(s) in the bottom of the page:
- Fixed cost; and
- Hour Cost
- Volume Unit Cost.
21. Click OK.
Alternatively, assignment fixed cost can be set up directly in cells of Assignments table. To perform this, double click a corresponding cell, edit contents, and press Enter key on the keyboard.
Note That: Resources, activities, and materials costs cannot be edited directly in Assignments table.

Material and Cost Component Consumptions
154
To cancel the last action performed select menu item Edit -> Undo last action or press button (see Undo for more details).
19.17. Costs Setup in Activity Network Activity Cost Setup
22. Invoke Activity Properties dialog window with double click on activity row number (or select Properties from Activity shortcut menu invoked with the right mouse button click on activity row number.)
23. Open Cost components page.
24. Click Add button. This will invoke Cost components dialog window containing list of all cost components available. Select one or several cost components from the list and click OK. You will be returned to Cost components page. Set up the following properties for new cost component(s) in the bottom of the page:
- Fixed Cost;
- Hour Cost; and
- Volume Unit Cost
- Profile.
25. Click OK.
Assignment cost setup
To set up cost component for resources assigned to activity:
26. Invoke Activity shortcut menu with the right mouse button click on activity box, and select Properties, or simply double click activity box. Activity Properties dialog window will be invoked. If activities are not shown in Activity Network,
click Show/Hide Activities icon on Activity Network toolbar.
27. Open Assignments page and select resource to set up cost for. (Note That: Resources in list on Assignments page start with Resource word).
28. Click Properties button. This will invoke Resource Assignment properties dialog window.
29. Open Cost Components page and click Add button. This will invoke Cost Components dialog window containing the list of all cost components available. Select one or several cost components from the list and click OK. You will be returned to Cost Components page. Set up the following properties for new cost component(s) in the bottom of the page:
- Fixed cost;
- Hour Cost; and
- Volume Unit Cost
30. Click OK.
Note That: Resources and materials costs cannot be edited directly in Activity Network.
To cancel the last action performed select menu item Edit -> Undo last action or press button (see Undo for more details).

Scheduling
155
20. Scheduling
20.1. Performing Schedule Calculation Scheduling is process of project performance scheduling.
Set up constrains and optimization method in scheduling options dialog window.
Scheduling can be done using one of the four methods, which vary in the resulting schedule and calculation time:
- Standard is the quickest method used in all Western project management programs. This method performs scheduling based on activity priorities set up in scheduling options dialog window.
- Advanced is method delivering more optimal schedule, but it takes longer time to calculate.
- Optimization is method using special algorithms during scheduling and, therefore, requiring a significant calculation time due to large number of iterations performed.
- Previous version support is scheduling method with first priority set up on the activities sequence as in the project’s previous version. When this method is selected, define previous version to be used to continue activities.
Previous support version allows you to avoid negative consequences of schedule changes. For example, if during project performance a contract for materials delivery was signed, changes in schedule might involve fines or other problems.
Spider Project software gives you advantage of calculating resource constrained scheduling leveled by materials or cost components: make selections in Scheduling Options dialog window.
Scheduling might be interrupted for the following reasons:
- There are obvious mistakes in project initial data (for example, negative activity volume);
- There are mismatches in project data (for example, resource quantity in assignment exceeds total quantity of that resource in the project);
- There is attempt to use more material or cost component than available.
If scheduling was interrupted, a corresponding message will appear.
To start scheduling, click Scheduling (without resource constrains) or Resource Constrained Scheduling icon on Gantt diagram toolbar.
After scheduling is finished, recalculate Cost and Materials and Resource Peak Work Load. Click Cost and Materials icon on the toolbar (or select Calculations -> Cost and Materials from Gantt diagram menu) to start costs and material consumption calculation.
Click Resource Peak Work Load icon on the toolbar (or select Calculations -> Resource Peak Work Load from Gantt diagram menu) to start peak project resources work loads calculation.
20.2. Scheduling Options Dialog Window This dialog window sets options for schedule calculation process:
- Priority. This field lets to choose activity property that will participate in schedule optimization as additional criteria. Pressing Select Field button opens fields list dialog window.
- Methods of schedule calculation can be chosen in frame Method: which are Standard, Advanced, Optimization, and Previous version support. See detailed description of calculation methods in schedule calculation. Previous project version for Previous version support method is set in frame Define Previous Version at the bottom of the page either through projects and documents dialog window (that can be invoked by pressing Select button) or direct entering of project code and version number (different Storage location can be selected by pressing Select button).
- Priority order of optimization is set in frame Order: Ascending or Descending. - Direction of schedule calculation in frame Direction defines either schedule will be calculated Forward starting the
current date or Backward from the target finish date. Backward direction enables schedule calculation for project that necessarily requires completion at target finish date.

Scheduling
156
You can include different objects in resource constrained scheduling: Materials, Cost Components, Material Centers, Cost Centers, Material Sets and Total Cost. Checking required checkboxes enables leveling of selected items. To define objects for leveling press corresponding button, select required items from the total list in the left part of invoked dialog window and move them to the right part with the help of arrow button:
- Resources to level – opens dialog window for selecting particular resources to be leveled - Materials to level – opens dialog window for selecting particular materials to be leveled - Cost Components – opens dialog window for selecting particular cost components to be leveled - Material Centers – opens dialog window for selecting particular Material Centers to be leveled - Cost Centers – opens dialog window for selecting particular cost centers to be leveled - Material Sets – opens dialog window for selecting particular material sets to be leveled
To select work breakdown structure with required phase priorities press WBS for Phase Priorities button and select one from the list in structures dialog window. You can customize calculation process with the aid of additional checkboxes:
- Show Report – gives a report after calculation - Apply Phase Priorities – enables phase priorities in schedule calculation - Disable Splits – checking this box disables splits for schedule calculation for all interruptable activities - Minimize Parallel Activities – enabling this option maximizes resource load on higher priority activities with variable
resource assignment (variable resource quantity and work load is set assignment properties dialog window). - Without float calculation – calculates schedule ‘as late as possible’ (ALAP) and thus no floats are produced; - Calculate recommended schedule – recommended schedule will be calculated and shown in black in graphical part of
Activity Gantt. Non-critical activities in recommended schedule are scheduled to ensure that they would not become critical with the same probability as was set for timely completion of the whole project (phase) set in Risk analysis dialog window.
- Consider Portfolio Schedule – If this option is selected, project schedule will be constructed in its interrelations view with other portfolio projects, and also in view of other portfolio projects’ loading resources, materials and costs distribution (if they are chosen for alignment)
- Allow performance interruptions not longer than – enables activity interruptions and sets maximum duration of possible interruptions in hours or days.
- Continuous performance not less than – sets minimum duration (in hours or days) of uninterruptable activity performance for interruptable activities.

Scheduling
157
- Detailed information – By selecting this option activity, phase, department, resources and assignments in graphic part of gantt chart will be displayed not by continuous rectangulars (from the start before the end), but intermittent, according to calendar working hours.
- Ignore preceding activity links if activity in progress – links to the operations in progress at schedule calculation will be ignored
- Show this window before resource constrained scheduling – checking this box invokes scheduling options dialog window each time resource constrained scheduling is performed
- Show this window before scheduling – checking this box invokes scheduling dialog window options each time scheduling (without leveling) is performed.
All options set in this dialog window are stored in project file and restored after opening.
20.3. Choose Objects for Leveling Dialog Window
Allows selecting objects for leveling and is invoked from Scheduling Options dialog window (for Resource Constrained Scheduling) by clicking Resource to level, Materials to level, Cost Components to level, Material Centers to level, or Cost Centers to level and Material Sets to level buttons. Name of Select Objects for Leveling dialog window changes according to what object was selected to level. If you click Materials to level, the dialog window name will be Select materials for leveling, and it will contain materials in the lists.
The left list contains all selected category objects available in the project, and the right list contains objects to be leveled by.
After highlighting required objects, click >> button to move them from Resources to Resources to be leveled list, or use << to perform opposite action.
Use Search text field in the bottom of each list to search for certain objects in the list. Use Code and Name options to sort the list by object codes or names, respectively.
20.4. Structures List Dialog Window
Structures list dialog window can be opened from scheduling properties dialog window and lets you select source work breakdown structure (WBS) for phase priorities: click with left mouse button on desired WBS and press OK button.
Scheduling
158
20.5. Work Load Calculation for All Activity Assignments with Preset Duration and Productivity
This calculation is used for activities of Duration and Hammock types.
Calculates resource assignments work load so that, with productivities given, activity volume would be completely performed during given activity duration. If this is not achievable, (resulting work load exceeds 100 %), corresponding error message will appear.
If workload can be calculated, its amount will be entered in the corresponding activity assignment field.

Filters
159
21. Filters
21.1. Filters Filtering is a quick and easy way to find and work with a subset of data. Filtering temporarily hides rows you do not want to display. You can use filters in project tables (except monitoring table), Gantt charts and documents. Spider Project lets you create and use two types of filters:
- Simple filter – logical expression, containing parameter and criteria, combined by comparison operator Less than, Less than or Equal to, Greater than, Greater than or Equal to, Equal to, Not Equal to and Contains.
- Complex filter – combination of several other filters by logical operators: AND, OR, NOT. Example of complex filter: (DurPlanD > 2) AND (DurPlanD < 10), where DurPlanD – parameter - Activity duration in days [Remaining]; > - operator Greater than; < - operator Less than; 2, 10 – criteria. Current filter will select rows, corresponding to activities with remaining duration greater than 2 and less than 10 days. Creation of Simple Filter To create new simple filter:
1. Open filters dialog window: goto menu Filter -> Apply; and press New. 2. Simple filters dialog window will open.
- Define a Name for a new filter; - In frame Field press Select button to select required table field (i.e. table column) as parameter; or directly
enter field Code. Note that small and capital letters are considered as different characters. - Select Condition from the list; - Enter criteria in box Value.
For table fields of date and time you can use a special variable DataDate, corresponding to current project date (according to included performance data). Specify after a space positive or negative shift (in days) to project data date. E.g., ‘DataDate 0’ – equals to current project date; ‘DataDate -5’ – five days before current project date.
- Press OK. 3. New simple filter will be stored and its name will appear in the list of filters in filters dialog window.
You can create several simple filters. Creation of Complex Filter Complex filter is a combination of several simple and/or complex filters. To create new complex filter in filters dialog window choose option New Complex. complex filters dialog window will open:
1. Define a Name for a new filter; 2. Press Add button and select a filter to be included in current complex filter from the list. Repeat this action to add
several filters to the current one. 3. Choose required logical condition to combine all the fields selected. In frame Operation choose among two
operators AND or OR and check box NOT if required: - AND – conditions of all comprising filters must be met; - OR – conditions of at least one of the comprising filter must be met; - NOT – checking this box reverses the logic of AND or OR operators. I.e. AND + NOT means that conditions of
all comprising filters must not be met; OR + NOT means that conditions of at least one of the comprising filter must not be met.
4. To exclude one of the comprising filters select required filter and press Delete button. 5. Press OK.

Filters
160
New complex filter will be stored and its name will appear in the list of filters in filters dialog window. Editing and Deleting Filters To view properties or edit existing simple or complex filter select required filter from the list in filters dialog window and press Properties button. Complete editing of filters in simple filters dialog window or complex filters dialog window and press OK. To delete a filter select required filter from the list in filters dialog window and press Delete button. Applying a Filter Applying a filter to a table or a document temporarily hides all rows that do not meet filter criteria. To apply a filter open filters dialog window (goto menu Filter -> Apply), select required filter from the list and press Apply. The name of applied filter would appear in the window status bar (if no filter is applied you will see ‘Filter – None’). Only one simple or complex filter can be applied at the same time to a table or a document. Applied filter is stored within a project or document. Its action can be canceled by applying another filter or selecting menu item Filter -> Restore. Creating of a New Breakdown Structure from Filtered Activity Gantt or Resource Gantt Table
1. Apply filter to the table: open filters dialog window (goto menu Filter -> Apply), select required filter from the list and press Apply.
2. Open structures list dialog window: in Activity Gantt goto menu Project -> WBS; in Resource Gantt goto menu Project -> OBS;
3. Press button Copy Filtered.
21.2. Filters Dialog Window
Is the main dialog window to work with Filters and contains:
- List of all filters created.
- Properties - button invokes Simple Filter dialog window or Complex Filter dialog window depending on highlighted filter type.
- New - creates new simple filter by evoking Simple Filter dialog window.
- New Complex - creates new complex filter by evoking Complex Filter dialog window.
- Delete - deletes highlighted filter.
- Cancel Previous – when this option is selected before applying a new filter, previously applied filters will be cancelled.
- Apply - starts applying highlighted filter to the program.

Filters
161
- Cancel - closes dialog window without any changes.
21.3. Simple Filter Dialog Window
Allows setting up simple filter and contains the following options and fields:
- Name field contains filter name.
- Field frame contains Name and Code fields to be used to filter data.
- Select button invokes fields available dialog window containing list of all available fields. Select one and click OK to return back to Simple Filter dialog window.
- Condition and Value are text fields to set up filtering conditions.
If you leave Value field empty, ‘0’ will be used for numerical fields and empty cell for text fields. Empty Value field for date fields can only be filtered with Equal to (resulting in no date) or Not Equal to (resulting in any date) conditions.
For date-time fields, you can use DataDate pseudo-variable for current project time. To set up time shift from the project current time, add date shift (in days - negative or positive value) after DataDate, separated with space. E.g. if you want to filter all activities that are scheduled to start within 5 days since current project time make a simple filter with settings shown in the example.
Apply to Substring (For text fields only) frame lets you specify symbol number (Length) and starting symbol number (from) to compare specified Field with entered Value. For example (as it is shown in the picture above), you can filter all activities with codes, where the third symbol is less than ‘b’, i.e. is ‘a’. If Length is left blank it is assumed that you wish to search in string (Field) from specified symbol number to the end of string. If field From is left blank search would be performed from the first symbol.
21.4. Complex Filter Dialog Window Allows editing existing and creating new complex filter and contains:
- Name field contains filter name.

Filters
162
- Filters contains list of simple filters included in complex filter.
- Add button adds new filter by evoking dialog window with list of filters available. Highlight filters you want to add and click OK.
- Delete deletes highlighted filter.
- Operation frame contains AND, OR, and NOT options, and allows setting up logical operation between simple filters in complex filter.
Logical operation AND means complex filter will have true meaning only when all filters included have true meaning.
Logical operation OR means complex filter will have true meaning when at least one of filters included has true meaning.
Logical operation NOT is applied to resulting meaning of complex filter changing it to the opposite.
For example, complex filter (K<10)OR(K>15) will become true when is less than 10 or greater than 15, and false when is between 10 and 15. If NOT operation is applied to this filter [resulting filter will be
NOT[ (K<10)OR(K>15))], it will become true when is between 10 and 15.

Formulae
163
22. Formulae
22.1. Formulae Formulae are instruments to calculate table column values. Formulae can be added in any project table (except for Monitoring table) and document and will be applied to all shown rows (others, for example, can be hidden with filter).
Formula syntax
In Spider Project, formulae are made of column codes separated with mathematical operators. Formula starts with column code the calculation is performed for, followed by equality sign and a mathematical expression. Mathematical expression contains column codes, operator, and functions.
Creating formula
To add formula in table:
1. Select Formulae from Edit menu.
2. Click New in the invoked Formulae dialog window.
3. Spell out formula in the invoked Formula dialog window.
4. Field button will invoke Fields available dialog window to help to enter field names in formula. Function button invokes Functions dialog window containing list of all functions. Insert mathematical operators in formula by clicking corresponding buttons.
5. Click OK when finished creating formula. If obvious mistakes in formula syntax are made, a warning message will appear.
6. To apply the formula to table column, click Execute.
Deleting formula
To delete a formula:
1. Select Formulae from Edit menu.
2. Highlight formula to be deleted in the invoked Formulae dialog window and click Delete.
Editing formula
To edit a formula:
1. Select Formulae from Edit menu.
2. Highlight formula to be edited in the invoked Formulae dialog window and click Edit.
3. Edit it in the invoked Formula dialog window and click OK when finished.
4. To reapply the formula to table column, click Execute.
Note That: Updated formula will not be reapplied to project table automatically. Therefore, whenever you made a change in formula or data, use Execute button in Formulae dialog window.
22.2. Formulae Creation Dialog Window Allows working with formulae table.
To create new formula, edit or delete existing formulae, use Edit, New, and Delete buttons, respectively.
To apply highlighted formula to table column, click Execute.
To close Formulae dialog window without applying formulae, click Cancel

Formulae
164
.
22.3. Formula Creation Dialog Window
Allows creating formulae and contains the following buttons:
+, -, *, /, (, ), =, !=, <, >, <=, >=, and, or, not, xor buttons add mathematical operators into the formula.
Function button invokes dialog window containing list of available functions. Function highlighted in the list will be inserted into formula after clicking OK. Use comma to separate function arguments.
Field button invokes fields available dialog window to add fields in formula. If field code contains number, include code in inverted commas to separate codes and numbers (example, ‘1’).
OK closes dialog window changing formula in the list in Formulae dialog window.
Cancel closes dialog window without any changes.
Help invokes context help for this dialog window.
22.4. Mathematical Operators Mathematical operators connect field codes in formulae creating mathematical expressions. There are operators of three types in Spider Project: arithmetical, logical, and comparative.
Arithmetical operators
Operator Meaning Example
+ (Plus) Addition DurPlan + 3
- (Minus) Subtraction AlapFin - AlapStart
Negative Value -5
* (Asterisk) Multiplication CostPlan * 28
/ (Slash) Division VolPlan / DurPlanD

Formulae
165
Logical Operators
and
Logical AND takes True meaning if both arguments are True, and takes False if at least of the arguments is False.
Example: (DurPlanD>10) and (DurPlanD<20). If scheduled duration is less than 10 and greater than 20, then this expression becomes True.
or
Logical OR takes True meaning if at least one argument is True, and takes False if both arguments are False.
Example: (DurPlanD>10) or (DurPlanD<0). If scheduled duration is greater than 10 and less than 0, then this expression takes True.
not
Logical NOT changes argument meaning to the opposite.
Example: NOT (VolPlan>2). If scheduled volume is greater than 2, resulting expression becomes False.
xor
Excepting OR takes True meaning if only one argument is True, and takes False meaning if both of the arguments are either True or False.
Example: (VolPlan=2) xor (VolPlan=10). If scheduled volume equals 2 or 10, expression takes True meaning.
Comparative operators
Operator Meaning Example
= Equals to VolPlan = 2
!= Not equals to VolPlan != VolFact
< Less than CostPlan < 20
> Greater than DurPlanD > 2
<= Less than or equals to CostPlan <= CostFact
>= Greater than or equals to CostFact >= CostPlan
22.5. Functions Logical functions
if (Logical expression, Meaning_if_True, Meaning_if_False)
Logical expression is any expression containing logical operators and comparative operators and taking True or False meaning.
Meaning_if_True is resulting meaning of IF function when Logical expression was True.
Meaning_if_False is resulting meaning of IF function when Logical expression was False.
Example: VolPlan = if(VolPlan>100, 100, VolPlan). This formula checks meaning of scheduled activity volume. If scheduled activity was greater than 100, formula would return its meaning as 100. If scheduled activity was less than 100, its meaning would remain in table the same as it was before the formula was applied to it.
Mathematical functions
pow(Number, Power) raises Number into Power.
sqrt(Number) extracts square root from Number.
abs(Number) calculates Number’s module.
exp(Number) raises e number into power equaling Number
log(Number) calculates natural logarithm of Number.
sin(Angle_in_radians) calculates sine of Angle.

Formulae
166
cos(Angle_in_radians) calculates cosine of Angle.
tan(Angle_in_radians) calculates tangent of Angle.
Example: VolPlan = abs(VolPlan). This formula would change all negative meanings of scheduled activity volume to the opposite positive ones. And, as a result, messages about negative activity volume will not appear.

Centers
167
23. Centers
23.1. Centers There are three types of centers in the program:
- Material centers;
- Resource centers; and
- Cost centers.
Material centers are formed the same way: to group similar materials to get their joint consumption. For example, there are different types of concrete in the project, but for some calculations the total concrete consumption is needed. Create Concrete material center. All Material centers are saved in Material Centers table.
Resource centers are used to group resources of similar type to jointly analyze them. For example, there are three carpenters in the project: Jack, Jim, and John, and you need to see joint work load parameters for carpenters. Create Carpenters resource center including carpenters Jack, Jim, and John, to see joint parameters. All Resource centers are saved in Resource Centers table.
Cost centers are created different way. Cost center might include materials and cost components and might be used to summarize material consumption or material revenue (in monetary value) depending on the option selected in Cost Center properties dialog window. For example, cost of putting up a brick wall within erecting a building project is needed to be calculated. Create cost center including Cost Components – material cost and work cost, and Materials – bricks. All Cost centers are saved in Cost Centers table
23.2. Resource Centers Table
Contains all project resource centers data and includes the following columns (fields) by default:
- Name is a Resource center name.
- Code is a sequence of characters, unique for each resource center. Code is made of letters, numbers, and special characters (#$%&@_-~) without spaces, and is case sensitive.
- Name for Columns is resource center name to be reflected in table column headers. If, for example, Name is too long, a shorter name to be used in column headers, can be entered here. If this field remains empty, resource center Name will be reflected in columns.
- Notes contains comments to resource center (if any). Double click in cell will invoke Resource Center properties dialog window opened on the notes standard page.
- User-defined fields.
Resource Center shortcut menu
Row shortcut menu in Resource Centers table contains the following options:
- Properties invokes Resource Center properties dialog window to edit resource center’s properties
- New allows creating new resource center by evoking Resource Center properties dialog window and adds new row in Resource Centers table. Note that properties dialog window will be opened automatically for newly created Resource Center only if you have selected to Open properties for new created objects in the spider project parameters dialog window. Otherwise newly created Resource Center will be saved with default parameters and you will have to invoke Resource Center dialog window by double click on new Resource Center row number (or by selecting Properties from shortcut menu invoked with a right mouse button click on new Resource Center row number)
- Delete deletes highlighted resource center and a corresponding row in Resource Centers table.
To cancel the last action performed select menu item Edit -> Undo last action or press button (see Undo for more details).
When several rows are highlighted simultaneously, row shortcut menu contains Delete option only.
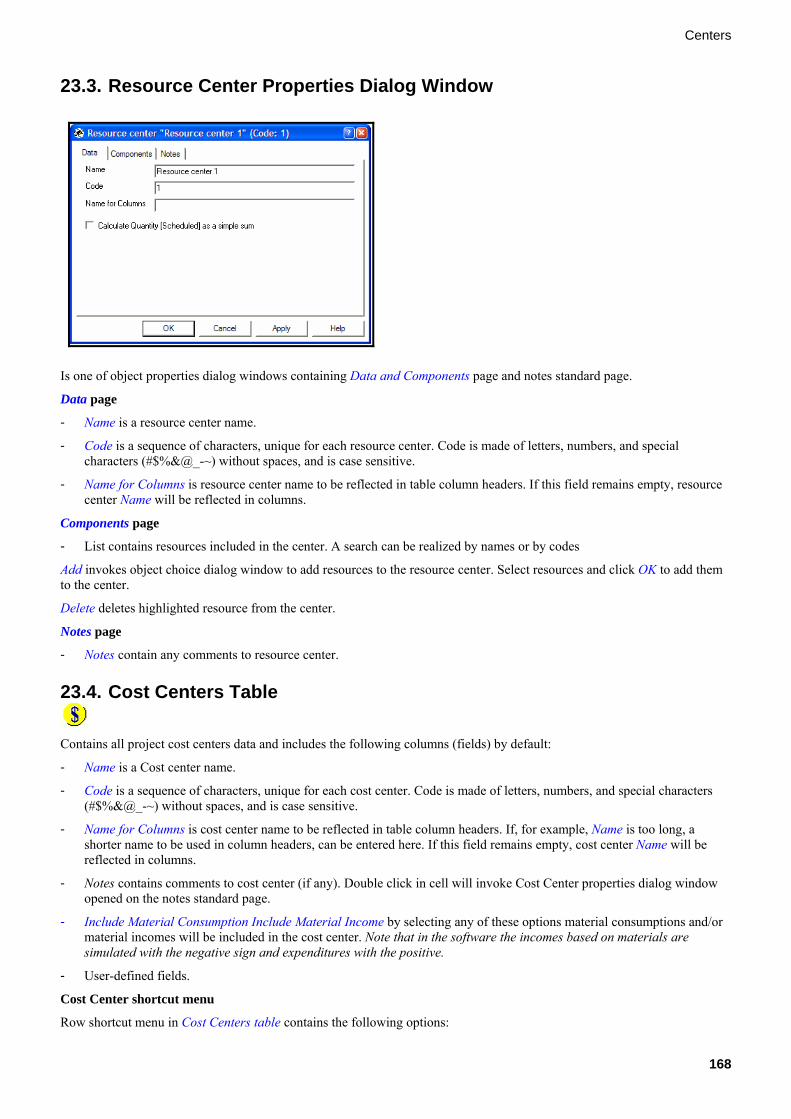
Centers
168
23.3. Resource Center Properties Dialog Window
Is one of object properties dialog windows containing Data and Components page and notes standard page.
Data page
- Name is a resource center name.
- Code is a sequence of characters, unique for each resource center. Code is made of letters, numbers, and special characters (#$%&@_-~) without spaces, and is case sensitive.
- Name for Columns is resource center name to be reflected in table column headers. If this field remains empty, resource center Name will be reflected in columns.
Components page
- List contains resources included in the center. A search can be realized by names or by codes
Add invokes object choice dialog window to add resources to the resource center. Select resources and click OK to add them to the center.
Delete deletes highlighted resource from the center.
Notes page
- Notes contain any comments to resource center.
23.4. Cost Centers Table
Contains all project cost centers data and includes the following columns (fields) by default:
- Name is a Cost center name.
- Code is a sequence of characters, unique for each cost center. Code is made of letters, numbers, and special characters (#$%&@_-~) without spaces, and is case sensitive.
- Name for Columns is cost center name to be reflected in table column headers. If, for example, Name is too long, a shorter name to be used in column headers, can be entered here. If this field remains empty, cost center Name will be reflected in columns.
- Notes contains comments to cost center (if any). Double click in cell will invoke Cost Center properties dialog window opened on the notes standard page.
- Include Material Consumption Include Material Income by selecting any of these options material consumptions and/or material incomes will be included in the cost center. Note that in the software the incomes based on materials are simulated with the negative sign and expenditures with the positive.
- User-defined fields.
Cost Center shortcut menu
Row shortcut menu in Cost Centers table contains the following options:

Centers
169
- Properties invokes Cost Center properties dialog window to edit cost center ‘s properties.
- New allows creating new cost center by evoking Cost Center properties dialog window and adds new row in Cost Centers table. Note that properties dialog window will be opened automatically for newly created Cost Center only if you have selected to Open properties for new created objects in the spider project parameters dialog window. Otherwise newly created Cost Center will be saved with default parameters and you will have to invoke Cost Center dialog window by double click on new Cost Center row number (or by selecting Properties from shortcut menu invoked with a right mouse button click on new Cost Center row number)
- Delete deletes highlighted cost center and a corresponding row in Cost Centers table.
To cancel the last action performed select menu item Edit -> Undo last action or press button (see Undo for more details).
When several rows are highlighted simultaneously, row shortcut menu contains Delete option only.
23.5. Cost Center Properties Dialog Window
Is dialog window containing the following pages: Data; Components; and notes standard page.
Data page
- Name is a cost center name.
- Code is a sequence of characters, unique for each cost center. Code is made of letters, numbers, and special characters (#$%&@_-~) without spaces, and is case sensitive.
- Name for Columns is cost center name to be reflected in table column headers. If this field remains empty, cost center Name will be reflected in columns.
- Include Material Consumptions and Include Material Income options show whether materials expenditure or revenues will be taken into account in cost center.
Note That: Material incomes are entered as negative values and Material Consumption values are entered as positive.
Components page
Contains two lists:
- List of Cost components included in cost center. To add new cost component, click Add button and select cost component from the invoked Cost Components dialog window containing the list of all cost components available. To delete highlighted cost component from cost center, click Delete.

Centers
170
- List of Materials included in cost center. To add new material, click Add button and select material from the invoked Materials dialog window containing the list of all materials available. To delete highlighted material from cost center, click Delete.
Notes page
- Notes contains comments to cost center (if any). Double click in the cell invokes Cost Center properties dialog window opened on notes standard page.
23.6. Material Centers Table
Contains all project material centers data and includes the following columns (fields) by default:
- Name is a Material center name.
- Code is a sequence of characters, unique for each material center. Code is made of letters, numbers, and special characters (#$%&@_-~) without spaces, and is case sensitive.
- Name for Columns is material center name to be reflected in table column headers. If, for example, Name is too long, a shorter name to be used in column headers, can be entered here. If this field remains empty, material center Name will be reflected in columns.
- Notes contains comments to material center (if any). Double click in cell will invoke Material Center properties dialog window opened on the notes standard page.
- User-defined fields.
Material Center shortcut menu
Row shortcut menu in Material Centers table contains the following options:
- Properties invokes Material Center properties dialog window to edit material center’s properties.
- New allows creating new material center by evoking Material Center properties dialog window and adds new row in Material Centers table. Note that properties dialog window will be opened automatically for newly created Material Center only if you have selected to Open properties for new created objects in the spider project parameters dialog window. Otherwise newly created Material Center will be saved with default parameters and you will have to invoke Material Center dialog window by double click on new Material Center row number (or by selecting Properties from shortcut menu invoked with a right mouse button click on new Material Center row number)
- Delete deletes highlighted material center and a corresponding row in Material Centers table.

Centers
171
To cancel the last action performed select menu item Edit -> Undo last action or press button (see Undo for more details).
When several rows are highlighted simultaneously, row shortcut menu contains Delete option only.
23.7. Material Center Properties Dialog Window
Is one of object properties dialog windows containing Data and Components page and notes standard page.
Data page
- Name is a material center name.
- Code is a sequence of characters, unique for each material center. Code is made of letters, numbers, and special characters (#$%&@_-~) without spaces, and is case sensitive.
- Name for Columns is material center name to be reflected in table column headers. If this field remains empty, material center Name will be reflected in columns.
- Include Material Consumptions, Include Material Income – after selecting these options material consumptions and material incomes will be included in calculations.
Components page
- List contains materials included in the center. A search can be realized by names or by codes
- Add invokes project materials list of. Select material(s) from the list and click OK to add them to material center.
- Delete deletes highlighted material from the center.
Notes page
- Notes contain any comments to material center.
Cost periods
172
24. Cost periods
24.1. Cost Periods Cost periods reflect projected changes of project costs. You can create cost periods if you need to change planned cost of cost components, materials and resources in certain project periods. Cost periods can be created for:
- cost components (see cost component cost periods properties dialog window), e.g., if you want to take into account currency rate changes;
- materials (see material cost periods properties dialog window) if need to take into account estimated changes of material unit costs;
- resources (see resource cost periods properties dialog window) if you need to take into account projected changes of resource per hour cost.
You can create and edit cost periods in dialog windows of cost component, material or resource properties on the Cost Periods page. Created cost periods are stored in the following tables: Cost Component Periods table, Material Periods table and Resource Periods table. You can edit properties of created (in corresponding dialog windows) cost periods either in corresponding dialog windows or tables. Note that if project contains cost periods for cost components, materials and resources – all of them would participate in cost calculations. For example, you have project phase with one activity and with following properties: - activity duration – 3 days; - activity start date – September, 5 2003; - activity fixed cost – 6 units of cost component ‘USD’; - activity fixed material consumption – 6 units of material ‘Material 1’; - ‘Material 1’ unit cost – 1 unit of ‘USD’; - activity resource assignment: one ‘Resource 1’; - ‘Resource 1’ hour cost – 1 unit of ‘USD’; - both activity and resource have 7 days working calendar (working hours 8:00 – 16:00) - ‘USD’ has following cost periods: (Date&Time of period Start – Unit Cost) 05.09.2003 00:00 – 1; 06.09.2003 00:00 – 2; - ‘Material 1’ has following cost periods: (Date&Time of period Start – USD [Unit Cost]) 05.09.2003 00:00 – 1; 07.09.2003 00:00 – 2; - ‘Resource 1’ has following cost periods: (Date&Time of period Start – USD [per Hour]) 05.09.2003 00:00 – 1; 05.09.2003 12:00 – 2; 06.09.2003 00:00 – 1; 06.09.2003 12:00 – 2; Total activity cost in USD would constitute of fixed activity cost, material cost and assigned resource work cost: Taking into account cost periods Without cost periods Total Fixed cost of
activity Material only
Resource only
Total Fixed cost of activity
Material only
Resource only
05.09.2003 8:00 1.5 0.25 0.25 1 1.5 0.25 0.25 1 05.09.2003 9:00 1.5 0.25 0.25 1 1.5 0.25 0.25 1 05.09.2003 10:00 1.5 0.25 0.25 1 1.5 0.25 0.25 1 05.09.2003 11:00 1.5 0.25 0.25 1 1.5 0.25 0.25 1
Resource hour cost changed from 1.0 to 2.0 05.09.2003 12:00 2.5 0.25 0.25 2 2.5 0.25 0.25 2

Cost periods
173
05.09.2003 13:00 2.5 0.25 0.25 2 2.5 0.25 0.25 2 05.09.2003 14:00 2.5 0.25 0.25 2 2.5 0.25 0.25 2 05.09.2003 15:00 2.5 0.25 0.25 2 2.5 0.25 0.25 2
Cost component unit cost changed from 1.0 to 2.0 Resource hour cost changed from 2.0 to 1.0
06.09.2003 8:00 3 0.5 0.5 2 1.5 0.25 0.25 1 06.09.2003 9:00 3 0.5 0.5 2 1.5 0.25 0.25 1 06.09.2003 10:00 3 0.5 0.5 2 1.5 0.25 0.25 1 06.09.2003 11:00 3 0.5 0.5 2 1.5 0.25 0.25 1
Resource hour cost changed from 1.0 to 2.0 06.09.2003 12:00 5 0.5 0.5 4 2.5 0.25 0.25 2 06.09.2003 13:00 5 0.5 0.5 4 2.5 0.25 0.25 2 06.09.2003 14:00 5 0.5 0.5 4 2.5 0.25 0.25 2 06.09.2003 15:00 5 0.5 0.5 4 2.5 0.25 0.25 2
Material unit cost changed from 1.0 to 2.0 07.09.2003 8:00 5.5 0.5 1 4 2.75 0.25 0.5 2 07.09.2003 9:00 5.5 0.5 1 4 2.75 0.25 0.5 2 07.09.2003 10:00 5.5 0.5 1 4 2.75 0.25 0.5 2 07.09.2003 11:00 5.5 0.5 1 4 2.75 0.25 0.5 2 07.09.2003 12:00 5.5 0.5 1 4 2.75 0.25 0.5 2 07.09.2003 13:00 5.5 0.5 1 4 2.75 0.25 0.5 2 07.09.2003 14:00 5.5 0.5 1 4 2.75 0.25 0.5 2 07.09.2003 15:00 5.5 0.5 1 4 2.75 0.25 0.5 2 Total 92 10 14 68 54 6 8 40
24.2. Cost Component Periods Properties Dialog Window
Cost component period properties dialog window contains following pages: Data page, Notes standard page. You can edit properties of cost period in this dialog window. Data page
- Cost Component – is cost component name for which cost period was created.
- Start – date and time of cost period start; - Unit cost – of cost component for this cost period;

Cost periods
174
- Do not use in calculations – when this option will be selected this period will not be considered by the calculations of expenditures.
24.3. Material Cost Period Properties Dialog Window
Cost component cost period properties dialog window is an object properties dialog window containing following pages: Data page, Cost Components page, Notes standard page. You can edit properties of cost period in this dialog window. Data page
- Material - is material name for which cost period was created;
- Start – date and time of cost period start; Cost Components page Cost component page slightly differs from Cost Components standard page: it contains list of assigned cost components to the current material and Unit cost of cost component for each of cost components. To add new cost component press Add button, select required cost component from the list of available cost components and press Enter. To change value of certain cost component select it in the list and enter new value in the Unit cost field. To remove cost component from the list select it in the list and enter zero value in the Unit cost field.
24.4. Resource Cost Period Properties Dialog Window Resource cost period properties dialog window is an Object properties dialog window containing following pages: Data page, Cost Components page, Notes standard page. You can edit properties of cost period in this dialog window.

Cost periods
175
Data page
- Resource - is resource name for which cost period was created;
- Start – date and time of cost period start; Cost Components page Cost component page slightly differs from Cost Components standard page: it contains list of assigned cost components to the current resource and per Hour cost of cost component for each of cost components. To add new cost component press Add button, select required cost component from the list of available cost components and press Enter. To change value of certain cost component select it in the list and enter new value in the Unit cost field. To remove cost component from the list select it in the list and enter zero value in the Unit cost field.

Overtimes
176
25. Overtimes
25.1. Overtime Overtime lets you model extra resources costs for working overtime (i.e. per hour expenditure of cost component(s) by resource in certain periods is increased by certain percent).
For example, if a driver is working in the night hours or weekends and standard per hour payment must be increased by e.g. 30%, you can use Overtime to model such situations:
1. Modeling of overtimes is started by creating a new week of resource total working schedule. This week must define daily hours that the resource (e.g. driver) is allowed and is able to work including overtime periods (e.g. every day since 8 a.m. until 6 p.m. except Sundays).
2. Overtime periods can be defined in an additional week (e.g. Monday – Friday since 4 p.m. until 6 p.m. and Saturday since 8 a.m. until 6 p.m.). E.g.,
‘withOver’ – week with resource total working schedule (at standard payment as well as overtime hours with extra payment);
‘Overtime’ - week defining overtime hours with extra payment.
3. On the next step you should create two new calendars - each containing previously created weeks as main weeks. E.g.,
4. Now you are ready to define overtime periods in the Overtime table: create new overtime period, set calendar (containing overtime hours only) for it and define increase of cost component(s) expenditure per hour in percent (for each necessary cost component)
5. Finally, when overtime periods are defined and extra payment is set, you can assign required resource main calendar (containing total working hors) and overtime calendar (containing overtime hours with extra payment).
25.2. Overtime Properties Dialog Window Dialog window of overtime periods lets you view and edit properties of overtimes. Dialog window contains following pages: Data, Cost Components, Notes standard page.

Overtimes
177
Page Data: Name – overtime period name; Code – unique code of overtime period Calendar – calendar, used to calculate overtime costs. Use Choose button to select required calendar from the list. Page Cost Components You can view, add and delete cost components for current overtime period and define percent of each cost component consumption increase for current overtime period. Use button Add to add new cost component from the list of available cost components. Set required increase of selected cost component consumption by resources in the Percent per hour field. If you set zero percent increase for certain cost component, it would be deleted from the list of current overtime.

Risk Analysis
178
26. Risk Analysis
26.1. Risk Analysis
In risk analysis dialog window you can set parameters required for risk analysis. Frame Versions contain information about Optimistic, Probable and Pessimistic project versions. You can edit data on each version name, code and storage folder name: press Select button and select appropriate project version in opened projects and documents dialog window. Note that optimistic, probable and pessimistic project versions must already exist before risk analysis performance. Required probabilities of compliance with terms and budget are set in fields Duration and Cost in frame Required Probability for (%). To specify probabilities of compliance with materials, cost components, material centers cost centers and Material Sets consumption:
1. Check box corresponding to needed cost type (under buttons Add and Delete): Materials, Cost Components, Material Centers, Cost Centers, and Material Sets selecting cost type in checkbox filters list of entered items according to this cost type.
2. Press Add button. 3. Select with left mouse button objects to be added from the list in opened dialog window and press OK. 4. Specify probabilities for each item in field Probability.
You can enable or disable calculation of critical costs for each cost type during risk analysis: check or uncheck appropriate box in the upper part of the frame Required Probability for (%). Critical schedule is calculated backward from project critical finish date calculated according to selected three versions (optimistic, most probable and pessimistic) and selected probabilities of successful project completion. Alternatively, critical schedule can be calculated backward from project (or phases) target finish date - if you check box Apply Target Finish Dates in Target Finish column of Activity Gantt table. Frame Critical Schedule lets you specify which project version would be used as source of activities duration in critical schedule calculation – Optimistic or Probable. Check corresponding box in frame Most Probable. Critical schedule shows as late as possible dates for activity execution according to risks reflected in three project versions (optimistic, most probable and pessimistic) and selected probabilities of successful project completion. Thus delays of

Risk Analysis
179
even non-critical activities in critical schedule (scheduled for execution as late as possible) - will lead to delay in the whole project execution. If option Calculate recommended schedule is selected – recommended schedule will be calculated and shown in black in graphical part of Activity Gantt. Recommended schedule. Non-critical activities in recommended schedule are scheduled to ensure that they would not become critical with the same probability as was set for timely completion of the whole project (phase). You can calculate probabilities of compliance with established project finish date, budget, consumption of materials, cost components, material centers and cost centers. To calculate probability:
1. Press Select Parameter button in Project Parameter Probability frame and specify needed item in opened fields' list dialog window;
2. Enter Parameter Value; 3. Press Calculate Probability.
Checking box Show this window before risk analysis (enabled by default) displays current window each time risk analysis is performed. To make report on risk analysis check box Show Calculation Report.
26.2. Success Probabilities Trends Success Probabilities Trends - is a method of project performance analysis. Probabilities of achieving target project finish dates, target budget and target material consumption are analyzed in the course of project performance. Trends can be obtained for such parameters as project finish date, total cost, project cost components, materials, cost centers and material centers. Trends of these probabilities provide valuable information for project success estimates. To build Success Probabilities Trends it is recommended to follow general algorithm:
1. Create three project versions, corresponding to optimistic, pessimistic and probable (expected) scenarios: - Set optimistic project parameters’ estimates (activities duration and volume, resources productivities, activities
and resources calendars, required costs) and calculate optimistic project schedule. Save this project version (i.e. ‘optimistic version’).
- Set pessimistic project parameters’ estimates and calculate pessimistic project schedule. Save this project version (i.e. ‘pessimistic version’).
- Set probable (expected) project parameters’ estimates and calculate probable project schedule. Save this project version (i.e. ‘probable version’). Note that each project version must correspond to one of three estimates and these project versions must be saved to disk (i.e. to selected Storage folder).
2. Decide which parameters are important for the project and calculate corresponding probabilities of compliance with
one or several goals: target activities and phases finish dates; target costs of activities, phases and resources assignments; target consumption (expenditure) of materials, cost components, material and cost centers. Success probabilities calculation is recommended to perform in one of project versions (either of optimistic, probable or optimistic). Note that you should save project after success probabilities calculation for further creation of trends. 1) In frame Versions of success probability calculation dialog window specify actual project versions corresponding
to pessimistic, probable and optimistic estimates. 2) Calculation of probability of compliance with target activities and phases finish dates:
a. In Activity Gantt table set target activity or phase finish date in column Finish [Target]. To display this column choose Show Column from the shortcut menu invoked with right mouse button click on column names in table part of diagram; check box Standard, select Finish [Target] and Finish [Target Probability] with left mouse button from the list and press OK.
b. Go to menu Calculations -> Success Probability Calculation. c. Check box Duration in Analyzed Parameters frame of opened success probability calculation dialog
window. d. Press OK button.

Risk Analysis
180
e. Calculated value will appear in Finish [Target Probability] column of Activity Gantt table in row corresponding to activity or phase.
3) Calculation of probability of compliance with target activities and phases costs: a. In Activity Gantt table set target activity or phase costs in column Total Cost [Target].
To display this column choose Show Column from the shortcut menu invoked with right mouse button click on column names in table part of diagram; check box Standard, select Total Cost [Target] and Total Cost [Probability] with left mouse button from the list and press OK.
b. Go to menu Calculations -> Success Probability Calculation. c. Check box Cost in Analyzed Parameters frame of opened success probability calculation dialog window. d. Press OK button. e. Calculated value will appear in Total Cost [Probability] column of Activity Gantt table in row
corresponding to activity or phase. 4) Calculation of probability of compliance with target consumption of materials, cost components, material and cost
centers: a. In Activity Gantt table set values of target consumption of materials, cost components, material and cost
centers in corresponding columns: Material_Name [Target], Cost Component_Name [Target], Material Center_Name [Target] and Cost Center_Name [Target]. (Column name is formed from the name of material/cost component/material center/cost center and [Target]) To display these columns choose Show Column from the shortcut menu invoked with right mouse button click on column names in table part of diagram; check box Materials and box Target, select with left mouse needed materials from the list, and press OK. Repeat these actions display columns of target consumption for cost components (check box Cost Components and box Target), material centers (check box Material Centers and box Target) and cost centers (check box Cost Centers and box Target). Then display columns of probabilities for all required materials, cost components, material and cost centers: repeat the same actions as described above, checking box Probability (instead of Target).
b. Go to menu Calculations -> Success Probability Calculation. c. Check box Materials (Cost Components, Material Centers, or Cost Centers) in Analyzed Parameters
frame of opened success probability calculation dialog window. d. Press OK button. e. Calculated value will appear in [Probability] columns of Activity Gantt table (e.g., Material_Name
[Probability], Cost Center_Name [Probability]) 3. As the project progresses and performance data is added to monitoring, probabilities of compliance with target project
goals would change. Therefore, you need to recalculate success probabilities each time performance data has been added. 1) Add performance data to one of three project versions (either of optimistic, probable or pessimistic). Save this
project file with a new version number; 2) Import performance data from the version with actual data (selected on the previous step) to other two project
versions: a. Open Performance archive in project version to which performance data is to be imported; b. Goto menu Table -> Import Performance from other Project; c. Specify source project file (selected on step ‘3.1)’) and press OK;
d. Recalculate project expenditures by clicking Cost and Materials icon on the Gantt diagram toolbar. e. Save project file with a new version number. f. Repeat steps a-d for the third project version
3) To recalculate probabilities repeat step ‘2’. Perform recalculation in project version, selected on step ‘2’. 4. Building of success probabilities trends:
1) In Activity Gantt menu select Reports -> Success Probabilities Trends -> Table Report or Diagram; 2) In opened dialog window select group of parameters for report: General (Total Cost, Finish), or Cost Components,
or Cost Centers, or Materials, or Material Centers. Then select one or several items in the group with left mouse button click and press >>. Selected items would appear in the right window of dialog window.
3) Press OK.

Risk Analysis
181
26.3. Success Probability Calculation Dialog Window
You can set options for probability calculation of compliance with:
- Activities and phases target finish dates; - Target total costs of activities and phases, and resources assignments; - Materials consumption (individual materials and material centers); cost components expenditures (individual cost
components and cost centers). Frame Versions contain information about Optimistic, Probable and Pessimistic project versions. You can edit data on each version name, code and storage folder name: press Select button and select appropriate project version in opened projects and documents dialog window. Note that optimistic, probable and pessimistic project versions must already exist and be saved. Frame Apply to lets you choose which parameters would participate in success probability calculation (you can check several boxes): Duration, Cost, Materials, Cost Components, Material Centers, Cost Centers, Material Sets and User Fields. To add materials, cost components, material centers and cost centers to success probability calculation: Choose the elements corresponding to needed object type (under buttons Add and Delete): Materials, Cost Components, Material Centers, Cost Centers, Material Sets and User Fields.
1. Selecting object type in checkbox filters list of existing items according to this object type. 2. Use Add button to include the elements to the list. 3. Highlight all the objects to be added from the list, in the opened dialog window with left mouse button and
press OK. You can enable or disable calculation of critical costs for each cost type during success probability calculation: check or uncheck appropriate box in the upper part of the frame Apply to.
You can calculate probabilities of compliance with established project finish date, budget, consumption of materials, cost components, material centers and cost centers. To calculate probability:
1. Press Select Parameter button in Project Parameter Probability frame and specify needed item in opened fields' list dialog window;
2. Enter Parameter Value; 3. Press Calculate Probability.

Risk Analysis
182
Checking box Show this window before success probability calculation (enabled by default) will display current window, each time when success probability calculation will be performed.

Monitoring of Project Execution
183
27. Monitoring of Project Execution
27.1. Monitoring Project Performance Project performance is controlled by analyzing data containing:
- Actual material consumption and actual cost components expenditure;
- Volumes performed and work duration passed.
Performance data is included in Monitoring table where it can be edited and then transferred into project’s Performance Archive. Thus, Monitoring Table is used as a temporary storage for performance data as a tool for editing data prior to transfer into project database. No performance data will influence overall project data unless it is transferred to Performance Archive. That is why you can enter performance data several times to Monitoring Table (e.g. each day), collect it, edit, verify and only then (e.g. at the end of the week) transfer to Performance Archive.
Entering performance data into Monitoring Table
You can enter actual performance data into Monitoring table in either of two ways:
1. In activity gantt:
- Select phase(s) or individual activities (for which you would like to enter performance data.
- Invoke row shortcut menu and select Monitoring item.
- You would be prompted to specify beginning and ending of monitoring period for activities/phases being added in the dialog window of including activities to monitoring or dialog window of including phases to monitoring. These dates will be set for all selected activities/phases and you can later specify exact periods of individual activities/phases (in case some of them differ from the period of the group of activities/phases being added) in Monitoring Table. To complete editing these dialog windows press OK button.
- Monitoring table will be opened and selected activities/phases would appear in the table with corresponding WBS structure.
2. In Monitoring table:
- Goto menu Monitoring -> Add activities or press Add activities button on the toolbar;
- You would be prompted to specify beginning and ending of monitoring period for activities/phases being added – as described earlier. Complete editing dialog windows of including activities/phases to monitoring and press OK button.
- Monitoring table will be opened and selected activities/phases would appear in the table with corresponding WBS structure.
Note That: you can use both of the methods described to enter performance data into Monitoring table before the data is transferred to Performance Archive.
Correction of performance data in Monitoring Table
After selected activities/phases are entered in Monitoring Table, Spider Project automatically calculates data for specified monitoring period (material consumption, cost components expenditure, activity volumes performed and work duration passed) according to the scheduled values.
If the project is being performed in accordance with the schedule, performance data can be transferred from Monitoring table
to Performance Archive with no changes. To do so in Monitoring table, click Transfer into Project button on the toolbar or select Monitoring ->Transfer into Project menu. All transferred data will disappear from Monitoring table.
Note That: it is essential to manually recalculate the project after data transfer to Performance Archive
If actual performance data differs from the scheduled, you can edit performance data directly in the table or in corresponding dialog windows (that can be invoked with double click on phases, activities or assignments). For more information see detailed description of Monitoring table. To quickly edit performance data in the table format do the following:
1. For each activity, enter monitoring period start and finish dates. If these dates are missing, activity will not be included in Performance Archive.
To simplify monitoring data entry, performed volumes and spent activity durations are automatically recalculated after monitoring period start and finish dates are entered into Period Start and Period Finish columns.

Monitoring of Project Execution
184
2. Check and update when necessary:
- Performed activity volumes in Volume [Done] column. When performed activity volume changes, spent and remaining activity durations (Duration [Spent] and Duration [Remaining] columns), cost components expenditures and material consumptions, including fixed, are recalculated in Monitoring table.
- Remaining activity duration in Duration [Spent] column. When spent activity duration changes, resource work time, cost components expenditures, and material consumptions, including fixed, are recalculated in Monitoring table.
- Cost components expenditures and material consumptions.
Follow the steps of monitoring data entry for all resources assigned to activities. This data needs to be entered into separate rows of Monitoring table.
If Period Start and Period Finish fields are left empty, it is considered that resource did not work on activity.
Monitoring data for activities and resource assignments can be entered separately in Monitoring table. If you enter activity data, then duration, volume, material consumption, and costs will be calculated for assignments. And vice versa: if monitoring data was entered for assignments, activity duration, volume, material consumptions, and costs will be calculated.
Person responsible for performing activities can be mentioned during monitoring data entry. If there are several persons, separate their name with commas. New data will be included to Performance Archive table.
Transfer performance data to Performance Archive
After you finished entering monitoring data, save it to the project database by clicking Transfer into Project icon or select menu item Monitoring -> Transfer into Project.
Then recalculate project schedule and expenditures by clicking the following icons on Gantt diagram toolbar in the following order:
- Scheduling or Resource Constrained Scheduling; and
- Cost and Materials.
After performance data from Monitoring table is transferred to Performance Archive appearance of activity gantt diagram changes: parts of activities, phases and assignments bars, corresponding to completed parts of work, would be highlighted grey. Project data date would become equal to the ending of monitoring period.
27.2. Monitoring
27.2.1. Monitoring Table
Monitoring Table is aimed to enter data on project performance. To open the table in main program window or on the toolbox in the left area of other opened windows press Monitoring icon; or goto menu Project -> Monitoring.
Monitoring Table presents activity structure with resources assignments and contains following columns:
- Level – object level in WBS; - Code – code of activity to which current assignment was made; or code of resource, assigned to activity; - Name – name of activity to which current assignment was made; or name of resource, assigned to activity; - Start of Period – defines the start date of the period for which performance data is added to monitoring; - Finish of Period – defines the end of the period for which performance data is added to monitoring; - Responsible – person, responsible for execution of the activity; - DPH Type - defines DPH type of activity or assignment – duration, productivity, hammock or milestone. - Volume [Before] – scheduled activity volume or part of activity volume to be performed by the resource assigned; - Volume [Done] – actual work volume performed (in corresponding units) or part of activity volume performed by the
resource (team, multi-resource or resource skill); - Volume [Remaining] - remaining activity volume or part of activity volume to be performed by the resource. - Duration [Before] – scheduled activity duration or resource work duration; - Duration [Spent] – actual activity duration or resource work duration passed;
Monitoring of Project Execution
185
- Duration [Remaining] - remaining activity duration or resource work duration; - Quantity [Actual] – number of resources, actually participated in activity execution; - Resource-Hours [Done] – actual volume of resource-hours. `Assignment resource-hours’ can be calculated as
assignment duration multiplied by resource work load and multiplied by the number of assigned resources. `Activity resource-hours’ can be calculated as sum of all corresponding assignments’ resource-hours.
- Work Load [Actual] – actual work load of assigned resources in percent of their working time. - Fields with actual, scheduled and remaining consumption of all materials and expenditures of cost components:
- [Before] – scheduled quantity of material consumption or cost component expenditure; - [Consumed by Period] – actual total quantity of material or amount of cost component spent; - [Fixed Before] - scheduled fixed material consumption or cost component expenditure; - [Fixed by Period] - actual quantity of fixed material consumption or fixed cost component expenditure. Note
that fixed consumption is part of total consumption (i.e. [Consumed by Period]) and therefore cannot exceed it;
- [Fixed Remaining] – remaining part of fixed material consumption or cost component expenditure.
There are two ways of including project performance data in the Monitoring Table:
I. In activity gantt: 1) Select required phase or activity with a left mouse button click on corresponding row number. To select
several phases or activities press and hold Ctrl button and select required phases (or activities). Note that you can select only activities or only phases at ones.
2) Invoke shortcut menu with a right mouse button click on one of the selected phases (activities) row number; select Monitoring;
3) Specify period for monitoring in opened dialog window `Include in monitoring (fields From and To); press OK.
4) Selected phases and activities would be added to the Monitoring Table and current work breakdown structure would be preserved.
II. In the Monitoring Table:
1) Press Add Activities button on the toolbar or goto menu Monitoring -> Add Activities or press button in tools bar;
2) Specify period for monitoring in opened include in monitoring dialog window (fields From and To); 3) Specify in frame Include Activities whether all incomplete activities (All) or only scheduled activities
(Scheduled) should be added and press OK. 4) Phases and activities would be added to the Monitoring Table and current work breakdown structure
would be preserved. To remove phases or activities with corresponding assignments from the Monitoring Table invoke shortcut menu on corresponding phase (activity) row number and select Exclude.
To edit actual performance data (e.g., consumption of materials and expenditure of cost components; monitoring period) in actual period properties dialog window double click on corresponding row number, or invoke shortcut menu (with a right mouse button click on row number) and choose Properties.
Performance data can also be edited directly in corresponding fields of the Monitoring Table. In this case, it is strongly recommended to change data in table rows from the left to the right to enable automatic recalculation of remaining activities durations, material consumption, cost components expenditures etc.
To include performance data into the project press button Transfer into Project on the toolbar or goto menu Monitoring -> Transfer into Project. All data from the Monitoring Table would be transferred to Performance Archive; completed activities and completed parts of activities would be pained grey in activity gantt. Project data date would be set to the latest date of actual activities start or finish.
After including performance data it is necessary to recalculate project schedule: activate activity gantt window, press
Scheduling or Resource Constrained Scheduling button on the toolbar; then press Cost and Materials button.

Monitoring of Project Execution
186
27.2.2. Add Phase to Monitoring Table (Include in Monitoring) Dialog Window
Allows including phases (and comprising activities) into Monitoring table. Phases and activities that are active during the monitoring period will be included. To invoke, select Monitoring from Phase shortcut menu () activity gantt.
Note That: For activity, Include in Monitoring - Activity - dialog window will be invoked.
Set up monitoring period in From and To fields. Click Project Data Date button to set up From field equaling to the current project time. Double click in the fields invokes Mini-calendar dialog window to simplify date and time entry.
In Include Activities frame, select Scheduled if only phases and activities either started or scheduled to start during the monitoring period need to be included. If you want to include all activities in Monitoring table, select All.
In case All option is selected, activities started after the end of monitoring period might be reflected two ways:
1. Start of Period and Finish of Period field are left empty. Click Leave dates blank in Unscheduled Activities frame; or
2. Start of Period date equals to From field value, and Finish of Period depends on whether the scheduled activity duration is longer than the monitoring period. If it is, then Finish of Period equals to To field value. If scheduled activity duration is not longer than the monitoring period, than Finish of Period date will equal to activity finish date, and executed value is set up as 100%. Select Assume that activities start during period being monitored option in that case.
Select Show assignments option to expand Monitoring table to assignments.
27.2.3. Include in Monitoring (Add Activities to Monitoring Table) Dialog Window

Monitoring of Project Execution
187
Dialog window of including activities to Monitoring table allows setting up Monitoring period of activity performance. To invoke, select Monitoring from Activity shortcut menu in activity gantt.
Note That: For phase being included to monitoring, Include Phases in Monitoring dialog window will be invoked.
Set up monitoring Period in From and To fields. Click Project Data Date button to set up From field equaling to the current project time. Double click in the fields invokes Mini-calendar dialog window to simplify date and time entry.
In Include Activities field can be choosed to include only Scheduled activities which are performed or started by the end of the monitoring period or All. If All option is selected then Unscheduled Activities frame will be activated and Leave dates blank or Assume that activities start during period being monitored options will be available to be chosen.
Select Show assignments option to expand Monitoring table to assignments.
27.2.4. Activity Monitoring Dialog Window
Allows editing activity monitoring data and contains the following pages: Data; Assignments; Materials standard page; Cost Components standard page and Material Sets standard page
Data page
Activity is name of activity being monitored.
Responsible is person responsible for activity performance.
Start and Finish are start and finish dates of monitoring period. Double click in the fields invokes Mini-calendar dialog window to simplify date and time entry.
Volume frame
- Before is scheduled activity volume.
- Done is volume of activity performed.
- Remaining is remaining activity volume.
Duration frame
- Before is scheduled activity duration.
- Done is actual activity duration.
- Remaining is remaining activity duration.
Assignments page
Use this page to assign resources, multi-resources, skills, and teams to perform the activity, which were not initially scheduled.

Monitoring of Project Execution
188
Add frame
Resource button assigns new resource to activity. Select resource from the dialog window invoked and click OK to return to Assignments page.
Multi-Resource button assigns new multi-resource to activity. Select multi-resource from the dialog window invoked and click OK to return to Assignments page.
Resource Skill button assigns a new resource skill to the activity. Select a resource skill from the dialog window invoked and click OK to return back to Assignments page.
Team button assigns new resource team to activity. Team Monitoring dialog window is invoked by clicking this button.
Properties button is active for resources only. Clicking this button invokes Monitoring Assignment of resource dialog
window. Multi-Resource and Resource Skills properties are set up through setting up properties of resources included.
Types and number of fields with assignment parameters vary depending on the type of highlighted assignment: resource, multi-resource, skill, or team, as follows:
- Resource: Quantity, Productivity, Priority, Work Load, Type, Scheduled Quantity, Calendar, Fixed Cost, Resource-Hours, and Remaining Cost.
- Multi-resource: Quantity, Productivity, Priority, Work Load, Type, and Scheduled Quantity.
- Skill: Type and Quantity.
- Team: Duration and Volume.
(User-editable fields are shown here in blue).
Delete deletes highlighted assignment.
27.2.5. Resource Assignment Monitoring Dialog Window
Is dialog window for editing monitoring data for resource assignment. Contains the following pages: Data; Materials standard page Cost Components standard page, and Material Sets standard page
Data page - Activity is name of activity being monitored.
- Resource is name of resource assigned to activity
- Responsible is a person responsible for activity performance.
- Start and Finish are start and finish dates of the period for which monitoring is performed. Double click in the fields invokes Mini-calendar dialog window to simplify date and time entry.

Monitoring of Project Execution
189
Volume frame
Before is scheduled volume of resource work.
Done is performed volume of resource work.
Remaining is remaining volume of resource work.
Duration frame
Before is scheduled duration of resource work.
Done is performed duration of resource work.
Remaining is remaining duration of resource work.
Quantity frame
Scheduled is a scheduled quantity of the resource assigned.
Actual is actual quantity of the resource performing this activity.
Work load frame
Scheduled is a scheduled work load of the resource assigned.
Actual is actual work load of the resource performing this activity.
Productivity frame
Scheduled is a scheduled productivity of the resource assigned.
Actual is actual productivity of the resource performing this activity.
Resource-hours are actual hours of work of the resource for this assignment.
27.3. Team Assignment Monitoring Dialog Window
You can view and edit performance data of a team assigned to activity execution in this dialog window. Title of dialog window window contains team name and the name of activity, to which the team was assigned. Page Data Activity – name and code of activity, to which the team was assigned; Team – name and code of assigned team; Responsible – name of person responsible for activity execution; Start; Finish – beginning and ending of monitored period (for which performance data is entered). You can edit dates in these fields directly (click once with left mouse button, enter date and time in the following format: ‘DD.MM.YYYY
Monitoring of Project Execution
190
HH.SS’ and press Enter) or double click on the cell and select required date and time in opened calendar window. Example of date and time cell value: 13.03.2003 08:00.
Frame Volume: Before – scheduled part of activity volume (in activity volume units), that the team is assigned to perform (prior to the Start date of monitoring period); Done – actual volume of activity that the team performed during the monitored period. By default, part of activity volume, scheduled for the team for monitored period, is displayed in this field. You can correct this value according to actual volume, performed by the team. Remaining - remaining part of activity volume (in activity volume units). By default, part of activity volume, remaining after the monitored period, is displayed in this field. You can correct this value according to actually remaining volume that the team would have to perform. Frame Duration: Before – scheduled time (in hours) that the team is assigned to spend on activity execution (prior to theStart date of monitored period); Done – actual resource-hours, spent by the team on activity execution. Note that the value of actual resource-hours participate in automatic calculation of assignments’ cost (e.g. resources that consume materials per hour of their work or spend cost components per hour of their work). By default, scheduled duration of team work for monitored period is displayed in this field. You can correct this value according to actual resource-hours, spent by the team on activity execution. Remaining - remaining duration of team work in hours. By default, scheduled duration of remaining team work is displayed in this field. You can correct this value according to actually remaining duration of team work in hours.
Page Assignments Page Assignments contains a list of resources, multi-resources and resource skills – assigned to activity execution as part of current team. You can view and edit properties of monitored resources assignment (also for resources comprising multi-resources and resource skills): select required resource from the list and press Properties button. To delete resource, multi-resource or resource skill assignments from monitoring (e.g. excluding resources that have not actually participated in activity execution during monitored period) – select required object and press Delete button. Note that deleted objects are excluded from current monitored period only. Dialog window contains buttons OK, Cancel, Apply and Help:
- OK – applies changes made and closes dialog window; - Cancel – allows to discard changes and close dialog window; - Apply - applies changes made and leaves dialog window opened; it is useful if changes to several object are to be made; - Help – displays current object help window.
27.4. Performance Archive
27.4.1. Performance Archive
Performance Archive contains records of project performance, added to monitoring. Performance Archive serves for analysis and correction of performance data. Note that after entering data directly in Performance Archive, remaining work volumes and activity durations are not recalculated automatically. Performance Archive table contains following columns (fields):
- Code of Activity – code of activity to which current assignment was made; - Code of Resource – code of resource, assigned to activity; - Name of Activity – name of activity to which current assignment was made; - Name of Resource – name of resource, assigned to activity;

Monitoring of Project Execution
191
- Folder - full path to attached folder, that may be used to store files with referential information for current object. Double click on the cell in this column allows defining the folder path or open the folder (if its path has already been defined).
- OLE objects; icon defines whether documents of other applications (Word, Excel etc.) are attached to the object. Double click on this field opens actual period properties dialog window on OLE objects and Folder page.
- Notes - A field that lets users to provide an assignment with notes and explanations. Double click on this field opens actual period properties dialog window on Notes page.
- Start of Period – beginning of time period, for which performance data has been added to monitoring; - Finish of Period – ending of time period, for which performance data has been added to monitoring; - Volume [Actual] – actual work volume performed (in corresponding units); - Duration, Hours [Actual] – actual duration of work performed (in hours); - Resource-Hours [Actual] – actual volume of resource-hours. ‘Assignment resource-hours’ can be calculated as
assignment duration multiplied by resource work load and multiplied by the number of assigned resources. ‘Activity resource-hours’ can be calculated as sum of all corresponding assignments’ resource-hours.
- Work Load [Actual] – actual work load of assigned resources in percent of their working time. - Quantity [Actual] – number of resources, actually participated in activity execution; - User defined fields. - Fields with actual fixed and total consumption of all materials (and material centers) and expenditures of cost
components (and cost centers). Rows (records) of Performance Archive table represent entered performance data on activities and corresponding resource assignments. Data on activities and assignments is added each time, as performance data is added in monitoring table. See general description of tables in Spider Project for common rules of working with tables. You can import performance data from another project to Performance Archive: go to the menu Table -> Import Performance from other Project, and specify source project (see Importing Performance Data from another Project. Shortcut menu for table rows contains following options:
- Properties – to view or edit properties of selected object; - Delete - deletes current object from the project.
To delete row from Performance Archive: select desired row with left mouse button click and press Delete button, or invoke shortcut menu and choose Delete, or select menu item Edit -> Delete. To delete several rows select desired rows with left mouse button clicks (keeping Ctrl button pressed) first, then perform one of the actions, described above for deleting of single row. Note that: deleting of row with data on activity performance would also delete data on corresponding resource assignments. Planned activity characteristics would not be restored automatically after deletion of data from Performance Archive; you should restore them manually. To edit actual consumption of materials and expenditure of cost components in actual period properties dialog window double click on corresponding row number, or invoke shortcut menu and choose Properties.
27.4.2. Actual Period Properties Dialog Window
Is dialog window with the following pages: Data, Materials standard page, and Cost components standard page, notes standard page OLE-objects and Folder standard page and Material Sets standard page Allows editing activity properties in Performance archive.
Monitoring data can be for activity or for assignment. Therefore, a row in Performance archive table might contain either activity or assignment. Actual period properties dialog window varies depending on whether it was activity or assignment.

Monitoring of Project Execution
192
This dialog window is invoked with double click on activity row number or by evoking shortcut menu with the right mouse click on row number.
Data page
- Activity contains activity name.
If the dialog window is invoked for resource assignment following additional fields will appear:
- Resource – the name of resource assigned to activity execution
- Quantity – actual quantity of resource, that performed activity
- Work load – actual work load coefficient
- Responsible is editable field with name of the person responsible for this activity performance.
- Start, Finish – start and finish date of monitored period
- Actual Volume – actual volume performed (in corresponding units)
- Actual Duration – actual duration of activity/assignment passed (in hours)
27.4.3. Import Performance Data from Another Project You can import data on project performance from another project version, already containing this data. This option is useful in risk analysis: you can enter performance data (in Monitoring Table) in one of the three created project versions (i.e. optimistic, most probable and pessimistic) and then import data to other versions. To import performance data from another project version:
1. Open Performance Archive by double click on its icon in the main program window or on the toolbar in left part of opened project data windows (e.g., Activity Gantt, Resource Gantt, etc.)
2. Goto menu Table -> Import Performance from other Project; 3. In opened projects and documents dialog window select project version, containing performance data to import; 4. Press OK.
5. Recalculate project expenditures by clicking Cost and Materials icon on the Gantt diagram toolbar. Note that import of performance data is executed with following peculiarities:
- If source project version (from which performance data is imported) has resource assignments, initially absent in destination project version (to which performance data is imported) – these assignments would be automatically added to destination project version;
- Performance data cannot be imported for resources, initially absent in destination project version;

Monitoring of Project Execution
193
- If source project version has activities, initially absent in destination project version – these activities would be automatically added to newly created phase ‘Unscheduled activities’ (with Code ‘$$$’) in all work breakdown structures of destination project version. Links of these activities would not be imported.
During performance archive import from another project, success probability trends are also imported. Note that: While importing performance, if in the imported performance archive there are resources which have not been assigned on activities in the initial project, the program will automatically add corresponding assignments in the project to which the monitoring information is imported. Note that: if in the project, there is no operation from imported performance archive while importing monitoring information it will be created and placed in a phase "Off-schedule activities" in each project WBS. Note that: after importing monitoring information, it is necessary to check up in project properties dialog window concurrence of current time in both projects (in initial and in imported).
27.4.4. Update Actual Material Consumption in Performance Archive To update actual material consumption in performance archive:
1. In Performance Archive table, invoke Actual Period properties dialog window by one of the following methods:
- Double click row number; or
- Invoke shortcut menu with the right mouse button click on row number and select Properties.
2. Open Materials page.
3. Click Add button to invoke Materials dialog window containing list of all materials available. Select one or several materials from the list and click OK. You will be returned to Materials page. Update the following properties for material(s) consumption in the bottom of the page:
- Overall Consumption is actual material consumption; and
- Including Fixed is fixed part of actual material consumption.
4. Click OK.
Alternatively, material consumption can be updated directly in cells of Performance Archive table. To perform this, double click a corresponding cell, edit contents, and press Enter key on the keyboard. To find the cell to make the change, find it on crossing of the column corresponding to material being updated and of the row corresponding to activity or assignment this material is assigned to. Note that there are two columns for each material: ‘Material Name [Actual]’ is total actual material consumption for this material, and ‘Material Name [Fixed Actual]’ is fixed consumption of this material and is part of actual consumption.
27.4.5. Update Actual Cost Component Expenditure in Performance Archive To update actual cost component expenditure on activity or assignment in Performance Archive table:
31. In Performance Archive table invoke Actual Period properties dialog window with one of the following methods:
- Double click on row number; or
- Invoke shortcut menu with the right mouse button click on row number and select Properties.
32. Open Cost components page.
33. Click Add and select cost component from the invoked Cost components dialog window containing list of all cost components available. Select one or several cost components from the list and click OK. You will be returned to Cost components page. Update the following properties for cost component(s) consumption in the bottom of the page:
- Overall Consumption is actual cost component expenditure; and
- Including Fixed is fixed part of actual cost component expenditure.
34. Click OK.
Alternatively, cost component expenditure can be updated directly in cells of Performance Archive table. To perform this, double click a corresponding cell, edit contents, and press Enter key on the keyboard. To find the cell to make the change, find it on crossing of the column corresponding to cost component being updated and of the row corresponding to activity or

Monitoring of Project Execution
194
assignment this cost component is assigned to. Note that there are two columns for each cost component: ‘Cost component Name [Actual]’ is total actual cost component expenditure and ‘Cost component Name [Fixed Actual]’ is fixed expenditure of this cost component and is part of actual expenditure.

Documents, Tables and Reference-Books
195
28. Documents, Tables and Reference-Books
28.1. Notes Standard Page
Allows to type in any notes or other texts to be attached to the object. Type the text in Notes text field.
28.2. Documents
28.2.1. Working with Documents Documents contain structured information that can be used in projects, e.g. estimates, materials requirements, resources productivities. Opened documents are listed in right area of main program window, named «Documents».
Every document has a document main menu and tools panel. Documents can belong to one of following groups:
- General document or reference-book; - Reports; - Reference-books: Reference books can be as following: - Materials, - Resources, - Cost Components, - Activities, - Resource Assignments, - Resource Skill Assignments, - Multi-resource Assignments, - Team Assignments, - Resource assignment productivities, - Resource assignment work loads, - Multi-Resource Assignment productivities, - Multi-Resource Assignment work loads, - Resource Production,

Documents, Tables and Reference-Books
196
- Activity cost and material requirements (fixed per volume), - Activity cost and material requirements (per volume unit), - Activity cost and material requirements (per hour), - Resource assignments cost and material requirements (fixed per volume), - Resource assignments cost and material requirements (fixed per quantity), - Resource assignments cost and material requirements (per volume unit), - Resource assignments cost and material requirements (per hour), - Resource skills, - Multi-resources, - Cost Component Periods, - Material Periods, - Resource Periods, - Weeks, - Calendar Exceptions, - Calendars, - Material Centers, - Cost Centers, - Cost Centers, - Material Sets, - Overtime, - Users, - Access Rights, - Links, - Corporate Reference-books, - Scripts, - Filters, - Formulae, - Print Templates, - Report Templates, - Eva Report Templates, - Trend Report Templates, - Variance Report Templates, - Signals, - User Fields,
Values of Enumerated Fields Each document can be viewed or edited in table format. You can also transfer data from document to project or another document. Each document is presented in the form of a table. It is possible to transfer data, to a key field, or to transfer fields. Key and transfer fields can be set in data transfer dialog window, and in column options for transfer data dialog window where it is necessary to specify, to which fields to transfer data: to key fields or to transfer fields.
Note That: In Spider Project Software, there is also a document of a seperate type, called monitoring document exists. As the given document is created after distributing monitoring data in the form of documents, type of such document is determined automatically and to change it is not possible.

Documents, Tables and Reference-Books
197
Shortcut menu of a document row consists of following items: Properties – invokes object properties dialog window to edit its characteristics (this item is available only in refrence-book shortcut menus). Row Color – invokes object color dialog window to change row colors in document. New – creates a new object. Delete – deletes object from document.
It is possible to cancel the executed actions– see. Protocol of actions. Shortcut menu of a group of rows contains: Row Color and Delete.
28.2.2. General Document
Document containing general or custom information can be created from the main program window menu File -> Create Document –> New.
Document properties dialog window will be invoked. By default, single No Name field is created in the new document and is considered a key field. General document type is General document or reference-book. Any project report has the same type.
You can add new columns to the document (working with tables), change their properties (see Dialog window of column properties, Dialog window of user-defined fields (advanced) ), and export data from general document to any project table.
28.2.3. Create Reference-book from Project Table You can create reference-books from all project tables (except Assignments Table, Links Table, Monitoring Table and Performance Archive). To create reference-book select item Table from table menu and choose Copy as a new Document. Icon of newly created reference-book would appear in right area (Documents) of program main window All data from corresponding table is copied to new reference-book (even if filters have been applied). Field Code is a key field in data transfer.
28.2.4. Open a Document To open a document:
1. Invoke projects and documents dialog window either by clicking Open icon on main program window toolbar, or by selecting Open from Project menu in main program window or by pressing F12 hot key from keyboard.
2. Select Documents option from top left frame.
3. Select Storage where document is filed.
4. Select document Code/Name and then Version/Date.
5. Click Open. When document is open, its name and icon are shown in the right part of main program window
Note That:: You cannot open document twice. If an already opened document will be attempted to open again "A project or document with this code and version is already open" error message will appear.
28.2.5. Create New Document
To create a new document:
1. In the main program window, select Create Document –> New from File menu.
2. In the invoked document properties dialog window, set up new document’s properties, such as Code, Version, Storage, Name, Type, and Notes. By default, document will have the code ‘New’, the version "1", and the name "No Name", in addition to its type "General document or reference- book".
3. Click OK. Document icon/name will appear in the left part of main program window, the document becomes highlighted and its window becomes active.

Documents, Tables and Reference-Books
198
From the drop down menu you can select the type of the created document. General document or reference-book is set by default.
Columns Options for Transfer Data button invokes data transfer options dialog window.
28.2.6. Save Document Documents can be saved within their windows or in main program window.
To save document within its window, select Save from Document menu or click Save icon on the toolbar or use hot key (Ctrl + S).
To save document in main program window, invoke document shortcut menu right clicking on document’s icon/name in the left part of main program window, and select Save.
Document will be saved without any changes on its code or version number.
28.2.7. Document Properties Dialog Window
You can view or edit following document properties in this window: Name, Code (document must have fields with unique codes), Version, Notes and Type. Field Storage displays current document storage name Document Type can be selected from the drop-down list:
- General document or reference-book - Materials, - Resources, - Cost Components, - Activities, - Resource Assignments, - Resource Skill Assignments, - Multi-resource Assignments, - Team Assignments, - Resource assignment productivities, - Resource assignment work loads, - Multi-Resource Assignment productivities, - Multi-Resource Assignment work loads, - Resource Production, - Activity cost and material requirements (fixed per volume), - Activity cost and material requirements (per volume unit), - Activity cost and material requirements (per hour), - Resource assignments cost and material requirements (fixed per volume),

Documents, Tables and Reference-Books
199
- Resource assignments cost and material requirements (fixed per quantity), - Resource assignments cost and material requirements (per volume unit), - Resource assignments cost and material requirements (per hour), - Resource skills, - Multi-resources, - Cost Component Periods, - Material Periods, - Resource Periods, - Weeks, - Calendar Exceptions, - Calendars, - Material Centers, - Cost Centers, - Cost Centers, - Material Sets, - Overtime, - Users, - Access Rights, - Links, - Corporate Reference-books, - Scripts, - Filters, - Formulae, - Print Templates, - Report Templates, - Eva Report Templates, - Trend Report Templates, - Variance Report Templates, - Signals, - User Fields,
Values of Enumerated Fields
Note That: In Spider Project Software, there is also a document of a separate type, called monitoring document exists. As the given document is created after distributing monitoring data in the form of documents, type of such document is determined automatically and to change it is not possible. Column Options for Transfer Data opens a transfer settings dialog window in which it is possible to set, on what fields data transfer is carried out, to change codes of transferable fields in the target table and others. In some reference-books transfer data settings dialog windows have different appearance: «Links», «Assignments», «Multi-resource Assignments», «Resource Skill Assignments», «Team Assignments», «Values of enumerated fields». In Storage field the storage, where document is kept, is shown.
28.2.8. Document Shortcut Menu Is invoked from main program window with the right mouse button click on document name/icon in the right part of the window and contains the following options:

Documents, Tables and Reference-Books
200
- Properties invokes document properties dialog window to set up or edit document Code, Version, Storage, Name, Type, and Notes.
- Open opens document.
- Save allows saving active document.
- Save As saves document with changes in project code and/or version number by evoking projects and documents dialog window.
- Close closes active document.
28.2.9. Data Transfer between Documents Data from the document or reference-book can be transferred to any projects and documents, and also into columns of projects and documents.
Data transfer can be made from the document, from its visible parts or from selected rows.
As a rule, data transfer is carried out through a key field which can only be one in the document. But in some documents the key field is absent (such documents are, for example, periods reference-books, links reference-books, general reference-books and others) and data transfer is carried out at once on several fields - on connecting to fields.
If transfer is carried out through a key field in the document or project table where data are transferred, there should be a field, whose code coincides with the code of initial document’s key field. Value of this field also should coincide with value of initial document’s key field.
If in the initial document key field is not set, in column options for transfer data dialog window it is necessary to include the corresponding option. Besides for all document columns, from which data should be transferred, the option To use should be included at carry in the same dialogue window.
Field codes of initial document, whose values are transferred, should coincide with field codes of the new document or project table.
For data transfer choose item Transfer -> Transfer Data in the main menu of document or reference-book. In the opened data transfer dialog window it is necessary to set the necessary parameters and press ОК. Data will be transferred.
Note That: If in Transfer to framework options Selected projects or Selected documents are chosen, data will be transferred into lines of chosen projects tables or into lines of chosen documents.
If Columns of selected documents option will be chosen, transferable lines of the initial document will be added into the right part of the new document.
28.2.10. Data Transfer Options Dialog Window

Documents, Tables and Reference-Books
201
Sets up properties for data transfer and contains the following options:
Document field shows the name of the document.
Transfer to; field reflects; where to, the data will be transferred.
- Selected projects,
- Selected Documents,
- Columns of selected project tables,
- and Columns of selected documents are available options.
Method of data transfer
- Just transfer data to existing rows; means that new rows will not be created;
- If row does not exist - create a new one; means that if in the resulting document one of key type lines is missing, a row will be added to copy corresponding original document row.
What to transfer field defines the elements to be transferred such like:
- Whole document; transfers the whole document without any exceptions
- Filtered data only; transfers the elements which are still remaining after filtering. A filter must be realized to make this option available.
- Selected data only; transfers only previously selected field(s)
Column type; in this field depending on the transferred values the types of created columns are assigned. Numerical, Text or Data-Time.
Fields used to link
- Transfer by key field
- Transfer by key fields for transfer data
With pressing button Columns Options for Transfer Data; Columns options for data transfer window will be invoked to edit the necessary parameters of the transfer of data from the documents and the reference-books.
28.3. Tables
28.3.1. Working with Tables There are common approaches to working with tables, documents and reference-books. Table rows correspond to objects and columns – to their fields (for example, in the activities table each line corresponds to an activity, and each column - to any field of activity). Tables are split into two parts. Therefore, you can scroll columns in each part independently. This is useful for large tables. Note that a field can be displayed only in one part of the table. Working with table cells. You can copy, cut and paste cell content to/from the clipboard. To perform these actions invoke a shortcut menu with right mouse button on corresponding cell number or use hot keys. Edit Enter – allows the cell content to be edited; Copy Ctrl + Ins, Ctrl+C – copies cell content to the clipboard; Paste Shift + Ins, Ctrl+V – paste clipboard content to the cell; Cut Shift + Del, Ctrl+X – moves cell content to the clipboard; Clear Ctrl + Del, Del – clears cell content.
You can edit cell content with either of following ways:
- Double click on required cell, edit content and then press Enter or click with left mouse button outside the cell.

Documents, Tables and Reference-Books
202
- Point to required cell with left mouse button click, edit content and press Enter or click with left mouse button outside the cell.
- Cells of data and time type can be edited directly in the cell (click once with left mouse button, enter date and time in the following format: ‘DD.MM.YYYY HH.SS’ and press Enter) or in calendar window, invoked by double click on corresponding cell. Example of date and time cell value: 06.03.2006 08:00.
Note that; Content of cell with calculated data cannot be changed. Contents of these fields are highlighted in dark blue color. If it will be attempted to change such error message will appear; "This cell cannot be modified by user". All changes made are stored in the Protocol Table and can be canceled.
Working with table columns. Table columns correspond to internal database fields . Some of table columns are available to hide. To display desired columns use Show Columns command from the column shortcut menu (invoked with right mouse button click on columns name) or from main menu Edit item. Column (or columns) selected in fields' list dialog window are placed before the column, on which menu as entered. To hide a column highlight it with a left mouse button click and press keyboard button Delete or invoke column shortcut menu and select Hide Column. To create new columns (i.e. User Defined Fields) use New Field command from the column shortcut menu (invoked with right mouse button click on columns name) or from main menu Edit item. Properties for new field can be entered in opened field properties dialog window. Note that properties dialog window will be opened automatically for newly created object only if you have selected to Open properties for new created objects in the Spider Project Parameters Dialog window. Otherwise, newly created object will be saved with default parameters and you can edit them later. List of user-defined fields is common for Gantt diagrams as well as for tables of activities, assignments and resources. Therefore, fields created by user in one these tables become available in other tables. You can set rules of summing values for numerical user defined fields in advanced field properties dialog window that can be invoked by Advanced button in dialog window of field properties. All columns have name, displayed in the top cell of each column. By default, column name is equal to the name in field properties dialog window. Names of standard fields cannot be changed, but can be replaced with an Alternative Name in dialog window of field properties. User defined fields can have any name; therefore these fields have no alternative name. You can change the order of table columns. To move column select it by left mouse button click (cursor will change its appearance to column cursor), drag column to new location and release mouse button. Columns can be moved within one part (left or right) of the table only. To have a column on another part of the table use Show Column command from the column shortcut menu. Pressing with left mouse button on the column headers highlights (selects) corresponding column. Then you can move between columns with the help of ‘Left Arrow’, ‘Right Arrow’, ‘Home’ and ‘End’ buttons on the keyboard. 1. You can save order of columns, their width and names to configuration file (*.stc)For this choose menu item Table -> Save Configuration (in Gantt charts: Gantt -> Save Configuration). 2. Load Configuration – restores configuration from file (*.stc); all columns created by user (and not described in configuration file) in current structure will be hidden.
3. To restore default order of columns press button on the toolbar (or go to menu Table (Gantt)-> Options) to invoke table properties dialog window, check box Default order and width(Default order) in the frame Columns and press OK. (
Working with table rows Properties of the object, corresponding to row, can be viewed and edited in dialog window, invoked by double click on corresponding row number or selecting Properties from row shortcut menu, invoked with a right mouse button by clicking on corresponding row number. E.g., double clicking on activity row number invokes activity properties dialog window. To select (highlight) a row click with left mouse button on corresponding row number. To select several rows first use Ctrl button. To move selection use ‘Up arrow’, ‘Down Arrow’, ‘Page Up’ and ‘Page Down’ buttons on the keyboard. To undo selection (highlight) click on required row number with left mouse button, keeping Ctrl button pressed. To select all table rows goto menu Edit -> Select All. To delete a row:

Documents, Tables and Reference-Books
203
- Select it with left mouse button click on corresponding row number and press Delete; or - Invoke row shortcut menu and choose Delete; - Select a row and goto menu Edit -> Delete.
You can select (highlight) unused project objects in the tables of resources, cost components, materials, multi-resources, resource skills, calendars and weeks: goto menu Edit -> Select unused objects. Each table has the table main menu and the tools panel
28.3.2. Table Setup Dialog Window
Allows setting up standard set of columns in the table and is invoked by selecting Options from Table menu or by clicking
Options icon on the toolbar.
Default order sets up default set of columns in the table.
To change table row height, change number in Number of rows in cells field.
28.3.3. Table Row Shortcut Menu Table Row Shortcut Menu is invoked with a right mouse button click on row number. If one row is selected shortcut menu contains following options: Properties – opens dialog window of corresponding object properties; you can view and edit properties for selected object; New (Insert) – allows creating new object (new row will be added to the table) and opens object properties dialog window where you can set properties for newly created object. Note that properties dialog window will be opened automatically for newly created object only if you have selected to Open properties for new created objects in the Spider Project Parameters Dialog window. Otherwise, newly created object will be saved with default parameters and you can edit them later; Delete – deleted selected object from the project. If no rows have been selected(left mouse click below row numbers) shortcut menu will contain only one option: New (Insert). If several rows have been selected shortcut menu will contain option Delete and some additional options, specific for the table, where shortcut menu has been evolved. See description of corresponding shortcut menus for more details.
To see what other options are available in row shortcut menus, select one of the following hyperlinks to tables: Activities table; Resources table; Materials table; Cost components table; Calendars table; Weeks table; Calendar exceptions table; Users table; Access rights table; Assignments table; Links table;

Documents, Tables and Reference-Books
204
Multi-resources table; Resource skills table; Performance archive table; Monitoring table; Protocol table; Resource centers table; Material centers table; Cost centers table; Table of cost component periods; Table of material cost periods; Table of resource cost periods; Overtime table; Corporate reference-books table.
28.3.4. Table Column Shortcut Menu
Table column shortcut menu is invoked by right clicking on table column header. This shortcut menu varies from table to table, but the following options are present in all:
- Show Columns – invokes fields available dialog window containing list of all table columns. Highlight columns you want to move and click OK. Selected columns to be inserted on the left from highlighted column.
- Hide Column – hides highlighted column without removing it from internal database.
- Autofit Column – fits the selected columns due to their contents in order to make all their contents completely visable.
- Properties – invokes column properties dialog window to edit column properties. This dialog window is also invoked by double click on column header.
- Search / Replace – allows searching for the text entered in Find text field of invoked search dialog window.
- Repeat Search / Replace – repeats search of context string starting current cell.
- Sort by Column – sorts table rows by highlighted column (for example, alphabetically for text fields).
- Sort by Multiple Columns – allows sorting data on several columns of tble by opening the dialog window of sort by multiple columns
- Unsort – cancels all previously made sorting
- Filter by Values – filters the selected columns by selected value and condition
- New Field – allows creating new field in internal database – and adding a new table column. Set up new field properties in invoked field properties dialog window and click OK. Note that properties dialog window will be opened automatically for newly created field only if you have selected to Open properties for newly created objects in the spider project parameters dialog window. Otherwise newly created field will be saved with default parameters.
- Delete Field – deletes field and column
- Note That: Only user-defined fields (columns) can be deleted.
28.3.5. Column Codes Column code – is a sequence of characters that should be unique for each project column (field). Code is made up by letters, figures and special characters (#$%&@_-~) without spaces and is case sensitive. Column codes for cost components, materials, cost centers and material centers must have special codes:
1. These codes must begin with prefix: - Codes for cost components must begin with ‘c_’; - Codes for materials must begin with ‘m_’; - Codes for cost centers must begin with ‘C_’; - Codes for material centers must begin with ‘M_’;
2. Special column identifier follows the prefix: - prf_ – profile of fixed consumption (expenditure); - fix_ – fixed consumption (expenditure);

Documents, Tables and Reference-Books
205
- pln_ – remaining consumption (expenditure); - act_ – actual consumption (expenditure) in Gantt chart; - tim_ – per hour consumption (expenditure) – for resources; - aac_ - actual consumption (expenditure); - fac_ – fixed part of actual consumption (expenditure) – in the Monitoring Table and Performance Archive; - ref_ – critical consumption (expenditure); - sum_ - cumulative consumption (expenditure) – equals to sum of actual and remaining consumption; - tar_ – target consumption (expenditure); - prb_ – probability of compliance with target consumption (expenditure); - asp_ – consumption (expenditure) in the Monitoring Table (columns [Consumed by Period]); - fsp_ – fixed consumption (expenditure) in the Monitoring Table (columns [Fixed by Period]); - res_ – remaining fixed consumption (expenditure) in the Monitoring Table (columns [Fixed Remaining]).
3. Code must end with code of corresponding cost component, or material, or cost center or material center. For example, code of column (field) for fixed expenditure of cost component with code Cost would have code ‘c_fix_Cost’.
28.3.6. Column Properties Dialog Window
Is invoked from the right mouse button click menu on column header in any project table. The dialog window appearance varies depending on whether column (field) is standard or user-defined.
For standard fields, the dialog window looks as follows:
Dialog window for standard fields contains the following options:
- Name is a column (field) name in Internal database. Cannot be modified by user for standard columns.
- Code is column code. Code is a sequence of characters, unique for each column. Code is made of letters, numbers, and special characters (#$%&@_-~) without spaces, and is case sensitive. Code is necessary for unique column identification in database; columns (fields) might have the same names, but unique codes. Cannot be modified by user for standard columns.
- Type shows type of data in column. It might be Number, Text, Time, or Date. Cannot be modified by user for standard columns.

Documents, Tables and Reference-Books
206
- Width is column width (in pixels). Can be modified by user.
- Group shows a name of group where the column is included. Cannot be modified by user.
- Alternative Name is option allowing user to change column name to appear in column headers in project tables. Click on check box and type in new name in text field on the right. If you check off this option, the column will have its Name used by default.
- Key Field option informs whether this field is key field for data transfer. Cannot be modified by user.
- Transfer Data option informs whether this column data will be transferred into document. If the option is off, column will be ignored in data transfers. Cannot be modified by user.
- Notes contains comments to the column (if any). For columns containing data on materials, cost components, material centers, cost centers and some other, notes will be about the corresponding object and to edit them, notes standard page of a corresponding Object properties dialog window will be invoked.
For user-defined columns, Field properties dialog window looks as follows:
Dialog window for user-defined columns contains the following options:
- Name is a column (field) name in Internal Database. Can be modified by user for user-defined.
- Code is column code. Code is a sequence of characters, unique for each column. Code is made of letters, numbers, and special characters (#$%&@_-~) without spaces, and is case sensitive. Code is necessary for unique column identification in database; columns (fields) might have the same names, but unique codes. Can be modified by user for user-defined columns.
- Type shows type of data in column. It might be Number, Text, Time, or Date. Can be modified by user for user-defined columns and for columns in documents.
- Width is column width (in pixels). Can be modified by user.
- Group shows a name of group where the column is included. By default, group is User-defined for user-defined columns. Cannot be modified by user.
- Key Field option informs you Key Field option informs whether this field is key field for data transfer. Cannot be modified by user.
- Transfer Data option informs whether this column data will be transferred into document. If the option is off, column will be ignored in data transfers. Cannot be modified by user.
- Notes contains comments to the column (if any).

Documents, Tables and Reference-Books
207
28.3.7. Delete Table Column To delete a column:
- Highlight column by clicking its header.
- Invoke column shortcut menu with a right click on its column header.
- Select Delete Field. You will be asked to confirm deletion. After you click OK, column will be deleted from table and the corresponding field will be deleted from internal database.
Note That: Only user-defined fields (columns) can be deleted; standard columns can only be hidden.
28.3.8. Empty Table Column Shortcut Menu Contains the following options:
- Show Columns - allows moving selected columns to the right part of table. Select column(s) to be shown in fields available dialog window. Highlight columns to move and click OK.
- Unsort - cancels all previously made sorting.
- New Field - allows creating new field (and new table column). Set up new field properties in invoked field properties dialog window and click OK.
Note that: Properties dialog window will be opened automatically for newly created field only if you have selected to Open properties for new created objects in the spider project parameters dialog window. Otherwise newly created field will be saved with default parameters.
28.3.9. Table Cell Shortcut Menu Is invoked with the right mouse button click on cell and contains the following options:
- Edit edits cell contents.
- Copy copies cell contents on clipboard.
- Paste inserts clipboard contents into cell.
- Cut moves cell contents on clipboard.
- Clear deletes cell contents.
28.3.10. Fields Available Dialog Window
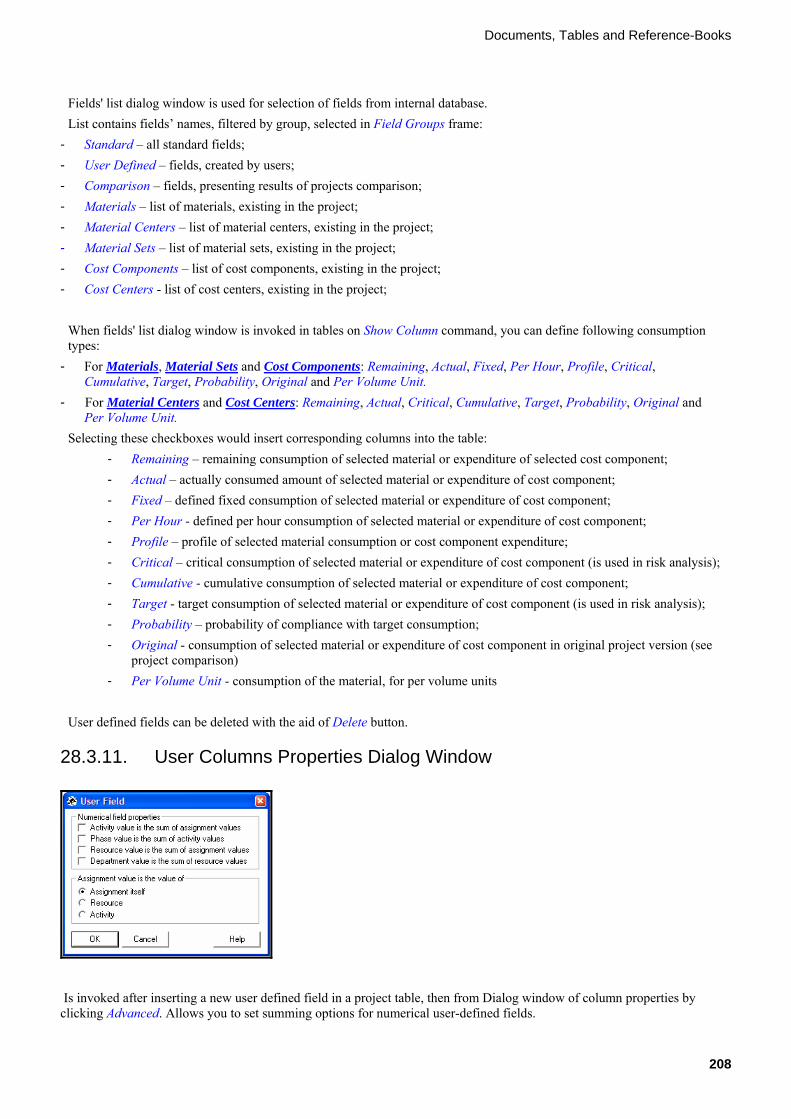
Documents, Tables and Reference-Books
208
Fields' list dialog window is used for selection of fields from internal database. List contains fields’ names, filtered by group, selected in Field Groups frame:
- Standard – all standard fields; - User Defined – fields, created by users; - Comparison – fields, presenting results of projects comparison; - Materials – list of materials, existing in the project; - Material Centers – list of material centers, existing in the project; - Material Sets – list of material sets, existing in the project; - Cost Components – list of cost components, existing in the project; - Cost Centers - list of cost centers, existing in the project;
When fields' list dialog window is invoked in tables on Show Column command, you can define following consumption types:
- For Materials, Material Sets and Cost Components: Remaining, Actual, Fixed, Per Hour, Profile, Critical, Cumulative, Target, Probability, Original and Per Volume Unit.
- For Material Centers and Cost Centers: Remaining, Actual, Critical, Cumulative, Target, Probability, Original and Per Volume Unit.
Selecting these checkboxes would insert corresponding columns into the table: - Remaining – remaining consumption of selected material or expenditure of selected cost component; - Actual – actually consumed amount of selected material or expenditure of cost component; - Fixed – defined fixed consumption of selected material or expenditure of cost component; - Per Hour - defined per hour consumption of selected material or expenditure of cost component; - Profile – profile of selected material consumption or cost component expenditure; - Critical – critical consumption of selected material or expenditure of cost component (is used in risk analysis); - Cumulative - cumulative consumption of selected material or expenditure of cost component; - Target - target consumption of selected material or expenditure of cost component (is used in risk analysis); - Probability – probability of compliance with target consumption; - Original - consumption of selected material or expenditure of cost component in original project version (see
project comparison) - Per Volume Unit - consumption of the material, for per volume units
User defined fields can be deleted with the aid of Delete button.
28.3.11. User Columns Properties Dialog Window
Is invoked after inserting a new user defined field in a project table, then from Dialog window of column properties by clicking Advanced. Allows you to set summing options for numerical user-defined fields.

Documents, Tables and Reference-Books
209
"Numerical field properties" frame
Activity value is the sum of assignment values – value of user-defined activity field will be a sum of values of all user-defined assignments fields for this activity.
Phase value is the sum of activity values – value of user-defined phase field will be a sum of values of all activity fields for this phase.
Resource value is the sum of assignment values – value of user-defined resource field will be a sum of values of all user-defined assignments fields for this resource.
Department value is the sum of resource values – value of user-defined department field will be a sum of values of all resource fields for this department.
"Assignment value is the value of" frame
Select a field that will be considered assignment (a user-defined assignment field). Select from Assignment itself, Resource, and Activity options.
28.3.12. User Columns Properties Dialog Window
Is invoked after inserting a new user defined field in a project table, then from Dialog window of column properties by clicking Advanced. Allows you to set summing options for numerical user-defined fields.
"Numerical field properties" frame
Activity value is the sum of assignment values – value of user-defined activity field will be a sum of values of all user-defined assignments fields for this activity.
Phase value is the sum of activity values – value of user-defined phase field will be a sum of values of all activity fields for this phase.
Resource value is the sum of assignment values – value of user-defined resource field will be a sum of values of all user-defined assignments fields for this resource.
Department value is the sum of resource values – value of user-defined department field will be a sum of values of all resource fields for this department.
"Assignment value is the value of" frame
Select a field that will be considered assignment (a user-defined assignment field). Select from Assignment itself, Resource, and Activity options.
28.4. Reference Books
28.4.1. Choosing Objects from Reference-book Dialog Window Allows receiving objects from reference-books. This option is only available between documents. The reference-book containing necessary objects, is set by button to Select. In the opened projects and documents dialog window after choosing necessary reference-book, then in the top part of dialog window (in Reference-book frame) Code, Version and Storage of the chosen reference-book will be displayed.

Documents, Tables and Reference-Books
210
In the list it is necessary to select lines with necessary objects and to press ОК. Besides, objects can be chosen By type or By filter. Fields can be chosen by means of the button to Select type field. If options All is selected the full list of objects will be displayed. If Selected type option is chosen in the list only objects of that type (which is chosen in the list of types at the left) will be displayed. If the option Selected filter only was selected, only the objects satisfying the filter condition (chosen in filters list) will be displayed in the list, which is on the left. Pressing button OK closes dialog window with applying changes. Button Cancel closes dialog window, canceling all installations. Help - invokes corresponding help window.
28.4.2. Cost Components Reference-book
Contains Cost components data and has following standard fields (columns): Code, Name, Name For Columns, Folder, Notes, and Unit Cost. Code is Key field by default.
Creating cost components reference-book will help you in two ways: 1) you will be able to quicker form cost components list for new project; 2) you will be able to quickly update cost components in the existing projects when market or project conditions change (for example, exchange rate changes).
To use reference-book to create new cost components list for new project or to add these cost components to existing project:
In Cost Components reference-book window, select Transfer -> To Selected Project -> Cost Components menu. Data Transfer options dialog window will be invoked. Select If row does not exist – create a new one option.
If not all data from reference-book needs to be transferred, before making transfer as described above highlight in the reference-book only those cost components you want to be transferred by clicking their column headers while holding Ctrl key.
To update cost components, select Just transfer data to existing rows option in Data Transfer options dialog window.
When transfer from Cost Components reference-book to Cost Components table is performed, program matches key field (Code by default) of all cost components in project and cost components from the reference. Once the match is found, values of other fields of the matched cost component are transferred from the reference-book to the project.
28.4.3. 'Materials' Reference-book
Reference-book of ‘Materials’ can be used for quick update of materials properties or filling of Materials Table in a new project. For example, the reference-book is useful for updating of changed material price.

Documents, Tables and Reference-Books
211
By default reference-book table contains following columns (fields): - Code – unique material code (default key field); - Name – material name; - Unit – units for material measurement (e.g. m3).
You can enter per unit cost of materials in the reference-book ‘Materials’:
1. Create reference-books from the table of cost components by entering menu item Table -> Copy as document in Cost Components Table;
2. Select icon of a reference-book ‘Resources’ in the main program window with a single left mouse button click. If there is no icon of desired reference-book you should first open it (or create new reference-book);
3. Perform data transfer from a reference-book of cost components to columns of reference-book ‘Materials’. In the reference-book of cost components go to menu Transfer -> Transfer Data(To Columns of Selected Document). Press OK in opened data transfer dialog window.
4. New columns (fields), corresponding to cost components would be added to the reference-book ‘Materials’ and required codes would be set to these columns (fields).
5. You can enter values of per unit cost of materials in corresponding columns. Data from the reference-book ‘Materials’ can be transferred selectively:
- To transfer data for selected materials, firstly do the following - apply filter; and/or - select rows of desired resources with left mouse button clicks (Ctrl button must be pressed); If no rows are selected and no filters are applied data from the whole reference-book would be transferred.
- Just transfer data to existing rows – choose this option in the data transfer dialog window to update data on existing materials in the destination project Materials Table or in another document;
- If row does not exist - create a new one - choose this option in the data transfer dialog window to update data on existing materials and to add new materials to destination Materials Table or in another document.
28.4.4. 'Resources' Reference-book
Reference-book ‘Resources’ can be used for quick update of resource properties or filling of Resources Table in a new project. For example, the reference-book is useful for recalculating of actual resource assignment cost if per hour cost of resource work changes. By default reference-book table contains following columns (fields):
- Code – unique resource code (default key field); - Name – resource name; - Short Name – resource short name; - Quantity – amount of resource units at disposal; - Type – type of the resource.
You can enter per hour cost of resource work in the reference-book ‘Resources’:
1. Create reference-books from the table of cost components by entering menu item Table -> Copy as a new document in the Cost Components Table;
2. Select icon of reference-book ‘Resources’ in the main program window with a single left mouse button click. If there is no icon of desired reference-book you should first open it (or create new reference-book);
3. Perform data transfer from reference-book of cost components to columns of reference-book ‘Resources’. In the reference-book of cost components goto menu Transfer -> To Columns of Selected Document. Press OK in opened data transfer dialog window.
4. New columns (fields), corresponding to cost components would be added to the reference-book ‘Resources’ and required codes would be set to these columns (fields).

Documents, Tables and Reference-Books
212
5. You can enter values of per hour cost of resource work in corresponding columns. In the same way you can specify per hour materials consumption for resources:
1. Create new (as described earlier) or choose existing resources reference-book; 2. Perform data transfer from reference-book of materials to columns of reference-book ‘Resources’. In the reference-
book of materials goto menu Transfer -> To Columns of Selected Document. Press OK in opened data transfer dialog window.
3. New columns (fields), corresponding to materials would be added to the reference-book ‘Resources’ and required codes would be set to these columns (fields).
4. You can enter values of per hour material consumption for resources in corresponding columns. Data from the reference-book ‘Resources’ can be transferred selectively:
- To transfer data for selected resources, firstly do the following - apply filter; and/or - select rows of desired resources with left mouse button clicks (Ctrl button must be pressed); If no rows are selected and no filters are applied data from the whole reference-book would be transferred.
- Just transfer data to existing rows – choose this option in the data transfer dialog window to update data on existing resources in the destination project Resources Table or in another document;
- If row does not exist - create a new one - choose this option in the data transfer dialog window to update data on existing resources and to add new resources to destination project Resources Table or in another document.
You can recalculate actual assignments’ costs by data transfer from the reference-book ‘Resources’ to project performance archive. Actual assignments’ costs would be recalculated as follows:
( Hour cost (from reference-book) * Duration [Actual] * Work Load [Actual] * Quantity [Actual] ) + Actual fixed assignment cost (column [Fixed Actual] for corresponding cost component)
Note that: It is necessary to recalculate costs, materials requirements and resources work load – by pressing button on the Activity Gantt toolbar or Resource Gantt toolbar (or select menu Calculations -> Cost and Materials) after data transfer.
28.4.5. 'Multi-resources' Reference-book
Multi-Resources Reference-book contains data on multi-resources in table format with following default fields:
- Code - A sequence of characters that should be unique for each project multi-resource. Code is made up by letters, figures and special characters (#$%&@_-~) without spaces and is case sensitive.
- Name - multi-resource full name. - Type – field, that can be used for organizing of data transfer from reference-books for changing of multi-resources
properties in projects. (Folder - full path to attached folder, that may be used to store files with referential information for current multi-resource. Double click on the cell in this column allows defining the folder path or open the folder (if its path has already been defined).
- Notes - A field that lets users provide current multi-resource with notes and explanations. - Participants [Numbers and Codes] – field showing multi-resources composition in text format: amount of resource
units in current multi-resource and resource code, separated by space; data on different resources is separated by ‘|’ symbol.
- Participants [Names] – field with resources (comprising current multi-resource) names, separated by ‘|’ symbol. It is strongly recommended to change multi-resource composition (participants and their quantity) in multi-resource properties dialog window(that can be invoked by double click on corresponding multi-resource row number) and not directly in the table fields! Note that changing codes of resources would affect data transfer from reference-book to the project. Multi-Resources Reference-books are useful for adding new multi-resources or changing composition of multi-resources in projects through data transfer from the reference-book to Multi-resources Table. To transfer data from current multi-resources reference-books:

Documents, Tables and Reference-Books
213
1. Select destination project or document in the main program window; 2. Open source multi-resource reference-book window; 3. Select with left mouse button multi-resources for data transfer (press and hold Ctrl button to select several multi-
resources); do not select any to transfer all data; 4. Select Transfer from menu in multi-resource reference-book window; 5. Choose destination type: To selected project; To selected document or To columns of selected document (See data
transfer dialog window and description of documents for more details) 6. Specify method of data transfer –
- Just transfer data to existing rows – to update data on existing multi-resources in the destination project/document
- If row does not exist - create a new one - to update data on existing multi-resources and add new multi-resources to destination project/document
By default multi-resource Code is used as key field in data transfer: data is only updated in multi-resources, whose codes exactly match source multi-resources codes. Composition of source multi-resources is transferred to project Multi-resources Table only in case destination project contain resources with codes matching source reference-book resources codes.
28.4.6. Multi-resource Properties in Reference-books Dialog Window
Page Data. You can edit Name, Code and Type of multi-resource in corresponding fields. If reference-book has no fields with codes Name , Code and Type - corresponding cells would become inaccessible. Page Participants. Contain list of resources comprising current multi-resource with quantities in resource units. Button Add – opens list of available resources in reference-book . Choose desired resource(s), press OK and specify quantity of each resource comprising current multi-resource in units of resource per multi-resource - in field Quantity under the list. To delete selected resource from current multi-resource press Delete button.
Documents, Tables and Reference-Books
214
28.4.7. 'Resource Skill' Reference-book
Resource Skills Reference-book contains data on resource skills table about resource skills in table format with following default fields:
- Code - A sequence of characters that should be unique for each project resource skill. Code is made up by letters, figures and special characters (#$%&@_-~) without spaces and is case sensitive. Code is default key field.
- Name - resource skill’s full name. - Folder - full path to attached folder, that may be used to store files with referential information for current resource
skill. Double click on the cell in this column allows defining the folder path or open the folder (if its path has already been defined).
- Notes - A field that lets users provide current resource skill with notes and explanations. - Participants [Types and Codes] – field, showing resource skill composition in text format. type and code, separated by
space; data on different resource skills is separated by ‘|’ symbol. Type can be ‘R’ (i.e., resource) or ‘M’ (i.e., multi-resource)
- Participants [Names] – field, containing comprising resources and multi-resources names, separated by ‘|’ symbol. Note That:It is strongly recommended to change resource skill composition (participants and their codes) in resource skill properties dialog window (that can be invoked by double click on corresponding resource skill row number) and not directly in the table fields! Note that changing codes of resources would affect data transfer from reference-book to the project. Resource Skill Reference-books are useful for adding new resource skills or changing composition of existing resource skills in projects through data transfer from the reference-book to Resource Skills Table. To transfer data from current resource skill reference-book:
1. Select destination project or document in the main program window; 2. Open source resource skill reference-book window; 3. Select with left mouse button resource skills for data transfer (press and hold Ctrl button to select several multi-
resources); do not select any to transfer all data; 4. Select Transfer from menu in resource skill reference-book window; 5. Choose destination type: To selected project; To selected document or To columns of selected document (See data
transfer dialog window and description of documents for more details) 6. Specify method of data transfer –
- Just transfer data to existing rows – to update data on existing resource skills in the destination project/document
- If row does not exist - create a new one - to update data on existing resource skills and add new resource skills to destination project/document
By default resource skill Code is used as the key field in data transfer: data is only updated in resource skills, whose codes exactly match source resource skill codes. Composition of source resource skills is transferred to project Resource Skills Table only in case destination project contain resources (and/or multi-resources) with codes matching source reference-book resources (and/or multi-resources) codes.
28.4.8. Resource Skill Properties in Reference-book Dialog Box Page Data. You can edit Name, Code and Types of resource skills in corresponding fields. If reference-book has no fields with codes Name and Code - corresponding windows would become inaccessible. Page Participants. Contain list of resources and multi-resources comprising current resource skill with their priorities. Frame Add contains two buttons, Resource and Multi-Resource – and lets you add new components to resource skill through list of available resources (multi-resources) in reference-books . Choose desired resources (multi-resources), press OK and specify priority of each component comprising current resource skill in field Priority under the list. To delete a resource or multi-resource from current resource skill select desired component and press Delete button.
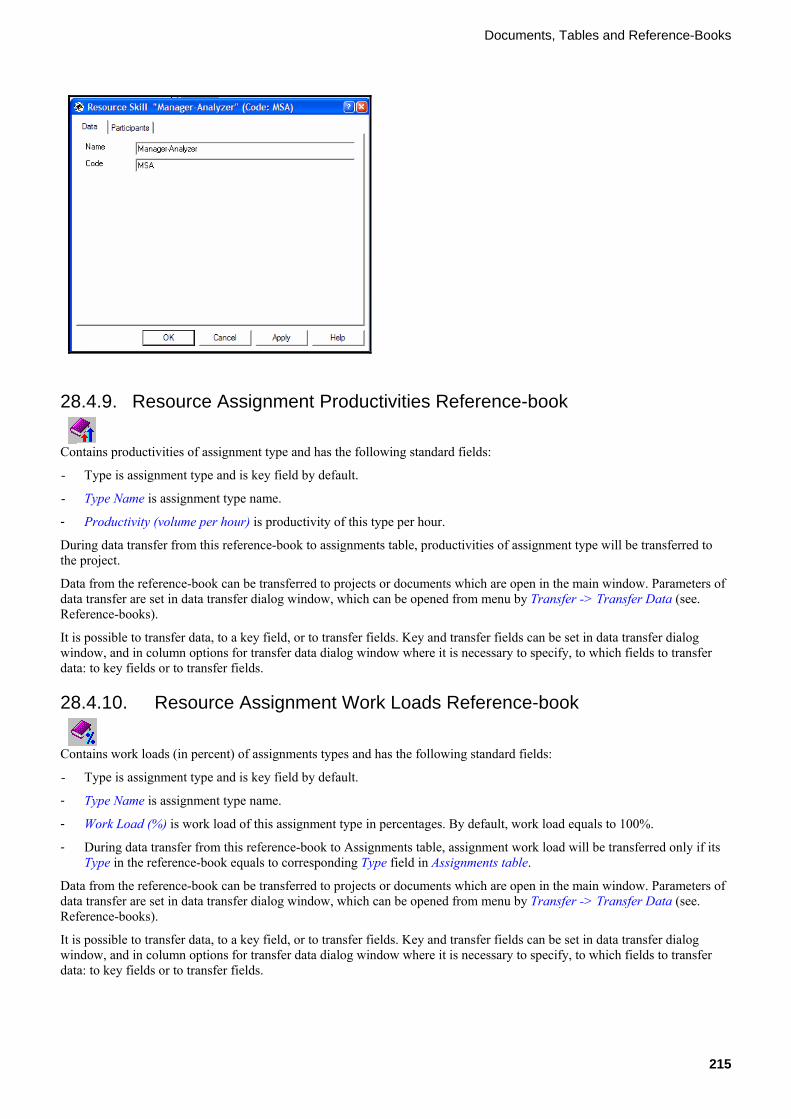
Documents, Tables and Reference-Books
215
28.4.9. Resource Assignment Productivities Reference-book
Contains productivities of assignment type and has the following standard fields:
- Type is assignment type and is key field by default.
- Type Name is assignment type name.
- Productivity (volume per hour) is productivity of this type per hour.
During data transfer from this reference-book to assignments table, productivities of assignment type will be transferred to the project.
Data from the reference-book can be transferred to projects or documents which are open in the main window. Parameters of data transfer are set in data transfer dialog window, which can be opened from menu by Transfer -> Transfer Data (see. Reference-books).
It is possible to transfer data, to a key field, or to transfer fields. Key and transfer fields can be set in data transfer dialog window, and in column options for transfer data dialog window where it is necessary to specify, to which fields to transfer data: to key fields or to transfer fields.
28.4.10. Resource Assignment Work Loads Reference-book
Contains work loads (in percent) of assignments types and has the following standard fields:
- Type is assignment type and is key field by default.
- Type Name is assignment type name.
- Work Load (%) is work load of this assignment type in percentages. By default, work load equals to 100%.
- During data transfer from this reference-book to Assignments table, assignment work load will be transferred only if its Type in the reference-book equals to corresponding Type field in Assignments table.
Data from the reference-book can be transferred to projects or documents which are open in the main window. Parameters of data transfer are set in data transfer dialog window, which can be opened from menu by Transfer -> Transfer Data (see. Reference-books).
It is possible to transfer data, to a key field, or to transfer fields. Key and transfer fields can be set in data transfer dialog window, and in column options for transfer data dialog window where it is necessary to specify, to which fields to transfer data: to key fields or to transfer fields.

Documents, Tables and Reference-Books
216
28.4.11. 'Resource Assignment Cost and Materials Requirements' Reference-book
Reference-book ‘Resource Assignment Cost and Materials Requirements’ contains data on fixed material consumption and cost component expenditures on activities. By default reference-book table contains following columns (fields):
- Type; Type Name – activity type (key field by default) and its name; - Per Volume – amount of activity volume units, for which fixed material consumption and cost component expenditures
are assigned; - Unit - activity volume units.
To enter fixed material consumption and cost component expenditures on activities it is necessary to add corresponding columns (fields) and set special codes for them. You can perform this action by data transfer to columns of reference-book (document):
1. reference-books from the tables of cost components and materials by entering menu item Table -> Copy as document in Cost Components Table and Materials Table;
2. Select icon of reference-book ‘Resource Assignment Cost and Materials Requirements’ in the main program window with a single left mouse button click. If there is no icon of desired reference-book you should first open it (or create new reference-book);
3. Perform data transfer from reference-book of materials and reference-book of cost components to columns of reference-book ‘Resource Assignment Cost and Materials Requirements’. In the reference-book of materials and reference-book of cost components goto menu Transfer -> To Columns of Selected Document. Press OK in opened data transfer dialog window.
4. New columns (fields), corresponding to materials and cost components would be added to the reference-book ‘Resource Assignment Cost and Materials Requirements’ and required codes would be set to these columns (fields).
5. You can enter values of fixed material consumption and cost component expenditures on activities in corresponding columns.
Later you can use reference-book ‘Resource Assignment Cost and Materials Requirements’ to enter or edit activity data on material consumption and cost component expenditures. When data is transferred to Activities Table, values from reference-book are recalculated according to following formula: value of fixed material consumption or cost component expenditures (from reference-book) is divided by Per Volume field value (if the field is empty, it is considered to be ‘1’) and multiplied by activity volume (from Activities Table). Note that: It is necessary to recalculate schedule before data transfer from reference-book.
28.4.12. 'Resource Assignment Cost and Materials Requirements' (per Volume unit) Reference-book
‘Resource Assignment Cost and Materials Requirements (per Volume Unit)’ reference-book contains data on fixed material consumption and cost component expenditures on activities. By default reference-book table contains following columns (fields):
- Type; Type Name – activity type (key field by default) and its name; - Per Volume – amount of activity volume units, for which fixed material consumption and cost component expenditures
are assigned; - Unit – activity volume units.
To enter fixed material consumption and cost component expenditures on activities it is necessary to add corresponding columns (fields) and set special codes for them. You can perform this action by data transfer to columns of reference-book (document):
1. Create reference-books from the tables of cost components and materials by entering menu item Table -> Copy as document in Cost Components Table and Materials Table;

Documents, Tables and Reference-Books
217
2. Select icon of reference-book ‘Resource Assignment Cost and Materials Requirements (per Volume)’ in the main program window with a single left mouse button click. If there is no icon of desired reference-book you should first open it (or create new reference-book);
3. Perform data transfer from reference-book of materials and reference-book of cost components to columns of reference-book ‘Resource Assignment Cost and Materials Requirements (per Volume)’. In the reference-book of materials and reference-book of cost components goto menu Transfer -> To Columns of Selected Document. Press OK in opened data transfer dialog window.
4. New columns (fields), corresponding to materials and cost components would be added to the reference-book ‘Resource Assignment Cost and Materials Requirements (per Volume)’ and required codes would be set to these columns (fields).
5. You can enter values of fixed material consumption and cost component expenditures on activities in corresponding columns.
Later you can use reference-book ‘Resource Assignment Cost and Materials Requirements (per Volume)’ to enter or edit activity data on material consumption and cost component expenditures. When data is transferred to Activities Table, values from reference-book are recalculated according to following formula: value of fixed material consumption or cost component expenditures (from reference-book) is divided by Per Volume field value (if the field is empty, it is considered to be ‘1’) and multiplied by activity volume (from Activities Table). Note that: It is necessary to recalculate schedule before data transfer from reference-book.
Data from the reference-book can be transferred to projects or documents which are open in the main window. Parameters of data transfer are set in data transfer dialog window, which can be opened from menu by Transfer -> Transfer Data (see. Reference-books). It is possible to transfer data, to a key field, or to transfer fields. Key and transfer fields can be set in data transfer dialog window, and in column options for transfer data dialog window where it is necessary to specify, to which fields to transfer data: to key fields or to transfer fields.
28.4.13. 'Resource Assignment Cost and Materials Requirements' (Fixed per Quantity) Reference-book
‘Resource Assignment Cost and Materials Requirements (fixed per quantity)’ Reference-book contains data on fixed material consumption and cost component expenditures on activities. By default reference-book table contains following columns (fields):
- Type; Type Name – activity type (key field by default) and its name; - Per Number of Units – amount of resource units, on which fixed material consumption and cost component
expenditures are assigned; To enter fixed material consumption and cost component expenditures on assignments it is necessary to add corresponding columns (fields) and set special codes for them. You can perform this action by data transfer to columns of reference-book (document):
1. Create reference-books from the tables of cost components and materials by entering menu item Table -> Copy as document in Cost Components Table and Materials Table;
2. Select icon of reference-book ‘Resource Assignment Cost and Materials Requirements (per quantity)’ in the main program window with a single left mouse button click. If there is no icon of desired reference-book you should first open it (or create new reference-book);
3. Perform data transfer from reference-book of materials and reference-book of cost components to columns of reference-book ‘Resource Assignment Cost and Materials Requirements (per quantity)’. In the reference-book of materials and reference-book of cost components goto menu Transfer -> To Columns of Selected Document. Press OK in opened data transfer dialog window.
4. New columns (fields), corresponding to materials and cost components would be added to the reference-book ‘Resource Assignment Cost and Materials Requirements (per quantity)’ and required codes would be set to these columns (fields).
5. You can enter values of fixed material consumption and cost component expenditures on activities in corresponding columns.

Documents, Tables and Reference-Books
218
Later you can use reference-book ‘Resource Assignment Cost and Materials Requirements (per quantity)’ to enter or edit activity data on material consumption and cost component expenditures. When data is transferred to Assignments Table, values from reference-book are recalculated according to following formula: value of fixed material consumption or cost component expenditures (from reference-book) is divided by Per quantity field value (if the field is empty, it is considered to be ‘1’) and multiplied by number of resources (from Assignments Table). Note that: It is necessary to recalculate schedule before data transfer from reference-book.
Data from the reference-book can be transferred to projects or documents which are open in the main window. Parameters of data transfer are set in data transfer dialog window, which can be opened from menu by Transfer -> Transfer Data (see. Reference-books). It is possible to transfer data, to a key field, or to transfer fields. Key and transfer fields can be set in data transfer dialog window, and in column options for transfer data dialog window where it is necessary to specify, to which fields to transfer data: to key fields or to transfer fields.
28.4.14. Corporate Reference Books
28.4.14.1. Corporate Reference-books Table Corporate Reference-books Table contains links to corporate reference-books. Corporate reference-books share all characteristics of standard Spider Project reference-books with following peculiarities:
- usually are stored in the corporate intranet; access to these directories is limited by the means of operating system to certain users;
- can be used to change object properties by users with access right ‘Only from corporate reference-books’ (see Access Rights for more details).
Table of Corporate Reference-books contains following columns by default: - Code – unique code of reference-book (is filled automatically in this field after selecting location of reference-
book);
- Name – the name of reference-book (is filled automatically in this field after selecting location of reference-book);
- Notes – notes to reference-book; double click on this field opens corporate reference-book properties dialog window on the Notes page;
- Reference-book Type - reference-book type (is filled automatically in this field after selecting location of reference-book); by default type is to ‘General document or reference-book’; see Documents for more details on types;
- Document Code – unique code of corresponding document
- Document Version – version of corresponding document
- Location – path to local or network directory where corporate reference-book is stored. You can either enter path directly in the field or press Choose button and select required file.
- Transfer filtered data only – indicates if only filtered data will be transferred or whole.
- If row does not exist- create a new one – indicates if a row to transfer data into it does not exist in new document to create a new one or not.
- Transfer by key fields for data transfer – indicates if data transfer will be by key fields or not.
Row shortcut menu Row shortcut menu is invoked with the right mouse button click on row number and contains the following options:
- Properties invokes corporate reference-book properties dialog window.
- New allows new reference-book to the table Note that properties dialog window will be opened automatically for newly created reference-book only if you have selected to Open properties for new created objects in the Spider Project Parameters Dialog window. Otherwise, newly created reference-book will be saved with default parameters and you can edit its properties later in the corporate reference-book properties dialog window, invoked with right mouse button click on corresponding row number.
- Delete deletes highlighted link to reference-book and a corresponding row in the table.
- Apply – allows to transfer data from selected reference-book to the current project: transfers data from the reference-book to corresponding project table(e.g. from reference-book of ‘Materials’ to Materials table).

Documents, Tables and Reference-Books
219
- Open – opens the reference-book selected in corporate reference-book.
When several rows are highlighted simultaneously, shortcut menu contains Apply, Open and Delete options only.
To cancel last action performed select menu item Edit -> Undo last action or press button (see Undo for more details). See Working with tables for more details on general approaches to working with Spider Project tables.

Reports and Diagrams
220
29. Reports and Diagrams
29.1. General Reports and Diagrams
29.1.1. Reports You can create following reports in Spider Project:
– General reports and diagrams on templates – General reports and diagrams – EVA reports and diagrams on templates – EVA reports and diagrams – Success probability trends on templates – Success probability trends – Resource overloads bar – Resource overloads report – Project truncation
See Table reports and diagrams on report templates for procedure of creating reports and diagrams on report templates. General reports and diagrams can be created in Activity Gantt and Resource Gantt according to currently active structure (WBS or OBS). According to WBS, opened in Activity Gantt you can create following reports on the whole project, individual phases or activities:
- Cumulative costs of phases, activities and the whole project; - Durations, volumes and resource-hours of activities and phases; - Cost of activities, phases and the whole project – according to individual cost components and cost centers; - Materials consumption on activities, phases and for the whole project; - Cumulative materials consumption of material centers; - Resource hours of resources, assigned to activities execution.
According to OBS, opened in Resource Gantt you can create following reports on the whole project, individual departments or resources:
- Cumulative costs of departments, resources and assignments; - Working duration for departments and comprising resources; - Work volumes and resource-hours; - Individual resources work costs; cumulative costs or resources, comprising departments – in the context of
cost components and cost centers; - Material consumption by resources and departments; - Consumption of materials, organized in material centers; - Resource hours of resources assigned to activities execution in resource-hours;
Report parameters can be specified and edited in Report settings dialog window. 1. To create report or diagram on the whole project:
a. Leave only those rows visible that correspond to desired level of detalization (i.e. hide/unhide assignments, fold/unfold phases or departments, use filters);
b. Goto menu Report -> General reports and diagrams -> Table report or Diagram;
c. Select desired report template from the list and press OK.
2. To create report or diagram on individual phase, department, activity, resource or assignment:

Reports and Diagrams
221
a. Select required phase, department, activity, resource or assignment. To obtain report on the whole phase or department (without detalization by comprising activities or resources or assignments) - leave only those rows visible that correspond to desired level of detalization (hide/unhide assignments, fold/unfold phases or departments, use filters);
b. Invoke shortcut menu by right mouse button click on corresponding row number and select General reports and diagrams -> Table report or Diagram;
c. Select desired report template from the list and press OK.
3. Table report will be created in a new document (with name, code and version number defined in report template); a diagram will be placed at the bottom of Gantt chart.
4. To make adjustments to report created - repeat steps 1 - 3.
5. To adjustments to diagram created - invoke shortcut menu on the graphic part of the diagram and select Properties, Contents or Delete.
Note that you can temporarily store the list of parameters in your last report created: check box Do not clear parameters list before new report creation in Spider Project parameters dialog window. Report on earned value analysis – document with actual data and prognosis according to earned value analysis. Parameters of earned value analysis are placed in report rows, while calculated values are in columns, corresponding to dates.
ACWP Actual Cost of Work Performed, or Actual Cost;
BCWP Budgeted Cost of Work Performed, or Earned Value; BCWS Budgeted Cost of Work Scheduled, or Planned
Value; CV Cost Variance; CV%); Cost Variance in percent; SV Schedule Variance; SV% Schedule Variance in percent; CPI Cost Performance Index; CPI% Cost Performance Index in percent; SPI Schedule Performance Index; SPI% Schedule Performance Index in percent; PF Performance factor; BAC Budget at Completion; EAC Estimate at Completion; VAC Variance at Completion; VAC% Variance at Completion in percent; TCPI To Complete Performance Index; PSc Percent Scheduled; PSp Percent Spent;
You can make earned value analysis report on total cost, or selected cost component, material, material center or cost center. Report on material and material center would be presented in corresponding material units. Note that you should save baseline project version before earned value analysis.
Reports and Diagrams
222
Success Probability trends - is a method of project performance analysis. Probabilities of achieving target project finish dates, target budget and target material consumption are analyzed in the course of project performance. Trends can be obtained for such parameters as project finish date, total cost, project cost components, materials, cost centers and material centers. Trends of these probabilities provide valuable information for project success estimates.
Reports can be created from Activity Gantt only. To create report on the whole project:
1. Goto menu Report and select required report type; 2. Then select required report type and set report options. 3. Report would be opened in new window and icon of the report would appear in area Documents of the main program
window To create a report on individual project phase, activity (in Activity Gantt) or assignment (for success probabilities trends):
1. Invoke shortcut menu with a right mouse button click on corresponding phase, activity or assignment row number; 2. Select required report type; 4. Then select Table Report. Depending on report type following dialog windows will open:
- earned value analysis report properties dialog window – for earned value analysis report; - success probabilities trends dialog window – for success probabilities trends report; - Report settings dialog window – for other types of reports.
5. Set required option in dialog window and press OK. 6. Report would be opened in new window and icon of the report would appear in area Documents of the main program
window
Resource overloads bar – see Diagrams section in diagrams and histograms in Gantt's diagrams. Resource overloads report – can be created after calculating the schedule and contains data about overloaded resources (see resources overloads report). Project Truncation report–to create this report it is necessary to set its parameters in truncate project by period dialog window. To create reports and diagrams it is necessary to choose in gantt Main menu item Report and further the subitem corresponding that kind of the report which is necessary. After creating table report, its pictogram will be displayed in Documents window which is located in the main program window Diagrams will displayed in the bottom part of gantt charts. To create report on a separate activity, a phase, a resource or department (and in project gantt – on a separate project, multiproject) it is necessary to invoke the shortcut menu on the row number of a row with an activity, a phase, etc. and to choose corresponding item. See description of Documents for details on working with reports.
29.1.2. Report Parameters Wizard Report parameters wizard is started from Report template properties dialog window, Report settings dialog window or Diagram settings dialog window by pressing Report Parameters Wizard button on the Parameters and Data page. A step by step wizard allows creating additional parameters, missing in the standard parameters groups such as:
– General – contains Total Cost, Duration (Hours), Resource-hours and Volume parameters; – Cost Components – contains the list of cost components; – Cost Centers – contains the list of cost centers; – Materials – contains the list of materials; – Material Centers – contains the list of material centers; – Material Sets – contains the list of material sets; – Resources – contains the list of resources; – Resource Centers – contains the list of resource centers.
Set Parameters – Step 1 Page

Reports and Diagrams
223
On this step you can specify what creating parameter should refer to:
– Other, i.e. you can make report on selected activity, phase, resource or department;
– Resources;
– Resource Centers.
Choosing Resources or Resource centers will show a list of available resources and centers. You can select one (for table reports and diagrams) or several items (for table reports only) and press Next > button to move to the next step.
Set Parameters – Step 2 Page
Parameter selected on the previous step is further detailed by expenditures of:
– General – contains for o Resources and Resource Centers:
Total Cost (total expenditures on parameters selected on the previous step), Quantity, and Resource-hours parameters;
o Object itself: Total Cost (total expenditures on parameters selected on the previous step), Duration (Hours), Resource-hours and

Reports and Diagrams
224
Volume – Cost Components – contains the list of cost components; – Cost Centers – contains the list of cost centers; – Materials – contains the list of materials; – Material Centers – contains the list of material centers; – Material Sets – contains the list of material sets;
Choosing Cost Components, Cost Centers, Materials, Material Centers, Material Sets or User Defined Gantt Fields will show a list of available items. You can select one (for table reports and diagrams) or several items (for table reports only) and press Next > button to move to the next step.
If parameter from the General group was selected on this step pressing Next > button will move you to the last page Finish. Otherwise you will proceed to Set Parameters – Step 3 page.
Set Parameters – Step 3 Page
On this step you can define how to present report results:
– Quantity - entered values of cost component and material expenditures/revenues, or
– General -> Total Cost – i.e. report on selected parameters would be created with Unit cost of cost components and Cost periods (i.e. cost component cost periods and material cost periods) taken into consideration.
Finish Page.
This page shows report parameters created.

Reports and Diagrams
225
Pressing Next > finishes the wizard and returns you to the dialog where the wizard was started. Created parameter(s) will be added to the list.
Pressing Cancel stops the wizard without adding report parameter.
Pressing < Back returns you to the previous step.
29.1.3. Diagrams and Histograms in Gantt Diagrams Following diagram types are available in Activity Gantt and Resource Gantt: - Resource work load diagram; - Diagrams of costs and material consumption; - Diagrams of volumes, durations and resource-hours; - Earned value analysis diagrams; - Resource overloads bar; - Success probability trends. Diagrams can be drawn for whole project or separate project phases or activities and are placed in the lower part of Gantt diagrams. Go to menu Report -> General Reports and Diagrams -> Diagram to create diagram for whole project. To create diagram for selected phase or activity (in Activity Gantt only) invoke corresponding shortcut menu with right mouse button click on corresponding row number, select General Reports and Diagrams -> Diagram. Diagram details can be specified in opened Diagram settings dialog window. Success probability trends diagram and earned value analysis diagram can also be created for whole project (in Activity Gantt only) or for separate project phases and activities: select menu Report -> Success ProbabilityTrends -> Diagram (or Report -> Earned Value Analysis -> Diagram). Resource overloads bar can be displayed for all resources of the whole project as green bar with red vertical lines corresponding to periods of time, when resources are overloaded. To display resource overloads bar select Report ->
Resource Overloads Bar, then press button Resource peak workload (or select menu item Calculations -> Resource Peak Workload) or Ctrl + F8 as hot key. Resource overloads bar shortcut menu (to invoke shortcut menu click with right mouse button on Resource overloads bar) contains following items:
- Search for overloads – displays a list of overloaded resources in periods corresponding to the point where shortcut menu was invoked.
- Delete Diagram –removes bar. You can customize view of created diagrams of other types, edit content and delete diagrams. To perform these actions invoke diagram shortcut menu with a right mouse button click on a diagram and select:
- Properties – allows to customize view of created diagrams in properties dialog window; - Contents – allows to specify content to display on the diagram in Diagram settings dialog window; - Update – recalculates the diagram according to the changes made in the project; - Delete –removes the diagram.
Resource Work Load Histogram. Displays resource (or resource center) work load on the time scale in resource-hours or quantity of resources, participating in activities execution by specified periods (by hours, by days, by weeks, by months, by quarters, by years). To draw histogram go to menu Report -> General Reports and Diagrams -> Diagram, in opened Diagram settings dialog window check box Resources or Resource Centers, select required resource (or resource center) with left mouse button and specify type of histogram in Resource Load frame:
- Resource-Hour – shows quantity of resource-hours, that selected resource (or resource center) is involved in activities execution by its working periods;
- Quantity - shows quantity of resources, involved in activities execution by its working periods;

Reports and Diagrams
226
Diagrams of Cost and Material Consumption. These diagrams display activity cost or materials consumption on activities execution by specified periods (by hours, by days, by weeks, by months, by quarters, by years). Following diagram types are available:
- Total cost diagram – shows total costs by specified periods To draw histogram go to menu Report -> General Reports and Diagrams -> Diagram, in opened Diagram settings dialog window check box General, select Total Cost.
- Materials (Material Centers) consumption – shows selected material (or Material Centers) consumption by specified periods To draw histogram go to menu Report -> General Reports and Diagrams -> Diagram, in opened Diagram settings dialog window check box Materials (or Material Centers), select required material (or Material Centers) with left mouse button click.
- Diagram of costs – shows selected cost component (or Cost Center) value by specified periods To draw histogram go to menu Report -> General Reports and Diagrams -> Diagram, in opened Diagram settings dialog window check box Cost Components (or Cost Center), select required cost component (or Cost Center) with left mouse button click.
Diagrams of Volumes, Durations and Resource-hours. Displays values of:
- Activity volumes (in Activity Gantt) or resource assignments (in Resource Gantt) by specified periods; To draw histogram go to menu Report -> General Reports and Diagrams -> Diagram, in opened Diagram settings dialog window check box General, select Volume.
- Activity duration in hours (in Activity Gantt) or resources work durations in hours (in Resource Gantt) by specified periods; To draw histogram go to menu Report -> General Reports and Diagrams -> Diagram, in opened Diagram settings dialog window check box General, select Duration (Hours).
- Activity resource-hours (in Activity Gantt) or assigned resource resource-hours (in Resource Gantt) by specified periods; To draw histogram go to menu Report -> General Reports and Diagrams -> Diagram, in opened Diagram settings dialog window check box General, select Resource-hours.
You can also specify additional options in Diagram settings dialog window: Cumulative (disabling this option would display result for each period), Include Actual (disabling this option would exclude historical data from diagram, i.e. data prior to project data date). Options of the above mentioned diagrams can be specified in Diagram settings dialog window. Earned Value Analysis Diagram. Earned Value Analysis diagram shows actual and projected values of:
- Actual Cost of Work Performed (ACWP), or Actual Cost; - Budgeted Cost of Work Performed (BCWP), or Earned Value; - Budgeted Cost of Work Scheduled (BCWS), or Planned Value; - Cost Variance (CV); - Schedule Variance (SV); - Cost Variance in percent (CV%); - Schedule Variance in percent (SV%); - Cost Performance Index (CPI); - Schedule Performance Index (SPI); - Cost Performance Index in percent (CPI%); - Schedule Performance Index in percent (SPI%);

Reports and Diagrams
227
Options of Earned value analysis diagram can be specified in Earned value analysis diagram setup dialog window. Resource Overloads Bar. Resource overloads bar can be displayed for all resources of the whole project as green bar with red vertical lines corresponding to periods of time, when resources are overloaded when schedule is calculated without resource leveling. To display Resource overloads bar select Report -> Resource Overloads Bar, then press button Resource peak workload
(or select menu item Calculations -> Resource Peak Workload) or Ctrl + F8 as hot key. Success Probability Trends. Success Probability Trends (available in Activity Gantt only) show target indices (e.g. finish date, total cost, etc.) probabilities’ changes as the project progresses and performance data is included. Options of Success Probability Trends diagram can be specified in Success probabilities diagram options dialog window. See Gantt diagram descriptions for additional details.
29.1.4. Diagram Settings Dialog Window
Parameters and Data Page.
Diagram Name – name of the diagram created. By default diagram name corresponds to report object name;
Frame Report Beginning and End allows to choose the period for which the report is created:
Whole Project – the report will be created under the whole project.
By selecting Selected Period option, in fields Start and Finish date and time of the beginning and the end of the period for which the report is created (double click in this cell opens mini-calendar dialog window to set date and time easier) can be set.

Reports and Diagrams
228
By selecting Shift from Data Date option, in fields Shift of Beginning and Shift of end the quantity of days added by current time of the project to receive the certain interval of time for which the report will be created can be set.
Parameters to create the diagram are selected in this page. Choosing parameters is possible by group buttons: General; Cost Components; Cost Centers; Materials; Material Centers, Material Sets and User Fields (only Numerical User Fields).
Depending on the chosen parameter the list of corresponding elements will be available to choose in the list which is located on the left. This list can be sorted by Code and Name. From this list, move necessary elements to the list which is on the right with button >> to complete selection. It is possible to include elements more than once to have their datas in multiple places.
Elements can be ordered in the list which is on the right. Chosen element can be moved downwards or upwards in the list by using corresponding «Up» – «Down» buttons (fields will be displayed in diagram with this order).Button << will remove selected objects from list.
Sort button opens parameter sorting setup dialog window, where you can select descending or ascending (if descending option is not selected by default it will be sorted ascending) options to sort.
Note That: in choice of parameters Resources and Resource Centers in the left bottom corner Resources frame will be accessible. Depending on, on what parameter the report will be generated, it is necessary to choose one of options Resource Hours, Quantity, Resource Hours (Free), or Quantity (Free), and only then to transfer objects to the right field. Parameters Resource Hours (Free), and Quantity (Free) display free quantity of the chosen resource or quantity free resource-hours.
Note That: option Total Cost becomes accessible in a choice of parameters Cost components, Materials and Material Centers. When it will be selected data on the chosen parameter will be displayed in the report in base project currency (base currency is the monetary unit in which final expenses of the project in view of cost component unit cost and cost component cost periods and materials are considered).
Frame Parameter Type contains options: Total, Consumption, Income. Depending on which option is selected, in the report final expenses on chosen parameters, only charges, or only incomes will be displayed accordingly.
Baseline allows to display inclusion of an option in the report data on the chosen parameters from the base version (before generating reports on templates it is necessary to specify the baseline in project properties dialog window). The option should be included before transferring parameter to the right field of the list of parameters.
Report Parameters Wizard button, located in the left top part, allows choosing and adding basic additional parameters to report. As a result report becomes more detailed, as different types of data and various combinations will be incorporated in it. Thus, use of additional parameters will allow receiving various reports.
Button Formulae invokes formulae creation dialog window
Frame By Period allows setting an interval of time for which report data will be generated. For example, period By weeks is set by default. It means, that data will be included in the report on the chosen parameters per week.
Note That: If period By Weeks is chosen; in column headings, first day dates of each week (Monday) will be written. For example: 02.02.2006; 09.02.2006 and so on. To display the name of last day of the week in document columns heading this option must be included in Rows and Columns page (option: Use the last day of the week in column name)
- Cumulative – whether to form report with cumulative result;
- Include Plan – whether to include in the report target parameters of material costs, costs, workload or resource quantities;
- Include Actual – whether to include in the report actual parameters of material costs, costs, workload or resource quantities;
- For Specified Period – shows whether the report will be created for the certain period. Dates of beginning and end must be specified in fields Start and Finish;
- Show Revenue as Positive – if selected the income of cost components and production of materials are displayed in the report as positive numbers, and the charge of materials and cost components - negative;
- Availability – inclusion of the given option allows to display in the report remainings on the chosen parameters at the end of the period which was set in a By Periods frame.
Button Save as Report Template allows keeping settings of the created report in the EVA report templates table for subsequent uses. In the opened dialog window a name and code for template should be set. It is possible to rename templates, from EVA report templates table in their EVA report template properties dialog window.
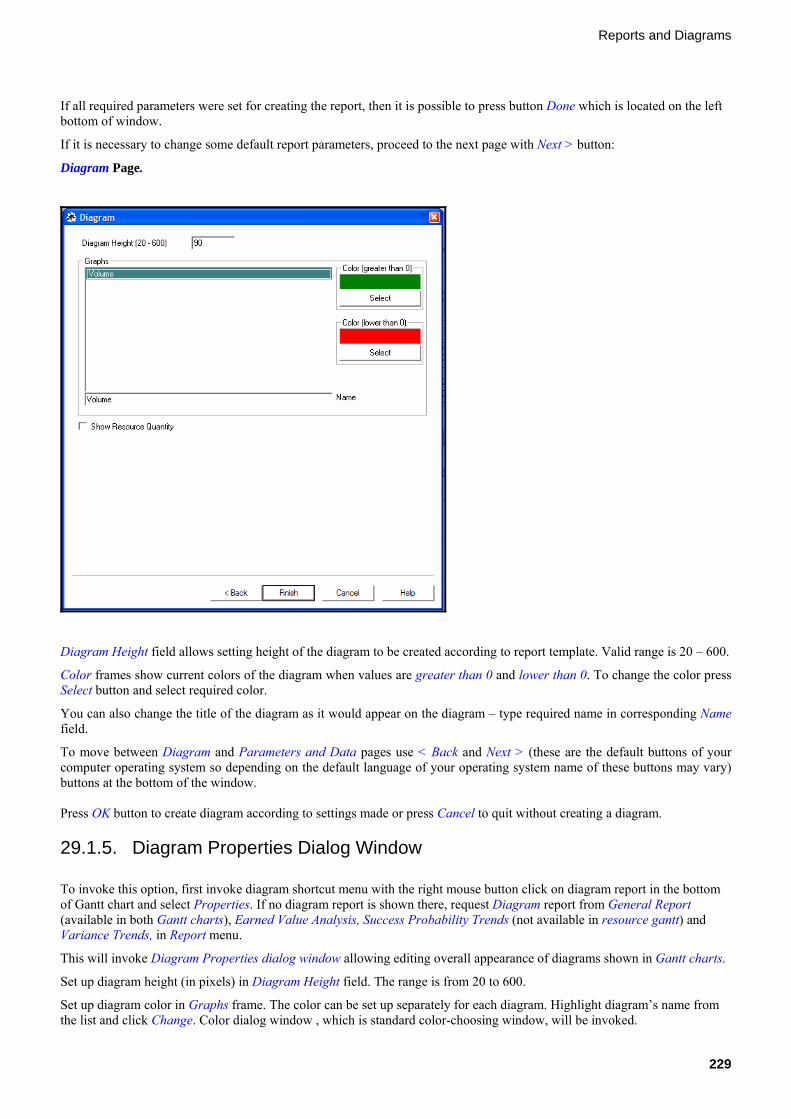
Reports and Diagrams
229
If all required parameters were set for creating the report, then it is possible to press button Done which is located on the left bottom of window.
If it is necessary to change some default report parameters, proceed to the next page with Next > button:
Diagram Page.
Diagram Height field allows setting height of the diagram to be created according to report template. Valid range is 20 – 600.
Color frames show current colors of the diagram when values are greater than 0 and lower than 0. To change the color press Select button and select required color.
You can also change the title of the diagram as it would appear on the diagram – type required name in corresponding Name field.
To move between Diagram and Parameters and Data pages use < Back and Next > (these are the default buttons of your computer operating system so depending on the default language of your operating system name of these buttons may vary) buttons at the bottom of the window. Press OK button to create diagram according to settings made or press Cancel to quit without creating a diagram.
29.1.5. Diagram Properties Dialog Window
To invoke this option, first invoke diagram shortcut menu with the right mouse button click on diagram report in the bottom of Gantt chart and select Properties. If no diagram report is shown there, request Diagram report from General Report (available in both Gantt charts), Earned Value Analysis, Success Probability Trends (not available in resource gantt) and Variance Trends, in Report menu.
This will invoke Diagram Properties dialog window allowing editing overall appearance of diagrams shown in Gantt charts.
Set up diagram height (in pixels) in Diagram Height field. The range is from 20 to 600.
Set up diagram color in Graphs frame. The color can be set up separately for each diagram. Highlight diagram’s name from the list and click Change. Color dialog window , which is standard color-choosing window, will be invoked.

Reports and Diagrams
230
Set up diagram name in Name field by typing new name directly in the field.
29.2. Earned Value Analysis
29.2.1. Earned Value Analysis
Earned value analysis is a specific technique for measuring the performance of work and used to establish the performance measurement baseline (PMB). It combines project scopes, costs, and time limits and helps project team to estimate project execution process.
Earned value analysis is based on three basic parameters calculated for each activity:
2. Budgeted Cost of Work Scheduled (BCWS), or Planned Value is part of budgeted activity cost that should be used up by the time according to basic plan. BCWS is also the authorized budget assigned to the scheduled work to be accomplished for a schedule activity or work breakdown structure component.
3. Actual Cost of Work Performed (ACWP), or Actual Cost is actual expenditure on activity works finished by the current moment of time. Total costs actually incurred and recorded in accomplishing work performed during a given time period for a schedule activity or work breakdown structure component. ACWP can sometimes be direct labor hours alone direct costs alone or all costs including indirect costs.
4. Budgeted Cost of Work Performed (BCWP), or Earned Value is budgeted cost of actually performed activity works. BCWP is also the value of work performed expressed in terms of the approved budget assigned to that work for a schedule activity or work breakdown structure component.
These are parameters used in different combinations to estimate actual project execution compared to the scheduled one. The following indicators are used most frequently:
Original Cost Variance:
OCV = BCWP - ACWP
When used effectively, allows estimating cost variances and probability trends for individual activities as much as for activities groups, phases, and project in general.
Cost Variance (%):
CV% = (OCV / ACWP) x 100
Cost Variance in percent is relative indicator showing what share of actual cost of work performed the cost variance takes.
Schedule Variance:
SV = BCWP - BCWS

Reports and Diagrams
231
Schedule Variance compares budgeted cost of work performed with budget. Instead of cost usually used as performance characteristic, other important properties can be used in this equation: Volumes, Man-hours, Main materials. As Cost Variance, Schedule Variance allows predicting in some early stages of project execution, negative and positive variances and trends for single activities, phases, and the project in general.
Schedule Variance in percent:
SV% = (SV / BCWS) x 100
Schedule Variance in percent is relative indicator showing what share of budgeted costs Schedule Variance takes.
Cost Performance Index:
CPI = BCWP / ACWP
To predict and estimate project execution in cost terms, cost performance indexes is often used. It is budgeted and actual costs of work performed ratio.
Cost Performance Index in percent:
CPI% = (BCWP / ACWP) x 100
Cost Performance Index can be calculated in percent.
In some applications, the following indicators are used to predict project completion date:
Schedule Performance Index:
SPI = BCWP / BCWS
Schedule Performance Index equaled to budgeted cost of work performed over budgeted cost ratio, characterizes work completion term variance.
Schedule Performance Index in percent:
SPI% = (BCWP / BCWS) x 100
Schedule Performance Index can be calculated in percent.
The following indicators in Earned Value Analysis make up group of trend indicators:
Estimate to Completion:
ETC = ACWP + PF x (BAC - BCWP)
Estimate to Completion is sum of actual cost of work performed (ACWP) and budgeted cost of remaining work (BAC - BCWP) multiplied by Performance Factor. BAC stands for Budget at Completion, which is sum of costs of all project work according to baseline. Performance Factor value depends on subjective estimation of current cost variances of work and shows how many times future actual expenditure will exceed budgeted ones.
If project team decides that current variance is of coincidental nature and that future cost of work will correspond to the budgeted, Performance Factor equals to 1:
ETC = ACWP + (BAC - BCWP)
If current variances are expected to correspond with the future ones, Performance Factor is set up as inverse to Cost Performance Index (CPI):
ETC = ACWP + (BAC - BCWP) / CPI
In other cases, Performance Factor is set up as some weighted value.
Variance at Completion:
VAC = BAC - ETC
Variance at Completion compares Budget at Completion (BAC) with Estimate to Completion (ETC).
Variance at Completion in percent:
VAC% = (VAC / ETC) x 100
Variance at Completion in percent shows what percent Variance at Completion is from Estimate to Completion.
To Complete Performance Index:
TCPI = ((BAC - BCWP) / (ETC - ACWP)) x 100

Reports and Diagrams
232
To Complete Performance Index shows what percent budgeted cost of remaining work is of the estimated one. In other words, shows what effectiveness (in percent) should be applied to remaining work to reach Estimate to Completion value.
These are some cost estimations of project completion.
The following indicators are also used in Earned Value Analysis:
Percent Scheduled:
PSc = (BCWS / BAC) x 100
Percent Scheduled shows what percent of cost of work scheduled to be spent by the current moment of time.
Percent Spent:
PSp = (ACWP / BAC) x 100
Percent Spent shows what percent of scheduled cost of work was spent to the current moment of time.
Note That: To perform Earned Value Analysis, baseline must be set up .
29.3. Success Probabilities Trends
29.3.1. Success Probabilities Report Settings Dialog Window

Reports and Diagrams
233
Page Parameters and Data– Success Probability Trends contains following fields:
- Report Name – name of report (by default corresponds to the name of project); - Report Code – code of report (by default corresponds to the code of project); - Report Version – version number of report (by default corresponds to the version number of project); Frame Report Beginning and End allows to choose the period for which the report is created: Whole Project – the report will be created under the whole project. By selecting Selected Period option, in fields Start and Finish date and time of the beginning and the end of the period for which the report is created (double click in this cell opens Mini-calendar dialog window to set date and time easier) can be set. By selecting Shift from Data Date option, in fields Shift of Beginning and Shift of end the quantity of days added by current time of the project to receive the certain interval of time for which the report will be created can be set.
Parameters to create the diagram are selected in this page. Choosing parameters is possible by group buttons: General; Cost Components; Cost Centers; Materials; Material Centers, Material Sets and User Fields (only Numerical User Fields). Depending on the chosen parameter the list of corresponding elements will be available to choose in the list which is located on the left. This list can be sorted by Code and Name. From this list, move necessary elements to the list which is on the right with button >> to complete selection. It is possible to include elements more than once to have their data in multiple places. Elements can be ordered in the list which is on the right. Chosen element can be moved downwards or upwards in the list by using corresponding «Up» – «Down» buttons (fields will be displayed in diagram with this order).Button << will remove selected objects from list. Sort button opens parameter sorting setup dialog window, where you can select descending or ascending (if descending option is not selected by default it will be sorted ascendingly) options to sort.
Button Save as Report Template allows keeping settings of the created report in EVA report templates table for subsequent uses. In the opened dialog window a name and code for template should be set. It is possible to rename templates, from EVA report templates table in their template properties dialog windows. . If all required parameters were set for creating the report, then it is possible to press button Done which is located on the left bottom of window.

Reports and Diagrams
234
If it is necessary to change some default report, proceed to the next page with Next > button: Page Rows and Columns
In frame Additional Fields for every object (Activities, Phases; Costs; Cost Centers etc) with Add button it is possible to choose additional fields which will be displayed in the report (by default report will contain Code and Name fields). Additional fields can be ordered in the list which is on the right. Chosen element can be moved downwards or upwards in the list by using corresponding «Up» – «Down» buttons (fields will be displayed in report with this order). Under additional fields list in Column Width floor width of each selected field in the report (column width can be changed manually) is specified. Remove button deletes selected fields from the report. Field Data Columns Width allows changing width of the columns containing data, in the created report. Field Number of rows in cells allows set number of rows in report cells.
In the left lower side of the window fields Rows and Columns are ordered. These fields contain the data: - Object - these are the objects of report i.e., phase or the operation, on which the report will be created. - Parameter - parameter, which will be used for creating the report on the object (for example, total cost, end etcetera). - Date - when comparison of the current project version with baseline is spent and variance trend points are defined. With buttons >> and << it is possible to transfer between fields. Next to each field also «up and down arrow» buttons are located to change order of elements inside of each field. The relative positioning of these data determines appearance of the report, which data will be transferred to report rows and which – to report columns. In the right top part of window frame Row Colors is located, where is possible to choose what color in the report will represent objects (Activities, Phases, etc.): According to Hierarchy or Custom.
According to Hierarchy - color of rows in the report will correspond to objects hierarchical color scale in gantt diagram; Custom - allows changing object row color in the report by Select button. Default button returns color set of all objects to program defaults.
- Delete Blank Rows – shows whether rows which are containing no data will be removed; - Delete Blank Columns – shows whether columns which are containing no data will be removed;

Reports and Diagrams
235
- Additional Fields – whether additional fields (by default in the report there are additional fields Name and Code) will be brought in the report;
- Autofit of Columns – whether there will be standard width of columns (set by default) or they will automatically fit, depending on their data,
- Expand Centers – if as a parameter (chosen on page Parameters) Cost Centers or Material Centers are used, by choosing this option in the report all objects which are a part of this center will be displayed and the line with the center will be total for its cost components;
Button Back returns to Parameters and Data page. Button Done creates report, and report will be present in the right part of main program window Note That: if it is necessary, to view the parameters on which report was created, it is necessary to select option to Keep new report settings in Spider Project Parameters window.
29.3.2. Success Probabilities Diagram Options Dialog Window
Данное диалоговое окно предназначено для создания диаграммы трендов вероятности успеха. Page Parameters and Data – Success Probability Trends contains following fields:
Diagram Name – the name of the diagram (by default corresponds to the name of object on which the diagram is created). Frame Report Beginning and End allows to choose the period for which the diagram is created: Whole Project – the report will be created under the whole project. By selecting Selected Period option, in fields Start and Finish date and time of the beginning and the end of the period for which the diagram is created (double click in this cell opens "Mini-calendar dialog window" to set date and time easier) can be set. By selecting Shift from Data Date option, in fields Shift of Beginning and Shift of end the quantity of days added by current time of the project to receive the certain interval of time for which the diagram will be created can be set.

Reports and Diagrams
236
By means of group buttons, located below, the parameter on which the success probability trends diagrams will be created gets out: General; Cost Components; Cost Centers; Materials; Material Centers; Material Sets and User Fields.(only numerical) Depending on the chosen parameter, in the left floor of a window there will be a list. In the appeared list it is necessary to select the necessary object and to transfer it to the right field of list by means of the button >>. The list can be sorted on the Code or the Name of object, by choosing the corresponding option under the list. Button << removes object from the right field. Success probability trends diagrams can be created at once on several parameters. Properties button opens report parameters dialog window, where its possible to edit characteristics of selected parameter from the list located on the right side. Sort button opens parameter sorting setup dialog window, where you can select descending or ascending (if descending option is not selected by default it will be sorted ascendingly) options to sort. Button Save as Report Template Allows keeping settings of the created diagram in the EVA report templates table for subsequent use. In the invoked dialog window specify the name and the code for the template to be saved. It is possible to rename the saved template anytime by opening it from EVA report templates table and evoking its properties.
If enough parameters were set by the user for construction of the diagram press Done button which is on the left bottom part of page. The diagram will be created on the chosen parameters. If it is necessary to change some default parameters of the diagram (the name of a parameter on the diagram, color and the size of the diagram) with button > (text in this button will depend on your computer’s operating system’s default language) the following page of dialog window opens:
Page Diagram
In field Diagram Height (20 – 600) it is possible to change the height of the formed diagram between values 20(min) and 600 (max). In field Graphs its possible to change Color of diagram (with Select button) and name of the data on diagram (in field -Name). Button < (text in this button will depend on your computer’s operating system’s default language) returns to the previous Parameters and Data page to re-edit any parameters of the diagram.

Reports and Diagrams
237
Button Done (text in this button will depend on your computer’s operating system’s default language) creates the diagram. Note That: After the creating diagram, if it is necessary for the user, to be able to view again the parameters on which the diagram was created, (on page Parameters and data) before the creation of the diagram it is necessary to select option in a to Keep new report settings from Spider Project Parameters window.
29.4. Variance Trends
29.5. Project Truncation
29.5.1. Project Truncation by Period Dialog Window
Period for project truncation report is specified in this dialog window.
Set report starting and ending dates From and To fields in By Period frame.
Pressing Project Data Date button sets From field equal to project data date.

Report Templates
238
30. Report Templates
30.1. Report Template While working with projects, as a rule, it is necessary for user to receive periodically reports or diagrams created under certain forms. For this purpose it is convenient to use report templates
In a report pattern certain report or diagram parameters created and kept for further uses, for example, on which object the report (object can be an activity, a phase, a resource or a department) is created, which parameters will be deduced in the report, how will it be grouped etc.
In Spider Project software it is possible to create reports and diagrams on templates : General reports and diagrams, Earned Value Analysis reports and diagrams, Success Probability Trends reports and diagrams and Variance trends reports and diagrams.
At creation on a template of any of the set forth above reports, a window with the list of corresponding report templates, where it is necessary to choose the name of the necessary one, opens. Characteristics of reports templates are set and edited in corresponding dialog windows:
- General report properties dialog window;
- EVA report report properties dialog window;
- Success probability trends report properties dialog window;
- Variance report properties dialog window.
Report patterns are created and stored in corresponding tables:
- Reports(general) table (by default this table contains five standard report templates);
- EVA reports table;
- Success probability trends table;
- Variance report trends table.
30.2. Report Version and Period Dialog Window
Report version and period dialog window is opened before creating reports on templates in case Define version number and report period option is enabled in report template properties dialog window.
Version field contains version number of the last report created. To replace existing report with a new one – leave Version number unchanged. For a new Version number new report file will be created and its icon will appear in Documents section of the main program window
Start and Finish fields allows to set report period starting and ending date and time.
30.3. General Report Templates
30.3.1. Standard Report Templates
By default project contains the following report templates:
- Total Cost;

Report Templates
239
- All Cost Components; - All Materials; - All Resources - Quantity; - All Resources - Resource Hours - Resources - Overloads
Standard report templates have predefined name, code and parameters list; these properties of standard report templates cannot be edited. You can edit other template properties in Report template properties dialog window.
Standard report templates are stored and can be edited in standard report templates table.
Total Cost standard template allows to receive the report only on total costs. In table reports created on other standard patterns, data at once on all parameters of the chosen template, for example, on all cost components of the project, on all materials of the project, on all resources of the project (by their quantity(amount), workload or overload) will be displayed.
Resources – Overloads standard pattern creates only table report, and to create diagram with it is not possible. On the rest of templates it is possible to create both table reports and diagrams. Diagrams can be formed only on one parameter(the first in parameters list). On Data page of Resources – Overloads standard pattern there is an additional option to Expand Resource Overloads to Assignments. At its inclusion, in the given report besides overloaded resources, names of activities where resources are overloaded, will be displayed.
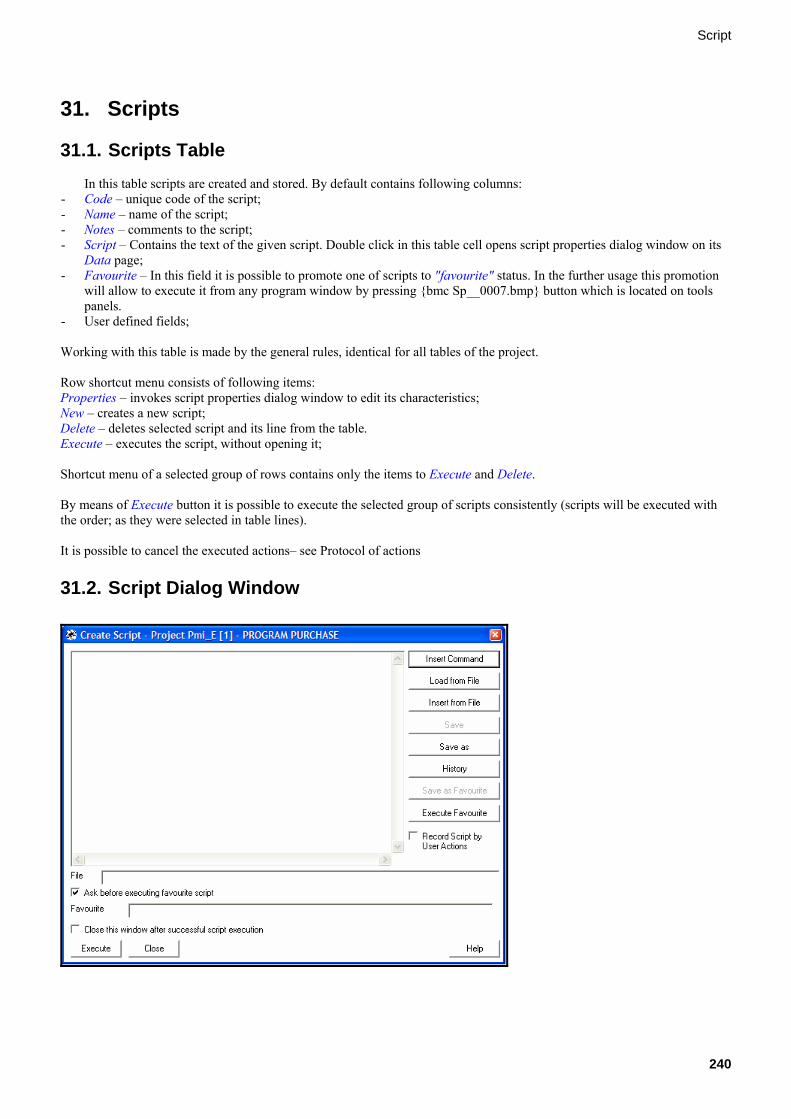
Script
240
31. Scripts
31.1. Scripts Table In this table scripts are created and stored. By default contains following columns: - Code – unique code of the script; - Name – name of the script; - Notes – comments to the script; - Script – Contains the text of the given script. Double click in this table cell opens script properties dialog window on its
Data page; - Favourite – In this field it is possible to promote one of scripts to "favourite" status. In the further usage this promotion
will allow to execute it from any program window by pressing {bmc Sp__0007.bmp} button which is located on tools panels.
- User defined fields; Working with this table is made by the general rules, identical for all tables of the project. Row shortcut menu consists of following items: Properties – invokes script properties dialog window to edit its characteristics; New – creates a new script; Delete – deletes selected script and its line from the table. Execute – executes the script, without opening it; Shortcut menu of a selected group of rows contains only the items to Execute and Delete. By means of Execute button it is possible to execute the selected group of scripts consistently (scripts will be executed with the order; as they were selected in table lines). It is possible to cancel the executed actions– see Protocol of actions
31.2. Script Dialog Window

Script
241
This dialog window is intended for creation and editing scripts. Using scripts will allow automating numerous performance processes of set action sequences. The scripts dialog window is invoked from the main menu of any table or gantt chart (from menu items Edit -> Script -> Create), and also from the main program window (from menu items File-> Script -> Create). Scripts can be created in the different ways: - Insert Command (thus Add command dialog window - containing necessary commands list will open and with OK
button they can be added to the script). - Insert from a file a previously created script file is possible to add in the script structure which is in the given dialog
window. - Load from File (in the opened window it is necessary to choose previously created and saved script, which will be
imported from a text file). Attention: The script loaded from a file, entirely replaces the script in the dialog window. - From command lines (if the previous script has been kept in a text file). For this in a command line, it is necessary to
prescribe a complete way to Spider exe-file, then to put down symbols /s exec and to specify a full way to the script file. For example: D \SPIDER \sp.exe/s exec scenar.txt
- Commands can be entered manually consistently, one after another, directly in the field of given dialog window Save button allows to keep the created script on a disk where it has been kept earlier (a way to the file containing script is specified in the floor on the bottom part of window) Save As allows to keep created script in a text file for its further use(to save the same script in a different path this option should be use). Button History invokes script history dialog window, where it is possible to choose previously executed scripts and to add it in script window. The history of scripts (creation time and the description of each script) is being kept only untill closing the program. Button Save as Favourite saves the script as «Favourite», which will allow to execute this script instantly, from any program window by clicking button which is located on tools panel (a way to a file with the script is displayed in File field) Execute Favourite – executes favourite script. Record Script by User Actions – to create the script on actions of the user, it is necessary to select this option and, without closing the script creation dialog window, to execute the certain sequence of actions. After all actions are executed and list of commands are automatically added, it is necessary to save the created script, or to execute it at once. File – In this field, full way to the file with the script is specified. The way to the file is displayed after saving created script for the first time or after an inserting (loading) the script from a text file. Ask before executing favourite script – By selecting this option, before performance of the script which was selected as favourite, the inquiry about action acknowledgement will appear. Favourite – In this field, full way to the file with the favourite script is specified. The way to the file will be displayed after assigning the script as favourite by pressing button Save as Favourite. Close this window after successful script execution – the given option allows choosing, whether to keep this dialog window opened on screen or is necessary to close it after the script it is successfully executed. If there are any mistakes in the script the software will prevent the script execution. Pressing Execute button executes the script entered in the window.
31.3. Insert Command Dialog Window Add (insert) command dialog window allows you to select and enter script command from the list and enter selected command in the Script command arguments dialog window for further editing in Script dialog window and execution or saving to file. Short description is shown for selected script command.

Script
242
31.4. Script Command Arguments Dialog Window
Script command arguments dialog window is invoked from Add command dialog window when you insert script command that has any arguments.
The appearance of the dialog window invoked is specific to command being inserted and contains all command arguments. Arguments are arranged in different ways to ease the process of entering commands. For example, dialog window of PROJSETSCHED command has the following view:

Script
243
Text fields (e.g. for Structure Code) allows either direct typing required values or choosing from alternatives available (pressing Select button invokes corresponding dialog window). Fields with list boxes (e.g., Method of calculation) allows selecting required value from the list. Fields with radio buttons (Yes, No) allows to select option required.
Brief description of the command can be found at the bottom of the window; detailed description can be accessed on pressing Help button.
You can specify arguments required and press OK. Command with all entered arguments will appear in Script dialog window. Pressing Cancel closes the Script command arguments dialog window without inserting command.
31.5. Script History Dialog Window
Script History Dialog window allows you to repeat script executed during current session of work with project file. The list of date and time of scripts executed is shown in the Time frame. Commands performed in each selected script are shown in the Script frame. You can select required script in the Time frame and press OK button to insert commands from current script into the window of Script dialog window for further editing and execution or saving script to file. Button Cancel closes the dialog window.
31.6. Script Commands
31.6.1. About Script Commands If you perform a task repeatedly, you can automate this task with the aid of scripts. Script includes commands that perform individual tasks. Commands generally refer to certain items in program menus or dialog windows. For example, to create a new project with code ‘delivery’ and version #1 in your ‘Working’ storage, you can run following script command: CREATEPROJNEW ( delivery , 1 , Working ); Several commands can be performed one after another in one script, e.g., OPENPROJ (plant , 2 , Working ); PROJIMPORTFACT ( plant , 1 , Working ); PROJCALCSCHED (); PROJCALCRES (); PROJCALCCOST (); PROJSAVEAS (plant , 3 , Working); PROJCLOSE ();
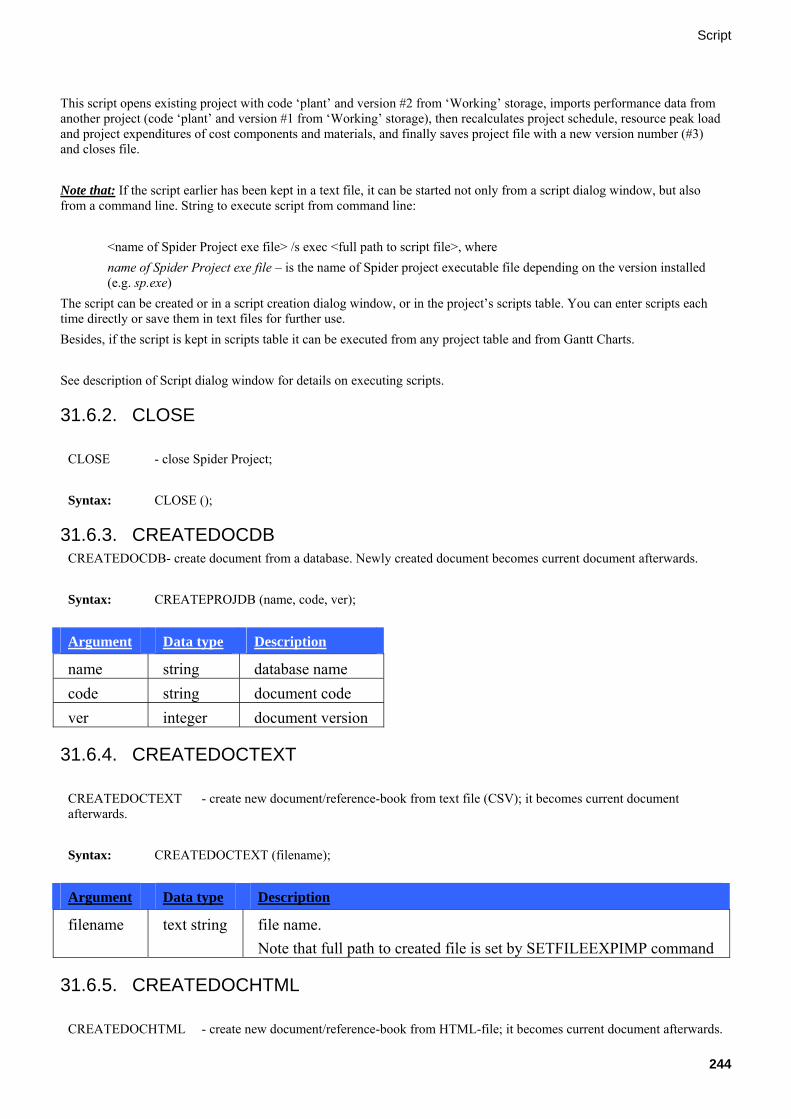
Script
244
This script opens existing project with code ‘plant’ and version #2 from ‘Working’ storage, imports performance data from another project (code ‘plant’ and version #1 from ‘Working’ storage), then recalculates project schedule, resource peak load and project expenditures of cost components and materials, and finally saves project file with a new version number (#3) and closes file. Note that: If the script earlier has been kept in a text file, it can be started not only from a script dialog window, but also from a command line. String to execute script from command line:
<name of Spider Project exe file> /s exec <full path to script file>, where name of Spider Project exe file – is the name of Spider project executable file depending on the version installed (e.g. sp.exe)
The script can be created or in a script creation dialog window, or in the project’s scripts table. You can enter scripts each time directly or save them in text files for further use. Besides, if the script is kept in scripts table it can be executed from any project table and from Gantt Charts. See description of Script dialog window for details on executing scripts.
31.6.2. CLOSE
CLOSE - close Spider Project; Syntax: CLOSE ();
31.6.3. CREATEDOCDB CREATEDOCDB- create document from a database. Newly created document becomes current document afterwards. Syntax: CREATEPROJDB (name, code, ver);
Argument Data type Description
name string database name code string document code ver integer document version
31.6.4. CREATEDOCTEXT
CREATEDOCTEXT - create new document/reference-book from text file (CSV); it becomes current document afterwards. Syntax: CREATEDOCTEXT (filename);
Argument Data type Description
filename text string file name. Note that full path to created file is set by SETFILEEXPIMP command
31.6.5. CREATEDOCHTML
CREATEDOCHTML - create new document/reference-book from HTML-file; it becomes current document afterwards.

Script
245
Syntax: CREATEDOCHTML (filename);
Argument Data type Description
filename text string file name. Note that full path to created file is set by SETFILEEXPIMP command
31.6.6. CREATEDOCNEW
CREATEDOCNEW - create new document/reference-book. (It becomes 'current document' afterwards); Syntax: CREATEDOCNEW (code , ver , storage);
Argument Data type Description
code text string document code ver integer document version storage text string storage name
31.6.7. CREATEPROJDB CREATEPROJDB- create project from a database. Newly created project becomes current project afterwards. Syntax: CREATEPROJDB (name, code, ver);
Argument Data type Description
name string database name code string project code ver integer project version
31.6.8. CREATEPROJFILE
CREATEPROJFILE - create new project from text files of Spider Project format (it becomes 'current project' afterwards) Syntax: CREATEPROJFILE ();
31.6.9. CREATEPROJMPX
CREATEPROJMPX - create new project from MPX-file; Syntax: CREATEPROJMPX (filename);
Argument Data type Description
filename text string file name with full path

Script
246
31.6.10. CREATEPROJMSP CREATEPROJMSP - create project from Microsoft Project database. Newly created project becomes current project afterwards. Syntax: CREATEPROJMSP (filename);
Argument Data type Description
filename string full file name
31.6.11. CREATEPROJNEW CREATEPROJNEW - create new project (it becomes 'current project' afterwards); Syntax: CREATEPROJNEW (code , ver , storage);
Argument Data type Description
code text string project code ver integer project version storage text string storage name
31.6.12. CREATEPROJP3E CREATEPROJP3E - create project from Primavera P3e database. Newly created project becomes current project afterwards. Syntax: CREATEPROJP3E (name, code);
Argument Data type Description
name string Primavera P3e database name code string project code
31.6.13. DOCAPPLYCOLUMNS DOCAPPLYCOLUMNS - applies current document/reference-book to columns of a document/reference-book. Syntax: DOCAPPLYCOLUMNS (code, ver, storage);
Argument Data type Description
code text string destination document code ver integer destination document version storage text string storage name
31.6.14. DOCAPPLYCURRPROJ DOCAPPLYCURRPROJ – apply current document/reference-book to current project.

Script
247
Syntax: DOCAPPLYCURRPROJ ();
31.6.15. DOCAPPLYDOC DOCAPPLYDOC applies current document/reference-book to a document/reference-book. Syntax: DOCAPPLYDOC (code, ver, storage);
Argument Data type Description
code text string destination document code ver integer destination document version storage text string storage name
31.6.16. DOCAPPLYPROJ DOCAPPLYPROJ - applies current document/reference-book to corresponding project table according to source document/reference-book type :
Document/reference-book type (source) Corresponding project table (destination)
Materials Materials Resources Resources Cost components Cost components Activity cost and material requirements (per volume); Activities Resource assignment productivities Assignments Resource assignment work load Assignments Resource assignment cost and material requirements (per volume)
Assignments
Resource assignment cost and material requirements (per quantity)
Assignments
Resource pools Resource skills Multi-resources Multi-resources
Note that to apply General document or reference-book use DOCAPPLYPROJTAB command. Syntax: DOCAPPLYPROJ (code, ver, storage);
Argument Data type Description
code text string destination project code ver integer destination project version storage text string storage name
31.6.17. DOCAPPLYPROJTAB
DOCAPPLYPROJTAB - applies current document or reference-book to a project table;
Syntax: DOCAPPLYPROJTAB (code, ver, storage, tab);
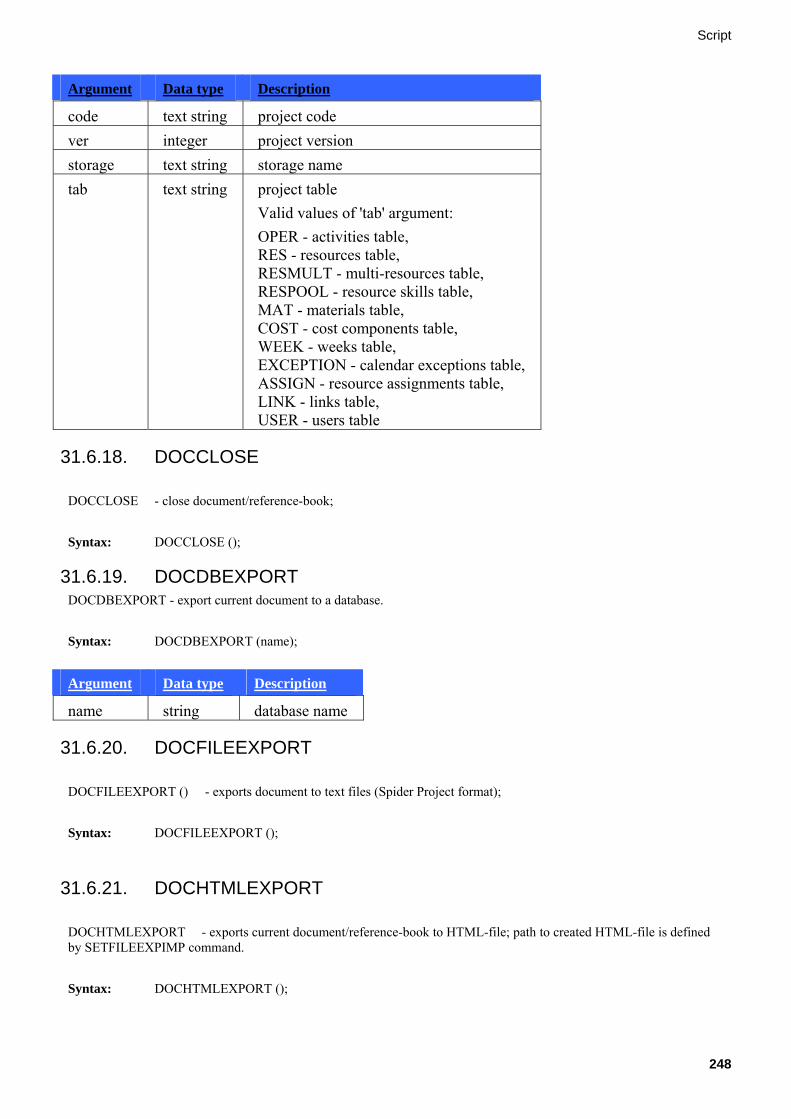
Script
248
Argument Data type Description
code text string project code ver integer project version storage text string storage name tab text string project table
Valid values of 'tab' argument: OPER - activities table, RES - resources table, RESMULT - multi-resources table, RESPOOL - resource skills table, MAT - materials table, COST - cost components table, WEEK - weeks table, EXCEPTION - calendar exceptions table, ASSIGN - resource assignments table, LINK - links table, USER - users table
31.6.18. DOCCLOSE
DOCCLOSE - close document/reference-book; Syntax: DOCCLOSE ();
31.6.19. DOCDBEXPORT DOCDBEXPORT - export current document to a database. Syntax: DOCDBEXPORT (name);
Argument Data type Description
name string database name
31.6.20. DOCFILEEXPORT DOCFILEEXPORT () - exports document to text files (Spider Project format); Syntax: DOCFILEEXPORT ();
31.6.21. DOCHTMLEXPORT DOCHTMLEXPORT - exports current document/reference-book to HTML-file; path to created HTML-file is defined by SETFILEEXPIMP command. Syntax: DOCHTMLEXPORT ();

Script
249
31.6.22. DOCRUNFORMULA DOCRUNFORMULA - execute calculation with formula in current document. Syntax: DOCRUNFORMULA (formula);
Argument Data type Description
formula string formula text
In Spider Project, formulas are made of column codes separated with mathematical operators. Formula starts with column code the calculation is performed for, followed by equality sign and a mathematical expression. Mathematical expression contains column codes, operator, and functions.
31.6.23. DOCSAVE
DOCSAVE - save document/reference-book; Syntax: DOCSAVE ();
31.6.24. DOCSAVEAS
DOCSAVEAS - save document/reference-book with a new name/version number; Syntax: DOCSAVEAS (code , ver , storage);
Argument Data type Description
code text string document code ver integer document version storage text string storage name
31.6.25. DOCSETKEYFIELD DOCSETKEYFIELD - sets document/reference-book key field. Syntax: DOCSETKEYFIELD (field);
Argument Data type Description
field text string key field code
31.6.26. DOCSETPROP DOCSETPROP - sets current document properties. Syntax: DOCSETPROP (CODE : code, VER : ver, NAME: name, NOTES : notes, TYPE : type);
Argument Data Description

Script
250
type
code text string
document code
ver integer document version name text
string document name
notes text string
notes to document
type text string
document type. Valid document types: COMMON – general document or reference-book; MAT – materials; RES – resources; COST – cost components; SPENDOPER – activity cost and material requirements (per volume); PRODASSIGN – resource assignment productivities; LOADASSIGN – resource assignment work load; SPENDASSIGNVOL – resource assignment cost and material requirements (per volume); SPENDASSIGNNUM - resource assignment cost and material requirements (per quantity); RESPOOL – resource skill; RESMULT – multi-resources.
31.6.27. DOCTEXTEXPORT DOCTEXTEXPORT - exports current document to text file (CSV format). Syntax: DOCTEXTEXPORT ();
31.6.28. OPENDOC
OPENDOC - open document/reference-book. (It becomes 'current document' afterwards); Syntax: OPENDOC (code , ver , storage);
Argument Data type Description
code text string document code ver integer document version storage text string storage name
31.6.29. OPENPROJ
OPENPROJ - open project (it becomes 'current project' afterwards); Syntax: OPENPROJ (code , ver , storage);

Script
251
Argument Data type Description
code text string project code ver integer project version storage text string storage name
31.6.30. PROJAPPLYREF PROJAPPLYREF - apply corporate reference-book to the current project. Syntax: PROJAPPLYREF (code);
Argument Data type Description
code string corporate reference-book code from the Corporate reference-books table
31.6.31. PROJAPPLYREFTAB PROJAPPLYREFTAB - apply corporate reference-book to a table of the current project. Syntax: PROJAPPLYREFTAB (code, tab);
Argument Data type Description
code string corporate reference-book code from the Corporate reference-books table tab string project table;
Valid values of 'tab' argument: OPER - activities table MAT - materials table RES - resources table LINK - links table ASSIGN - resource assignments table RESPOOL - resource skills table COST - cost components table RESMULT - multi-resources table USER - users table WEEK - weeks table EXCEPTION - calendar exceptions table
31.6.32. PROJCALCCOST
PROJCALCCOST - calculate project cost components and materials expenditures; Syntax: PROJCALCCOST ();
31.6.33. PROJCALCPROB
PROJCALCPROB - perform success probabilities calculation;

Script
252
Syntax: PROJCALCPROB ();
31.6.34. PROJCALCRES
PROJCALCRES - calculate resources peak work load; Syntax: PROJCALCRES ();
31.6.35. PROJCALCRISK
PROJCALCRISK - perform risk analysis; Syntax: PROJCALCRISK ();
31.6.36. PROJCALCSCHED
PROJCALCSCHED - perform schedule calculation; Syntax: PROJCALCSCHED ();
31.6.37. PROJCALCSCHEDRES
PROJCALCSCHEDRES - perform resource constrained schedule calculation; Syntax: PROJCALCSCHEDRES ();
31.6.38. PROJCLOSE
PROJCLOSE - close project; Syntax: PROJCLOSE ();
31.6.39. PROJCOMPAREBASEPROJ
PROJCOMPAREBASEPROJ - compare project with baseline; Syntax: PROJCOMPAREBASEPROJ ();
31.6.40. PROJCOMPAREPROJ
PROJCOMPAREPROJ - compare project with another project; Syntax: PROJCOMPAREPROJ (code, ver, storage);
Argument Data type Description
code text string project code ver integer project version

Script
253
storage text string storage name
31.6.41. PROJCOPYPHASEASPROJ
PROJCOPYPHASEASPROJ - copy phase as a new project; Syntax: PROJCOPYPHASEASPROJ (phasecode, strcode);
Argument Data type Description
phasecode text string - phase code strcode text string WBS code
31.6.42. PROJDBEXPORT PROJDBEXPORT - export current project to a database. Syntax: PROJDBEXPORT (name);
Argument Data type Description
name string database name
31.6.43. PROJDELCOMPARE
PROJDELCOMPARE - undo project comparison; Syntax: PROJDELCOMPARE ();
31.6.44. PROJDELPROB
PROJDELPROB - clear fields of success probabilities; Syntax: PROJDELPROB ();
31.6.45. PROJDELRISK
PROJDELRISK - undo risk analysis; Syntax: PROJDELRISK ();
31.6.46. PROJEVACALCPFOPER
PROJEVACALCPFOPER - calculate default performance factor for earned value analysis report for activity; Syntax: PROJEVACALCPFOPER (code);
Argument Data type Description

Script
254
code text string activity code
31.6.47. PROJEVACALCPFPHASE
PROJEVACALCPFPHASE - calculate default performance factor for earned value analysis report for phase; Syntax: PROJEVACALCPFPHASE (phasecode, strcode);
Argument Data type Description
phasecode text string phase code strcode text string WBS code
31.6.48. PROJEVACALCPFWBS
PROJEVACALCPFWBS - calculate default performance factor for earned value analysis report for WBS; Syntax: PROJEVACALCPFWBS (code);
Argument Data type Description
code text string WBS code
31.6.49. PROJFILEEXPORT
PROJFILEEXPORT - export project to text files (Spider Project format); Syntax: PROJFILEEXPORT ();
31.6.50. PROJFOLDOPER PROJFOLDOPER - fold or unfold activity assignments in Activity Gantt. Syntax: PROJFOLDOPER (code, fold);
Argument Data type Description
code string activity code fold Y or N fold (Y) or unfold (N) activity assignments
31.6.51. PROJFOLDRES PROJFOLDRES - fold or unfold resource assignments in Resource Gantt. Syntax: PROJFOLDRES (code, fold);
Argument Data type Description
code string resource code
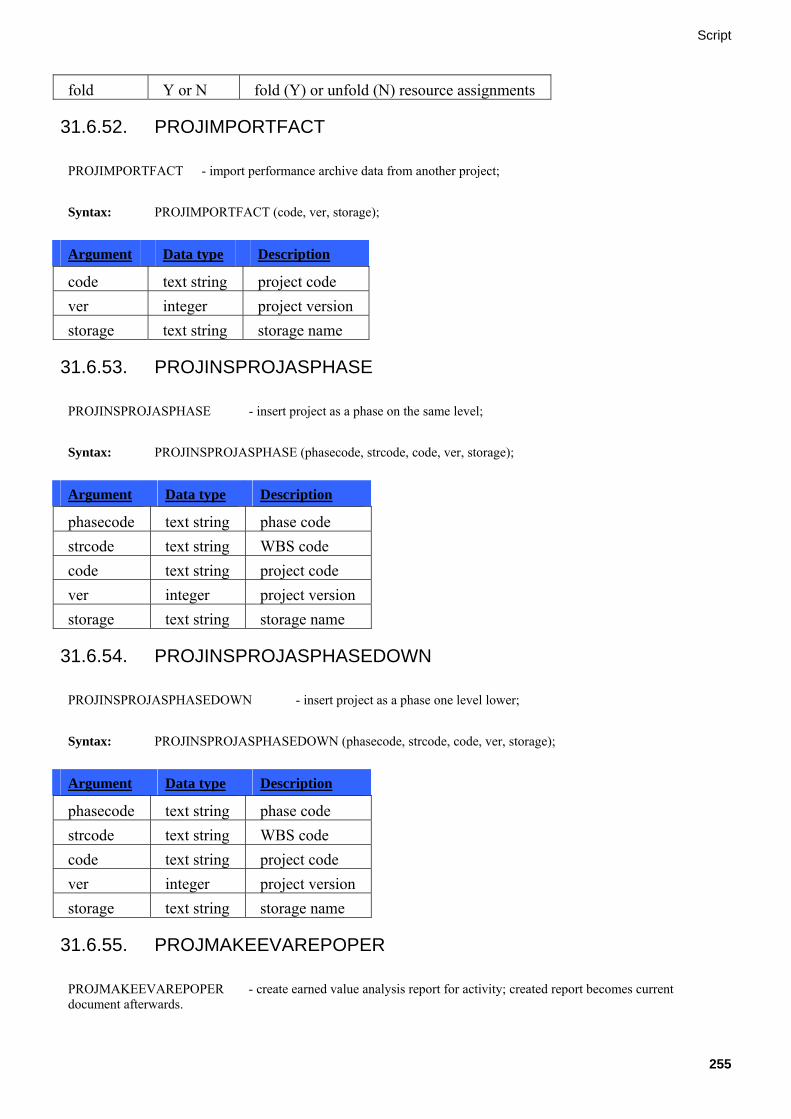
Script
255
fold Y or N fold (Y) or unfold (N) resource assignments
31.6.52. PROJIMPORTFACT
PROJIMPORTFACT - import performance archive data from another project; Syntax: PROJIMPORTFACT (code, ver, storage);
Argument Data type Description
code text string project code ver integer project version storage text string storage name
31.6.53. PROJINSPROJASPHASE
PROJINSPROJASPHASE - insert project as a phase on the same level; Syntax: PROJINSPROJASPHASE (phasecode, strcode, code, ver, storage);
Argument Data type Description
phasecode text string phase code strcode text string WBS code code text string project code ver integer project version storage text string storage name
31.6.54. PROJINSPROJASPHASEDOWN
PROJINSPROJASPHASEDOWN - insert project as a phase one level lower; Syntax: PROJINSPROJASPHASEDOWN (phasecode, strcode, code, ver, storage);
Argument Data type Description
phasecode text string phase code strcode text string WBS code code text string project code ver integer project version storage text string storage name
31.6.55. PROJMAKEEVAREPOPER
PROJMAKEEVAREPOPER - create earned value analysis report for activity; created report becomes current document afterwards.

Script
256
Syntax: PROJMAKEEVAREPOPER (code);
Argument Data type Description
code text string activity code
31.6.56. PROJMAKEEVAREPPHASE
PROJMAKEEVAREPPHASE - create earned value analysis report for phase; created report becomes current document afterwards. Syntax: PROJMAKEEVAREPPHASE (phasecode, strcode);
Argument Data type Description
phasecode text string phase code strcode text string WBS code
31.6.57. PROJMAKEEVAREPWBS
PROJMAKEEVAREPWBS - create earned value analysis report for WBS; created report becomes current document afterwards. Syntax: PROJMAKEEVAREPWBS (code);
Argument Data type Description
code text string WBS code
31.6.58. PROJMAKESPENDREPDEPT
PROJMAKESPENDREPDEPT - create general report for department; created report becomes current document afterwards. Syntax: PROJMAKESPENDREPDEPT (deptcode, strcode);
Argument Data type Description
deptcode text string department code strcode text string WBS code
31.6.59. PROJMAKESPENDREPDEPTPATT PROJMAKESPENDREPDEPTPATT - create general report for department according to report template. Created document (report) becomes active afterwards. Syntax: PROJMAKESPENDREPDEPTPATT (deptcode, strcode, repcode);
Argument Data type Description
code string department code to create report on

Script
257
strcode string OBS code for current department repcode string code of report template to use for report
31.6.60. PROJMAKESPENDREPOBS
PROJMAKESPENDREPOBS - create general report for OBS; created report becomes current document afterwards. Syntax: PROJMAKESPENDREPOBS (code);
Argument Data type Description
code text string OBS code
31.6.61. PROJMAKESPENDREPOBSPATT PROJMAKESPENDREPOBSPATT - create general report for OBS according to report template. Created document (report) becomes active afterwards. Syntax: PROJMAKESPENDREPOBSPATT (code, repcode);
Argument Data type Description
code string OBS code to create report on repcode string code of report template to use for report
31.6.62. PROJMAKESPENDREPOPER
PROJMAKESPENDREPOPER - create general report for activity; created report becomes current document afterwards. Syntax: PROJMAKESPENDREPOPER (code);
Argument Data type Description
code text string activity code
31.6.63. PROJMAKESPENDREPOPERPATT PROJMAKESPENDREPOPERPATT - create general report for activity according to report template. Created document (report) becomes active afterwards. Syntax: PROJMAKESPENDREPOPERPATT (code, repcode);
Argument Data type Description
code string activity code to create report on repcode string code of report template to use for report

Script
258
31.6.64. PROJMAKESPENDREPPHASE
PROJMAKESPENDREPPHASE - create general report for phase; created report becomes current document afterwards. Syntax: PROJMAKESPENDREPPHASE (phasecode, strcode);
Argument Data type Description
phasecode text string phase code strcode text string WBS code
31.6.65. PROJMAKESPENDREPPHASEPATT PROJMAKESPENDREPPHASEPATT - create general report for phase according to report template. Created document (report) becomes active afterwards. Syntax: PROJMAKESPENDREPPHASEPATT (phasecode, strcode, repcode);
Argument Data type Description
code string phase code to create report on strcode string WBS code for current phase repcode string code of report template to use for report
31.6.66. PROJMAKESPENDREPRES
PROJMAKESPENDREPRES - create general report for resource; created report becomes current document afterwards. Syntax: PROJMAKESPENDREPRES (code);
Argument Data type Description
code text string resource code
31.6.67. PROJMAKESPENDREPWBS
PROJMAKESPENDREPWBS - create general report for WBS; created report becomes current document afterwards. Syntax: PROJMAKESPENDREPWBS (code);
Argument Data type Description
code text string WBS code
31.6.68. PROJMAKETRENDREPASSIGN
PROJMAKETRENDREPASSIGN - create success probabilities trend report for activity resource assignment; created report becomes current document afterwards.

Script
259
Syntax: PROJMAKETRENDREPASSIGN (opercode, rescode, index);
Argument Data type Description
opercode text string activity code rescode text string resource code index integer assignment index in activity
31.6.69. PROJMONITORAPPLY PROJMONITORAPPLY - transfer performance data into the project. Syntax: PROJMONITORAPPLY ();
31.6.70. PROJMONITORDBEXPORT PROJMONITORDBEXPORT - export monitoring table data from the current project to a database. Syntax: PROJMONITORDBEXPORT (name);
Argument Data type Description
name string database name
31.6.71. PROJMONITORDBIMPORT PROJMONITORDBIMPORT- import monitoring data to the current project from a database. Syntax: PROJMONITORDBIMPORT (name, code, ver);
Argument Data type Description
name string database name code string project code ver integer project version
31.6.72. PROJMONITORFILEEXPORT PROJMONITORFILEEXPORT - exports project monitoring table to text file (Spider Project format). Syntax: PROJMONITORFILEEXPORT ();
31.6.73. PROJMONITORFILEIMPORT PROJMONITORFILEIMPORT - imports project monitoring table from text file (Spider Project format). Syntax: PROJMONITORFILEIMPORT ();
31.6.74. PROJMPXEXPORT
PROJMPXEXPORT - export project to MPX-file;

Script
260
Syntax: PROJMPXEXPORT (structcode, filename);
Argument Data type Description
structcode text string WBS code filename text string file name with full path
31.6.75. PROJMSPEXPORT PROJMSPEXPORT - export current project to Microsoft Project database. Syntax: PROJMSPEXPORT ();
31.6.76. PROJP3EEXPORT PROJP3EEXPORT - export current project to Primavera P3e database. Syntax: PROJP3EEXPORT (COSTCENT : costcent, MPXCOSTCENT : code);
Argument Data type Description
costcent Y or N Whether to use cost centers in total costs
code string Code of cost component Arguments can be listed in the any order, and it is not necessary to list all.
31.6.77. PROJRUNFORMULATAB PROJRUNFORMULATAB - execute calculation with formula in project table. Syntax: PROJRUNFORMULATAB (formula, tab);
Argument Data type Description
formula string formula text tab string project table. Valid values of 'tab' argument:
GANTTOPER - Activity Gantt GANTTRES - Resource Gantt OPER - activities table MAT - materials table RES - resources table LINK - links table ASSIGN - resource assignments table RESPOOL - resource skills table COST - cost components table ACTUAL - monitoring table RESMULT - multi-resources table USER - users table CALEN - calendars table WEEK - weeks table RIGHT - access rights table
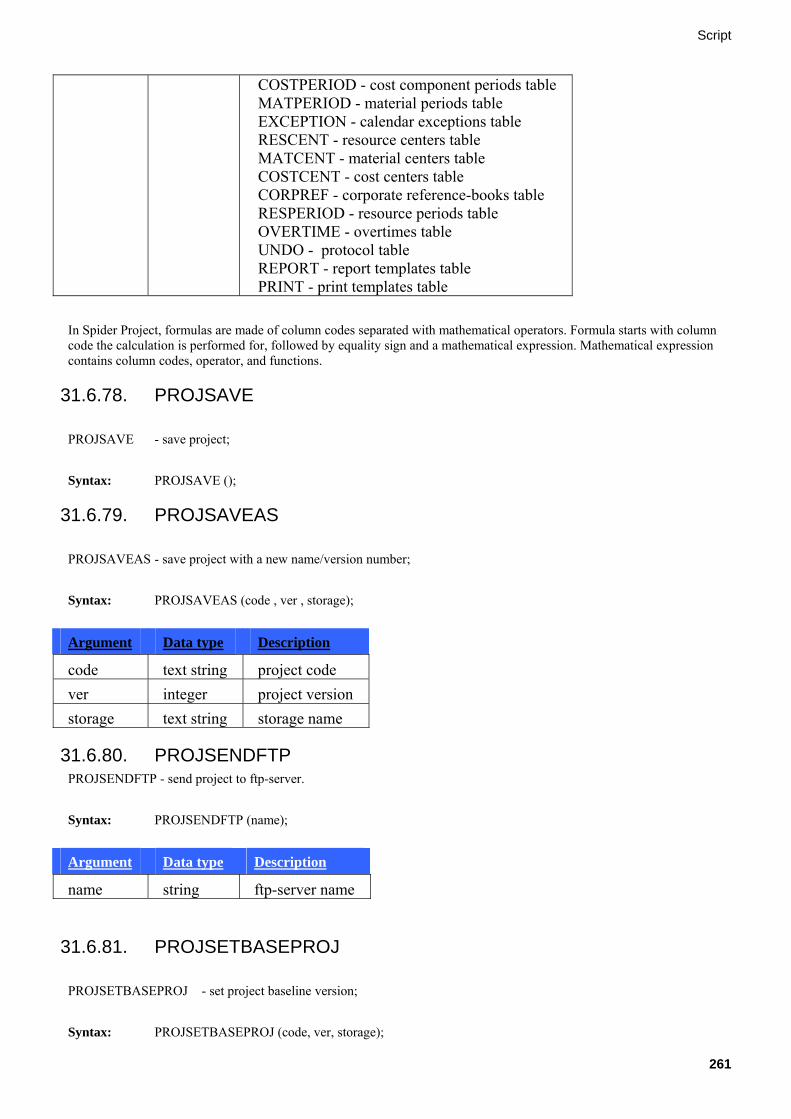
Script
261
COSTPERIOD - cost component periods table MATPERIOD - material periods table EXCEPTION - calendar exceptions table RESCENT - resource centers table MATCENT - material centers table COSTCENT - cost centers table CORPREF - corporate reference-books table RESPERIOD - resource periods table OVERTIME - overtimes table UNDO - protocol table REPORT - report templates table PRINT - print templates table
In Spider Project, formulas are made of column codes separated with mathematical operators. Formula starts with column code the calculation is performed for, followed by equality sign and a mathematical expression. Mathematical expression contains column codes, operator, and functions.
31.6.78. PROJSAVE
PROJSAVE - save project; Syntax: PROJSAVE ();
31.6.79. PROJSAVEAS
PROJSAVEAS - save project with a new name/version number; Syntax: PROJSAVEAS (code , ver , storage);
Argument Data type Description
code text string project code ver integer project version storage text string storage name
31.6.80. PROJSENDFTP PROJSENDFTP - send project to ftp-server. Syntax: PROJSENDFTP (name);
Argument Data type Description
name string ftp-server name
31.6.81. PROJSETBASEPROJ
PROJSETBASEPROJ - set project baseline version; Syntax: PROJSETBASEPROJ (code, ver, storage);

Script
262
Argument Data type Description
code text string project code ver integer project version storage text string storage name
31.6.82. PROJSETCOMPARE
PROJSETCOMPARE - set project comparison options; Syntax: PROJSETCOMPARE (COMMON : common, COST : cost, COSTCENT : costcent, MAT : mat, MATCENT : matcent);
Argument Data type Description
common Y or N include general fields into comparison cost Y or N include cost components into comparison costcent Y or N include cost centers into comparison mat Y or N include materials into comparison matcent Y or N include material centers into comparison
31.6.83. PROJSETCOMPARECOMMON
PROJSETCOMPARECOMMON - set general field codes for project comparison; Syntax: PROJSETCOMPARECOMMON (code1, .., codeN);
Argument Data type Description
codei text string field code. Valid field code values: CostTotal - Total Cost DurSum - Duration (Hours) Fin - Finish Start - Start VolSum - Volume WorkLoadSum - Resource-hours
31.6.84. PROJSETCOMPARECOMMONALL
PROJSETCOMPARECOMMONALL - set all general fields to participate in project comparison; Syntax: PROJSETCOMPARECOMMONALL ();
31.6.85. PROJSETCOMPARECOST
PROJSETCOMPARECOST - set cost components codes for project comparison; Syntax: PROJSETCOMPARECOST (code1, .., codeN);

Script
263
Argument Data type Description
codei text string cost component code
31.6.86. PROJSETCOMPARECOSTALL
PROJSETCOMPARECOSTALL - set all cost components to participate in project comparison; Syntax: PROJSETCOMPARECOSTALL ();
31.6.87. PROJSETCOMPARECOSTCENT
PROJSETCOMPARECOSTCENT - set cost center codes for project comparison; Syntax: PROJSETCOMPARECOSTCENT (code1, .., codeN);
Argument Data type Description
codei text string cost center code
31.6.88. PROJSETCOMPARECOSTCENTALL
PROJSETCOMPARECOSTCENTALL - set all cost centers to participate in project comparison; Syntax: PROJSETCOMPARECOSTCENTALL ();
31.6.89. PROJSETCOMPAREMAT
PROJSETCOMPAREMAT - set material codes for project comparison; Syntax: PROJSETCOMPAREMAT (code1, .., codeN);
Argument Data type Description
codei text string material code
31.6.90. PROJSETCOMPAREMATALL
PROJSETCOMPAREMATALL - set all materials to participate in project comparison; Syntax: PROJSETCOMPAREMATALL ();
31.6.91. PROJSETCOMPAREMATCENT
PROJSETCOMPAREMATCENT - set material center codes for project comparison; Syntax: PROJSETCOMPAREMATCENT (code1, .., codeN);

Script
264
Argument Data type Description
codei text string material center code
31.6.92. PROJSETCOMPAREMATCENTALL
PROJSETCOMPAREMATCENTALL - set all material centers to participate in project comparison; Syntax: PROJSETCOMPAREMATCENTALL ();
31.6.93. PROJSETEVAREP
PROJSETEVAREP - set earned value analysis report options; Syntax: PROJSETEVAREP (PF : pf, PERIOD : period, TYPE : type);
Argument Data type Description pf fractional number (>0) performance factor period string report detalization;
Valid values of period field: hour detail report up to hours day detail report up to days week detail report up to weeks mon detail report up to months quar detail report up to quarters year detail report up to years
type string report objects type; Valid values of period field:
common include general fields into report cost include cost components into report costcent include cost centers into report mat include materials into report matcent include material centers into report
31.6.94. PROJSETEVAREPCOMMON
PROJSETEVAREPCOMMON - set general field code for earned value analysis report; Syntax: PROJSETEVAREPCOMMON (code);
Argument Data type Description
code text string field code. Valid field code values: CostTotal - Total Cost
31.6.95. PROJSETEVAREPCOST
PROJSETEVAREPCOST - set cost component code for earned value analysis report;

Script
265
Syntax: PROJSETTRENDREPCOST (code);
Argument Data type Description
code text string cost component code
31.6.96. PROJSETEVAREPCOSTCENT
PROJSETEVAREPCOSTCENT - set cost center code for earned value analysis report; Syntax: PROJSETTRENDREPCOSTCENT (code);
Argument Data type Description
code text string cost center code
31.6.97. PROJSETEVAREPMAT
PROJSETEVAREPMAT - set material code for earned value analysis report; Syntax: PROJSETTRENDREPMAT (code);
Argument Data type Description
code text string material code
31.6.98. PROJSETEVAREPMATCENT
PROJSETEVAREPMATCENT - set material center code for earned value analysis report; Syntax: PROJSETTRENDREPMATCENT (code);
Argument Data type Description
code text string material center code
31.6.99. PROJSETGANTTOPER PROJSETGANTTOPER - set Activity Gantt diagram options. Syntax: PROJSETGANTTOPER (STRUCT : struct, PHASE : phase, OPER : oper, ASSIGN : assign, LEVEL : level);
Argument Data type Description
struct string structure code; phase Y or N hide (Y) or show (N) phases; oper Y or N hide (Y) or show (N) activities; assign Y or N hide all (phases and activities) but assignments (Y);

Script
266
level string/integer greater than zero
expand Gantt diagram to: – OPER - expand to activities; – ASSIGN - expand to assignments; – integer greater than zero - expand to certain level.
31.6.100. PROJSETGANTTRES PROJSETGANTTRES - set Resource Gantt diagram options. Syntax: PROJSETGANTTRES (STRUCT : struct, DEPT : dept, RES : res, LEVEL : level);
Argument Data type Description
struct string structure code; dept Y or N hide (Y) or show (N) departments; res Y or N hide (Y) or show (N) resources; level string/integer greater than
zero expand Gantt diagram to:
– RES - expand to resources; – ASSIGN - expand to assignments; – integer greater than zero - expand to certain level.
31.6.101. PROJSETMONITORFILEIMPORT PROJSETMONITORFILEIMPORT - set options for monitoring table import from text files (Spider Project format). Syntax: PROJSETMONITORFILEIMPORT (DURATION : duration, WORKLOAD : workload, MAT : mat, COST : cost);
Argument Data type
Description
duration Y or N should durations be calculated automatically (Y) or imported from files (N)
workload Y or N should resource hours be calculated automatically (Y) or imported from files (N)
mat Y or N should materials be calculated automatically (Y) or imported from files (N)
cost Y or N should costs be calculated automatically (Y) or imported from files (N)
31.6.102. PROJSETMPXEXPORT
PROJSETMPXEXPORT - set options for project export to MPX-file; Syntax: PROJSETMPXEXPORT (PRIMAVERA : primavera, COSTCENT : costcent, MPXCOSTCENT : code, LEVEL : level);

Script
267
Argument Data type Description
primavera Y or N export to Primavera (Y) or standard MS Project (N) format costcent Y or N use cost center as total cost code text string cost center code level number (>0) level to export WBS up to (inclusively)
31.6.103. PROJSETOPTPROJ
PROJSETOPTPROJ - set optimistic project version; Syntax: PROJSETOPTPROJ (code, ver, storage);
Argument Data type Description
code text string project code ver integer project version storage text string storage name
31.6.104. PROJSETP3EEXPORT PROJSETP3EEXPORT - set export options to Primavera P3e database. Syntax: PROJSETP3EEXPORT (COSTCENT : costcent, MPXCOSTCENT : code);
Argument Data type Description
costcent Y or N specifies whether cost center is to be used as total cost code text string the code of the cost center to be used as total cost
31.6.105. PROJSETPESSPROJ
PROJSETPESSPROJ - set pessimistic project version; Syntax: PROJSETPESSPROJ (code, ver, storage);
Argument Data type Description
code text string project code ver integer project version storage text string storage name
31.6.106. PROJSETPRECPROJ
PROJSETPRECPROJ - set preceding project version; Syntax: PROJSETPRECPROJ (code, ver, storage);

Script
268
Argument Data type Description
code text string project code ver integer project version storage text string storage name
31.6.107. PROJSETPROBPROJ
PROJSETPROBPROJ - set probable project version; Syntax: PROJSETPROBPROJ (code, ver, storage);
Argument Data type Description
code text string project code ver integer project version storage text string storage name
31.6.108. PROJSETPROP
PROJSETPROP - set project properties; Syntax: PROJSETPROP (CURTIME : curtime, DIRFIN : dirfin, CODE : code, VER : ver);
Argument Data type Description
curtime date-time current project time dirfin date-time project target finish code text string project code ver integer project version
31.6.109. PROJSETRISK
PROJSETRISK - set options for risk analysis and success probability calculation; Syntax: PROJSETRISK (FIN : fin, TOTALCOST : totalcost, COST : cost, COSTCENT : costcent, MAT : mat, MATCENT : matcent, PROBOPT : probopt, USEDIRFIN : usedirfin, RECTIME : rectime);
Argument Data type
Description
fin Y or N include durations into analysis totalcost Y or N include total cost into analysis cost Y or N include cost components into analysis costcent Y or N include cost centers into analysis mat Y or N include materials into analysis matcent Y or N include material centers into analysis probopt Y or N use optimistic (Y) or probable (N) schedule for critical schedule

Script
269
calculation usedirfin Y or N apply target finish dates rectime Y or N defines whether recommended schedule should be calculated
31.6.110. PROJSETRISKCOMMON
PROJSETRISKCOMMON - set required probabilities of meeting project duration and total cost; Syntax: PROJSETRISKCOMMON (probtime, probcost);
Argument Data type Description
probtime fractional number 0 - 100 required probability of meeting schedule goals probcost fractional number 0 - 100 required probability of meeting total cost;
31.6.111. PROJSETRISKCOST
PROJSETRISKCOST - set codes and required probabilities of meeting project cost components consumption; Syntax: PROJSETRISKCOST (code1, prob1, .., codeN, probN);
Argument Data type Description
codei text string cost component code probi fractional number 0 -
100 required probability of meeting cost goals for each cost component;
31.6.112. PROJSETRISKCOSTCENT
PROJSETRISKCOSTCENT - set codes and required probabilities of meeting project cost centers consumption; Syntax: PROJSETRISKCOSTCENT (code1, prob1, .., codeN, probn);
Argument Data type Description
codei text string cost center code probi fractional number 0 -
100 required probability of meeting cost goals for each cost center;
31.6.113. PROJSETRISKMAT
PROJSETRISKMAT - set codes and required probabilities of meeting project materials consumption; Syntax: PROJSETRISKMAT (code1, prob1, .., codeN, probn);
Argument Data type Description
codei text string material code probi fractional number 0 - required probability of meeting material consumption

Script
270
100 goals;
31.6.114. PROJSETRISKMATCENT
PROJSETRISKMATCENT - set codes and required probabilities of meeting project material centers consumption; Syntax: PROJSETRISKMATCENT (code1, prob1, .., codeN, probn);
Argument Data type Description
codei text string material center code probi fractional number 0 -
100 required probability of meeting material center consumption goals;
31.6.115. PROJSETSCHED
PROJSETSCHED - set scheduling options; Syntax: PROJSETSCHED ( STRUCT : struct, PRIOR : prior, TYPE : type, MINPARALL : minparall, DIRFORW : dirforw, PRIOR : prior, ORDERASC : orderasc, SPLITDIS : splitdis, BREAKMAX : breakmax, BREAKMAXDAY : breakmaxday, BREAKMAXDUR : breakmaxdur, WORKMIN: workmin, WORKMINDAY : workminday, WORKMINDUR : workmindur, TOTALCOST : totalcost, COST : cost, COSTCENT : costcent, MAT : mat, MATCENT : matcent, WITHOUTFLOAT : withoutfloat );
Argument Data type Description struct text string code of WBS used for phase priority determination prior Y or N take phase priorities into account (Y) or no (N) type text string calculation method;
Valid values of type field: standard use standard scheduling method advanced use advanced scheduling method optim use optimization for scheduling prevver previous version support
minparall Y or N minimize parallel activities execution (Y) or no (N) dirforw Y or N forward (Y) or backward (N) schedule calculation order prior text string activity field code used as additional criteria for priority
determination orderasc Y or N arrange activities by 'prior' criteria: ascending (Y) or
descending (N) splitdis Y or N disable splits (Y) or no (N) breakmax Y or N set continuous slack maximal duration (Y) or no (N) breakmaxday
Y or N maximal continuous slack duration is set in days (Y) or in hours (N)
breakmaxdur
fractional number not less than zero
maximal continuous slack duration allowed
workmin Y or N set continuous (uninterruptible) activity performance minimal duration (Y) or no (N)
Y or N minimal duration of continuous (uninterruptible) activity

Script
271
workminday performance is set in days (Y) or in hours (N) workmindur fractional number
not less than zero minimal duration of continuous (uninterruptible) activity performance
totalcost Y or N include total cost in leveling (Y) or no (N) cost Y or N include cost components in leveling (Y) or no (N) costcent Y or N include cost centers in leveling (Y) or no (N) mat Y or N include materials in leveling (Y) or no (N) matcent Y or N include material centers in leveling withoutfloat Y or N disable float calculation (Y) or no (N)
31.6.116. PROJSETSCHEDCOST
PROJSETSCHEDCOST - set cost component codes for leveling; Syntax: PROJSETSCHEDCOST (code1, .., codeN);
Argument Data type Description
codei text string cost component code
31.6.117. PROJSETSCHEDCOSTCENT
PROJSETSCHEDCOSTCENT - set cost center codes for leveling; Syntax: PROJSETSCHEDCOSTCENT (code1, .., codeN);
Argument Data type Description
codei text string cost center code
31.6.118. PROJSETSCHEDMAT
PROJSETSCHEDMAT - set material codes for leveling; Syntax: PROJSETSCHEDMAT (code1, .., codeN);
Argument Data type Description
codei text string material code
31.6.119. PROJSETSCHEDMATCENT
PROJSETSCHEDMATCENT - set material center codes for leveling; Syntax: PROJSETSCHEDMATCENT (code1, .., codeN);
Argument Data type Description
codei text string material center code

Script
272
31.6.120. PROJSETSCHEDRES
PROJSETSCHEDRES - set resource codes for leveling; Syntax: PROJSETSCHEDRES (code1, .., codeN);
Argument Data type Description
codei text string resource code
31.6.121. PROJSETSCHEDRESALL
PROJSETSCHEDRESALL - set all resources to participate in leveling; Syntax: PROJSETSCHEDRESALL ();
31.6.122. PROJSETSPENDREP
PROJSETSPENDREP - set general report options; Syntax: PROJSETSPENDREP (PERIOD : period, FROMTO : fromto, DATEFROM : datefrom, DATETO : dateto, CUMULATIVE : cumulative, ACTUAL : actual, PLAN : plan, USERFIELDS : userfields, REVPOSITIVE : revpositive, DELBLANKROW : delblankrow, DELBLANKCOL : delblankcol, TOTAL : total, DATE : date, HLACTUAL : hlactual, NAME : name, CODE : code, VER : ver, ROWCOL : rowcol, WIDTH : width, AUTOFIT : autofit, LOWEST : lowest);
Argument Data type
Description
period string report detalization; Valid values of period field:
hour detail report up to hours day detail report up to days week detail report up to weeks mon detail report up to months quar detail report up to quarters year detail report up to years
fromto Y or N make report for a specified period (Y) or for the whole project (N) datefrom date-
time report starting date
dateto date-time
report ending date
cumulative Y or N create cumulative report actual Y or N include performance (actual) data into report plan Y or N include planned data into report userfields Y or N include user defined fields into report revpositive Y or N express revenues as positive values delblankrow Y or N delete blank rows delblankcol Y or N delete blank columns total Y or N add column with totals date Y or N include intermediate data hlactual Y or N highlight actual performance data
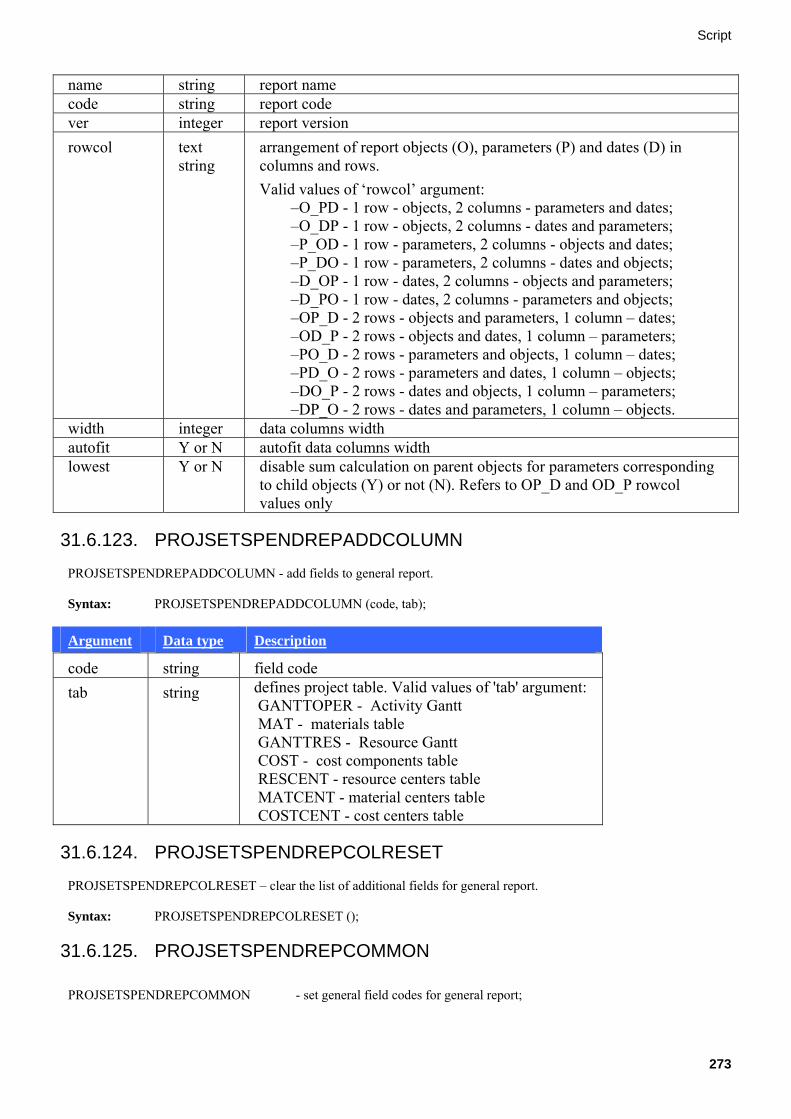
Script
273
name string report name code string report code ver integer report version rowcol text
string arrangement of report objects (O), parameters (P) and dates (D) in columns and rows. Valid values of ‘rowcol’ argument:
– O_PD - 1 row - objects, 2 columns - parameters and dates; – O_DP - 1 row - objects, 2 columns - dates and parameters; – P_OD - 1 row - parameters, 2 columns - objects and dates; – P_DO - 1 row - parameters, 2 columns - dates and objects; – D_OP - 1 row - dates, 2 columns - objects and parameters; – D_PO - 1 row - dates, 2 columns - parameters and objects; – OP_D - 2 rows - objects and parameters, 1 column – dates; – OD_P - 2 rows - objects and dates, 1 column – parameters; – PO_D - 2 rows - parameters and objects, 1 column – dates; – PD_O - 2 rows - parameters and dates, 1 column – objects; – DO_P - 2 rows - dates and objects, 1 column – parameters; – DP_O - 2 rows - dates and parameters, 1 column – objects.
width integer data columns width autofit Y or N autofit data columns width lowest Y or N disable sum calculation on parent objects for parameters corresponding
to child objects (Y) or not (N). Refers to OP_D and OD_P rowcol values only
31.6.123. PROJSETSPENDREPADDCOLUMN PROJSETSPENDREPADDCOLUMN - add fields to general report. Syntax: PROJSETSPENDREPADDCOLUMN (code, tab);
Argument Data type Description
code string field code tab string defines project table. Valid values of 'tab' argument:
GANTTOPER - Activity Gantt MAT - materials table GANTTRES - Resource Gantt COST - cost components table RESCENT - resource centers table MATCENT - material centers table COSTCENT - cost centers table
31.6.124. PROJSETSPENDREPCOLRESET PROJSETSPENDREPCOLRESET – clear the list of additional fields for general report. Syntax: PROJSETSPENDREPCOLRESET ();
31.6.125. PROJSETSPENDREPCOMMON
PROJSETSPENDREPCOMMON - set general field codes for general report;
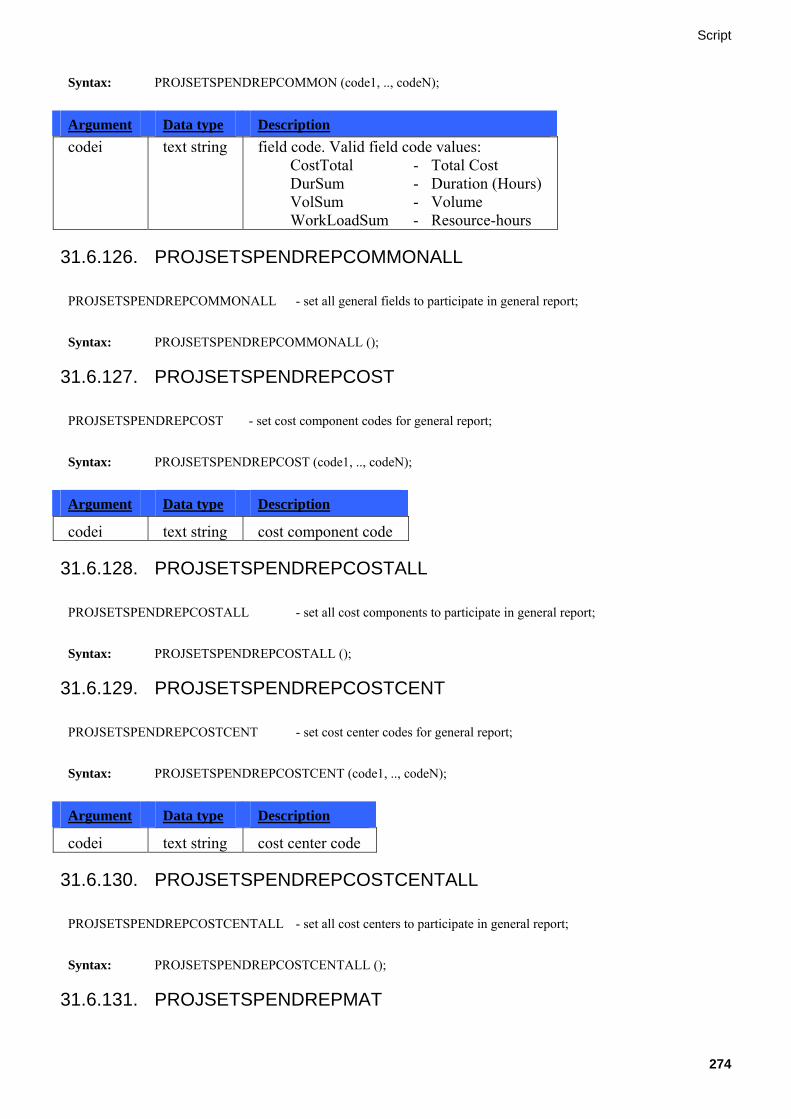
Script
274
Syntax: PROJSETSPENDREPCOMMON (code1, .., codeN);
Argument Data type Description codei text string field code. Valid field code values:
CostTotal - Total Cost DurSum - Duration (Hours) VolSum - Volume WorkLoadSum - Resource-hours
31.6.126. PROJSETSPENDREPCOMMONALL
PROJSETSPENDREPCOMMONALL - set all general fields to participate in general report; Syntax: PROJSETSPENDREPCOMMONALL ();
31.6.127. PROJSETSPENDREPCOST
PROJSETSPENDREPCOST - set cost component codes for general report; Syntax: PROJSETSPENDREPCOST (code1, .., codeN);
Argument Data type Description
codei text string cost component code
31.6.128. PROJSETSPENDREPCOSTALL
PROJSETSPENDREPCOSTALL - set all cost components to participate in general report; Syntax: PROJSETSPENDREPCOSTALL ();
31.6.129. PROJSETSPENDREPCOSTCENT
PROJSETSPENDREPCOSTCENT - set cost center codes for general report; Syntax: PROJSETSPENDREPCOSTCENT (code1, .., codeN);
Argument Data type Description
codei text string cost center code
31.6.130. PROJSETSPENDREPCOSTCENTALL
PROJSETSPENDREPCOSTCENTALL - set all cost centers to participate in general report; Syntax: PROJSETSPENDREPCOSTCENTALL ();
31.6.131. PROJSETSPENDREPMAT

Script
275
PROJSETSPENDREPMAT - set material codes for general report; Syntax: PROJSETSPENDREPMAT (code1, .., codeN);
Argument Data type Description
codei text string material code
31.6.132. PROJSETSPENDREPMATALL
PROJSETSPENDREPMATALL - set all materials to participate in general report; Syntax: PROJSETSPENDREPMATALL ();
31.6.133. PROJSETSPENDREPMATCENT
PROJSETSPENDREPMATCENT - set material center codes for general report; Syntax: PROJSETSPENDREPMATCENT (code1, .., codeN);
Argument Data type Description
codei text string material center code
31.6.134. PROJSETSPENDREPMATCENTALL
PROJSETSPENDREPMATCENTALL - set all material centers to participate in general report; Syntax: PROJSETSPENDREPMATCENTALL ();
31.6.135. PROJSETSPENDREPPAR PROJSETSPENDREPPAR - set parameter for general report. Syntax: PROJSETSPENDREPPAR (RES : rescode, RESCENT : rescentcode, MAT : matcode, MATCENT : matcentcode, COST : costcode, COSTCENT : costcentcode, COMMON : commoncode);
Argument Data type Description
rescode string resource code rescentcode string resource center code matcode string material code matcentcode string material center code costcode string cost component code costcentcode string cost center code commoncode string general field code Composition and order of arguments are arbitrary. Each argument can be specified only once.
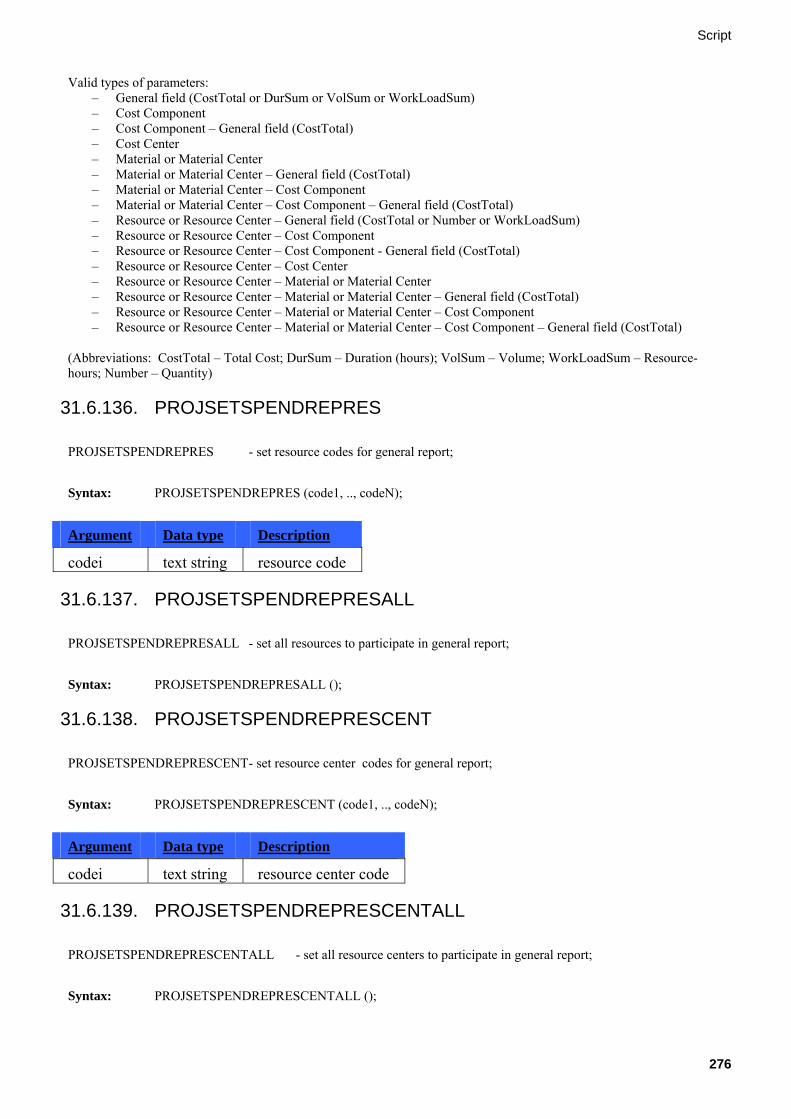
Script
276
Valid types of parameters: – General field (CostTotal or DurSum or VolSum or WorkLoadSum) – Cost Component – Cost Component – General field (CostTotal) – Cost Center – Material or Material Center – Material or Material Center – General field (CostTotal) – Material or Material Center – Cost Component – Material or Material Center – Cost Component – General field (CostTotal) – Resource or Resource Center – General field (CostTotal or Number or WorkLoadSum) – Resource or Resource Center – Cost Component – Resource or Resource Center – Cost Component - General field (CostTotal) – Resource or Resource Center – Cost Center – Resource or Resource Center – Material or Material Center – Resource or Resource Center – Material or Material Center – General field (CostTotal) – Resource or Resource Center – Material or Material Center – Cost Component – Resource or Resource Center – Material or Material Center – Cost Component – General field (CostTotal)
(Abbreviations: CostTotal – Total Cost; DurSum – Duration (hours); VolSum – Volume; WorkLoadSum – Resource-hours; Number – Quantity)
31.6.136. PROJSETSPENDREPRES
PROJSETSPENDREPRES - set resource codes for general report; Syntax: PROJSETSPENDREPRES (code1, .., codeN);
Argument Data type Description
codei text string resource code
31.6.137. PROJSETSPENDREPRESALL
PROJSETSPENDREPRESALL - set all resources to participate in general report; Syntax: PROJSETSPENDREPRESALL ();
31.6.138. PROJSETSPENDREPRESCENT
PROJSETSPENDREPRESCENT - set resource center codes for general report; Syntax: PROJSETSPENDREPRESCENT (code1, .., codeN);
Argument Data type Description
codei text string resource center code
31.6.139. PROJSETSPENDREPRESCENTALL
PROJSETSPENDREPRESCENTALL - set all resource centers to participate in general report; Syntax: PROJSETSPENDREPRESCENTALL ();

Script
277
31.6.140. PROJSETSPENDREPRESCENTCOMMON PROJSETSPENDREPRESCENTCOMMON - set parameter: resource center general field for general report. Syntax: PROJSETSPENDREPRESCENTCOMMON (rcode, code);
Argument Data type Description
rcode string resource center code code string general field code
Valid values of field codes: CostTotal - Total Cost Number - Quantity WorkLoadSum - Resource-hours
31.6.141. PROJSETSPENDREPRESCOMMON PROJSETSPENDREPRESCOMMON - set parameter: resource general field for general report. Syntax: PROJSETSPENDREPRESCOMMON (rcode, code);
Argument Data type Description
rcode string resource code code string general field code
Valid values of field codes: CostTotal - Total Cost Number - Quantity WorkLoadSum - Resource-hours
31.6.142. PROJSETSPENDRESET PROJSETSPENDREPRESET - clear general report parameters list. Syntax: PROJSETSPENDREPRESET ();
31.6.143. PROJSETTRENDREPCOMMON
PROJSETTRENDREPCOMMON - set general field codes for success probabilities trend report; Syntax: PROJSETTRENDREPCOMMON (code1, .., codeN);
Argument Data type Description
codei text string field code. Valid field code values: CostTotal - Total Cost Fin - Finish

Script
278
31.6.144. PROJSETTRENDREPCOMMONALL
PROJSETTRENDREPCOMMONALL - set all general fields to participate in success probabilities trend report; Syntax: PROJSETTRENDREPCOMMONALL ();
31.6.145. PROJSETTRENDREPCOST
PROJSETTRENDREPCOST - set cost component codes for success probabilities trend report; Syntax: PROJSETTRENDREPCOST (code1, .., codeN);
Argument Data type Description
codei text string cost component code
31.6.146. PROJSETTRENDREPCOSTALL
PROJSETTRENDREPCOSTALL - set all cost components to participate in success probabilities trend report; Syntax: PROJSETTRENDREPCOSTALL ();
31.6.147. PROJSETTRENDREPCOSTCENT
PROJSETTRENDREPCOSTCENT - set cost center codes for success probabilities trend report; Syntax: PROJSETTRENDREPCOSTCENT (code1, .., codeN);
Argument Data type Description
codei text string cost center code
31.6.148. PROJSETTRENDREPCOSTCENTALL
PROJSETTRENDREPCOSTCENTALL - set all cost centers to participate in success probabilities trend report; Syntax: PROJSETTRENDREPCOSTCENTALL ();
31.6.149. PROJSETTRENDREPMAT
PROJSETTRENDREPMAT - set material codes for success probabilities trend report; Syntax: PROJSETTRENDREPMAT(code1, .., codeN);
Argument Data type Description
codei text string material code

Script
279
31.6.150. PROJSETTRENDREPMATALL
PROJSETTRENDREPMATALL - set all materials to participate in success probabilities trend report; Syntax: PROJSETTRENDREPMATALL ();
31.6.151. PROJSETTRENDREPMATCENT
PROJSETTRENDREPMATCENT - set material center codes for success probabilities trend report; Syntax: PROJSETTRENDREPMATCENT(code1, .., codeN);
Argument Data type Description
codei text string material center code
31.6.152. PROJSETTRENDREPMATCENTALL
PROJSETTRENDREPMATCENTALL - set all material centers to participate in success probabilities trend report; Syntax: PROJSETTRENDREPMATCENTALL ();
31.6.153. PROJTABDBEXPORT PROJTABDBEXPORT - export current project table to a database. Syntax: PROJDBEXPORT (name, tab);
Argument Data type Description
name string database name tab string project table. Valid values of 'tab' argument:
OPER - activities table MAT - materials table RES - resources table LINK - links table ASSIGN - resource assignments table RESPOOL - resource skills table COST - cost components table ACTUAL - monitoring table RESMULT - multi-resources table USER - users table CALEN - calendars table WEEK - weeks table RIGHT - access rights table COSTPERIOD - cost component periods table MATPERIOD - material periods table EXCEPTION - calendar exceptions table RESCENT - resource centers table MATCENT - material centers table COSTCENT - cost centers table

Script
280
CORPREF - corporate reference-books table RESPERIOD - resource periods table OVERTIME - overtimes table UNDO - protocol table REPORT - report templates table PRINT - print templates table
31.6.154. PROJTABDOCCOPY PROJTABDOCCOPY - copies a table from current project as Spider Project document. Document becomes current document afterwards. Syntax: PROJTABDOCCOPY (tab);
Argument Data type Description
tab text string project table. Valid values of 'tab' argument: OPER - activities table MAT - materials table RES - resources table RESPOOL - resource skills table COST - cost components table RESMULT - multi-resources table USER - users table CALEN - calendars table WEEK - weeks table RIGHT - access rights table EXCEPTION - calendar exceptions table RESCENT - resource centers table MATCENT - material centers table COSTCENT - cost centers table CORPREF - corporate reference-books table OVERTIME - overtimes table UNDO - protocol table REPORT - report templates table PRINT - print templates table
31.6.155. PROJTABFILEEXPORT PROJTABFILEEXPORT - exports a table from current project to text file (Spider Project format). Syntax: PROJTABFILEEXPORT (tab);
Argument Data type Description
tab text string project table. Valid values of 'tab' argument: OPER - activities table MAT - materials table RES - resources table LINK - links table

Script
281
ASSIGN - resource assignments table RESPOOL - resource skills table COST - cost components table ACTUAL - monitoring table RESMULT - multi-resources table USER - users table CALEN - calendars table WEEK - weeks table RIGHT - access rights table COSTPERIOD - cost component periods table MATPERIOD - material periods table EXCEPTION - calendar exceptions table RESCENT - resource centers table MATCENT - material centers table COSTCENT - cost centers table CORPREF - corporate reference-books table RESPERIOD - resource periods table OVERTIME - overtimes table UNDO - protocol table REPORT - report templates table PRINT - print templates table
31.6.156. PROJTABHTMLEXPORT PROJTABHTMLEXPORT - exports a table from current project to HTML-file. Syntax: PROJTABHTMLEXPORT (tab);
Argument Data type Description
tab text string project table. Valid values of 'tab' argument: GANTTOPER - Activity Gantt GANTTRES - Resource Gantt OPER - activities table MAT - materials table RES - resources table LINK - links table ASSIGN - resource assignments table RESPOOL - resource skills table COST - cost components table ACTUAL - monitoring table RESMULT - multi-resources table USER - users table CALEN - calendars table WEEK - weeks table RIGHT - access rights table COSTPERIOD - cost component periods table MATPERIOD - material periods table EXCEPTION - calendar exceptions table RESCENT - resource centers table MATCENT - material centers table COSTCENT - cost centers table

Script
282
CORPREF - corporate reference-books table RESPERIOD - resource periods table OVERTIME - overtimes table UNDO - protocol table REPORT - report templates table PRINT - print templates table
31.6.157. PROJTABTEXTEXPORT PROJTABTEXTEXPORT - exports a table from current project to text file (CSV-format). Syntax: PROJTABTEXTEXPORT (tab);
Argument Data type Description
tab text string Designation of project table. Admissible values of argument: OPER – activities table MAT – materials table RES – resources table LINK – links table ASSIGN – resource assignments table RESPOOL – resource skills table COST – cost components table ACTUAL – performance archive table RESMULT – multi-resources table USER – users table CALEN – calendars table WEEK – weeks table RIGHT – access rights table COSTPERIOD – cost periods table MATPERIOD – material periods table EXCEPTION – calendar exceptions table RESCENT – resource centers table MATCENT – material centers table COSTCENT – cost centers table CORPREF - corporative reference-books table RESPERIOD – resource periods table OVERTIME – overtimes table UNDO – protocol of actions table REPORT – report templates table PRINT – print templates table GANTTOPER – activity gantt GANTTRES – resource gantt PROJ – project portfolio registration table

Script
283
TRENDREPORT - success probability trends report templates tableGANTTPROJ – project gantt SCRIPT – scripts table FORMULA – formulae table FILTER – filters table MAKERES – resource production table EVAREPORT – EVA report templates table TREND – success probability trends table TRENDDIF – variance trends table TRENDDIFREPORT – variance trend reports table TEAMASSIGN – team assignments table RESPOOLASSIGN – resource skill assignments table RESMULTASSIGN – multi-resource skill assignments table PROJASSIGN – resource assignments to projects table MATSET – material sets table USERFIELD – user fields table
31.6.158. PROJVERINC PROJVERINC - increase project version by 1. Syntax: PROJVERINC ();
31.6.159. RECEIVEPROJFTP RECEIVEPROJFTP- receive project from ftp-server. Received project becomes current project afterwards. Syntax: RECEIVEPROJFTP (name, code, ver);
Argument Data type Description
name string ftp-server name code string project code ver integer project version
31.6.160. SAVEALL SAVEALL - save all opened files; Syntax: SAVEALL ();
31.6.161. SETCOPYPROJ SETCOPYPROJ - set options of copied (i.e. source) and original (i.e. destination) activities and phases change; (Activity Gantt; Copying Activities in Activity Gantt)
Syntax: SETCOPYPROJ (OFROM : ofrom, OREPL : orepl, OPREF : opref, OPOST : opost, CMULT : cmult, CFROM : cfrom, CREPL : crepl, CPREF : cpref, CPOST : cpost);

Script
284
Argument Data type Description ofrom integer position in copied activity/phase codes to start change from orepl text string string to replace copied activity/phase code with opref text string prefix to copied activity/phase codes opost text string postfix to copied activity/phase codes cmult fractional
number multiplication factor for copied activity volumes, durations and expenditures
cfrom integer position in original activity/phase codes to start change from crepl text string string to replace original activity/phase code with cpref text string prefix to original activity/phase codes cpost text string postfix to original activity/phase codes
31.6.162. SETCURRDOC
SETCURRDOC - set current document/reference-book; Syntax: SETCURRDOC (code , ver , storage);
Argument Data type Description
code text string document code ver integer document version storage text string storage name
31.6.163. SETCURRPROJ SETCURRPROJ - set current project; Syntax: SETCURRPROJ (code , ver , storage);
Argument Data type Description
code text string project code ver integer project version storage text string storage name
31.6.164. SETDISTRPROJ
SETDISTRPROJ - set options of copied subprojects; ( Syntax: SETDISTRPROJ (RES : res, MAT : mat, COST : cost, CALEN : calen);
Argument Data type Description
res Y or N defines whether unused resources multi-resources and resources skills should be deleted
mat Y or N defines whether unused materials should be deleted cost Y or N defines whether unused cost components should be deleted

Script
285
calen Y or N defines whether unused calendars weeks and calendar exceptions should be deleted
31.6.165. SETDOCAPPLY SETDOCAPPLY - sets options for applying a document. Syntax: SETDOCAPPLY (ADD : add);
Argument Data type
Description
add Y or N should a row be created in destination table (document) for a missing one.
31.6.166. SETFILEEXPIMP
SETFILEEXPIMP - set options of export-import to/from text files (CSV) and Spider Project files; Syntax: SETFILEEXPIMP (TEXT : textpath, MONITOR : monitorpath, HTML : htmlpath, DELIMITER : delimiter, VISIBLEFIELDS : visiblefields, USERFIELDS : userfields, COST : cost, MAT : mat);
Argument Data type Description
textpath text string full path to text files and Spider Project files monitorpath text string path to text files with monitoring data htmlpath text string path to HTML-files delimiter text string symbol to be used as text delimiter (e.g., #) or its ANSI-code (e.g.,
\35). Tab symbol is defined with TAB string visiblefields Y or N export only visible fields from the table to the database userfields Y or N export user defined fields from the table to the database cost Y or N export cost component expenditure fields from the table to the
database mat Y or N export material expenditure fields from the table to the database
32. Signals
32.1. Signals In the user fields it is possible to mark cells with markers of various colors and shapes, which notify that the various values in the given floor get in the certain intervals. A set of intervals, to each appointed a certain color, is called Signal. The signal, in particular, can be used for tracking deviations from the base plan. In this case in signal properties, what color corresponds to this or that time interval of a deviation from the base plan, is shown. For example, the deviation of less than one day can be marked with green color, a deviation about three days - yellow, and deviations more than three days - red. To set basic characteristics of a signal include option Signal type in columns properties dialog window of user fields, which shows, that values in the given field are transformed to the markers of a signal. Then press button Select to choose a previously created signal from the list and a kind of marker from «Markers» window. Signals are created and edited in signals table. To set and change the characteristics of each signal is possible in signal properties dialog window or in columns properties dialog window. Note That: Signals and markers can be created and selected only for user fields.

Script
286
32.2. Signals Table In this table all signals of project are stored and created. By default table contains following fields: - Code – unique code of signal. - Name – name of signal. - Notes – comments to signals Working with this table is made by the general rules, identical for all tables of the project. The shortcut menu of a row consists of following items: Properties – opens signal properties dialog window to edit signal properties. New – creates a new signal. Delete – deletes the signal and its line from the table. It is possible to cancel the executed actions– see. Protocol of actions. Shortcut menu of a selected group of rows contains only the item Delete.
32.3. Signal Properties Dialog Window
This dialog window is intended for editting signal properties and consists of following pages: - Data; - notes standard page. Page Data Name – name of the signal. Code – unique code of the signal. In Intervals field intervals of numbers (to each of them a certain color is appropriated) which refers to signal as a set are displayed.. To create a new interval use Add button, which opens interval properties dialog window. In the given window interval beginning and the color appropriated to it are shown. Properties button opens interval properties dialog window to edit its characteristics. Button Delete, deletes the created interval. In Color field color of the selected interval is shown.
32.4. Interval Properties Dialog Window This dialog window is intended for editting Interval Beginning (задается в соответствующем поле) and colors of interval markers. (See. signals). In Color frame set the color for the selected interval by pressing Change button, in the opened color dialog window.

Script
287
If no color is desired to be used press None button. Thus the marker of the inverval will also not be displayed.

Group Work on the Project
288
33. Group Work on the Project
33.1. Group Work on the Project In group works on multiprojects, different persons can be responsible for separate subproject performances. Different subprojects can use common resources, materials and cost components. Due to this fact, subprojects are combined into single multiproject and schedule can be calculated taking common resources, materials and cost constraints. Multiproject phases are distributed to managers (users), assigned to each phase. These phases are separate projects allowing correcting schedule and inserting performance data. Consolidation of subprojects can be performed on every level of project organizational structure and is initiated by responsible manager of separate phase or multiproject. Such organization of group work enables control over suggested corrections and accepting changes of the multiproject. To organize group work effectively it is recommended to create work breakdown structure with respect to responsible managers. This responsibility assignment matrix is used for assigning responsible managers to separate phases and for distribution and consolidation of subprojects. It is worth mentioning, that subprojects can be distributed among managers (users) for their attention only. In this case, any work breakdown structure can be used for distribution of subprojects, while responsibility assignment matrix is recommended for consolidation of subprojects. Organization of group work on projects require restriction of users’ access rights to project folders (Storage) according to project organizational breakdown structure by means of operating system. E.g. to protect local user project from unauthorized change it is recommended to forbid access to ‘Working’ storage over the network. Access rights to project objects can also be set by means of operating system.
33.2. User Properties Dialog Window
Dialog window sets properties for persons taking part in current project management. Dialog window includes following pages: Data, Access Rights, Phases Notes, OLE-objects and Folder. Page Data Sets users Name, Code and one of possible Connection Methods: Local network or FTP-server. You can Select paths to folders (or name of FTP-server) in fields Inbox (for distribution) and Outbox (for consolidation). Actuality of project information in group work on the project is maintained through distribution and consolidation of subprojects. Folder (or FTP-server) Inbox (for Distribution) receives phases for the current manager (defined in phase properties dialog window) after the procedure of distribution of subprojects. Manager should save revised project in Outbox (for Consolidation). During consolidation phases are read from Outbox (for Consolidation) of responsible managers, set in phase properties dialog window.

Group Work on the Project
289
With enabled option Send the whole project by distribution current user will receive the whole project file after distribution; nevertheless during consolidation only phases that the current user is responsible for will be taken. If box Send the whole project by distribution is checked, current user will be send the whole project even if the user is assigned as a Manager to a single phase. Nevertheless the user will be able to read and write data according to access rights set for this user. Use E-mail by distribution - the file with the project will be sent to user on the electronic mail. The address of electronic mail is assigned in field e-mail address. If you fill fields of user E-mail address– the user will automatically receive notification of successful completion and start of project distribution if Notify before Start and Finish of Works option is selected. User can also send email from the users table. Note that: you can set the same paths of folders (or names of FTP-servers) for Inbox (for Distribution) and Outbox (for Consolidation). Page Access Rights On this page limitations for users to access to the projects are determined. By pressing Select button the dialog window with the list of the access rights is invoked (Access rights are created from Access Rights window).Required rights level should be selected from the list and attended to the user. If necessary password can be changed with pressing button Change Password. In the invoked window current password should be entered in order to define a new one in the Old field. And then the new password should be entered to New field and confirmed in the Confirm field to avoid any misspellings. OK button saves the newly created password and Cancel button keeps the current password and cancels the change. Page Phases On this page, phase users can be appointed. In Structure field, the structure in which the given user will be appointed is selected from project structures drop-down list. The phases list of the chosen structure is displayed hierarchically in the floor located below. Add button appoints the chosen user as selected phase’s manager. The button Responsible appropriates to the appointed manager the status responsible of the phase. Delete button removes user from purpose as the manager of the selected phase.
33.3. Add Users To add manager (users) to the list of available users:
1. Open Users Table which is located under Group Work section from the main program window 2. Press Ins button on the keyboard, choose New from the shortcut menu (invoked with a right mouse click on row
number) to add new item or click on empty gray area below the table with the right mouse button and select New option in the invoked shortcut menu.
3. In dialog window users set properties for the manager being added, connection method, and access rights. Note that properties dialog window will be opened automatically for newly created object only if you have selected to Open properties for new created objects in the Spider Project Parameters Dialog window. Otherwise, newly created object will be saved with default parameters and you can edit them later.
4. Press OK.
33.4. Edit User Properties To change data on existing user/manager:
1. Open Users Table from the main program window 2. Click with a right mouse button on desired user row number and choose Properties from the shortcut menu. 3. In users dialog window change properties, Connection Method, Access Rights, and other options for selected
manager. 4. Press OK.
33.5. Delete a User To delete user/manager from the list of available managers:
1. Open Users Table from the main program window

Group Work on the Project
290
2. Highlight the corresponding row to be deleted by clicking on row number. 3. Press Del button on the keyboard or choose Delete from the shortcut menu (invoked with a right mouse click on
row number) to delete user from the project. 4. Note that administrator users cannot be deleted. 5. Press OK.

Access Rights
291
34. Access Rights
34.1. Access Rights Properties Dialog Window
Access rights properties dialog window lets you view and edit access rights templates to project objects (on corresponding pages): Data; Cost Components; Materials ; Resources; Reference-books; Actual Performance; Notes; Weeks, Calendars, Exceptions; Users; WBS; Phases;. Created access rights templates can be assigned to project users. Page Data – you can set Name and Code of access rights template on this page. Page Notes – you can add comments to current access rights template on this page. Other pages of dialog window represent groups of project objects, for which you can set access rights. Lists of all project groups’ objects contain code and name of the object and type of access:
Full rights, full access for reading and changing project/portfolio objects and their properties Only from corporate reference-books changing project/portfolio objects is possible only in by corporate reference-books
application. View only – only viewing project/portfolio objects and their properties without any opportunity to change them (it will be
impossible to change or remove object properties) By default (for newly created access rights template), access is set to ‘full rights’.
The list can be sorted by Code or by Name (check corresponding box below the list). To change access rights:
On pages Resources, Weeks, Calendars and Exceptions, Users, Reference-books, Performance Archive access right will be applied to all objects contained in corresponding project tables (for example, access rights set on page Resources, will be applied to all resources stored the resources table) On pages Materials, Cost Components, WBS (also in PBS and Multiprojects – in project portfolios), Without dependence from the chosen variant of access rights for these objects, it is possible to establish an option to Hide. If on these pages one or several objects will be chosen from the list and the option to hide will be selected for them, the information on the latent objects will be inaccessible for users to whom the given access rights are appropriated. The button All the same equally allows to establish or remove an option to Hide for all objects from the list on corresponding page.

Access Rights
292
On page Phases, besides Full access rights, for one or several phases chosen from the hierarchical list, the option View only similarly is established and the button All the same equally is used. Note that: Setting access rights is possible only for the phases included in responsibility structure .
34.2. User Identification User identification is performed every time project is being opened. User identification includes name and password verification for the user opening the project.
If there is al least one record in Users table, authorization dialog window requesting to enter User name and password will be invoked every time the project is being opened.
Note That: In the Desktop and Lite versions, Users table is not available; therefore, you cannot add or delete users, change access rights and passwords.
When authorization dialog window is invoked, type in User name and Password and click OK. The project will not be opened if password entered is incorrect.
34.3. Change Password Dialog Window
To change password: enter old password in field Old, enter new password in fields New and Confirm and press OK. To cancel the action press Cancel button.
Project Portfolio
293
35. Project Portfolio
35.1. Project Portfolio Portfolio of projects –is a set of projects of the incorporated company, as a rule, with common financing. Management of the Portfolio of projects will allow to estimate investment appeal of projects, to define the optimum scheme of financing, to balance possible contradictions between various directions of company activity, the resources participating in activity design, and so on. In the Portfolio of projects the summary information on distribution of monetary streams, the general resource loads, and also on terms of separate projects execution is displayed. Besides projects register table contains brief information on each portfolio project, preliminary set in the project passports: basic project characteristics, calculated economic efficiency parameters, necessary comments etc. At the further work with projects the information on the Portfolio of projects can be updated. And, there is an opportunity to update the information from current project versions (specified in projects register table), and from new versions (last, kept in the specified site). If it is necessary to make changes to the schedule of projects of the Portfolio, the updated projects gather in the Multiprojects, updates are brought in the schedule, and projects of the Portfolio are dispatched or at number of the current version, or as the new version (the given version will have a following version number behind last kept version) For further details see: working with project portfolios.
35.2. Workıng with Project Portfolios To create a Portfolio of projects is possible in main program window by selecting items File –> Create Portfolio –> New. After this portfolio properties dialog window, where it is necessary to specify the name and the code of the created portfolio of projects, will be opened. At creation of a portfolio Project Gantt, containing one Multiproject of the first level by default, opens. To include projects into the structure of a portfolio, invoke multiproject shortcut menu of the first level, choose the option to Add Project, and then in the opened projects and documents dialog window choose the necessary project. The basic characteristics of the project can be set in its properties dialog window. If projects inside of a portfolio are necessary for grouping in the multiproject, it is necessary to choose item New Multiproject –> One Level Lower or The Same Level in the shortcut menu. In the opened properties dialog window it is necessary to specify necessary characteristics of the multiproject. Further projects will already be added in multiproject structure. To add projects into the portfolio structure is also possible in projects register table. Only it is necessary to note, that the projects added into the portfolio in projects register table, are not grouped under multiprojects. To open Project Gantt for projects register table is possible only through the main program window Further actions which can be taken in project gantt, are described in working with project Gantt and project Gantt main menu sections. When projects are already added into projects portfolio structure and the portfolio is calculated, the further work with a portfolio is conducted as follows: 1. If in a portfolio of projects it is necessary to receive only the summary information on portfolio, to count terms of
multiprojects, costs under all projects, total resource loadings, and also to receive reports under all projects (multiprojects), it is enough only to update the information on projects, by choosing corresponding items in the main menu of Project Gantt: Portfolio – > Update Portfolio. Thus for updating the information it is possible to choose the Current Version of projects (specified in a portfolio), or the New Version (having last version number among the kept versions of each of projects).
2. If changes are brought directly in portfolio schedule, it is necessary to update the information on projects (Update Portfolio) all over again and then to Consolidate Projects, by choosing (Portfolio – > Consolidate Projects). By this, Project Gantt, where all projects of a portfolio will be hierarchically grouped on phases of various levels will open. After modification it is necessary to Distribute projects (by choosing in Gantt Diagram items Portfolio – > Distribute projects). At project distribution the sub items Current Version or the New Version means a choice, whether to update existing (specified in a portfolio) versions, or to keep under new version number.
Each project of the portfolio can be opened separately, by evoking its shortcut menu in Project Gantt and choosing item to Open. Item to Select Project from the same menu allows to replace the corresponding project in the portfolio with another one.

Project Portfolio
294
35.3. Project Portfolio Properties Dialog Window
This window is opened automatically at the creation of a project portfolio (in main program window choose items File –> Create Portfolio –> New from the menu). In the invoked window Name, Code, Version and, Data Date, Target Finish, Notes of the portfolio are set. In Storage field storage, where the portfolio is, displayed. By choosing option Show hours and minutes, in corresponding table cells and in portfolio dialog windows fields both date, and time will be displayed. If not - only date. In Baseline frame, Code and Version number of base protfolio is shown. The base version is set in a projects and documents dialog window which is opened by Change button. In Storage field the storage, where the portfolio is kept, is displayed. In Number of linked OLE objects frame number of documents of other appendices attached to the portfolio is displayed. Activities will be considered critical if their floats in hours will be less than the amount in field Activity is critical if its float is not greater than _ hours. If this field will be left empty, or its value will be set equal to 0, than all the activities without a reserve, will be considered critical. Name and the code of the manager and their access rights to the protfolio are displayed in the bottom part of the given dialog window. To edit portfolio properties afterwards choose items Project –> Properties from menu(from any window of a portfolio item) or from main program window right click on the portfolio and choose Properties option from the invoked shortcut menu.
35.4. Project Properties in a Portfolio Dialog Window

Project Portfolio
295
Represents a dialog window, which is intended for editing project properties in a portfolio, with following pages: - Data, - standard page of OLE-objects and folder, - notes standard page. Page Data - Name – name of the project in the portfolio. - Code – unique code of the project in the portfolio. - In Project frame, Code and Version of the project are displayed, with the name of its Storage, which indicates the storage
where the project file is. The project can be replaced by Select button, and choosing the required project from the invoked window. If only the storage needs to be changed without changing the code and the version, then a double-click on the Storage field will invoke storages list to select a new one. Storages can be added and removed from projects and documents dialog window. If it is required to change only storage of the reference-book, without changing its code and version, it is necessary to double click with left mouse button in Storage floor and to choose the necessary storage from the opened list.
- Calendar – displays the code and the name of the calendar, on which the duration of project (in days) is considered. To change the calendar, choose Select option, choose the required calendar from the invoked list and press ОК.
- Manager– displays the name of the manager, assigned in the analogue field of project passport. To replace the manager press Select button and than choose the new one from the opened portfolio users list window and by press OK button.
- Bar Color – changes project’s bar color on the graphical part of project gantt (object color dialog window will be invoked)
35.5. Resource Assignments to Projects Table contains resource assignments to project portfolios characteristics. Contains following columns for each assignment, by default: - Project name, Project code – name and code of the project to which the resource is assigned. - Resource name, Resource code – name and code of resource. - Quantity [Scheduled] – scheduled (calculated) quantity of resource. - Type – type of resource. - Start [ASAP], Finish [ASAP] – start and finish dates of resource work in the project, received by ASAP schedule
calculation method. - Start [ALAP], Finish [ALAP] – start and finish dates of resource work in the project, received by ALAP schedule
calculation method. - Float Hours, Float Days – assignments reserves in hours and days, respectively. - Resource Hours [Remaining] – remaining scheduled assignment labour hours in resource -hours. - User defined fields. Working with this table is made by the general rules, identical for all tables of the project. Shortcut menu of a row consists item: Properties - invokes resource assignments to projects properties dialog window for viewing its characteristics. It is possible to cancel the executed actions– see. Protocol of actions. As it is not possible to create a new row in this table, item New is absent in row shortcut menus.
35.6. Project Registry Table Registry table of a portfolio contains the basic projects characteristics and also the list of the projects which are a part of portfolio. Characteristics of each project are displayed in corresponding table columns. Table columns are filled automatically, after entering the specified information of the new project into project properties dialog window and project passports. They automatically will be transferred to the registry table. - Code – code of the project in the registry table and in the project portfolio. - Name – full name of the project. - Notes – comments to the project. - Project Code – unique code of the project included in the portfolio. - Version – version number of the project included in the portfolio. - Location – way to the folder (to a place on a disk or server) where the project is stored.

Project Portfolio
296
- Attached Documents [OLE] – if any OLE document was attached to the project, in this table field (also in a similar field
of project gantt) there will be a sign. Double click in this table cell invokes a project properties in a portfolio dialog window, opening on its ole-objects and folder page.
- Project Data Date – status project date (scheduled works beginning date) from which there is a forwards calculation of project schedule.
- Priority – is used at the schedule calculation in view of phases priorities. At assembly of a portfolio the priorities of projects specified in a given floor become priorities of the created phases.
In columns Bussiness Unit, Budget Unit, Sponsor, Manager, Technical Manager, Project Type, Short Description, Status additional project characteristics are displayed. In columns NPV (Net Presented Value), IRR (Internal Return Rate), Payback Date and Expenses values of preliminary calculated economic parameters of the project are displayed. After comparison of the current project with the base version or with other project of value of economic parameters of the initial project are displayed in columns NPV [Baseline], IRR [Baseline], Payback Date [Baseline] and Expenses [Baseline]. Working with this table is made by the general rules, identical for all tables of the project. The shortcut menu of a row consists of following items: Passport – invokes project passport for editing its characteristics; New – opens projects and documents dialog window to choose the project which will be added in the table of the register of projects; Delete – deletes the project and its line from the table. Open – opens the selected project in a separate window. It is possible to cancel the executed actions– see. Protocol of actions. Shortcut menu of a selected group of rows contains only the items to Open and Delete.
35.7. Project Portfolios Shortcut Menu Can be invoked from main program window, by right clicking on the corresponding portfolio in the Projects field, which is in the left part of the window,. The shortcut menu consists of items: Properties – allows to edit portfolio properties Passport – opens passport window to edit portfolio characteristics. Data – consists of sub items, each of which corresponds to one of data of the project. At their choice the dialog window or the table intended for its display and editing becomes more active. Views – consisting of sub items, each corresponds to one of views of the project, opened by its choice. Monitoring – opens monitoring table. Save – saves project portfolio. Save As – allows to save project portfolios with a different code and/or name Save without costs – saves the project portfolio without costs, with removing the data on costs of activities materials and works of resources. Create Standard Reference-Books – opens create standard reference-books dialog window, where it is possible to create a reference-book on the basis of the settlement or actual information of the project. Export
Into CSV-files – exports the portfolio into text files in CSV format (format Comma Separated Value). Into Data Base – exports the portfolio into the database.
Upload to FTP-server – allows uploading portfolios to FTP-servers. Send by e-mail – sends an e-mail (sending by means of the program set as default), which contains the given portfolio of projects as an attachment. Close – closes the portfolio.
35.8. Multiproject Properties in a Portfolio Dialog Window Is a dialog window with the following pages: Data, Projects, Multiprojects, notes standard page and OLE-objects and folder Standard page.

Project Portfolio
297
Page Data
- Name – name of the multiproject. - Code – unique code of the multiproject in Project Portfolio. - Level – level of the multiproject in the hierarchical structure of projects. - Type – type of the multiproject for the connection with the reference-books. - Short Name – brief name of the multiproject. - Priority – priority of the multiproject. - Calendar – calendar, by which multiproject duration will be calculated in the days. To change the calendar press
Select button and choose new calendar from the list and press OK. - ASAP Start – the earliest date of the beginning ASAP of the project, in a multiproject. - ASAP Finish – the latest date of the end ASAP of the project, in a multiproject. - ALAP Start – the earliest date of the beginning ALAP of the project, in a multiproject. - ALAP Finish – latest date of the end ALAP of the project, in a multiproject.
In the Manager field name of the manager is reflected (with Select button it is possible to replace manager, by selecting him in the opened project portfolio users list window) Bar Color – changes the bar color of multiproject on the graphic part of projects Gantt (in this case object color dialog window will be invoked) Page Projects - Included Projects – list of projects, included in multiproject. - New – to add new projects to multiproject. - Properties – to invoke properties dialog window of chosen project. - Delete – to delete chosen project from projects portfolio. - Exclude –to exclude selected project from the structure and to transfer into excluded projects list. - Excluded Projects – list of projects, excluded in multiproject.
- Include – to return excluded projects back to included list. - Properties – to invoke the properties dialog window of chosen project. - Delete – to delete chosen project from portfolio.
Page Multiprojects Contains a list of multiprojects from lower levels to higher ones. - New – to add new multiprojects. - Delete – to delete chosen project from portfolio. - Exclude – to exclude selected multiprojects from structure (multiprojects can not be excluded from responsibility
structure, since it must be complete). With the exception of multiprojects from the current structure, the objects of the lower level of (projects) hierarchy are excluded, and empty multiprojects can be removed from the structure. Excluded objects can be subsequently included in the current structure.

Project Portfolio
298
35.9. Multiprojects in Portfolios Shortcut Menu Is invoked by right clicking on a row number of a multiproject in Gantt Chart of Projects, or on the bar of the multiproject in a graphic part of the Gantt Chart. Contains items: Properties – invokes properties of a multiproject in a portfolio to edit its properties . Open – открывает opens the multiproject in a separate window, as the isolated project. General reports and diagrams
Table opens report settings dialog window for creation of the report for the multiproject. Diagram – opens diagram settingsdialog window to set the parameters for the created diagram. Table Templates – opens a dialog window with the list of templates of general reports to choose a template on which the report will be created.
Diagram Templates – opens a dialog window with the list of templates of general reports for a choice of a template on which the it will be created.
Cut – places the allocated in the buffer for an exchange, not deleting it from Gantt Chart. Removal of the object will occur only after performance of an insert. Paste –
One Level Lower – inserts projects and multiprojects (together with projects), being in the buffer of an exchange, inside of the multiproject on which the shortcut menu has been invoked. The Same Level – Inserts projects and multiprojects (together with projects), being in the buffer of an exchange, for the same level of structure, as the multiproject on which the shortcut menu has been invoked. If it is the multiproject is attempted to be copied to the first level, the corresponding message "Cannot move or copy objects onto the first level" will appear.
Add Project – adds the new project in structure of the multiproject, on the same line with which the shortcut menu has been invoked. New Multi-project
One Level Lower – Adds the new multiproject one level lower of the multiproject on which the shortcut menu has been invoked. The Same Level – adds the new multiproject on the same level of structure, as the multiproject on which the shortcut menu has been invoked.
Delete – deletes the multiproject from the portfolio of projects.
35.10. Project in a Portfolio Shortcut Menu Can be invoked by right clicking on the row number of a project in table part of Project Gantt. Contains: Properties – invokes project properties in portfolio dialog window. Passport – opens passport window to edit project characteristics Bar Color – invokes object color dialog window to set color settings of project in Project Gantt diagram part. Open – opens the project in a separate window. Select Project – opens projects and documents dialog window to choose project, to replace the selected one. Reports and Diagrams Templates Table / Diagram – opens a dialog window with general reports and diagram templates list to choose a template on which
the report or diagram will be created. General Reports and Diagrams Table / Diagram – opens report parameters dialog window to create general reports and diagrams. Copy – copies selected project to clipboard. Cut – copies selected project to clipboard, without moving it away from Gantt diagram. The removal of object will occur only after insertation. Paste – if in clipboard one or several projects are located, then they will be inserted below the project, on which this menu was caused. If in clipboard multiprojects are located, then they will be included into the multiproject, which is located inside the chosen project. Add Project – opens projects and documents dialog window to add project to portfolio. Remove from portfolio – removes project from portfolio. If several lines will be selected in Gantt diagram, shortcut menu will consist: Open, Reports and Diagram Templates (Table; Diagram), General Reports and Diagrams (Table; Diagram),Copy, Cut, Paste and Remove from portfolio.
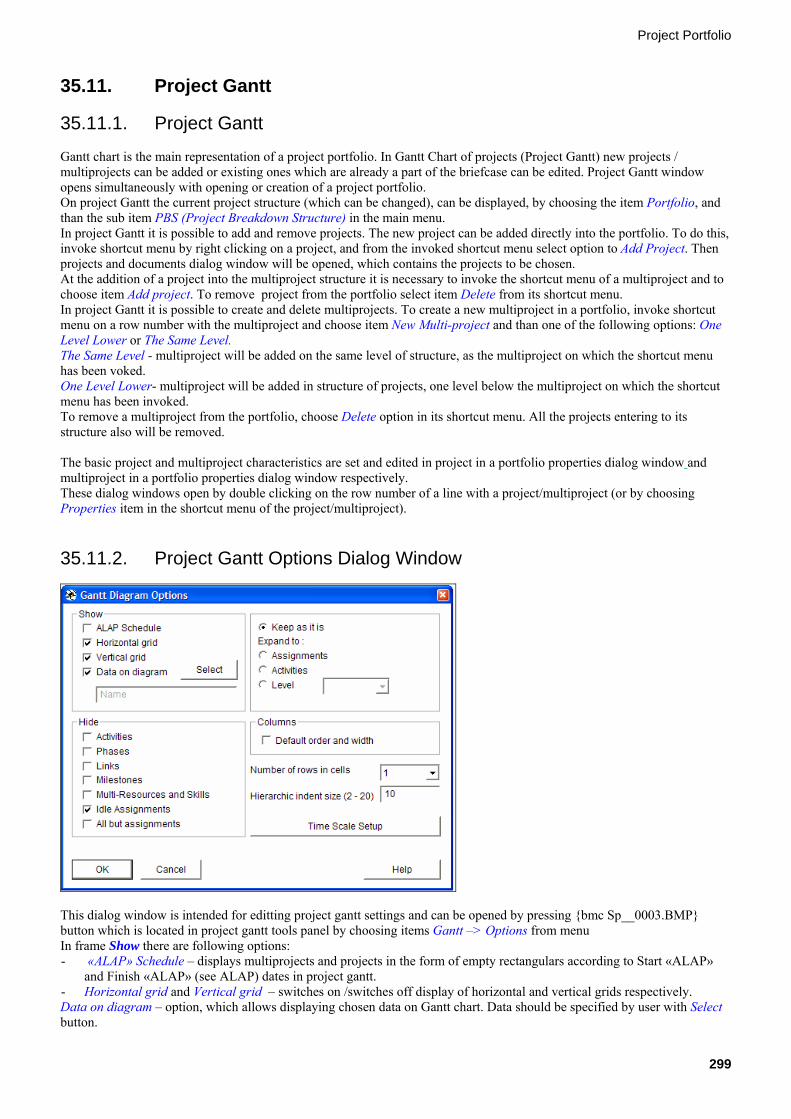
Project Portfolio
299
35.11. Project Gantt
35.11.1. Project Gantt Gantt chart is the main representation of a project portfolio. In Gantt Chart of projects (Project Gantt) new projects / multiprojects can be added or existing ones which are already a part of the briefcase can be edited. Project Gantt window opens simultaneously with opening or creation of a project portfolio. On project Gantt the current project structure (which can be changed), can be displayed, by choosing the item Portfolio, and than the sub item PBS (Project Breakdown Structure) in the main menu. In project Gantt it is possible to add and remove projects. The new project can be added directly into the portfolio. To do this, invoke shortcut menu by right clicking on a project, and from the invoked shortcut menu select option to Add Project. Then projects and documents dialog window will be opened, which contains the projects to be chosen. At the addition of a project into the multiproject structure it is necessary to invoke the shortcut menu of a multiproject and to choose item Add project. To remove project from the portfolio select item Delete from its shortcut menu. In project Gantt it is possible to create and delete multiprojects. To create a new multiproject in a portfolio, invoke shortcut menu on a row number with the multiproject and choose item New Multi-project and than one of the following options: One Level Lower or The Same Level. The Same Level - multiproject will be added on the same level of structure, as the multiproject on which the shortcut menu has been voked. One Level Lower- multiproject will be added in structure of projects, one level below the multiproject on which the shortcut menu has been invoked. To remove a multiproject from the portfolio, choose Delete option in its shortcut menu. All the projects entering to its structure also will be removed. The basic project and multiproject characteristics are set and edited in project in a portfolio properties dialog window and multiproject in a portfolio properties dialog window respectively. These dialog windows open by double clicking on the row number of a line with a project/multiproject (or by choosing Properties item in the shortcut menu of the project/multiproject).
35.11.2. Project Gantt Options Dialog Window
This dialog window is intended for editting project gantt settings and can be opened by pressing {bmc Sp__0003.BMP} button which is located in project gantt tools panel by choosing items Gantt –> Options from menu In frame Show there are following options: - «ALAP» Schedule – displays multiprojects and projects in the form of empty rectangulars according to Start «ALAP»
and Finish «ALAP» (see ALAP) dates in project gantt. - Horizontal grid and Vertical grid – switches on /switches off display of horizontal and vertical grids respectively. Data on diagram – option, which allows displaying chosen data on Gantt chart. Data should be specified by user with Select button.

Project Portfolio
300
Data of the chosen field will be displayed on Gantt chart near to graphic representation of projects and multiprojects. Field Name is selected by default. Frame Hide: - Projects – projects will be hidden if this option is selected. - Multiprojects – multiprojects will be hidden if this option is selected. Keep, as it is – does not change the elaboration detail level project gantt. Expand to: allows setting an elaboration detail level for structure of projects:
Projects – displays structure up to projects, i.e. in project gantt both multiprojects, and projects are displayed.
- - Level – displays structure of projects up to a level specified in a floor, located on the right. At introduction of wrong value the corresponding message stands out: "Invalid Value!"
Frame Columns: Selecting option Default order and width establishes standard column setting in a table part of gantt chart which is formed at the creation of a project portfolio. Option Number of rows in cells is used for changing height of lines in a table part of Gantt charts. In field Hierarchic indent size the size of hierarchical spaces in screen pixels (by default from 2 up to 20) for Name and Short Name fields of gantt chart and account tables is set. For other text fields, spaces can be set in properties dialog window of each field. Button Time Scale Setup invokes time scale dialog window for adjusting project portfolio graphic display.
35.11.3. Project Gantt Main Menu Portfolio
PBS – alows to switch between work breakdown structures, to create new and edit existing project PBS project structures listdialog window . Properties – opens project properties dialog window for review and edit. Passport – opens project passport window Data – contains list of project data. Selecting each item opens corresponding dialog window or table for review and edit. Views – contains list of project views. Monitoring – opens monitoring table. Update Portfolio – if any changes were made in projects of a portfolio (resources, materials, etc. were added or
removed) all of them will be updated in portfolio’s tables. The information to portfolio will be added to: Current version - from versions of projects which are specified in portfolio. New version - from last saved versions of each project. Consolidate Projects – collects all projects of portfolio in one summary multiproject, and opens it in gantt chart. Distribute Projects – dispatches multiprojects of a portfolio to a folder specified in Location floor. During dispatch subitems Current version or New version mean a choice, whether existing (specified in a portfolio) versions will be updated, or they will be kept under new version number. Next View, Previous View– lets move between left toolbar buttons, corresponding to project data and views. Open (F12) – opens projects and documents dialog window; Save (Ctrl +S)– saves portfolio. Save As – opens projects and documentsdialog window ; lets save opened project with different code, version number or to different Storage folder. Save Without Costs – saves project without costs data deleting activity, material and resource costs. Check Data Integrity – achieves testing correctness and consistency of the information of project. Create Standard Reference-Book – opens create standard reference-books dialog window , which allows creating reference-books, on the basis of the calculated or actual information of the projects. Export –
Into CSV-files – saves active project as text files of CSV format. Into Data Base – saves active project to DBF file (see Project Export to Database for details); Into MPX-file – saves active project to MPX file format . Into MS Project – exports current project to MS Project and opens it; Primavera database – exports current project to Primavera P3e database. Version 3 and Version 4 options are available.
Upload to FTP-Server – opens dialog window of FTP servers; select desired FTP server and press Send to send project. Send by E-mail – sends the current project via e-mail. Close – closes current project file and removes project icon from the main window.

Project Portfolio
301
Gantt Print Preview – opens print preview window. Options – opens Activity Gantt diagram options dialog window, where you can customize diagram view in graphic area. Load Configuration – restores order of columns, their width in table area and time scale in graphic area from configuration file (*.stc); all columns created by user (and not described in configuration file) in current project will be hidden and can be unhidden later through Show Columns (Ins) command from the shortcut menu (invoked with right mouse button click on columns name) or from main menu Edit item. Save Configuration – saves order of columns, their width in table area and time scale in graphic area to configuration file (*.stc). Export Table to file – exports the table part of the Gantt diagram of activities into the CSV (Comma Separated Value) type files or HTML. Export Table to Data Base – exports table to data base. Export Table to Excel – exports table to excel. Export Table to CSV-file – exports to CSV or HTML file.delete Copy as a new Document – copies table of gantt as a new reference-book.
Edit
Undo Last Action – undoes last action. Protocol of Actions – opens protocol of actions table . Formulae – opens dialog box to create, edit and apply of formulae. Script Create – opens Script dialog window where you can enter, edit and execute scripts; Execute from File – lets you execute script stored in text file.
Execute– lets you execute a script from the list of previously created ones. Execute Favourite Script– lets you execute the script, which was previously created and chosen as
favourite. Show Columns –opens fields' list dialog window ; lets you select hidden columns (fields) to display before active one. Hide Column – hides selected columns (these columns are not actually deleted from internal database). Autofit All Columns – resizes all columns in order to make their contents available to be seen completely. Search / Replace – opens Search dialog window and starts context string search; Repeat Search / Replace – repeats search of context string starting current cell. Copy – copies selected rows or cells to the clipboard. Cut – puts selected rows or cells to the clipboard. Objects are actually deleted from Activity Gantt only after Paste command. Paste – inserts objects from the clipboard: to current work breakdown structure or to selected cell. You can Paste copied (or cut) activities and phases to selected phase: - - One Level Lower – choose this option to insert phase as a subphase of the current phase (or activity of
current phase). New phase will be placed next to selected. - - The Same Level - choose this option to insert phase of the project on the same level of WBS as the
selected phase. Phase of the first level cannot be added. Select All – selects all rows of Activity Gantt.
Filter: Apply – opens dialog window where you can create, edit and apply filters. Filter by Selected Rows – allows filtering out contents of table by the selected rows from the filters dialog window. Restore – abolishes the action of the used filter.
Calculations. Cost and Materials Calculation Options – calculates Cost and Materials Calculation – calculates (recalculates) costs, materials requirements and resources work load according to current schedule. Calculations EVA Columns – calculates EVA and then displays calculated parameters values in corresponding gantt columns (preliminary in cost calculation settings dialog window it is necessary to select corresponding option to Calculate EVA columns). Calculations Resource Center Columns – calculates values in Resource Centers (Quantity) and Resource Centers (Workload) columns (preliminary in cost calculation settings dialog window it is necessary to select corresponding option to Callculate columns in Resource Center frame). Resource Peak Work Load - calculates (recalculates) resources work load on activities assignments. Phase, Department and Resource Dates – calculates phases start and finish dates; calculates dates of work start and finish for departments and resources.
Report

Project Portfolio
302
Reports and Diagrams Templates: Table – opens Report templates list window where you can choose report template for table report. Diagram – opens Report templates list window where you can choose report template to create a diagram.
General Reports and Diagrams: Table – creates report on the whole project data; opens report parameters dialog window . Diagram – draws diagram on the whole project data in the lower part of Activity Gantt; opens Diagram settings dialog window.
Variance Trends Templates: Table – opens a dialog window with the list of variance trends reports templates to choose the template on which the new table report will be created Diagram – opens a dialog window with the list of variance trends reports templates to choose the template on which the new diagram will be created
Variance Trends: Table – opens variance trends report settings dialog window to create a new table report for project. Diagram – opens variance trends report settings dialog window to create a new diagram for project.
Resource Overloads Bar – reflects the diagram of the Resource Overloads of the project (Searching for resource overloads). Resource Overloads Report – creates a table of report on the Resource Overloads. In the report besides the overloaded resources activities to which these resources were assigned are also available to see. Before creating the table it is necessary in the table of the report templates to open the dialog window of properties of standard resource templates.
Comparison With Baseline – performs comparison of opened project with its baseline project version. With Other Project – performs comparison of opened project with another project selected in projects and documents dialog window . Recreate Variance Trends – recreates variance trends on the set of projects selected in select projects dialog window. Hide Comparison – undoes comparison. Comparison Setup – opens dialog window and lets customize project comparison.
Window Close All – closes all opened documents and activates Main Window Cascade – arranges all opened projects and documents windows on the screen to make all of them visible even partially. Tile – arranges all opened projects and documents windows on the screen to make them no overlapping. Next Window – makes next opened window active. Previous Window – makes previous opened window active. Maximize/Restore – maximizes opened window size on the screen or restores it to original size. Maximize/Restore All – maximizes all opened windows size on the screen or restores them to original size. Main Window – makes main window active. List of opened projects and documents: project (or document) name; project (or document) code; for opened projects – type of data window.
Help and Support Spider Project Help – opens help document. Project Scheduling Technique - opens a PDF document, which provides help about Project Scheduling techniques written by V.I.Liberzon. Data Base Structure - opens a PDF document with the list of tables and communications between them. Technical Support E-Mail - allows sending an E-mail to address [email protected] via Outlook Express to receive technical support. Information and News – opens the internet address http://www.spiderproject.ru/aboutus_e.php via default internet browser to access latest news and information about Spider Project Management Technologies. Installation Instruction – shows installation instructions, minimum and optimum system requirements. Spider Project Update Site – allows updating current version of software. Note that Program must be closed before applying updates. About – displays brief information about current Spider Project program version and Spider Management Technologies.
35.11.4. Project Gantt Tools Panel Project Gantt window has a tools panel, with often used commands, which contains following buttons:
Spider Project Help – invokes help menu Open – causes a dialog window to open projects and documents kept on a disk.

Project Portfolio
303
Save – saves the current data.
Main Window – by pressing this button main program window will be activated.
Print Preview – invokes the print preview window.
Options – opens Gantt Diagram Options dialog window for project gantt.
Undo last action – cancels last executed action (see. Protocol of actions).
Execute Favoured Script – executes the script which has been selected as "favourite" before. Export Table to Excel – exports the table to Excel, by opening export to excel wizard. Cut – places the selected objects in the buffer of an exchange. Thus they do not leave from Gantt Chart. Removal of
objects will occur only after performance of an insert.
Paste – inserts objects from the buffer of an exchange after the object selected in Gantt Chart.
Resource Peak Work Load – settles scheduled quantity of the resources, involved in projects. Besides, if in Spider Project Parameters window the option to Highlight overloaded resources is selected, the overloaded resources on the Gantt Chart will be allocated by color.
Cost and Materials Calculation – settles an invoice scheduled and actual costs (including on the cost centers), the scheduled and actual expenditure of materials (including on the cost centers) for projects and multiprojects.
Scale – allows to adjust scale of the diagram (see. Scale). Besides, in each project table window there is an additional tools panel located on the left side. This panel consists of corresponding project data and representations buttons to switch quickly in other project table or representation.
35.11.5. Workıng wıth Project Gantt Diagrams In Spider Project Software there are three kinds of Gantt Charts: - Activity Gantt; - Resource Gantt; - Project Gantt.
Working with Activity Gantt and Resource Gantt is by identical rules (see. Working with Gantt Charts). And the rules to work with Project Gantt are as described below. Project Gantt consists of two parts: table (text information), displaying project structure which is a part of Project Portfolio, and Gantt Charts (graphical information). The structure of projects, displayed on Project Gantt, is the current structure. The current structure can be changed, by choosing Portfolio item, from Project Gantt main menu, and then the sub item PBS. In the opened dialog window specify necessary structure to display, and press Switch to button. For convenience work with hierarchical structure of projects in the table parts next to the row numbers + and – signs are located, allowing to toggle on or off to view the sub-elements of the corresponding element. The arrangement of columns, their width and name can be kept in a separate file, by saving the configuration. Thus all the installations made in Gantt diagram settings dialog window also are kept. To save a configurations: 1. From the main menu choose items Gantt –>Save Configuration. In the opened window specify a name for the file
and press Save. 2. 2. Previously saved configuration can be loaded, by choosing items
Gantt –>Load Configuration in the main menu. Note that: it is possible to load a configuration in Gantt Chart, which was saved in other table, document or reference-book (see working with tables). In Gantt Chart, it is possible to select the objects located at the same level of hierarchical structure: only multiprojects or only projects. For this purpose, keep Ctrl button pressed and select with row numbers of desired objects with left mouse button. At attempt of selecting simultaneous objects of different type the corresponding error message will appear. If on row number of any object in the table part of Gantt, right click action will be performed, shortcut menu of object will be invoked: Shortcut menu of a project in a portfolio; Shortcut menu of a multiproject in a portfolio.

Project Portfolio
304
At the top of the graphic part of Gantt Chart, time scale is located. Right clicking will invoke time scale properties dialog window to adjust it. In the graphic part of Gantt Chart objects are displayed by rectangulars of the certain color from ASAP Start to ASAP Finish (see. ASAP). From the main menu and by hot keys of Gantt Chart tools panel it is possible to: - Calculate expenses; - Calculate peak loading of resources; - Calculate terms of phases, divisions and resources. In Project Gantt it is possible to create only General reports and diagrams (see. Reports and Diagrams on Gantt Chart). Besides this, diagrams and table reports can be created on previously created templates. The created table report opens in a separate window, and its pictogram is displayed in the right part of the main program window The generated diagrams are displayed in the bottom part of Gantt Chart: resource overloads diagram, costs and materials requirements diagram, volumes etc. Reports and diagrams can be created or on the whole portfolio, or on its separate objects (on projects or multiprojects). To create a report / diagram on the whole portfolio, choose items Report –> General Reports and Diagrams or Reports and Diagrams Templates from Gantt Chart main menu, and set further report/diagram properties. To create a report / diagram on a separate object, invoke object shortcut menu, where it is necessary to choose, necessary kind of report / diagram. Note that: indicator of an overload can be created only on all resources and for the whole portfolio. For this in Gantt Chart main menu choose Report –> Resource Overloads Bar. When a portfolio is saved, all unextracted diagrams will also be kept, and table reports can be kept as independent documents. There are corresponding buttons for data and representations of portfolio, which are located on the left side. By means of these buttons it is possible to switch quickly to other portfolio and Gantt Chart tables.
35.12. PBS
35.12.1. Hierarchical Structure of Projects All projects of the company which are a part of a project portfolio, form a Hierarchical structure of projects(PBS). Projects inside a portfolio can be united in of different hierarchy level groups. For example, in the multiprojects where same resources are involved can be incorporated, or projects are united to a territorial attribute. In the portfolio it is possible to create several hierarchical structures of projects (PBS) .In different structures a project can be a part of different multiprojects. Using more than one hierarchical structure of projects allows to receive reports and the information on separate projects groups.
35.12.2. PBS
Displays the current projects structure. Appearance of a projects hierarchy (PBS) window depends on what kind of hierarchy is set in PBS diagram options dialog
window which is accessed by pressing button on tools panel or from menu by selecting items Diagram -> Options. If Hierarchy type was chosen, multiprojects settle down in the form of a vertical hierarchy. The information on the multiproject (its name and the code) is displayed on the right of multiprojects graphic representations. If Tree type was chosen, multiprojects are represented in the form of rectangulars. The information on the multiproject is located in rectangulars. Multiprojects are displayed according to the hierarchy level: top - multiprojects of the first level, below - multiprojects of the second level, etc. Each hierarchy level has a background color which can be changed from main program window, which can be opened by
pressing button on the panel of tools. In the opened color setup dialog window it is possible to change corresponding multiprojects colors. On hierarchy of projects it is possible to display multiprojects up to any level (for example, only multiprojects of the first and second level). Adjustment of display level is made in breakdown structure setup dialog window. Double clicking on a multiproject invokes multiproject properties dialog window, where basic characteristics can be edited. By right clicking on the multiproject, a shortcut menu allowing to create general reports for the chosen multiproject, to create and delete multiprojects and so on will be invoked.

Project Portfolio
305
The hierarchy of projects can be edited by mouse. It is possible to drag multiprojects inside each level by clicking holding left mouse button on it and leaving it free on the desired position. To move multiprojects to a below level, hold Shift key pressed -Alt key to the same level.
35.12.3. Pbs Tools Panel PBS window has a tools panel, with often used commands, which contains following buttons:
Spider Project Help – invokes help menu. Open – causes a dialog window to open projects and documents kept on a disk. Save – saves the current portfolio. Main Window – by pressing this button main program window will be activated.
Print Preview – invokes the print preview window.
Options – opens PBS setup dialog window.
Undo last action – cancels last executed action (see. Protocol of actions). Execute Favoured Script – executes the script which has been selected as "favourite" before.
Template – invokes templates dialog window. If in PBS setup dialog window Tree-type hierarchy is selected (thus projects are represented in the form of rectangulars), the Panel of tools contains a Scale for smooth change of display scale of PBS Arrow Type to change graphical type of arrows: from Direct to Rooted and vice versa with each click on this icon.
35.12.4. Hierarchy of Projects Main Menu Portfolio
PBS – alows to switch between work breakdown structures, to create new and edit existing project PBS project structures list dialog window . Properties – opens project properties dialog window for review and edit. Passport – opens project passport window Data – contains list of project data. Selecting each item opens corresponding dialog window or table for review and edit. Views – contains list of project views. Monitoring – opens monitoring table. Open (F12) – opens projects and documents dialog window; Save (Ctrl +S)– saves portfolio. Save As – opens projects and documents dialog window ; lets save opened project with different code, version number or to different Storage folder. Save Without Costs – saves project without costs data deleting activity, material and resource costs. Check Data Integrity – achieves testing correctness and consistency of the information of project. Create Standard Reference-Book – opens create standard reference-books dialog window , which allows creating reference-books, on the basis of the calculated or actual information of the projects. Export –
Into CSV-files – saves active project as text files of CSV format. Into Data Base – saves active project to DBF file (see Project Export to Database for details); Into MPX-file – saves active project to MPX file format . Into MS Project – exports current project to MS Project and opens it; Primavera database – exports current project to Primavera P3e database. Version 3 and Version 4 options are available.
Upload to FTP-Server – opens dialog window of FTP servers; select desired FTP server and press Send to send project. Send by E-mail – sends the current project via e-mail. Close – closes current project file and removes project icon from the main window.
Diagram Print Preview – opens print preview window. Options – opens Activity Gantt diagram options dialog window, where you can customize diagram view in graphic area. Template – opens template dialog window and lets you customize text displayed in activities boxes.
Edit

Project Portfolio
306
Undo Last Action – undoes last action. Protocol of Actions – opens protocol of actions table .
Window Close All – closes all opened documents and activates Main Window Cascade – arranges all opened projects and documents windows on the screen to make all of them visible even partially. Tile – arranges all opened projects and documents windows on the screen to make them no overlapping. Next Window – makes next opened window active. Previous Window – makes previous opened window active. Maximize/Restore – maximizes opened window size on the screen or restores it to original size. Maximize/Restore All – maximizes all opened windows size on the screen or restores them to original size. Main Window – makes main window active. List of opened projects and documents: project (or document) name; project (or document) code; for opened projects – type of data window.
Help and Support Spider Project Help – opens help document. Project Scheduling Technique - opens a PDF document, which provides help about Project Scheduling techniques written by V.I.Liberzon. Data Base Structure - opens a PDF document with the list of tables and communications between them. Technical Support E-Mail - allows sending an E-mail to address [email protected] via Outlook Express to receive technical support. Information and News – opens the internet address http://www.spiderproject.ru/aboutus_e.php via default internet browser to access latest news and information about Spider Project Management Technologies. Installation Instruction – shows installation instructions, minimum and optimum system requirements. Spider Project Update Site – allows updating current version of software. Note that Program must be closed before applying updates. About – displays brief information about current Spider Project program version and Spider Management Technologies.
35.12.5. Multiprojects in Hierarchy of Projects (PBS) Shortcut Menu Is invoked by right clicking on the image of the multiproject in PBS and consists of items: - Properties – opens multiproject properties dialog window to edit its properties. - Open – opens the multiproject in a separate window, as an isolated project. - Reports and Diagrams Templates – opens a dialog window with general report templates list to choose a template on
which table report will be created. - General Reports and Diagrams – opens report settings dialog window to create general reports and diagrams for the
multiproject. - Add Project – opens projects and documents dialog window to add projects into portfolio structure. - New Multi-project
One Level Lower – adds the new multiproject into the multiproject structure, one level lower than the multiproject on which the shortcut menu is invoked.
The Same Level – adds the new multiproject on the same level of structure, as the multiproject on which the shortcut menu is invoked. At attempt to add the multiproject to the first level, corresponding message "Cannot insert objects on the first level" will appear, since the multiproject of the first level can be only one in the project
- Delete – deletes the multiproject.
35.12.6. Projects Shortcut Menu in PBS Shortcut menu of a project in PBS can be invoked by right clicking on the image of a multiproject in PBS and consists of following items: Properties – invokes project properties in portfolio dialog window. Passport – opens passport window to edit project characteristics. Open – opens the project in a separate window. Select Project – opens projects and documents dialog window to choose project, to replace the selected one. Reports and Diagrams Templates Table – opens a dialog window with the list of general report templates for a choice of a template on which the will be
created. General Reports and Diagrams

Project Portfolio
307
Table – opens report parameters dialog window to create general reports on the multiproject. Add Project – opens projects and documents dialog window to add project to portfolio. Remove from portfolio – removes project from portfolio.

Data Export-Import
308
36. Data Export-Import
36.1. Import / Export from Files Dialog Window
This dialog window is intended for adjustment of export/import of the project or the document into text files.
To simplify path entering, click Choose button, select folder with project text files in the invoked dialog window, and click Open.
Exporting /importing a project is carried out only into CSV format text files. Exporting /importing tables can be made both into CSV, and into HTML-files. The format of export/import can be selected in the given dialog window.
Click Change button and select new Text files delimiter from the invoked Spider Project Options dialog window.
Note That: To find out more about file formats, see Monitoring data format.
While exporting to CSV format, table columns are divided by tabs or other symbols chosen by the user (such format allows to export any table documents to other programs: Word, Excel, Databases).
Format HTML (Hyper Text Marking Language) allows looking through a file in internet browsers without using Spider Project Software.
Data divider in text files (by default - tabs) can be selected by button Change, opening Spider Project parameters dialog window.
Format description of file import/export can be received, by pressing Format Description button.
Other settings in the given window are availavle only at export/import of tables (documents):
In First Lines frame, what fields properties of the table should be placed in a file at export / import can be set: Codes (unique codes of fields), Types (type of each field), Names (the name of table fields). For example, if three options are all included, in the created text document:
- In the first line Codes of all exported table fields will be displayed;
- In the second line - field Types: symbol S means String field type, and symbol N - Integer field type (if in this line at any field, near to symbol S or N there is a second symbol K ,it means that the given field is a Key);
- In the third - Names of fields.
Other lines correspond to lines with data.
It is necessary to note, that at creation of a document from files it is necessary to set the same First lines, as in the imported document.

Data Export-Import
309
In Decimal Digits frame, whether to export all figures after a comma or according to the adjustments made in Spider Project parameters dialog window. is set.
Selecting Text in DOS codepage option means that the exported file will be kept in DOS coding (by default the text is kept in Windows coding). During import (creation) of text files the given option is selected depending on in what coding the initial information is kept.
The option to Export empty values as zeros is used only during export into a file and allows to choose, how table cells with empty values will be displayed: will be left empty or instead of empty values "0" (zero) will be put down.
The option to Skip rows with empty codes is used only during creation (import) of projects or documents from files. When this option is selected, lines which do not contain values in Code column will not be included in the created project or the document.
36.2. Spider Project File Export into MPX-File Dialog Window
This dialog window allows you to define options of Spider Project file export to MPX-file format.
If you click Use cost center as total cost option, cost calculated for the selected cost center will be included into MPX format instead of total costs of phases and activities. Click Select button to select a cost center from the invoked Cost Centers dialog window containing list of all cost centers available. After you select cost center and click OK, its name and code will appear in Export into MPX format dialog window.
In Format modifications frame, MS Project (Standard modification) option is selected by default. If you select Primavera format, WBS activity codes will be converted the following way: ‘0’ is added in code beginning and the last digit is ignored.
Note that after export to MPX-file following project data will be lost in exported file: materials, resource skills, multi-resources and breakdown structures. Nevertheless all assignments of resources comprising multi-resources and resource skills are transferred correctly.
If an activity had more than one team assigned, assignments of the first team would be exported to MPX-file. You would be noticed of data loss in this case.
36.3. Table Export Options Dialog Window

Data Export-Import
310
Table export options dialog window allows you to customize the set of Spider Project table columns to export to database. Dialog window appears after selection of menu item Table -> Export table to Data Base.
You can choose to:
- Export only visible fields (checked by default);
- export all standard table fields (option Export only visible fields and all other options unchecked);
- export all standard table fields (option Export only visible fields unchecked) and export additional fields: Material consumption, Set of materials consumption, Cost components spending, User fields.
Note That: for documents and reference books, where there is no opportunity to export user fields, window looks in another way:
36.4. Project Import-Export
36.4.1. Create Project from Database
To create a project from external database:
1. From the Main Window Menu, select File -> Create Project -> From Data Base.
2. Create project from database dialog window will be invoked. Select required database in the list of Database names and press Open (in the Database frame).
3. Choose necessary project version from the list of projects (Code – Version – Name) and press Import (in the Project frame).
4. New project will be created and Project properties dialog window will be opened.
Pressing Exit will close the dialog window prior to importing database table to document.

Data Export-Import
311
Note That: you must have database options set for the database that you are exporting Spider Project table to.
36.4.2. Create Project from MS Project Database To create a Spider Project file (import) from MS Project data base:
1. Select File -> Create Project -> From MS Project Data Base from the main program window menu;
2. 3.
4. Specify path to MS Project database (*.mdb) file to be imported to Spider Project;
5. Press Import button.
Note that project created in MS Project must be saved to mdb-file (Microsoft Access Database) format before it can be imported to Spider Project.
36.4.3. Create Project from Primavera P3E Database You can import a project from Primavera P3e SQL database to Spider Project. To perform import:
1. In Main Window menu select File -> Create Project -> From Primavera Data Base; 2. In opened Create project from database dialog window select required Primavera P3e database and press Open. In the
opened list of projects (with project codes, version number and name) you can select required project (for further import) or press Close (to halt import and close database).
3. Press Import. Selected project will be imported to Spider Project. Code and name of the imported project will appear in the opened project properties dialog window.
Note That: you must have database options set for the database that you are importing project from. In order to establish initial connection to Primavera P3e database you must specify user name privuser and password privuser.
During Primavera P3e project import certain database fields (i.e. missing in Spider Project database structure) are transferred to user-type fields (see Fields' list dialog window). These fields can be useful in some cases; e.g. to obtain the same activities order as in Primavera P3e project you can sort activities in activity gantt by seq_num field.
36.4.4. Create Project from CSV and MPX Files
To create project from files, they should be in CSV or MPX format.
Creating project from CSV-files
CSV (Comma Separated Value) format is format where data is separated by TAB or any other symbol (delimiter) selected by user in Spider Project Options dialog window. Invoke this dialog window in main program window by selecting Parameters
from Options menu or by clicking Parameters icon on main program window toolbar. The format allows exporting table documents to other programs (such as Word, Excel, Databases). File extension will be .txt.
To create project from CSV-file:
1. In main program window select File -> Create Project -> From CSV-Files.
2. In the invoked Project Import from Files dialog window select path to files and their type,browse by using Choose button or type it directly into the field. Change button invokes Spider Project Options dialog window.
3. Set other required parameters and then click OK.
Creating project from MPX-file
Before importing MPX-files to Spider Project, make sure they the following criteria:

Data Export-Import
312
- All activities and phases have WBS codes;
- WBS codes are numbers separated with points; and
- Dates are in numeric format (no dates as January or Jan, no weekdays as Monday or Mon or any other text is allowed).
To create project from MPX-file:
1. In main program window select File -> Create Project -> From MPX-file.
2. Select path to files in the invoked dialog window.
3. Click Open.
Note That: To transfer links between phases, Spider Project creates activities of Milestone type that are linked to all phase activities and do not have incoming or outgoing links.
To transfer assignments, activity of Hammock type is created with duration through the phase, and resources assigned to the phase in MPX-files are assigned to this hammock.
36.4.5. Export Project to Database To export a Spider Project project to database select in any project window menu item Project -> Export -> Into database.
Select destination database in opened Export project to database dialog window and press Export.
On completion of the project export - its code, version # and name would appear in the Projects list. Press Exit to close the dialog window.
36.4.6. Export Project to Primavera P3e Database To export a Spider Project project to database select in any project window menu item Project -> Export -> Primavera database. After selecting version Export into Primera data base window will be invoked to select the option whether to Use cost center as total cost or not.
In the opened databases dialog window choose Primavera database to which the project will be exported, and to press button Export. If in the list of the databases there will be no Primavera base program, after checking up the format of database, will give out the corresponding error message.
After export, the name of the exported project will be brought in Primavera database (in Projects floor), and the initial code of the project will exchange with the code in Primavera database.
After the export, project can be opened in Primavera. For the exported projects opened in Primavera database, a separate group "Spider Project Projects" will be created.
After opening the exported project in Primavera database, it is necessary to recalcute the schedule as graphic part of gantt chart will not appear without it.
Note That: you must have database options set for the database that you are exporting Spider Project project to. To access Primavera P3e database (at the database setup step) you must use user privuser and password privuser. Primavera P3e database must be managed by SQL-Server.
36.4.7. Export Project to MS Project To export Spider Project project file select menu item Project -> Export -> Into MS Project in any program window except main window and linear diagram window. Export of the current project to MS Project will be started and corresponding message will appear.
On completion of export process project file will be opened in Microsoft Project.
Note that export to MS Project is possible only in case MS Project is installed on your computer.
Note that export to MS Project is performed from current WBS structure only and in case it is a full structure. In case several teams are assigned to activity execution, only first team assignments will be exported. Multi-resource and resource skills assignments from the first team are exported as resource assignments. Activities of Hammock DPH type are assigned calculated duration.
As result of project export to MS Project certain data loss occur; data missing in MS Project database is lost, e.g. multiple work breakdown structures, cost periods, etc.

Data Export-Import
313
36.4.8. Export Project to CSV-Files All project objects can be exported in text files (CSV-format). To export project to text files
1. Select Project -> Export -> Into CSV-files from any project window menu;
2. Specify destination path to store files to and text delimiter in opened Dialog window of import/export from files ;
3. Press OK.
36.4.9. Export Project to MPX-file To export project to MPX-file, from any project window menu (except for main program window and Linear Diagram) select Project -> Export -> Into MPX-file. Export into MPX format dialog window will be invoked.
Phases' rows will not be transferred to MPX-file. Information on materials, resource skills, multi-resources, and hierarchical structures are lost during export to MPX-file.
All assignments, including assignments in resources skills and multi-resources, are exported.
If more than one team is assigned to activity, only first team’s assignments will be exported, and a corresponding message will appear.
Spider Project objects are transferred to MPX-file with the following exceptions:
- Activity and phases codes are transferred to Text1 field;
- Total phases and activities costs by the first three cost components (as in Cost Components table with no filters or sorting) are moved to Cost1, Cost2, and Cost3 fields, accordingly. And these costs total will be transferred to Cost field.
- Resource Type column is transferred to Text1 field;
- Activity Type column is transferred to Text2 field;
- Activity Name for Columns is transferred to Text3 field;
- Activity Volume Unit is transferred to Text4 field;
- Activity Volume is transferred to Number1 field; and
- Activity calendars are lost. All activities are performed by the main project calendar.
36.5. Document Import-Export
36.5.1. Create Document from Database

Data Export-Import
314
To create Spider Project table document from database:
1. In main program window select menu item File -> Create Document – > From Database.
2. Create document from database dialog window will be invoked. Select required database in the list of Database names and press Open (in the Database frame).
3. Choose necessary source table to create document from the list of database tables and press Import (in the Document frame).
4. New document will be created and document properties dialog window will be opened.
Pressing Exit will close the dialog window prior to importing database table to document.
Note That: you must have database options set for the database that you are exporting Spider Project table to.
36.5.2. Import Document from File
To import a document from text file, select Create Document –> From file option from File menu in main program window Import from files dialog window will be invoked. Browse the file you want to import by using Choose button and click OK.
In the invoked window Path shows the directory of the document where it is located.Format can be CSV-file or HTML-file. Any document in CSV format can be imported to Spider Project. Therefore, table documents created in other applications (such as Microsoft Word, Excel or database programs) can be imported Spider Project.
36.5.3. Export Project Table to Database Spider Project table data can be exported to external database. New database table will be created or existing (previously exported) table will be replaced.
To export project table to database:
1. Select Table -> Export table to database from the menu of the table being exported. You can specify field types to export in opened Table export options dialog window;
2. Select destination database in opened Export project table to database dialog window and press Export.
3. Spider Project table will be exported to selected database and the list of this database tables will be shown in Export project table to database dialog window. The list of database tables may contain special tables if you have created database structure during setting up the database (see Database settings for details). The database table name of exported Spider Project table is formed from the project code + project version + Spider Project tab code, separated by underline symbol (‘_’). E.g., activities table from the project with code cworks and version #1 – will be named cworks _1_oper. If table with the same name already exists in the database, you will be prompted to replace existing table.
4. To close current dialog window and return to your project table press Exit.
Note That: you must have database options set for the database that you are exporting Spider Project table to.

Data Export-Import
315
36.5.4. Exporting Tables into Files Documents, separate project tables, as well as the whole project, can be exported to text files (CSV format).
Exporting Project tables or Documents
To export tables (documents) into text files, select Export Table to file from Table menu in any project table. After selecting table export options in Table Export dialog box, Export into Files dialog window will be invoked, to set up export settings
CSV (Comma Separated Value) format saves table in a format, where its columns will be separated by TABS or any other symbols (delimiters). This format allows exporting any table documents to other programs (such as Word, Excel, and Databases). File extension of the files is .txt.
Delimiter can be changed in spider project options dialog window.
Documents saved in HTML format can be opened with internet browsers. Therefore, user will be able to access these documents without using Spider Project software.
36.6. Monitoring Data Import-Export
36.6.1. Performance Data Import Options Dialog Window During import of performance data, some parameters can be charged off automatically and proportionally to the executed volumes. Select required options from: Duration, Work Load, Materials, Fixed material expenditure, Cost components, and Fixed costs. If option is checked on, corresponding object’s value will be charged off proportionally to the executed volume. If the option is checked off, this object’s value will be imported from files (see Import of performance data from files) or from database (see Import performance data from database dialog window) to Monitoring Table without changes (exact value from external source).
36.6.2. Import Performance Data from Database Copies project performance data from database to Monitoring table. To be able to import data from database, make sure the database meets special Monitoring data format requirements.
To perform importing:
1. Open Monitoring table.
2. Open Table menu and click Import from Data Base. Import performance data from database dialog window will be invoked.
3. Select required database from the list and press Open (in the Database frame).
4. Select required project version to import performance data from and press Import from the Performance data frame.
5. In the opened Performance data import options dialog window specify whether to charge off automatically (i.e. proportionally to executed volumes) Duration, Work load, Materials and Cost components, or transfer exact values from the source database. Press OK.
6. After import is completed you can edit manually data in Monitoring table and transfer performance data to Performance archive.
7. Recalculate the project ().
36.6.3. Import Performance Data from Files When monitoring data is imported, project performance data is copied to Monitoring table from three files:
- Activities and assignments data (ProjectCode_monit.txt);
- Materials monitoring (ProjectCode_monit_mat.txt); and
- Costs monitoring (ProjectCode_monit_cost.txt).
Files can as well be created in programs other than Spider Project. This allows maintaining performance monitoring without using Spider Project. File contents should correspond to Monitoring data format.
To import performance data to Monitoring Table:
1. Open Monitoring table.
Data Export-Import
316
2. Select Import from Files from Table menu.
3. In the invoked Project Import from files dialog window, click Select and set up path to file containing monitoring data to import. Click OK.
4. Dialog window of import/export from files will be invoked. Select which parameters you want to be charged off automatically during monitoring, proportionally with the executed volumes. Select from: Duration, Work Load, Materials, Fixed material expenditure, Cost components, and Fixed costs.
5. Recalculate project expenditures by clicking Cost and Materials icon on the Gantt diagram toolbar.
36.6.4. Export Performance Data to Database Data on project performance is exported to database in format described in Format of monitoring data.
To export performance data to database:
1. Open Monitoring table;
2. Select menu item Table -> Export to database (Note that you must have database options set for the database that you are exporting Spider Project table to);
3. Monitoring table will be exported to selected database and the list of project codes and version numbers for which performance data is stored in the current database will be opened in the Export performance data to database dialog window.
6. To close current dialog window and return to your project table press Exit.
Note That: you must have database options set for the database that you are exporting Spider Project table to.
36.6.5. Export Performance Data to Files When monitoring data is exported, project performance data is copied from Monitoring table from three files:
- Activities and assignments data (ProjectCode_monit.txt);
- Materials monitoring (ProjectCode_monit_mat.txt); and
- Costs monitoring (ProjectCode_monit_cost.txt).
Files can as well be edited in programs other than Spider Project. This allows maintaining performance monitoring without using Spider Project. Updated files can later be Imported to Monitoring table.
File contents should correspond to the Monitoring data format.
To export Monitoring Table:
1. Open Monitoring table window.
2. Select from the menu: Table ->Export to CSV-Files.
3. In the invoked Export into Files dialog window, click Select and set up pathway to the file to which you will export monitoring data. Click OK.
36.7. Working with Databases
36.7.1. Create Document from Database Dialog Window Current dialog window is invoked from Main Window Menu File -> Create document -> From database. In the dialog window you can select database and database table to create Spider Project table document from (see Create document from database)
Note That: you must have database options set for the database that you are exporting Spider Project table to.
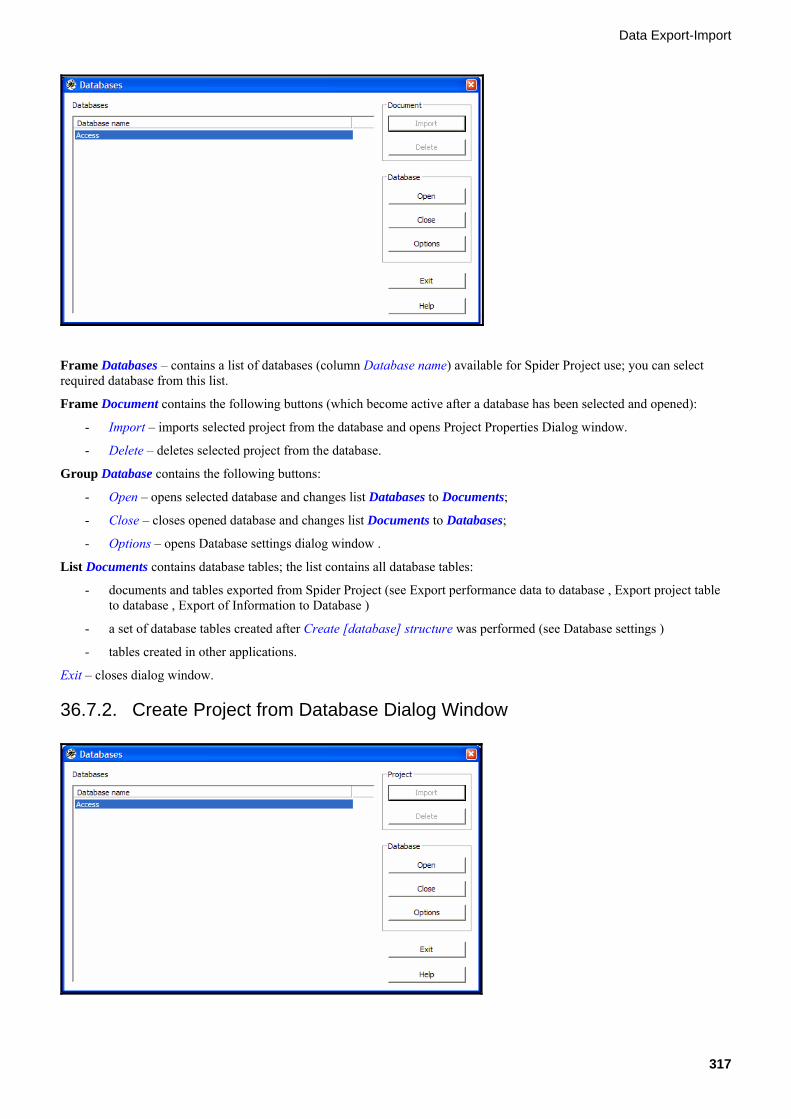
Data Export-Import
317
Frame Databases – contains a list of databases (column Database name) available for Spider Project use; you can select required database from this list.
Frame Document contains the following buttons (which become active after a database has been selected and opened):
- Import – imports selected project from the database and opens Project Properties Dialog window.
- Delete – deletes selected project from the database.
Group Database contains the following buttons:
- Open – opens selected database and changes list Databases to Documents;
- Close – closes opened database and changes list Documents to Databases;
- Options – opens Database settings dialog window .
List Documents contains database tables; the list contains all database tables:
- documents and tables exported from Spider Project (see Export performance data to database , Export project table to database , Export of Information to Database )
- a set of database tables created after Create [database] structure was performed (see Database settings )
- tables created in other applications.
Exit – closes dialog window.
36.7.2. Create Project from Database Dialog Window

Data Export-Import
318
Current dialog window is invoked from Main Window Menu File -> Create project -> From Data Base. In the dialog window you can select database, project code and version number to create Spider Project project file from (see Create project from database).
Note That: you must have database options set for the database that you are exporting Spider Project table to.
Frame Databases – contains a list of databases (column Database name) available for Spider Project use; you can select required database from this list.
Frame Project – contains the following buttons (which become active after a database has been selected and opened):
- Import – imports selected database table as Spider Project document and opens document properties dialog window.
- Delete – deletes selected table from the database.
Frame Database contains the following buttons:
- Open – opens selected database and changes list Databases to Projects;
- Close – closes opened database and changes list Projects to Databases;
- Options – opens Database settings dialog window.
List Projects contains projects in selected database with their Code, Version [number] and [project] ]Name.
Exit – closes dialog window.
36.7.3. Export Project to Database Dialog Window
Current dialog window is invoked from any project window menu Project -> Export -> Into Data Base. In the dialog window you can select database to export current project to (see Export project to database).
Note that you must have database options set for the database that you are exporting Spider Project table to.
Frame Databases – contains a list of databases (column Database name) available for Spider Project use; you can select required database from this list.
Frame Project contains the following buttons (which become active after a database has been selected and opened):
- Export – exports current project to selected database.
- Delete – deletes selected project from the database.
Frame Database contains the following buttons:
- Open – opens selected database and changes list Databases to Projects;
- Close – closes opened database and changes list Projects to Databases;
- Options – opens Database settings dialog window.
List Projects contains projects in selected database with their Code, Version [number] and [project] ]Name.

Data Export-Import
319
Exit – closes dialog window.
36.7.4. Export Document to Database Dialog Window
Current dialog window is invoked from table menu Table -> Export table to Data Base (after you specify field types to export in opened Table export options dialog window). In the dialog window you can select database to export current table to (see Export project table to database).
Note That: you must have database options set for the database that you are exporting Spider Project table to.
Frame Databases – contains a list of databases (column Database name) available for Spider Project use; you can select required database from this list.
Frame Document contains the following buttons (which become active after a database has been selected and opened):
- Export – exports table to selected database. If a database is already opened (button Open) pressing button "Export" will add new table to selected database; if a database was not previously opened new table will be exported to selected database and list Databases will change to Documents.
- Delete – deletes selected table from the database.
Frame Database contains the following buttons:
- Open – opens selected database and changes list Databases to Documents;
- Close – closes opened database and changes list Documents to Databases;
- Options – opens Database settings dialog window.
List Document contains database tables; the list contains all database tables:
- documents and tables exported from Spider Project (see Export performance data to database , Export project table to database , Export of Information to Database )
- a set of database tables created after Create [database] structure was performed (see Database settings )
- tables created in other applications.
Exit – closes dialog window.
36.7.5. Export Performance Data to Database Dialog Window Current dialog window is invoked from (monitoring table -> Export to Data Base. In the dialog window you can select database to export performance data to (see Export performance data to database).
Note That: you must have database options set for the database that you are exporting Spider Project table to.

Data Export-Import
320
Frame Databases – contains a list of databases (column Database name) available for Spider Project use; you can select required database from this list.
Frame Performance data contains the following buttons (which become active after a database has been selected and opened):
- Export – exports performance data to selected database. If a database is already opened (button Open) pressing Export will add new performance data to selected database; if a database was not previously opened new performance data will be exported to selected database and list Databases will change to Performance data.
- Delete – deletes selected project performance data from the database.
Frame Database contains the following buttons:
- Open – opens selected database and changes list Databases to Performance data;
- Close – closes opened database and changes list Performance data to Databases;
- Options – opens Database settings dialog window.
List Performance data contains exported performance data from projects (project codes and version numbers) to selected database.
Exit – closes dialog window.
36.7.6. Import Performance Data from Database Dialog Window
Current dialog window is invoked from Monitoring Table -> Import from database. In the dialog window you can select database to import performance data from (see Import performance data from database).
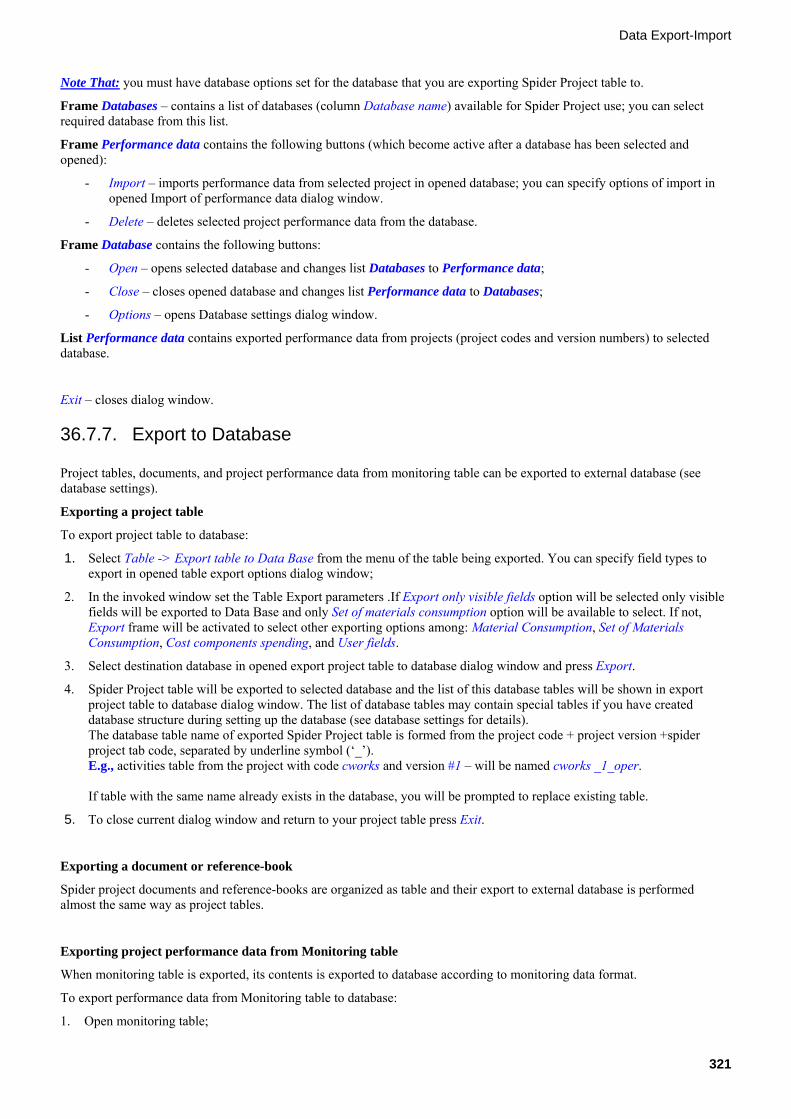
Data Export-Import
321
Note That: you must have database options set for the database that you are exporting Spider Project table to.
Frame Databases – contains a list of databases (column Database name) available for Spider Project use; you can select required database from this list.
Frame Performance data contains the following buttons (which become active after a database has been selected and opened):
- Import – imports performance data from selected project in opened database; you can specify options of import in opened Import of performance data dialog window.
- Delete – deletes selected project performance data from the database.
Frame Database contains the following buttons:
- Open – opens selected database and changes list Databases to Performance data;
- Close – closes opened database and changes list Performance data to Databases;
- Options – opens Database settings dialog window.
List Performance data contains exported performance data from projects (project codes and version numbers) to selected database.
Exit – closes dialog window.
36.7.7. Export to Database Project tables, documents, and project performance data from monitoring table can be exported to external database (see database settings).
Exporting a project table
To export project table to database:
1. Select Table -> Export table to Data Base from the menu of the table being exported. You can specify field types to export in opened table export options dialog window;
2. In the invoked window set the Table Export parameters .If Export only visible fields option will be selected only visible fields will be exported to Data Base and only Set of materials consumption option will be available to select. If not, Export frame will be activated to select other exporting options among: Material Consumption, Set of Materials Consumption, Cost components spending, and User fields.
3. Select destination database in opened export project table to database dialog window and press Export.
4. Spider Project table will be exported to selected database and the list of this database tables will be shown in export project table to database dialog window. The list of database tables may contain special tables if you have created database structure during setting up the database (see database settings for details). The database table name of exported Spider Project table is formed from the project code + project version +spider project tab code, separated by underline symbol (‘_’). E.g., activities table from the project with code cworks and version #1 – will be named cworks _1_oper. If table with the same name already exists in the database, you will be prompted to replace existing table.
5. To close current dialog window and return to your project table press Exit.
Exporting a document or reference-book
Spider project documents and reference-books are organized as table and their export to external database is performed almost the same way as project tables.
Exporting project performance data from Monitoring table
When monitoring table is exported, its contents is exported to database according to monitoring data format.
To export performance data from Monitoring table to database:
1. Open monitoring table;

Data Export-Import
322
2. Select menu item Table -> Export to Data Base (Note that you must have database options set for the database that you are exporting Spider Project table to);
3. Monitoring table will be exported to selected database and the list of project codes and version numbers for which performance data is stored in the current database will be opened in the export performance data to database dialog window.
4. To close current dialog window and return to your project table press Exit.
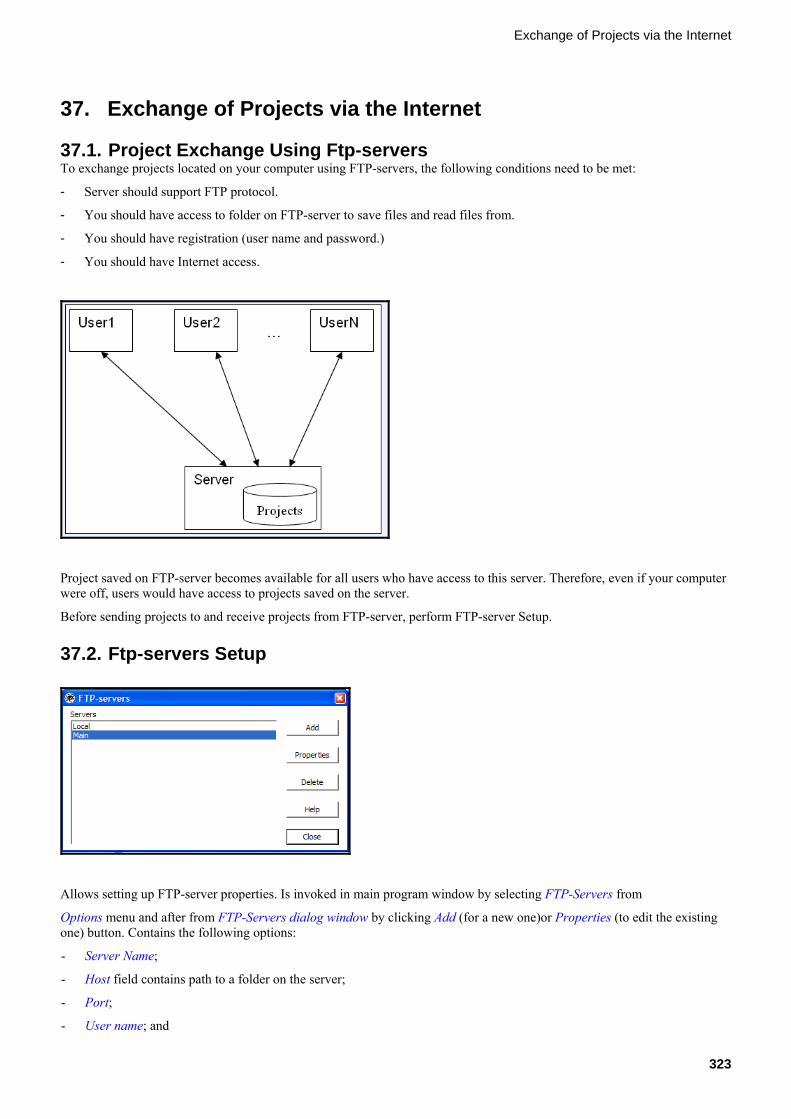
Exchange of Projects via the Internet
323
37. Exchange of Projects via the Internet
37.1. Project Exchange Using Ftp-servers To exchange projects located on your computer using FTP-servers, the following conditions need to be met:
- Server should support FTP protocol.
- You should have access to folder on FTP-server to save files and read files from.
- You should have registration (user name and password.)
- You should have Internet access.
Project saved on FTP-server becomes available for all users who have access to this server. Therefore, even if your computer were off, users would have access to projects saved on the server.
Before sending projects to and receive projects from FTP-server, perform FTP-server Setup.
37.2. Ftp-servers Setup
Allows setting up FTP-server properties. Is invoked in main program window by selecting FTP-Servers from
Options menu and after from FTP-Servers dialog window by clicking Add (for a new one)or Properties (to edit the existing one) button. Contains the following options:
- Server Name;
- Host field contains path to a folder on the server;
- Port;
- User name; and

Exchange of Projects via the Internet
324
- Password.
37.3. Upload (Send) Project / Portfolio to Ftp-server
Uploading a project / portfolio to FTP-server can be done from any program window (except for Linear Diagram).
To send from main program window, invoke Project shortcut menu with the right mouse button click on project’s icon/name, and select Upload to FTP-server.
To send from any other program window (except Linear Diagram), select Upload to FTP-server from Project menu.
To upload a portfolio repeat the same actions on a portfolio.
The following dialog window will be invoked:
In the invoked dialog window, highlight FTP-servers where the project will be sent to and click Send. If you have Internet access through telephone line, your Internet connection program window will be invoked and connection will start to be developed. If you are connected through local network, immediate connection will be established.
37.4. Import Project from Ftp-server Receiving projects from FTP-server can only be done from main program window Select Receive from FTP-server from File menu. The following dialog window will be invoked:

Exchange of Projects via the Internet
325
Receiving projects from FTP-servers
1. Select server name from drop-down list.
2. Click icon on the toolbar or select Connect from Server menu. If you have Internet access through telephone line, your Internet connection program window will be invoked and connection will start to be developed. If you are connected through local network, immediate connection will be established. Connection to FTP-server is considered to become successful when ‘You are not connected to the server’ message on the toolbar disappears. After the connection was established, the program starts receiving information about available projects and will include them into Available Projects table field on the left.
3. Highlight project you want to receive. Select several projects by holding Ctrl key.
4. Click > button. The selected projects will be moved to Projects selected for reception table field on the right. To move all projects from Available projects list, click>> button.
5. Click Receive Projects to start project receiving.
6. After the process is finished, close Receiving Projects dialog window. This will automatically disconnect your computer from FTP-server. All new files will be opened.
Sorting projects available on server
Projects listed in Available projects table field can be sorted by code, name, or version. Sorting starts with click on a
corresponding column header.
Filtering projects available on server
To apply filter to projects:
1. Invoke ‘Filters for Projects on FTP-server dialog window by selecting Apply from Filter menu.
2. Create a new filter by clicking Add button or select existing filter from the list. This will invoke ‘Filters for Projects on
FTP-server properties dialog window to set up Name, Field, and sorting Sample.
3. Click on Apply button. Filter will be applied and it name will be displayed in Receiving projects dialog window.
To cancel filtering applied, select Restore from Filter menu.
Note That: To force the program to disconnect from FTP-server, click Disconnect icon on the toolbar.
Note That: After you have received projects from FTP-server, some other user might have updated the files on the server. If you would like to receive updated version, click Refresh projects list icon on the toolbar or select Refresh projects list from Server menu.

Exchange of Projects via the Internet
326
37.5. Filters for Projects on Ftp-server Dialog Window
Is invoked from Receiving Projects dialog window and allows setting up filters to show only projects that meet filtering criteria. Displays the following buttons:
Apply applies highlighted filter.
Add adds new filter by evoking Filter for Projects on FTP-server properties dialog window.
Delete deletes highlighted filter from the list.
Properties invokes Filter for Projects on FTP-server properties dialog window to edit highlighted filter’s properties.
37.6. Filters for Projects on Ftp-server Properties Dialog Window
Is invoked from ‘Filters for Projects on FTP-server dialog window when new filter is being added or properties of existing filter are edited.
Name is filter name.
Field is a field to be used for filtering objects.
If Name or Code field are chosen as Field, set up Sample to be used in filtering: only projects with first symbols of the selected field matching with the Sample will be included in the resulting list.
If Version is chosen as Field, set up a range of project versions to be included in the filtered list. If From field is left empty, it is set up as 0; if To field is left empty, it is equaled to infinity by default.

327
38. E-mail
38.1. Send E-mail You can send e-mail message to users in the Users Table. To send e-mail:
1) Check that user you are going to send e-mail has defined E-mail address (in users properties dialog window) 2) Check that the name of SMTP Server used to send E-mail in spider project parameters dialog window is defined, 3) Invoke shortcut menu for the user or group of users whom you want to send e-mail and choose Send Mail option. 4) In opened send e-mail dialog window enter subject and the message body; 5) Press Send to send e-mail; Close – to cancel action
During sending e-mail Outgoing mail SMTP server name and return mail address correspond to those set for the user that has currently opened the project file. (see User Identification for more details) Note that users will be notified via e-mail for successful project data distribution for them.
38.2. Sending E-mails Dialog Window
The user has an opportunity to send messages by e-mail directly from Spider Project Software. For this purpose in Users Table it is necessary to specify e-mail the address of all users, and in Spider Project Parameters Dialog window - SMTP server used to send E-mail.
To create a message, it is necessary to invoke shortcut menu on users line(to whom the message will send) in users table than In the shortcut menu to choose item to Send Mail. If the mail address for this user was not defined corresponding error mesaage will appear. In this case invoke user properties dialog window and define E-mail address. Field To indicates the address of user(it is filled automatically if it was defined before in user properties dialog window) Subject and the Message fields indicate subject of e-mail and message to be sent, respectively. If it is necessary to disconnect modem connection after the sending the message, option to Hang up at completion should be selected. Send – sends the message. Close – closes window, without sending the message. Help – causes help information on this dialog window.

Attached Documents
328
39. Attached Documents
39.1. Attach Document Objects, i.e. documents or files from other applications such as Microsoft Word, Excel, Paint, and others, can be attached to Spider Project software. For example, Microsoft Word file containing contract text can be attached to ‘Signing Contract’ project activity.
To attach document, use OLE-objects and Folder standard page included in most of Object properties dialog windows except for Links, Assignments, Weeks, Access Rights, Calendars, and some others.
To create and attach new OLE-object, click Add button.
OLE object dialog window will be invoked. Type in new OLE-object name (OLE object by default) and click OK.
Insert Object dialog window is invoked next. Select between Create New and Create from file. The dialog window appearance depends on choice you made. When Create New option is selected, dialog window contains list of object types. Select type and click OK. When Create from file option is selected, dialog window contains path to disk location. Browse button helps you to locate files easier. Click Link option if you want this OLE-object to be attached to the project, not embedded into it. Click OK when finished.
To change name or any property of highlighted OLE-object, click Properties.
To delete highlighted OLE-object, click Delete. If OLE-object was of Linked type, only link to it will be deleted, file/document itself will not be deleted.
39.2. Attach Folder You can attach folder to program object using ‘OLE-object and Folder’ standard page. Only one folder can be attached to program object. This folder might contain documents, graphs, letters, and other files.
To attach folder, go to Attached folder frame in the bottom of ‘OLE-object and Folder’ standard page containing text field to enter folder path, Open and Select buttons.
If full path to folder is known type it in text field directly. To simplify path entry, use Select button.
To see attached folder contents, use Open button. To delete folder attachment (not folder itself) clear path information from text field.
In almost all project tables (except for Links, Assignments, Weeks, Access Rights, Calendars, and some others) and in table part of Gantt diagrams, Folder column exists containing attached folder path information. If this column doesn’t exist in table, right click on any column header and choose Show Columns option. From the invoked list, choose the field Folder and click OK. Invoke Folder shortcut menu with the right mouse button click in Folder cells, containing:

Attached Documents
329
- Open opens attached folder.
- Choose simplifies folder path entry evoking standard browsing window (or double click on cell).
- Edit allows path editing directly in cell (or press Enter key on the keyboard when the cell to edit is highlighted).
If folder does not exist in the location you specified, the program will attempt to create folder there. If, for some reason, this is impossible, a corresponding message will appear.
39.3. Insert Object Dialog Window
Allows setting up properties for object being inserted. Once this dialog window is invoked, its appearance depends on option you select: Create New or Create from file.
When Create New option is selected, dialog window contains list of object types. Select type and click OK.
When Create from file option is selected, the dialog window contains path to disk location. Browse button helps you to locate files easier. Click Link option if you want this OLE-object to be attached to the project, not embedded into it. Click OK when finished.
39.4. ‘OLE-object and Folder’ Standard Page
This page is a part of Object properties dialog windows and allows attaching other applications’ documents (such as Microsoft Word, Microsoft Excel, or database programs) as well as assigning an object a special folder to store referential data. It contains the following fields:
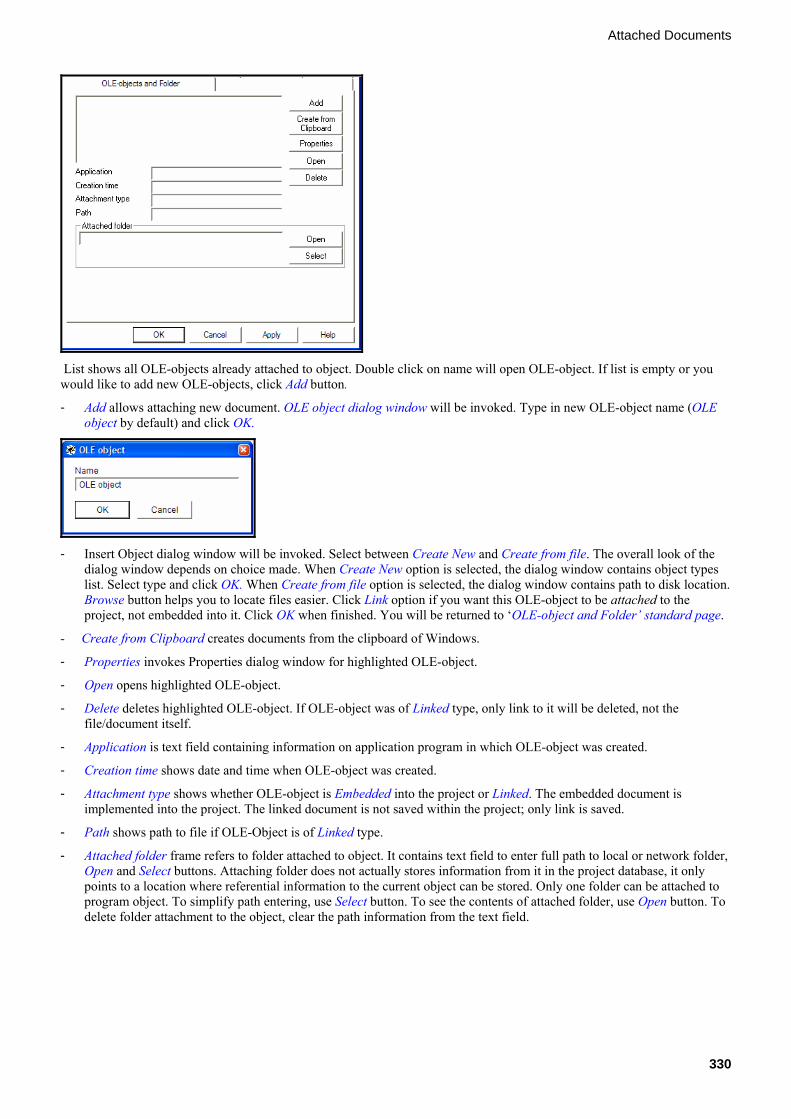
Attached Documents
330
List shows all OLE-objects already attached to object. Double click on name will open OLE-object. If list is empty or you would like to add new OLE-objects, click Add button.
- Add allows attaching new document. OLE object dialog window will be invoked. Type in new OLE-object name (OLE object by default) and click OK.
- Insert Object dialog window will be invoked. Select between Create New and Create from file. The overall look of the
dialog window depends on choice made. When Create New option is selected, the dialog window contains object types list. Select type and click OK. When Create from file option is selected, the dialog window contains path to disk location. Browse button helps you to locate files easier. Click Link option if you want this OLE-object to be attached to the project, not embedded into it. Click OK when finished. You will be returned to ‘OLE-object and Folder’ standard page.
- Create from Clipboard creates documents from the clipboard of Windows.
- Properties invokes Properties dialog window for highlighted OLE-object.
- Open opens highlighted OLE-object.
- Delete deletes highlighted OLE-object. If OLE-object was of Linked type, only link to it will be deleted, not the file/document itself.
- Application is text field containing information on application program in which OLE-object was created.
- Creation time shows date and time when OLE-object was created.
- Attachment type shows whether OLE-object is Embedded into the project or Linked. The embedded document is implemented into the project. The linked document is not saved within the project; only link is saved.
- Path shows path to file if OLE-Object is of Linked type.
- Attached folder frame refers to folder attached to object. It contains text field to enter full path to local or network folder, Open and Select buttons. Attaching folder does not actually stores information from it in the project database, it only points to a location where referential information to the current object can be stored. Only one folder can be attached to program object. To simplify path entering, use Select button. To see the contents of attached folder, use Open button. To delete folder attachment to the object, clear the path information from the text field.

Printing
331
40. Printing
40.1. Print Preview Window In print preview window before printing, all pages of the document are displayed. They are displayed with fields, whose size is set in Printer and Page window, which can be opened in main program window Window toolbar displays the following icons:
context help invokes help.
Print invokes Print dialog window.
When All pages is selected, a dialog window will be invoked containing total number of pages to be printed and Don’t print last vertical column of pages option to cancel printing of the last vertical column of pages, which usually are empty pages (or example, in Gantt diagrams).
Properties allow editing document printing properties by evoking print options dialog window.
Page Left, Page Right, Page Up, and Page Down allow previewing pages in a corresponding direction.
Each page has double numbering - matrix (numbers of horizontal and vertical numbers) and through (page serial number in viewing window). For example, if the page has number 2 - 3 (6) it means, that the given page is in the second horizontal and third vertical line, and its serial number is – six.
Pages to print can be chosen by cursor buttons on the keyboard, and also by left mouse button. It is necessary to keep Ctrl button pressed while selecting multiple pages with mouse. Selected pages are highlighted round by a red frame, and current page – by a double red frame.
If after pages are selected, mouse button will be pressed on any page with out keeping Ctrl button pressed all selections will be canceled and selected page will be current. All selection is also is cancelled at the change Printing Scale and the first page becomes current.
If on any previewed page mouse button will be double clicked Preview Scale will be set equal 100 %. Again clicking double returns the previous scale.
Note That: Synchronize document print preview and changes in the document itself by opening both windows simultaneously.
40.2. Print Properties Dialog Window Allows setting up printing options and is invoked by clicking Properties icon on print preview window toolbar (in case of both document and project print).
It contains the following text fields: Title, Subtitle, Left header, Right header, Left footer, and Right footer of the printed document
If this window was opened for a gantt chart, frame Diagram will be accessible. Selecting of one the three options (on every page, on the first page only, on the last page only) sets, on which pages of the printed document it is necessary to display the generated diagrams.
In Print framework it is possible to choose, that it is necessary to unpack - graphic part (this option is possible only for gantt diagrams) left table part or right table part.
Printing Scale –a field to change the scale of the printed document (from 50 up to 1000 %).
Save as a pattern – all assigned print properties will be set as a print template.

Printing
332
40.3. Print Templates Print patterns let you specify and store certain parameters for the printed reports:
- Title - report name in the printed document;
- Subtitle - printed document subtitle;
- data that would appear in corresponding areas of the printed document (Upper left corner, Upper right corner, Lower left corner, Lower right corner);
- Scale - printed document scale.
Print patterns can be specified in Print pattern properties dialog window and are stored in Print patterns table.
40.4. Print Template Properties Dialog Window

Printing
333
You can set and edit print template properties in this dialog window:
- page Data;
- notes standard page
Page Data contains following fields:
- Name - print template name;
- Code - unique print template code;
- Title - report name in the printed document;
- Scale (50-1000 %) - allows specifying scale of printed document.
- Subtitle - printed document subtitle;
- Left header, Right header, Left footer, Right footer – in these fields contents of top and bottom headlines are set and edited;
In Diagram frame, on which page(s) to print diagrams can be set - on every page, on first page only or on last page only.
In Print frame it is possible to choose, which parts will be printed - graphic part (the given option is available only for gantt diagrams), the left table part or the right table part.
40.5. Print Patterns Table Print patterns can be specified in Print pattern properties dialog window and are stored in Print patterns table. By default current table contains following columns:
- Code - unique print pattern code;
- Name - print pattern name;
- Notes - any comments made to print pattern. Double click on this field opens Print pattern properties dialog window on the notes standard page;
- Title - report name in the printed document;
- Subtitle - printed document subtitle;
- Upper left corner, Upper right corner, Lower left corner, Lower right corner - these fields contain data that would appear in the printed document in corresponding areas;
- Scale - allows to specify the printed document scale;
- user defined fields.
Working with this table is made by the general rules, identical for all tables of the project.
Table row shortcut menu contains the following options:
- Properties - opens Print pattern properties dialog window;
- New - creates new print pattern;
- Delete - deletes selected print pattern.
Shortcut menu for several selected rows contain one option - Delete.

Options
334
41. Options
41.1. Spider Project Parameters Dialog Window
Allows setting up spider project parameters and contains the following frames:
Text Import-Export frame defines text delimiter that will be used during export and import of project tables or documents/reference-books into text (CSV) files. Delimiter choices are: Tab; Semicolon; Comma; Space; and Other. You can enter symbols by their ANSI-codes in Other - field. ANSI-codes must be entered after a backslash. E.g., \35 - will set # symbol as text delimiter.
Save and Open frame contains the following options:
- Create backup copy option, requests to save a backup copy to Backup folder of the corresponding storage every time the project is saved.
- Reopen if file changed option, selected, offers to reopen the project file every time it was changed by another user in network. Therefore, the project while being changed by one user (who has access), is constantly updated for other users who opened the project in read-only mode. (Manager with full project access is given rights to read and write project, while other users are given read-only accesses)
Undo frame sets up the number of Undo steps (number of rows in Protocol table). Enter the desired number in Depth text field from 0 to 1000. Select Show notifications option if you want to be notified on each Undo action.
Appearance frame sets up the number of Digits after decimal point. Enter desired number of digits from 0 to 14 in the field ( value "3" is set by default.)
Pressing Material and Cost Column Names setup button opens postfixes of material and cost column names dialog window where you can customize postfixes, added to the names of columns, corresponding to durations, volumes, expenditures of cost components and materials.
Date -Time Format button invokes Date Time format window for setting date and time format. Date Delimiter frame allows selecting the separator of dates -Point, Slash or Hyphen. Time Delimiter frame allows determining the time separator between hours and minutes -Colon or Point.
- Open properties for new objects – checking this box will enable opening properties dialog window for newly created objects (where you can enter required properties immediately after the object has been created). This option is disabled

Options
335
by default, so you can create multiple objects faster and define their properties later. Select this option if you wish to enter properties for the newly created object immediately.
- Keep new report settings - this option lets you temporarily store the parameters list of the last general report or diagram created in report settings dialog window or diagram settings dialog window, so that you can quickly modify them and adjust your report or diagram. By default this option is disabled and parameters of the last report or diagram created are not stored.
- Delete files into Recycle Bin – after selecting this option, deleted projects and documents will be placed into Recycle Bin with the possibility of their subsequent restoration.
- Open the last active window when opening a project (else – Gantt Diagram) – when this option will be selected, the project will be opened in the last table, on which user has worked before closing the program (the project must be saved and closed). If this option will not be selected, projects will be opened on gantt chart as default.
- Highlight overloaded resources –overloaded resources will be highligted in resources table and in gantt diagram
- Highlight acitivites that violate links – if this option is activated, after entering monitoring data, activities that are violating links between operations, will be highlighted on the graphic part of activity gantt.
STMP Server used to send E-mail field indicates the SMTP address of server.
If SMTP server requests authorization while sending messages by e-mail (via Spider Project Software), select SMTP server requires authentication option, and enter Username and Password in the corresponding fields located below (User name and Password)
- OK – saves changes and exits.
- Cancel – exits without applying any changes.
- Help – opens related help window.
41.2. Color Setup Dialog Window
This window allows setting up graphical element colors in program windows, and can be invoked in the main program
window by clicking Colors icon on the toolbar.
All elements are combined in groups listed in the left part of the dialog window, in Group frame. Colors can be selected separately for each element.
For example, Network Diagram group contains Background, Text, Activities, Links, Phases, Selected, and Phase Title elements. Current color of highlighted element is shown in Color field on the right. To change color for highlighted element, click Change button. color window, which is a standard color-selecting window, will be invoked.
To return to program color defaults for an element, click Default button after selecting it. To return to default color scheme for all items, click All by Default (replaces all new settings back with Spider Project Software defaults).
Apply button applies changes without closing Color Setup dialog window.
OK button closes dialog window with all changes saved.
Cancel button closes dialog window without any changes.

Options
336
Help button opens related help window.
41.3. Color Selection Dialog Window
Is a standard window allows setting up the color of a graphical object. To learn more about this window and its contents, first click at the ‘?’ sign on the right corner top and then click to the window element of interest.
41.4. Object Color Dialog Window
Allows changing object color from Standard color set up by default to any other. To change, select User defined option and click Change button. Color dialog window, which is standard color-selecting window, is invoked.
If object currently is of user-defined color and you would like to return to by-default color, select Standard option and click OK.
Current object color is shown in Color field.
41.5. Fonts Setup Dialog Window

Options
337
Is invoked from main program window by clicking Fonts icon on the toolbar. Allows setting up fonts in different program windows.
All program elements are combined in groups listed in Group frame. Font can be set up for each element separately.
For example, Table group contains Title and Index, Data elements.
Element’s current font is shown in Font field on the right. To change highlighted element’s font, click Change button. Font dialog window, which is a standard font-selecting window, is invoked.
Select font properties and click OK. You will be returned to Font Setup dialog window.
To return to default font, click Default button. To return to default font for all items, click All Default.
Apply button changes highlighted item’s font without closing Font Setup dialog window.
OK button closes dialog window, saving all changes.
Cancel button closes dialog window without changes saved.
41.6. Printer and Page Setup Dialog Window

Options
338
Allows setting up pager size, paper type, orientation (select between Portrait and Landscape), and margins of printed document. To set up printer properties, click Printer button. Click ‘?’ in the top right corner of the dialog window to learn more about this dialog window.
41.7. Time Scale Dialog Window
Time Scale Dialog window is invoked with double click (or right click) on the Time scale in graphic part of Gantts charts and is used to set up the time frame for diagram presentation. The scale of the diagram also can be customized with the help of the scaling tool.
From and To dates in the Scrolling range frame set the minimum period of the project that would be displayed in the graphical part of the diagram at any scale, selected with the Scaling tool, and that can be scrolled. If you define the time frame of the project in these date fields that is less than the whole project period, you will also be able to print this time frame of the project only. If selected scale does not allow viewing the whole time frame in one window, you can scroll the window with the help of horizontal scroll bar (located at the bottom of the diagram window).
Double click in From and To fields invokes mini-calendar dialog window to simplify date and time entry. You can also edit dates in these fields manually.
Whole Project button automatically sets the time frame to the whole project duration.
Automatic scrolling range – checking this box enables automatic scrolling range. I.e. after schedule calculation scrollable project time frame will correspond to the whole project duration. For better presentation results project time frame is expanded one day ‘to the left’ and certain space (equal to 200 dots) ‘to the right’ – to ensure that existing notes on the diagram fit space available.
Week’s Title frame contains options for presentation of weeks’ titles on the time scale in Gantt diagrams:
- First day of the week – weeks will have titles corresponding to the date of first days of weeks;
- Week’s number in a year – weeks will have titles corresponding to week’s number in a year;
- Week’s number in a month – weeks will have titles corresponding to week’s number in a month ;
Day’s Title frame contains options for presentation of days’ titles on the time scale in Gantt diagrams:
- Date – days will have titles corresponding to their calendar date;
- Day’s number in a year –days will have titles corresponding to their number in a year;
- Day’s number in a project - days will have titles corresponding to their number in current project;
As you change the scale of your diagram with the help of the Scaling tool, titles on the time scale will change to fit space available.
If minimum scale is set – only year and comprising quarters will be displayed in the time scale. As you increase the scale of your diagram, titles on the time scale will also change.
41.8. Template Dialog Dindow

Options
339
Allows setting up a template, that could later be used for automatic text changes in activities, phases, and departments in one of the following: activity network, OBS(Organizational Breakdown Structure), WBS (Work Breakdown Structure) or PBS
(Project Breakdown Structure) and can be invoked from their menus by pressing icon.
Prefix - allows entering the text you want to appear in front of each field name in Field field.
Field - field contains field names to be edited by template. Edit or add a field by clicking Select button. Select field name in the invoked fields available dialog window and click OK.
Number of fields to be displayed in activity, phase, or department box depends on current scale in Activity Network, OBS, WBS, or PBS and can equal 1, 3, or 5.
None option clears field from template canceling its presentation in diagram.
41.9. Replication Options Dialog Window
You can enable or disable deletion of unused project objects during phase copying as new project and distribution of projects. To enable deletion of unused objects check boxes, corresponding to required object types:
- Resources, Skills, Multi-Resources; - Materials; Material Sets - Cost Components; - Calendars. Weeks and Exceptions
To view this dialog window before each distribution of projects or phase copying as new project leave Show options every time box checked (is enabled by default).
41.10. Column Name Postfixes Setup This dialog window allows you to customize postfixes to the names of columns corresponding to durations, volumes, expenditures of cost components and materials.

Options
340
Main frame:
- Remaining – scheduled remaining volume, duration, expenditure; - Actual – actually passed duration, performed volume, expenditure; - Total (Actual plus remaining by schedule) - Total in Compared Project – total volume, duration, or expenditure from the project being compared with.
Fixed frame: - Fixed Remaining– fixed scheduled expenditure of cost components or materials; - Fixed Actual - fixed actual expenditure of cost components or materials;
Other frame: - Material Unit Cost - Utilizing per hour – expenditure of cost components or materials per hour; - Overtime Cost per Hour (Percents) (see Overtime ) - Per Volume Unit
Risk Analysis frame (see description of columns in Risk Analysis): - Critical value - Target Value - Probability of Conformance to Targets OK - button applies the changes and exists. Cancel - button exits without saving any changes. Default - button returns all settings to defaults. Help – invokes the corresponding help topic.

Options
341
42. Miscellaneous
42.1. Help Contains context help for a program element where Spider Project Help button or Help icon was clicked.
42.2. Priority Priority of Activities. Priority is a number, reflecting the order of activities performance in resource constrained scheduling. Activities with higher priority (i.e. larger number of priority) are performed earlier. For example, if two activities share the same limited resource (with a workload of 100%), activity with higher priority would be scheduled first in resource constrained scheduling. Priority of Resources (Multi-resources) Inside Resource Skills. Priorities of assignments are used in resource skills. Resources (multi-resources) with higher priority of assignment (i.e. larger number of priority) are scheduled to activity execution first (if they are not busy on others, e.g. higher priority, activities). Priority of resources (multi-resources) assignments to current activity refers to current activity only. When a resource skill is assigned to activity execution, priorities of comprising resources (multi-resources) are initially set to values specified for this resource skill. You can later change priorities of resources (multi-resources) assignments manually for each activity. Priority of Phases. Priority is a number, reflecting the order of phase’s performance in resource constrained scheduling (with Use Phase Priority option enabled). Phases with higher priority (i.e. larger number of priority) are performed earlier. Priority of phase is similar to priority of activity, but is of major importance. Phases with higher priorities are scheduled first irrespective of comprising activities priorities. Note that priority can have positive or negative values.
42.3. Type Is standard field in activity, phase, resource, and assignment properties and is used in highlighting, sorting and working with reference-books.
For all objects, except for resource assignments, there are no strict rules in creating type. For assignments, type is set up from activity type for which resource is assigned, followed by underscore sign, and assigned resource type. For example, if activity has Demo type and resource has "A" type, resource assignment will have Demo_A type.
If in reference-book Type field matches with project object type, data from reference-book can be exported to the project.
Type field is set up by default for project presentation in linear diagram.
42.4. Float Activity Float. Activity float is the amount of time that an activity may be delayed from its early start without delaying the project finish date. Float is a mathematical calculation, and can change as the project progresses and changes are made to the project plan. Activities with floats less than or equal to specified value, often zero, define project critical path and are called critical activities. Execution delay of such activities leads to increase of project duration unless preventive measures are undertaken (usually assignment of additional resources, increase of work load and so on). Resource or team assignment float. Resource or team assignment float defines time interval that these assignments may be delayed without delaying the project finish date. Assignments with zero float are called critical. Resource float. Resource float defines time interval that the work of this resource may be delayed without delaying the project finish date.

Options
342
42.5. Keyboard Hot Keys
F12 - open project or document;;
Alt+X - exit Spider Project;
F6 - switch to the next program window;
Ctrl+F6 - switch to the previous program window;
F5 - maximize /restore window;
Shift+F5 - maximize /restore all windows;
F11 - switch to main program window;
F1 - open Spider Project help;
Alt+PageDown - go to the next project page;
Alt+PageUp - go to the previous project page;
Ctrl+S - save current project or document;
Alt+BkSp, Ctrl+Z - undo last action performed;
F7, Ctrl+F - find and/or replace;
F3, Ctrl+N - find/replace next;
Ctrl+Ins, Ctrl+C - copy to the clipboard;
Shift+Del, Ctrl+X - cut to the clipboard;
Shift+Ins, Ctrl+V - paste from the clipboard;
Ctrl+Shift+Ins, Ctrl+D
- insert one level lower;
Shift+Ins, Ctrl+V - paste from the clipboard;
Ctrl+Alt+Ins - create phase one level lower;
Alt+Ins - create phase on the same level;
Ins - create new object (row) or show column (if a column is selected);
Del - delete selected object (row) or hide column (if a column is selected);
Ctrl+O - sort by column;
Ctrl+Shift+O - cancel sort by column;
Ctrl – - fold hierarchical objects;
Ctrl + - unfold hierarchical objects;
Ctrl * - fold/unfold (inverse);
Alt+F10 - activate contextual menu (or with the aid of the button «mеnu» on the keyboard);
F9 - schedule calculation;
Ctrl+F9 - resource constrained schedule calculation;

Options
343
F8 - calculation of costs and material expenditures;
Ctrl+F8 - resource peak workload calculation;
Ctrl+W - autofit selected column;
Ctrl+Shift+W - autofit all columns;
For selection lists (objects' lists for selection):):
Ctrl - to select several objects press and hold Ctrl and select/unselect objects with mouse clicks (or Ins key);
Shift - to select a group of consecutive objects point to the first and last objects with mouse clicks (or Ins key) keeping Shift key pressed;
Shift+Ctrl+End - to select all objects in the list;
Insert - to select/unselect object.
42.6. Cursor Types There are the following cursor types in the program:
Clock Cursor means user should wait till the program finishes operation.
Link Cursor means link from one activity to another can be created holding the left mouse button.
Title Cursor appears with the left mouse button click on column header and means the column can be moved to another location by dragging and dropping.
Duration Cursor means activity duration can be changed by dragging it with the left mouse button click.
Not Earlier Than Cursor means activity start date and Not Earlier Than Start date can be changed by dragging it with the left mouse button click.
42.7. Dialog Windows There are two types of dialog windows in Spider Project: modal and non-modal. Modal dialog windows do not allow user to work in any other dialog or program windows until this one is closed, as Non-modal dialog allow this.
To close a modal dialog window, click OK button. All the changes made in the dialog window will be incorporated into the program. To cancel changes, click Cancel.
To close a non-modal dialog window, click Close. All the changes made in the dialog window will be incorporated into program.
Clicking Help invokes context help.
42.8. Text Object Dialog Window

Options
344
Allows inserting texts and is invoked by selecting Insert Text option in gantt diagram shortcut menu, both activity gantt and resource gantt.
It contains text field for text editing and standard OK, Cancel, and Help buttons.
42.9. Search and Replace Dialog Window
Allows searching texts in selected table columns or in entire table. To invoke this dialog window:
- Select (highlight) column;
- With the right mouse button click on column header, invoke Table Column shortcut menu; and
- Select Search / Replace option.
Alternatively you can invoke this dialog window from table menu: Edit -> Search / Replace
Select search option in Restriction frame from the following options:
- No restriction will find text (and parts of any text) matching with text entered in Find text field.
- Cell beginning only will find cells where text begins with entered text.
- Whole word only will find cells where entered text is separated from other text with spaces.
Search direction is set up in Direction frame.
- Select from Forward and Backward options.
Search can be performed in current Column or in Whole table (Scope frame), in all rows (Entire scope option) or starting from the current row (From cursor option).

Options
345
Search can be Case sensitive.
Replace frame allows to enter text that should replace the text found (in Replace the text found with field).Note that you can replace all occurences of text found without query (by checking corresponding box).
42.10. Mini-Calendar Dialog Window
Allows entering date and time into table cells and dialog window fields. Mini-Calendar dialog window is invoked by double click on table cells of data type or in dialog window fields containing date.
Select month and year from the drop-down lists, or move through the list one by one using left/right arrows in the top part of the dialog window (there are two sets of left/right arrows corresponding to months and years).
Hours and Minutes are given in drop-down lists in the bottom part of the dialog window. You can either type them in directly, or select from the drop-down list.
Select a date with a single left mouse button click on corresponding number in the calendar., or double click on date to close the dialog window and insert the date and time into table or dialog window field.
Current date and time are used if you click button.
To confirm entered time and date press Enter or double click on date to close the dialog window and insert the date and time into table or dialog window field.
To leave dialog window without entering data into the project press Esc or { bmc Sp__0154.BMP } button.
42.11. ANSI Codes Symbols in their ANSI-codes can be used to define test delimiter in Spider Project parameters dialog window and in SETFILEEXPIMP script command. Text delimiter is used for export and import of project tables or documents/reference-books to text (CSV) files. ANSI-codes must be entered after a backslash. E.g., \35 - will set # symbol as text delimiter. The list of ANSI-codes for some sybols: ANSI-code Symbol
33 ! 34 " 35 # 36 $ 37 % 38 & 59 ; 64 @
42.12. Journal of Actions Any changes in table cell value, either made directly in the cell or in a dialog window field, as well as object deletions, are recorded in Protocol table. A Protocol record contains the following data:
- Action (delete, add or change value);Operation
- Name and user code of the user who performed the operation;

Options
346
- Time and date of change;Time
- Name of changed object;Object Name
- Name of changed field;Field Name
- Old value in the field;Old Value
- New value in the field; New Value and
- User-defined fields.
To cancel action stored in Protocol record:
1. In Protocol table: Invoke row shortcut menu with the right mouse click on row number and select Undo.
2. In a project table or Gantt diagram where operation was originally performed: Either select Edit -> Undo last action
menu, or click Undo icon on the toolbar.
To delete Protocol record: Invoke row shortcut menu with the right mouse click on row number in Protocol table and select Delete.
Note That: Once you have deleted record in Protocol table, you will not be able to cancel operation (perform Undo).
Note That: Changes associated with adding objects are not recorded in Protocol; therefore, they cannot be cancelled or deleted.
Note That: Protocol table is not saved in Project file.
42.13. Protocol Table
Protocol table contains data on all actions (operations) performed by user and contains the following columns (fields) by default:
- Operation is activity done with object (delete, add, or change value);
- Time is date and time of change;
- Object Name is name of changed object;
- Field Name is name of changed field;
- Old value is field value before it was changed;
- New value is current value in the field;
- User-defined fields.
Protocol shortcut menu
Row shortcut menu contains the following options:
- Undo cancels the highlighted operation.
- Delete deletes operation and its row from Protocol table.
To cancel the last action performed select menu item Edit -> Undo last action or press button (see Undo for more details).
When several rows are highlighted simultaneously, shortcut menu contains Delete option only.
Since user is not allowed to add new row in Protocol table, shortcut menu lacks Add option.