Space Crusade - The Lost and the Damned...
25
Space Crusade Controls Use the joystick or the directional arrow keys to move the cursor. The fire button on the joystick or the Space Bar on the keyboard selects the current option. In addition the following keys can be used: K-Up, M-Down, Z-Left, X-Right, Space Bar – Fire, Shift/Q – Quits the current mission. In the main game, keys 1-5 will select the available Commander and Marines. Also in the main games, pressing the S key will allow the keys used for moving the cursor to be used to scroll around the mission map. Pressing the S key again will toggle off the scroll function. QUICK START GUIDE Doubtless you will be impatient to play Space Crusade as soon as it has loaded. We would not recommend this, as it is best to get an understanding of the rules, and the computer controls before you do. We are aware, however, that this is no deterrent, and you will want to go blasting aliens as soon as you can. With this in mind, we have made beginning the first quest as easy as possible. We have equipped each chapter with a set of weapons, so all you will need to do is select the number of players. To do this, choose ‘Select Chapter’ from the Main Menu. Each player taking part must now click on a Marine Chapter emblem. They will not need to select Equipment and Orders, as this has already been done. So, click on ‘Done’ to take you back to the Main Menu. Now click on ‘Start’ at the bottom of the screen. You will now begin the first mission. Refer to the weapons descriptions on page 8, and the Equipment and Orders descriptions on page 22 to utilise your weapons and descriptions. THE IMPERIUM More than 25 millennia ago mankind took the first tentative steps to the stars. With the discovery of the Warp drive came the Great Expansion. What was once a journey of several centuries became a journey of several days. Warp Space Warp space is the parallel universe through which starships may jump, travelling hundreds of thousands of light years in a few hours. Warp space is also the domain of Chaos. In Warp space nothing may be taken for granted. It is a universe filled with cross-currents, eddies and whirlpools of power. Ships have disappeared without reason, and emerged from the Warp centuries after they entered it, millions of light years from their destination. These derelict starships, distorted beyond all recognition, are known as Space Hulks.
Transcript of Space Crusade - The Lost and the Damned...

Space Crusade
Controls
Use the joystick or the directional arrow keys to move the cursor. The fire button on the joystick or the Space Bar on the keyboard selects the current option.
In addition the following keys can be used: K-Up, M-Down, Z-Left, X-Right, Space Bar – Fire, Shift/Q – Quits the current mission.
In the main game, keys 1-5 will select the available Commander and Marines. Also in the main games, pressing the S key will allow the keys used for moving the cursor to be used to scroll around the mission map. Pressing the S key again will toggle off the scroll function.
QUICK START GUIDEDoubtless you will be impatient to play Space Crusade as soon as it has loaded. We would not recommend this, as it is best to get an understanding of the rules, and the computer controls before you do.
We are aware, however, that this is no deterrent, and you will want to go blasting aliens as soon as you can. With this in mind, we have made beginning the first quest as easy as possible. We have equipped each chapter with a set of weapons, so all you will need to do is select the number of players. To do this, choose ‘Select Chapter’ from the Main Menu. Each player taking part must now click on a Marine Chapter emblem. They will not need to select Equipment and Orders, as this has already been done. So, click on ‘Done’ to take you back to the Main Menu. Now click on ‘Start’ at the bottom of the screen. You will now begin the first mission. Refer to the weapons descriptions on page 8, and the Equipment and Orders descriptions on page 22 to utilise your weapons and descriptions.
THE IMPERIUMMore than 25 millennia ago mankind took the first tentative steps to the stars. With the discovery of the Warp drive came the Great Expansion. What was once a journey of several centuries became a journey of several days.
Warp SpaceWarp space is the parallel universe through which starships may jump, travelling hundreds of thousands of light years in a few hours. Warp space is also the domain of Chaos. In Warp space nothing may be taken for granted. It is a universe filled with cross-currents, eddies and whirlpools of power. Ships have disappeared without reason, and emerged from the Warp centuries after they entered it, millions of light years from their destination. These derelict starships, distorted beyond all recognition, are known as Space Hulks.
The Age of StrifeDuring the Great Expansion man reached ever further into the stars. In time the hidden power of the Warp came to be noticed. By entering Warp space man had awoken an ancient evil: the minions of Chaos had escaped the Warp. The first great war, known as the Age of Strife, had begun.
For more than five thousand years, warfare wracked mankind, nation battled with nation, planet fought planet, system destroyed system. Abandoned colonies perished by the scores whilst aliens plundered and grew fat on the wreck of humanity.
Then came a saviour. The Age of Strife, arguably the greatest time of peril man has ever faced, brought forth the greatest man history has recorded - the man who would be known as the Emperor of Human Space. A shrewd diplomat, he gathered the fragments of human Society and formed them into the Empire. A brilliant soldier, he conquered and reclaimed the worlds lost to Chaos. For this task he created the Space Marines, the greatest warriors of all.
The Legiones Asartes is the official title of the warrior organisation known as the Space Marines. Its warriors are acknowledged as the most powerful and feared fighting men in the Imperium.
In numerical terms the Space Marines are a small force, but their superhuman ability and fearsome reputation make them worth many times their own number in conventional troops. They are held in awe throughout the Empire.
Space Marines are organised into self -contained chapters. each with its own fleet. A chapter’s fleet provides accommodation. training facilities, machine shops, armouries, shuttle silos and every other facility the chapter requires. The fleet roams through the galaxy in pursuit of the enemies of mankind. Task forces break away from it for individual missions or campaigns, and rejoin the fleet when their mission is accomplished.
Space Marine EquipmentSpace Marines have access to the full range of Imperial weaponry and equipment. The distinctive Space Marine powered armour protects them in all environments and is capable of withstanding direct hits from all but the most powerful weapons.
The standard Space Marine weapon is the bolt gun or the bolter. This is a devastating automatic weapon, which fires a hail of small-calibre explosive shells. The main close-assault weapon is the bolt pistol, a smaller version of the bolter that because of its size is ideal for hand-to-hand fighting.
The Space Marines also have a number of heavy weapons that may be employed when greater firepower is needed for a mission.
Assaulting Space HulksA common assault procedure is as follows:1. The Mothership launches one or more assault vessels towards the alien starship. Once alongside, a number of docking claws extend from the assault vessels and grab the side of the alien ship, The powerful claws tear info the alien ship and pull the assault vessel into the attack position.
2. Probes which pierce the skin of the alien ship are then extended from the claws. Each probe has within it a passageway through which the Space Marines attack. Once this has punctured the alien ship and been made airtight, the blast doors are opened and the Space Marines assault the alien ship.

3. The Space Marine squad is expected to move fast and accomplish the set mission. Once the mission has been accomplished the Space Marines make their way back to the docking claw. With all the Space Marines back on the assault ship, the docking claws release the alien ship and the assault vessel re urns, to the mothership.
SPACE CRUSADE: THE GAMESpace Crusade is a science fiction role playing game, in which you control a commander and four marines. Your commander starts off as a Sergeant, and can work his way through the ranks. The computer version allows for three players, each commanding one marine chapter each. The alien is ‘played’ by the computer.
If you do well you will be promoted until you reach the exalted rank of Captain Senioris, or, if you manage to accomplish each of the primary missions, you will become Captain Supremus. (Some of the terms being used here will seem a little daunting at first. Don’t worry. everything is explained in detail over the next few pages.)
You will also be awarded honour badges if you do well in a game. The six marine ranks are shown on the marine Rank Section following.
The Rules of PlayThe best way to explain how to play Space Crusade is to explain the rules of the board game, and then indicate how they are implemented on your computer.
The game is for one to three players. The players control three marine commanders and their Space marines. These players are called the marine players. The computer plays the Alien. Each game is a mission, and details of all the missions appear at the end of this manual. Put as simply as possible, the game goes as follows:
At the start of a game, the marine players choose the marine chapter they wish to represent, the weapons for their marine team, the mission to be played and the equipment packs and orders for their marine team. The marine players take their turn first, after each marine team that are in play have had their turn then the alien takes its turn. The marine players must attempt to accomplish the mission they have selected from the mission list. During their turn, each marine may move, fire or fight using hand to hand combat. As the marines explore the game map, they will obviously encounter aliens, marine players score points for eliminating their opponents, and the player who scores the most points wins the game. That’s it-move in, kill aliens, achieve mission objectives, move out.
The MissionsThe marine players choose one of the missions from the mission list and read the missionbrief text which explains the mission objectives.
INCREASING IN RANK AND GAINING AWARDSThe player with the most points, at the end at each mission, wins, provided that the minimum point threshold has been reached by that player. The player who won the game moves up a rank by one level and players who have scored sufficient points will receive awards. If none of the players have
reached the highest rank, another mission will need to be played.
A player may trade in four honour badges to move up one rank. The awards are lost, but the player moves up one rank. Awards may not be used to reach the rank of Captain Senioris you can only reach this rank by winning a game. Awards may not be used to reach the rank of Captain Supremus - you can only reach this rank it you are already Captain Senioris, and then by accomplishing all of the primary missions.
Between games any casualties that were lost are replaced so that you start each new game with a full set of marines. The only exception to this is the marine commander. If a marine commander is eliminated then that player must start off with a Sergeant in the next game, and any honour badges that the player had are lost. Marine commanders of any rank start each level with six life points.
THE CAMPAIGN GAMEThe campaign links all twelve games that you have played together. The object of the campaign is to be the first player to reach the rank of Captain Senioris, or even better, to accomplish all of the primary missions to become Captain Supremus, but only if you have previously reached Captain Senioris.
In the first game you play in a campaign you will choose your roles as normal. You must then play the same role for the rest of the games until one player has won the campaign game. Therefore, a player who chooses to be the Ultra Marines will continue to play the Ultra Marines until the campaign has been finished. The games need not be played all at the same time. You may choose to play the games over a number of days or even weeks. At the end of each game that is played the players may be promoted or receive honour badges depending on how well they played and how many points they scored.
In the campaign game the number of equipment packs and orders a marine player may choose will depend upon their rank and how many honour badges they have been awarded in previous games. A player always has four equipment packs and one order. For each honour badge they have been awarded the player may take an additional equipment pack. For each rank he has been promoted, the player may take an additional order. A player may never have more than 8 equipment packs or 4 orders.
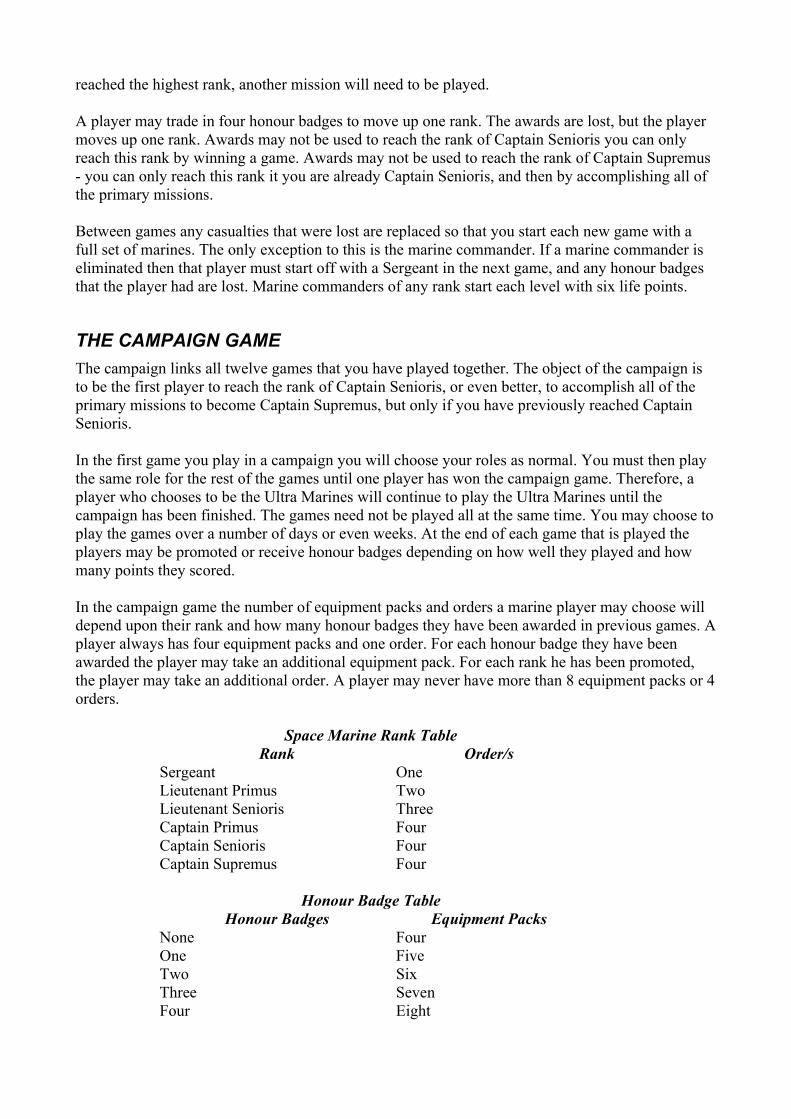
Space Marine Rank TableRank Order/s
Sergeant OneLieutenant Primus TwoLieutenant Senioris ThreeCaptain Primus FourCaptain Senioris FourCaptain Supremus Four
Honour Badge TableHonour Badges Equipment Packs
None FourOne FiveTwo SixThree SevenFour Eight

The Marine PlayersThe marine players must choose which marine chapter they are going to play with. The marine players must then choose their weapons. equipment packs and orders. Each player must choose four of the eight equipment packs and one of the four orders available to that chapter although they may choose more if their rank or honours allow.
Choosing WeaponsEach marine player has a range of weaponry to choose from at the start of each mission. The weapons chosen may vary from one game to another, depending on the aim of the mission.
Commander’s WeaponsThere are three alternative weapon combinations for the marine commander:
1. Power Axe and Bolt Pistol.This gives him a good hand-to-hand combat weapon with a little firepower.
2. Power Sword and Power Glove.This gives him no firepower at all. but two fearsome hand to-handcombat weapons.
3. Heavy Bolter.This gives him better firepower but his hand-to-hand combat ability is only as good as a normal marine.
Marine’s WeaponsThe four marines may choose from the available weapons. One of the four marines must carry a heavy weapon and one other must carry a Bolter. The remaining two may choose between carrying a Bolter or a heavy weapon. The three heavy weapons available are:
1. Assault CannonA useful weapon for attacking scattered groups of the weaker aliens or for attacking single, more powerful aliens.
2. Missile LauncherA good weapon for attacking aliens who are closely packed together or for attacking more powerful aliens.
3. Plasma GunThe plasma gun is a very powerful weapon that is best used in the corridors where it is effective against all manner of aliens.

Order of PlayThe Blood Angels will move first, followed by the Imperial Fists, and then the Ultra Marines.
Marine Players TurnDuring a marine player’s turn they may move and/or fire (or engage in hand to hand combat) all of their marines. They may move and fire each marine in turn. A marine may move first, then fire, or fire first and then move. A marine does not have to fire or move. However, a marine may not move twice or fire twice unless an order is played that allows the marine player to do so. The marine player may use any of their equipment packs during the course of their turn. However, marine players may only use one order per turn. The order is played at the beginning of a marine player’s turn, before moving or firing, and cannot be played again for the duration of that game.
1. MovementThe game map is divided into squares which are used for movement. Squares are either corridor or room squares. A commander and any marine with a bolter may move up to six squares, and marines with heavy weapons may only move up to four squares, although one of the equipment packs will allow a chapter to move six. A marine may be moved in any direction, horizontally, vertically or diagonally. The player may always choose to move a marine less than the maximum distance allowed, or not to move a marine at all.
When moving, you will not be allowed to finish your move on an occupied square. You may, however, pass through a square occupied by one of your own marines provided you have enough movement to move beyond the square. You may not move through a square occupied by an alien or a marine from another marine chapter, Otherwise you must take another route or stop. Only one marine or alien may occupy a square.
2. Opening DoorsAliens and marines may only enter and leave rooms through open doors. A door may be opened by moving a marine onto one at the squares in front of it, clicking on the Door icon in the control panel at the bottom of the screen. Players do not have to open a door if they do not wish to. Opening a door does not count as a move. Players may not close doors or open doors they are not adjacent to. unless an alien event (see Alien Events) has occurred and allows them to do so. A door will open automatically if a player moves on, or past it.
3. ScanningAny of the marines in your team may scan for aliens during their turn, but only one scan is allowed per turn, If there are aliens within scan range then blips, which are unrevealed aliens, will appear. Blips will only appear if they are not within a marines line of sight. Obviously, any aliens within the sight of a marine will be shown as an alien, regardless of whether you have scanned or not. If a marine moves onto a square from which a line of sight can be traced to one or more blips, then those blips will be revealed and an alien will appear in place of the blip.

BlipsIf a marine or commander moves onto a square from which a line of sight can be traced to one or more blips, then those blips will be revealed.
Line of SightLine of sight between marines or aliens is calculated by tracing a straight line from the centre of one square to the other. If the line of sight passes through a square containing a marine or alien, a closed door or a wall, the line of sight is blocked. Aliens or marines only block the line of sight for firing, they do not block the line of sight for the purpose of seeing if a blip needs to be revealed. Obviously, on the computer this is calculated automatically.
FiringYou may only fire at targets that are visible and cannot fire at blips. Targets are visible if you can trace a line of sight to them. There is no maximum range for any of the weapons used in Space Crusade. The dice rolled will depend upon which weapon you are using.
Light WeaponsBolter or Bolt Pistol 2 Light Weapons diceHeavy Bolter 2 Heavy Weapons dice
Heavy WeaponsAssault Cannon 2 Heavy Weapons dicePlasma Gun 2 Heavy Weapons diceMissile Launcher 2 Heavy Weapons dice
Obviously, in the computer version the appropriate dice will be chosen for you.
Rolling to HitWhen firing, the appropriate dice for the weapon being fired are rolled. It the total is greater than the armour value of your target then you will have scored a hit. The target must then lose one life point for each point you rolled over its armour value.
All aliens, except the dreadnought, have only one life point and are therefore eliminated when they are hit, marines also have one life point. Marine commanders start the game with six life points. Points are scored when a rival marine or alien are eliminated.
Re-rolling DiceHaving rolled the combat dice, some equipment packs allow you to re-roll one dice. You do not have to re-roll a dice, but it you do then the new roll will be used. Click on the dice you wish to re-roll or click on the cancel button below the dice it you don’t wish to re-roll.
Heavy WeaponsThere are three heavy weapons in the game and each has a special way of firing All heavy weapons affect an area, and therefore may hit more than one target.

Assault CannonWhen using the assault cannon the total number rolled may be split between any visible targets. Eliminating a marine or alien may make others visible targets. These will then be eliminated provided you have scored enough points.
Assault Cannon ExampleIf the player’s dice roll scores a total of four and there are three gretchin, two orks and an android all of which are visible then the player may split their total of tour in four possible ways.
One point against each of the gretchin. The last point is then wasted as it cannot overcome the armour value of either an ork or an android.
Two points against an ork and then two points, one each, against two of the gretchin.
Two points against both orks.
Three points against the android and then one point against one of the three gretchin.
The number of points remaining will be displayed in the Dynamic Information Window. If there are no more aliens to fire at or the points are lower than an alien's armour value, then click on the 'Fire' icon to end your weapon fire.
Plasma GunThe plasma gun fires at all marines or aliens in a straight line of squares, which may be vertical, horizontal or diagonal. The total number rolled is compared to the armour value of each and every marine or alien in the line of fire. The line of fire will be blocked as soon as it hits a wall or a closed door.
Plasma Gun ExampleIn this example the player with the plasma gun may fire in any one of the three directions. He scored a total of four. Thus all the aliens in his chosen line of fire will be hit with four points. The alien in square B will also be hit with four points, regardless of whether the alien in square A is eliminated or not. He may only fire one square diagonally before hitting the wall.
Missile Launcher
The missile launcher must fire at a square, rather than at a specific marine or alien, although the target square may contain an alien or marine. Any alien or marine in the target square will be attacked with the total number rolled on both dice. Furthermore, any marine or alien in an adjacent square will be caught in the blast and is attacked with the higher of the two dice rolled. The blast will not affect marines or aliens on the far side of a wall or closed door.
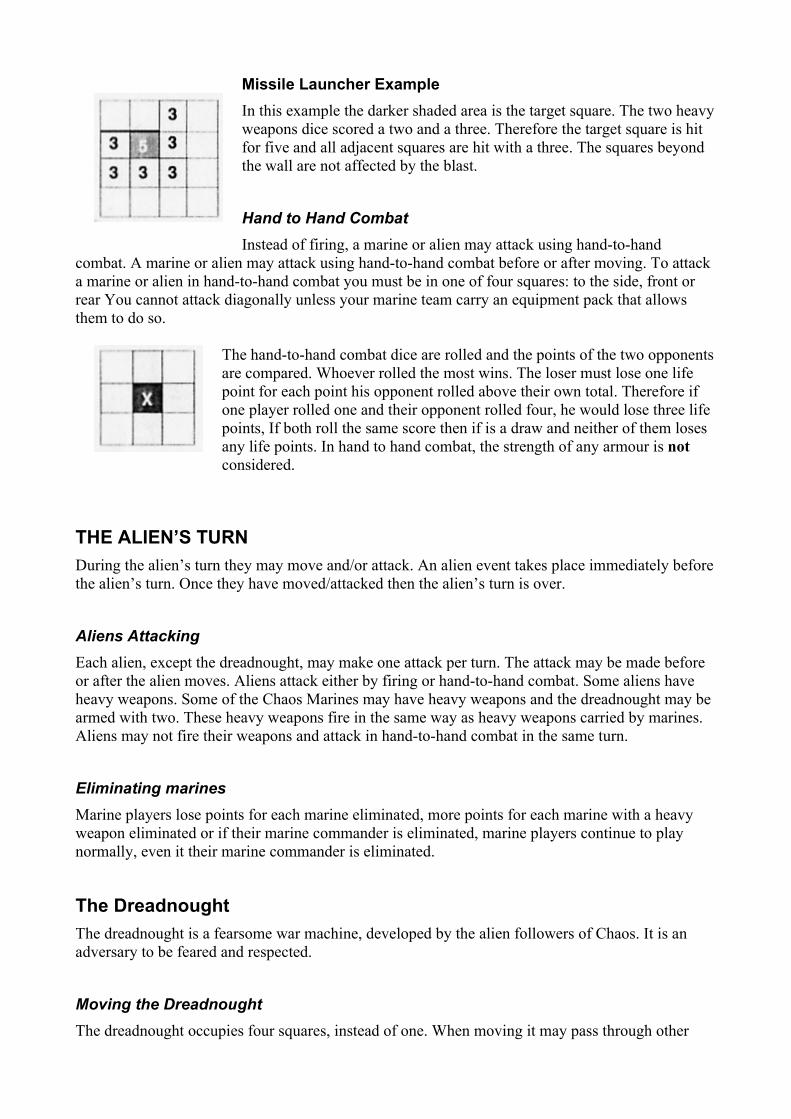
Missile Launcher ExampleIn this example the darker shaded area is the target square. The two heavy weapons dice scored a two and a three. Therefore the target square is hit for five and all adjacent squares are hit with a three. The squares beyond the wall are not affected by the blast.
Hand to Hand CombatInstead of firing, a marine or alien may attack using hand-to-hand
combat. A marine or alien may attack using hand-to-hand combat before or after moving. To attack a marine or alien in hand-to-hand combat you must be in one of four squares: to the side, front or rear You cannot attack diagonally unless your marine team carry an equipment pack that allows them to do so.
The hand-to-hand combat dice are rolled and the points of the two opponents are compared. Whoever rolled the most wins. The loser must lose one life point for each point his opponent rolled above their own total. Therefore if one player rolled one and their opponent rolled four, he would lose three life points, If both roll the same score then if is a draw and neither of them loses any life points. In hand to hand combat, the strength of any armour is not considered.
THE ALIEN’S TURNDuring the alien’s turn they may move and/or attack. An alien event takes place immediately before the alien’s turn. Once they have moved/attacked then the alien’s turn is over.
Aliens AttackingEach alien, except the dreadnought, may make one attack per turn. The attack may be made before or after the alien moves. Aliens attack either by firing or hand-to-hand combat. Some aliens have heavy weapons. Some of the Chaos Marines may have heavy weapons and the dreadnought may be armed with two. These heavy weapons fire in the same way as heavy weapons carried by marines. Aliens may not fire their weapons and attack in hand-to-hand combat in the same turn.
Eliminating marinesMarine players lose points for each marine eliminated, more points for each marine with a heavy weapon eliminated or if their marine commander is eliminated, marine players continue to play normally, even it their marine commander is eliminated.
The DreadnoughtThe dreadnought is a fearsome war machine, developed by the alien followers of Chaos. It is an adversary to be feared and respected.
Moving the DreadnoughtThe dreadnought occupies four squares, instead of one. When moving it may pass through other

aliens but may not end its move if any of the four squares it occupies contains an alien or marine. The dreadnought may always change the direction in which it is facing by turning on the spot. The dreadnought may not move diagonally.
The Dreadnought’s WeaponsThe dreadnought starts the game with bolters mounted onto its body and two heavy weapons. When a dreadnought fires it may fire all three of its weapons. The weapons are fired one at a time. It may fire more than one weapon at the same target or may choose to fire each weapon at a different target. The dreadnought can fire all its weapons as long as it can trace a line of sight to its intended target from at least one of the four squares it occupies. The dreadnought may not fire those weapons that have been lost during combat. When both heavy weapons have been lost then it may only fire with its bolters.
The Dreadnought’s Life PointsThe dreadnought has three life points. When it loses the first life point then it will lose one of its heavy weapons. The second heavy weapon is lost when it loses another life point. It continues to roll its full number of combat dice for hand-to-hand combat, even when it is damaged. The dreadnought is destroyed when it loses its third life point.
Dreadnought ExampleThe dreadnought begins on the four shaded squares. It moves four squares, first onto the two squares marked 1. then moves onto the two squares marked 2. The dreadnought then turns and moves onto the two squares marked 3 and finally onto the two squares marked 4. The dreadnought therefore ends up occupying the four lighter shaded squares. From this position the dreadnought can trace a line of sight for all its weapons onto any of the squares, except those marked with an X.
Alien ReinforcementsThe alien starts the game with a number of reinforcements. The exact number will depend on the mission being played. The alien may move up his reinforcements at the end of his turn.
Alien reinforcements will not be placed on a square that is visible to a marine. Obviously, all the above actions will be carried out by the computer.
Alien Armour Values, Movement Limits and Combat Dice(L=Light weapon dice, H = Heavy Weapon dice)
Alien Armour Value Move Fire Hand-to-handOrks 1 6 2L 2LGretchin 0 8 2L 1LAndroid 2 4 3L 2HChaos Marine 2 6 with LW 2L 2L

4 with HWChaos Commander 2 6 2H 2LSoulsucker 3 8 None 2HDreadnought 4 4 2x2H + 2L 2H + 2L
Completing the MissionIf one of the marine players succeeds in fulfilling the mission they will be awarded the primary mission, for which you will be awarded thirty points. A marine player who accomplishes the secondary mission will be awarded the secondary mission, and points. For more information on secondary missions, see ‘Alien Events’ later in the manual.
Once the mission has been accomplished the marines must return to their own docking claws. Any marine on a docking claw is safe from attack. Aliens may not move onto a marine docking claw. Once a marine has returned to the docking claw It plays no further part in the game. A marine may not fire or move back onto the map. If the marines fail to complete the mission they may still return to their docking claw to escape.
End of the gameOnce all the marines and commanders have returned to their docking claws then the game ends The game ends automatically after each remaining marine chapter have taken their final turn The marine players have one last turn each, to try to save as many of their marines as they can. Any marines left still outside their docking claw after this last turn are assumed to be eliminated,
Winning the GameThe computer will total up the score for each of the players, and will tell you who the winner is, providing that at least one player has reached the minimum winning points required. Again, this number is mission dependent, but this number will be given in the mission briefing screen. Once a game is over, the players will be given the opportunity of saving their chapters to use in later games or campaigns.
Those are the rules of play, and you will need to be familiar with them before you play the computer game. The computer will enforce most of the rules for you, of course. The following section explains how the computer game works.
SPACE CRUSADE: THE COMPUTER VERSION
MAIN MENUFollowing the loading sequence of Space Crusade you will be presented with the ‘Options Screen’ showing a menu which will offer you the following choices: Select Mission, Select Chapter and Expansion Missions.
Select MissionHaving chosen this option a menu will present itself with a list of missions. Click on one of the missions, we recommend that you play the missions in the order that they are presented. Click on the arrow in the bottom right hand corner of the screen, you will then be presented with the ‘Mission Briefing Screen’.
Mission BriefingThis will be the marines’ mission and will tell the marine players what they must try to do to achieve the primary mission objective and so score bonus points. Click on the arrow at the bottom right of the screen and you will be taken back to the ‘Options Screen’ ready to choose the ‘Chapter Select’ icon. Repeat the process if you wish to change the mission. (Amstrad 464 and Spectrum 48 users must refer to the manual).
Select ChapterHaving chosen this you will be presented with a screen with three icons showing a graphic of each marine chapters’ emblem with the name of the chapter underneath. Each player wishing to play Space Crusade must choose a chapter of marines to play with. Click on the chapter emblem representing the marine team you wish to play with. A menu appears under each of the selected marine chapter emblems which will offer you the choice of ‘Set Up’, ‘Load’ which enables you to load in a previously saved chapter on the disk version, or, on the cassette version, to enter a code which will load a chapter from a previous game Also displayed is ‘Status’ which will show the status of your currently selected chapter. If you reselect an emblem, you will have to select ‘Set Up’, and may then choose new weapons, equipment or orders, or keep your previous selections. Once you have finished making your choice, clicking on the arrows at the bottom right hand corner of the screens, will return you to the Select chapter Screen.
Set UpEach player must select the weapons their chapter of marines will use during the chosen mission by clicking on ‘Set up’ from the menu. You will first be presented with commander Weapon Select.
Commander Weapon SelectYou must now select one of the three weapons available for your commander by clicking on the weapon graphic, notice the un-selected weapons de-hilight. If you wish to change your commanders choice of weapon then click again on the previously chosen weapon and select again or just click on the new weapon you wish to select.
Equipment SelectionBelow the commanders weapon select section is the equipment selection section. The number of equipment packs you can select will depend on the number of honour badges your commander currently possesses, initially you will only be able to possess four. Click on the desired equipment packs which will then hi-light to show which ones you have selected. If targeters are chosen, then a weapon will appear next to the targeter icon. To change the weapon the targeter is to be attached to, click on the weapon next to the targeter and another weapon will appear, repeat this process until you have decided on the weapon you wish the targeter to be attached to. The heading ‘Select Equipment’ will de-hilight when all of the equipment packs you are allowed to possess have been
chosen. Again, to change your choice just click on the equipment you wish to discard and choose another.
Order SelectionThe section to the right of equipment select is the order select section. The number of orders your commander is allowed to choose will depend on his current rank, initially only one order may be chosen. Click on the icon/s representing the order/s you wish to select. The heading ‘Select Orders’ will de-hilight when all the orders you are allowed have been selected. Again, to change your choice just click on the order you wish to discard and then choose another. The arrow at the bottom right of the screen will start flashing (will not flash on Amstrad 464 version) when all your available selections have been made. Clicking on the flashing arrow will now take you to the ‘Marine Weapon Select’ Screen.
For details on how the equipment and orders are activated see the Action Icons Control Panel section. The actions and capabilities of orders and equipment are all explained in an appendix at the end of this manual.
Marine Weapon SelectionOn the left hand side of this screen are all the weapons available to your marine team. On the right hand side of this screen in the Amstrad version are the faces and names of your marine team. In the Spectrum version only the names of your marine team are displayed. Click on a weapon and you will notice that it de-hilights and the weapon appears next to a marine on the right hand side of the screen. Repeal this process to equip the other marines with their weapons, If you wish to change some of the weapons you have previously selected for your marines, click on the de-hilighted weapon on the left hand side of the screen, that weapon will now be hilighted, now click on any of the other hilighted weapons to replace your previous choice. Clicking on the marine’s faces in the Amstrad version or on the marine names in the Spectrum version, will make them active. Therefore if they’re hilighted and active, the weapon chosen next will appear next to the hilighted marine. When you have made and are happy with your selections, click on the flashing (not 464) arrow in the bottom right hand corner of the screen. This will return the player to the chapter Select screen ready for the next player to equip their marine team following the same processes as above.
When all of the players have made their selections and are satisfied that they are happy with their selection of mission, marine chapter and Weapons, then click on the ‘DONE’ box at the bottom of the marine chapter select screen which will take you to the Options screen. Click on the START box at the bottom of the screen. This will then start the mission you have previously selected.
Load ChapterPlease follow on screen prompts. In the disk version you will be presented with a list of slots with the name and number of your previously saved marine chapter. Click on the marine chapter slot you wish to load. In the cassette version you will be presented with a keypad to allow you to enter a code. Click on the appropriate keys to enter the cede of a previous marine chapter, which will have been given after a previous mission on the second mission de-briefing screen.
StatusThis screen shows the current status of your marine chapter. If you have forgotten to save after a mission and have exited the mission de-brief screens, then it gives you another chance to save your

chapter (see Save for details). This screen will show your chapter emblem, your commanders current rank, any honour badges held and your mission record, which displays any previous missions and whether you successfully completed them or not. This will be indicated by a tick or a cross next to the mission and its number. This is also where you can trade your honour badges. (See Mission De-briefing Section).
Expansion MissionsThe expansion mission option is provided for future missions that will be released at a later date. Follow on-screen instructions.
Playing the GameEach marine team starts a mission from their own docking claw. The docking claw is also the place that the team should return to at the end of a mission in order to be safe, a commander must return to the docking claw in order to gain any points scored in the mission. However when a marine returns to the docking claw then they can’t perform any action again but are safe from alien attack.
During a marine player’s turn they may move and/or fire all of their marines, although some of the Alien Events that occur during a mission may alter this rule. A player may move and fire each marine in turn. A marine may move first, then fire, or fire first and then move. A marine does not have to fire or move. However a marine may not move twice or fire twice unless the player possesses Equipment or an Order that allows them to do so.
Starting the GameWhen the game begins, the following screen will be the first you will encounter.
Alien Events and Secondary MissionsBefore each alien turn an alien event is carried out. Alien events can affect either the marines or the aliens. Some alien events are harmless to both aliens and marines but some are potentially harmful. One of the alien events is to reveal the secondary mission for the marines. If the secondary mission
is not revealed, then no points are scored, even if, by chance, you achieve the aims of the secondary mission.
The Main ScreenThe Main Screen is made up of the Main View Window, the Small Map Window and the Dynamic Information Window. Underneath these is the Control Panel.
1. Main View WindowThis is where all of the action takes place. Shown in either 2D or 3D, depending upon the mode, any action, and the consequences of it. will be shown on this screen.(Due to machine limitations, you will not see movement when in 3D mode on the C64 version) The current player may click on any of his marines in this window in order to select them. Also clicking on a revealed alien and holding the fire button down will show the alien in 3D with its name in the Small Map Window. The Main View Window has arrows around the edges, clicking on any of these, or along the edges of the Main View Window will scroll it in the chosen direction. Clicking and holding down the fire button on these arrows will continue to scroll the Main View Window until either the fire button is released or until the end of the mission’s map is reached.
2. Small Map WindowThis window displays the mission map. Aliens and your marines are shown as dots and they can be seen moving around the map when ordered to do so. Clicking anywhere on this map will take the Main View Window to that position. When the 3D button(k) is selected, clicking and holding the fire button down anywhere on the Small Map Window will display a 3D view of that part of the map in the Main View Window. When the dice are being rolled this window will display the dice roll as digital read-outs, dice that aren’t active will be de-hilighted. The Light weapons dice are displayed above the Heavy Weapons dice. A player may sometimes be given the option to re-roll some of the dice, you will be informed of this option via the Dynamic Information Window (3). Click on the particular die you wish to re-roll or click on CANCEL if you are happy with the dice roll and do not wish to re-roll.
3. Dynamic Information WindowThis window at the top right hand corner of the screen shows information about the currently selected marine in the marine team currently taking their turn, or the aliens when it is their turn. When a marine team are playing their turn the marine’s chapter emblem will be displayed in the top right hand corner of this window (i) along with the name of the currently selected marine, the number of life points the marine holds (ii), the weapon carried by that marine (iii) and also a targeter (iv). if one was chosen as part of your equipment choices.
If a marine has collected an object as part of the mission objective then this will also be displayed in this window to indicate which marine possesses it. When all of the marine teams have had their turn, this window will then display the number of turns remaining and will prompt you to press the fire button. Once the turn counter reaches one and the fire button has been pressed then your marine team will have one extra turn to get all of their marines back into the docking claw, otherwise they will all die. After the number of turns remaining have been displayed then it is the alien’s turn. Before the alien lakes its turn an alien event will be played (see Alien Events) which may be beneficial or detrimental to the marines: The alien will then take its turn.

You will see the alien emblem in the top right hand corner of this window and the Control Panel Action Icons will light up with a green surround when the aliens are taking their turn, this helps you see what actions the aliens are performing. Some weapons held by specific aliens will also appear in this window to show what weapon is being used against a marine. If the alien attacks using hand-to-hand combat then the marine involved will automatically make a defensive dice roll. You will be prompted to re-roll under certain circumstances, at which point your chapter emblem will appear in the Dynamic Information Window to inform you that you must re-roll.
Marine Team Icons (J 1-5)This panel shows the faces of the marines in your team. A marine must be selected before Move, Fire, Hand to Hand combat, Door, Equipment or Scan can be selected from the Control Panel. To select a marine, click on one of the marine face icons at the bottom of the screen, on a marine displayed in the Main View Window or press keys 1-5 which correspond to the commander and marines. The Control Panel will now hi-light the actions available to the selected marine. Double clicking on a marine icon or a marine displayed in the Main View Window will centre screen on the selected marine. There will be an L.E.D under the selected marine to show he is currently selected. If any of your marines have returned to the docking claw, or do not leave the docking claw after the first turn, their faces will be dehilighted to indicate that they cannot be selected. When a marine is eliminated a skull will appear in place of his face. Any orders should be played prior to selecting a marine in all but one case. Refer to Appendix One for further information.
4. Control PanelThe panel at the bottom of the screen is where you control your marine’s actions. Each icon has a particular function. Only the currently available actions will be highlighted.
The Icon Action Control PanelThis is the main section of the panel, and appears under the Main View Window. Clicking on these icons will cause them to be surrounded by the colour of your marine team to indicate that it has been selected. The coloured surround will stay active whilst the action is taking place or until the icon is clicked on again to cancel it. Obviously, this does not occur with ‘Scan’ and ‘Next Player’.
The icons are, from left to right:
a Scroll IconClick on this icon and move the joystick or appropriate keys to scroll around the mission map. Click on this icon again to exit this mode. Pressing the S key will also activate this option, use the keyboard or joystick to move around the map. Pressing the S key again will deactivate this option.
b MoveWhen a marine is selected this icon will be hi-lighted (not if the player has already moved, unless an order they may possess, allows them to do so). Click on this icon and the Main Map View Window will de-hilight all squares that can not be walked on.
Squares that the marine can move to will stay as normal, marines with bolters and commanders are able to move up to six squares. Marines with heavy weapons can only move up to four squares (unless they possess equipment that allows them to move up to six squares). When the Main View Window has de-hilighted the unavailable squares, click on a square within the allowed movement

distance and the marine will move to that square. Any blips will appear on squares within your available range to prevent you walking on or through those squares.
c FireWhen the Fire Icon in the Icon Action Control Panel is clicked on, the Main View Window will de-hilight, leaving the squares that can be fired upon displayed as normal. Click on an alien to be fired at or, if the missile launcher or plasma gun are being used, click on any square either containing an alien or an empty square with aliens on adjacent squares, The digital dice roll will now appear in the bottom right hand window. If CANCEL appears underneath the dice then the player has the opportunity to click on one of the dice to get a re-roll. If the player does not wish to re-roll a die then they should click on CANCEL. If the player’s dice roll has scored more than the alien’s armour value then the alien will die, with the exception of the dreadnought, who has three life points beyond his armour value.
d Hand-to-HandWhen this icon is selected, any aliens on adjacent squares to the currently selected marine can be attacked in hand-to-hand combat, marines can’t use hand-to-hand combat diagonally unless they have Equipment that allows them to do so. All other squares will de-hilight leaving the individual squares adjacent to the marine with aliens on as normal. Click on the square containing the alien you wish to attack. The dice will now roll for the marine’s attack score, followed by the defensive dice roll for the alien. Whoever gets the highest dice roll will win, the loser will lose one life point for each point his opponent rolled above his own total, If it’s a draw, then neither loses any life points. The icon will not be available for selection if a marine is not adjacent to an opponent or if they have already fired a weapon this turn.
e OrdersThis icon will only be active and hi-lighted at the start of the marine player’s turn, once selected it will not be available for the rest of the turn. If the player has more than one order, only one can be used per turn. Selecting this icon displays the currently available orders in the Small Map Window. Click on the Order Icon displayed in the Small Map Window that you wish to select, click on CANCEL if you no longer wish to select an order. (For a description of the Orders see Space Crusade Equipment and Orders section).
f EquipmentClicking on this icon will display all your equipment which can only be used once in the Small Map Window. Equipment which is used throughout a mission, for example the Bionic Eye, will not be shown here because it is always in use, and does not need to be selected at any particular point in the game. Click on the Equipment Icon you wish to use, click on CANCEL if you no longer wish to use the equipment. (For a description of the equipment see Space Crusade Equipment and Orders section)
g DoorsWhen a marine is standing next to a door he can open it by clicking on this icon. A door will open automatically when a marine or alien’s move allows them to travel past the door. A door can’t be closed once it has been opened unless the Master Controls have been discovered (see Alien Events).

h ScannerThe scanner can be used by any selected marine to reveal blips but only once per turn. The Scanner con will de-hilight when not available.
i Next PlayerClicking on this icon will finish your team’s turn and transfer to the next player’s marine team, or the alien, for them to take their turn.
j1-j5 FacesClicking on these will make that particular marine the current marine. So, if it is your turn and you wish to move marine j2, simply click on this icon, and j2 will become highlighted on the Main View Window. This is exactly the same as clicking on a marine in the Main View Window.
k 3D IconClicking on this icon will toggle the 3D on or off. When this icon is hi-lighted all actions will be displayed in 3D isometric view (except ‘Move’ on the C64 version). When this is not selected only the outcome of firing and hand-to-hand combat will be displayed in 3D isometric view. If the player puts their cursor on the Small Map Window and holds down the fire button then an isometric view of that part of the map will be displayed, releasing the fire button will return to the small map. When the 3D icon is not selected, clicking on the Small Map Window will position the Main View Window to the corresponding position.
Quit MissionThere may be times when you may wish to quit the current mission and start again or your marines may be trapped somewhere because they are surrounded by a vacuum. Press the Shift and Escape key to quit the mission on the Amstrad version and Shift and the Q key on the Spectrum version. C64 owners should press the Run/Stop and F1 keys.
Mission De-brief ScreensWhen all marine teams have either returned to the docking claw, or have died, the mission is finished and your marine commander will get a mission De-brief from the Imperium. Your commander’s current rank will be displayed on this screen, your commander may have been promoted by one rank since the last mission de-brief if he has won the mission. The number of aliens killed during the completed mission will be displayed and will also be converted into points which are also displayed on this screen, this will determine the type of mission de-brief you will receive. You will be told whether you have won the mission.
Each mission will have a minimum score that is required to win the mission. If playing a game with more than one marine team then the team with the most points wins the mission but only if they have scored above the minimum number of points required to win that mission. The commander of the winning team will be promoted by one rank. Completion or non-completion of the primary mission will also determine the type of de-briefing message you will be given. Also displayed will be the previous missions and whether you successfully completed them or not. This will be indicated by a tick or a cross next to the mission and its number. The number of points you gained during a mission also determines how many Honour badges, if any, you have been awarded. The

honour badges will be displayed on the second mission de-brief screen, accessed by clicking on the arrow in the bottom right hand corner of the first screen. If you have four honour badges a Trade Button will appear to allow you to trade them in for a promotion by one rank, unless you are already at the highest rank, or the rank below. If you click on the Trade Button, you will lose four of your badges, and be promoted by one rank. The button will then disappear. This screen is also where you can save your marine chapter. See Save chapter section. When you wish to leave the mission De-brief screens click on the arrow in the bottom right hand corner to take you to the Options Screen. You can now select a new mission and begin play immediately, or choose some different weapons, equipment and orders for your marine team if you wish before starting a new mission.
Save chapterThe option to save a chapter is also offered on this screen. Click on Save at the bottom of the second Mission De-Briefing Screen and follow on screen prompts. The disk version will have a list of slots which will automatically enter a file name of your marine chapter and a number when you save.
The cassette version will display a code number on the second Mission De-Brief Screen which you must write down so you can enter the code at a later date. This option is also offered on the Status Screen (See above).
APPENDIX ONE
EQUIPMENT AND ORDER CARDS
Blood Angels Equipment Packs1. Bionic Arm: This gives the marine commander enormous strength which is best brought into use in hand-to-hand combat. Your commander may re-roll one die whenever attacking in hand-to-hand combat, to try to improve his score Remains in use for the entire mission.
2 Blind Grenades: These release a broad spectrum electro-magnetic interference that prevents the marines being seen or detected. This equipment can only be used at the end of your turn. The Alien player may not attack any of your marines on his next turn. This equipment can only be used once.
Click on the Equipment Icon, and then on the Blind Grenade Icon in the Small Map Window. On the alien’s turn they will not attack your marine team.
3. Close Assault Blades: These are heavier than the normal bolter blade, and are only issued to marines who have received advanced close-quarter training. All of your marines with bolters may attack diagonally in hand-to-hand combat. When they do this the opponent rolls one less die than normal. Remains in use for the entire mission.
4. Melta Bomb: This device once attached, explodes, the blast of super-heat atomising the target. It is especially useful against androids and dreadnoughts. Any one of your marines may roll two extra heavy weapons dice in hand-to-hand combat attack. This equipment can only be used once.
First select a marine, then select the Equipment Icon and then the Melta Bomb Icon in the Small Map Window. If the selected marine fights using hand-to-hand he may roll two extra heavy weapon dice.
5. Bolt Pistol: This is a smaller version of the bolter. It is especially useful in close quarter-combat battle. All of your marines armed with bolters are also carrying bolt pistols and may roll one extra light weapons die in hand-to-hand combat. Remains in use for the entire mission.
6. Targeter: This is an advanced weapon sight. It combines an image intensifier with a full spectrum scope. It must be assigned to a specific weapon during equipment selection prior to a mission. Any of your marines that use this weapon may re-roll one die after firing, to try to improve the score. Remains in use for the entire mission.7: Force Field: This is a belt-worn generator for your commander. The Force Field is not impervious to attack but the energy emitted is enough to reduce the velocity of all incoming missiles or blows. Your commander has an armour value of three. Remains in use for the entire mission.
Blood Angel Orders1. Fire!: This Order should be used when there are many aliens in view. This will then maximise the fire effect of your squad and enable you to eliminate a larger alien force. Each of your marines may fire twice. They may fire, move and then fire again, OR fire twice before or after moving. This order can only be used once.
2.Photon Grenades!: These release a burst of light energy that stuns. They are commonly used by the marines before they engage in hand-to-hand combat. Any Aliens that you attack in hand-to-hand combat this turn must roll one die less than normal. This order can only be used once. This order is active for the whole team.3. Close Assault!: This is best used to force a passage through a blocking force of aliens. The marines are trained to fire as they rush in combat. Any of your marines armed with betters may fire them AND attack in hand-to-hand combat, or perform a hand to hand combat twice. This order can only be used once.4. Move It!: This should be used either to move your squad out of a danger zone or to secure advanced fire positions quickly. Each of your marines may move twice. They may move, fire and then move again, OR move twice before or after firing. This order can only be used once.
Imperial Fists Equipment Packs

1. Suspensors: These are small anti-gravity devices that are often used to negate the weight of heavy weapons and equipment. All of your marines with heavy weapons may move as though they have Bolters. Remains in use for the entire mission.
2. Combi-Weapon: These are rare and prized possessions. They combine several weapons into one and are deadly in the hands of an experienced commander. To use this equipment your commander must have the heavy bolter. He may fire the heavy bolter normally OR as if it were a plasma gun. Remains in use for the entire mission.
Each time the commander selects the FIRE icon he will be given the choice between his heavy bolter or a plasma gun. To select the desired weapon, click on one of the two weapons displayed in the Small Map Window.
3. Bionic Eye: This is used by some commanders. It combines target acquisition with an image intensifier and full spectrum scope. Your commander may re-roll one die whenever he fires, to try to improve his score. Remains in use for the entire mission.
4. Melta Bomb: See Blood Angels Equipment.
5. Targetter: See Blood Angels Equipment.
6. Bolt Pistols: See Blood Angels Equipment.
7. Blind Grenades: See Blood Angels Equipment.
Imperial Fists Orders1. Heavy Weapon!: This enables the concentration of fire of a heavy weapon. This movement allows you to position the weapon or to pull the marine back after firing. One of your heavy weapon marines may move twice and fire twice. This may be done in any order. This order can only be used once.
A marine carrying a heavy weapon must first be selected, then select the ORDER.2. By Sections!: This order is useful, it allows you to move up those marines who are out of position whilst using the others to give effective fire support. Each of your marines may either move twice OR fire twice. They may not move and fire. This order can only be used once.
First select the order, then a marine and then either the Move, Fire or Hand-to-Hand Icons. Whichever action was chosen for that marine will be the action that he can perform twice. The actions allowed are; two Move, two Fire, two Hand-to-Hand or one Hand-to-Hand and one Fire
3. Fire!: See Blood Angels Orders.
4. Move It!: See Blood Angels Orders.
Ultramarines Equipment Packs1 Bio-Scanner: This advanced scanner can identify the traces it has picked up. However it has limited capacity, and should be used to identify the traces that pose the greatest threat. May be used at the beginning of a turn to identify any three blips anywhere on a ship to see what they are. Remains in use for the entire mission.
At the start of your team’s turn the bio-scanner is displayed in the Dynamic Information Window, click on three blips in the Main View Window you wish to reveal. Whilst the bio-scanner is visible in the Dynamic Information Window no marine can be selected via the Main View Window, but a marine can be selected via the Control Panel but doing this will cancel the bio-scanner until your team’s next turn.
2. Digital Weapons: These are miniature weapons that fit either onto a finger or a knuckle. Activated by the fingers, they give a commander a greater all-round combat ability. Your commander may re-roll one die when he attacks, either when firing or in hand-to-hand combat, to try and improve his score. Remains in use for the entire mission.
3. Medi-Kit: This is a belt-carried field dressing. It contains a sophisticated assessor that will administer treatment until the commander can return to the Mothership. Once selected it will restore all your commanders life points. It may not be used if they have just been reduced to zero. This equipment can only be used once.
4. Bolt Pistols: See Blood Angels Equipment.
5. Targetter: See Blood Angels Equipment.
6. Melta Bomb: See Blood Angels Equipment.
7. Blind Grenades: See Blood Angels Equipment.
Ultramarines Orders1. Fire!: See Blood Angels Orders.
2. Move It!: See Blood Angels Orders.
3. Close Assault!: See Blood Angels Orders.
4. By Sections!: See Imperial Fists Orders.
APPENDIX TWO: ALIEN EVENTS1. Communications MalfunctionThis is played on one player That player may not use an order on their nest turn.
2. Suicide androidAny one android may self destruct after moving. 2 heavy weapons dice are rolled. Each

marine/alien adjacent to the android is attacked with the total of 2 dice.
3. Android FaultNo androids or dreadnought may move or fire this turn.
4. Lure of ChaosA marine is randomly chosen (not a commander) and 1 heavy weapons die is rolled. If a 3 is rolled, the marine is replaced with a Chaos Marine.
5. Master controlsMarines may open or close as many doors as they like. This stays active for the rest of the mission. The door icon will now be highlighted for the rest of the mission. Click on the door icon and then on any door in the Main View Window you wish to open or close.
6. Booby TrapA marine is randomly chosen (not commander) and a missile launcher attack is made on that square.
7. Out of AmmoA marine with a heavy weapon is randomly chosen and has his heavy weapon replaced with a bolter. If no bolter is available then the marine will have no weapon and can only fight using hand-to-hand.
8. Report InThis is played on a player, that player’s commander may not move or attack on his next turn.
9. Auto-DefenceThis shoots at any marine. 1 heavy weapons dice is rolled.
10. Mech. AssaultAll androids and dreadnoughts may move up to twice their normal move this turn as well as attack.
11. Weapons JammedThis is played on one of the players. That player may not fire any heavy weapons or heavy bolter on their next turn.
12. Psychic AttackNo gretchins or orks may move this turn.
13. Mothership CommunicationThe secondary mission is transmitted to the marine teams attempting a mission and is displayed in the Main View Window.
APPENDIX THREE: SPACE CRUSADE MISSIONSEven when all mission objectives have been achieved, the players still have to return to the docking claw with as many surviving marines as possible.
1. Primary missionMission 653/4-Sector 45. Seek and destroy. Seek and destroy dreadnought aboard alien vessel 653.

The aliens have blocked some corridors with rubble. Clear rubble with weapon hit of one or above. The primary mission will be awarded to the player who destroys the dreadnought.
2. Primary MissionMission 653/5-Sector 46. Eliminate and survive. The Empire has failed to destroy all aliens on board alien vessel 656 by using experimental germ warfare. Eliminate as many aliens as possible and also any marines from another chapter as there is only enough antidote available aboard the Mother ship for one marine chapter. If only one marine chapter is deployed on this mission then eliminate all five infected Chaos Marines. The primary mission will be awarded to the player who eliminates the greatest number of rival marines, If any players eliminate the same number of marines it will be awarded to the player who has scored the most points. If one player only, then all Chaos Marines must be destroyed.
3. Primary MissionMission 653/6-Sector 47. Disable alien vessel. Disable alien vessel by destroying engineering control panel located in the engine room. Engineering control panel requires a weapons hit of two or above to destroy it. The primary mission will be awarded to the player who destroys the engine control panel.
4. Primary MissionMission 653/7-Sector 16. Locate and rescue. Locate a container which is preserving the brain of the Empire’s top scientist and return it to the docking claw. The primary mission will be awarded to the player who returns the container safely to the docking claw.
5. Primary MissionMission 653/8-Sector 85. Locate and retrieve. Delta Squad, Beta Company have been wiped out whilst testing a secret experimental weapon. Locate the experimental weapon and return it to the docking claw. The primary mission will be awarded to the player who returns to the docking claw with the experimental weapon.
6. Primary MissionMission 653/8-Sector 12. Purge and withdraw. Intelligence reports that the alien vessel has three outer hull doors. Open an outer hull door and withdraw from the vacuum that will spread to the rest of the ship. The primary mission will be awarded to the player who is the first to open an outer hull door and returns to the docking claw.
7. Primary MissionMission 653/9-Sector 24. Interception. Aliens have been detected aboard a drilling hulk in Sector 24. As many aliens must be engaged and destroyed as possible. However Intelligence reports that a radio-active source is aboard which is known to sometimes cause false scanner readings. If only one marine team is deployed then at least 15 aliens must be destroyed. The primary mission will be awarded to the player who eliminates the greatest number of aliens. If two players kill the same number of aliens then the primary mission is awarded to the player with the most points. If only one player, they must kill over 15 aliens.

8. Primary MissionMission 653/10-Sector 16. Exterminate. There are reports of a very dangerous breed of alien nick-named Soulsuckers aboard alien vessel 93. Eliminate all Soulsuckers that are encountered. If only one marine team is deployed then at least 10 Soulsuckers must be destroyed. The primary mission will be awarded to the player who kills the greatest number of Soulsuckers. If two players destroy the same number of Soulsuckers then the player who scored the most points is awarded the primary mission.
9. Primary MissionMission 653/11-Sector 53. Locate and exterminate. Soulsucker eggs are reported to be hidden on board alien vessel 28. Locate egg hatchery room and send a marine into the room to destroy as many of the soulsucker eggs as possible. Eggs can only be destroyed with a weapon hit of one or above. If only one marine team deployed then all soulsucker eggs must be destroyed. The primary mission will be awarded to the player who destroyed the greatest number of soulsucker eggs. If a one player game then the primary mission will be awarded if all eggs are destroyed.
10. Primary MissionMission 653/12-Sector 68. Sabotage and withdraw. Intelligence reports the discovery of a weak spot in the outer hull of alien vessel 331. Locate the weak spot, blow a hole in the outer hull, a weapon hit of three or above is required, and retreat to the docking claw from the vacuum that will spread throughout the ship. The primary mission will be awarded to the first player to blow a hole in the outer hull.
11. Primary MissionMission 653/13-Sector 5. Destroy alien Ship 17. Intelligence reports that alien ship 17 has not had its self destruct mechanism disabled by the aliens. Activate ship self destruct by destroying control panel in Control room with a weapon hit of two or above. The primary mission will be awarded to the player who activates the ship self destruct.
12. Primary MissionMission 653/14-Sector 44. Destroy Cube of Chaos. Intelligence reports that the aliens are protecting The Cube of Chaos’, a device that is close to completion. If this device is allowed to survive the aliens plan to use it to rip a hole in the fabric of space and time and allow the realm of Chaos to enter through the warp. The Cube requires a weapon hit of three or above. The primary mission is awarded to the player who destroys the Cube of Chaos.