
SPA Windows 10 Checklist -...
15
Windows 10 Checklist: After installing Windows 10: Our experience has been that the Windows 10 install restores the system to the factory default, this means that if you changed certain system settings in Windows prior to the update that they have been reset. 1.) Check that the UAC is turned off click here for steps 2.) Check that the Region and Language is correct click here for steps 3.) Check that your email program is set as default click here for steps 4.) If your Printer driver is compatible with Windows 10 make sure that the paper size is A4 or if using pre-printed paper that the custom paper size is selected. 5.) Make sure that if the Windows 10 is the Pastel Server that this is shared correctly click here for steps
-
Upload
nguyenthien -
Category
Documents
-
view
224 -
download
0
Transcript of SPA Windows 10 Checklist -...

Windows 10 Checklist:
After installing Windows 10: Our experience has been that the Windows 10 install restores the system to the factory default, this means that if you changed certain system settings in Windows prior to the update that they have been reset.
1.) Check that the UAC is turned off click here for steps 2.) Check that the Region and Language is correct click here for steps 3.) Check that your email program is set as default click here for steps 4.) If your Printer driver is compatible with Windows 10 make sure that the paper size is A4 or if
using pre-printed paper that the custom paper size is selected. 5.) Make sure that if the Windows 10 is the Pastel Server that this is shared correctly click here
for steps

Turning off the UAC in Windows 10
This document will guide and illustrate on how to turn off the UAC for Windows 10
Solution: • Go to your Control Panel which you can access by clicking on the Windows home button and
selecting Settings in the Menu. • On the top right hand corner where you see find a setting type in Control Panel • Click the Control Panel Icon from the list displayed. • Ensure that your View By option is set to“Category”
• Click on the green text listed as “User Accounts”
• You will get a second menu and once again click on the green text listed as “User Accounts”

• In the next menu in the User Accounts settings click on “Change User Account Control Settings”
• Make sure the slider is at the bottom on never notify.

Checking the Region and Language in Windows 10
This document explains how to setup your region and language to avoid errors in Pastel.
Solution: • Go to your Control Panel which you can access by clicking on the Windows home button and
selecting Settings in the Menu. • On the top right hand corner where you see find a setting type in Control Panel • Click the Control Panel Icon from the list displayed.
• If “view by” is set to small or large icons, then select Region • If “view by” is set to Category, then select Clock, Language and Region, then Region
• On the Formats tab make sure that the current format is English South Africa
Click on Additional settings and go on the Numbers tab make sure your settings are as per the below screenshot:
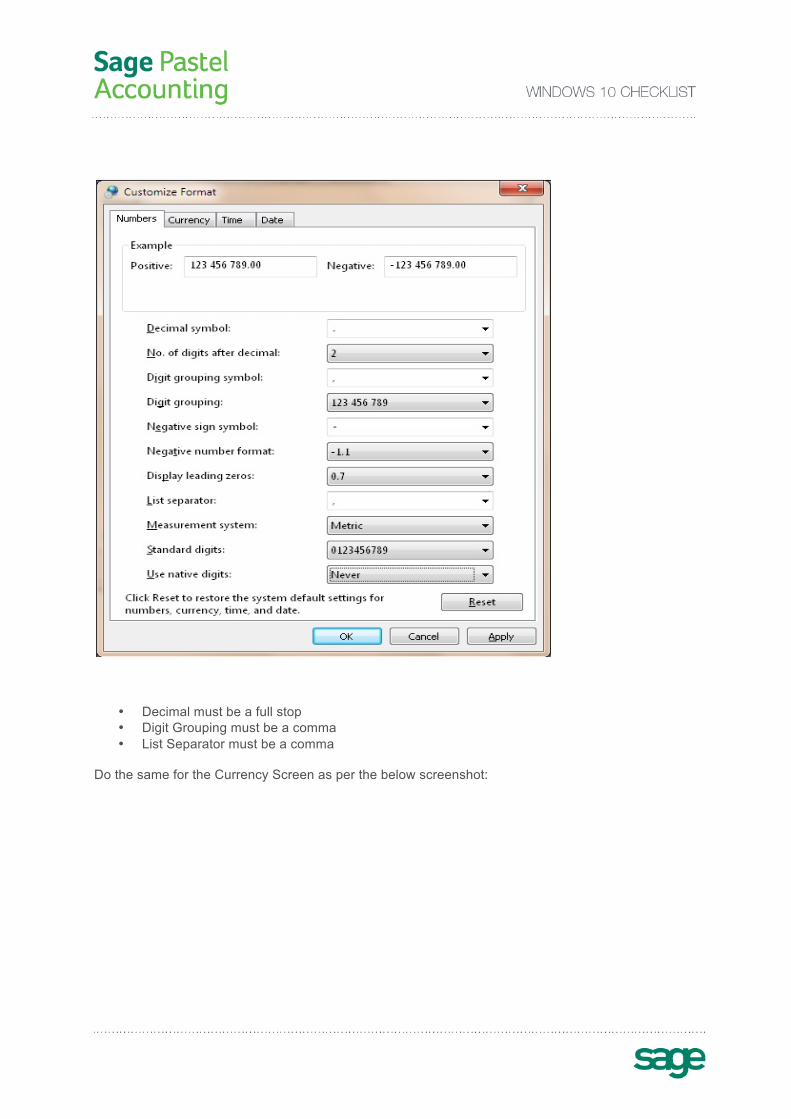
• Decimal must be a full stop • Digit Grouping must be a comma • List Separator must be a comma
Do the same for the Currency Screen as per the below screenshot:

• Decimal must be a full stop • Digit Grouping must be a comma
On the Date Screen please make sure the short date is correct as per the below screenshot:

• Short date must be: dd/mm/yy

Set Email Program as Default in Windows 10
This document explains how to set your email program as default in Windows 10.
Solution: • Go to your Control Panel which you can access by clicking on the Windows home button and
selecting Settings in the Menu. • On the top right hand corner where you see find a setting type in Control Panel • Click the Control Panel Icon from the list displayed. • If “view by” is set to small or large icons, then select Default Programs • If “view by” is set to Category, then select Programs| Default Programs • Click on Set your default programs as shown below:
• Wait for the list to populate • On the left hand side select your email program i.e Outlook • Click the option to Set this program as default as shown in the screenshot below:

• Click ok
Network Sharing and Security on Windows 10
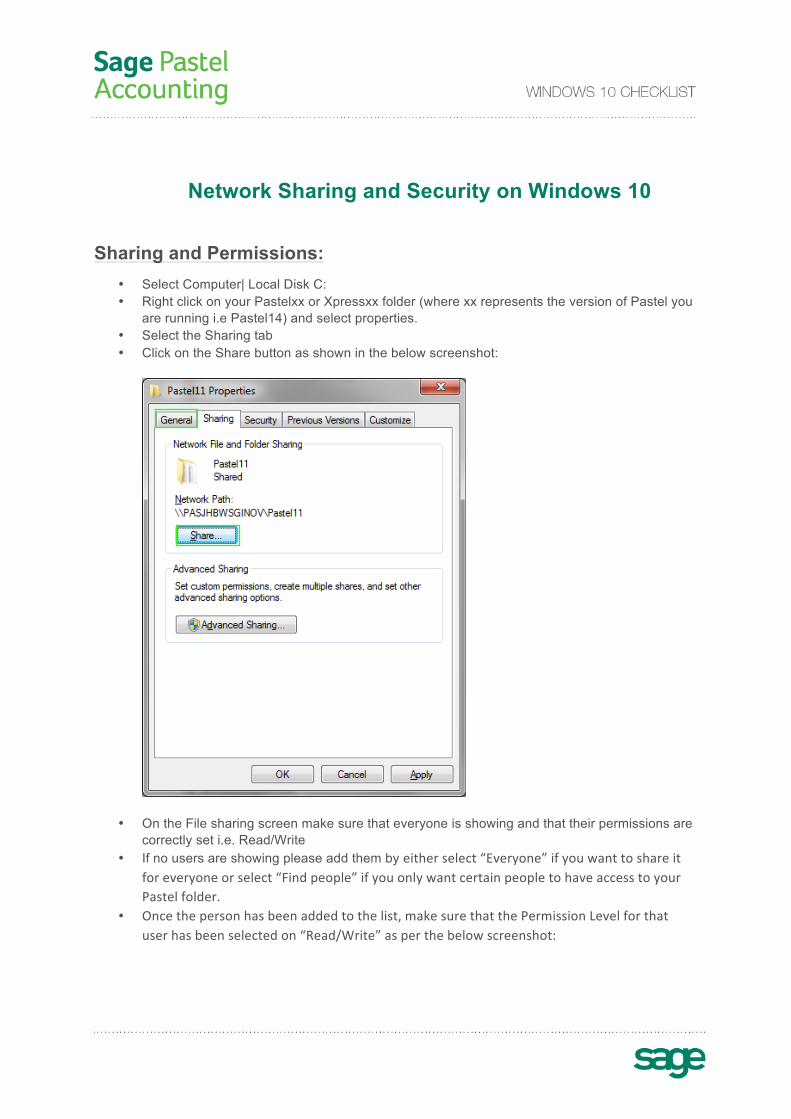
Sharing and Permissions: • Select Computer| Local Disk C: • Right click on your Pastelxx or Xpressxx folder (where xx represents the version of Pastel you
are running i.e Pastel14) and select properties. • Select the Sharing tab • Click on the Share button as shown in the below screenshot:
• On the File sharing screen make sure that everyone is showing and that their permissions are correctly set i.e. Read/Write
• If no users are showing please add them by either select “Everyone” if you want to share it for everyone or select “Find people” if you only want certain people to have access to your Pastel folder.
• Once the person has been added to the list, make sure that the Permission Level for that user has been selected on “Read/Write” as per the below screenshot:
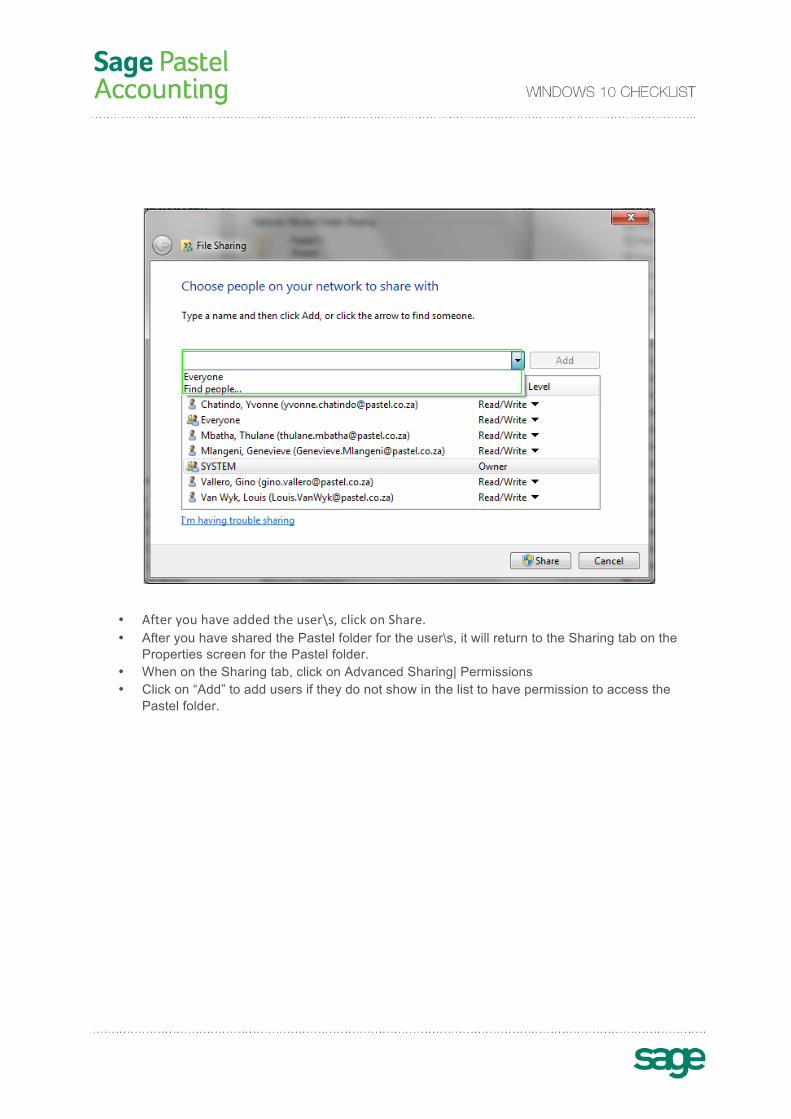
• After you have added the user\s, click on Share. • After you have shared the Pastel folder for the user\s, it will return to the Sharing tab on the
Properties screen for the Pastel folder. • When on the Sharing tab, click on Advanced Sharing| Permissions • Click on “Add” to add users if they do not show in the list to have permission to access the
Pastel folder.

• If they are showing click on the user\s and ensure that there is a tick on Full Control, Change and Read under the column “Allow”. As per the below screenshot:

• Select the security tab and follow the same procedure as the Advanced Sharing process as per the below screenshot:

Read-only:
• To turn off “Read-only”, select the General tab and then make sure that there isn’t a tick in the block where it says “Read-only (Only applies to files in folder)”.
Network Discovery:
• If the workstation still cannot access the Pastel folder, register the package as a workstation or is receiving permissions errors after checking all the sharing option explained previously, please make sure that the Server computer has tuned on “Network Discovery” (making the computer visible to other computers).
• To turn on Network Discovery on the server computer, click on the network computer screen on the bottom right hand corner next to the time and date in Windows and click on “Open Network and Sharing Center”.

• On the left hand side of the Network and Sharing Center screen, click on Change advanced sharing settings.
• Under the option “Network discovery”, select the option Turn on network discovered and click on Save changes.