Repeater Buildermanuals.repeater-builder.com/te-files/MISCELLANEOUS/CLARKE HES… · Repeater Builder
Upload
nguyentuongCategory
view
231download
0
SOFTWARE INSTRUCTION MANUAL
SOUND REPEATER EV-20RPM-20EV
Please follow the instructions in this manual to obtain the optimum results from this unit.We also recommend that you keep this manual handy for future reference.

2
TABLE OF CONTENTS
1. SOFTWARE GENERAL DESCRIPTION ................................................... 3
2. HANDLING PRECAUTIONS .......................................................................... 3
3. SOFTWARE STARTUP ................................................................................... 3
4. SCREEN DESCRIPTION4.1. Sound Repeater Memory Area ......................................................................... 44.2. PC Hard Disk Area ............................................................................................ 6
5. USABLE AUDIO DATA5.1. Audio Data Creation .......................................................................................... 75.2. Linking Wave Files to Create New Files ........................................................... 8
6. DOWNLOADING AUDIO DATA6.1. Creating and Writing the Entire Repeater Data ............................................... 116.2. Writing Individual Messages to the Sound Repeater
6.2.1. Writing Individual Messages .................................................................. 166.2.2. Deleting Individual Messages ................................................................ 18
7. RECORDED DATA BACKUP7.1. Entire Repeater Data Backup .......................................................................... 207.2. Individual Message Backup ............................................................................. 23
8. DOWNLOADING BACKED-UP DATA ........................................................ 25
9. CONTROLLING THE SOUND REPEATER9.1. Playback .......................................................................................................... 299.2. Recording ......................................................................................................... 309.3. Formatting ........................................................................................................ 31
10. TROUBLESHOOTING ..................................................................................... 33

3
1. SOFTWARE GENERAL DESCRIPTION
The software program described in this manual is a data transfer program used to enable communicationsbetween the TOA Sound Repeater and a computer (PC).
2. HANDLING PRECAUTIONS
• This CD-ROM is not an audio CD-ROM. Do not attempt to use it in an ordinary audio CD player.
• Avoid exposing the CD-ROM to direct sunlight, as data may be lost.
• When the EV-20R or PM-20EV is in the following operating states, do not switch off its power nor insert orremove the USB cable. PC operation may stop. · While the driver software program is being installed.· While the OS is being activated or terminated.· During the course of being suspended or resumed. · While data is being transferred between the unit and the PC.Because PC operations could also freeze, avoid performing the following:· Frequent ON and OFF power switching · Frequent USB cable insertion and detachment
3. SOFTWARE STARTUP
NoteInstall the USB driver and data transfer program in a compatible PC, then connect the PC to the SoundRepeater. For more information regarding software installation and connections, please refer to the separatelysupplied instruction manual.
The data transfer software program can be started by double-clicking on the shortcut icon created onthe desktop screen during installation. (The data transfer program is located in the "C:\Program Files\EV-20PC\" folder, unless the designated installation folder was changed during installation.)
4
4. SCREEN DESCRIPTION
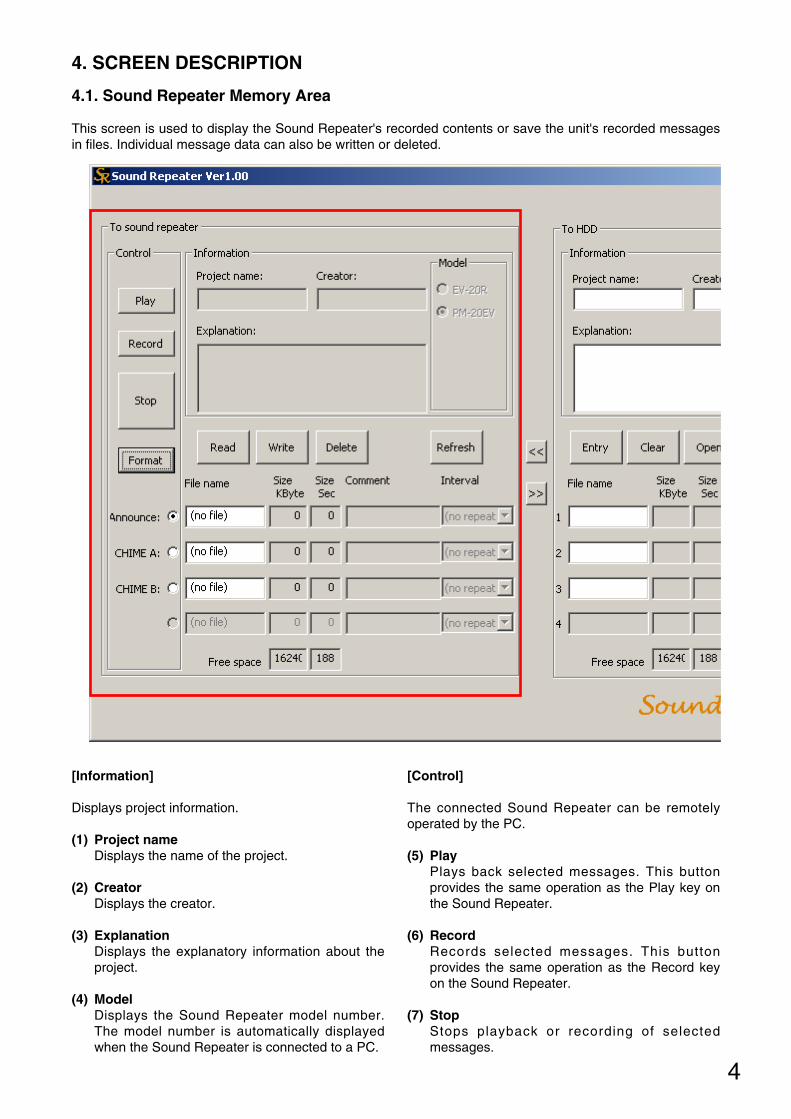
4.1. Sound Repeater Memory Area
This screen is used to display the Sound Repeater's recorded contents or save the unit's recorded messagesin files. Individual message data can also be written or deleted.
[Information]
Displays project information.
(1) Project nameDisplays the name of the project.
(2) CreatorDisplays the creator.
(3) ExplanationDisplays the explanatory information about theproject.
(4) ModelDisplays the Sound Repeater model number.The model number is automatically displayedwhen the Sound Repeater is connected to a PC.
[Control]
The connected Sound Repeater can be remotelyoperated by the PC.
(5) PlayPlays back selected messages. This buttonprovides the same operation as the Play key onthe Sound Repeater.
(6) RecordRecords selected messages. This buttonprovides the same operation as the Record keyon the Sound Repeater.
(7) StopStops playback or recording of selectedmessages.
5
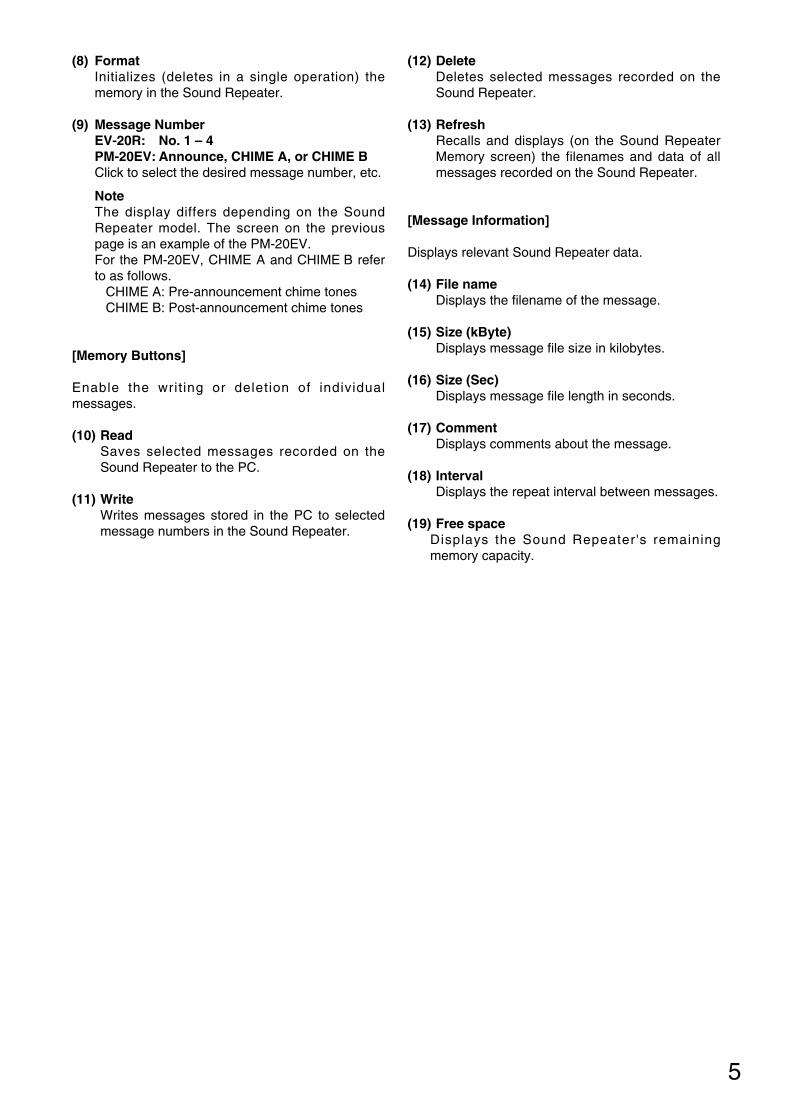
(8) FormatInitializes (deletes in a single operation) thememory in the Sound Repeater.
(9) Message NumberEV-20R: No. 1 – 4PM-20EV: Announce, CHIME A, or CHIME BClick to select the desired message number, etc.
NoteThe display differs depending on the SoundRepeater model. The screen on the previouspage is an example of the PM-20EV.For the PM-20EV, CHIME A and CHIME B referto as follows.
CHIME A: Pre-announcement chime tonesCHIME B: Post-announcement chime tones
[Memory Buttons]
Enable the writ ing or deletion of individualmessages.
(10) ReadSaves selected messages recorded on theSound Repeater to the PC.
(11) WriteWrites messages stored in the PC to selectedmessage numbers in the Sound Repeater.
(12) DeleteDeletes selected messages recorded on theSound Repeater.
(13) RefreshRecalls and displays (on the Sound RepeaterMemory screen) the filenames and data of allmessages recorded on the Sound Repeater.
[Message Information]
Displays relevant Sound Repeater data.
(14) File nameDisplays the filename of the message.
(15) Size (kByte)Displays message file size in kilobytes.
(16) Size (Sec)Displays message file length in seconds.
(17) CommentDisplays comments about the message.
(18) Interval Displays the repeat interval between messages.
(19) Free spaceDisplays the Sound Repeater's remainingmemory capacity.
6
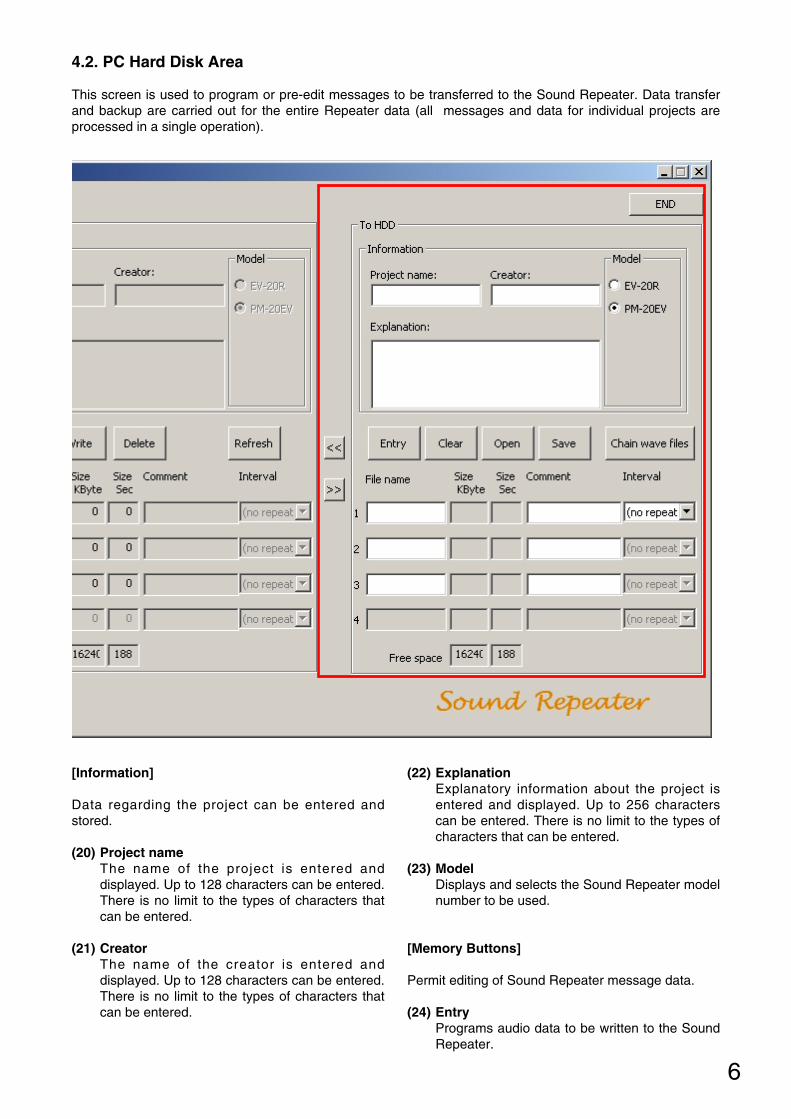
4.2. PC Hard Disk Area
This screen is used to program or pre-edit messages to be transferred to the Sound Repeater. Data transferand backup are carried out for the entire Repeater data (all messages and data for individual projects areprocessed in a single operation).
[Information]
Data regarding the project can be entered andstored.
(20) Project nameThe name of the project is entered anddisplayed. Up to 128 characters can be entered.There is no limit to the types of characters thatcan be entered.
(21) CreatorThe name of the creator is entered anddisplayed. Up to 128 characters can be entered.There is no limit to the types of characters thatcan be entered.
(22) ExplanationExplanatory information about the project isentered and displayed. Up to 256 characterscan be entered. There is no limit to the types ofcharacters that can be entered.
(23) ModelDisplays and selects the Sound Repeater modelnumber to be used.
[Memory Buttons]
Permit editing of Sound Repeater message data.
(24) EntryPrograms audio data to be written to the SoundRepeater.

7
(25) ClearDeletes selected programmed messages.
(26) OpenReads and displays entire Repeater data (forindividual projects) stored in the PC.
(27) SaveSaves data and information concerning themessage being edited to the PC as a file forentire Repeater data (for individual projects).
(28) Chain wave filesCreates new audio data by linking two audiofiles stored in either the PC or a CD-ROM.
[Programming Status]
Messages used by the Sound Repeater can beedited. Comments can also be added to each file.
(29) File nameDisplays the filename of the message.
(30) Size (kByte)Displays the message file size in kilobytes.
(31) Size (Sec)Displays the message file length in seconds.
(32) Free spaceDisplays the Sound Repeater's remainingmemory capacity.
(33) CommentUsed to display and enter comments about themessage. Up to 128 characters can be entered.There is no limit to the types of characters thatcan be entered.
(34) IntervalSets the repeat interval between messages.Select the desired interval from the pull-downmenu. In the case of the EV-20R, the intervalcannot be set on the PC screen. Use the unit'sDIP switch to set the interval.
[Miscellaneous]
(35) One-Touch Write [<<] (Center-left of the areascreen)Writes data contents programmed on the SoundRepeater's PC Hard Disk area by transferringthem to the Repeater. Written contents aredisplayed on the Sound Repeater Memoryscreen.
(36) Backup [>>] (Center-left of the area screen)Displays the Sound Repeater's programmedcontents by transferring them to the PC HardDisk Area.
(37) END (Top right of the area screen)Used to quit and exit the software program.
5. USABLE AUDIO DATA
Audio data previously prepared by the customer can be read and written to the Sound Repeater.
5.1. Audio Data Creation
Previously prepared customer Wave (.WAV) files can also be used for broadcast. Specifications for Wave filesthat can be written to the Sound Repeater are as follows:
Sampling frequency: 44.1 kHzQuantifying number: 16 bitsMode: MonauralData format: PCMFilename: 8.3 format (8 alphanumeric characters or less); extension: WAV)Format: Wave format
CautionThe Sound Repeater is not compatible with the Broadcast Wave Format (BWF),the upgraded Wave format.
8
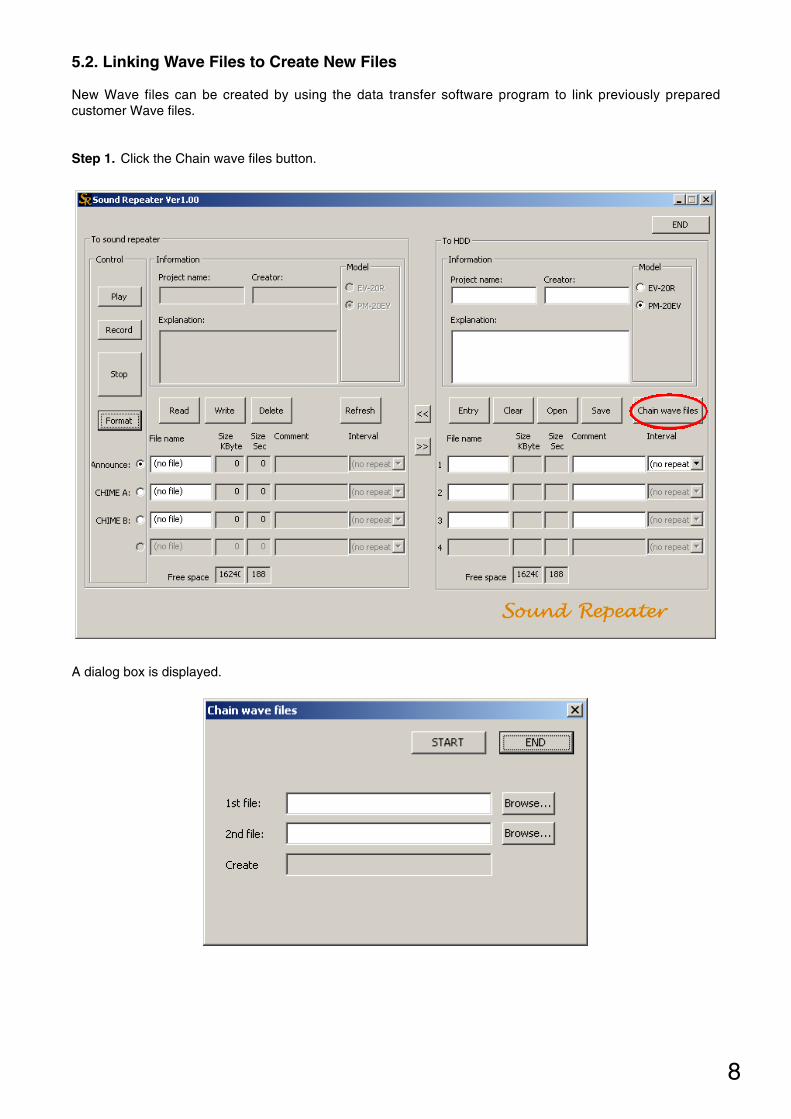
5.2. Linking Wave Files to Create New Files
New Wave files can be created by using the data transfer software program to link previously preparedcustomer Wave files.
Step 1. Click the Chain wave files button.
A dialog box is displayed.
9
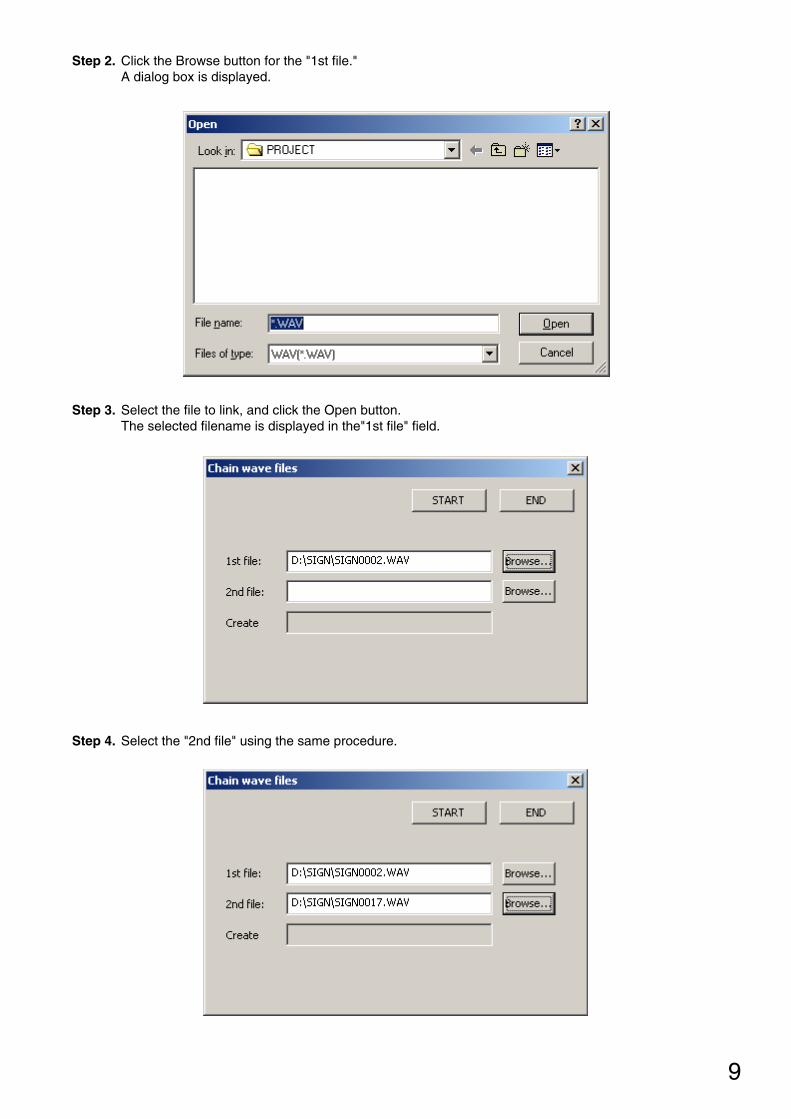
Step 2. Click the Browse button for the "1st file." A dialog box is displayed.
Step 3. Select the file to link, and click the Open button.The selected filename is displayed in the"1st file" field.
Step 4. Select the "2nd file" using the same procedure.
10
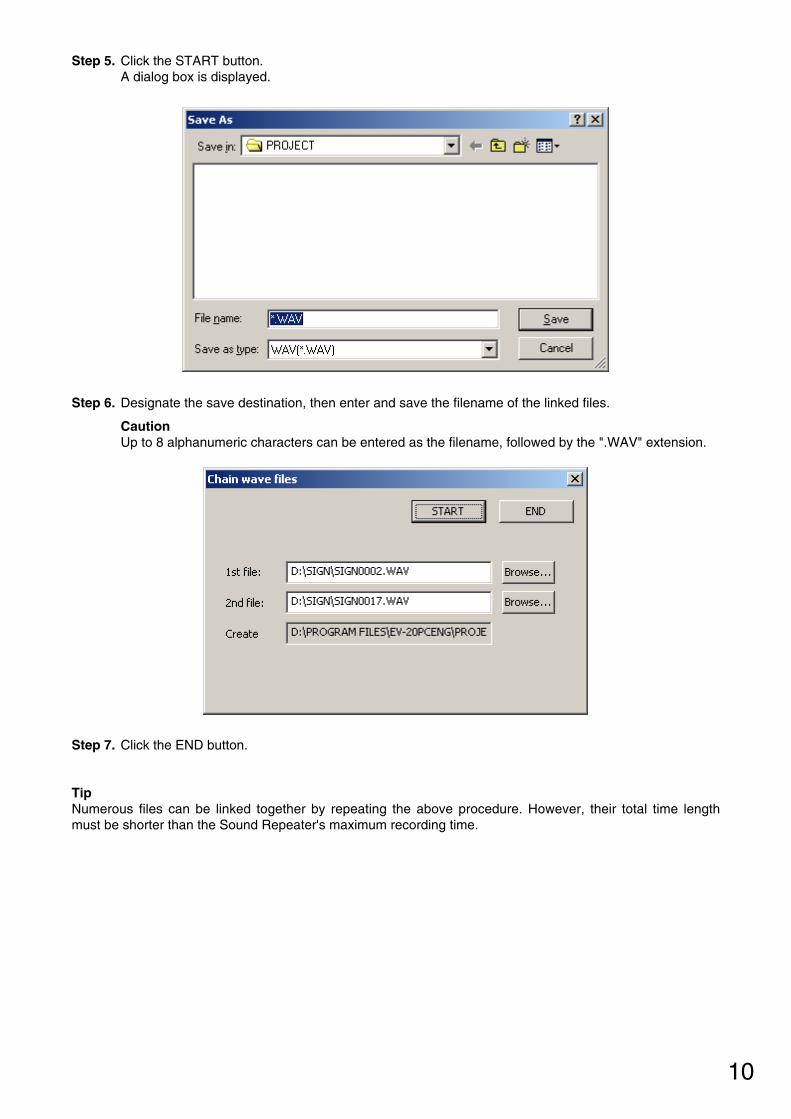
Step 5. Click the START button.A dialog box is displayed.
Step 6. Designate the save destination, then enter and save the filename of the linked files.
CautionUp to 8 alphanumeric characters can be entered as the filename, followed by the ".WAV" extension.
Step 7. Click the END button.
TipNumerous files can be linked together by repeating the above procedure. However, their total time lengthmust be shorter than the Sound Repeater's maximum recording time.
11
6. DOWNLOADING AUDIO DATA
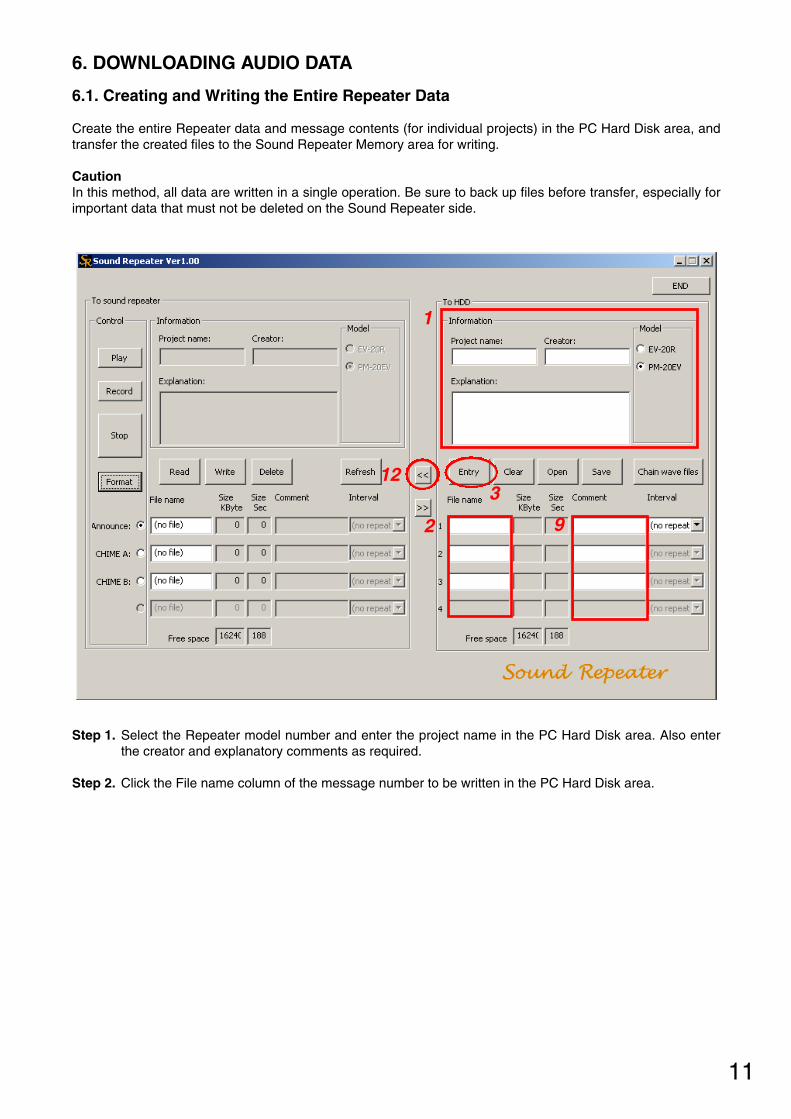
6.1. Creating and Writing the Entire Repeater Data
Create the entire Repeater data and message contents (for individual projects) in the PC Hard Disk area, andtransfer the created files to the Sound Repeater Memory area for writing.
CautionIn this method, all data are written in a single operation. Be sure to back up files before transfer, especially forimportant data that must not be deleted on the Sound Repeater side.
Step 1. Select the Repeater model number and enter the project name in the PC Hard Disk area. Also enterthe creator and explanatory comments as required.
Step 2. Click the File name column of the message number to be written in the PC Hard Disk area.
1
123
2 9
12
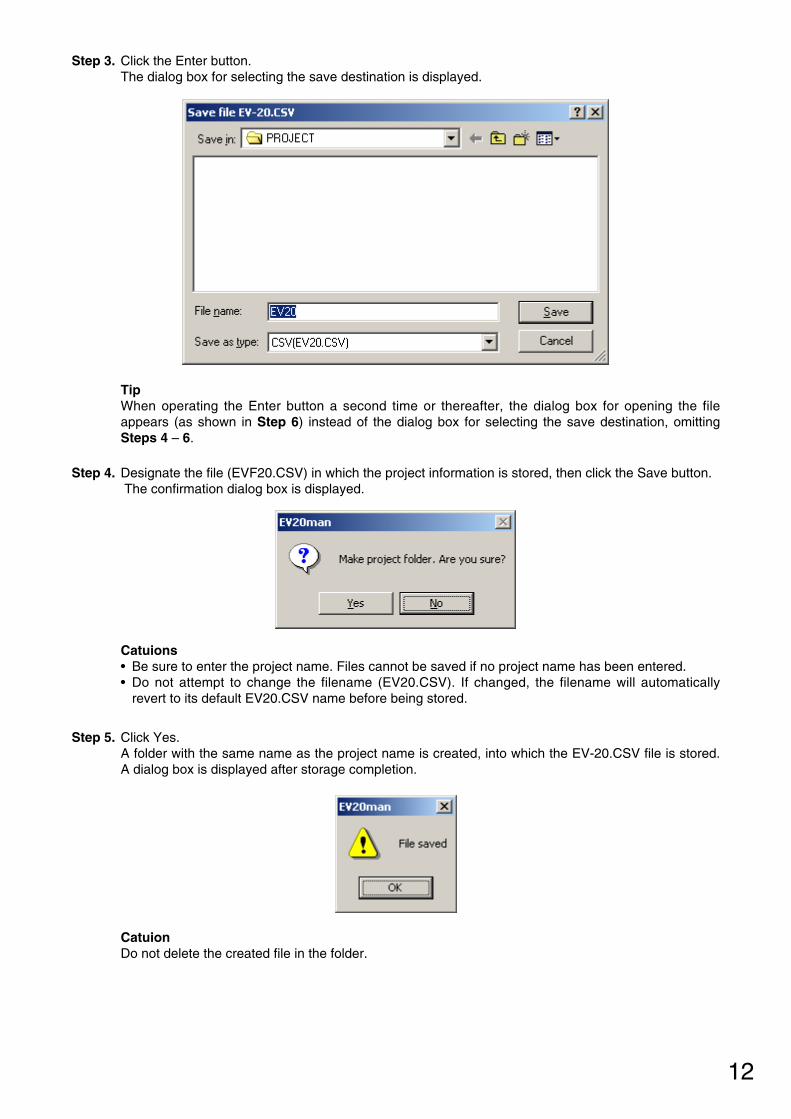
TipWhen operating the Enter button a second time or thereafter, the dialog box for opening the fileappears (as shown in Step 6) instead of the dialog box for selecting the save destination, omittingSteps 4 – 6.
Step 4. Designate the file (EVF20.CSV) in which the project information is stored, then click the Save button. The confirmation dialog box is displayed.
Catuions• Be sure to enter the project name. Files cannot be saved if no project name has been entered.• Do not attempt to change the filename (EV20.CSV). If changed, the filename will automatically
revert to its default EV20.CSV name before being stored.
Step 5. Click Yes.A folder with the same name as the project name is created, into which the EV-20.CSV file is stored.A dialog box is displayed after storage completion.
CatuionDo not delete the created file in the folder.
Step 3. Click the Enter button. The dialog box for selecting the save destination is displayed.

13
Step 6. Click the OK button.A dialog box is displayed.
Step 7. Designate the names of the folder and file containing the message to be programmed, then click theOpen button.The confirmation dialog box is displayed.
Step 8. Click Yes. The programmed message is displayed on the PC Hard Disk screen.
CatuionTwo or more messages with the same filename cannot be programmed. Change filenames beforeprogramming.
TipProgramming into a previously programmed message number replaces the original message of thatnumber with a new message.
14
Step 9. Enter information in the Comment column as required.
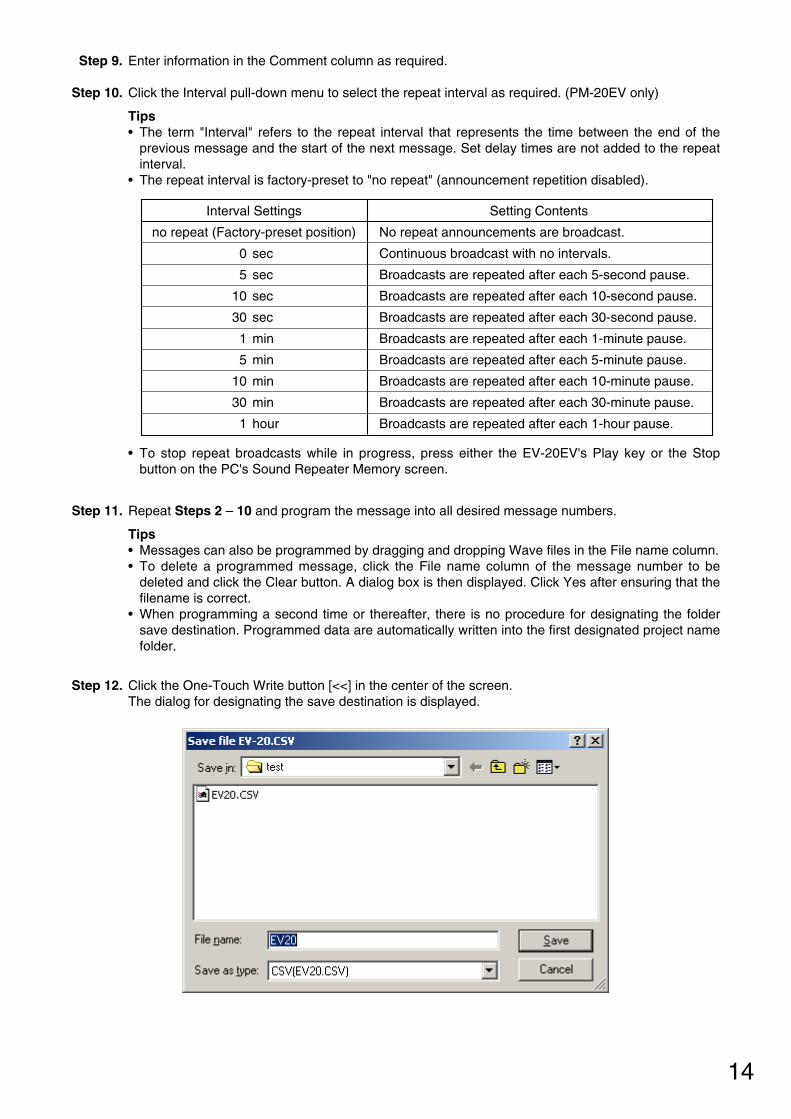
Step 10. Click the Interval pull-down menu to select the repeat interval as required. (PM-20EV only)
Tips• The term "Interval" refers to the repeat interval that represents the time between the end of the
previous message and the start of the next message. Set delay times are not added to the repeatinterval.
• The repeat interval is factory-preset to "no repeat" (announcement repetition disabled).
Setting Contents
No repeat announcements are broadcast.
Continuous broadcast with no intervals.
Broadcasts are repeated after each 5-second pause.
Broadcasts are repeated after each 10-second pause.
Broadcasts are repeated after each 30-second pause.
Broadcasts are repeated after each 1-minute pause.
Broadcasts are repeated after each 5-minute pause.
Broadcasts are repeated after each 10-minute pause.
Broadcasts are repeated after each 30-minute pause.
Broadcasts are repeated after each 1-hour pause.
Interval Settings
no repeat (Factory-preset position)
0 sec
5 sec
10 sec
30 sec
1 min
5 min
10 min
30 min
1 hour
• To stop repeat broadcasts while in progress, press either the EV-20EV's Play key or the Stopbutton on the PC's Sound Repeater Memory screen.
Step 11. Repeat Steps 2 – 10 and program the message into all desired message numbers.
Tips• Messages can also be programmed by dragging and dropping Wave files in the File name column.• To delete a programmed message, click the File name column of the message number to be
deleted and click the Clear button. A dialog box is then displayed. Click Yes after ensuring that thefilename is correct.
• When programming a second time or thereafter, there is no procedure for designating the foldersave destination. Programmed data are automatically written into the first designated project namefolder.
Step 12. Click the One-Touch Write button [<<] in the center of the screen.The dialog for designating the save destination is displayed.

15
Step 13. Designate the save destination and click the Save button.If the save destination is not changed, programmed data are stored in the folder created in Step 5. A dialog box is displayed after storage completion.
Step 14. Click the OK button.After the Sound Repeater is formatted, files in the PC Hard Disk area are copied to the SoundRepeater Memory area and written into the Sound Repeater.
TipThe time required for a One-Touch Operation Write differs depending on the size of the file to betransferred. (Minimum: 40 seconds; Maximum: 3 minutes)
16
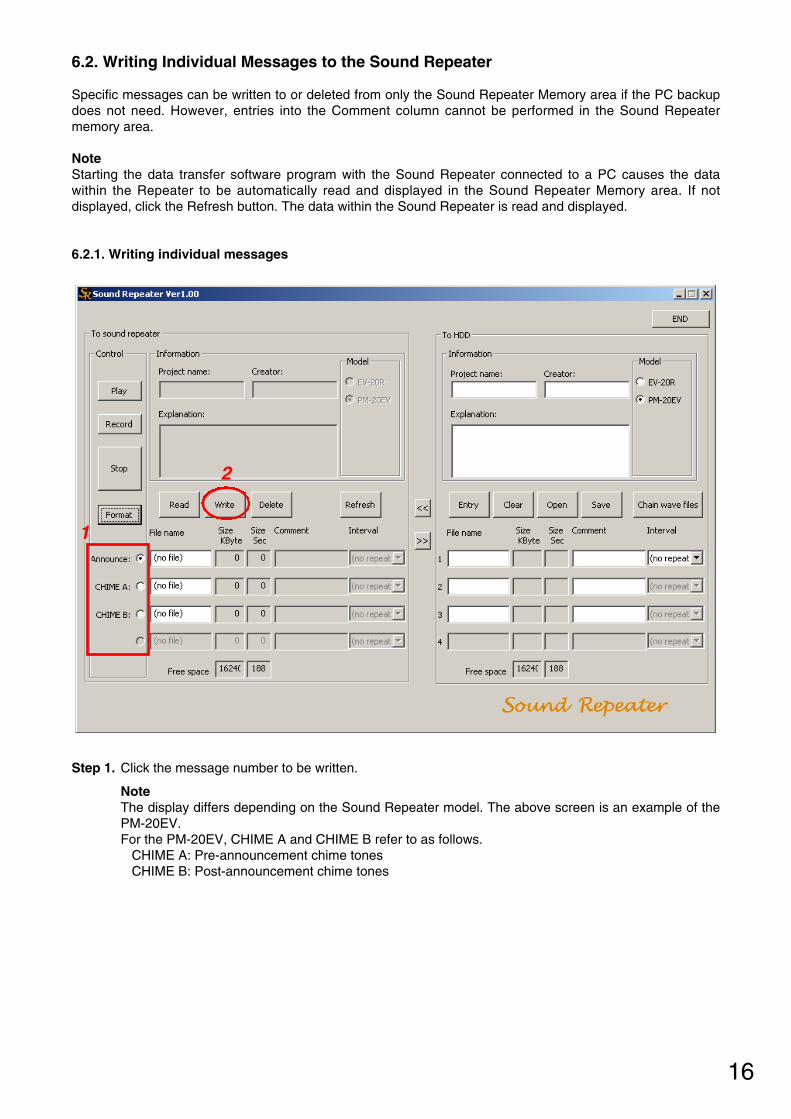
Step 1. Click the message number to be written.
NoteThe display differs depending on the Sound Repeater model. The above screen is an example of thePM-20EV.For the PM-20EV, CHIME A and CHIME B refer to as follows.
CHIME A: Pre-announcement chime tonesCHIME B: Post-announcement chime tones
6.2. Writing Individual Messages to the Sound Repeater
Specific messages can be written to or deleted from only the Sound Repeater Memory area if the PC backupdoes not need. However, entries into the Comment column cannot be performed in the Sound Repeatermemory area.
NoteStarting the data transfer software program with the Sound Repeater connected to a PC causes the datawithin the Repeater to be automatically read and displayed in the Sound Repeater Memory area. If notdisplayed, click the Refresh button. The data within the Sound Repeater is read and displayed.
6.2.1. Writing individual messages
2
1
17
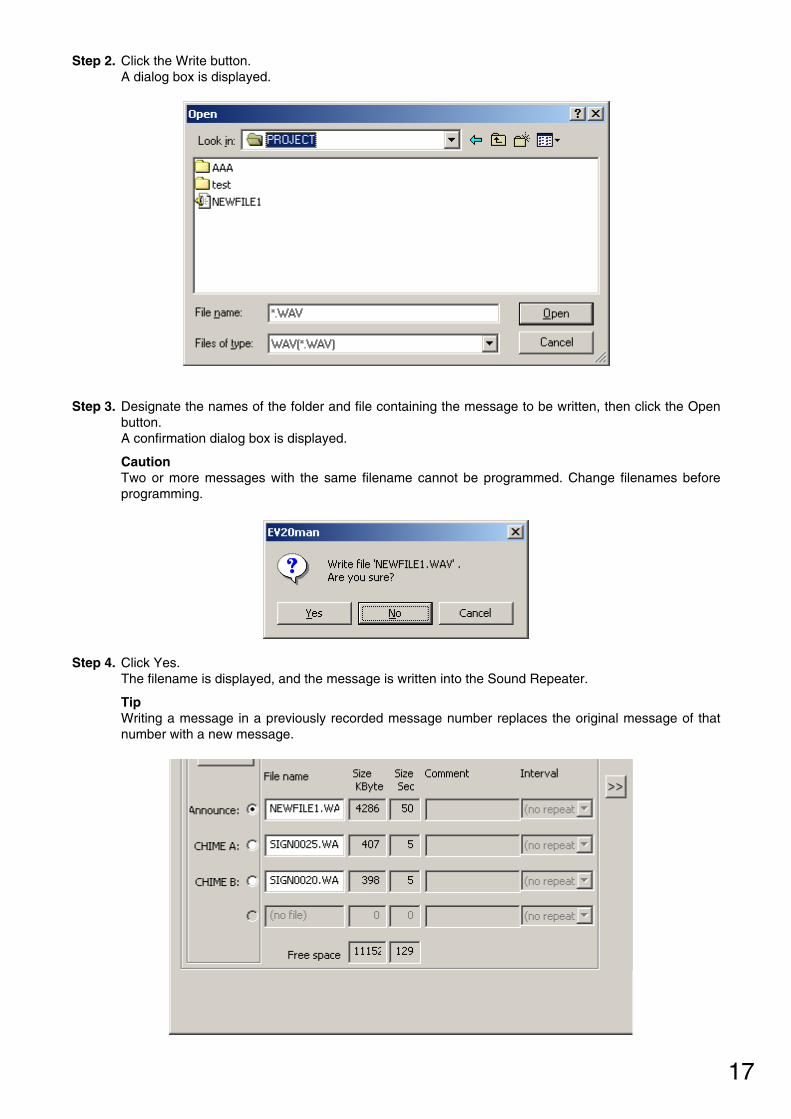
Step 3. Designate the names of the folder and file containing the message to be written, then click the Openbutton. A confirmation dialog box is displayed.
CautionTwo or more messages with the same filename cannot be programmed. Change filenames beforeprogramming.
Step 4. Click Yes. The filename is displayed, and the message is written into the Sound Repeater.
TipWriting a message in a previously recorded message number replaces the original message of thatnumber with a new message.
Step 2. Click the Write button. A dialog box is displayed.

18
Step 1. Click the message number to be deleted.
Step 2. Click the Delete button. The confirmation dialog box is displayed.
6.2.2. Deleting individual messages
2
1

19
Step 3. Click Yes if the displayed filename is correct. The message recorded on the Sound Repeater is deleted.

20
7. RECORDED DATA BACKUP
Data recorded with the Sound Repeater-whether individual messages or for the entire Repeater unit-can bebacked up by uploading them to a PC.
NoteStarting the data transfer software program with the Sound Repeater connected to a PC causes the datawithin the Repeater to be automatically read and displayed in the Sound Repeater Memory area. If notdisplayed, click the Refresh button. The data within the Sound Repeater is then read and displayed.
7.1. Entire Repeater Data Backup
After copying entire Repeater data and message contents (for individual projects) to the PC Hard Disk area,save them to a PC or other external storage media.
Step 1. Enter the project name in the PC Hard Disk area.
Tips• Project names can be up to 128 characters in length.• The project name becomes a folder name when saving entire Repeater data.
TipMessages recorded with the Sound Repeater are automatically assigned such fi lenames as"EVTF0001.WAV" when read into the Sound Repeater Memory area.
2
1

21
Step 2. Click the Backup button [>>] in the center of the screen. The confirmation dialog box is displayed.
Step 3. Click Yes. The dialog box for selecting the save destination is displayed.
CautionBe sure to enter the project name. Files cannot be saved if no project name has been entered.
Step 4. Designate the destination to store the file (EV20.CSV) related to the project, then click the Savebutton.The confirmation dialog box is displayed.
CautionDo not attempt to change the filename (EV20.CSV). If changed, the filename will automatically revertto its default EV20.CSV name before being stored.

22
Step 5. Click Yes. A folder with the same name as the project name is created, into which the EV-20.CSV file is stored.A dialog box is displayed after storage completion.
CautionDo not delete the created file in the folder nor change the name.
Step 6. Click the OK button.The Sound Repeater's memory contents are backed up in the created folder and displayed in the PCHard Disk area. The project name entered in Step 1 is also used in the Sound Repeater Memoryarea.
TipThe time required for file transfer differs depending on the size of the file to be transferred. (Minimum:40 seconds; Maximum: 3 minutes)

23
7.2. Individual Message Backup
Use the Sound Repeater Memory area to save only Sound Repeater's recorded messages in files to a PC orexternal storage medium.
Step 1. Click the message number to be backed up.
2
1

24
Step 2. Click the Read button. The save destination dialog box is displayed.
Step 3. Designate the save destination and save after changing the filename as required.
CautionThe filename of the file to be backed up can be changed, however the original filename existing in theSound Repeater cannot be changed while in the Sound Repeater Memory area. To change theoriginal filename, change the filename when reading, then write the file of which filename waschanged.
25
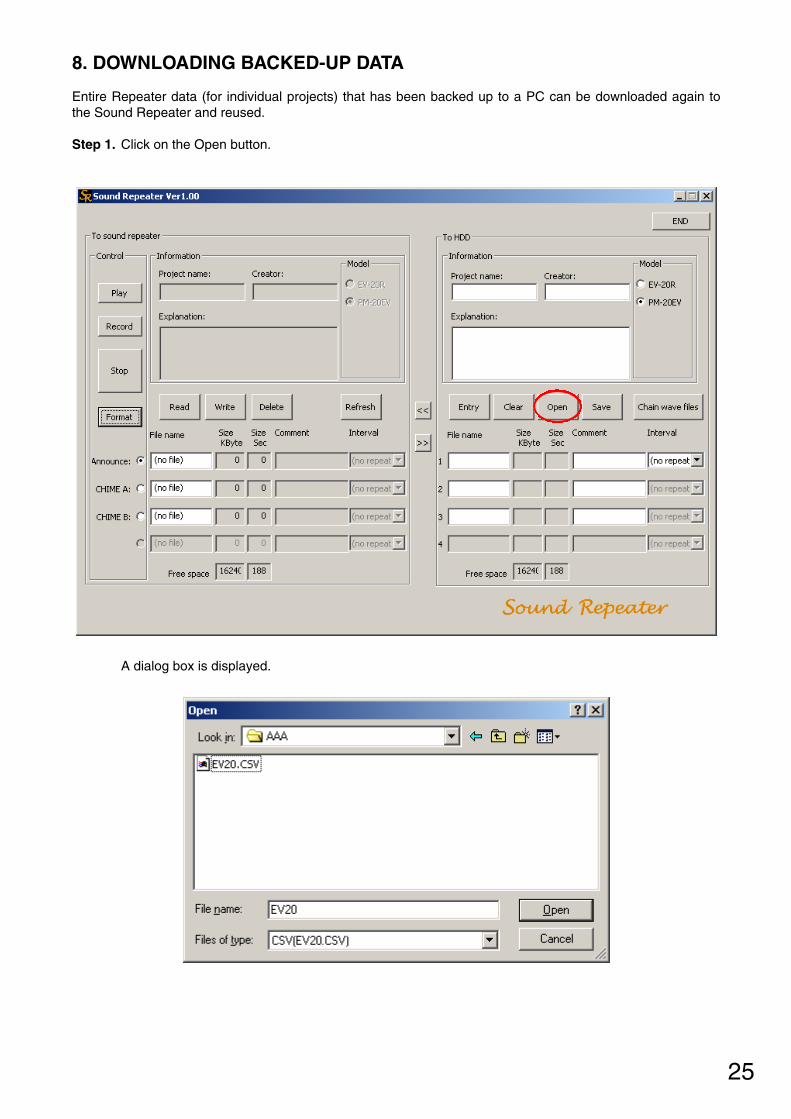
8. DOWNLOADING BACKED-UP DATA
Entire Repeater data (for individual projects) that has been backed up to a PC can be downloaded again tothe Sound Repeater and reused.
Step 1. Click on the Open button.
A dialog box is displayed.
26
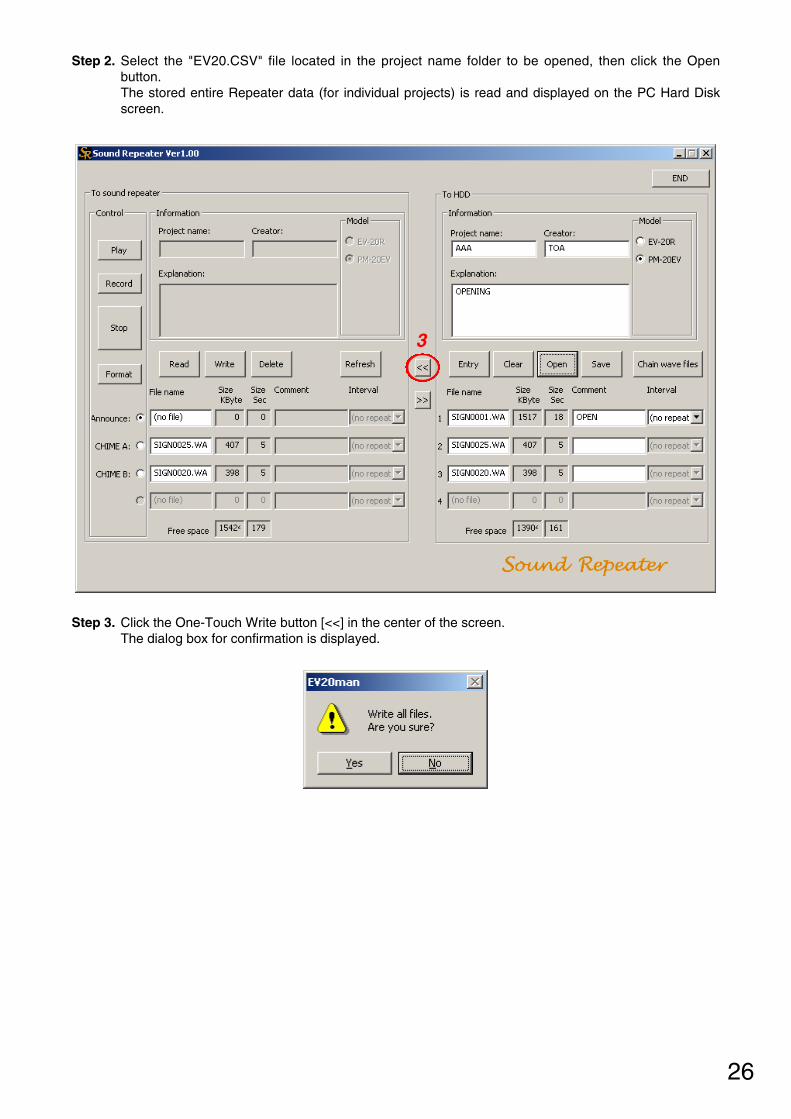
Step 2. Select the "EV20.CSV" file located in the project name folder to be opened, then click the Openbutton. The stored entire Repeater data (for individual projects) is read and displayed on the PC Hard Diskscreen.
Step 3. Click the One-Touch Write button [<<] in the center of the screen.The dialog box for confirmation is displayed.
3

27
Step 4. Click Yes. The save destination dialog box is displayed.
Step 5. Designate the save destination and click the Save button. If no change is made to the save destination, programmed data is stored in the backed up folder.A dialog box is displayed after storage completion.
28
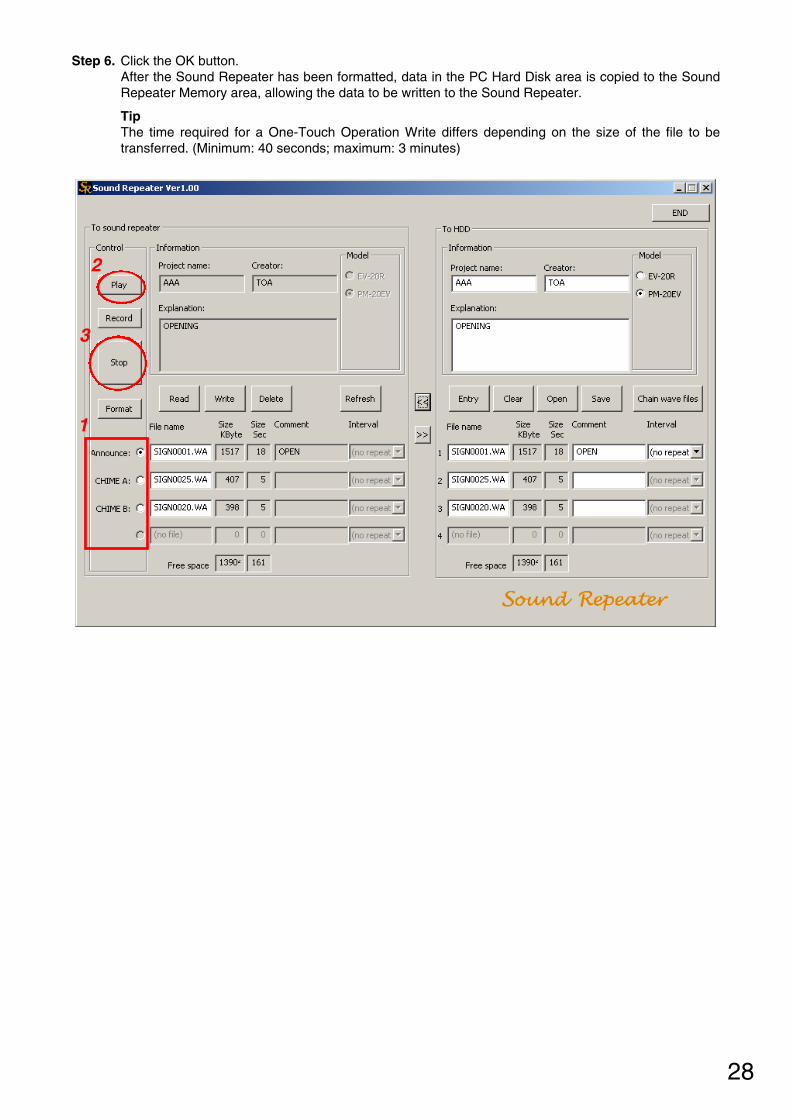
Step 6. Click the OK button.After the Sound Repeater has been formatted, data in the PC Hard Disk area is copied to the SoundRepeater Memory area, allowing the data to be written to the Sound Repeater.
TipThe time required for a One-Touch Operation Write differs depending on the size of the file to betransferred. (Minimum: 40 seconds; maximum: 3 minutes)
2
1
3
29
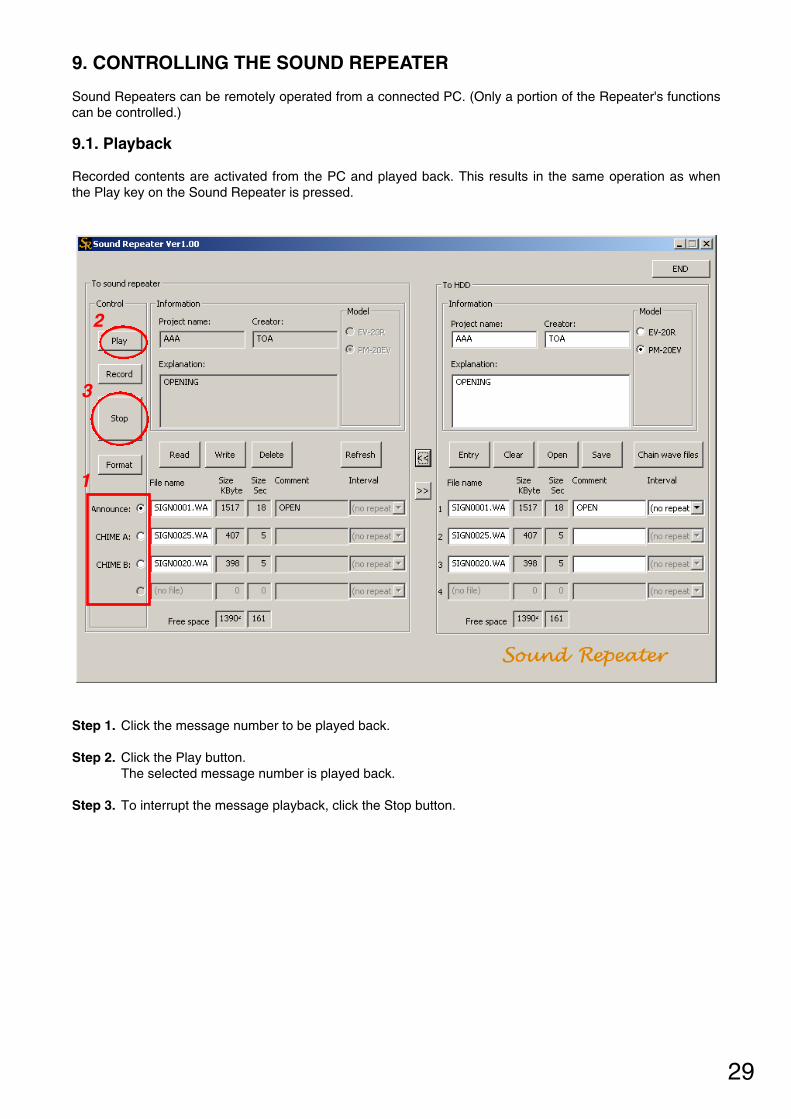
9. CONTROLLING THE SOUND REPEATER
Sound Repeaters can be remotely operated from a connected PC. (Only a portion of the Repeater's functionscan be controlled.)
9.1. Playback
Recorded contents are activated from the PC and played back. This results in the same operation as whenthe Play key on the Sound Repeater is pressed.
Step 1. Click the message number to be played back.
Step 2. Click the Play button.The selected message number is played back.
Step 3. To interrupt the message playback, click the Stop button.
2
1
3

30
9.2. Recording
Recordings can be made for selected message numbers through PC activation. This results in the sameoperation as when the Record key on the Sound Repeater is pressed.
Step 1. Click the message number to be recorded.
CautionIf the Repeater is a PM-20EV, pre-announcement and post-announcement chime tones cannot berecorded.
Step 2. Click the Record button.The confirmation dialog box is displayed.
Step 3. Click Yes. When the Sound Repeater's indicator changes from flashing to steady ON, start recordingfrom the microphone or connected CD player.
CautionThe Sound Repeater's recording operation is the same as when the Repeater's Record key ispressed. Use the indicator to confirm the timing of the recording. (In the case of the PM-20EV, timingcan also be confirmed by means of a chime tone.)
Step 4. To stop the recording, click the Stop button.
2
1
3

31
9.3. Formatting
Initializes the Sound Repeater's internal memory. All messages are deleted in a single operation. Thisoperation is identical to the simultaneous deletion performed using the Sound Repeater's key.
Step 1. Click the Format button.
The confirmation dialog box is displayed.
Step 2. Click Yes. All messages recorded on the Sound Repeater are deleted.
Tips• The time required for formatting is approximately 40 seconds.• The Sound Repeater's operation during formatting is the same as when operating the Repeater's
key to delete all messages in a single operation.
32
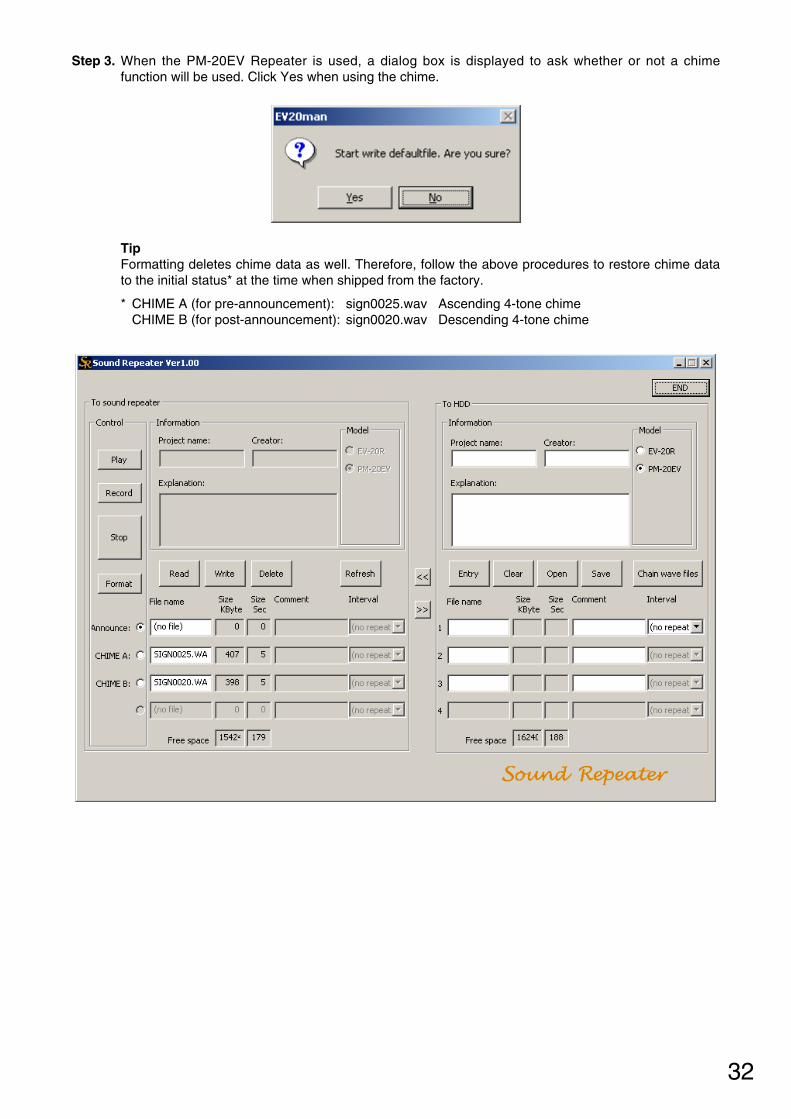
Step 3. When the PM-20EV Repeater is used, a dialog box is displayed to ask whether or not a chimefunction will be used. Click Yes when using the chime.
TipFormatting deletes chime data as well. Therefore, follow the above procedures to restore chime datato the initial status* at the time when shipped from the factory.
* CHIME A (for pre-announcement): sign0025.wav Ascending 4-tone chimeCHIME B (for post-announcement): sign0020.wav Descending 4-tone chime
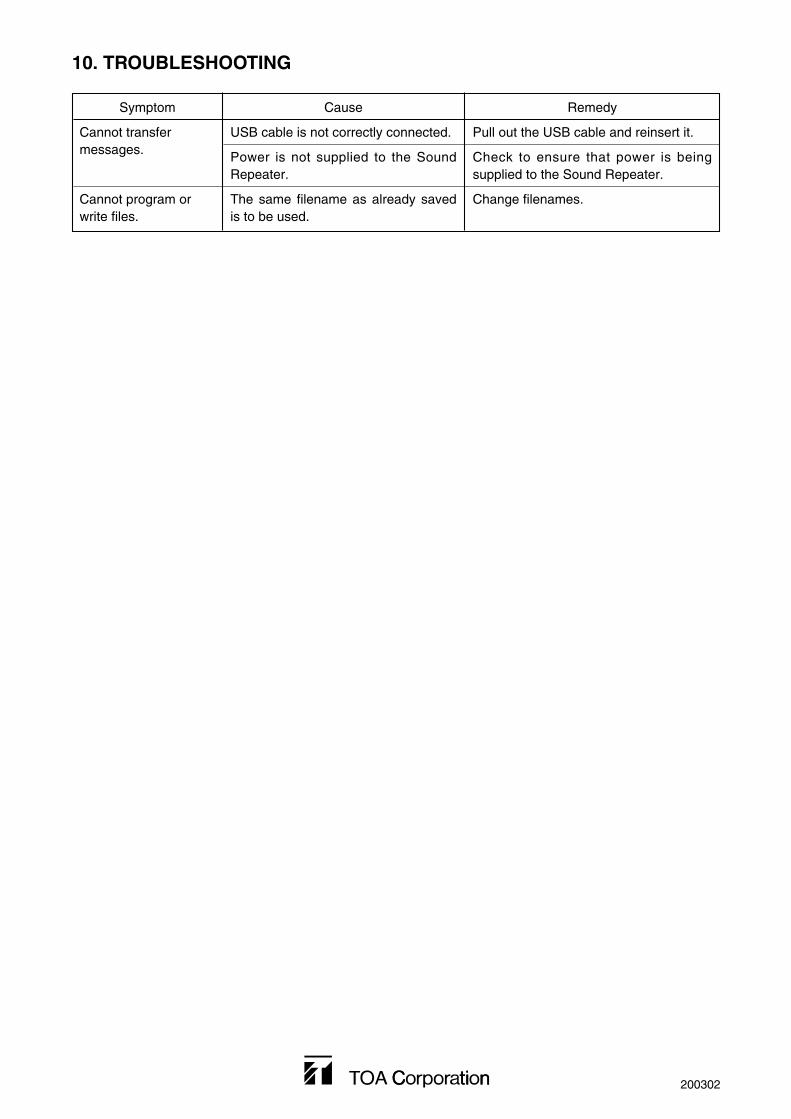
10. TROUBLESHOOTING
200302
Remedy
Pull out the USB cable and reinsert it.
Check to ensure that power is beingsupplied to the Sound Repeater.
Change filenames.
Symptom
Cannot transfermessages.
Cannot program orwrite files.
Cause
USB cable is not correctly connected.
Power is not supplied to the SoundRepeater.
The same filename as already savedis to be used.