SOP for PM Gravimetric Analysis (PDF)
22
PM Gravimetric Analysis Revision 9 Date: July 8, 2008 Page 1 of23 Standard Operating Procedure for Particulate Matter (PM) Gravimetric Analysis Environmental and Industrial Sciences Division RTI Intemational* Research Triangle Park, North Carolina -P' C. H_ Prepared by: Date: +- - '1 - :J.. (J 0 %' Date: Reviewed Approved by: Date: 7- I () - INTERNATIONAL * R II International is a trade name of Research Triangle Institute.
Transcript of SOP for PM Gravimetric Analysis (PDF)
PM Gravimetric Analysis Revision 9
Date: July 8, 2008 Page 1 of23
Standard Operating Procedure for Particulate Matter (PM) Gravimetric Analysis
Environmental and Industrial Sciences Division RTI Intemational*
Research Triangle Park, North Carolina
-P' C. H_ Prepared by: ~ ~ Date: +- - '1 - :J.. (J 0 %'
Date:Reviewed bY~T-+--~_~--=..-/,,-----3---->.-~_~_~J----¥'A--=~ Approved by: /?If1!I~ Date: 7 - I () - ()~
~RTI INTERNATIONAL
*RII International is a trade name of Research Triangle Institute.

PM Gravimetric Analysis Revision 9
Date: July 8, 2008 Page 2 of 22
Contents
Section Page
1.0 Procedural Section ...............................................................................................................3 1.1 Scope and Applicability...........................................................................................3 1.2 Summary of Method ................................................................................................3 1.3 Definitions ...............................................................................................................4 1.4 Health and Safety Warnings ....................................................................................4 1.5 Cautions ...................................................................................................................4 1.6 Interferences.............................................................................................................5 1.7 Personnel Qualifications ..........................................................................................5 1.8 Apparatus and Materials ..........................................................................................6 1.9 Calibration ...............................................................................................................6 1.10 Sample Collection....................................................................................................7 1.11 Sample Handling......................................................................................................7 1.12 Sample Preparation and Analysis ............................................................................8
1.12.1 Initial Lot Stability Test ............................................................................ 9 1.12.2 Filter Storage ............................................................................................. 9 1.12.3 Filter Inspection and Conditioning............................................................ 9 1.12.4 Pre-sampling Batch Stability Test........................................................... 10 1.12.5 Pre-sampling Weighing Procedure.......................................................... 11 1.12.6 Preparing the Filters for Shipment .......................................................... 13 1.12.7 Receipt of Filters from the Field ............................................................. 13 1.12.8 Receipt of Filters from the SHAL and Post-sampling Batch Stability Test............................................................................................ 13 1.12.9 Post-sampling Filter Weighing................................................................ 14 1.12.10 Filter Archival ......................................................................................... 15 1.12.11 Troubleshooting....................................................................................... 15
1.13 Data Acquisition Hardware and Software .............................................................16 1.14 Calculations and Data Reduction...........................................................................17 1.15 Records Management.............................................................................................17
2.0 Quality Control and Quality Assurance.............................................................................18 2.1 Determination of Working Standard QC Weight ..................................................18 2.2 Monitoring Microbalance Performance.................................................................19
2.2.1 Quality Control Checks of the Microbalance............................................. 19 2.2.2 Removing a Microbalance from Service.................................................... 19
2.3 QC Filter Samples..................................................................................................20 2.4 Cleaning the Laboratory ........................................................................................21
3.0 References..........................................................................................................................22
PM Gravimetric Analysis Revision 9
Date: July 8, 2008 Page 3 of 22
Standard Operating Procedure for Particulate Matter (PM) Gravimetric Analysis
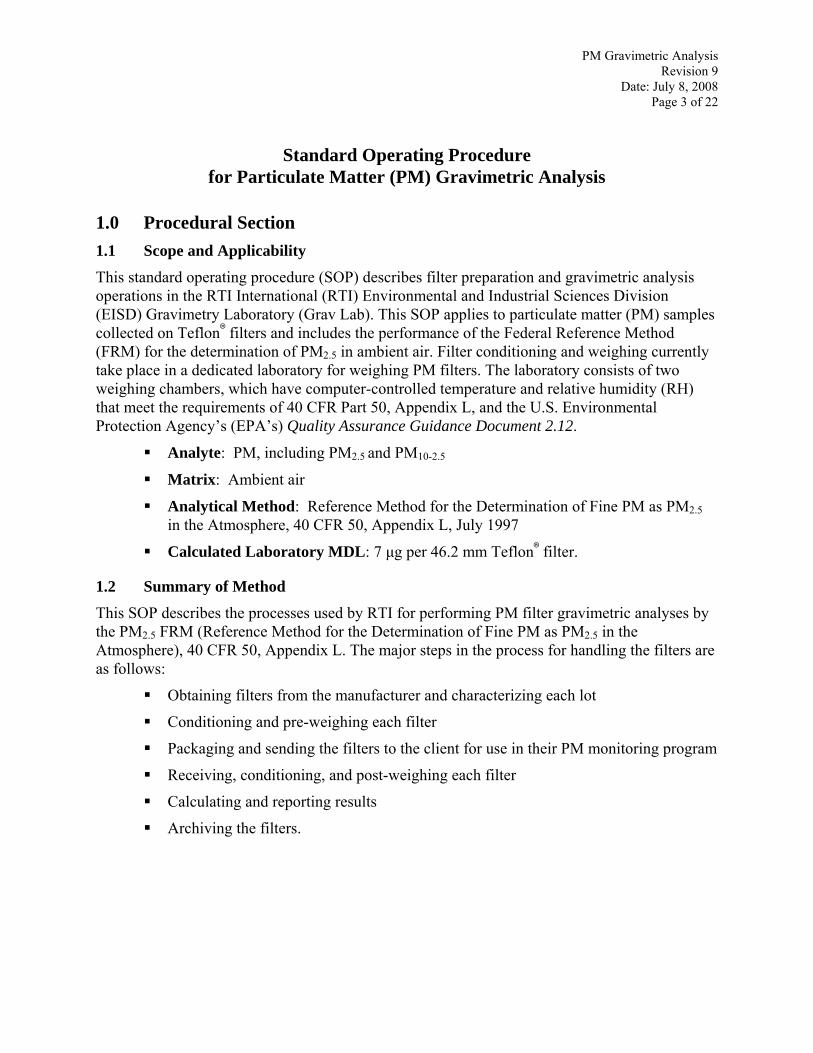
1.0 Procedural Section 1.1 Scope and Applicability
This standard operating procedure (SOP) describes filter preparation and gravimetric analysis operations in the RTI International (RTI) Environmental and Industrial Sciences Division (EISD) Gravimetry Laboratory (Grav Lab). This SOP applies to particulate matter (PM) samples collected on Teflon7 filters and includes the performance of the Federal Reference Method (FRM) for the determination of PM2.5 in ambient air. Filter conditioning and weighing currently take place in a dedicated laboratory for weighing PM filters. The laboratory consists of two weighing chambers, which have computer-controlled temperature and relative humidity (RH) that meet the requirements of 40 CFR Part 50, Appendix L, and the U.S. Environmental Protection Agency’s (EPA’s) Quality Assurance Guidance Document 2.12.
Analyte: PM, including PM2.5 and PM10-2.5
Matrix: Ambient air
Analytical Method: Reference Method for the Determination of Fine PM as PM2.5 in the Atmosphere, 40 CFR 50, Appendix L, July 1997
Calculated Laboratory MDL: 7 μg per 46.2 mm Teflon7 filter.
1.2 Summary of Method
This SOP describes the processes used by RTI for performing PM filter gravimetric analyses by the PM2.5 FRM (Reference Method for the Determination of Fine PM as PM2.5 in the Atmosphere), 40 CFR 50, Appendix L. The major steps in the process for handling the filters are as follows:
Obtaining filters from the manufacturer and characterizing each lot
Conditioning and pre-weighing each filter
Packaging and sending the filters to the client for use in their PM monitoring program
Receiving, conditioning, and post-weighing each filter
Calculating and reporting results
Archiving the filters.
PM Gravimetric Analysis Revision 9
Date: July 8, 2008 Page 4 of 22
The individual procedures are described in this SOP and related SOPs. This SOP concentrates on filter weighing operations, and other SOPs are referenced as necessary.
1.3 Definitions
Gravimetric Analysis—Determination of particulate concentration based on weight difference
PM2.5 — PM with an aerodynamic diameter less than or equal to 2.5 microns
PM10-2.5 — PM with an aerodynamic diameter between 10 and 2.5 microns, also known as PMCoarse
Filter Lot — Units of filters from a single type, grade, class, size, and composition, manufactured under essentially the same conditions and time by the same manufacturer
Filter Batch — Units of unsampled filters inspected and equilibrated under essentially the same conditions and time in the RTI EISD Grav Lab for use in one given shipment (or hand delivery, if appropriate) of tared filters to the client
Weighing Session — Period of time in which filters for one client are weighed by one Laboratory Analyst on one balance on one date, interrupted only by brief breaks of no more than 15 minutes’ duration.
1.4 Health and Safety Warnings
The PM weighing operations do not involve unusual risks from electrical equipment or chemical exposures. Standard RTI laboratory health and safety precautions must be followed.
RTI personnel must exercise caution when using antistatic devices containing radioactive polonium sources, must keep an inventory of the location and size of antistatic devices, and must dispose of the devices in accordance with manufacturers’ specifications, RTI safety and health guidelines, and state and local regulations.
1.5 Cautions
Laboratory personnel will always wear clean clothes and wash thoroughly all parts of their bodies that are exposed during weighing, especially their hands, arms, face, and hair, using adequate soap and water to remove loose skin and hair, as close as possible in time to the weighing activity. Laboratory coats and gloves are required and will minimize the potential for laboratory contamination. Laboratory coats must be taken off before leaving the weighing facility to minimize contamination from the external environment.
RH is a particularly difficult parameter to control; even if total moisture content stays constant, if temperature changes, RH will also change. Gravimetric laboratory personnel must be aware of the potential for unacceptable RH excursions during seasonal extremes (e.g., high heat and humidity in the summer). Corrective measures must be taken whenever environmental controls are out of specification.
PM Gravimetric Analysis Revision 9
Date: July 8, 2008 Page 5 of 22
1.6 Interferences
PM gravimetric results are highly sensitive to certain interfering factors and conditions. The following list describes common precautions to be taken against interferences:
Ensure proper handling procedures humidity and temperature control of the filter and particulate sample during weighing, and promptness in, and consistency of, the weighing method prior to and following collection to control weighing artifacts due to environmental conditions.
Minimize or standardize weight losses by keeping the filters cool during transport to the weighing laboratory and by conditioning and weighing the filters promptly after their receipt in the laboratory. Weight losses can occur due to thermal or chemical decomposition or evaporation of compounds like ammonium nitrate (NH4 NO3 ), which releases ammonia and nitric acid as gases. Semivolatile organic compounds (SVOCs) may be part of the PM on the filters; if so, they may evaporate and cause sample weight losses.
Check for weight loss in any new lot of filters that is received. Filters must not be used until their weights have stabilized. Some new blank Teflon7 filters have been found to exhibit a weight loss of up to 150 micrograms (μg) over a period of time up to 6 weeks after being removed from their original shipping containers.
Minimize weight loss due to mechanical removal of particles and/or filter material by careful handling during removal of the filter from its cassette, filter conditioning, neutralization of electrostatic charge buildup on the filter, and all other filter-handling tasks before weighing.
Neutralize electrostatic to prevent biases due to electrostatic attraction or repulsion during the weighing process.
1.7 Personnel Qualifications
Personnel employed to perform weighing operations must have a minimum of a high school diploma with at least 6 months’ experience in computer applications, including spreadsheet and word processing software and laboratory sample handling and record-keeping practices. Lead analysts must have a minimum of a bachelor’s degree in a laboratory science and at least 6 months’ additional experience in the RTI EISD Grav Lab. All personnel employed to perform weighing operations will be trained by a supervisor before being allowed to process client samples for the PM program. RTI Laboratory Supervisors helped to devise the written examination and the hands-on practical examination for the laboratory component of EPA’s PM2.5 FRM Performance Evaluation (PE) program. All RTI analysts will be trained to a competency level that is equivalent to the FRM PE certification before they are allowed to perform weighing operations.
PM Gravimetric Analysis Revision 9
Date: July 8, 2008 Page 6 of 22
1.8 Apparatus and Materials
Mention of specific suppliers or trade names does not constitute endorsement by RTI.
Mettler Toledo UMT2 or UMX2 balance
U-electrode (ionizer)
Marble balance table
Filters, 46.2 mm, Teflon7
Millipore Petrislides7, appropriately sized for 46.2 mm filters
Filter cassettes of the correct type and make
Filter cassette holders, protective containers
Nonmetallic forceps to handle weights
Nonmetallic forceps to handle filters
Staticide7
Kimwipes7
Three sets of National Institute of Standards and Technology (NIST)–traceable standards used for working mass reference standards
At least one set of NIST–traceable standards used for primary mass reference standards
Millipore Petrislides7
Powderfree gloves
Labcoats
Shoecovers
Sticky floor mats
Computer
Balance Link7 or equivalent data acquisition software
Laboratory notebook or database.
1.9 Calibration
The microbalance will be certified upon initial set-up by an authorized microbalance service representative. Thereafter, the microbalance will be serviced at least annually, and on an as needed basis, by an authorized microbalance service representative. Records kept by RTI will include service dates and calibration results. NIST–traceable standards will be tracked by a control chart to determine if any bias is entering into the system. These standards will be recertified annually.
PM Gravimetric Analysis Revision 9
Date: July 8, 2008 Page 7 of 22
Temperature and RH sensors will be calibrated annually.
The microbalance will be internally calibrated using its internal standards and “Autocalibrate” function each time it is brought up from “Standby” mode.
If the microbalance is found to be out of calibration during routine weighing operations, it must be recalibrated by the analyst using the microbalance’s internal standards and “Autocalibrate” function. If the microbalance cannot be autocalibrated, it must be serviced only by an authorized microbalance service representative.
1.10 Sample Collection
Sample collection is not applicable to this SOP because samples are acquired by the state or federal agencies responsible for exposing the filters.
1.11 Sample Handling
Note: The information in this section pertains to EISD Grav Lab handling of both speciation and compliance samples. Additional information on this topic that is specific to the speciation network can be found in the SOP, Standard Operating Procedure for the Sample Handling and Archiving Laboratory (SHAL), Research Triangle Institute, 2005. The SHAL SOP is the default SOP for the handling of speciation samples.
RTI will provide Chain-of-Custody documentation with all sample shipments to track and ensure the following: samples are collected, transferred, stored, and analyzed by authorized personnel; sample integrity is maintained during all phases of sample handling and analysis; and an accurate written record is maintained of sample handling and treatment from the time of its collection, through the laboratory analytical process, to the eventual relinquishing of all data to the client.
Upon initial receipt of new filters, RTI will prepare a “Filter Inventory and Inspection” spreadsheet containing the manufacturer’s lot number, box numbers, filter identification numbers, and date received by the RTI EISD Grav Lab. This form will allow laboratory personnel to select and use the filter boxes in the proper sequence.
If the filters are from a manufacturer’s lot that has not previously been used in the RTI EISD Grav Lab, then an Initial Lot Stability Test must be performed on randomly selected filters to determine and document the minimum length of time required to condition filters from that lot. The Initial Lot Stability Test is explained fully in Section 1.12.1 (Initial Lot Stability Test).
Filters must be inspected and conditioned before use. Inspection and conditioning must be performed in the weighing environment. The inspection date, analyst’s initials, number of filters rejected, and reasons for rejection must be noted on the hard copy “Pre-sampling Batch Inspection and Stability Form” in the RTI EISD Grav Lab and will be entered into the “Filter Inventory and Inspection” spreadsheet as soon as is practicable. Conditioned filters must be sequentially weighed and packaged for shipment to the designated receiving address(es) in order
PM Gravimetric Analysis Revision 9
Date: July 8, 2008 Page 8 of 22
of filter identification number. Additional information on this topic can be found in Section 1.12.3 (Filter Inspection and Conditioning).
Filters will be shipped to the designated address(es) or hand delivered to the designated SHAL contact within 5 days of preweighing to ensure that the 30-day window for using the filters is met. If a filter expires without being used, the filter will be returned to RTI to be reconditioned and weighed again only if a system for the return of unsampled filters to RTI has been established with the client. The decision to recondition filters will be made on a case-by-case basis by the Laboratory Supervisor in coordination with the Project Manager and client.
Chain-of-Custody forms will accompany each sample shipment and will contain the filter identification numbers, accompanying cassettes’ identification, pre-sampling weighing date, and date shipped to the designated site operator. Chain-of-Custody forms will be completed by site operators to provide tracking information from receipt in the field, through sample collection, to return sample shipment to RTI.
Upon receipt of loaded filters, RTI will complete the receipt portion of the “Chain-of-Custody” form, including the date and maximum temperature, if specified.
RTI will implement, as a matter of standard practice, a sample turnaround time of 10 calendar days from the date of receipt from the field. Shipping and maintaining the filters at or below 4EC provides a 30-day window from sampling for RTI to condition and weigh filters. The designated site operators are responsible for shipping filters and cassettes, and cassette containers, to RTI at a temperature at or below 4EC. All custody information will be entered into and maintained in the project database.
Once the filters have been weighed and the appropriate internal quality control (QC) procedures have been completed, the filters must be returned to their Petrislides7, and the lids must be securely replaced. The Petrislides7 must be placed in numerical order in the Millipore7 slide tray. Each tray must be labeled with the client’s name and the range of filter ID numbers archived in that tray and then sealed in a plastic bag. Two sealed trays will be placed in each outer cardboard Millipore7 box. The outer box must then be labeled with the appropriate archival information, including the client’s name, RTI contact name and telephone extension, filter ID range, and archival date. The box must be placed in a cold storage facility to be maintained at or below 4EC. The archival date must be entered into the appropriate Microsoft (MS) Excel7 spreadsheet beside each filter ID number.
1.12 Sample Preparation and Analysis
Note: Additional information on this topic for the laboratory’s support of the Speciation Trends Network is found in the SOP, Standard Operating Procedures for Procurement and Acceptance Testing of Teflon, Nylon, and Quartz Filters, Research Triangle Institute, 2005.
PM Gravimetric Analysis Revision 9
Date: July 8, 2008 Page 9 of 22
1.12.1 Initial Lot Stability Test
Information derived from the Lot Stability Test must be used to determine the average length of time required to equilibrate filters from a given lot. All Lot Stability Test information must be recorded in the laboratory notebook. The Lot Stability Test must be performed as follows:
1. Randomly select six filter boxes from the same filter lot. 2. Randomly select 2 filters from each box. 3. Weigh the 12 filters and then place the filters in Petrislides7. 4. Allow the filters to equilibrate for at least 24 hours in the weighing environment. 5. Weigh the 12 filters, return them to their Petrislides7, allow them to equilibrate for
another 24 hours in the weighing environment, and reweigh the filters. 6. Continue the 24-hour equilibration and weighing process for up to 7 days (5 days
minimum) and plot the trend of weight loss. If the trend is still decreasing after 5 days, continue the 24-hour schedule of equilibration and weighing.
7. The filters are considered equilibrated when they no longer exhibit a consistent downward weight trend.
8. Record the length of time it took the filters to equilibrate. This will be the minimum time that all filters from this lot must equilibrate prior to performing a Batch Stability Test. (described in Section 1.12.4).
1.12.2 Filter Storage
After successful completion of the Initial Lot Stability Test, the numbered boxes of unused filters will be stored until needed. After the manufacturer’s lot number, box numbers, filter identification numbers, and date received by the RTI EISD Grav Lab are recorded in the “Filter Inventory and Inspection” spreadsheet, the numbered boxes will be placed on the designated laboratory shelf in numerical order so that the next box to be used can be easily obtained. The boxes must be used in numerical order, with the lowest number being used first.
1.12.3 Filter Inspection and Conditioning
An initial screening inspection of each lot of filters must be performed prior to their use for the program. Randomly select 10% of the total quantity of filters received from the vendor. Transport these filters to the Optical Microscopy Laboratory and examine each filter with the aid of a stereo microscope and enhanced lighting (e.g., fiberoptic illuminators, tensor lamps). Record observations of filter appearance, including, but not limited to, extraneous debris or loose pieces of extra filter membrane, filter damage, uniformity of color, clarity of identification number, overspray of filter identification number, or crimping or irregularities in the thickness of the reinforcing ring. Provide the appropriate Task Leader and the program’s Quality Assurance Officer (QAO) with a copy of the inspection notes. The lot will be rejected and returned to the manufacturer for replacement if more than 1/4 of the filters inspected (2.5% of the total lot) exhibit defects that are judged by the Task Leader and QAO to adversely impact sample collection or data quality.

PM Gravimetric Analysis Revision 9
Date: July 8, 2008 Page 10 of 22
In addition to the initial screening, filters must be individually inspected in groups of 25 before they are conditioned for taring. A filter must be rejected if it exhibits any of the following defects:
Pinhole
Separation of ring
Chaff or flashing
Loose material
Discoloration
Filter nonuniformity
Others: see Laboratory Supervisor.
If a filter is rejected, the analyst must make a note of the rejection on the hard copy “Pre-sampling Batch Inspection and Stability Form” and in the MS Excel “Filter Inventory and Inspection” spreadsheet and must discard the filter. If the filter is accepted, the analyst must place it in a Petrislide for equilibration. The analyst must place the Petrislide lid slightly ajar over the well so that it covers approximately 3/4 of the filter surface. This placement of the lid allows for outgassing of the filter and offers some protection from particle deposition. The analyst must inspect and equilibrate a sufficient number of filters to allow for unforeseen filter problems or rejection during weighing. The number of filters equilibrated will consist, at a minimum, of the number of filters required for shipment to the client plus an additional 5 filters. Filters must equilibrate for at least the period of time determined in the Initial Lot Stability Test.
1.12.4 Pre-sampling Batch Stability Test
The Batch Stability Test is used to verify that filters from a particular batch have achieved weight stability and are not losing weight due to outgassing or another process. The Batch Stability Test must be performed after the filters have equilibrated for at least the period of time determined in the Initial Lot Stability Test. Only stable filter batches will be used for PM sampling. The following procedure must be performed each time a batch of filters that has been equilibrated in the RTI EISD Grav Lab for less than 60 hours is prepared for analysis:
1. Randomly select 3 filters from the batch of equilibrated filters. 2. Weigh each of the 3 filters and record their weights in the laboratory notebook. 3. Allow the filters to equilibrate overnight and reweigh. 4. If the average weight loss for the 3 filters is less than 5 Fg, they are ready to be
weighed for shipment to the client. 5. If the average weight loss for the 3 filters exceeds 5 Fg, repeat the 24-hour
schedule of equilibration and weighing until the average weight loss for the 3 filters is less than 5 Fg.
PM Gravimetric Analysis Revision 9
Date: July 8, 2008 Page 11 of 22
1.12.5 Pre-sampling Weighing Procedure
The following procedure must be performed each time PM filters are tare-weighed in the RTI EISD Grav Lab:
1. The laboratory’s Dickson7 RH and temperature data logger is routinely set to collect 5-minute grab samples. Twenty-four hours prior to a weighing session, verify that this logger setting has not been changed.
2. The microbalance must be left plugged in and turned on at all times to avoid lengthy warm-up periods. If the microbalance has been left in “Standby” mode, the LCD screen display must be turned on by pressing the tare (Zero) button once. Note: Do not press the On/Off button.
3. Verify that the microbalance is level by observing the level indicator bubble at the rear of the sample chamber. If the microbalance is level, the air bubble will be positioned in the center of the indicator circle. If the air bubble is not centered, level the microbalance by turning the two leveling feet at the rear of the sample chamber until the bubble is in the middle of the indicator circle. Note: The microbalance must be releveled each time it is moved. Releveling will not normally be necessary because the microbalance is not routinely moved. If observation of the level bubble indicates that the microbalance has been moved, notify the Laboratory Supervisor immediately. Always calibrate the microbalance after releveling.
4. Internally calibrate the microbalance with its “Autocalibrate” function. The microbalance must be internally calibrated each time it is brought up from “Standby” mode. Note: Do not lean on or place weight on the stone balance table or open the laboratory door while the internal calibration is in progress. Minimize movement in the laboratory during the internal calibration.
5. Turn on the computer, if necessary, and download the humidity and temperature data from the data logger to the computer.
6. Pull the data into an MS Excel spreadsheet and calculate the 24-hour mean and standard deviation for temperature and RH. Report temperature to 3 significant digits.
7. Verify that the weighing chamber’s mean temperature and RH for the previous 24 hours have met the following specifications: temperature maintained between 20–23EC with a standard deviation less than 2, and 24-hour mean RH maintained between 30–40% with a standard deviation less than 5.
8. Lightly spray a low-lint disposable cloth (Kimwipe7) with Staticide7. Do not direct the spray toward the data logger, microbalance, reference weights, filters, or area around the microbalance and computer. Use the moistened cloth to wipe both sets of forceps and the work area around the microbalance and computer. Allow the forceps and work area to air-dry before proceeding. The computer and monitor will be routinely cleaned with products designed for that purpose.

PM Gravimetric Analysis Revision 9
Date: July 8, 2008 Page 12 of 22
9. Open the weighing template spreadsheet in the client’s folder or the Grav Lab speciation database application, each where appropriate, and create a filename or initial weighing session consisting of the first and last filter ID numbers in the range to be weighed (e.g., 9021884_9021920).
10. Complete the QC data worksheet or initial weighing session setup form with analyst initials, weigh date, start time, client/RTI project number, filter lot, initial RH (%), and initial temperature (EC, to 3 significant digits).
11. Complete the database worksheet or Grav database initial weighings form with filter ID number, weighing type, and any other specified information.
12. Begin the weighing session by weighing reference standards that bracket the typical weight of a filter. Using nonmetallic forceps, place either the 100 mg or 200 mg working mass standard on the microbalance weigh pan and close the microbalance door. Take care not to drop, bend, or otherwise mar the standard.
13. Wait for the microbalance to display a stable reading for at least 20 seconds. 14. Press either the “print” button on the microbalance or the “print screen” button on
the computer keyboard to enter the displayed weight directly to the cursor position in the spreadsheet or database form.
15. Repeat this process with a second working mass standard to bracket the weight of a typical Teflon7 PM filter.
16. Compare the weights of the working mass standards to the QC weight acceptance limits posted near the microbalance. If a mass standard varies from its verified weight by more than 3 Fg, autocalibrate the microbalance and reweigh the working mass standard. If the mass standard still varies by more than 3 Fg, contact the Laboratory Supervisor.
17. Reposition the cursor (if necessary) in the first filter weight cell. Using the filter handling forceps, pick up the first filter to be weighed and pass it through the U-electrode to neutralize static charge and place the filter on the weigh pan and close the microbalance door. Wait for the microbalance to display a stable reading for at least 20 seconds
18. Press the “print” or “print screen” button to enter the weight directly into the database worksheet or data entry form.
19. Open the automatic microbalance door, remove the filter from the weigh pan, and reclose the microbalance door. The microbalance must return to zero on its own. If, after 20 seconds, the microbalance has not returned to zero, press the “tare” key. It should not be necessary to press the “tare” key after every filter. If it proves necessary to press the “tare” key after every filter, troubleshoot the system as outlined in this procedure.
20. Repeat the process for all the filters. After every tenth filter, reweigh working mass standards that bracket the weight of a typical filter (e.g., 100 mg and 200 mg) and record the weight in the QC data worksheet. Compare the weights of the working mass standards to the QC weight acceptance limits for the working mass standards.
PM Gravimetric Analysis Revision 9
Date: July 8, 2008 Page 13 of 22
21. If the number of tared filters needed for shipment or hand delivery to the client can be weighed in one weighing session, then weigh the number of filters needed for shipment or delivery plus 1 additional filter to be used as a laboratory (lab) blank. If the client requires a quantity of filters too large to be weighed in one weighing session, then weigh the number of filters that can be safely weighed in the time available and select 1 filter to be used as a lab blank for that weighing session. In each case, the lab blank must be placed in a Petrislide7 and labeled with the client name, RTI project number, weigh date, and the filter ID range that it represents. In each case, the lab blank must also be identified as a lab blank in the weighing spreadsheet.
22. Reweigh every filter and record the initial and final weights in the appropriate spaces on the database or Excel form used for the weighing session.. If replicate filter weights vary by more 5 μg, weigh the filter a third time to confirm the weight. If replicate filter weights vary by more than 15 Fg, contact the Laboratory Supervisor. The Laboratory Supervisor will troubleshoot the system and direct the analyst to troubleshoot the microbalance system and/or to allow the filters to equilibrate an additional length of time before reweighing all the filters in the batch.
23. If replicate filter weights are within 15 Fg, then reweigh the 100 mg and 200 mg working mass standards. If the working mass standards are within 3 Fg of their verified weight, then the weighing session is complete. All changes to the spreadsheet or weighing session must be saved.
24. If the purpose of the weighing session is to tare filters to complete the batch started previously, then a lab blank must be included in the weighing session. This practice will result in multiple lab blanks covering all weighing sessions for the batch of filters shipped or delivered to the client.
1.12.6 Preparing the Filters for Shipment
Shipping and receiving of filters for the PM Chemical Speciation Program will be performed in the SHAL. These procedures are discussed in the SOPs for the SHAL.
1.12.7 Receipt of Filters from the Field
Shipping and receiving of filters for the PM Chemical Speciation Program will be performed in the SHAL. These procedures are discussed in the SOPs for the SHAL.
1.12.8 Receipt of Filters from the SHAL and Post-sampling Batch Stability Test
The following procedure must be performed each time PM filters are received from the SHAL:
1. Review and complete all Chain-of-Custody forms submitted with the filters. Return one completed carbonless copy of the form to SHAL and retain the other copies.
PM Gravimetric Analysis Revision 9
Date: July 8, 2008 Page 14 of 22
2. Log the filter identification information in the PM Sample Receipt Notebook. Include filter ID numbers, date received from the SHAL, receiver’s initials, pertinent information concerning shipment integrity communicated by the SHAL, and any observations about obvious filter damage.
3. Transfer the copies of the “Chain of Custody” form(s) with the filters to the weighing chamber in RTI Building 11. If the filters are not received from the SHAL in Petrislides7, place each filter in a clean Petrislide7. Label each Petrislide7 with client name, date received from the SHAL, and filter ID number.
4. Place the Petrislides7 containing the filters in numerical order on a tray. Verify the filter ID numbers against the ID numbers recorded on the “Chain of Custody” form(s).
5. Place the filter tray on the appropriate shelves in the weighing chamber to equilibrate. Place the Petrislide7 lid slightly ajar over the slide well so that it covers approximately 3/4 of the filter surface.
6. Allow the filters to equilibrate in the weighing chamber for at least 24 hours. 7. Randomly select 3 of the sampled filters, weigh them, and then replace them on
the shelf to equilibrate at least 24 additional hours. 8. Reweigh the 3 sampled filters. If the average weight loss for the 3 filters is less
than 5 Fg, the batch of filters can be weighed. If the average weight loss for the 3 filters exceeds 5 Fg, repeat the 24-hour equilibration and weighing process.
1.12.9 Post-sampling Filter Weighing
Open the appropriate MS Excel7 spreadsheet(s) or database final weighing session forms to perform post-sampling weighing of PM filters. Post-sampling weighing is performed as outlined in the pre-sampling weighing section (see 1.12.5). All internal QC procedures described in the pre-sampling filter weighing section must be followed during post-sampling weighing. Different or additional QC data that must be recorded are as follows:
1. Perform replicate weighing of post-sampling filters at a frequency of every third filter rather than reweighing every filter. In addition to incremental reweighing, reweigh any filter for which a negative net mass is noted. Reweigh any field or trip blank for which a negative net mass or a net mass greater than 30 μg is noted.
2. Identify field or trip blanks, if known, in the “Blanks” column of each spreadsheet.
3. Reweigh the lab blank for each tare session with filters in the post-sampling batch and enter these weights in the appropriate field of the QC data worksheet or database final weighings form. It is imperative that all lab blanks for the batch be reweighed in each post-sampling weighing session. Initial and final lab blank weights must not differ by more than 15 Fg. A weight gain of more than 15 Fg (positive weight change) indicates potential contamination in the weighing chamber. A weight loss of more than 15 Fg (negative weight change) indicates either that the filters were not adequately equilibrated before shipment to the sampling sites or that the filters were contaminated before shipment with
PM Gravimetric Analysis Revision 9
Date: July 8, 2008 Page 15 of 22
particulate that was dislodged prior to post-sampling weighing. If the lab blank does not meet the appropriate criterion, notify the Laboratory Supervisor and QAO immediately. Anomalies that cannot be traced to issues in the laboratory will be noted as such by the Laboratory Supervisor.
4. Record field and trip blank weighings in the appropriate section of the QC data worksheet or database final weighings form. The initial and final field blank weights must not differ by more than 30 Fg. A weight gain of more than 30 Fg indicates possible field contamination of the filters or that tare or post-sampling weights were not correctly recorded. A weight loss of more than 30 Fg indicates possible inadequate equilibration of the filters before shipment to the sampling sites, or that tare weights were not correctly recorded. If initial and final field blank weights differ by more than 30 Fg, notify the Laboratory Supervisor so that the issue can be investigated in the laboratory and the client can be notified of possible field-related problems.
5. All post-sampling filter weights must be recorded. Note any problems observed during post-sampling filter weighing (e.g., filter damage, incomplete documentation) in the “Comments” field of the database worksheet or database final weighings form. Data flags will notify quality assurance (QA) and SHAL personnel, and, if necessary, the client, that these data must be reviewed to be deemed valid or invalid.
1.12.10 Filter Archival
After post-sampling weighing, filters must be archived according to the procedure outlined in Section 1.11 (Sample Handling). The “Archival Date” column must be completed in the appropriate MS Excel7 spreadsheet.
1.12.11 Troubleshooting
Problems in meeting the various QC requirements during a pre-sampling or post-sampling weighing session can be related to the filter conditioning environment, a malfunctioning microbalance, or the filters themselves (e.g., exposed filters). Analysts must take the appropriate corrective action or call the matter to the attention of the Laboratory Supervisor if serious problems are observed. All problems that affect reportable data must be brought to the attention of the Laboratory Supervisor and must be documented for use during data validation. Serious, systematic, or chronic problems must be dealt with using the Corrective Action Procedures described in the laboratory's QA Project Plan (QAPP).
The following list describes common troubleshooting situations and recommended solutions:
If filter weights are unstable, ensure that temperature and RH are within the acceptance criteria and that levels do not fluctuate excessively. Also, check temperature and RH monitoring devices with independent devices.
PM Gravimetric Analysis Revision 9
Date: July 8, 2008 Page 16 of 22
If unexplained weight gains are observed on laboratory blanks, or if visual contamination is observed, laboratory contamination is present. In this case, more frequent cleaning is required.
If there are measurement uncertainties and fluctuations associated with electrical charge, samples must be charge-neutralized prior to weighing using Polonium 210 alpha sources or an ionizing electrode. Since the radioactive half-life of Polonium 210 is approximately 6 months, Polonium charge neutralizers, if used in the lab, must be replaced at least annually.
If a power failure has occurred, the user must manually reset the microbalance’s electronics and run the internal recalibration procedure. Recovery time may be required for the microbalance to stabilize after a power outage. Refer to the instrument’s operating manual for recommendations.
If blank or working standard weighing discrepancies are observed between sessions, recertify the working standards against the laboratory primary standards and/or calibrate the microbalance using an external laboratory primary standard.
If microbalance repairs or significant internal adjustments are necessary, a qualified service technician must be called. Unqualified personnel must not attempt to adjust or repair the microbalance. Note: Additional information on this topic can be found in Section 2.2.2 (Removing a Microbalance from Service).
If certain exposed filters appear to be losing weight systematically over time, the PM may be composed of nitrates or other semivolatile species. Notify the QAO and expedite final weighing as much as possible within the confines of the reference method.
If any unused filter is found to have a weight outside the normal range (i.e., 110 to 160 mg), an investigation is warranted. Examine other filters from the same lot for defects.
If there is a consistent negative replication (>15 μg) for laboratory blank filters, it is a sign that the filters have not equilibrated long enough and are off-gassing semivolatiles from the manufacturing process. Monitor other filters from the same lot; additional conditioning time is required before filters from that lot can be used for sampling.
1.13 Data Acquisition Hardware and Software
Note: See the SOP, Data Handling Procedures for the Speciation Analysis Program, for detailed procedures on this topic. The referenced SOP will provide details about the data acquisition software to be used in the chemical speciation program.
The three major programs currently used to process RTI EISD Grav Lab data are MS Access7, MS Excel7, and Mettler BalanceLink7. Spreadsheets used for managing state client compliance data are created in MS Excel7. Speciation data are managed with custom RTI–written MS
PM Gravimetric Analysis Revision 9
Date: July 8, 2008 Page 17 of 22
Access7 routines to facilitate compliance with Good Automated Laboratory Practices requirements. Speciation data are recorded on the program’s dedicated server maintained by RTI’s Ragland Computer Center staff.
IBM-PC compatible computers will be used in the weighing laboratory. These will be networked via RTI’s internal computer network. Password security will be used to validate users. Full or incremental backups of the data will be performed daily.
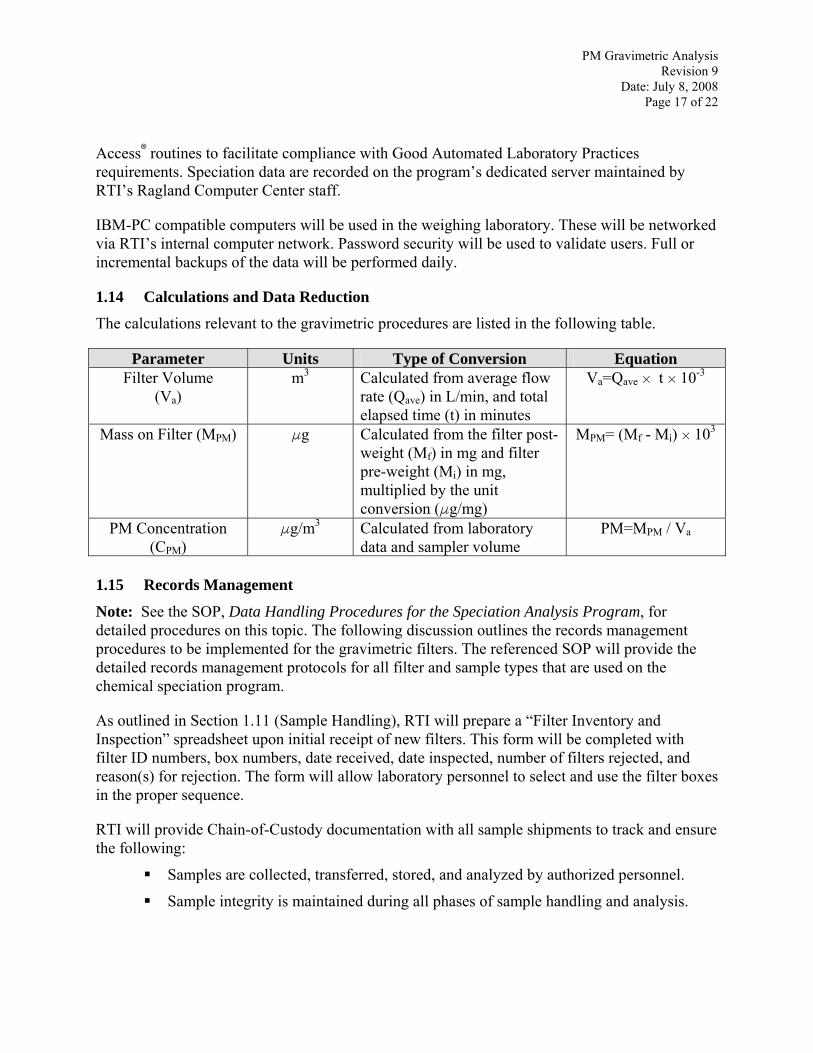
1.14 Calculations and Data Reduction
The calculations relevant to the gravimetric procedures are listed in the following table.
Parameter Units Type of Conversion Equation Filter Volume
(Va) m3 Calculated from average flow
rate (Qave) in L/min, and total elapsed time (t) in minutes
Va=Qave H t H 10-3
Mass on Filter (MPM) Fg Calculated from the filter post-weight (Mf) in mg and filter pre-weight (Mi) in mg, multiplied by the unit conversion (Fg/mg)
MPM= (Mf - Mi) H 103
PM Concentration (CPM)
Fg/m3 Calculated from laboratory data and sampler volume
PM=MPM / Va
1.15 Records Management
Note: See the SOP, Data Handling Procedures for the Speciation Analysis Program, for detailed procedures on this topic. The following discussion outlines the records management procedures to be implemented for the gravimetric filters. The referenced SOP will provide the detailed records management protocols for all filter and sample types that are used on the chemical speciation program.
As outlined in Section 1.11 (Sample Handling), RTI will prepare a “Filter Inventory and Inspection” spreadsheet upon initial receipt of new filters. This form will be completed with filter ID numbers, box numbers, date received, date inspected, number of filters rejected, and reason(s) for rejection. The form will allow laboratory personnel to select and use the filter boxes in the proper sequence.
RTI will provide Chain-of-Custody documentation with all sample shipments to track and ensure the following:
Samples are collected, transferred, stored, and analyzed by authorized personnel.
Sample integrity is maintained during all phases of sample handling and analysis.
PM Gravimetric Analysis Revision 9
Date: July 8, 2008 Page 18 of 22
An accurate written record is maintained of sample handling and treatment from the time of its collection, through the laboratory analytical process, to the eventual relinquishing of all data to the client.
Chain-of-Custody forms will include filter ID numbers, accompanying cassette identification, pre-sampling weighing date, and date shipped to the designated site operator. One copy of the Chain-of-Custody form will be retained by the site operator. A second copy of the form will accompany return shipments to RTI. Upon receipt of loaded filters from the field, RTI will complete the final portion of the Chain-of-Custody form, including date received at RTI and maximum temperature during shipment. The designated site operators are responsible for shipping filters and cassettes, and cassette containers to RTI at a temperature at or below 4EC.
The filter database will be completed with the information described above and with filter archiving information. Filters will be archived, following the procedures outlined in Sections 1.11 (Sample Handling) and 1.12.8 (Filter Archival), until 1 year after termination of the contract or until the client requests return of such materials. Boxes of archived filters will be labeled with the appropriate archiving information, including client name, RTI contact name and telephone extension, filter ID range, and archive date, and the boxes will be placed in a secure cold storage facility. The archival date for each filter ID number will be completed in all pertinent MS Excel7 spreadsheets.
2.0 Quality Control and Quality Assurance 2.1 Determination of Working Standard QC Weight
The following procedure must be performed each time the working mass reference standards are recertified by the North Carolina Department of Agriculture Standards Laboratory, or a similar NIST–traceable standards laboratory, and each time the working mass reference standards exceed the PM acceptance limits.
1. Using clean weight forceps, weigh the working mass reference standard daily for five days.
2. Record the weights and calculate the mean (i.e., The mean will be the weight used for comparison during each subsequent weighing session).
If the mean weight determined for the working mass reference standard differs from the certified value by more than 20 Fg, verify the primary standards and then either call the microbalance manufacturer’s service representative to calibrate the microbalance or return the working mass standard for recertification.
PM Gravimetric Analysis Revision 9
Date: July 8, 2008 Page 19 of 22
2.2 Monitoring Microbalance Performance
2.2.1 Quality Control Checks of the Microbalance
Routine checks of the microbalance using certified mass standards must be performed to detect any appreciable changes in instrument response over time. Since fine particulate mass concentrations are calculated based on the measured difference between loaded filters and clean filters, the absolute response of the microbalance is less critical than long-term stability and repeatability. Internal QC checks are recorded during each weighing session on the session’s QC data worksheet. The following internal QC checks designed to monitor appreciable changes in microbalance response are performed at the beginning and end of every weighing session:
1. Measure and record the temperature, RH, operator’s initials, date, and time on the weighing session’s QC data worksheet.
2. Zero and autocalibrate the microbalance. 3. Weigh the NIST Class 1 100 mg mass standard. Record the weight on the QC
data worksheet for that weighing session and compare this weight to those previously determined for the 100 mg standard.
4. Weigh the NIST Class 1 200 mg calibration weight. Record the weight on the QC data worksheet for that weighing session and compare this weight to those previously determined for the 200 mg standard.
2.2.2 Removing a Microbalance from Service
If the weights recorded for the certified mass standards used to perform systematic checks of the microbalance differ by more than 20 Fg from their certified value or by more than 5 Fg from their last recorded weight, the microbalance must be examined to verify that it is level, that the weigh pan and sample chamber are free of visible contamination, and that the chamber door mechanism is free of visible contamination that would prevent the door from sealing properly. These conditions must be corrected, if necessary. The microbalance must be internally calibrated and the certified mass standards must be weighed again. If the weights recorded for the certified mass standards still differ by more than 20 Fg from their certified value or by more than 5 Fg from their last recorded weight, 3 laboratory blanks must be randomly selected from the laboratory blanks exposed in the laboratory. The3 laboratory blanks will be weighed and their weights will be recorded on the QC data worksheet for the weighing session. If the weight recorded for any 1 of the laboratory blanks differs by more than 15 Fg from its initial weight, the microbalance will be removed from service pending repair and calibration by an authorized microbalance service representative.
The procedure for removing a microbalance from service in the RTI EISD Grav Lab is as follows:
1. Leave the microbalance in “Standby” mode. 2. Notify the Laboratory Supervisor that a routine check of the microbalance as
described above has indicated that the microbalance is out of compliance. 3. Place a clearly written notice on the stone weighing table that states, “THIS
PM Gravimetric Analysis Revision 9
Date: July 8, 2008 Page 20 of 22
MICROBALANCE WAS REMOVED FROM SERVICE ON (MM/DD/YY) PENDING REPAIR AND CALIBRATION BY AN AUTHORIZED MICROBALANCE SERVICE REPRESENTATIVE.” Sign and date the notice.
4. Print the pertinent weighing session QC data worksheet. Paste this worksheet into the microbalance log. Write a brief summary of the microbalance checks and corrective actions in the microbalance log and initial and date the summary.
5. The Laboratory Supervisor will contact Mettler Toledo to schedule a service appointment, notify the QAO, and contact clients and the SHAL, as deemed necessary and appropriate, to discuss rescheduled delivery of tared filters.
6. If sampled filters must be weighed to avoid expiration in the RTI EISD Grav Lab, notify the Laboratory Supervisor. Weigh the sampled filters on the laboratory’s second microbalance. Flag any filter with an explanatory comment where the post-sampling weighing is performed on a microbalance other than the microbalance on which its initial (tare) weighing was performed.
7. After the microbalance has been repaired, calibrated, and certified by an authorized microbalance service representative, remove the written notice from the stone weighing table. Write a brief summary of the microbalance repair in the microbalance log and initial and date the summary.
8. Verify the microbalance performance with the certified working mass standards as described in Section 2.2.1 and document this verification in the microbalance log.
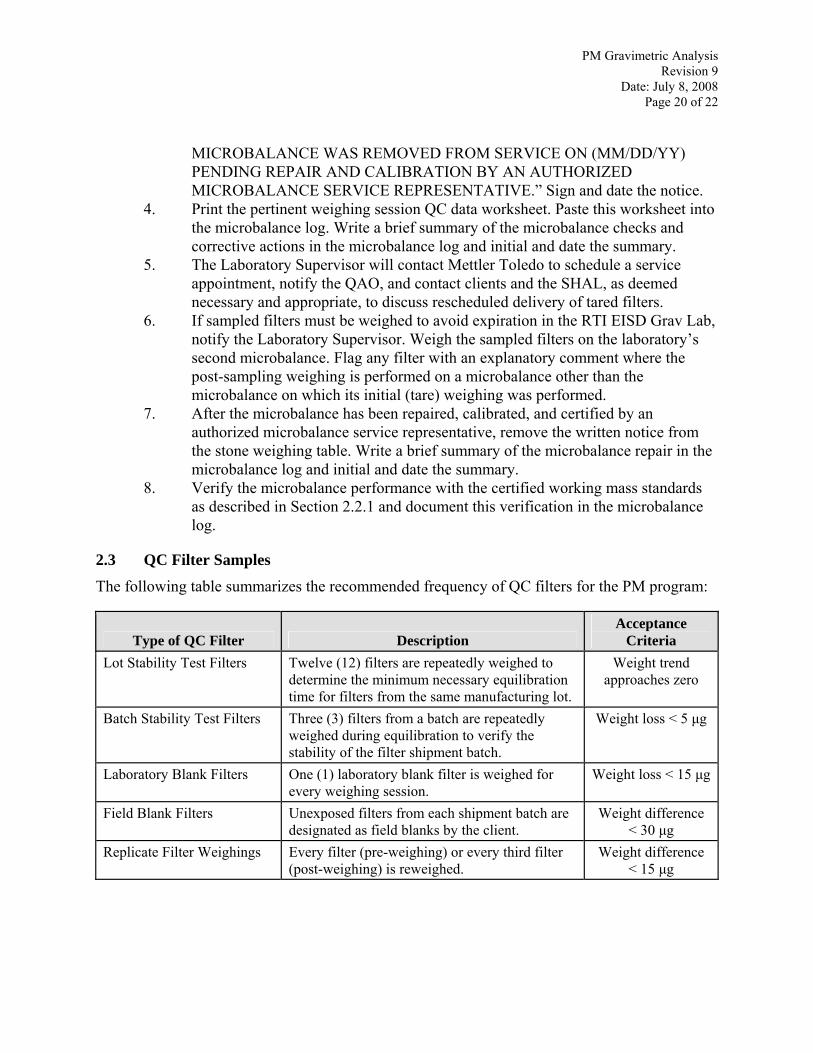
2.3 QC Filter Samples
The following table summarizes the recommended frequency of QC filters for the PM program:
Type of QC Filter Description Acceptance
Criteria Lot Stability Test Filters Twelve (12) filters are repeatedly weighed to
determine the minimum necessary equilibration time for filters from the same manufacturing lot.
Weight trend approaches zero
Batch Stability Test Filters Three (3) filters from a batch are repeatedly weighed during equilibration to verify the stability of the filter shipment batch.
Weight loss < 5 μg
Laboratory Blank Filters One (1) laboratory blank filter is weighed for every weighing session.
Weight loss < 15 μg
Field Blank Filters Unexposed filters from each shipment batch are designated as field blanks by the client.
Weight difference < 30 μg
Replicate Filter Weighings Every filter (pre-weighing) or every third filter (post-weighing) is reweighed.
Weight difference < 15 μg
PM Gravimetric Analysis Revision 9
Date: July 8, 2008 Page 21 of 22
2.4 Cleaning the Laboratory
The laboratory will be cleaned monthly or as needed to minimize contamination in the weighing environment. The laboratory will be cleaned after any renovation, maintenance, or repair activity in the vicinity of the weighing chambers (RTI Bldg 11, Bay 6). Cleaning will be performed by Laboratory Analysts who are familiar with the laboratory equipment, systems, and gravimetric analysis operations. Ultraviolet (UV) fluorescent inspection of surfaces in the weighing chambers will be performed annually to detect particulate microcontamination in the controlled environment to aid the analysts in identifying problem areas and refining their cleaning strategy. In this inspection, a UV hand lamp will be used to highlight contamination on surfaces in the illumination area. At a minimum, the following procedure will be followed when cleaning the laboratory:
1. Don shoe covers, disposable lab coats, and powder-free gloves prior to cleaning the laboratory.
2. After donning protective garments and gloves, replace all Petrislide7 lids securely on open Petrislides7 in which unsampled and sampled filters are conditioning. Closing the Petrislides7 protects filter surfaces from contamination due to fall-out of settled particulate that is resuspended during cleaning.
3. Place all balances in “Standby” mode. 4. Verify that all working mass standards (reference weights) are stored in tightly
closed boxes to protect them from contamination during cleaning. 5. Shut down all computers. 6. Remove all auxiliary supplies (e.g., unopened boxes of filters, FRM magazines
and cassettes, mouse pads) from the chamber. 7. Invert all ionizing units and tap them gently on a table top to dislodge
particulates. Note: Do not tamper with or touch the foil-covered Polonium strips if any are in use.
8. Damp-wipe all vertical and horizontal surfaces with a low-lint disposable cloth moistened with deionized (DI) water. Disposable cloths should be damp, not wet. Add a small amount (approximately 50 FL) of Staticide7 to the DI water used to wipe items, including walls, shelves, table tops, and network junction boxes. Note: Do not wipe the floor with a Staticide7 solution; Staticide7 may make the floor slippery. Discard disposable cloths after use.
9. When damp-wiping vertical and horizontal surfaces, pay particular attention to cables and cords, corners, ledges, network/telephone junction boxes, telephones, computer components, computer mouse, the shelf racks on which trays of filters are placed, the work area around the balances, and the balances themselves. Gently wipe the top of the balance’s power supply, data acquisition component, and chamber component. Do not place pressure on the microbalance.
10. Gently clean the balance’s sample chamber and weigh the pan with the brush provided by the manufacturer. The brush is located in a small drawer on the side of the chamber component. Pay particular attention to the groove in which the automatic chamber door moves as it opens and closes.
PM Gravimetric Analysis Revision 9
Date: July 8, 2008 Page 22 of 22
11. Using a low-lint sponge mop, damp-mop the floor with DI water. Rinse the mop frequently and change the water frequently. Use a textured scrubber as needed to remove visible staining. As noted previously, Staticide7 must not be added to the water used to mop the floor.
12. Exit the chamber, changing the adhesive mats inside and outside the chamber door.
13. Allow surfaces to air dry. Wait at least 1 hour for the chamber’s air circulation system to pull air through the plenum’s course filters.
14. Pre-clean auxiliary supplies before returning them to the chamber. 15. After donning protective garments and gloves, remove Petrislide7 lids from the
Petrislides7 that were closed prior to cleaning and place each lid slightly ajar over the Petrislide7 well so that it covers approximately 3/4 of the filter surface. As noted previously in this SOP, such a placement of the lid allows for outgassing of the filter and offers some protection from particle deposition.
16. Reboot computers. 17. Bring balances up from “Standby” mode and internally calibrate them using the
“Autocalibrate” function.
3.0 References 40 Code of Federal Regulations, Parts 50 (Appendix L), 53, and 58. Revised Requirements for
Designation of Reference and Equivalent Methods for PM2.5 and Ambient Air Quality Surveillance for Particulate; Final Rule (referred to herein as 40 CFR Parts 50/53/58) as published in the Federal Register, Volume 62, Number 138, Friday, July 18, 1997.
U.S. EPA (Environmental Protection Agency) The U.S. EPA Quality Assurance Handbook. Monitoring PM2.5 in ambient air using designated reference or class 1 equivalent methods. Volume II, Part II, Section 2.12., November 1998
Mettler UMT2/UMX2 Microbalance Operations Manuals
Related SOPs:
Sample Receiving, Shipping, and Archiving Procedures for the PM2.5 Chemical Speciation Program, RTI, 2005.
Standard Operating Procedures for Procurement and Acceptance Testing of Teflon, Nylon, and Quartz Filters, RTI, 2005.
Data Handling Procedures for the Speciation Analysis Program, RTI, 2005.