SOLUZIONE RealMYST
114
SOLUZIONE RealMYST Part 1: Myst Island You begin on the docks. Walk forward to the Marker Switch and move the lever to the up position (F). Walk left up the stairs, then take the next flight up on the right to the giant gear (G).
Transcript of SOLUZIONE RealMYST

SOLUZIONE RealMYST
Part 1: Myst Island
You begin on the docks. Walk forward to the Marker Switch and move the lever to the up position (F). Walk left up the stairs, then take the next flight up on the right to the giant gear (G).

Turn on the Marker switch (H). Return down the curved flight of stairs. Walk forward, then go up the stone steps on your right .
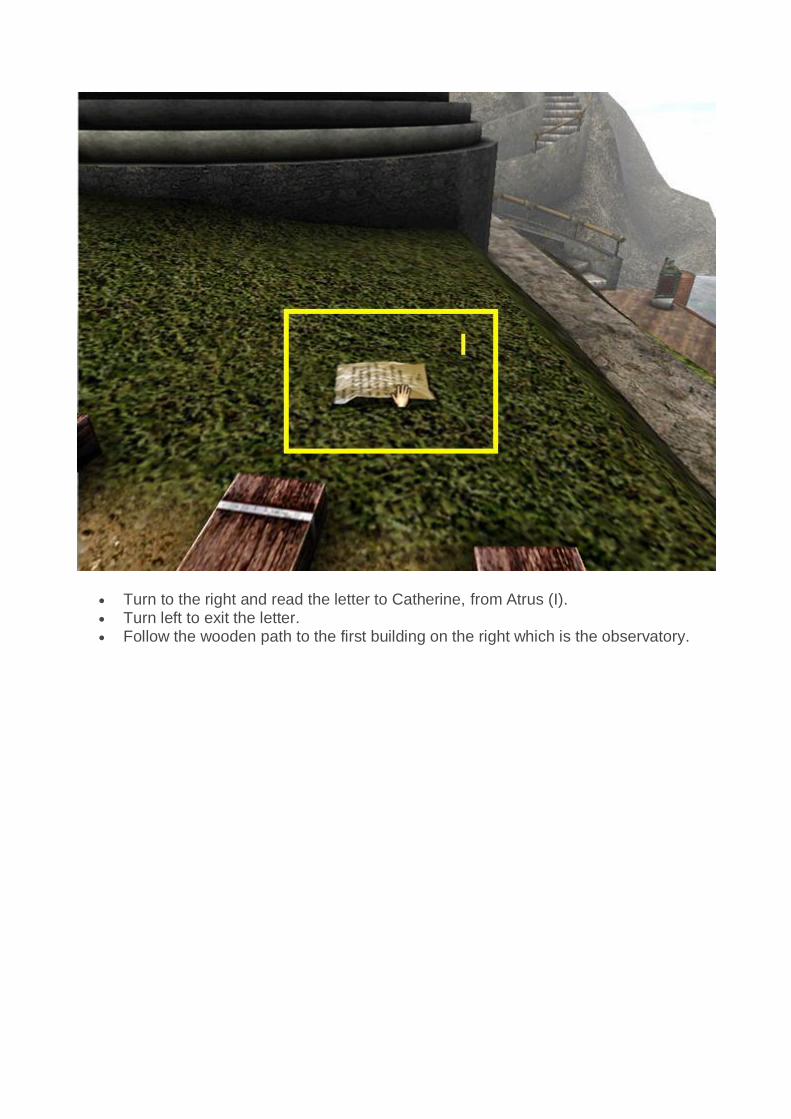
Turn to the right and read the letter to Catherine, from Atrus (I). Turn left to exit the letter. Follow the wooden path to the first building on the right which is the observatory.
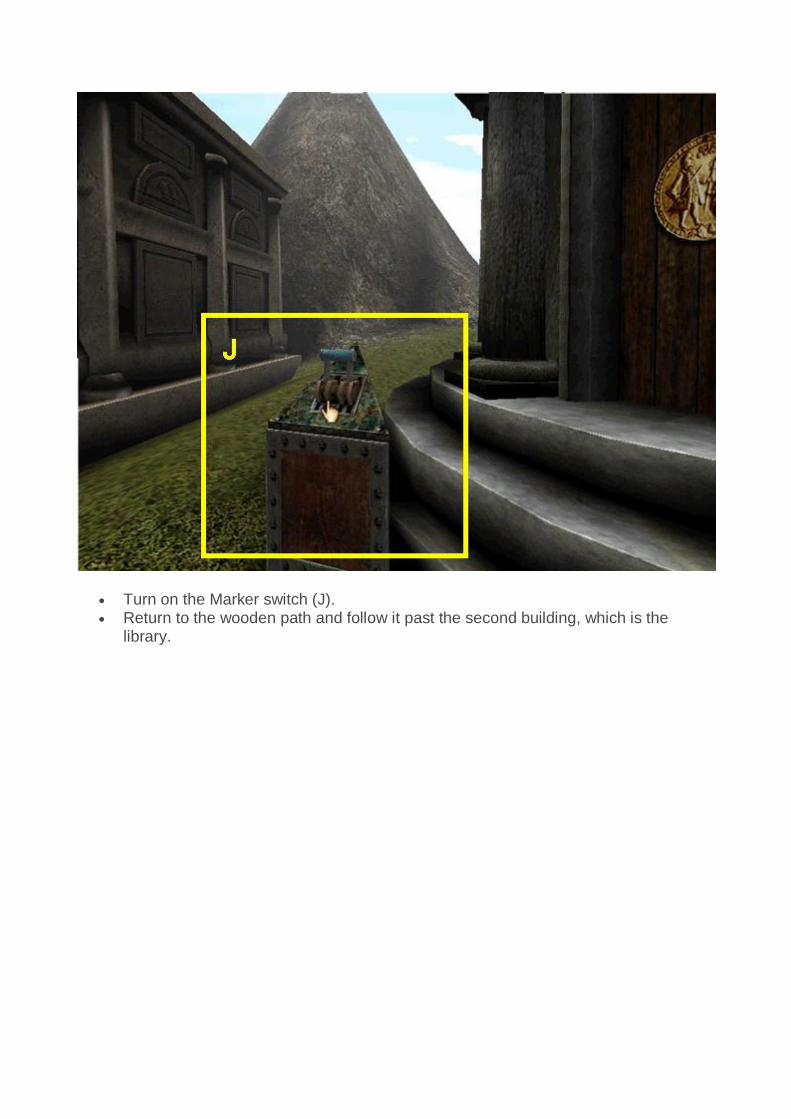
Turn on the Marker switch (J). Return to the wooden path and follow it past the second building, which is the
library.
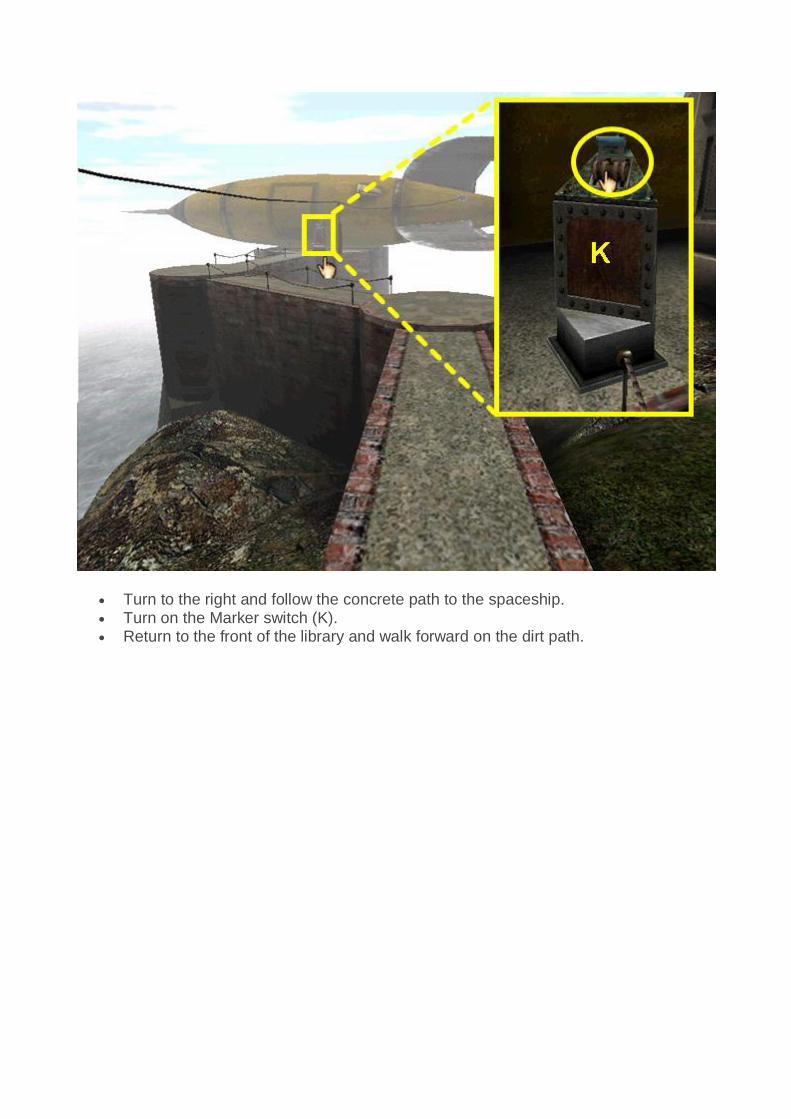
Turn to the right and follow the concrete path to the spaceship. Turn on the Marker switch (K). Return to the front of the library and walk forward on the dirt path.
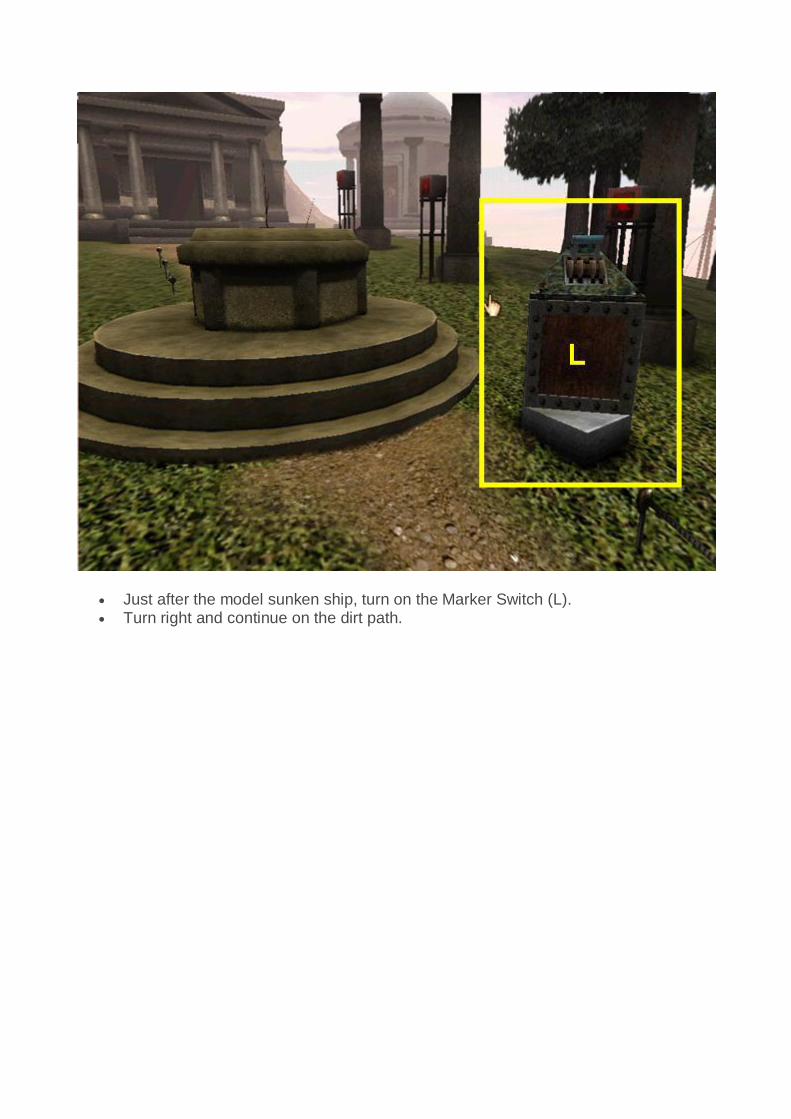
Just after the model sunken ship, turn on the Marker Switch (L). Turn right and continue on the dirt path.
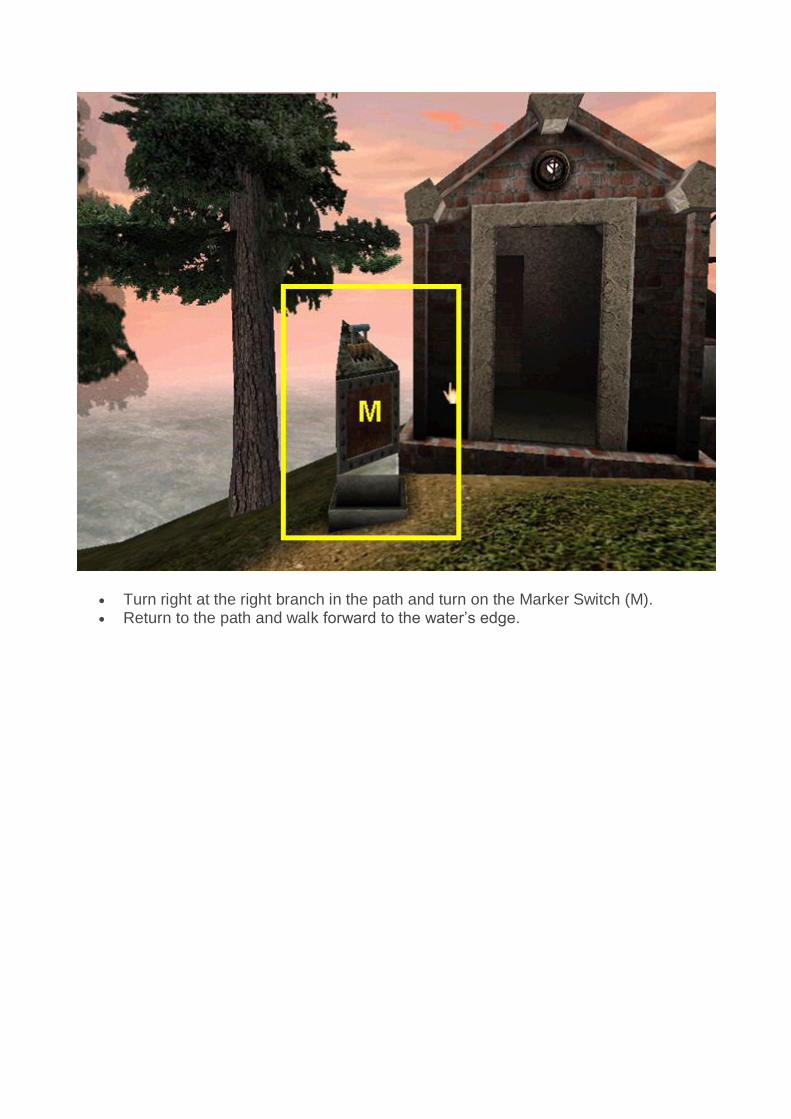
Turn right at the right branch in the path and turn on the Marker Switch (M). Return to the path and walk forward to the water’s edge.
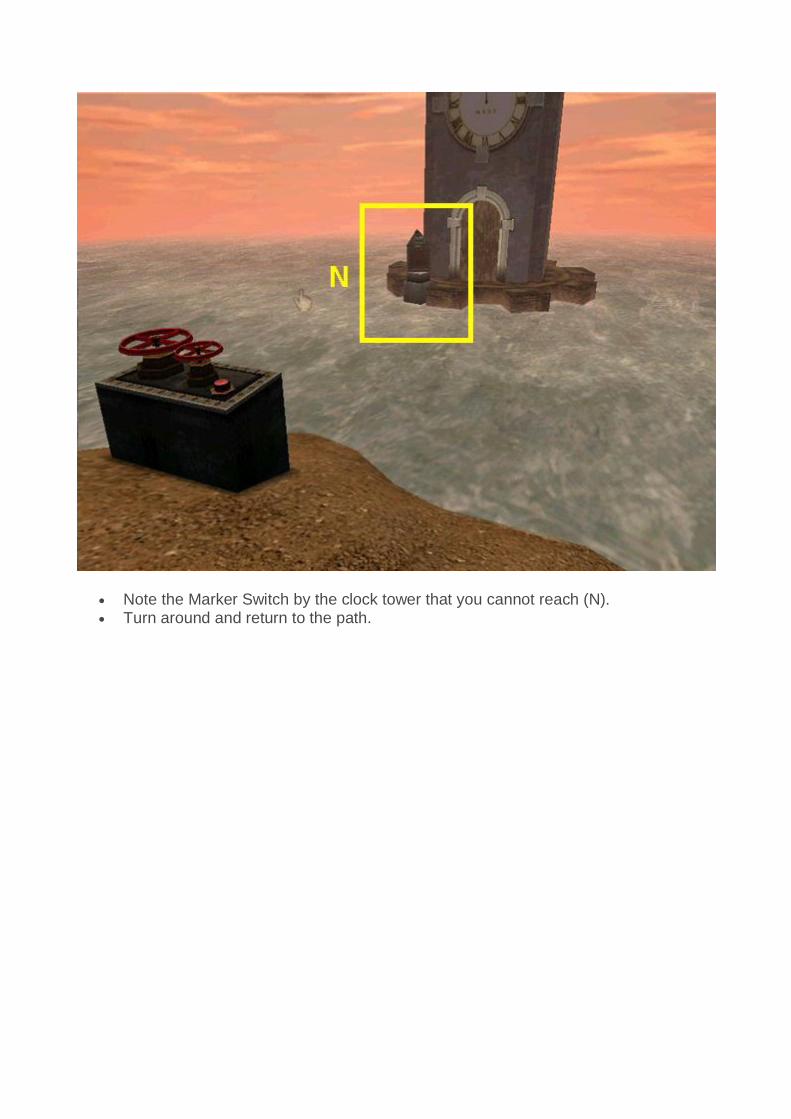
Note the Marker Switch by the clock tower that you cannot reach (N). Turn around and return to the path.
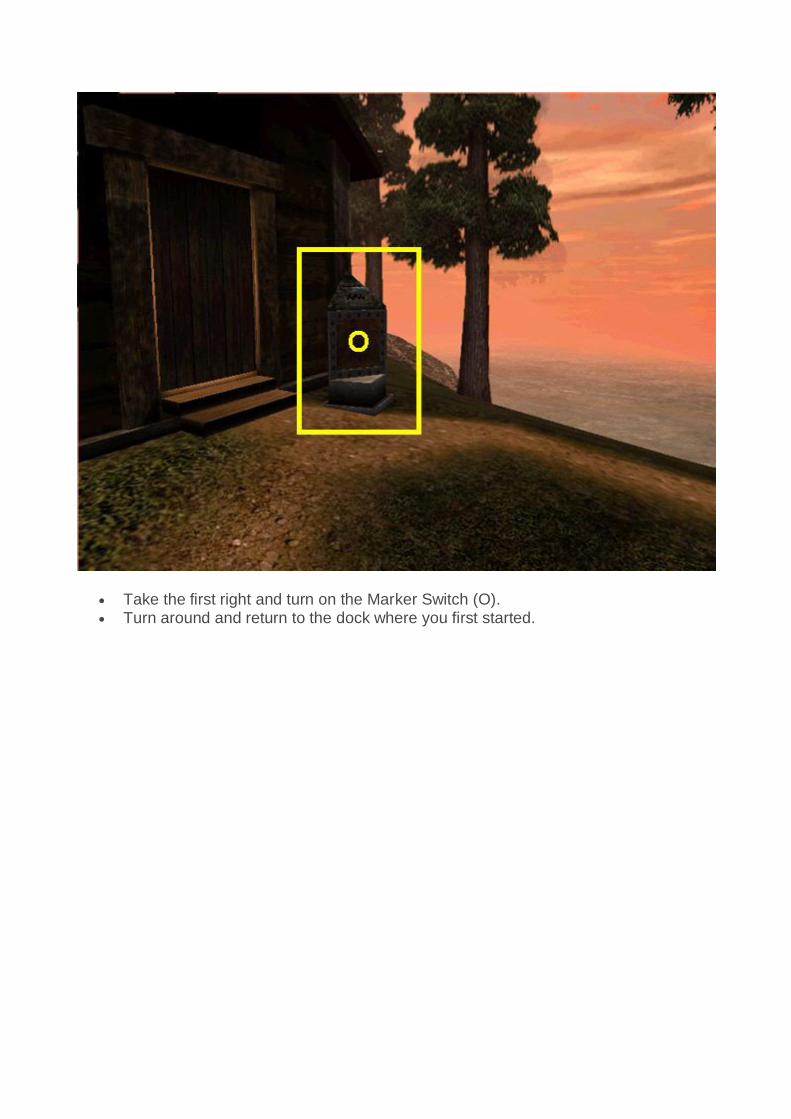
Take the first right and turn on the Marker Switch (O). Turn around and return to the dock where you first started.
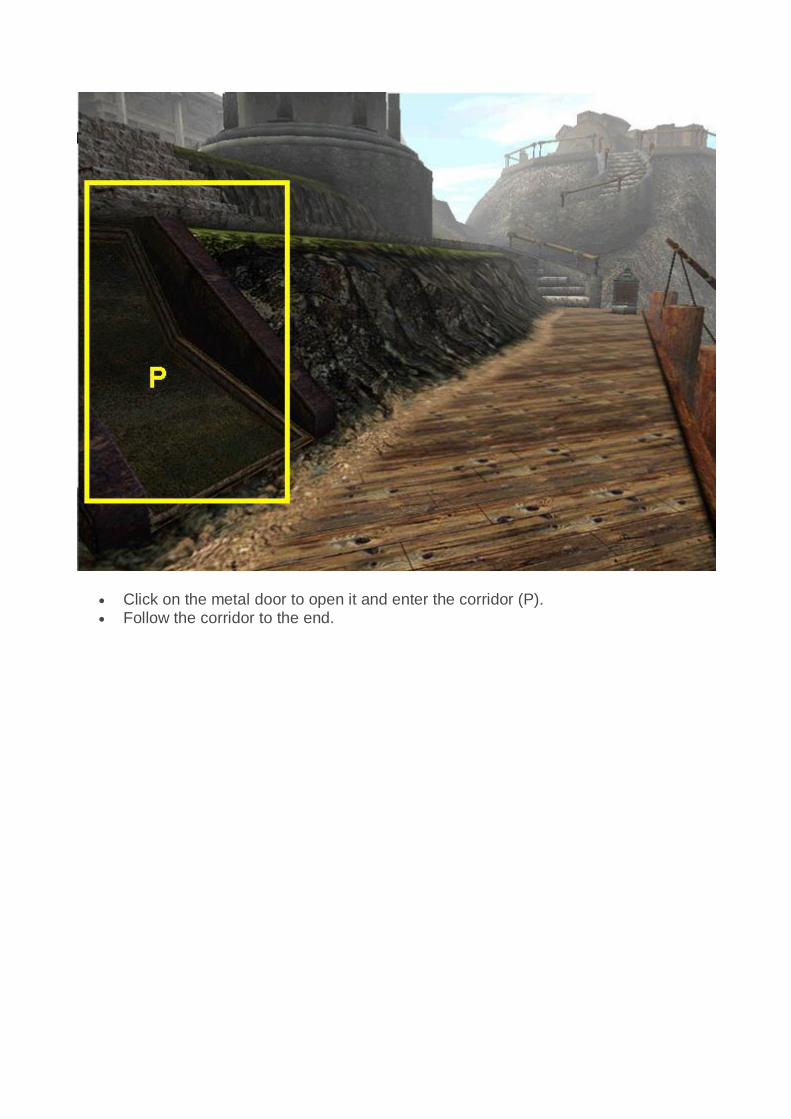
Click on the metal door to open it and enter the corridor (P). Follow the corridor to the end.

Press the button on the round imager to remove the water (Q). Turn around and look at the panel just to the left of the exit.
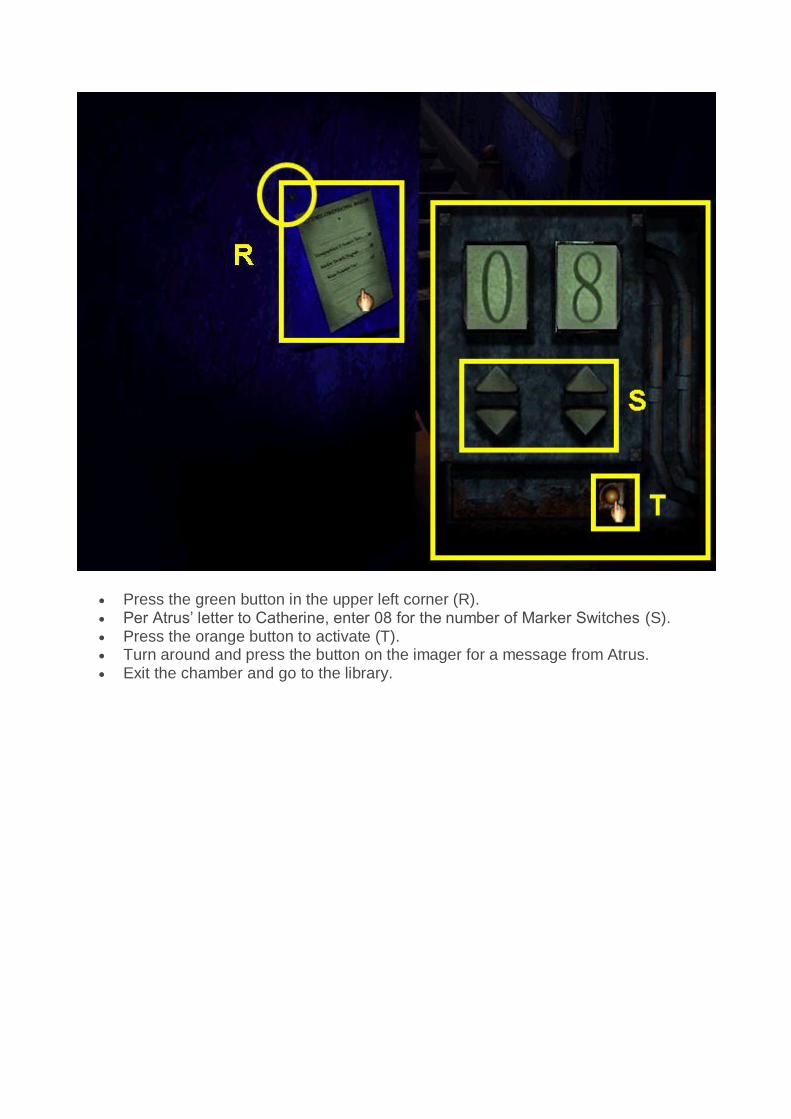
Press the green button in the upper left corner (R). Per Atrus’ letter to Catherine, enter 08 for the number of Marker Switches (S). Press the orange button to activate (T). Turn around and press the button on the imager for a message from Atrus. Exit the chamber and go to the library.

Inside on the right take the blue page and use it on the blue book. Listen to Achenar ask you to bring the blue pages (U). Use the red page on the red book to the left (V). Listen to Sirrus ask for the red pages.

Look at the bookcase and read the legible books thoroughly. The Fireplace book with the pages of squares can be left for later. Make notes of any symbols, diagrams, or possible clues. The upper shelf holds the Channelwood (A) and Stoneship (B) books. The center shelf has the Selenitic (C) and Fireplace (D) books. The bottom shelf holds the Mechanical (E) and Rime (F) books. Note: Rime is a additional age that did not appear in the original Myst.

Look at the map that is just to the left of the door as you enter. Click on the tower and hold until the white line turns red (G). The line should be near the large gear (H).
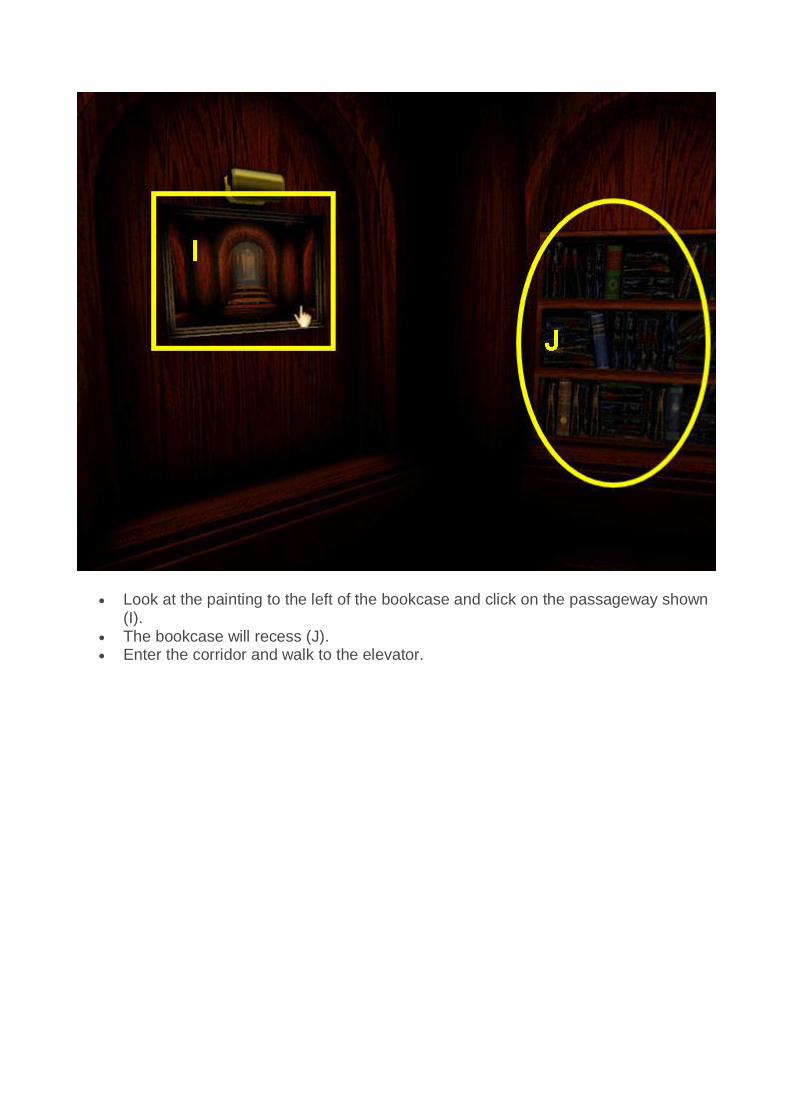
Look at the painting to the left of the bookcase and click on the passageway shown (I).
The bookcase will recess (J). Enter the corridor and walk to the elevator.
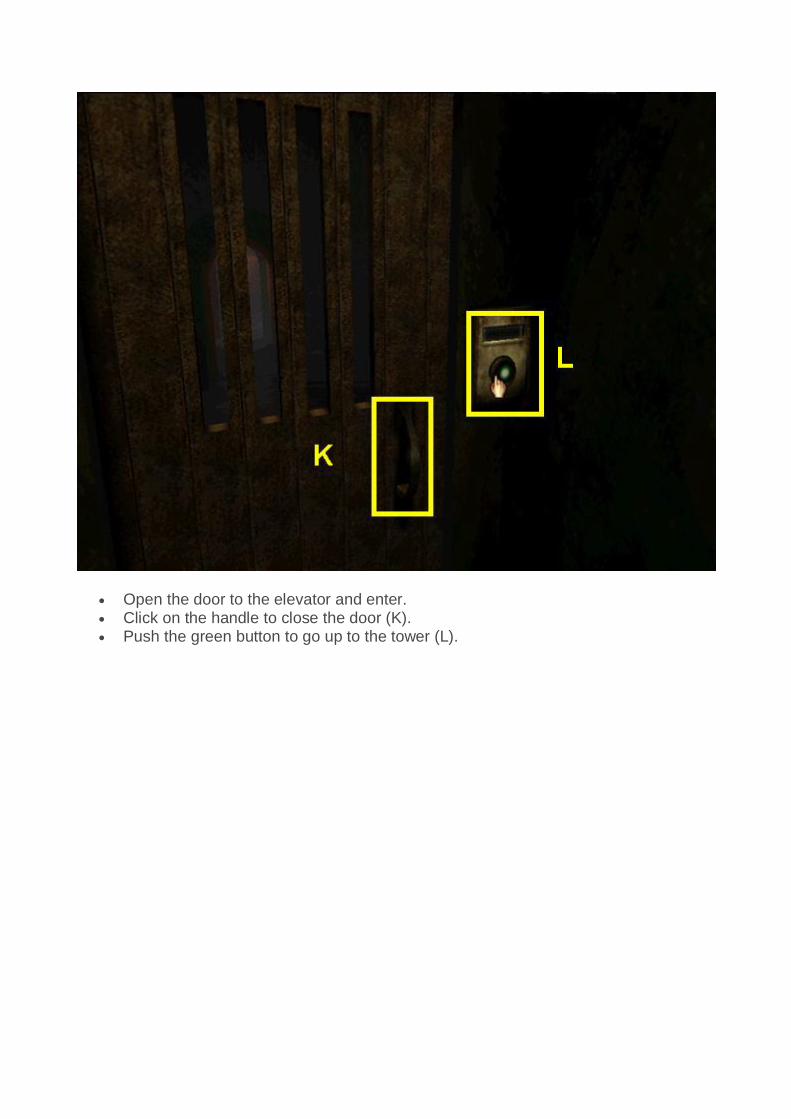
Open the door to the elevator and enter. Click on the handle to close the door (K). Push the green button to go up to the tower (L).
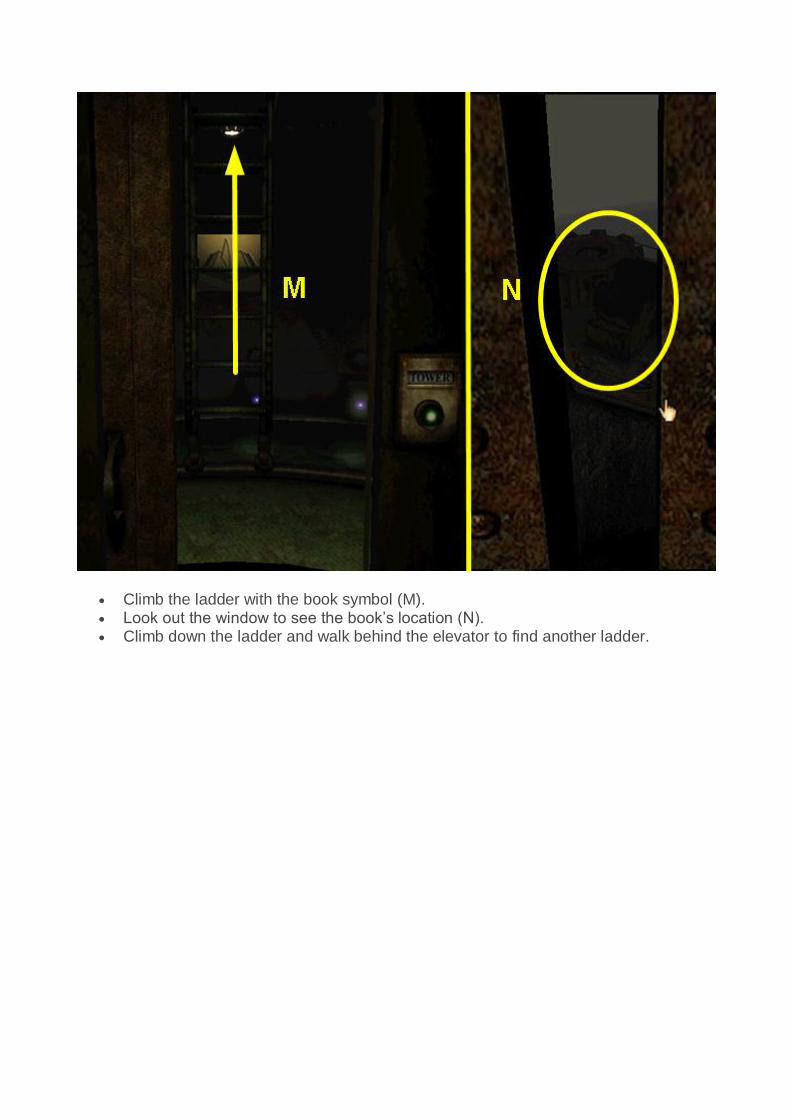
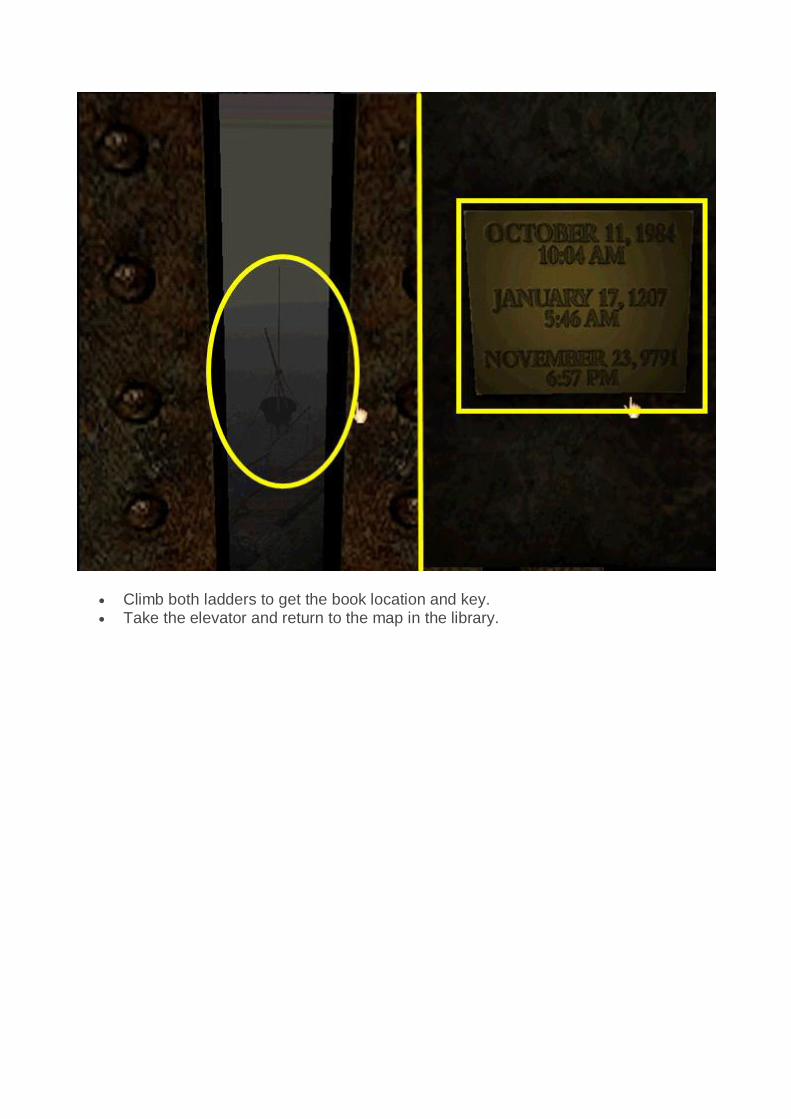
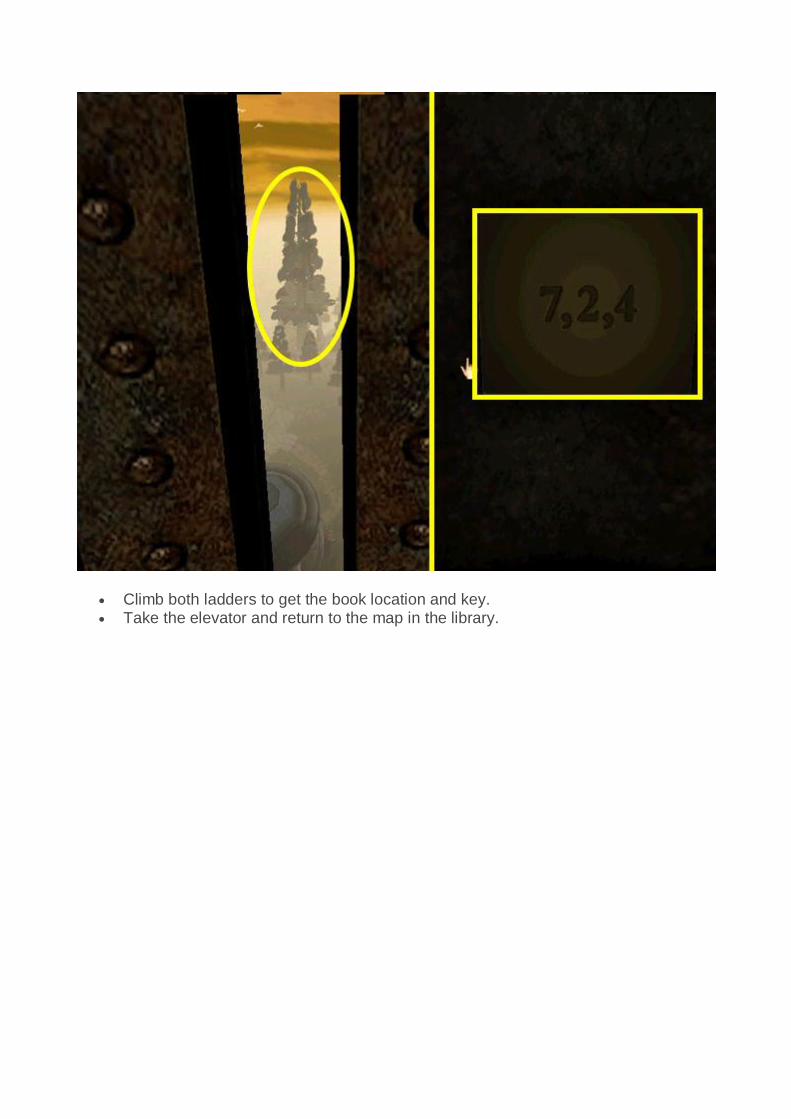
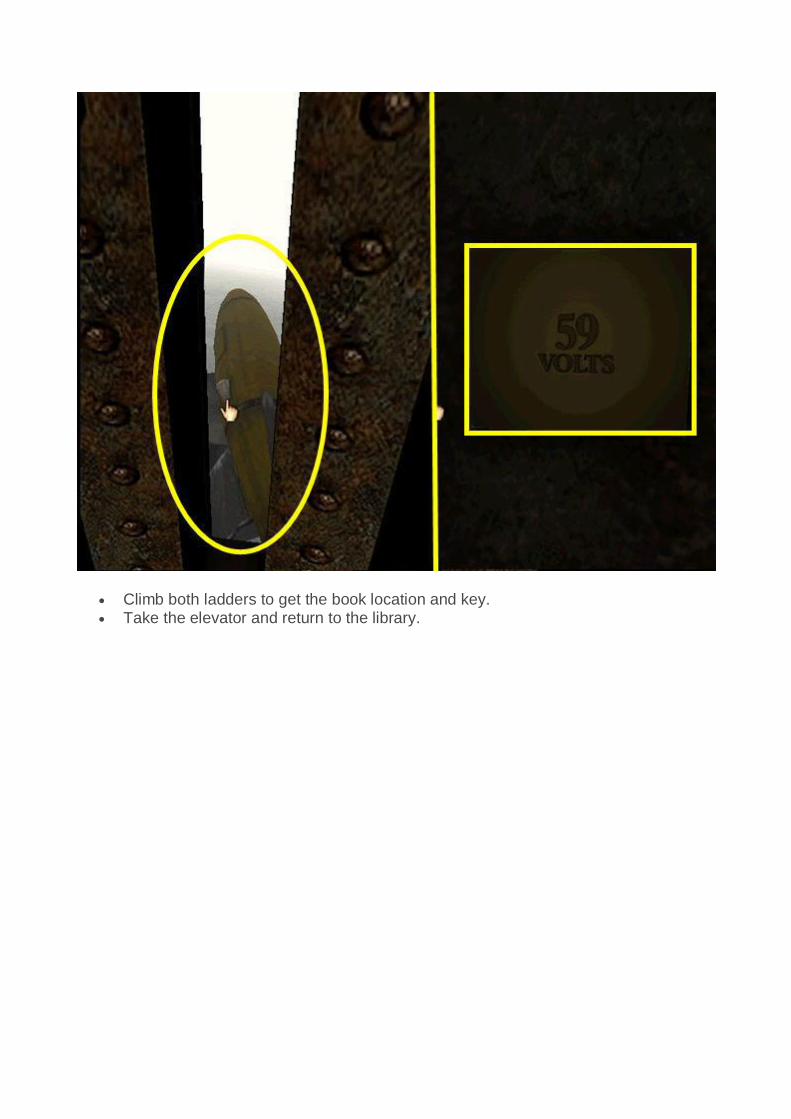
Climb the ladder with the book symbol (M). Look out the window to see the book’s location (N). Climb down the ladder and walk behind the elevator to find another ladder.

Climb the ladder with the key symbol (M). The clue at the top is the key (N). Travel down the elevator and return to the map in the library. You need to repeat the process three more times to find the locations and keys for
3 more books.
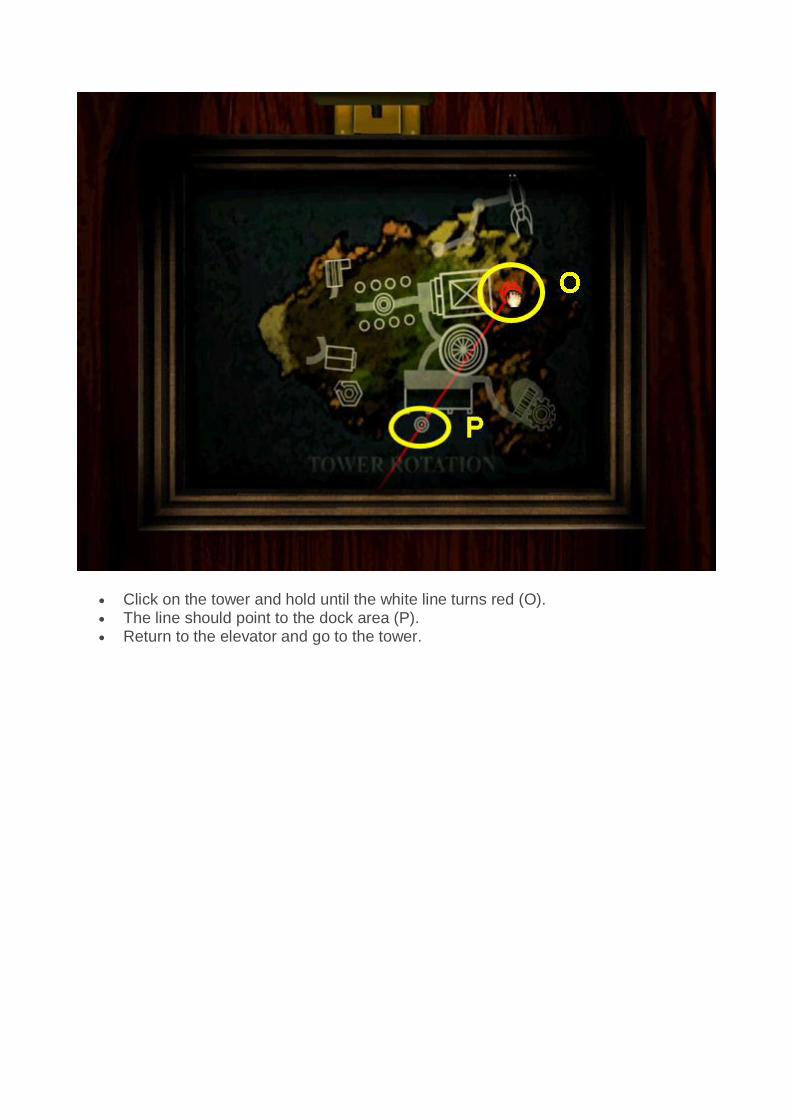
Click on the tower and hold until the white line turns red (O). The line should point to the dock area (P). Return to the elevator and go to the tower.
Climb both ladders to get the book location and key. Take the elevator and return to the map in the library.

Click on the tower and hold until the white line turns red (Q). The line should point to the tree behind the cabin (R). Return to the elevator and go to the tower.
Climb both ladders to get the book location and key. Take the elevator and return to the map in the library.
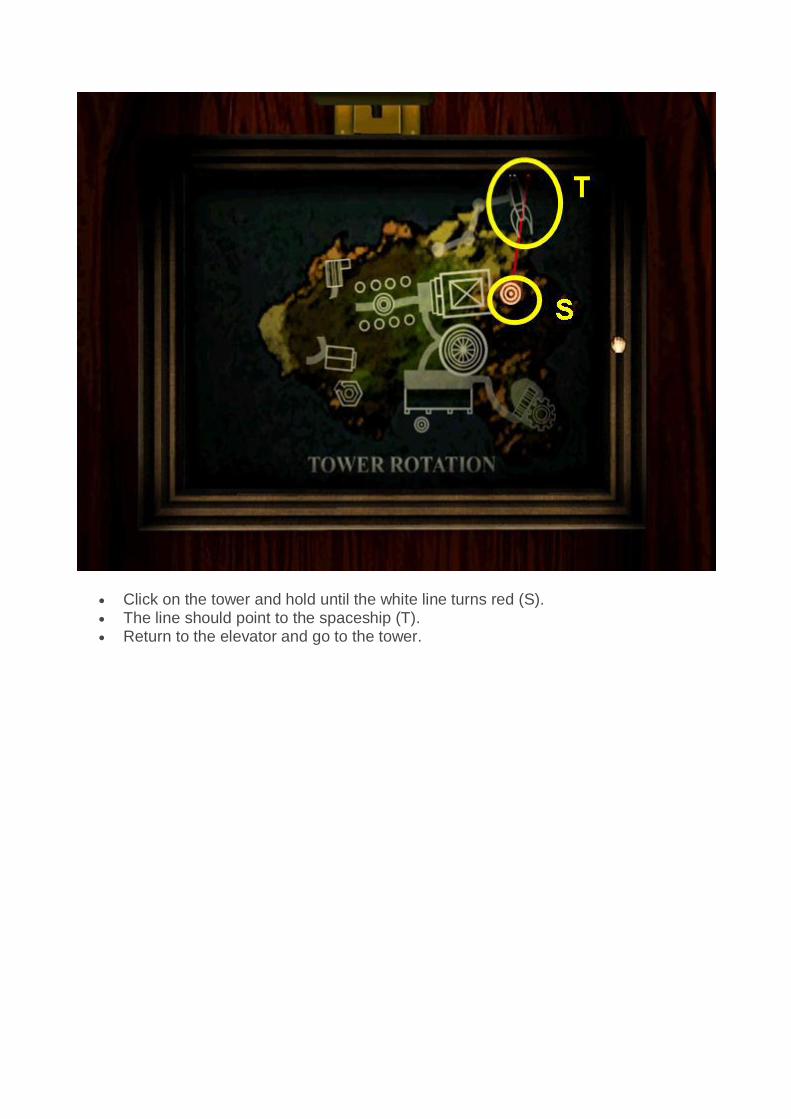
Click on the tower and hold until the white line turns red (S). The line should point to the spaceship (T). Return to the elevator and go to the tower.
Climb both ladders to get the book location and key. Take the elevator and return to the library.
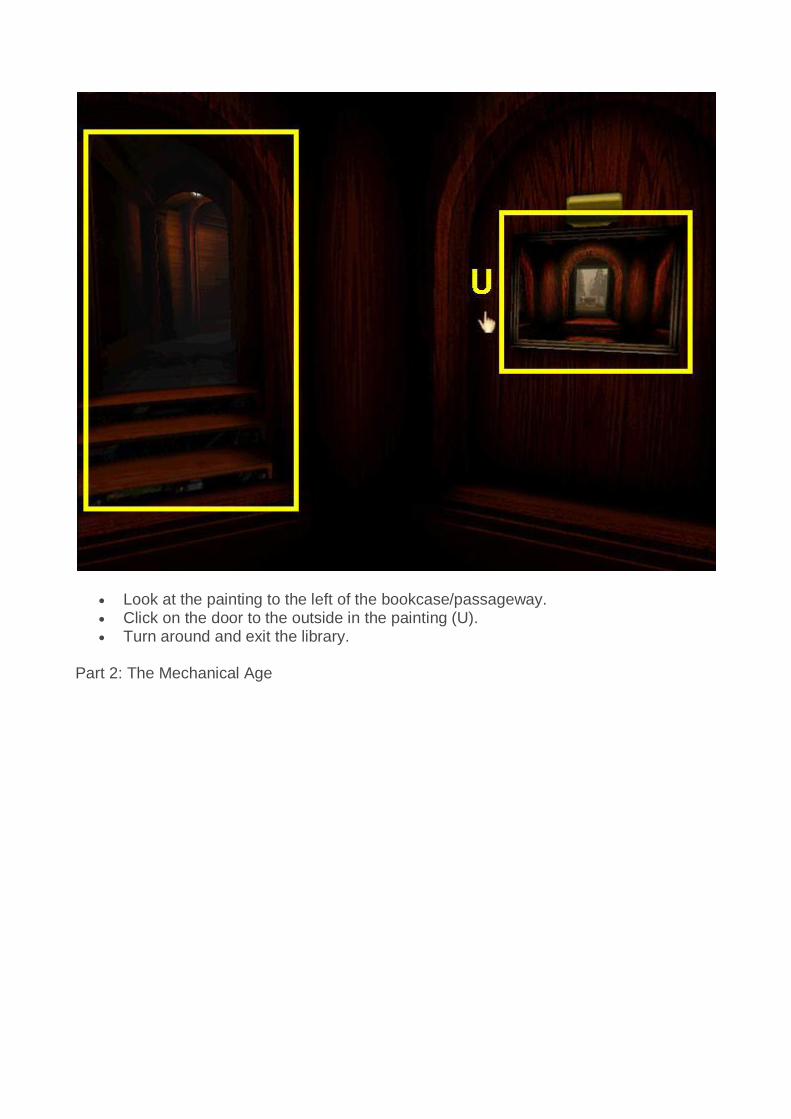
Look at the painting to the left of the bookcase/passageway. Click on the door to the outside in the painting (U). Turn around and exit the library.
Part 2: The Mechanical Age
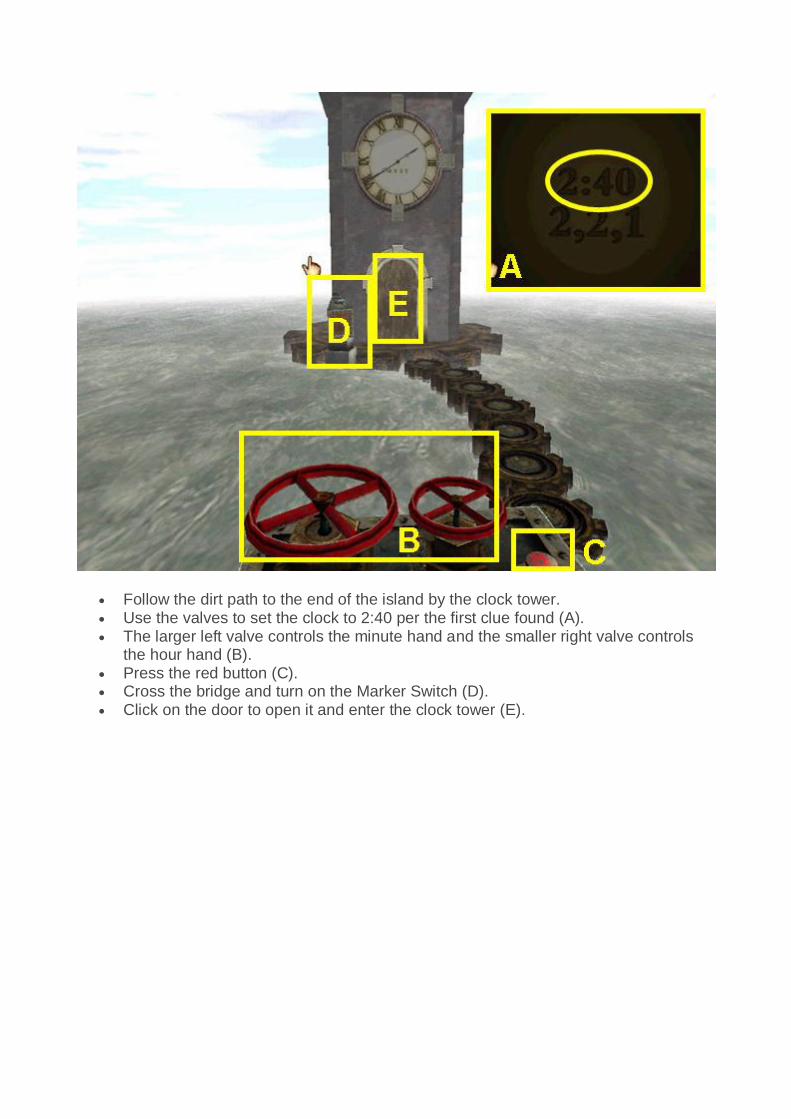
Follow the dirt path to the end of the island by the clock tower. Use the valves to set the clock to 2:40 per the first clue found (A). The larger left valve controls the minute hand and the smaller right valve controls
the hour hand (B). Press the red button (C). Cross the bridge and turn on the Marker Switch (D). Click on the door to open it and enter the clock tower (E).
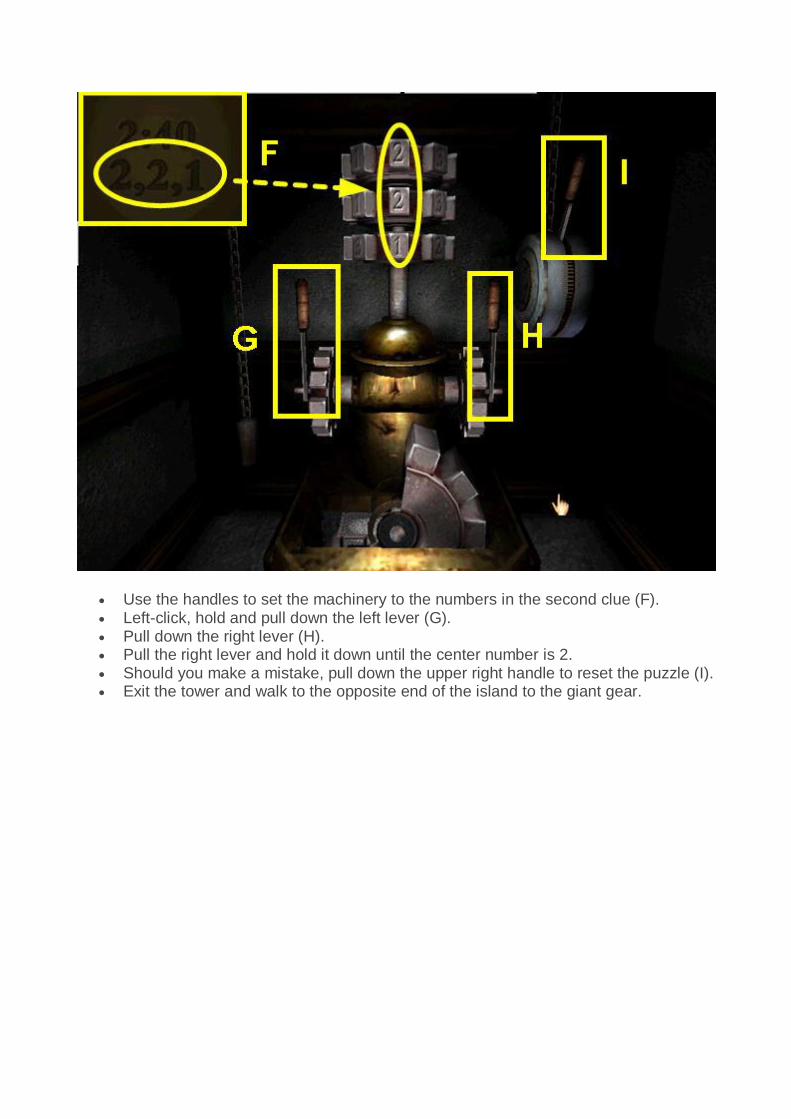
Use the handles to set the machinery to the numbers in the second clue (F). Left-click, hold and pull down the left lever (G). Pull down the right lever (H). Pull the right lever and hold it down until the center number is 2. Should you make a mistake, pull down the upper right handle to reset the puzzle (I). Exit the tower and walk to the opposite end of the island to the giant gear.
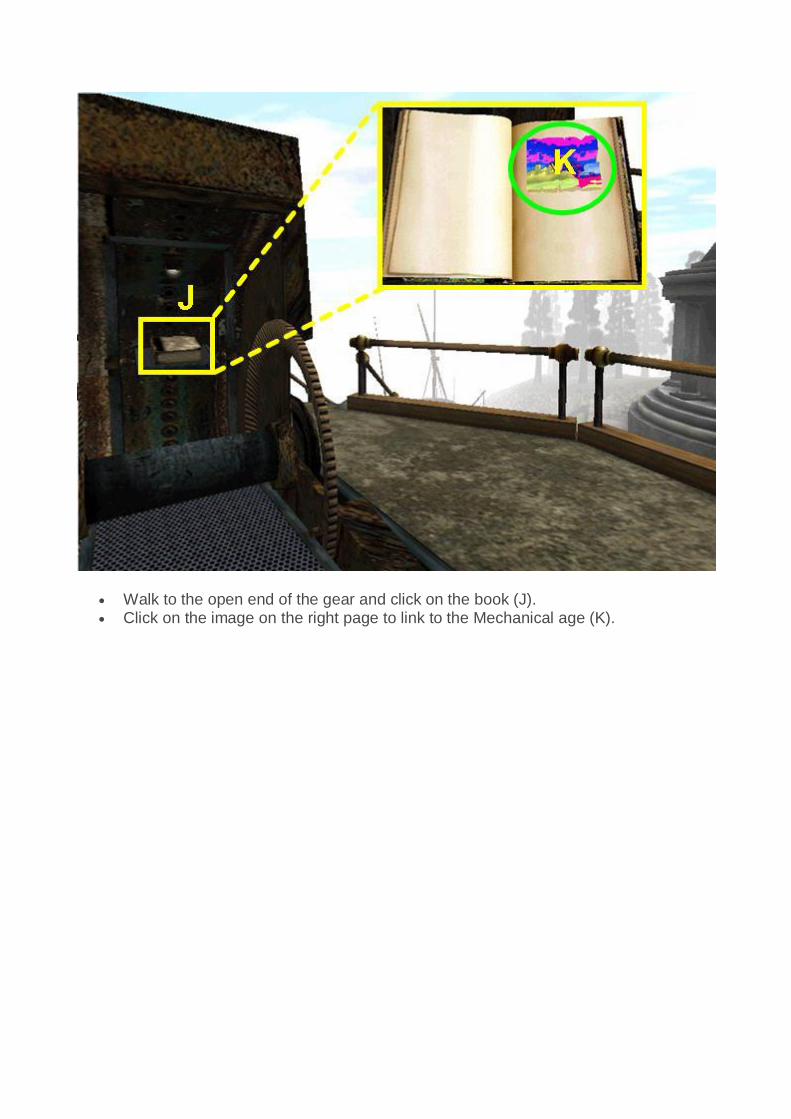
Walk to the open end of the gear and click on the book (J). Click on the image on the right page to link to the Mechanical age (K).
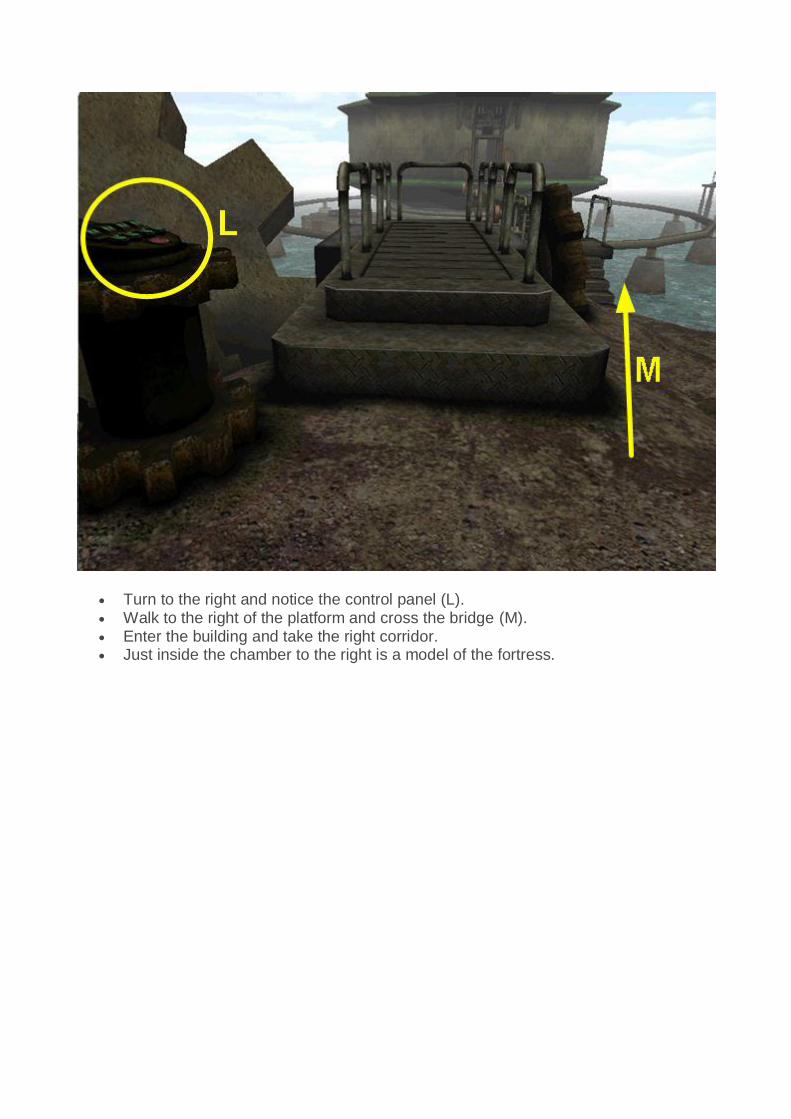
Turn to the right and notice the control panel (L). Walk to the right of the platform and cross the bridge (M). Enter the building and take the right corridor. Just inside the chamber to the right is a model of the fortress.
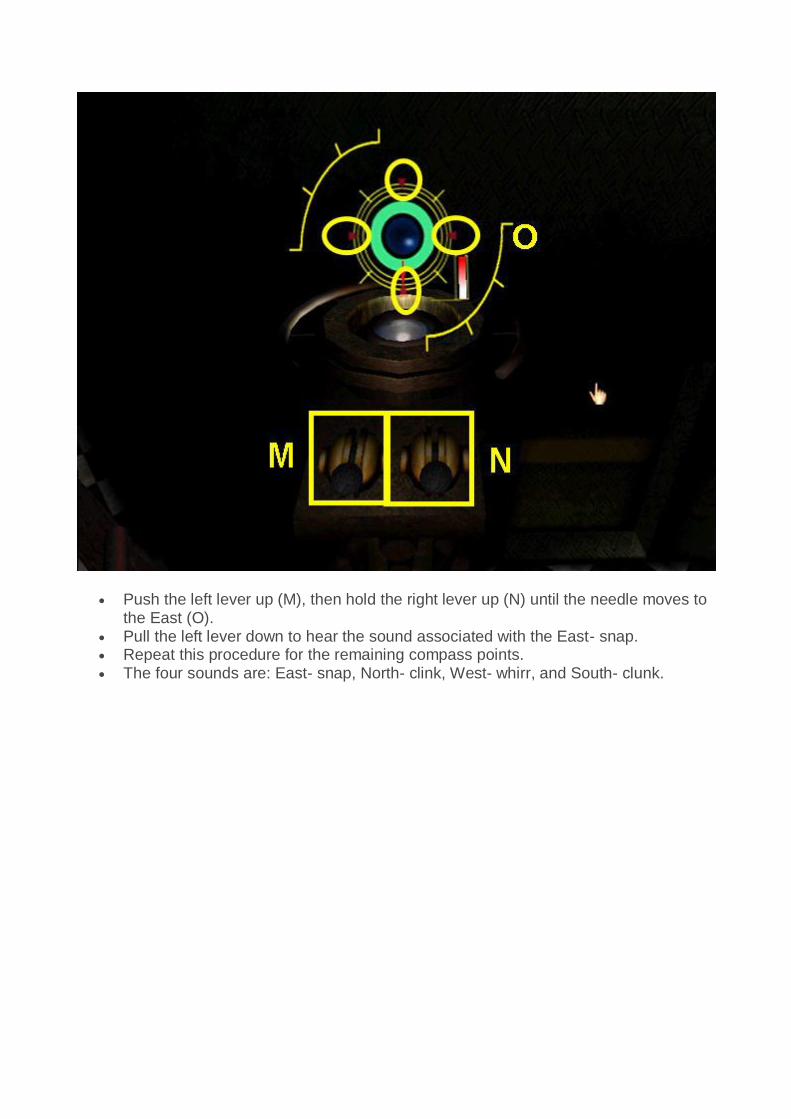
Push the left lever up (M), then hold the right lever up (N) until the needle moves to the East (O).
Pull the left lever down to hear the sound associated with the East- snap. Repeat this procedure for the remaining compass points. The four sounds are: East- snap, North- clink, West- whirr, and South- clunk.
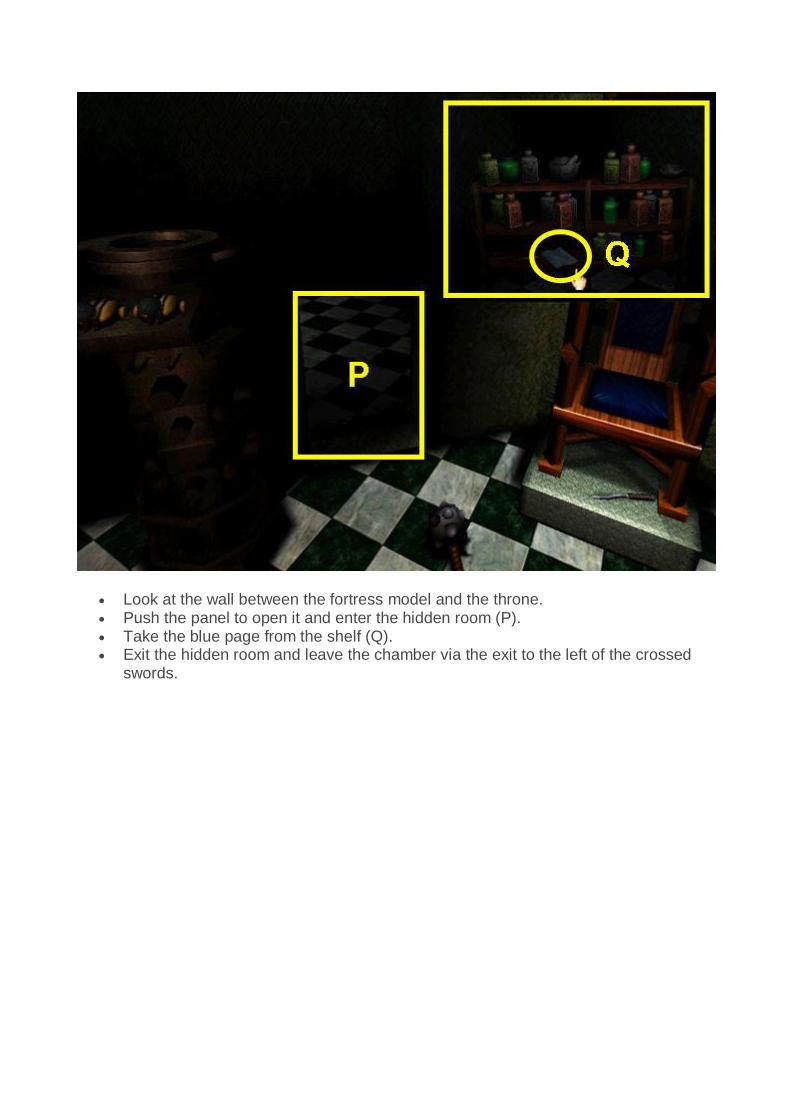
Look at the wall between the fortress model and the throne. Push the panel to open it and enter the hidden room (P). Take the blue page from the shelf (Q). Exit the hidden room and leave the chamber via the exit to the left of the crossed
swords.
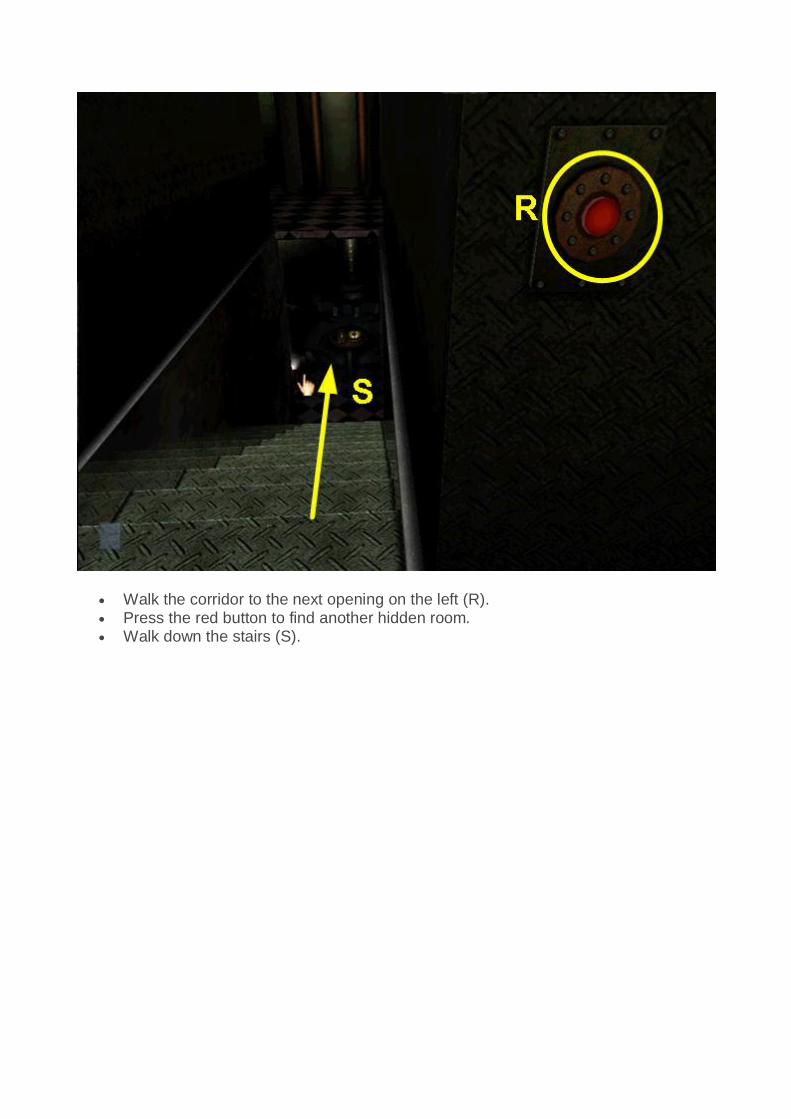
Walk the corridor to the next opening on the left (R). Press the red button to find another hidden room. Walk down the stairs (S).
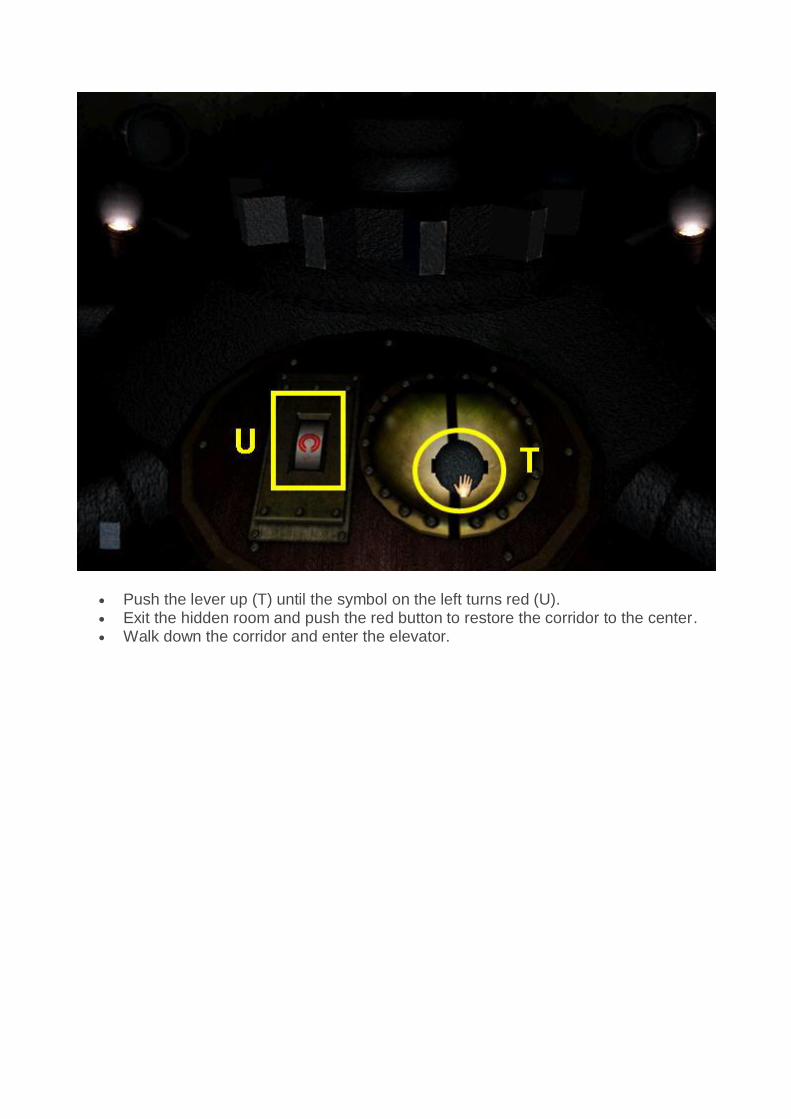
Push the lever up (T) until the symbol on the left turns red (U). Exit the hidden room and push the red button to restore the corridor to the center. Walk down the corridor and enter the elevator.
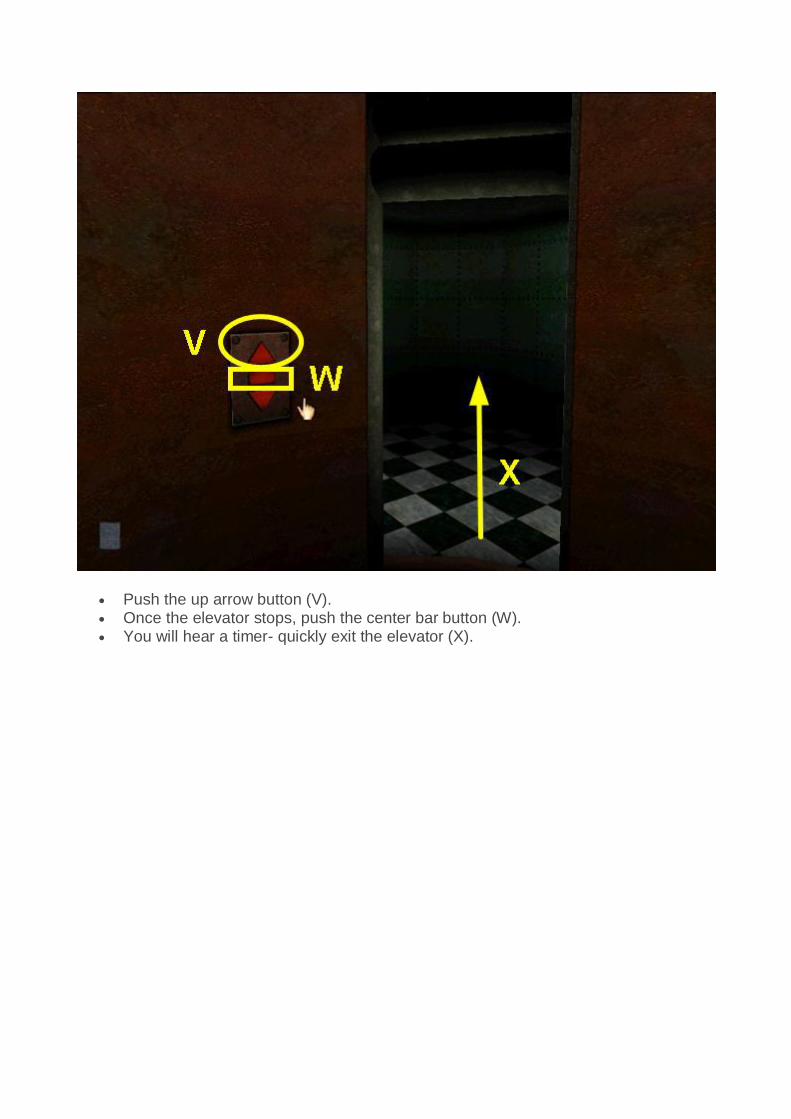
Push the up arrow button (V). Once the elevator stops, push the center bar button (W). You will hear a timer- quickly exit the elevator (X).
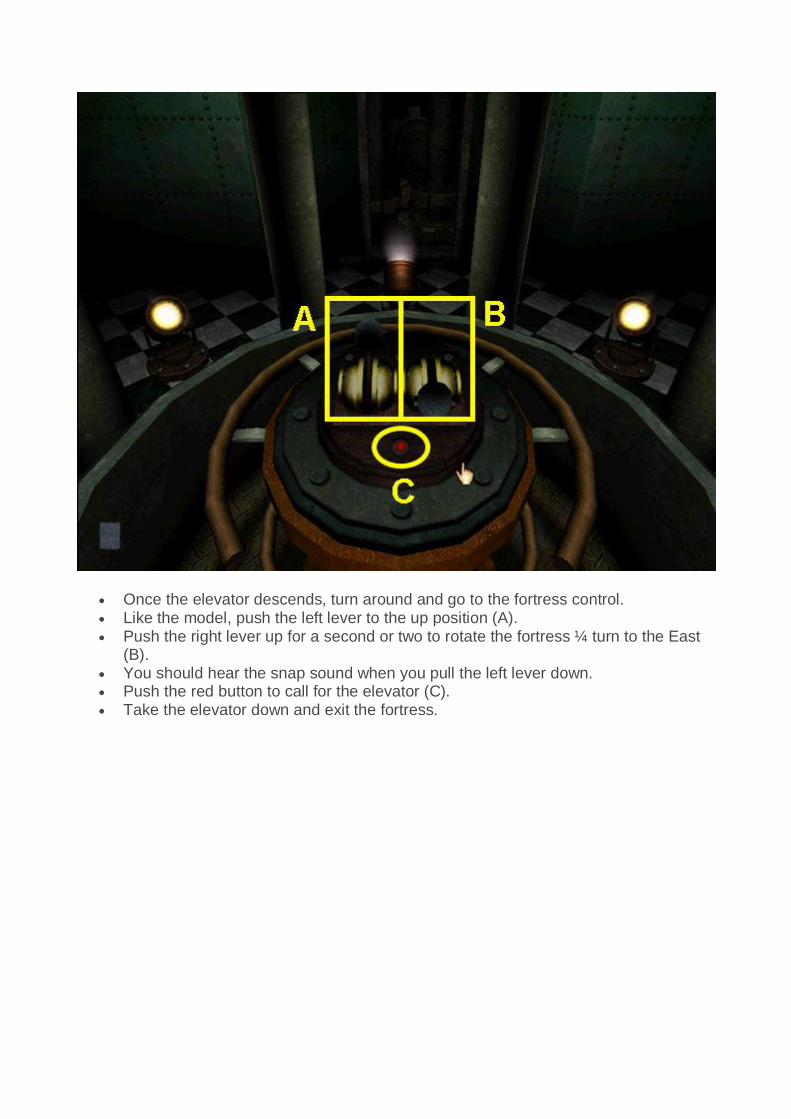
Once the elevator descends, turn around and go to the fortress control. Like the model, push the left lever to the up position (A). Push the right lever up for a second or two to rotate the fortress ¼ turn to the East
(B). You should hear the snap sound when you pull the left lever down. Push the red button to call for the elevator (C). Take the elevator down and exit the fortress.
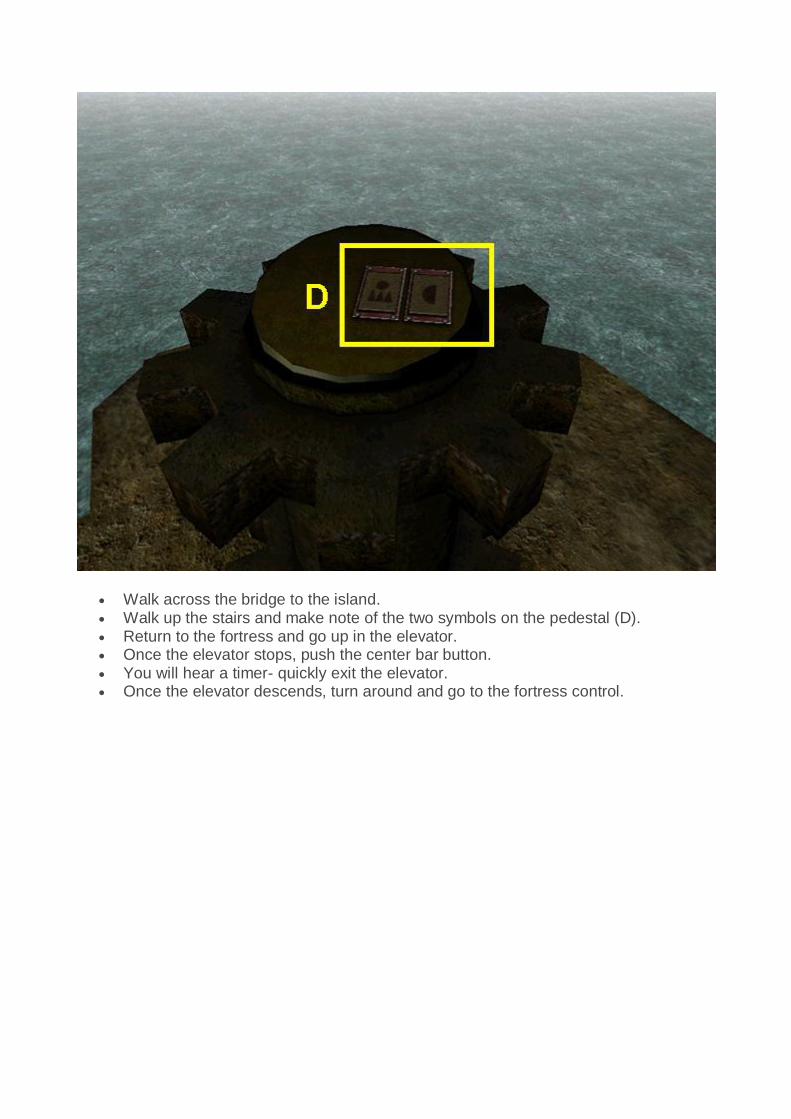
Walk across the bridge to the island. Walk up the stairs and make note of the two symbols on the pedestal (D). Return to the fortress and go up in the elevator. Once the elevator stops, push the center bar button. You will hear a timer- quickly exit the elevator. Once the elevator descends, turn around and go to the fortress control.

Push the left lever to the up position (E). Push the right lever up for a second or two to rotate the fortress ¼ turn to the North
(F). You should hear the clink sound when you pull the left lever down. Push the red button to call for the elevator (G). Take the elevator down and exit the fortress.
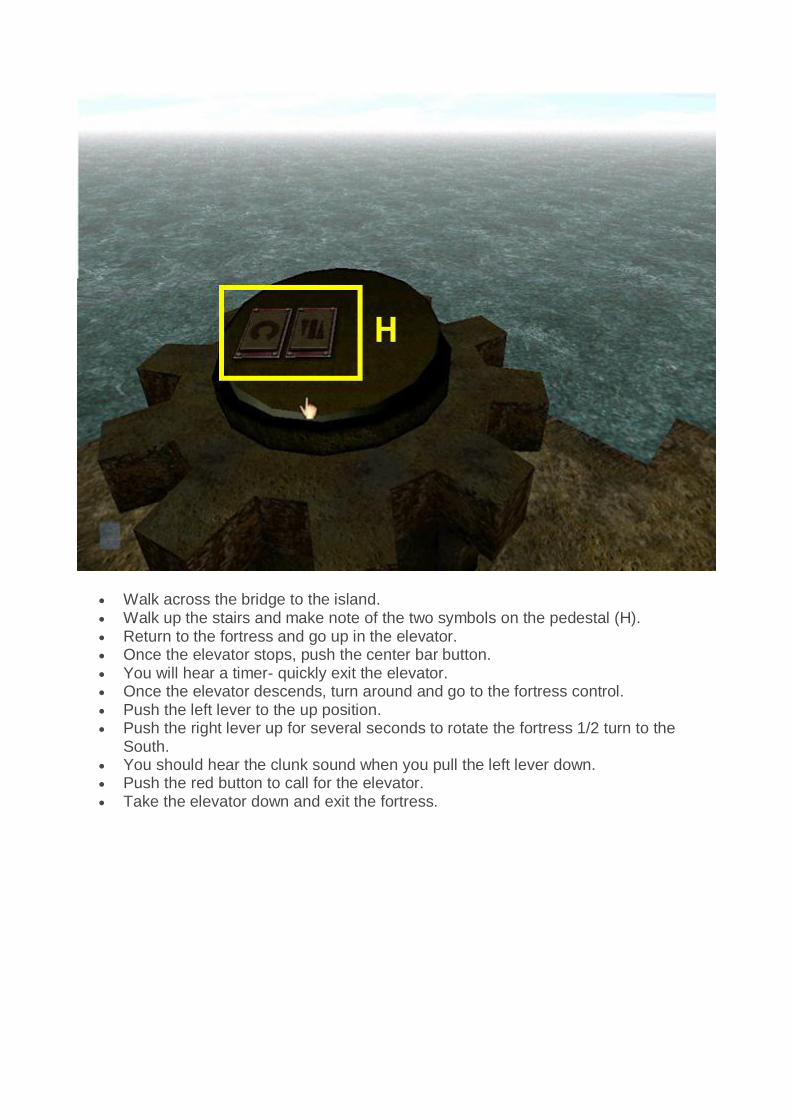
Walk across the bridge to the island. Walk up the stairs and make note of the two symbols on the pedestal (H). Return to the fortress and go up in the elevator. Once the elevator stops, push the center bar button. You will hear a timer- quickly exit the elevator. Once the elevator descends, turn around and go to the fortress control. Push the left lever to the up position. Push the right lever up for several seconds to rotate the fortress 1/2 turn to the
South. You should hear the clunk sound when you pull the left lever down. Push the red button to call for the elevator. Take the elevator down and exit the fortress.

Walk across the bridge to the island. Look at the control panel and enter the symbols (I) from the two islands using the
green buttons (J). Press the red button (K). Walk down the hidden staircase that appears to the right (L).

Click on the Myst book (M). Open the book and click on the image on the right page to link back to Myst Island
(N). Back in the library, click on the blue book to return the page. Open the book and listen to Achenar. Exit the library, walk to the giant gear and use the book to link back to the
Mechanical Age. Cross the bridge to the fortress and take the left corridor.
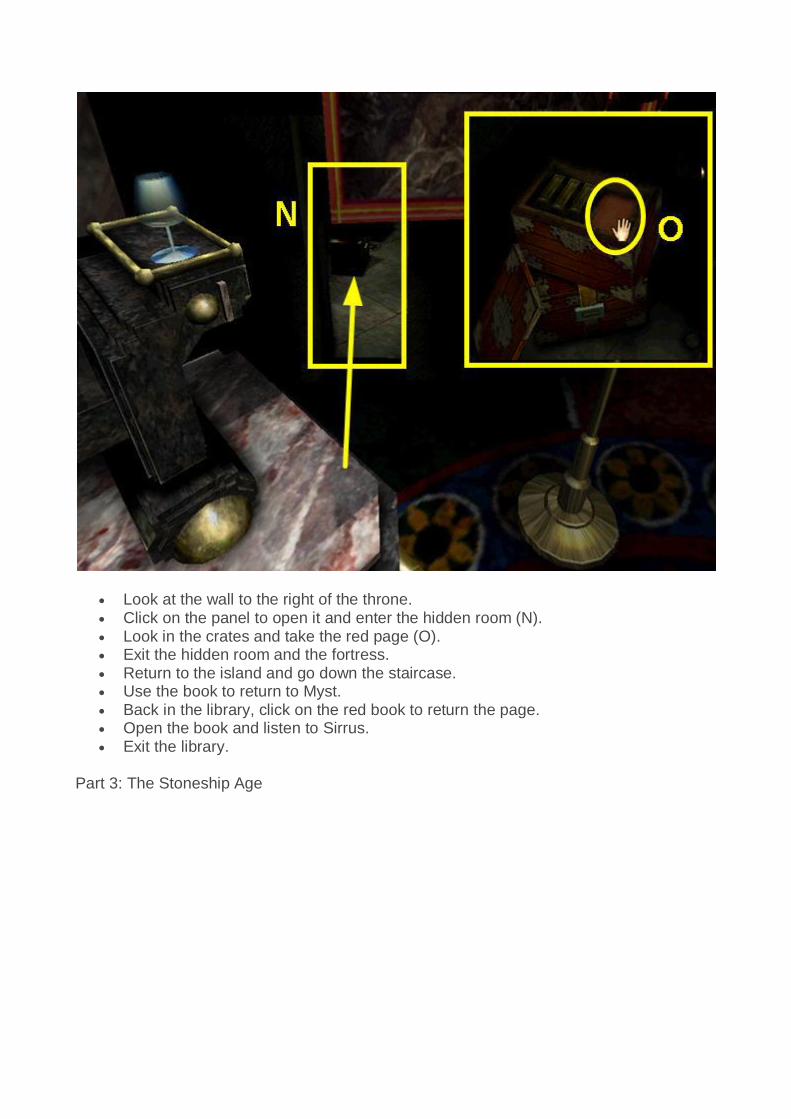
Look at the wall to the right of the throne. Click on the panel to open it and enter the hidden room (N). Look in the crates and take the red page (O). Exit the hidden room and the fortress. Return to the island and go down the staircase. Use the book to return to Myst. Back in the library, click on the red book to return the page. Open the book and listen to Sirrus. Exit the library.
Part 3: The Stoneship Age

Enter the observatory (A). Turn around and turn off the lights (B). Turn around again and click on the chair to sit. Click on the console to lower it.
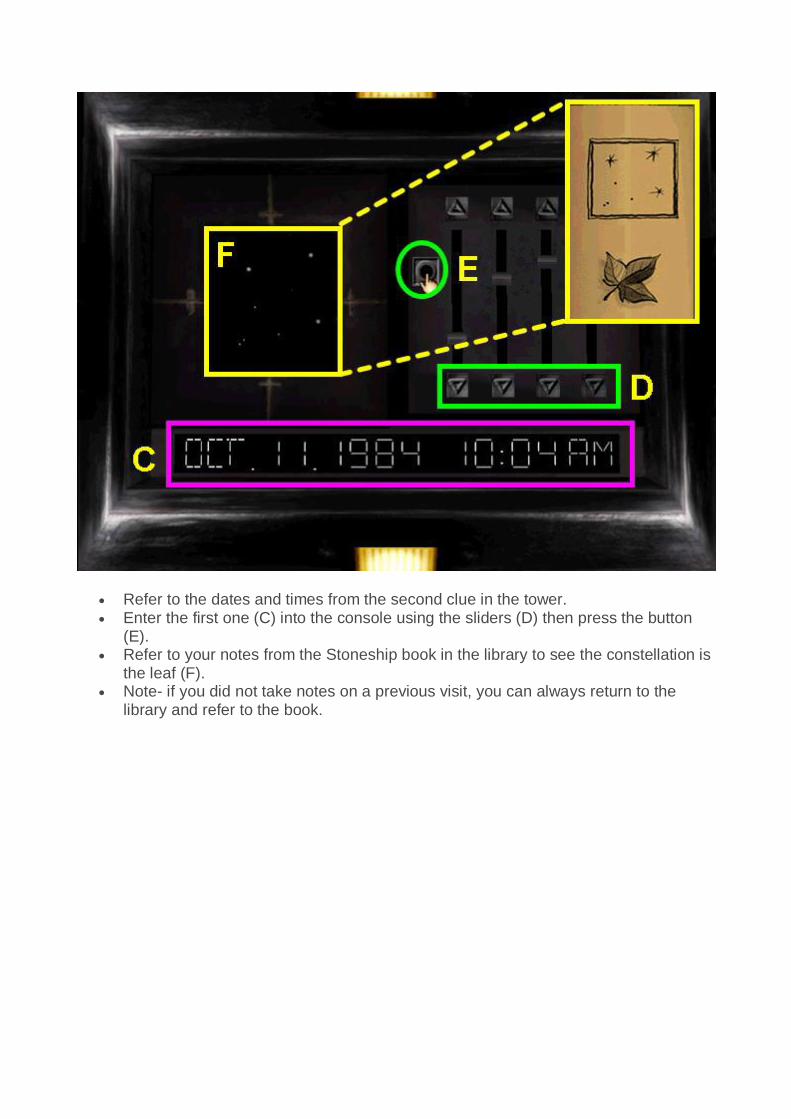
Refer to the dates and times from the second clue in the tower. Enter the first one (C) into the console using the sliders (D) then press the button
(E). Refer to your notes from the Stoneship book in the library to see the constellation is
the leaf (F). Note- if you did not take notes on a previous visit, you can always return to the
library and refer to the book.
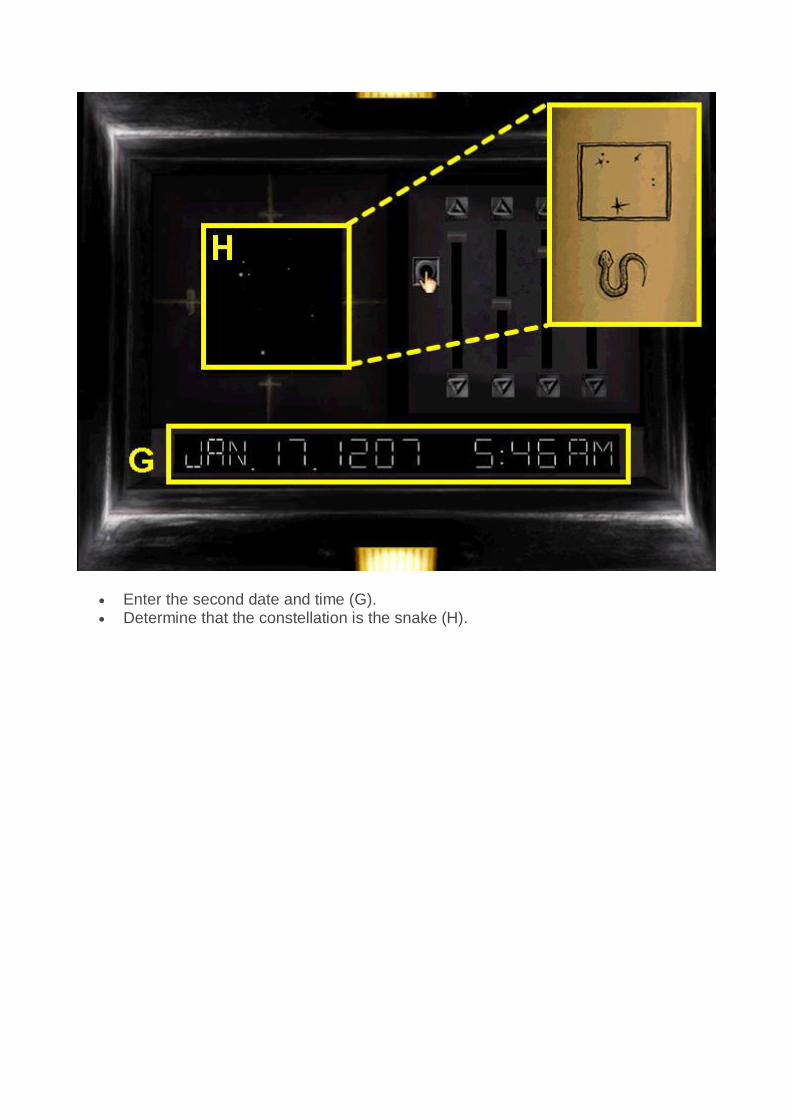
Enter the second date and time (G). Determine that the constellation is the snake (H).

Enter the third date and time (I). Determine that the constellation is the beetle (J). Click on the edge of the console to exit the chair. Exit the observatory and walk to the dirt path in front of the library.
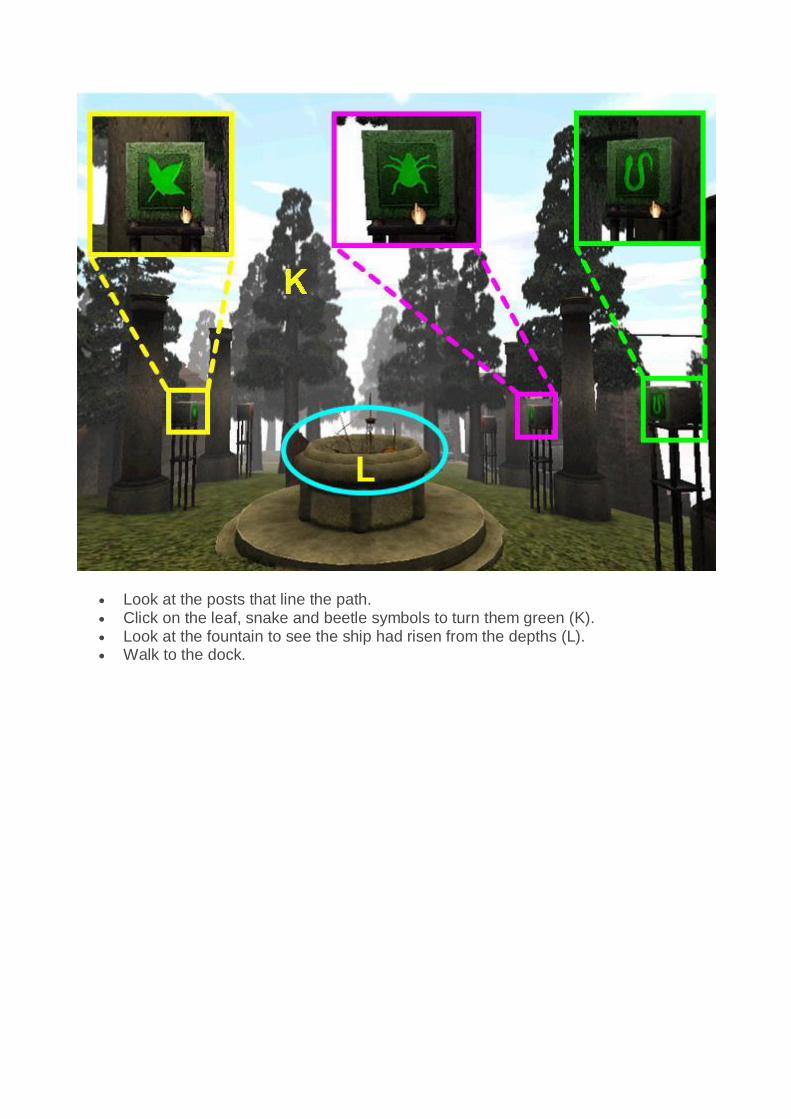
Look at the posts that line the path. Click on the leaf, snake and beetle symbols to turn them green (K). Look at the fountain to see the ship had risen from the depths (L). Walk to the dock.
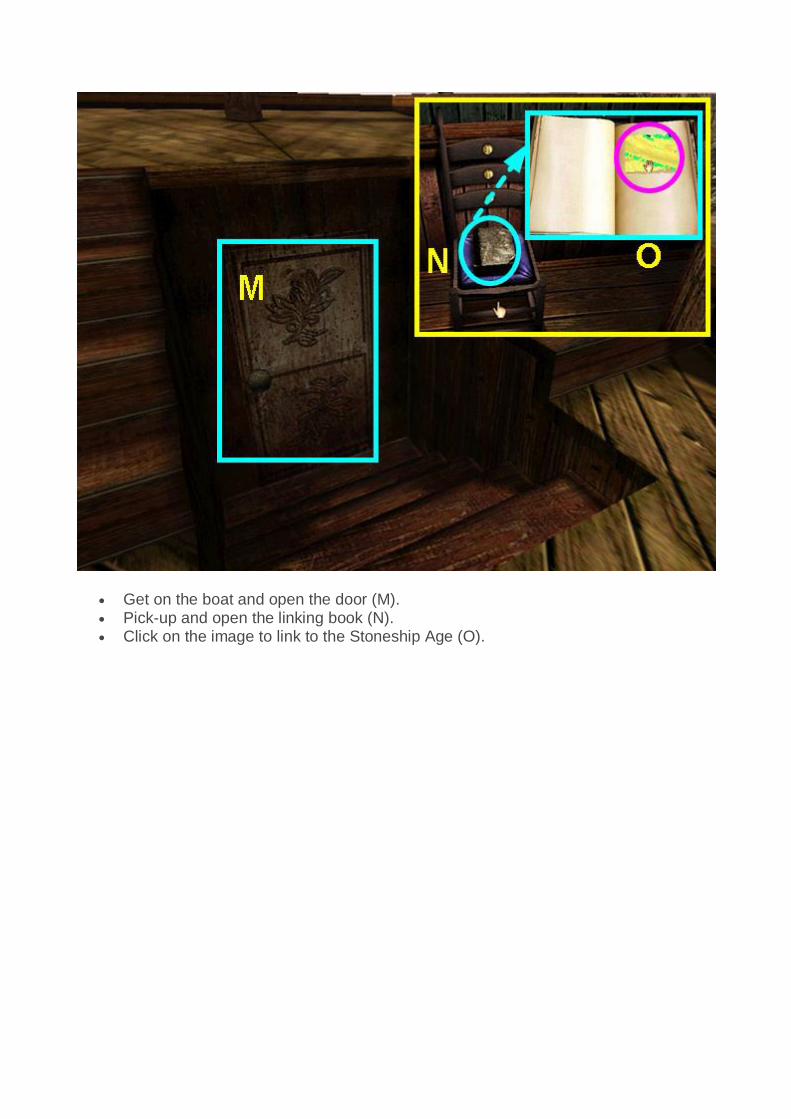
Get on the boat and open the door (M). Pick-up and open the linking book (N). Click on the image to link to the Stoneship Age (O).

Turn right and walk the planks to the pump station which is an island with an umbrella (P).
Press the right button and return to the ship (Q).

Continue across the boat and walk the planks to the lighthouse. Enter the lighthouse and walk down the circular staircase. Look at the left end of the chest. Open the valve to drain water from the chest (R). Once the water is drained, close the valve. Exit the lighthouse and return to the pump station. Press the middle button and return to the lighthouse.
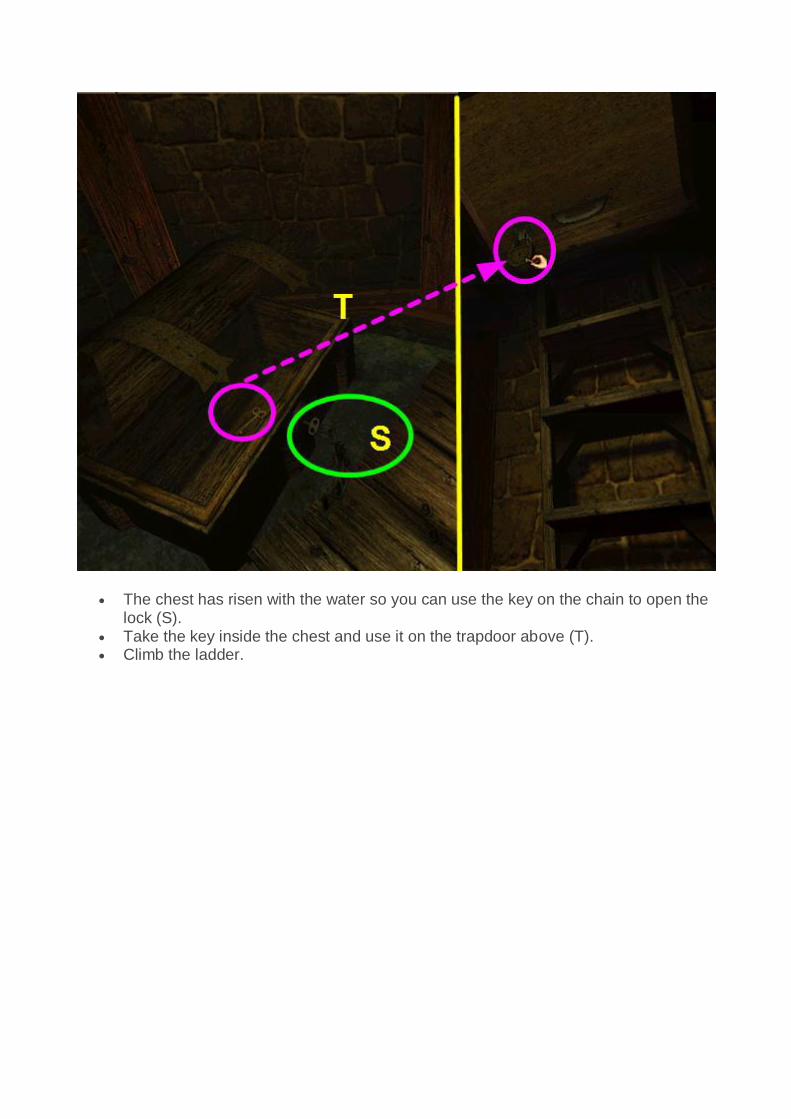
The chest has risen with the water so you can use the key on the chain to open the lock (S).
Take the key inside the chest and use it on the trapdoor above (T). Climb the ladder.
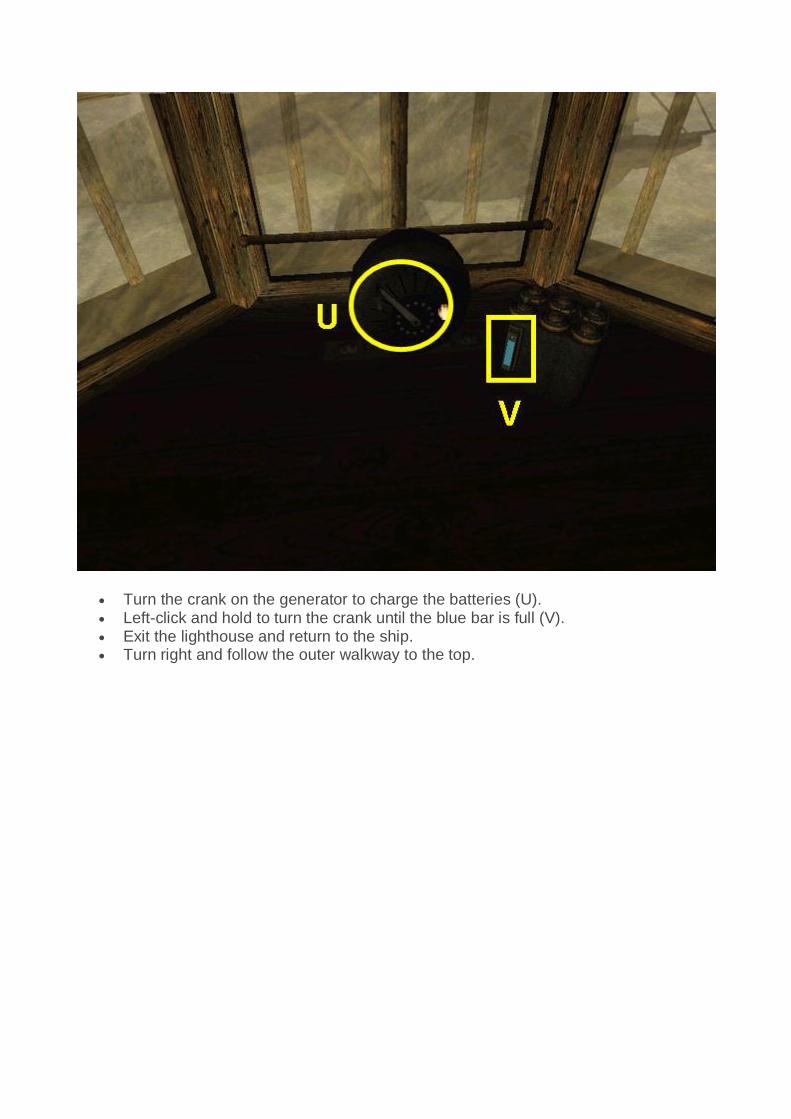
Turn the crank on the generator to charge the batteries (U). Left-click and hold to turn the crank until the blue bar is full (V). Exit the lighthouse and return to the ship. Turn right and follow the outer walkway to the top.

Look in the telescope. Left-click and hold to turn the telescope. Find the blinking light on top of the lighthouse and note the coordinates- 135 (W). Follow the walkway down to the first corridor on the right. This is on the bow section of the ship. Follow the corridor all the way to the end.
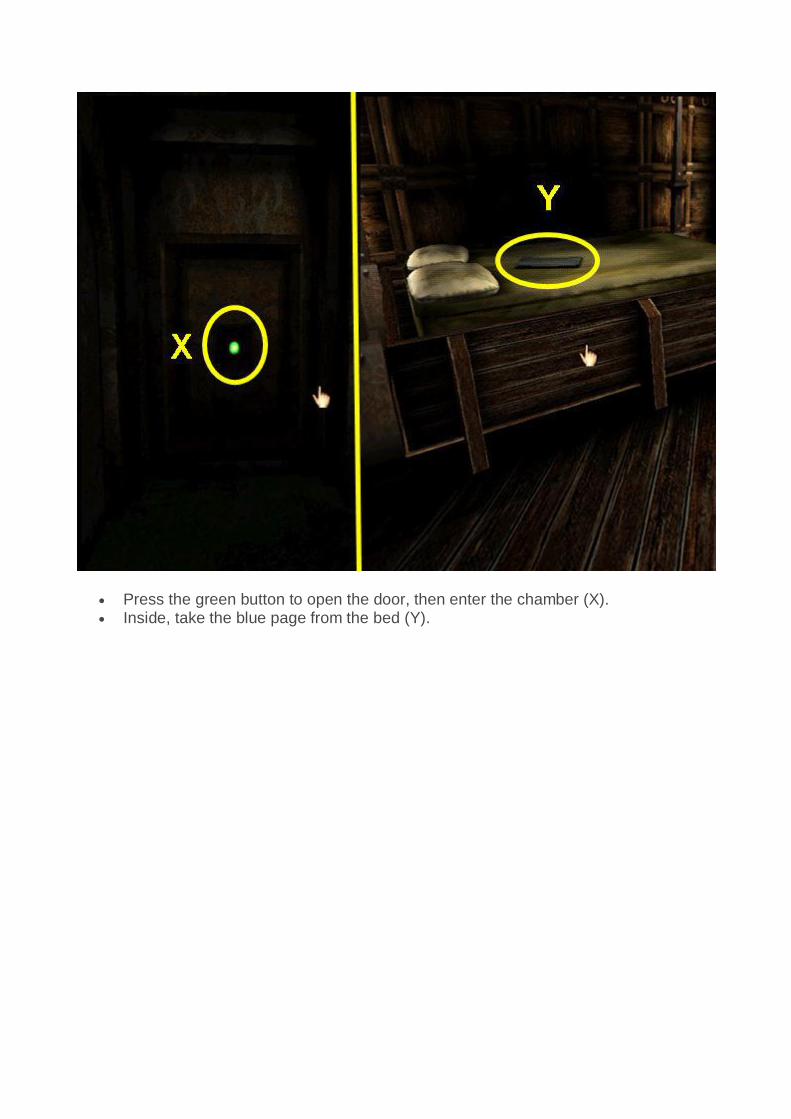
Press the green button to open the door, then enter the chamber (X). Inside, take the blue page from the bed (Y).
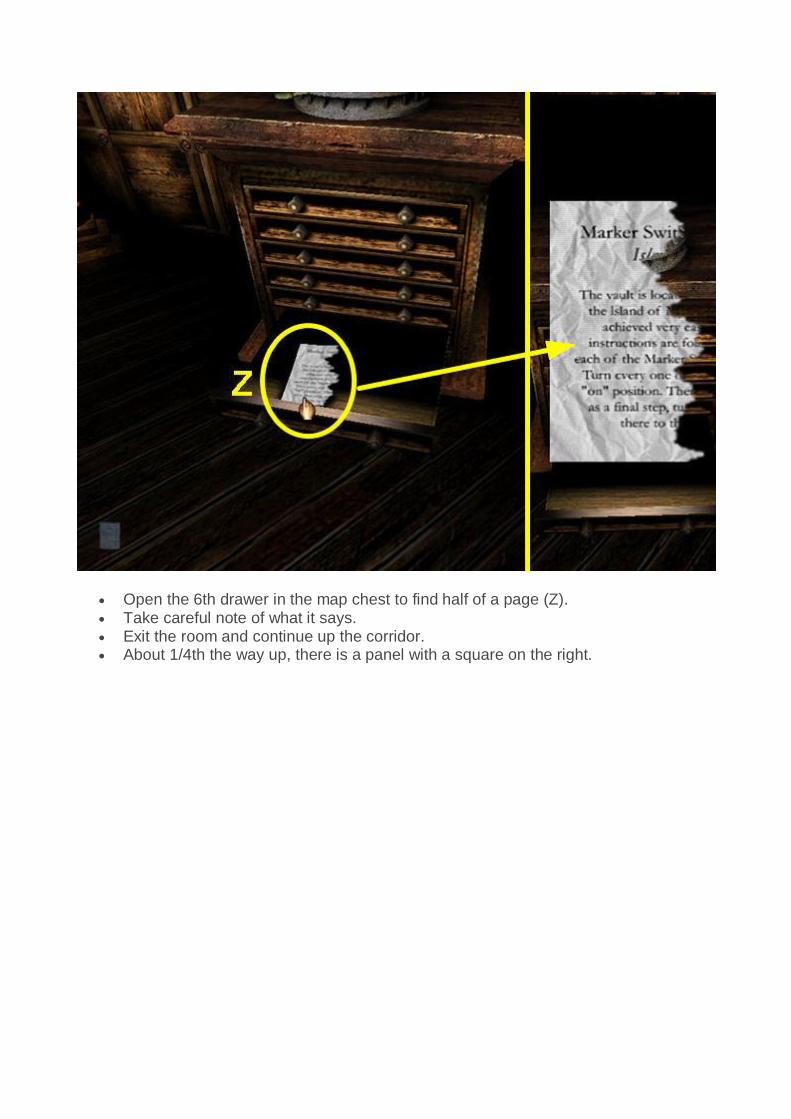
Open the 6th drawer in the map chest to find half of a page (Z). Take careful note of what it says. Exit the room and continue up the corridor. About 1/4th the way up, there is a panel with a square on the right.

Click on the panel to reveal a hidden walkway (A). Enter the walkway and continue to the next room.
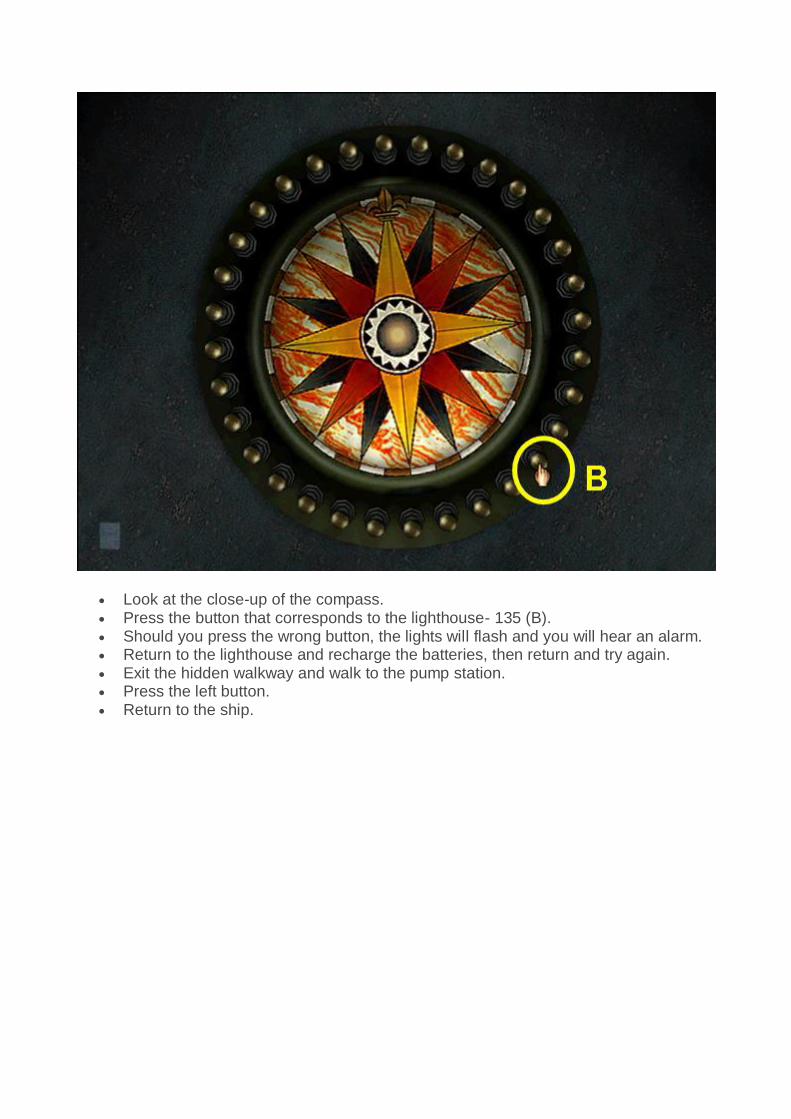
Look at the close-up of the compass. Press the button that corresponds to the lighthouse- 135 (B). Should you press the wrong button, the lights will flash and you will hear an alarm. Return to the lighthouse and recharge the batteries, then return and try again. Exit the hidden walkway and walk to the pump station. Press the left button. Return to the ship.
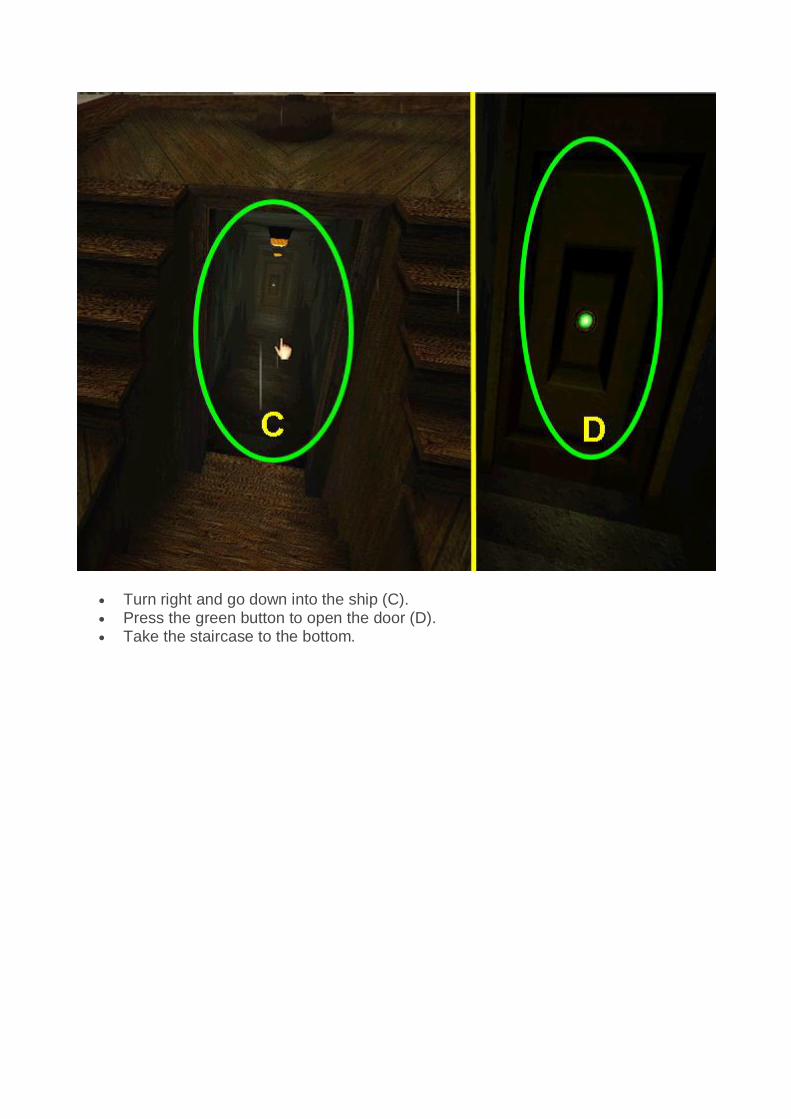
Turn right and go down into the ship (C). Press the green button to open the door (D). Take the staircase to the bottom.
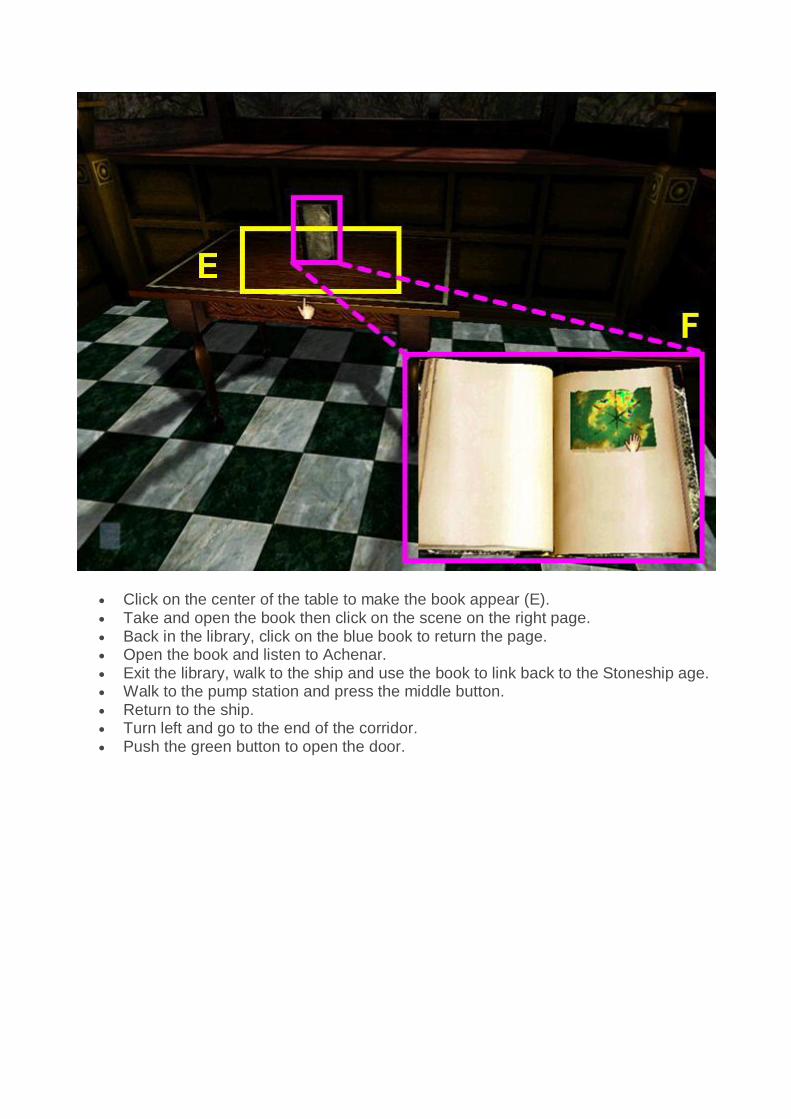
Click on the center of the table to make the book appear (E). Take and open the book then click on the scene on the right page. Back in the library, click on the blue book to return the page. Open the book and listen to Achenar. Exit the library, walk to the ship and use the book to link back to the Stoneship age. Walk to the pump station and press the middle button. Return to the ship. Turn left and go to the end of the corridor. Push the green button to open the door.
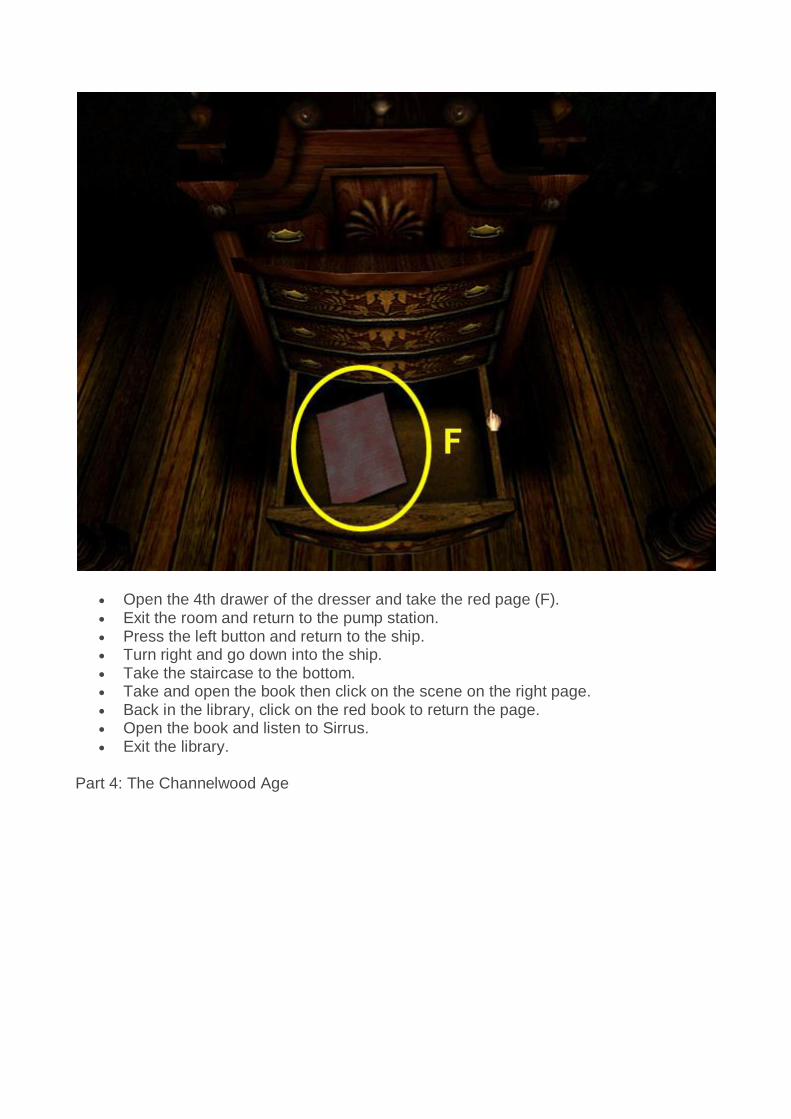
Open the 4th drawer of the dresser and take the red page (F). Exit the room and return to the pump station. Press the left button and return to the ship. Turn right and go down into the ship. Take the staircase to the bottom. Take and open the book then click on the scene on the right page. Back in the library, click on the red book to return the page. Open the book and listen to Sirrus. Exit the library.
Part 4: The Channelwood Age
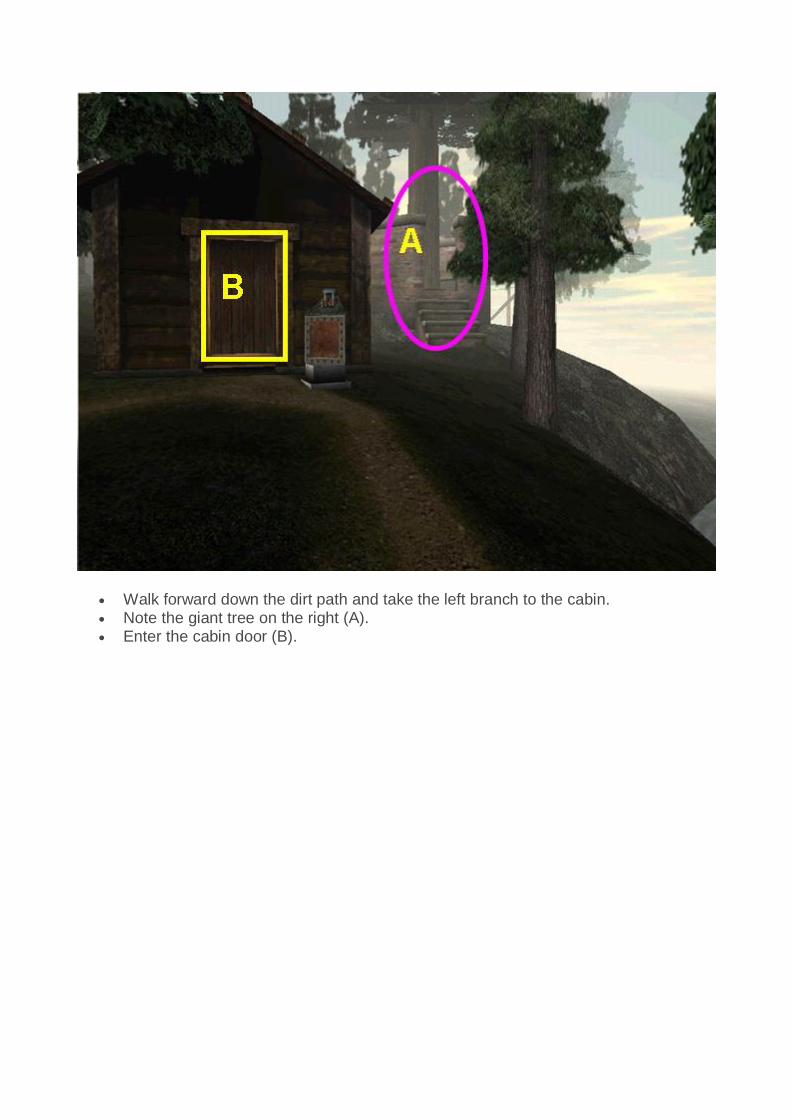
Walk forward down the dirt path and take the left branch to the cabin. Note the giant tree on the right (A). Enter the cabin door (B).

Turn around and look at the safe. Use the numbers from the third clue as the combination (C). Drag the handle down to open the safe (D). Click on the matchbox to open it (E). Click a second time to take a match. Click once again to light the match.
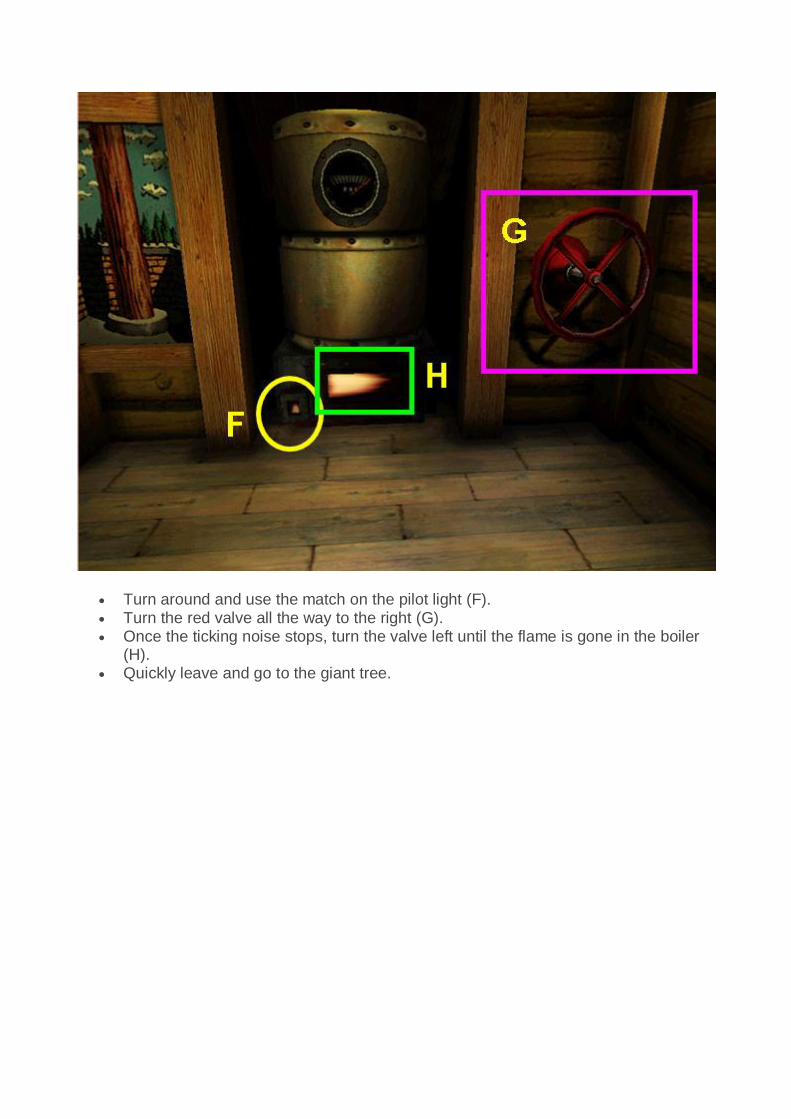
Turn around and use the match on the pilot light (F). Turn the red valve all the way to the right (G). Once the ticking noise stops, turn the valve left until the flame is gone in the boiler
(H). Quickly leave and go to the giant tree.
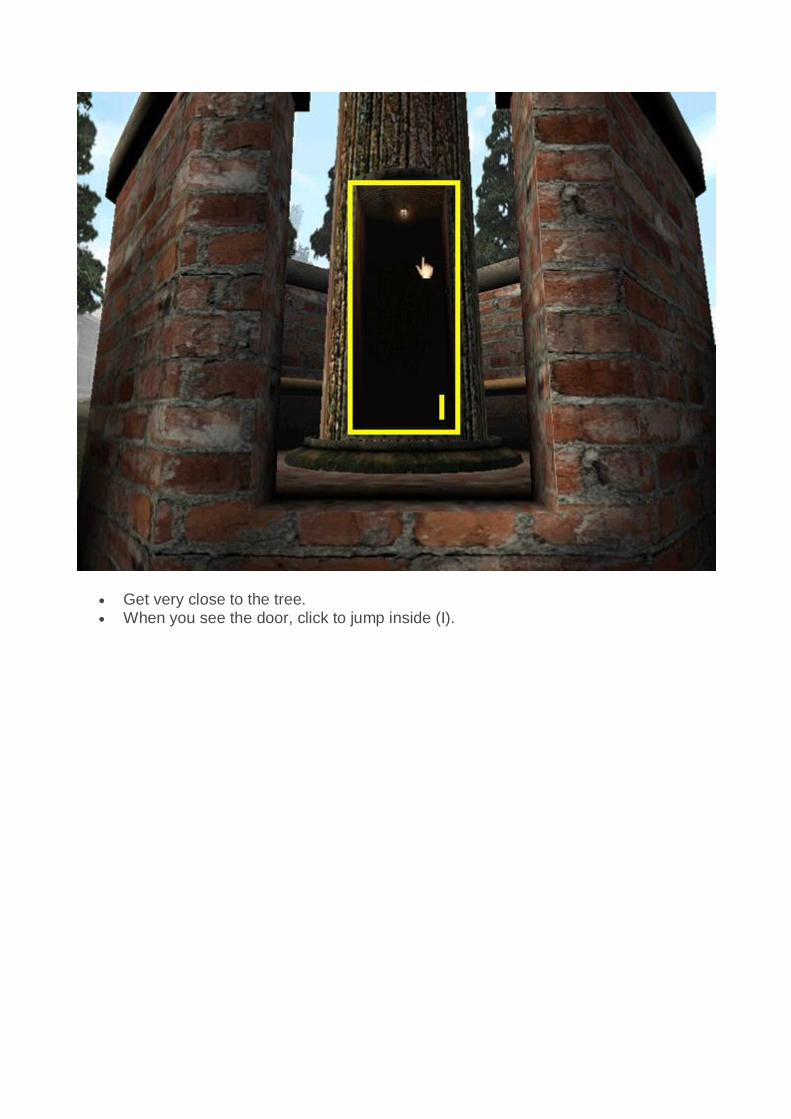
Get very close to the tree. When you see the door, click to jump inside (I).
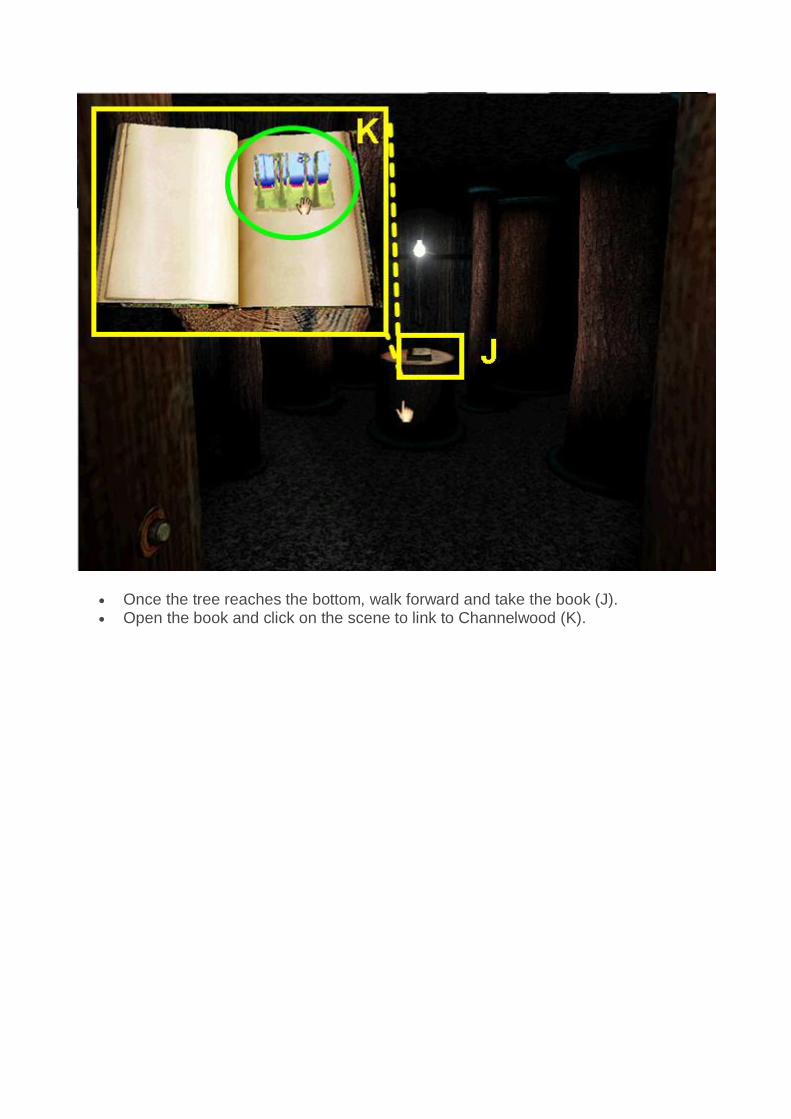
Once the tree reaches the bottom, walk forward and take the book (J). Open the book and click on the scene to link to Channelwood (K).
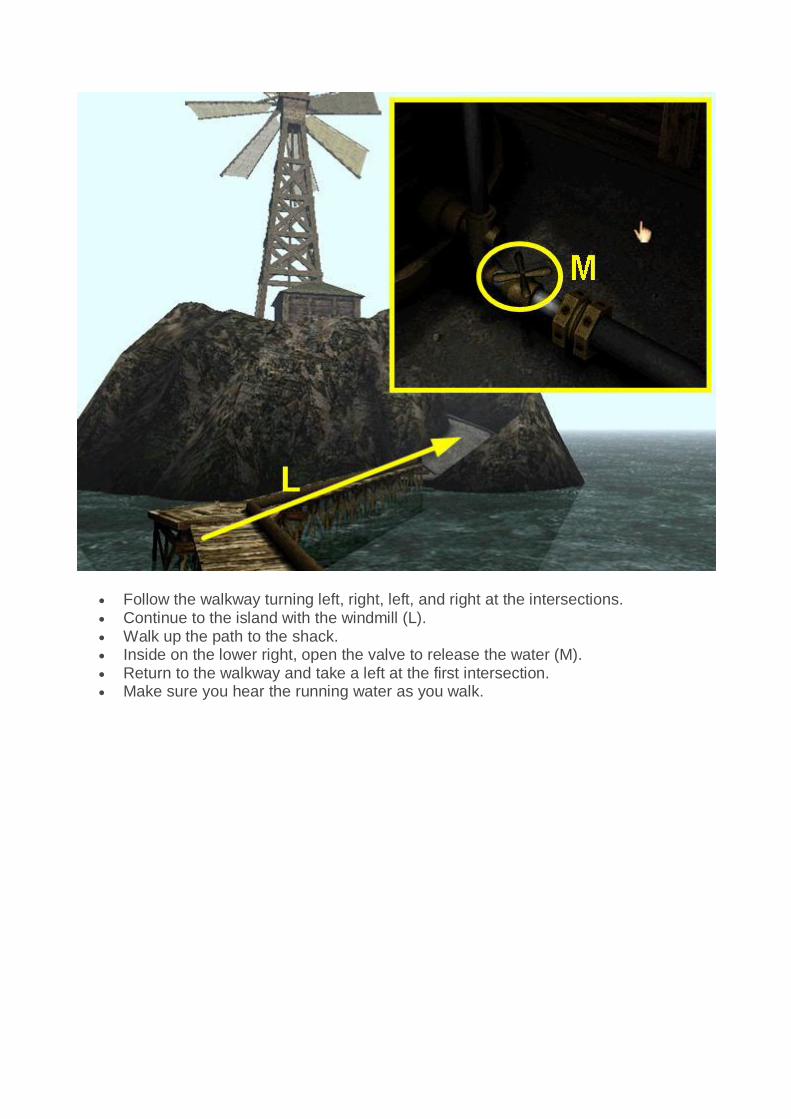
Follow the walkway turning left, right, left, and right at the intersections. Continue to the island with the windmill (L). Walk up the path to the shack. Inside on the lower right, open the valve to release the water (M). Return to the walkway and take a left at the first intersection. Make sure you hear the running water as you walk.
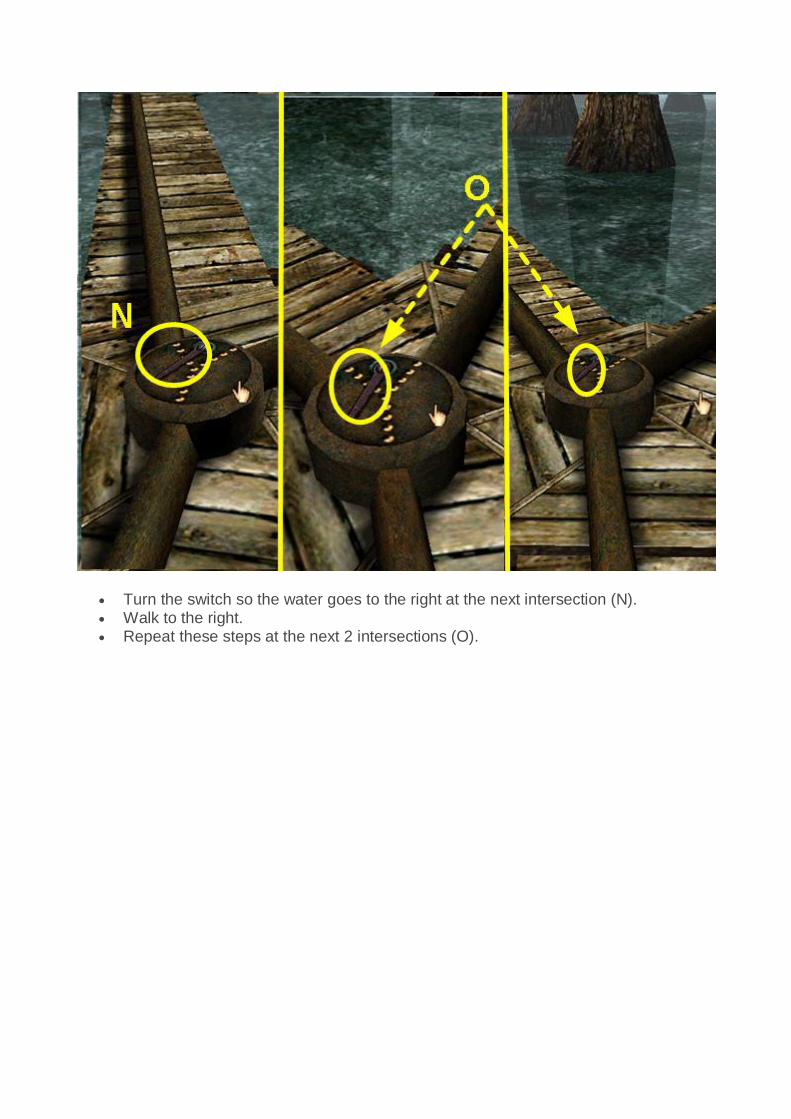
Turn the switch so the water goes to the right at the next intersection (N). Walk to the right. Repeat these steps at the next 2 intersections (O).
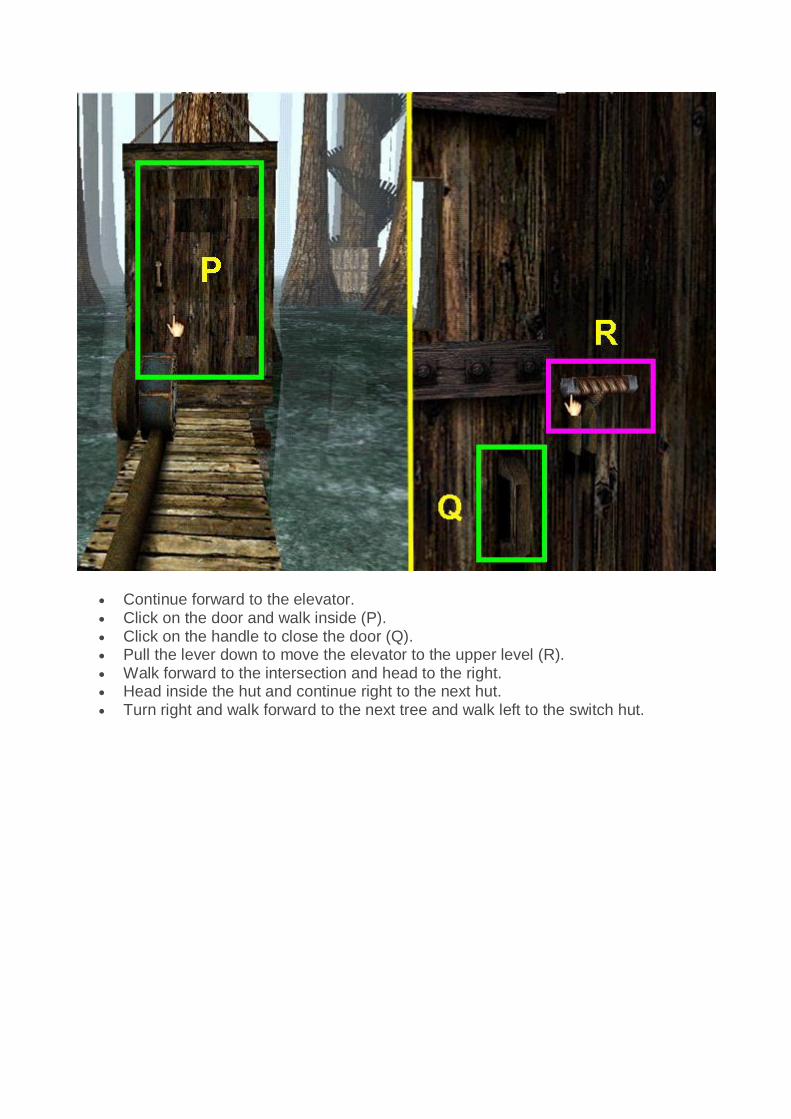
Continue forward to the elevator. Click on the door and walk inside (P). Click on the handle to close the door (Q). Pull the lever down to move the elevator to the upper level (R). Walk forward to the intersection and head to the right. Head inside the hut and continue right to the next hut. Turn right and walk forward to the next tree and walk left to the switch hut.
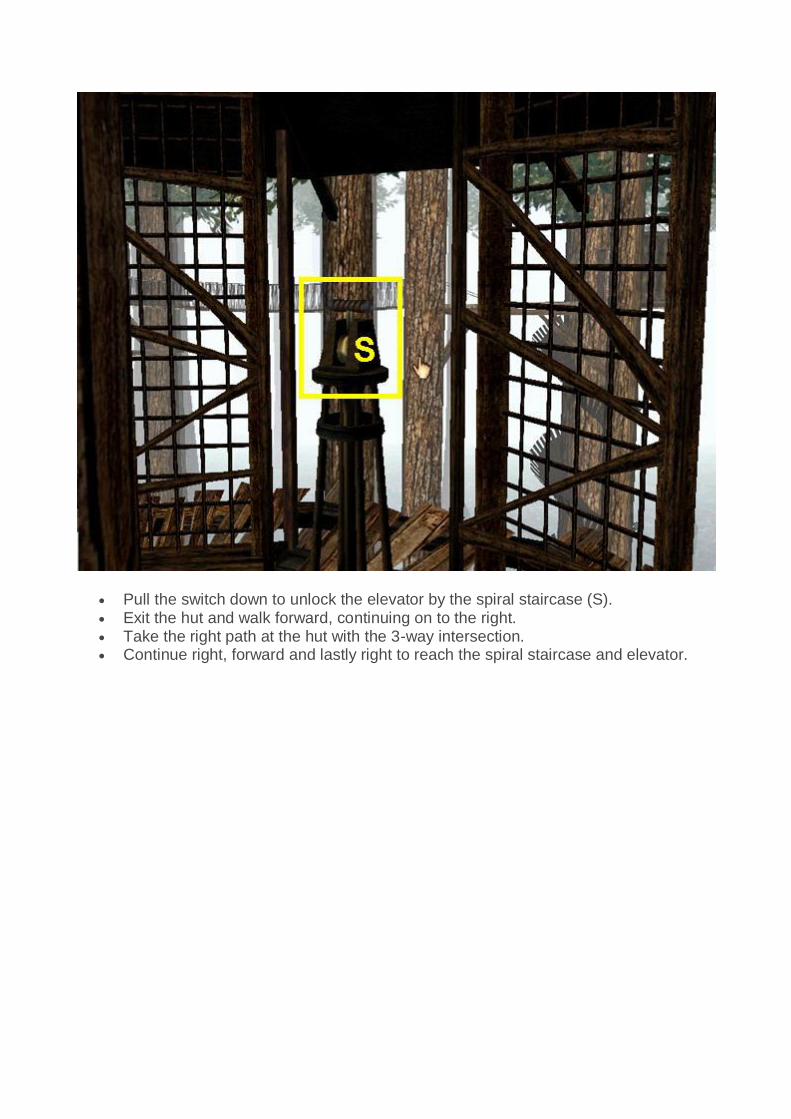
Pull the switch down to unlock the elevator by the spiral staircase (S). Exit the hut and walk forward, continuing on to the right. Take the right path at the hut with the 3-way intersection. Continue right, forward and lastly right to reach the spiral staircase and elevator.
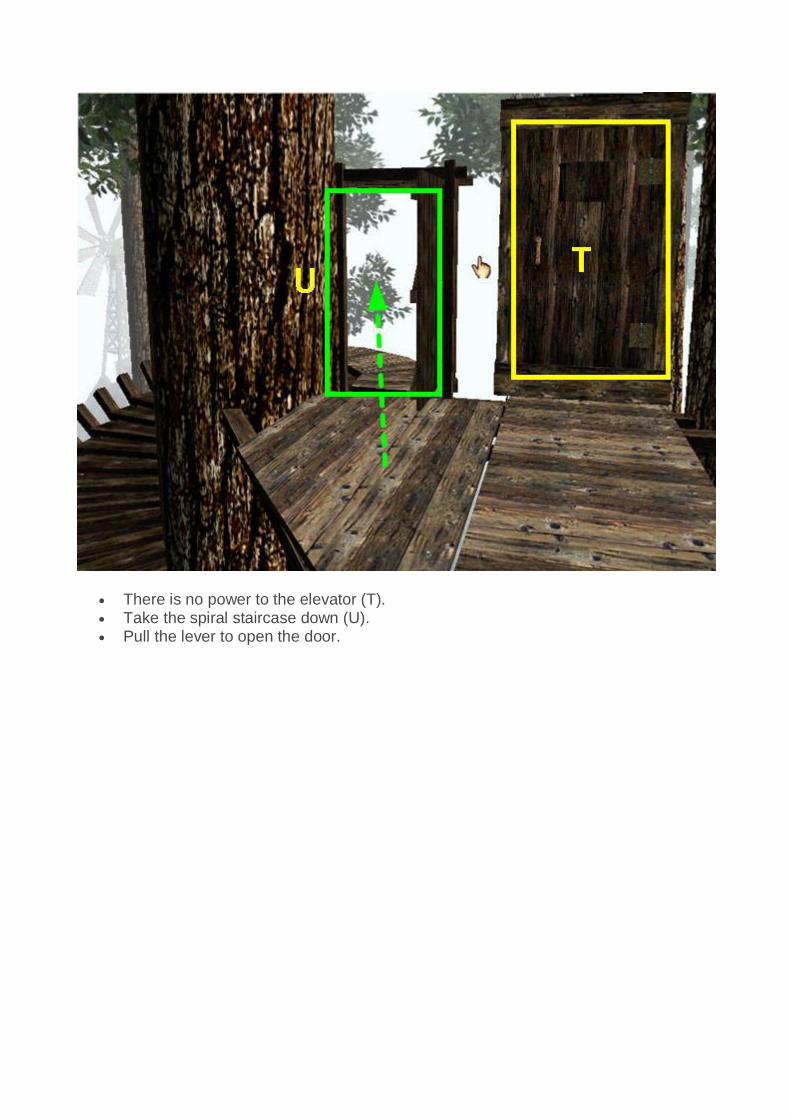
There is no power to the elevator (T). Take the spiral staircase down (U). Pull the lever to open the door.
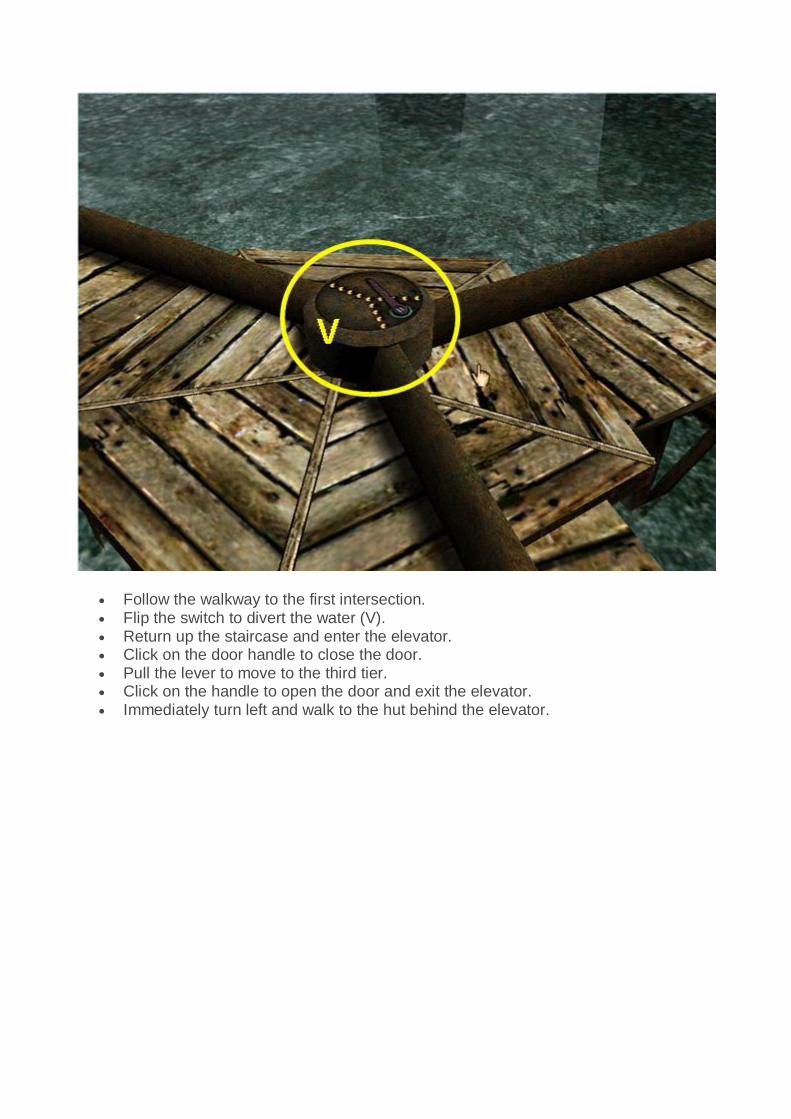
Follow the walkway to the first intersection. Flip the switch to divert the water (V). Return up the staircase and enter the elevator. Click on the door handle to close the door. Pull the lever to move to the third tier. Click on the handle to open the door and exit the elevator. Immediately turn left and walk to the hut behind the elevator.
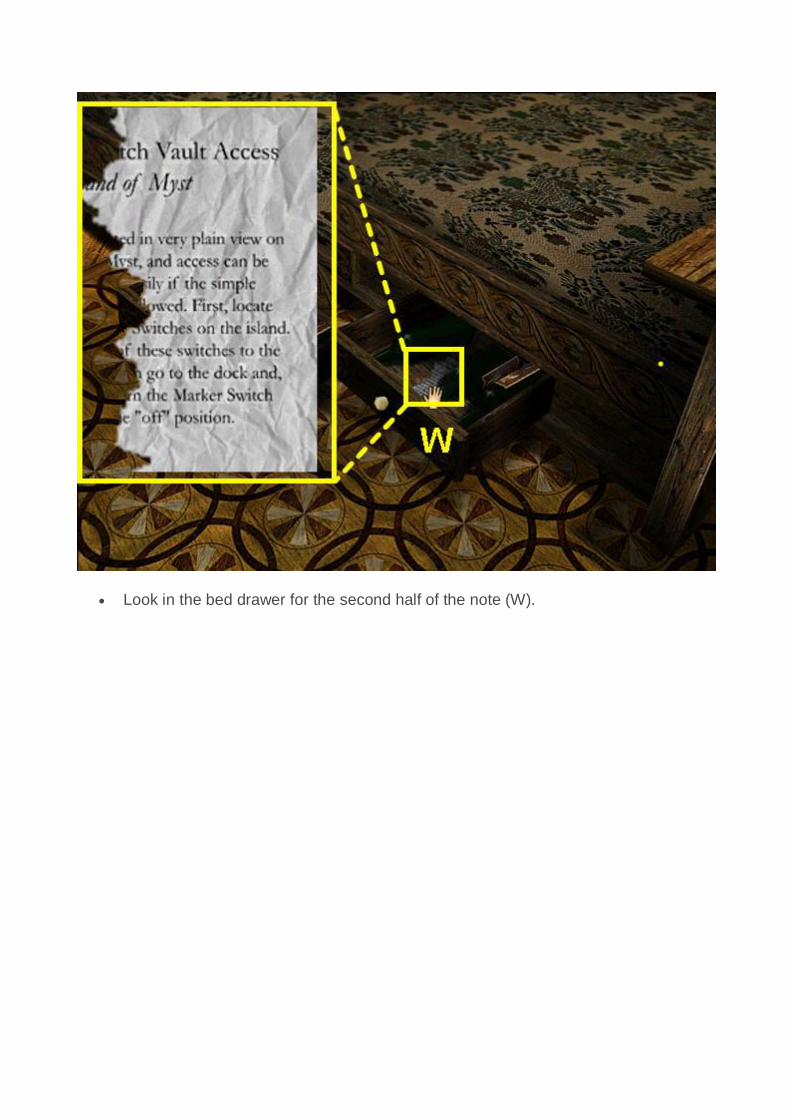
Look in the bed drawer for the second half of the note (W).
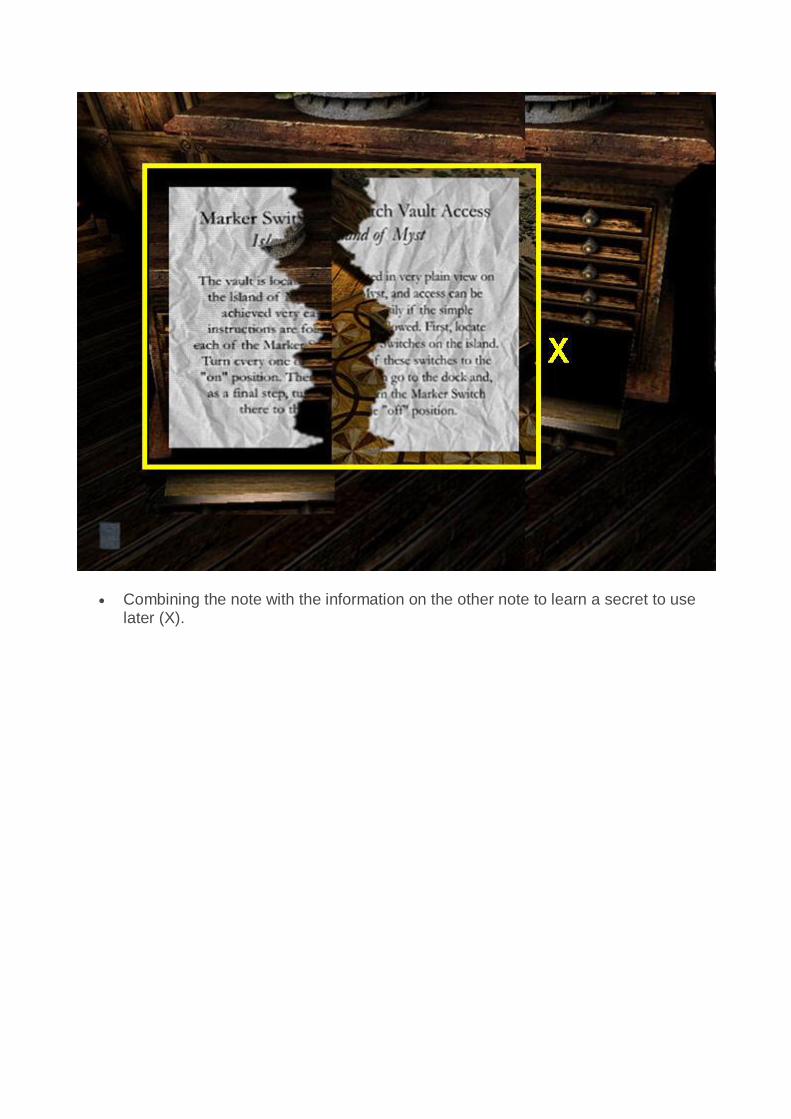
Combining the note with the information on the other note to learn a secret to use later (X).
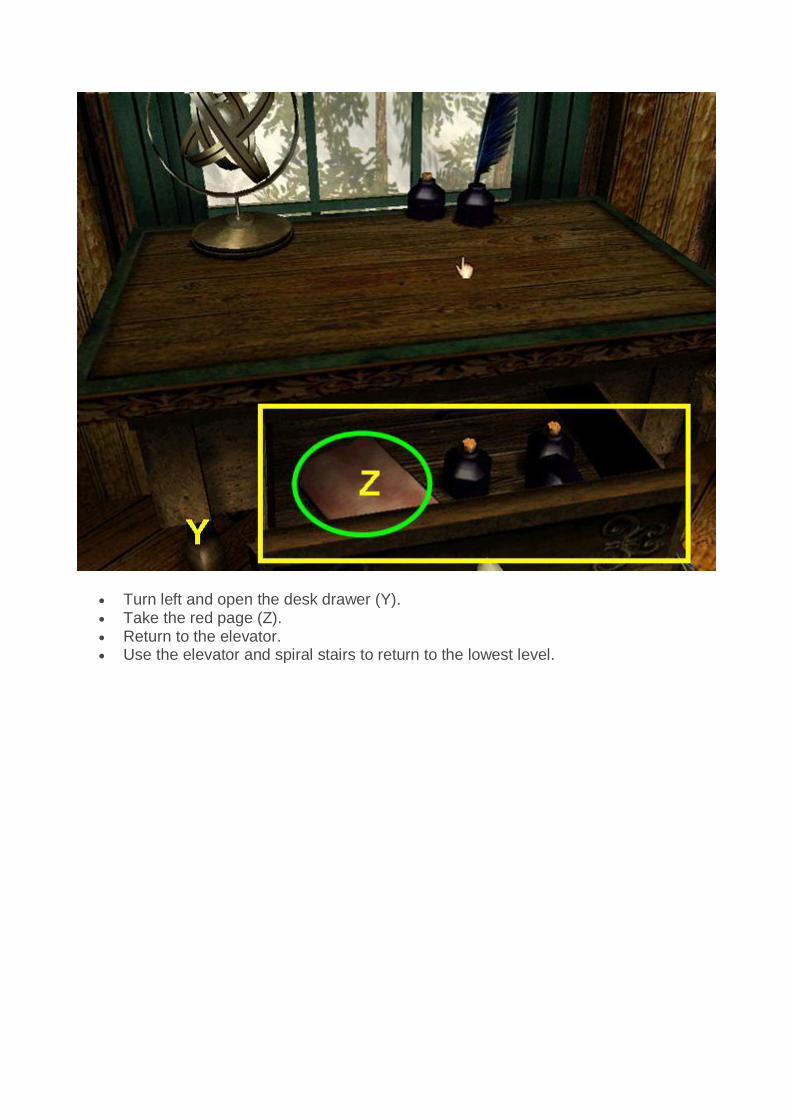
Turn left and open the desk drawer (Y). Take the red page (Z). Return to the elevator. Use the elevator and spiral stairs to return to the lowest level.
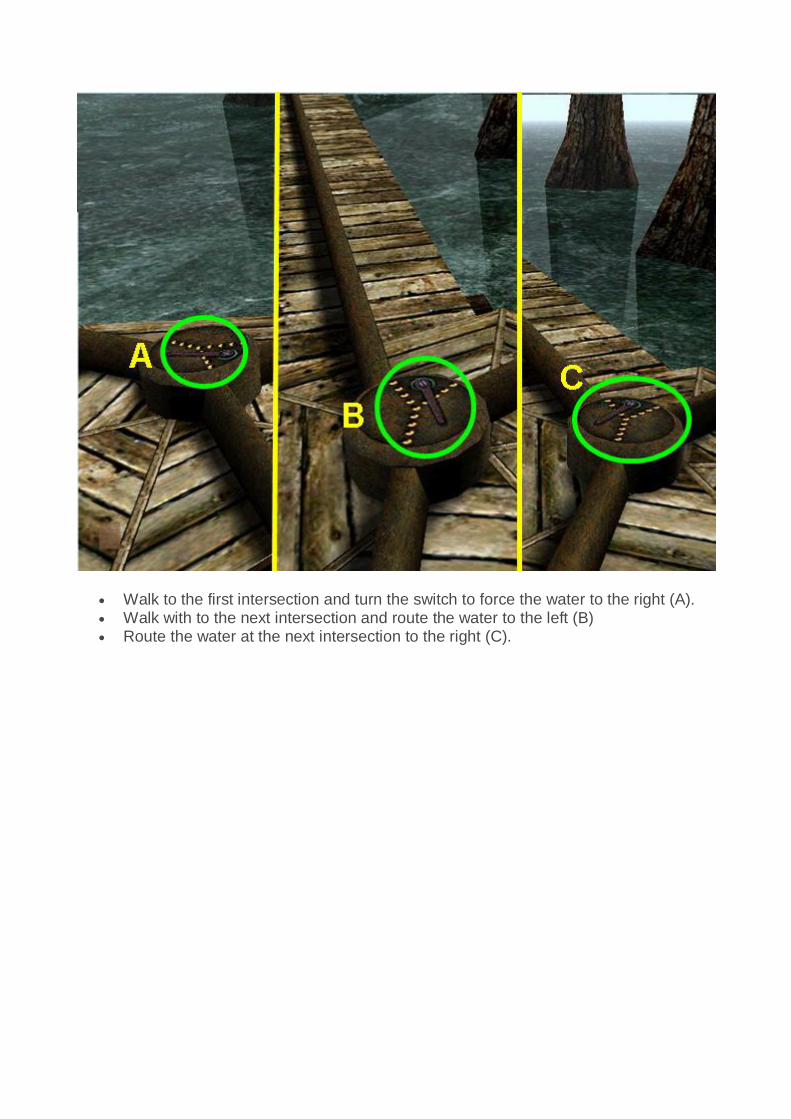
Walk to the first intersection and turn the switch to force the water to the right (A). Walk with to the next intersection and route the water to the left (B) Route the water at the next intersection to the right (C).
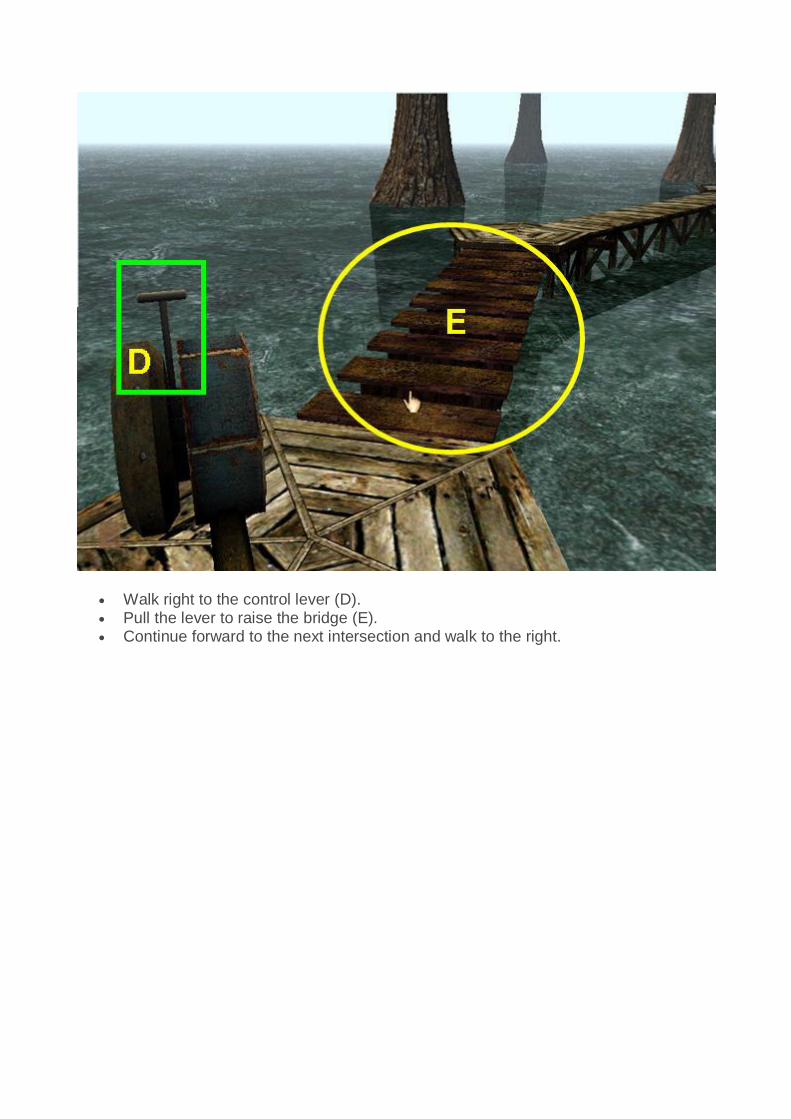
Walk right to the control lever (D). Pull the lever to raise the bridge (E). Continue forward to the next intersection and walk to the right.
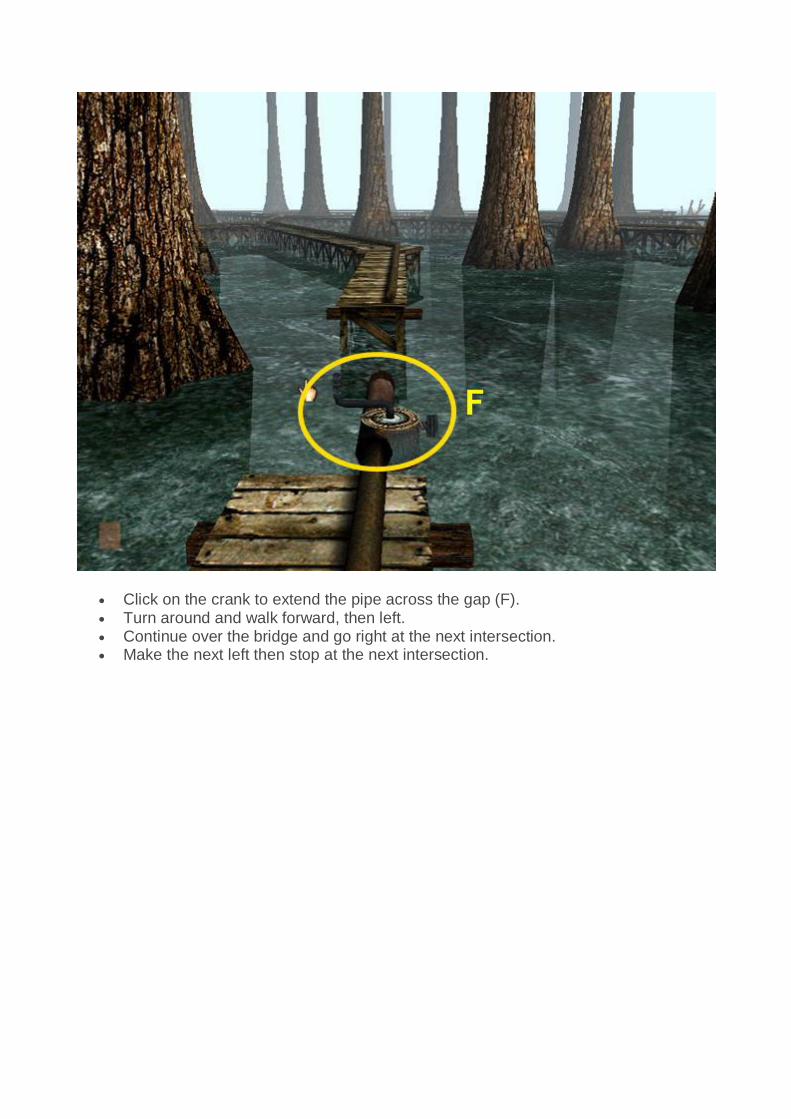
Click on the crank to extend the pipe across the gap (F). Turn around and walk forward, then left. Continue over the bridge and go right at the next intersection. Make the next left then stop at the next intersection.
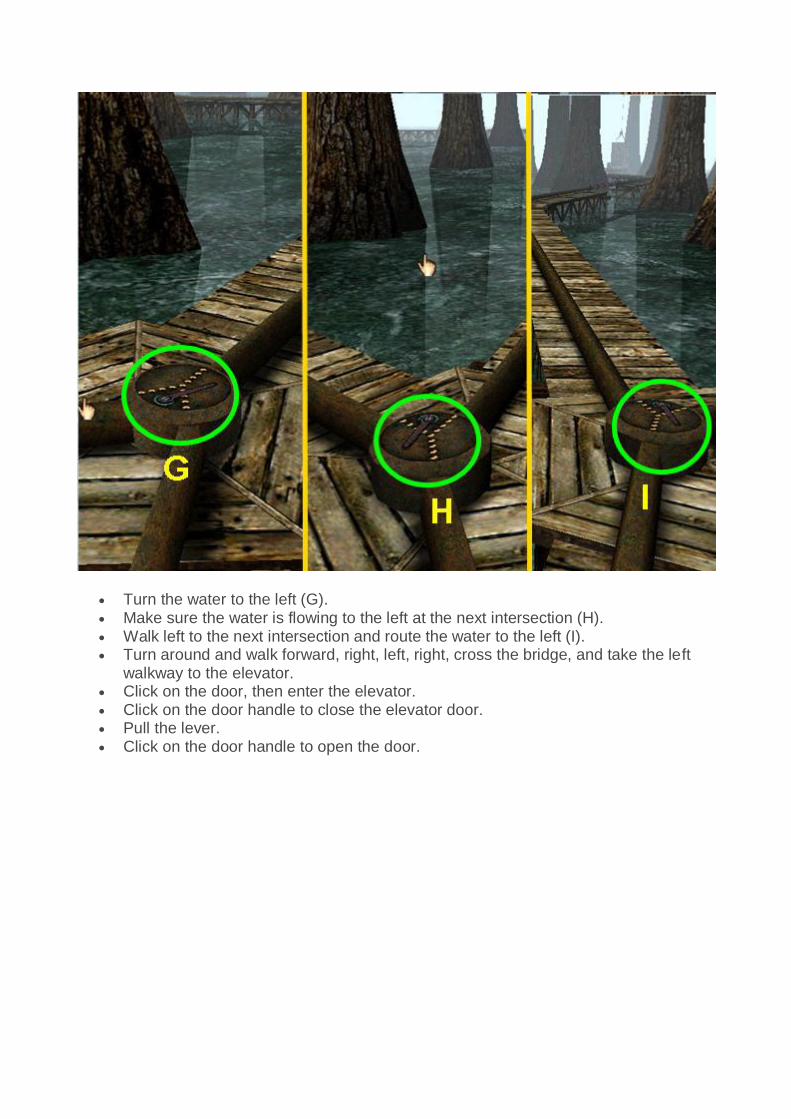
Turn the water to the left (G). Make sure the water is flowing to the left at the next intersection (H). Walk left to the next intersection and route the water to the left (I). Turn around and walk forward, right, left, right, cross the bridge, and take the left
walkway to the elevator. Click on the door, then enter the elevator. Click on the door handle to close the elevator door. Pull the lever. Click on the door handle to open the door.

Take and open the book then click on the scene on the right page (J). Back in the library, click on the red book to return the page. Open the book and listen to Sirrus. Return to the cabin and repeat the steps necessary to activate the tree and return to
Channelwood. Turn around and walk forward, then left, right, left and stop at the next intersection. Route the water to the left. Walk left and take the spiral staircase and elevator to the third tier. Open the elevator door and walk forward, passing the hut with the metal door.

Enter the larger hut and take the blue page (K). Exit and return to the elevator. Return to the lowest level and walk to the first intersection. Route the water to the right. Continue on the walkway and follow the outer edge to return to the far elevator and
travel up. Take and open the book then click on the scene on the right page. Back in the library, click on the blue book to return the page. Open the book and listen to Achenar. Exit the library.
Part 5: The Selenitic Age
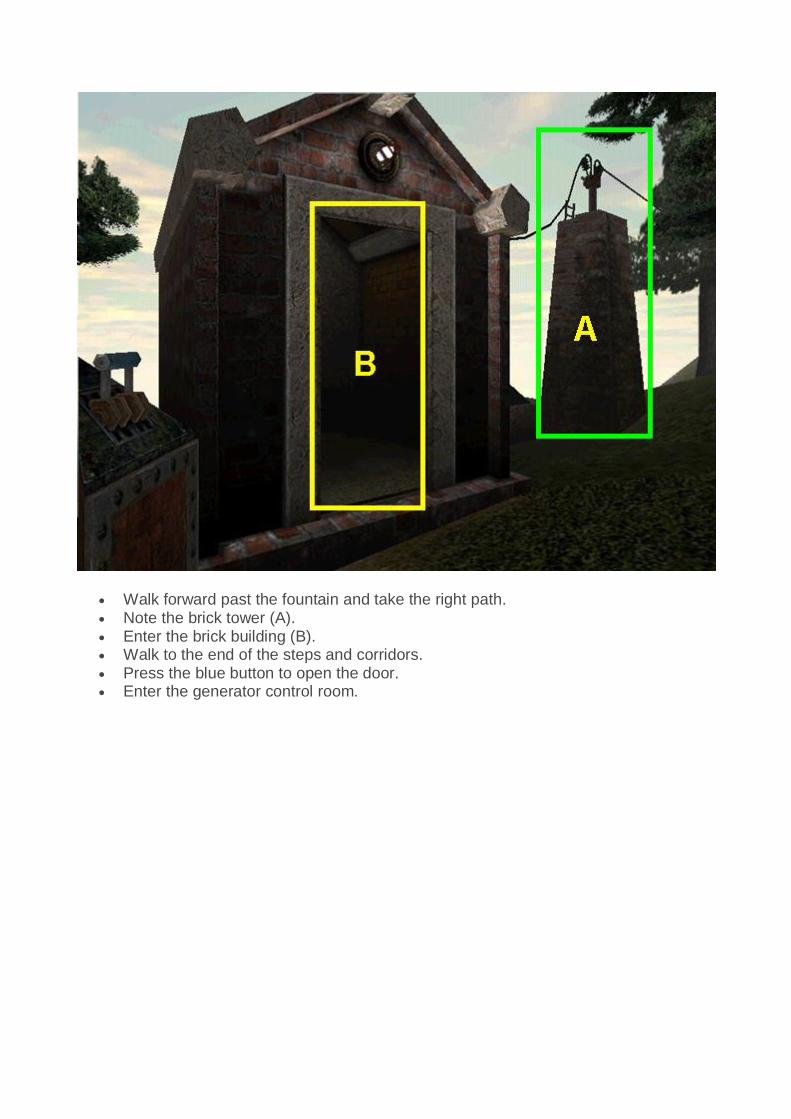
Walk forward past the fountain and take the right path. Note the brick tower (A). Enter the brick building (B). Walk to the end of the steps and corridors. Press the blue button to open the door. Enter the generator control room.
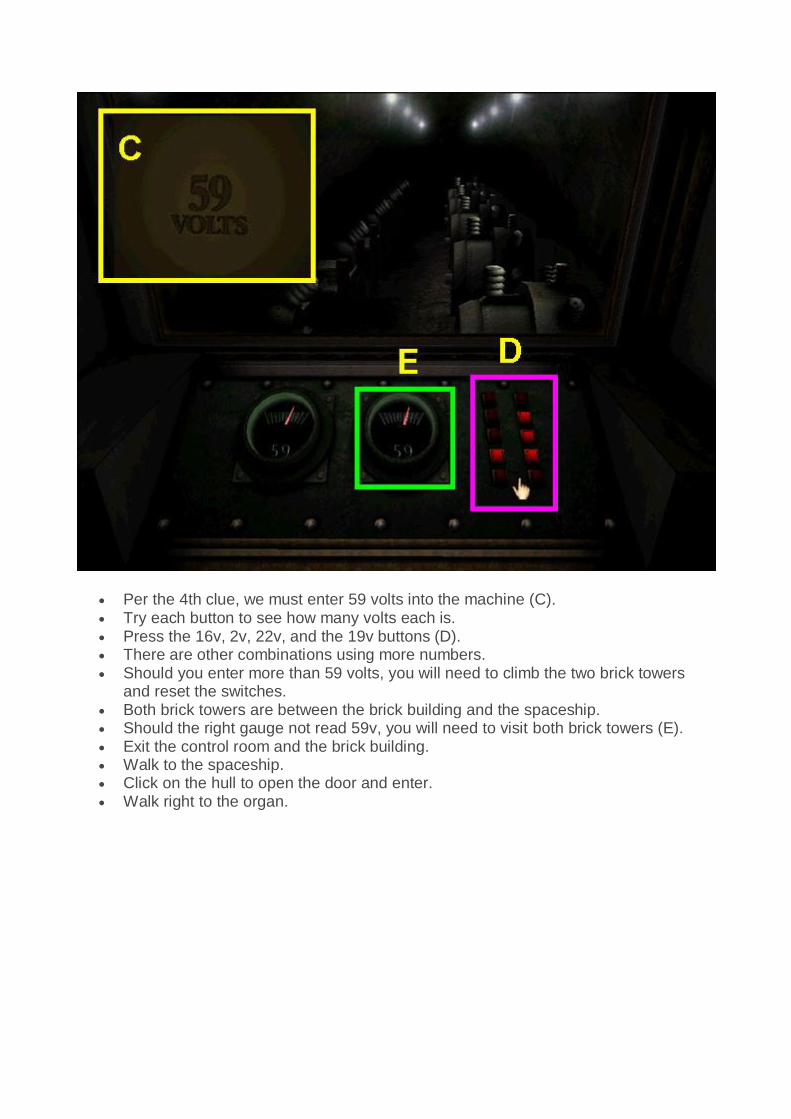
Per the 4th clue, we must enter 59 volts into the machine (C). Try each button to see how many volts each is. Press the 16v, 2v, 22v, and the 19v buttons (D). There are other combinations using more numbers. Should you enter more than 59 volts, you will need to climb the two brick towers
and reset the switches. Both brick towers are between the brick building and the spaceship. Should the right gauge not read 59v, you will need to visit both brick towers (E). Exit the control room and the brick building. Walk to the spaceship. Click on the hull to open the door and enter. Walk right to the organ.
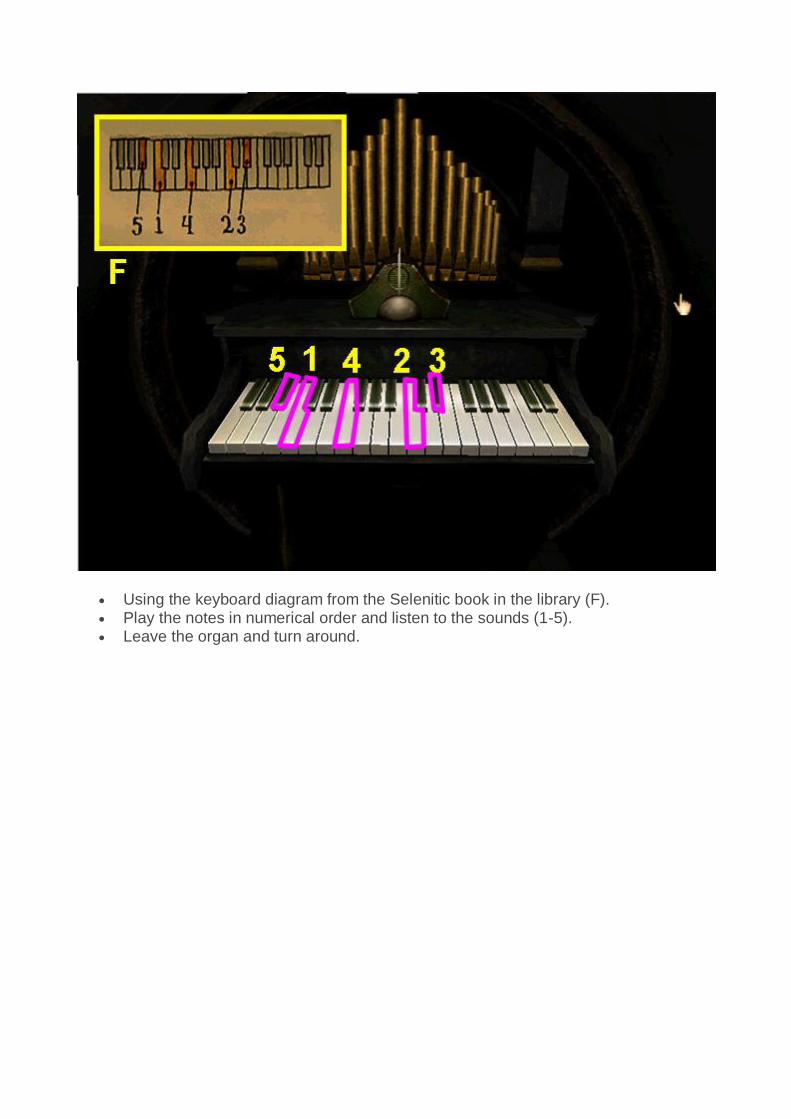
Using the keyboard diagram from the Selenitic book in the library (F). Play the notes in numerical order and listen to the sounds (1-5). Leave the organ and turn around.
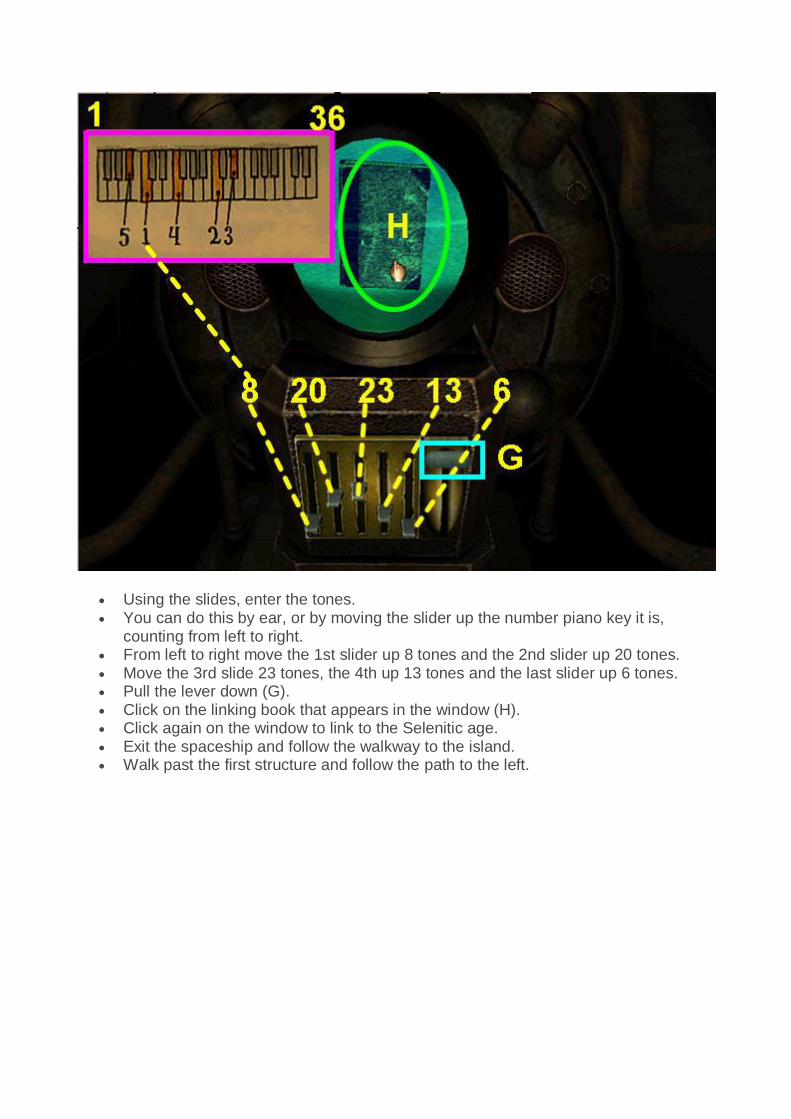
Using the slides, enter the tones. You can do this by ear, or by moving the slider up the number piano key it is,
counting from left to right. From left to right move the 1st slider up 8 tones and the 2nd slider up 20 tones. Move the 3rd slide 23 tones, the 4th up 13 tones and the last slider up 6 tones. Pull the lever down (G). Click on the linking book that appears in the window (H). Click again on the window to link to the Selenitic age. Exit the spaceship and follow the walkway to the island. Walk past the first structure and follow the path to the left.

Push the button below the rain symbol- note the rain’s sound (I). Note the blue page (J). Turn around and return to the center of the island and take the next path to the left.

Press the button under the lightning symbol (K). Note the sound of the lightning. Turn around and return to the center of the island and take the next path to the left.
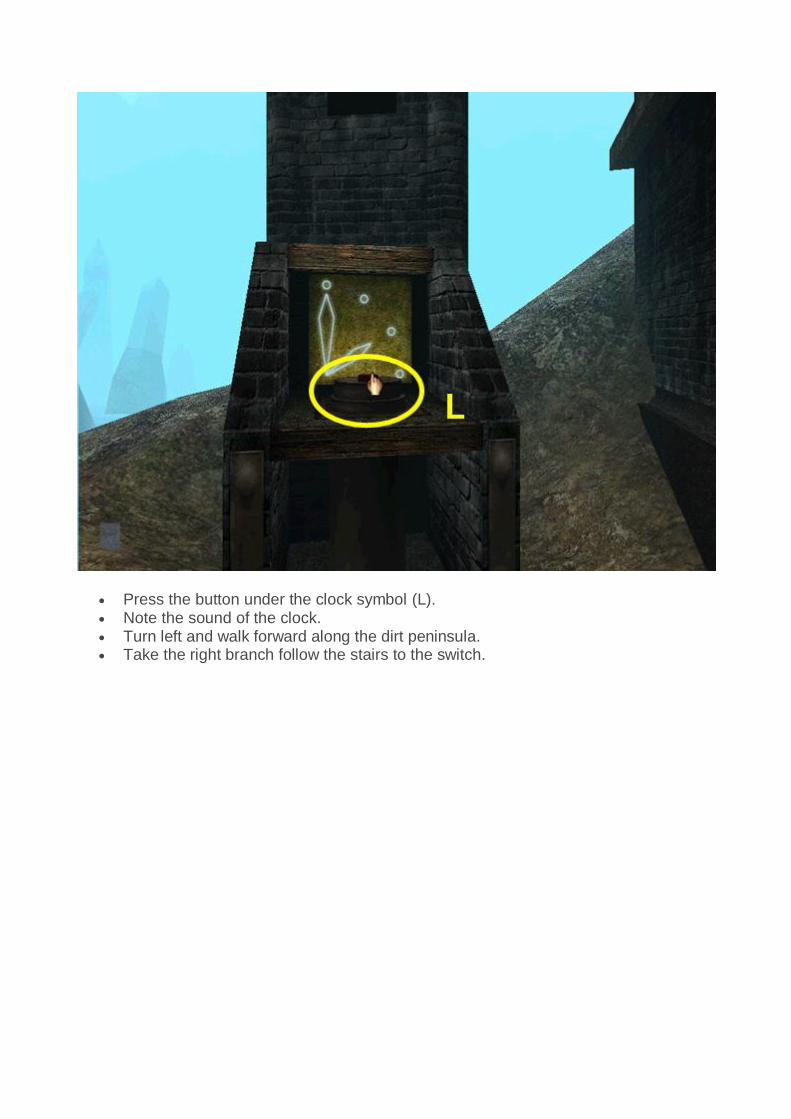
Press the button under the clock symbol (L). Note the sound of the clock. Turn left and walk forward along the dirt peninsula. Take the right branch follow the stairs to the switch.
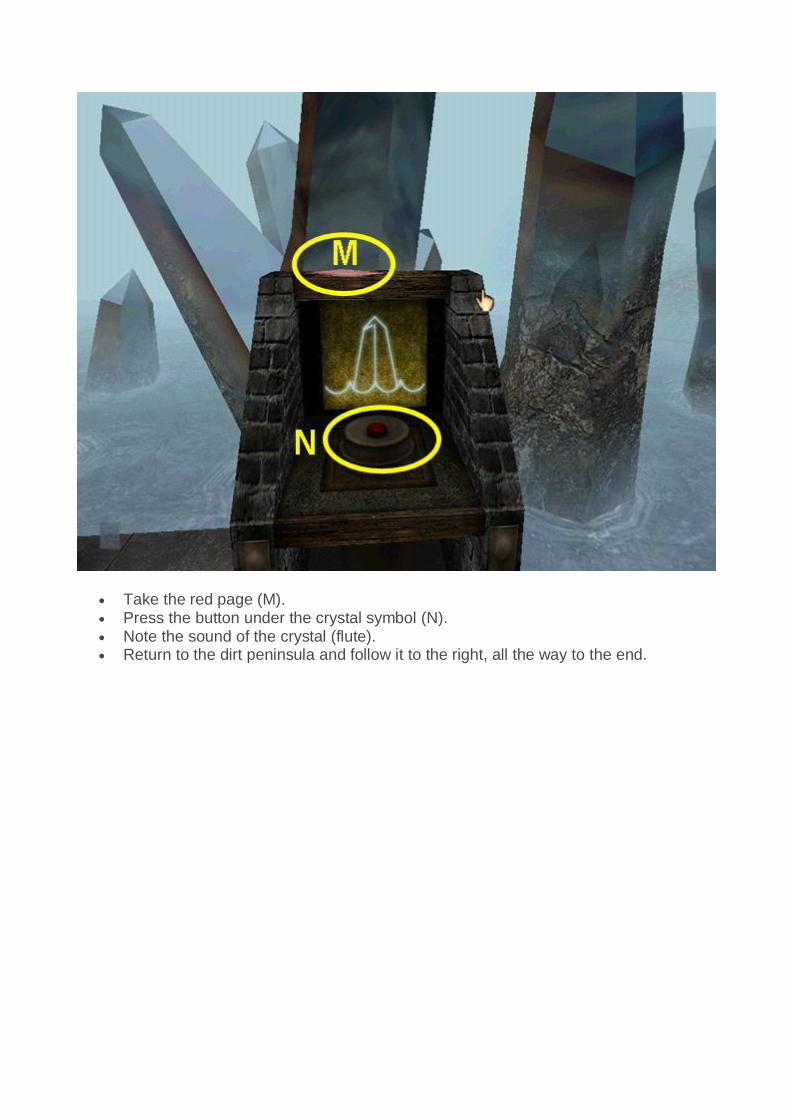
Take the red page (M). Press the button under the crystal symbol (N). Note the sound of the crystal (flute). Return to the dirt peninsula and follow it to the right, all the way to the end.

Press the button under the wind symbol (O). Note the sound of the wind. Climb into the manhole (P). Turn around and flip the light switch on the right. Walk forward to the next ladder and climb to the top. Follow the stairs to the end. Click on the cabinet doors to open them, then look at the machine.

Click on a symbol and use the arrows to rotate the viewer until the satellite dish for that switch is centered in the viewer (Q).
When you are very close, one of the arrows will flash in the direction you need to move.
Rain is at bearing 122.1 (R). Lightning is bearing 99.4 (S).
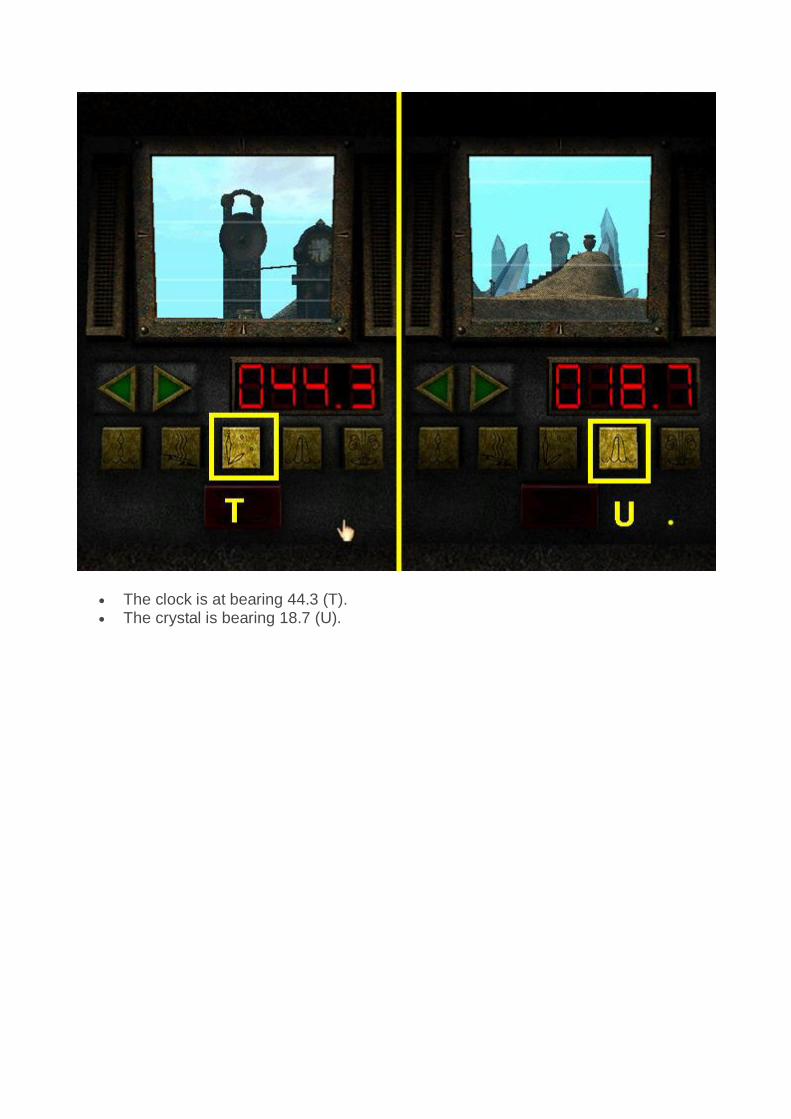
The clock is at bearing 44.3 (T). The crystal is bearing 18.7 (U).
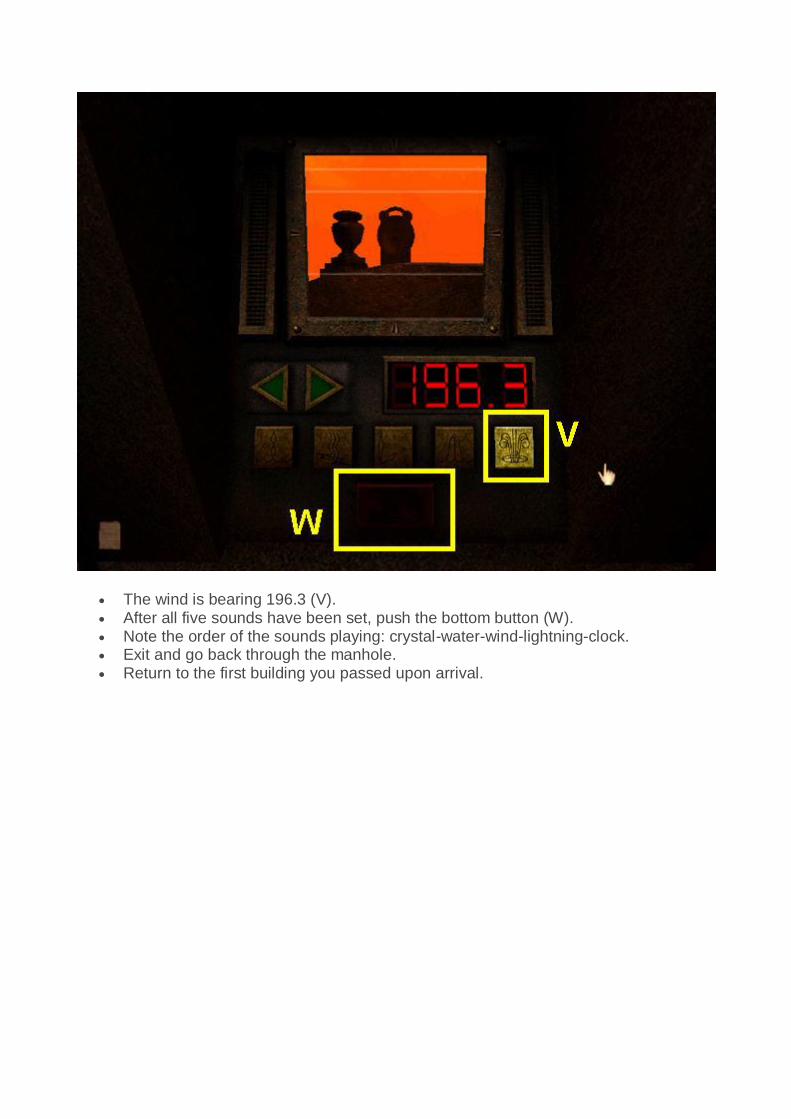
The wind is bearing 196.3 (V). After all five sounds have been set, push the bottom button (W). Note the order of the sounds playing: crystal-water-wind-lightning-clock. Exit and go back through the manhole. Return to the first building you passed upon arrival.

Use the slides to enter the sounds. From left to right: crystal-water-wind-lightning-clock. There are 10 positions on each slide. When all the slides are correct press the button to open the door (X). Enter the building and follow the corridor to the end. Press the lighted button to open the door. Enter the chamber.
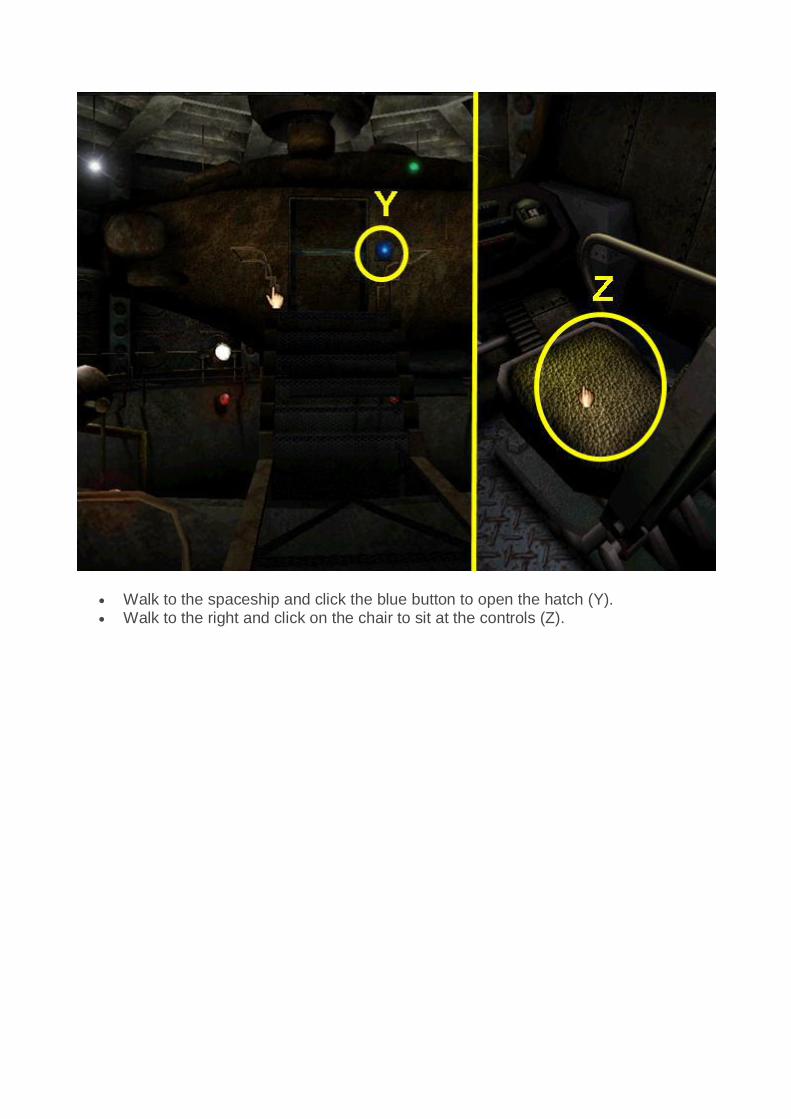
Walk to the spaceship and click the blue button to open the hatch (Y). Walk to the right and click on the chair to sit at the controls (Z).

Press the forward button to enter the maze (A). Remember the sounds for the directions in the Mechanical Age? The four sounds are: East- snap, North- clink, West- whirr, and South- clunk. These sounds will tell you what direction to travel. Should you need to replay a sound, push the red button (B). There will sometimes be two sounds. The directions are: N, W, N, E, E, S, S, W, SW, W, NW, NE, N, SE. Use the arrows to turn the ship in the correct direction then press forward (C). Click on the side to exit the controls. Push the lighted button to open the hatch and exit the ship. Walk to the end of the corridor and push the lighted button.
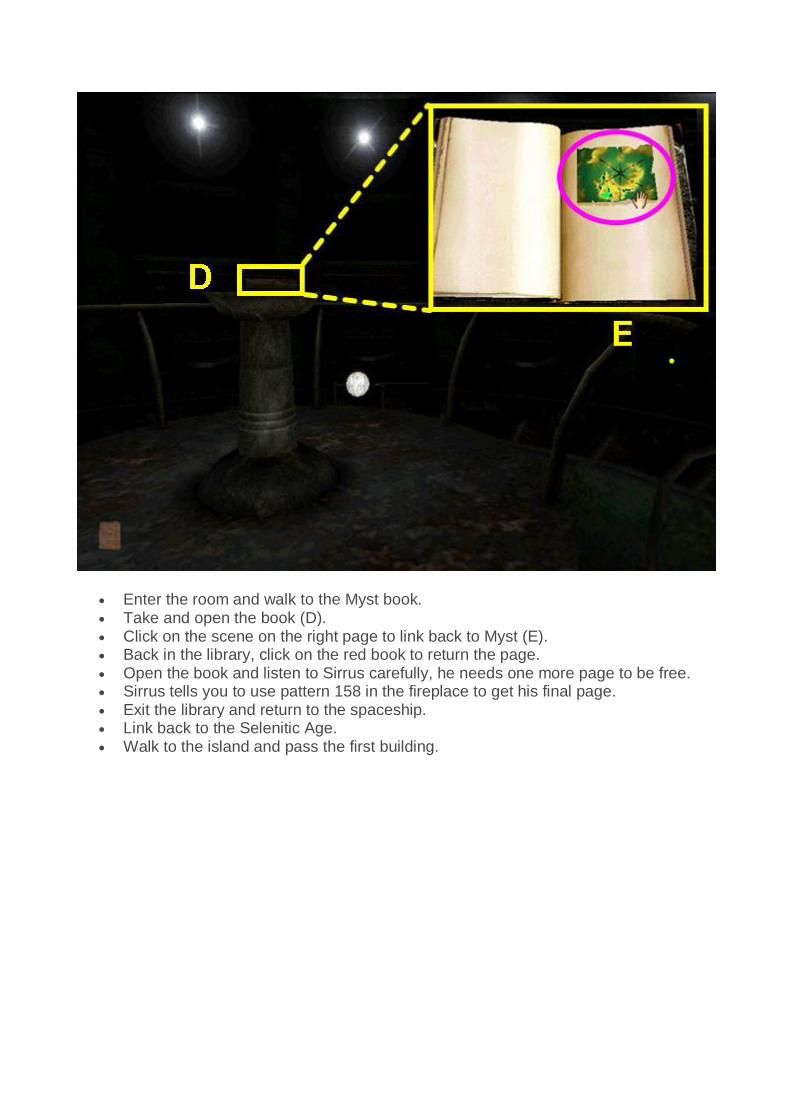
Enter the room and walk to the Myst book. Take and open the book (D). Click on the scene on the right page to link back to Myst (E). Back in the library, click on the red book to return the page. Open the book and listen to Sirrus carefully, he needs one more page to be free. Sirrus tells you to use pattern 158 in the fireplace to get his final page. Exit the library and return to the spaceship. Link back to the Selenitic Age. Walk to the island and pass the first building.
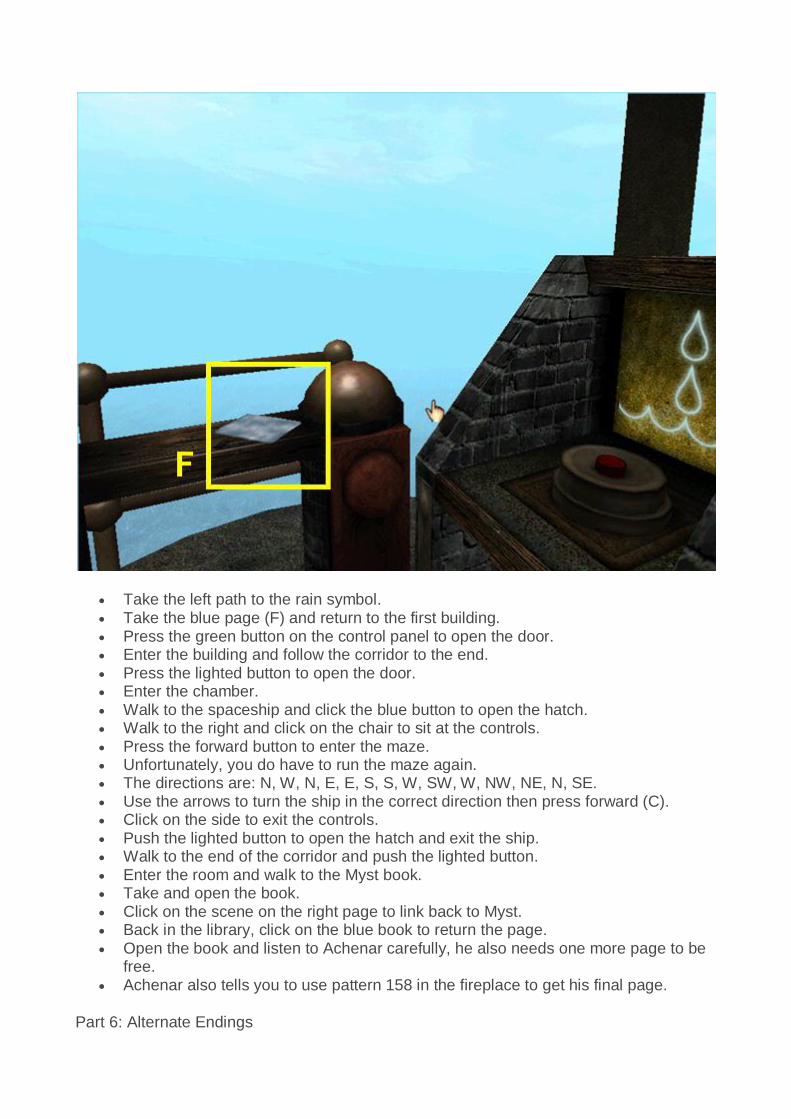
Take the left path to the rain symbol. Take the blue page (F) and return to the first building. Press the green button on the control panel to open the door. Enter the building and follow the corridor to the end. Press the lighted button to open the door. Enter the chamber. Walk to the spaceship and click the blue button to open the hatch. Walk to the right and click on the chair to sit at the controls. Press the forward button to enter the maze. Unfortunately, you do have to run the maze again. The directions are: N, W, N, E, E, S, S, W, SW, W, NW, NE, N, SE. Use the arrows to turn the ship in the correct direction then press forward (C). Click on the side to exit the controls. Push the lighted button to open the hatch and exit the ship. Walk to the end of the corridor and push the lighted button. Enter the room and walk to the Myst book. Take and open the book. Click on the scene on the right page to link back to Myst. Back in the library, click on the blue book to return the page. Open the book and listen to Achenar carefully, he also needs one more page to be
free. Achenar also tells you to use pattern 158 in the fireplace to get his final page.
Part 6: Alternate Endings

Save your game here if you would like to play all the alternate endings. There are four possible endings to the original game, but only one will allow you to
play the additional Age of Rime.
Exit the library and walk to the Marker Switch on the dock. Per the two note pieces turn off the dock marker switch (A). Take the white page from the vault (B). Should the bottom portion of the switch not open, make sure the other seven
Marker Switches are in the on position. Return to the library.

Look at the last book on the middle shelf of the bookcase (C). Turn to page 158 and take note of the pattern (D).
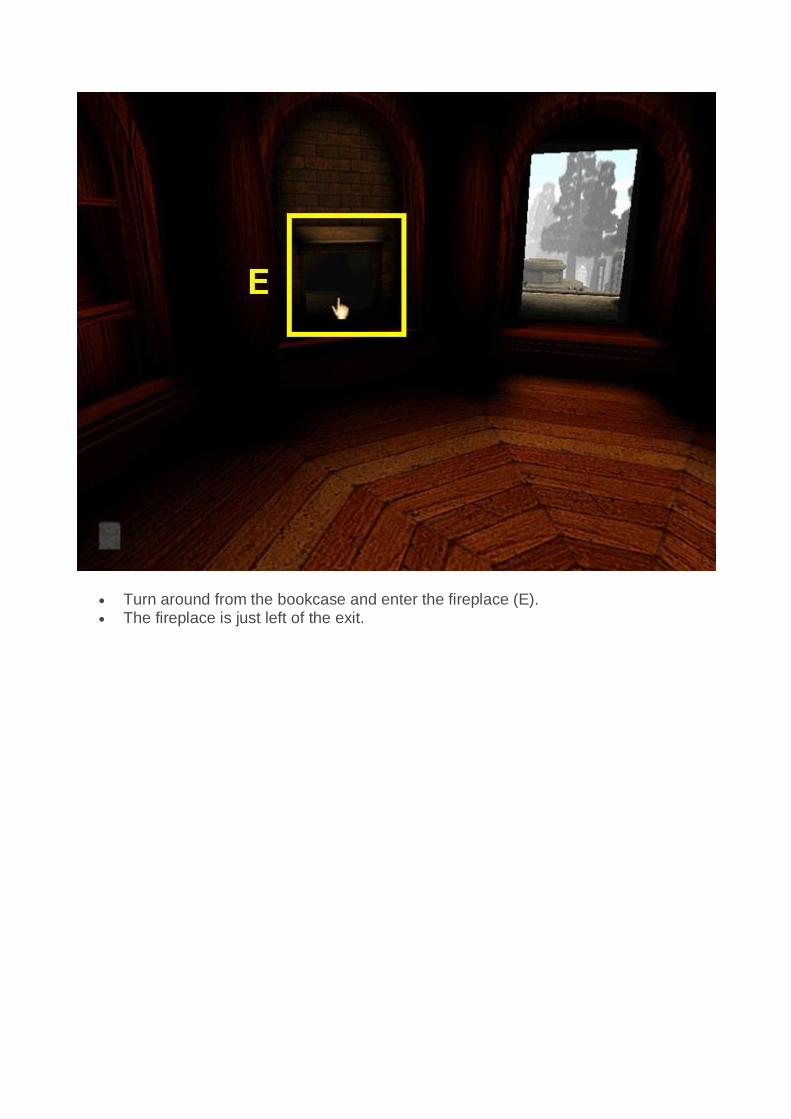
Turn around from the bookcase and enter the fireplace (E). The fireplace is just left of the exit.
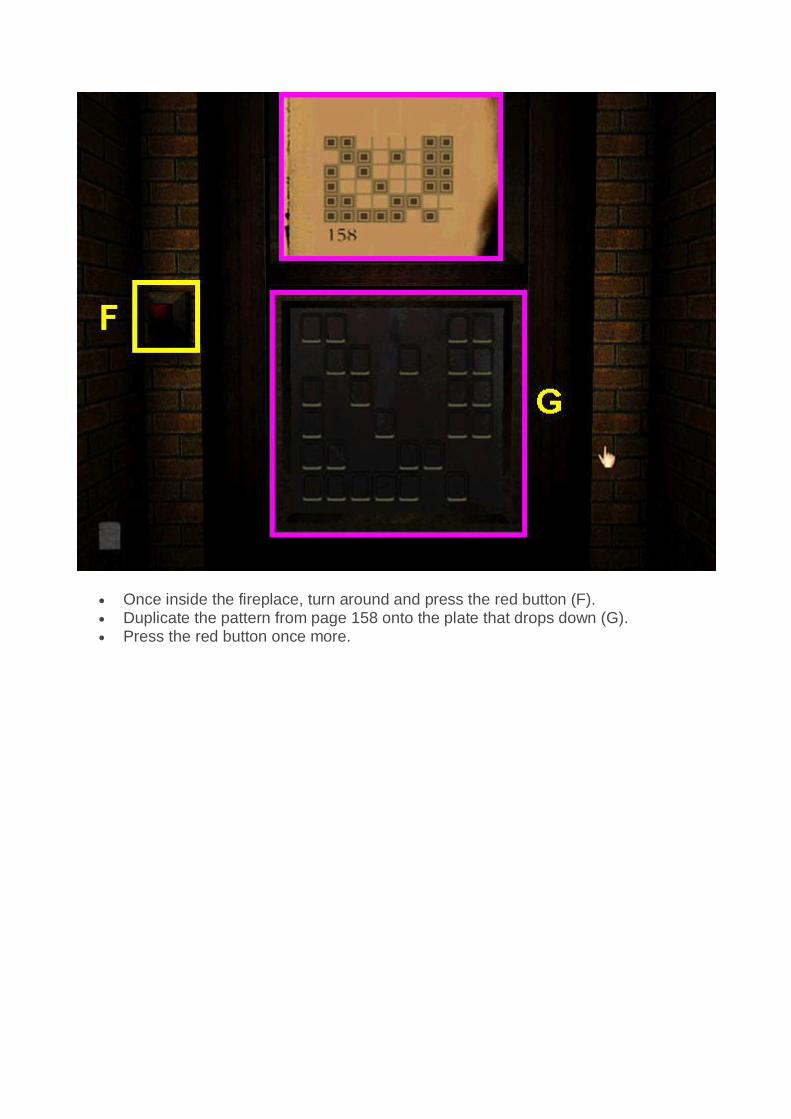
Once inside the fireplace, turn around and press the red button (F). Duplicate the pattern from page 158 onto the plate that drops down (G). Press the red button once more.

Should you take the blue page and free Achenar, you will be imprisoned in the blue book as he was (H).
Should you take the red page and free Sirrus, the red book will become your prison (I).
Using the green book and linking to D’ni without the white page from the vault will trap you in D’ni (J).
Making sure you have the white page (K), use the green book to link to D’ni and Atrus.
Note- if you touched the red or blue pages, the white page will return to the switch vault on the dock.
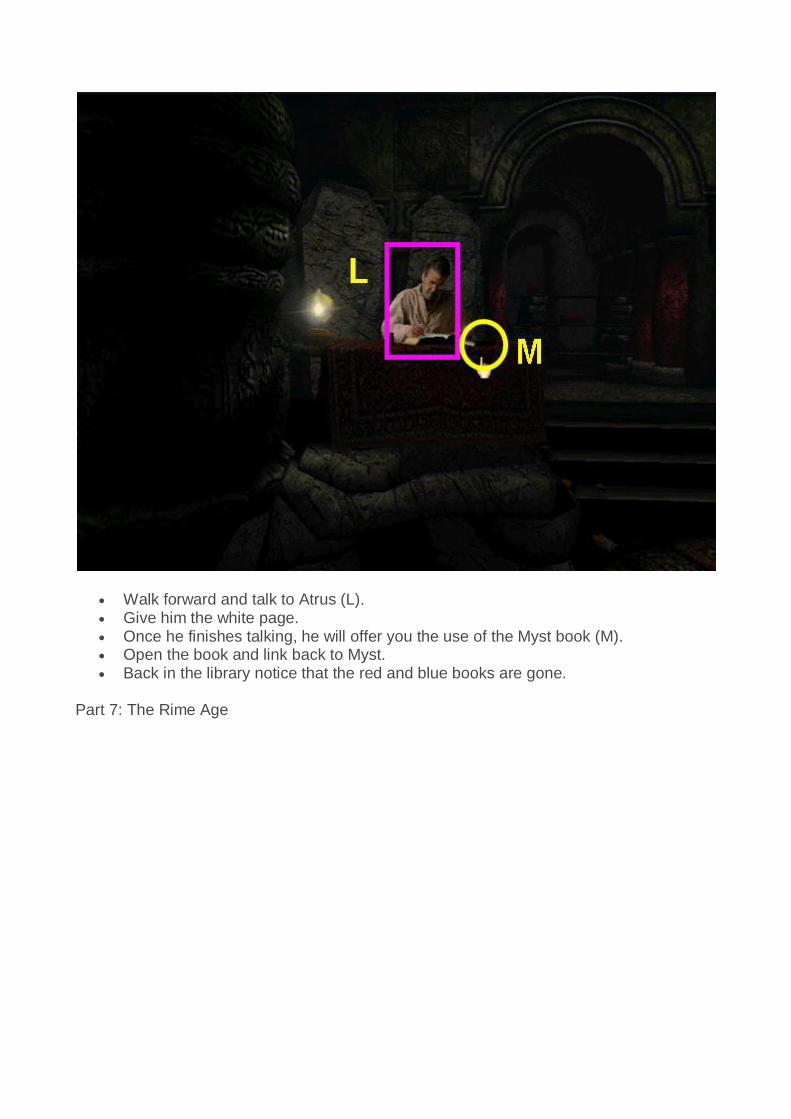
Walk forward and talk to Atrus (L). Give him the white page. Once he finishes talking, he will offer you the use of the Myst book (M). Open the book and link back to Myst. Back in the library notice that the red and blue books are gone.
Part 7: The Rime Age

Turn toward the door and find the Rime book on the floor (A). Make note of the code written in the book (B). Exit the library and walk to the imaging room on the docks.

Open the panel, enter 40, then press the button (C). Turn around and press the button to start the imager (D).
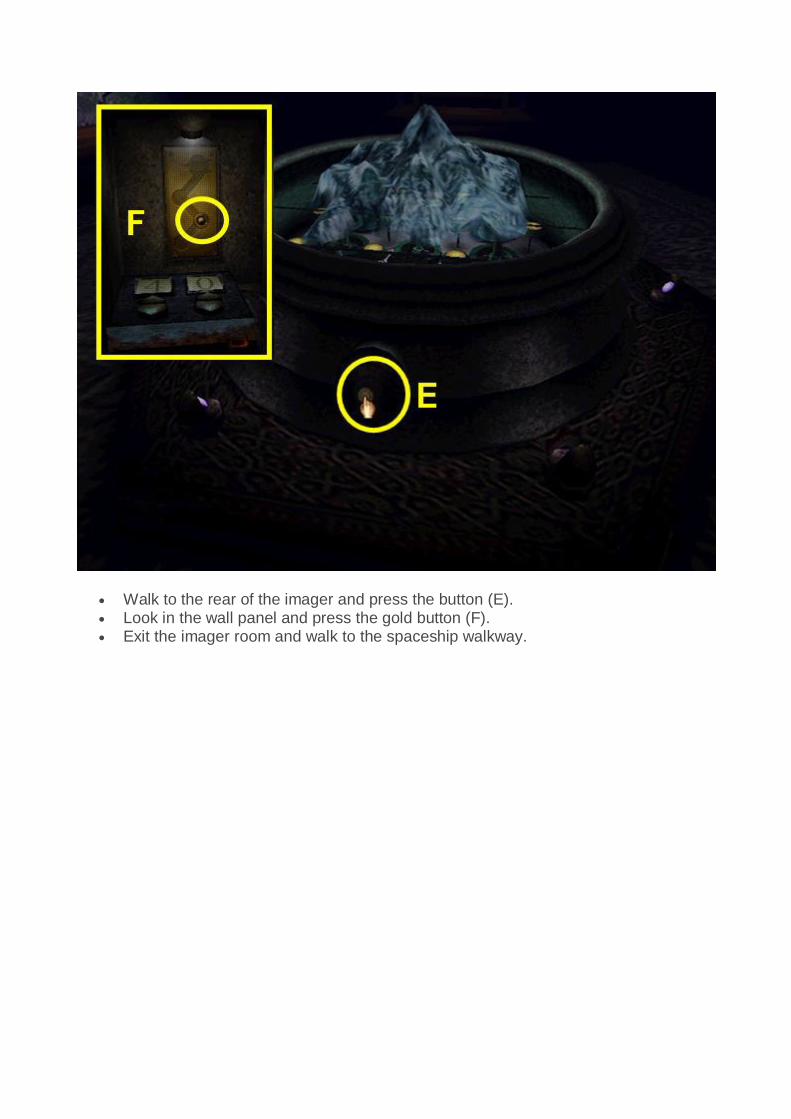
Walk to the rear of the imager and press the button (E). Look in the wall panel and press the gold button (F). Exit the imager room and walk to the spaceship walkway.
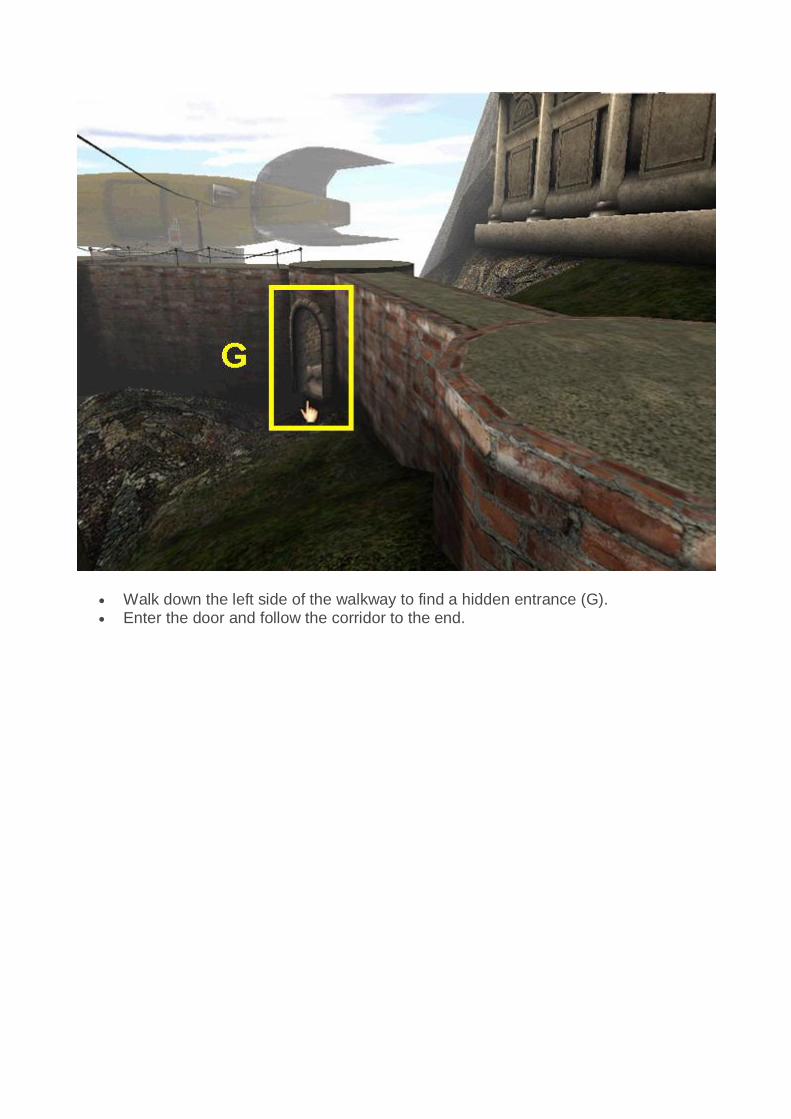
Walk down the left side of the walkway to find a hidden entrance (G). Enter the door and follow the corridor to the end.

Look at the machine and enter the number found in the Rime notebook- 2735 (H). Press the red button (I). Exit to the outside and return to the library.

Inside the library, a pedestal has appeared. Take and open the book (J). Click on the scene on the right page to link to Rime (K).
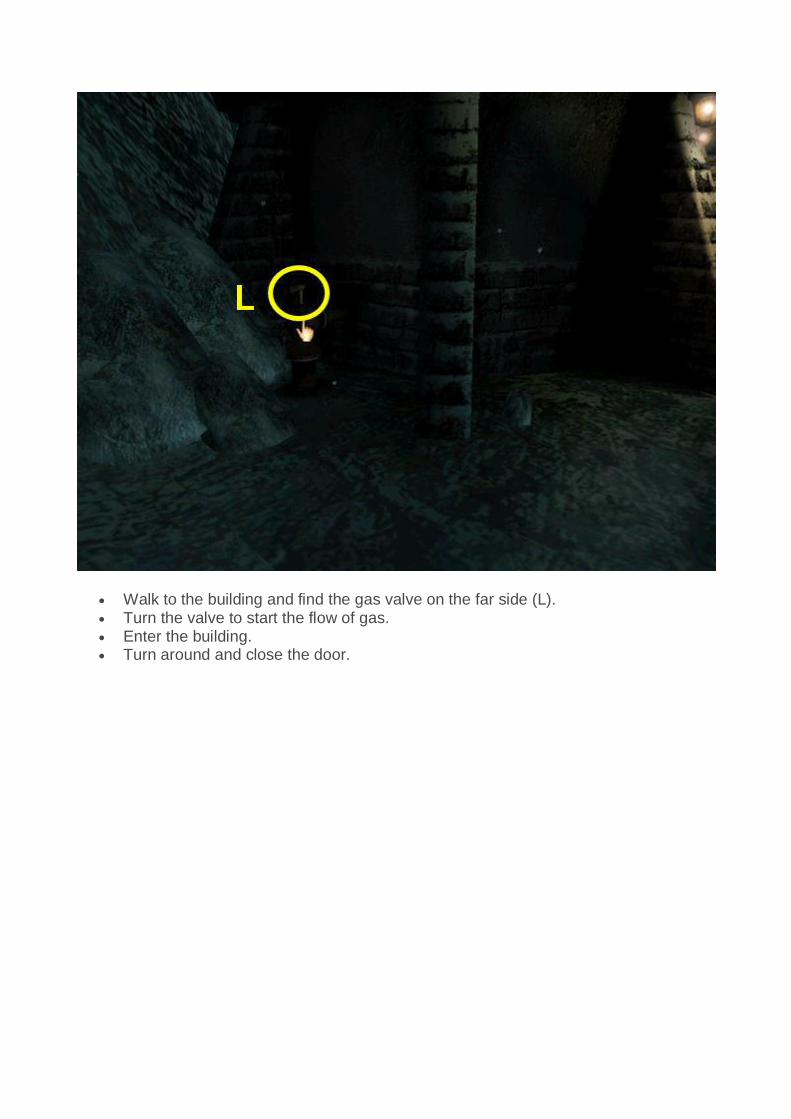
Walk to the building and find the gas valve on the far side (L). Turn the valve to start the flow of gas. Enter the building. Turn around and close the door.

Turn to the right and press the red button on the stove (M). Note the Myst linking book (N). Turn around and wait for the furnace to melt the ice on the ornate door. Walk down the corridor. Enter the elevator and push the up button.

Without exiting the elevator, turn to the left. Press the red button (O). Once the elevator rotates, enter the office and read the notebook on the desk (P). Return to the elevator and push the down button.
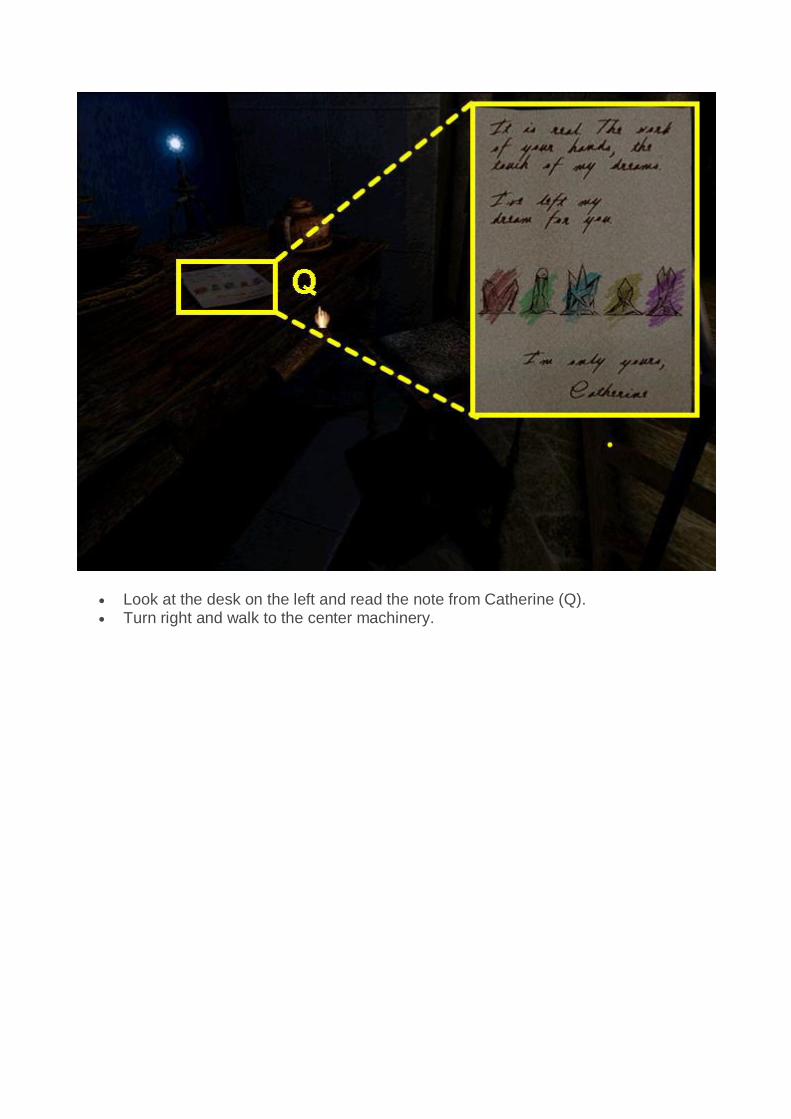
Look at the desk on the left and read the note from Catherine (Q). Turn right and walk to the center machinery.

Using Catherine’s sketch as a guide, recreate the crystals (R). Click on a crystal to change its shape. Wave your mouse over a crystal to change its color. Once you have the correct configuration, press the red button (S). The display will show a scene from Riven, the next game in the series (T). You are free to explore Myst and all the ages.
Congratulations! You have completed RealMYST!