Solution domain vContainer User Manual 4a5001869-b5fc-43d6-82fc...Also assign the user a specific...
106
Solution domain vContainer User Manual 4.0 Date 06/01/2016 Sensitivity Unrestricted
Transcript of Solution domain vContainer User Manual 4a5001869-b5fc-43d6-82fc...Also assign the user a specific...
Solution domain
vContainer User Manual 4.0
Date 06/01/2016
Sensitivity Unrestricted
Proximus PLC under Belgian Public Law, Bd. du Roi Albert II 27, B-1030 Brussels, Belgium, VAT BE 0202.239.951, Brussels Register of Legal Entities, Giro BE50 0001 7100 3118
BPOTBEB
Table of contents
Table of contents ................................................................................................................................................. 2
1. Concept ............................................................................................................................................................ 5
2. Connection ...................................................................................................................................................... 6
3. Working with organizations and resources ......................................................................................8
3.1 Organization settings ................................................................................................................................................................. 8
3.1.1 Managing users ............................................................................................................................................................................ 8
3.1.2 Managing organization policies ........................................................................................................................................... 9
3.1.3 Managing event notification ................................................................................................................................................ 12
3.1.4 Managing guest personalization ....................................................................................................................................... 12
3.1.5 Logs and tasks ............................................................................................................................................................................ 13
3.2 Managing virtual datacenters ............................................................................................................................................... 13
3.2.1 Concept .......................................................................................................................................................................................... 13
3.2.2 List of virtual datacenters ..................................................................................................................................................... 14
3.2.3 Monitoring virtual datacenter usage .............................................................................................................................. 14
3.2.4 Listing virtual datacenter content .................................................................................................................................... 15
3.3 Managing networks................................................................................................................................................................... 16
3.3.1 List of available networks ..................................................................................................................................................... 17
3.3.2 Routed-Nat organization network .................................................................................................................................. 18
3.3.3 Monitoring IP address usage on network ..................................................................................................................... 51
3.3.4 Resetting a network ................................................................................................................................................................ 52
4. Working with catalogs ............................................................................................................................ 52
4.4 Private catalogs versus public catalogs .......................................................................................................................... 52
4.5 Adding a new catalog ............................................................................................................................................................. 53
4.6 Modifying the catalog.............................................................................................................................................................. 55
4.7 Accessing catalog content .................................................................................................................................................... 55
5. Working with a vApp template ........................................................................................................... 57

Proximus PLC under Belgian Public Law, Bd. du Roi Albert II 27, B-1030 Brussels, Belgium, VAT BE 0202.239.951, Brussels Register of Legal Entities, Giro BE50 0001 7100 3118
BPOTBEB Page 3 of 106
5.1 Accessing a vApp template ................................................................................................................................................... 57
5.2 Viewing vApp template content .......................................................................................................................................... 57
5.3 Creating a vApp template ...................................................................................................................................................... 57
5.3.1 Uploading a vApp template ............................................................................................................................................... 58
5.3.2 Saving from a vApp ................................................................................................................................................................ 59
5.4 Manipulating vApp templates ............................................................................................................................................. 60
5.5 Downloading vApp templates ............................................................................................................................................. 61
6. Working with media files ....................................................................................................................... 63
6.1 Accessing media repositories .............................................................................................................................................. 63
6.2 Uploading a media file ............................................................................................................................................................ 63
6.3 Manipulating a media file ....................................................................................................................................................... 64
7. Working with vApps ................................................................................................................................. 66
7.4 Viewing vApps ............................................................................................................................................................................ 66
7.5 Creating a vApp ......................................................................................................................................................................... 68
7.5.1 Creating from a vApp template ....................................................................................................................................... 68
7.5.2 Creating from scratch ............................................................................................................................................................. 72
7.6 Configuring a vApp network .................................................................................................................................................78
7.6.1 Managing DHCP ....................................................................................................................................................................... 80
7.6.2 Managing NAT ............................................................................................................................................................................ 81
7.6.3 Managing the firewall ............................................................................................................................................................ 83
7.7 Managing a vApp ...................................................................................................................................................................... 84
7.7.1 Manipulating a vApp ............................................................................................................................................................... 84
7.7.2 Snapshotting .............................................................................................................................................................................. 85
7.7.3 vApp properties ......................................................................................................................................................................... 87
8. Working with virtual machines .......................................................................................................... 89
8.1 Creating a virtual machine .................................................................................................................................................... 89
8.2 Virtual machine properties ................................................................................................................................................... 90
8.2.1 General tab .................................................................................................................................................................................. 91
8.2.2 Hardware tab .............................................................................................................................................................................. 91
8.2.3 Guest OS Customization tab .............................................................................................................................................. 92
8.2.4 Resource Allocation ................................................................................................................................................................ 93
8.3 Vmtools ........................................................................................................................................................................................ 93

Proximus PLC under Belgian Public Law, Bd. du Roi Albert II 27, B-1030 Brussels, Belgium, VAT BE 0202.239.951, Brussels Register of Legal Entities, Giro BE50 0001 7100 3118
BPOTBEB Page 4 of 106
8.4 Manipulating virtual machines ............................................................................................................................................ 95
8.5 Windows Licensing................................................................................................................................................................... 98
8.6 SMTP configuration ................................................................................................................................................................. 99
8.7 Anti Virus Configuration ...................................................................................................................................................... 100
8.7.1 Deploy anti-virus .................................................................................................................................................................. 100
8.7.2 Activate Deactivate anti-virus ........................................................................................................................................ 102
8.7.3 Check licenses ......................................................................................................................................................................... 103
Annex 1 – Guest operating systems ..................................................................................................... 104
Annex 2 – Natting rules example ........................................................................................................... 106

vContainer User Manual
Proximus PLC under Belgian Public Law, Bd. du Roi Albert II 27, B-1030 Brussels, Belgium, VAT BE 0202.239.951, Brussels Register of Legal Entities, Giro BE50 0001 7100
3118 BPOTBEB Page 5 of 106
1. Concept
The Proximus vContainer solution is an environment that provides the ability to build secure, multi-tenant
clouds by pooling resources (CPU – memory – storage – network – security) into virtual data centers and
exposing them to users through Web-based portal services and catalog-based services.
Additional information on the product can be found on
http://pubs.vmware.com/vcd-56/topic/com.vmware.ICbase/PDF/vcd_56_user_guide.pdf
Proximus PLC under Belgian Public Law, Bd. du Roi Albert II 27, B-1030 Brussels, Belgium, VAT BE 0202.239.951, Brussels Register of Legal Entities, Giro BE50 0001 7100
3118 BPOTBEB Page 6 of 106
2. Connection
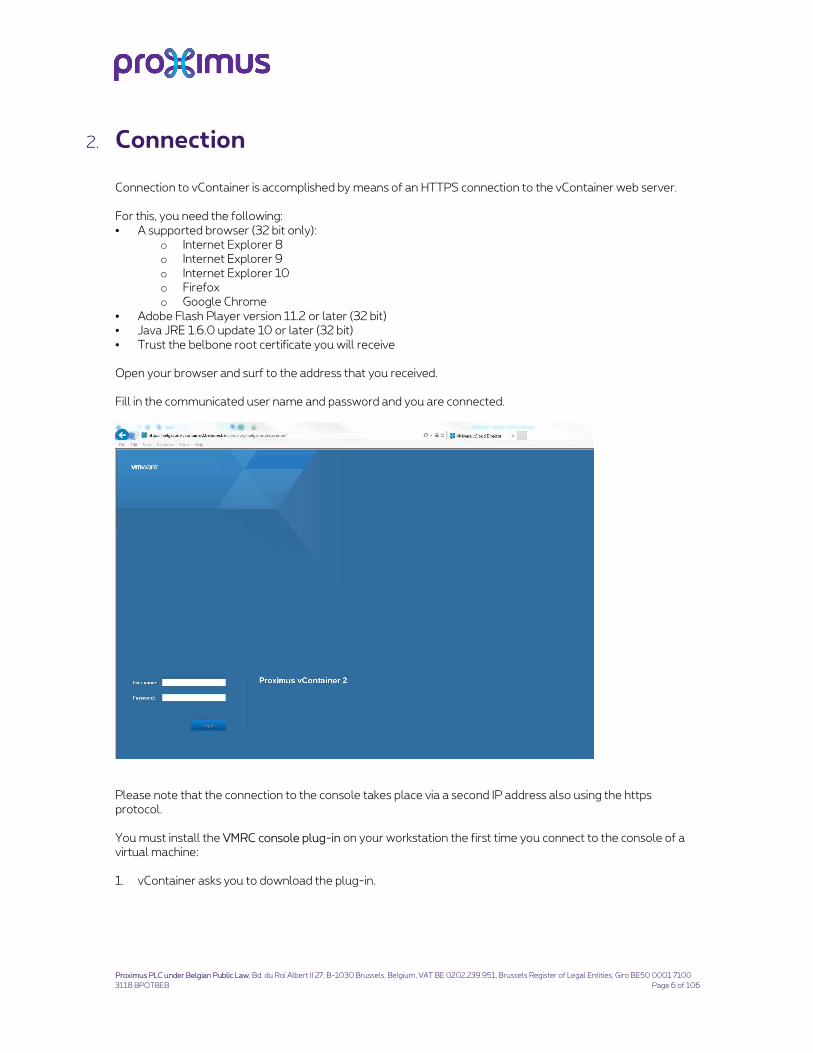
Connection to vContainer is accomplished by means of an HTTPS connection to the vContainer web server. For this, you need the following: • A supported browser (32 bit only):
o Internet Explorer 8 o Internet Explorer 9 o Internet Explorer 10 o Firefox o Google Chrome
• Adobe Flash Player version 11.2 or later (32 bit) • Java JRE 1.6.0 update 10 or later (32 bit) • Trust the belbone root certificate you will receive Open your browser and surf to the address that you received. Fill in the communicated user name and password and you are connected.
Please note that the connection to the console takes place via a second IP address also using the https protocol. You must install the VMRC console plug-in on your workstation the first time you connect to the console of a virtual machine: 1. vContainer asks you to download the plug-in.

Proximus PLC under Belgian Public Law, Bd. du Roi Albert II 27, B-1030 Brussels, Belgium, VAT BE 0202.239.951, Brussels Register of Legal Entities, Giro BE50 0001 7100
3118 BPOTBEB Page 7 of 106
2. When the download is complete, close all browsers and proceed with the installation.
3. Reopen your session in vContainer and select the console again. At this point, you must allow the add-on
to run and allow the pop-up from the vContainer site.
Proximus PLC under Belgian Public Law, Bd. du Roi Albert II 27, B-1030 Brussels, Belgium, VAT BE 0202.239.951, Brussels Register of Legal Entities, Giro BE50 0001 7100
3118 BPOTBEB Page 8 of 106
3. Working with organizations and resources
A vContainer (also called organization) is a collection of users, groups and cloud resources. Users authenticate
at the vContainer level and can use resources inside their vContainer based on the rights they receive within it.
The cloud resources available in a vContainer are located in one or more virtual datacenters.
3.1 Organization settings
By default, each vContainer is delivered with an “organization administrator” user account. An organization
administrator can perform several administrative tasks in his vContainer:
• Manage users in his organization
• Manage organization policies
• View logs and tasks in his organization
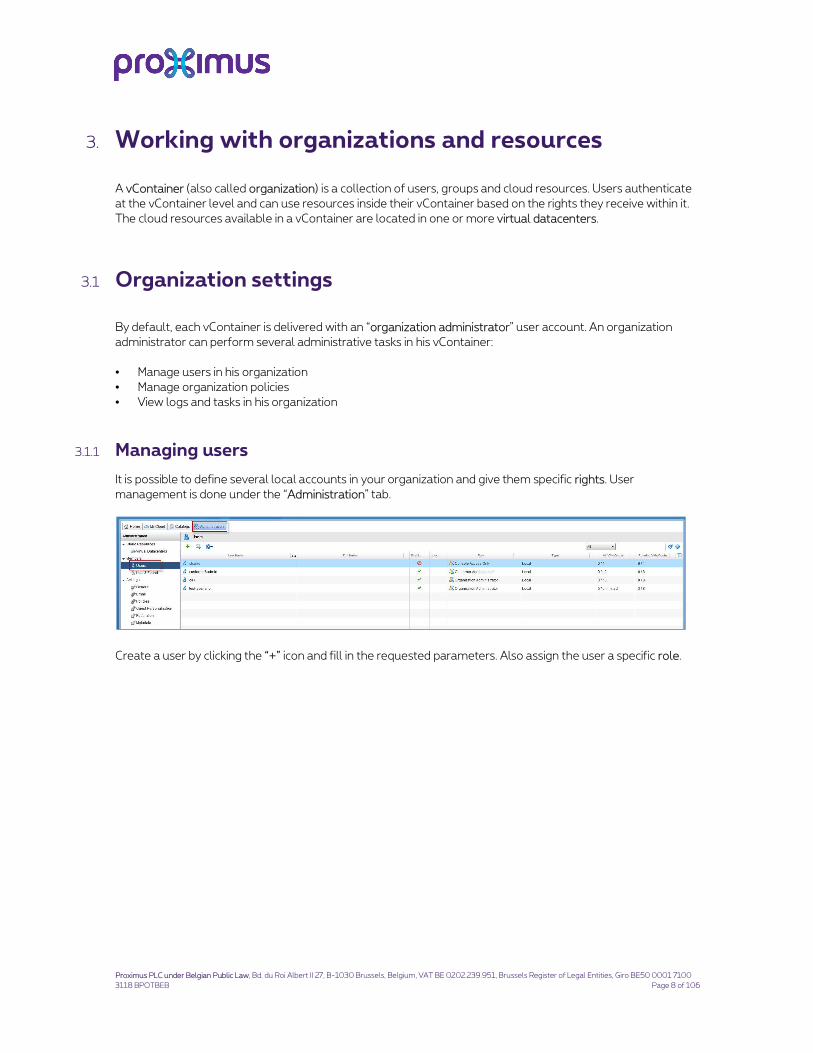
3.1.1 Managing users
It is possible to define several local accounts in your organization and give them specific rights. User
management is done under the “Administration” tab.
Create a user by clicking the “+” icon and fill in the requested parameters. Also assign the user a specific role.

Proximus PLC under Belgian Public Law, Bd. du Roi Albert II 27, B-1030 Brussels, Belgium, VAT BE 0202.239.951, Brussels Register of Legal Entities, Giro BE50 0001 7100
3118 BPOTBEB Page 9 of 106
The attributes can be modified afterwards. A created user account can be:
• Disabled/Enabled
• Unlocked (if the account is locked due to several unsuccessful login attempts)
• Deleted
• Notified (send an e-mail if the e-mail address is already completed in Properties)
Even if technically possible, integration with LDAP or SAML 2.0 is not supported by Proximus at this stage.
Group usage is therefore not possible neither.
3.1.2 Managing organization policies
Policies are used to tune the behavior of the users and vApp on vContainer. Policies can be accessed under the
“Administration” tab.

Proximus PLC under Belgian Public Law, Bd. du Roi Albert II 27, B-1030 Brussels, Belgium, VAT BE 0202.239.951, Brussels Register of Legal Entities, Giro BE50 0001 7100
3118 BPOTBEB Page 10 of 106
3.1.2.1 Leases
Leases provide a level of control over an organization’s storage and compute resources by specifying the
maximum amount of time that vApps and vApp templates can run or be stored.
vApp maximum runtime lease is the maximum time a vApp can run before being automatically suspended.
Maximum storage lease time is the maximum amount of time a non-running vApp and vApp template can stay
in the organization before being marked as an expired item.
Expired items are visible in the “My Cloud” tab –”Expired Items” menu.

Proximus PLC under Belgian Public Law, Bd. du Roi Albert II 27, B-1030 Brussels, Belgium, VAT BE 0202.239.951, Brussels Register of Legal Entities, Giro BE50 0001 7100
3118 BPOTBEB Page 11 of 106
Expired items can be deleted or renewed.
3.1.2.2 Quotas and limits
Quotas make it possible to define the number of virtual machines that can run and exist inside the organization
at a given time. Quotas can be adapted by the organization administrator.
Limits show the limit set for the number of operations that can be executed at the same time in the
organization (these parameters cannot be changed). This is a way of avoiding resource shortages:
• Limit the number of resource-intensive operations such as copy, move, upload, etc. for each user
inside an organization
• Limit the number of resource-intensive operations such as copy, move, upload, etc. for a complete
organization
• Limit the number of connection consoles for each virtual machine1. This parameter must always be
set to a value lower than 4
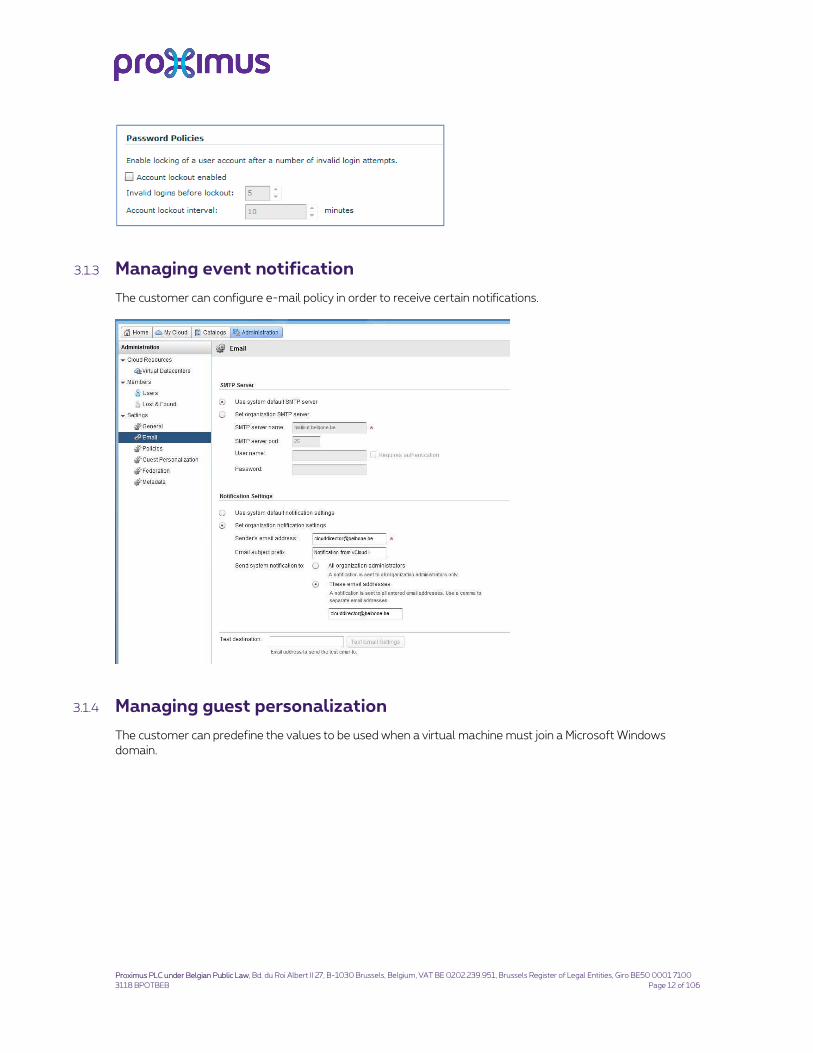
3.1.2.3 Password policies
The customer can enforce log-on security by using a lock mechanism when wrong passwords are used several
times for an account.
1 The parameter does not influence the usage of connection protocols such as RDP and VNC to access a virtual machine.
Proximus PLC under Belgian Public Law, Bd. du Roi Albert II 27, B-1030 Brussels, Belgium, VAT BE 0202.239.951, Brussels Register of Legal Entities, Giro BE50 0001 7100
3118 BPOTBEB Page 12 of 106
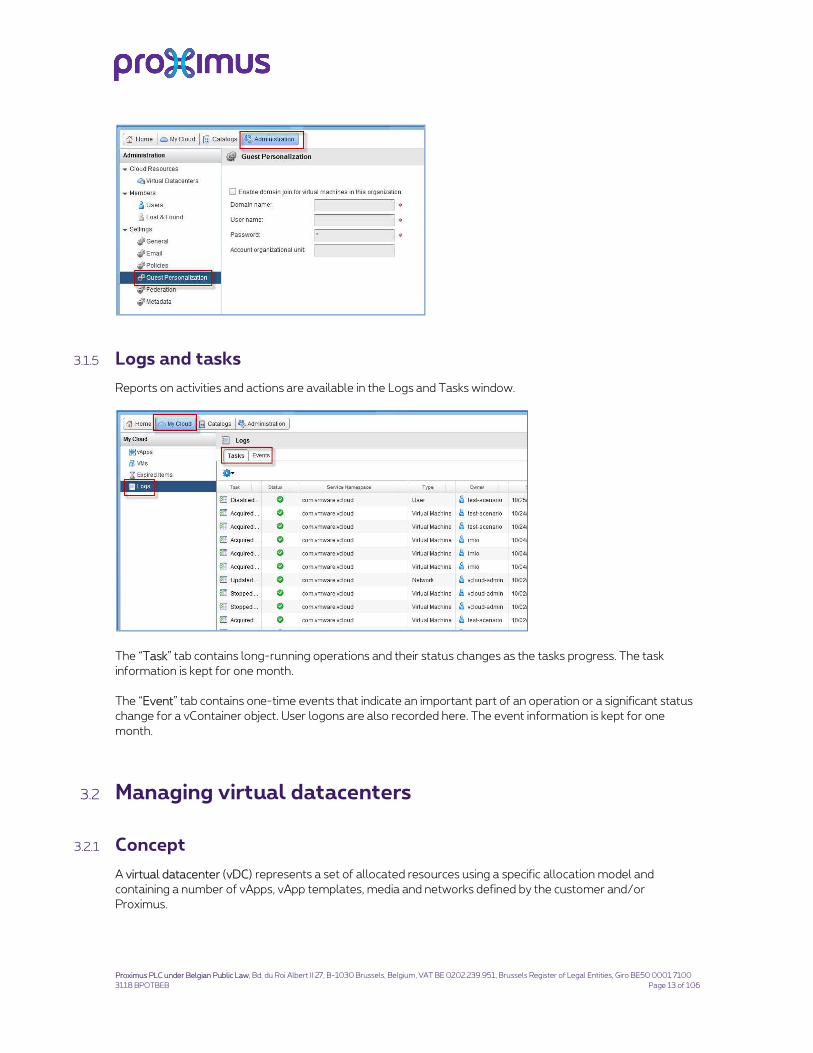
3.1.3 Managing event notification
The customer can configure e-mail policy in order to receive certain notifications.
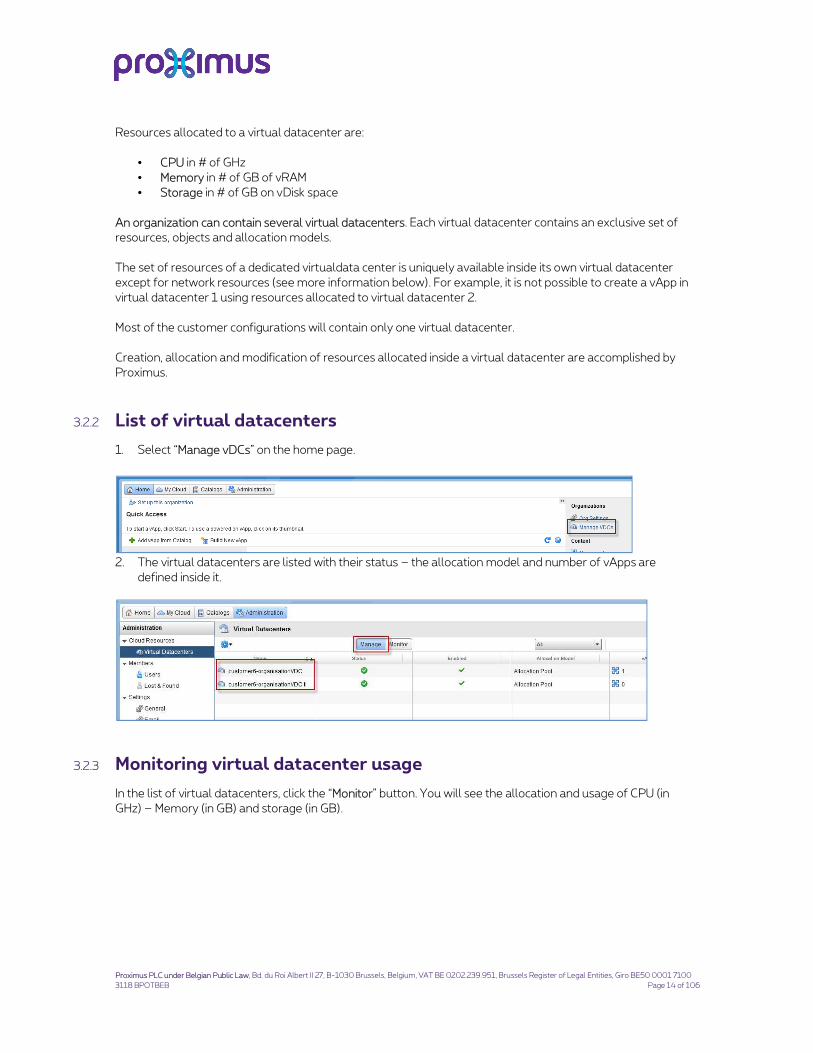
3.1.4 Managing guest personalization
The customer can predefine the values to be used when a virtual machine must join a Microsoft Windows
domain.
Proximus PLC under Belgian Public Law, Bd. du Roi Albert II 27, B-1030 Brussels, Belgium, VAT BE 0202.239.951, Brussels Register of Legal Entities, Giro BE50 0001 7100
3118 BPOTBEB Page 13 of 106
3.1.5 Logs and tasks
Reports on activities and actions are available in the Logs and Tasks window.
The “Task” tab contains long-running operations and their status changes as the tasks progress. The task
information is kept for one month.
The “Event” tab contains one-time events that indicate an important part of an operation or a significant status
change for a vContainer object. User logons are also recorded here. The event information is kept for one
month.
3.2 Managing virtual datacenters
3.2.1 Concept
A virtual datacenter (vDC) represents a set of allocated resources using a specific allocation model and
containing a number of vApps, vApp templates, media and networks defined by the customer and/or
Proximus.
Proximus PLC under Belgian Public Law, Bd. du Roi Albert II 27, B-1030 Brussels, Belgium, VAT BE 0202.239.951, Brussels Register of Legal Entities, Giro BE50 0001 7100
3118 BPOTBEB Page 14 of 106
Resources allocated to a virtual datacenter are:
• CPU in # of GHz
• Memory in # of GB of vRAM
• Storage in # of GB on vDisk space
An organization can contain several virtual datacenters. Each virtual datacenter contains an exclusive set of
resources, objects and allocation models.
The set of resources of a dedicated virtualdata center is uniquely available inside its own virtual datacenter
except for network resources (see more information below). For example, it is not possible to create a vApp in
virtual datacenter 1 using resources allocated to virtual datacenter 2.
Most of the customer configurations will contain only one virtual datacenter.
Creation, allocation and modification of resources allocated inside a virtual datacenter are accomplished by
Proximus.
3.2.2 List of virtual datacenters
1. Select “Manage vDCs” on the home page.
2. The virtual datacenters are listed with their status – the allocation model and number of vApps are
defined inside it.
3.2.3 Monitoring virtual datacenter usage
In the list of virtual datacenters, click the “Monitor” button. You will see the allocation and usage of CPU (in
GHz) – Memory (in GB) and storage (in GB).

Proximus PLC under Belgian Public Law, Bd. du Roi Albert II 27, B-1030 Brussels, Belgium, VAT BE 0202.239.951, Brussels Register of Legal Entities, Giro BE50 0001 7100
3118 BPOTBEB Page 15 of 106
3.2.4 Listing virtual datacenter content
In the list of virtual datacenters, click the name of a virtual datacenter. A new window containing access to the
vApp, vApp template, storage profiles, org vDC networks, edge gateway and media available inside that
specific datacenter will appear.
3.2.4.1 Storage profile
A storage profile represents an amount of storage space allocated to a specific virtual datacenter. This storage
space can contain vApp, virtual machines, vApp or virtual machine templates or media. A storage profile has
four characteristics:
• Size in GB
• Type of disk (Performance – Capacity)
• Physical location (Evere – Machelen)2
• High availability storage
A virtual datacenter may contain several storage profiles. A created virtual machine cannot span several
storage profiles (all the disks that are part of the virtual machine must reside in the same storage profile).
2 As the compute resources (underlying hypervisor) are spread over the two data centers most of the time, virtual machines are
automatically moved to a location near their physical storage whenever possible in order to avoid SAN traffic on the data center
interconnect as much as possible.
If you want to implement a high availability solution where two virtual machines never run on the same underlying host, you can use
two storage profiles located in two different data centers. This way, the virtual machine located in data center 1 will run on hosts
located in data center 1 whereas the virtual machine located in data center 2 will run on hosts located in data center 2, even if the
hosts are part of the same compute resource group.

Proximus PLC under Belgian Public Law, Bd. du Roi Albert II 27, B-1030 Brussels, Belgium, VAT BE 0202.239.951, Brussels Register of Legal Entities, Giro BE50 0001 7100
3118 BPOTBEB Page 16 of 106
3.3 Managing networks
Organization networks allow virtual machines to communicate with each other or to provide access to the
outside (Explore or Internet). Organization networks are available for all virtual machines inside a specified
vContainer. An organization network cannot be shared between several vContainers.
Several organization networks of different types can coexist inside a specified vContainer.
Type Description Organization
administrator rights
Direct network This network type represents a VLAN that is directly
connected to the outside. This network is terminated at the
vContainer’s external firewall.
The IP address range on this VLAN is assigned and
managed by Proximus. The IP addresses are routable to
Explore/ Internet (with additional natting at the external
firewall level). vContainer can automatically assign IP
addresses to connected virtual machines.
None
NAT-routed
network
This network represents a VLAN that is connected to the
outside by means of an edge gateway appliance.
IP subnet on this VLAN is assigned by Proximus and is not
routable to Explore/Internet. Connection to or from the
outside is done by means of NAT delivered by an edge
gateway appliance. Firewalling, load balancing, IP sec
tunneling and static routing are also possible.
• Modify IP pool
• Configure natting
policy
• Configure firewall
policy
• Configure DHCP
• Configure static
routing
• Configure SSL/VPN
• Configure Load
Balancing
Internal
network
This network represents a VLAN that has no direct or
indirect connection to the outside. It is an isolated network.
Virtual machines which are connected only to this kind of
network cannot reach the outside world.
• Modify IP pool
• Configure DHCP

Proximus PLC under Belgian Public Law, Bd. du Roi Albert II 27, B-1030 Brussels, Belgium, VAT BE 0202.239.951, Brussels Register of Legal Entities, Giro BE50 0001 7100
3118 BPOTBEB Page 17 of 106
Direct and routed networks are connected to the outside world using an external network. The customer does
not have access to the external network which can be considered as a type of management network for
vContainer.
Vapp network – Internal ip subnet
Vapp network – Internal ip subnet
NAT-routed Organization network – Internal ip subnet
External network –External ip subnet (routed inside DC)
Vir
tua
l d
ata
cen
ter
1
Vir
tua
l d
ata
cen
ter
2
Vapp 2 Vapp 1
Organization ABC
Internet – public ip
address
Explore – public ip address
Direct connect network – External ip subnet (routed inside DC)
Vapp network – Internal ip subnet
Internal Organization network – Internal ip subnet
Vapp network – Internal ip subnet
3.3.1 List of available networks
Organization networks are listed per vDC where they are available. Some organization networks can be
available only in one vDC while others are shared between all defined vDCs.
To see the organization networks available with a specific vDC:
Double-click the “target” vDC in the administration tab and select the “Org vDC Networks” tab. The list of
available organization networks is displayed, including their characteristics such as status – gateway address –
type – vDC owner – etc.

Proximus PLC under Belgian Public Law, Bd. du Roi Albert II 27, B-1030 Brussels, Belgium, VAT BE 0202.239.951, Brussels Register of Legal Entities, Giro BE50 0001 7100
3118 BPOTBEB Page 18 of 106
3.3.2 Routed-Nat organization network
3.3.2.1 Edge gateway
A routed-nat organization network is connected to the outside world using an edge gateway.
The edge gateway is configured by Proximus and resides within a dedicated virtual datacenter. The edge
gateway is connected to the external network through one link. Several (up to 9) routed-nat organization
networks can be connected to a single edge gateway.
Several edge gateways can be defined within a vContainer in one or more vDCs.
To see the edge gateways available within a specific vDC, proceed as follows:
Double-click the “target” vDC in the Administration tab and select the “Edge Gateways” tab. The list of
available edge gateways is displayed, including their characteristics such as status – multi-interface mode –
connected networks – etc.
The properties of an edge gateway can be viewed by right-clicking the name of the edge gateway and
selecting Properties. All available properties are read-only and are defined or modified upon request by
Proximus’s vContainer administrator.

Proximus PLC under Belgian Public Law, Bd. du Roi Albert II 27, B-1030 Brussels, Belgium, VAT BE 0202.239.951, Brussels Register of Legal Entities, Giro BE50 0001 7100
3118 BPOTBEB Page 19 of 106
External IP addresses (IP addresses on the external network) given to the edge gateway become visible upon
right-clicking the name of the edge gateway and selecting “External IP Allocations”.
3.3.2.2 Edge gateway reset
In case of an issue, the configuration of an edge gateway can be reapplied by right-clicking the name of the
edge gateway and selecting “Re-apply Service Configuration…” or it can be completely redeployed by right-
clicking the name of the edge gateway and selecting “Re-deploy…”
3.3.2.3 Creating a routed-nat organization network
Routed-nat networks are created by Proximus during the design phase or can be created by the vContainer
administrator afterwards.
To create an additional routed-nat organization network, proceed as follows:
1. Select a vDC where you want to create the organization (the vDC must contain an edge gateway that has
no routed-nat organization network connected if the edge gateway does not allow multi-interface, or
must contain an edge gateway with multi-interface enabled), select the “Org vDC Networks” tab and click
the green cross. The vDC will be the owner of the routed-nat organization network

Proximus PLC under Belgian Public Law, Bd. du Roi Albert II 27, B-1030 Brussels, Belgium, VAT BE 0202.239.951, Brussels Register of Legal Entities, Giro BE50 0001 7100
3118 BPOTBEB Page 20 of 106
2. Select “Create a routed network by connecting to an existing edge gateway” and select the edge gateway
that will be used to terminate it.
3. Define the network parameters of the routed-nat organization network:
• Gateway address
• Network mask
• DNS
• Static IP Pool

Proximus PLC under Belgian Public Law, Bd. du Roi Albert II 27, B-1030 Brussels, Belgium, VAT BE 0202.239.951, Brussels Register of Legal Entities, Giro BE50 0001 7100
3118 BPOTBEB Page 21 of 106
4. Give a name to and a description of the organization network and select “Share this network with other
vDCs in the organization” if you want the newly created network to be visible in the entire vContainer.
Sharing of the organization network can be removed afterwards in the general tab of the organization
network properties.
5. Review the parameters and click Finish.
3.3.2.4 Configuring a routed-nat organization network
3.3.2.4.1 List – modify IP configuration
IP address ranges and the DNS can be changed on a routed organization network. The range must reside
within the defined subnet (check the default gateway and the associated subnet mask).
1. Select “Properties” of a network.
2. On the “Network Specification” tab, you can modify the DNS parameters and add/modify/remove static IP
pool.

Proximus PLC under Belgian Public Law, Bd. du Roi Albert II 27, B-1030 Brussels, Belgium, VAT BE 0202.239.951, Brussels Register of Legal Entities, Giro BE50 0001 7100
3118 BPOTBEB Page 22 of 106
3.3.2.4.2 Configure DHCP
1. Select “Configure Services” upon right-clicking the name of a network.
2. On the “DCHP” tab you can add – edit – delete ranges:
a. Enable/Disable DHCP on that network
b. Define the range of IP addresses that can be dynamically allocated. The range of DHCP IP
addresses cannot overlap the static IP pool defined for that network
c. Define the lease time

Proximus PLC under Belgian Public Law, Bd. du Roi Albert II 27, B-1030 Brussels, Belgium, VAT BE 0202.239.951, Brussels Register of Legal Entities, Giro BE50 0001 7100
3118 BPOTBEB Page 23 of 106
3.3.2.4.3 Configuring NAT : network traffic from the inside to the outside
Virtual machines connected behind a routed-nat network receive a private IP address that cannot be routed.
The edge gateway connected to that network allows the natting of the virtual machine’s private IP address
towards a routable IP address available on the external network.
A list of predefined IP addresses available for natting can be found inside the configuration of the edge
gateway that provides the connectivity. The list of available IP addresses is defined by Proximus during the
design phase. To find the list of IP addresses, proceed as follows:
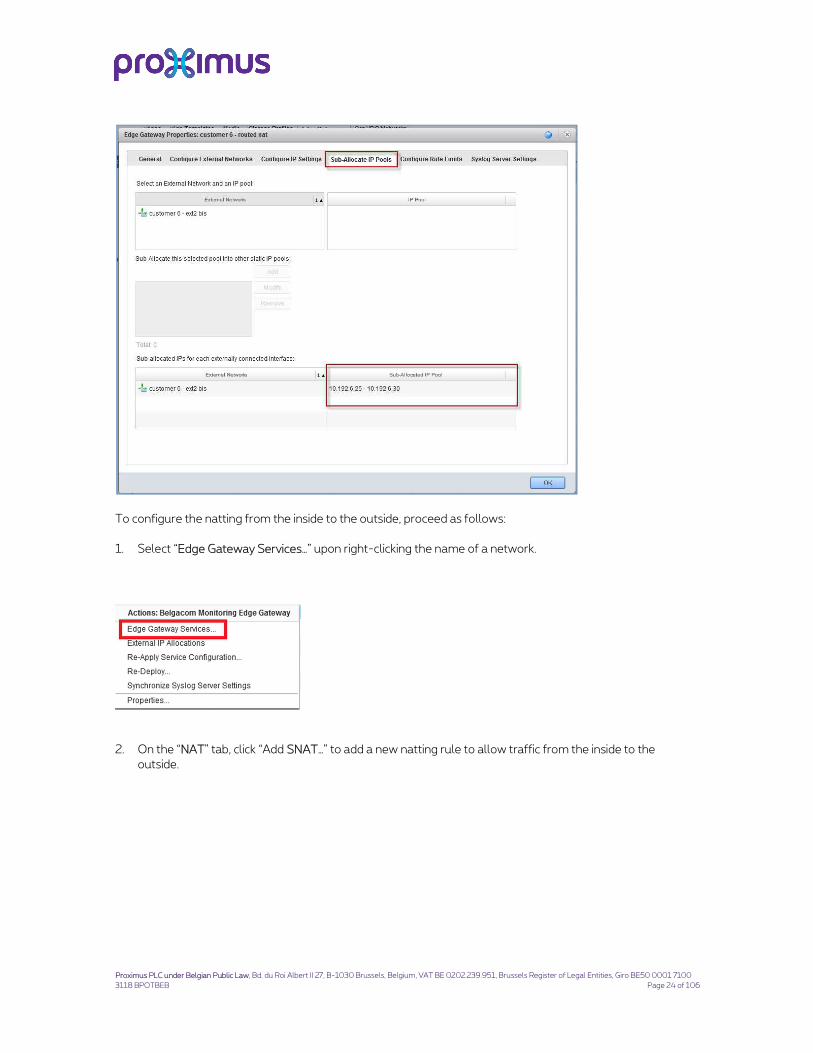
1. Select “Properties” of the edge gateway.
2. Select the “Sub-Allocate IP Pools” tab and look at the available range displayed in the right column of the
table “Sub-Allocated IPs for each externally connected interface:”
Proximus PLC under Belgian Public Law, Bd. du Roi Albert II 27, B-1030 Brussels, Belgium, VAT BE 0202.239.951, Brussels Register of Legal Entities, Giro BE50 0001 7100
3118 BPOTBEB Page 24 of 106
To configure the natting from the inside to the outside, proceed as follows:
1. Select “Edge Gateway Services…” upon right-clicking the name of a network.
2. On the “NAT” tab, click “Add SNAT…” to add a new natting rule to allow traffic from the inside to the
outside.

Proximus PLC under Belgian Public Law, Bd. du Roi Albert II 27, B-1030 Brussels, Belgium, VAT BE 0202.239.951, Brussels Register of Legal Entities, Giro BE50 0001 7100
3118 BPOTBEB Page 25 of 106
3. On the “Add Source NAT Rule” window, fill in the following values:
• Applied on: enter the external network to which the edge gateway of the routed-nat network is
connected
• Original source IP: enter the IP address of the virtual machine that you want to allow to
communicate to the outside
• Translated source IP: enter an IP address from the allocated range on the external network (see
above to find the list of available addresses)
4. The new NAT rule is available in the list of NAT rules. The NAT rule can be modified (edit) or deleted.

Proximus PLC under Belgian Public Law, Bd. du Roi Albert II 27, B-1030 Brussels, Belgium, VAT BE 0202.239.951, Brussels Register of Legal Entities, Giro BE50 0001 7100
3118 BPOTBEB Page 26 of 106
Several virtual machines (with different IP addresses) can use the same external IP address to reach the
outside world.
3.3.2.4.4 Configuring network traffic from the outside to the inside
Virtual machines connected behind a routed network receive a private IP address that cannot be routed. The
edge gateway connected to that network allows the natting of the virtual machine private IP address towards a
routable IP address available on the external network.
A list of predefined IP addresses available for natting can be found within the configuration of the edge
gateway that provides the connectivity. The list of available IP addresses is defined by Proximus during the
design phase. To find the list of IP addresses, proceed as follows:
1. Select “Properties” of the edge gateway.

Proximus PLC under Belgian Public Law, Bd. du Roi Albert II 27, B-1030 Brussels, Belgium, VAT BE 0202.239.951, Brussels Register of Legal Entities, Giro BE50 0001 7100
3118 BPOTBEB Page 27 of 106
2. Select the “Sub-Allocate IP Pools” tab and look at the available range displayed in the right column of
the table “Sub-Allocated IPs for each externally connected interface:”
To configure the natting from the outside to the inside:
1. Select “Edge Gateway Services…” upon right-clicking the name of a network.

Proximus PLC under Belgian Public Law, Bd. du Roi Albert II 27, B-1030 Brussels, Belgium, VAT BE 0202.239.951, Brussels Register of Legal Entities, Giro BE50 0001 7100
3118 BPOTBEB Page 28 of 106
2. On the “NAT” tab, click “Add DNAT…” to add a new natting rule to allow traffic from the outside to the
inside.
3. In the “Add Destination NAT Rule” window, fill in the following values:
a. Applied on: enter the external network to which the edge gateway of the routed-nat network is
connected
b. Original (external) IP: enter an IP address from the allocated range on the external network (see
above to find the list of available addresses)
c. Protocol
d. Original port or ICMP type
e. Translated (internal) IP: enter the IP address of the virtual machine that you want to allow to be
reachable from the outside
f. Translated port
Proximus PLC under Belgian Public Law, Bd. du Roi Albert II 27, B-1030 Brussels, Belgium, VAT BE 0202.239.951, Brussels Register of Legal Entities, Giro BE50 0001 7100
3118 BPOTBEB Page 29 of 106
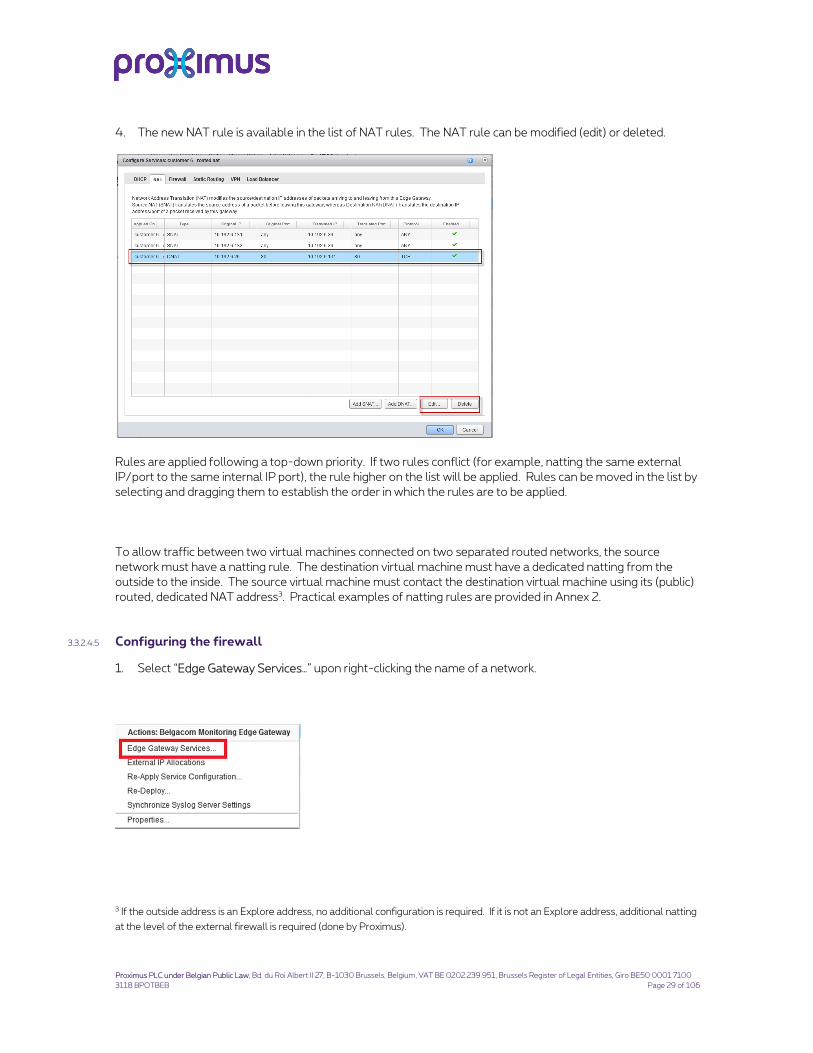
4. The new NAT rule is available in the list of NAT rules. The NAT rule can be modified (edit) or deleted.
Rules are applied following a top-down priority. If two rules conflict (for example, natting the same external
IP/port to the same internal IP port), the rule higher on the list will be applied. Rules can be moved in the list by
selecting and dragging them to establish the order in which the rules are to be applied.
To allow traffic between two virtual machines connected on two separated routed networks, the source
network must have a natting rule. The destination virtual machine must have a dedicated natting from the
outside to the inside. The source virtual machine must contact the destination virtual machine using its (public)
routed, dedicated NAT address3. Practical examples of natting rules are provided in Annex 2.
3.3.2.4.5 Configuring the firewall
1. Select “Edge Gateway Services…” upon right-clicking the name of a network.
3 If the outside address is an Explore address, no additional configuration is required. If it is not an Explore address, additional natting
at the level of the external firewall is required (done by Proximus).

Proximus PLC under Belgian Public Law, Bd. du Roi Albert II 27, B-1030 Brussels, Belgium, VAT BE 0202.239.951, Brussels Register of Legal Entities, Giro BE50 0001 7100
3118 BPOTBEB Page 30 of 106
2. On the “Firewall” tab you will see the list of existing firewall rules along with the option to enable/disable
the firewall. By default, the firewall is enabled and no rules are configured, meaning that the firewall is not
open at all. You can disable the firewall by deselecting “Enable firewall”.
3. New rules can be added. A rule allows or denies a type of traffic to reach or leave the routed-nat
organization network. When you add a rule, you need to specify the following:
a. A name for the rule
b. The source IP address4 and port
c. The destination IP address and port
d. The type of protocol
e. The type of action (allow or deny)
The rule can be enabled or disabled.
4 The source IP or destination IP can be:
• An IP address • A range of IP addresses • Internal -> apply the rule to all internal traffic • External -> apply the rule to all external traffic • Any -> apply the rule to traffic from any source or with any destination

Proximus PLC under Belgian Public Law, Bd. du Roi Albert II 27, B-1030 Brussels, Belgium, VAT BE 0202.239.951, Brussels Register of Legal Entities, Giro BE50 0001 7100
3118 BPOTBEB Page 31 of 106
Firewall rules are enforced in the order in which they appear in the list. New firewall rules are added at the end
of the list. Drag the firewall rules to establish the order of priority in which the rules are to be applied.
Syslog functionality is not activated in this release of vContainer.
3.3.2.4.6 Configuring a site-to-site VPN
IP sec VPN tunnels can be implemented between:
• Organization networks (routed type) inside a vContainer
• Between organization networks (routed type) that are part of a different vContainer
• Between an organization network (routed type) and a remote network
The following requirements must be met in order to build the tunnel:
• The following ports must be opened:
o IP Protocol ID 50 (ESP)
o IP Protocol ID 51 (AH)
o UDP port 500 (IKE)
o UDP port 4500
• The IP range used on the different organization networks must not overlap
3.3.2.4.7 VPN inside a vContainer
The following procedure must be followed:
1. Select “Edge Gateway Services…” upon right-clicking the name of a network.

Proximus PLC under Belgian Public Law, Bd. du Roi Albert II 27, B-1030 Brussels, Belgium, VAT BE 0202.239.951, Brussels Register of Legal Entities, Giro BE50 0001 7100
3118 BPOTBEB Page 32 of 106
2. Select the “VPN” tab, check “Enable VPN” and click “Add”.
“Enable VPN” must be checked on both sides, otherwise tunneling will fail.
3. The “Add a Site-to-Site VPN configuration” window will appear:
a. Give a name to and a description of the VPN tunnel
b. Select the value “a network in this organization” in the “Establish VPN to:” dropdown list
c. Select “Peer Edge Gateway” if the other organization network is connected behind it. (It is not
possible to build a tunnel between two routed-nat organization networks connected behind the
same edge gateway.)
d. Select (by highlighting) the local network and the peer network
e. Define the VPN connection settings (the default values are fine)
i. The external network to use on each point (the dropdown list should contain only one
element, since multiport is not allowed in vContainer). Public IP should not be used as the
connection occurs only within a vContainer.
ii. The encryption protocol and the associated key.

Proximus PLC under Belgian Public Law, Bd. du Roi Albert II 27, B-1030 Brussels, Belgium, VAT BE 0202.239.951, Brussels Register of Legal Entities, Giro BE50 0001 7100
3118 BPOTBEB Page 33 of 106
4. It may take up to two minutes to establish a connection. Once the connection is established, a green check
mark appears behind the name of the VPN tunnel.
The VPN tunneling configuration can be edited or removed afterwards.
3.3.2.4.8 VPN between vContainers
Proximus delivers support only for configurations in which both vContainer instances are defined and managed
on Proximus infrastructure.
The following procedure must be followed:
1. Select “Edge Gateway Services…” upon right-clicking the name of a network.

Proximus PLC under Belgian Public Law, Bd. du Roi Albert II 27, B-1030 Brussels, Belgium, VAT BE 0202.239.951, Brussels Register of Legal Entities, Giro BE50 0001 7100
3118 BPOTBEB Page 34 of 106
2. Select the “VPN” tab, check “Enable VPN” and click “Add”.
“Enable VPN” must be checked on both sides, otherwise tunneling will fail.
If the external IP address of the edge gateway connecting the organization network to the external
network is further natted (on the external physical firewall), the associated public IP address must be
mentioned in the “Public Address” field. The same operation must be repeated for the “target”
organization network on the target vContainer.

Proximus PLC under Belgian Public Law, Bd. du Roi Albert II 27, B-1030 Brussels, Belgium, VAT BE 0202.239.951, Brussels Register of Legal Entities, Giro BE50 0001 7100
3118 BPOTBEB Page 35 of 106
3. The “Add a Site-to-Site VPN configuration” window will appear:
a. Give a name to and a description of the VPN tunnel
b. Select the value “a network in another organization” in the “Establish VPN to:” dropdown list
c. Click the “Login to Remote VCD” button.
d. Type the reference (vContainer URL – Organization – Username – Password) of the target
vContainer in the window and click OK. Be aware that organization name is key sensitive.
e. Allow Java plugin to run

Proximus PLC under Belgian Public Law, Bd. du Roi Albert II 27, B-1030 Brussels, Belgium, VAT BE 0202.239.951, Brussels Register of Legal Entities, Giro BE50 0001 7100
3118 BPOTBEB Page 36 of 106
f. Select the Remote Organization VDCs and remote Peer Edge Gateway if the target organization
network is connected behind it
g. Select (by highlighting) the local network and the peer remote network
h. Define the VPN connection settings:
i. The external network to use on each point (the dropdown list should contain only one
element as multiport is not allowed in vContainer). Public IP should be used if natting is
defined on the external firewall.
ii. The encryption protocol and the associated key.
5. It may take up to two minutes to establish a connection. Once the connection is established, a green check
mark appears behind the name of the VPN tunnel.

Proximus PLC under Belgian Public Law, Bd. du Roi Albert II 27, B-1030 Brussels, Belgium, VAT BE 0202.239.951, Brussels Register of Legal Entities, Giro BE50 0001 7100
3118 BPOTBEB Page 37 of 106
The VPN tunneling configuration can be edited or removed afterwards.
3.3.2.4.9 VPN to remote network
Proximus does not deliver any support on this configuration. Configuring remote devices to connect to a VPN
based on vContainer edge gateway requires an understanding of IPsec and the supported policies to
successfully establish an encrypted tunnel
vContainer allows the creation of site-to-site tunnels using IPsec. It supports NAT-T traversal for using IPsec through network address translation (NAT) devices.
Pre‐shared key mode, IP unicast traffic, and NAT-T traversal with no dynamic routing protocols are supported
between the Edge device and peers. Behind each remote VPN endpoint, multiple subnets can be configured to
connect to the network behind a vCloud Networking and Security Edge device over IPsec tunnels. These
networks must have non‐overlapping address ranges.
Phase 1
The following IKE Phase 1 parameters are used by the egde gateway VPN:
• Main mode. • Pre-shared key authentication mode. • 3DES or AES128 encryption. • SHA1 authentication. • MODP Group 2 (1024 bits). • SA lifetime of 28800 seconds (8 hours). • Disable ISAKMP aggressive mode.
Phase 2
The following additional parameters for IKE Phase 2 are supported:
• Diffie-Helman Group 2/5 (1024 bit/1536 bit, respectively). • Perfect Forward Secrecy (PFS). • ESP tunnel mode. • SA lifetime of 3600 seconds (one hour).
Edge gateway proposes a policy that requires 3DES or AES128 (configurable, although AES is recommended), SHA1, PSK, and DH Group 2/5.
To allow IPsec VPN traffic, the following ports must be open on firewalls between the two endpoints:
• Protocol 50 ESP. • Protocol 51 AH. • UDP port 500 IKE.

Proximus PLC under Belgian Public Law, Bd. du Roi Albert II 27, B-1030 Brussels, Belgium, VAT BE 0202.239.951, Brussels Register of Legal Entities, Giro BE50 0001 7100
3118 BPOTBEB Page 38 of 106
• UDP port 4500.
The extern IP address for the Edge gateway must be accessible to the remote endpoint, either directly or using NAT. In a NAT deployment, the external address of the edge gateway must be translated into a publicly accessible address. Remote VPN endpoints then use this public address to access the edge gateway.
It is also possible for the remote VPN endpoints to be located behind an NAT device, although on both ends a static one‐to‐one NAT is required for the external IP address.
VPNs are used to provide secure access to a remote vContainer organization networks, and consumers should be aware of any security implications. A guideline for VPN configuration is to filter and restrict VPN traffic to destinations that are necessary. vContainer can also apply firewall rules to VPN traffic.
vContainer IPsec VPN has a maximum of 10 sites per edge gateway.
The following features are not currently supported :
• Remote endpoints with dynamic IP addresses. • Site-to-site VPNs at the vApp network level (available only to organization virtual datacenter networks). • SSL VPNs. These typically support per-user tunnels as opposed to network tunnels with IPsec VPNs, work
over HTTPS, and are often based on vendor specific implementations. • IPv6 support. • Authentication types other than pre-shared keys, for example, certificates. • Fenced vApps (VPN can be enabled only on routed networks).
The following procedure must be followed:
1. Select “Edge Gateway Services…” upon right-clicking the name of a network.
2. Select the “VPN” tab, check “Enable VPN” and click “Add”.
“Enable VPN” must be checked on both sides, otherwise tunneling will fail.

Proximus PLC under Belgian Public Law, Bd. du Roi Albert II 27, B-1030 Brussels, Belgium, VAT BE 0202.239.951, Brussels Register of Legal Entities, Giro BE50 0001 7100
3118 BPOTBEB Page 39 of 106
If the external IP address of the edge gateway connecting the organization network to the external
network is further natted (on the external physical firewall), the associated public IP address must be
mentioned in the “Public Address” field.
3. Click the “Add” button. The “Add VPN Tunnel” window will appear:
a. Give a name to the VPN tunnel
b. Enable VPN configuration
c. Select the value “a remote network” in the tunnel dropdown list
d. Highlight the local network
e. Fill in the remote subnets, comma separated
f. Fill in the VPN connection settings
i. Local Endpoint: the external network to which the local edge gateway is connected
(since multiple external networks are not allowed in vContainer, the dropdown list
should contain only one external network).
ii. Local ID : Fill in the edge IP address (external IP address)
iii. Peer ID.: Fill in the remote public IP
iv. Peer IP: Fill in the remove public IP address of the remote peer.
v. Encryption protocol : AES-256
vi. Shared Key : Fill in the agreed shared key
vii. MTU size : 1500

Proximus PLC under Belgian Public Law, Bd. du Roi Albert II 27, B-1030 Brussels, Belgium, VAT BE 0202.239.951, Brussels Register of Legal Entities, Giro BE50 0001 7100
3118 BPOTBEB Page 40 of 106
The VPN tunneling configuration can be edited or removed afterwards.
The configuration proposed here below is an example of configuration on the remote device.

Proximus PLC under Belgian Public Law, Bd. du Roi Albert II 27, B-1030 Brussels, Belgium, VAT BE 0202.239.951, Brussels Register of Legal Entities, Giro BE50 0001 7100
3118 BPOTBEB Page 41 of 106
3.3.2.4.10 Configuring static routing
A routed network can be configured in order to provide static routing services between two different vApp
networks connected to a same organization network. Static routes allow traffic between vApp networks.
The concept of the vApp network is explained later in this manual.
The prerequisites for this are:
• vApp network IP addresses must not overlap.
• The firewall must be configured to allow traffic between the networks.
• The static route only works when the associated vApp is running. If you change the parent network of a
vApp, delete a vApp or delete a vApp network and the vApp includes static routes, those routes will not
function anymore and must be removed.
• The vApp network must be defined with the option “always use assigned IP addresses until this vApp or
associated network is deleted” (click “Apply” when the modification has been made).
To configure it, you must:
1. Enable the static routing function on the organization network where the vApp networks are
connected. Select “Edge Gateway Services…” upon right-clicking the target organization network –
Select the “Static Routing” tab and check “Enable static routing”.
Phase1
---------
Peer: host public ip address (mip)
Local id: own public ip address
Remote id: edge gateway private ip address
Ahtenticatie methode: Preshare-key
Hashing/authenticatie: sha-1
Keygroup: Diffie-Hellman group 2
Encryptie: aes-256
Lifetime: standaard (28800)
Phase2
---------
Protocol: esp
Encryptie: Aes-256
Perfect Forward Secrecy: Diffie-Hellman group 5
Authenticatie: sha-1
Lifetime: standaard (3600)

Proximus PLC under Belgian Public Law, Bd. du Roi Albert II 27, B-1030 Brussels, Belgium, VAT BE 0202.239.951, Brussels Register of Legal Entities, Giro BE50 0001 7100
3118 BPOTBEB Page 42 of 106
2. Add the static routing for the first vApp network:
a. Click “Add” on the “Static Routing”
b. In the “Add Static Route” window, fill in the following:
i. Name = name of the static route
ii. Network = IP subnet of the first vApp network in CIDR format (e.g.: 192.168.1.0/24)
iii. Next Hop IP = external IP address of the vshield edge used by the vApp network.
You can retrieve the information when you open the “Static Routing” tab on the
“Configure Services” menu of the vApp vshield edge (external IP address)

Proximus PLC under Belgian Public Law, Bd. du Roi Albert II 27, B-1030 Brussels, Belgium, VAT BE 0202.239.951, Brussels Register of Legal Entities, Giro BE50 0001 7100
3118 BPOTBEB Page 43 of 106
iv. The new route is listed
3. The same operation must be repeated for the second vApp network.
The same operation can be directly initiated from the edge gateway using the static routing tab.
It is now possible to allow communication with virtual machines defined on both vApp networks without the
need to configure natting at the level of the organization network.
3.3.2.4.11 Configuring the Load Balancer
Edge gateways provide load balancing for TCP, HTTP, and HTTPS traffic.
You map an external IP address to a set of internal servers for load balancing. The load balancer accepts TCP,
HTTP or HTTPS requests on the external IP address and decides which internal server to use based on policy.
The configuration of the load balancing server uses 2 steps:
• Creation of the internal pools of servers that reside behind the edge gateway and provide the service
• Creation of the virtual servers (the external IP address(es) that will expose the redundant service to
the outside

Proximus PLC under Belgian Public Law, Bd. du Roi Albert II 27, B-1030 Brussels, Belgium, VAT BE 0202.239.951, Brussels Register of Legal Entities, Giro BE50 0001 7100
3118 BPOTBEB Page 44 of 106
NAT-routed Organization network
Load balancer server Pool
192.168.100.10 192.168.100.11
192.168.100.12
or
External IP
Virtual server that load balance
the requests to real servers in the
pool following selected policy
1. Select “Edge Gateway Services…” upon right-clicking the name of a network and choose the “Load
Balancer” tab.
3.3.2.4.12 Managing Pool Servers
A pool of servers is a group of virtual machines located on a routed-nat organization network that deliver a
common service in load balancing mode
To create a pool of servers, proceed as follows:
1. Select “Pool Servers” on the “Load Balancer” tab and click “Add”.

Proximus PLC under Belgian Public Law, Bd. du Roi Albert II 27, B-1030 Brussels, Belgium, VAT BE 0202.239.951, Brussels Register of Legal Entities, Giro BE50 0001 7100
3118 BPOTBEB Page 45 of 106
2. Give a name to and a description of the new pool of servers.
3. Select the service that the pool of servers will deliver (HTTP – HTTPS – TCP). For each service, define the
following:
a. The port that will be used for it
b. The type of balancing method:
i. Round Robin: each server is used in turn according to the weight assigned to it. This is the
smoothest and fairest algorithm when the server’s processing time remains equally
distributed.
ii. IP hash: elects a server based on a hash of the source and destination IP address of each
packet.
iii. URI: the left part of the URI (before the question mark) is hashed and divided by the total
weight of the running servers. The result designates which server will receive the request.
This ensures that a URI is always directed to the same server as long as no server goes up
or down. The URI is only valid for HTTP service.
iv. Least Connected: distributes client requests to multiple servers based on the number of
connections already on the server. New connections are sent to the server with the
fewest connections.

Proximus PLC under Belgian Public Law, Bd. du Roi Albert II 27, B-1030 Brussels, Belgium, VAT BE 0202.239.951, Brussels Register of Legal Entities, Giro BE50 0001 7100
3118 BPOTBEB Page 46 of 106
4. Configure the Health Check that will help to determine if a server in a pool is still active or must be
removed due to malfunctioning. The Heath Check is configured for the complete pool and per selected
service. For each service, define:
a. The port to monitor if it differs from the port to serve
b. The health check mode (depending on the service):
i. SSL: tests servers using SSLv3 client hello messages. The server is considered valid only
when the response contains server hello messages.
ii. HTTP: the GET / default method is used to detect server status. Only responses 2xx and
3xx are valid. Other responses (including a lack of response) indicate a server failure. The
/ default URI can be modified by specifying the URI on the “URI for HTTP service” field.
iii. TCP: TCP connection check.
c. The timer for the check to avoid too intensive checks and flip flap:
i. Interval: interval at which a server is checked.
ii. Timeout: time within which a response from the server must be received.
iii. Health threshold: number of consecutive successful health checks before a server is
declared operational.
iv. Unhealth threshold: number of consecutive unsuccessful health checks before a server is
declared dead.

Proximus PLC under Belgian Public Law, Bd. du Roi Albert II 27, B-1030 Brussels, Belgium, VAT BE 0202.239.951, Brussels Register of Legal Entities, Giro BE50 0001 7100
3118 BPOTBEB Page 47 of 106
5. Add Members (virtual machines) to the pool of servers:
a. Click “Add…” on the Managed Members windows (operation must be repeated for each server that
will be a member of the pool).
b. Add the characteristics of the virtual machines:
i. IP address
ii. Ratio weight (ratio of how many requests are to be served by this virtual machine)
iii. Port to services and monitor

Proximus PLC under Belgian Public Law, Bd. du Roi Albert II 27, B-1030 Brussels, Belgium, VAT BE 0202.239.951, Brussels Register of Legal Entities, Giro BE50 0001 7100
3118 BPOTBEB Page 48 of 106
6. Review the configuration and click “Finish” to activate it.

Proximus PLC under Belgian Public Law, Bd. du Roi Albert II 27, B-1030 Brussels, Belgium, VAT BE 0202.239.951, Brussels Register of Legal Entities, Giro BE50 0001 7100
3118 BPOTBEB Page 49 of 106
7. A green “v” icon in the status column indicates that the pool is working (it will take a few seconds before it
works after the configuration due to the health threshold)
Defined pool servers can be modified (using the Edit … button) or deleted afterwards.
3.3.2.4.13 Managing virtual servers
A virtual server is a virtual representation of a service delivered by the virtual machines running in a specified
pool server.
To create a virtual server, proceed as follows:
1. Select “Pool Servers” on the “Load Balancer” tab and click “Add”

Proximus PLC under Belgian Public Law, Bd. du Roi Albert II 27, B-1030 Brussels, Belgium, VAT BE 0202.239.951, Brussels Register of Legal Entities, Giro BE50 0001 7100
3118 BPOTBEB Page 50 of 106
2. Configure the following parameters in the “Add Virtual Server” window:
a. Name
b. Description
c. Location (interface on the edge gateway) where the virtual server will be active. It can be on
the internal interface using a free IP address on the internal network or on the external
interface using an IP address made available on the sub-allocate IP Pools of the edge
gateway where the load balancer is defined
d. IP address (as explained above)
e. Pool servers (defined in the section above) that will serve the requests
f. Services delivered:
i. Port
ii. Persistence method:
1. None
2. Cookies with cookie name and cookie mode
3. Sessionid
g. Enable or not
3. A green “v” icon in the “Enabled” column indicates that the virtual server is correctly configured.
Syslog functionality is not activated in this release of vContainer.
Defined virtual servers can be modified (using the “Edit …” button) or deleted afterwards.

Proximus PLC under Belgian Public Law, Bd. du Roi Albert II 27, B-1030 Brussels, Belgium, VAT BE 0202.239.951, Brussels Register of Legal Entities, Giro BE50 0001 7100
3118 BPOTBEB Page 51 of 106
3.3.3 Monitoring IP address usage on network
It is possible to see the IP address allocation inside a specified network.
1. Select “IP Allocations” upon right-clicking the name of a network.
On selecting “Connected vApps”, you can see the vApps connected to the network.

Proximus PLC under Belgian Public Law, Bd. du Roi Albert II 27, B-1030 Brussels, Belgium, VAT BE 0202.239.951, Brussels Register of Legal Entities, Giro BE50 0001 7100
3118 BPOTBEB Page 52 of 106
3.3.4 Resetting a network
If DCHP, firewall settings, natting, … do not behave as expected, the network can be reset (only available for
routed and internal network). This operation can take a few minutes. During the reset operation, network
services on the network are not available.
A reset must be done at the edge gateway level (see edge gateway reset above).
4. Working with catalogs
A catalog is a repository for vApp templates and media files in a vContainer. vContainer administrators can
create catalogs inside their vContainer and share them with other users in the vContainer.
All catalog operations are available on the “Catalogs” tab, which you can reach by clicking “Manage Catalog…”
from the home page or the “Catalogs” tab at the top of the main window.
The Catalogs main page shows the catalogs available inside your vContainer.
4.4 Private catalogs versus public catalogs
A private catalog is a catalog that you make for your vContainer. This catalog contains your own vApp
templates and media. The customer has full access to this catalog.

Proximus PLC under Belgian Public Law, Bd. du Roi Albert II 27, B-1030 Brussels, Belgium, VAT BE 0202.239.951, Brussels Register of Legal Entities, Giro BE50 0001 7100
3118 BPOTBEB Page 53 of 106
A public catalog is available to all vContainer customers. Proximus publishes a public catalog called “Public
templates” that contains ready-to-use vApp templates. The customer only has read access to the Proximus
public catalog.
From the Catalogs page, click “My Organization’s Catalogs” to access the private catalog list.
From the Catalogs page, click “Public Catalogs” to access the list of public catalogs (contains only the Proximus
catalog).
4.5 Adding a new catalog
1. Click the “+” icon to start the “Add Catalog” wizard when you are in the “My Organization’s Catalog” section
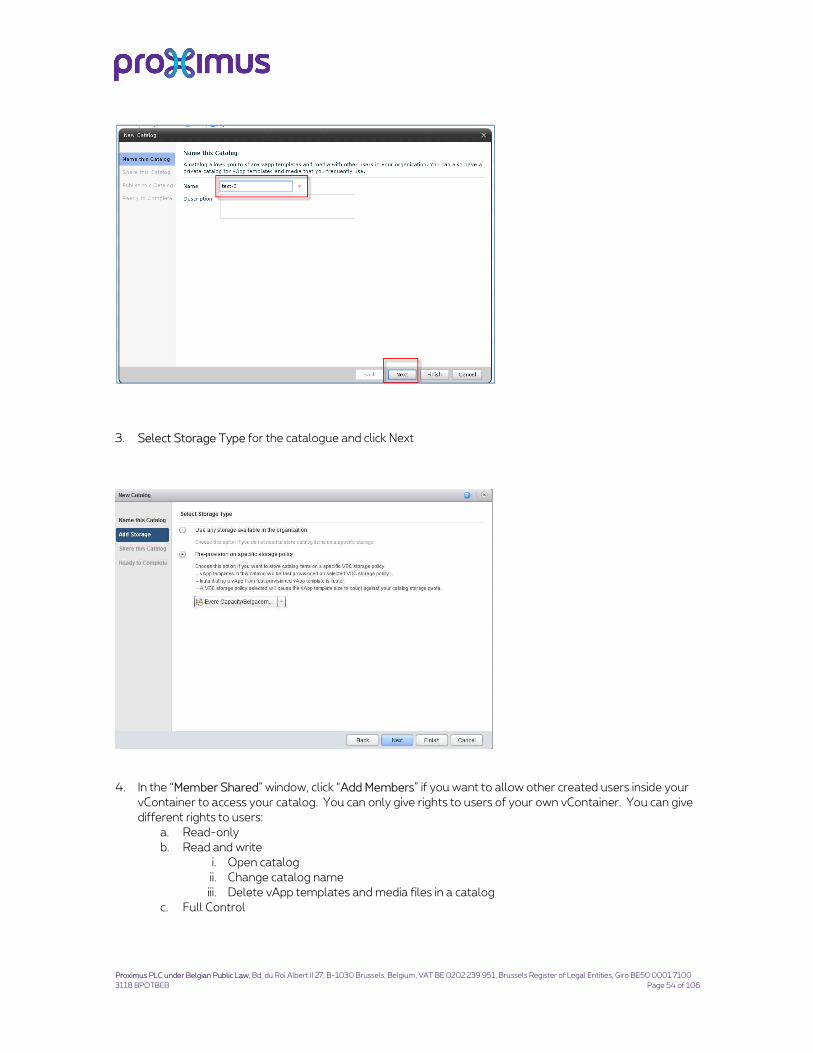
2. Give a name to the catalog and click “Next”.
Proximus PLC under Belgian Public Law, Bd. du Roi Albert II 27, B-1030 Brussels, Belgium, VAT BE 0202.239.951, Brussels Register of Legal Entities, Giro BE50 0001 7100
3118 BPOTBEB Page 54 of 106
3. Select Storage Type for the catalogue and click Next
4. In the “Member Shared” window, click “Add Members” if you want to allow other created users inside your
vContainer to access your catalog. You can only give rights to users of your own vContainer. You can give
different rights to users:
a. Read-only
b. Read and write
i. Open catalog
ii. Change catalog name
iii. Delete vApp templates and media files in a catalog
c. Full Control

Proximus PLC under Belgian Public Law, Bd. du Roi Albert II 27, B-1030 Brussels, Belgium, VAT BE 0202.239.951, Brussels Register of Legal Entities, Giro BE50 0001 7100
3118 BPOTBEB Page 55 of 106
Adding content to the catalog (either vApp template or media) is discussed in the chapter on vApp templates
and media.
4.6 Modifying the catalog
The properties of the catalog can be modified by right-clicking the name of the catalog and choosing what you
want to modify (owner, sharing, etc.).
The menu also allows you to delete the selected catalog.
4.7 Accessing catalog content
Clicking the name of a catalog will take you to a new window containing a “vApp Templates” tab and a “Media”
tab. By clicking the appropriate tab, you will see the list of vApp templates/media in that specific catalog.

Proximus PLC under Belgian Public Law, Bd. du Roi Albert II 27, B-1030 Brussels, Belgium, VAT BE 0202.239.951, Brussels Register of Legal Entities, Giro BE50 0001 7100
3118 BPOTBEB Page 56 of 106

Proximus PLC under Belgian Public Law, Bd. du Roi Albert II 27, B-1030 Brussels, Belgium, VAT BE 0202.239.951, Brussels Register of Legal Entities, Giro BE50 0001 7100
3118 BPOTBEB Page 57 of 106
5. Working with a vApp template
A vApp template is a “gold” image of a vApp that is loaded with a preconfigured operating system, applications,
network and data. These templates are part of a catalog. A vApp template can be deployed multiple times in
the form of a vApp.
5.1 Accessing a vApp template
Templates are part of a catalog (either organization or public catalogs). To view the list of templates for a
specific catalog, click the catalog name and choose the “vApp Templates” tab.
5.2 Viewing vApp template content
The content of the vApp template will be displayed if you double-click a vApp template name. A list of virtual
machines will be displayed.
Clicking a virtual machine name will give more details about it (see the chapter “Working with virtual machines”
for more information).
5.3 Creating a vApp template
There are several ways in which to create a vApp template. vApp templates are stored in a virtual data center.
They do not use compute resources but do use storage resources. vApp templates are always created inside a
catalog.

Proximus PLC under Belgian Public Law, Bd. du Roi Albert II 27, B-1030 Brussels, Belgium, VAT BE 0202.239.951, Brussels Register of Legal Entities, Giro BE50 0001 7100
3118 BPOTBEB Page 58 of 106
5.3.1 Uploading a vApp template
A vApp can be directly uploaded from an external source inside a catalog.
For this, the following prerequisites apply:
• The computer used as the upload source must have java plug-in 1.60_10 or later.
• The source must be in a non-compressed OVF format.
• You must ensure that the vmtools are installed on each virtual machine before using the template
(see the chapter “Working with virtual machines” for more information).
The upload is done using the “Upload” icon displayed above the description of a catalog vApp template.
Uploading a virtual machine can take time, depending on the size of the virtual machine and the available
bandwidth.
When uploading a vApp, you will need to specify:
• New vAPP template name
• The destination catalog
The maximum allowed size for an OVF upload in a shared vContainer is 300 GB. This is also the default size
for a dedicated vContainer but it can be adapted during the initial design phase.

Proximus PLC under Belgian Public Law, Bd. du Roi Albert II 27, B-1030 Brussels, Belgium, VAT BE 0202.239.951, Brussels Register of Legal Entities, Giro BE50 0001 7100
3118 BPOTBEB Page 59 of 106
The status of the download can be viewed by clicking the “Upload and download progress windows” button on
the “vApp Templates” tab. Delete – resume upload/download actions can be carried out from that window.
5.3.2 Saving from a vApp
An existing vApp can be saved as a vApp template inside a catalog. This functionality is useful when:
• You want to create a vApp template from scratch.
• You want to modify a configuration in an already existing vApp template.5
• You want to add virtual machines in an already existing vApp template.6
To do this, proceed as follows:
1. Right-click the stopped vApp (see below for vApp access) that you want to insert into a template and
select “Add to Catalog…”
2. Fill in the options for the new vApp template (name – storage lease).
You can choose what to do when your template is deployed:
• Make an identical copy of it. vApps that are created from this vApp template must follow the
guest OS settings of the vApp template. If you select this option, and guest customization is
enabled, the guest operating system is personalized;
• Customize VM settings. The guest operating system is personalized regardless of the vApp
template settings, and the guest operating system is personalized when the vApp is deployed.
5 To do this, you will need to deploy the template – make the modification – convert to a new template
6 To do this, you will need to deploy the template – make the modification – convert to a new template

Proximus PLC under Belgian Public Law, Bd. du Roi Albert II 27, B-1030 Brussels, Belgium, VAT BE 0202.239.951, Brussels Register of Legal Entities, Giro BE50 0001 7100
3118 BPOTBEB Page 60 of 106
This option requires that a supported version of VMware Tools be installed on all virtual
machines in the vApp.
5.4 Manipulating vApp templates
It is possible to:
• Move or copy a vApp template to another catalog or to another virtual data center.
• Delete a vApp template.
By right-clicking the vApp template name, you can view/modify its properties:
• Name
• Description
• The way the vApp is created when it is deployed from this template:
o Identical copy (overridden if guest customization is enabled on the virtual machine).
o Customize virtual machine settings.
• Reset lease: how long the deployed stopped vApp from that vApp template exists on the storage
before releasing it
• Do not use the “Gold Master” function

Proximus PLC under Belgian Public Law, Bd. du Roi Albert II 27, B-1030 Brussels, Belgium, VAT BE 0202.239.951, Brussels Register of Legal Entities, Giro BE50 0001 7100
3118 BPOTBEB Page 61 of 106
5.5 Downloading vApp templates
You can download a created vApp from your vContainer environment to the workstation you are using.
To do so, the following prerequisites must be met:
• The computer used as the download target must have java plug-in 1.60_10 or later
• Allow the running of the application “VMware vcloud Director File Transfer Client”
• The vApp is delivered in the OVF format.
To download, proceed as follows:
1. Right-click the name of the vApp template and select “Download”.

Proximus PLC under Belgian Public Law, Bd. du Roi Albert II 27, B-1030 Brussels, Belgium, VAT BE 0202.239.951, Brussels Register of Legal Entities, Giro BE50 0001 7100
3118 BPOTBEB Page 62 of 106
2. Enter the destination of the OVF template on your local workstation.

Proximus PLC under Belgian Public Law, Bd. du Roi Albert II 27, B-1030 Brussels, Belgium, VAT BE 0202.239.951, Brussels Register of Legal Entities, Giro BE50 0001 7100
3118 BPOTBEB Page 63 of 106
6. Working with media files
Media files (ISO) can be uploaded into a catalog and used for installing a specific application or operating
system into a created virtual machine.
6.1 Accessing media repositories
Media files are part of either organization or public catalogs.
A list of all the media files of all catalogs can be viewed on the “Catalogs” page - “Media” tab.
6.2 Uploading a media file
A media file can be directly uploaded from an external source inside a catalog. The computer used as the
upload source must have java plug-in 1.60_10 or later. The upload is done using the “Upload” icon displayed
above the description of a catalog - media.

Proximus PLC under Belgian Public Law, Bd. du Roi Albert II 27, B-1030 Brussels, Belgium, VAT BE 0202.239.951, Brussels Register of Legal Entities, Giro BE50 0001 7100
3118 BPOTBEB Page 64 of 106
It can take time to upload a media file, depending on the size of the file and the available bandwidth.
6.3 Manipulating a media file
It is possible to:
• Move or copy a media file to another catalog or another virtual data center
• Delete a media file
• Modify the properties (name – description)
• Upload new version

Proximus PLC under Belgian Public Law, Bd. du Roi Albert II 27, B-1030 Brussels, Belgium, VAT BE 0202.239.951, Brussels Register of Legal Entities, Giro BE50 0001 7100
3118 BPOTBEB Page 65 of 106
Media files can only be attached to a virtual machine that is part of the same virtual data center.

Proximus PLC under Belgian Public Law, Bd. du Roi Albert II 27, B-1030 Brussels, Belgium, VAT BE 0202.239.951, Brussels Register of Legal Entities, Giro BE50 0001 7100
3118 BPOTBEB Page 66 of 106
7. Working with vApps
A vApp consists of one or more virtual machines that communicate over a network and use resources and
services in a deployed environment.
7.4 Viewing vApps
All deployed vApps are directly visible from the main menu (2 vApps are visible on the image below).
Alternatively, you can click the “My Cloud” tab and select “vApps” from the left menu, after which the list of
vApps with a number of characteristics will appear.
By clicking a vApp name, you list the virtual machines that are part of the vApp. Three tabs are available:
• The “vApp Diagram” tab displays the current configuration of the vApp and allows manipulations on it
(stop – start – suspend – add network – add virtual machine – etc.) It is here that the general
configuration of the vApp is performed.

Proximus PLC under Belgian Public Law, Bd. du Roi Albert II 27, B-1030 Brussels, Belgium, VAT BE 0202.239.951, Brussels Register of Legal Entities, Giro BE50 0001 7100
3118 BPOTBEB Page 67 of 106
• The “Virtual Machines” tab displays the list of virtual machines contained in the vApp. It is here that
individual virtual machines are manipulated (start specific virtual machine –stop specific virtual
machine – manipulate virtual machine properties – etc.).
• The “Networking” tab displays the network(s) used by the vApp (either vApp network(s) or
organization networks). It is here that you manipulate the VApp’s network configuration.

Proximus PLC under Belgian Public Law, Bd. du Roi Albert II 27, B-1030 Brussels, Belgium, VAT BE 0202.239.951, Brussels Register of Legal Entities, Giro BE50 0001 7100
3118 BPOTBEB Page 68 of 106
7.5 Creating a vApp
A vApp can be created from an existing vApp template or from scratch. You must have sufficient resources
when you deploy a new vApp. The deployment will fail if not enough resources are available.
7.5.1 Creating from a vApp template
The deployment of a vApp can be based on an existing vApp template (private or public).
There are several ways in which to initiate the process:
• Right-click the name of a vApp template and select “Add to My Cloud…”
• Click the green cross on the “My Cloud” tab: the “Add vApp from catalog” window will appear (you can
select any catalog and vApp template you want)
When deploying the vApp, you will need to:
1. Select “My Organization’s Catalogs” or the “Public catalogs” (depending on the location of the desired
template) and click on the “All Templates” view.

Proximus PLC under Belgian Public Law, Bd. du Roi Albert II 27, B-1030 Brussels, Belgium, VAT BE 0202.239.951, Brussels Register of Legal Entities, Giro BE50 0001 7100
3118 BPOTBEB Page 69 of 106
2. Select your desired template and click on next
3. Give it a unique name and a description. Afterwards select the virtual datacenter where you want to deploy
the vAPP.
4. Select the storage profile where each virtual machine will reside.

Proximus PLC under Belgian Public Law, Bd. du Roi Albert II 27, B-1030 Brussels, Belgium, VAT BE 0202.239.951, Brussels Register of Legal Entities, Giro BE50 0001 7100
3118 BPOTBEB Page 70 of 106
5. Review the network configuration, give a name to each virtual machine and define the way IP addresses
will be allocated (if the “Switch to the advanced networking workflow” box is checked).
6. Review/modify the advanced networking configuration:
• Allow network fencing if required
• Choose to always assign the same MAC address and IP address on the vApp throughout its
lifetime, if required
If your virtual machine(s) are directly connected to an organization network, you can choose to
connect them:
• Directly, meaning that the virtual machines are directly connected to the organization network.
• Fenced, meaning that the virtual machines’ real network parameters are hidden behind a self-
configured vshield edge, allowing identical virtual machines in different vApps to be powered on

Proximus PLC under Belgian Public Law, Bd. du Roi Albert II 27, B-1030 Brussels, Belgium, VAT BE 0202.239.951, Brussels Register of Legal Entities, Giro BE50 0001 7100
3118 BPOTBEB Page 71 of 106
without conflict by isolating the MAC and IP addresses of the virtual machines. Proximus does not
recommend the usage of fencing. Create a vApp network instead. Click next.
7. Customer your hardware settings for the virtual machine. Afterwards click Next.

Proximus PLC under Belgian Public Law, Bd. du Roi Albert II 27, B-1030 Brussels, Belgium, VAT BE 0202.239.951, Brussels Register of Legal Entities, Giro BE50 0001 7100
3118 BPOTBEB Page 72 of 106
8. After reviewing the configuration click Finish and the vApp is deployed.
A vApp deployed from a template has a defined lease time (7 days power on – 30 days delete after power off).
You can change these parameters in the vApps properties.
7.5.2 Creating from scratch
To be able to create a new vApp, you need to address the following:
1. Create the vApp “space”.
2. Add/create and configure virtual machine(s) in the new vApp.
3. Add/create and configure the network(s) in the new vApp.
7.5.2.1 Creating a vApp
A vApp “space” is a kind of box in which all the parameters of the vApp (including policy – virtual machine(s) –
network(s)) are defined.
To initiate the creation of a new vApp, go on “My Cloud” and select the “New” icon.
You can fill in generic information about the vApp, the virtual datacenter and vApp behavior (name – lease
time).

Proximus PLC under Belgian Public Law, Bd. du Roi Albert II 27, B-1030 Brussels, Belgium, VAT BE 0202.239.951, Brussels Register of Legal Entities, Giro BE50 0001 7100
3118 BPOTBEB Page 73 of 106
7.5.2.2 Adding/configuring virtual machine(s)
You can either create a new virtual machine (this procedure is explained in the chapter “Working with virtual
machines”) by clicking “New Virtual Machine…” or select one or several virtual machine(s) already present in
existing vApp templates and add them.

Proximus PLC under Belgian Public Law, Bd. du Roi Albert II 27, B-1030 Brussels, Belgium, VAT BE 0202.239.951, Brussels Register of Legal Entities, Giro BE50 0001 7100
3118 BPOTBEB Page 74 of 106
After clicking “Next”, you can give a name (name as shown in vContainer) to each virtual machine, along with
the storage profile to be used.
Next, you can configure the specific parameters of each virtual machine that is part of the vApp:
• Computer name (name that will be given to the virtual machine depending on the chosen
customization option – see later)
• Configure the network where the virtual machine will be connected. It is possible to select an existing
organization network or to define a new vApp network by selecting “Add Network” (new vApp network
is explained below). If you select a network, you can decide how the virtual machine should receive an
IP address (static address from the pool – static address given manually – DHCP)

Proximus PLC under Belgian Public Law, Bd. du Roi Albert II 27, B-1030 Brussels, Belgium, VAT BE 0202.239.951, Brussels Register of Legal Entities, Giro BE50 0001 7100
3118 BPOTBEB Page 75 of 106
Configure network isolation:
• Allow network fencing if required
• Choose to always assign the same MAC address and IP address on the vApp throughout its lifetime, if
required
If your virtual machine(s) are directly connected to an organization network, you can choose to connect them:
• Directly, meaning that the virtual machines are directly connected to the organization network.
• Fenced, meaning that the virtual machines’ real network parameters are hidden behind a self-
configured vshield edge, allowing identical virtual machines in different vApps to be powered on
without conflict by isolating the MAC and IP addresses of the virtual machines. Proximus does not
recommend the usage of fencing. Create a vApp network instead.
7.5.2.3 Adding vApp network(s)
A vApp network is a separated VLAN. To be able to create it, you must have enough VLANs (at least one) in
the network pool you have ordered. You can create several vApp networks inside one vApp. Several virtual
machines can be connected to the same vApp network. A virtual machine can be connected to several vApp
networks or to a vApp network and an organization network at the same time.
A vApp network is private to a vApp. It cannot be used by a virtual machine running in another vApp7.
A vApp network can be created:
7 If you want two virtual machines on two separate vApps to connect directly (without vshield edge), you will need to connect them
on an organization network without vshield edge or use static routing.

Proximus PLC under Belgian Public Law, Bd. du Roi Albert II 27, B-1030 Brussels, Belgium, VAT BE 0202.239.951, Brussels Register of Legal Entities, Giro BE50 0001 7100
3118 BPOTBEB Page 76 of 106
• During the creation of a vApp (add network… on the drop-down, list network in the virtual machine
line)
• By clicking the “Add Network” icon on the vApp view. In this case, you will need to specify that you
want to add a vApp network8
The parameters to be specified are:
• Network mask
• Default gateway
• DNS values
• Static IP pool
8 If you select organization network, you will be presented with a list of existing organization networks that you can make available in
your vApp (by default, organization networks are not visible in a vApp).

Proximus PLC under Belgian Public Law, Bd. du Roi Albert II 27, B-1030 Brussels, Belgium, VAT BE 0202.239.951, Brussels Register of Legal Entities, Giro BE50 0001 7100
3118 BPOTBEB Page 77 of 106
Give a name to and a description of the vApp network you are creating.

Proximus PLC under Belgian Public Law, Bd. du Roi Albert II 27, B-1030 Brussels, Belgium, VAT BE 0202.239.951, Brussels Register of Legal Entities, Giro BE50 0001 7100
3118 BPOTBEB Page 78 of 106
7.6 Configuring a vApp network
A vApp network is a network with private non-routable addresses that can only be used by virtual machines
inside that instance of the vApp.
The configuration of a vApp network is done on the vApp’s “Networking” tab.
A vApp network can be internal without access to the outside world, or “routed” using a self-created edge
gateway appliance.
A vApp network is made “routed” by attaching it to another existing vApp or organization network on the
network details window. In the “Connection” column of the vApp network that needs to be connected, select
the network you want to attach it to. When the network has been selected, click the “Apply” button at the
bottom right of the window to implement it.
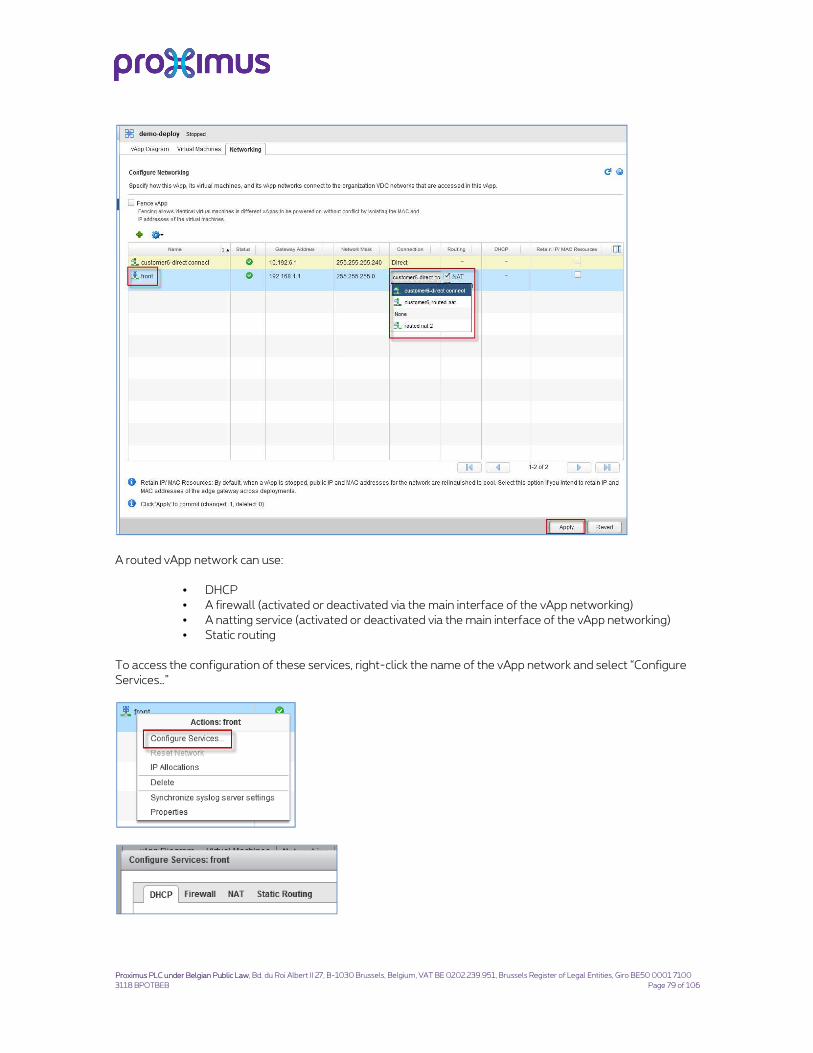
Proximus PLC under Belgian Public Law, Bd. du Roi Albert II 27, B-1030 Brussels, Belgium, VAT BE 0202.239.951, Brussels Register of Legal Entities, Giro BE50 0001 7100
3118 BPOTBEB Page 79 of 106
A routed vApp network can use:
• DHCP
• A firewall (activated or deactivated via the main interface of the vApp networking)
• A natting service (activated or deactivated via the main interface of the vApp networking)
• Static routing
To access the configuration of these services, right-click the name of the vApp network and select “Configure
Services…”

Proximus PLC under Belgian Public Law, Bd. du Roi Albert II 27, B-1030 Brussels, Belgium, VAT BE 0202.239.951, Brussels Register of Legal Entities, Giro BE50 0001 7100
3118 BPOTBEB Page 80 of 106
When a network configuration has been performed or has been changed, always click the “Apply” button
located at the bottom right of the window.
You can view the current IP address allocation on a specific vApp network by right-clicking the vApp name and
selecting “IP Allocations”.
7.6.1 Managing DHCP
On the “DCHP” tab, you can:
• Activate/deactivate the DHCP function (disabled by default)
• Enter the IP range
• Enter the IP address lease time

Proximus PLC under Belgian Public Law, Bd. du Roi Albert II 27, B-1030 Brussels, Belgium, VAT BE 0202.239.951, Brussels Register of Legal Entities, Giro BE50 0001 7100
3118 BPOTBEB Page 81 of 106
7.6.2 Managing NAT
As the IP range inside the vApp network is not routed9, natting must be performed to allow communication
from and to the virtual machines inside the vApp. All traffic from and to the outside always goes over the edge
gateway instance that is connected to the vApp network.
The natting can be done using IP translation or port forwarding. The choice is implemented on the NAT tab.
7.6.2.1 IP translation
Each virtual machine’s internal IP address can be natted to an IP address on the “outside” network where the
vApp network is connected. The relation between the “private” address and the “public” address is selected
automatically or manually.
To configure this, proceed as follows:
1. Set the NAT type to “IP translation” in the NAT window
2. Select “Add” in the NAT “IP Translation” window
3. Choose the virtual machine interface that will be natted into the list
4. Select the mode:
o Automatic (IP address will be determined when the virtual machine starts)
o Manual (value of the IP address must be filled in)
9 Unless you use static routing.

Proximus PLC under Belgian Public Law, Bd. du Roi Albert II 27, B-1030 Brussels, Belgium, VAT BE 0202.239.951, Brussels Register of Legal Entities, Giro BE50 0001 7100
3118 BPOTBEB Page 82 of 106
7.6.2.2 Port forwarding
Port forwarding enables you to configure port-based NAT.
To configure this, proceed as follows:
1. Set the NAT type to “Port Forwarding” in the NAT window.
2. If you want to allow traffic to pass from the inside to the outside, select “Enable IP Masquerade” (this
parameter is valid for all virtual machines attached to that vApp network).
3. Click “Add” to add a new port forwarding rule to allow specific traffic from the outside to the inside:
o Select the interface of the virtual machine you want to nat.
o Select the external port value that will be used to connect the internal port of the virtual
machine. The external IP address to be used is that of the edge gateway (the address is only
known when the vApp is started. The IP address comes from the pool of available addresses
of the outside network where the edge gateway is connected).
o Select the internal port value of the virtual machine (“Forward to port” field).
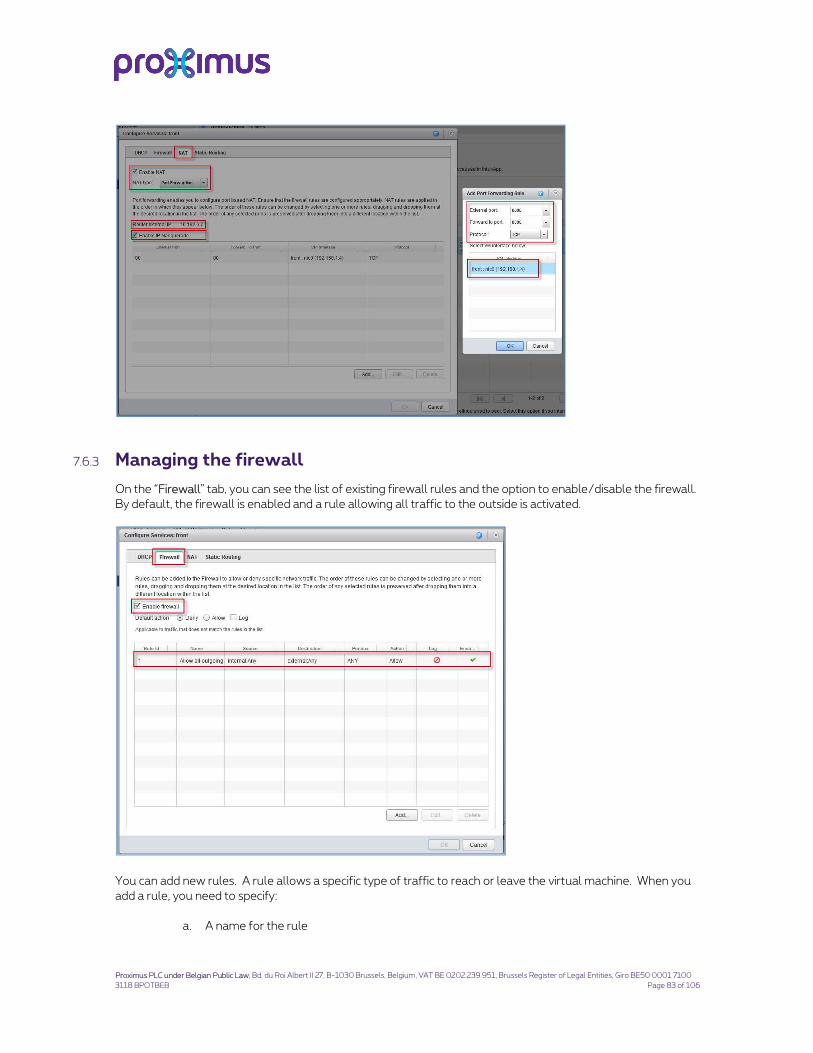
Proximus PLC under Belgian Public Law, Bd. du Roi Albert II 27, B-1030 Brussels, Belgium, VAT BE 0202.239.951, Brussels Register of Legal Entities, Giro BE50 0001 7100
3118 BPOTBEB Page 83 of 106
7.6.3 Managing the firewall
On the “Firewall” tab, you can see the list of existing firewall rules and the option to enable/disable the firewall.
By default, the firewall is enabled and a rule allowing all traffic to the outside is activated.
You can add new rules. A rule allows a specific type of traffic to reach or leave the virtual machine. When you
add a rule, you need to specify:
a. A name for the rule

Proximus PLC under Belgian Public Law, Bd. du Roi Albert II 27, B-1030 Brussels, Belgium, VAT BE 0202.239.951, Brussels Register of Legal Entities, Giro BE50 0001 7100
3118 BPOTBEB Page 84 of 106
b. The source IP address and port
c. The destination IP address and port
d. The type of protocol
e. Whether the rule is enabled or disabled
Firewall rules are enforced in the order in which they appear in the list. New firewall rules are added at the end
of the list. Drag and drop to reorder the firewall rules.
Syslog functionality is not activated in this release of vContainer.
7.7 Managing a vApp
7.7.1 Manipulating a vApp
It is possible to start, stop, suspend and reset a complete vApp by using the following icons:
These icons are available in different locations:
• My cloud – vApp diagram
• My cloud – vApps listing
• Home
The same is possible for individual virtual machines under “My Cloud” – “vApp” – “Virtual Machines”
A vApp can also:
• Be deleted
• Be saved as a vApp template (Add to Catalog…)
• Be moved to another virtual data center

Proximus PLC under Belgian Public Law, Bd. du Roi Albert II 27, B-1030 Brussels, Belgium, VAT BE 0202.239.951, Brussels Register of Legal Entities, Giro BE50 0001 7100
3118 BPOTBEB Page 85 of 106
• Be copied to the same or to another virtual data center
• Receive additional virtual machines (or delete some virtual machines inside it).
To perform these activities, right-click the name of a vApp.
7.7.2 Snapshotting
It is possible to create a snapshot of all the virtual machines in a vApp (it is also possible to do it machine by
machine). After taking the snapshot, you can either:
• Revert it -> roll back to the moment when the snapshot was taken. Any changes performed after
taking the snapshot will be lost
• Remove it -> Commit the snapshot. Any changes performed after taking the snapshot will be forever
written into the vApp. Rollback will not be possible anymore
Only one level of snapshot is supported.
A snapshotted vApp or virtual machine should be committed/reverted as quickly as possible as snapshots
impact the performance of the virtual machine and burn allocated disk space (the redo log of the snapshot
contains all the changes performed after taking the snapshot and can grow very rapidly if you perform lots of
disk activities)
To take a vApp snapshot, proceed as follows:
1. Right-click the vApp name and select “Create Snapshot” (the creation of the snapshot may take a few
minutes).
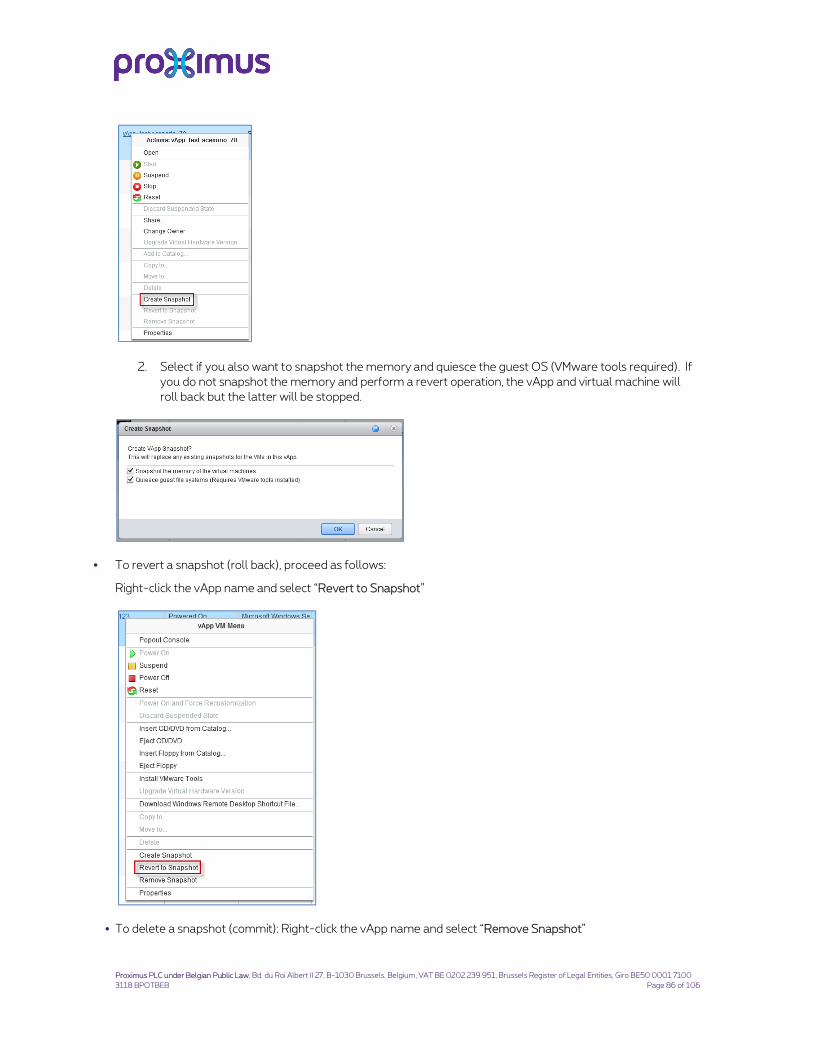
Proximus PLC under Belgian Public Law, Bd. du Roi Albert II 27, B-1030 Brussels, Belgium, VAT BE 0202.239.951, Brussels Register of Legal Entities, Giro BE50 0001 7100
3118 BPOTBEB Page 86 of 106
2. Select if you also want to snapshot the memory and quiesce the guest OS (VMware tools required). If
you do not snapshot the memory and perform a revert operation, the vApp and virtual machine will
roll back but the latter will be stopped.
� To revert a snapshot (roll back), proceed as follows:
Right-click the vApp name and select “Revert to Snapshot”
� To delete a snapshot (commit): Right-click the vApp name and select “Remove Snapshot”
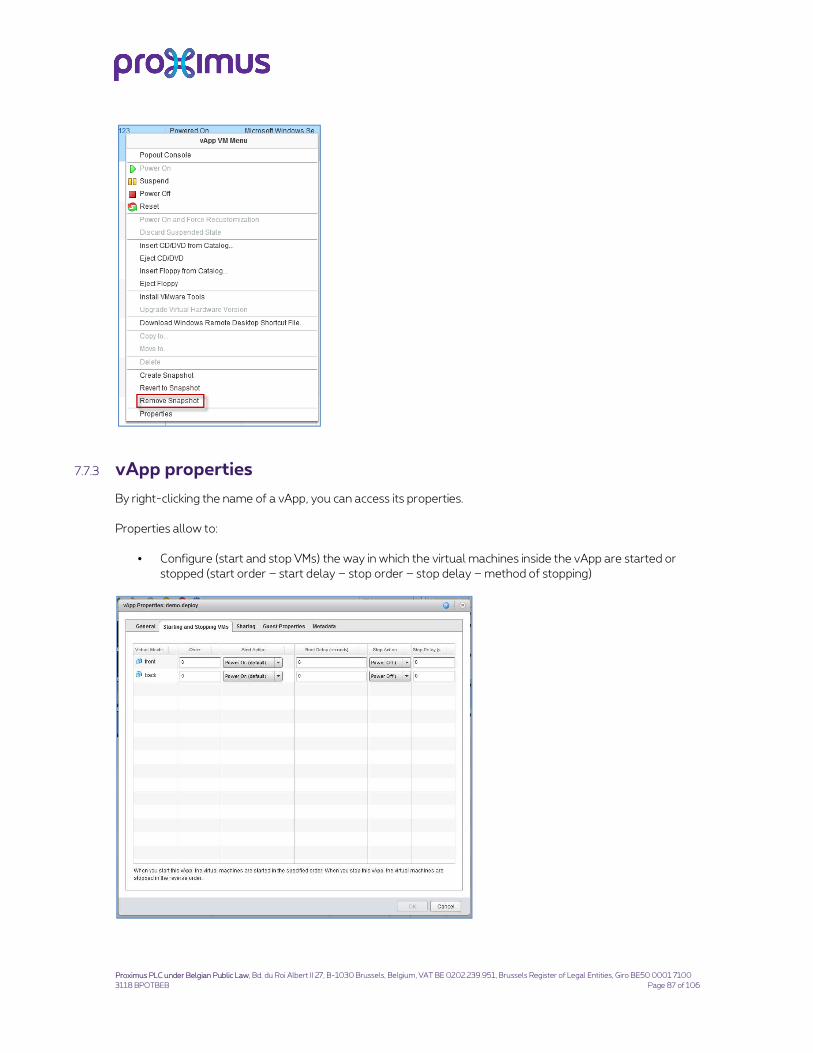
Proximus PLC under Belgian Public Law, Bd. du Roi Albert II 27, B-1030 Brussels, Belgium, VAT BE 0202.239.951, Brussels Register of Legal Entities, Giro BE50 0001 7100
3118 BPOTBEB Page 87 of 106
7.7.3 vApp properties
By right-clicking the name of a vApp, you can access its properties.
Properties allow to:
• Configure (start and stop VMs) the way in which the virtual machines inside the vApp are started or
stopped (start order – start delay – stop order – stop delay – method of stopping)

Proximus PLC under Belgian Public Law, Bd. du Roi Albert II 27, B-1030 Brussels, Belgium, VAT BE 0202.239.951, Brussels Register of Legal Entities, Giro BE50 0001 7100
3118 BPOTBEB Page 88 of 106
• Determine (via the Sharing tab) which user in your organization has certain defined rights (full control
– read, write – read only) on the vApp

Proximus PLC under Belgian Public Law, Bd. du Roi Albert II 27, B-1030 Brussels, Belgium, VAT BE 0202.239.951, Brussels Register of Legal Entities, Giro BE50 0001 7100
3118 BPOTBEB Page 89 of 106
8. Working with virtual machines
8.1 Creating a virtual machine
A virtual machine can only be created inside a vApp.
You can create it when you create the vApp (see the “Working with vApps” chapter) or add it afterwards in an
existing vApp via the “Add Virtual Machine” icon on the “vApp Diagram” tab or the “Virtual Machines on the
vApp Instance” tab.
Select “New Virtual Machine…” and fill in the following parameters:
• The virtual machine’s full name (the label of the machine on vContainer).
• The computer name (the name that will be featured inside the guest OS of the virtual machine).
• The virtual hardware version:
o Select “Hardware Version 7” if the vContainer platform is running on ESX 4 or you want to
migrate the machine in the future to a platform running ESX 4
o Select “Hardware Version 8” or “Hardware Version 9” if the vContainer platform is running on
ESX 5
• The operating system family and type (used to optimize the virtual hardware: it is not related to the
operating system installation).
• The number of virtual CPUs (up to 8 vCPUs supported).
• The memory configured (up to 32 GB supported).
• The hard disk size.
• The bus type (depends on the operating system you want to install).
• The number of network cards.
The option “Expose hardware-assisted CPU virtualization to guest OS” is not supported in vContainer and
cannot be selected.
The sum total of the disk size of a virtual machine and the configured memory may never exceed 1750 GB.

Proximus PLC under Belgian Public Law, Bd. du Roi Albert II 27, B-1030 Brussels, Belgium, VAT BE 0202.239.951, Brussels Register of Legal Entities, Giro BE50 0001 7100
3118 BPOTBEB Page 90 of 106
Fill in the network properties as explained above in the “Working with vApps” chapter. When you click “Finish”,
the empty virtual machine (without OS installed) will be created in the target vApp.
8.2 Virtual machine properties

Proximus PLC under Belgian Public Law, Bd. du Roi Albert II 27, B-1030 Brussels, Belgium, VAT BE 0202.239.951, Brussels Register of Legal Entities, Giro BE50 0001 7100
3118 BPOTBEB Page 91 of 106
Most of the machine properties can be changed only when the virtual machine is powered off. To access the
properties, right-click the virtual machine name and select properties.
8.2.1 General tab
The general tab allows you to modify the following:
• The virtual machine’s full name
• The computer name
• The description
• The type of OS
• The possibility of performing CPU and Memory hot add (depending on the chosen operating system)
• The possibility of upgrading the virtual hardware version
• The possibility of synchronizing the time of the virtual machine with the vDC in which it is running
• The storage profile
8.2.2 Hardware tab
The hardware tab allows you to modify the hardware configuration of the virtual machine. You can:
• Modify the number of vCPUs supported (up to 8 vCPUs supported in vContainer)
• Expose hardware assist (feature not supported by Proximus)
• Modify the memory defined for the virtual machine (up to 32 GB supported)
• Add/Remove hard drive(s) to/from the virtual machine
• Add/Remove vNIC card(s) to/from the virtual machine (up to 10 vNIC cards supported)
• Modify vNIC card parameters:
o Connection
o Connected organization/vApp network
o IP address allocation mode and associated value
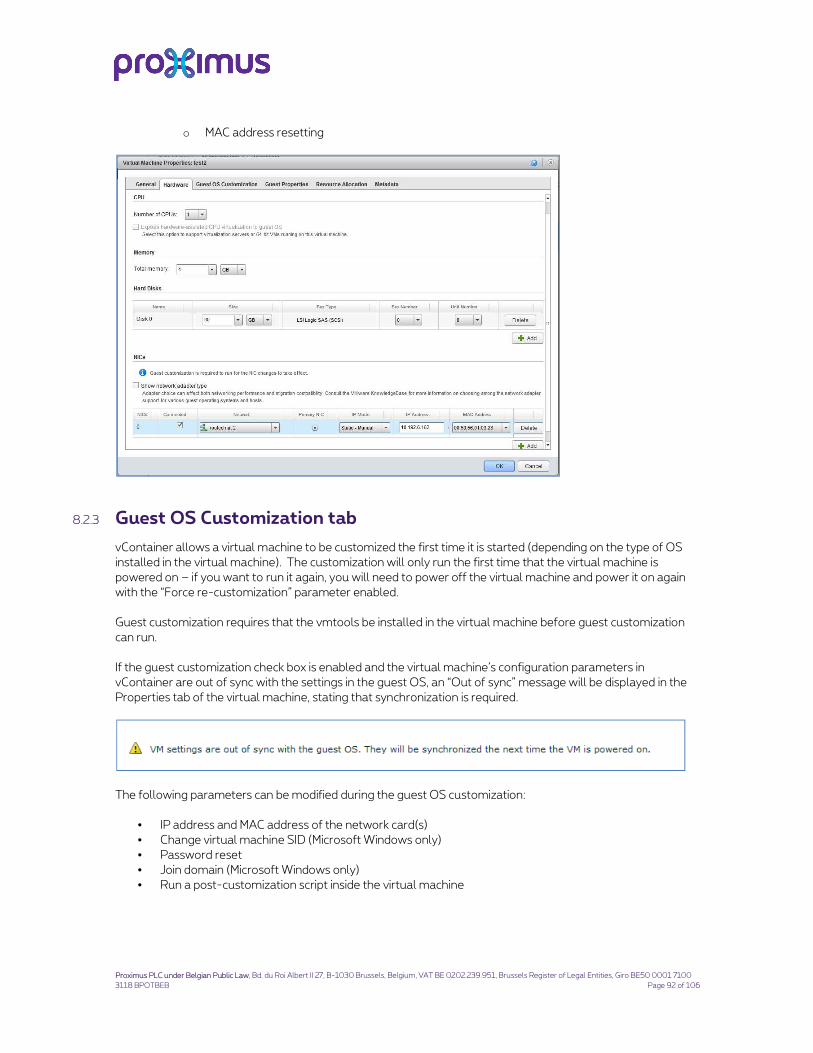
Proximus PLC under Belgian Public Law, Bd. du Roi Albert II 27, B-1030 Brussels, Belgium, VAT BE 0202.239.951, Brussels Register of Legal Entities, Giro BE50 0001 7100
3118 BPOTBEB Page 92 of 106
o MAC address resetting
8.2.3 Guest OS Customization tab
vContainer allows a virtual machine to be customized the first time it is started (depending on the type of OS
installed in the virtual machine). The customization will only run the first time that the virtual machine is
powered on – if you want to run it again, you will need to power off the virtual machine and power it on again
with the “Force re-customization” parameter enabled.
Guest customization requires that the vmtools be installed in the virtual machine before guest customization
can run.
If the guest customization check box is enabled and the virtual machine’s configuration parameters in
vContainer are out of sync with the settings in the guest OS, an “Out of sync” message will be displayed in the
Properties tab of the virtual machine, stating that synchronization is required.
The following parameters can be modified during the guest OS customization:
• IP address and MAC address of the network card(s)
• Change virtual machine SID (Microsoft Windows only)
• Password reset
• Join domain (Microsoft Windows only)
• Run a post-customization script inside the virtual machine

Proximus PLC under Belgian Public Law, Bd. du Roi Albert II 27, B-1030 Brussels, Belgium, VAT BE 0202.239.951, Brussels Register of Legal Entities, Giro BE50 0001 7100
3118 BPOTBEB Page 93 of 106
Additional information about guest OS customization is available in the VMware vcloud director manual
referred to at the beginning of this manual.
8.2.4 Resource Allocation
Resource allocation is not activated in this release of vContainer.
8.3Vmtools
Up-to-date VMware tools are mandatory in a virtual machine.
VMware tool versions earlier than 9216 must be upgraded.
To be able to install the vmtools, the virtual machine must contain an OS.

Proximus PLC under Belgian Public Law, Bd. du Roi Albert II 27, B-1030 Brussels, Belgium, VAT BE 0202.239.951, Brussels Register of Legal Entities, Giro BE50 0001 7100
3118 BPOTBEB Page 94 of 106
vApp deployment from template may fail if VMware tools are not installed on the virtual machines inside the
vApp template.
To be able to install the vmtools on a virtual machine inside a vApp, you need to:
• Disable guest customization on the virtual machine
• Start the vApp
• Install the vmtools (right-click the virtual machine and select “Install VMware tools” in the menu)
• Stop the vApp
• Enable guest customization on the virtual machine
• Start the vApp
To install the VMware tools inside a vApp template, you need to:
• Add the vApp template to “My Cloud” (= making an instance of the vApp template) using the “Make
Identical Copy” parameter
• Perform the operation as explained above
• Add that vApp to the catalog using “Make Identical Copy”
• Delete the old vApp template
To be able to make consistent backups of your virtual machine, the vmtools agent must be installed with the
“Volume Shadow Copy Service” parameter disabled. This is done by performing a personalized installation of
the vmtools. If this parameter is enabled, the machine will not be backed up. This limitation will be corrected in
a future release.
To be able to use the anti-virus service (see below), the vmtools agent must be installed with the vshield
Drivers parameter enabled (this is not the case by default). The names of drivers may differ according to the
ESXi version. Earlier versions used "vShield Drivers". Later versions use "Guest Introspection Thin Agent” or
"NSX File Introspection Driver". Please note that the name of the driver may be changed without notice.
However it is the driver as shown here under the section “VMCI” in the screenshots as "vShield Drivers".

Proximus PLC under Belgian Public Law, Bd. du Roi Albert II 27, B-1030 Brussels, Belgium, VAT BE 0202.239.951, Brussels Register of Legal Entities, Giro BE50 0001 7100
3118 BPOTBEB Page 95 of 106
The activation of vshield Endpoint drive is only mandatory when the customer is using anti-virus solution as
proposed by Proximus (see below)
8.4 Manipulating virtual machines
You can access the virtual machine by:

Proximus PLC under Belgian Public Law, Bd. du Roi Albert II 27, B-1030 Brussels, Belgium, VAT BE 0202.239.951, Brussels Register of Legal Entities, Giro BE50 0001 7100
3118 BPOTBEB Page 96 of 106
• Selecting the Virtual Machines directory in the left menu on the “My Cloud” tab. You will see all the
defined virtual machines on all the vApps.
• Selecting the “Virtual Machines” tab inside a vApp.
Depending on the current state of the virtual machine, when you right-click its name you will be able to
perform the following actions:
• Power on
• Suspend
• Power off
• Reset
• Insert/Eject CD/DVD available in the catalog
• Insert/Eject Floppy available in the catalog
• Manipulate vmtools
• Upgrade virtual hardware version
• Move/copy virtual machine
• Pop out console

Proximus PLC under Belgian Public Law, Bd. du Roi Albert II 27, B-1030 Brussels, Belgium, VAT BE 0202.239.951, Brussels Register of Legal Entities, Giro BE50 0001 7100
3118 BPOTBEB Page 97 of 106
• Force reconfiguration
• Access the properties
• Manage snapshot (see the vApp chapter for more information)
When you open the console of a virtual machine (using the “Popout Console” button or double-clicking the
screen thumbnail) you are able to directly interact with the console of the virtual machine. The menu on top of
the console allows you to perform various activities on the virtual machine:
• Stop/start/suspend/reset virtual machine
• Attach DVD/floppy directly from the customer’s workstation
• Send CRTL-ALT-DELETE into the console
The “VMRC plug-in” must be installed on your workstation to allow access to the console (see the Connection
chapter for more information).
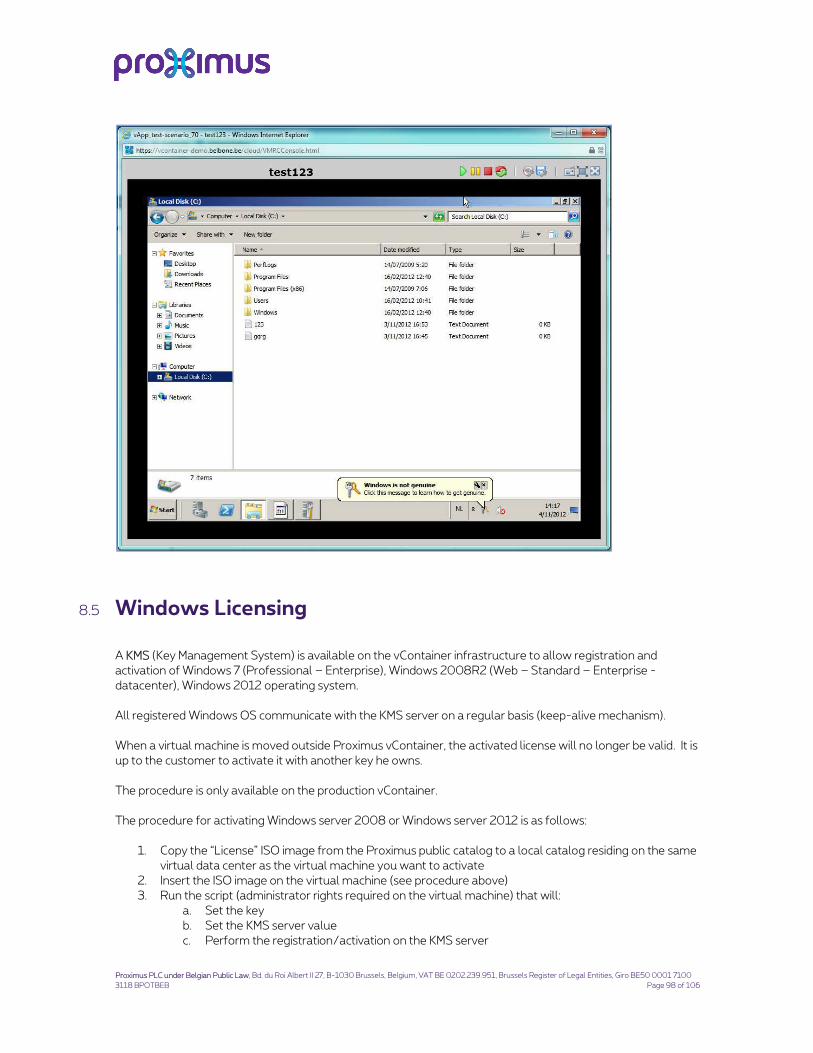
Proximus PLC under Belgian Public Law, Bd. du Roi Albert II 27, B-1030 Brussels, Belgium, VAT BE 0202.239.951, Brussels Register of Legal Entities, Giro BE50 0001 7100
3118 BPOTBEB Page 98 of 106
8.5 Windows Licensing
A KMS (Key Management System) is available on the vContainer infrastructure to allow registration and
activation of Windows 7 (Professional – Enterprise), Windows 2008R2 (Web – Standard – Enterprise -
datacenter), Windows 2012 operating system.
All registered Windows OS communicate with the KMS server on a regular basis (keep-alive mechanism).
When a virtual machine is moved outside Proximus vContainer, the activated license will no longer be valid. It is
up to the customer to activate it with another key he owns.
The procedure is only available on the production vContainer.
The procedure for activating Windows server 2008 or Windows server 2012 is as follows:
1. Copy the “License” ISO image from the Proximus public catalog to a local catalog residing on the same
virtual data center as the virtual machine you want to activate
2. Insert the ISO image on the virtual machine (see procedure above)
3. Run the script (administrator rights required on the virtual machine) that will:
a. Set the key
b. Set the KMS server value
c. Perform the registration/activation on the KMS server

Proximus PLC under Belgian Public Law, Bd. du Roi Albert II 27, B-1030 Brussels, Belgium, VAT BE 0202.239.951, Brussels Register of Legal Entities, Giro BE50 0001 7100
3118 BPOTBEB Page 99 of 106
The procedure can also be executed manually in the virtual machines using command prompts with
administrator privileges:
• slmgr.vbs /skms 172.19.137.172:1688
• slmgr.vbs /ipk [KEY] - the value [KEY] depends on the type of operating system
• slmgr.vbs /ato
Operating System Edition Product Key
Windows Server 2008 R2 Datacenter 74YFP-3QFB3-KQT8W-PMXWJ-7M648
Windows Server 2008 R2 Enterprise 489J6-VHDMP-X63PK-3K798-CPX3Y
Windows Server 2008 R2 Standard YC6KT-GKW9T-YTKYR-T4X34-R7VHC
Windows Web Server 2008 R2 6TPJF-RBVHG-WBW2R-86QPH-6RTM4
Windows Server 2012 Core BN3D2-R7TKB-3YPBD-8DRP2-27GG4
Windows Server 2012 Core N 8N2M2-HWPGY-7PGT9-HGDD8-GVGGY
Windows Server 2012 Core Single Language 2WN2H-YGCQR-KFX6K-CD6TF-84YXQ
Windows Server 2012 Core Country Specific 4K36P-JN4VD-GDC6V-KDT89-DYFKP
Windows Server 2012 Server Standard XC9B7-NBPP2-83J2H-RHMBY-92BT4
Windows Server 2012 Standard Core BN3D2-R7TKB-3YPBD-8DRP2-27GG4
Windows Server 2012 MultiPoint Standard HM7DN-YVMH3-46JC3-XYTG7-CYQJJ
Windows Server 2012 MultiPoint Premium XNH6W-2V9GX-RGJ4K-Y8X6F-QGJ2G
Windows Server 2012 Datacenter 48HP8-DN98B-MYWDG-T2DCC-8W83P
Microsoft Windows Server 2012 R2 Datacenter W3GGN-FT8W3-Y4M27-J84CP-Q3VJ9
Microsoft Windows Server 2012 R2 Essentials KNC87-3J2TX-XB4WP-VCPJV-M4FWM
Windows Server 2012 Server Standard R2 D2N9P-3P6X9-2R39C-7RTCD-MDVJX
8.6 SMTP configuration
In order to protect your vContainer environment, Proximus does not allow direct outgoing SMTP traffic (port
TCP 25) for virtual machines running into a vContainer.
Virtual machines that need to use SMTP outgoing traffic must sent it to Proximus SMTP relay server
vcrelay.belbone.be.

Proximus PLC under Belgian Public Law, Bd. du Roi Albert II 27, B-1030 Brussels, Belgium, VAT BE 0202.239.951, Brussels Register of Legal Entities, Giro BE50 0001 7100
3118 BPOTBEB Page 100 of 106
The following limitations are active on the SMTP relay :
• Maximum number of concurrent connections : 3
• Maximum number of connections per timeframe : 100
• Maximum number of messages per timeframe : 500
• Maximum number of recipients per interval : 1500
• Timeframe : 300 sec
8.7 Anti Virus Configuration
Proximus proposes an innovative optional (fee applies) agentless anti-virus system for vContainer solution.
The solution will intercept and automatically delete virus, malware as they are copied/moved to the virtual
machine or when they are executed in real-time. Customer does not have the possibility to perform a
preventive regular scanning of the content of his virtual Machine.
Proximus takes care of updating anti-virus detection definition based on daily updates delivered by the anti-
virus supplier.
As the solution is using VMware vShield endpoint product available in vmtools, the Customer
• is responsible to always install and let run the latest version of the vmtools on the virtual machine to
be sure to be protected.
• is responsible to install the vmtools with the option “vShield Drivers” activated (see procedure above)
Activation of antivirus is always performed by the Customer using the vContainer interface management.
Activation is possible until the number of bought licenses is exhausted. Customer can always buy additional
licenses. A virtual machine can be deactivated, putting the license back into the available pool. Customer can
control the number of remaining free licenses on the vContainer interface management.
8.7.1 Deploy anti-virus
To activate anti-virus protection on a specific virtual machine :
1. Right-click the virtual machine name and select properties
2. Go to the tab “Matadata” and fill-in (case sensitive):
a. Type : Yes and No
b. Name : Anti Virus Protection
c. Value : Yes
3. Click Add
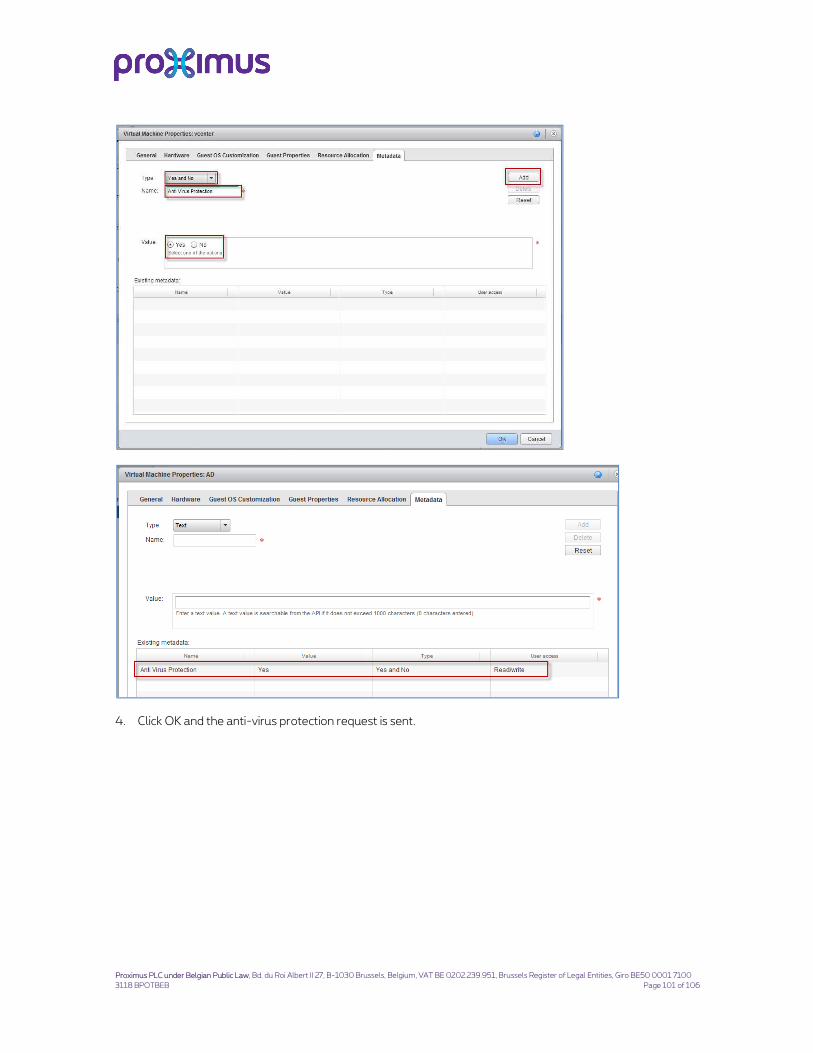
Proximus PLC under Belgian Public Law, Bd. du Roi Albert II 27, B-1030 Brussels, Belgium, VAT BE 0202.239.951, Brussels Register of Legal Entities, Giro BE50 0001 7100
3118 BPOTBEB Page 101 of 106
4. Click OK and the anti-virus protection request is sent.
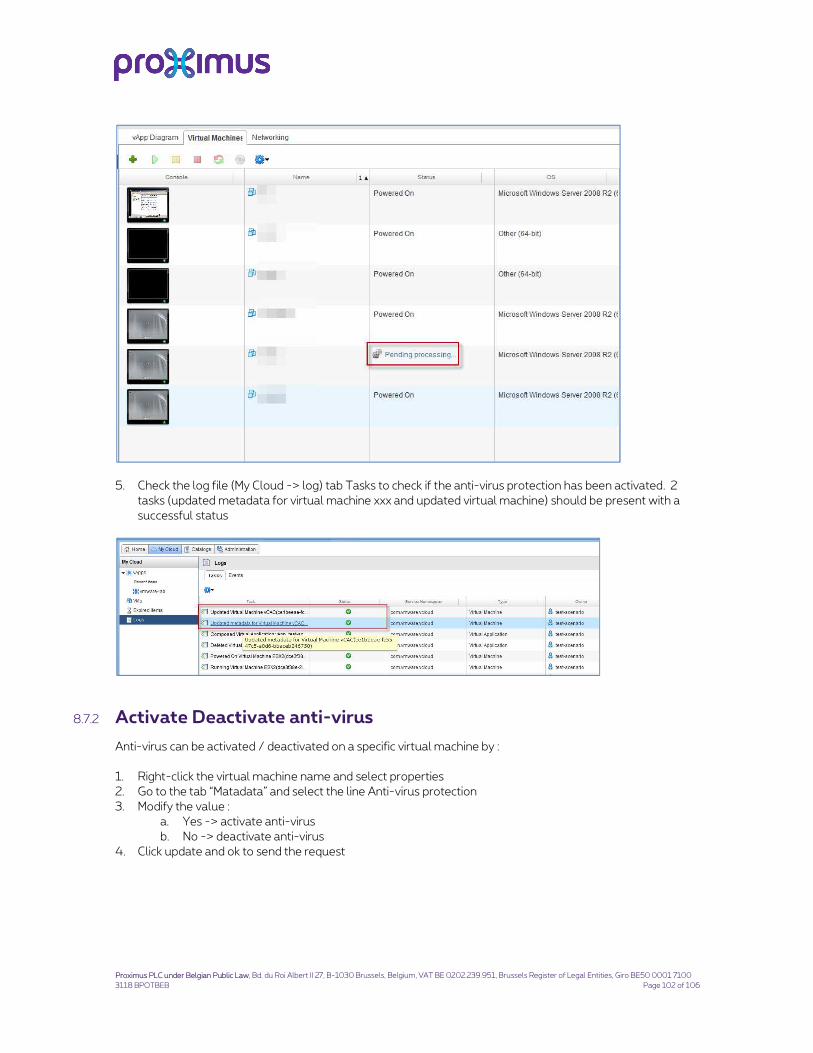
Proximus PLC under Belgian Public Law, Bd. du Roi Albert II 27, B-1030 Brussels, Belgium, VAT BE 0202.239.951, Brussels Register of Legal Entities, Giro BE50 0001 7100
3118 BPOTBEB Page 102 of 106
5. Check the log file (My Cloud -> log) tab Tasks to check if the anti-virus protection has been activated. 2
tasks (updated metadata for virtual machine xxx and updated virtual machine) should be present with a
successful status
8.7.2 Activate Deactivate anti-virus
Anti-virus can be activated / deactivated on a specific virtual machine by :
1. Right-click the virtual machine name and select properties
2. Go to the tab “Matadata” and select the line Anti-virus protection
3. Modify the value :
a. Yes -> activate anti-virus
b. No -> deactivate anti-virus
4. Click update and ok to send the request
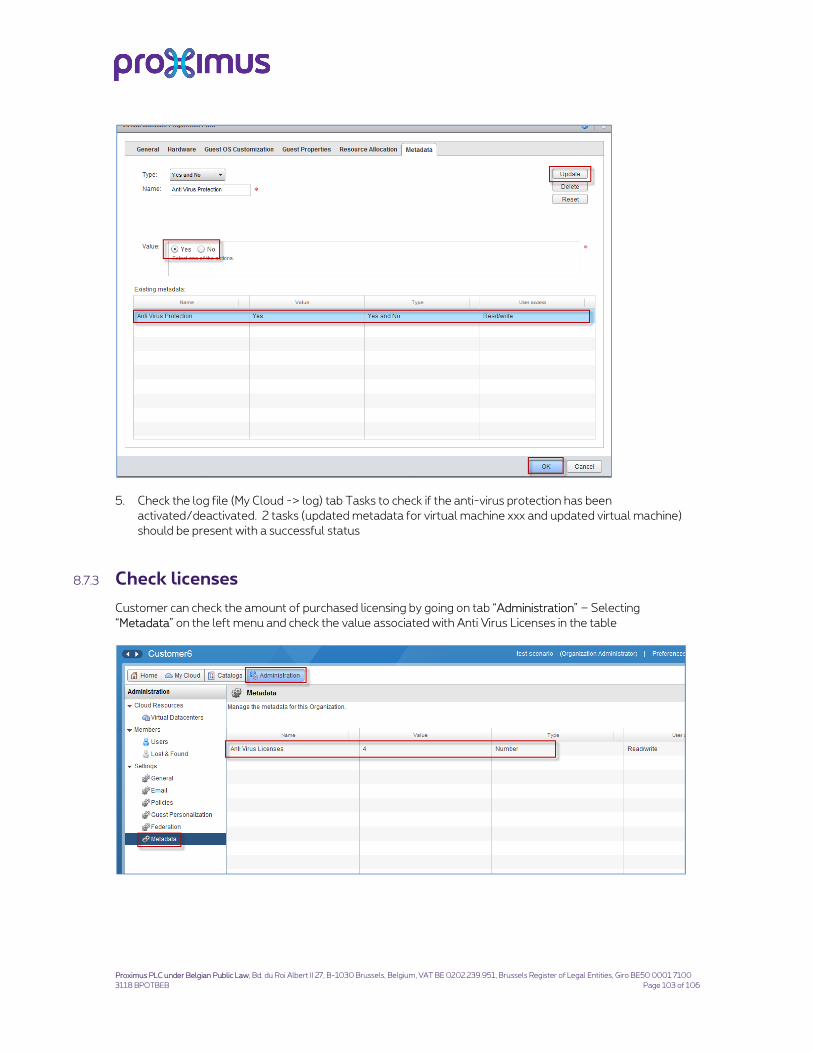
Proximus PLC under Belgian Public Law, Bd. du Roi Albert II 27, B-1030 Brussels, Belgium, VAT BE 0202.239.951, Brussels Register of Legal Entities, Giro BE50 0001 7100
3118 BPOTBEB Page 103 of 106
5. Check the log file (My Cloud -> log) tab Tasks to check if the anti-virus protection has been
activated/deactivated. 2 tasks (updated metadata for virtual machine xxx and updated virtual machine)
should be present with a successful status
8.7.3 Check licenses
Customer can check the amount of purchased licensing by going on tab “Administration” – Selecting
“Metadata” on the left menu and check the value associated with Anti Virus Licenses in the table

Proximus PLC under Belgian Public Law, Bd. du Roi Albert II 27, B-1030 Brussels, Belgium, VAT BE 0202.239.951, Brussels Register of Legal Entities, Giro BE50 0001 7100
3118 BPOTBEB Page 104 of 106
Annex 1 – Guest operating systems
This is the list of operating systems that can run inside vContainer. Proximus does not manage them. All must
run with a version 7, 8 or 9 virtual machine (important when you upload an existing virtual machine into
vContainer) and run the latest version of vmtools.
OS name type
Microsoft Windows Server 2012 R2 64 bits
Microsoft Windows Server 2012 64 bits
Microsoft Windows Server 2008 R2 64 bits
Microsoft Windows Server 2008 (all versions) 32 bits
Microsoft Windows Server 2008 (all versions) 64 bits
Microsoft Windows Server 2003 (all versions) 32 bits
Microsoft Windows Server 2003 (all versions) 64 bits
Microsoft Windows 2000 Advanced Server 32 bits
Microsoft Windows 2000 server 32 bits
Microsoft Windows 2000 Professional 32 bits
Red Hat Enterprise Linux 7 64 bits
Red Hat Enterprise Linux 7 32 bits
Red Hat Enterprise Linux 6 64 bits
Red Hat Enterprise Linux 6 32 bits
Red Hat Enterprise Linux 5 32 bits
Red Hat Enterprise Linux 5 64 bits
Red Hat Enterprise Linux 4 32 bits
Red Hat Enterprise Linux 4 64 bits
Red Hat Enterprise Linux 3 32 bits
Red Hat Enterprise Linux 3 64 bits
Red Hat Enterprise Linux 2 32 bits
Suse Enterprise Linux 12 64 bits
Suse Enterprise Linux 12 32 bits
Suse Enterprise Linux 11 32 bits
Suse Enterprise Linux 11 64 bits
Suse Enterprise Linux 10 32 bits
Suse Enterprise Linux 10 64 bits
Suse Enterprise Linux 8/9 32 bits
Suse Enterprise Linux 8/9 64 bits
Open Enterprise Server 32 bits
CentOS 32 bits
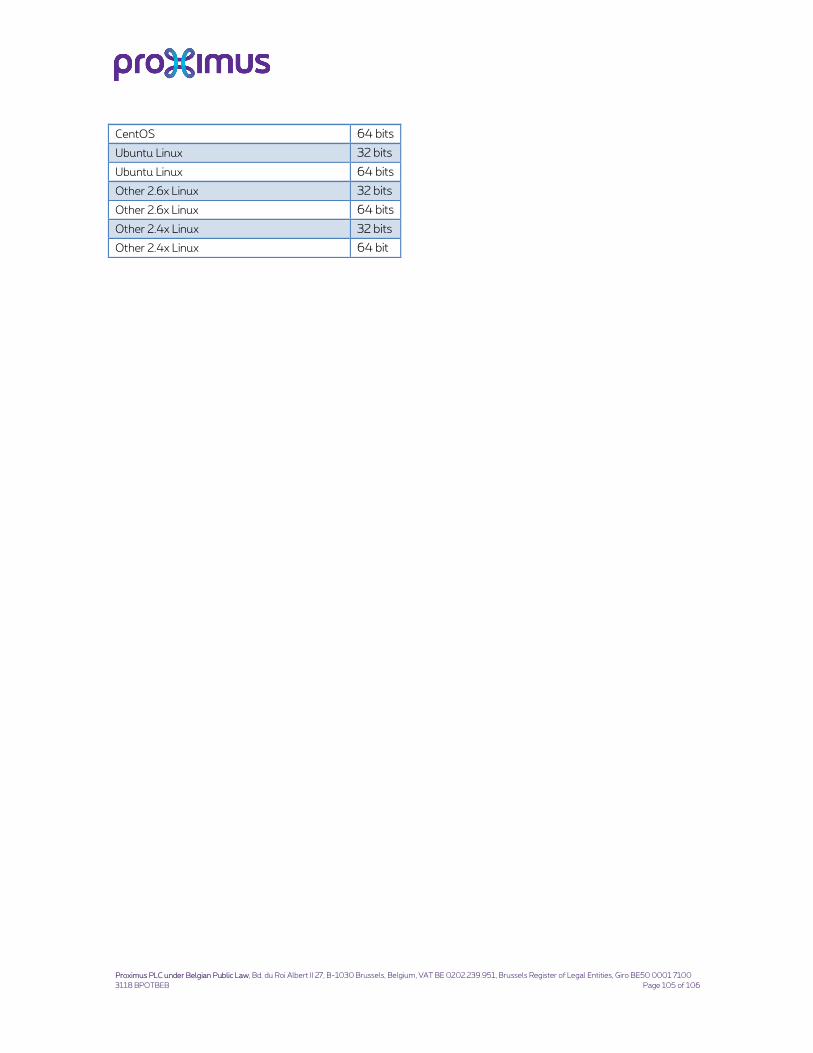
Proximus PLC under Belgian Public Law, Bd. du Roi Albert II 27, B-1030 Brussels, Belgium, VAT BE 0202.239.951, Brussels Register of Legal Entities, Giro BE50 0001 7100
3118 BPOTBEB Page 105 of 106
CentOS 64 bits
Ubuntu Linux 32 bits
Ubuntu Linux 64 bits
Other 2.6x Linux 32 bits
Other 2.6x Linux 64 bits
Other 2.4x Linux 32 bits
Other 2.4x Linux 64 bit

Proximus PLC under Belgian Public Law, Bd. du Roi Albert II 27, B-1030 Brussels, Belgium, VAT BE 0202.239.951, Brussels Register of Legal Entities, Giro BE50 0001 7100
3118 BPOTBEB Page 106 of 106
Annex 2 – Natting rules example
vContainer instance
Internet Explore
Pub
lic ip
ad
dre
ss
spac
eE
xte
rna
l ip
add
ress
sp
ace 10.1.1.1
Vapp x
Inte
rna
l ip
add
ress
sp
ace
External firewallNatting table :
10.1.1.10 <-> 81.81.81.8110.1.1.11 <-> 81.81.81.8210.1.1.12 <-> 81.81.81.83
External network 1 – 10.1.1.0/24
vShield edge
192.168.1.1 192.168.2.1
10.1.1.2 10.1.1.3
vShield edgeNatting table :
192.168.2.10 <-> 10.1.1.11
vShield edgeNatting table :
192.168.1.10 <-> 10.1.1.10192.168.1.11 <-> 10.1.1.12
vShield edge
Vapp y
Connected organizationnetwork 1 – 192.168.1.0/24
VM3192.168.1.11
Gw : 192.168.1.1
VM1192.168.1.10
Gw : 192.168.1.1
VM2192.168.2.10
Gw : 192.168.2.1
Connected organizationnetwork 2 – 192.168.2.0/24
• If VM1 (web server) wants to communicate with VM2 (database server), it must use the external IP
address of VM2 (= 10.1.1.11)
• If VM1 (web server) needs to be reached by a browser coming from the Internet, the browser must use
the public IP address of VM1 (=81.81.81.81)10 • If VM1 wants to communicate with VM3 (located on the same organization network), it can use the
internal IP address of VM3 (192.168.1.11)
10 The natting occurs at two levels in this example :
• Natting from public IP (81.81.81.81) to external IP (10.1.1.10) at the level of the external firewall.
• Natting from external IP (10.1.1.10) to internal IP (192.168.1.10) at the level of the vshield edge.