
Solidwork Install Guide
114
Installation and Administration SOLIDWORKS 2011
Transcript of Solidwork Install Guide

Installation and AdministrationSOLIDWORKS 2011

Contents
Legal Notices.....................................................................................................................v
1 SolidWorks Installation and Administration....................................................................7Individual Installation or Administrative Image.........................................................................................8Initiating SolidWorks Installation..............................................................................................................8
2 Individual Installations..................................................................................................10Installation on Individual Computers......................................................................................................10Administration of Individual Installations................................................................................................12
Modifying an Installation...................................................................................................................12Repairing an Installation...................................................................................................................13Rolling Back an Individual Installation to a Previous Service Pack..................................................13Removing an Installation..................................................................................................................13Upgrading to a New Release...........................................................................................................14Product Coexistence Rules..............................................................................................................15
3 Multiple Installations.....................................................................................................16Deploying to Multiple Clients..................................................................................................................16Using Administrative Images.................................................................................................................16
Creating an Administrative Image from SolidWorks Installation Manager.......................................17Administrative Image Option Editor..................................................................................................17Deploying an Administrative Image to Clients Through Email.........................................................24Advertising an Administrative Image to Clients................................................................................25
Command-Line Deployment..................................................................................................................25Creating an Administrative Image from the Command Line ............................................................25Preparing Clients for Command-Line Installation from an Administrative Image.............................26Installing from the Administrative Image Using the Command Line.................................................34Command-Line Properties...............................................................................................................36Deploying an Administrative Image Using Microsoft Active Directory..............................................47
Administration of Multiple Installations...................................................................................................50Upgrading Administrative Images to a New Release.......................................................................50Service Pack Product Update Administration...................................................................................53Removing an Installation..................................................................................................................55
4 Workgroup PDM...........................................................................................................56Workgroup PDM Viewer........................................................................................................................57Installing a Workgroup PDM Server......................................................................................................58Configuring Workgroup PDM for Clients................................................................................................59
Configuring the Workgroup PDM Viewer to Connect to a Different Vault Location.........................59
ii

Configuring Mime Types for Document Downloading .....................................................................59Installing Workgroup PDM Server and Viewer in a Perimeter Network.................................................60
Network Configuration for Workgroup PDM Viewer in a Perimeter Network...................................60Installing and Configuring the Workgroup PDM Web Server and Viewer........................................61
Workgroup PDM Client Access..............................................................................................................62Workgroup PDM VaultAdmin Administration.........................................................................................62
Initial Login to Workgroup PDM VaultAdmin....................................................................................63Upgrading the Workgroup PDM Vault Server..................................................................................63Upgrading Workgroup PDM Clients.................................................................................................64
5 License Administration.................................................................................................65Administering Individual Licenses..........................................................................................................65
Activating a License..........................................................................................................................65Transferring a License......................................................................................................................66
Administering Licenses Using a SolidNetWork License Manager.........................................................66Activating a SolidNetWork License..................................................................................................67Transferring a SolidNetWork License...............................................................................................68Installing and Configuring SolidNetWork Licensing..........................................................................68SolidNetWork License Administration..............................................................................................74
6 Troubleshooting...........................................................................................................80SolidWorks Installation Manager Log Files............................................................................................80SolidWorks Installation Manager Download Folder...............................................................................80Troubleshooting SolidNetWork Licenses...............................................................................................83
Accessing the SolidNetWork License log files.................................................................................83Could not obtain a license for SolidWorks. Cannot connect to license server. ...............................83
Troubleshooting Upgrades....................................................................................................................84Upgrading from a Source That Has Moved......................................................................................84
7 SolidWorks Installation Manager Application Help......................................................85SolidWorks Background Downloader....................................................................................................86Check for Updates Results....................................................................................................................87Administrative Image Location...............................................................................................................88Download Options..................................................................................................................................88Download Options for SolidWorks Installation Manager Files...............................................................91Download Product Installation Files.......................................................................................................92Download Progress................................................................................................................................92Download Results..................................................................................................................................93Installation Errors/Installation Cancelled................................................................................................93
Recovering from a Failed or Cancelled Installation..........................................................................94Repairing the Installation..................................................................................................................95Contacting the SolidWorks Reseller.................................................................................................95
Installation Is Complete..........................................................................................................................95Checking for Updates to SolidWorks................................................................................................96SolidWorks Customer Experience Program.....................................................................................96
iii
Contents

Installation Location...............................................................................................................................97Upgrade Options....................................................................................................................................98Installation Progress..............................................................................................................................99Installation Type.....................................................................................................................................99Manual Download................................................................................................................................101Newer Version Available......................................................................................................................102Processes Detected.............................................................................................................................103Product Selection.................................................................................................................................103Products to Download..........................................................................................................................105Products to Repair...............................................................................................................................106Serial Numbers....................................................................................................................................106Server Installation................................................................................................................................106SolidNetWork License Manager..........................................................................................................107Summary..............................................................................................................................................107System Check Warnings......................................................................................................................108Hole Wizard/Toolbox Options..............................................................................................................109
Notes About Configuring SolidWorks Toolbox...............................................................................111UNC Format...................................................................................................................................113
Uninstall Products................................................................................................................................113Workgroup PDM Server Options.........................................................................................................113
iv
Contents

Legal Notices© 1995-2010, Dassault Systèmes SolidWorks Corporation, a Dassault Systèmes S.A. company,300 Baker Avenue, Concord, Mass. 01742 USA. All Rights Reserved.
The information and the software discussed in this document are subject to change withoutnotice and are not commitments by Dassault Systèmes SolidWorks Corporation (DS SolidWorks).
No material may be reproduced or transmitted in any form or by any means, electronically ormanually, for any purpose without the express written permission of DS SolidWorks.
The software discussed in this document is furnished under a license and may be used orcopied only in accordance with the terms of the license. All warranties given by DS SolidWorksas to the software and documentation are set forth in the license agreement, and nothingstated in, or implied by, this document or its contents shall be considered or deemed amodification or amendment of any terms, including warranties, in the license agreement.
Patent NoticesSolidWorks
®3D mechanical CAD software is protected by U.S. Patents 5,815,154; 6,219,049;
6,219,055; 6,611,725; 6,844,877; 6,898,560; 6,906,712; 7,079,990; 7,477,262; 7,558,705;7,571,079; 7,590,497; 7,643,027; 7,672,822; 7,688,318; 7,694,238; and foreign patents,(e.g., EP 1,116,190 and JP 3,517,643).
eDrawings®software is protected by U.S. Patent 7,184,044; U.S. Patent 7,502,027; and
Canadian Patent 2,318,706.
U.S. and foreign patents pending.
Trademarks and Product Names for SolidWorks Products and ServicesSolidWorks, 3D PartStream.NET, 3D ContentCentral, eDrawings, and the eDrawings logo areregistered trademarks and FeatureManager is a jointly owned registered trademark of DSSolidWorks.
CircuitWorks, Feature Palette, FloXpress, PhotoWorks, TolAnalyst, and XchangeWorks aretrademarks of DS SolidWorks.
FeatureWorks is a registered trademark of Geometric Ltd.
SolidWorks 2011, SolidWorks Enterprise PDM, SolidWorks Simulation, SolidWorks FlowSimulation, and eDrawings Professional are product names of DS SolidWorks.
Other brand or product names are trademarks or registered trademarks of their respectiveholders.
COMMERCIAL COMPUTER SOFTWARE - PROPRIETARY
U.S. Government Restricted Rights. Use, duplication, or disclosure by the government is subjectto restrictions as set forth in FAR 52.227-19 (Commercial Computer Software - RestrictedRights), DFARS 227.7202 (Commercial Computer Software and Commercial Computer SoftwareDocumentation), and in the license agreement, as applicable.
Contractor/Manufacturer:
Dassault Systèmes SolidWorks Corporation, 300 Baker Avenue, Concord, Massachusetts 01742USA
v

Copyright Notices for SolidWorks Standard, Premium, Professional,and Education ProductsPortions of this software © 1986-2010 Siemens Product Lifecycle Management Software Inc.All rights reserved.
Portions of this software © 1986-2010 Siemens Industry Software Limited. All rights reserved.
Portions of this software © 1998-2010 Geometric Ltd.
Portions of this software © 1996-2010 Microsoft Corporation. All rights reserved.
Portions of this software incorporate PhysX™ by NVIDIA 2006-2010.
Portions of this software © 2001 - 2010 Luxology, Inc. All rights reserved, Patents Pending.
Portions of this software © 2007 - 2010 DriveWorks Ltd.
Copyright 1984-2010 Adobe Systems Inc. and its licensors. All rights reserved. Protected byU.S. Patents 5,929,866; 5,943,063; 6,289,364; 6,563,502; 6,639,593; 6,754,382; PatentsPending.
Adobe, the Adobe logo, Acrobat, the Adobe PDF logo, Distiller and Reader are registeredtrademarks or trademarks of Adobe Systems Inc. in the U.S. and other countries.
For more copyright information, in SolidWorks see Help > About SolidWorks.
Copyright Notices for SolidWorks Simulation ProductsPortions of this software © 2008 Solversoft Corporation.
PCGLSS © 1992-2007 Computational Applications and System Integration, Inc. All rightsreserved.
Copyright Notices for Enterprise PDM ProductOutside In® Viewer Technology, © Copyright 1992-2010, Oracle
© Copyright 1995-2010, Oracle. All rights reserved.
Portions of this software © 1996-2010 Microsoft Corporation. All rights reserved.
Copyright Notices for eDrawings ProductsPortions of this software © 2000-2010 Tech Soft 3D.
Portions of this software © 1995-1998 Jean-Loup Gailly and Mark Adler.
Portions of this software © 1998-2001 3Dconnexion.
Portions of this software © 1998-2010 Open Design Alliance. All rights reserved.
Portions of this software © 1995-2009 Spatial Corporation.
This software is based in part on the work of the Independent JPEG Group.
vi

1SolidWorks Installation and
AdministrationDeploying Multiple InstallationsIndividual Installations
Installation
Creation of an administrative image that isdeployed to a number of client computers.
Installation
Installation on one or a few computers.
Licensing
License activation or network licensing.
Licensing
License activation or network licensing.
Upgrades
Moving multiple computers to a new releaseby updating the administrative image used toinstall on those computers.
Upgrades
Moving individual computers to a new release.
Administration
Upgrading administrative images and clients,Network licensing administration, WorkgroupPDM vault administration.
Administration
Modifying, repairing, and removinginstallations, upgrading to new releases.
SolidWorks Installation Manager enables you to configure settings for SolidWorks productcomponents, including SolidWorks, SolidWorks Toolbox, PhotoView 360, Workgroup PDM, andSolidWorks SolidNetWork License Manager.
Workgroup PDM is project data management software that runs inside the SolidWorksenvironment or as a standalone application inside SolidWorks Explorer. Workgroup PDM controlsprojects with procedures for check out, check in, revision control, and other administrationtasks.
SolidNetWork License Manager supports multiple license clients by distributing licenses toclients on the network. This allows the number of users to exceed the number of licenses byusing floating licenses.
This chapter includes the following topics:
• Individual Installation or Administrative Image
7

• Initiating SolidWorks Installation
Individual Installation or Administrative ImageShould you install SolidWorks products on each computer individually, or should youcreate an administrative image and deploy the installation to all clients with one command?
If you are installing on only one computer, or if you manage dozens or hundreds ofcomputers, the choice is obvious. For situations in between, consider the followingcomparisons.
Administrative imageIndividual installation
The system administrator can customizemultiple installations using the OptionEditor, specifying installation options suchas creating a new installation or updatingan existing one, running the installation asan administrative user, running externalcommands before or after the installation,different product groupings, and so on.
Users can do their own SolidWorksadministration.
Client computers can be distantly locatedas long as they are accessible from thesame network.
The computers must be physically accessibleto the person performing the installation.
Using the Option Editor, administrativeimages can maintain consistency inversions, service packs, products, andsettings for multiple installations.
You can install different versions, servicepacks, or products on different computers,with independent settings.
Media drives are not required when applyingservice packs.
The original source media (DVD) is requiredwhen applying service packs.
A local network connection is required todeploy the application; media drives are notrequired on client computers.
The computer does not need to be on anetwork.
Clients can be updated automatically. Allclients deployed from the sameadministrative image are at the sameservice pack. To maintain multiple versions,you can create multiple administrativeimages.
License activation can be automated.
An administrative image requires additionaldisk space on the server; clients require thesame space as individual installations.
Initiating SolidWorks InstallationYou can initiate SolidWorks installation from loading a DVD on the local computer,accessing a shared installation directory, or downloading from SolidWorks.
To initiate SolidWorks installation, do one of the following:
8
SolidWorks Installation and Administration

• To install on a local computer from disk, insert the appropriate disk into thecomputer's disk drive.
• To install from a download directory, navigate to the directory and double-clicksetup.exe.
• To install by downloading from SolidWorks:
1. Browse to the SolidWorks Web site.2. Login as a Subscription Service Customer, using your email address andpassword, or your SolidWorks serial number.
3. Under Self Service, click Download Software and Updates.4. Under Download Software, select the SolidWorks version and service packto download.
9
SolidWorks Installation and Administration

2Individual Installations
This chapter includes the following topics:
• Installation on Individual Computers• Administration of Individual Installations
Installation on Individual ComputersYou can install SolidWorks on an individual computer using several installation methods.
The SolidWorks Installation Manager performs the installation, tailoring the installationto the products you have purchased. Before you start the installation:
• Have your SolidWorks serial number available.• Verify that you have a working internet connection.
SolidWorks Installation Manager requires various Microsoft components, includingMicrosoft Windows Installer, Office Web Components, Microsoft Visual Studio Toolsfor Applications, and .NET Framework. If the correct versions of all Windowsprerequisite components are not installed on the computer, SolidWorks InstallationManager installs them automatically prior to installing SolidWorks products.
10

Summary of the ProcessInstallation Method
Insert the appropriate DVD disk into the computerdisk drive.
Using the SolidWorks installationmedia
The SolidWorks installation media providesseparate DVDs for 32-bit and 64-bit Windowsinstallations.
In the download directory, double-click setup.exe.
The download directory must be accessible from thecomputer on which you are installing SolidWorks
Using a download directory on aserver
products, and it must contain all of the SolidWorksinstallation files before installation can begin.SolidWorks Installation Manager can help you findmissing files if you have internet access and writeaccess to the download directory.
This is not an administrative image. Theonly way to install a client computer from anadministrative image is by clicking the link inthe HTML page distributed by the SolidWorksadministrator.
Do one of the following:Updating an existing SolidWorksinstallation using Check forUpdates
• In SolidWorks, click Help > Check for Updates.• In Windows, click Start > All Programs >SolidWorks Installation Manager > Check forUpdates.
You must have a working internet connection.
Workgroup PDM clients detect Vault updatesautomatically. You do not need to download aservice pack to update clients. For details, seeUpdate Clients in the Workgroup PDM onlinehelp.
11
Individual Installations

Summary of the ProcessInstallation Method
1. Browse to the SolidWorks Web site.2. Login as a Subscription Service Customer, usingyour email address and password, or yourSolidWorks serial number.
3. Under Self Service, click Download Softwareand Updates.
4. Under Download Software, click the SolidWorksversion you wish to install.
You must have a working internet connection.
You must be a Subscription Service Customerwith login access to the Customer Portal site.
Downloading from the SolidWorkscustomer Web site.
When the installation is complete, start the SolidWorks application and activate thelicense.
Administration of Individual InstallationsTypically, administration of individual installations consists of modifying, repairing,removing, and upgrading installations.
Modifying an InstallationYou can modify an installation to install products that have not been installed or to removeproducts.
If you installed SolidWorks and purchased an add-in at a later time, you can modify theinstallation to include the new add-in. You must install the add-in on each individualmachine.
Workgroup PDM is not installed if you are modifying your original SolidWorks packageto include SolidWorks Professional or SolidWorks Premium.
1. Make sure no SolidWorks sessions are active.2. In Windows, open the Control Panel and run Add or Remove Programs.3. Select the SolidWorks installation you want to modify and then click Change.4. On the Welcome to the SolidWorks Installation Manager screen, click Modify the
individual installation (on this computer).5. On the Serial Number screen, verify that the appropriate serial numbers are specified.6. On the Product Selection screen, select the products to install or remove.
When modifying an installation:
• No products are installed or removed by default, even if you specify a new serialnumber. You must change the installation action of each product or featurecomponent.
• To view the projected action for a particular component, click the component name(but not the check box). The intended installation action appears in the informationfield below the product listing.
12
Individual Installations

• You can click the check box next to the product component to change the installationaction for that component. (For example, if you are installing or removingcomponents, selecting the check box specifies that the component is to be installedor removed and clearing the check box specifies that the component is not to beinstalled or removed.)
• When you change a component installation action from the initial specification, anasterisk (*) appears next to that component in the listing.
• If a component has optional installation sub-components in it, a + icon appearsnext to the component. To see the available sub-components for a component,click the + icon.
• If a component has been expanded to show optional sub-components, a - iconappears next to the component. To collapse the sub-component listing, click the -icon.
7. On the Summary screen, click Modify Now.8. On the Installation is Complete screen, click Finish.
Repairing an InstallationIf you encounter problems with an installed SolidWorks Product, you can use theSolidWorks Installation Manager to repair the installation.
You can repair an individual installation. You cannot repair an administrative image;you must uninstall and then reinstall the administrative image.
1. Click Start > Control Panel > Add or Remove Programs.2. Select the SolidWorks version you wish to repair and click Change.3. On the Welcome to SolidWorks Installation Manager screen, click Repair the
individual installation (on this computer).4. On the Products to Repair screen, select the product to repair.5. Clear the rest of the products on the screen.6. Click Repair.
Rolling Back an Individual Installation to a Previous Service PackTo roll back an individual installation to a previous service pack release in the currentmajor release family, uninstall the service pack version currently installed on the computerand then re-install the earlier version.
Removing an InstallationYou can remove an installation on an individual computer or in a client/server environment.
1. Make sure no SolidWorks sessions are active.2. If you wish to transfer the SolidWorks license to another computer, transfer the license
to that computer before removing the SolidWorks installation on this computer.
For information about transferring SolidWorks licenses, see Transferring aLicense on page 66.
3. In Windows, open the Control Panel and double-click Add or Remove Programs.4. In Add or Remove Programs, select the product component to remove.
13
Individual Installations

In some cases, you might find multiple SolidWorks Service Pack componentsfor a given major release version. To remove a SolidWorks major release, removeall Service Pack elements for that major release in Add or Remove Programs.
5. Click Remove.6. On the Welcome to the SolidWorks Installation screen:
a) Select the products to remove.
By default, all product components are selected.
b) Clear the products you do not want to remove.c) Click Remove Items.
Upgrading to a New ReleaseThere are several methods for upgrading an individual installation to a new SolidWorksrelease.
You can upgrade to a new release when you:
• Receive new installation media• Are notified of upgrades when starting SolidWorks• Check for updates manually• Start a new instance of SolidWorks Installation Manager
When installing a new major release, you can upgrade a previously installed major releaseor install the new release in parallel. If you are installing a Service Pack release for apreviously installed major release, that release is updated automatically.
Checking for Updates ManuallyYou can check for updates for a currently installed SolidWorks release using one of thesemethods.
• In SolidWorks, click Help > Check for Updates.• In Microsoft Windows, click Start > All Programs > SolidWorks InstallationManager > Check for Updates.
Upgrading Workgroup PDM ClientsWorkgroup PDM clients detect when the Vault has been updated. You do not need todownload a service pack to update clients.
For instructions, see Update Clients in the Workgroup PDM online help.
Upgrade CaveatsProducts that can have multiple installations with different major versions do not alwayssupport major upgrades, or the ability to upgrade between major versions as a singleoperation.
In this case, SolidWorks Installation Manager simulates the upgrade by first installing thenew version, then removing the old one. At this time, the core SolidWorks product supportsmajor upgrades, while the other products do not.
The consequences of this are:
• When upgrading the core SolidWorks product between major versions:
14
Individual Installations

Your existing installed location does not change.•• The upgrade can be rolled back if an error occurs or the you cancel during theupgrade.
• When other products are upgraded between major versions:
• Each product is first installed as a new product to a new location, then the originalinstallation is removed.
• Once started, the upgrade cannot be rolled back if an error occurs or if you cancelduring the upgrade.
Product Coexistence RulesThese product coexistence rules determine how new products are installed and existingproducts are upgraded.
ExamplesRule
SolidWorks 2009 SP3.0, and SolidWorks2010 SP0.0 can coexist on the samecomputer.
However, if SolidWorks 2010 SP0.0 isinstalled on a computer, and you installSolidWorks 2010 SP1.0, SolidWorksInstallation Manager replaces the SP0.0version with the new SP1.0 version.
SolidWorks 2010 SP0.0 and 2010 SP1.0 willnot coexist on the same computer.
Multiple major release versions of a coreSolidWorks product are allowed, regardlessof service pack or major release (with theexception of the three products mentionedbelow).
If SolidWorks 2010 SP0.0 is installed,Workgroup PDM Server is upgraded to 2010SP0.0, even if an earlier major release ofSolidWorks remains on the computer.
Only one version of the following productsis allowed on the computer:
• Workgroup PDM Server• SolidNetWork License Manager
If SolidWorks 2010 SP0.0 is upgraded to2010 SP1.0, SolidWorks Explorer 2010SP0.0 will automatically upgrade to 2010SP1.0. However, SolidWorks Explorer 2009SP4.0 can also exist on the computer.
Only one version of an included product canbe installed for any major version.
15
Individual Installations

3Multiple Installations
This chapter includes the following topics:
• Deploying to Multiple Clients• Using Administrative Images• Command-Line Deployment• Administration of Multiple Installations
Deploying to Multiple ClientsYou can install the SolidWorks product on multiple clients by creating an administrativeimage and then deploying the installation to clients.
The process for deploying to multiple clients is:
1. Create an administrative image.
• Creating an Administrative Image from SolidWorks Installation Manageron page 17
• Creating an Administrative Image from the Command Line on page 25
2. Deploy the administrative image to clients.
• Deploying an Administrative Image to Clients Through Email on page 24• Installing from the Administrative Image Using the Command Line on page34
3. Implement licensing.
• Administering Individual Licenses on page 65• Administering Licenses Using a SolidNetWork License Manager on page 66
Using Administrative ImagesAn administrative image allows configurable installations of SolidWorks products from asingle network location.
You can install the administrative image from any computer on the network, including aclient computer.
• The administrative image must be in a shared folder.• If you include all products, the administrative image disk space requirements can be7GB or more.
• If you update the share name when you upgrade the administrative image, the clientupgrades automatically the next time the application is started. For details, seeUpgrading Clients from Administrative Images on page 51.
• Clients must have administrative privileges on their computers, unless the Run theinstallation as a different user option is specified for the client installation.
16

This option is not supported on Windows Vista or later.
Once you have created an administrative image, the Administrative Image Option Editorcan manage installation option settings for users and groups installing from that image.For details, see Administrative Image Option Editor on page 17.
Creating an Administrative Image from SolidWorks InstallationManagerIf you are installing SolidWorks on multiple computers, you can create an administrativeimage and then deploy the application to other computers.
1. Start SolidWorks Installation Manager (as described under Initiating SolidWorksInstallation on page 8).
2. On the Welcome screen, select Administrative image.Administrative image creation options appear:
Create the image using the default configurationsettings (that is, not based on the settings currently
Create a new image usingdefault settings.
established for an existing administrative image atyour site).
Create the image using configuration settings specifiedfor an existing administrative image at your site. Click
Create a new image usingsettings and files from anexisting image. Browse to specify the installation directory for the
existing administrative image.
You can create both 32-bit and 64-bit images on asingle computer or you can create just the image that
Create both 32-bit and64-bit administrativeimages. corresponds to that computer architecture. Creating
both images does require that you have access to the32-bit and 64-bit installation media.
3. Follow the on-screen instructions.
Administrative Image Option EditorThe Administrative Image Option Editor lets you customize installation parameter settingsin an administrative image for individual machines and for groups of machines.
After creating an administrative image, SolidWorks Installation Manager asks you to startthe Option Editor. You can also start the Option Editor by double-clickingsldAdminOptionEditor.exe in the administrative image folder.
To specify different installation configurations for groups of machines or individualmachines, add groups and machines in the Option Editor and then specify the installationoptions for those groups and machines.
Adding and Deleting Groups and MachinesThe Administrative Image Option Editor lets you specify different installation configurationsfor groups of machines and for individual machines.
For example, you might want to configure several machines to use a particular subset ofthe product components available in the image while another group might use a differentsubset of product components. Even though you are using one administrative image, the
17
Multiple Installations

Option Editor group settings enable you to install different product subsets to differentgroups of machines.
To add a group:1. Right-click Global Settings and then click Add
Group.2. Enter the group name.
To add machines:1. Right-click an existing group or Global Settingsand then click Add Machine.
If you right-click an existing group, machinesare added to that group. Otherwise, they areadded at the top level.
2. Do one of the following:
• Enter one or more machine names underMachine Name.
Multiple machines can be separated by a linebreak, space, tab, comma, period, colon, orsemi-colon. You can copy and paste a list ofmachine names from an external file.
Machine names cannot include domain qualifiers.For example, pluto.solidworks.com is invalid.
• Click Add Multiple Machines to select machinesfrom the network.
Drag the machine onto the group.To move an existing machine toa group:
Drag the machine onto Global Settings or onto adifferent group.
To move a machine out of agroup:
Right-click the group or machine and then click DeleteGroup or Delete Machine.
To delete a group or machine:
If you delete a group, all machines within thatgroup are deleted.
Right-click Global Settings and then click Delete All.To delete all groups andmachines:
18
Multiple Installations

Viewing and Editing Option SettingsSolidWorks Administrative Image Option Editor enables you to view and change optionsettings for groups and machines specified for the image.
• When you first start the Option Editor, option settings are displayed in read-only mode.
The Edit icon is not shaded: .
Clicking on Global Settings, a group, or a machine displays a summary of optionsettings for that item:
Option Settings DisplayedScope
All option settings specified for the administrative imageGlobal Settings
Changes in the group settings relative to the Global SettingsGroup
Changes in the machine settings relative to the groupMachine
• To make changes to option settings, click on the Edit icon. The icon becomes shaded
( ) and a more detailed option settings listing appears.
Clicking on Global Settings, a group, or a machine lets you change option settingsfor that item. When you make a change in an option setting that differs from theinherited Global Settings or group settings, that option setting is highlighted.
If you click the Edit icon again, the display reverts to read-only mode.
If you make changes, the Option Editor prompts you to save or discard them whenyou exit.
Specifying Option Settings for Groups and MachinesYou can specify option settings for all machines (Global Settings), groups of machines,and individual machines.
1. In the Option Editor, click the object to modify (Global Settings, a group, or amachine).
2. On the right, click the Edit icon .
The Edit icon becomes shaded ( ) and a more detailed option settings listing appears.3. Make option setting changes by clicking option settings on the right for the item
selected on the left.Changes in option settings that override Global Settings or group settings arehighlighted.
4. Click OK or Close to save your changes.
The Option Editor saves your changes and exits.OK
The Option Editor asks if you want to save your changes and thenexits.
Close
Administrative Image Option SettingsThe Option Editor enables you to specify option settings for individual clients or groups,including serial numbers, client installation options, which software components to beinstalled, and toolbox location.
19
Multiple Installations

Serial NumbersEnter the serial numbers for products to be installed on client machines.
Because there are multiple ways to purchase SolidWorks products, some serialnumbers can cover two or more products. For example, a SolidWorks serial numbermight enable you to install SolidWorks Simulation without entering a separateSolidWorks Simulation serial number. In addition, some products do not require aserial number. If you have any questions about your serial numbers, contact yourVAR.
If you are managing licensing using SolidNetWork Licensing:
• In the first serial number field, enter the SolidNetWork serial number.• In the SNL Server port@server field, enter the SolidNetWork License Manager servername and port in the form nnnnn@servername . Separate multiple entries usingsemicolons.
For details about SolidNetWork licensing, see Installing and Configuring SolidNetWorkLicensing on page 68.
Client Installation Options
You can specify how client installations will handle an existing priormajor version installation:
How do youwant to performclient • Upgrade an existing major version (if one exists).
Specify this option to replace the prior major version installationwith the new version installation
installations ofmajor versions?
• Create a new major version.
Specify this option to keep the prior major version and create anew installation for the new major version.
To specify a location for the new version installation, click Browse.
You can specify that client installations configure SolidWorks settingsbased on the SolidWorks settings configured on the client machineor SolidWorks settings exported from the Copy Settings Wizard.
How do youwant to applySolidWorksSettings? • Use current settings (if they exist) or use SolidWorks default
settings
If the client machine has defined SolidWorks settings, keep thosesettings. (For any settings that are not specifically defined on theclient, the client installation uses the default SolidWorks settings.)
• Use a settings file exported from the Copy Settings Wizard.
Selecting this option setting enables you to specify option settingsfrom an existing Copy Settings Wizard export file. (Typically, thisfile is named solidworkssettings.sldreg.)
• Click Browse to find an existing settings file.• Click New to start the Copy Settings Wizard to create a newsettings file.
20
Multiple Installations

You can specify whether to complete product activation automaticallyafter running the installation, or require that the user perform productactivation manually after installation.
How do youwant to activateclientinstallations? • Activate automatically when each client installation
completes.
Selecting this option setting specifies that product activation runsautomatically using a SolidWorks Product Activation file. (Typically,this file is named AutoActivation.xml.)
• Click Browse to find an existing activation file.• Click New to start SolidWorks Product Activation to create a newactivation file.
• Do not activate automatically.
Selecting this option setting specifies that no automated productactivation occurs. The client user performs product activation afterinstallation.
If you specify automatic product activation, the administrativeimage must be available through the shared network location thefirst time clients run SolidWorks after the installation. If theadministrative image is unavailable to clients that installed fromthat image, those clients will not be able to complete theautomatic product activation. They will not be able to runSolidWorks unless they run SolidWorks Product Activationmanually.
Administrative Options
A client installation can create a diagnostic log that canbe used to troubleshoot installation problems. Creatingthis log can make the client installation run slower.
Create a diagnostic logduring each installation
A client installation can run as a different user. This optioncan be useful when individual users do not have local
Run the installation as adifferent user.
administrative permissions on their machines (which isrequired to install SolidWorks products).
This is not supported on Windows Vista, Windows7, or later.
You can specify that a custom program runs before orafter the client installation.
Run a program before orafter installation
You can specify that client machines participate in theSolidWorks Customer Experience Program. Performance
Do you want clients toparticipate in the
information is sent to SolidWorks Corporation to helpSolidWorks CustomerExperience Program? improve the product. The process is transparent and
confidential. For details, see SolidWorks CustomerExperience Program on page 96.
21
Multiple Installations

Software to InstallYou can specify what SolidWorks product components to install.
• Selecting the check box next to the product component specifies that the componentis installed during the client installation.
• Clearing the check box specifies that the component is not installed.• If a component has optional installation sub-components in it, a + icon appears nextto the component. To see the available sub-components for a component, click the +icon.
• If a component has been expanded to show optional sub-components, a - icon appearsnext to the component. To collapse the sub-component listing, click the - icon.
The Languages specification limits the languages that are installed for theSolidWorks product only. Other product installations are not affected by thisspecification. For example, SolidWorks eDrawings
®, SolidWorks Workgroup PDM,
and SolidWorks Explorer install all languages.
Toolbox OptionsYou can specify the default Toolbox location for client installations.
It is common to have multiple users accessing a shared Toolbox, typically through anetwork location (for example, a UNC path, a shared folder, or a common network drivespecification).
If the location contains an older major version of Toolbox, the client installation willupgrade that Toolbox to the new major version. The files will no longer be compatiblewith previous major versions of SolidWorks.
If you want to retain the Toolbox for the older SolidWorks version (for example, ifsome clients might continue using the older version), you must specify a differentToolbox network location for clients that are upgrading to the newer version.
For details about SolidWorks Toolbox administration, see the Toolbox information inSolidWorks Help.Inheritance of Global and Group Option SettingsOption settings for Global Settings or groups are inherited by items underneath them.
For example:
• Settings defined for Global Settings are inherited by all groups and machines.• Settings defined for a group are inherited by all machines within that group.
You can change option settings for a machine or group to override default or inheritedsettings. When you change an option setting from the default or its inherited value, thatoption is highlighted.
To revert option settings to the original inherited values, right-click the group ormachine and then click Revert to Global Settings (for a group or machine that isnot a group member) or Revert to Group Settings (for a machine that is a groupmember).
22
Multiple Installations

Switching Between 32-Bit and 64-Bit ImagesIf you have created both 32-bit and 64-bit images in the administrative image installationdirectory, the Option Editor can operate on both images.
In the Option Editor, click 32 or 64 to operate on the 32-bit or 64-bit image.Clicking on Setup or Deploy enables you to view and modify option settings or deployinstallations for that image.
If you have both 32-bit and 64-bit images, you must specify Global Settings, groupsand group settings, and individual machine settings separately for each image.
Deploying Installations from the Option EditorYou can deploy installations directly from the Option Editor using email instructions tostart the installation.
You must change the administrative image installation directory to a Windows shareddirectory, so it is available through a network location (for example,\\machine\shared_directory ).
1. In the Option Editor, click Deploy.2. If you have 32-bit and 64-bit images configured for this administrative image
installation directory, click 32 or 64 to view the machines for the 32-bit or 64-bitimage.Installation availability and status for each machine appears.
3. Click Send Email.4. Specify the network path to the administrative image installation directory.
Typically, the directory path to the administrative image installation directory is showninitially as a Windows file path (for example, C:\SolidWorks Admin\SolidWorks2011 SP0). The dialog box indicates This path is not a network path.
a) Click Browse to specify the network location for this administrative imageinstallation directory.
b) Navigate to the computer where the administrative image is installed, and selectthe Windows shared directory specified for the administrative image installationdirectory.
Do not navigate inside the administrative image shared directory (for example,into the 32bit or 64bit subdirectories).
c) Click OK.The dialog box indicates This path is a network path.
An email is created to instruct the machine owner how to install from the administrativeimage using the network location for the StartSWInstall.hta file in the administrativeimage.
5. Send the email to the users responsible for installing SolidWorks.
Users can double-click the link to the network location for StartSWInstall.hta in theemail to install SolidWorks from the administrative image.
In the Option Editor, Installation Status shows:
The user has not yet run the Installation on this machine.Pending
23
Multiple Installations

The user successfully completed the installation on this machine.Successful
The user ran the installation on this machine, but it failed.Failed
Using a Mapped Drive to Deploy an Administrative ImageA UNC path (\\machine_name\share_name ) is the recommended method for specifyinga network location for the administrative image installation directory. However, you canuse a mapped drive as the location for the StartSWInstall.hta file in the administrativeimage (for example, U:\StartSWInstall.hta), provided the installing users all have thatsame drive letter mapped to the administrative image shared directory.
For example, if you mapped the U: drive to the administrative image shared directory,the notification email will instruct the users to click a link tofile://U:\StartSWIOnstall.hta. Users receiving the email can successfully installprovided that the U: drive is mapped to the UNC location for the administrative image(\\machine_name\share_name ).
Exiting the Option EditorYou can click OK or Close to exit the Option Editor.
Click OK, Close, or use the Windows application Close button to apply changes andexit the Option Editor.
• Click OK to apply any option setting changes and exit the Option Editor.• Click Close to exit the Option Editor.
If there are changes to be applied, you are asked whether you want to save thosechanges.
• Click the Windows application Close button (X). If there are changes to be applied,you are asked whether you want to save those changes.
Creating a Desktop Shortcut to the Option EditorYou can create a Windows desktop shortcut to the Option Editor for a particularAdministrative Image from within the application.
1. Start the Option Editor.For example, in Windows Explorer, navigate to the administrative image installationdirectory and double-click sldAdminOptionEditor.exe.
2. Click Create Desktop Shortcut to this Option Editor.A shortcut to the Option Editor for the administrative image appears on the Windowsdesktop.
Deploying an Administrative Image to Clients Through EmailOnce you have created a shared administrative image directory, you can notify clientsby email.
Configure the administrative image directory to be shared on a machine that is accessibleto other computers (for example, through a UNC path).
You can send an email containing a link toadmin_image_install_dir\StartSWInstall.hta to all clients. Clients then can click thislink and then click Install SolidWorks products now to start the installation from theadministrative image.
24
Multiple Installations

If you are upgrading an administrative image to a new SolidWorks version, you canconfigure your administrative image location and share properties so that any clientsthat installed previously using that image will upgrade automatically. For details,see Upgrading Clients from Administrative Images on page 51.
Advertising an Administrative Image to ClientsYou can run a command to advertise a new administrative image installation to clients.
Email deployment is the method generally used to notify clients of a new SolidWorksinstallation. For details, see Deploying an Administrative Image to Clients ThroughEmail on page 24.
However, as an alternative, you can execute a command to advertise a new installationto clients. For example, you might advertise to employees who do not normally use theSolidWorks application.
Advertising SolidWorks creates a shortcut to the SolidWorks application on the Startmenu on the user's computer and creates a file association with the administrative imageon the server. Initially, the executable files are not installed. Installation occurs only whenthe user first needs the application.
When the user clicks the shortcut or double-clicks a SolidWorks document, the installationbegins and the SolidWorks application executes.
To advertise from an administrative image:
1. Create and configure the administrative image.2. Advertise the product on each machine where the SolidWorks application is to be
installed.For example:
msiexec /jm path_to_msi_file_of_admin_image
where path_to_msi_file_of_admin_image is a UNC path to the administrative imagedirectory.
Command-Line DeploymentYou can automatically deploy an administrative image using a command prompt or batchfile (silent installation).
Creating an Administrative Image from the Command LineYou can create an administrative image using SolidWorks Installation Manager or theMS-DOS command line.
When creating administrative images from the command line, you must create anddeploy a separate image for each SolidWorks product component by running the.msi file for that component. If you are installing for non-English languages, youmust create and deploy a separate image for each non-English language by runningthe .msi file for that language. For details about the locations of .msi files, see MSIFile Locations for Administrative Images on page 45.
1. Open a Command Prompt window.a) In Windows, click Start > Run.
25
Multiple Installations

b) Enter cmd and click OK.
2. Enter this command:msiexec /a Msi_path
where Msi_path is the location of the .msi file for your operating system. TheSolidWorks.msi is located in the swwi\data subdirectory in the installation directory.
For example:
msiexec /a F:\swwi\data\SolidWorks.msi
3. In the SolidWorks Setup Wizard, follow the on-screen instructions.4. If you are installing SolidWorks products for non-English languages, create a separate
administrative image for that language using this command:msiexec /a Msi_path_for_language
where Msi_path_for_language is the location of the .msi file for the language. Forexample, french.msi is located in the swwi\lang\french subdirectory in theinstallation directory.
For example:
msiexec /a F:\swwi\lang\french\french.msi
Preparing Clients for Command-Line Installation from anAdministrative ImageAfter creating the administrative image and before notifying clients, you must installMicrosoft Windows components that cannot be installed by administrative images createdusing the command line or Microsoft Active Directory.
Installing these Windows components manually is required only if you are installingfrom an administrative image that was created manually using the command lineor through Microsoft Active Directory. If you use SolidWorks Installation Managerto create and install the administrative image, these Windows components areinstalled automatically.
Here is a summary of the files required by SolidWorks in the Windows components:
Contains files needed to run the installation of SolidWorksSimulation Premium.
Windows Installer
Contains COM controls that are needed for DriveWorks.Office Web Components
Contains runtime components for Microsoft Visual C++.Visual C++ 2005 and 2008Redistributable Package
The 2005 and 2008 versions both must be installed.
Contains a tool set supporting Visual Studio applications.Visual Studio Tools forApplications
Provides a debugging environment for 64-bit operatingsystems.
Visual Studio RemoteDebugger
Contains the common language runtime and .NETFramework components that are necessary to run .NETFramework applications.
.NET Framework
26
Multiple Installations

Supports fast searches of files and data across differentdata sources and locations, including the local computerand shared networks.
Windows Desktop Search(optional)
Windows Desktop Search files are language specific.For details, see Windows Desktop SearchLanguage Support on page 47.
Visual C++ Redistributable Package and .NET Framework 3.5 are required for allSolidWorks products, not just the core SolidWorks product.
These components must be included in subdirectories of the administrative image directory.
This table identifies the specific files that are required for each supported operating system.
27
Multiple Installations

Operating System: Windows 2003 32-bit1
SolidWorks Media: 32-bit version for Windows XP, Windows Vista, and Windows 7
(Not applicable)Windows Installer:
owc11.exeOffice Web Components:
vcredist_x86.exeVisual C++ 2005 Redistributable Package:
vcredist_x86.exeVisual C++ 2008 Redistributable Package:
vsta_aide.msiVisual Studio Tools for Applications:
(Not applicable)Visual Studio Remote Debugger:
dotnetfx35.exe.NET Framework:
Windows Desktop Search (optional):
WindowsDesktopSearch-KB917013-V301-Srv2K3-x86-lang.exe
Operating System: Windows 2003 64-bit1
SolidWorks Media: 64-bit version for Windows XP, Windows Vista, and Windows 7
(Not applicable)Windows Installer:
owc11.exeOffice Web Components:
vcredist_x86.exe
vcredist_x64.exe
Visual C++ 2005 Redistributable Package:
Both must be installed.
vcredist_x86.exe
vcredist_x64.exe
Visual C++ 2008 Redistributable Package:
Both must be installed.
vsta_aide.msiVisual Studio Tools for Applications:
rdbgexp.msiVisual Studio Remote Debugger:
dotnetfx35.exe.NET Framework:
Windows Desktop Search (optional):
WindowsDesktopSearch-KB917013-V301-Srv2K3_XP-x64-enu.exe
Operating System: Windows 2008 32-bit1
SolidWorks Media: 32-bit version for Windows XP, Windows Vista, and Windows 7
(Not applicable)Windows Installer:
owc11.exeOffice Web Components:
vcredist_x86.exeVisual C++ 2005 Redistributable Package:
28
Multiple Installations

vcredist_x86.exeVisual C++ 2008 Redistributable Package:
vsta_aide.msiVisual Studio Tools for Applications:
(Not applicable)Visual Studio Remote Debugger:
dotnetfx35.exe.NET Framework:
Windows Desktop Search is a feature ofthe operating system.
Windows Desktop Search (optional):
Operating System: Windows 2008 64-bit1
SolidWorks Media: 64-bit version for Windows XP, Windows Vista, and Windows 7
(Not applicable)Windows Installer:
owc11.exeOffice Web Components:
vcredist_x86.exe
vcredist_x64.exe
Both must be installed.
Visual C++ 2005 Redistributable Package:
vcredist_x86.exe
vcredist_x64.exe
Both must be installed.
Visual C++ 2008 Redistributable Package:
vsta_aide.msiVisual Studio Tools for Applications:
rdbgexp.msiVisual Studio Remote Debugger:
dotnetfx35.exe.NET Framework:
Windows Desktop Search is a feature ofthe operating system.
Windows Desktop Search (optional):
Operating System: Windows XP 32-bit
SolidWorks Media: 32-bit version for Windows XP, Windows Vista, and Windows 7
WindowsInstaller-KB893803-v2-x86.exeWindows Installer:
owc11.exeOffice Web Components:
vcredist_x86.exeVisual C++ 2005 Redistributable Package:
vcredist_x86.exeVisual C++ 2008 Redistributable Package:
vsta_aide.msiVisual Studio Tools for Applications:
(Not applicable)Visual Studio Remote Debugger:
dotnetfx35.exe.NET Framework:
Windows Desktop Search (optional):
WindowsDesktopSearch-KB917013-V301-XP-x86-lang.exe
29
Multiple Installations

Operating System: Windows XP 64-bit
SolidWorks Media: 32-bit version for Windows XP, Windows Vista, and Windows 7
(Not applicable)Windows Installer:
owc11.exeOffice Web Components:
vcredist_x86.exeVisual C++ 2005 Redistributable Package:
vcredist_x86.exeVisual C++ 2008 Redistributable Package:
vsta_aide.msiVisual Studio Tools for Applications:
rdbgexp.msiVisual Studio Remote Debugger:
dotnetfx35.exe.NET Framework:
Windows Desktop Search (optional):
WindowsDesktopSearch-KB917013-V301-Srv2K3_XP-x64-enu.exe
Operating System: Windows XP 64-bit
SolidWorks Media: 64-bit version for Windows XP, Windows Vista, and Windows 7
(Not applicable)Windows Installer:
owc11.exeOffice Web Components:
vcredist_x86.exe
vcredist_x64.exe
Both must be installed.
Visual C++ 2005 Redistributable Package:
vcredist_x86.exe
vcredist_x64.exe
Both must be installed.
Visual C++ 2008 Redistributable Package:
vsta_aide.msiVisual Studio Tools for Applications:
rdbgexp.msiVisual Studio Remote Debugger:
dotnetfx35.exe.NET Framework:
Windows Desktop Search (optional):
WindowsDesktopSearch-KB917013-V301-Srv2K3_XP-x64-enu.exe
Operating System: Windows Vista 32-bit
SolidWorks Media: 32-bit version for Windows XP, Windows Vista, and Windows 7
(Not applicable)Windows Installer:
owc11.exeOffice Web Components:
30
Multiple Installations

vcredist_x86.exeVisual C++ 2005 Redistributable Package:
vcredist_x86.exeVisual C++ 2008 Redistributable Package:
vsta_aide.msiVisual Studio Tools for Applications:
(Not applicable)Visual Studio Remote Debugger:
dotnetfx35.exe.NET Framework:
Windows Desktop Search is a feature ofthe operating system.
Windows Desktop Search (optional):
Operating System: Windows Vista 64-bit
SolidWorks Media: 64-bit version for Windows XP, Windows Vista, and Windows 7
(Not applicable)Windows Installer:
owc11.exeOffice Web Components:
vcredist_x86.exe
vcredist_x64.exe
Both must be installed.
Visual C++ 2005 Redistributable Package:
vcredist_x86.exe
vcredist_x64.exe
Both must be installed.
Visual C++ 2008 Redistributable Package:
vsta_aide.msiVisual Studio Tools for Applications:
rdbgexp.msiVisual Studio Remote Debugger:
dotnetfx35.exe.NET Framework:
Windows Desktop Search is a feature ofthe operating system.
Windows Desktop Search (optional):
Operating System: Windows 7 32-bit
SolidWorks Media: 32-bit version for Windows XP, Windows Vista, and Windows 7
(Not applicable)Windows Installer:
owc11.exeOffice Web Components:
vcredist_x86.exeVisual C++ 2005 Redistributable Package:
vcredist_x86.exeVisual C++ 2008 Redistributable Package:
vsta_aide.msiVisual Studio Tools for Applications:
(Not applicable)Visual Studio Remote Debugger:
.NET Framework and Windows DesktopSearch are features of the operatingsystem.
.NET Framework:
Windows Desktop Search (optional):
31
Multiple Installations

Operating System: Windows 7 64-bit
SolidWorks Media: 64-bit version for Windows XP, Windows Vista, and Windows 7
(Not applicable)Windows Installer:
owc11.exeOffice Web Components:
vcredist_x86.exe
vcredist_x64.exe
Both must be installed.
Visual C++ 2005 Redistributable Package:
vcredist_x86.exe
vcredist_x64.exe
Both must be installed.
Visual C++ 2008 Redistributable Package:
vsta_aide.msiVisual Studio Tools for Applications:
rdbgexp.msiVisual Studio Remote Debugger:
.NET Framework and Windows DesktopSearch are features of the operatingsystem.
.NET Framework:
Windows Desktop Search (optional):
1Installation on Windows 2003 or Windows 2008 is supported only for Workgroup PDMServer and SolidNetWork License (SNL) Server.
Installing Windows Prerequisites from the Command Line on 32-bit OperatingSystemsFollow this process to install Windows prerequisites for administrative image installationsusing the command line on 32-bit Versions of Windows.
To install multiple components in one install operation, create a batch file with thecommands provided in the following procedures and use it to push the components tothe client computers.
1. Ensure that the target computer has at least 290 MB of available disk space and avalid TEMP directory.
2. Install Office Web Components by running this command:administrative_image_directory \OfficeWeb_11\owc11.exe
3. For Windows XP, install Windows Installer:administrative_image_directory\WindowsInstaller\WindowsInstaller-KB893803-v2-x86.exe
It is not necessary to install Windows installer on any version of Windows otherthan Windows XP.
4. Install the Visual C++ 2005 Redistributable Package:
32
Multiple Installations

administrative_image_directory\Microsoft_C++_2005_Redistributable\vcredist_x86.exe /Q
5. Install the Visual C++ 2008 Redistributable Package:administrative_image_directory\Microsoft_C++_2008_Redistributable\vcredist_x86.exe /Q
6. For Windows XP and Windows Vista, install Microsoft .NET Framework 3.5 usingWindows Server Update Services.
It is not necessary to install the .NET Framework image on Windows 7 or later.
7. Install the Visual Studio Tools for Applications:administrative_image_directory \Microsoft_VSTA\vsta_aide.msi
Installing Windows Prerequisites from the Command Line on 64-bit OperatingSystemsFollow this process to install Windows prerequisites for administrative image installationusing the command line on 64-bit Versions of Windows.
To install multiple components in one install operation, create a batch file with thecommands provided in the following procedures and use it to push the components tothe client computers.
1. Ensure that the target computer has at least 620 MB of available disk space and avalid TEMP directory.
2. Install Office Web Components by running this command:administrative_image_directory \OfficeWeb_11\owc11.exe
3. Install the Visual C++ 2005 Redistributable Package:administrative_image_directory\Microsoft_C++_2005_Redistributable_(x64)\vcredist_x64.exe /Q
administrative_image_directory\Microsoft_C++_2005_Redistributable\vcredist_x86.exe /Q
Both the 32-bit and the 64-bit versions of this package must be installed.
4. Install the Visual C++ 2008 Redistributable Package:administrative_image_directory\Microsoft_C++_2008_Redistributable_(x64)\vcredist_x64.exe /Q
administrative_image_directory\Microsoft_C++_2008_Redistributable\vcredist_x86.exe /Q
Both the 32-bit and the 64-bit versions of this package must be installed.
5. For Windows XP and Windows Vista, install Microsoft .NET Framework 3.5 usingWindows Server Update Services.
It is not necessary to install the .NET Framework image on Windows 7 or later.
6. Install the Visual Studio Tools for Applications:
33
Multiple Installations

administrative_image_directory \Microsoft_VSTA\vsta_aide.msi
7. Install the Visual Studio Remote Debugger:administrative_image_directory \VSRemoteDebugger\install.exe /Q
SolidWorks Search and Microsoft Windows Desktop SearchSolidWorks Search is integrated with Microsoft
®Windows
®Desktop Search.
If the correct version of Windows Desktop Search is not already installed on your computer,you are asked to install or update it during SolidWorks installation.
If you are creating an administrative image, Windows Desktop Search is not included inthe administrative image directory. Microsoft Windows Desktop Search must be installedmanually on client computers that install SolidWorks from an administrative image ifthose computers are to use SolidWorks Search.
Installing from the Administrative Image Using the Command LineYou can deploy installations from an administrative image using the command line.
To install silently:
1. Open a Command Prompt window (in Windows, click Start > Run.2. Type the msiexec.exe command with the /i and /qb switches and set the propertiesfor any options that are not the default values as shown below.
Individual installation component command-line properties include:
• Command-Line Feature Properties on page 36• Command-Line Global Properties on page 37• SolidWorks eDrawings Command Line Properties on page 40• SolidWorks Explorer/Workgroup PDM Command-Line Properties on page 42• SolidWorks Flow Simulation Command Line Properties on page 44
Use the following examples as templates for silent installation.
34
Multiple Installations

SolidWorks Client
• SolidWorks core (English)• Toolbox add-in• Participation in the feedback program• French language
32-bit version of SolidWorks on 32-bit operating system:
msiexec /i "32-bit_admin_image_path\SolidWorks\SolidWorks.Msi"INSTALLDIR="C:\Program Files\your_folder" SOLIDWORKSSERIALNUMBER="xxxxxxxx xxxx xxxx xxxx xxxx" ENABLEPERFORMANCE=1 OFFICEOPTION=3ADDLOCAL=SolidWorks,SolidWorksToolbox,Intel_Modules_AgeiaX86 /qb
32-bit version of SolidWorks on 64-bit operating system:
msiexec /i "32-bit_admin_image_path\SolidWorks\SolidWorks.Msi"INSTALLDIR="C:\Program Files\your_folder" SOLIDWORKSSERIALNUMBER="xxxxxxxx xxxx xxxx xxxx xxxx" ENABLEPERFORMANCE=1 OFFICEOPTION=3ADDLOCAL=SolidWorks,SolidWorksToolbox,Intel_Modules_AgeiaX64 /qb
64-bit version of SolidWorks on 64-bit operating system:
msiexec /i "64-bit_admin_image_path\SolidWorks\SolidWorks.Msi"INSTALLDIR="C:\Program Files\your_folder" SOLIDWORKSSERIALNUMBER="xxxxxxxx xxxx xxxx xxxx xxxx" ENABLEPERFORMANCE=1 OFFICEOPTION=3ADDLOCAL=SolidWorks,SolidWorksToolbox /qb
The SolidWorks French language installation component must be installed separately:
• 32-bit version:
msiexec /i "32-bit_admin_image_path\SolidWorks French\french.msi" /qb
• 64-bit version:
msiexec /i "64-bit_admin_image_path\SolidWorks French\french.msi" /qb
When specifying SolidWorks language component installation commands, do notspecify command-line arguments.
eDrawings Client
• Log performance• All features
msiexec /i "admin_image_path\SolidWorks eDrawings\eDrawings.msi"INSTALLDIR="C:\Program Files\your_folder" LOGPERFORMANCE=1SNLSERVER=eDrawings_SNL_server TRANSFORMS=1040.mst ADDLOCAL=All /qb
35
Multiple Installations

SolidWorks Explorer and Workgroup PDM add-in
• SolidWorks Explorer with Workgroup PDM add-in
msiexec /i "admin_image_path\SolidWorks Explorer\SolidWorks Explorer.msi"INSTALLDIR="C:\Program Files\your_folder" EXPLORERORPDM=1ADDLOCAL=VaultAdmin,Client,Standalone,DocMgr,LicenseEXEACTIVSERIALNUMBER="xxxx xxxx xxxx xxxx xxxx xxxx" /qb
Command-Line PropertiesCommand-line properties describe here include feature properties, global properties,product-specific properties and Windows location conventions.
Command-Line Feature PropertiesSolidWorks installation supports these ADDLOCAL properties for command-line deployment.
• CircuitWorks• CoreSolidWorksTaskScheduler• ExampleFiles• FeatureWorks• HelpFiles• InstantWebsite• Intel_Modules_AgeiaX86 (for 32-bit SolidWorks on 32-bit operating systems)• Intel_Modules_AgeiaX64 (for 32-bit SolidWorks on 64-bit operating systems)• Manuals• Motion• PhotoView• RealViewGraphicsdisplay• ScanTo3D• Simulation• SolidWorks• SolidWorksAnimator• SolidWorksDesignChecker• SolidWorksRoutedsystems• SolidWorksToolbox• SolidWorksUtilities• TolAnalyst• XchangeWorks
When specifying properties for command-line installation:
• SolidWorks does not support product installation using the ADDSOURCE option.• Properties are case sensitive, cannot contain spaces or dashes, and must beseparated by commas.
• SolidWorks must be specified for the SolidWorks application to be installedcorrectly.
36
Multiple Installations

Command-Line Global PropertiesEach property is defined for administrative or individual installations, unless otherwisenoted. Serial numbers can be passed to both an administrative installation and an individualinstallation using global properties.
37
Multiple Installations

DescriptionProperty
Whether the application should automaticallysend performance data to SolidWorksCorporation.
1 to send performance data, 0 otherwise.
ENABLEPERFORMANCE
Installation folder for SolidWorks.
Individual installations only.
INSTALLDIR
Install the SolidWorks extensions that useMicrosoft Windows Desktop Search Engine. For
INSTALLWDS
details, see Preparing Clients forCommand-Line Installation from anAdministrative Image on page 26.
1 to install the extensions, 0 otherwise.
Serial number for the SolidWorks Motion productMOTIONSERIALNUMBER
Specify product package to install:OFFICEOPTION
SolidWorks Client0
SolidWorks Office1
SolidWorks Professional2
SolidWorks Premium3
Specify ALL to update all features currentlyinstalled.
REINSTALL
Specify this property only when updatingto a Service Pack release within an existingmajor release (for example, updating anexisting SolidWorks 2010 SP01 installationto SolidWorks 2010 SP02).
38
Multiple Installations
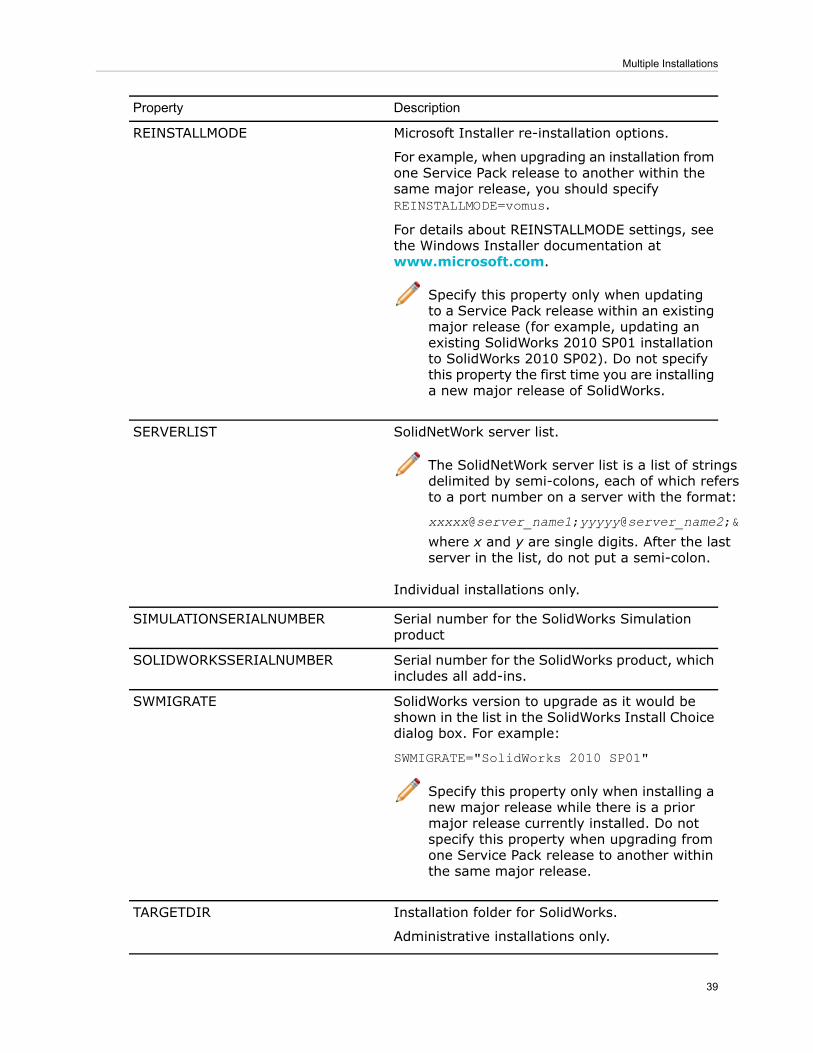
DescriptionProperty
Microsoft Installer re-installation options.
For example, when upgrading an installation fromone Service Pack release to another within thesame major release, you should specifyREINSTALLMODE=vomus.
For details about REINSTALLMODE settings, seethe Windows Installer documentation atwww.microsoft.com.
Specify this property only when updatingto a Service Pack release within an existingmajor release (for example, updating anexisting SolidWorks 2010 SP01 installationto SolidWorks 2010 SP02). Do not specifythis property the first time you are installinga new major release of SolidWorks.
REINSTALLMODE
SolidNetWork server list.
The SolidNetWork server list is a list of stringsdelimited by semi-colons, each of which refersto a port number on a server with the format:
xxxxx@server_name1;yyyyy@server_name2;&
where x and y are single digits. After the lastserver in the list, do not put a semi-colon.
Individual installations only.
SERVERLIST
Serial number for the SolidWorks Simulationproduct
SIMULATIONSERIALNUMBER
Serial number for the SolidWorks product, whichincludes all add-ins.
SOLIDWORKSSERIALNUMBER
SolidWorks version to upgrade as it would beshown in the list in the SolidWorks Install Choicedialog box. For example:
SWMIGRATE="SolidWorks 2010 SP01"
Specify this property only when installing anew major release while there is a priormajor release currently installed. Do notspecify this property when upgrading fromone Service Pack release to another withinthe same major release.
SWMIGRATE
Installation folder for SolidWorks.
Administrative installations only.
TARGETDIR
39
Multiple Installations

DescriptionProperty
Installation folder for SolidWorks Toolbox files.
Individual installations only.
TOOLBOXFOLDER
Contains language-specific items of the form:
TRANSFORMS number.mst
• Chinese (1028)• Chinese-Simplified (2052)• Czech (1029)• English (1033)• French (1036)• German (1031)• Italian (1040)• Japanese (1041)• Korean (1042)• Polish (1045)• Portuguese-Brazilian (1046)• Russian (1049)• Spanish (1034)• Turkish (1055)
TRANSFORMS
Specify whether to upgrade an existing versionof SolidWorks to the current version.
New installation, do not update0
Update1
Individual installations only.
Specify this property only when installing anew major release while there is a priormajor release currently installed. Do notspecify this property when upgrading fromone Service Pack release to another withinthe same major release.
UPGRADESWINSTALL
SolidWorks eDrawings Command Line PropertiesThese command-line properties are specific to eDrawings.
40
Multiple Installations

DescriptionProperty
Specifies which portion of the SolidWorks eDrawingsapplication to install.
All is the recommended option.
ADDLOCAL
Feature:Command Line Syntax:
Installs all the features. TheeDrawings application
All
searches for installedSolidWorks and AutoCADpublisher applications tovalidate the install.
View eDrawings and otherfiles.
eDrawingsViewer
Create eDrawings files fromthe AutoCAD R14application.
PublisherForAutoCADR14
Create eDrawings files fromthe AutoCAD 2000application.
PublisherForAutoCAD2000
Create eDrawings files fromthe AutoCAD 2004application.
PublisherForAutoCAD2004
Create eDrawings files fromthe AutoCAD 2005application.
PublisherForAutoCAD2005
Create eDrawings files fromthe AutoCAD 2006application.
PublisherForAutoCAD2006
View DXF/DWG files in theeDrawings Viewer.
DXFDWGTranslator
Install desktop shortcut.Shortcuts
View 3DXML files in theeDrawings Viewer.
XML3D
Specifies the installation folder for SolidWorks eDrawings.INSTALLDIR
Specifies whether the application should automaticallyemail performance data to SolidWorks Corporation.
LOGPERFORMANCE
Send performance data1
Otherwise0
41
Multiple Installations

DescriptionProperty
Enter the port@servername for your SolidNetWorkLicense server. Use semi-colons to separate multipleport@servername combinations.
A port server name for SNLSERVER is only required for theSolidWorks SNL server configuration.list_of_port@server_strings is a list of strings delimitedby semi-colons, each of which refers to a port number ona server with the format:
xxxxx@server_name1; yyyyy@server_name2;
where x and y are single digits. After the last server in thelist, do not put a semi-colon.
SNLSERVER
SolidWorks Explorer/Workgroup PDM Command-Line PropertiesThese command-line properties are specific to SolidWorks Explorer and SolidWorksWorkgroup PDM.
For SolidWorks Explorer/Workgroup PDM client:
42
Multiple Installations

DescriptionClient Property
EXPLORERORPDMSolidWorks Explorer only0
Workgroup PDM features can beinstalled
1
ADDLOCAL • Standalone• Client• Client64• VaultAdmin• AutoCADRxxxx• DocMgr• DocMgr64• LicenseEXE
Standalone is the Contributor and Clientis the SolidWorks Add-in for SolidWorksExplorer silent installations.
If you specify AutoCAD, AutoCAD must beinstalled on your system. Workgroup PDMlocates the appropriate version of AutoCAD.You can specify more than one version ofAutoCAD:
• AutoCADR14Addin• AutoCADR2000Addin• AutoCADR2004Addin• AutoCADR2005Addin• AutoCADR2006Addin
Client64 and DocMgr64 work with only64-bit SolidWorks Explorer installations.
Specifies the installation folder forWorkgroup PDM.
INSTALLDIR
Specifies the Solidworks serial number.ACTIVSERIALNUMBER
For Workgroup PDM Server:
43
Multiple Installations

DescriptionServer Property
ADDLOCAL • Vault• WebPortal• API
If you specify WebPortal (the Viewer), youmust also specify VAULTNAME.
Specifies the installation folder forWorkgroup PDM.
INSTALLDIR
Specifies the name of the computer wherethe license server resides.
LICENSE_SERVER
Specifies the path and folder of the vault.VAULTDATA
Specifies the name of the computer wherethe vault resides.
VAULTNAME
SolidWorks Flow Simulation Command Line PropertiesThese command-line properties are specific to SolidWorks Flow Simulation.
44
Multiple Installations

DescriptionProperty
SolidWorks Flow Simulation standaloneserial number.
(Individual installations and clientinstallations from an administrative image)
ACTIVSERIALNUMBER
Upgrades an existing version of a particularSolidWorks Flow Simulation applicationsoftware.
CWUPGRADEINSTALL
Update1
New installation; install in a newdirectory
2
(Individual installations and clientinstallations from an administrative image)
Specifies the installation for a particularSolidWorks Flow Simulation applicationsoftware.
(Individual installations only)
INSTALLDIR
List of strings delimited by semi-colons,each of which refers to a port number on aserver with the format:xxxxx@server_name1;yyyyy@server_name2;& where x and y aresingle digits. After the last server in the list,do not put a semi-colon.
SERVERLIST
Specifies the folder where the SolidWorkssoftware is installed.
(Individual installations and clientinstallations from an administrative image)
SOLIDWORKSPATH
Specifies the installation for a particularSolidWorks Flow Simulation applicationsoftware.
(Administrative image installations only)
TARGETDIR
MSI File Locations for Administrative ImagesTo create administrative images from the command line, the product component .msifiles are stored in these locations on the SolidWorks media.
45
Multiple Installations

Media LocationProduct
swwi\data\SolidWorks.msiSolidWorks (coreproduct, English)
swwi\lang\chinese\chinese.msiTraditionalChinese
SolidWorks(non-English languagecomponents)
swwi\lang\chinese-simplified\chinese-simplified.msiSimplifiedChinese
swwi\lang\czech\czech.msiCzech
swwi\lang\french\french.msiFrench
swwi\lang\german\german.msiGerman
swwi\lang\italian\italian.msiItalian
swwi\lang\japanese\japanese.msiJapanese
swwi\lang\korean\korean.msiKorean
swwi\lang\polish\polish.msiPolish
swwi\lang\portuguese-brazilian\portuguese-brazilian.msiPortuguese(Brazilian)
swwi\lang\russian\russian.msiRussian
swwi\lang\spanish\spanish.msiSpanish
swwi\lang\turkish\turkish.msiTurkish
2DEditor\2DEditor.msiSolidWorks 2D Editor
apisdk\SolidWorks API SDK.msiSolidWorks API SDK
COSMOSM\COSMOSM_lang.msiSolidWorks Simulationproducts
eDrawings\eDrawings.msieDrawings
eDrawingsShaders\eDrawings.msieDrawings Shaders
eDrwAPISDK\eDrawings API SDK.msieDrawingsAPI SDK
Flow Simulation\SolidWorks Flow Simulation.msiFlow Simulation
pdmwserver\SolidWorks Workgroup PDM Server.msiWorkgroup PDMServer
swactwizard\Activation Wizard.msiSolidWorks ActivationWizard
swdocmgr\SolidWorks Document Manager API.msiDocManager APIs
swexplorer\SolidWorks Explorer.msiSolidWorks Explorer
swlicmgr\SolidWorks SolidNetWork License Manager.msiSolidNetWork LicenseManager
swviewer\SolidWorks Viewer.msiSolidWorks Viewer
46
Multiple Installations

Windows Desktop Search Language SupportWindows Desktop Search file names indicate platform and language information.
Platform/architecture:
Windows Server 2003srv2k3
Windows XPxp
32-bit Windowsx86
64-bit Windowsx64
Language:
Simplified Chinesechs
Chinesecht
Czechcsy
Germandeu
Englishenu
Spanishesn
Frenchfra
Italianita
Japanesejpn
Koreankor
Polishplk
Brazilian Portugueseptb
Russianrus
Turkishtrk
Deploying an Administrative Image Using Microsoft Active DirectoryMicrosoft Active Directory Deployment is supported for deployment of the core SolidWorksproduct to clients.
Microsoft Active Directory is a directory service for managing clients and servers in networkenvironments. It simplifies management, migration, and deployment.
1. Create an administrative image using SolidWorks Installation Manager or the commandline.
2. If you have created the administrative image using the command line, install theWindows prerequisites for installation from an administrative image using MicrosoftActive Directory. For details, see Installing Windows Prerequisites UsingMicrosoft Active Directory on page 49.
Perform this step only if you created the image manually using the commandline. If you created and installed the image using SolidWorks Installation Manager,all Windows prerequisites were installed automatically.
47
Multiple Installations

3. Create a transform file to customize the SolidWorks software:a) Open the Command Prompt window.b) In the folder that contains the administrative image, drag SWCreateMST.exe intothe Command Prompt window.The command should be in the format:
administrative_image_directory\SWCreateMST.exepath_to_MSI_file_of_an_administrative_image list_of_properties
Properties can be feature properties or global properties. For details, seeCommand-Line Feature Properties on page 36 and Command-Line GlobalProperties on page 37.
Use the following examples as templates:
• If you are installing SolidWorks (32-bit version) on a 32-bit operating system:
C:\admin\SWCreateMST.exe "c:\admin\SolidWorks.msi"INSTALLDIR="C:\Program Files\your_folder"SOLIDWORKSSERIALNUMBER="xxxx xxxx xxxx xxxx"ADDLOCAL=SolidWorks,Manuals,Intel_Modules_AgeiaX86 OFFICEOPTION=0SERVERLIST="25734@your_server"
• If you are installing SolidWorks (32-bit version) on a 64-bit operating system:
C:\admin\SWCreateMST.exe "c:\admin\SolidWorks.msi"INSTALLDIR="C:\Program Files\your_folder"SOLIDWORKSSERIALNUMBER="xxxx xxxx xxxx xxxx"ADDLOCAL=SolidWorks,Manuals,Intel_Modules_AgeiaX64 OFFICEOPTION=0SERVERLIST="25734@your_server"
• If you are installing SolidWorks (64-bit version) on a 64-bit operating system:
C:\admin\SWCreateMST.exe "c:\admin\SolidWorks.msi"INSTALLDIR="C:\Program Files\your_folder"SOLIDWORKSSERIALNUMBER="xxxx xxxx xxxx xxxx"ADDLOCAL=SolidWorks,Manuals OFFICEOPTION=0SERVERLIST="25734@your_server"
The transform file, SolidWorks.mst, is created in the folder that contains theadministrative image.
4. In the Active Directory, edit the Published Apps policy for the group or groups todeploy the SolidWorks software.
5. In the Group Policy dialog box, expand Computer Configuration and Software Settings.6. Right-click Software installation and select New > Package.7. Browse to the administrative image and click Open.8. In the Deploy Software dialog box, select Advanced published or assigned, then
click OK.9. In the SolidWorks Properties dialog box, on the Modifications tab:
a) Click Add.b) Browse to the .mst file.c) Click Open.
10. Click OK.
48
Multiple Installations

Installing Windows Prerequisites Using Microsoft Active DirectoryFollow this process to prepare an existing administrative image that will install SolidWorksonto client computers using Microsoft Windows Active Directory.
In these processes, use the command that is appropriate to the version of SolidWorksyou are deploying.
1. Extract the 2005 Visual C++ Redistributable Package installer files and install them.a) Run one of these commands.
For 32-bit versions of Windows:
administrative_image_directory\Microsoft_C++_2005_Redistributable\vcredist_x86.exe/C /T:{C++_target_directory}
For 64-bit versions of Windows:
administrative_image_directory\Microsoft_C++_2008_Redistributable(64)\vcredist_x64.exe/C /T:{C++_target_directory}
b) Create a policy to install the Microsoft C++ 2005 redistributable module:{2005_C++_target_directory}\vcredist.msi –
No transform file is needed for this installation.
2. Extract the 2008 Visual C++ Redistributable Package installer files and install them.a) Run one of these commands.
For 32-bit versions of Windows:
administrative_image_directory\Microsoft_C++_2008_Redistributable\vcredist_x86.exe/x:{C++_target_directory}
For 64-bit versions of Windows:
administrative_image_directory\Microsoft_C++_2008_Redistributable(64)\vcredist_x64.exe/x:{C++_target_directory}
b) Create a policy to install the Microsoft C++ 2008 redistributable module:{2008_C++_target_directory}\vcredist.msi –
No transform file is needed for this installation.
3. Using Windows Server Update Services, install Microsoft .NET Framework 3.5.
It is not necessary to install the .NET Framework image on Windows 7 or later.
4. Extract the Office Web Components files and install them.a) Run this command:
administrative_image_directory\OfficeWeb_11\owc11.exe/extract:{Office_Web_components_directory}
b) Create a policy to install the Office Web Components:{Office_Web_components_directory}\owc11.MSI
49
Multiple Installations

No transform file is needed for this installation.
5. Install the Visual Studio Tools for Applications (VSTA), by creating this policy:{Microsoft_VSTA_directory}\vsta_aide.MSI
No transform file is needed for this installation.
6. Install the Visual Studio Remote Debugger (64-bit versions only), by creating thispolicy:{Microsoft_remote_debugger_directory}\rdbgexp.MSI
No transform file is needed for this installation.
Administration of Multiple InstallationsFor multiple installations, administrative tasks include upgrading administrative imagesto new releases, applying service pack updates, and removing installations.
Upgrading Administrative Images to a New ReleaseTo update clients who installed from an administrative image, first update theadministrative image and then configure the clients to reference the new copy of theimage.
Run SolidWorks Installation Manager from the Internet so that the correct files arereferenced. SolidWorks Installation Manager will redirect itself to do this, or you can runthe update directly from the SolidWorks Downloads Web site(http://www.solidworks.com/sw/support/downloads.htm).
Once you have updated the administrative image (which creates a new copy of the image),you can update clients by having them reference the new copy of the administrativeimage.
If clients referenced the previous version of the administrative image using a mappeddrive or a shared directory, you could redefine that mapped drive or shared directoryusing the location of the updated copy of the administrative image.
Downloading Updated Installation Files for Administrative ImagesSolidWorks Installation Manager can detect when you need updated installation files whenupgrading an administrative image.
1. Start SolidWorks Installation Manager by inserting the DVD.2. On the Welcome screen, select Administrative image.3. On the Serial Number screen, enter the SolidWorks serial number.
SolidWorks Installation Manager checks the SolidWorks Web site for your licensedproducts and available service packs.
4. If the Newer Version Available screen appears, select Yes, download and install anewer version: version.SolidWorks Installation Manager starts a new session to install the newer version.
50
Multiple Installations

5. If there is a problem with the download folder, Download Options might appear, inwhich case, accept the default directory for the new installation files or enter a newdirectory name.
If you see a message that the directory does not exist, click Yes to create it.
6. On the Download Complete screen, click Close to close the current installer and startthe installer for the new version.
Upgrading an Administrative ImageTo upgrade an administrative image, SolidWorks Installation Manager creates a newimage directory. You then direct clients to use the new administrative image directory toupgrade to that product version.
This process assumes you have downloaded any updated installation files for theadministrative image. For details, see Downloading Updated Installation Files forAdministrative Images on page 50.
1. Start SolidWorks Installation Manager. For details, see Initiating SolidWorksInstallation on page 8.
2. On the Welcome screen, select Administrative image.Administrative image creation options appear:
Create the image using the default configurationsettings (that is, not based on the settings currently
Create a new image usingdefault settings.
established for an existing administrative image atyour site).
Create the image using configuration settings specifiedfor an existing administrative image at your site. Click
Create a new image usingsettings and files from anexisting image. Browse to specify the installation directory for the
existing administrative image.
You can create both 32-bit and 64-bit images on asingle computer or you can create just the image that
Create both 32-bit and64-bit administrativeimages. corresponds to that computer architecture. Creating
both images does require that you have access to the32-bit and 64-bit installation media.
3. On the Serial Number screen, check the serial number.4. On the Summary (Ready to Create Image) screen, check that the administrative
image options are correct.For details about individual administrative image and installation options, clickCHANGE to go to the option page and then click Help.
5. To create the new version of the administrative image, click Create Now.
You can now upgrade clients to this new version of the administrative image. For details,see Upgrading Clients from Administrative Images on page 51.
Upgrading Clients from Administrative ImagesSolidWorks Installation Manager can automatically update client computers installed froman administrative image.
51
Multiple Installations

Typically, administrative images are organized in folders on a server. To support theautomatic upgrade of clients, the administrative image must be located in a shared folder.
After upgrading the administrative image, the original installation will be in one folderand the upgraded installation will be in another folder. To use the upgraded installation,remove the sharing option from the original administrative image folder and then addthe sharing option to the upgraded administrative image folder.
When SolidWorks starts on a client machine that installed from the original administrativeimage, it sees the new version and upgrades the client.Removing the Sharing Option from the Original Administrative Image FolderWhen upgrading an administrative image that is accessed from a shared folder, you mustremove the sharing option from the original folder.
1. Browse to the folder where the original administrative image files are located.2. Right-click the folder and select Properties.3. On the Sharing tab, select Do not share this folder, and then click OK.
Now add the sharing option to the upgraded administrative image folder as described inAdding the Sharing Option to an Upgraded Administrative Image Folder on page52.Adding the Sharing Option to an Upgraded Administrative Image FolderOnce you have created an updated administrative image folder and disabled the sharingfor the original administrative image folder, you must add the sharing option to the newfolder to re-enable the administrative image.
1. Browse to the folder where the upgraded administrative image files are located.2. Right-click the folder and select Properties.3. On the Sharing tab, specify the sharing properties appropriate for your organization
or group and change the share name to the name used for the original administrativeimage folder.
Computers that installed from the original administrative image share location will upgradeto the new version automatically when starting SolidWorks.Upgrading Clients of Administrative Images Manually Using the Command LineOnce you have upgraded an administrative image, you can upgrade clients manuallyusing the command line.
1. Make sure all clients are at the same service pack of the previous release. (Clientsthat do not already have the application installed are not upgraded.)
2. Optionally, on one of the client systems, run the Copy Settings Wizard to capture thecurrent SolidWorks options.
3. Create a new administrative image using SolidWorks Installation Manager or thecommand line.
Do not upgrade or overwrite the previous image.
If you are upgrading a non-English SolidWorks installation, you must create anew administrative image for the non-English language installation component.
4. Upgrade all clients to the new version using the msiexec command, with thesespecifications:
52
Multiple Installations

Include the /I and qb msiexec command-line options.•• Specify any required feature and global command-line properties. For details, seeCommand-Line Properties on page 36.
For example, to upgrade an existing version of SolidWorks:
msiexec /I Msi_path" INSTALLDIR="C:\Program Files\your_folder"SOLIDWORKSSERIALNUMBER="xxxx xxxx xxxx xxxx xxxx xxxx" UPGRADESWINSTALL=1SWMIGRATE="SolidWorks version servicepack" /qb
If you are upgrading a non-English SolidWorks installation, you must upgradethe non-English language component after you upgrade the SolidWorkscomponents.
Service Pack Product Update AdministrationService Pack product updates can contain updates for system reliability, programcompatibility, security, and so on.
You can acquire product updates in two ways:
By using SolidWorks Installation Manager to check for, download,and install updates.
You can initiate SolidWorks Installation Manager manually, orschedule it to check periodically for updates.
For currentversions ofSolidWorks:
By downloading service packs manually from the SolidWorkssupport Web site.
Service packs are applied as patches to an existing softwareversion. For example, SolidWorks 2007 SP1.0 is a service pack
For versions ofSolidWorks prior to2008:
for SolidWorks 2007 SP0.0. You can install these service packsusing SolidWorks 2007 Installation Manager; you cannot installthem using SolidWorks Installation Manager in SolidWorks 2008or later.
For instructions on downloading and installing service packs, seethe installation documentation for the SolidWorks version you areupdating.
Rolling Back Service Packs in an Administrative ImageYou can roll back an administrative image to an earlier installed service pack. If youinstalled the SolidWorks software with disks, you need the original disks to restore aservice pack. You must have saved a copy of the earlier administrative image.
Administrative images that have been upgraded cannot be rolled back to a previousservice pack. Administrative images created with any method other than SolidWorksInstallation Manager cannot be rolled back to a previous version. Clients installedfrom these administrative images must be uninstalled and then reinstalled using anadministrative image created from the previous version.
1. Delete the folder that contains the current administrative image. To do this, open theCommand Prompt window and enter:rmdir /s/q path_to_current_administrative_image
53
Multiple Installations

2. Move the backup copy of the administrative image to the location where you deletedthe current administrative image. To do this, open the Command Prompt window andenter:move path_to_backup_administrative_imagepath_to_current_administrative_image
After you roll back an administrative image, client computers roll back automaticallythe next time they run the SolidWorks software.
Applying Service Packs to Clients Deployed with Microsoft Active DirectoryIf you have installed the SolidWorks software using the Microsoft Active Directory, youcan apply service packs to clients with it.
1. Copy the administrative image to a new folder using the following command line:xcopy path_to_current_administrative_imagepath_to_backup_administrative_image /s/i/v
2. Apply the service pack to the copy of the administrative image.3. Create a new transform file to specify an upgrade installation for the SolidWorks
software:a) Open the Command Prompt window.b) In the folder that contains the administrative image, drag SWCreateMST.exe intothe Command Prompt window.The command format is:
path_to_administrative_image\SWCreateMST.exepath_to_MSI_file_of_an_administrative_image list_of_properties
The command line must include all of the parameters used to create theoriginal transform file, plus the global properties UPGRADESWINSTALL andSWMIGRATE.
For example, if the original command was:
C:\admin\SWCreateMST.exe "c:\admin\SolidWorks.msi"INSTALLDIR="C:\Program Files\your_folder" SOLIDWORKSSERIALNUMBER="xxxxxxxx xxxx xxxx" ADDLOCAL=SolidWorks,Manuals,Intel_Modules_AgeiaX86OFFICEOPTION=0 SERVERLIST=25734@your_server
the update command must be:
C:\admin\SWCreateMST.exe "c:\admin\SolidWorks.msi"INSTALLDIR="C:\Program Files\your_folder" SOLIDWORKSSERIALNUMBER="xxxxxxxx xxxx xxxx" ADDLOCAL=SolidWorks,Manuals,Intel_Modules_AgeiaX86OFFICEOPTION=0 SERVERLIST=25734@your_server UPGRADESWINSTALL=1SWMIGRATE="SolidWorks version service_pack"
The transform file, SolidWorks.mst, is created in the folder that contains theadministrative image.
The original and update commands in this example are for installing the 32-bitversion of SolidWorks on a 32-bit version operating system. If you areinstalling the 32-bit version of SolidWorks on a 64-bit operating system, youwould use "Intel_Modules_AgeiaX64" in place of "Intel_Modules_AgeiaX86".
54
Multiple Installations

If you are installing the 64-bit version of SolidWorks on a 64-bit operatingsystem, you would not use either "Intel_Modules_AgeiaX86” or“Intel_Modules_AgeiaX64".
4. In the Active Directory, edit the Published Apps policy for the group or groups todeploy the SolidWorks software.
5. In the Group Policy dialog box, expand Computer Configuration and SoftwareSettings.
6. Right-click Software installation and select New > Package.7. Browse to the administrative image and click Open.8. In the Deploy Software dialog box, select Advanced published or assigned, then
click OK.9. In the SolidWorks Properties dialog box, on the Modifications tab:
a) Click Add.b) Browse to the .mst file.c) Click Open.
10. Click OK.
Removing an InstallationYou can remove an installation on an individual computer or in a client/server environment.
1. Make sure no SolidWorks sessions are active.2. If you wish to transfer the SolidWorks license to another computer, transfer the license
to that computer before removing the SolidWorks installation on this computer.
For information about transferring SolidWorks licenses, see Transferring aLicense on page 66.
3. In Windows, open the Control Panel and double-click Add or Remove Programs.4. In Add or Remove Programs, select the product component to remove.
In some cases, you might find multiple SolidWorks Service Pack componentsfor a given major release version. To remove a SolidWorks major release, removeall Service Pack elements for that major release in Add or Remove Programs.
5. Click Remove.6. On the Welcome to the SolidWorks Installation screen:
a) Select the products to remove.
By default, all product components are selected.
b) Clear the products you do not want to remove.c) Click Remove Items.
55
Multiple Installations

4Workgroup PDM
A Workgroup PDM system is illustrated as follows:
• A computer can contain only one Vault.• The Vault directory cannot be a hidden or read-only directory.• As a client/server application, Workgroup PDM performance depends on a robustnetwork.
• If your users maintain a large number of documents, performance is improved if youcreate more projects or subprojects with fewer documents per project instead of keepingthe documents in a smaller number of projects with more documents per project.
Installation• Clients and the VaultAdmin, API, and Viewer can be installed on the same computer as theVault, or on different computers.
• It is not necessary to install the Workgroup PDM Server to install the client API. The clientAPI is installed during the Workgroup PDM Client installation.
• To configure the vault folder on a remote location, type the full Universal Naming Convention(UNC) path when prompted for the server destination. (For details, see UNC Format onpage 113.)
• Installing or updating the vault requires a computer reboot.• If the Workgroup PDM Server Service does not start automatically after rebooting, you muststart it manually. In Windows Explorer, run pdmwvault.exe in the install_dir\SolidWorksWorkgroup PDM\Vault folder.
• When you install a Workgroup PDM client, you must install solidworksexplorer.exe oneach computer. This executable can be on a shared drive. The Workgroup PDM Vault, Viewer,API Client, and VaultAdmin are not installed on each client computer.
56

Licenses• A license for Workgroup PDM API is included with the licenses of SolidWorks clients andExplorer clients. Check-in APIs require client licenses.
• A Workgroup PDM Viewer license must be installed with the vault to enable the Viewer.
Permissions• The vault administrator should have write permission for installation and for the vault folder.• The vault administrator should manage the vault folder from the VaultAdmin, not withWindows Explorer.
• Users should never have write permission in Windows Explorer for the vault folder.
Security, Ports, and Duplex Settings• Workgroup PDM must be able to install as a Windows service, so other applications cannotbe allowed to block or filter the service. For example, if anti-spyware tools such as MicrosoftAntiSpyware display an alert requiring approval during the installation process, click Allowso the Workgroup PDM Server is installed as a Windows Service.
• If you install Workgroup PDM on a Windows XP system with Service Pack 2, a Windows 2003server with Service Pack 1, or a computer with an active firewall, you must enable WorkgroupPDM ports as exceptions in the firewall setup.
Typically, the ports are:
• 20000 (VaultAdmin)• 30000 (Data)• 40000 (Request)• 80 (Viewer)
For information on changing the port settings, see Troubleshooting for Vault Administratorsin the Workgroup PDM and SolidWorks Explorer help and the Microsoft Windows help forSecurity Center. To install the Workgroup PDM Vault and the Viewer concurrently, use theCustom option in the Setup Type dialog box.
• The duplex setting for servers and their corresponding ports should be the same; for example,both could be 100MB Full or both could be Auto.
SolidWorks Toolbox DocumentsSolidWorks Toolbox documents are common hardware components that usually do not requirerevision control and are not checked in to the Workgroup PDM Vault. See the Workgroup PDMonline help for details about configuring SolidWorks Toolbox and other standard libraries.
This chapter includes the following topics:
• Workgroup PDM Viewer• Installing a Workgroup PDM Server• Configuring Workgroup PDM for Clients• Installing Workgroup PDM Server and Viewer in a Perimeter Network• Workgroup PDM Client Access• Workgroup PDM VaultAdmin Administration
Workgroup PDM ViewerThe Workgroup PDM software automatically sets up a virtual directory during installationusing Microsoft Internet Information Services (IIS).
57
Workgroup PDM

You must install Microsoft Internet Information Services (IIS) before installing theViewer.
Required components include:
• Web Management Tools
• IIS Management Console
• World Wide Web Services: Application Development Features
• .NET Extensibility• ASP.NET• CGI• ISAPI Extensions• ISAPI Filters
See Microsoft documentation for IIS installation instructions.
The Workgroup PDM Viewer installation is subject to these restrictions:
• The Web Site Content Directory is the Viewer installation folder.• You cannot use underscore characters in the name of the machine that hosts the Viewer.• If you install the Viewer on Windows XP Service Pack 2, you must enable a port in theWindows Firewall for HTTP (port 80).
• The Viewer can point to only a single vault at any time.
Users access the Workgroup PDM Viewer by typing this URL into the address field ofInternet Explorer:
http://ViewerComputerName/pdmweb/
Installing a Workgroup PDM ServerInstalling the Workgroup PDM Server creates a Workgroup PDM vault, which is thedatabase that stores the managed SolidWorks projects.
1. Start SolidWorks Installation Manager (as described under Initiating SolidWorksInstallation on page 8).
2. In the Welcome screen, select the following:
• Server products• Install SolidWorks Workgroup PDM Server (vault) on this computer.
3. On the Serial Number screen, click SolidWorks Workgroup PDM, and enter theSolidWorks Workgroup PDM serial number.
4. Follow the SolidWorks Workgroup PDM Server installation instructions, selecting Vaultas the Setup Type.
5. On the final screen, do one of the following:
• If you have already installed SolidWorks Explorer, clear Launch SolidWorksExplorer Install and then click Finish.
• If you have not installed SolidWorks Explorer, ensure that Launch SolidWorksExplorer Install is checked and then click Finish.
58
Workgroup PDM

Configuring Workgroup PDM for ClientsAfter you have installed the Workgroup PDM server vault, you can then configure thevault for clients.
1. Log in to the VaultAdmin (installed with SolidWorks Explorer) with the default username and password.
2. In the VaultAdmin, set up user and group accounts, project folders, permissions, andso on.
For instructions, see Workgroup PDM Help.
3. Email client users with the server computer name and their user names and passwords,which are usually not the same as their Microsoft Windows user names and passwords.
Configuring the Workgroup PDM Viewer to Connect to a DifferentVault LocationYou can configure Workgroup PDM Viewer to connect to a different Vault location usingthe Windows Registry.
1. Update the registry path by changing the Vault Computer value:HKEY_LOCAL_MACHINE\SOFTWARE\SolidWorks\SolidWorks2009\PDMWorksWorkgroup\Vault Computer
2. Reinstall the Workgroup PDM Viewer. In the Vault Computer Name dialog box, typethe new computer name.
Configuring Mime Types for Document DownloadingYou can configure mime types for document downloading using Windows Registry settings.
By default, the Viewer sends Open Document requests with the generic mime type"application/octet-stream." Microsoft Internet Explorer then opens the requested documentwith the supplied file extension. You can map additional mime types or turn off mimetype mappings by modifying the Mime Types registry sub-key in Windows Registry.
To map additional mime types, create additional string values under this registrysub-key:HKEY_LOCAL_MACHINE\SOFTWARE\SolidWorks\SolidWorks2009\PDMWorksWorkgroup\WebPortal\Mime Types
in the form:
"ext" = "mime type"
For example:
"dxf" = "image/vnd.dxf"
You must manually create this registry sub-key before you add the values.
To turn off mime type mappings, change the Use Custom MIME Types registryvalue to 0 (zero).
HKEY_LOCAL_MACHINE\SOFTWARE\SolidWorks\SolidWorks2009\PDMWorksWorkgroup\WebPortal\Use Custom MIME Types
59
Workgroup PDM

Restarting the web server is not required to activate this setting.
InstallingWorkgroup PDMServer and Viewer in a Perimeter NetworkInstalling a SolidWorks Workgroup PDM Web server and Workgroup PDM Viewer in aperimeter network (DMZ) has firewall implications.
Because Workgroup PDM Viewer clients communicate with the Web server over the HTTPor HTTPS ports, these ports must be open on the Internet Information Server (IIS) systemwhere the Web server is installed.
• For the HTTP protocol, the default port is 80.• For the HTTPS protocol (SSL), the default port is 443.
The Web Viewer clients themselves do not need firewall exceptions.
You must ensure that the Web server system can reach the Vault server over these defaultports:
• 30000 (Data)• 40000 (Request)
Network Configuration for Workgroup PDM Viewer in a PerimeterNetworkThe network configuration shows a perimeter network server set up on a perimeter subnetand its communication to the internal and external networks.
The perimeter network server communicates to the LAN through an internal firewall. Itcommunicates to the external network through an external firewall, a router, and a clusterof load balancers.
60
Workgroup PDM

The Internet Explorer client connects to the Workgroup PDM Viewer/IIS server by wayof port 80 (or 443 if configured to use SSL). The Workgroup PDM Viewer then connectsto the Vault server using ports 30000 or 40000. The Vault server sends the requestedinformation back to the Workgroup PDM Viewer, which then feeds the information backto the Internet Explorer client.
The perimeter network Web server has two IP addresses:
• The internal IP address on the LAN• The public IP address provided by the ISP
The Web server in the perimeter network is located behind a cluster of load balancers.Although you can get directly to the Web server for administrative tasks, all Web servicestraffic to the servers in the perimeter network is processed through the load balancers.
The load balancers translate the server hardware IP address to a virtual IP (VIP) on thenetwork leg that is exposed to the public. If you browse to either the VIP or the Webserver URL while attached to the network, you can see the site.
The external firewall translates the load balancer VIP to a public, route-able address.
Installing and Configuring the Workgroup PDM Web Server andViewerWhen you set up a Workgroup PDM Web server in a perimeter network, the installationlocation of the components is important.
• Install the IIS-enabled Web server on the perimeter subnet.
61
Workgroup PDM

• Install the IIS-enabled Workgroup PDM Viewer on the perimeter subnet.• Install the Workgroup PDM Vault on the primary domain or internal network on thelocal intranet.
The prerequisites for installing and configuring Workgroup PDM Viewer in a perimeternetwork are:
• Microsoft IIS 6.0 or later• A public IP address to the Web server on the perimeter subnet, assigned by your ISPprovider
To install and configure the Workgroup PDM components:
1. Install Microsoft IIS on the perimeter subnet server system.2. Perform two SolidWorks Workgroup PDM Server installations:
a) First, install the Vault component on the Vault server.b) Run the installer a second time and install the Workgroup PDM View and Viewerlicense components on the IIS Web server. Enter the vault server computer nameso that the Web portal knows where to look for the Vault server service.
When you perform the installation, the PDMWeb application is added automaticallyto the default IIS Web site.
3. Ensure that the firewall to the internal network has ports 30000 and 40000 open.4. If the internal server has a fixed IP address, on the perimeter server system, edit the
C:\Windows\system32\drivers\etc\hosts file. Create a system name to IP addressmapping so that the perimeter server can communicate with the internal server:a) Open the hosts file in a text editor such as Notepad.b) Add a new line for the Vault server IP address and name.c) Save the hosts file.
Workgroup PDM Client AccessWorkgroup PDM clients use Microsoft Windows login access control, have Web accessthrough the Workgroup PDM Viewer, and are updated automatically whenever theWorkgroup PDM Vault has been updated.
Client user names and passwords are notthe same in Workgroup PDM as for MicrosoftWindows login. Contact your systemadministrator for login information.
To log in as a Workgroup PDM client:
Contact your system administrator for theURL to connect to the Viewer.
To connect to the Workgroup PDM Viewer:
The Workgroup PDM clients (SolidWorksadd-in and Contributor) detect when theVault has been updated. You do not needto download a service pack to updateclients.
To update the Workgroup PDM clients:
Workgroup PDM VaultAdmin AdministrationAfter Workgroup PDM is installed, vault administrators should perform these tasks.
62
Workgroup PDM

• Log in to the VaultAdmin.• Change the vault administrator password.• Create user accounts.• Notify users of their account names and passwords.
For details, see SolidWorks Workgroup PDM in the main SolidWorks help.
Initial Login to Workgroup PDM VaultAdminWhen you first login to Workgroup PDM VaultAdmin, specify the Workgroup PDMadministrator name and password, and the name of the computer hosting the WorkgroupPDM Vault.
1. In Windows, click Start > All Programs > SolidWorks version > WorkgroupPDM VaultAdmin.
2. In the dialog box, enter this information:
pdmwadminName
pdmwadminPassword
The host name of the computer where the vault is installed. If yourun the VaultAdmin on the computer where the vault is installed,type localhost.
Vaultcomputer
3. Click Login.
For security reasons, we recommend that you change the password for the administratoras soon as possible. Select the Users and Groups tab in the VaultAdmin.
Upgrading the Workgroup PDM Vault ServerYou can upgrade the Workgroup PDM Vault Server using SolidWorks Check for Updates,a SolidWorks installation DVD, or a Workgroup PDM upgrade file manually downloadedto a local folder.
You can install only one version of Workgroup PDM Vault Server
1. Ask all users to log out of the Workgroup PDM vault and then lock it.2. Backup the vault data.3. Use Microsoft Windows Control Panel Add/Remove Programs to remove the current
version of Workgroup PDM Server.4. Install the new version of Workgroup PDM Server.
• To use SolidWorks Check for Updates:
1. In Windows, click Start > All Programs > SolidWorks Installation Manager> Check for Updates.
2. In the Newer Versions Available dialog box, select Download and install anew version, select the version to install, and then click Next.
The new version of SolidWorks Installation Manager downloads and runs.
• To use a SolidWorks installation DVD, insert the DVD into the drive and follow theSolidWorks Installation Manager instructions.
63
Workgroup PDM

• To use the manually downloaded Workgroup PDM installation file (pdmwserver.exe),double-click the file and then follow the instructions to upgrade the WorkgroupPDM Server.
5. Use SolidWorks Task Scheduler to update the Workgroup PDM files in the vault.6. Unlock the vault and then notify users that they can return to using it.
Upgrading Workgroup PDM ClientsClients are prompted to update the first time they log in after the vault is updated. Noservice pack is required for client updates.
ActionClient Status Relative to Vault
NoneSame version as vault
NoneSame major release, newer than vault
Login is blockedNewer major release, newer than vault
Optional updateSame major release, older than vault
Mandatory updateOlder major release, older than vault
For details about updating Workgroup PDM clients, see Update Clients in the WorkgroupPDM Help.
64
Workgroup PDM

5License Administration
Typically, installations on individual computers use license activation; however, you can installthe software individually and then control the licenses with SolidNetWork License Manager.Conversely, although larger sites typically use floating network licenses, you can deploy theinstallations from an administrative image and then activate the serial numbers from theindividual computers.
This chapter includes the following topics:
• Administering Individual Licenses• Administering Licenses Using a SolidNetWork License Manager
Administering Individual LicensesTypically, administration of individual licenses consists of activating and transferringlicenses directly from SolidWorks.
Activation is a product licensing and registration process for SolidWorks standalone(non-SolidNetWork License) licenses. Typically, if your product license has not yet beenactivated, SolidWorks tries to activate it when you start the product.
You can also transfer individual licenses, by clicking Help > Transfer Licenses inSolidWorks.
Activating a LicenseBefore you can run SolidWorks products on an individual computer, you must activatethe license for that computer.
Activation requires that you have Internet or email access. After activation, you do notneed to be online to use the products. If you do not have email access on the computerwhere you use this product, you can save the activation file and send it from anothercomputer.
This process:
• Activates all software licenses across the SolidWorks product line.• Allows you to transfer licensing rights from one computer to another.• Enables you to install and activate the SolidWorks products on one work computer andone home computer.
• Can be performed immediately (recommended) or within 30 days of installation.• Eliminates the need for dongles. However, if you run previous versions of SolidWorksproducts that do not use activation, you need to retain the dongle.
For system administrators who have multiple serial numbers to manage, you can use theAdministrative Image Option Editor. For details, see Administrative Image OptionEditor on page 17.
To activate a license:
65

1. Start the SolidWorks application.2. Start SolidWorks Product Activation using one of these methods:
• If you have not yet activated the license for this computer, the SolidWorks ProductActivation window appears automatically when you start SolidWorks.
• If the SolidWorks Product Activation window does not appear automatically, startactivation by clicking Help > Activate Licenses.
3. Click the Product listing to specify the product whose license you want to activate.4. Specify automatic activation over the internet or manual activation using email.5. Supply email contact information.6. Click Next to proceed.
• Internet: Activation occurs automatically.• Email: Press Save to create a request file, then email the file to
[email protected]. When you receive the email containing the responsefile, extract the file from email and then click Open to load it.
If necessary, you can exit and rerun the activation procedure to open theresponse file.
7. Click Finish.
Transferring a LicenseTo transfer a license to a new or upgraded computer, first transfer it to the license keyserver at Dassault Systèmes SolidWorks Corporation, then reactivate it on the othercomputer.
If you were unable to transfer the license to Dassault Systèmes SolidWorksCorporation (because of hard drive failure, for example), reactivation is still successfulin most cases. If not, contact your VAR for help.
To transfer a license back to the server:
1. In SolidWorks, click Help > Transfer Licenses, and follow the instructions.2. To reactivate, go to the new or upgraded computer and activate the license as you
did during the initial activation. For details, see Activating a License on page 65.
Administering Licenses Using a SolidNetWork License ManagerSolidNetWork License Manager supports multiple license clients by distributing licensesto clients on the network. This allows the number of users to exceed the number oflicenses by using floating licenses.
This image depicts a typical SolidNetWork licensing installation:
66
License Administration

This image illustrates:
• SolidNetWork License Manager software is installed and activated on the license managercomputer only.
• License client computers do not have any additional SolidNetWork-specific softwareinstalled.
If you specify a SolidNetWork License serial number when installing, SolidWorksInstallation Manager identifies that computer as a SolidNetWork license client.SolidWorks Installation Manager prompts you for the SolidNetWork license managercomputer name and port number to connect the client to the license manager.
• The license manager and all license clients must have TCP/IP (Transmission ControlProtocol/Internet Protocol) connectivity.
Activating a SolidNetWork LicenseBefore users can run SolidWorks products on their individual computers, you must activatea SolidNetWork license on the SolidNetWork License Manager computer.
Activation requires that you have Internet or email access. After activation, you do notneed to be online to use the products. If you do not have email access on the computerwhere you use this product, you can save the activation file and send it from anothercomputer.
This process:
• Activates the SolidWorks SolidNetWork License Manager with SolidNetWork licensesacross SolidWorks products.
• Allows you to transfer SolidNetWork licensing rights from one SolidNetWork LicenseManager computer to another.
67
License Administration

• Enables you to install and activate the SolidNetWork licensing rights on one SolidNetWorkLicense Manager computer.
• Must be performed before you can use SolidNetWork licenses.• Eliminates the need for dongles. If you activate a SolidNetWork license for this versionof SolidWorks, SolidNetWork licenses for previous versions of SolidWorks are activated.(You no longer need to retain the dongle.)
To activate a SolidNetWork license:
1. Start the SolidNetWork License Manager ( Start > Programs > SolidWorks version> SolidNetWork License Manager > SolidNetWork License Manager .
2. If you have not yet activated the SolidNetWork license, you are asked whether youwant to activate it now. Click Yes to activate.
3. Under How would you like to activate?, select Automatically over the internet(recommended).
4. Under Contact Information, specify an email contact address.
The Activation/Reactivation Succeeded dialog box displays the products that have beenactivated.
Transferring a SolidNetWork LicenseTo transfer a SolidNetWork license to a new or upgraded computer, first transfer thelicense to the license key server at Dassault Systèmes SolidWorks Corporation, thenreactivate it on the other computer.
If you were unable to transfer the license to Dassault Systèmes SolidWorksCorporation (because of hard drive failure, for example), reactivation is still successfulin most cases. If not, contact your VAR for help.
To transfer a SolidNetWork license back to the server:
1. Start SolidNetWork License Manager ( Start > Programs > SolidWorks version> SolidNetWork License Manager > SolidNetWork License Manager ).
2. Under License Information, clickModify. The SolidWorks Product Activation wizardstarts.
3. UnderWhat would you like to do?, select Transfer a software license and thenclick Next.
4. Under How would you like to transfer?, select Automatically over the internet(recommended).
5. Under Contact Information, specify an email contact address.6. Click Next. The product license transfer completes.
Installing and Configuring SolidNetWork LicensingConfiguring SolidNetWork Licensing consists of installing the SolidNetWork License Manageron the license manager computer and then installing SolidWorks on client computersusing the SolidNetWork license serial number.
Installing and Activating a License ManagerThe SolidNetWork License Manager supports multiple license clients. It distributes licensesto clients on the network.
68
License Administration

If you are upgrading from a previous version of SolidNetWork License Manager that usedhardware dongles for license activation, remove the hardware dongle before installingthe new version of SolidNetWork License Manager.
1. Start SolidWorks Installation Manager (as described under Initiating SolidWorksInstallation on page 8).a) For type of installation, select the following:
• Server products• Install SolidNetWork License Manager (distributed licensing) on thiscomputer.
b) On the SolidNetWork License Manager Options page, specify the SolidNetWorkLicense serial number and SolidNetWork License Manager installation location.
c) On the Summary page, click Install Now to complete the SolidWorks InstallationManager process.
2. To activate SolidNetWork licensing:a) Start SolidNetWork License Manager ( Start > Programs > SolidWorks version> SolidNetWork License Manager > SolidNetWork License Manager ).
b) When prompted to activate, click Yes.c) On the SolidNetWork License Server Information screen:
• If your company uses a firewall, select A firewall is in use on this server.
For more information, see Using SolidNetWork Licenses with Firewalls onpage 73.
• Use the default value for Port Number (and for Vendor Daemon Port Numberif you have a firewall) or specify the port numbers your company uses.
The port number is a TCP/IP port number in the 1024-60000 range, usedexclusively by this process. Normally, the default (25734) is suitable andis unlikely to be the same as any other FLEXnet server process currentlyon the license manager computer.
d) On the Activate Your SolidWorks Product screen:
• Select the Internet or email procedure.• Supply email contact information.• Click Next to proceed.
• Internet: Activation occurs automatically.• Email: Press Save to create a request file, then send the file [email protected]. When you receive the email containing theresponse file, extract the file from email and then click Open to load it.
If necessary, you can exit and rerun the activation procedure to openthe response file.
3. Click Finish.
69
License Administration

Installing a License ClientWhen installing SolidWorks on SolidNetWork License Client computers, the serial numberidentifies that computer as a SolidNetWork License Client.
1. Start SolidWorks Installation Manager (as described under Initiating SolidWorksInstallation on page 8).
2. On the Welcome screen click Individual (on this computer) if this is the firstSolidWorks installation on this computer for this major release.
If you are upgrading from an existing release, and are changing from individuallicensing to SolidNetWork licensing, click Modify the individual installation(on this computer). For details, see Upgrading from Individual Licensingto SolidNetWork Licensing on page 78.
3. When prompted for a serial number, enter the SolidNetWork License serial number.4. In the Add Server dialog box, type the SolidNetWork License Manager's address in
the form:
port@ComputerName
The port number must be the same one used for the license manager computer. Thedefault is 25734 (as described in Installing and Activating a License Manager onpage 68).
SolidWorks Installation Manager will attempt to validate that this SolidNetWorkLicense Manager is accessible. If you have not yet installed a license manager,this validation will fail; however, you still can proceed with the license clientinstallation.
5. Complete the SolidWorks installation by following the SolidWorks Installation Managerinstructions.
Install SolidNetWork License Managers Before Installing License ClientsYou should install and configure SolidNetWork License Manager on at least one computerprior to installing any SolidNetWork license client computers.
When installing with a SolidNetWork License serial number, SolidWorks InstallationManager prompts you to enter the SolidNetWork License Manager computer name andport number, and then attempts to validate that information.
If you have not yet installed SolidNetWork License Manager on the computer you specified,this validation cannot succeed. However, in this case validation failure does not indicatewhether you have supplied correct license manager information. If the license manageris installed, validation failures indicate that you have specified incorrect license managerinformation.
Triad License Manager InstallationTriad license managers use three computers for extra stability. If the computer managingthe license file is not available, one of the other two computers takes over.
Requirements for using triad license managers:
• Three hardware dongles are required.
70
License Administration

• Install triad license managers only on stable computers not scheduled for frequentshutdowns.
• The three license manager computers should be on the same subnet. Never configuretriad license managers with slow communications or dial-up links.
• The system administrator should detect when a license manager computer goes downand should restart it as soon as possible.
If only two license manager computers are running, the situation is worse thana single license manager computer, because there are two points of failure.
Installing the Initial Triad License ManagerTriad license managers use three computers for extra stability. This process shows howto install SolidNetWork License Manager on the first computer in the triad.
1. On the first triad license manager computer, install the SolidNetWork License Managerusing SolidWorks Installation Manager:a) Start SolidWorks Installation Manager (as described under Initiating SolidWorks
Installation on page 8).b) For type of installation, select the following:
• Server products• Install SolidNetWork License Manager (distributed licensing) on thiscomputer.
c) On the SolidNetWork License Manager Options page, specify the SolidNetWorkLicense serial number and SolidNetWork License Manager installation location.
d) On the Summary page, click Install Now to complete the SolidWorks InstallationManager process.
2. Using the SolidNetWork License Manager, configure the initial triad license managercomputer:a) Start SolidNetWork License Manager ( Start > Programs > SolidWorks version> SolidNetWork License Manager > SolidNetWork License Manager ).
b) Click No.The Server Administration tab of the SolidWorks SolidNetwork License Managerappears.
c) Under Advanced Options, click Options.The Advanced Options dialog box appears.
d) Under SolidNetWork Server License Mode, click Use a License File and click OK.The Advanced Options dialog box closes.
e) Under License Information, click Modify.The SolidNetWork License File Wizard appears.
f) Under Server Type, select Triad and click Next.g) On the Server Information pane, verify that the computer name, dongle ID, andport number for the initial triad license manager computer are correct, and clickNext.
If your computer uses a firewall, you might have to make some additionalspecifications on this screen. For more information, see Using SolidNetWorkLicenses with Firewalls on page 73.
h) On the Triad Partner Server Information screen, enter the computer name anddongle ID values for the other two triad license manager computers.
71
License Administration

This ensures that if one license manager is unavailable, client computers canget a license from the other two servers.
i) On the Licenses screen, click Read to browse to and open the SolidNetWork licensefile.The licenses appear in the SolidNetWork License File wizard.
j) Click Finish.k) Click OK to exit the SolidNetWork License File wizard and then Finish to exit theSolidNetWork License Manager.
Installing the Triad License Manager on Subsequent ComputersTriad license managers use three computers for extra stability. This process shows howto install SolidNetWork License Manager on the second and third computers in the triad.
It is assumed that you already have installed at least one triad license manager on anothercomputer. For details, see Installing the Initial Triad License Manager on page 71.
1. On the triad license manager computer, install the SolidNetWork License Managerusing SolidWorks Installation Manager:a) Start SolidWorks Installation Manager (as described under Initiating SolidWorks
Installation on page 8).b) For type of installation, select the following:
• Server products• Install SolidNetWork License Manager (distributed licensing) on thiscomputer.
c) On the SolidNetWork License Manager Options page, specify the SolidNetWorkLicense serial number and SolidNetWork License Manager installation location.
d) On the Summary page, click Install Now to complete the SolidWorks InstallationManager process.
2. Using the SolidNetWork License Manager, configure the triad license managercomputer:a) Start SolidNetWork License Manager ( Start > Programs > SolidWorks version> SolidNetWork License Manager > SolidNetWork License Manager .Since this is the first time you are running the SolidNetWork License Manager onthis computer, you are asked whether you would like to activate now.
b) Click No.The Server Administration tab of the SolidWorks SolidNetwork License Managerappears.
c) Under Advanced Options, click Options.The Advanced Options dialog box appears.
d) Under SolidNetWork Server License Mode, click Use a License File and click OK.The Advanced Options dialog box closes.
e) Under License Information, click Modify.The SolidNetWork License File Wizard appears.
f) Under Server Type, select Triad and Synchronize server/license informationand then click Next.
g) On the Server Information pane, verify that the computer name, dongle ID, andport number for this triad license manager computer are correct, and click Next.
72
License Administration

If your computer uses a firewall, you might have to make some additionalspecifications on this screen. For more information, see Using SolidNetWorkLicenses with Firewalls on page 73.
h) On the Triad Partner Server Information screen, enter the computer name anddongle ID values for the other two triad license manager computers.
This ensures that if one license manager is unavailable, client computers canget a license from the other two servers.
i) On the Licenses screen, click Read to browse to and open the SolidNetWork licensefile.
Typically, the licenses file is located on \licenses\sw_d.lic on the first triadlicense manager computer you configured.
The licenses appear in the SolidNetWork License File wizard.j) Click Finish.A SolidNetWork License File Wizard warning appears.
k) Click OK to exit the SolidNetWork License File wizard and then Finish to exit theSolidNetWork License Manager.
If you are configuring the second triad license manager computer, repeat this processfor the third triad license manager computer.
Using SolidNetWork Licenses with FirewallsIf your computer uses a firewall, you must configure ports to support SolidNetWorkLicensing.
In the firewall software, you must add two SolidNetWork License ports (for example,SNL-in-port and SNL-out-port) to the firewall exceptions list. For details aboutconfiguring these ports, consult with your system administrator.
If you are using Windows Firewall on Windows XP SP2 and Windows Server 2003 SP1,you must modify ports on the SolidNetWork license manager computer and modify theSolidNetWork license file to distribute licenses to the license client computers.Modifying License Manager Computer Ports for Windows FirewallIf you are using Windows Firewall, you must modify firewall port settings on theSolidNetWork license manager computer.
1. In Windows, open the Control Panel and then double-click Security Center.2. Click Windows Firewall.3. On the Exceptions tab, click Add Port.4. Type a Name (for example, SNL-in-port) and a Port Number (for example, 25734)
and then click OK.5. For the second port, click Add Port on the Exceptions tab again, specify the other
port's name and number (for example, SNL-out-port and 25735), and then click OK.Note the port number, as you will reference it later when modifying the SolidNetWorklicense file.
73
License Administration

If you use Workgroup PDM, you must modify Workgroup PDM port numbers inWindows Firewall. Typically, these ports are 20000 (VaultAdmin), 30000 (Data),40000 (Request), and 80 (Viewer).
6. Close Windows Security Center and Control Panel.
Modifying SolidNetWork License Manager Settings for Windows FirewallIf you are using Windows Firewall, you must modify the SolidNetWork license file to usethe firewall ports to distribute licenses to the license client computers.
1. Start SolidNetWork License Manager ( Start > Programs > SolidWorks version> SolidNetWork License Manager > SolidNetWork License Manager ).
2. On the Server Administration tab, under License Server, click Stop. (Click Yes whenprompted for confirmation and OK to complete stopping the license server.)
3. Under License Information, click Modify.4. Under Server Type, select the server arrangement for your network (Single or
Triad) and then click Next.5. Under Server Information:
a) Select A firewall is in use on this server.b) Port Number and Vendor Daemon Port Number should contain the port numbersspecified for the Windows Firewall (for details, see Modifying License ManagerComputer Ports for Windows Firewall on page 73).
c) Click Next and then click Finish.
6. On the Server Administration tab, under License Server, click Start.7. Click OK to close the SolidNetWork License Manager.
SolidNetWork License AdministrationTasks include starting, upgrading, and uninstalling the license manager, and retrieving,borrowing and returning licenses.
Starting the SolidNetWork License ManagerYou can start the SolidNetWork License Manager from the Windows Start menu.
In Windows, run this command: Start > Programs > SolidWorks version >SolidNetWork License Manager > SolidNetWork License Manager .
Upgrading the SolidNetWork License ManagerFor major releases of SolidWorks, upgrading the license manager consists of uninstallingthe old license manager, installing a new one, and re-activating the SolidNetWork license.
The license manager for a newer release can distribute licenses for client computersremaining at the previous release as well.
1. Start SolidNetWork License Manager ( Start > Programs > SolidWorks version> SolidNetWork License Manager > SolidNetWork License Manager ).
2. On the License Usage tab, verify that no client computers on the network are runningSolidWorks.
3. Uninstall the old license manager. For details, see Uninstalling the SolidNetWorkLicense Manager on page 75.
74
License Administration

4. Install the new license manager and re-activate the SolidNetWork license on thelicense manager computer. For details, see Installing and Activating a LicenseManager on page 68.
If you are upgrading the SolidNetWork License Manager on a computer that also runs theSolidWorks application, upgrade SolidNetWork license managers and clients beforeinstalling any new SolidWorks application service packs on that computer.
If you are upgrading the license manager on a computer that hosts administrative images,upgrade the license manager before upgrading the administrative images. For details,see Using the Same Computer for the License Manager and Administrative ImageInstallations on page 79.Uninstalling the SolidNetWork License ManagerWhen upgrading the SolidNetWork License Manager, you must uninstall the old licensemanager before installing the new one.
1. Start SolidNetwork License Manager ( Start > Programs > SolidWorks version >SolidNetWork License Manager > SolidNetWork License Manager ).
2. Verify that no client computers on the network are running SolidWorks.The License Usage tab shows clients running SolidWorks.
3. If you wish to transfer the SolidNetWork license to another computer, transfer thelicense to that computer before removing the SolidNetWork License Manager fromthis computer.
For information about transferring SolidNetWork licenses, see Transferring aSolidNetWork License on page 68.
4. On the Server Administration tab, under License Server, click Stop.5. Click OK to exit the license manager.6. In Windows, open Control Panel > Add or Remove Programs.7. Select SolidWorks SolidNetWork License Manager, click Remove, and confirm
the deletion.8. In Windows Explorer, delete the SolidWorks SolidNetWork License Manager folder.
(Typically, this folder is located under Program Files in the SolidWorks installationdirectory.)
You now are ready to install a new version of the license manager. For details, seeInstalling and Activating a License Manager on page 68.
If the SolidNetWork License Manager computer has a hardware dongle attached,remove the hardware dongle before installing the new version of SolidNetWorkLicense Manager.
Deleting SolidNetWork License FilesDelete old and expired SolidNetWork license files before upgrading to new ones.
1. Start SolidNetWork License Manager ( Start > Programs > SolidWorks version> SolidNetWork License Manager > SolidNetWork License Manager ).
2. On the Server Administration tab, under License File, click Modify, and then clickNext until you reach the Licenses screen.
75
License Administration

3. On the Licenses screen, select the old or expired SolidNetWork license file, then clickRemove.
4. Click Finish and then click OK.
Retrieving Client LicensesTo terminate a client SolidNetWork connection, a system administrator can stop thelicense and return it to the free license pool.
• The client must have been connected to the license manager for at least two minutes.• You can configure the SolidNetWork timeout feature to be the 15-minute minimum.After 15 minutes of idle time, that license is returned to the free license pool.
For details, seeSolidNetWork_License_Manager_install_dir\Docs\flexuser\licensingenduserguide.pdf.
1. Click Start > Run, type cmd, and then click OK to open a Windows command window.
2. In the command window, enter:cd SolidNetWork_License_Manager_install_dir\utilslmutil lmremove feature user computer display
where feature, user, computer, and display are the terms shown on the License Usagetab of the SolidNetWork License Manager.For example:
lmutil lmremove solidworks carlos designcmp1 corpserver
You must terminate the license for each add-in product (PhotoView 360,FeatureWorks, etc.) separately.
Borrowing and Returning SolidNetWork LicensesYou can borrow a SolidNetWork license to use the software from a remote location. Sincethe license is removed from the pool of available licenses, a borrowed license must bereturned for it to become available again.
Borrowed licenses are valid only for the system on which they were borrowed; theycannot be transferred.
The license is lent for a specified period of time, up to 30 days (or as defined by thesystem administrator), and the license is removed from the pool of available licenses.
System administrators can customize borrowing to:
• Define users or groups that are allowed to borrow licenses• Set the number of licenses that cannot be borrowed
For details, seeSolidNetWork_License_Manager_install_dir\Docs\flexuser\licensingenduserguide.pdf.
Borrowing SolidNetWork LicensesYou can borrow a SolidNetWork license to use the software from a remote location.
You must be connected to the SolidNetWork license manager to borrow the license, butnot necessarily to use it.
76
License Administration

1. Start SolidNetWork License Manager ( Start > Programs > SolidWorks version> SolidNetWork License Manager > SolidNetWork License Manager ).
2. On the License Borrowing tab:a) Select a date in Borrow until.b) Select the products to borrow, then click Borrow, and click Yes to confirm.c) Click Refresh. The Expire Date column indicates when licenses are due back.
3. Click OK.
To run SolidWorks, you must borrow a SolidWorks license. SolidWorks Professionaland SolidWorks Premium enable only the add-ins associated with the package, butnot SolidWorks.
Returning a Borrowed SolidNetWork LicenseSince a borrowed SolidNetWork license is removed from the pool of available licenses,that borrowed license must be returned for it to become available again.
1. Start SolidNetWork License Manager ( Start > Programs > SolidWorks version> SolidNetWork License Manager > SolidNetWork License Manager ).
2. On the License Borrowing tab:a) Select the products to return, click Return, and then click Yes to confirm.b) Click Refresh. The Expire Date column becomes blank, indicating that the licenseshave been returned.
3. Click OK.
It is not necessary to return licenses after the expiration date. The license is returnedto the pool on the SolidNetWork license manager at midnight on the expiration dateand the applications on the remote system no longer run.
Monitoring License Idle TimeSolidWorks can register idle time with the SolidNetWork License Manager so that licensesthat have not been used for a certain amount of time are returned to the free licensepool.
1. In the SolidNetwork License Manager installation directory, create a text file:SolidNetWork_License_Manager_install_dir\Licenses\sw_d.opt
2. Add the following line to the file:TIMEOUTALL seconds
where seconds is a number greater than or equal to 900 (15 minutes), which is theminimum time allowed.
Installing Temporary LicensesThe temporary "ANY" license can be used temporarily when the original SolidNetWorklicense is not available.
By installing the "ANY" license file, you agree to implement the traditional licenseupon receipt of a SolidNetWork license from Dassault Systèmes SolidWorksCorporation. Compliance with license restrictions still is required.
77
License Administration

To install an "ANY" license:
1. If you are an existing SolidNetWork user, uninstall the SolidNetWork License Managerand delete the installation folder. For details, see Uninstalling the SolidNetWorkLicense Manager on page 75.
2. Start SolidWorks Installation Manager (as described under Initiating SolidWorksInstallation on page 8).a) For type of installation, select the following:
• Server products• Install SolidNetWork License Manager (distributed licensing) on thiscomputer.
b) On the SolidNetWork License Manager Options page, specify the SolidNetWorkLicense serial number and SolidNetWork License Manager installation location.
c) On the Summary page, click Install Now to complete the SolidWorks InstallationManager process.
3. Start SolidNetWork License Manager ( Start > Programs > SolidWorks version> SolidNetWork License Manager > SolidNetWork License Manager ).
4. If you are prompted to activate, click No.The Server Administration tab of the SolidWorks SolidNetwork License Managerappears.
5. Under Advanced Options, click Options.The Advanced Options dialog box appears.
6. Under SolidNetWork Server License Mode, click Use a License File and click OK.The Advanced Options dialog box closes.
7. Under License Information, click Modify.The SolidNetWork License File Wizard appears.
8. Under Server Type, select Single and click Next.9. When you see this message:
Could not read the dongle ID number.
click Cancel.
The ID "ANY" appears automatically.
If your computer uses a firewall, you might have to make some additionalspecifications on this screen. For more information, see Using SolidNetWorkLicenses with Firewalls on page 73.
10. Continue with the installation.
Upgrading from Individual Licensing to SolidNetWork LicensingYou can upgrade a computer from individual SolidWorks licensing to SolidNetWork licensingby specifying the SolidNetWork license serial number in SolidWorks Installation Manager.
If a computer does not have SolidWorks installed, you can specify SolidNetWork licensingby entering the SolidNetWork serial number when installing with SolidWorks InstallationManager.
If a computer already has SolidWorks installed and you are switching from individuallicensing to SolidNetWork Licensing, you can modify the installation for the client computerand specify the SolidNetWork License serial number in place of the individual license serial
78
License Administration

number when running SolidWorks Installation Manager. For details, see Modifying anInstallation on page 12.
Using SolidNetWork Licenses with Add-in ProductsYou can use the SolidNetWork License Manager to distribute licenses for SolidWorks coreadd-in products (such as FeatureWorks, Workgroup PDM Server, and so on).
• An equal number of SolidWorks software licenses and SolidWorks add-in licenses isnot required.
• To check out a license for an add-in product, you first must check out a license forSolidWorks.
• To borrow an add-in product license, you must borrow both the SolidWorks softwarelicense and the SolidWorks product license that includes the add-in. For example, youmight have to borrow either a SolidWorks Professional or SolidWorks Premium productlicense.
• To release an add-in product license:
• In SolidWorks, click Tools > Add-ins and clear the add-in.• Exit SolidWorks.
Using the Same Computer for the License Manager and Administrative ImageInstallationsYou can configure one computer on a network to act both as a license manager distributingSolidNetWork licensing and as an administrative image location from which users caninstall SolidWorks software.
Client computers can obtain licenses from the license manager and then install SolidWorksfrom the same computer.
This configuration requires that the license manager and administrative image beinstalled on the same computer. Install the license manager first and then createand deploy the administrative image.
For details, see:
• Installing and Activating a License Manager on page 68• Deploying to Multiple Clients on page 16
FLEXnet Publisher License ManagementSolidNetWork Licensing is based on FLEXnet Publisher® license management.
For more information about FLEXnet Publisher license management, see the FLEXnetPublisher License Administration Guide in the SolidNetwork License Manager installationdirectory (SolidNetwork_License_Manager_install_dir\Docs\flexuser\licensingenduserguide.pdf).
For the latest information about FLEXnet Publisher license management, contact Acresso®Software.
79
License Administration

6Troubleshooting
This chapter includes the following topics:
• SolidWorks Installation Manager Log Files• SolidWorks Installation Manager Download Folder• Troubleshooting SolidNetWork Licenses• Troubleshooting Upgrades
SolidWorks Installation Manager Log FilesSolidWorks Installation Manager log files are available to assist you in troubleshootinginstallation problems.
These log files are located with the other SolidWorks application log files.
• For Windows Vista or later:
C:\Users\username\AppData\Roaming\SolidWorks\InstallationLogs\installed_version
• For Windows operating system versions prior to Vista:
C:\Documents and Settings\username\Application Data\SolidWorks\InstallationLogs\installed_version\
To see the log file directories, you might have to configure the Windows Folderoptions to Show hidden files and folders.
If the application data is located on a drive other than C:, adjust the directory pathaccordingly.
This directory contains the SummaryIMLog_nnnnn_nnnnn_nnnn_nnnnn.txt file, a generallog of SolidWorks Installation Manager progress.
The Other Logs subdirectory contains more detailed installation log information.
SolidWorks Installation Manager Download FolderSolidWorks Installation Manager can download the installation files it needs to a folderthat you specify. This topic provides answers to frequently asked questions about thedownload folder.
1. How do I install the files in this folder? on page 812. Can I install MSI files manually from this folder using msiexec or some other
application? on page 813. Can I select the same download folder for each version I install? on page 81
80

4. I downloaded some productsmanually from the Dassault Systèmes SolidWorksCorporation Web site. Can the Installation Manager install these? on page 81
5. Can the files I download be shared by other users? on page 826. How do I knowwhen a new version of SolidWorks products becomes available?on page 82
7. SolidWorks Installation Manager shows only SW2006 or SW2007 installs, butnot the current version. on page 82
8. SolidWorks Installation Manager does not let me select a different servicepack of a product to install. on page 82
9. SolidWorks Installation Manager is prevented from downloading files. on page83
10. Not all of my SolidWorks products are updated to the latest service pack, butCheck For Updates tells me I have the latest version? on page 83
11. Can I copy a DVD to a download folder? on page 83
How do I install the files in this folder?Run setup.exe. You may still be required to download some files if you select to installitems that were not downloaded previously.
Do not install using msiexec (see below).
Back to Top
Can I install MSI files manually from this folder using msiexec orsome other application?No. The Installation Manager does not download some files that would be required whenrunning msiexec.
Back to Top
Can I select the same download folder for each version I install?Download folders are version-specific. Starting in SolidWorks 2010, SolidWorks InstallationManager automatically creates a version-specific sub-folder within the specified folder.
Back to Top
I downloaded some products manually from the Dassault SystèmesSolidWorks Corporation Web site. Can the Installation Managerinstall these?Starting in SW2009, files downloaded manually can be used by SolidWorks InstallationManager. However, it is better to run SolidWorks Installation Manager, selecting theoption to download files. SolidWorks Installation Manager shows which files you needbased on what you are installing, providing links to download each file. This option canbe used when the built-in download page does not work (most likely because ofdownloading restrictions enforced by a proxy server).
If Microsoft Internet Explorer asks whether you want to save or run files during adownload or installation, always specify save.
Back to Top
81
Troubleshooting

Can the files I download be shared by other users?Yes. To do so, download to a network share. Each client can then run SolidWorksInstallation Manager from the share to install.
No further downloads will be required unless a user selects some items to install thatwere not selected during the initial download or if a computer that uses this download toinstall has a different set of prerequisites than the computer to which you downloadedthe files.
If you are downloading on behalf of others but are not installing, select the DownloadOnly option when installing. This option will allow you to select products regardless ofwhat may be installed on your system. However, this option cannot be used to downloadpatches or to create administrative images.
Back to Top
How do I know when a new version of SolidWorks productsbecomes available?You will be informed when a new version is available in the following cases:
• If you run Check for Updates ( Start > All Programs > SolidWorks InstallationManager > Check For Updates)
• If you have enabled SolidWorks Background Downloader.• If you select an installed version of SolidWorks in Windows Add/Remove Programsand click Change
• If you run an older version of the Installation Manager (sldIM.exe) from a downloadfolder
In these cases, you may select to download the newer version. SolidWorks InstallationManager will download and run the newer version of itself, and not any installation files.After the newer version of SolidWorks Installation Manager runs, you may select a set ofinstallation actions. SolidWorks Installation Manager will then determine which installationfiles are needed (and not downloaded previously) and will offer to download those files.
Back to Top
SolidWorks Installation Manager shows only SW2006 or SW2007installs, but not the current version.You are running an older version of SolidWorks Installation Manager that is no longersupported for the current release. It can only download service packs for SW2006 andSW2007 versions.
Back to Top
SolidWorks Installation Manager does not let me select a differentservice pack of a product to install.That is by design. Each version of SolidWorks Installation Manager is designed to installonly a specific version of SolidWorks products. If you want to install a different servicepack, you need to run that version of SolidWorks Installation Manager. To find the latestversion available, see How do I know when a new version of SolidWorks productsbecomes available? on page 82
Back to Top
82
Troubleshooting

SolidWorks Installation Manager is prevented from downloadingfiles.If proxy server restrictions prevent applications from downloading files, SolidWorksInstallation Manager cannot download files automatically.
You can download files manually and then install them using SolidWorks InstallationManager. Select the option in SolidWorks Installation Manager to download individualfiles (for example, Conduct manual download on the Download Options page). Basedon your product selections and system requirements, a web page appears in a separatewindow containing links to download all required files manually. These links are identicalto those provided by the SolidWorks Customer Portal, but you do not need to search forthe files.
Back to Top
Not all of my SolidWorks products are updated to the latest servicepack, but Check For Updates tells me I have the latest version?Check For Updates only tells you whether you have installed (or are running) the latestversion of SolidWorks Installation Manager.
If you want to update all products to the latest version that is installed, in Add/RemovePrograms, select the latest installed version of SolidWorks and click Change.
Back to Top
Can I copy a DVD to a download folder?Yes, but installations may fail unless you copy the entire contents of each DVD releasedfor that platform (x86 or x64). SolidWorks Installation Manager looks for the filesswdata*.id to determine the version. If these files are not present, it will fail to recognizeany of the installation files that you copied and will require that they be downloaded.
Back to Top
Troubleshooting SolidNetWork LicensesIf the SolidNetWork License Manager installation fails, check for these possibleexplanations.
Accessing the SolidNetWork License log filesWhen a license error occurs, the answer often appears in theSNL_Manager_install_dir\lmgrd.log file.
Could not obtain a license for SolidWorks. Cannot connect to licenseserver.Typically, this problem is caused by port settings.
• Port settings between the SolidNetWork license manager and the license client mightnot match.
• Additional port settings for multiple versions of SolidNetWork license managers mightnot have been specified.
For details about port settings for SolidNetWork license managers and clients, see UsingSolidNetWork Licenses with Firewalls on page 73.
83
Troubleshooting

Troubleshooting UpgradesIf you encounter problems while upgrading to a new SolidWorks release, check for thesepossible explanations.
Upgrading from a Source That Has MovedWhen SolidWorks is installed, SolidWorks Installation Manager remembers the locationof the installation sources (disk media, disk image on a network, etc.). It expects thesources to be available at the same location when updating.
If the source moves or is deleted, or if the source media changes, SolidWorks InstallationManager produces an error message. However, you can continue the upgrade by browsingto another location as long as it contains all the same file and folder structure.
84
Troubleshooting

7SolidWorks Installation Manager
Application HelpYou can run SolidWorks Installation Manager:
• From a SolidWorks DVD or a shared source or download folder (when installing a new version)• From the Control Panel Add or Remove Programs page (when modifying or removing anexisting version)
• Through a scheduled or manual update check (when detecting, downloading, and installingnew release versions)
Each version of SolidWorks has a version of SolidWorks Installation Manager specific to thatSolidWorks version.
For versions prior to SolidWorks 2008, use SolidWorks 2007 Installation Manager ordownload product versions manually from the SolidWorks Support Web site.
This chapter includes the following topics:
• SolidWorks Background Downloader• Check for Updates Results• Administrative Image Location• Download Options• Download Options for SolidWorks Installation Manager Files• Download Product Installation Files• Download Progress• Download Results• Installation Errors/Installation Cancelled• Installation Is Complete• Installation Location• Upgrade Options• Installation Progress• Installation Type• Installing and Managing Multiple Computers• Manual Download• Newer Version Available• No New Versions Available• Processes Detected• Product Selection• Products to Download• Products to Repair• Serial Numbers
85

• Server Installation• SolidNetWork License Manager• Summary• System Check Warnings• Hole Wizard/Toolbox Options• Uninstall Products• Workgroup PDM Server Options
SolidWorks Background DownloaderSolidWorks Background Downloader performs automated file downloads (for example,when a new Service Pack release is found) using background processes, enabling you tocontinue other work while downloading. When the download completes, you are askedwhether you want to install now, postpone the download, or remove the download.
SolidWorks Background Downloader is enabled by default when you install SolidWorksusing SolidWorks Installation manager.
When SolidWorks Installation Manager is running, whether for an installation ordownload operation, SolidWorks Background Downloader is paused. For example,it will pause any running downloads, not allow any new downloads to start, and willnot allow you to change the download folder specification.
SolidWorks Background Downloader is enabled by default when you install SolidWorks.You can disable SolidWorks Background Downloader during SolidWorks installation bychanging the Download Options on the Summary page. (Clear the Do you want to usethe Background Downloader? option.)
When enabled, this icon appears in the Windows system tray in the toolbar:
Clicking this icon enables these operations:
• Help with Background Downloader• Pause Download• Resume Download• Cancel Download• Installation Options• Change Download Location• Check for Updates• Automatically Check for Updates• Automatically Download Updates• Disable Background Downloader
Help with Background DownloaderOpen this help topic for Background Downloader in SolidWorks Installation Guide.
Pause/Resume DownloadIf a download is running in the background, click Pause Download to pause thatdownload, with the ability to resume later by clicking Resume Download.
86
SolidWorks Installation Manager Application Help

Cancel DownloadIf a download is running, stop that download and delete any files Background Downloaderhas already downloaded.
You cannot resume a canceled download.
Installation OptionsWhen a download is completed, you can choose from the following options:
• Install now: Install the downloaded files.• Remind me later: Do not install the downloaded files, but set up a message to remindyou later.
• Delete this download: Do not install the downloaded files, and delete them. (This isuseful if you have decided you no longer want to install the downloaded files.)
Change Download LocationChange the location where Background Downloader downloads files.
This option is not available if a download is either running or paused.
Check for UpdatesRun the Check for Updates feature of SolidWorks Installation Manager.
Automatically Check for UpdatesPeriodically run Check for Updates, notifying you when updates are available fordownload.
Automatically Download UpdatesPeriodically run Check for Updates, downloading updates as they become available.
Disabling and Re-Enabling SolidWorks Background DownloaderYou can disable Background Downloader by clicking the icon and then selecting DisableBackground Downloading.
To re-enable Background Downloader, click Start > All Programs > SolidWorksInstallation Manager > SolidWorks Background Downloader.
Check for Updates ResultsCheck for Updates looks for later versions of SolidWorks.
You can run Check for Updates manually:
• In Windows, click Start > Programs > SolidWorks Installation Manager > Checkfor Updates
• In SolidWorks, click Help > Check for Updates.
Check for Updates is not available on clients installed from administrative images.
87
SolidWorks Installation Manager Application Help

Newer Version AvailableSolidWorks Installation Manager has detected a newer version of SolidWorks products.You can update to a newer version by selecting the SolidWorks Installation Manager forthat version.
This newer version can download installation files based on the products you specify inthe installation. You can share the downloaded files with other users who install usingSolidWorks Installation Manager.
These downloads are only for use by SolidWorks Installation Manager.
These options are available:
• If there are multiple versions available, you can select a version from the list.• For details about this version, click Check to see what this upgrade includes.
Clicking Next obtains and runs the selected version of SolidWorks Installation Manager.
No New Downloads Available/Unable to Check for New VersionsSolidWorks Installation Manager has not found a newer version of SolidWorks products,either because you are installing the latest version available or because it could notconnect to the SolidWorks site to check.
Administrative Image LocationSpecify the installation location of the administrative image.
When creating an administrative image, these options apply:
This is the directory location in which SolidWorks InstallationManager will create the new image.
New image location
This location cannot contain an existing administrativeimage. The administrative image must be in a folder thatcan be shared for client deployment.
This is the additional space required for the administrativeimage.
Estimated spacerequired for imagecreation Verify that the disk to which you are installing has sufficient
free space to support the image requirements.
This is the directory location from which you are installingSolidWorks products.
Create image from
This option appears only if the Install Only option isspecified. For details, see Download Options on page 88.
Download OptionsSpecify details for completing the download operation, such as the location of thedownloaded files, how to download the files, and whether to install the downloaded files.
88
SolidWorks Installation Manager Application Help

SolidWorks Installation Manager supports electronic software distribution (ESD). If youare not installing from a SolidWorks DVD, you are prompted to specify the source for theSolidWorks products you are installing.
For answers to questions about the download folder, see SolidWorks InstallationManager Download Folder on page 80.
What do you want to do?Choose one of the following:
After the download completes, SolidWorks Installation Managerruns an installation using the downloaded files.
Download andinstall/Downloadand create image
SolidWorks Installation Manager does not run an installation afterthe download completes.
Typically, you would specify this option if you are downloading thefiles to configure an installation file set to share among multiplecomputers.
Download only.You can downloadonce and thensharedownloaded fileswith multiplecomputers. If you specify this option, you are then asked to choose between
two sets of files to download:
• Files for THIS computer: The download will contain only thosefiles that are missing from the installation file set currently onthis computer.
This should be a smaller download because it contains:
• Only files for products selected on the Product Selection page• Only the prerequisite files that are required for your computerbut not yet installed
However, if you try to use this downloaded file set on anothercomputer to perform an installation, some files could be missing(because the installation file set on the other computer might bedifferent from this one). You can use these download files toinstall on another computer, but when the installation runs youmay have to download additional files to complete the installationfile set on that computer.
• Files to share with ANY computer: The download will containthe complete installation file set that can be used to install thisversion on any computer.
This will be the larger download because it contains the completefile set that you can use to install this version of any product onany computer.
If you specified a limited set of products to download, this optionignores that specification and downloads all products containedin the product release.
The download will contain all files required to create anadministrative image, not just those files required to perform anindividual installation.
89
SolidWorks Installation Manager Application Help

SolidWorks Installation Manager does not download any files, butuses the files in the selected directory.
Click Browse to navigate to a different location. For example, youcan browse to an installation DVD or a download folder, providedthat location contains all the required files.
Installonly/Createimage only. Ialready have allthe installationfiles needed.
If you receive an error message that the folder is incomplete, andyou were expecting all installation files to be present at that location,possible explanations include:
• You selected a component for installation that had not beendownloaded previously or it was selected by default.
• The files were downloaded on another computer with a differentset of system requirements.
• You previously performed a client installation and now are creatingan administrative image, which requires a larger file set.
You can either browse to a folder containing all the files (forexample, a DVD) or select one of the download options.
Where do you want to download the required files?This is the download folder location.
In some cases, this option might be visible but disabled. For example, if Install only isspecified, SolidWorks Installation Manager will install any downloaded files from thedirectory specified for that option, rather than using a separate download folder.
Whether you are downloading these files or accessing them from your own location,all files must be downloaded to the same download folder.
Estimated download sizeThe estimated download disk space requirements are based on the complete componentlisting chosen, regardless of whether this is a new download or you are resuming adownload from a previous session.
For example, if you are resuming a previous download SolidWorks Installation Managerprocesses only those files that have not already been downloaded. The download timecould be less than the estimate.
If a file completed downloading in the previous download, its size is not included in thisestimate. Therefore, the estimate might be higher than the actual download size.
How do you want to download?There are two options:
In some cases, a proxy server might prohibit automatic downloadsfrom SolidWorks Installation Manager.
Conduct manualdownload
By selecting this option, you can download the files manuallythrough a Web page and then proceed within SolidWorksInstallation Manager to complete the installation operations. ThisWeb page is customized by SolidWorks Installation Manager todownload only the files required to complete the installation.
90
SolidWorks Installation Manager Application Help

The downloader uses an algorithm to increase the speed of thedownload by increasing the network bandwidth used during thedownload.
In some cases, this can disturb network performance. If you havetrouble downloading, this option might not be supported by the
Speed updownloads byusing morenetworkbandwidth
proxy server. Try clearing the option and attempting the downloadagain. For details, check with your network administrator.
This option applies only to automatic downloads. It has noimpact on manual downloads.
Using SolidWorks Background DownloaderYou can use SolidWorks Background Downloader to complete this download operation orto download future SolidWorks Service Pack releases as they become available.
Solidworks Background Downloader can automatically detect and download new ServicePack updates in the background, notifying you when downloading is complete and thefiles are ready for installation. For details, see SolidWorks Background Downloaderon page 86.
Download Options for SolidWorks Installation Manager FilesYou have chosen to download a later version of SolidWorks Installation Manager. Use thisscreen to specify where and how it is downloaded.
For answers to questions about the download folder, see SolidWorks InstallationManager Download Folder on page 80.
This screen appears only if there is a problem with the default download folder (forexample, if write access or network access is not available). Typically, you can just specifyan alternate download directory to proceed.
Download DirectoryBrowse to the destination for SolidWorks Installation Manager files.
The size of the download and the amount of space needed is shown. The amount of spaceneeded includes extra space required to unzip certain downloads and is larger than theactual download size.
Use Download AccelerationIf you choose this option, the downloader uses an algorithm to increase the speed of thedownload.
Download acceleration increases bandwidth and can disturb network performance.Check with your network administrator before enabling download acceleration.
If download acceleration is not supported by the proxy server, this option is automaticallydisabled.
91
SolidWorks Installation Manager Application Help

Download Product Installation FilesSpecify where and how to download missing files for the specified product.
SolidWorks Installation Manager downloads, verifies, and extracts all files in parallel duringthe download process.
Cancelling out of this screen cancels the rest of the installation sequence.
For the consequences of cancellation and instructions on completing interruptedinstallations, see Installation Errors/Installation Cancelled on page 93.
Download DirectoryBrowse to the destination for the downloaded files.
The download size and the required space is shown. The required space includes anyextra space needed to unzip certain downloads and is larger than the actual downloadsize.
For answers to questions about the download folder, see SolidWorks InstallationManager Download Folder on page 80.
Download Options
The downloader uses an algorithm to increase the speed of thedownload by increasing the network bandwidth used duringthe download.
In some cases, this can disturb network performance. If youhave trouble downloading, this option might not be supported
Speed up downloadsby using morenetwork bandwidth
by the proxy server. Try clearing the option and attemptingthe download again. For details, check with your networkadministrator.
Download acceleration increases bandwidth and can disturb network performance.Check with your network administrator before enabling download acceleration.
If download acceleration is not supported by the proxy server, this option might beautomatically disabled.
Download ProgressSolidWorks Installation Manager downloads, verifies, and extracts all files in parallel duringthis process.
To cancel the download after it has begun, click Cancel.
If you cancel the download or the download fails, a Download Canceled or DownloadProblem screen indicates which downloads were not completed and lets you resume thedownload or close the application.
For answers to questions about the download folder, see SolidWorks InstallationManager Download Folder on page 80.
92
SolidWorks Installation Manager Application Help

Download ResultsIndicates whether the download completed successfully, failed during operation, or wascancelled.
Download Problem/Download CancelledIf you see Download Problem, SolidWorks Installation Manager encountered problemsthat prevented the download from completing.
If you see Download Cancelled, you cancelled the download before it could complete.
To proceed:
To resume the automatic download from when you cancelled,select this option and click Retry Download or ResumeDownload.
Retry/Resumeautomatic downloads
In some cases, a proxy server might prohibit automaticdownloads from SolidWorks Installation Manager.
Download filesindividually in a Webbrowser By selecting this option, you can download the files manually
through a Web page and then proceed within SolidWorksInstallation Manager to complete the installation operations.This Web page is customized by SolidWorks InstallationManager to download only the files required to complete theinstallation.
Download CompleteThe Download Complete screen appears when the download completes if you specifiedthe Download Only option.
Click Finish to exit SolidWorks Installation Manager.
Do not attempt to install any of these products manually. Always use SolidWorksInstallation Manager to install downloaded files.
Installation Errors/Installation CancelledThe installation has encountered an error or was cancelled.
If an error or cancellation occurs:
• Products that installed before the error or cancellation remain on the computer.• The product that was being installed at the time of the cancellation is rolled back, ifpossible, so that there are no partial installations.
• Remaining products are not installed or uninstalled. A list is provided under Not YetAttempted.
To resume installing or uninstalling these products, click the link provided.
SolidWorks Installation Manager first installs any prerequisites that are not installedon the computer, such as .NET framework. It then installs the selected products inthis order:
1. SolidWorks2. eDrawings
93
SolidWorks Installation Manager Application Help

3. SolidWorks Search4. SolidWorks Explorer/Workgroup PDM5. PhotoView 3606. SolidWorks Flow Simulation7. COSMOSM
Recovering from a Failed or Cancelled InstallationIf an error or cancellation occurs during installation, you can recover from that point byre-running the installation.
1. Record the error message and product code for the installation that failed, as shownon the Installation Errors or Installation Cancelled screen.
If you are prompted for a source file and you are not modifying an existingSolidWorks installation, the installation or computer may be corrupt. Contactyour SolidWorks reseller.
2. Reboot the computer.3. To ensure that no SolidWorks products are running, in Windows, press Ctr+Alt+Del
to open the Task Manager.4. On the Processes tab, if any of the following processes appear under Image Name,
select them and click End Process.
• SLDWORKS.exe• EModelViewer.exe• PDMworks.exe• pdmwVault.exe• SWViewer.exe• solidworksexplorer.exe• swlmwiz.exe• photoview360.exe• SWBoengine.exe• SWVBAServer.exe• Sldshellextserver.exe
5. If the application is already installed and you were trying to modify or remove it, tryto repair the installation. For details, see Repairing an Installation on page 13.
6. Click Start > Control Panel > Add or Remove Programs.7. Select the version of SolidWorks that failed.
If there is no entry for the SolidWorks version you are trying to install, repeatthe installation process.
8. Do one of the following:
• To retry, click Change and select all products that failed to install or were skippedduring the installation.
• To skip the failed installation, click Change and select all products that wereskipped during the installation. Clear the product that failed to install.
94
SolidWorks Installation Manager Application Help

• To abandon the installation, click Remove and select any products that wereinstalled.
This will not restore the previous version of any products you are upgrading.
Repairing the InstallationIf an error or cancellation occurs during installation, you can use Windows Control Panelto repair the installation.
You can repair an individual installation. You cannot repair an administrative imageinstallation; you must uninstall and then reinstall the administrative image.
To repair the installation:
1. In Windows, click Start > Control Panel > Add or Remove Programs.2. Select the version of SolidWorks that failed and click Change.
SolidWorks Installation Manager starts.3. In the welcome screen, click Repair the individual installation (on this computer).
and click Next.4. Select the products that failed to install or remove and click Repair.
Contacting the SolidWorks ResellerIf modifying or repairing the installation fails, contact your local SolidWorks reseller withthe information gathered from this screen. You might also be asked to provide a zip fileof SolidWorks Installation Manager log files.
1. Locate the log files:
• For Windows operating system versions prior to Vista:
C:\Documents and Settings\username\ApplicationData\SolidWorks\Installation Logs\installed_version\
• For Windows Vista or later:
C:\Users\username\AppData\Roaming\SolidWorks\InstallationLogs\installed_version\
If you cannot find the folder, it might be hidden. In Windows Explorer, clickTools > Folder Options. On the View tab, under Advanced Settings, selectShow hidden files and folders for Hidden files and folders.
2. Zip the entire contents of this folder, including sub-folders.
Installation Is CompleteSolidWorks Installation Manager has completed its processing.
One or more of these options may be displayed.
What's NewFor individual installations, when you finish the installation process, a document describingnew functionality in SolidWorks and its add-in products appears.
95
SolidWorks Installation Manager Application Help

For administrative image installations, the document appears on client computers whenthey complete their installations.
SurveyGive us your opinions about the installation process by answering a short survey.
Customer Experience ProgramPerformance information is sent to SolidWorks Corporation to help improve the product.The process is transparent and confidential. For details, see SolidWorks CustomerExperience Program on page 96.
Administrative Image Creation Is CompleteWhen you finish creating the administrative image, you can click Customize Image torun the Administrative Image Option Editor to customize the image.
Click Show me how to install this image on a client. to show instructions on usingthe Option Editor.
For details about configuring an administrative image using the Option Editor, seeAdministrative Image Option Editor on page 17.
Click Customize Image to start the Administrative Image Option Editor to customizethe option settings for this administrative image.
You can start the Option Editor later by double-clicking sldAdminOptionEditor.exein the Administrative Image installation directory.
Checking for Updates to SolidWorksYou can use SolidWorks Installation Manager to check for updates manually or to configureautomatic periodic checking for updates.
1. Start SolidWorks Installation Manager by doing one of the following:
• In the SolidWorks application, click Help > Check for Updates.
• In Windows, click Start > Programs > SolidWorks Installation Manager >Check for Updates.
SolidWorks Installation Manager tells you whether any updates are currently available.2. If updates are available, choose whether to download and install them.3. To enable automatic periodic checks for updates, when SolidWorks Installation Manager
completes its processing select Check for Updates every __ days and specify thefrequency of checks.
SolidWorks Customer Experience ProgramWhen installing SolidWorks, you can specify that performance information is sent toSolidWorks Corporation to help improve the product.
SolidWorks uses this information to determine trends concerning product usage andquality. Our goal is to deliver the highest quality product and the performance logs area useful tool in this process.
The process is transparent. All information contained within the log files is treatedconfidentially. It is not used for any other purpose and no one will contact you.
96
SolidWorks Installation Manager Application Help

For further information, see the Customer Experience Feedback Program Web site.
Installation LocationSpecify SolidWorks installation locations.
For installations except administrative image creation, these options apply:
This is the directory location to which you are installingSolidWorks.
Install selectedproducts to
When upgrading or modifying an installation, all files mustbe installed to the existing location for that installation. Inthis case, you cannot change the location of the existingSolidWorks installation.
This is the additional space required for the products selectedfor installation or modification.
Estimated spacerequired forinstallation Verify that the disk to which you are installing has sufficient free
space to support the installation requirements.
This is the directory location from which you are installingSolidWorks.
Install from
This option appears only if the Install Only option isspecified. For details, see Download Options on page 88.
Consult your system administrator before changing either SolidWorks installationlocation.
Administrative Image LocationsWhen creating an administrative image, these options apply:
This is the directory location in which SolidWorks InstallationManager will create the new image.
New image location
This location cannot contain an existing administrativeimage.
This is the additional space required for the administrativeimage.
Estimated spacerequired for imagecreation Verify that the disk to which you are installing has sufficient
free space to support the image requirements.
This is the directory location from which you are installingSolidWorks products.
Create image from
This option appears only if the Install Only option isspecified. For details, see Download Options on page 88.
97
SolidWorks Installation Manager Application Help

When upgrading an existing administrative image, SolidWorksInstallation Manager creates a new image based on the settings
Existing imagelocation
for that existing image. This existing image is not modified. Thisshows the location of the original image you specified on theWelcome screen.
Avoid Using Version-Specific Directory PathsIf you specify a version number in an installation directory location (for example,C:\Program Files\SolidWorks Corp\SolidWorks 2010\), and then upgrade thatinstallation to SolidWorks 2011, you will have a SolidWorks 2011 installation directorythat is labeled SolidWorks 2010.
Upgrade OptionsOne or more older major versions of SolidWorks are currently installed on this computer.Choose whether to upgrade the latest existing version to the new version or to create anew installation for the new version.
This choice appears only if no previous version of this major release is installed onthis computer. If a previous version of this major release is installed, SolidWorksInstallation Manager always updates that installation.
(Starting in SolidWorks 2010, parallel installations of multiple Service Pack versionsof the same major release are no longer supported.)
When upgrading:
• All specified products are upgraded.• All installed products are selected by default.• If you deselect a product, that product is not upgraded.
If you deselect a product component, you are not specifying that SolidWorksInstallation Manager remove that component. To remove a product component,use Add/Remove Programs, as described under Removing an Installationon page 55.
Select the appropriate option and click Next to continue.
Create a new installation of SolidWorks version.Selecting this option preserves the older major version installation in addition to creatinga new installation for this major version.
This can be useful if you want to access the older version of SolidWorks even afterthe newer version is installed. For example, if you are sharing files with other userswho are still running the older version, you can avoid version incompatibility with filessaved using the newer version.
Upgrade SolidWorks previous_major_version to SolidWorkscurrent_major_version.Selecting this option upgrades the older version installation to the newer version.
98
SolidWorks Installation Manager Application Help

Once the installation completes, the older SolidWorks version will no longer beavailable on this computer.
Installation ProgressThis screen shows the progress of the installation.
To cancel the installation after it has begun, click Cancel.
For the consequences of cancellation and instructions on completing interruptedinstallations, see Installation Errors/Installation Cancelled on page 93.
Installation TypeSpecify the installation operation you would like to run, such as creating a new installation,modifying or repairing an existing installation, creating an administrative image, installingadministrative server products, or downloading files without installing.
IndividualInstall SolidWorks products on this computer.
This option appears only if this version is not currently installed on this computer.
Modify the individual installationModify the existing SolidWorks installation on this computer.
This option appears only if this version is currently installed on this computer.
Modifications include:
• Adding or removing SolidWorks product components• Changing to a different SolidWorks package (for example, SolidWorks Professional,SolidWorks Premium, and so on)
• Changing the SolidWorks serial number setting
If you already specified a SolidWorks serial number during a prior installation,SolidWorks Installation Manager might not prompt for it again. To change theserial number that is assumed by SolidWorks Installation Manager, you mustselect this option.
Repair the individual installationRepair the existing SolidWorks installation on this computer.
This option appears only if this version is currently installed on this computer.
Repair verifies that all the files are present and registered properly and fixes any problemsthat are found. Data you have created is not affected.
• To repair a product, ensure that it is selected.• Clear the check boxes for products you do not want to repair.
99
SolidWorks Installation Manager Application Help

You can repair an individual installation. You cannot repair an administrative imageinstallation; you must reinstall using the administrative image.
Administrative imageCreate or update an administrative image on this computer.
You can use an administrative image to install on multiple computers. For details aboutinstalling SolidWorks on multiple clients using administrative images, see UsingAdministrative Images on page 16.
When creating or updating administrative images:
• You can use installation settings from an existing image to configure the new or updatedimage, or you can use the default SolidWorks installations settings.
• If you are updating an existing image:
• SolidWorks Installation Manager creates a new copy of the image, even if you areupdating. The original image is not modified.
• You can create the updated image using files from the existing image you areupdating. This results in a smaller download.
If you do not specify an image for which a Service Pack release is available toupdate the previous image, you cannot take advantage of the smaller download.
• You can create a 32-bit administrative image and a 64-bit image on this computer.Otherwise, only the image that corresponds to the hardware architecture of thiscomputer is created.
If you do specify both 32-bit and 64-bit image creation, the SolidWorks installationmedia for both architectures will be required to complete the installation.
Server productsSolidWorks administrative server products include SolidWorks Workgroup PDM Server(Vault) and SolidNetWork License Manager.
For details about these products, see:
• Workgroup PDM on page 56• Administering Licenses Using a SolidNetWork License Manager on page 66
Download onlyDownload the installation files for selected SolidWorks products without installing theproducts.
This option does not appear if you are installing from a DVD.
The content of the downloaded files is the same as the files that are available on theSolidWorks installation DVD. Selecting this option downloads the full set of installationfiles, regardless of what files might already be installed on your computer.
You can use this method to set up a server from which your users can perform installations.This is different from creating an administrative image.
100
SolidWorks Installation Manager Application Help

Installing the wrong SolidWorks architecture for this computerIf you are attempting to install using the wrong SolidWorks installation media for thiscomputer architecture (for example, if you are trying to install 64-bit SolidWorks on a32-bit computer) this installation panel should indicate this problem.
To continue the installation:
1. Cancel this SolidWorks Installation Manager session.2. Check the computer architecture and system requirements for this computer.3. Re-install using the correct SolidWorks installation media for this computer architecture.
Installing and Managing Multiple ComputersSolidWorks Installation Manager provides the following tools to install and manage multipleSolidWorks computers.
SolidWorks Administrative ImagesIf you are installing SolidWorks on multiple computers, you can create an administrativeimage and then deploy the application to other computers.
Workgroup PDM ServerThe Workgroup PDM application is project data management software that runs insidethe SolidWorks environment or as a standalone application inside SolidWorks Explorer.Workgroup PDM controls projects with procedures for check out, check in, revision control,and other administration tasks. Installing the Workgroup PDM Server creates a WorkgroupPDM vault, which is the database that stores the managed SolidWorks projects.
SolidNetWork License ManagerThe SolidNetWork License Manager allows the number of users to exceed the number oflicenses by floating the use of licenses. When a client license is not in use, it is availablefor another SolidWorks user.
You can also use the SolidNetWork License Manager to distribute licenses for SolidWorkscore add-in products (for example, FeatureWorks).
Manual DownloadYou have chosen to download files manually (or you might have chosen to downloadmanually the last time you ran SolidWorks Installation Manager).
Click the link to open an automatically generated Web page that contains a complete listof the files you need to complete your download.
You must download to the folder specified on the Summary page. Installation cannotbegin until all the files are downloaded into that folder.
Once you have completed the manual downloads, click Next to continue.
If you want to download automatically, you can change the option by going back to theSummary Page and changing Download Options.
101
SolidWorks Installation Manager Application Help

Newer Version AvailableThe Installation Manager has detected a newer version of SolidWorks products. You canchoose to install the version contained in the original installation DVD or download, oryou can choose to download and install the newer version.
If You Are Installing from a DVDUnder Would you like to use the newer version?, choose one of the following:
• No, continue installing version from this DVD. You can update afterwards witha smaller download.
Select this option to continue with the installation using the current Installation Manager.
After the installation completes, you can check for and install updates using theInstallation Manager. To check for updates, run Start > SolidWorks InstallationManager > Check for Updates.
The advantage is that this results in a smaller download. The disadvantages are thatthis is a two-step process and the files that you download are version specific (andcannot be shared by other users using different versions).
• Yes, perform installation using this DVD, then download and update to version.
Select this option to download and run a later version of the Installation Manager toinstall SolidWorks products for that version.
If a small Service Pack release is available to update the DVD version, InstallationManager first will install the original version from the DVD and then apply the ServicePack update. This results in a smaller download.
You can achieve the same result by selecting the option to continue installing from theDVD and then applying the update at a later date.
The advantage of this option is that it is a one-step process.
In most cases, installing the full version from the DVD and then using the InstallationManager to check for and install updates is preferred because it requires smallerdownloads.
If You Are Installing from a DownloadChoose one of the following:
• Continue installing version.
Select this option to continue installing the version contained in the initial download.
• Download and install a new version: version
Select this option to download the new version and install that. If there are multiplenew versions available, you can select the version to download and install.
No New Versions AvailableThere are no newer versions available for download. Proceed with installing the specifiedversion.
To proceed with the installation, click Next.
102
SolidWorks Installation Manager Application Help

Processes DetectedSolidWorks Installation Manager has detected processes on this computer that mightprevent a successful installation.
• To continue the installation do one of the following:
• Close these processes (for example, using Microsoft Windows Task Manager) andthen press Retry.
• Click Ignore to proceed without closing the processes.
• To stop the installation, press Cancel.
Product SelectionSpecify the product components to install, modify, download, or remove.
In the product listing:
• The product listing is the complete listing of products that are available in the packagespecified above the product listing.
• To view the projected action for a particular component, click the component name(but not the check box). The intended installation action appears in the informationfield below the product listing.
• You can click the check box next to the product component to change the installationaction for that component. (For example, if you are installing or removing components,selecting the check box specifies that the component is to be installed or removed andclearing the check box specifies that the component is not to be installed or removed.)
• If you are performing a Modify installation, an asterisk (*) appears to the left ofcomponents when you make any change in the product selection.
• If a component has optional installation sub-components in it, a + icon appears nextto the component. To see the available sub-components for a component, click the +icon.
• If a component has been expanded to show optional sub-components, a - icon appearsnext to the component. To collapse the sub-component listing, click the - icon.
If you are applying a Service Pack, features of SolidWorks appearing under SolidWorks(for example, FeatureWorks) cannot be selected. This is because you cannot add orremove a feature when performing this type of upgrade.
The actions performed by SolidWorks Installation Manager are controlled by a set ofproduct coexistence rules. For details, see Product Coexistence Rules on page 15.
SolidWorks Installation Manager selects these product components by default:
• If you are performing an upgrade or a Service Pack update, SolidWorks InstallationManager selects the products currently installed.
• Otherwise, SolidWorks Installation Manager selects all products to which you areentitled.
To reduce your installation or download time and disk space requirements, expandthe product components and clear the check box for those components you do notneed.
If SolidWorks Installation Manager was unable to verify the products to which youare entitled, you can click Select different packages or products to change theproduct package (such as SolidWorks Professional or SolidWorks Premium) listingto install or modify. SolidWorks Installation Manager lists all SolidWorks products
103
SolidWorks Installation Manager Application Help

on your installation media that are compatible with the package you select. You canselect any products you purchased or are entitled to evaluate.
SolidWorks SearchSolidWorks Search provides a powerful full text search of SolidWorks documents, theWorkgroup PDM vault, and 3D ContentCentral. Search displays a preview and the filelocation and name.
After the installation, SolidWorks Search indexes SolidWorks documents for faster searches.Only SolidWorks files are indexed by default.
Installing SolidWorks Search automatically installs Windows Desktop Search if it isnot already installed on your computer.
Language SupportExpand the SolidWorks product and the Languages component to see the languagesyou can install.
The Languages specification limits the languages that are installed for theSolidWorks product only. Other product installations are not affected by thisspecification. For example, SolidWorks eDrawings
®, SolidWorks Workgroup PDM,
and SolidWorks Explorer install all languages.
Space NeededSolidWorks Installation Manager reports either total installation size or total downloadsize at the bottom of the page.
• If you selected the Download Only option, download size appears. Download sizeis the total amount of disk space required for all of the downloaded files (not includingextra space required to unzip the files after the download completes). This figure is anestimate.
All files needed for installation are included in the total download size. If somefiles already were downloaded into the current download folder, they will not bedownloaded again. As a result, your actual download size might be smaller thanthe total download size shown, or you might not need to download any files.
• Otherwise, installation size appears. Installation size is the change in disk spaceusage that will occur when you complete this installation. Due to file compression,these figures are estimates.
If you are upgrading or removing an existing installation, the installation size could bezero.
The figure shown does not include any space needed to download or extract files ifrequired for the installation.
104
SolidWorks Installation Manager Application Help

If downloads are required and you are downloading to the same drive, the actualdisk space requirements could be significantly greater than the installation sizethat appears.
To reduce download or installation time for future modifications, do not deletethe downloaded files after installation. Subsequent updates and patches typicallyrequire access to the last full installation file set.
Products to DownloadSelect SolidWorks products to download to a specified location.
The products available for download are determined by the serial number you supplied:
• The action to be performed for each component appears to the right of each item.• If a component has optional installation sub-components in it, a + icon appears nextto the component. To see the available sub-components for a component, click the +icon.
• If a component has been expanded to show optional sub-components, a - icon appearsnext to the component. To collapse the sub-component listing, click the - icon.
• Click the check box to the left of each component to select how it is handled bySolidWorks Installation Manager.
SolidWorks Installation Manager downloads all product components to which you areentitled, unless you specify otherwise. To reduce your download time and disk spacerequirements, expand the product components and specify Do not download forthose components you do not need.
If SolidWorks Installation Manager was unable to verify the products to which youare entitled, you can select a SolidWorks package to download. SolidWorks InstallationManager lists all SolidWorks products that are compatible with the package you select.
If SolidWorks Installation Manager was unable to verify the products to which youare entitled, you can click Select different packages or products to change theproduct package (such as SolidWorks Professional or SolidWorks Premium) listing toinstall or modify. SolidWorks Installation Manager lists all SolidWorks products onyour installation media that are compatible with the package you select. You canselect any products you purchased or are entitled to evaluate.
Language SupportExpand the SolidWorks product and the Languages component to see the languagesyou can install.
The Languages specification limits the languages that are installed for theSolidWorks product only. Other product installations are not affected by thisspecification. For example, SolidWorks eDrawings
®, SolidWorks Workgroup PDM,
and SolidWorks Explorer install all languages.
Space NeededBased on the products you select, the space needed to perform the download is shown.Download size is the total amount of disk space required for all of the downloaded files
105
SolidWorks Installation Manager Application Help

(not including extra space required to unzip the files after the download completes). Thisfigure is an estimate.
To reduce download or installation time for future updates and patches, do not deletethe downloaded files after installation. Subsequent updates and patches typicallyrequire access to the last full installation file set.
Products to RepairWhen you specify Repair this installation, this screen displays the SolidWorks products,with version numbers, that can be repaired by this version of SolidWorks InstallationManager.
Repair verifies that all the files are present and registered properly and fixes any problemsthat are found. Data you have created is not affected.
• To repair a product, ensure that it is selected.• Clear the check boxes for products you do not want to repair.
Click Repair to begin repairing the selected products.
You can repair an individual installation. You cannot repair an administrative imageinstallation; you must reinstall the administrative image.
Serial NumbersSerial numbers, found on the distribution box, associate your computer with the SolidWorksproducts you have purchased.
If SolidWorks products are already installed on your computer, their serial numbers aredisplayed by default.
• Enter your SolidWorks serial number if it is not already displayed.• If you have serial numbers for products that are not included with your SolidWorkslicense, click the product entry underneath Do You Have Other Serial Numbers?and then enter the serial number for that product.
If you have an internet connection, the serial numbers you provide will determine theproducts to which you are entitled as you continue through the installation process.
Because there are multiple ways to purchase SolidWorks products, some serialnumbers can cover two or more products. For example, a SolidWorks serial numbermight enable you to install SolidWorks Simulation without entering a separateSolidWorks Simulation serial number. In addition, some products do not require aserial number. If you have any questions about your serial numbers, contact yourVAR.
Server InstallationThe server products you are attempting to install are listed, with the results of theinstallations.
106
SolidWorks Installation Manager Application Help

Server Installation StatusServer product installations are performed by an external installation application. If youare not currently in that application, you must switch to it to complete the installation.
Click Cancel to stop the server product installations.
Server Installation CompleteThe external installation application has completed successfully.
Click Finish or Next.
• If you are installing other administrative products (for example, a SolidWorksadministrative image), that installation continues.
• If the server product installations were the only installation operation, SolidWorksInstallation Manager closes.
Server Installation Cancelled or FailedIf a server product installation failed or was cancelled after it was begun, servers thatwere not installed are listed.
Click Close or Next.
• If you specified other administrative product installations, SolidWorks InstallationManager will resume.
• If the server product installations were the only installation operation, SolidWorksInstallation Manager closes.
SolidNetWork License ManagerSpecify installation options for the SolidNetWork License Manager server product.
Serial numbersSpecify SolidNetWork License serial numbers. You can specify multiple serial numbers byseparating them using commas.
SolidNetWork serial numbers are different from SolidWorks serial numbers.
Installation locationSpecify the installation location for the SolidNetWork License Manager.
If you are updating an existing SolidNetWork License Manager, you must install tothe existing installation location.
For more informationFor details about installing, configuring, and using SolidNetWork License Manager, seeAdministering Licenses Using a SolidNetWork License Manager on page 66.
SummarySolidWorks Installation Manager has all of the information needed to complete theinstallation operation.
107
SolidWorks Installation Manager Application Help

Click the action Now button to initiate the installation operation(for example, Install Now, Create Now, Download Now,Modify Now).
To continue:
Click CHANGE for the section you want to change (forexample, Products, Installation Location, Toolbox Options).
To change installationsettings:
Click Cancel to exit SolidWorks Installation Manager withoutchanging installation components.
To cancel:
Click Back to return to a previous page in SolidWorksInstallation Manager.
To revert to a previouspage:
For information about a particular set of installation options (for example, Products,Installation Location, Toolbox Options, and so on):
1. Click CHANGE next to the section for which you want information.
2. In the detail page that appears, click Help to get information about thoseinstallation option settings.
System Check WarningsSystem Check reported issues that could impact how you continue with the installation.In most cases, you should be able to proceed with SolidWorks Installation Manager.
The warnings you can encounter at this stage are listed below with suggestions abouthow to proceed.
The Installation Manager was not able to check for newversions because it could not validate your serial number.
SerialNumberValidationProblems
If you are connected and entered a valid serial number, thiscould indicate a temporary problem on our server. Try againlater.
Serial Number Validation: The Installation Manager could notvalidate your serial number to determine which products youare entitled to install. You will still be able to choosethe products you want to install, but you will not be ableto download any installation files. You will need to providea complete set of download source files or a DVD from whichto install.
Resolution:
• Check the internet connection. The serial number check requires avalid internet connection.
• Check that the serial number you entered is valid for the productsyou are trying to install.
• Some installations require that you have a valid subscription in placeat the time the version was released. For details, consult yourSolidWorks reseller.
108
SolidWorks Installation Manager Application Help

• In most cases, you can proceed with the installation, provided youare installing from a DVD or a previously downloaded file set.
Newer Version Available
New Versions Available
NewerVersionAvailable
A newer version of this product is available for download.
Resolution: When performing a Check for Updates operation, theinstallation might prompt you to install a later version that is availableby downloading from SolidWorks. You can continue this operation usingthe version you initially specified or you can download this newer versionand continue the operation using that version instead.
This is the latest version available. Click Next to continue.
No New Downloads Available
LatestVersionAvailable
Resolution: This message can appear when you are checking for updatesduring an installation or modification. It indicates that you are currentlyinstalling (or have installed) the latest version available.
Internet Connection: The Installation Manager could notconnect to the SolidWorks server to determine which products
InternetConnectionProblems you are entitled to install. You will still be able to choose
the products you want to install, but you will not be ableto download any installation files. You need to provide sourcefiles on DVD or a previously downloaded file set.
Unable to Check for New Versions
The Installation Manager was not able to check for newversions because it could not connect to the server.
Resolution:
• Check the internet connection.• You can proceed with the installation, provided you are installing froma DVD or a previously downloaded file set.
Hole Wizard/Toolbox OptionsIf SolidWorks Toolbox is installed, SolidWorks includes a standard library of hole typesand hardware.
For details about configuring, extending, and using SolidWorks Toolbox, click Help >Toolbox Help in SolidWorks.
To view this help, you might have to start the Toolbox add-in, using Tools >Add-Ins.
Before using a SolidWorks Toolbox, make sure it is properly configured according to yourcompany or group policy. In many cases, a group will configure and maintain a centralToolbox. Check with the SolidWorks administrator for guidance on how to specify a Toolboxduring SolidWorks installation.
109
SolidWorks Installation Manager Application Help

You can change the selected SolidWorks Toolbox after installation. In SolidWorks, clickTools > Options. On the System Options tab, click Hole Wizard/Toolbox.
The following sections describe all options you can encounter on this screen for allconfigurations. The actual Toolbox options you see depends on the pre-existing SolidWorksand Toolbox configurations on this computer and SolidWorks Installation Manager choicesyou have specified to this point.
Create a new new-version ToolboxCreate a new version of SolidWorks Toolbox on this computer.
Any existing Toolboxes on this computer are not modified.
This option appears in all installation scenarios except creating an administrative image.
Reference or upgrade an existing ToolboxUse an existing Toolbox. Click Browse to specify the location of the Toolbox you wantto use with this installation.
• If the Toolbox is configured for a previous SolidWorks major release version, it isupgraded to this version. Any customizations made to that Toolbox are preserved inthe upgraded Toolbox.
Upgrading a Toolbox to a new SolidWorks major release version makes that Toolboxincompatible with computers running prior major release SolidWorks versions.
• If the Toolbox is configured for this SolidWorks version (as might be the case if youspecify a shared network Toolbox that has already been upgraded), no upgrade to thatToolbox occurs.
• If you are upgrading a Toolbox in an Enterprise PDM environment, additional proceduresare required. For details, see Upgrading Toolbox in a SolidWorks Enterprise PDMEnvironment on page 112.
This option appears in all installation scenarios except creating an administrative image.
Upgrade a previous-version ToolboxCopy a Toolbox configured for a previous major release version to a new location andupgrade that copy to this version.
This option appears if a previous SolidWorks major release version is installed on thiscomputer, but you have chosen not to upgrade that installation to this release.
The purpose of this option is to upgrade a Toolbox for a previous major releaseSolidWorks version that is installed without impacting users that are using the olderversion of Toolbox.
If you are upgrading a Toolbox in an Enterprise PDM environment, additional proceduresare required. For details, see Upgrading Toolbox in a SolidWorks Enterprise PDMEnvironment on page 112.
Upgrade this installed previous-version ToolboxUpgrade this Toolbox to the newer version.
Upgrading a Toolbox to a new SolidWorks major release version makes that Toolboxincompatible with computers running prior major release SolidWorks versions.
110
SolidWorks Installation Manager Application Help

This option appears if you are upgrading a previous SolidWorks major release version tothis version and a Toolbox configured for that release is found on this computer.
If you are upgrading a Toolbox in an Enterprise PDM environment, additional proceduresare required. For details, see Upgrading Toolbox in a SolidWorks Enterprise PDMEnvironment on page 112.
Use the installed current-version ToolboxSolidWorks Installation Manager has detected on this computer a Toolbox configured forthis SolidWorks major release version.
If you select this option, SolidWorks will use this Toolbox. No upgrade occurs.
This option appears if a previous SolidWorks major release version is installed on thiscomputer, but a Toolbox is configured for this version. This might occur if a shared Toolboxis created on a computer that is still running an older SolidWorks version.
Specify the Toolbox location for the client computerSpecify a network or directory location as the default Toolbox location when clients installfrom an administrative image.
If the location contains a Toolbox configured for a previous SolidWorks major releaseversion at the time the client installation occurs, SolidWorks Installation Managerupgrades that Toolbox.
This option appears when you are creating a new administrative image.
Upgrade or use the Toolbox referenced in the existing image forthe client computerUse the Toolbox location specified in an existing administrative image you are updating.
If the location contains a Toolbox configured for a previous SolidWorks major releaseversion at the time the client installation occurs, SolidWorks Installation Managerupgrades that Toolbox.
Select a different Toolbox location for the client computerSpecify a different Toolbox location from that specified in an existing administrative imageyou are updating.
If the location contains a Toolbox configured for a previous SolidWorks major releaseversion at the time the client installation occurs, SolidWorks Installation Managerupgrades that Toolbox.
Notes About Configuring SolidWorks ToolboxSolidWorks Toolbox is a powerful and complex feature. This topic summarizes someconcepts to consider before configuring a Toolbox using SolidWorks Installation Manager.
Finding More Information About SolidWorks ToolboxFor details about configuring, extending, and using SolidWorks Toolbox, click Help >Toolbox Help in SolidWorks.
111
SolidWorks Installation Manager Application Help

To view this help, you might have to start the Toolbox add-in, using Tools >Add-Ins.
Using a Shared ToolboxWhen you install Toolbox, you can have Toolbox data on the local computer or in a sharednetwork location. Storing Toolbox data in a network location is recommended. By usinga common location, all SolidWorks users share a consistent set of fastener information.
If this is the first time installing, browse to the new shared location where you would liketo install the Toolbox.
Upgrading an Existing ToolboxUpgrading a Toolbox to a new SolidWorks major release version makes that Toolboxincompatible with computers running prior major release SolidWorks versions.
If other computers remain at that prior major release and continue to require a Toolboxconfigured for that release, you should make a copy of that Toolbox and upgrade thatcopy. The new SolidWorks installation will upgrade the copy of the Toolbox and theprevious SolidWorks installations will continue using the old Toolbox.
Configuring Toolbox AccessAfter installation, when you access Toolbox components SolidWorks checks how you haveconfigured Toolbox and makes suggestions to improve access and performance.
For accessing the shared network Toolbox (recommended), use a UNC path to the serveron which the shared Toolbox was installed. For details, see UNC Format on page 113.
An administrator can create a password for Toolbox and set permissions and preferencesfor the workgroup. Restricting access to configuration and setting common preferencesensures consistent Toolbox data.
Upgrading Toolbox in a SolidWorks Enterprise PDM EnvironmentBefore you upgrade the first SolidWorks installation that accesses the Toolbox databasein an Enterprise PDM vault:
1. In Windows Explorer, navigate to the Toolbox folder in the Enterprise PDM vault.2. Right-click the Toolbox folder and click Get Latest Version.
This enables SolidWorks Installation Manager to verify whether parts need to beupdated.
3. Check out the SWBrowser.mdb Toolbox database file from:
Vault\Toolbox_folder\lang\Language
The database file must be checked out so SolidWorks Installation Manager can updatethe Toolbox.
4. After upgrading, check in the Toolbox folder to check in the database file and any newToolbox parts.
The Toolbox library in the vault has now been upgraded.
For subsequent SolidWorks upgrades, before initiating the upgrade, Enterprise PDM clientsmust get the latest version of the vault Toolbox folder (using Get Latest Version). Thisenables SolidWorks Installation Manager to verify that the files are up to date.
112
SolidWorks Installation Manager Application Help

For details about Toolbox configuration in SolidWorks Enterprise PDM, see ConfiguringToolbox in the SolidWorks Enterprise PDM Administration Tool help.
UNC FormatUniform (or Universal) Naming Convention format specifies a file name syntax format todescribe a shared file location.
\\server\volume\path
For example:
\\Disk_Server\SolidWorks\AdminImage
Uninstall ProductsWhen you select Remove from the Add or Remove Programs list, this screen displaysthe SolidWorks products (with version numbers) that can be uninstalled by this versionof SolidWorks Installation Manager.
Select the SolidWorks products to uninstall. By default, all SolidWorks products for theselected release are specified for uninstall.
• To uninstall a product, ensure that it is selected.
If you uninstall all products, SolidWorks Installation Manager is also uninstalled.
• To retain a product, clear its check box.
If you retain any product, SolidWorks Installation Manager is not removed from theControl Panel Add or Remove Programs list.
To remove the selected products, click Remove Items .
When you click Remove Items, SolidWorks Installation Manager starts removingproducts immediately.
Workgroup PDM Server OptionsSpecify installation options for the SolidWorks Workgroup PDM server product.
Installation LocationSpecify the installation location for the Workgroup PDM server products.
Products to installSpecify which Workgroup PDM server products to install:
Specify the location for the Workgroup PDM Vault data. AWorkgroup PDM Viewer license must be installed with the vaultto enable the Viewer.
Workgroup PDM Vault
When installing the Workgroup PDM Viewer, you must specifythe name or IP address of the Workgroup PDM Vault computerthat the Viewer will access.
Workgroup PDMViewer
113
SolidWorks Installation Manager Application Help

A license for Workgroup PDM API is included with the licensesof SolidWorks clients and Explorer clients. Check-in APIs requireclient licenses.
Workgroup PDM API
For more informationFor details about installing Workgroup PDM, see Workgroup PDM on page 56.
For details about using Workgroup PDM, see Workgroup PDM in SolidWorks Help.
114
SolidWorks Installation Manager Application Help


![Giao trinh-solidwork[bookbooming.com]](https://static.fdocuments.net/doc/165x107/5596decd1a28abbc408b45d8/giao-trinh-solidworkbookboomingcom.jpg)


![SolidWork Module [UTHM]](https://static.fdocuments.net/doc/165x107/577ccf271a28ab9e788f0220/solidwork-module-uthm.jpg)


