
SolarWinds Network Configuration Manager Getting Started …api/deki/files/28214/Network... ·...
56
GETTING STARTED GUIDE Network Configuration Manager Version 7.7 Last Updated: Monday, October 9, 2017 Retrieve the latest version from: https://support.solarwinds.com/@api/deki/files/28214/OrionNCMGetStartedGuide.pdf
Transcript of SolarWinds Network Configuration Manager Getting Started …api/deki/files/28214/Network... ·...

GETTING STARTED GUIDE
Network ConfigurationManagerVersion 7.7
Last Updated: Monday, October 9, 2017
Retrieve the latest version from: https://support.solarwinds.com/@api/deki/files/28214/OrionNCMGetStartedGuide.pdf

Copyright © 2017 SolarWinds Worldwide, LLC. All rights reserved worldwide.
No part of this document may be reproduced by any means nor modified, decompiled, disassembled, published or distributed, in whole or in part, or translated to any electronic medium or other means without the written consent of SolarWinds. All right, title, and interest in and to the software and documentation are and shall remain the exclusive property of SolarWinds and its respective licensors.
SOLARWINDS DISCLAIMS ALL WARRANTIES, CONDITIONS OR OTHER TERMS, EXPRESS OR IMPLIED, STATUTORY OR OTHERWISE, ON SOFTWARE AND DOCUMENTATION FURNISHED HEREUNDER INCLUDING WITHOUT LIMITATION THE WARRANTIES OF DESIGN, MERCHANTABILITY OR FITNESS FOR A PARTICULAR PURPOSE, AND NONINFRINGEMENT. IN NO EVENT SHALL SOLARWINDS, ITS SUPPLIERS, NOR ITS LICENSORS BE LIABLE FOR ANY DAMAGES, WHETHER ARISING IN TORT, CONTRACT OR ANY OTHER LEGAL THEORY EVEN IF SOLARWINDS HAS BEEN ADVISED OF THE POSSIBILITY OF SUCH DAMAGES.
The SOLARWINDS and SOLARWINDS & Design marks are the exclusive property of SolarWinds Worldwide, LLC and its affiliates, are registered with the U.S. Patent and Trademark Office, and may be registered or pending registration in other countries. All other SolarWinds trademarks, service marks, and logos may be common law marks, registered or pending registration in the United States or in other countries. All other trademarks mentioned herein are used for identification purposes only and may be or are trademarks or registered trademarks of their respective companies.
Version 7.6, revised 10/9/2017
page i

Table of Contents
How do I get started with SolarWinds NCM? 1
Prerequisites 2
Product terminology 2
Populate Solarwinds NCM with devices 3
Discovery for SolarWinds NCM 3
Add devices to SolarWinds NCM 4
Manage network change 7
Ways to edit configs 7
Scripts 7
Templates 8
Back up a config manually 8
Edit a config using a script 9
Add a config change script 10
Edit a config using a script 11
Verify config changes 12
Edit multiple configs 13
Run an inventory scan on a node 14
Edit a config using a template 15
Execute the banner change template 16
Verify config changes 19
Edit multiple nodes 19
Import a change template from THWACK 20
Network troubleshooting and remediation 23
Troubleshoot a network issue caused by a config change 23
Review the Active Alert Details page 23
GETTING STARTED GUIDE: NETWORK CONFIGURATION MANAGER
page ii

Identify root cause of the problem 24
Revert a config 26
Learn more 28
How was it done? Troubleshoot a network issue caused by a config change 28
Create a path to NetSuite 28
Monitor nodes on a path 30
Create a NetPath™ alert for NetSuite 32
Real-time change detection 35
What is real-time change detection? 35
Real-time change detection requirements 35
Learn more 36
Configure a Cisco device to send syslog messages 36
Next step 38
Configure alerts and filters triggered by syslog and SNMP trap messages 38
Set the syslog rule 39
Next step 39
Configure SolarWinds NCM for real-time change detection 39
Access real-time change detection settings 39
Enter device login information 41
Configure config download and notifications 41
Enable real-time config change notifications 43
Reporting 44
Uses of inventory reports 44
Run an inventory report 45
Schedule a report 46
Compliance 51
Audit your Cisco routers 51
page iii

How do I get started with SolarWinds NCM?Welcome to the SolarWinds Network Configuration Manager (NCM) Getting Started Guide.
Ensure your long term success with SolarWinds NCM by following the guidelines described in this guide. Depending on your workload, getting started with NCM should take you one week or less.
To get started with SolarWinds NCM, complete the following tasks.
Install SolarWinds NCM.
Use the SolarWinds Orion Installer to prepare the environment and install SolarWinds NCM.
Populate NCM with devices.
For NCM to manage your device configs, you need to discover those network devices and add them to Orion for monitoring.
Manage network change.
Understand options for editing configs. Learn how to manually back up a config, edit one or more configs with a script, run an inventory scan, and edit a config using a config change template.
Troubleshoot a network problem caused by a config change.
Get a walk-through of investigating and correcting a network outage caused by a config change, and learn what was configured to enable that type of monitoring and troubleshooting.
Configure real-time change detection.
Get instant notification through email whenever a change occurs to any of your device configurations. Real-time change detection helps you troubleshoot the root cause of network performance issues and identify unauthorized changes.
Run and schedule inventory reports.
Use NCM inventory reports to access up-to-date device information and to manage the inventory of your network infrastructure. Learn how to run and schedule device inventory reports.
Ensure compliance.
Use the NCM compliance policy reports to verify and maintain compliance within your network. Learn how to use preconfigured reports to conduct a compliance audit.
Existing customers: Access your licensed software from the SolarWinds Customer Portal.
If you need implementation help, contact our Support Geeks. Read this SolarWinds Customer Support article to learn how to properly open a support case and get your case the right level of visibility.
page 1

Evaluators: If you are evaluating SolarWinds NCM, download a free 30-day evaluation. The evaluation version of SolarWinds NCM is a full version of the product, functional for 30 days. After the evaluation period, you can easily convert your evaluation license to a production license by obtaining and applying a license key. If you need assistance with your evaluation, contact [email protected].
PrerequisitesThis getting started guide assumes that you have:
l Purchased or are evaluating NPM and NCM. l Installed NPM and are adding NCM to your SolarWinds Orion deployment. l Completed the NPM Getting Started Guide. There are some very important principles and skills that
you learn in the NPM Getting Started Guide, so SolarWinds highly encourages you to work through that content.
Product terminologyOrion Platform: The common backend platform used by the SolarWinds Orion suite of products, including NPM, SAM, NCM, NTA, and more. The platform provides the backbone for navigation, settings, and common features like alerts and reports. It also provides a consistent look-and-feel across products, giving you a “single pane of glass” for your Orion monitoring tools.
Orion Web Console: The web interface that you use to access NCM and other products that run on the Orion Platform. This interface is used to view, configure, and manage all of your monitored objects.
Check out this video on navigating the Web Console.
Orion Application Server: A Windows server that runs the Orion Web Console and collects data from monitored objects. Also called the Orion Main Poller.
Orion Database Server: A Windows SQL server that should be hosted on a dedicated server in a production environment, separately from the Orion Application Server. It stores Orion configuration data and all collected performance and syslog data.
Polling Engine: A polling engine controls polling job scheduling, data processing, and queries your monitored devices for performance metrics such as CPU, memory, and up or down status. Additional Polling Engines can be licensed to provide additional scalability and capacity. By default, the Orion Server provides one polling engine (often referred to as the main polling engine).
GETTING STARTED GUIDE: NETWORK CONFIGURATION MANAGER
page 2

Populate Solarwinds NCM with devicesThis section includes the following topics:
l Discovery for SolarWinds NCM l Add devices to SolarWinds NCM
Discovery for SolarWinds NCMFor NCM to manage your device configs, you need to discover those network devices and add them to Orion for monitoring.
l If you completed the Network Performance Monitor Getting Started Guide, you discovered the routers, switches, and firewalls that you want to manage with NCM. There is no discovery specific to NCM.
l If you have not discovered these types of network devices, discover your network, add discovered devices to Orion, and then return to the Network Configuration Manager Getting Started Guide so you can add those devices to NCM.
SolarWinds recommends that you begin by discovering a limited number of core routers and switches so that you can learn how to manage them with NCM. Then you can add more devices to scale your deployment.
If you are unsure if you discovered any network devices, log in to NPM and click My Dashboards > Network > Network Summary. The All Nodes managed by NPM resource lists all network devices discovered and added to Orion for monitoring.
The examples in this guide use the Tex-3750.aus.lab Cisco router to illustrate how to back up and make changes to a config.
page 3

Add devices to SolarWinds NCMAfter you discover and add devices to the Orion platform for monitoring, you also need to add the devices to NCM. When you add a device to NCM, you configure a connection profile that establishes a line of communication between NCM and the node you want to manage. Communication is established by Telnet or SSH protocols.
Before you begin:
l Locate the login credentials for the node you want to add to NCM. l Determine whether NCM communicates with the router by way of Telnet or SSH. l Identify the Telnet or SSH ports used for communication.
The following example illustrates how to add the Tex-3750.lab.aus router to NCM for management. This router has already been added to, and is monitored by, the Orion platform and now needs to be added to NCM.
GETTING STARTED GUIDE: NETWORK CONFIGURATION MANAGER
page 4

1. Click Settings > All Settings. 2. Click Manage Nodes.
3. Select all of the devices that you want to bring under NCM management, and click Edit Properties. This example adds the Tex-3750.aus.lab router under NCM management.
4. In the Manage Node(s) with NCM field, select Yes. 5. Enter the connection profile credentials and then click Test to make sure there is a valid connection
between NCM and the router.
6. When a successful connection is made, click Submit. The results are displayed on the Managed Nodes page.
page 5

7. To verify the router was successfully added, view the NCM - Licensed column.
GETTING STARTED GUIDE: NETWORK CONFIGURATION MANAGER
page 6
Manage network changeThis section includes the following topics:
l Ways to edit configs l Back up a config manually l Edit a config using a script l Run an inventory scan on a node l Edit a config using a template
Ways to edit configsEdit configs to streamline complex configuration changes and make bulk changes to multiple nodes. To edit a config, you can manually run a script against a node or use a config change template. Read below about the differences between using a script and a template to decide which method is right for your task. The troubleshooting and remediation section provides an example of a config change that had a major impact on a network and how a system administrator used tools to discover and remedy the problem.
ScriptsExecuting a command script is the most effective way to make a change to a device or group of devices if you already know which components of the device configuration need to be changed. Users who write scripts must know command line interface (CLI). Commands include arguments and logical operations needed to produce a set of CLI commands and execute those commands against each NCM node targeted for a specific config change.
Several tasks can be automated with command scripts. For example:
l Download configuration files l Upload configuration files l Upload IOS images l Update login banners l Update access control lists (ACLs)
Ready to create a script?
page 7
TemplatesConfig change templates include programming language that enable you to create sophisticated config change routines without writing a script. This method removes the chance of incorrect script syntax creating network errors. Change templates use variables based on custom properties and data from the NCM inventory to make a change to a device. You only need to know the variable information of the node that is being changed.
Examples of tasks that can be completed using a template:
l Change VLAN membership by device port l Configure device interfaces based on description l Enable IPSLA for VOIP implementations l Manage a NetFlow collection at the source device
You can either use a config change template provided with NCM out-of-the-box, import a template from THWACK, or create your own.
The framework for creating config change templates depends on the SolarWinds Information Service (SWIS). SWIS is an API that is installed with NCM and interacts with inventory data in the Orion platform database. Any device that is not inventoried in NCM cannot be targeted with a config change template. Each object in a device inventory is a SWIS entity that can be referenced in specific ways within scripts.
Ready to run a template?
Back up a config manuallyBefore you make a change to a config, SolarWinds recommends that you back up the config in case the change is unsuccessful. If the change is unsuccessful, you can revert to the version you backed up. Configs monitored by NCM are scheduled to be automatically backed up each night. You can use that schedule or you can schedule a back up job to run at any time.
SolarWinds recommends the following best practices:
l For configurations that change daily, schedule a daily backup of the config. l Use the real-time change detection feature to automatically back up configs when a change is
made. l At a minimum, back up configs weekly.
For the purposes of this guide, and so that you do not have to wait until the nightly backup job has run, you can manually back up a config.
The following example backs up the running and the startup config for the Tex-3750.aus.lab router.
GETTING STARTED GUIDE: NETWORK CONFIGURATION MANAGER
page 8

1. Click My Dashboard > Configs > Configuration Management. 2. Select the device with the configs you want to back up. 3. Click Download > Running.
4. Click Download > Startup.
5. To verify the config was backed up, click the Transfer Status tab and view the Status column.
Edit a config using a scriptEdit config change scripts to update access lists, modify community strings, or make other configuration changes. Before you write a script, be sure you know the basics of commands, variables, and logical structures. This guide does not address how to write CLI commands.
Scripts are often used to make bulk changes to multiple devices. SolarWinds recommends running a script on one device to test your changes and, if you verify your changes and they are successful, then apply the script to multiple devices.
This topic provides steps on how to add, edit, and verify a config change script for one or more devices.
page 9

Add a config change scriptTo edit a config using a script, you must first add a config change script.
The following example shows how to add a SolarWinds banner config change script.
1. Click My Dashboard > Configs > Configuration Management. 2. Click the Script Management tab. 3. Click Add New Script.
4. Enter the script information and click Save.
GETTING STARTED GUIDE: NETWORK CONFIGURATION MANAGER
page 10

The script is displayed in the Script Management tab.
Edit a config using a scriptThe following example shows how to execute the SolarWinds banner script against a node managed in SolarWinds NCM.
1. Click My Dashboards > Configs > Configuration Management. 2. Select the configuration item to edit and click Execute Script.
page 11
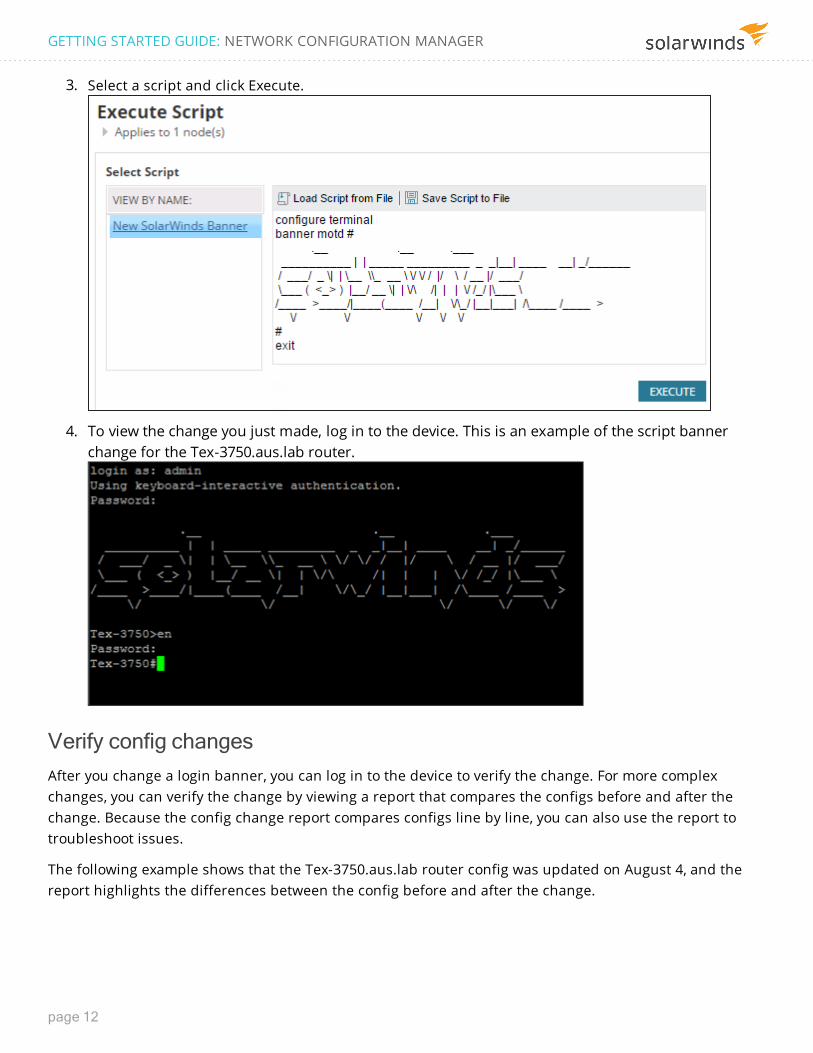
3. Select a script and click Execute.
4. To view the change you just made, log in to the device. This is an example of the script banner change for the Tex-3750.aus.lab router.
Verify config changesAfter you change a login banner, you can log in to the device to verify the change. For more complex changes, you can verify the change by viewing a report that compares the configs before and after the change. Because the config change report compares configs line by line, you can also use the report to troubleshoot issues.
The following example shows that the Tex-3750.aus.lab router config was updated on August 4, and the report highlights the differences between the config before and after the change.
GETTING STARTED GUIDE: NETWORK CONFIGURATION MANAGER
page 12

1. Click My Dashboard > Config > Config Summary. 2. Navigate to the Last 5 Config Changes resource and note the date and time of the config change.
You can click Edit to change the number of configs listed in the resource.
3. To view changes, click the View Change Report link.
Edit multiple configsTo make changes to multiple devices, select multiple configs before you click Execute Script.
page 13

Run an inventory scan on a nodeAn inventory scan queries a node and gathers device information including the model and serial numbers, the operating system version, the number of NIC or interface cards, routing protocols, IP addresses, active ports, and much more. An inventory scan is a prerequisite for creating and running a config change template because the framework for creating config change templates depends on the SolarWinds Information Service (SWIS). SWIS is an API installed with NCM that interacts with inventory data in the Orion platform database. Any device that is not inventoried in NCM cannot be targeted with a config change template.
The information collected from an inventory scan can also be viewed in a number of inventory reports.
You can the choose the type of information collected by NCM for the inventory scan, as well as other settings that help you manage the inventory process. You can perform inventory scans on all of your nodes, node groups, or on a single node.
As a best practice, the system automatically runs a daily inventory scan at midnight. If you have other jobs that run at the same time, you can change the time the inventory scan runs to avoid conflict. To have the latest available information, run an inventory scan before you generate NCM reports.
For the purpose of this guide, and to populate data now, the following example manually runs an inventory scan on the Tex-3750.aus.lab router.
GETTING STARTED GUIDE: NETWORK CONFIGURATION MANAGER
page 14

1. Click My Dashboards > Configuration Management. 2. Select the Tex-3750.aus.lab router and click Update Inventory.
When the inventory scan is complete, the progress bar reads Complete 100%.
3. To view an inventory report, see Run an inventory report.
Edit a config using a templateConfig change templates save time and ensure that changes are consistently applied to devices. Use an out-of-the-box template or create a template.
Templates are often used to make bulk changes to multiple devices. SolarWinds recommends running a template on one device to test your changes and, when you verify your changes are successful, then apply the template to multiple devices.
The example in this section shows how to apply the login banner template for a Cisco router. Other commonly used templates include:
l Change passwords l Change SNMP settings l Enable Netflow l Define ACLs l Define VLAN memberships
Before you begin:
page 15

l Run an inventory scan on a node: if you have just added a device, you must perform an NCM device inventory scan and update device inventories before you can create and run a config change template.
l Back up a config manually: SolarWinds recommends that you back up a config before you make a change so that you can revert to a previous version of the config if the change is not successful.
Execute the banner change templateThis example uses a template to create a restricted access warning in the login banner.
1. Click My Dashboards > Configs > Config Change Template. 2. Select the Change Login Banner template and click Define Variables & Run.
3. Select nodes and click Next.
GETTING STARTED GUIDE: NETWORK CONFIGURATION MANAGER
page 16

4. In the Login Banner field, enter the banner text and click Next.
5. Click Show commands in new window to preview the script.
6. Verify the banner text is correct in the script preview.
page 17

7. Click Execute.
The Transfer Status tab shows the script execution status.
8. To view a change, log in to the device. This is an example of the login banner change for the Tex-3750.aus.lab router.
GETTING STARTED GUIDE: NETWORK CONFIGURATION MANAGER
page 18

Verify config changesAfter you change a login banner, you can log in to the device to verify the change. For more complex changes or changes across multiple configuration items, you can verify the change by viewing a report that compares the configs before and after the change. Because the config change report compares configs line by line, you can also use the report to troubleshoot issues.
The following example shows that the Tex-3750.aus.lab router config was updated on August 4, and the report highlights the differences between the config before and after the change.
1. Click My Dashboard > Config > Config Summary. 2. Navigate to the Last 5 Config Changes resource and note the date and time of the config change.
You can click Edit to change the number of configs listed in the resource.
3. To view changes, click the View Change Report link.
Edit multiple nodesTo make changes to multiple devices, select multiple nodes before you click Execute Script.
If you want to verify changes to multiple devices, review the Status/Details of the Transfer Status tab.
page 19

Import a change template from THWACKSolarWinds NCM ships with preconfigured templates you can use to make common changes to configs. You can also create your own change templates, or import change templates that other SolarWinds customers have created and posted to THWACK.
Creating a change template is not addressed in this guide. For information on creating a change template, see the SolarWinds Network Configuration Manager Administrator Guide.
Before you begin, create a THWACK account.
1. Click My Dashboards > Config Change Templates. 2. On the Config Change Templates page, click Shared Config Change Templates on THWACK.
NCM automatically connects with THWACK and populates the list with shared config change
GETTING STARTED GUIDE: NETWORK CONFIGURATION MANAGER
page 20

templates.
3. Select a template and click Import.
page 21

4. Enter your user name and password, and click Log In.
NCM imports the template and displays it in the list of config change templates. You can now execute the template against one or more nodes.
SolarWinds recommends running a template on one device to test your changes and, when you verify your changes are successful, then apply the template to multiple devices.
GETTING STARTED GUIDE: NETWORK CONFIGURATION MANAGER
page 22
Network troubleshooting and remediationThis section includes the following topics:
l Troubleshoot a network issue caused by a config change l How was it done? Troubleshoot a network issue caused by a config change
Troubleshoot a network issue caused by a config changeChanges to configs can range from simple (using a template to create a login banner) to complex (using a script to change VLAN membership). Errors introduced in complex config changes can result in a network outage. By monitoring your network, you can learn about network problems before they affect your business critical applications. Instant notification of an error is essential to resolving a problem before business is disrupted and support calls are logged.
In the following scenario, a support organization uses NetSuite® as their customer relationship management system. The organization uses NetPath™ to monitor the path from the NetSuite service to the support organization. One day during business hours, a system administrator receives an alert notification email that the NetSuite service is unavailable and needs to investigate and resolve the problem immediately.
The system administrator begins by reviewing the details of the alert.
Review the Active Alert Details pageAn alert is a notification that indicates a problem with a monitored element. There are different options for how to receive an alert. See the NPM Getting Started Guide for more information on alerts.
In an alert notification email, click the provided link to open the Active Alert Details page. This alert is critical and needs to be addressed immediately. The system administrator clicks the link next to Triggered by to open NetPath™ and find if the problem is on an internal monitored device or caused by an external provider.
page 23

Identify root cause of the problem
Check out this video on using NetPath™.
Use NetPath™ to discover and troubleshoot network paths, hop-by-hop, of the networks that you manage and the nodes and links of your providers. NetPath™ provides performance metrics and device details of the nodes, interfaces, and connectors it finds. Point to objects to see more details using the Object Inspector, or drill down on managed nodes.
The color red indicates where on the path there is a problem.
GETTING STARTED GUIDE: NETWORK CONFIGURATION MANAGER
page 24

The system administrator notices the node is:
l Part of the organization's internal network l Experiencing high latency l Showing a recent configuration change
To explore the configuration change, the system administrator clicks Config Change. The system compares the current config to last backed up config.
The config comparison shows that in line 180, an IP address is added to the current config. This routing change prevents traffic from accessing its destination and creates network performance issues.
page 25
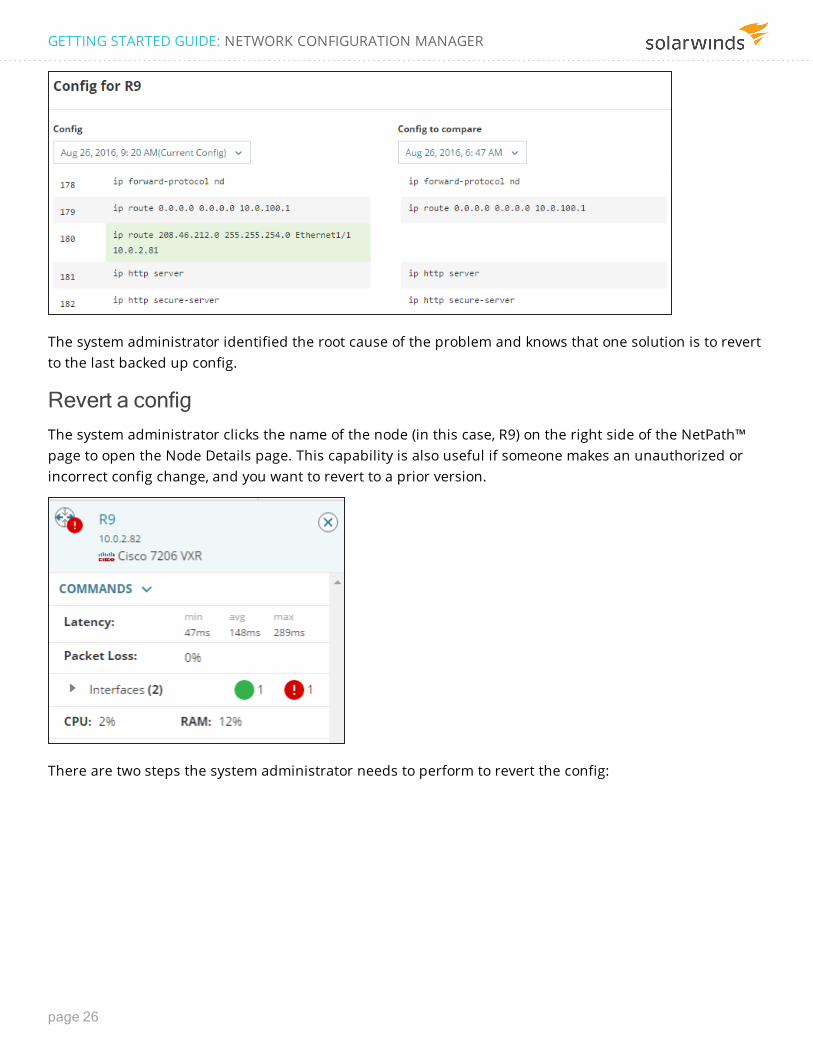
The system administrator identified the root cause of the problem and knows that one solution is to revert to the last backed up config.
Revert a configThe system administrator clicks the name of the node (in this case, R9) on the right side of the NetPath™ page to open the Node Details page. This capability is also useful if someone makes an unauthorized or incorrect config change, and you want to revert to a prior version.
There are two steps the system administrator needs to perform to revert the config:
GETTING STARTED GUIDE: NETWORK CONFIGURATION MANAGER
page 26

1. Click the Configs tab.
2. Select the configuration item to revert back to and then click Upload.
NetPath™ refreshes a path during each polling interval. In this example, the polling interval is 10 minutes. The change to revert the node is made immediately and the service is restored, but NetPath™ does not show the updated path until the next polling interval completes.
page 27

Learn moreFor more information on the setup necessary to replicate the troubleshooting and solution steps in this topic, see How was it done? Troubleshoot a network issue caused by a config change.
How was it done? Troubleshoot a network issue caused by a config changeIn the Troubleshoot a network issue caused by a config change topic, a system administrator finds the root cause of a network problem and reverts a config to resolve the alert. This topic explains the setup necessary to replicate the troubleshooting and solution steps performed by the system administrator.
Create a path to NetSuiteBefore you can monitor, you must first create a new service path. This example creates a path to NetSuite.
GETTING STARTED GUIDE: NETWORK CONFIGURATION MANAGER
page 28

1. Navigate to My Dashboards > Network > NetPath Services. 2. Click Create New Service. 3. Enter the Service Details and click Next.
4. Assign a probe or create a probe.
page 29

5. Click Create.
After the first polling interval, the network path from the probe to the NetSuite service is active. The system administrator knows that all nodes beginning with the number 10 are internal nodes.
l If you are already monitoring internal nodes on the path, you see data about the nodes. In this example, nodes EAST-4506E-CORE and EAST-2821-WAN are monitored.
l If you are not monitoring internal nodes on the path, you can add them. See the Monitor nodes on a path section below. In this example, the system is not monitoring node 10.0.2.82.
Monitor nodes on a pathBefore you begin, ensure that you know the credentials for the nodes you want to monitor.
GETTING STARTED GUIDE: NETWORK CONFIGURATION MANAGER
page 30

1. Click any node on the path that you want to monitor. 2. Click Add this device to Orion.
page 31

3. Enter the node credentials.To learn how to complete the remaining steps for adding a node, see the NPM Getting Started Guide.
Create a NetPath™ alert for NetSuiteThis example shows how to duplicate and edit the out-of-the-box alert Path to Google to create an alert for the new path to NetSuite. When the path to Netsuite breaks, an alert is triggered.
GETTING STARTED GUIDE: NETWORK CONFIGURATION MANAGER
page 32

1. Navigate to the Manage Alert page.
2. On the Properties page, update the name and description of the alert. For example, you can enter Path to NetSuite for the name.
3. On the Trigger Condition page, change Google to NetSuite.
4. Click Next until you reach the Trigger Action page.
page 33

5. Edit the email action so you (or other responsible party) receive a notification email when the alert is triggered.
6. Complete the rest of the alert wizard steps, and then click Submit on the Summary page.
You can review possible errors made to configs before an alert is sent. Enable real-time change detection and receive an email notification whenever there is a change to a config. Real-time change detection also has an option to restrict access to users so you can prevent unauthorized changes to configs.
GETTING STARTED GUIDE: NETWORK CONFIGURATION MANAGER
page 34

Real-time change detectionThis section contains the following topics:
l What is real-time change detection? l Configure a Cisco device to send syslog messages l Configure alerts and filters triggered by syslog and SNMP trap messages l Configure SolarWinds NCM for real-time change detection
What is real-time change detection?The Troubleshoot a network issue caused by a config change section provides an example scenario of a system administrator resolving an alert caused by a config change. If the system administrator had enabled real-time change detection, the config change could have been viewed and resolved before the alert was sent. Real-time change detection provides instant notification through email whenever a change occurs to any of your device configurations.
Real-time notifications are coordinated and sent by Message Center, a built-in syslog server and SNMP trap receiver. The notification provides log information you can use to quickly determine if a configuration change is the cause of a network problem. This access to real-time visibility of your network helps you improve your network security, prevent unexpected downtime or delays, and resolve known errors faster.
Unlike the Config Change Report, changes are detected only on the same configuration type. For example, if you download a startup configuration, make changes, and then upload it as a running configuration, the changes are compared against the previous running configuration. A comparison is not made between running and startup configuration types.
Real-time change detection requirementsReal-time change detection requires:
l A Windows user account with administrative rights. l Network devices configured to send syslog or SNMP trap messages when configurations change. l The SolarWinds syslog service account must have read-write access to the Orion platform database.
For example, if your SQL Server resides on the same server as SolarWinds NCM, consider using a local administrator account for the SolarWinds syslog service.
l The SolarWinds trap service account must have read-write access to the Orion platform database. For example, if your SQL Server resides on the same server as SolarWinds NCM, consider using a local administrator account for the SolarWinds trap service.
page 35

l The SolarWinds syslog and trap services must be configured to run as administrator so the scheduled jobs are processed correctly. For detailed steps, see Run syslog and trap services as administrator.
l Ensure the SNMP trap service is running. If the SNMP trap service is not listed as a running service in the service control manager (services.msc), you can enable SNMP in the Management and Monitoring Tools through Add/Remove Windows Components in the Add/Remove Programs application.
Learn moreThe following topics walk you through the process of enabling real-time change detection fo ra Cisco router:
1. Configure a Cisco device to send syslog messages. 2. Configure alerts and filters triggered by syslog and trap messages. 3. Configure SolarWinds NCM for real-time change detection.
The example in this guide enables a Cisco router to send syslog messages. To learn how to enable other devices, see configure real time change detection.
Configure a Cisco device to send syslog messagesReal-time change detection provides instant notification through email whenever a change to any of your device configurations occurs. Real-time change detection requires you to enable your device to send syslog or SNMP trap messages.
Cisco devices send trap messages when a user enters config mode, but not when the user exits. To address this scenario, SolarWinds recommends using the syslog option for setting up real-time change detection.
The following example shows how to use a config change template to enable syslog messaging on the Tex-3750.aus.lab router.
GETTING STARTED GUIDE: NETWORK CONFIGURATION MANAGER
page 36

1. Click My Dashboards > Configs > Config Change Templates. 2. Select Enable Syslog - Cisco IOS, and click Define Variables & Run.
3. Select the device on which you want to enable syslog, and click Next.
4. Enter the IP address of the router, and select a Severity level.You can choose any logging severity value.
page 37

5. Click Next.
6. After the system generates the script, click Execute.
Next stepThe next step in enabling real-time change detection is to configure alerts and filters triggered by syslog and trap messages.
Configure alerts and filters triggered by syslog and SNMP trap messagesSolarWinds NCM uses a built-in syslog server and SNMP trap receiver to notify you when it detects configuration changes to your monitored devices. A syslog rule locates syslog messages and compares the current config status with the previously backed-up config version. SolarWinds NCM notifies you of any differences between the configs. Using the information provided, you can quickly determine if a configuration change is the cause of a network problem.
GETTING STARTED GUIDE: NETWORK CONFIGURATION MANAGER
page 38

Set the syslog rule
1. Log in to the Orion Server as an administrator. 2. In the SolarWinds program folder, start the Syslog Viewer. 3. Click View > Alerts/Filter Rules.
4. Select NCM Rule: Cisco IOS Realtime Change Notifications, and click OK. SolarWinds NCM is now configured to accept syslog messages generated by the Cisco router.
Next stepThe next step in enabling real-time change detection is to configure SolarWinds NCM for real-time change detection
Configure SolarWinds NCM for real-time change detectionAfter you Configure a Cisco device to send syslog messages and Configure alerts and filters triggered by syslog and SNMP trap messages, you can configure SolarWinds NCM for real-time change detection.
Access real-time change detection settingsThe real-time change detection settings page lists the required steps to configure real-time change detection.
page 39
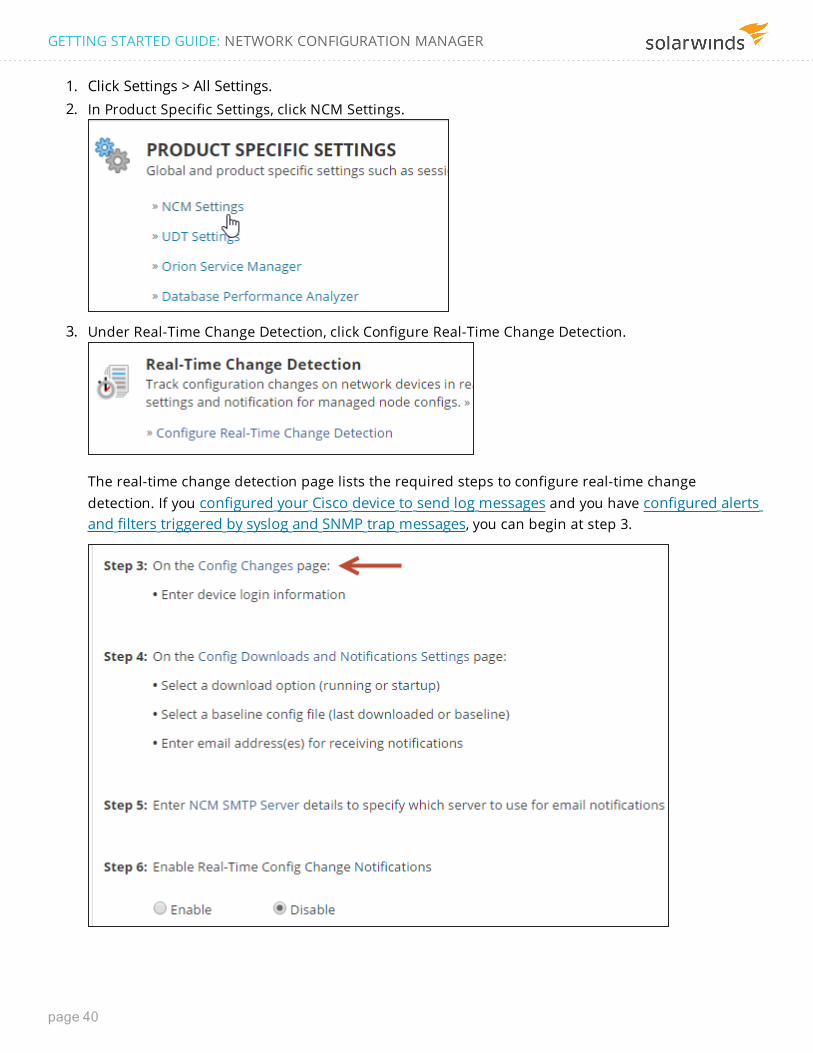
1. Click Settings > All Settings. 2. In Product Specific Settings, click NCM Settings.
3. Under Real-Time Change Detection, click Configure Real-Time Change Detection.
The real-time change detection page lists the required steps to configure real-time change detection. If you configured your Cisco device to send log messages and you have configured alerts and filters triggered by syslog and SNMP trap messages, you can begin at step 3.
GETTING STARTED GUIDE: NETWORK CONFIGURATION MANAGER
page 40

Enter device login informationEnter log in credentials that syslog will use to access devices.
1. Click Config Changes.
2. On the Config Change page, select Enable these account credentials. 3. Enter the account credentials for the devices on which you want to receive real-time change
detection emails.
Configure config download and notificationsUse the Config Download and Notifications page to select the config type to monitor for change, and specify who gets notified when a change is made.
page 41

1. On the Real-Time Change Detection page, click Config Downloads and Notifications Settings.
2. In the Monitor this file type field, select Running or Startup.
3. Under Baseline Config File, select whether you want to compare the changed config against the latest downloaded config or the baseline config.
4. Select email notification options, and click Submit.
Enter SMTP server detailsUse the SMTP Server page to enter the credentials for an SMTP server used for config change approvals, real-time change detection, and running jobs.
GETTING STARTED GUIDE: NETWORK CONFIGURATION MANAGER
page 42

1. On the Real-Time Change Detection page, click NCM SMTP Server.
2. Enter the email server address and credentials, and click Submit.
Enable real-time config change notificationsAfter you configure the SMTP server, configure the system to send change notification emails.
On the Real-Time Change Detection page, click Enable and then click Submit.
page 43

ReportingThis section includes the following topics:
l Uses of inventory reports l Run an inventory report l Schedule a report
Uses of inventory reportsUse NCM inventory reports to access up-to-date device information and to manage the inventory of your network infrastructure. NCM automatically updates your device information when you import a device. Select and run an inventory report to collect specific information for devices. For example, you can run an inventory scan of all IP addresses inventoried on each device. A searchable list of IP addresses is valuable when trying to locate an address in a large network. You can also set regular inventory scans to gather device information.
Examples of device information collected by network inventory reports include:
l Serial numbers l Port details l IP addresses l Vendors l End-of-life dates l End-of-support dates l Maintenance providers
You can choose from several unique inventory reports, or create your own.
Popular out-of-the-box inventory reports include:
l Cisco 3750 Stack - Physical Entity: displays information about Physical Entities within each device. l Cisco Chassis IDs: displays the Chassis IDs (and serial number if available) for Cisco devices. l Cisco IOS Image Details: shows details about the running IOS in each Cisco device. l Cisco VLANs: displays which VLAN IDs belong to which devices.
To learn more, see:
l Run an inventory report l Schedule a report
GETTING STARTED GUIDE: NETWORK CONFIGURATION MANAGER
page 44

Run an inventory reportGenerate a detailed report of a single node, all nodes, or groups of nodes. Inventory reports provide on-demand information for your devices, such as auditing, routing protocols, end-of-support, and much more.
The following example shows how to:
l Filter all reports in the system to include just the NCM Cisco Inventory reports. l Run the Cisco 3750 Stack - Physical Entity report.
Complete the following steps.
1. Click Reports > All Reports. 2. In the search field, type NCM Cisco Inventory and click Search.
page 45
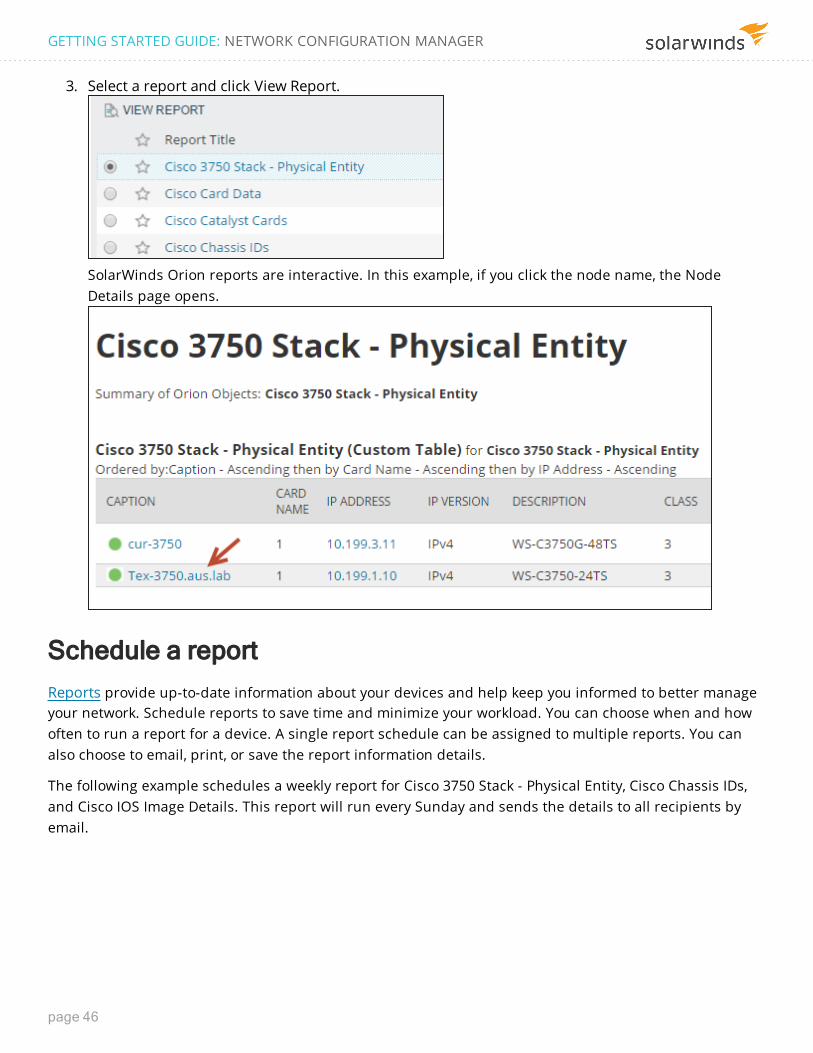
3. Select a report and click View Report.
SolarWinds Orion reports are interactive. In this example, if you click the node name, the Node Details page opens.
Schedule a reportReports provide up-to-date information about your devices and help keep you informed to better manage your network. Schedule reports to save time and minimize your workload. You can choose when and how often to run a report for a device. A single report schedule can be assigned to multiple reports. You can also choose to email, print, or save the report information details.
The following example schedules a weekly report for Cisco 3750 Stack - Physical Entity, Cisco Chassis IDs, and Cisco IOS Image Details. This report will run every Sunday and sends the details to all recipients by email.
GETTING STARTED GUIDE: NETWORK CONFIGURATION MANAGER
page 46

1. Click Reports > All Reports. 2. Click Manage Reports.
3. Click Schedule Report > Create New Schedule.
4. Name your report schedule and provide a description.
5. Click Assign Report. 6. Search for NCM Cisco Inventory reports and select reports. This example shows three assigned
reports.
page 47

7. Select the frequency to run the report.
8. Select the actions you want to execute with assigned reports. This example shows the email option selected.
GETTING STARTED GUIDE: NETWORK CONFIGURATION MANAGER
page 48
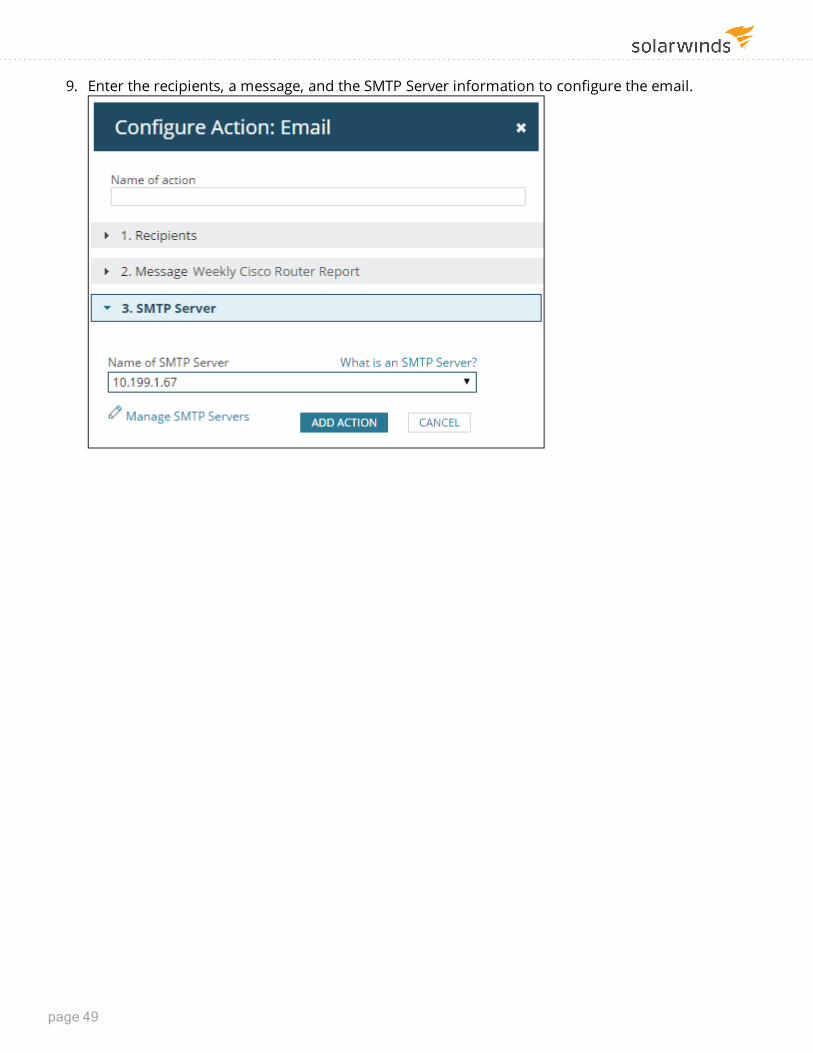
9. Enter the recipients, a message, and the SMTP Server information to configure the email.
page 49

10. Review the report schedule configuration, and then click Create Schedule.
The schedule is displayed in the Schedule Manager tab.
GETTING STARTED GUIDE: NETWORK CONFIGURATION MANAGER
page 50

ComplianceThis section contains the following topic:
l Audit your Cisco routers
Audit your Cisco routersOrganizations must adhere to different policy compliance requirements such as HIPAA, SOX, DISA, STIG, FISMA, and PCI. Use the NCM compliance policy reports to verify and maintain compliance within your network. Policy reports help ensure that your device configurations conform to both internal business practices and federal regulations. You can use out-of-the-box reports, create your own report, or upload a report from THWACK.
The following example shows you how to run a Cisco Security Audit policy report.
1. Click My Dashboards > Configs > Compliance. 2. Select a report and click Update Selected.
When the report is complete the Last Update column displays the date you ran the report.
3. Click the report name to view the Report Details page. The Tex-3750.aus.lab router has one violation for Disable IP Redirects & IP Unreachables.
page 51

4. On the Report Details page, click the violation icon to open the Violation Details page. 5. On the Violation Details page, click Execute Remediation Script on this Node.
6. Run the report again. The violation has now been resolved and is no longer displayed.
GETTING STARTED GUIDE: NETWORK CONFIGURATION MANAGER
page 52


