Solar Oven Module - Rose-Hulman Institute of … · 2018-08-07 · Procedure for Solar Oven Module...
9
Solar Oven Module Team Sunspot Pierce Bartine Andy Beckman Chris Sokoloff Whitney Strain Brooks Swift Warren Whithaus 1
Transcript of Solar Oven Module - Rose-Hulman Institute of … · 2018-08-07 · Procedure for Solar Oven Module...
Solar Oven Module Team Sunspot
Pierce Bartine Andy Beckman Chris Sokoloff Whitney Strain Brooks Swift
Warren Whithaus
1

Learning Objectives This project is aimed at the grand challenge, how to make solar energy more efficient. As energy is a growing concern in today’s world, we want to introduce the topic of solar energy to children. Through introducing this issue/module to a younger audience, we hope to inspire an interest that will lead them to a career in solar technologies or simply in engineering. By the end of this lesson, students will have an understanding of the potential of solar energy to become an efficient source of energy. Students will also be introduced to parts of the scientific method which coincides with the 4th and 5th grade curriculum. Technical Background
The proposed project elucidates the global challenge of transitioning to solar power in a well grounded technical manner. Just as the Grand Challenges description of the solar energy problem elaborates that to make solar economically competitive, engineers must find ways to improve its efficiency [1], this project encourages students to design, build, test and ultimately refine systems in pursuit of greater efficiency. In developing new solar cells, materials and structure can be a bottleneck on efficiency; consequently, urging students to think critically and in this case design an oven with the most optimal layout for heat generation will imprint a hunger for perfection in their upcoming careers as the world’s engineers. This process mirrors the current endeavor of real world engineers to deliver innovative solar photovoltaic and concentrating solar power technologies. [2]
[3]
Solar ovens work by concentrating the heat given off by the sun into one place to let the heat build up, as shown above. Black paper, a well known insulator, allows the oven to absorb more heat when added due to its color. Colors closer in hue to black will absorb heat readily, while those closer to white will absorb much less. Another key component to the solar oven is aluminum foil; this material is known to reflect radiant heat, or heat in the form of light
2

such as from the sun. It is possible to apply aluminum foil to the oven so that sunlight is reflected to one focal point. For example, one may choose to line the inside of a small cup with aluminum foil in a parabolic shape. This causes the sunlight to concentrate onto the chocolate and melt it faster, much like using a magnifying glass to concentrate sunlight to a focal point (seen in the figure to the right). [4]
Chocolate is a product of cocoa beans and thereby contains cocoa butter and ground cocoa solid, among other processing chemicals. Chocolate becomes shiny as it begins to melt; this is due to the cocoa butter melting around 90 degrees F. This first stage of melting can be seen after 5 minutes in the solar oven. Between 104 and 113 degrees F, chocolate fully melts into a thick liquid. [5] This process should take about 10 minutes total, depending on the intensity of the sunlight. Materials and Budget
Item Quantity Overall Cost
Lamp 6 $60.00
Light Bulb (150 watt) 6 $18.00
Chocolate 6 bars $15.00
Pizza Box 6 Free
Aluminum Foil 1 roll $9.00
Black Paper 6 sheets $6.00
Dixie Cups 6 $5.00
Tape 6 $10.00
TOTAL COST $123.00 *NOTE: These are all materials that can be found at any local Walmart.
Procedure for Solar Oven Module SAFETY
The lamps are to be a certain distance away from the pizza box (See Appendix B for details). This set distance is to ensure that there is no accidental fires during the lengthy
3

heating process. Make sure that the students do not look into the light while observing their experiment. SETUP Done by the Instructor(s)
1. Gather the materials (See table above) *NOTE: Materials shown above are for ~30 students; the amount of materials needed will vary with group and class size.
2. Prepare materials for each group. 2.a. Each group should have: 1 pizza box, 1 small cup, 1 piece of chocolate,
1 12”x12” piece of aluminum foil, 1 12”x12” piece of black paper, and 1 roll of tape. *NOTE: Each group may need more aluminum foil or black paper.
3. Prepare lights in an ideal area for students to observe their experiment. 3.a. Leave about one foot or more of space between the light and where the
pizza box will be placed.
3.b. Above is an example picture of the distance and setup of the light and oven.
4. Explanation of material properties. 4.a. Students should be given a short explanation of the properties of black
paper and aluminum foil, such as how black paper absorbs light and aluminum foil reflects it.
5. Distribute handouts listed in Appendix A and B 5.a. These contain a list of questions and requirements for the module.
Students should review the requirements before beginning. 6. Hand out the materials to each group when ready. Below is a picture of all the
materials involved. (bag of pretzels is for the whole class)
4

CONDUCTING THE EXPERIMENT Done by the Students
Make Predictions (See Appendix A)
1. Students need to mark which material will be used for the experiment on the observations sheet.
2. Students should explain why they think that material will melt the chocolate the fastest.
3. Students should then write down how long they think it will take the chocolate to completely melt.
Perform the experiment
1. Consult with other group members about possible designs *NOTE: A sample design will be shown to them
2. Work with each other in order to efficiently create their solar oven WITHIN THE GUIDELINES (See Appendix B)
*NOTE: This is where the students get to be creative 3. After finishing the build, students should walk around and compare their design
with the other groups and write down which design they think will be the first to completely melt the chocolate.
Observations *NOTE: Instructor should provide some type of stopwatch
1. All solar ovens should be placed under the light source at the same time (in order to compare each design’s efficiency)
2. While chocolate is melting, students should keep track of the time elapsed and fill out the ‘Observations’ section of the worksheet (See Appendix B). Once the chocolate has fully melted, the experiment is complete.
3. Students can be given pretzels to dip in the chocolate as a reward, if desired. POSTMODULE QUESTIONS Done by the Students
1. Answer the questions at the bottom of the worksheet (See Appendix B) *NOTE: These questions are meant to challenge the students to think about what has actually happened during their experiment. The goal is to have them think about ways that they could have improved their design, as this is an application that employers in the STEM field use daily.
5

Suggested Schedule
Schedule
Introduction 5 minutes
Design Time 5 minutes
Build 15 minutes
Testing 15 minutes
Reflection/ Extension 10 minutes
Total Time 50 minutes
Engaging Interest In order to engage the students interest a picture oriented presentation should be made. The pictures should include some common applications of solar power and a few more advanced examples. This will appeal to visual learners, and presenting this material will appeal to auditory learners. In order to get them thinking, it would be a good idea to ask them what things they think might use energy from the sun. Since most students learn best through handson experience that’s what the main activity is based upon. The students will be split into groups and will design and build their own solar oven. To keep them actively thinking throughout the activity they will be given a worksheet to make predictions and make observations, see Appendix A. Below there are a variety of resources provided that may interest students in learning more about solar energy. They include websites with information about solar energy, audio to go along, videos, and even a game. All of these different resources allow for all different learners to effectively learn about solar energy if they wish to do so. We hope this will promote the students interest in science, technology, and math.
6

Further Research Sources for Students Energy Kids (U.S. Energy Information Administration): Solar Basics http://www.eia.gov/kids/energy.cfm?page=solar_homebasicsk.cfm eSchoolToday Renewable Energy Sources: Solar Power http://www.eschooltoday.com/energy/renewableenergy/solarenergy.html SolarForward: Solar Kids http://solarforward.com/solarkids/ Teacher Tube: Bill Nye Solar Energy in the Home http://www.teachertube.com/video/solarenergyinthehome96536 Wonderville: Solar Energy Defenders (Game) http://www.wonderville.ca/asset/solarenergydefenders/ Sources Used [1] "Make Solar Energy Economical." NAE Grand Challenges for Engineering. National Academy of Engineering, n.d. Web. 12 Jan. 2015. [2] "Solar." Energy.gov. U.S. Department of Energy, n.d. Web. 13 Jan. 2015. [3]http://www.fsec.ucf.edu/en/consumer/solar_electricity/basics/images/F1_HowCellWorks_401x217.gif [4]https://1.bp.blogspot.com/_KQ3D3SVTmzQ/TEWZzsOPIVI/AAAAAAAAAIE/p1_zLP1NdyU/s1600/ray+diagram.bmp [5] "Chocolate Melt." CraftyBaking. Sarah Phillips Inc., n.d. Web. 09 Feb. 2015.
7
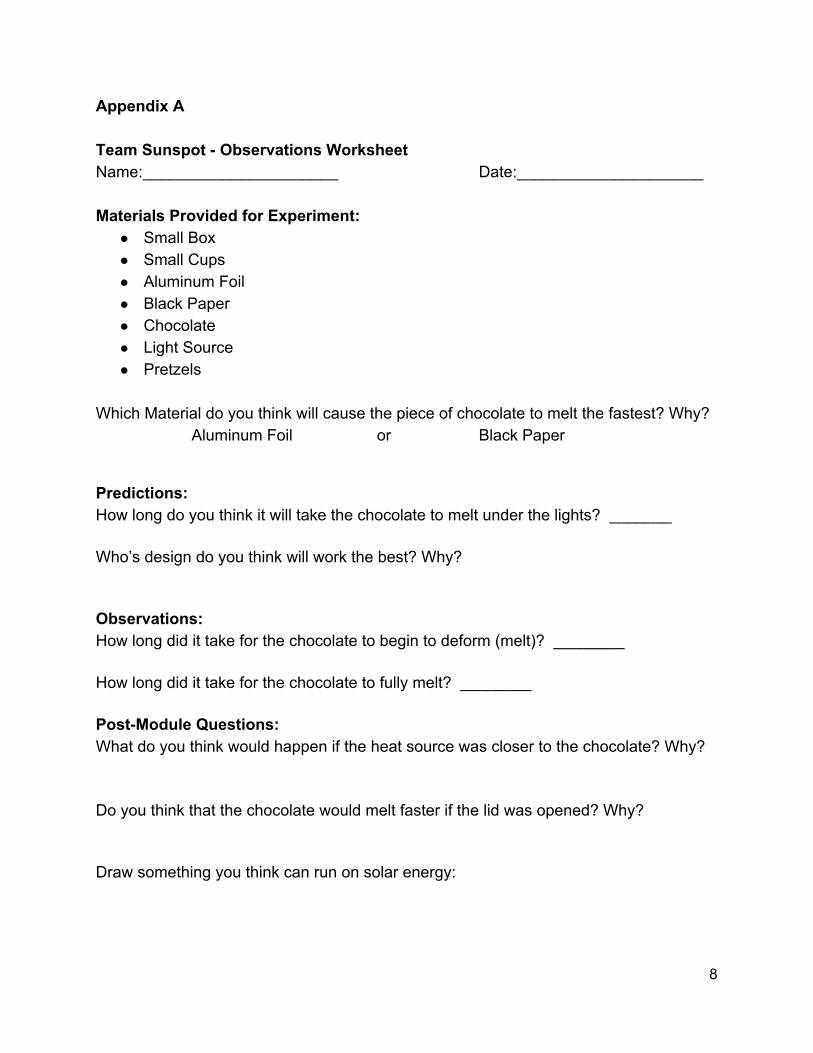
Appendix A Team Sunspot Observations Worksheet Name:______________________ Date:_____________________ Materials Provided for Experiment:
Small Box Small Cups Aluminum Foil Black Paper Chocolate Light Source Pretzels
Which Material do you think will cause the piece of chocolate to melt the fastest? Why? Aluminum Foil or Black Paper
Predictions: How long do you think it will take the chocolate to melt under the lights? _______ Who’s design do you think will work the best? Why? Observations: How long did it take for the chocolate to begin to deform (melt)? ________ How long did it take for the chocolate to fully melt? ________ PostModule Questions: What do you think would happen if the heat source was closer to the chocolate? Why? Do you think that the chocolate would melt faster if the lid was opened? Why? Draw something you think can run on solar energy:
8

Appendix B Solar Oven Building Requirements:
1. Make a Team Name and label your oven
2. Pizza box must be closed when under the lamp
3. Chocolate must be melted inside of the cup
4. Box must be at least a foot away from the lamp
5. Have fun and be creative!
Here is a picture of our solar oven!
9