Software RAID & LVM -
22
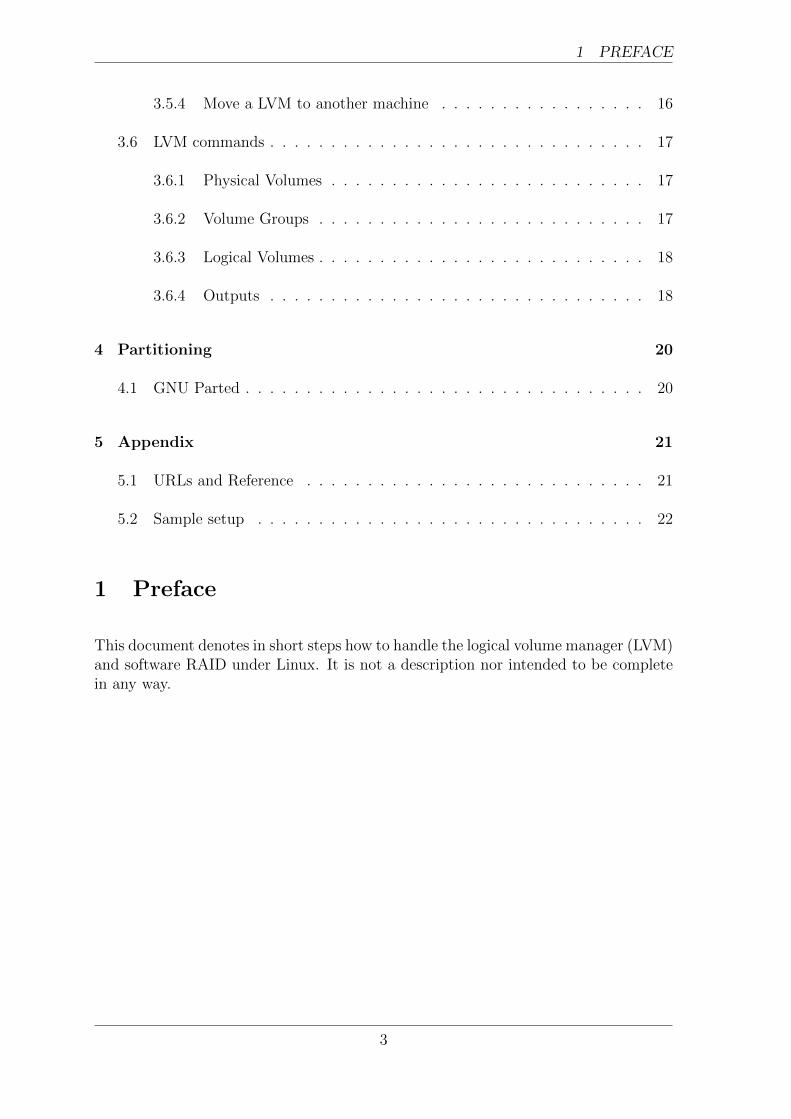
Software RAID & LVM under Linux GNS Systems GmbH Am Gaußberg 2 38114 Braunschweig / Germany Tue 16 Nov 2021, Revision 0.1 Please send comments about this document to: [email protected]
Transcript of Software RAID & LVM -
Software RAID & LVMunder Linux
GNS Systems GmbHAm Gaußberg 238114 Braunschweig / Germany
Tue 16 Nov 2021, Revision 0.1
Please send comments about this document to: [email protected]

Contents
1 Preface 3
2 RAID 4
2.1 RAID levels . . . . . . . . . . . . . . . . . . . . . . . . . . . . . . . . . 4
2.2 Notes . . . . . . . . . . . . . . . . . . . . . . . . . . . . . . . . . . . . . 5
2.3 Performance issues . . . . . . . . . . . . . . . . . . . . . . . . . . . . . 5
2.4 Create a RAID . . . . . . . . . . . . . . . . . . . . . . . . . . . . . . . 6
2.5 Test, check and manage the RAID . . . . . . . . . . . . . . . . . . . . 7
2.6 Handle a Foreign RAID . . . . . . . . . . . . . . . . . . . . . . . . . . 7
2.7 More Shots . . . . . . . . . . . . . . . . . . . . . . . . . . . . . . . . . 8
2.8 Fix Errors . . . . . . . . . . . . . . . . . . . . . . . . . . . . . . . . . . 9
2.8.1 Unsyncronized Blocks . . . . . . . . . . . . . . . . . . . . . . . 9
2.8.2 Broken Drive . . . . . . . . . . . . . . . . . . . . . . . . . . . . 9
2.9 Erase a RAID . . . . . . . . . . . . . . . . . . . . . . . . . . . . . . . . 10
3 Logical Volume Manager - LVM 11
3.1 Create a Logical Volume . . . . . . . . . . . . . . . . . . . . . . . . . . 12
3.2 Resize or Extend a Logical Volume . . . . . . . . . . . . . . . . . . . . 13
3.3 Mount a Foreign Logical Volume . . . . . . . . . . . . . . . . . . . . . 14
3.4 Destroy a LVM . . . . . . . . . . . . . . . . . . . . . . . . . . . . . . . 15
3.5 Move or Modify a LVM . . . . . . . . . . . . . . . . . . . . . . . . . . . 15
3.5.1 Remove a Physical Volume . . . . . . . . . . . . . . . . . . . . . 15
3.5.2 Rename items . . . . . . . . . . . . . . . . . . . . . . . . . . . . 15
3.5.3 Make a snapshot . . . . . . . . . . . . . . . . . . . . . . . . . . 15
1 PREFACE
3.5.4 Move a LVM to another machine . . . . . . . . . . . . . . . . . 16
3.6 LVM commands . . . . . . . . . . . . . . . . . . . . . . . . . . . . . . . 17
3.6.1 Physical Volumes . . . . . . . . . . . . . . . . . . . . . . . . . . 17
3.6.2 Volume Groups . . . . . . . . . . . . . . . . . . . . . . . . . . . 17
3.6.3 Logical Volumes . . . . . . . . . . . . . . . . . . . . . . . . . . . 18
3.6.4 Outputs . . . . . . . . . . . . . . . . . . . . . . . . . . . . . . . 18
4 Partitioning 20
4.1 GNU Parted . . . . . . . . . . . . . . . . . . . . . . . . . . . . . . . . . 20
5 Appendix 21
5.1 URLs and Reference . . . . . . . . . . . . . . . . . . . . . . . . . . . . 21
5.2 Sample setup . . . . . . . . . . . . . . . . . . . . . . . . . . . . . . . . 22
1 Preface
This document denotes in short steps how to handle the logical volume manager (LVM)and software RAID under Linux. It is not a description nor intended to be completein any way.
3
2 RAID
2 RAID
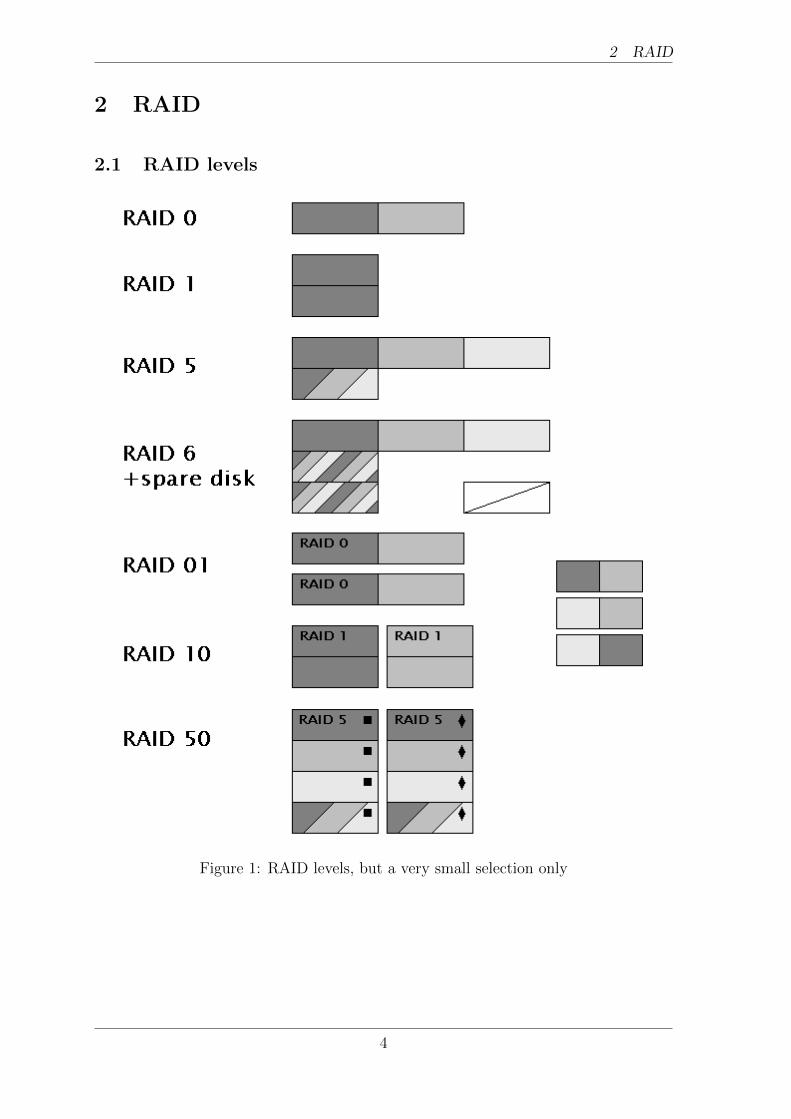
2.1 RAID levels
Figure 1: RAID levels, but a very small selection only
4
2.2 Notes 2 RAID
2.2 Notes
RAID has the following design parameters:
• improve performace or data safety
• be cheap (hardware RAID isn’t)
• deliver devices bigger than the underlying hard drives
The most more complicated RAID Levels are available in hardware only. Linux soft-ware RAID supports at least the levels: 0, 1, 5, 6 and a few more.
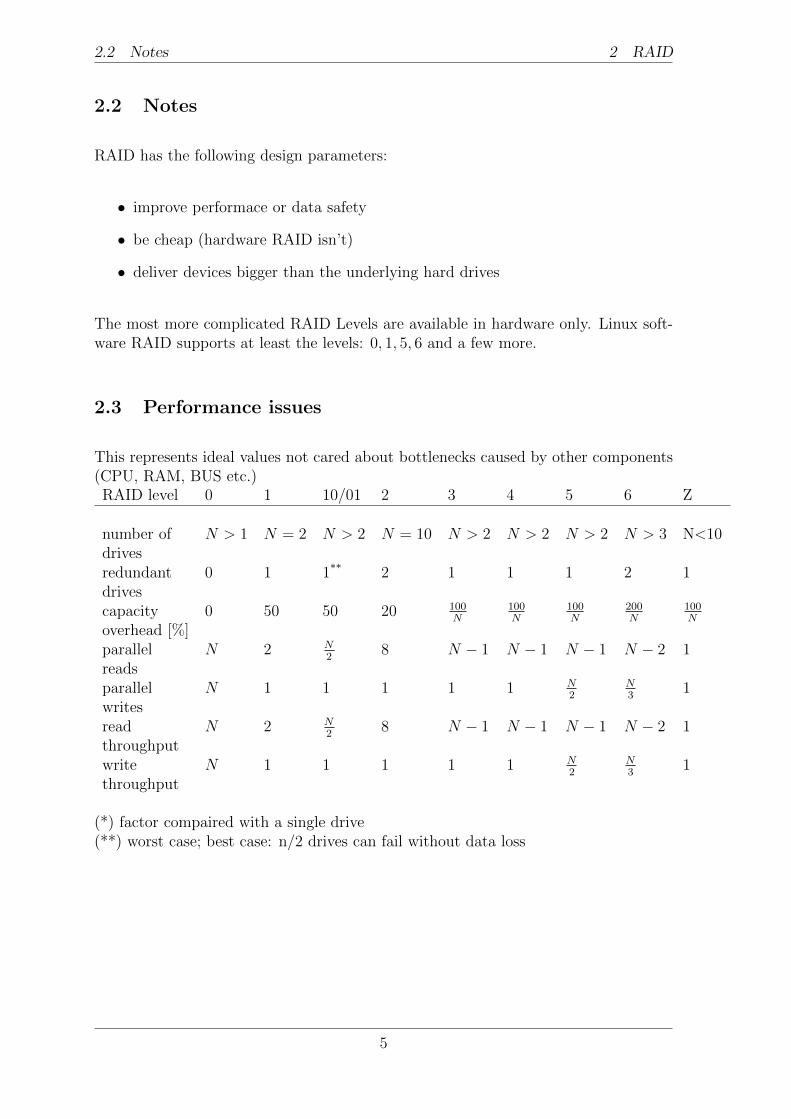
2.3 Performance issues
This represents ideal values not cared about bottlenecks caused by other components(CPU, RAM, BUS etc.)RAID level 0 1 10/01 2 3 4 5 6 Z
number of N > 1 N = 2 N > 2 N = 10 N > 2 N > 2 N > 2 N > 3 N<10drivesredundant 0 1 1** 2 1 1 1 2 1drivescapacity 0 50 50 20 100
N100N
100N
200N
100N
overhead [%]parallel N 2 N
28 N − 1 N − 1 N − 1 N − 2 1
readsparallel N 1 1 1 1 1 N
2N3
1writesread N 2 N
28 N − 1 N − 1 N − 1 N − 2 1
throughputwrite N 1 1 1 1 1 N
2N3
1throughput
(*) factor compaired with a single drive(**) worst case; best case: n/2 drives can fail without data loss
5
2.4 Create a RAID 2 RAID
2.4 Create a RAID
1. install the raid utils: mdadm
# apt-get install mdadm
# rpm -ivh mdadm-1.12.0-2.x86_64.rpm (the exact version doesn’t mat-ter)
# yum install mdadm
2. take two identical hard drives: /dev/sdb and /dev/sdc and prepare them
• dd if=/dev/zero of=/dev/sdb count=1 bs=512
• # fdisk /dev/sdb
– n create a new partition - default values: one partition per disk
– t set the RAID-signature: fd
– w write the changes to disk and exit
and repeat this step for the second disk
3. create the RAID
• make sure that the RAID daemons are started. Under Debian look for
/etc/default/mdadm
and look for AUTOSTART - however you’ll see if the RAID isn’t up yet.
• RAID-0: stripe
# mdadm -C /dev/md0 -a yes -l 0 -n 2 /dev/sdb1 /dev/sdc1
• RAID-1: mirror
# mdadm -C /dev/md0 -a yes -l 1 -n 2 /dev/sdb1 /dev/sdc1
Note:# mdadm -D /dev/md0 of the new array need to show ”State: clean” and”spare rebuilding” for the last drive in the list. If the status is ”clean,degraded” and it shows one removed and one spare drive instead then youneed to run # mdadm --manage /dev/md0 --remove /dev/sdX
# mdadm --manage /dev/md0 --add /dev/sdX
• RAID-5: stripe with one parity disk
# mdadm -C /dev/md0 -a yes -l 5 -n 3 /dev/sdb1 /dev/sdc1 /dev/sdd1
• RAID-5+1: stripe with one parity disk and one spare disk
# mdadm -C /dev/md0 -a yes -l 5 -n 5 -x 1 /dev/sd{b,c,d,e,f}1
4. fix the configuration
• /etc/mdadm/mdadm.conf:
DEVICE /dev/sdb1 /dev/sdc1
• # mdadm -Dvb /dev/md0 >> /etc/mdadm/mdadm.conf
-Dvb: --brief --detail --verbose
5. finish
6
2.5 Test, check and manage the RAID 2 RAID
• # mkfs.ext3 /dev/md0
• /etc/fstab:
/dev/md0 /usr2 ext3 defaults 0 0
• # /sbin/reboot
• at boot time:
mdadm --assemble /dev/md0 /dev/sdb1 /dev/sdc1
Debian: /etc/default/mdadm AUTOSTART=true
2.5 Test, check and manage the RAID
• monitor with:
# mdadm; dmesg
# mdadm -D /dev/md0
# cat /proc/mdstat
• simulate a disk failure:
# mdadm /dev/md0 -f /dev/sdb1
• remove a drive (p.e. to boot after a disk failure)
# mdadm /dev/md0 -r /dev/sdb1
• restore the RAID (p.e. after exchanging the broken drive /dev/sdb):
# mdadm /dev/md0 -a /dev/sdb1
• disassemble a RAID:
# mdadm -S /dev/md0
2.6 Handle a Foreign RAID
Assume a system crash and boot a live medium, p.e. the grml-CD (http://grml.org).To find the RAIDs on the machine use:
# mdadm -D --scan
Look at the RAIDs p.e. with
# mdadm -D /dev/md0
Look for the configuration file under /etc: mdadm.confCheck the RAID device with
# fdisk -l /dev/md0
7
2.7 More Shots 2 RAID
Try to mount it if it should contain a file system or continue with LVM.
2.7 More Shots
Stop array
# mdadm --stop /dev/md0
Start array
If the creation command was p.e.:
# mdadm -C /dev/md0 -l 5 -n 3 /dev/sda1 /dev/sdb1 /dev/sdc1
Run
# mdadm --assemble /dev/md0 /dev/sda1 /dev/sdb1 /dev/sdc1
Easy
# mdadm --assemble --scan
Targeted
# mdadm --scan --assemble --uuid=a26bf396:31389f83:0df1722d:f404fe4c
8
2.8 Fix Errors 2 RAID
2.8 Fix Errors
2.8.1 Unsyncronized Blocks
/etc/cron.weekly/99-raid-check:
WARNING: mismatch_cnt is not 0 on /dev/md0
Get the amount of unsynced blocks
# cat /sys/block/md0/md/mismatch_cnt
Unmount, if possible:
# umount /dev/md0
Start repair process:
# echo repair > /sys/block/md0/md/sync_action
See the progress:
# cat /proc/mdstat
After finishing the rebuild, check the RAID; this resets also the mismatch_cnt value:
# echo check > /sys/block/md0/md/sync_action
See the progress in /proc/mdstat and after finishing check
# cat /sys/block/md0/md/mismatch_cnt
again.
2.8.2 Broken Drive
# /etc/init.d/nfs-kernel-server stop
# /etc/init.d/samba stop
# umount /dev/md0
# mdadm --manage /dev/md0 --fail /dev/sdb1
# mdadm --manage /dev/md0 --remove /dev/sdb1
.. replace the broken drive ..
# mdadm --manage /dev/md0 --add /dev/sdb1
9
2.9 Erase a RAID 2 RAID
2.9 Erase a RAID
p.e. two RAID partitions /dev/sdc1 and /dev/sdd1
# mdadm --stop /dev/md0
# mdadm --remove /dev/md0
# mdadm --zero-superblock /dev/sdc1
# mdadm --zero-superblock /dev/sdd1
# mkswap /dev/sdb2
# mkswap /dev/sdc2
# echo "#New RAID SCAN" >> /etc/mdadm/mdadm.conf
# mdadm --examine --scan >> /etc/mdadm/mdadm.conf
Edit with a text editor, and place the new scanned arrays under:the section: defini-tions of existing MD arrays
Remove the previous config.
# /etc/mdadm/mdadm.conf
# fdisk /dev/sdb
Toggle the partition to 83 if it is fd. This will prevent the kernel from auto startingthe array on the next bootup.
Do the same for the other disk.
10
3 LOGICAL VOLUME MANAGER - LVM
3 Logical Volume Manager - LVM
Figure 2: LVM - overview
PV physical volume == Linux block devicePE physical extendV G volume groupLV logical volume - can contain a file system
LVM has the following design ideas:
• map physical to logical volumes
• deliver volume sizes independent from the sizes of the underlying hard drives
• no redundancy - (it is not a RAID!)
• no additional CPU load
11
3.1 Create a Logical Volume 3 LOGICAL VOLUME MANAGER - LVM
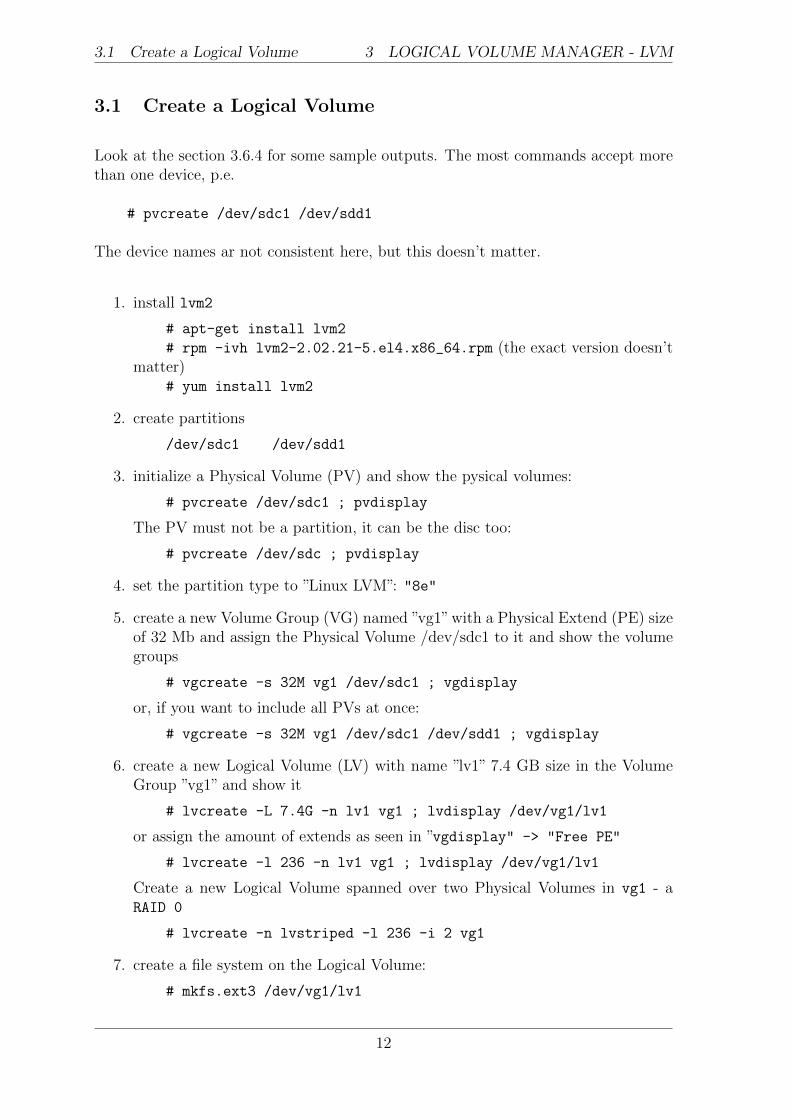
3.1 Create a Logical Volume
Look at the section 3.6.4 for some sample outputs. The most commands accept morethan one device, p.e.
# pvcreate /dev/sdc1 /dev/sdd1
The device names ar not consistent here, but this doesn’t matter.
1. install lvm2
# apt-get install lvm2
# rpm -ivh lvm2-2.02.21-5.el4.x86_64.rpm (the exact version doesn’tmatter)
# yum install lvm2
2. create partitions
/dev/sdc1 /dev/sdd1
3. initialize a Physical Volume (PV) and show the pysical volumes:
# pvcreate /dev/sdc1 ; pvdisplay
The PV must not be a partition, it can be the disc too:
# pvcreate /dev/sdc ; pvdisplay
4. set the partition type to ”Linux LVM”: "8e"
5. create a new Volume Group (VG) named ”vg1”with a Physical Extend (PE) sizeof 32 Mb and assign the Physical Volume /dev/sdc1 to it and show the volumegroups
# vgcreate -s 32M vg1 /dev/sdc1 ; vgdisplay
or, if you want to include all PVs at once:
# vgcreate -s 32M vg1 /dev/sdc1 /dev/sdd1 ; vgdisplay
6. create a new Logical Volume (LV) with name ”lv1” 7.4 GB size in the VolumeGroup ”vg1” and show it
# lvcreate -L 7.4G -n lv1 vg1 ; lvdisplay /dev/vg1/lv1
or assign the amount of extends as seen in ”vgdisplay" -> "Free PE"
# lvcreate -l 236 -n lv1 vg1 ; lvdisplay /dev/vg1/lv1
Create a new Logical Volume spanned over two Physical Volumes in vg1 - aRAID 0
# lvcreate -n lvstriped -l 236 -i 2 vg1
7. create a file system on the Logical Volume:
# mkfs.ext3 /dev/vg1/lv1
12
3.2 Resize or Extend a Logical Volume3 LOGICAL VOLUME MANAGER - LVM
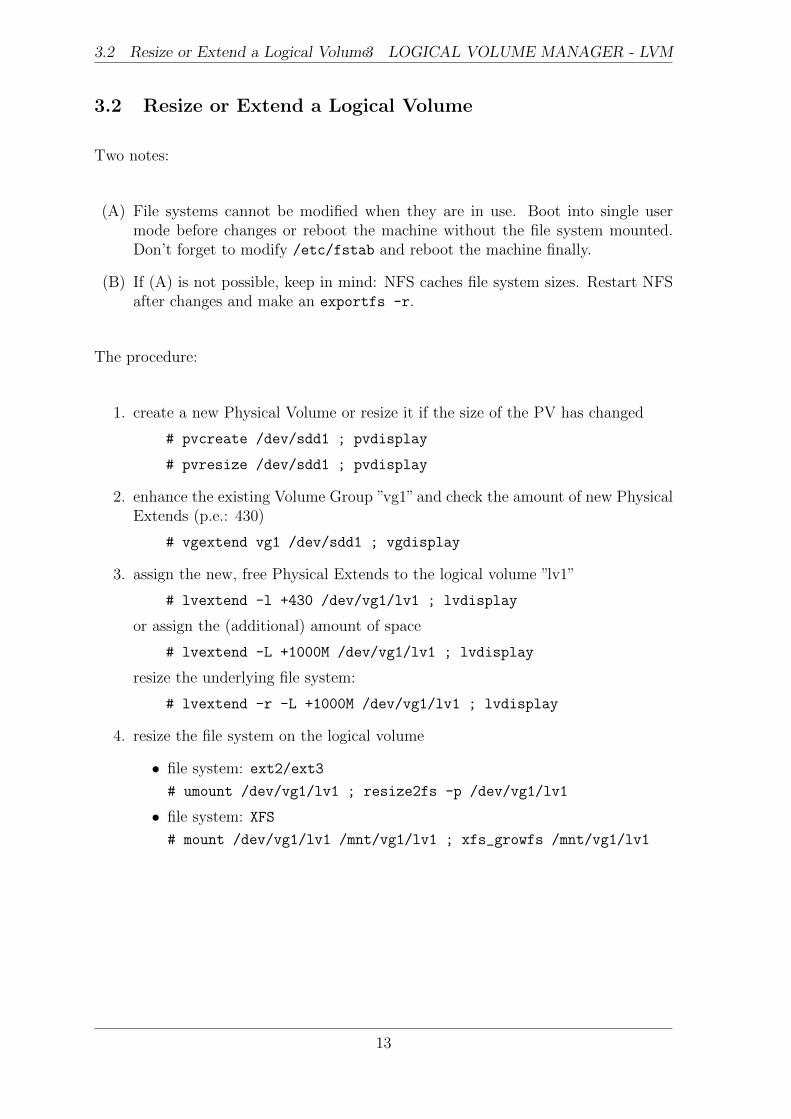
3.2 Resize or Extend a Logical Volume
Two notes:
(A) File systems cannot be modified when they are in use. Boot into single usermode before changes or reboot the machine without the file system mounted.Don’t forget to modify /etc/fstab and reboot the machine finally.
(B) If (A) is not possible, keep in mind: NFS caches file system sizes. Restart NFSafter changes and make an exportfs -r.
The procedure:
1. create a new Physical Volume or resize it if the size of the PV has changed
# pvcreate /dev/sdd1 ; pvdisplay
# pvresize /dev/sdd1 ; pvdisplay
2. enhance the existing Volume Group ”vg1” and check the amount of new PhysicalExtends (p.e.: 430)
# vgextend vg1 /dev/sdd1 ; vgdisplay
3. assign the new, free Physical Extends to the logical volume ”lv1”
# lvextend -l +430 /dev/vg1/lv1 ; lvdisplay
or assign the (additional) amount of space
# lvextend -L +1000M /dev/vg1/lv1 ; lvdisplay
resize the underlying file system:
# lvextend -r -L +1000M /dev/vg1/lv1 ; lvdisplay
4. resize the file system on the logical volume
• file system: ext2/ext3
# umount /dev/vg1/lv1 ; resize2fs -p /dev/vg1/lv1
• file system: XFS
# mount /dev/vg1/lv1 /mnt/vg1/lv1 ; xfs_growfs /mnt/vg1/lv1
13

3.3 Mount a Foreign Logical Volume 3 LOGICAL VOLUME MANAGER - LVM
3.3 Mount a Foreign Logical Volume
Assume a system crash and boot a live medium, p.e. the grml-CD (http://grml.org).
1. check the available physical volumes
# pvs
PV VG Fmt Attr PSize PFree
/dev/sda1 vg1 lvm2 a- 74.50G 0
/dev/sdb1 vg1 lvm2 a- 74.50G 0
2. check the logical volume
# lvdisplay vg1
--- Logical volume ---
LV Name /dev/vg1/lv1
VG Name vg1
LV UUID mmv77R-zrhD-HuO2-CvQq-piys-FFNL-swiNB2
LV Write Access read/write
LV Status available
# open 0
LV Size 149.00 GB
Current LE 4768
Segments 2
Allocation inherit
Read ahead sectors auto
- currently set to 256
Block device 253:0
we have now the device name: /dev/vg1/lv1
3. start the LVM if there is some kind of init script
# /etc/init.d/lvm2 start
4. or start it manually. Try these:
# modprobe dm-mod ; modprobe lvm-mod
# /sbin/vgscan --ignorelockingfailure --mknodes
# /sbin/vgchange -aly --ignorelockingfailure
# mkdir -p /mnt/vg1/lv1 ; mount /dev/vg1/lv1
5. stop it after unmounting:
# umount /dev/vg1/lv1
# /sbin/vgchange -aln --ignorelockingfailure
14
3.4 Destroy a LVM 3 LOGICAL VOLUME MANAGER - LVM
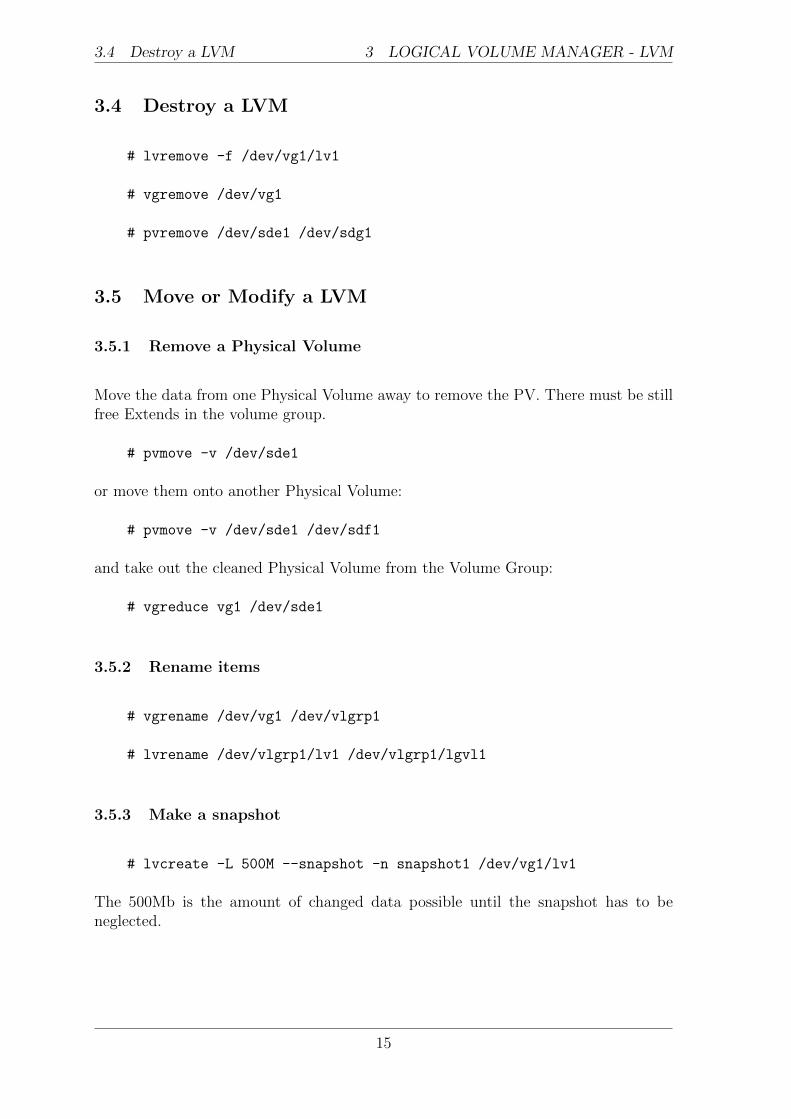
3.4 Destroy a LVM
# lvremove -f /dev/vg1/lv1
# vgremove /dev/vg1
# pvremove /dev/sde1 /dev/sdg1
3.5 Move or Modify a LVM
3.5.1 Remove a Physical Volume
Move the data from one Physical Volume away to remove the PV. There must be stillfree Extends in the volume group.
# pvmove -v /dev/sde1
or move them onto another Physical Volume:
# pvmove -v /dev/sde1 /dev/sdf1
and take out the cleaned Physical Volume from the Volume Group:
# vgreduce vg1 /dev/sde1
3.5.2 Rename items
# vgrename /dev/vg1 /dev/vlgrp1
# lvrename /dev/vlgrp1/lv1 /dev/vlgrp1/lgvl1
3.5.3 Make a snapshot
# lvcreate -L 500M --snapshot -n snapshot1 /dev/vg1/lv1
The 500Mb is the amount of changed data possible until the snapshot has to beneglected.
15
3.5 Move or Modify a LVM 3 LOGICAL VOLUME MANAGER - LVM
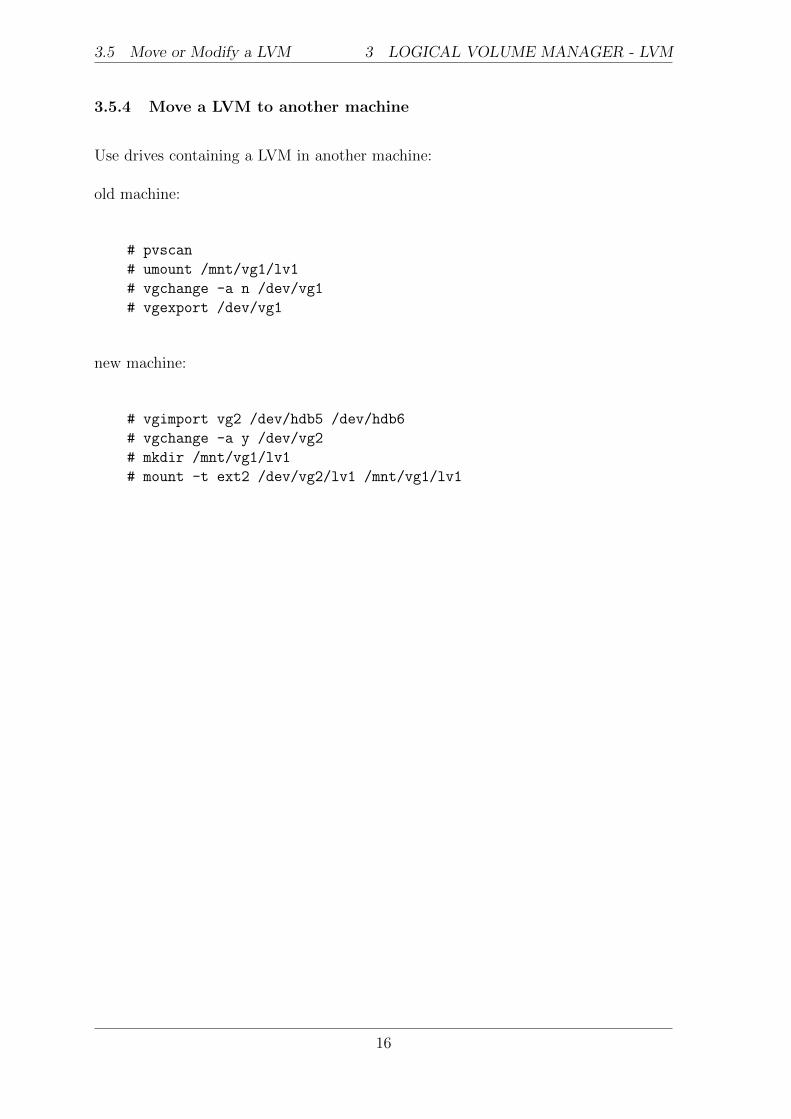
3.5.4 Move a LVM to another machine
Use drives containing a LVM in another machine:
old machine:
# pvscan
# umount /mnt/vg1/lv1
# vgchange -a n /dev/vg1
# vgexport /dev/vg1
new machine:
# vgimport vg2 /dev/hdb5 /dev/hdb6
# vgchange -a y /dev/vg2
# mkdir /mnt/vg1/lv1
# mount -t ext2 /dev/vg2/lv1 /mnt/vg1/lv1
16
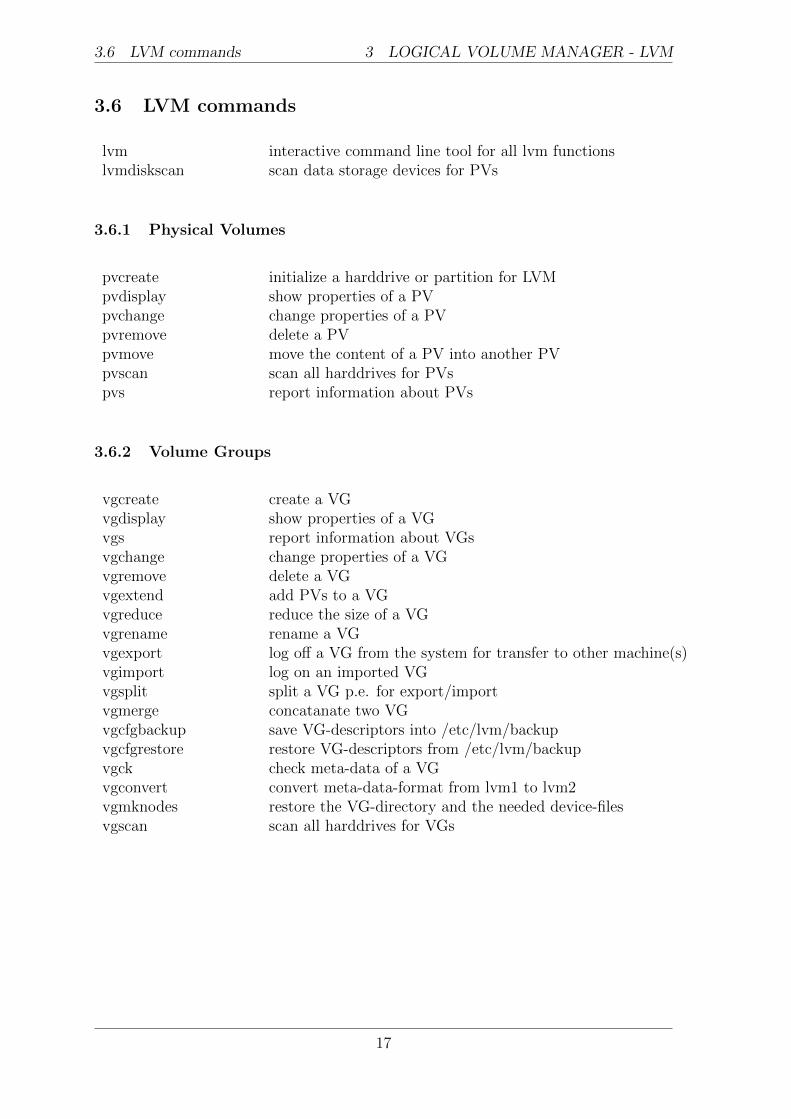
3.6 LVM commands 3 LOGICAL VOLUME MANAGER - LVM
3.6 LVM commands
lvm interactive command line tool for all lvm functionslvmdiskscan scan data storage devices for PVs
3.6.1 Physical Volumes
pvcreate initialize a harddrive or partition for LVMpvdisplay show properties of a PVpvchange change properties of a PVpvremove delete a PVpvmove move the content of a PV into another PVpvscan scan all harddrives for PVspvs report information about PVs
3.6.2 Volume Groups
vgcreate create a VGvgdisplay show properties of a VGvgs report information about VGsvgchange change properties of a VGvgremove delete a VGvgextend add PVs to a VGvgreduce reduce the size of a VGvgrename rename a VGvgexport log off a VG from the system for transfer to other machine(s)vgimport log on an imported VGvgsplit split a VG p.e. for export/importvgmerge concatanate two VGvgcfgbackup save VG-descriptors into /etc/lvm/backupvgcfgrestore restore VG-descriptors from /etc/lvm/backupvgck check meta-data of a VGvgconvert convert meta-data-format from lvm1 to lvm2vgmknodes restore the VG-directory and the needed device-filesvgscan scan all harddrives for VGs
17
3.6 LVM commands 3 LOGICAL VOLUME MANAGER - LVM
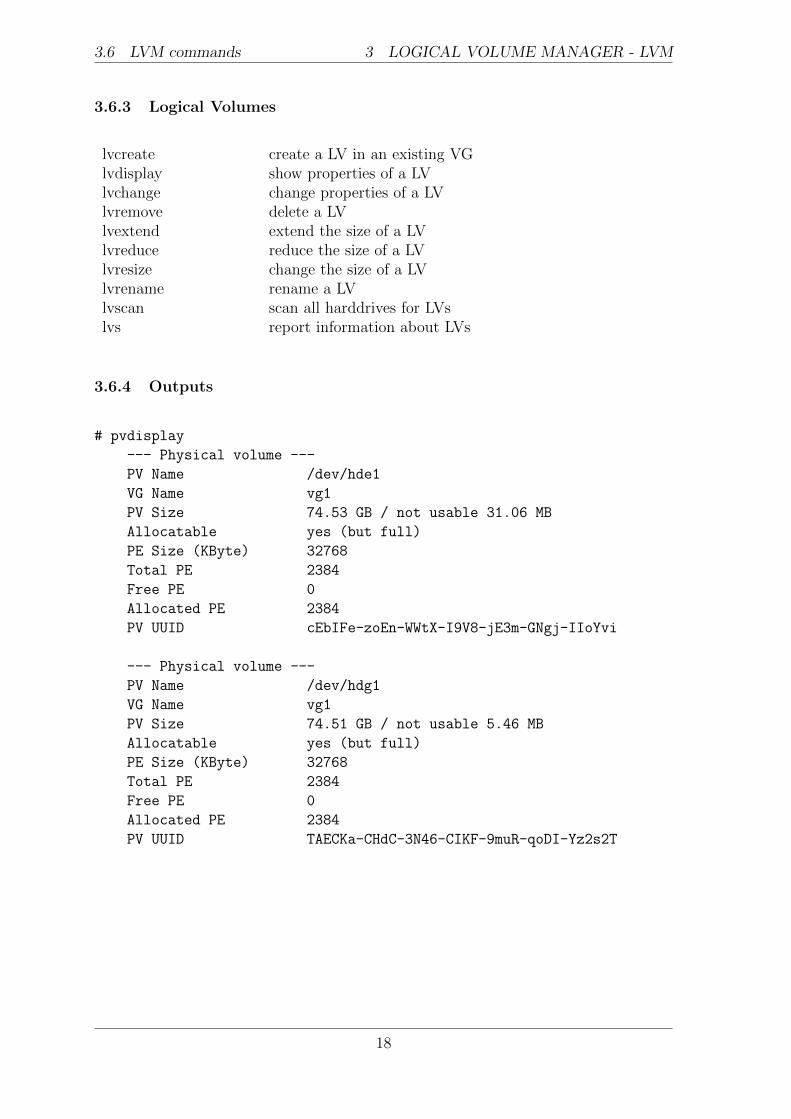
3.6.3 Logical Volumes
lvcreate create a LV in an existing VGlvdisplay show properties of a LVlvchange change properties of a LVlvremove delete a LVlvextend extend the size of a LVlvreduce reduce the size of a LVlvresize change the size of a LVlvrename rename a LVlvscan scan all harddrives for LVslvs report information about LVs
3.6.4 Outputs
# pvdisplay
--- Physical volume ---
PV Name /dev/hde1
VG Name vg1
PV Size 74.53 GB / not usable 31.06 MB
Allocatable yes (but full)
PE Size (KByte) 32768
Total PE 2384
Free PE 0
Allocated PE 2384
PV UUID cEbIFe-zoEn-WWtX-I9V8-jE3m-GNgj-IIoYvi
--- Physical volume ---
PV Name /dev/hdg1
VG Name vg1
PV Size 74.51 GB / not usable 5.46 MB
Allocatable yes (but full)
PE Size (KByte) 32768
Total PE 2384
Free PE 0
Allocated PE 2384
PV UUID TAECKa-CHdC-3N46-CIKF-9muR-qoDI-Yz2s2T
18
3.6 LVM commands 3 LOGICAL VOLUME MANAGER - LVM
# vgdisplay
--- Volume group ---
VG Name vg1
System ID
Format lvm2
Metadata Areas 2
Metadata Sequence No 1
VG Access read/write
VG Status resizable
MAX LV 0
Cur LV 0
Open LV 0
Max PV 0
Cur PV 2
Act PV 2
VG Size 149.00 GB
PE Size 32.00 MB
Total PE 4768
Alloc PE / Size 0 / 0
Free PE / Size 4768 / 149.00 GB // free physical extends
VG UUID KDXvtE-ID6R-Y2Fg-chg6-OPUl-KjDz-NzMtjI
# lvdisplay
--- Logical volume ---
LV Name /dev/vg1/lv1
VG Name vg1
LV UUID GbrEW3-ICGL-Rysl-9rmB-spIm-1gQE-7kWfeK
LV Write Access read/write
LV Status available
# open 1 // File system mounted: 1
// not mounted: 0
LV Size 7.4 GB
Current LE 236 // logical extends
Segments 2
Allocation inherit
Read ahead sectors 0
Block device 253:0 // major/minor
// block device number
19
4 PARTITIONING
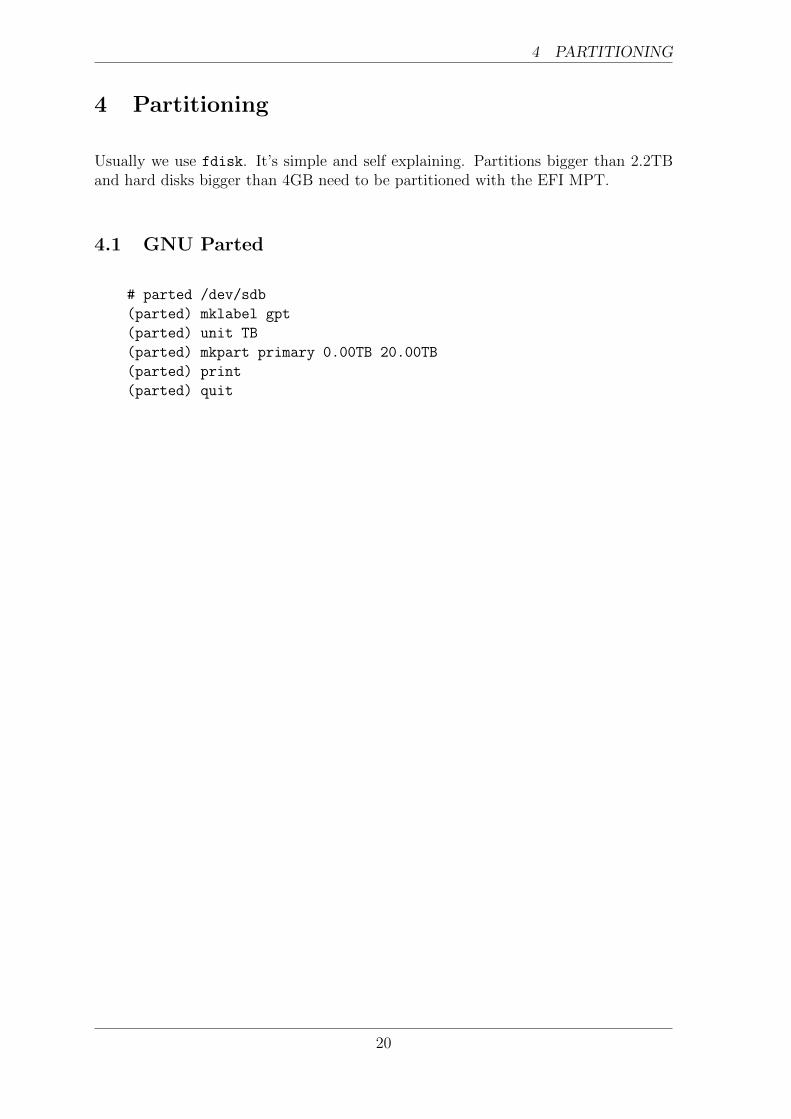
4 Partitioning
Usually we use fdisk. It’s simple and self explaining. Partitions bigger than 2.2TBand hard disks bigger than 4GB need to be partitioned with the EFI MPT.
4.1 GNU Parted
# parted /dev/sdb
(parted) mklabel gpt
(parted) unit TB
(parted) mkpart primary 0.00TB 20.00TB
(parted) print
(parted) quit
20
5 APPENDIX
5 Appendix
5.1 URLs and Reference
http://tldp.org/guides.html
http://linuxwiki.de/mdadm
http://www.brandonhutchinson.com/Mounting_a_Linux_LVM_volume.html
http://www.linuxhaven.de/dlhp/HOWTO/DE-LVM-HOWTO-{1..7}.html
21
5.2 Sample setup 5 APPENDIX
5.2 Sample setup
Software
RAID
&LVM
underLinux
GN
SSyst
ems
Gm
bH
Am
Gau
ßber
g2
3811
4B
raunsc
hw
eig
/G
erm
any
Tue16
Nov
2021
,Revision0.1
Pleasesendcomments
aboutthis
documentto:norm
an.krebs@
gns-sy
stems.de
Figure 3: Sample setup - how RAID and LVM may work together
22