SoftBank 006Z User Guide
79
Transcript of SoftBank 006Z User Guide

Introduction
Thank you for purchasing SoftBank 006Z High Speed Mobile Wi-Fi Router.
• SoftBank 006Z is referred to as "Wi-Fi router" in this guide. • Read this guide thoroughly beforehand for proper usage. • Accessible services may be limited by contract conditions or service area. • This Wi-Fi router is compatible with 3G network technologies.
Notes · Unauthorized copying of any part of this guide is prohibited. · Contents are subject to change without prior notice. · Steps have been taken to ensure the accuracy of descriptions in this guide. If you find inaccurate or missing
information, contact SoftBank Customer Support, General Information (P.7-3).
ii
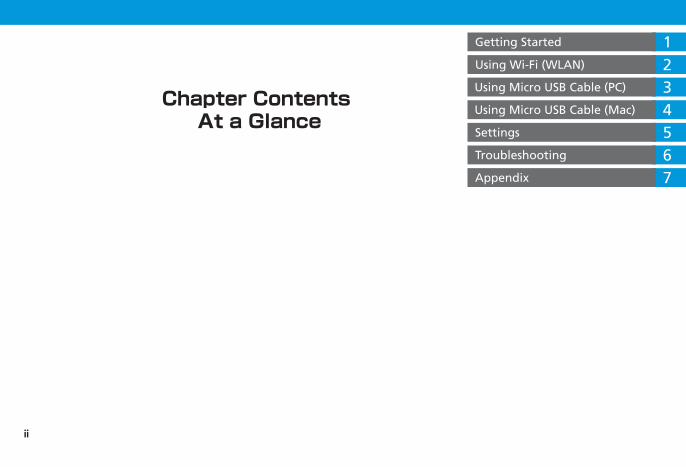
Getting Started 1Using Wi-Fi (WLAN) 2
Settings
Troubleshooting
Appendix
34567
Chapter Contents At a Glance
Using Micro USB Cable (PC)
Using Micro USB Cable (Mac)

iii
ContentsContents .......................................... iiiIntroduction .................................... ivSafety Precautions ........................... vGeneral Notes ................................. xiTrademarks ................................... xiii
1 Getting Started
Getting Started .............................1-2Package Contents ..........................1-2Parts & Functions ...........................1-3USIM Card ......................................1-5Memory Card .................................1-6Battery ...........................................1-8
2 Using Wi-Fi (WLAN)
Using Wi-Fi (WLAN) ......................2-2WLAN .............................................2-2Connecting Wi-Fi Devices via WLAN ...2-2Connecting Windows ....................2-8Connecting Mac ..........................2-11
3 Using Micro USB Cable (PC)
Using Micro USB Cable (PC) .........3-2Device Recognition (PC) ................3-2Software Installation (PC) .............3-2Connecting to Internet .................3-7Device Removal (PC) .....................3-8
4 Using Micro USB Cable (Mac)
Using Micro USB Cable (Mac) ......4-2Device Recognition (Mac) ............4-2Software Installation (Mac) ..........4-2Connecting to Internet .................4-4Device Removal (Mac) ...................4-5
5 Settings
Settings .........................................5-2Overview ........................................5-2WLAN & WAN Information ..........5-3Advanced Settings ........................5-4Changing Security .......................5-19Internet Connectivity ..................5-21
6 Troubleshooting
Troubleshooting ...........................6-2
7 Appendix
Appendix ......................................7-2Specifications .................................7-2Warranty & Service .......................7-2
Customer Service ..........................7-3

iv
Factory Default SettingsUse this information to connect Wi-Fi router to Wi-Fi devices. SSID and security keys are set by default. See WLAN Initialization Sticker ("Package Contents" P.1-2) for SSID, WEP Key, and WPA Key. • Internet connectivity (WAN Connection Mode in SoftBank 006Z Utility) is Always On by default. Use SoftBank 006Z Utility to change to Manual. See "Internet Connectivity" P.5-21.
• Encrypt Type is set to WEP by default. For greater security, use WPA/WPA2. Some game consoles may not be WPA compatible. See game console user guide for compatibility.
Operating Environment Use Wi-Fi router in any of these operating environments: • Compatible Operating Systems:Windows XP Home Edition (Service Pack 2 or later)Windows XP Professional (Service Pack 2 or later)Windows XP (64-bit)Windows Vista Home Basic (32-bit or 64-bit)Windows Vista Home Premium (32-bit or 64-bit)Windows Vista Business (32-bit or 64-bit)Windows Vista Ultimate (32-bit or 64-bit)Windows 7 Starter Edition (32-bit or 64-bit)Windows 7 Home Basic (32-bit or 64-bit)Windows 7 Home Premium (32-bit or 64-bit)Windows 7 Professional (32-bit or 64-bit)Windows 7 Enterprise (32-bit and 64-bit)Windows 7 Ultimate (32-bit or 64-bit)Mac OS X 10.4 to 10.6 (Intel)Compatible OS includes both English and Japanese versions.
• Memory Requirements:Windows XP: 256MB (512MB+ recommended)
Windows Vista: 512MB (1GB+ recommended)Windows 7 (32-bit): 1GB+Windows 7 (64-bit): 2GB+Mac OS X: 256MB (512MB+ recommended)
• Available Hard Disk Capacity: 50MB required (100MB+ recommended)
• Recommended resolution: Over 1024 × 768 • Compatible browser: Windows Microsoft Internet Explorer 6, 7, 8 Mac OS X: Safari 3, 4
Use outside these environments may affect performance. Operating environment (hardware, connected peripherals, installed applications, etc.) may also affect performance.
•For PC support, OS version upgrade information, etc., see corresponding manufacturer's product support documentation.
Usage Conditions • Wi-Fi router is for use within SoftBank Mobile service areas/areas covered by SoftBank Mobile Global Roaming Service.
• Even within service areas, transmissions may be disrupted inside buildings, aboard trains, inside tunnels, underground, behind buildings, in valleys, etc. Signal may be weak in some areas. Signals may not travel well in some areas in certain regions.
• Extremely strong or weak signals may disrupt transmissions. Transmissions may be disrupted even when signals are fine.
• Router transmissions are highly secure, however, eavesdropping can occur. Please use accordingly.
• Wi-Fi router is a radio as stipulated by the Radio Law. Under this law, it must be submitted for inspection upon request.
• In public places please use Wi-Fi router without disturbing others.
• USIM Card must be installed to use Wi-Fi router. • SoftBank Mobile is not liable for any damages/recovery costs associated with Wi-Fi router use.
Introduction

v
• Read Safety Precautions before using Wi-Fi router. • Observe precautions to avoid injury or property damage. • SoftBank is not liable for damages incurred by the user or third parties due to Wi-Fi router malfunctions, incorrect operations, or inconveniences caused by missed transmissions.
LabelsThese labels indicate the degree of risk from improper use. Make sure you thoroughly understand meanings before reading on.
Great risk of death or serious injury1
Risk of death or serious injury1
Risk of injury2 or damage to property3
1 Includes blindness, wounds, low/high heat burns, electric shock, bone fractures, poisoning or other physical harm with aftereffects, or requiring hospitalization or ongoing hospital visits.
2 Includes wounds, burns, electric shock or other physical harm not requiring hospitalization or ongoing hospital visits.
3 Includes damage to home, furniture, livestock, pets, etc.
SymbolsThese symbols indicate prohibited or compulsory actions. Make sure you thoroughly understand meanings before reading on.
ProhibitedProhibited actions
Do Not Disassemble
Disassembly prohibited
Avoid LiquidsOr Moisture
Exposure to liquids prohibited
Handling with wet hands prohibited
CompulsoryCompulsory actions
Unplug FirstDisconnect power source
Safety Precautions

vi
Wi-Fi Router, Battery, USIM Card, AC Adapter & Micro USB Cable
Compulsory
Use SoftBank specified battery, AC Adapter or Micro USB Cable only.Use of non-specified accessories may cause battery to leak, overheat, rupture or ignite; AC Adapter may overheat, ignite or malfunction.
Do Not Disassemble
Do not disassemble, modify or solder Wi-Fi router or related hardware.May cause fire, injury, electric shock or malfunction. Modifying the Wi-Fi router is a violation of the Radio Act, thus penalties may be imposed.
Avoid LiquidsOr Moisture
Do not expose to liquids.Do not leave Wi-Fi router or related hardware wet after exposure to water, pet urine, etc., and do not insert wet Wi-Fi router into PC. May cause overheating, electric shock, fire, injury or malfunction. Use them in an appropriate place properly.
Prohibited
Do not use or expose Wi-Fi router or related hardware to extreme heat (e.g., near fire or sources of heat, in direct sunlight, inside vehicles, etc.).May cause warping or malfunction. In addition a portion of the case may heat up, thereby causing burns.
Prohibited
Do not use excessive force to install battery, or insert Micro USB Cable into AC Adapter or Wi-Fi router. Confirm battery terminal orientation before installation.Battery may leak, overheat, rupture or ignite.
Prohibited
Do not place Wi-Fi router, battery, AC Adapter or Micro USB Cable in/on ovens, microwave ovens, pressure cookers, induction stoves or other cooking appliances.May cause battery to leak, overheat, rupture or ignite; or may cause Wi-Fi router, AC Adapter or Micro USB Cable to overheat, emit smoke, ignite or malfunction.
Compulsory
Stop using Wi-Fi router near gas stations or places with fire/explosion risk.Gases may ignite. Using Wi-Fi router near petrochemicals or other flammables may cause fire or explosion.
Prohibited
Do not apply strong shocks or impacts.May cause malfunction.
Compulsory
If any unusual sounds, odors, smoke or other abnormalities occur while using or storing, turn off the PC connected with Wi-Fi router.Continued use may cause fire or electric shock.
Prohibited
Keep liquids (water, pet urine, etc.) and conductive materials (e.g. pencil lead, metal fragments, metal necklaces, hairpins, etc.) away from External Device Port. In addition do not put anything inside of it.May cause short circuit, resulting in fire or malfunction.
Prohibited
Do not place Wi-Fi router on unstable surfaces.Wi-Fi router or related hardware may fall, resulting in injury, malfunction, etc.
Compulsory
Keep Wi-Fi router out of infants' reach.Infants may choke from swallowing Wi-Fi router or related hardware or be injured, etc.
Compulsory
If your child is using Wi-Fi router, explain all instructions and supervise usage.Misuse may cause injury, etc.
vii
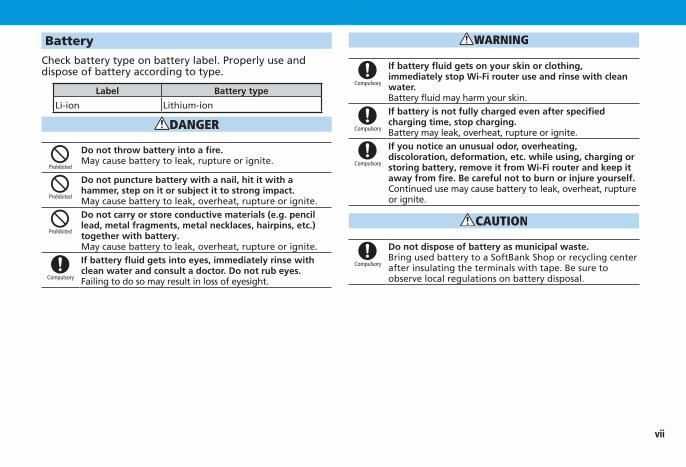
BatteryCheck battery type on battery label. Properly use and dispose of battery according to type.
Label Battery type
Li-ion Lithium-ion
Prohibited
Do not throw battery into a fire.May cause battery to leak, rupture or ignite.
Prohibited
Do not puncture battery with a nail, hit it with a hammer, step on it or subject it to strong impact.May cause battery to leak, overheat, rupture or ignite.
Prohibited
Do not carry or store conductive materials (e.g. pencil lead, metal fragments, metal necklaces, hairpins, etc.) together with battery.May cause battery to leak, overheat, rupture or ignite.
Compulsory
If battery fluid gets into eyes, immediately rinse with clean water and consult a doctor. Do not rub eyes.Failing to do so may result in loss of eyesight.
Compulsory
If battery fluid gets on your skin or clothing, immediately stop Wi-Fi router use and rinse with clean water.Battery fluid may harm your skin.
Compulsory
If battery is not fully charged even after specified charging time, stop charging.Battery may leak, overheat, rupture or ignite.
Compulsory
If you notice an unusual odor, overheating, discoloration, deformation, etc. while using, charging or storing battery, remove it from Wi-Fi router and keep it away from fire. Be careful not to burn or injure yourself.Continued use may cause battery to leak, overheat, rupture or ignite.
Compulsory
Do not dispose of battery as municipal waste.Bring used battery to a SoftBank Shop or recycling center after insulating the terminals with tape. Be sure to observe local regulations on battery disposal.
viii
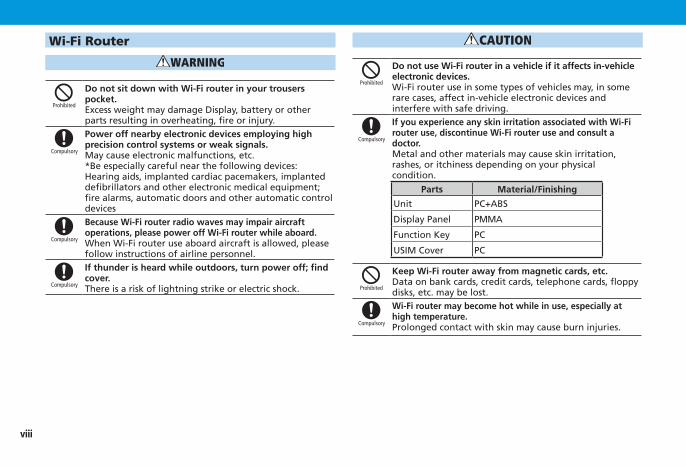
Wi-Fi Router
Prohibited
Do not sit down with Wi-Fi router in your trousers pocket.Excess weight may damage Display, battery or other parts resulting in overheating, fire or injury.
Compulsory
Power off nearby electronic devices employing high precision control systems or weak signals.May cause electronic malfunctions, etc.*Be especially careful near the following devices:Hearing aids, implanted cardiac pacemakers, implanted defibrillators and other electronic medical equipment; fire alarms, automatic doors and other automatic control devices
Compulsory
Because Wi-Fi router radio waves may impair aircraftoperations, please power off Wi-Fi router while aboard.When Wi-Fi router use aboard aircraft is allowed, please follow instructions of airline personnel.
Compulsory
If thunder is heard while outdoors, turn power off; find cover.There is a risk of lightning strike or electric shock.
Prohibited
Do not use Wi-Fi router in a vehicle if it affects in-vehicle electronic devices.Wi-Fi router use in some types of vehicles may, in some rare cases, affect in-vehicle electronic devices and interfere with safe driving.
Compulsory
If you experience any skin irritation associated with Wi-Fi router use, discontinue Wi-Fi router use and consult a doctor.Metal and other materials may cause skin irritation, rashes, or itchiness depending on your physical condition.
Parts Material/Finishing
Unit PC+ABS
Display Panel PMMA
Function Key PC
USIM Cover PC
Prohibited
Keep Wi-Fi router away from magnetic cards, etc.Data on bank cards, credit cards, telephone cards, floppy disks, etc. may be lost.
Compulsory
Wi-Fi router may become hot while in use, especially at high temperature.Prolonged contact with skin may cause burn injuries.
ix
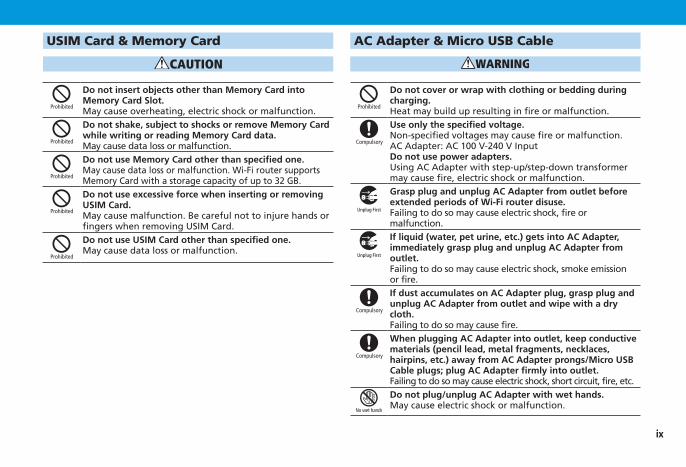
USIM Card & Memory Card
Prohibited
Do not insert objects other than Memory Card into Memory Card Slot.May cause overheating, electric shock or malfunction.
Prohibited
Do not shake, subject to shocks or remove Memory Card while writing or reading Memory Card data.May cause data loss or malfunction.
Prohibited
Do not use Memory Card other than specified one.May cause data loss or malfunction. Wi-Fi router supports Memory Card with a storage capacity of up to 32 GB.
Prohibited
Do not use excessive force when inserting or removing USIM Card.May cause malfunction. Be careful not to injure hands or fingers when removing USIM Card.
Prohibited
Do not use USIM Card other than specified one.May cause data loss or malfunction.
AC Adapter & Micro USB Cable
Prohibited
Do not cover or wrap with clothing or bedding during charging.Heat may build up resulting in fire or malfunction.
Compulsory
Use only the specified voltage.Non-specified voltages may cause fire or malfunction.AC Adapter: AC 100 V-240 V InputDo not use power adapters.Using AC Adapter with step-up/step-down transformer may cause fire, electric shock or malfunction.
Unplug First
Grasp plug and unplug AC Adapter from outlet before extended periods of Wi-Fi router disuse.Failing to do so may cause electric shock, fire or malfunction.
Unplug First
If liquid (water, pet urine, etc.) gets into AC Adapter, immediately grasp plug and unplug AC Adapter from outlet.Failing to do so may cause electric shock, smoke emission or fire.
Compulsory
If dust accumulates on AC Adapter plug, grasp plug and unplug AC Adapter from outlet and wipe with a dry cloth.Failing to do so may cause fire.
Compulsory
When plugging AC Adapter into outlet, keep conductive materials (pencil lead, metal fragments, necklaces, hairpins, etc.) away from AC Adapter prongs/Micro USB Cable plugs; plug AC Adapter firmly into outlet.Failing to do so may cause electric shock, short circuit, fire, etc.Do not plug/unplug AC Adapter with wet hands.May cause electric shock or malfunction.

x
Prohibited
If thunder is heard, do not touch AC Adapter.May cause electric shock.
Unplug First
Firmly hold plug and unplug AC Adapter from outlet before cleaning.Failing to do so may cause electric shock.
Compulsory
Do not unplug AC Adapter by pulling the cord. Firmly hold plug and unplug AC Adapter.Pulling the cord may damage the cord resulting in electric shock or fire.
Prohibited
When AC Adapter is connected to an outlet, do not pull on cord or otherwise subject AC Adapter to strong shock.May cause injury or malfunction.
Prohibited
Do not touch Wi-Fi router with sweaty hands or place it into a sweaty clothes pocket.Sweat and humidity may corrode internal components of Wi-Fi router and cause overheating or malfunction.
Prohibited
Do not pull, bend with excessive force or twist Micro USB Cable.Do not damage or modify Micro USB Cable. Do not place objects on Micro USB Cable.Do not expose Micro USB Cable to heat; avoid heaters.Damage to Micro USB Cable may cause electric shock, overheating or fire.
Electronic Medical Equipment
This section is based on “Guidelines on Safeguarding Medical Equipment from Electromagnetic Waves from Mobile Phones and Other Devices“ (Electromagnetic Compatibility Conference Japan), and “Research Report on the Influence of Electromagnetic Waves on Medical Equipment“ (Association of Radio Industries and Businesses, March 2001).
Compulsory
Keep Wi-Fi router at least 22 centimeters away from implanted cardiac pacemaker or implanted defibrillator.Radio waves may interfere with implanted pacemakers or defibrillators.
Compulsory
If you intend to use electronic medical equipment other than implanted pacemaker/defibrillator outside medical facilities, consult the vendor on radio wave effects.Radio waves may interfere with electronic medical equipment.
Compulsory
Observe the following in medical institutions. Radio waves from Wi-Fi router may affect electronic medical equipment. • Do not enter an operating room or an Intensive or Coronary Care Unit while carrying Wi-Fi router.
• Power off Wi-Fi router in hospitals. • Even in lobbies or other places where Wi-Fi router use is permitted, turn off Wi-Fi router near electronic medical equipment.
• Obey medical facility rules on use.
Compulsory
Do not use in crowds/trains. People with implanted pacemaker/defibrillator may be near.Radio waves may interfere with the operation of implanted cardiac pacemakers or implanted defibrillators.

xi
General Notes
Usage Basics • Wi-Fi router transmissions may be disrupted inside buildings, tunnels, or underground, or when moving into/out of such places.
• Use Wi-Fi routers without disturbing others. Theaters and public transportation systems may or may not allow use of Wi-Fi router.
• Wi-Fi routers are radios as stipulated by the Radio Law. Under the Radio Law, Wi-Fi router must be submitted for inspection upon request.
• Files may be lost or damaged in the following situations. SoftBank Mobile is not liable for damages incurred due to lost or altered information. To minimalize damages, back up data and store separately.•When using Wi-Fi router incorrectly.•When affected by static electricity or electrical noise.•Powering Wi-Fi router off while in use...•When Wi-Fi router breaks down or is submitted for repair.
• The Ordinance of the Ministry Specifying Goods and Technologies Pursuant to Provisions of the Appended Table 1 of the Export Trade Control Order and the Appended Table of the Foreign Exchange Order documents might be needed depending on what kinds of devices are taken overseas, but if Wi-Fi router is taken abroad on trips or short business trips for personal usage, they essentially are not needed when bringing it back in. However, if Wi-Fi router is used by other individuals or handed over to them, an export license may be required. In addition, if Wi-Fi router is taken to countries (Cuba, North Korea, Iran, Sudan and Syria) which are subject to U.S. government stipulated export restraints, then U.S. government export licenses might be required. For details on the particulars of regulations for export laws and ordinances and procedures visit the Ministry of Economy, Trade and Industry’s Security Export Control Division’s website.
• Do not use Wi-Fi router in the proximity of areas where explosive materials are handled. An explosion may be induced. In addition, explosive devices might be affected.
• Wi-Fi router USIM Card cannot be used with some mobile devices (including SoftBank models).
• If Wi-Fi router is used for a long time or while charging, Wi-Fi router may become hot.
• Prolonged contact with skin may cause burn injuries. • AC Adapter may become hot while charging.
Aboard Aircraft • Radio waves may impair aircraft operations; power off Wi-Fi router while aboard aircraft. If Wi-Fi router use is allowed, follow the instructions of airline personnel.
Handling • Do not expose Wi-Fi router to rain, snow, or high humidity. Wi-Fi router is not waterproof.
• Avoid extreme temperatures/direct sunlight/dusty areas. • Do not drop or subject Wi-Fi router to shocks. • Clean Wi-Fi router with soft dry cloth. In addition do not use alcohol nor thinners since their use may fade colors and lettering.
xii
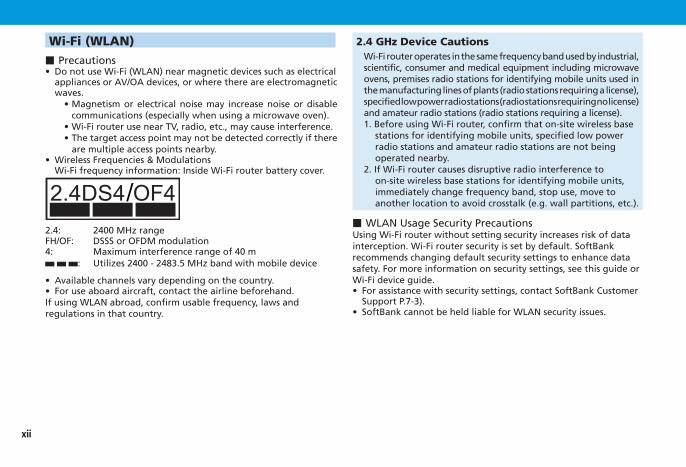
Wi-Fi (WLAN)■Precautions • Do not use Wi-Fi (WLAN) near magnetic devices such as electrical appliances or AV/OA devices, or where there are electromagnetic waves.•Magnetism or electrical noise may increase noise or disable
communications (especially when using a microwave oven).•Wi-Fi router use near TV, radio, etc., may cause interference.•The target access point may not be detected correctly if there
are multiple access points nearby. • Wireless Frequencies & ModulationsWi-Fi frequency information: Inside Wi-Fi router battery cover.
2.4: 2400 MHz rangeFH/OF: DSSS or OFDM modulation4: Maximum interference range of 40 m
: Utilizes 2400 - 2483.5 MHz band with mobile device
• Available channels vary depending on the country. • For use aboard aircraft, contact the airline beforehand.
If using WLAN abroad, confirm usable frequency, laws and regulations in that country.
2.4 GHz Device CautionsWi-Fi router operates in the same frequency band used by industrial, scientific, consumer and medical equipment including microwave ovens, premises radio stations for identifying mobile units used in the manufacturing lines of plants (radio stations requiring a license), specified low power radio stations (radio stations requiring no license) and amateur radio stations (radio stations requiring a license).1. Before using Wi-Fi router, confirm that on-site wireless base
stations for identifying mobile units, specified low power radio stations and amateur radio stations are not being operated nearby.
2. If Wi-Fi router causes disruptive radio interference to on-site wireless base stations for identifying mobile units, immediately change frequency band, stop use, move to another location to avoid crosstalk (e.g. wall partitions, etc.).
■ WLAN Usage Security PrecautionsUsing Wi-Fi router without setting security increases risk of data interception. Wi-Fi router security is set by default. SoftBank recommends changing default security settings to enhance data safety. For more information on security settings, see this guide or Wi-Fi device guide. • For assistance with security settings, contact SoftBank Customer Support P.7-3).
• SoftBank cannot be held liable for WLAN security issues.

xiii
TrademarksZTE, ZTE中興 and ZTE logo are trademarks or registered trademarks of ZTE Corporation in China/other countries.Copyright © 2011 ZTE Corporation. All rights reserved.
SOFTBANK, SOFTBANK’s equivalent in Japanese and the SOFTBANK logo are registered trademarks or trademarks of SOFTBANK CORP. in Japan and other countries.
Microsoft®, Windows®, Internet Explorer, Windows Vista® are registered trademarks of Microsoft Corporation in the United States/other countries.Microsoft Windows Operating System is indicated in its abbreviated form as Windows.
Apple and "Apple" logos (Mac, Mac OS, Macintosh, QuickTime) are trademarks of Apple Inc. in the United States/other countries.
Wi-Fi®, Wi-Fi Alliance®,Wi-FiCertified®, WPA™, WPA2™, Wi-Fi Protected Setup™, and the Wi-Fi Protected Setup logo are trademarks or registered trademarks of the Wi-Fi Alliance.
PlayStation, PS3 and PSP are trademarks or registered trademarks of Sony Computer Entertainment Inc.
Wii, Nintendo DS, Nintendo DS Lite, Nintendo DSi and Nintendo DSi LL are registered trademarks of Nintendo.Nintendo 3DS and Nintendo Wi-Fi Connection are trademarks of Nintendo.
The names of the companies, products and services used in this guide are registered trademarks or trademarks of the respective companies.

1G
ettin
g S
tarte
d
Getting Started ............................................................................................................... 1-2Package Contents ......................................................................................................... 1-2Parts & Functions .......................................................................................................... 1-3USIM Card ..................................................................................................................... 1-5Memory Card ................................................................................................................ 1-6Battery .......................................................................................................................... 1-8
1-2
Gettin
g Started
1
Getting Started
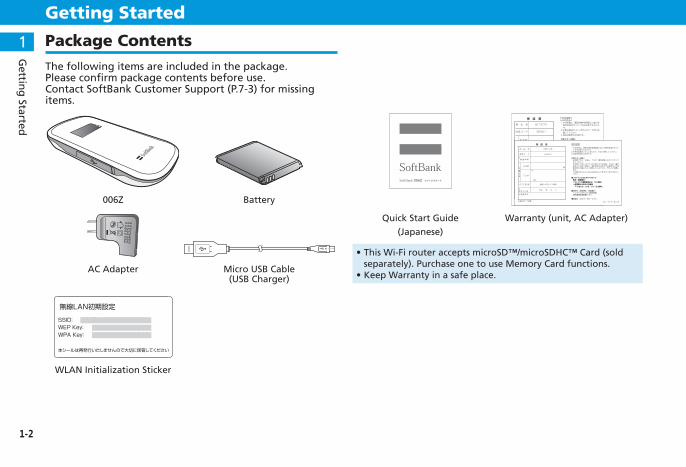
Package ContentsThe following items are included in the package.Please confirm package contents before use.Contact SoftBank Customer Support (P.7-3) for missing items.
006Z Battery
AC Adapter Micro USB Cable (USB Charger)
無線LAN初期設定
SSID: 006Z - XXXXXXXXXXXXWEP Key: XXXXXWPA Key: XXXXXXXXXXXXXXX
本シールは再発行いたしませんので大切に保管してください
WLAN Initialization Sticker
Quick Start Guide(Japanese)
Warranty (unit, AC Adapter)
•This Wi-Fi router accepts microSD™/microSDHC™ Card (sold separately). Purchase one to use Memory Card functions.
•Keep Warranty in a safe place.

1-3
Gettin
g Started
1Parts & Functions
Part Names & Functions
ef
cd
a
b
a Display Wi-Fi router status appears. See "Display" (P.1-3).b External Device Port Connect Micro USB Cable here. c WPS Key
•Long Press to enable/disable Wi-Fi. When Wi-Fi is disabled, press any key to enable Wi-Fi.
•With WLAN on, press and hold for WPS (Wi-Fi Protected Setup); adjust settings for WPS compatible Wi-Fi devices. See "Connecting WPS Supported Wi-Fi Devices" (P.2-8). Security set to WEP by default; use SoftBank 006Z Utility to set WPS. See "Activating SoftBank 006Z Utility" (P.5-2).
d CONNECT Key•Long Press to toggle connect/disconnect. •Press and hold to toggle Always On/Manual.
Setting appears on Display.e Power Key Toggle power on/off. Power on to enable WLAN; connects to
Internet automatically. f Battery Cover
Display
a
b
c
d
e
f
g
h
a Connection Status•3G: Connected Network
b Signal Strength• ⇔ : Strong⇔Weak
c Status Notifications Battery charging or WPS connection status.
See "Status Notifications" (P.1-4)d Internet Connectivity Default : Press and hold CONNECT Key to toggle setting:
• : Always On• : Manual
e Roaming Status Appears when roaming. Packet Communications charges may
be high when roaming. f Connected Wi-Fi devices
• : No Wi-Fi devices connected• : Wi-Fi disabled

1-4
Gettin
g Started
1 g Battery Strength• ⇒ : Full ⇒Empty•Blinking: Battery exhausted• ⇒ ⇒ ⇒ ⇒ : Charging
h Internet Connectivity•Connected•Disconnected
•If Wi-Fi router is not used for a while, Display turns off automatically. Press any key to illuminate Display.
•Leaving Wi-Fi router idle (no transmissions/battery fully charged) activates Sleep mode and ends Internet connection. Press any key to cancel Sleep mode and re-establish a connection.
Status NotificationsThese notifications may appear on Wi-Fi router:
表表Display 表表Status
Charging (Power Off)
WPS Processing Configuring WPS connection
WPS Succeed WPS connection established
WPS Failed WPS connection failed
Connecting Attempting to establish Internet connection
No Service Wi-Fi router is outside service area
Insert USIM USIM Card is not installed
Invalid USIM Invalid USIM is installed
Enter PIN PIN entry required in SoftBank 006Z Utility
Enter PUK PUK entry required in SoftBank 006Z Utility
SIM Lock USIM Card is locked
LOW Battery Charge battery now
DATA MAIN Wi-Fi router is in Unlimited Data Discount Area
DATA SUB Wi-Fi router is in Unlimited Data Discount Sub Area

1-5
Gettin
g Started
1USIM CardUSIM Card is the property of SoftBank Mobile. The IC chip contains customer information including phone number. USIM Card must be installed for use. See USIM Card user guide (Japanese).
USIM Card Installation
1 Power off
2 If Micro USB Cable is connected, remove it
3 Remove Cover (Use Notch 表a)
4 Lift battery 表b and remove it c
5 Insert USIM Card into USIM Card Slot with IC chip down
a
c
b
IC chip
6 Confirm USIM Card installation
7 With label up, ④ slide forward, ⑤ press down to insert
8 Replace Cover
d
e

1-6
Gettin
g Started
1 Removing USIM Card
1 Power off
2 If Micro USB Cable is connected, remove it
3 Remove Cover (Use Notch 表a)
4 Lift battery 表b and remove it c
5 Slide USIM Card out and remove it from USIM Card Slot
a
c
b
6 With label up, ④ slide forward, ⑤ press down to insert
7 Replace Cover
d
e
•Avoid touching the IC chip; may cause damage. Forcibly inserting/removing USIM Card may damage it.
•Be careful not to lose removed USIM Card.•Prevent children from accidentally swallowing USIM Card.•If IC chip is dusty, clean with a soft cloth.
Memory CardWi-Fi router accepts microSD™/microSDHC™ up to 32GB. SoftBank does not guarantee compatibility with all microSD™/microSDHC™ cards.

1-7
Gettin
g Started
1Memory Card Installation
1 Power off
2 If Micro USB Cable is connected, remove it
3 Remove Cover (see "USIM Card Installation" (P.1-5)Step3)
4 Remove battery (see "USIM Card Installation" (P.1-5) Step4)
5 Slide Cover down until it clicks and lift it as shown
6 With contacts down, insert Memory Card
7 Slide Cover up until it clicks
LOCK
OPEN
LOCK
OPEN
LOCK
OPEN
8 Replace battery (see "USIM Card Installation" (P.1-5) Step7)
9 Replace Cover (see "USIM Card Installation" (P.1-5) Step8)
Removing Memory Card
1 Power off
2 If Micro USB Cable is connected, remove it
3 Remove Cover (see "Removing USIM Card" (P.1-6) Step3)
4 Remove battery (see "Removing USIM Card" (P.1-6) Step4)
5 Slide Cover down until it clicks and lift it as shown
6 Remove Memory Card
7 Slide Cover up until it clicks
LOCK
OPEN
LOCK
OPEN
LOCK
OPEN
8 Replace battery (see "Removing USIM Card" (P.1-6) Step6)
9 Replace Cover (see "Removing USIM Card" (P.1-6) Step7)
•Do not insert USIM Card or Memory Card with excessive force. May cause damage. Do not misplace a removed Memory Card.

1-8
Gettin
g Started
1 Battery
Inserting BatteryInsert battery before use. For battery installation steps, see "USIM Card" (P.1-5).
Charging BatteryBattery is not charged fully out of the box. Charge battery fully before using Wi-Fi router.AC Adapter
1 Insert Micro USB Cable micro plug into Wi-Fi router External Device Port
2 Insert Micro USB Cable plug into AC Adapter
3 Plug AC Adapter prongs into AC 100 V outlet
USB Charger
1 Insert Micro USB Cable micro plug into Wi-Fi router External Device Port
2 Insert Micro USB Cable plug into PC USB port•Connecting Wi-Fi router to PC for the first time automatically
activates driver installer. See P.3-5 or P.3-6.
•USB charging may be unavailable depending on modem (battery) temperature.
Battery Strength
Battery Strength indicator appears at the top of Display. If battery becomes low, indicator flashes. See "Display" (P.1-3)

1-9
Gettin
g Started
1Charging PrecautionsWhen charging battery, note the following:•Battery must be installed to charge it.•Always use specified AC Adapter or Micro USB Cable.•Battery discharges even if Wi-Fi router is not in use.
Charge after long periods of disuse.•Approximate Charging Time/Operating Time
Charging Time1 Continuous Operating Time2
Continuous Communication
Time2
AC Adapter: 4 hoursUSB Charger: 5 hours 100 hours 4 hours
1Varies by ambient temperature, battery usage, etc.2Varies by environment, signal conditions, etc.•Replace battery if operating time shortens noticeably.
2U
sing
Wi-Fi (W
LAN
)
Using Wi-Fi (WLAN) ........................................................................................................ 2-2WLAN ............................................................................................................................ 2-2Connecting Wi-Fi Devices via WLAN ........................................................................... 2-2Connecting Windows ................................................................................................... 2-8Connecting Mac ......................................................................................................... 2-11

2-2
3
Usin
g W
i-Fi (WLA
N)
22
Using Wi-Fi (WLAN)
WLANWi-Fi router supports IEEE 802.11b/g/n standards. Connect Wi-Fi devices (PC, game console, etc.) via Wi-Fi for wireless data transfers.Wi-Fi router supports Wi-Fi Protected Setup (WPS), which easily configures Wi-Fi connection settings on any WPS compliant Wi-Fi device.Enter Wi-Fi router's SSID and WEP keys to connect non-WPS compliant Wi-Fi devices. See WLAN Initialization Sticker for SSID and WEP keys.This section describes setup operations First connections to establish initial Wi-Fi connection to Nintendo DS series*, PSP (PlayStation Portable), Wii, PS3 (PlayStation 3), WPS compatible devices, PC and MAC.* Nintendo DS series is generic name of Nintendo 3DS/DSi LL/DSi/DS
Lite/DS.
•These settings should be performed the first time Wi-Fi router is connected to another Wi-Fi device. Thereafter, simply activate WLAN to automatically connect Wi-Fi router to a Wi-Fi device (WAN Connection Mode set to Always On).
•Change WLAN settings as required. See "Settings" (P.5-2).•For added security, change default SSID or WEP Key.•Use Wi-Fi router to connect up to ten Wi-Fi devices
simultaneously.
Connecting Wi-Fi Devices via WLAN
Connecting Nintendo DSThis guide describes operations using software compatible with Nintendo Wi-Fi Connection for Nintendo DS series*.* Connection verification for 3DS/DS Lite/DS is completed. All
screenshots and operations based on Nintendo DS Lite.
•Make sure Wi-Fi router Security (Encrypt Type) is set to WEP ("Security" (P.5-10). Note that changing Security settings ends current Wi-Fi device connections.
•Confirm Wi-Fi router is connected to the Internet. Internet connection is required to establish Wi-Fi connections.
Power on Wi-Fi routerActivate WLAN for an Internet connection. •WAN Connection Mode is set to Always On by default.
Press CONNECT Key or connect Wi-Fi router to PC and use SoftBank 006Z Utility to change it to Manual. See "Internet Connectivity" (P.5-21).
On Nintendo DS, Activate Nintendo Wi-Fi Connection, Wi-Fi appears•For Nintendo DSi, from the menu, touch 本体設定, and then
インターネット.•For Nintendo 3DS, from the HOME menu, touch 本体設定,
and then インターネット設定.•For the operating method, refer to each software manual.
2-3
2
Usin
g W
i-Fi (WLA
N)
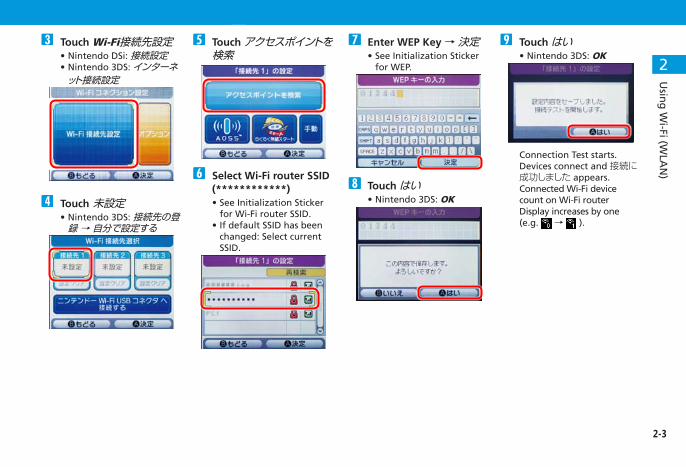
Touch Wi-Fi接続先設定•Nintendo DSi: 接続設定•Nintendo 3DS: インターネ
ット接続設定
Touch 未設定•Nintendo 3DS: 接続先の登
録 → 自分で設定する
Touch アクセスポイントを検索
Select Wi-Fi router SSID (************)•See Initialization Sticker
for Wi-Fi router SSID.•If default SSID has been
changed: Select current SSID.
Enter WEP Key → 決定•See Initialization Sticker
for WEP.
Touch はい•Nintendo 3DS: OK
Touch はい•Nintendo 3DS: OK
Connection Test starts. Devices connect and 接続に成功しました appears. Connected Wi-Fi device count on Wi-Fi router Display increases by one (e.g. → ).

2-4
3
Usin
g W
i-Fi (WLA
N)
22
Connecting PSPScreenshots/operations are based on PSP-2000/PSP-3000, with WLAN security set to WEP.Screenshots/operations may vary for PSP-1000* or when security is not set to WEP. See PSP User's Guide.* Some procedures may vary for PSP-1000 system software earlier
than version 1.52.
1 Wi-Fi router: Activate WAN Connection Mode•WAN Connection Mode is set to Always On by default.
Press CONNECT Key or connect Wi-Fi router to PC and use SoftBank 006Z Utility to change it to Manual. See "Internet Connectivity" (P.5-21).
2 PSP: Slide WLAN Switch to On
3 In PSP Home menu, select Settings →Network Settings →○
4 Select Infrastructure Mode → ○
5 Select New Connection → ○
•PSP-1000: Enter connection name → .
6 Select Scan →
7 Select Wi-Fi router SSID (************)•See Initialization Sticker
for Wi-Fi router SSID.•If default SSID has been
changed: Select current SSID → ○.
8 Confirm SSID →
9 Select WEP →
Press ○ → Enter WEP Key → 表•See Initialization Sticker
for WEP.
Select Easy →
Confirm name → •PSP-1000: Skip ahead to
Step .
2-5
2
Usin
g W
i-Fi (WLA
N)
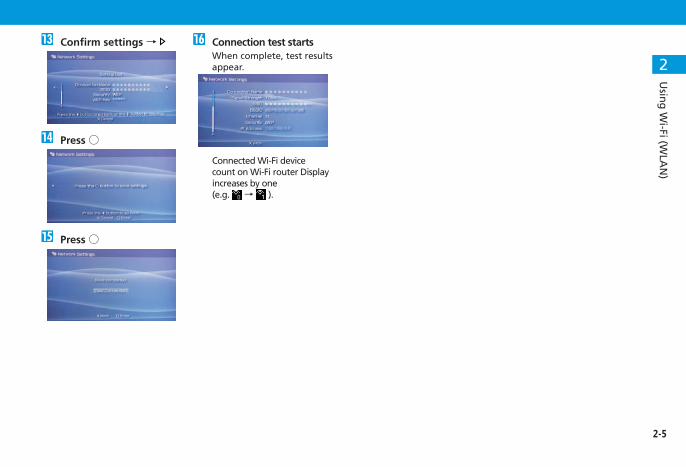
Confirm settings →
Press ○
Press ○
Connection test startsWhen complete, test results appear.
Connected Wi-Fi device count on Wi-Fi router Display increases by one (e.g. → ).

2-6
3
Usin
g W
i-Fi (WLA
N)
22
Connecting WiiOperations are based on WEP.Operations may vary when security is not set to WEP. See Wii User's Guide.
1 Wi-Fi router: Activate WAN Connection Mode•WAN Connection Mode is set to Always On by default.
Press CONNECT Key or connect Wi-Fi router to PC and use SoftBank 006Z Utility to change it to Manual. See "Internet Connectivity" (P.5-21).
2 In Wii menu, select Wii
3 Select Wii本体設定4 Select
Wii本体設定2 appears.
5 Select インターネット6 Select 接続設定7 Select 未設定8 Select Wi-Fi接続9 Select アクセスポイントを検索
Select OK
Select Wi-Fi router SSID (************)•See Initialization Sticker for Wi-Fi router SSID.•If default SSID has been changed: Select current SSID.
Enter WEP key → OK•See Initialization Sticker for WEP.
Select OK
Select OKConnection test starts. When complete, 接続に成功しましたappears.Connected Wi-Fi device count on Wi-Fi router Display increases by one (e.g. → ).

2-7
2
Usin
g W
i-Fi (WLA
N)
Connecting PS3Screenshots/operations are based on WEP.Screenshots/operations may vary when security is not set to WEP. See PS3 User's Guide.
1 Wi-Fi router: Activate WAN Connection Mode•WAN Connection Mode is set to Always On by default.
Press CONNECT Key or connect Wi-Fi router to PC and use SoftBank 006Z Utility to change it to Manual. See "Internet Connectivity" (P.5-21).
8 Confirm SSID →
9 Select WEP →
Press ○. Enter WEP key → •See Initialization Sticker
for WEP.
Confirm settings → ○•Settings are saved.
Press ○The connection test starts.When complete, test results appear.
Connected Wi-Fi device count on Wi-Fi router Display increases by one (e.g. → ).
2 In PS3 Home menu, select Settings →Network Settings →Internet Connection Settings
3 Select Yes → ○
4 Select Easy →
5 Select Wireless →
6 Select Scan →
7 Select Wi-Fi router SSID (************)•See Initialization Sticker
for Wi-Fi router SSID.•If default SSID has been
changed: Select current SSID.

2-8
3
Usin
g W
i-Fi (WLA
N)
22
Connecting WindowsAll screenshots and procedures based on WEP.
Windows 7
1 Wi-Fi router: Activate WAN Connection Mode•WAN Connection Mode is set to Always On by default.
Press CONNECT Key or connect Wi-Fi router to PC and use SoftBank 006Z Utility to change it to Manual. See "Internet Connectivity" (P.5-21).
2 Turn on PC WLAN function
3 In Start menu, click Control Panel → Network and Internet →Network and Sharing Center
4 Click Connect to a network
Connecting WPS Supported Wi-Fi DevicesWPS button is unavailable if WEP is set. WEP is set by default, use utility to change WLAN security encryption setting.See "Changing Security" (P.5-19).
1 Wi-Fi router: Activate WAN Connection Mode•WAN Connection Mode is set to Always On by default.
Press CONNECT Key or connect Wi-Fi router to PC and use SoftBank 006Z Utility to change it to Manual. See "Internet Connectivity" (P.5-21).
2 Turn on the WLAN functions → Prepare for WPS settings as required
3 Power on Wi-Fi router"WPS Processing" appears on Display.
4 Connect Wi-Fi devices via WPSWhen complete, "WPS Succeed" appears.•Operations vary depending on Wi-Fi devices.
5 If other settings are required with Wi-Fi devices, follow the onscreen instructionsConnected Wi-Fi device count on Wi-Fi router Display increases by one (e.g. → ).
2-9
2
Usin
g W
i-Fi (WLA
N)
5 Click SSID (************) → Connect•See Initialization Sticker for Wi-Fi router SSID.•If default SSID has been changed: Select current SSID.
6 Enter Security key in Security key field, click OK•See Initialization Sticker for security key.
Connected Wi-Fi device count on Wi-Fi router Display increases by one (e.g. → ).
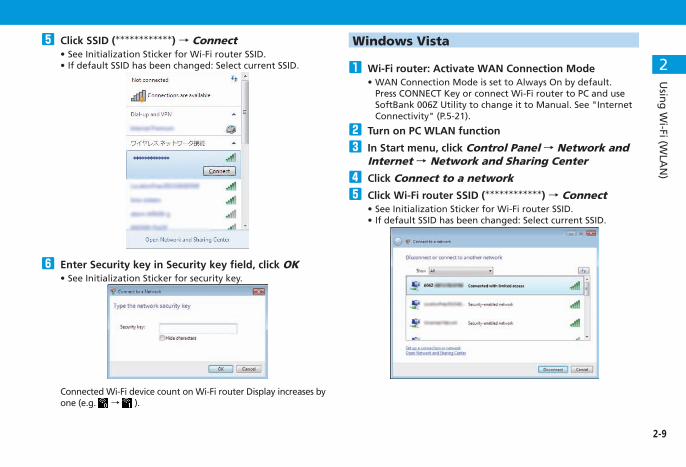
Windows Vista
1 Wi-Fi router: Activate WAN Connection Mode•WAN Connection Mode is set to Always On by default.
Press CONNECT Key or connect Wi-Fi router to PC and use SoftBank 006Z Utility to change it to Manual. See "Internet Connectivity" (P.5-21).
2 Turn on PC WLAN function
3 In Start menu, click Control Panel → Network and Internet →Network and Sharing Center
4 Click Connect to a network
5 Click Wi-Fi router SSID (************) → Connect•See Initialization Sticker for Wi-Fi router SSID.•If default SSID has been changed: Select current SSID.

2-10
3
Usin
g W
i-Fi (WLA
N)
22
6 Enter Security key in Security key or passphrase field, click Connect•See Initialization Sticker for security key.
7 Click CloseConnected Wi-Fi device count on Wi-Fi router Display increases by one (e.g. → ).
Windows XP
1 Wi-Fi router: Activate WAN Connection Mode•WAN Connection Mode is set to Always On by default.
Press CONNECT Key or connect Wi-Fi router to PC and use SoftBank 006Z Utility to change it to Manual. See "Internet Connectivity" (P.5-21).
2 Turn on PC WLAN function
3 In Start menu, click Control Panel → Network and Internet → Network and Sharing Center
4 Click Wireless network connection → Network task from Use displayed wireless network
5 Click Wi-Fi router SSID (************) → Connect•See Initialization Sticker for Wi-Fi router SSID.•If default SSID has been changed: Select current SSID.

2-11
2
Usin
g W
i-Fi (WLA
N)
6 In Network key, confirm Network key field, enter Security key → Connect•See Initialization Sticker for security key.
Connected Wi-Fi device count on Wi-Fi router Display increases by one (e.g. → ).
Connecting MacScreenshots/operations are based on WEP, Mac OS X 10.6.
1 Wi-Fi router: Activate WAN Connection Mode•WAN Connection Mode is set to Always On by default.
Press CONNECT Key or connect Wi-Fi router to PC and use SoftBank 006Z Utility to change it to Manual. See "Internet Connectivity" (P.5-21).
2 From Apple menu, click System Preferences → Network
3 Click AirPort → Turn AirPort On to turn WLAN function on

2-12
3
Usin
g W
i-Fi (WLA
N)
22
4 From Network Name pulldown list, select Wi-Fi router SSID (************) •See Initialization Sticker for Wi-Fi router SSID.•If default SSID has been changed: Select current SSID.
5 Enter security key in Password field → Remember this network → OK•See Initialization Sticker for security key.
6 Confirm Network Name is set to SSID (************)Connected Wi-Fi device count on Wi-Fi router Display increases by one (e.g. → ).
3U
sing
Micro
USB
Cab
le (P
C)Using Micro USB Cable (PC) ............................................................................................ 3-2
Device Recognition (PC) ............................................................................................... 3-2Software Installation (PC) ............................................................................................ 3-2Connecting to Internet ................................................................................................ 3-7Device Removal (PC) ..................................................................................................... 3-8
3-2
Usin
g M
icro U
SB C
able (PC
)
3
Device Recognition (PC)
1 Insert Micro USB Cable micro plug into Wi-Fi router (USIM Card installed) External Device Port
2 Insert Micro USB Cable plug into PC USB PortPC should recognize Wi-Fi router within a few minutes.
System message appears upon device recognition. Install driver for initial activation. See "Software Installation (PC)" (P.3-2)
2).
•Wi-Fi router may fail if PC enters sleep mode, etc. with it connected. Remove Wi-Fi router before leaving a PC unattended, etc. Wi-Fi router may malfunction if connected before PC starts/restarts. Remove Wi-Fi router before starting or restarting PC.
Software Installation (PC)Router driver and SoftBank 006Z Utility are saved in advance. For initial activation, they are installed automatically.•Do not remove Wi-Fi router during installation. May cause
installation failure, system malfunction or other system errors.•Login using administrator privileges.
Driver Installation (Windows 7)
1 Power on PC and initiate Windows
2 Connect Wi-Fi router to PC via Micro USB Cable
3 Installer activates a few seconds after connection
•If an older version of Utility is already installed a message appears. Remove old version before installation.
•If installer does not activate automatically, see (P.3-5).
4 In AutoPlay, click Run AutoRun.exe
5 If User Account Control appears, click Yes
6 設定言語の選択 appears, select 英語 → OK
Using Micro USB Cable (PC)

3-3
Usin
g M
icro U
SB C
able (PC
)
3
7 Welcome to the InstallShield Wizard for SoftBank 006Z Utility dialog box appears. Click Next
8 When dialog box below appears, click Finish
9 Utility shortcut icon appears and installation starts in the background. Web browser activates and SoftBank 006Z Utility appears
•Restart PC if it does not function correctly.
Driver Installation (Windows Vista)
1 Power on PC and initiate Windows
2 Connect Wi-Fi router to PC via Micro USB Cable
3 Installer activates a few seconds after connection
•If an older version of Utility is already installed a message appears. Uninstall old version before installation.
•If installer does not activate automatically, see (P.3-6).
4 In AutoPlay, click Run AutoRun.exe
5 If User Account Control appears, click Continue
6 設定言語の選択 appears, select 英語 → OK
7 Welcome to the InstallShield Wizard for SoftBank 006Z Utility dialog box appears. Click Next
3-4
Usin
g M
icro U
SB C
able (PC
)
3
8 When dialog box below appears, click Finish
9 Utility shortcut icon appears and installation starts. Web browser activates and SoftBank 006Z Utility appears
•Restart PC if it does not function correctly.
Driver Installation (Windows XP)
1 Power on PC and initiate Windows
2 Connect Wi-Fi router to PC via Micro USB Cable
3 Installer activates a few seconds after connection
•If an older version of SoftBank 006Z Utility is already installed a message appears. Uninstall old version before installation.
•If installer does not activate automatically, see (P.3-6).
4 設定言語の選択 appears, select 英語 → OK
5 Welcome to the InstallShield Wizard for SoftBank 006Z Utility dialog box appears. Click Next

3-5
Usin
g M
icro U
SB C
able (PC
)
3
6 When dialog box below appears, click Finish
7 Utility shortcut icon appears and installation starts. Web browser activates and SoftBank 006Z Utility appears
•Restart PC if it does not function correctly.
Manual Installation (Windows 7)If installer fails to start automatically, follow these steps:*Always power on PC before connecting Wi-Fi router to PC via Micro USB Cable.
1 In Start menu, click Computer
2 Double-click SoftBank 006Z
3 If User Account Control appears, click Yes
4 設定言語の選択 appears, see "Driver Installation (Windows 7)" (P.3-2) after Step 6

3-6
Usin
g M
icro U
SB C
able (PC
)
3
Manual Installation (Windows Vista)If installer fails to start automatically, follow these steps:*Always power on PC before connecting Wi-Fi router to PC via Micro USB Cable.
1 In Start menu, click Computer
2 Double-click SoftBank 006Z
3 If User Account Control appears, click Continue
4 設定言語の選択 appears, see "Driver Installation (Windows Vista)" (P.3-3) after Step 6
Manual Installation (Windows XP)If installer fails to start automatically, follow these steps:*Always power on PC before connecting Wi-Fi router to PC via Micro USB Cable.
1 In Start menu, click Computer
2 Double-click SoftBank 006Z
3 設定言語の選択 appears, see "Driver Installation (Windows XP)" (P.3-4) after Step 5
3-7
Usin
g M
icro U
SB C
able (PC
)
3
Uninstalling Driver
1 Select Start → All Programs → SoftBank 006 Utility → Uninstall
2 User Account Control appears. Click Yes•For Windows Vista, click Continue.•For Windows XP, screen does not appear.
3 Do you want to completely remove the selected application and all of its features? confirmation appears. Click Yes
4 Please remove USB MODEM from PC, before uninstalling! confirmation appears. Click Yes to start uninstallation
5 Upon uninstallation, dialog box below appears. Click Finish to end uninstallation
Connecting to Internet
1 Wi-Fi router: Activate WAN Connection Mode•WAN Connection Mode is set to Always On by default.
Press CONNECT Key or connect Wi-Fi router to PC and use SoftBank 006Z Utility to change it to Manual. See "Internet Connectivity" (P.5-21).

3-8
Usin
g M
icro U
SB C
able (PC
)
3
Device Removal (PC)
•Close SoftBank 006Z Utility before removing Wi-Fi router. Do not remove Wi-Fi router during transmissions.
For Windows 7, exit Utility before removing Wi-Fi router.
•With Memory Card installed, in Task Tray, click then click Eject Removable Disk. Once Wi-Fi router can be removed safely, remove it.
For Windows Vista/Windows XP, click Removable Disk before removing Wi-Fi router.
1 Double-click on Task Tray•For Windows XP, double-click in Task Tray.
2 Safely Remove Hardware appears. Select USB Mass Storage Device and click Stop
•For Windows XP, USB Mass Storage Device appears.
3 Stop a Hardware device appears. If Wi-Fi router can be safely removed from PC, click OK

3-9
Usin
g M
icro U
SB C
able (PC
)
3
4 When Safely Remove Hardware appears, disconnect the Wi-Fi router

4U
sing
Micro
USB
Cab
le (M
ac)Using Micro USB Cable (Mac) ......................................................................................... 4-2
Device Recognition (Mac) ........................................................................................... 4-2Software Installation (Mac) ......................................................................................... 4-2Connecting to Internet ................................................................................................ 4-4Device Removal (Mac) .................................................................................................. 4-5

4-2
Usin
g M
icro U
SB C
able (M
ac)
4
Device Recognition (Mac) Make sure USIM Card is installed in Wi-Fi router, insert Micro USB Cable plug into Wi-Fi router External Device Port. Insert Micro USB Cable plug into Mac USB port. Mac should automatically recognize Wi-Fi router within a few seconds.
See "Software Installation (Mac)" (P.4-2)•Wi-Fi router may fail if Mac enters sleep mode, etc. with it
connected. Remove Wi-Fi router before leaving a Mac unattended, etc. Wi-Fi router may malfunction if connected before Mac starts/restarts. Remove Wi-Fi router before starting or restarting Mac.
Software Installation (Mac)All screenshots and procedures based on Mac OS 10.6.
Driver installationWi-Fi router driver and SoftBank 006Z Utility are saved in advance. For initial activation, they are installed automatically. •Do not remove Wi-Fi router during installation. May cause
installation failure, system malfunction or other system errors.
1 Power on Mac and initiate Mac
2 Connect Wi-Fi router to Mac via Micro USB CableIf icon appears on desktop, double-click it. SoftBank 006Z Utility opens automatically.
3 Double-click SoftBank 006Z Utility to start installation. Dialog box below appears. Click Continue
Using Micro USB Cable (Mac)

4-3
4
Usin
g M
icro U
SB C
able (M
ac)
•If an older version of this software, etc. is already installed, uninstall it, then install SoftBank 006Z Utility.
•Make sure that only the latest Utility is installed before use.
4 Standard Install on Macintosh HD dialog box appears. Click Install
•"Macintosh HD" is hard disk name. It may vary.
5 Certification appears. Enter Name and Password and click OK
6 Installation starts
7 When dialog box below appears, click Close
8 Web browser activates and SoftBank 006Z Utility appears
•Restart Mac if it does not function correctly.

4-4
Usin
g M
icro U
SB C
able (M
ac)
4
Uninstalling Driver
1 Click to open Finder
2 Remove SoftBank 006 Utility•Double-click Uninstall SoftBank 006Z Utility in Macintosh
HD/application folder.
3 Click Uninstall
4 Certification appears. Enter Name and Password and click OK
5 When uninstallation finishes, click Close
6 Restart Mac
•"Macintosh HD" is hard disk name. It may vary.
Connecting to Internet
1 Wi-Fi router: Activate WAN Connection Mode •WAN Connection Mode is set to Always On by default.
Press CONNECT Key or connect Wi-Fi router to PC and use SoftBank 006Z Utility to change it to Manual. See "Internet Connectivity" (P.5-21).
4-5
4
Usin
g M
icro U
SB C
able (M
ac)
Device Removal (Mac)
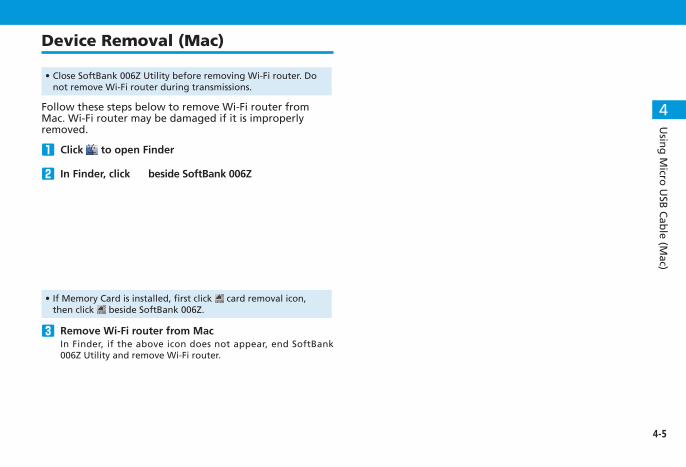
•Close SoftBank 006Z Utility before removing Wi-Fi router. Do not remove Wi-Fi router during transmissions.
Follow these steps below to remove Wi-Fi router from Mac. Wi-Fi router may be damaged if it is improperly removed.
1 Click to open Finder
2 In Finder, click beside SoftBank 006Z
•If Memory Card is installed, first click card removal icon, then click beside SoftBank 006Z.
3 Remove Wi-Fi router from MacIn Finder, if the above icon does not appear, end SoftBank 006Z Utility and remove Wi-Fi router.

5-3
5
Setting
s
SoftBank 006Z Utility
b
a
i
k
h
j
c d e f g
aMain MenuToggle setting pages
gNetwork Connection Status
bSettingsCurrent settings and options
hHomeClick to return to Main Menu
cSignal Strength iLogoutEnd SoftBank 006Z Utility
dNetwork TypeConnected network type
jBattery Strength ⇒ :Full ⇒Empty ⇒ ⇒ ⇒ ⇒
:ChargingeCommunication Service
fConnected Wi-Fi devices Number of connected Wi-Fi devices
kPhone NumberUSIM phone number
WLAN & WAN Information
1 In SoftBank 006Z Utility, click HomeWLAN and WAN Information appears.

5-4
Setting
s
5
Advanced Settings
1 Click Settings
2 Click item to set/check
■3G SettingsSet details regarding Internet connection (P.5-4). ■Wi-Fi SettingsSet details regarding WLAN (P.5-8). ■FirewallSet details regarding security (P.5-12). ■AdvancedSet details regarding Wi-Fi router (P.5-15).
3G Settings
1 Click item to set/check
■Network Operator (P.5-5) ■APN Setting (P.5-5) ■Traffic Information (P.5-6) ■Data Communication Area Setting (P.5-7)

5-5
5
Setting
s
Network Operator
Select Network Operator. Setting cannot be changed during Internet use.
1 Set each item
Item Used to Options Default
Network operator
For Manual: Click Apply, select Network Operator, click Apply again
Automatic, Manual
Automatic
2 Click Apply
APN Setting
Select Unlimited Data Discount Area or Sub Area profiles (connection settings). Create, edit and delete profiles.
1 Perform these steps for APN Setting for Unlimited Data Discount Area, etc.:
■Create New ProfileClick Add and proceed to Step 2. ■Delete ProfileIn Profile Selection, select one and click Delete . ■Edit ProfileIn Profile Selection, select one and proceed to Step 2. •Default profiles/those in use cannot be edited/deleted.
2 For Unlimited Data Discount Area and Sub Area, set each item and click Save

5-6
Setting
s
5
Item Used to Options Default
Profile Selection
Select profile to edit/delete
Save up to ten profiles including two defaults
-
Profile NameEnter optional profile name if initially setting
Alphanumerics/symbols(except \)
-
APN Set APN
Alphanumerics/symbols (. , -) (. and - cannot be used for the first and last characters)
-
DNS Set DNSAuto DNS, Manual DNS
Auto DNS
AuthenticationSet authentication method
CHAP, PAP
DATA MAIN:CHAPDATA SUB:PAP
User Name Set user nameSpecified by provider
-
Password Set PasswordSpecified by provider
-
*DATA MAIN and DATA SUB default profiles cannot be edited/deleted.
•Click Set default to save profiles used for connecting to Internet.
3 Click Apply
Traffic Information
View data packets and connection times.
1 View each item
Item Used to Options Default
Data PacketsShows most recent and total transmitted data packets
- -
Connection Time
Shows most recent and total connection times
- -
Unit SettingSelect from Byte/Packet - Byte
•Shown values are approximates, actual data communication packets and connection times may vary.

5-7
5
Setting
s
2 Perform these operations ■Refresh Traffic InformationClick Refresh . •Data packets and connection time values are updated. ■Change Traffic Information UnitsIn Unit Setting, click Byte /Packet → Apply .•Unit is changed. ■Clear ValueCheck box next to item → Click Clear .•Data packets or connection time values are cleared. •Most recent and total connection times are reset to 0 if
power is turned off or Internet is disconnected from.•To reset total transmitted data packets or total connection
times, reset values with these procedures or reset to factory default.
Data Communication Area Setting
These settings cannot be changed while Wi-Fi router is connected to the Internet.
1 Set each item
Item Used to Options Default
Data communication area setting
Set Area manual selection: Click Apply → Selectnetwork operatorfrom list → Apply
Unlimited Data Discount Area/Sub Area auto selection/Area manual selection
Unlimited Data Discount Area/Sub Area auto selection
2 Click Apply

5-8
Setting
s
5
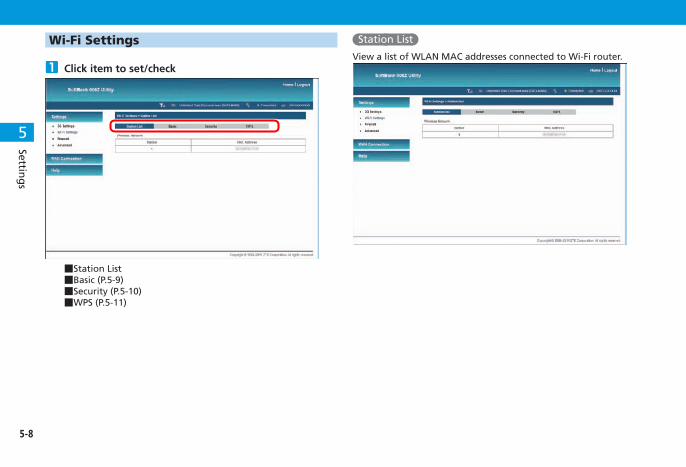
Wi-Fi Settings
1 Click item to set/check
■Station List ■Basic (P.5-9) ■Security (P.5-10) ■WPS (P.5-11)
Station List
View a list of WLAN MAC addresses connected to Wi-Fi router.

5-9
5
Setting
s
Basic
Set basic settings for wireless network.
1 Set each item
Item Used to Options Default
Network Mode
Select operation mode for WLAN
Auto (11b/11g/11n), 11b Only, 11g Only
Auto (11b/11g/11n)
Network Name (SSID)
Set network name SSID
Available characters: 32 alphanumerics/symbols (except " ' < > & * ¥ , ; : [ ])
006Z-************ (MAC address)*
Item Used to Options Default
Broadcast Network Name (SSID)
Set whether to show access point
Enable/Disable Enable
AP Isolation
Set Wi-Fi device communication option. Setting Disabled prevents file sharing between Wi-Fi devices
Enable/Disable Disable
Frequency (Channel)
Specify frequency to select
Select from list Auto
RateSpecify rate to select
Select from list 72.2 Mbps
MAX Station Number
Specify the maximum number of Wi-Fi devices to connect
1 to 10 10
*See WLAN Initialization Sticker for SSID and WEP key.
•After completing settings, reconnect Wi-Fi devices. •Wi-Fi communications cannot be used overseas.
2 Click Apply
5-10
Setting
s
5
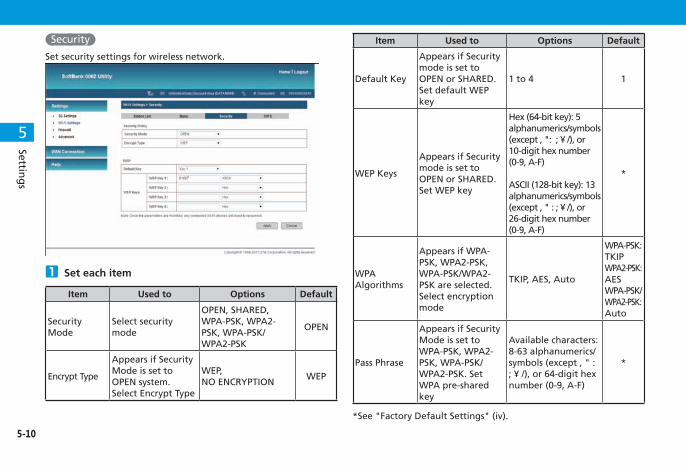
Security
Set security settings for wireless network.
1 Set each item
Item Used to Options Default
Security Mode
Select security mode
OPEN, SHARED, WPA-PSK, WPA2-PSK, WPA-PSK/WPA2-PSK
OPEN
Encrypt Type
Appears if Security Mode is set to OPEN system. Select Encrypt Type
WEP, NO ENCRYPTION
WEP
Item Used to Options Default
Default Key
Appears if Security mode is set to OPEN or SHARED. Set default WEP key
1 to 4 1
WEP Keys
Appears if Security mode is set to OPEN or SHARED. Set WEP key
Hex (64-bit key): 5 alphanumerics/symbols (except , ": ; ¥ /), or 10-digit hex number (0-9, A-F)
ASCII (128-bit key): 13 alphanumerics/symbols (except , " : ; ¥ /), or 26-digit hex number (0-9, A-F)
*
WPA Algorithms
Appears if WPA-PSK, WPA2-PSK, WPA-PSK/WPA2-PSK are selected.Select encryption mode
TKIP, AES, Auto
WPA-PSK: TKIPWPA2-PSK: AESWPA-PSK/WPA2-PSK: Auto
Pass Phrase
Appears if Security Mode is set to WPA-PSK, WPA2-PSK, WPA-PSK/WPA2-PSK. Set WPA pre-shared key
Available characters: 8-63 alphanumerics/symbols (except , " : ; ¥ /), or 64-digit hex number (0-9, A-F)
*
*See "Factory Default Settings" (iv).

5-11
5
Setting
s
2 Click Apply
•Previously set Wi-Fi devices may be unavailable with these settings. Change settings.
•For greater security, use WPA/WPA2. Some game consoles may not be WPA compatible.
WPS
Appears if PIN is selected. Set PIN for WPS compatible Wi-Fi devices.
1 Set each item
Item Used to Options Default
WPS ModeSelect WPA communication method
PIN, PBC PIN
Client PINAppears if PIN is selected. Set PIN for WPS compatible Wi-Fi devices
Four digits or eight digits of numerics
-
5-12
Setting
s
5
2 Click Apply•Wi-Fi router WPS function activates automatically. Connect
Connect WPS compatible Wi-Fi devices within two minutes.
Firewall & Port Filtering Settings
1 Click item to set/check
■MAC/IP/Port Filtering (P.5-12) ■Port Mapping (P.5-13) ■UPnP (P.5-14)
MAC/IP/Port Filtering
Set/apply rules whether to connect or not if setting MAC address, IP addresses and port numbers.
1 Set each item
Item Used to Options Default
MAC/IP/Port Filtering
Select action mode for MAC/IP/Port Filtering
Enable, Disable Disable

5-13
5
Setting
s
Item Used to Options Default
Default Policy -- The packet that doesn't match with any rules would be:
Set action for MAC/IP/Port Filtering
Accepted, Dropped
Accepted
MAC Address
Set up to ten Wi-Fi device MAC addresses permitted and not permitted to connect
Six sets of numbers (00 to FF)
-
Dest. IP Address
Set destination IP address to apply rules
Four sets of numbers (0 to 255)
-
Src. IP AddressSet source IP address to apply rules
Four sets of numbers (0 to 255)
-
ProtocolSelect protocols that apply rules
None, TCP, UDP, ICMP
None
Dest. Port Range
Set destination port number or range to apply rules
1 to 65535Link with “-” when specifying range
-
Src. Port RangeSet source port number or range to apply rules
1 to 65535Link with “-” when specifying range
-
Action Select action to set rules Drop, Accept Drop
CommentEnter comments regarding rules
Alphanumerics -
2 Click Apply•Filtering rules appear in Current MAC/IP/Port Filtering Rules
in System list. To delete rule, check Box and click Delete. To clear Boxes of all checks, click Reset.
Port Mapping
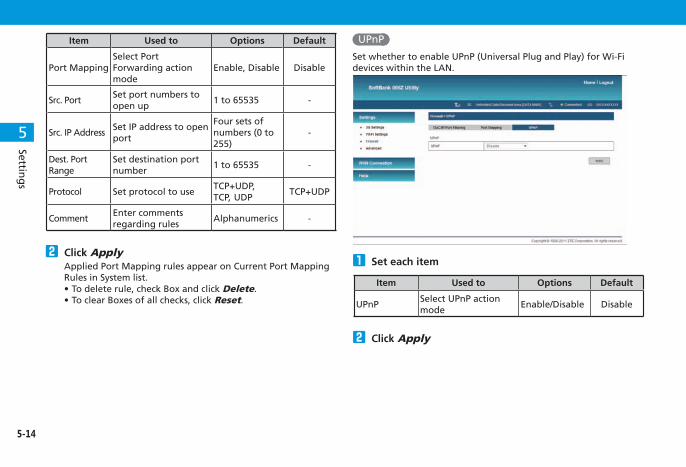
Set rules so that specific device port access in the LAN can be controlled from the Internet. Set a maximum of ten forwarding rules.
1 Set each item

5-14
Setting
s
5
Item Used to Options Default
Port MappingSelect Port Forwarding action mode
Enable, Disable Disable
Src. PortSet port numbers to open up
1 to 65535 -
Src. IP AddressSet IP address to open port
Four sets of numbers (0 to 255)
-
Dest. Port Range
Set destination port number
1 to 65535 -
Protocol Set protocol to useTCP+UDP, TCP, UDP
TCP+UDP
CommentEnter comments regarding rules
Alphanumerics -
2 Click ApplyApplied Port Mapping rules appear on Current Port Mapping Rules in System list.•To delete rule, check Box and click Delete.•To clear Boxes of all checks, click Reset.
UPnP
Set whether to enable UPnP (Universal Plug and Play) for Wi-Fi devices within the LAN.
1 Set each item
Item Used to Options Default
UPnPSelect UPnP action mode
Enable/Disable Disable
2 Click Apply

5-15
5
Setting
s
Advanced
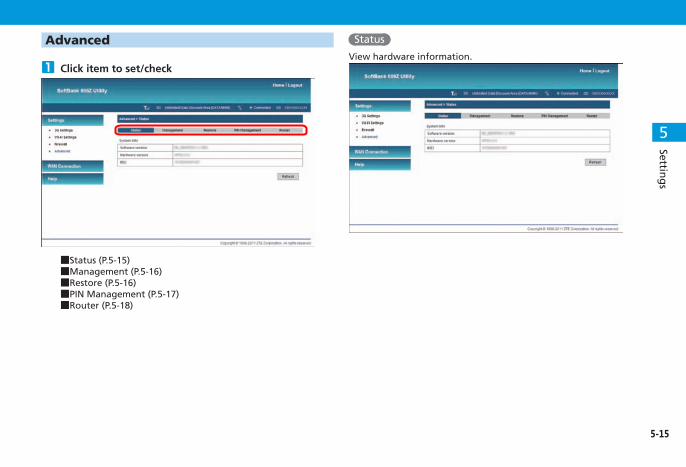
1 Click item to set/check
■Status (P.5-15)■Management (P.5-16)■Restore (P.5-16)■PIN Management (P.5-17)■Router (P.5-18)
Status
View hardware information.
5-16
Setting
s
5
Management
Change SoftBank 006Z Utility default Administrator Password ("admin").
1 Enter current Password, new Password, then enter new Password again for verification
Item Used to Options Default
Password -
Available characters: alphanumerics/symbols (except " ' < > & * ¥ , ; : [ ])
admin
2 Click Apply
Restore
Reset all Wi-Fi router settings to their factory defaults.
1 Click Restore
2 Click OK to reset to factory defaults Defaults are restored. Wi-Fi router automatically restarts andLogin window opens. Log in to continue.
5-17
5
Setting
s
PIN Management
Personal Identification Number (PIN) is USIM security code.Change PIN, or Enable/Disable PIN Authentication to control USIM access.
■To Enable/Disable PIN AuthenticationEnable PIN Authentication, power on Wi-Fi router, then use SoftBank 006Z Utility to enter PIN.
1 Select Enable/Disable from Action
2 Enter PIN correctly in PIN
Item Used to Options Default
ActionSelect operation to apply
Enable, Disable, Modify
Disable
Item Used to Options Default
PIN Current PIN Four to eight-digit number
9999
3 Click Apply
■Changing PIN
1 Select Modify → Enable
2 Set each item
Item Used to Options Default
PIN Enter current PIN Four to eight-digit number
9999
New PIN Enter new PINFour to eight-digit number -

5-18
Setting
s
5
Item Used to Options Default
Confirm New PIN
Enter new PIN again for confirmation
Four to eight-digit number -
PUKAppears when PIN Lock is enabled. Enter PUK Code
Eight-digit number -
3 Click Apply
•SoftBank 006Z Utility required to change PIN. Disable PIN operations for Wi-Fi devices other than computers.
•Log into SoftBank 006Z Utility to enable PIN Authentication. PIN Authentication window appears: Enter PIN → Click Apply
•Incorrectly entering PIN three consecutive times activates PIN Lock. PUK Code is required to unlock it. For details about PUK, contact SoftBank Customer Support, General Information (P.7-3). Entering PUK Code ten consecutive times locks Wi-Fi router completely. If Wi-Fi router is completely locked, predefined procedures are required. Contact SoftBank Customer Support, General Information (P.7-3).
Router
These settings cannot be changed while Wi-Fi router is connected to the Internet.
1 Set each item
Item Used to Options Default
IP AddressSet private IP address
Four sets of numbers (0 to 255)
192.168.3.1
Subnet Mask Set subnet maskFour sets of numbers (0 to 255)
255.255.255.0
MAC AddressConfirm Wi-Fi router MAC address
Six sets of numbers (00 to FF)
-

5-19
5
Setting
s
Item Used to Options Default
DHCP Server Select DHCP server action mode
Enable/Disable Enable
DHCP IP Pool
Set DHCP IP pool starting address and ending address
Four sets of numbers (0 to 255)• Starting address
value must be smaller than ending address
•Do not include IP address in pool
• Starting IP address and ending IP address must be in LAN subnet pool
192.168.3.2 to
192.168.3.253
DHCP Lease Time
Set IP address lease time
1 to 65535 24
2 Click ApplyA confirmation appears.
Changing SecurityChange security from default WEP.
1 Click Settings
2 In Connection menu, select Wi-Fi Settings

5-20
Setting
s
5
3 Click Security 4 Open Security Mode menu to select security•Select WPA-PSK, WPA2-PSK or WPA-PSK/WPA2-PSK.
5 Set items as required•See "Security" (5-10).
6 Click Apply

5-21
5
Setting
s
Internet Connectivity
ConnectionManage Internet connectivity manually via SoftBank 006Z Utility.
1 Click WAN Connection
2 In Connection menu, select Always On → Apply•Alternatively, open Manual menu → Select Connect
Internet → Apply for manual Internet connection.
3 To end Wi-Fi router Internet connection, open Manual menu →Select Disconnect Internet → Apply
Data Roaming Setting
1 Click WAN Connection → Data Roaming Setting
2 In Data Roaming Setting field, select On or Off•Click Apply
•Even if Data Roaming Setting is set to Off, press and hold CONNECT Key to activate Internet connectivity.

6Tro
ub
lesh
oo
ting
Troubleshooting .............................................................................................................. 6-2
6-2
Trou
blesh
oo
ting
6
TroubleshootingCase Refer
1. Unable to connect WLAN P.6-2
2. PC does not recognize Wi-Fi router P.6-3
3. Installer does not automatically activate P.6-4
4. Internet connection fails P.6-4
5. Transmission fails P.6-4
6. Transmissions are slow P.6-4
7. Forgot PIN/Unknown PUK Code/USIM Card is locked
P.6-4
8. USIM Card is not recognized P.6-4
9. Confirming Administrator logon P.6-5
10. "NO SERVICE" appears outside Japan P.6-5
11. Resetting factory defaults P.6-5
12. Old phone number appears in utility software P.6-5
13. Connection failed without notice P.6-5
1. Unable to connect WLAN
Make sure Wi-Fi router is properly connected to PC
If WPS connection fails, see Wi-Fi modem user guide or set Wi-Fi router manually (See "Connecting Wi-Fi Devices via WLAN" (P.2-2)
To connect to WPS PIN specified WLAN, confirm PIN (See "WPS" (P.5-11)
Confirm WEP Key (If forgotten, reset defaults or set WEP Key (See "Security" (P.5-10)) → Reconnect WLAN
To connect to WPS PIN specified WLAN, confirm PIN (See "Security" (P.5-10) → Reconnect WLAN Some Wi-Fi devices do not support WPA/WPA2. See WLAN user guide

6-3
Trou
blesh
oo
ting
6
2. PC does not recognize Wi-Fi router
Confirm that Wi-Fi router is properly installed
Remove Wi-Fi router from PC, restart PC, then reconnect Wi-Fi router
● For Windows 7 or Windows Vista, follow these steps to confirm proper Wi-Fi router installation. Right click Computer → Properties → System Settings → User Account Control → Yes (Windows 7) or Continue (Windows Vista)
In System Properties, select Hardware tab, then click Device Manager
•Windows XP: Right click My Computer → Properties In System Properties, select Hardware tab → Device Manager
Confirm that devices outlined below appear (COM port numbers vary by PC operating environment)

6-4
Trou
blesh
oo
ting
6
3. Installer does not automatically activate
New hardware recognition takes a few seconds.If installer does not automatically activate, remove Wi-Fi router from PC, then restart PC.If installer does not activate automatically, see P.3-5, P.3-6.
4. Internet connection failsMake sure you are within the service area.• If signal reception is poor, move to where signal is
strong, then reconnect.•The access point might be busy depending on the time
of day, wait a little while then reconnect.•Activate SoftBank 006Z Utility and confirm that
3G settings and network settings are correct. See "Advanced Settings" (P.5-4).
5. Transmission fails
Make sure Wi-Fi router is properly connected to PC
Signal may be weak. Move to where signal is stronger
Remove Wi-Fi router from PC and then reconnect it
If Steps to do not re-establish a connection, remove Wi-Fi router, restart PC, and try again
6. Transmissions are slow
Signal may be weak. Move to where signal is stronger.Connection may be poor. Try again later.
7. Forgot PIN/Unknown PUK Code/USIM Card is lockedContact SoftBank Customer Support, General Information (P.7-3).
8. USIM Card is not recognized
Confirm that USIM Card is properly installed See "USIM Card Installation" (P.1-5)
Check USIM Card for damage
Check USIM Card IC chip for scuffs/corrosion
Debris on USIM Card IC chip may prevent recognition. Clean it with a soft cloth
Contact SoftBank Customer Support, General Information (P.7-3)

6-5
Trou
blesh
oo
ting
6
9. Confirming Administrator logon
● For Windows 7 or Windows Vista Click Start menu → Control Panel Click User Accounts and Family Safety → User Accounts
User name and account type appear on the right. If Administrator appears, set up Wi-Fi router
● For Windows XP Click Start Current user name appears at top of Start menu•User name does not appear in Classic Start menu: Right
click Start menu → Properties → Start menu radio button.
Click Start → Control Panel Click User Accounts Check user name in Step . If Administrator appears
below user name, set up Wi-Fi router
10. "NO SERVICE" appears outside Japan
Power off and restart.
11. Resetting factory defaults
● Reset on Wi-Fi router Long Press WPS Key and Power Key simultaneously
● Reset via SoftBank 006Z Utility In SoftBank 006Z Utility, Settings → Advanced → Restore
Click Restore to reset to factory default
12. Old phone number appears in SoftBank 006Z UtilityDepending on contract/cancellation method, old phone number may appear in SoftBank 006Z Utility.
13. Connection failed without noticeConnection method may change. Confirm connection method on Display.•Manual Connection
Press and hold CONNECT Key to toggle auto/manual. Set to auto connection. If using utility, changing via PC is available. See "Internet Connectivity" (P.5-21).
•Auto Connection Turn power off and reconnect.
7A
pp
en
dix
Appendix ......................................................................................................................... 7-2Specifications ................................................................................................................ 7-2Warranty & Service ....................................................................................................... 7-2
Customer Service ............................................................................................................ 7-3
7-2
Ap
pen
dix
7
Appendix
Specifications
Model Name SoftBank 006Z
Dimensions 101.8 mm (D) × 51.8 mm (W) × 13.65 mm (H)
Weight* 80 g
InterfaceUSB 2.0
microSD Card or microSDHC Card
Power Consumption*
3.0 WPower consumption varies by usage.
Operating Environment
Operating Temperature: –10 to +45℃Operating Humidity: 5% to 95%
Frequency W-CDMA: 1500 MHz, 1700 MHz
CompatibleNetworks
WAN: 3G (W-CDMA); 3G High Speed (HSUPA/HSDPA)WLAN: IEEE802.11b/g/n
*Approximate value
Warranty & ServiceWi-Fi router purchase includes Warranty. • Confirm shop name and purchase date. • Read contents of Warranty and keep it in a safe place. • The warranty period can be found in the Warranty. • Before submitting Wi-Fi router for repairs, contact SoftBank Customer Support, General Information (P.7-3) or SoftBank Shop; be prepared to describe problem in detail.
• During the warranty period, repairs will be made under the terms and conditions described in the warranty.
• After the warranty period, repairs will be upon request; if said repairs can be made, you will be charged for them.
•SoftBank Mobile is not liable for any damages resulting from the use of this Wi-Fi router.
•Files and settings may be lost or altered due to accidents or repairs. Keep a copy of important files, etc. SoftBank Mobile is not liable for damages resulting from accidental loss or alteration of files or settings.
•Disassembling or modifying this Wi-Fi router may be a violation of the Radio Law. Note that SoftBank Mobile does not accept repair requests for disassembled or modified products.
•For more information, contact SoftBank Shop or SoftBank Customer Support, General Information (P.7-3).

7-3
Ap
pen
dix
7
For information about SoftBank Mobile devices or services, call General Information. For repairs, call Customer Assistance.
SoftBank Customer Support
General Information
•From a SoftBank handset, dial toll free at 157•From a landline/IP phone, dial toll free at 0800-919-0157
Customer Assistance
•From a SoftBank handset, dial toll free at 113•From a landline/IP phone, dial toll free at 0800-919-0113
If you cannot reach a toll free number, use the number (charges apply) below for your service area:
Hokkaido Area Tohoku Area
Hokuriku AreaKanto, Koshinetsu Area
022-380-4380 Tokai Area 052-388-2002
Kansai Area 06-7669-0180 Chugoku, Shikoku AreaKyushu, Okinawa Area 092-687-0010
SoftBank Technical Support Center (Setup, Operations & Technical Issues)*Service Hours 9:00-20:00From a SoftBank handset, dial toll free at 5525From a landline/IP phone, dial toll free at 0088-21-5525*These numbers cannot be dialed from outside Japan.
SoftBank Mobile Global Call CenterFrom outside Japan, dial +81-3-5351-3491 (toll free from SoftBank handsets)If 006Z is lost/stolen, call this number immediately (international charges apply)
ZTE Japan Customer Support Websitehttp://www.zte.co.jp/products/handsets/handsets_gallery/
Customer Service

SoftBank 006Z User Guide
Please help the mobile industry maintain high
environmental standards. Recycle your old handsets,
batteries and charger units (all manufacturers and
brands). Before you recycle, please remember these
important points: • Handsets, batteries and chargers submitted for recycling cannot be returned.
• Always erase all data on old handsets (Phone Book entries, call records, mail, etc.).
December 2011, Third Edition
SOFTBANK MOBILE Corp.
Model Name: SoftBank 006Z
Manufacturer: ZTE Corporation


![福岡ソフトバンクホークス オフィシャルサイト...polish 20 POINT SoftBank Ban] HAWGCUP $.tsn&viê 2018 Serie POINT Soft aiikî softBank' '7 SoftBankß SoftBank :](https://static.fdocuments.net/doc/165x107/60feec3309929e272b558bfd/cffffff-ffff-polish-20-point.jpg)