SoC Design Flow Tutorial - IAIK
57
SoC Design Flow Tutorial Digital System Integration and Programming Barbara Gigerl, Stefan Mangard, Stefan Steinegger October 6th, 2020 IAIK – Graz University of Technology
Transcript of SoC Design Flow Tutorial - IAIK

SoC Design Flow Tutorial
Digital System Integration and Programming
Barbara Gigerl, Stefan Mangard, Stefan Steinegger
October 6th, 2020
IAIK – Graz University of Technology

Overview www.tugraz.at
• What we want?
Run a bare-metal application on an FPGA
• What we have?
A Zybo FPGA board, a hardware design, software
• How do we get there?
1. Prepare FPGA board
2. Build FPGA HW
3. Build SW for HW
4. Combine everything in a boot image
5. Copy the boot image to the FPGA
6. Run the application
1 — IAIK – Graz University of Technology

Important note www.tugraz.at
Things could go wrong - and will. Don’t expect anything to work
out-of-the-box.
2 — IAIK – Graz University of Technology

Install Vivado and Vitis (SDK) www.tugraz.at
• Xilinx Vivado: IDE for creating hardware designs
• Xilinx Vitis (SDK): SDK for embedded software
• Support for Xilinx FPGAs
• Installation: https://www.xilinx.com/support/download.html
Recommendation: Use version 2018.3
• LXC container: https://github.com/Steinegger/vivado-lxc
• Docker container: https://github.com/Steinegger/vivado-docker/commit/
52865f53870bfc8ddceae689fac3cefe50ef6e0b
3 — IAIK – Graz University of Technology

Other Vivado versions www.tugraz.at
• Newer versions (2019, 2020) might work
• Possible issues:
• Issue #1 (Disable GUI):
https://forums.xilinx.com/t5/Installation-and-Licensing/
Installation-of-Vivado-2020-1-under-Centos-7-8-fails/td-p/1115482
• Issue #2 (Missing Dependencies): https://www.xilinx.com/html_docs/
xilinx2020_1/vitis_doc/aqm1532064088764.html
4 — IAIK – Graz University of Technology

Configuration of the Board

Zybo FPGA Board www.tugraz.at
• Zynq 7000 SoC
• Processor: 650Mhz dual-core
Cortex-A9
• Memory: 512 MB
• Peripherals:
• Ethernet, USB, MicroSD
slot
• Video: VGA and HDMI
• Audio: headphone out,
mircophone and line in
• GPIO: 6 pushbuttons, 4
slide switches, 5 LEDs
5 — IAIK – Graz University of Technology

Configuration of Zybo FPGA Board www.tugraz.at
• Power source
• JP7
• Set to ”USB”
• Boot source
• JP5
• Boot from SD card (”SD”)
• Other options: JTAG
• Board falls back to JTAG mode when no SD card is found.
• Connect USB interface and optionally VGA/HDMI to test our base project.
6 — IAIK – Graz University of Technology

Zybo Z7-20 FPGA Board www.tugraz.at
• Zynq 7020 SoC
• Processor: 650Mhz dual-core
Cortex-A9
• Memory: 1 GB
• Peripherals:
• Ethernet, USB, MicroSD
slot
• Video: VGA and HDMI
• Audio: headphone out,
mircophone and line in
• GPIO: 6 pushbuttons, 4
slide switches, 5 LEDs, 2
RGB LEDs
7 — IAIK – Graz University of Technology

Configuration of Zybo Z7-20 FPGA Board www.tugraz.at
• Power source
• JP6
• Set to ”USB”
• Boot source
• JP5
• Boot from SD card (”SD”)
• Connect USB interface and optionally VGA/HDMI to test our base project.
8 — IAIK – Graz University of Technology

ZedBoard www.tugraz.at
• Zynq 7000 SoC
• same processor, memory and
FPGA
• Peripherals: additional line
out (Audio), 8 LEDs, ...
9 — IAIK – Graz University of Technology

Configuration of ZedBoard www.tugraz.at
• Power source
• 12V barrel jack, no USB available
• Boot source
• JP10,JP9,JP8 set to 110
• Boot from SD card (”SD”)
• Connect USB interface and optionally VGA/HDMI to test our base project.
10 — IAIK – Graz University of Technology

Building the FPGA Hardware

Start Vivado www.tugraz.at
• Export path to license server:
export [email protected]
• Source Vivado environment settings:
source <VIVADO_ROOT>/Vivado/2018/settings64.sh
• Install cable drivers:
• cd <VIVADO_ROOT>/Vivado/2018.2/data/xicom/cable_drivers/
• Execute install script.
• Communication devices of board: /dev/ttyUSB0, /dev/ttyUSB1
• Check if user has privileges to access devices (e.g. is member of dialout group)
• Start Vivado and initialize it with the basis project: vivado
11 — IAIK – Graz University of Technology

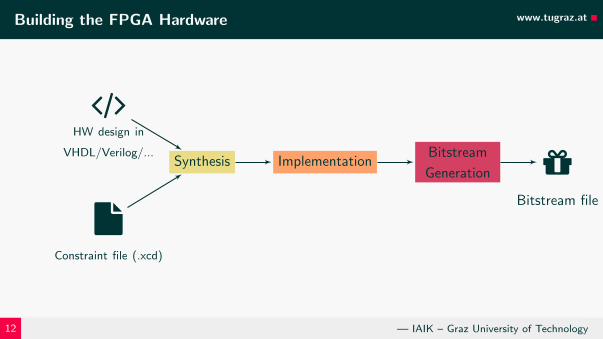
Building the FPGA Hardware www.tugraz.at
/HW design in
VHDL/Verilog/...
nConstraint file (.xcd)
Synthesis ImplementationBitstream
Generation �Bitstream file
12 — IAIK – Graz University of Technology

Building the FPGA Hardware www.tugraz.at
/HW design in
VHDL/Verilog/...
nConstraint file (.xcd)
Synthesis
ImplementationBitstream
Generation �Bitstream file
12 — IAIK – Graz University of Technology

Building the FPGA Hardware www.tugraz.at
/HW design in
VHDL/Verilog/...
nConstraint file (.xcd)
Synthesis Implementation
Bitstream
Generation �Bitstream file
12 — IAIK – Graz University of Technology

Building the FPGA Hardware www.tugraz.at
/HW design in
VHDL/Verilog/...
nConstraint file (.xcd)
Synthesis ImplementationBitstream
Generation
�Bitstream file
12 — IAIK – Graz University of Technology
Building the FPGA Hardware www.tugraz.at
/HW design in
VHDL/Verilog/...
nConstraint file (.xcd)
Synthesis ImplementationBitstream
Generation �Bitstream file
12 — IAIK – Graz University of Technology

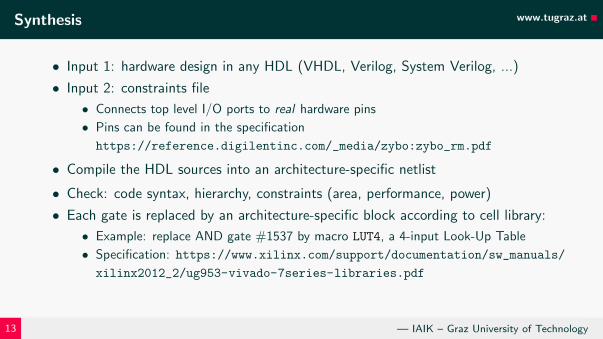
Synthesis www.tugraz.at
• Input 1: hardware design in any HDL (VHDL, Verilog, System Verilog, ...)
• Input 2: constraints file
• Connects top level I/O ports to real hardware pins
• Pins can be found in the specification
https://reference.digilentinc.com/_media/zybo:zybo_rm.pdf
• Compile the HDL sources into an architecture-specific netlist
• Check: code syntax, hierarchy, constraints (area, performance, power)
• Each gate is replaced by an architecture-specific block according to cell library:
• Example: replace AND gate #1537 by macro LUT4, a 4-input Look-Up Table
• Specification: https://www.xilinx.com/support/documentation/sw_manuals/
xilinx2012_2/ug953-vivado-7series-libraries.pdf
• Output: netlist tailored towards the FPGA on our ZYBO Board
13 — IAIK – Graz University of Technology

Implementation www.tugraz.at
• Input: Netlist
• Floor planning, placement and routing, optimizations for specific architecture
• Example: Netlist element AND #1537 which requires LUT4 is assigned LUT4
#20A5 on the FPGA
• Output: map of netlist elements to FPGA blocks → FPGA configuration
14 — IAIK – Graz University of Technology

Bitstream Generation www.tugraz.at
• Input: FPGA configuration
• Transforms map into the bitstream (.BIT) format
• Other formats: (.RBT, .BIN, .HEX, ...)
• Programming FPGA = write bitstream file into FPGA memory
• On boot: FPGA loads configuration from memory and programs all LUTs
15 — IAIK – Graz University of Technology

In Vivado... www.tugraz.at
1. Download suitable base project:
https://extgit.iaik.tugraz.at/sip2020/zybo_base_design
https://extgit.iaik.tugraz.at/sip2020/zybo_z7_base_design
https://extgit.iaik.tugraz.at/sip2020/zedboard_base_design
2. Generate Project: cd <PROJECT_ROOT>/HW && vivado -source project.tcl
3. Synthesis + Implementation + Bitstream Generation: Flow - Generate Bitstream
Note: takes around 15 minutes
4. Export hardware to SDK project: File - Export - Export Hardware
• Include Bitstream
16 — IAIK – Graz University of Technology

Building the ARM Software

Start SDK www.tugraz.at
• Simplest option: In Vivado, File - Launch SDK
• Keep default options for Exported Location and Workspace
• Otherwise, start Vitis (SDK) similar to Vivado via console
17 — IAIK – Graz University of Technology

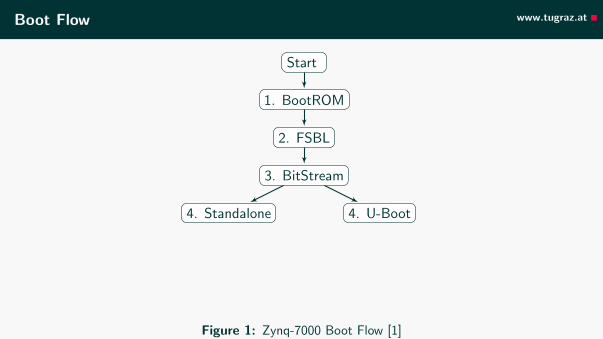
Boot Flow www.tugraz.at
Start
1. BootROM
2. FSBL
3. BitStream
4. Standalone 4. U-Boot
5. Linux OS
C programexecutes
executes
Figure 1: Zynq-7000 Boot Flow [1]
18 — IAIK – Graz University of Technology

Boot Flow www.tugraz.at
Start
1. BootROM
2. FSBL
3. BitStream
4. Standalone 4. U-Boot
5. Linux OS
C programexecutes
executes
Figure 1: Zynq-7000 Boot Flow [1]
18 — IAIK – Graz University of Technology

Boot Flow www.tugraz.at
Start
1. BootROM
2. FSBL
3. BitStream
4. Standalone 4. U-Boot
5. Linux OS
C programexecutes
executes
Figure 1: Zynq-7000 Boot Flow [1]
18 — IAIK – Graz University of Technology

Boot Flow www.tugraz.at
Start
1. BootROM
2. FSBL
3. BitStream
4. Standalone 4. U-Boot
5. Linux OS
C programexecutes
executes
Figure 1: Zynq-7000 Boot Flow [1]
18 — IAIK – Graz University of Technology

Boot Flow www.tugraz.at
Start
1. BootROM
2. FSBL
3. BitStream
4. Standalone
4. U-Boot
5. Linux OS
C programexecutes
executes
Figure 1: Zynq-7000 Boot Flow [1]
18 — IAIK – Graz University of Technology
Boot Flow www.tugraz.at
Start
1. BootROM
2. FSBL
3. BitStream
4. Standalone 4. U-Boot
5. Linux OS
C programexecutes
executes
Figure 1: Zynq-7000 Boot Flow [1]
18 — IAIK – Graz University of Technology

Boot Flow www.tugraz.at
Start
1. BootROM
2. FSBL
3. BitStream
4. Standalone 4. U-Boot
5. Linux OS
C programexecutes
executes
Figure 1: Zynq-7000 Boot Flow [1]
18 — IAIK – Graz University of Technology

Boot Flow www.tugraz.at
Start
1. BootROM
2. FSBL
3. BitStream
4. Standalone 4. U-Boot
5. Linux OS
C programexecutes
executes
Figure 1: Zynq-7000 Boot Flow [1]18 — IAIK – Graz University of Technology

Boot Flow www.tugraz.at
Start
1. BootROM
2. FSBL
3. BitStream
4. Standalone 4. U-Boot
5. Linux OS
C programexecutes
executes
Figure 2: Zynq-7000 Boot Flow [1]19 — IAIK – Graz University of Technology

FSBL in (SDK)... www.tugraz.at
1. File - New - Application Project
• Use default location
• OS Platform: standalone
• Target Hardware and Target Software: default values
• Template: Zynq FSBL
2. Project builds automatically.
20 — IAIK – Graz University of Technology

The C program in Vitis (SDK)... www.tugraz.at
1. File - New - Application Project
2. Template: Empty application
3. Copy the base demo sources into the project’s src folder.
4. Refresh project, it then builds automatically.
21 — IAIK – Graz University of Technology

Running the design

Creating a Boot Image www.tugraz.at
• Zynq SoCs combine FSBL, Bitstream and SW into one boot image (BOOT.bin)
• Select SW project, Create Boot Image
• Select correct paths for FSBL, Bitstream and SW (in this order!)
• Alternatively: run bootgen directly
bootgen -image <IMAGE.BIF> -arch zynq -o <OUTPUT_FILE.BIN>
22 — IAIK – Graz University of Technology

Running the application via SD card www.tugraz.at
• Copy the boot image to SD card
• First partition: FAT32, around 50 MB, used for boot files (BOOT.bin)
• Second partition: ext4 or other, used as root file system and data storage
• Use standard tools to create them (gparted, fdisk+mkfs ,..)
• Insert the SD card into the board
• Power up the board via SW4
• The red power LED (LD11) and the green FPGA programmed LED (LD10)
should be on.
• Test images should be displayed via VGA and HDMI.
23 — IAIK – Graz University of Technology

Communication with the board www.tugraz.at
• Use the virtual serial interface
• Typically: /dev/ttyUSB1
• Configuration: 115200 baud, 8 data bits, 1 stop bit, no parity
• screen /dev/ttyUSB1 115200
24 — IAIK – Graz University of Technology
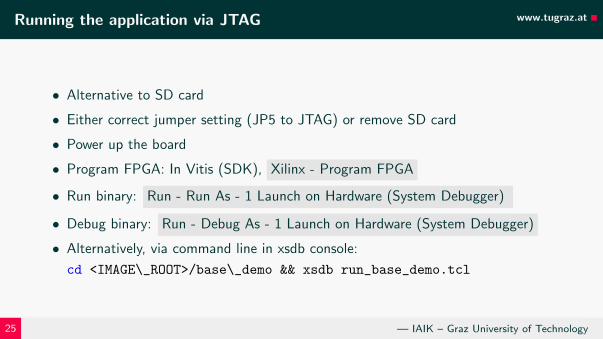
Running the application via JTAG www.tugraz.at
• Alternative to SD card
• Either correct jumper setting (JP5 to JTAG) or remove SD card
• Power up the board
• Program FPGA: In Vitis (SDK), Xilinx - Program FPGA
• Run binary: Run - Run As - 1 Launch on Hardware (System Debugger)
• Debug binary: Run - Debug As - 1 Launch on Hardware (System Debugger)
• Alternatively, via command line in xsdb console:
cd <IMAGE\_ROOT>/base\_demo && xsdb run_base_demo.tcl
25 — IAIK – Graz University of Technology

Links and Resources www.tugraz.at
• Xilinx Installation Resources:
• https://www.xilinx.com/support/download.html
• https://forums.xilinx.com/t5/Installation-and-Licensing/
Installation-of-Vivado-2020-1-under-Centos-7-8-fails/td-p/1115482
• https://www.xilinx.com/html_docs/xilinx2020_1/vitis_doc/
aqm1532064088764.html
• ZYBO FPGA Board Reference Manual
https://reference.digilentinc.com/_media/zybo:zybo_rm.pdf
• ZYBO-Z7 Reference Manual
https://reference.digilentinc.com/_media/reference/programmable-logic/
zybo-z7/zybo-z7_rm.pdf
• ZedBoard Reference Manual
https://reference.digilentinc.com/_media/zedboard:zedboard_ug.pdf
26 — IAIK – Graz University of Technology

References
[1] X. Inc., Ultrafast embedded design methodology guide,, 2018. [Online]. Available:
https://www.xilinx.com/support/documentation/sw_manuals/ug1046-
ultrafast-design-methodology-guide.pdf.
27 — IAIK – Graz University of Technology