
Snap Freezing of Tissue Samples - BioCisionbiocision.com.s219960.gridserver.com/uploads/docs/... ·...
3
BioCision, LLC • 12 E. Sir Francis Drake Boulevard, Unit B, Larkspur, CA 94939 USA • [email protected] • www.biocision.com Protocol 1001 Snap Freezing of Tissue Samples Introduction Snap freezing, or flash freezing, is the process by which samples are lowered to temperatures below -70°C very rapidly using dry ice or liquid nitrogen. Snap freezing achieves the same endpoint as slow rate- controlled freezing, but at a much faster rate. Snap freezing with a CoolRack ® module will provide sample vessel stability, organization and consistent freezing parameters, rapid hands-free sample processing while avoiding lost or contaminated samples. Snap freezing is performed on a pre-cooled CoolRack module, which ensures fast heat transfer. This method can provide excellent specimen integrity and a wide array of options for tissue analysis, including extraction of proteins, DNA and RNA for use in research and diagnostics. This procedure is intended to ensure that tissue samples collected will be frozen in a safe and efficient manner while eliminating the risks of contamination and variation in molecular integrity. The following protocol describes a general procedure for snap- freezing. For non-standard sample types, always refer to the tissue-specific protocols. Materials • Fresh tissue (harvest as fast as possible) • TruCool ® 1.5ml conical microcentrifuge tubes • CoolRack M15-PF or M30-PF module • Cryolabels or cryomarker • ThermalTray™ LP platform with CoolMat™ protector • Insulative ice pan or CoolBox 30 insulative system • 37°C water bath • Crushed ice • Liquid nitrogen or dry ice Tissue Collection Note: Ensure that the resected tissue never desiccates or is contaminated by surrounding tissue or other samples. Use clean scalpels and forceps between samples to avoid cross contamination between samples. 1. Place crushed ice in an ice pan and insert ThermalTray platform into ice until water vapor begins to collect on the surface. 2. Allow to cool until condensed 3. Place a CoolMat protector on the ThermalTray LP platform to protect surface and the edges of cutting tools. 4. Cut tissue from each anatomic site to the appropriate size (usually < 5mm thick), and place specimens onto the CoolMat protector for detailed dissection. Note: The low temperature will pre-chill the tissue and significantly reduce the rate of dehydration. 5. Place isolated segments of tissue into separate sterile labeled tubes or containers for snap freezing. 6. Close the container and place the specimen container into a CoolRack well. Note: Unless intended for another method of preservation, fresh tissue should be frozen as soon as possible, and, optimally, within 30 minutes from resection. Snap Freezing on Dry Ice Note: Using a CoolBox™ insulated container in this process allows protected handling of the CoolRack module and minimal requirements for dry ice. For optimum snap freezing rates in dry ice, we recommend using 1.5 mL conical microcentrifuge tubes with a profile-fit CoolRack M-PF series module. The contoured well design
Transcript of Snap Freezing of Tissue Samples - BioCisionbiocision.com.s219960.gridserver.com/uploads/docs/... ·...
BioCision, LLC • 12 E. Sir Francis Drake Boulevard, Unit B, Larkspur, CA 94939 USA • [email protected] • www.biocision.com
Protocol 1001
Snap Freezing of Tissue Samples Introduction Snap freezing, or flash freezing, is the process by which samples are lowered to temperatures below -70°C very rapidly using dry ice or liquid nitrogen. Snap freezing achieves the same endpoint as slow rate-controlled freezing, but at a much faster rate. Snap freezing with a CoolRack® module will provide sample vessel stability, organization and consistent freezing parameters, rapid hands-free sample processing while avoiding lost or contaminated samples. Snap freezing is performed on a pre-cooled CoolRack module, which ensures fast heat transfer. This method can provide excellent specimen integrity and a wide array of options for tissue analysis, including extraction of proteins, DNA and RNA for use in research and diagnostics. This procedure is intended to ensure that tissue samples collected will be frozen in a safe and efficient manner while eliminating the risks of contamination and variation in molecular integrity. The following protocol describes a general procedure for snap-freezing. For non-standard sample types, always refer to the tissue-specific protocols. Materials • Fresh tissue (harvest as fast as
possible) • TruCool® 1.5ml conical microcentrifuge
tubes • CoolRack M15-PF or M30-PF module • Cryolabels or cryomarker • ThermalTray™ LP platform with
CoolMat™ protector • Insulative ice pan or CoolBox 30
insulative system • 37°C water bath • Crushed ice • Liquid nitrogen or dry ice
Tissue Collection Note: Ensure that the resected tissue never desiccates or is contaminated by surrounding tissue or other samples. Use clean scalpels and forceps between samples to avoid cross contamination between samples. 1. Place crushed ice in an ice pan and insert
ThermalTray platform into ice until water vapor begins to collect on the surface.
2. Allow to cool until condensed 3. Place a CoolMat protector on the
ThermalTray LP platform to protect surface and the edges of cutting tools.
4. Cut tissue from each anatomic site to the appropriate size (usually < 5mm thick), and place specimens onto the CoolMat protector for detailed dissection.
Note: The low temperature will pre-chill the tissue and significantly reduce the rate of dehydration. 5. Place isolated segments of tissue into
separate sterile labeled tubes or containers for snap freezing.
6. Close the container and place the specimen container into a CoolRack well.
Note: Unless intended for another method of preservation, fresh tissue should be frozen as soon as possible, and, optimally, within 30 minutes from resection. Snap Freezing on Dry Ice Note: Using a CoolBox™ insulated container in this process allows protected handling of the CoolRack module and minimal requirements for dry ice. For optimum snap freezing rates in dry ice, we recommend using 1.5 mL conical microcentrifuge tubes with a profile-fit CoolRack M-PF series module. The contoured well design
BioCision, LLC • 12 E. Sir Francis Drake Boulevard, Unit B, Larkspur, CA 94939 USA • [email protected] • www.biocision.com
of the CoolRack M-PF modules snugly contacts the full exterior surface of the microfuge tubes and delivers a freeze rate that is faster than directly inserting tubes into dry ice. (Fig. 1) Depending on environmental conditions, a CoolBox base with 200cc crushed dry ice will maintain CoolRack module and sample tubes at -78oC. To extend the cooling duration, simply replenish the dry ice. Dry ice requirements and cooling duration will vary with other insulated containers. Always use dry ice to transfer sample tubes to permanent storage to avoid temperature rise and sample damage. Tube contents can rise from -75°C to over -50°C in less than one minute if exposed to room temperature air.
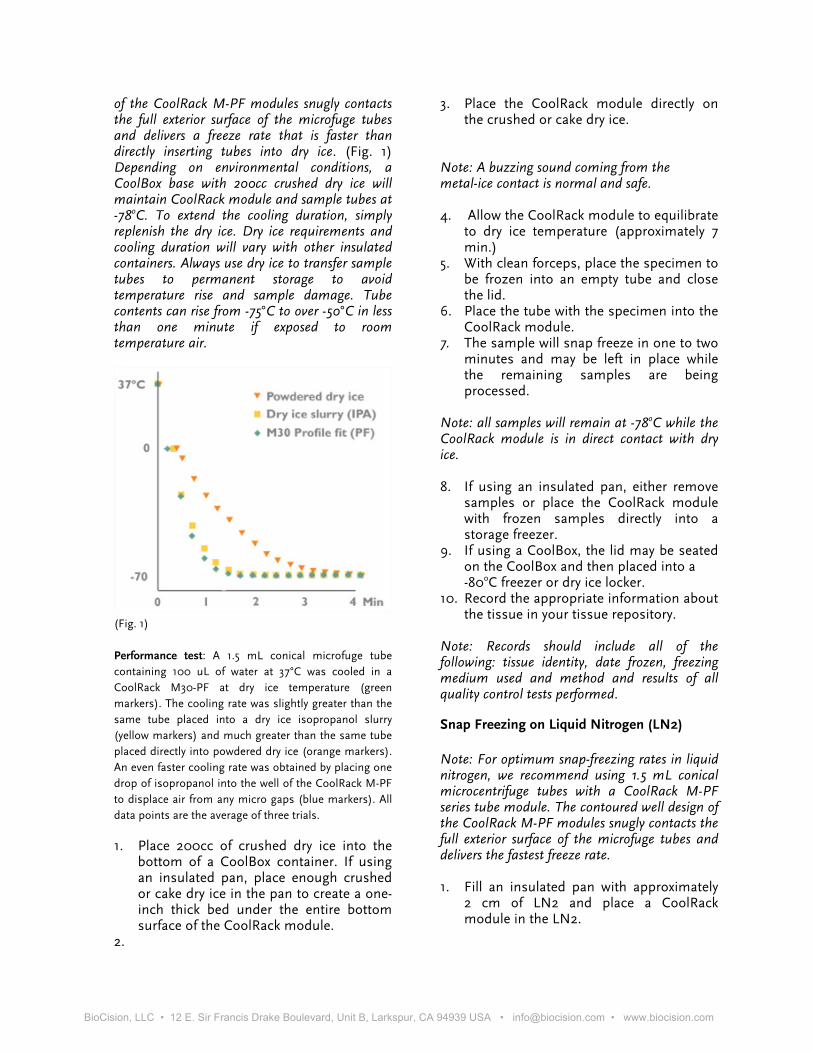
(Fig. 1) Performance test: A 1.5 mL conical microfuge tube containing 100 uL of water at 37°C was cooled in a CoolRack M30-PF at dry ice temperature (green markers). The cooling rate was slightly greater than the same tube placed into a dry ice isopropanol slurry (yellow markers) and much greater than the same tube placed directly into powdered dry ice (orange markers). An even faster cooling rate was obtained by placing one drop of isopropanol into the well of the CoolRack M-PF to displace air from any micro gaps (blue markers). All data points are the average of three trials. 1. Place 200cc of crushed dry ice into the
bottom of a CoolBox container. If using an insulated pan, place enough crushed or cake dry ice in the pan to create a one-inch thick bed under the entire bottom surface of the CoolRack module.
2.
3. Place the CoolRack module directly on the crushed or cake dry ice.
Note: A buzzing sound coming from the metal-ice contact is normal and safe. 4. Allow the CoolRack module to equilibrate
to dry ice temperature (approximately 7 min.)
5. With clean forceps, place the specimen to be frozen into an empty tube and close the lid.
6. Place the tube with the specimen into the CoolRack module.
7. The sample will snap freeze in one to two minutes and may be left in place while the remaining samples are being processed.
Note: all samples will remain at -78oC while the CoolRack module is in direct contact with dry ice. 8. If using an insulated pan, either remove
samples or place the CoolRack module with frozen samples directly into a storage freezer.
9. If using a CoolBox, the lid may be seated on the CoolBox and then placed into a -80oC freezer or dry ice locker.
10. Record the appropriate information about the tissue in your tissue repository.
Note: Records should include all of the following: tissue identity, date frozen, freezing medium used and method and results of all quality control tests performed. Snap Freezing on Liquid Nitrogen (LN2) Note: For optimum snap-freezing rates in liquid nitrogen, we recommend using 1.5 mL conical microcentrifuge tubes with a CoolRack M-PF series tube module. The contoured well design of the CoolRack M-PF modules snugly contacts the full exterior surface of the microfuge tubes and delivers the fastest freeze rate. 1. Fill an insulated pan with approximately
2 cm of LN2 and place a CoolRack module in the LN2.
BioCision, LLC • 12 E. Sir Francis Drake Boulevard, Unit B, Larkspur, CA 94939 USA • [email protected] • www.biocision.com
2. The CoolRack module will cool to snap freezing temperature of -140˚C in approximately 12 minutes, although to preserve LN2 and reduce time it takes to reach snap freezing temperature, the CoolRack module may be pre-chilled in a refrigerator or freezer.
3. With clean forceps, place the specimen to be frozen into an empty tube, and then place the tube in the CoolRack module.
4. The sample will quickly snap freeze and may be left in place while the remaining samples are being processed.
5. If storing the samples in liquid nitrogen, it is recommended that the samples be placed in the vapor phase of liquid nitrogen to prevent possible LN2 aspiration into the tube and a possible explosion when the tube is returned to room temperature.
6. Record the appropriate information about the tissue in your tissue repository.
Note: Records should include all of the following: tissue identity, date frozen, freezing medium used and method and results of all quality control tests performed. Sample Warming 1. Place a ThermalTray™ platform into a
37˚C water bath. Rest a CoolRack module on the ThermalTray and allow both to equilibrate to bath temperature (approximately 10-15 minutes).
2. Using appropriate safety equipment, remove the tube from its storage location and place it into the CoolRack module.
Note: This set up will ensure consistent and rapid thawing of all tubes and aid in ensuring sterility, as the tube will not be put into direct contact with the bath water. It might be necessary to offset the water bath by one or two degrees to maintain the ThermalTray platform and CoolRack module at 37oC.
3. The tissue is now ready to be processed.
Dry ice/LN2 or metal surfaces at dry ice/LN2 temperature can freeze skin on contact and may cause serious burns. Never handle dry ice, LN2 or cold metal with bare hands. Always use
protective equipment including insulated gloves when handling dry ice or materials such as the CoolRack that has been in contact with dry ice or LN2. This protocol is for orientation only and does not include, nor is intended to substitute for, proper laboratory safety procedures. Obtain training and certification for the safe handling of dry ice and LN2 from your laboratory safety supervisor before attempting any procedures involving dry ice or LN2. References Best Practices for Repositories I. Collection, Storage and Retrieval of Human Biological Materials for Research. International Society for Biological and Environmental Repositories (ISBER). http:// www.isber.org