Smart HP - CAREL
92
Smart HP Application for the management of ground source heat pumps Code FLSTDmHPGE User manual Integrated Control Solutions & Energy Savings
Transcript of Smart HP - CAREL
+030220741 Smart HP – rel 2.2 -12/11/2013 1
Smart HP Application for the management of ground source heat pumps Code FLSTDmHPGE
User manual
I n t e g r a t e d C o n t r o l S o l u t i o n s & E n e r g y S a v i n g s

ENG
+030220741 Smart HP – rel 2.2 -12/11/2013
2
ENG
+030220741 Smart HP – rel 2.2 -12/11/2013
3
WARNING
CAREL bases the development of its products on decades of experience in HVAC, on the continuous investments in technological innovations to products, procedures and strict quality processes with in-circuit and functional testing on 100% of its products, and on the most innovative production technology available on the market. CAREL and its subsidiaries nonetheless cannot guarantee that all the aspects of the product and the software included with the product respond to the requirements of the final application, despite the product being developed according to start-of-the-art techniques. The customer (manufacturer, developer or installer of the final equipment) accepts all liability and risk relating to the configuration of the product in order to reach the expected results in relation to the specific final installation and/or equipment. CAREL may, based on specific agreements, acts as a consultant for the positive commissioning of the final unit/application, however in no case does it accept liability for the correct operation of the final equipment/system. The CAREL product is a state-of-the-art product, whose operation is specified in the technical documentation supplied with the product or can be downloaded, even prior to purchase, from the website www.CAREL.com. Each CAREL product, in relation to its advanced level of technology, requires setup/configuration/programming/commissioning to be able to operate in the best possible way for the specific application. The failure to complete such operations, which are required/indicated in the user manual, may cause the final product to malfunction; CAREL accepts no liability in such cases. Only qualified personnel may install or carry out technical service on the product. The customer must only use the product in the manner described in the documentation relating to the product. In addition to observing any further warnings described in this manual, the following warnings must be heeded for all CAREL products: • Prevent the electronic circuits from getting wet. Rain, humidity and all types of
liquids or condensate contain corrosive minerals that may damage the electronic circuits. In any case, the product should be used or stored in environments that comply with the temperature and humidity limits specified in the manual.
• Do not install the device in particularly hot environments. Too high temperatures may reduce the life of electronic devices, damage them and deform or melt the plastic parts. In any case, the product should be used or stored in environments that comply with the temperature and humidity limits specified in the manual.
• Do not attempt to open the device in any way other than described in the manual.
• Do not drop, hit or shake the device, as the internal circuits and mechanisms may be irreparably damaged.
• Do not use corrosive chemicals, solvents or aggressive detergents to clean the device.
• Do not use the product for applications other than those specified in the technical manual.
All of the above suggestions likewise apply to the controllers, serial boards, programming keys or any other accessory in the CAREL product portfolio. CAREL adopts a policy of continual development. Consequently, CAREL reserves the right to make changes and improvements to any product described in this document without prior warning. The technical specifications shown in the manual may be changed without prior warning. The liability of CAREL in relation to its products is specified in the CAREL general contract conditions, available on the website www.CAREL.com and/or by specific agreements with customers; specifically, to the extent where allowed by applicable legislation, in no case will CAREL, its employees or subsidiaries be liable for any lost earnings or sales, losses of data and information, costs of replacement goods or services, damage to things or people, downtime or any direct, indirect, incidental, actual, punitive, exemplary, special or consequential damage of any kind
whatsoever, whether contractual, extra-contractual or due to negligence, or any other liabilities deriving from the installation, use or impossibility to use the product, even if CAREL or its subsidiaries are warned of the possibility of such damage. DISPOSAL
INFORMATION FOR USERS ON THE CORRECT HANDLING OF WASTE ELECTRICAL AND ELECTRONIC EQUIPMENT (WEEE) In reference to European Union directive 2002/96/EC issued on 27 January 2003 and the related national legislation, please note that: • WEEE cannot be disposed of as municipal waste and such waste must be
collected and disposed of separately; • the public or private waste collection systems defined by local legislation must
be used. In addition, the equipment can be returned to the distributor at the end of its working life when buying new equipment;
• the equipment may contain hazardous substances: the improper use or incorrect disposal of such may have negative effects on human health and on the environment;
• the symbol (crossed-out wheeled bin) shown on the product or on the packaging and on the instruction sheet indicates that the equipment has been introduced onto the market after 13 August 2005 and that it must be disposed of separately;
• in the event of illegal disposal of electrical and electronic waste, the penalties are specified by local waste disposal legislation.
KEY TO THE ICONS
NOTE: to bring attention to a very important subject; in particular, regarding the practical use of the various functions of the product.
IMPORTANT: to bring critical issues regarding the use of the product to the attention of the user. TUTORIAL: some simple examples to accompany the user in configuring the most common settings.

+030220741 Smart HP – rel 2.2 -12/11/2013 4
+030220741 Smart HP – rel 2.2 -12/11/2013 5
CONTENTS 1. INTRODUCTION ................................................................................................................................................................................................................................ 7
1.1 Main features ............................................................................................................................................................................................................................. 7 1.2 Components and accessories................................................................................................................................................................................................. 8 1.3 I/O configurations - type of unit (default) ........................................................................................................................................................................... 9
2. HARDWARE FEATURES AND INSTALLATION ........................................................................................................................................................................... 20 2.1 pCO3 board specifications ..................................................................................................................................................................................................... 20 2.2 Installation ................................................................................................................................................................................................................................. 21
3. COMMISSIONING ........................................................................................................................................................................................................................... 25 3.1 pCO Manager ........................................................................................................................................................................................................................... 25 3.2 SmartKey ................................................................................................................................................................................................................................... 26 3.3 Commissioning ........................................................................................................................................................................................................................ 26
4. USER INTERFACE ............................................................................................................................................................................................................................. 28 4.1 Graphic terminal ...................................................................................................................................................................................................................... 28 4.2 Display ....................................................................................................................................................................................................................................... 28
5. DESCRIPTION OF THE MENUS .................................................................................................................................................................................................... 30 5.1 A. Unit On/Off ................................................................................................................................................................................................................. 30 5.2 B. Set point ....................................................................................................................................................................................................................... 31 5.3 C. Clock/Time bands ...................................................................................................................................................................................................... 31 5.4 D. Inputs/Outputs ........................................................................................................................................................................................................... 31 5.5 E. Alarm log ...................................................................................................................................................................................................................... 32 5.6 F. Change Board ............................................................................................................................................................................................................. 32 5.7 G. Service .......................................................................................................................................................................................................................... 32 5.8 H. Manufacturer .............................................................................................................................................................................................................. 33
6. FUNCTIONS ...................................................................................................................................................................................................................................... 34 6.1 Compressor management .................................................................................................................................................................................................... 34 6.2 Inverter-driven compressor management with control of the envelope ................................................................................................................... 34 6.3 Electronic valve management with EVO ............................................................................................................................................................................ 35 6.4 Antifreeze function .................................................................................................................................................................................................................. 35 6.5 System water circuit and ground source circuit management. .................................................................................................................................... 35 6.6 Humidifier and dehumidifier management ...................................................................................................................................................................... 36 6.7 Domestic hot water temperature control and Antilegionella function ....................................................................................................................... 36 6.8 Solar collector management ................................................................................................................................................................................................. 36 6.9 Temperature compensation ................................................................................................................................................................................................. 37 6.10 Zone management using serial probes or Clima units .................................................................................................................................................. 37 6.11 Recovery fans ........................................................................................................................................................................................................................... 37 6.12 Outside coil fan control ......................................................................................................................................................................................................... 37 6.13 Defrost control ......................................................................................................................................................................................................................... 37 6.14 Comparing cost effectiveness between heat pump and boiler.................................................................................................................................... 38
7. TABLE OF PARAMETERS ................................................................................................................................................................................................................. 39 8. VARIABLES SENT TO THE SUPERVISOR ..................................................................................................................................................................................... 77 9. ALARMS .............................................................................................................................................................................................................................................. 82
9.1 Alarm management ................................................................................................................................................................................................................ 82 9.2 Alarm log ................................................................................................................................................................................................................................... 82 9.3 Table of alarms ........................................................................................................................................................................................................................ 83
10. NEW FEATURES IN VERSION 2.0 ............................................................................................................................................................................................ 87

+030220741 Smart HP – rel 2.2 -12/11/2013 6
ENG
+030220741 Smart HP – rel 2.2 -12/11/2013
7
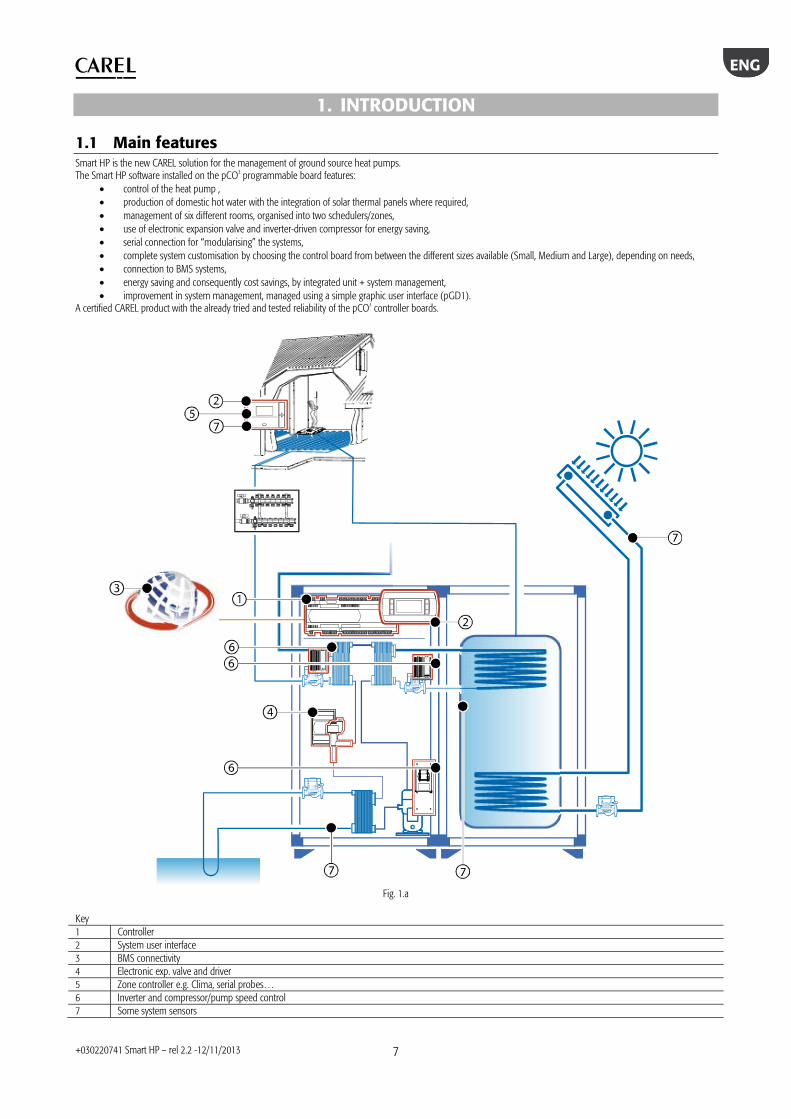
1. INTRODUCTION
1.1 Main features Smart HP is the new CAREL solution for the management of ground source heat pumps. The Smart HP software installed on the pCO3 programmable board features:
• control of the heat pump , • production of domestic hot water with the integration of solar thermal panels where required, • management of six different rooms, organised into two schedulers/zones, • use of electronic expansion valve and inverter-driven compressor for energy saving, • serial connection for “modularising” the systems, • complete system customisation by choosing the control board from between the different sizes available (Small, Medium and Large), depending on needs, • connection to BMS systems, • energy saving and consequently cost savings, by integrated unit + system management, • improvement in system management, managed using a simple graphic user interface (pGD1).
A certified CAREL product with the already tried and tested reliability of the pCO3 controller boards.
Fig. 1.a
Key 1 Controller 2 System user interface 3 BMS connectivity 4 Electronic exp. valve and driver 5 Zone controller e.g. Clima, serial probes… 6 Inverter and compressor/pump speed control 7 Some system sensors
ENG
+030220741 Smart HP – rel 2.2 -12/11/2013
8
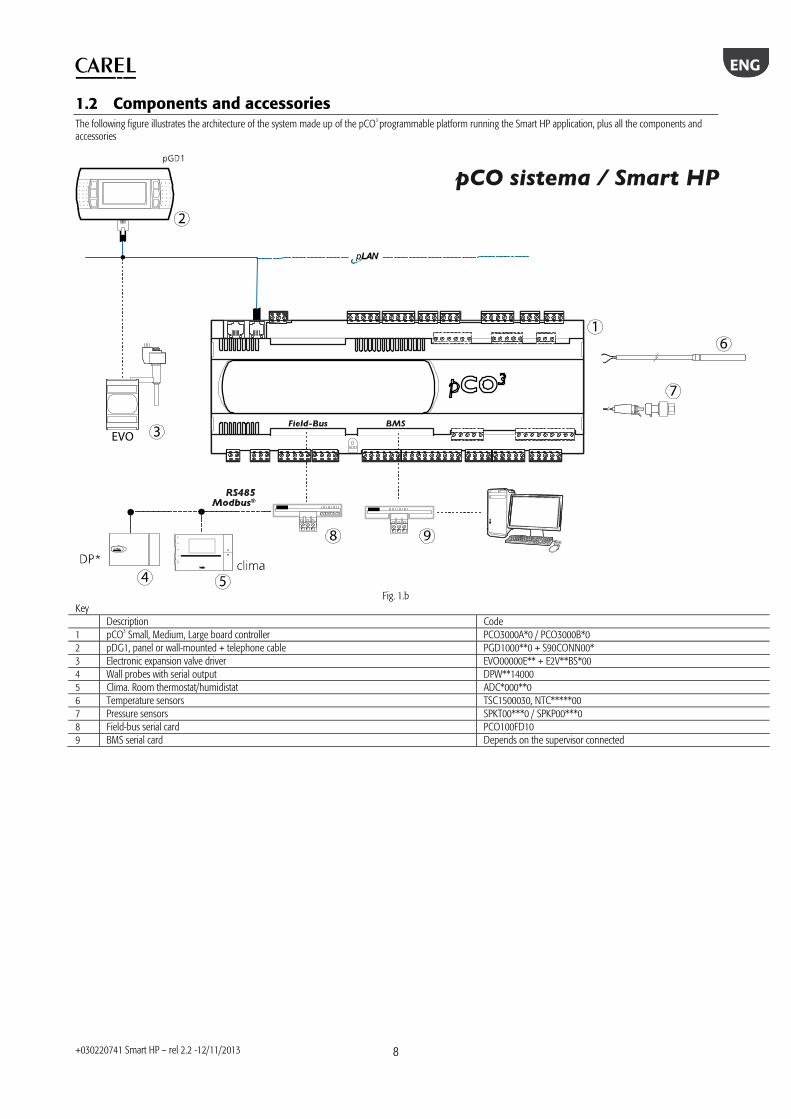
1.2 Components and accessories The following figure illustrates the architecture of the system made up of the pCO3 programmable platform running the Smart HP application, plus all the components and accessories
EVO
Fig. 1.b
Key Description Code 1 pCO3 Small, Medium, Large board controller PCO3000A*0 / PCO3000B*0 2 pDG1, panel or wall-mounted + telephone cable PGD1000**0 + S90CONN00* 3 Electronic expansion valve driver EVO00000E** + E2V**BS*00 4 Wall probes with serial output DPW**14000 5 Clima. Room thermostat/humidistat ADC*000**0 6 Temperature sensors TSC1500030, NTC*****00
7 Pressure sensors SPKT00***0 / SPKP00***0 8 Field-bus serial card PCO100FD10 9 BMS serial card Depends on the supervisor connected
ENG
+030220741 Smart HP – rel 2.2 -12/11/2013
9
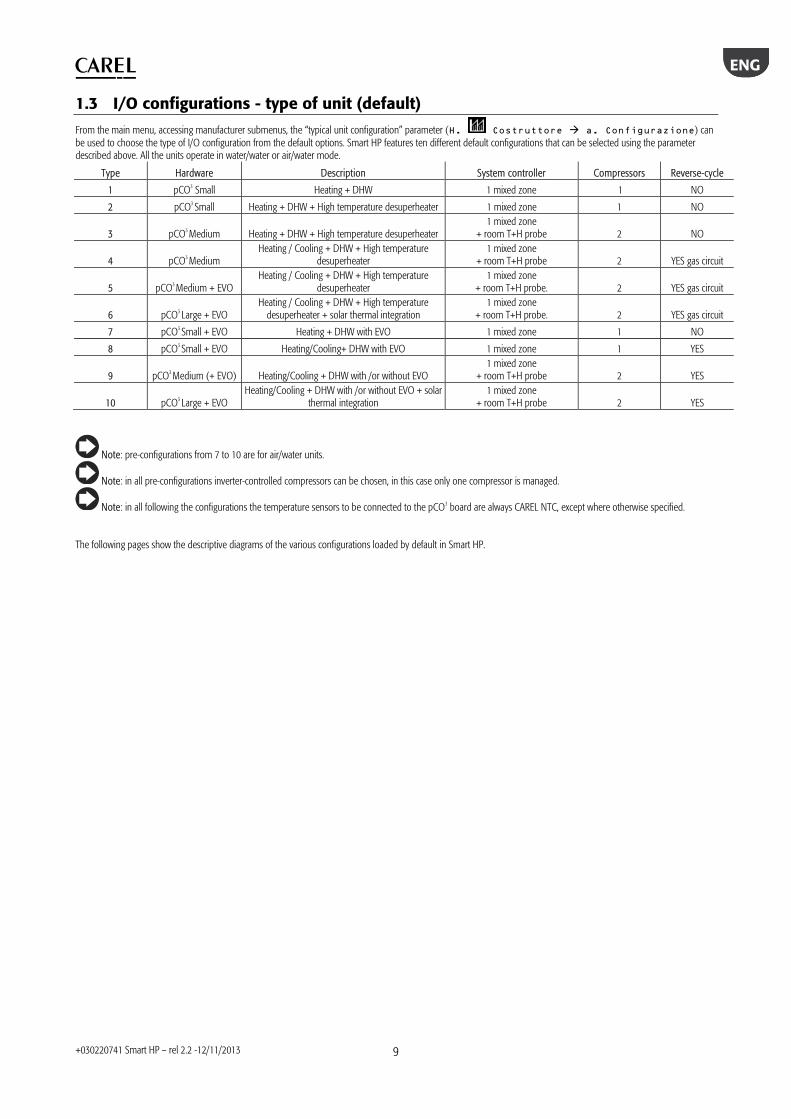
1.3 I/O configurations - type of unit (default)
From the main menu, accessing manufacturer submenus, the “typical unit configuration” parameter ( ) can be used to choose the type of I/O configuration from the default options. Smart HP features ten different default configurations that can be selected using the parameter described above. All the units operate in water/water or air/water mode.
Type Hardware Description System controller Compressors Reverse-cycle
1 pCO3 Small Heating + DHW 1 mixed zone 1 NO
2 pCO3 Small Heating + DHW + High temperature desuperheater 1 mixed zone 1 NO
3 pCO3 Medium Heating + DHW + High temperature desuperheater1 mixed zone
+ room T+H probe 2 NO
4 pCO3 Medium Heating / Cooling + DHW + High temperature
desuperheater 1 mixed zone
+ room T+H probe 2 YES gas circuit
5 pCO3 Medium + EVO Heating / Cooling + DHW + High temperature
desuperheater 1 mixed zone
+ room T+H probe. 2 YES gas circuit
6 pCO3 Large + EVO Heating / Cooling + DHW + High temperature
desuperheater + solar thermal integration 1 mixed zone
+ room T+H probe. 2 YES gas circuit
7 pCO3 Small + EVO Heating + DHW with EVO 1 mixed zone 1 NO
8 pCO3 Small + EVO Heating/Cooling+ DHW with EVO 1 mixed zone 1 YES
9 pCO3 Medium (+ EVO) Heating/Cooling + DHW with /or without EVO 1 mixed zone
+ room T+H probe 2 YES
10 pCO3 Large + EVO Heating/Cooling + DHW with /or without EVO + solar
thermal integration 1 mixed zone
+ room T+H probe 2 YES
Note: pre-configurations from 7 to 10 are for air/water units.
Note: in all pre-configurations inverter-controlled compressors can be chosen, in this case only one compressor is managed.
Note: in all following the configurations the temperature sensors to be connected to the pCO3 board are always CAREL NTC, except where otherwise specified. The following pages show the descriptive diagrams of the various configurations loaded by default in Smart HP.
ENG
+030220741 Smart HP – rel 2.2 -12/11/2013
10
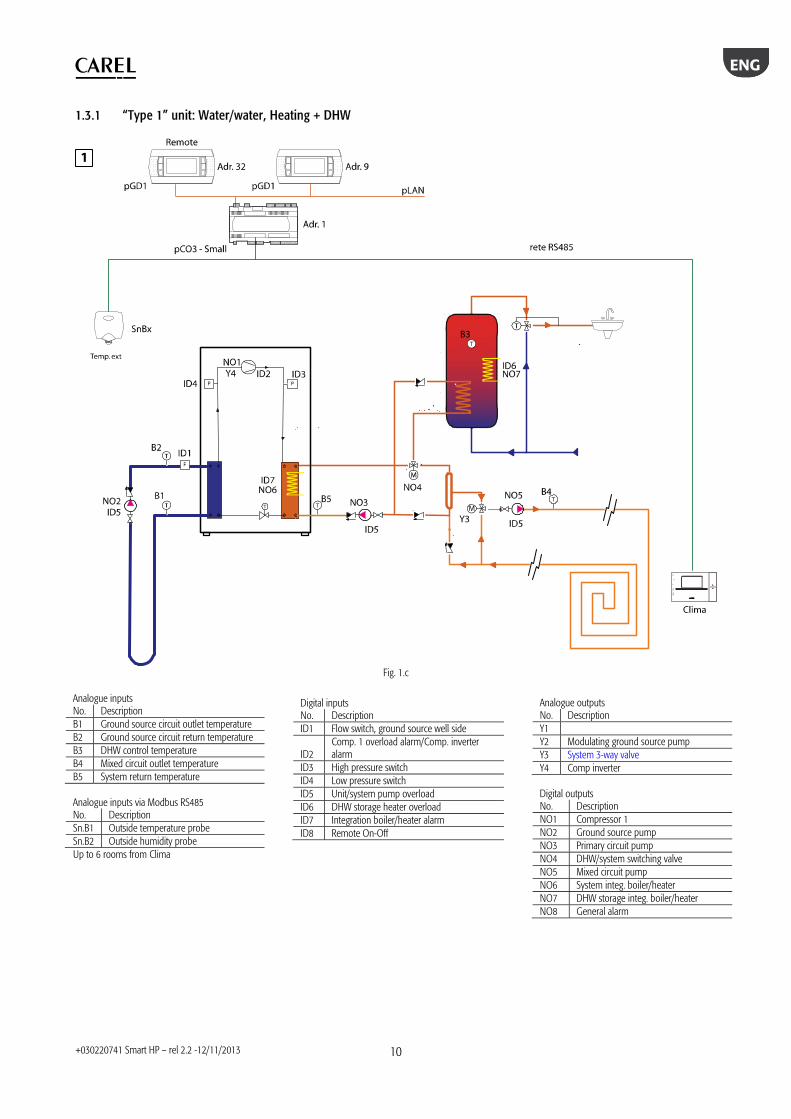
1.3.1 “Type 1” unit: Water/water, Heating + DHW
Fig. 1.c
Analogue inputs No. Description B1 Ground source circuit outlet temperature B2 Ground source circuit return temperature B3 DHW control temperature B4 Mixed circuit outlet temperature B5 System return temperature Analogue inputs via Modbus RS485 No. Description Sn.B1 Outside temperature probe Sn.B2 Outside humidity probe Up to 6 rooms from Clima
Analogue outputs No. Description Y1 Y2 Modulating ground source pump Y3 System 3-way valve Y4 Comp inverter Digital outputs No. Description NO1 Compressor 1 NO2 Ground source pump NO3 Primary circuit pump NO4 DHW/system switching valve NO5 Mixed circuit pump NO6 System integ. boiler/heater NO7 DHW storage integ. boiler/heater NO8 General alarm
Digital inputs No. Description ID1 Flow switch, ground source well side
ID2 Comp. 1 overload alarm/Comp. inverter alarm
ID3 High pressure switch ID4 Low pressure switch ID5 Unit/system pump overload ID6 DHW storage heater overload ID7 Integration boiler/heater alarm ID8 Remote On-Off
ENG
+030220741 Smart HP – rel 2.2 -12/11/2013
11
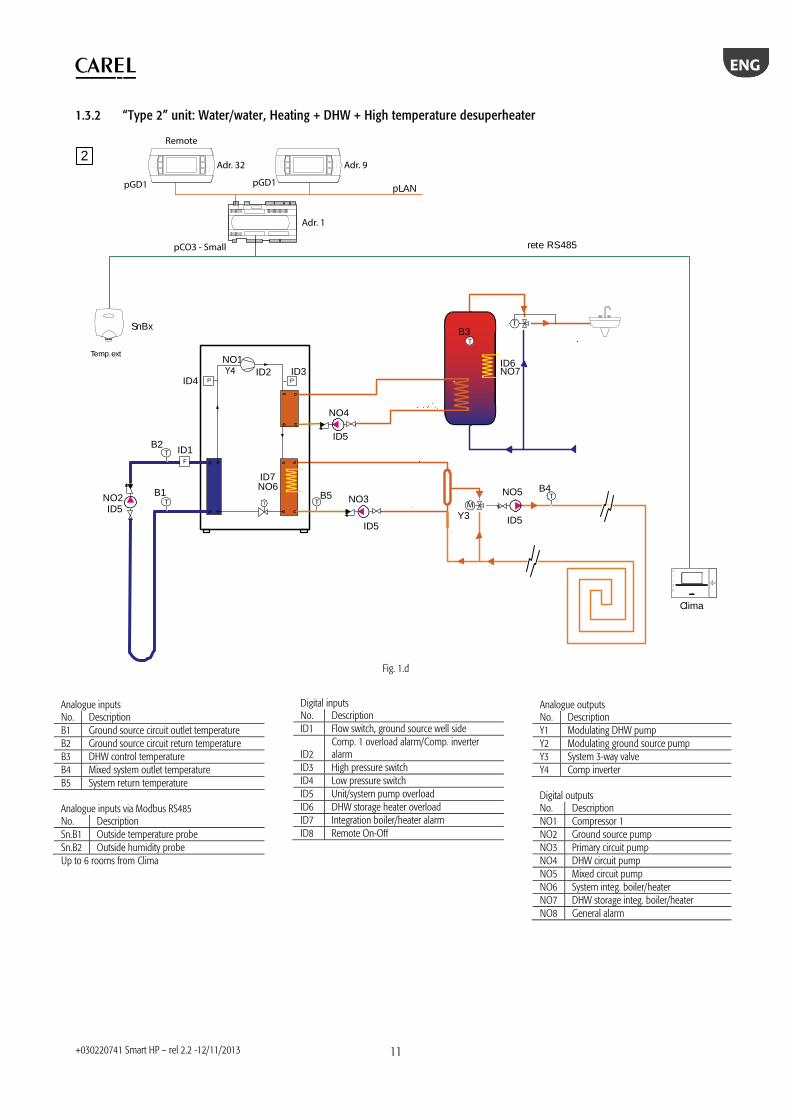
1.3.2 “Type 2” unit: Water/water, Heating + DHW + High temperature desuperheater
rete RS485
SnBx
B2
ID4
ID1
ID3ID2
ID5ID5
ID5
ID5
Y3
NO5NO3
NO4
NO2
NO1
B1 B5
ID6NO7
B4
pLANpGD1
Temp.ext
Clima
T
T
T TT
PP
F
B3
ID7NO6
2
pGD1
Remote
pCO3 - Small
Adr. 9Adr. 32
Adr. 1
°C/°F
Set
Prg
Fig. 1.d
Analogue outputs No. Description Y1 Modulating DHW pump Y2 Modulating ground source pump Y3 System 3-way valve Y4 Comp inverter Digital outputs No. Description NO1 Compressor 1 NO2 Ground source pump NO3 Primary circuit pump NO4 DHW circuit pump NO5 Mixed circuit pump NO6 System integ. boiler/heater NO7 DHW storage integ. boiler/heater NO8 General alarm
Digital inputs No. Description ID1 Flow switch, ground source well side
ID2 Comp. 1 overload alarm/Comp. inverter alarm
ID3 High pressure switch ID4 Low pressure switch ID5 Unit/system pump overload ID6 DHW storage heater overload ID7 Integration boiler/heater alarm ID8 Remote On-Off
Analogue inputs No. Description B1 Ground source circuit outlet temperature B2 Ground source circuit return temperature B3 DHW control temperature B4 Mixed system outlet temperature B5 System return temperature Analogue inputs via Modbus RS485 No. Description Sn.B1 Outside temperature probe Sn.B2 Outside humidity probe Up to 6 rooms from Clima
ENG
+030220741 Smart HP – rel 2.2 -12/11/2013
12
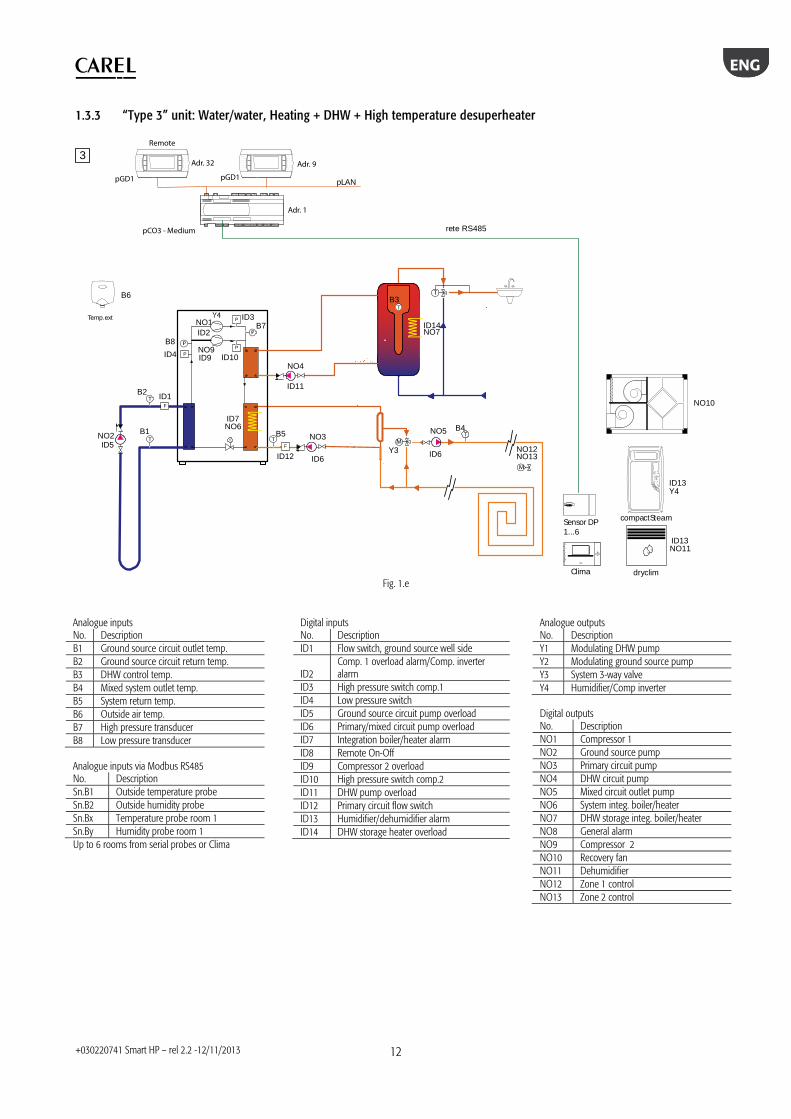
1.3.3 “Type 3” unit: Water/water, Heating + DHW + High temperature desuperheater
rete RS485
B6
B2
ID4
ID12
ID1
ID3
ID2
ID9 ID10
ID6ID6
ID5
ID11
Y3
NO5NO3
NO4
NO2
NO1
NO9
B1 B5
B8
B7 ID14NO7
B4
pLAN
pCO3 - Medium
Temp.ext
Sensor DP1...6
Clima
compactSteam
T
T
T TT
P
PP
F
F
B3
ID7NO6
ID13
NO10
Y4
NO12NO13
3
pGD1pGD1
Remote
Adr. 9Adr. 32
Adr. 1
dryclim
ID13NO11°C/°F
Set
Prg
Fig. 1.e
Analogue outputs No. Description Y1 Modulating DHW pump Y2 Modulating ground source pump Y3 System 3-way valve Y4 Humidifier/Comp inverter Digital outputs No. Description NO1 Compressor 1 NO2 Ground source pump NO3 Primary circuit pump NO4 DHW circuit pump NO5 Mixed circuit outlet pump NO6 System integ. boiler/heater NO7 DHW storage integ. boiler/heater NO8 General alarm NO9 Compressor 2 NO10 Recovery fan NO11 Dehumidifier NO12 Zone 1 control NO13 Zone 2 control
Digital inputs No. Description ID1 Flow switch, ground source well side
ID2 Comp. 1 overload alarm/Comp. inverter alarm
ID3 High pressure switch comp.1 ID4 Low pressure switch ID5 Ground source circuit pump overload ID6 Primary/mixed circuit pump overload ID7 Integration boiler/heater alarm ID8 Remote On-Off ID9 Compressor 2 overload ID10 High pressure switch comp.2 ID11 DHW pump overload ID12 Primary circuit flow switch ID13 Humidifier/dehumidifier alarm ID14 DHW storage heater overload
Analogue inputs No. Description B1 Ground source circuit outlet temp. B2 Ground source circuit return temp. B3 DHW control temp. B4 Mixed system outlet temp. B5 System return temp. B6 Outside air temp. B7 High pressure transducer B8 Low pressure transducer Analogue inputs via Modbus RS485 No. Description Sn.B1 Outside temperature probe Sn.B2 Outside humidity probe Sn.Bx Temperature probe room 1 Sn.By Humidity probe room 1 Up to 6 rooms from serial probes or Clima
ENG
+030220741 Smart HP – rel 2.2 -12/11/2013
13
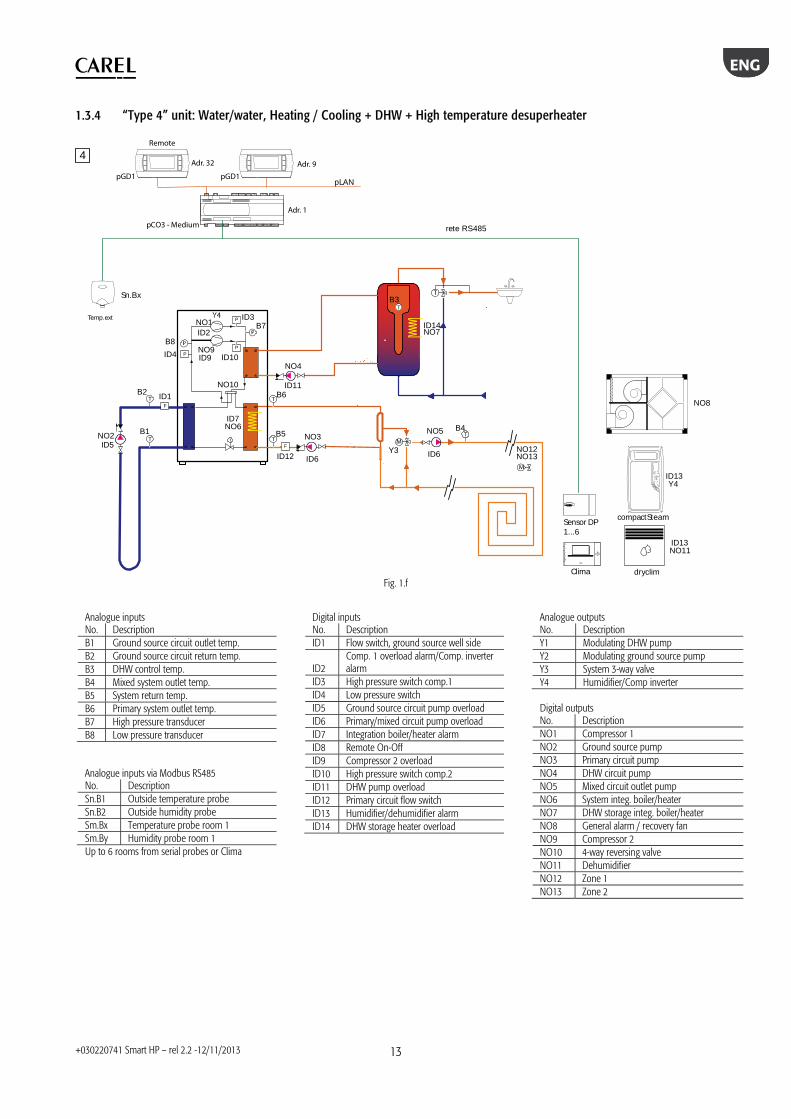
1.3.4 “Type 4” unit: Water/water, Heating / Cooling + DHW + High temperature desuperheater
rete RS485
Sn.Bx
B2
ID4
ID12
ID1
ID3
ID2
ID9 ID10
ID6ID6
ID5
ID11
Y3
NO5NO3
NO4
NO2
NO1
NO10
NO9
B1 B5
B6
B8
B7 ID14NO7
B4
pLANpGD1
pCO3 - Medium
Temp.ext
Sensor DP1...6
Clima
compactSteam
dryclim
T
T
T T
T
T
P
PP
F
F
B3
ID7NO6
ID13Y4
NO12NO13
ID13NO11
4
pGD1
Remote
Adr. 9Adr. 32
Adr. 1
°C/°F
Set
Prg
NO8
Fig. 1.f
Analogue outputs No. Description Y1 Modulating DHW pump Y2 Modulating ground source pump Y3 System 3-way valve Y4 Humidifier/Comp inverter Digital outputs No. Description NO1 Compressor 1 NO2 Ground source pump NO3 Primary circuit pump NO4 DHW circuit pump NO5 Mixed circuit outlet pump NO6 System integ. boiler/heater NO7 DHW storage integ. boiler/heater NO8 General alarm / recovery fan NO9 Compressor 2 NO10 4-way reversing valve NO11 Dehumidifier NO12 Zone 1 NO13 Zone 2
Digital inputs No. Description ID1 Flow switch, ground source well side
ID2 Comp. 1 overload alarm/Comp. inverter alarm
ID3 High pressure switch comp.1 ID4 Low pressure switch ID5 Ground source circuit pump overload ID6 Primary/mixed circuit pump overload ID7 Integration boiler/heater alarm ID8 Remote On-Off ID9 Compressor 2 overload ID10 High pressure switch comp.2 ID11 DHW pump overload ID12 Primary circuit flow switch ID13 Humidifier/dehumidifier alarm ID14 DHW storage heater overload
Analogue inputs No. Description B1 Ground source circuit outlet temp. B2 Ground source circuit return temp. B3 DHW control temp. B4 Mixed system outlet temp. B5 System return temp. B6 Primary system outlet temp. B7 High pressure transducer B8 Low pressure transducer Analogue inputs via Modbus RS485 No. Description Sn.B1 Outside temperature probe Sn.B2 Outside humidity probe Sm.Bx Temperature probe room 1 Sm.By Humidity probe room 1 Up to 6 rooms from serial probes or Clima
ENG
+030220741 Smart HP – rel 2.2 -12/11/2013
14
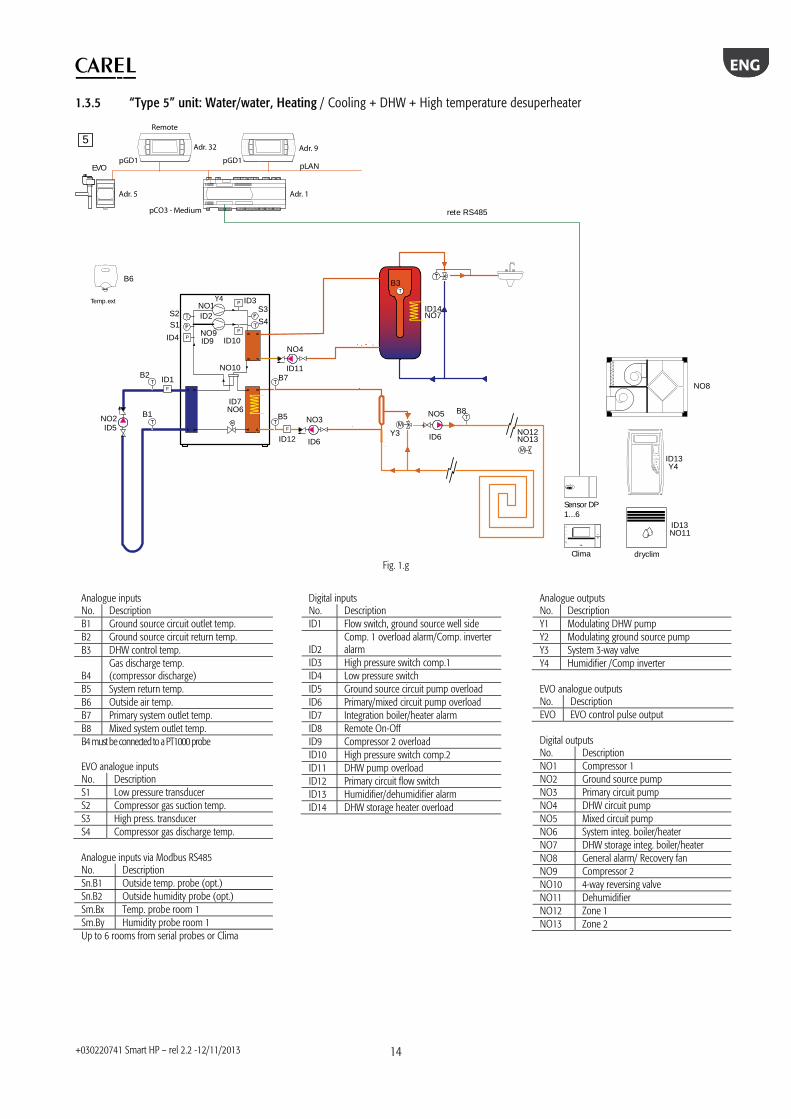
1.3.5 “Type 5” unit: Water/water, Heating / Cooling + DHW + High temperature desuperheater
rete RS485
B6
B2
ID4
ID12
ID1
ID3
ID2
ID9 ID10
ID6ID6
ID5
ID11
Y3
NO5NO3
NO4
NO2
NO1
NO10
NO9
B1 B5
B7
S2
S1
S3
S4
ID14NO7
B8
pLANEVO
pCO3 - Medium
Temp.ext
Sensor DP1...6
Clima dryclim
T
T
T
T
T T
T
T
P
PP
F
F
B3
ID7NO6
ID13Y4
NO12NO13
ID13NO11
5
pGD1 pGD1
Remote
Adr. 9Adr. 32
Adr. 1Adr. 5
°C/°F
Set
Prg
NO8
Fig. 1.g
Analogue outputs No. Description Y1 Modulating DHW pump Y2 Modulating ground source pump Y3 System 3-way valve Y4 Humidifier /Comp inverter EVO analogue outputs No. Description EVO EVO control pulse output Digital outputs No. Description NO1 Compressor 1 NO2 Ground source pump NO3 Primary circuit pump NO4 DHW circuit pump NO5 Mixed circuit pump NO6 System integ. boiler/heater NO7 DHW storage integ. boiler/heater NO8 General alarm/ Recovery fan NO9 Compressor 2 NO10 4-way reversing valve NO11 Dehumidifier NO12 Zone 1 NO13 Zone 2
Digital inputs No. Description ID1 Flow switch, ground source well side
ID2 Comp. 1 overload alarm/Comp. inverter alarm
ID3 High pressure switch comp.1 ID4 Low pressure switch ID5 Ground source circuit pump overload ID6 Primary/mixed circuit pump overload ID7 Integration boiler/heater alarm ID8 Remote On-Off ID9 Compressor 2 overload ID10 High pressure switch comp.2 ID11 DHW pump overload ID12 Primary circuit flow switch ID13 Humidifier/dehumidifier alarm ID14 DHW storage heater overload
Analogue inputs No. Description B1 Ground source circuit outlet temp. B2 Ground source circuit return temp. B3 DHW control temp.
B4 Gas discharge temp. (compressor discharge)
B5 System return temp. B6 Outside air temp. B7 Primary system outlet temp. B8 Mixed system outlet temp. B4 must be connected to a PT1000 probe EVO analogue inputs No. Description S1 Low pressure transducer S2 Compressor gas suction temp. S3 High press. transducer S4 Compressor gas discharge temp. Analogue inputs via Modbus RS485 No. Description Sn.B1 Outside temp. probe (opt.) Sn.B2 Outside humidity probe (opt.) Sm.Bx Temp. probe room 1 Sm.By Humidity probe room 1 Up to 6 rooms from serial probes or Clima
ENG
+030220741 Smart HP – rel 2.2 -12/11/2013
15
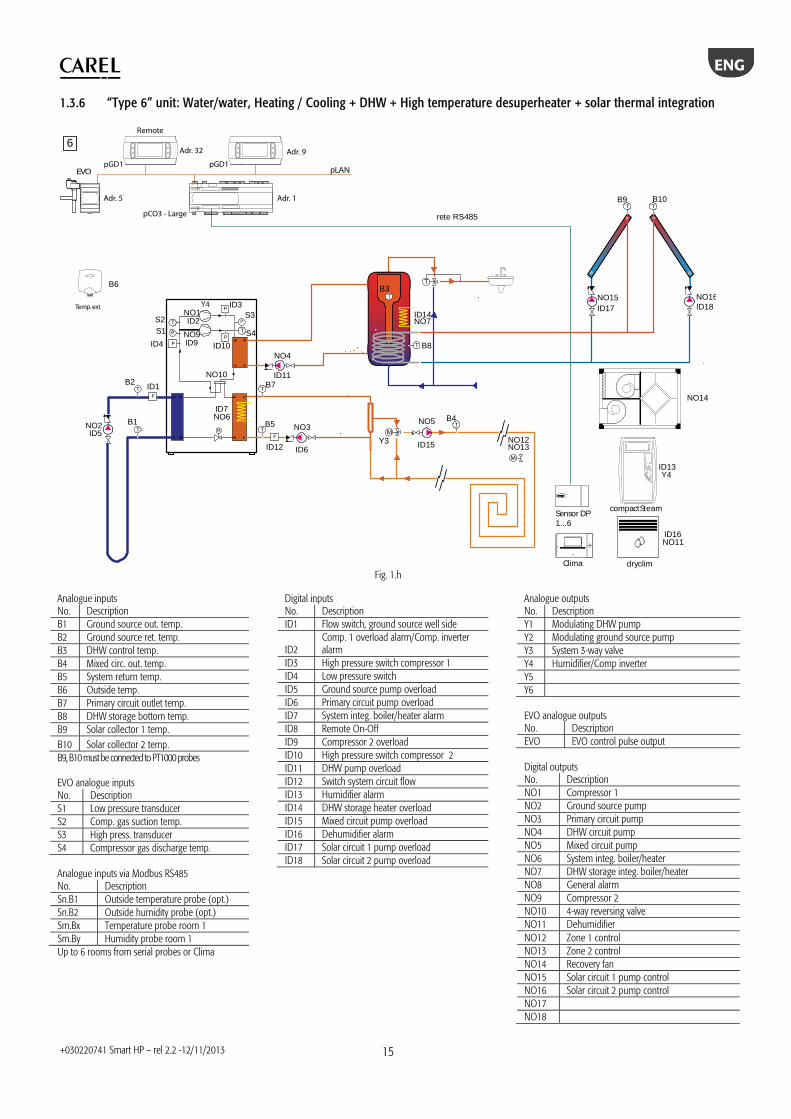
1.3.6 “Type 6” unit: Water/water, Heating / Cooling + DHW + High temperature desuperheater + solar thermal integration
rete RS485
B6
B2
ID4
ID12
ID1
ID3
ID2
ID9 ID10
ID15ID6
ID5
ID11
ID17 ID18
Y3
NO15
NO5NO3
NO4
NO2
NO1
NO10
NO9
NO16
B1 B5
B7
S2
S1
S3
S4
B8
ID14NO7
B4
B9 B10
EVO
pCO3 - Large
Temp.ext
Sensor DP1...6
Clima
compactSteam
dryclim
T
T
T
T
T T
T
T T
T
T
P
PP
F
F
B3
ID7NO6
ID13Y4
NO12NO13
ID16NO11
6
Adr. 5
pLANpGD1 pGD1
Remote
Adr. 9Adr. 32
Adr. 1
°C/°F
Set
Prg
NO14
Fig. 1.h
Analogue outputs No. Description Y1 Modulating DHW pump Y2 Modulating ground source pump Y3 System 3-way valve Y4 Humidifier/Comp inverter Y5 Y6 EVO analogue outputs No. Description EVO EVO control pulse output Digital outputs No. Description NO1 Compressor 1 NO2 Ground source pump NO3 Primary circuit pump NO4 DHW circuit pump NO5 Mixed circuit pump NO6 System integ. boiler/heater NO7 DHW storage integ. boiler/heater NO8 General alarm NO9 Compressor 2 NO10 4-way reversing valve NO11 Dehumidifier NO12 Zone 1 control NO13 Zone 2 control NO14 Recovery fan NO15 Solar circuit 1 pump control NO16 Solar circuit 2 pump control NO17 NO18
Digital inputs No. Description ID1 Flow switch, ground source well side
ID2 Comp. 1 overload alarm/Comp. inverter alarm
ID3 High pressure switch compressor 1 ID4 Low pressure switch ID5 Ground source pump overload ID6 Primary circuit pump overload ID7 System integ. boiler/heater alarm ID8 Remote On-Off ID9 Compressor 2 overload ID10 High pressure switch compressor 2 ID11 DHW pump overload ID12 Switch system circuit flow ID13 Humidifier alarm ID14 DHW storage heater overload ID15 Mixed circuit pump overload ID16 Dehumidifier alarm ID17 Solar circuit 1 pump overload ID18 Solar circuit 2 pump overload
Analogue inputs No. Description B1 Ground source out. temp. B2 Ground source ret. temp. B3 DHW control temp. B4 Mixed circ. out. temp. B5 System return temp. B6 Outside temp. B7 Primary circuit outlet temp. B8 DHW storage bottom temp. B9 Solar collector 1 temp. B10 Solar collector 2 temp. B9, B10 must be connected to PT1000 probes EVO analogue inputs No. Description S1 Low pressure transducer S2 Comp. gas suction temp. S3 High press. transducer S4 Compressor gas discharge temp. Analogue inputs via Modbus RS485 No. Description Sn.B1 Outside temperature probe (opt.) Sn.B2 Outside humidity probe (opt.) Sm.Bx Temperature probe room 1 Sm.By Humidity probe room 1 Up to 6 rooms from serial probes or Clima
ENG
+030220741 Smart HP – rel 2.2 -12/11/2013
16
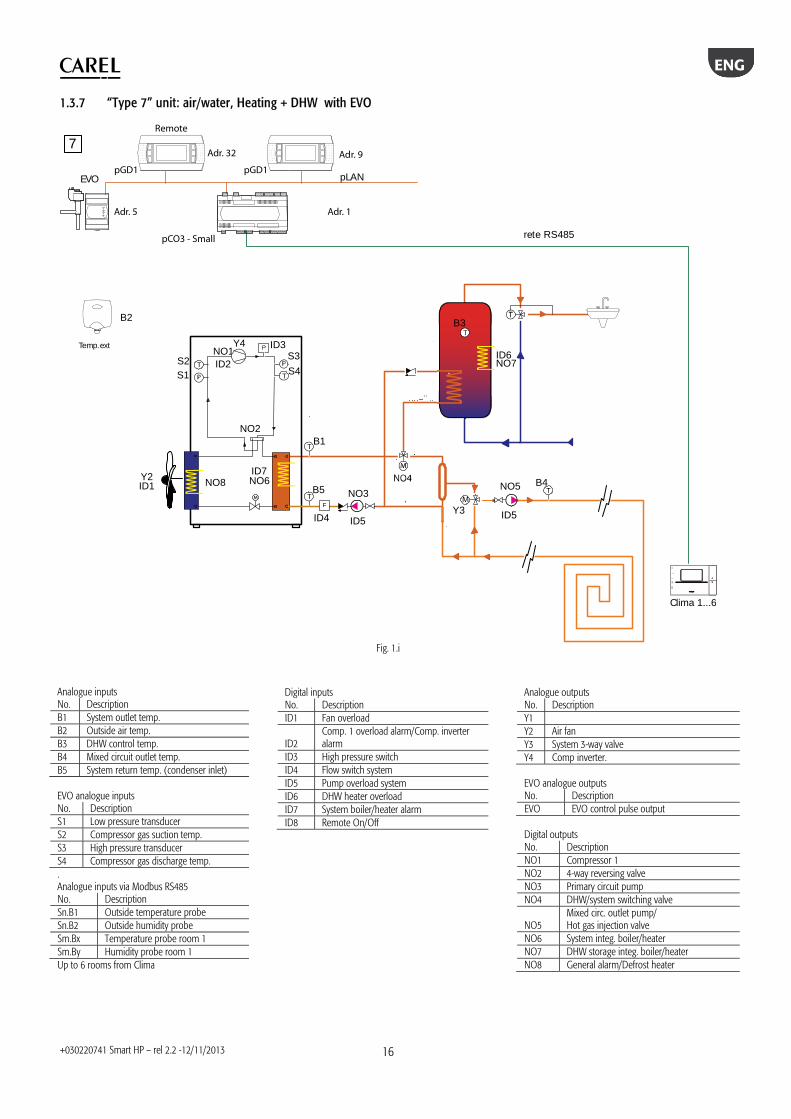
1.3.7 “Type 7” unit: air/water, Heating + DHW with EVO
rete RS485
B2
ID4
ID3
ID2
ID5ID5
Y3
NO5NO3
NO1
NO2
B5
B1
S2
S1 S4
ID6NO7
B4
pLANEVO
Temp.ext
Clima 1...6
T
T
T
T
T
T
P
F
B3
ID7NO6
7
pGD1 pGD1
Remote
Adr. 9Adr. 32
Adr. 1Adr. 5
°C/°F
Set
Prg
ID1Y2
NO8
Y4S3
pCO3 - Small
Fig. 1.i
Analogue outputs No. Description Y1 Y2 Air fan Y3 System 3-way valve Y4 Comp inverter. EVO analogue outputs No. Description EVO EVO control pulse output Digital outputs No. Description NO1 Compressor 1 NO2 4-way reversing valve NO3 Primary circuit pump NO4 DHW/system switching valve
NO5 Mixed circ. outlet pump/ Hot gas injection valve
NO6 System integ. boiler/heater NO7 DHW storage integ. boiler/heater NO8 General alarm/Defrost heater
Digital inputs No. Description ID1 Fan overload
ID2 Comp. 1 overload alarm/Comp. inverter alarm
ID3 High pressure switch ID4 Flow switch system ID5 Pump overload system ID6 DHW heater overload ID7 System boiler/heater alarm ID8 Remote On/Off
Analogue inputs No. Description B1 System outlet temp. B2 Outside air temp. B3 DHW control temp. B4 Mixed circuit outlet temp. B5 System return temp. (condenser inlet) EVO analogue inputs No. Description S1 Low pressure transducer S2 Compressor gas suction temp. S3 High pressure transducer S4 Compressor gas discharge temp. . Analogue inputs via Modbus RS485 No. Description Sn.B1 Outside temperature probe Sn.B2 Outside humidity probe Sm.Bx Temperature probe room 1 Sm.By Humidity probe room 1 Up to 6 rooms from Clima
ENG
+030220741 Smart HP – rel 2.2 -12/11/2013
17
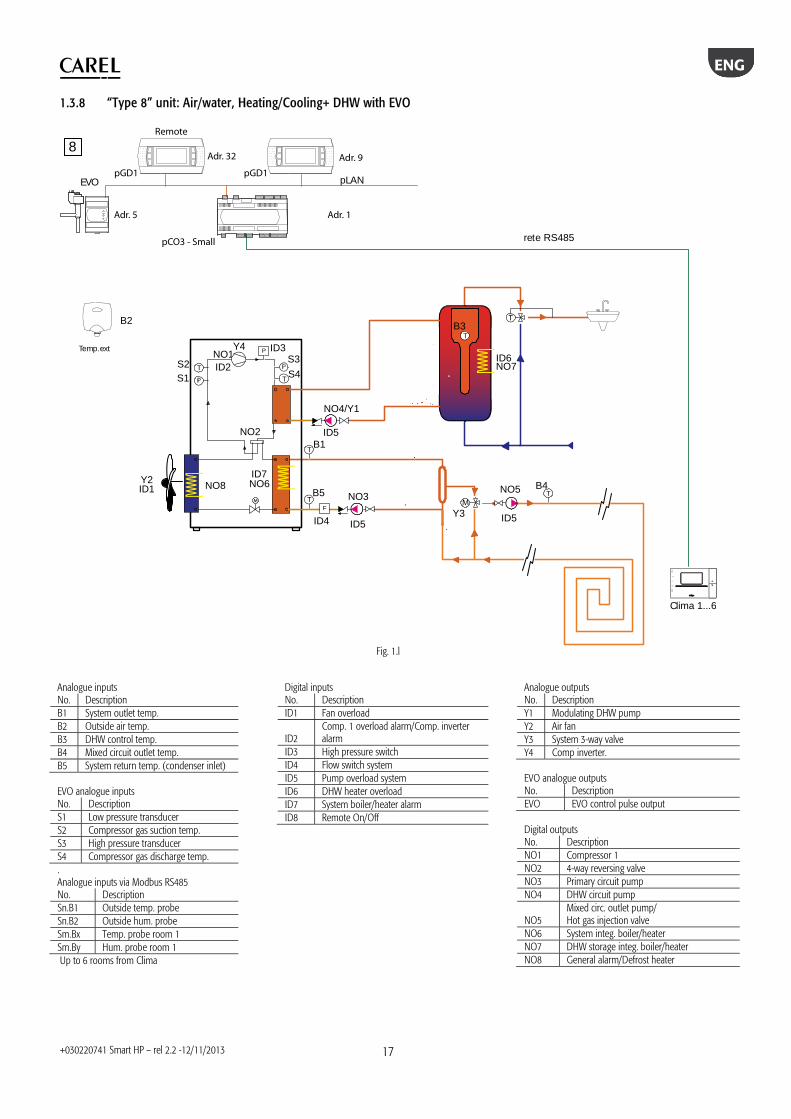
1.3.8 “Type 8” unit: Air/water, Heating/Cooling+ DHW with EVO
rete RS485
B2
ID4
ID3
ID2
ID5ID5
ID5
Y3
NO5NO3
NO4/Y1
NO1
NO2
B5
B1
S2S1 S4
ID6NO7
B4
pLANEVO
Temp.ext
Clima 1...6
T
T
T
T
T
T
P
F
B3
ID7NO6
8
pGD1 pGD1
Remote
Adr. 9Adr. 32
Adr. 1Adr. 5
°C/°F
Set
Prg
ID1Y2
NO8
S3
pCO3 - Small
Y4
Fig. 1.l
Analogue outputs No. Description Y1 Modulating DHW pump Y2 Air fan Y3 System 3-way valve Y4 Comp inverter. EVO analogue outputs No. Description EVO EVO control pulse output Digital outputs No. Description NO1 Compressor 1 NO2 4-way reversing valve NO3 Primary circuit pump NO4 DHW circuit pump
NO5 Mixed circ. outlet pump/ Hot gas injection valve
NO6 System integ. boiler/heater NO7 DHW storage integ. boiler/heater NO8 General alarm/Defrost heater
Digital inputs No. Description ID1 Fan overload
ID2 Comp. 1 overload alarm/Comp. inverter alarm
ID3 High pressure switch ID4 Flow switch system ID5 Pump overload system ID6 DHW heater overload ID7 System boiler/heater alarm ID8 Remote On/Off
Analogue inputs No. Description B1 System outlet temp. B2 Outside air temp. B3 DHW control temp. B4 Mixed circuit outlet temp. B5 System return temp. (condenser inlet) EVO analogue inputs No. Description S1 Low pressure transducer S2 Compressor gas suction temp. S3 High pressure transducer S4 Compressor gas discharge temp. . Analogue inputs via Modbus RS485 No. Description Sn.B1 Outside temp. probe Sn.B2 Outside hum. probe Sm.Bx Temp. probe room 1 Sm.By Hum. probe room 1 Up to 6 rooms from Clima
ENG
+030220741 Smart HP – rel 2.2 -12/11/2013
18
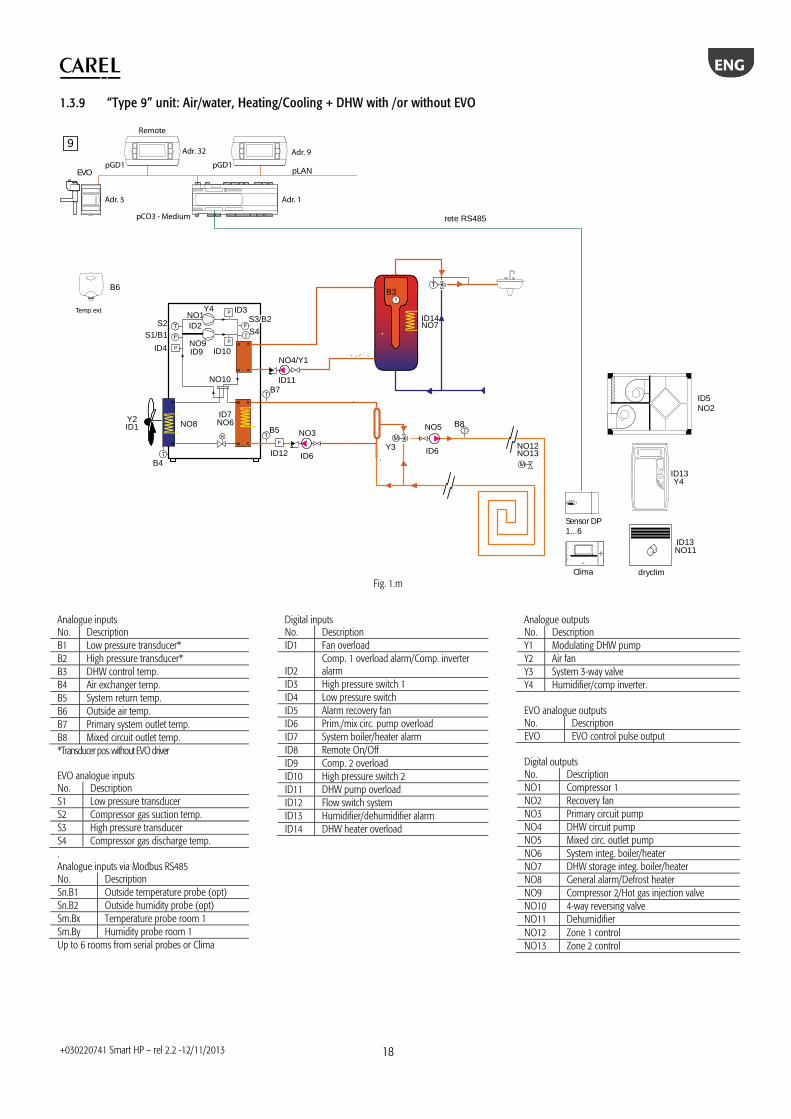
1.3.9 “Type 9” unit: Air/water, Heating/Cooling + DHW with /or without EVO
rete RS485
B6
ID4
ID12
ID3
ID2
ID9 ID10
ID6ID6
ID11
Y3
NO5NO3
NO4/Y1
NO1
NO10
NO9
B5
B7
S2
S1/B1 S4
ID14NO7
B8
pLANEVO
pCO3 - Medium
Temp.ext
Sensor DP1...6
Clima dryclim
T
T
T
T
T
T
P
PP
F
B3
ID7NO6
ID13Y4
NO12NO13
ID13NO11
9
pGD1 pGD1
Remote
Adr. 9Adr. 32
Adr. 1Adr. 5
°C/°F
Set
Prg
ID1Y2
B4T
NO8
S3/B2Y4
ID5NO2
Fig. 1.m
Analogue outputs No. Description Y1 Modulating DHW pump Y2 Air fan Y3 System 3-way valve Y4 Humidifier/comp inverter. EVO analogue outputs No. Description EVO EVO control pulse output Digital outputs No. Description NO1 Compressor 1 NO2 Recovery fan NO3 Primary circuit pump NO4 DHW circuit pump NO5 Mixed circ. outlet pump NO6 System integ. boiler/heater NO7 DHW storage integ. boiler/heater NO8 General alarm/Defrost heater NO9 Compressor 2/Hot gas injection valve NO10 4-way reversing valve NO11 Dehumidifier NO12 Zone 1 control NO13 Zone 2 control
Digital inputs No. Description ID1 Fan overload
ID2 Comp. 1 overload alarm/Comp. inverter alarm
ID3 High pressure switch 1 ID4 Low pressure switch ID5 Alarm recovery fan ID6 Prim./mix circ. pump overload ID7 System boiler/heater alarm ID8 Remote On/Off ID9 Comp. 2 overload ID10 High pressure switch 2 ID11 DHW pump overload ID12 Flow switch system ID13 Humidifier/dehumidifier alarm ID14 DHW heater overload
Analogue inputs No. Description B1 Low pressure transducer* B2 High pressure transducer* B3 DHW control temp. B4 Air exchanger temp. B5 System return temp. B6 Outside air temp. B7 Primary system outlet temp. B8 Mixed circuit outlet temp. *Transducer pos. without EVO driver EVO analogue inputs No. Description S1 Low pressure transducer S2 Compressor gas suction temp. S3 High pressure transducer S4 Compressor gas discharge temp. . Analogue inputs via Modbus RS485 No. Description Sn.B1 Outside temperature probe (opt) Sn.B2 Outside humidity probe (opt) Sm.Bx Temperature probe room 1 Sm.By Humidity probe room 1 Up to 6 rooms from serial probes or Clima
ENG
+030220741 Smart HP – rel 2.2 -12/11/2013
19
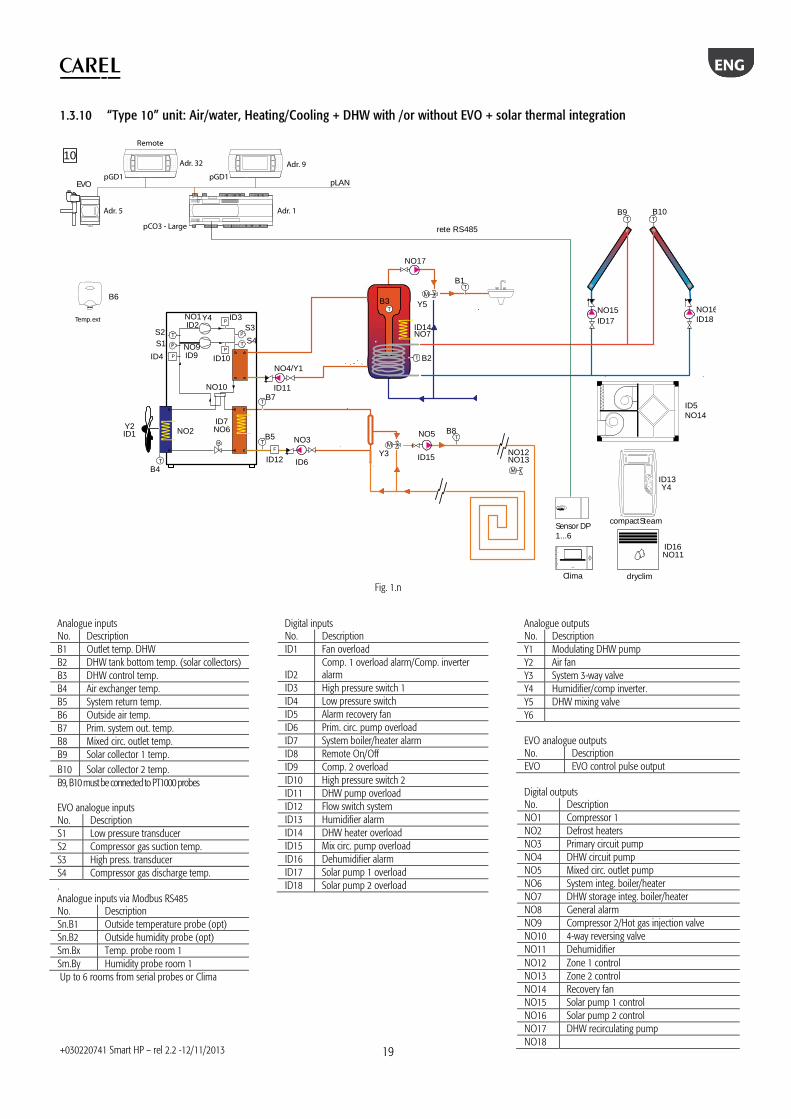
1.3.10 “Type 10” unit: Air/water, Heating/Cooling + DHW with /or without EVO + solar thermal integration
rete RS485
B6
ID4
ID12
ID3ID2
ID9 ID10
ID15ID6
ID1
ID11
ID17 ID18
Y3
Y5NO15
NO5NO3
NO4/Y1
Y2
NO1
NO10
NO9
NO16
B4
B5
B7
S2
S1
S3
S4
B2
ID14NO7
B8
B9 B10
NO17
EVO
pCO3 - Large
Temp.ext
Sensor DP1...6
Clima
compactSteam
dryclim
T
T
T
T T
T
T
T
T
T
B1T
P
PP
F
B3
ID7NO6NO2
ID13Y4
NO12NO13
ID16NO11
10
Adr. 5
pLANpGD1 pGD1
Remote
Adr. 9Adr. 32
Adr. 1
°C/°F
Set
Prg
Y4
ID5NO14
Fig. 1.n
Analogue outputs No. Description Y1 Modulating DHW pump Y2 Air fan Y3 System 3-way valve Y4 Humidifier/comp inverter. Y5 DHW mixing valve Y6 EVO analogue outputs No. Description EVO EVO control pulse output Digital outputs No. Description NO1 Compressor 1 NO2 Defrost heaters NO3 Primary circuit pump NO4 DHW circuit pump NO5 Mixed circ. outlet pump NO6 System integ. boiler/heater NO7 DHW storage integ. boiler/heater NO8 General alarm NO9 Compressor 2/Hot gas injection valve NO10 4-way reversing valve NO11 Dehumidifier NO12 Zone 1 control NO13 Zone 2 control NO14 Recovery fan NO15 Solar pump 1 control NO16 Solar pump 2 control NO17 DHW recirculating pump NO18
Digital inputs No. Description ID1 Fan overload
ID2 Comp. 1 overload alarm/Comp. inverter alarm
ID3 High pressure switch 1 ID4 Low pressure switch ID5 Alarm recovery fan ID6 Prim. circ. pump overload ID7 System boiler/heater alarm ID8 Remote On/Off ID9 Comp. 2 overload ID10 High pressure switch 2 ID11 DHW pump overload ID12 Flow switch system ID13 Humidifier alarm ID14 DHW heater overload ID15 Mix circ. pump overload ID16 Dehumidifier alarm ID17 Solar pump 1 overload ID18 Solar pump 2 overload
Analogue inputs No. Description B1 Outlet temp. DHW B2 DHW tank bottom temp. (solar collectors) B3 DHW control temp. B4 Air exchanger temp. B5 System return temp. B6 Outside air temp. B7 Prim. system out. temp. B8 Mixed circ. outlet temp. B9 Solar collector 1 temp. B10 Solar collector 2 temp. B9, B10 must be connected to PT1000 probes EVO analogue inputs No. Description S1 Low pressure transducer S2 Compressor gas suction temp. S3 High press. transducer S4 Compressor gas discharge temp. . Analogue inputs via Modbus RS485 No. Description Sn.B1 Outside temperature probe (opt) Sn.B2 Outside humidity probe (opt) Sm.Bx Temp. probe room 1 Sm.By Humidity probe room 1 Up to 6 rooms from serial probes or Clima
ENG
+030220741 Smart HP – rel 2.2 -12/11/2013
20
2. HARDWARE FEATURES AND INSTALLATION
2.1 pCO3 board specifications
Fig. 2.a Key 1 power supply connector G, G0 2 yellow power LED and 3 status LEDs; 3 additional power supply for the terminal and 0 to 5 V ratiometric probes; +Vterm, GND, +5 VREF 4 universal analogue inputs, NTC, 0 to 1 V, 0 to 5 V - ratiometric, 0 to 10 V, 0 to 20 mA, 4 to 20 mA; B1, B2, B3, GND, +VDC & B6, B7, B8, GND 5 passive analogue inputs, NTC, PT1000, ON/OFF; B4, BC4, B5, BC5 & B9, BC9, B10, BC10 6 0 to 10 V analogue outputs; VG, VG0, Y1, Y2, Y3, Y4 & Y5, Y6 7 24 Vac/Vdc digital inputs; ID1, ID2, ID3, ID4, ID5, ID6, ID7, ID8, IDC1, & ID9, ID10, ID11,
ID12, IDC9 & ID17, ID18, IDC17 8 230 Vac or 24 Vac/Vdc digital inputs; ID13H,ID13, IDC13, ID14, ID14H & ID15H, ID15, IDC15, ID16,
ID16H 9 overview terminal connector (external panel with direct signals); 10 connector for standard pCO series terminals and for downloading the application program; 11 relay digital outputs; C1, NO1, NO2, NO3, C1 & C4, NO4, NO5, NO6, C4 & C7, NO7,
C7 & NO8, C8, NC8 & C9, N09, N10, NO11, C9 & NO12, C12, NC12 & NO13, C13, NC13 & NO14, C14, NC14, NO15, C15, NC15 & C16, NO16, NO17, NO18, C16
12 I/O expansion board connector; E-, E+, GND 13 pLAN network connector; Rx-/Tx-, Rx+/Tx+, GND 14 cover for inserting the supervisor and telemaintenance option; 15 cover for inserting the field card option; 16 Built-In terminal (LCD, buttons and LEDs).
Models and features pCO3 SMALL pCO3 MEDIUM pCO3 LARGE No. of analogue inputs 5 8 10 No. of digital inputs 8 14 18 No. of analogue outputs 4 4 6 No. of digital outputs 8 13 18 Modbus RTU/CAREL protocol PCOS004850LonWorks protocol PCO10000F0BACnet Ethernet protocol PCO1000WB0BACnet MS/TP protocol PCO1000BA0HTTP/FTP/SNMP protocol PCO1000WB0Modem, GSM modem, SMS option PCO100MDM0
Product certification: IEC EN 50155 standard: “Railway applications • Electronic equipment used on rolling stock”; UL 873 and C22.2 No. 24-93: “Temperature-Indicating and -Regulating Equipment”; EC regulations 37/2005 of 12 January 2005; in particular, if the electronic controller is fitted with standard Carel NTC sensors, it is compliant with standard EN13485 on “Thermometers for measuring the air temperature in applications on units for the conservation and sale of refrigerated, frozen and deep-frozen food and ice cream”.
ENG
+030220741 Smart HP – rel 2.2 -12/11/2013
21
2.2 Installation 2.2.1 Installation instructions
Important: Environmental conditions
Avoid assembling the pCO board and the terminal in rooms with the following characteristics: temperature and humidity that do not conform to the rated
operating data of the product; strong vibrations or knocks; exposure to aggressive and polluting atmospheres(e.g.:
sulphur and ammonia fumes, saline mist, smoke) so as to avoid corrosion and/or oxidation;
strong magnetic and/or radio frequency interference (there avoid installing the units near transmitting antennae);
exposure of the pCO board to direct sunlight and to the elements in general;
large and rapid fluctuations in the room temperature; environments containing explosives or mixes of flammable
gases; exposure to dust (formation of corrosive patina with possible
oxidation and reduction of insulation).
Positioning the instrument inside the panel The position of the instrument in the electrical cabinet must be chosen so as to guarantee correct physical separation of the instrument from the power components (solenoids, contactors, actuators, inverters, ...) and the connected cables. Proximity to such devices/cables may create random malfunctions that are not immediately evident. The structure of the panel must allow the correct flow of cooling air
2.2.2 Wiring instructions
Important: when laying the wiring, "physically " separate the power part from the control part. The proximity of these two sets of wires will, in most cases, cause problems of induced disturbance or, over time, malfunctions or damage to the components. The ideal solution is to house these two circuits in two separate cabinets. Sometimes this is not possible, and therefore the power part and the control part must be installed in two separate areas inside the same panel. For the control signals, it is recommended to use shielded cables with twisted wires. If the control cables have to cross over the power cables, the intersections must be as near as possible to 90 degrees, always avoiding running the control cables parallel to the power cables. CAREL highlights the following warnings:
• Use cable ends suitable for the corresponding terminals.
Loosen each screw and insert the cable ends, then tighten the screws. When the operation is completed, slightly tug the cables to check they are sufficiently tight;
• separate as much as possible the sensor signal, digital input and serial line cables from the cables carrying inductive loads and power cables to avoid possible electromagnetic disturbance. Never insert power cables (including the electrical cables) and probe signal cables in the same conduits. Do not install the sensor cables in the immediate vicinity of power devices (contactors, circuit breakers or similar);
• reduce the path of the sensor cables as much as possible, and avoid spiral paths that enclose power devices;
• avoid touching or nearly touching the electronic components fitted on the boards to avoid electrostatic discharges (extremely damaging) from the operator to the components;
• if the power transformer secondary is earthed, check that the earth wire corresponds to the wire that runs to the controller and enters terminal G0; this applies to all the devices connected to the pCO;
• do not secure the cables to the terminals by pressing the screwdriver with excessive force, to avoid damaging the pCO;
• for applications subject to considerable vibrations (1.5 mm pk-pk 10/55 Hz), secure the cables connected to the pCO around 3 cm from the connectors using clamps;
• if the product is installed in industrial environments (application of the EN 61000-6-2 standard) the length of the connections must be less than 30 m;
• all the extra low voltage connections (analogue and 24 Vac/Vdc digital inputs, analogue outputs, serial bus connections, power supplies) must have reinforced or double insulation from the mains network;
• in residential environments, the connection cable between the pCO and the terminal must be shielded;
• there is no limit to the number of cables that can be connected to an individual terminal. The only limitation concerns the maximum current crossing each terminal: this must not exceed 8 A;
• the maximum cross-section of the cable that connected to a terminal is 2.5 sq.m (12 AWG);
• the maximum value of the twisting torque to tighten the screw on the terminal (torque tightening) is 0.6 Nm;
• installation must be performed according to the standards and legislation in force in the country where the device is used;
• for safety reasons the equipment must be housed inside an electrical panel, so that the only accessible part is the display and the keypad;
• in the event of malfunctions, do not attempt to repair the device, but rather contact the CAREL service centre.
2.2.3 Anchoring the pCO board The pCO is installed on a DIN rail. To fasten the unit to the DIN rail, press it lightly against the rail. The rear tabs will click into place, locking the unit to the rail. Removing the unit is just as simple, using a screwdriver through the release slot to lever and lift the tabs. The tabs are kept in the locked position by springs. 2.2.4 Power supply Power supply to the pCO3 board (controller with terminal connected): 28 to 36 Vdc +10/-20% or 24 Vac +10/-15% 50 / 60 Hz; Maximum current P= 15 W (Vdc power supply), P= 40 VA (Vac). power supplies other than those specified seriously damage the system; a Class 2 safety transformer, rating 50 VA, must be used in the installation
to supply just one pCO controller; the power supply to the pCO controller and terminal (or pCO controllers
and terminals) should be separated from the power supply to the other electrical devices (contactors and other electromechanical components) inside the electrical panel;
if the power transformer secondary is earthed, check that the earth wire is connected to terminal G0. This applies to all the devices connected to the pCO;
if more than one pCO board is connected in a pLAN network, make sure that the G and G0 references are observed (G0 must be maintained for all boards);
a yellow LED indicates that the pCO board is powered.
ENG
+030220741 Smart HP – rel 2.2 -12/11/2013
22
2.2.5 Connecting the analogue inputs
Note: in Smart HP the configuration of the analogue inputs is automatically set according to the type of unit selected. The analogue inputs on the pCO board can be configured for the more common sensors on the market: NTC, PT1000, 0 to 1 V, 0 to 5 V ratiometric, 0 to 10 V, 0 to 20 mA,, 4 to 20 mA. The different types of sensors can be selected by setting a parameter on the user terminal (if featured by the application program). Connecting active temperature and humidity probes The pCO can be connected to all the CAREL DP*2 series active temperature and humidity probes configured as 0 to 1 V or as 4 to 20 mA. For the temperature probes use the 4 to 20 mA or NTC configuration, as the 0/1 Vdc signal is limited to the range 0 to 1 V and therefore is not always compatible with the standard 10 mV/°C signal of CAREL probes (for negative temperatures and temperatures above 100 °C a probe alarm may be generated). The inputs must be pre-configured to accept 0 to 1 V or 4 to 20 mA signals in the application program. Controller pCO terminals Probe
terminals Description
PCO3
GND M Reference +Vdc +(G) Power supply B1, B2, B3, B6, B7, B8
out H Active humidity output
B1, B2, B3, B6, B7, B8
out T Active temp. output
Connecting universal NTC temperature probes All analogue inputs are compatible with 2-wire NTC sensors. The inputs must be pre-configured to accept NTC signals in the application program resident in the flash memory.
Controller pCO terminals NTC probe wire pCO3 GND, BC4, BC5, BC9, BC10 1 B1, B2, B3, B4, B5, B6, B7, B8, B9, B10 2
Connecting PT1000 temperature probes The pCO controller can be connected to 2-wire PT1000 sensors for all high temperature applications; the operating range is -50 to 200 °C. The inputs must be pre-configured to accept PT1000 signals in the application program resident in the flash memory.
Controller PT1000 probe wire pCO3 probe 1 probe 2 probe 3 probe 4 BC4 BC5 BC9 BC10 1 B4 B5 B9 B10 2
Connecting current pressure probes The pCO can be connected to all CAREL SPKT****C0 series active pressure probes or any pressure sensor on the market with signal 0 to 20 mA or 4 to 20 mA. The inputs must be pre-configured to accept signals 0 to 20 mA or 4 to 20 mA.
Controller pCO terminals Colour cable probe Description pCO3 +Vdc black power supply B1, B2, B3,B6, B7, B8 white signal green not used
Connecting 0/5 V ratiometric pressure probes The pCO can be connected to all the CAREL SPKT****R0 series active pressure probes or any pressure sensor on the market with 0/5 V ratiometric signal. The inputs must be pre-configured to accept 0/5V ratiometric signals in the application program.
Controller pCO terminals Probe wire colour Description pCO3 +5V Ref black power supply GND green Power supply
reference B1, B2, B3,B6, B7, B8 white signal
Connecting active probes with 0 to 10 V output The inputs must be pre-configured to accept 0 to 10 V signals in the application program.
Controller 0 to 10 V probe wire pCO3 GND reference B1, B2, B3, B6, B7, B8 signal
Connecting analogue inputs selected as ON/OFF The pCO allows some analogue inputs to be configured as voltage-free digital inputs. The inputs must be pre-configured as voltage-free digital inputs by the application program.
Controller pCO terminals Digital input wire pCO3 digit 1 digit 2 digit 3 digit4 BC4 BC5 BC9 BC10 1 B4 B5 B9 B10 2
Remote connection of the analogue inputs The sizes of the cables for the remote connection of the analogue inputs are shown in the following table:
type of input size (mm2) for length up to 50 m
size (mm2) for length up to 100 m
NTC 0.5 1.0 PT1000 0.75 1.5 I (current) 0.25 0.5 V (voltage) 1.5 not recommended
Note: If the product is installed in industrial environments (application of the EN 61000-6-2 standard) the length of the connections must be less than 30 m. This length shouldn’t be exceeded in any case, to avoid measurement errors. 2.2.6 Connecting the digital inputs The pCO features digital inputs for connecting safety devices, alarms, device status, remote switches. These inputs are all optically isolated from the other terminals. They can work at 24 Vac, 24 Vdc and some at 230 Vac.
Note: separate the sensor signal and digital input cables as much as possible from the inductive load and power cables, to avoid possible electromagnetic disturbance. Digital inputs powered at 24 Vac On the pCO3, all the inputs can be 24 Vac. The following figure represents one of the more common connection diagrams for the 24 Vac digital inputs.
Fig. 2.b
Note: the connection diagrams shown in these figures, which while being the more common and the more convenient, do not exclude the possibility of powering the digital inputs independently from the power supply to the pCO board. In any case, the inputs only have functional insulation from the rest of the controller.
ENG
+030220741 Smart HP – rel 2.2 -12/11/2013
23
Digital inputs powered at 24 Vdc On the pCO3, all the inputs can be 24Vdc. The following figure represents one of the more common connection diagrams for the 24 Vdc digital inputs.
Fig. 2.c
Digital inputs powered at 230 Vac There are up to two groups of inputs powered at 230 Vac; each group has two inputs. The groups feature double insulation between them and can refer to different voltages. Within each group the digital inputs are not independent, however: for example the inputs ID15 and ID16, due to the common terminal, must be powered at the same voltage to avoid dangerous short-circuits and/or the powering of lower-voltage circuits at 230 Vac. In any case, the inputs feature double insulation from the rest of the controller.
Fig. 2.d The range of uncertainty of the switching threshold is from 43 to 90 Vac. It is recommended to use a 100 mA fuse in series with the digital inputs. Remote connection of the digital inputs
Important: do not connect other devices to the IDn inputs. The sizes of the cables for the remote connection of the digital inputs are shown in the following table:
size (mm2) for length up to 50 m size (mm2) for length up to 100 m
0.25 0.5
Note: if the product is installed in industrial environments (application of the EN 61000-6-2 standard) the length of the connections must be less than 30 m. This length shouldn’t be exceeded in any case, to avoid measurement errors. 2.2.7 Connecting the analogue outputs Connecting the 0 to 10V analogue outputs The pCO provides 0 to 10 V optically-isolated analogue outputs, powered externally at 24 Vac/Vdc. The table below shown summarises the distribution of the analogue outputs according to the version available. pCO terminal reference pCO3 terminals
SMALL Y1, Y2, Y3, Y4 VG0 MEDIUM Y1, Y2, Y3, Y4 VG0 LARGE Y1, Y2, Y3, Y4, Y5, Y6 VG0
2.2.8 Connecting the digital outputs The pCO controller features digital outputs with electromechanical relays. For ease of installation, the common terminals of some of the relays have been grouped together. Electromechanical relay digital outputs The relays are divided into groups, according to the insulation distance. Inside each group, the relays have just basic insulation and thus must have the same voltage (generally 24 V ac or 110 to 230 Vac). Between the groups there is double insulation and thus the groups can have different voltages. There is also double insulation from the rest of the controller.
Group composition
Version Reference for relays with same insulation
Group 1
Group 2
Group 3
Group 4
SMALL 1…7 8 MEDIUM 1…7 8 9…13 LARGE 1…7 8 9…13 14…18
Relay ratings SPDT, 2000 VA, 250 Vac, 8 A resistive
pCO3 approval UL873
2.5 A resistive, 2 A FLA, 12 A LRA, 250Vac, C300 pilot duty (30,000 cycles)
EN 60730-1 2 A resistive, 2 A inductive, cosϕ=0.6, 2(2)A (100,000 cycles)
Solid state relay (SSR) digital outputs The pCO controller also features a version with solid state relays (SSR) (for example pCO LARGE code PCO300*AL0) for controlling devices that require an unlimited number of switching cycles and thus would not be supported by electromechanical relays. They are dedicated to loads powered at 24 Vac/Vdc with maximum power Pmax= 10 W. Summary table of digital outputs according to the versions available pCO3 terminals
no. SPST
no. SPDT total no. of outputs
SSR relay reference
SMALL 7 1 (8) 8 1 (7) MEDIUM 10 3 (8, 12, 13) 13 2 (7, 12) LARGE 13 5 (8, 12, 13,
14, 15) 18 3 (7, 12, 14) or
4 (7, 12, 14, 15)
Note: the corresponding terminal number is shown in brackets. E.g.: 8=N08. Remote connection of the digital outputs The sizes of the cables for the remote connection of the digital outputs are shown in the following table: AWG Size (mm2) Current (A) 20 0.5 2 15 1.5 6 14 2.5 8 If the product is installed in industrial environments (application of the EN 61000-6-2 standard) the length of the connections must be less than 30 m.
Note: for further details and for the connection diagrams, see the pCO sistema manual (+030220335).
input pCO3 terminals ID13H, ID14H, ID15H, ID16H
ENG
+030220741 Smart HP – rel 2.2 -12/11/2013
24
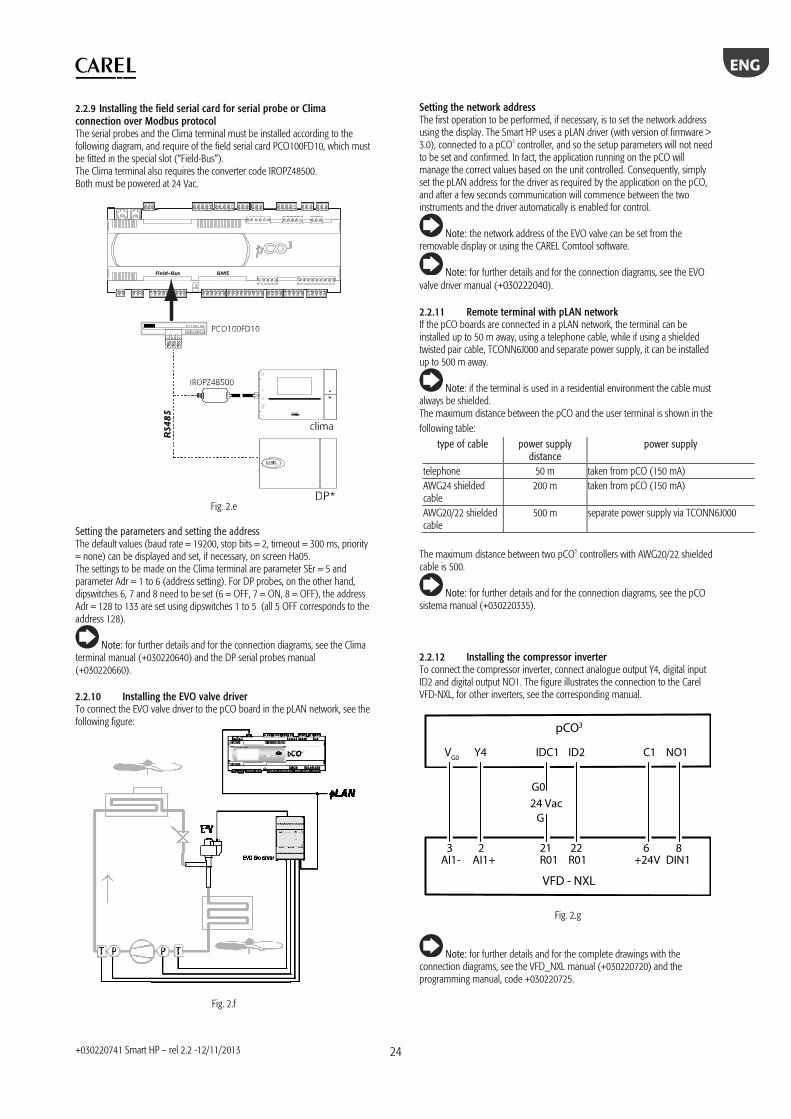
2.2.9 Installing the field serial card for serial probe or Clima connection over Modbus protocol The serial probes and the Clima terminal must be installed according to the following diagram, and require of the field serial card PCO100FD10, which must be fitted in the special slot (“Field-Bus”). The Clima terminal also requires the converter code IROPZ48500. Both must be powered at 24 Vac.
Fig. 2.e
Setting the parameters and setting the address The default values (baud rate = 19200, stop bits = 2, timeout = 300 ms, priority = none) can be displayed and set, if necessary, on screen Ha05. The settings to be made on the Clima terminal are parameter SEr = 5 and parameter Adr = 1 to 6 (address setting). For DP probes, on the other hand, dipswitches 6, 7 and 8 need to be set (6 = OFF, 7 = ON, 8 = OFF), the address Adr = 128 to 133 are set using dipswitches 1 to 5 (all 5 OFF corresponds to the address 128).
Note: for further details and for the connection diagrams, see the Clima terminal manual (+030220640) and the DP serial probes manual (+030220660). 2.2.10 Installing the EVO valve driver To connect the EVO valve driver to the pCO board in the pLAN network, see the following figure:
Fig. 2.f
Setting the network address The first operation to be performed, if necessary, is to set the network address using the display. The Smart HP uses a pLAN driver (with version of firmware > 3.0), connected to a pCO3 controller, and so the setup parameters will not need to be set and confirmed. In fact, the application running on the pCO will manage the correct values based on the unit controlled. Consequently, simply set the pLAN address for the driver as required by the application on the pCO, and after a few seconds communication will commence between the two instruments and the driver automatically is enabled for control.
Note: the network address of the EVO valve can be set from the removable display or using the CAREL Comtool software.
Note: for further details and for the connection diagrams, see the EVO valve driver manual (+030222040). 2.2.11 Remote terminal with pLAN network If the pCO boards are connected in a pLAN network, the terminal can be installed up to 50 m away, using a telephone cable, while if using a shielded twisted pair cable, TCONN6J000 and separate power supply, it can be installed up to 500 m away.
Note: if the terminal is used in a residential environment the cable must always be shielded. The maximum distance between the pCO and the user terminal is shown in the following table:
type of cable power supply distance
power supply
telephone 50 m taken from pCO (150 mA) AWG24 shielded cable
200 m taken from pCO (150 mA)
AWG20/22 shielded cable
500 m separate power supply via TCONN6J000
The maximum distance between two pCO3 controllers with AWG20/22 shielded cable is 500.
Note: for further details and for the connection diagrams, see the pCO sistema manual (+030220335). 2.2.12 Installing the compressor inverter To connect the compressor inverter, connect analogue output Y4, digital input ID2 and digital output NO1. The figure illustrates the connection to the Carel VFD-NXL, for other inverters, see the corresponding manual.
pCO3
VG0
Y4 IDC1 ID2 C1 NO1
VFD - NXL
AI1- AI1+ R01 R01 +24V
24 Vac
DIN13 2
G0
G
21 22 6 8
Fig. 2.g
Note: for further details and for the complete drawings with the connection diagrams, see the VFD_NXL manual (+030220720) and the programming manual, code +030220725.
ENG
+030220741 Smart HP – rel 2.2 -12/11/2013
25
3. COMMISSIONING The following systems can be used to update and install the Smart HP application on the pCO controller board: • pCO Manager (Winload); • SmartKey programming key.
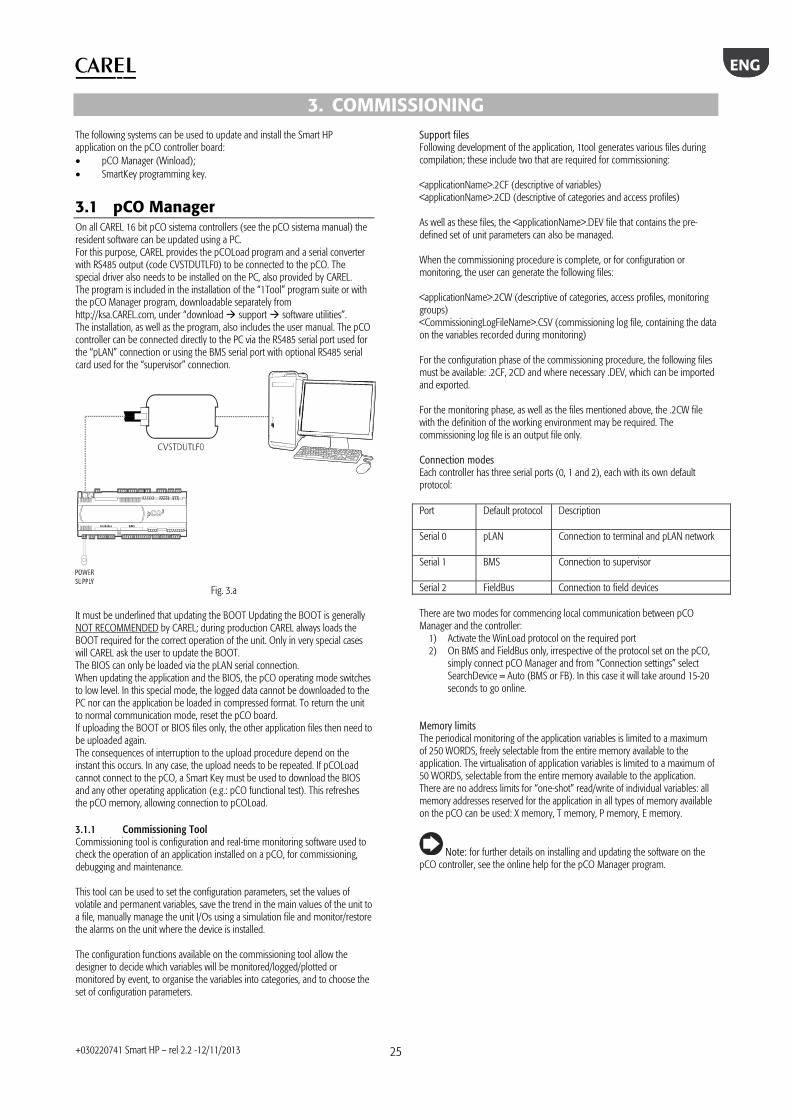
3.1 pCO Manager On all CAREL 16 bit pCO sistema controllers (see the pCO sistema manual) the resident software can be updated using a PC. For this purpose, CAREL provides the pCOLoad program and a serial converter with RS485 output (code CVSTDUTLF0) to be connected to the pCO. The special driver also needs to be installed on the PC, also provided by CAREL. The program is included in the installation of the “1Tool” program suite or with the pCO Manager program, downloadable separately from http://ksa.CAREL.com, under “download support software utilities”. The installation, as well as the program, also includes the user manual. The pCO controller can be connected directly to the PC via the RS485 serial port used for the “pLAN” connection or using the BMS serial port with optional RS485 serial card used for the “supervisor” connection.
Fig. 3.a
It must be underlined that updating the BOOT Updating the BOOT is generally NOT RECOMMENDED by CAREL; during production CAREL always loads the BOOT required for the correct operation of the unit. Only in very special cases will CAREL ask the user to update the BOOT. The BIOS can only be loaded via the pLAN serial connection. When updating the application and the BIOS, the pCO operating mode switches to low level. In this special mode, the logged data cannot be downloaded to the PC nor can the application be loaded in compressed format. To return the unit to normal communication mode, reset the pCO board. If uploading the BOOT or BIOS files only, the other application files then need to be uploaded again. The consequences of interruption to the upload procedure depend on the instant this occurs. In any case, the upload needs to be repeated. If pCOLoad cannot connect to the pCO, a Smart Key must be used to download the BIOS and any other operating application (e.g.: pCO functional test). This refreshes the pCO memory, allowing connection to pCOLoad. 3.1.1 Commissioning Tool Commissioning tool is configuration and real-time monitoring software used to check the operation of an application installed on a pCO, for commissioning, debugging and maintenance. This tool can be used to set the configuration parameters, set the values of volatile and permanent variables, save the trend in the main values of the unit to a file, manually manage the unit I/Os using a simulation file and monitor/restore the alarms on the unit where the device is installed. The configuration functions available on the commissioning tool allow the designer to decide which variables will be monitored/logged/plotted or monitored by event, to organise the variables into categories, and to choose the set of configuration parameters.
Support files Following development of the application, 1tool generates various files during compilation; these include two that are required for commissioning: <applicationName>.2CF (descriptive of variables) <applicationName>.2CD (descriptive of categories and access profiles) As well as these files, the <applicationName>.DEV file that contains the pre-defined set of unit parameters can also be managed. When the commissioning procedure is complete, or for configuration or monitoring, the user can generate the following files: <applicationName>.2CW (descriptive of categories, access profiles, monitoring groups) <CommissioningLogFileName>.CSV (commissioning log file, containing the data on the variables recorded during monitoring) For the configuration phase of the commissioning procedure, the following files must be available: .2CF, 2CD and where necessary .DEV, which can be imported and exported. For the monitoring phase, as well as the files mentioned above, the .2CW file with the definition of the working environment may be required. The commissioning log file is an output file only. Connection modes Each controller has three serial ports (0, 1 and 2), each with its own default protocol: Port
Default protocol
Description
Serial 0 pLAN
Connection to terminal and pLAN network
Serial 1
BMS Connection to supervisor
Serial 2 FieldBus Connection to field devices There are two modes for commencing local communication between pCO Manager and the controller:
1) Activate the WinLoad protocol on the required port 2) On BMS and FieldBus only, irrespective of the protocol set on the pCO,
simply connect pCO Manager and from “Connection settings” select SearchDevice = Auto (BMS or FB). In this case it will take around 15-20 seconds to go online.
Memory limits The periodical monitoring of the application variables is limited to a maximum of 250 WORDS, freely selectable from the entire memory available to the application. The virtualisation of application variables is limited to a maximum of 50 WORDS, selectable from the entire memory available to the application. There are no address limits for “one-shot” read/write of individual variables: all memory addresses reserved for the application in all types of memory available on the pCO can be used: X memory, T memory, P memory, E memory.
Note: for further details on installing and updating the software on the pCO controller, see the online help for the pCO Manager program.
ENG
+030220741 Smart HP – rel 2.2 -12/11/2013
26
3.2 SmartKey The SMARTKEY programming key is used to emulate the operation of the parallel programming key on pCO models where this is not available (pCOXS, pCO3), with the exception of the BOOT, which is not loaded by the SMARTKEY. Specifically, the key can clone the contents of one pCO and then download the data to another identical pCO via the terminal telephone connector (the pLAN must be disconnected). This function is obviously available for all pCO controllers, even those with parallel key. In addition to this mode, the key can transfer the data logged on a series of pCO devices and download them to the PC. From the PC, using the “SMARTKEY PROGRAMMER”, the key can be configured to run certain operations: retrieve logs, program applications, program BIOS, etc. For further details see the online help for the “SMARTKEY PROGRAMMER” and the SMARTKEY instruction sheet.
Fig. 3.b
Note: for further details on installing and updating the software on the pCO controller, see the online help for the pCO Manager program.
3.3 Commissioning When starting the pCO3 board that the Smart HP application has been installed on, a screen is displayed to choose the program interface language. Choose the required language using the navigation buttons and then confirm, so as to access the main menu.
Note: If no option is selected within the time defined by the corresponding parameter (in the manufacturer menu), the current language selected will be used. 3.3.1 Setting the terminal address The address of the terminal can be set in the range from 0 to 32; addresses between 1 and 32 are used by the pLAN protocol, while address 0 identifies the Local terminal protocol, used for non-graphic point-to-point connections and to configure the pCO controller. The default address is 32. The address of the terminal can only be set after having powered the terminal via RJ12 connector. To access configuration mode press
, and together for at least 5 seconds; the terminal will display a screen similar to the one shown below, with the cursor flashing in the top left corner:
.
Fig. 3.c
To modify the address of the terminal (“Display address setting”) carry out the following operations in sequence.
1. Press once: the cursor will move to the “Display address setting” field.
2. Select the desired value using and , and confirm by
pressing again 3. If the value selected is different from the value saved, the following
screen will be displayed and the new value will be saved to the permanent memory on the display.
Fig. 3.d If the address field is set to 0, the terminal communicates with the pCO board using the Local terminal protocol and the “I/O Board address” field disappears, as it no longer has any meaning. To modify the list of the terminals (private and shared) associated with a pCO board, carry out the following operations in sequence:
4. Enter configuration mode (see above) pressing , and together for at least 5 seconds.
5. Press twice: the cursor will move to the “I/O Board address” field.
6. Select the address for the pCO board in question and confirm by
pressing . Then the pCO controller will start the configuration procedure, opening a screen similar to the following.
Fig. 3.e
7. Press again: the configuration screen will be shown, similar to the one below.
Fig. 3.f
8. Configure the terminals as desired. Pressing moves the
cursor from one field to the next, while and change the value of the current field. P:xx represents the address of the selected pCO board (in the example in the figure, this is board 1).
9. To exit the configuration procedure and save the data, select “Ok?”,
set “Yes” and confirm by pressing . During the configuration procedure, if the terminal remains inactive (no button is pressed) for more than 30 seconds, the pCO board automatically interrupts the procedure without saving any changes.
ENG
+030220741 Smart HP – rel 2.2 -12/11/2013
27
Important: if during operation the terminal detects inactivity on the pCO board it is connected to, the display is cancelled and a message similar to the one shown below is displayed.
Fig. 3.g If the terminal detects inactivity of the entire pLAN network, that is, it does not receive any messages from the network for 10 seconds consecutively, the display is cancelled completely and the following message is shown:
Fig. 3.h
ENG
+030220741 Smart HP – rel 2.2 -12/11/2013
28
4. USER INTERFACE
4.1 Graphic terminalThe Smart HP user interface is the pGD1 terminal, in the wall or panel mounted versions, or if necessary using the “built-in” terminal installed directly on the pCO board.
Fig. 4.a
This terminal, illustrated in the figure above, features six buttons, with the following meanings:
- Alarm Display the list of active alarms.
Enter the main menu tree.
Return to the previous screen.
- Up Scroll a list upwards or increase the value shown on the display.
- Down Scroll a list downwards or decrease the value shown on the display.
- Enter Enter the selected submenu or confirm the set value.
4.2 Display The Smart HP screens can be grouped into three fundamental types: main screens (just one if Smart HP manages the unit alone, two to seven if the zones are also managed), the navigation menu and the parameter settings. The rows on the main screen (unit) are arranged as follows:
Fig. 4.b
1- date, time and unit connected, 2- main readings and corresponding values, 3- main actuators active, 4- unit status. The unit status may be:
• OFF, • ON, • ENERGY S., • AUTO-OFF, • AUTO-ON, • AUTO-E.S. • Din-OFF, • BMS-OFF, • ALARM-OFF • PROTECT.
The unit status screens may show the following icons:
This identifies the three temperature readings, that is,: T.DHW (domestic hot water temp. measured), T.OUTSIDE (outside temp. measured), T.SYSTEM (primary system water return temp.).
On when a compressor is running.
On when there is a domestic hot water heating request. On when one of the heating system pumps is on, except for the solar collector pumps. On when one or more solar collectors are installed and operating.
On when the additional heating system (heater or boiler) is operating. If the “solar collectors” icon is activated at the same time, only the latter is displayed. On when a defrost is in progress, alternating with the two above icons
The following figure shows the room navigation screen:
Fig. 4.c
1- date, time and room being displayed, 2- main readings and corresponding values (temp, humid, zone/scheduler active in the room), 3- main status/actuators active, 4- room status. The room status may be:
• OFF, • COMFORT, • ECONOMY, • AUTO-OFF, • AUTO-COMF, • AUTO–ECON, • KEY-OFF, • BMS-OFF, • ALARM-OFF • PROTECT.
The room status screens may show the following icons:
On steady on the screens displaying the zone status; shows the status of the zones being heated/cooled.
Indicates COOLING mode has been set.
Indicates HEATING mode has been set.
Indicates activation of the humidifier.
Indicates activation of the dehumidifier.
Indicates activation of the three-way valve in the radiant system.
Indicates activation of the zone valve.
Note: if there is more than on main screen (unit and zone), the right of the display shows
two arrows ( and ), used to scroll the screens.
ENG
+030220741 Smart HP – rel 2.2 -12/11/2013
29
The following figure shows the main menu navigation screen.
Fig. 4.d
Below are the eight menus:
A. Unit On-Off,
B. Set point,
C. Clock/Time bands,
D. Inputs/Outputs,
E. Alarm log,
F. Change Board,
G. Service,
H. Manufacturer. The parameter setting screens, on the other hand, are as shown in the example below:
Fig. 4.e
5- name of the menu entered, 6- screen index, 7- name of the submenu where the parameters are being edited, 8- name of the parameter, 9- settable value
Note: in Smart HP all settable fields are represented by numeric values or letters in upper case)
ENG
+030220741 Smart HP – rel 2.2 -12/11/2013
30
5. DESCRIPTION OF THE MENUS Main menu – Tree of functions
Fig. 5.a
5.1 A. Unit On/Off The unit status can be set from the main menu (A.), based on the selection made.
Fig. 5.b
The following can be selected on the first row of the screen: 1. if Smart HP is operating in “unit only” mode, ON, OFF, ENERGY
SAVING, AUTO; 2. if, on the other hand, the application has to manage “unit +
system”, the items that can be selected are OFF and ON FROM ROOM.
The items in case 1. relate to the selections for the heat pump unit only, and have the following meaning: ON = standard conditions, OFF = standby, ENERGY SAVING = “reduced” set point for greater energy saving, AUTO = scheduler activated (see Chap. 5.3) .
The second row (only editable if OFF is selected on the first row), on the other hand, is used to select the heat pump operating mode (COOLING+DHW, HEATING+DHW, DHW ONLY). The rooms can be configured on screens A03 and A04, and are similar to the example shown in Fig. 5.b, however only the first row is available; the meanings of the options for the room set point are: OFF = standby, ECONOMY = reduced set point for less energy consumption, COMFORT = optimum conditions, AUTO = indicates the scheduler is activated (see Chap. 5.3). The remote ON-OFF digital input can be used to place the entire system in standby, including domestic hot water control.
Note: the Smart HP operating mode (“unit only” or “unit + system”) is decided during the development/installation of the system and cannot be modified by the end user on the display.
Note: standby can be set on screen A02 with the “enable temporary off” function, used to start the unit again at a pre-set time and date.
Note: the AUTO function can be activated on screens A01, A03, A04, enabling the Scheduler (see Chap. 5.3).
Per a
cced
ere
a qu
esti
ram
i è
nece
ssar
io in
serir
e la
pass
word
PW
1
Per a
cced
ere
a qu
esti
ram
i è
nece
ssar
io in
serir
e la
pass
word
PW
2
ENG
+030220741 Smart HP – rel 2.2 -12/11/2013
31
5.2 B. Set point The various “set points” for the rooms only can be set from the main menu (B.); the COMFORT and ECONOMY set points can be set and depend on the configuration of the unit.
Fig. 5.c
The range of settings for the room set point available to the user is limited by the settings made to the corresponding parameters during installation.
Note: this menu is not active if “unit only” is selected and consequently the room controllers are not enabled.
5.3 C. Clock/Time bands Description of operation: pCO3 is fitted with an internal clock with backup battery that stores the time and date for all the associated functions. The time, date, time bands, closing periods and holidays are set from the Clock/Time bands menu (C.). The screens are:
• Time and date setting • Four daily time bands • Closing periods, up to a max. of three • Holidays/special dates, up to a max. of six
Below are the screens for setting the “unit only”:
Fig. 5.d
Note: If the Clima zone terminals or serial probes are fitted, two sets of screens are available, called “Bands zone 1” and “Bands zone 2”. The scheduler (screen C=2,C05,C08) is activated by setting Auto on screen A01,A03,A04 (see Chap. 5.1)
To set less time bands than the four allowed, simply leave the symbols “--:--“ in the field “hh:mm”, doing the same for the set point. On any day, four different time bands can be set, with corresponding set point for each band. After this each day of the week can be selected, either copying the previous day’s settings, or configuring them day-by-day. To select the set point see the corresponding paragraph and the parameters in the general table of parameters. For these types of units, system inertia is on average quite long, as radiant systems very often have large masses; in these cases, the working set points (COMFORT and ECONOMY) are set very close together. Consequently, also the time bands are normally reduced, because they consider the significant inertia of the system. If Smart HP is only configured to manage the unit, the “unit only” (UNIT) time bands will be displayed, while if the system is also managed, only the ZONE time bands are displayed, in this case the unit is forced to operate based on the highest load. If one zone is in ECONOMY mode and the other is OFF, the unit switches to the ENERGY SAVING set point. Status selectable UNIT OFF ON ENERGY SAVING AUTO ZONE OFF COMFORT ECONOMY AUTO
Note: OFF status still guarantees unit antifreeze protection.
Time bands can be created for one day and then copied to other days if these are the same.
5.4 D. Inputs/Outputs From the main menu (D.), both the type and the physical status of the inputs and outputs, both digital and analogue, can be displayed in sequence. If the input or output has not been set (no device connected), “----“ will be displayed. The related screens are shown below.
Fig. 5.e
Note: The values corresponding to analogue outputs are expressed as a percentage.
ENG
+030220741 Smart HP – rel 2.2 -12/11/2013
32
5.5 E. Alarm log From the main menu (E.) the logged alarms can be displayed in sequence; to reset the alarms, access the log from the service menu with password. The “ALARM” button on the other hand is used to mute the buzzer (if present), display the currently active alarms and reset them (obviously these remain in the log) and then access the log directly.
Fig. 5.f
Note: also see the specific paragraph (9.2).
Note: the list of active alarms can be accessed from the main page, by
pressing .
5.6 F. Change Board From the main menu (F.), the set of parameters on the other pCO controllers connected in the pLAN network can be displayed; to do this, access the screen shown below and enter the desired unit; once connected, the main screen shows the number of the unit in question.
Note: this function is not active on Smart HP.
5.7 G. Service The service submenu is accessed from the main menu (G.), and is divided into two parts, the first (a,b,c,d) not password-protected is used to display and set the following data: G.a. Change language: select one of the languages loaded in the application (Italian, English...). G.b. Info: view information relating to the application code (and corresponding version) on the first screen, while the second shows information concerning the pCO3 board hardware.
Fig. 5.g G.c. Unit temp. control: used to set the set point for the solar collectors (if present), the mixed circuit, the Antilegionella function and the heat pump (standard and energy saving set point for “heating/cooling”, and for domestic hot water production). The following figures only show the selection screens relating to the heat pump set point.
Fig. 5.h G.d. Operating hours: displays the operating hours of the main moving devices (compressors and pumps on the unit and that depend on the type of configuration) that may require periodical maintenance.
Fig. 5.i
Note: from this point on in the submenu, access requires password entry (PW1 – default 1234). G.e. BMS configuration: used to set all the parameters required for connection to a supervisory system; this thus depends on the type of optional card that is fitted and the type of protocol selected. Choosing “CAREL”, connection can be made over RS485 to a supervisor that supports the CAREL protocol, and cards can be connected that convert the CAREL protocol to others, such as the TCP/IP card or the Trend card.
Fig. 5.j G.f.a. Hour counter settings: used to set the operating hour threshold for the main devices on the unit (depending on the type of configuration) that require periodical maintenance. The timer for each device can be reset on the same screen.
Fig. 5.k
ENG
+030220741 Smart HP – rel 2.2 -12/11/2013
33
G.f.b. Probe calibration: used to set an offset to be added to or subtracted from the reading made by the probe in question. Once the offset (Ofs) value has
been confirmed, pressing automatically updates the reading of the corresponding probe (shown on the side).
Fig. 5.l
Note: The respective probes can also be enabled or disabled on these screens. G.f.c. Temperature control: this branch includes all the parameters relating to temperature control and modifiable during installation or service, except for those that corresponding to the manufacturer area, which are found under the H.c. branch. G.f.d. User def./change PW1: used to reset the alarm log and modify password PW1.
Fig. 5.m
G.g. Manual management: used to switch the individual actuators on the unit from automatic to manual. For digital outputs, the status may be ON or OFF, while for analogue outputs the selection varies from 0-100%, obviously all the defaults are Auto. This selection bypasses control, but not the alarm thresholds set, so as to ensure safety of the unit; in general, thus operation is used to test the individual actuators during installation.
Fig. 5.n
5.8 H. Manufacturer From the main menu (H.), the manufacturer submenu can be accessed after entering the corresponding password (PW2 – default 1234): H.a. Configuration: used to select the main features of the unit/installation and the functions of the individual devices. The first parameter is the type of unit and system, reverse-cycle or not. Then a series of screens are displayed that determine the main features of the individual system components (e.g. type and no. of compressors...) and the configuration allowed for the hardware. Inside this branch is the menu relating to the parameters for setting the EVO electronic valve driver (a. Configuration., b. Control, c. Custom). H.b. I/O configuration This menu selects the functions and the availability of the individual I/Os.
For each I/O there are various options, which essentially depend on the hardware used and the fact that some I/Os may have different functions from the default configuration. For digital I/Os, the status of the device can be selected, that is, NO or NC logic, while for analogue outputs the min. and max. values of the output (default 0-100%) can be set; in addition, for analogue inputs, both the type of input (e.g. 0-10V, 4-20 mA, etc.) and the operating range of the sensor connected (e.g. 0-44.8 Bars for the high pressure probe) can be selected. Below is an example of the digital input settings:
Fig. 5.o H.c. Manufacturer parameters: these screens are used to set the manufacturer parameters. H.d. Initialisation: used to initialise the software and restore the default values.
Fig. 5.p The following screen (Hd02) is used to change the manufacturer password. Screens Hd03 and Hd04 change the unit of measure, from the international system (°C and bar) to imperial (°F and psi), in this case the parameters are reset to allow the new ranges of values to be loaded in the respective unit of measure. Consequently, this operation must be completed before making any other settings.
Fig. 5.q
Note: The imperial configuration does not allow Clima room terminals to be selected, as Smart HP does not support conversion to these devices. The setting is however possible with serial probes. This screen can also be used to modify the date format, from the various international standards (dd.mm.yy; mm.dd.yy; yy.mm.dd),
Note: in this case, the display of the date is changed, but not the format for setting weekends, public holidays and special dates, which remains in the “dd/mm” format.
H.e. Test Inputs/outputs.
Note: this function is not active on Smart HP.
Note: after having set the values of the manufacturer parameters, the pCO controller needs to be powered down and up again in order to save and make the new settings active.
ENG
+030220741 Smart HP – rel 2.2 -12/11/2013
34
6. FUNCTIONSNot all the functions described are available on all configurations; in particular, some of these are exclusively dedicated to systems that use air/water units.
6.1 Compressor management These units often use hermetic scroll compressors. Smart HP manages up to two compressors in one refrigerant circuit; these are used to produce hot or cold water for the system, based on the operating season, and for the domestic water circuit. If the system features two compressors, activation can be rotated using FIFO logic (First In First Out), settable on screen Hc11. The management times follow the CAREL standard, that is, minimum on and off time, minimum time between two starts of the same compressor and between different compressors, as well as regards the delays when the unit and the pumps start. These parameters are displayed in the manufacturer branch (H) Manuf. parameters (c); for their meanings, see the following figure:
Fig. 6.a
For greater system efficiency, ONLY in total heat recovery mode (that is, domestic hot water production and room cooling, in summer) the normal compressor times are ignored and to carry out operation the compressor is stopped for 15s, after which the 4-way valve is reversed and after another 15s the compressor restarts; if there are two compressors the second restarts 10s after the first. The pCO3 controller manages the compressor alarms and precisely the thermal overload (without delays and with manual reset), the high pressure from pressure switch without delays and with manual reset and/or from high pressure probe, using a threshold (Hc01) that allows operation of one compressor to be stopped when there are two. The low pressure alarm, either from pressure switch or from probe has a settable delay and manual or automatic reset (in the latter case there are five consecutive attempts before going to manual reset mode); these parameters are located on screens Hc02 to Hc05. The circuit can be fitted with an electronic expansion valve, with relative EVO driver; in this case the low and high pressure probes used are those connected to the electronic expansion valve and not those connected to the pCO3 board.
6.2 Inverter-driven compressor management with control of the envelope For connection of the pCO3 to the compressor inverter see paragraph 2.2.12, while only one inverter controlled compressor is controlled (on screen Ha03 only one compressor should be selected). The compressor is managed using an analogue output as an alternative to the humidifier, where envisaged (which will automatically be deactivated by the application), a digital input (in place of compressor thermal overload 1) and a digital output.
System temperature continues to be performed on the system primary circuit return, the set point and corresponding control band depend on the working range (frequency) of the inverter-compressor, in proportional mode (see the following drawing). The inverter is enabled on screen Ha15, where two minimum frequency limits (working and absolute min) and two maximum limits (working and absolute max) can also be set. In the field from minimum working frequency to maximum working frequency the compressor can operate for an indefinite time. The compressor can operate in the field between maximum working frequency and absolute maximum only for domestic hot water production greater than 120s, corresponding to the maximum time set on screen Ha16. The field of frequencies between absolute minimum and working minimum also is limited by a time set on Ha16, this range is entered on when exiting the control band (temperature); the procedure ends when returning to the control band or exceeding the maximum time in the range. In the latter case, the compressor is shutdown by operating for 1 minute at fmin work (minimum working frequency) +10% before stopping; this guarantees the return of oil for the next restart. The drawing illustrates the operation of the outputs according to the control temperature.
Set point
Diff.
freq.
fmax
f max work
fmin work
fmin
10 V
0 V
B5
B5
NO1
Y4
Only DHW
Fig. 6.b
Note: to operate the compressor ONLY in the optimum working zone (that is, without using the maximum and minimum frequency) set the minimum frequency = minimum working frequency; likewise for the maximum frequency = maximum working frequency. In addition, the envelope can be enabled (Ha07), used to ensure optimum compressor pressure control. The drawing illustrates the control points (P1 to P5) that are entered on screens Ha09 to 11. Activating the possibility to setting the value of ‘‘f min work’’ (see Fig 6.b), the polygon of the envelope can be changed by setting the parameters corresponding to points P5a and P6a (Ha12); these in fact limit the working field proportionally to the minimum frequency (if this is different from the minimum working frequency ‘‘f min work’’). Zone 1 is normal operation, while zone 2 and zone 3 are temporary: if operation does not return within the set times the compressor is stopped with manual reset. In zone 4 and 5 on the other hand the compressor stops immediately for having exceeded the maximum pressure limits (Ha08), reset in this case is only manual. The drawing below illustrates the various working zones.
ENG
+030220741 Smart HP – rel 2.2 -12/11/2013
35
Zona 4
Zona 1
P_disch
Zona 3
Zona 2
P5
P6
P4
P3
P2P1
P_suct
Zona 5
P5a
P6a
Fig. 6.c
6.3 Electronic valve management with EVO To optimise operation of the refrigerant circuit, the electronic expansion valve (E2V-E3V…) can be used with EVO driver, installed in the pLAN network with address 5. When using the EVO the compressor high and low pressure probes are connected to the latter and the measurements are sent to the pCO3 controller across the pLAN serial network. The corresponding parameters are set in the related branch of Manufacturer settings (H.) EVO driver (Ha), in turn divided into three submenus a. Configuration, b. Control, c. Custom. The probe readings and the status of the E*V valve are available in the Inputs/outputs branch (D.). For testing when commissioning the system, in the Service branch (G.), Manual management (g), are screens for manually operating of the electronic expansion valve. For further details on the individual parameters, see the EVO manual (+030222040).
Note: the EVO driver can also be selected on type 1, 2, 3, 4 units. On type 3, 4 units the high and low pressure thresholds refer to the probes connected to the pCO³ while the EVO continues operating with its own probes.
6.4 Antifreeze function This function is used to prevent potentially dangerous temperatures being reached for both the system and the geothermal loops. The values are measured using the outlet temperature probes (ground source and system primary circuit), setting an antifreeze set point and differential for the individual circuits. These values can be set in the Service branch (Gfc27-28 and Gfc31-32). Antifreeze alarms are serious alarms that shut down the heat pump, reset may be manual or automatic as selected on the screens (see the table of alarms). The operating diagram is shown in the drawing below:
Fig. 6.d
For the individual rooms an antifreeze protection set point can be set that restarts the unit from standby if one of the serial probe/Clima unit readings falls below this value. This set point can be set under the Service branch (Gfc42) while the differential is fixed at 3°C, likewise reset is automatic.
6.5 System water circuit and ground source circuit management. The fundamental control functions of Smart HP are performed on the water outlet temperature in the mixed circuit, by managing the modulating three-way valve. The cooling and heating set points are set under the Service branch (Gc02), while the control, DYNAMIC or FIXED POINT, the control band, the type of control (P= proportional, P+I= proportional + integral), the integral constant time, the possible temperature compensation in winter, the anti-condensation offset for summer and the temperature limits can be set on screens Gfc21 to Gfc25.
Fig. 6.e
Operation of the compressor/compressors is controlled to ensure the return temperature in the primary circuit, the values for both cooling and heating operating are set on screens Gc04 and Gc05. The following diagrams illustrate the temperature control of the compressors in heating operation with 1 or 2 compressors; cooling operation is obviously opposite (direct) and refers to the corresponding set point (chiller).
Fig. 6.f
In heating mode, the primary circuit can be boosted by an integration system (digital output NO6 on the pCO3 board), either heaters in the exchanger or a boiler that receives a remote on-off signal and works with its own set point. The boiler is activated based on the outside temperature or when more cost effective for air-source units, or based on the temperature of the geothermal loops for ground source units; this setting is made on screen Gfc15. In cooling mode, the primary circuit outlet probe also guarantees antifreeze protection (see the paragraph on the Antifreeze function) of the unit heat exchanger. For system flow alarm management, either manual or automatic reset can be selected; in the latter case there are five consecutive attempts, after which manual reset is activated. Still on screen Hc21, checks on the physical presence of the flow switches can be set, performed 5s from power-on, after another 10s the pumps are activated, to avoid this the corresponding terminals are jumpered during installation. For reverse-cycle units (heating and cooling) a refrigerant circuit reversing valve is used to reverse the flow through the heat exchangers (system and geothermal); to avoid this four-way valves can be installed on the water circuits: to maintain counterflow through the exchangers. In this configuration, the probes should be installed downstream of the four-way valves on the water circuit, to avoid reversing the reading. For the ground source circuit, the pump control may be on-off or modulating, in the latter case operation is proportional with working set points and differentials set on screens Gfc29 and Gfc30 (see the following diagram); while the minimum value is set at 35% of the output. For antifreeze protection see the corresponding paragraph.
100%
Y
35%
Setpoint
Geo Inlet Temp
Winter
Diff
100%
Y
35%
Setpoint
Geo Inlet Temp
Summer
Diff
Fig. 6.g
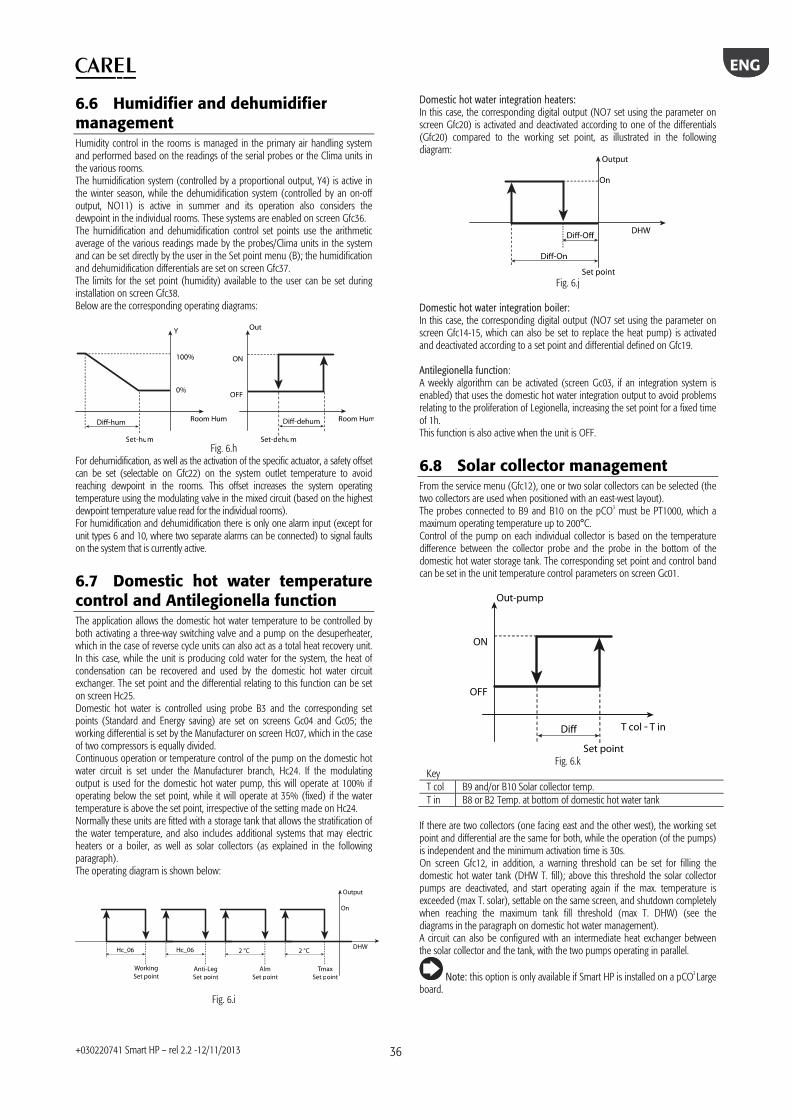
ENG
+030220741 Smart HP – rel 2.2 -12/11/2013
36
6.6 Humidifier and dehumidifier management Humidity control in the rooms is managed in the primary air handling system and performed based on the readings of the serial probes or the Clima units in the various rooms. The humidification system (controlled by a proportional output, Y4) is active in the winter season, while the dehumidification system (controlled by an on-off output, NO11) is active in summer and its operation also considers the dewpoint in the individual rooms. These systems are enabled on screen Gfc36. The humidification and dehumidification control set points use the arithmetic average of the various readings made by the probes/Clima units in the system and can be set directly by the user in the Set point menu (B); the humidification and dehumidification differentials are set on screen Gfc37. The limits for the set point (humidity) available to the user can be set during installation on screen Gfc38. Below are the corresponding operating diagrams:
Fig. 6.h
For dehumidification, as well as the activation of the specific actuator, a safety offset can be set (selectable on Gfc22) on the system outlet temperature to avoid reaching dewpoint in the rooms. This offset increases the system operating temperature using the modulating valve in the mixed circuit (based on the highest dewpoint temperature value read for the individual rooms). For humidification and dehumidification there is only one alarm input (except for unit types 6 and 10, where two separate alarms can be connected) to signal faults on the system that is currently active.
6.7 Domestic hot water temperature control and Antilegionella function The application allows the domestic hot water temperature to be controlled by both activating a three-way switching valve and a pump on the desuperheater, which in the case of reverse cycle units can also act as a total heat recovery unit. In this case, while the unit is producing cold water for the system, the heat of condensation can be recovered and used by the domestic hot water circuit exchanger. The set point and the differential relating to this function can be set on screen Hc25. Domestic hot water is controlled using probe B3 and the corresponding set points (Standard and Energy saving) are set on screens Gc04 and Gc05; the working differential is set by the Manufacturer on screen Hc07, which in the case of two compressors is equally divided. Continuous operation or temperature control of the pump on the domestic hot water circuit is set under the Manufacturer branch, Hc24. If the modulating output is used for the domestic hot water pump, this will operate at 100% if operating below the set point, while it will operate at 35% (fixed) if the water temperature is above the set point, irrespective of the setting made on Hc24. Normally these units are fitted with a storage tank that allows the stratification of the water temperature, and also includes additional systems that may electric heaters or a boiler, as well as solar collectors (as explained in the following paragraph). The operating diagram is shown below:
Fig. 6.i
Domestic hot water integration heaters: In this case, the corresponding digital output (NO7 set using the parameter on screen Gfc20) is activated and deactivated according to one of the differentials (Gfc20) compared to the working set point, as illustrated in the following diagram:
Fig. 6.j
Domestic hot water integration boiler: In this case, the corresponding digital output (NO7 set using the parameter on screen Gfc14-15, which can also be set to replace the heat pump) is activated and deactivated according to a set point and differential defined on Gfc19. Antilegionella function: A weekly algorithm can be activated (screen Gc03, if an integration system is enabled) that uses the domestic hot water integration output to avoid problems relating to the proliferation of Legionella, increasing the set point for a fixed time of 1h. This function is also active when the unit is OFF.
6.8 Solar collector management From the service menu (Gfc12), one or two solar collectors can be selected (the two collectors are used when positioned with an east-west layout). The probes connected to B9 and B10 on the pCO3 must be PT1000, which a maximum operating temperature up to 200°C. Control of the pump on each individual collector is based on the temperature difference between the collector probe and the probe in the bottom of the domestic hot water storage tank. The corresponding set point and control band can be set in the unit temperature control parameters on screen Gc01.
ON
Out-pump
OFF
T col - T inDiff
Set point Fig. 6.k
Key T col B9 and/or B10 Solar collector temp. T in B8 or B2 Temp. at bottom of domestic hot water tank
If there are two collectors (one facing east and the other west), the working set point and differential are the same for both, while the operation (of the pumps) is independent and the minimum activation time is 30s. On screen Gfc12, in addition, a warning threshold can be set for filling the domestic hot water tank (DHW T. fill); above this threshold the solar collector pumps are deactivated, and start operating again if the max. temperature is exceeded (max T. solar), settable on the same screen, and shutdown completely when reaching the maximum tank fill threshold (max T. DHW) (see the diagrams in the paragraph on domestic hot water management). A circuit can also be configured with an intermediate heat exchanger between the solar collector and the tank, with the two pumps operating in parallel.
Note: this option is only available if Smart HP is installed on a pCO3 Large board.
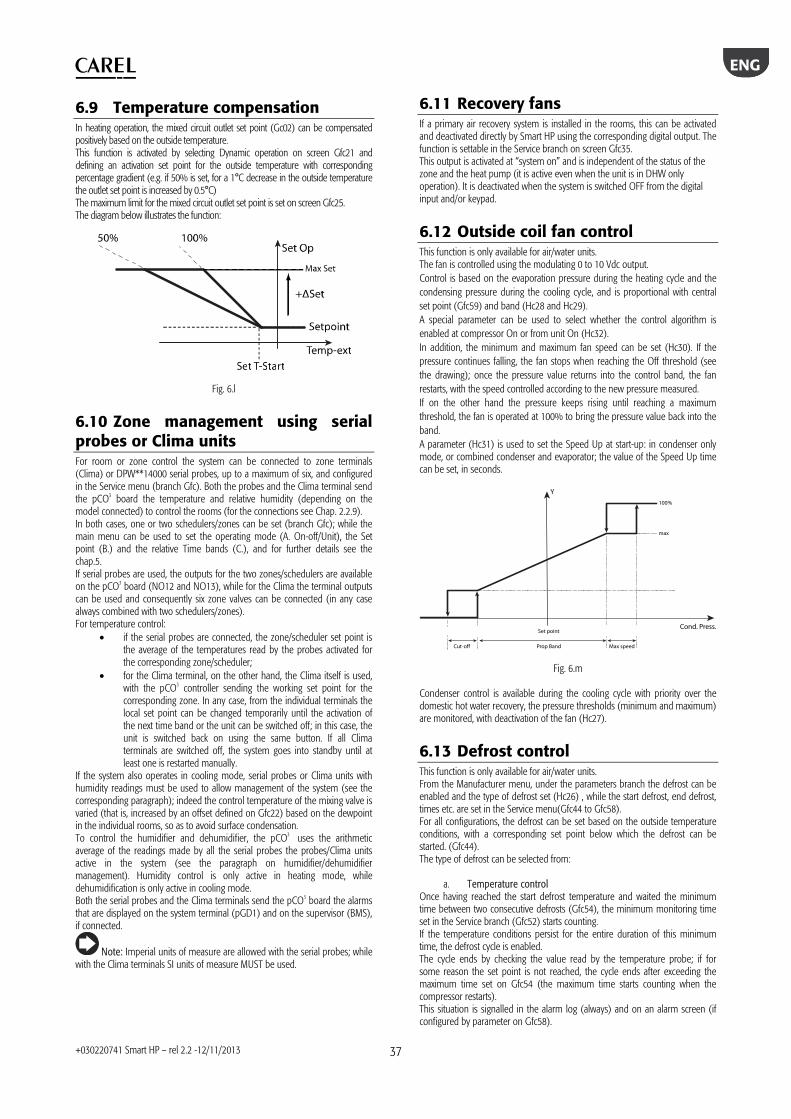
ENG
+030220741 Smart HP – rel 2.2 -12/11/2013
37
6.9 Temperature compensation In heating operation, the mixed circuit outlet set point (Gc02) can be compensated positively based on the outside temperature. This function is activated by selecting Dynamic operation on screen Gfc21 and defining an activation set point for the outside temperature with corresponding percentage gradient (e.g. if 50% is set, for a 1°C decrease in the outside temperature the outlet set point is increased by 0.5°C) The maximum limit for the mixed circuit outlet set point is set on screen Gfc25. The diagram below illustrates the function:
Fig. 6.l
6.10 Zone management using serial probes or Clima units For room or zone control the system can be connected to zone terminals (Clima) or DPW**14000 serial probes, up to a maximum of six, and configured in the Service menu (branch Gfc). Both the probes and the Clima terminal send the pCO3 board the temperature and relative humidity (depending on the model connected) to control the rooms (for the connections see Chap. 2.2.9). In both cases, one or two schedulers/zones can be set (branch Gfc); while the main menu can be used to set the operating mode (A. On-off/Unit), the Set point (B.) and the relative Time bands (C.), and for further details see the chap.5. If serial probes are used, the outputs for the two zones/schedulers are available on the pCO3 board (NO12 and NO13), while for the Clima the terminal outputs can be used and consequently six zone valves can be connected (in any case always combined with two schedulers/zones). For temperature control:
• if the serial probes are connected, the zone/scheduler set point is the average of the temperatures read by the probes activated for the corresponding zone/scheduler;
• for the Clima terminal, on the other hand, the Clima itself is used, with the pCO3 controller sending the working set point for the corresponding zone. In any case, from the individual terminals the local set point can be changed temporarily until the activation of the next time band or the unit can be switched off; in this case, the unit is switched back on using the same button. If all Clima terminals are switched off, the system goes into standby until at least one is restarted manually.
If the system also operates in cooling mode, serial probes or Clima units with humidity readings must be used to allow management of the system (see the corresponding paragraph); indeed the control temperature of the mixing valve is varied (that is, increased by an offset defined on Gfc22) based on the dewpoint in the individual rooms, so as to avoid surface condensation. To control the humidifier and dehumidifier, the pCO3 uses the arithmetic average of the readings made by all the serial probes the probes/Clima units active in the system (see the paragraph on humidifier/dehumidifier management). Humidity control is only active in heating mode, while dehumidification is only active in cooling mode. Both the serial probes and the Clima terminals send the pCO3 board the alarms that are displayed on the system terminal (pGD1) and on the supervisor (BMS), if connected.
Note: Imperial units of measure are allowed with the serial probes; while with the Clima terminals SI units of measure MUST be used.
6.11 Recovery fans If a primary air recovery system is installed in the rooms, this can be activated and deactivated directly by Smart HP using the corresponding digital output. The function is settable in the Service branch on screen Gfc35. This output is activated at “system on” and is independent of the status of the zone and the heat pump (it is active even when the unit is in DHW only operation). It is deactivated when the system is switched OFF from the digital input and/or keypad.
6.12 Outside coil fan control This function is only available for air/water units. The fan is controlled using the modulating 0 to 10 Vdc output. Control is based on the evaporation pressure during the heating cycle and the condensing pressure during the cooling cycle, and is proportional with central set point (Gfc59) and band (Hc28 and Hc29). A special parameter can be used to select whether the control algorithm is enabled at compressor On or from unit On (Hc32). In addition, the minimum and maximum fan speed can be set (Hc30). If the pressure continues falling, the fan stops when reaching the Off threshold (see the drawing); once the pressure value returns into the control band, the fan restarts, with the speed controlled according to the new pressure measured. If on the other hand the pressure keeps rising until reaching a maximum threshold, the fan is operated at 100% to bring the pressure value back into the band. A parameter (Hc31) is used to set the Speed Up at start-up: in condenser only mode, or combined condenser and evaporator; the value of the Speed Up time can be set, in seconds.
100%
max
Y
Set pointCond. Press.
Prop Band Max speedCut-off
Fig. 6.m Condenser control is available during the cooling cycle with priority over the domestic hot water recovery, the pressure thresholds (minimum and maximum) are monitored, with deactivation of the fan (Hc27).
6.13 Defrost control This function is only available for air/water units. From the Manufacturer menu, under the parameters branch the defrost can be enabled and the type of defrost set (Hc26) , while the start defrost, end defrost, times etc. are set in the Service menu(Gfc44 to Gfc58). For all configurations, the defrost can be set based on the outside temperature conditions, with a corresponding set point below which the defrost can be started. (Gfc44). The type of defrost can be selected from:
a. Temperature control Once having reached the start defrost temperature and waited the minimum time between two consecutive defrosts (Gfc54), the minimum monitoring time set in the Service branch (Gfc52) starts counting. If the temperature conditions persist for the entire duration of this minimum time, the defrost cycle is enabled. The cycle ends by checking the value read by the temperature probe; if for some reason the set point is not reached, the cycle ends after exceeding the maximum time set on Gfc54 (the maximum time starts counting when the compressor restarts). This situation is signalled in the alarm log (always) and on an alarm screen (if configured by parameter on Gfc58).
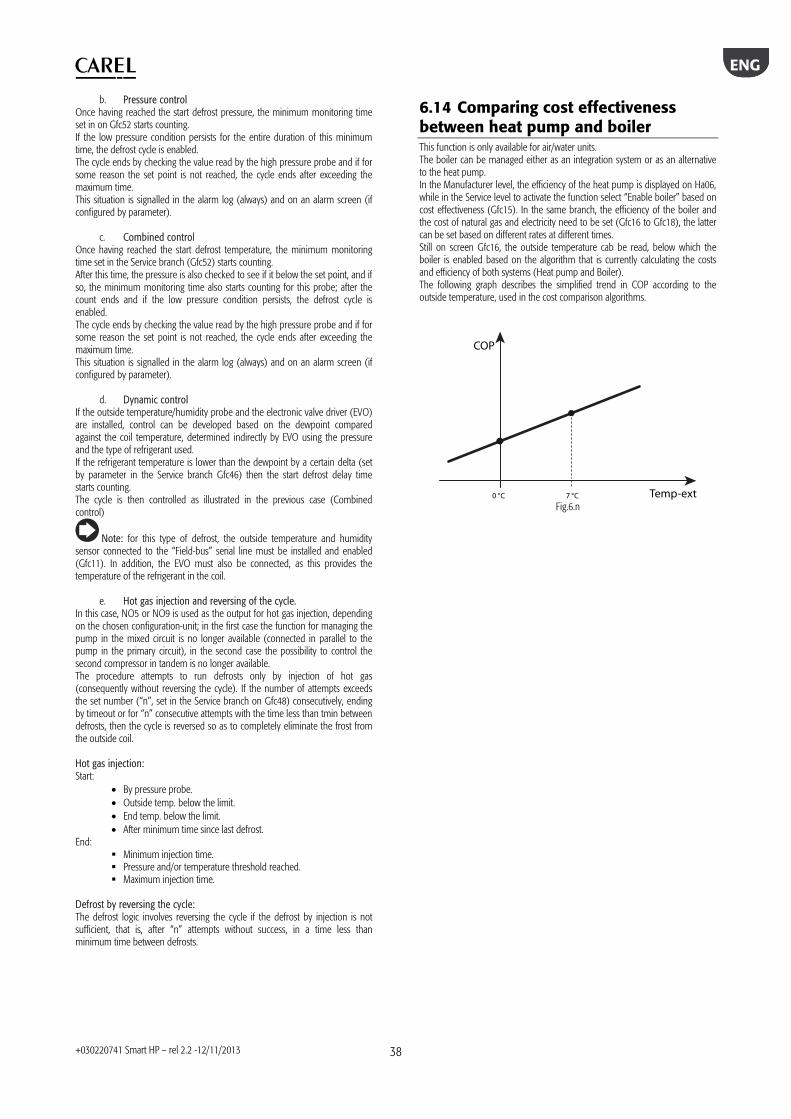
ENG
+030220741 Smart HP – rel 2.2 -12/11/2013
38
b. Pressure control Once having reached the start defrost pressure, the minimum monitoring time set in on Gfc52 starts counting. If the low pressure condition persists for the entire duration of this minimum time, the defrost cycle is enabled. The cycle ends by checking the value read by the high pressure probe and if for some reason the set point is not reached, the cycle ends after exceeding the maximum time. This situation is signalled in the alarm log (always) and on an alarm screen (if configured by parameter).
c. Combined control Once having reached the start defrost temperature, the minimum monitoring time set in the Service branch (Gfc52) starts counting. After this time, the pressure is also checked to see if it below the set point, and if so, the minimum monitoring time also starts counting for this probe; after the count ends and if the low pressure condition persists, the defrost cycle is enabled. The cycle ends by checking the value read by the high pressure probe and if for some reason the set point is not reached, the cycle ends after exceeding the maximum time. This situation is signalled in the alarm log (always) and on an alarm screen (if configured by parameter).
d. Dynamic control If the outside temperature/humidity probe and the electronic valve driver (EVO) are installed, control can be developed based on the dewpoint compared against the coil temperature, determined indirectly by EVO using the pressure and the type of refrigerant used. If the refrigerant temperature is lower than the dewpoint by a certain delta (set by parameter in the Service branch Gfc46) then the start defrost delay time starts counting. The cycle is then controlled as illustrated in the previous case (Combined control)
Note: for this type of defrost, the outside temperature and humidity sensor connected to the “Field-bus” serial line must be installed and enabled (Gfc11). In addition, the EVO must also be connected, as this provides the temperature of the refrigerant in the coil.
e. Hot gas injection and reversing of the cycle. In this case, NO5 or NO9 is used as the output for hot gas injection, depending on the chosen configuration-unit; in the first case the function for managing the pump in the mixed circuit is no longer available (connected in parallel to the pump in the primary circuit), in the second case the possibility to control the second compressor in tandem is no longer available. The procedure attempts to run defrosts only by injection of hot gas (consequently without reversing the cycle). If the number of attempts exceeds the set number (“n”, set in the Service branch on Gfc48) consecutively, ending by timeout or for “n” consecutive attempts with the time less than tmin between defrosts, then the cycle is reversed so as to completely eliminate the frost from the outside coil. Hot gas injection: Start:
• By pressure probe. • Outside temp. below the limit. • End temp. below the limit. • After minimum time since last defrost.
End: Minimum injection time. Pressure and/or temperature threshold reached. Maximum injection time.
Defrost by reversing the cycle: The defrost logic involves reversing the cycle if the defrost by injection is not sufficient, that is, after “n” attempts without success, in a time less than minimum time between defrosts.
6.14 Comparing cost effectiveness between heat pump and boiler This function is only available for air/water units. The boiler can be managed either as an integration system or as an alternative to the heat pump. In the Manufacturer level, the efficiency of the heat pump is displayed on Ha06, while in the Service level to activate the function select “Enable boiler” based on cost effectiveness (Gfc15). In the same branch, the efficiency of the boiler and the cost of natural gas and electricity need to be set (Gfc16 to Gfc18), the latter can be set based on different rates at different times. Still on screen Gfc16, the outside temperature cab be read, below which the boiler is enabled based on the algorithm that is currently calculating the costs and efficiency of both systems (Heat pump and Boiler). The following graph describes the simplified trend in COP according to the outside temperature, used in the cost comparison algorithms.
COP
0 °C 7 °C Temp-ext Fig.6.n
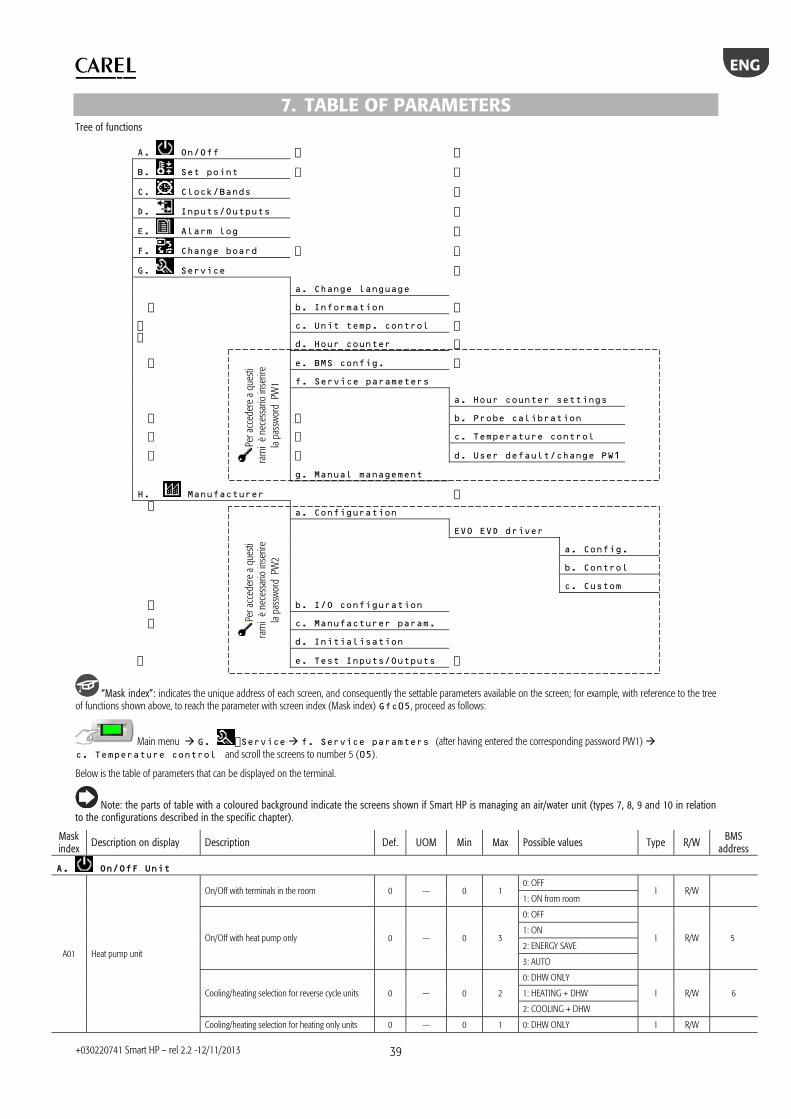
ENG
+030220741 Smart HP – rel 2.2 -12/11/2013
39
7. TABLE OF PARAMETERS
Tree of functions
“Mask index”: indicates the unique address of each screen, and consequently the settable parameters available on the screen; for example, with reference to the tree of functions shown above, to reach the parameter with screen index (Mask index) , proceed as follows:
Main menu (after having entered the corresponding password PW1) and scroll the screens to number 5 ().
Below is the table of parameters that can be displayed on the terminal.
Note: the parts of table with a coloured background indicate the screens shown if Smart HP is managing an air/water unit (types 7, 8, 9 and 10 in relation to the configurations described in the specific chapter).
Mask index Description on display Description Def. UOM Min Max Possible values Type R/W
BMS address
A01 Heat pump unit
On/Off with terminals in the room 0 --- 0 1 0: OFF
I R/W 1: ON from room
On/Off with heat pump only 0 --- 0 3
0: OFF
I R/W 5 1: ON
2: ENERGY SAVE
3: AUTO
Cooling/heating selection for reverse cycle units 0 --- 0 2
0: DHW ONLY
I R/W 6 1: HEATING + DHW
2: COOLING + DHW
Cooling/heating selection for heating only units 0 --- 0 1 0: DHW ONLY I R/W
Per a
cced
ere
a qu
esti
ram
i è
nece
ssar
io in
serir
e la
pass
word
PW
1
Per a
cced
ere
a qu
esti
ram
i è
nece
ssar
io in
serir
e la
pass
word
PW
2
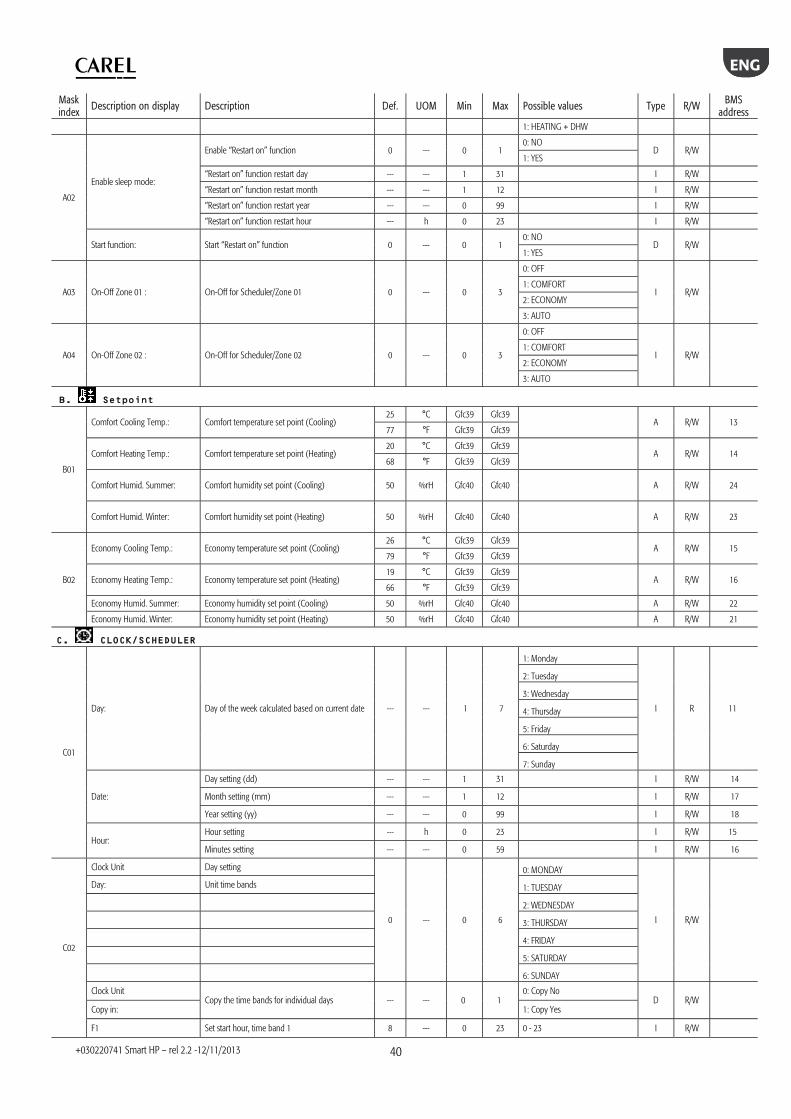
ENG
+030220741 Smart HP – rel 2.2 -12/11/2013
40
Mask index
Description on display Description Def. UOM Min Max Possible values Type R/W BMS address
1: HEATING + DHW
A02
Enable sleep mode:
Enable “Restart on” function 0 --- 0 1 0: NO
D R/W 1: YES
“Restart on” function restart day --- --- 1 31 I R/W
“Restart on” function restart month --- --- 1 12 I R/W
“Restart on” function restart year --- --- 0 99 I R/W
“Restart on” function restart hour --- h 0 23 I R/W
Start function: Start “Restart on” function 0 --- 0 1 0: NO
D R/W 1: YES
A03 On-Off Zone 01 : On-Off for Scheduler/Zone 01 0 --- 0 3
0: OFF
I R/W 1: COMFORT
2: ECONOMY
3: AUTO
A04 On-Off Zone 02 : On-Off for Scheduler/Zone 02 0 --- 0 3
0: OFF
I R/W 1: COMFORT
2: ECONOMY
3: AUTO
B01
Comfort Cooling Temp.: Comfort temperature set point (Cooling) 25 °C Gfc39 Gfc39
A R/W 13 77 °F Gfc39 Gfc39
Comfort Heating Temp.: Comfort temperature set point (Heating) 20 °C Gfc39 Gfc39
A R/W 14 68 °F Gfc39 Gfc39
Comfort Humid. Summer: Comfort humidity set point (Cooling) 50 %rH Gfc40 Gfc40 A R/W 24
Comfort Humid. Winter: Comfort humidity set point (Heating) 50 %rH Gfc40 Gfc40 A R/W 23
B02
Economy Cooling Temp.: Economy temperature set point (Cooling) 26 °C Gfc39 Gfc39
A R/W 15 79 °F Gfc39 Gfc39
Economy Heating Temp.: Economy temperature set point (Heating) 19 °C Gfc39 Gfc39
A R/W 16 66 °F Gfc39 Gfc39
Economy Humid. Summer: Economy humidity set point (Cooling) 50 %rH Gfc40 Gfc40 A R/W 22
Economy Humid. Winter: Economy humidity set point (Heating) 50 %rH Gfc40 Gfc40 A R/W 21
C01
Day: Day of the week calculated based on current date --- --- 1 7
1: Monday
I R 11
2: Tuesday
3: Wednesday
4: Thursday
5: Friday
6: Saturday
7: Sunday
Date:
Day setting (dd) --- --- 1 31 I R/W 14
Month setting (mm) --- --- 1 12 I R/W 17
Year setting (yy) --- --- 0 99 I R/W 18
Hour: Hour setting --- h 0 23 I R/W 15
Minutes setting --- --- 0 59 I R/W 16
C02
Clock Unit Day setting
0 --- 0 6
0: MONDAY
I R/W
Day: Unit time bands 1: TUESDAY
2: WEDNESDAY
3: THURSDAY
4: FRIDAY
5: SATURDAY
6: SUNDAY
Clock Unit Copy the time bands for individual days --- --- 0 1
0: Copy No D R/W
Copy in: 1: Copy Yes
F1 Set start hour, time band 1 8 --- 0 23 0 - 23 I R/W
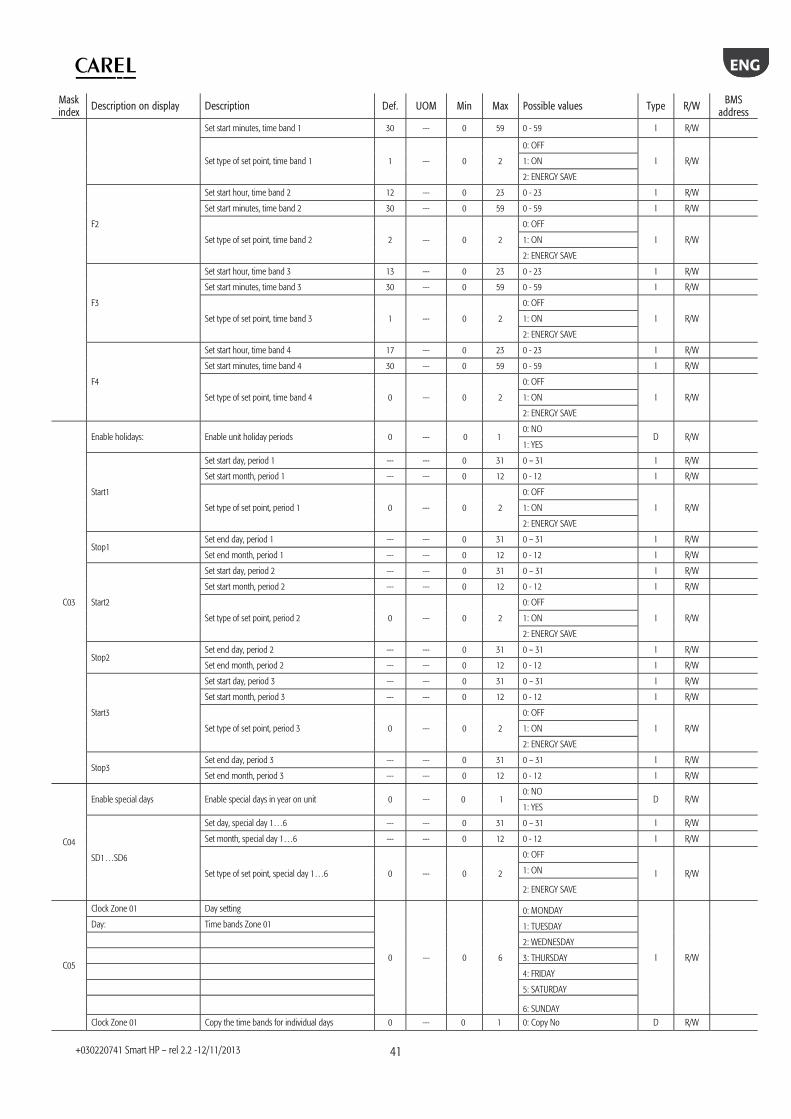
ENG
+030220741 Smart HP – rel 2.2 -12/11/2013
41
Mask index
Description on display Description Def. UOM Min Max Possible values Type R/W BMS address
Set start minutes, time band 1 30 --- 0 59 0 - 59 I R/W
Set type of set point, time band 1 1 --- 0 2
0: OFF
I R/W 1: ON
2: ENERGY SAVE
F2
Set start hour, time band 2 12 --- 0 23 0 - 23 I R/W
Set start minutes, time band 2 30 --- 0 59 0 - 59 I R/W
Set type of set point, time band 2 2 --- 0 2
0: OFF
I R/W 1: ON
2: ENERGY SAVE
F3
Set start hour, time band 3 13 --- 0 23 0 - 23 I R/W
Set start minutes, time band 3 30 --- 0 59 0 - 59 I R/W
Set type of set point, time band 3 1 --- 0 2
0: OFF
I R/W 1: ON
2: ENERGY SAVE
F4
Set start hour, time band 4 17 --- 0 23 0 - 23 I R/W
Set start minutes, time band 4 30 --- 0 59 0 - 59 I R/W
Set type of set point, time band 4 0 --- 0 2
0: OFF
I R/W 1: ON
2: ENERGY SAVE
C03
Enable holidays: Enable unit holiday periods 0 --- 0 1 0: NO
D R/W 1: YES
Start1
Set start day, period 1 --- --- 0 31 0 – 31 I R/W
Set start month, period 1 --- --- 0 12 0 - 12 I R/W
Set type of set point, period 1 0 --- 0 2
0: OFF
I R/W 1: ON
2: ENERGY SAVE
Stop1 Set end day, period 1 --- --- 0 31 0 – 31 I R/W
Set end month, period 1 --- --- 0 12 0 - 12 I R/W
Start2
Set start day, period 2 --- --- 0 31 0 – 31 I R/W
Set start month, period 2 --- --- 0 12 0 - 12 I R/W
Set type of set point, period 2 0 --- 0 2
0: OFF
I R/W 1: ON
2: ENERGY SAVE
Stop2 Set end day, period 2 --- --- 0 31 0 – 31 I R/W
Set end month, period 2 --- --- 0 12 0 - 12 I R/W
Start3
Set start day, period 3 --- --- 0 31 0 – 31 I R/W
Set start month, period 3 --- --- 0 12 0 - 12 I R/W
Set type of set point, period 3 0 --- 0 2
0: OFF
I R/W 1: ON
2: ENERGY SAVE
Stop3 Set end day, period 3 --- --- 0 31 0 – 31 I R/W
Set end month, period 3 --- --- 0 12 0 - 12 I R/W
C04
Enable special days Enable special days in year on unit 0 --- 0 1 0: NO
D R/W 1: YES
SD1…SD6
Set day, special day 1…6 --- --- 0 31 0 – 31 I R/W
Set month, special day 1…6 --- --- 0 12 0 - 12 I R/W
Set type of set point, special day 1…6 0 --- 0 2
0: OFF
I R/W 1: ON
2: ENERGY SAVE
C05
Clock Zone 01 Day setting
0 --- 0 6
0: MONDAY
I R/W
Day: Time bands Zone 01 1: TUESDAY 2: WEDNESDAY
3: THURSDAY 4: FRIDAY
5: SATURDAY
6: SUNDAY Clock Zone 01 Copy the time bands for individual days 0 --- 0 1 0: Copy No D R/W
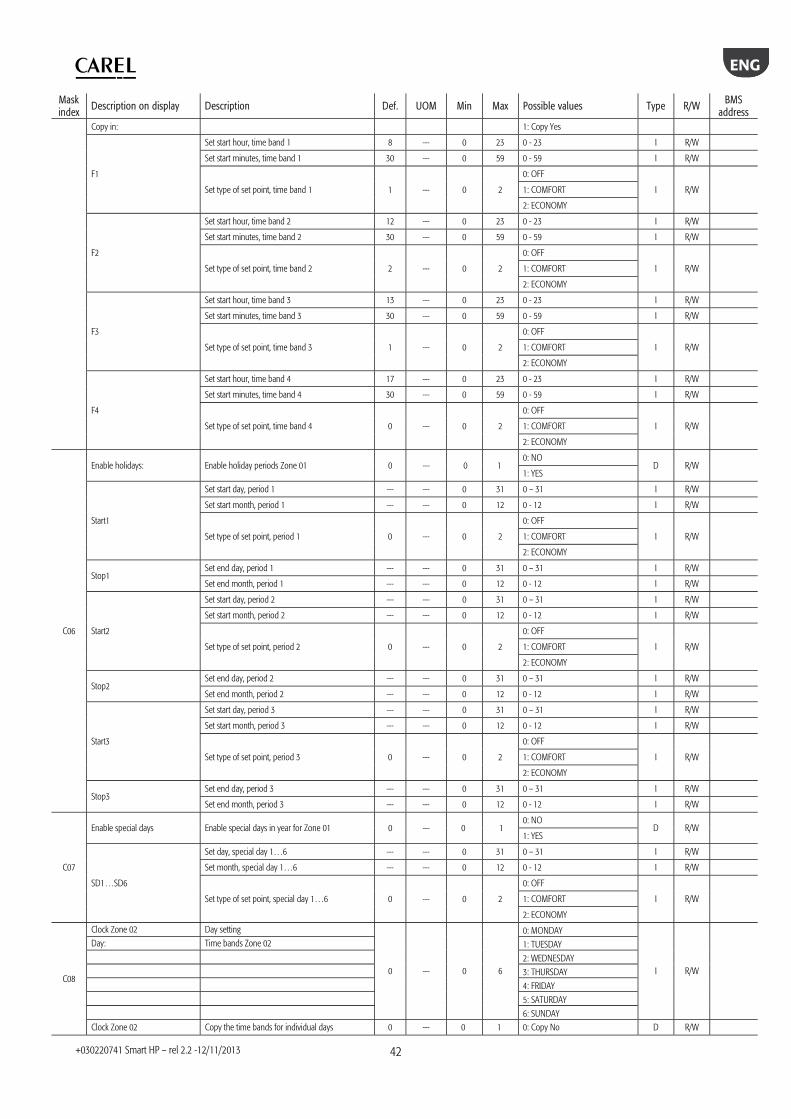
ENG
+030220741 Smart HP – rel 2.2 -12/11/2013
42
Mask index
Description on display Description Def. UOM Min Max Possible values Type R/W BMS address
Copy in: 1: Copy Yes
F1
Set start hour, time band 1 8 --- 0 23 0 - 23 I R/W
Set start minutes, time band 1 30 --- 0 59 0 - 59 I R/W
Set type of set point, time band 1 1 --- 0 2
0: OFF
I R/W 1: COMFORT
2: ECONOMY
F2
Set start hour, time band 2 12 --- 0 23 0 - 23 I R/W
Set start minutes, time band 2 30 --- 0 59 0 - 59 I R/W
Set type of set point, time band 2 2 --- 0 2
0: OFF
I R/W 1: COMFORT
2: ECONOMY
F3
Set start hour, time band 3 13 --- 0 23 0 - 23 I R/W
Set start minutes, time band 3 30 --- 0 59 0 - 59 I R/W
Set type of set point, time band 3 1 --- 0 2
0: OFF
I R/W 1: COMFORT
2: ECONOMY
F4
Set start hour, time band 4 17 --- 0 23 0 - 23 I R/W
Set start minutes, time band 4 30 --- 0 59 0 - 59 I R/W
Set type of set point, time band 4 0 --- 0 2
0: OFF
I R/W 1: COMFORT
2: ECONOMY
C06
Enable holidays: Enable holiday periods Zone 01 0 --- 0 1 0: NO
D R/W 1: YES
Start1
Set start day, period 1 --- --- 0 31 0 – 31 I R/W
Set start month, period 1 --- --- 0 12 0 - 12 I R/W
Set type of set point, period 1 0 --- 0 2
0: OFF
I R/W 1: COMFORT
2: ECONOMY
Stop1 Set end day, period 1 --- --- 0 31 0 – 31 I R/W
Set end month, period 1 --- --- 0 12 0 - 12 I R/W
Start2
Set start day, period 2 --- --- 0 31 0 – 31 I R/W
Set start month, period 2 --- --- 0 12 0 - 12 I R/W
Set type of set point, period 2 0 --- 0 2
0: OFF
I R/W 1: COMFORT
2: ECONOMY
Stop2 Set end day, period 2 --- --- 0 31 0 – 31 I R/W
Set end month, period 2 --- --- 0 12 0 - 12 I R/W
Start3
Set start day, period 3 --- --- 0 31 0 – 31 I R/W
Set start month, period 3 --- --- 0 12 0 - 12 I R/W
Set type of set point, period 3 0 --- 0 2
0: OFF
I R/W 1: COMFORT
2: ECONOMY
Stop3 Set end day, period 3 --- --- 0 31 0 – 31 I R/W
Set end month, period 3 --- --- 0 12 0 - 12 I R/W
C07
Enable special days Enable special days in year for Zone 01 0 --- 0 1 0: NO
D R/W 1: YES
SD1…SD6
Set day, special day 1…6 --- --- 0 31 0 – 31 I R/W
Set month, special day 1…6 --- --- 0 12 0 - 12 I R/W
Set type of set point, special day 1…6 0 --- 0 2
0: OFF
I R/W 1: COMFORT
2: ECONOMY
C08
Clock Zone 02 Day setting
0 --- 0 6
0: MONDAY
I R/W
Day: Time bands Zone 02 1: TUESDAY 2: WEDNESDAY 3: THURSDAY 4: FRIDAY 5: SATURDAY 6: SUNDAY Clock Zone 02 Copy the time bands for individual days 0 --- 0 1 0: Copy No D R/W
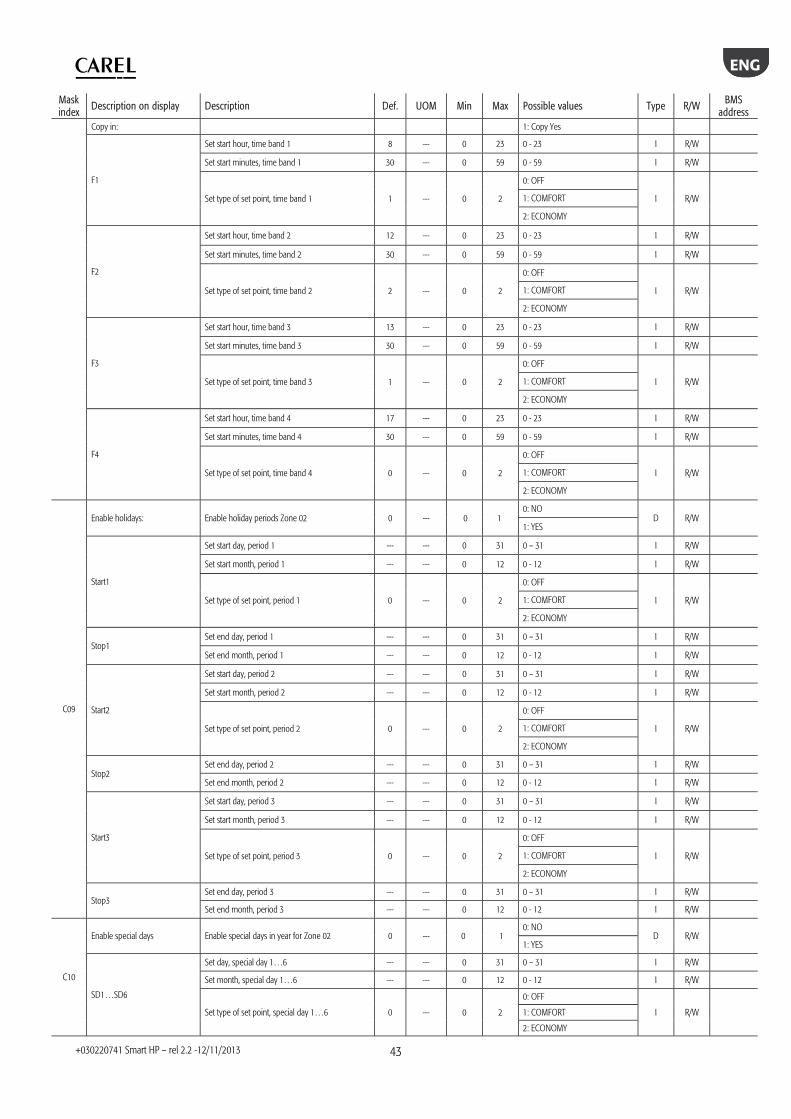
ENG
+030220741 Smart HP – rel 2.2 -12/11/2013
43
Mask index
Description on display Description Def. UOM Min Max Possible values Type R/W BMS address
Copy in: 1: Copy Yes
F1
Set start hour, time band 1 8 --- 0 23 0 - 23 I R/W
Set start minutes, time band 1 30 --- 0 59 0 - 59 I R/W
Set type of set point, time band 1 1 --- 0 2
0: OFF
I R/W 1: COMFORT
2: ECONOMY
F2
Set start hour, time band 2 12 --- 0 23 0 - 23 I R/W
Set start minutes, time band 2 30 --- 0 59 0 - 59 I R/W
Set type of set point, time band 2 2 --- 0 2
0: OFF
I R/W 1: COMFORT
2: ECONOMY
F3
Set start hour, time band 3 13 --- 0 23 0 - 23 I R/W
Set start minutes, time band 3 30 --- 0 59 0 - 59 I R/W
Set type of set point, time band 3 1 --- 0 2
0: OFF
I R/W 1: COMFORT
2: ECONOMY
F4
Set start hour, time band 4 17 --- 0 23 0 - 23 I R/W
Set start minutes, time band 4 30 --- 0 59 0 - 59 I R/W
Set type of set point, time band 4 0 --- 0 2
0: OFF
I R/W 1: COMFORT
2: ECONOMY
C09
Enable holidays: Enable holiday periods Zone 02 0 --- 0 1 0: NO
D R/W 1: YES
Start1
Set start day, period 1 --- --- 0 31 0 – 31 I R/W
Set start month, period 1 --- --- 0 12 0 - 12 I R/W
Set type of set point, period 1 0 --- 0 2
0: OFF
I R/W 1: COMFORT
2: ECONOMY
Stop1 Set end day, period 1 --- --- 0 31 0 – 31 I R/W
Set end month, period 1 --- --- 0 12 0 - 12 I R/W
Start2
Set start day, period 2 --- --- 0 31 0 – 31 I R/W
Set start month, period 2 --- --- 0 12 0 - 12 I R/W
Set type of set point, period 2 0 --- 0 2
0: OFF
I R/W 1: COMFORT
2: ECONOMY
Stop2 Set end day, period 2 --- --- 0 31 0 – 31 I R/W
Set end month, period 2 --- --- 0 12 0 - 12 I R/W
Start3
Set start day, period 3 --- --- 0 31 0 – 31 I R/W
Set start month, period 3 --- --- 0 12 0 - 12 I R/W
Set type of set point, period 3 0 --- 0 2
0: OFF
I R/W 1: COMFORT
2: ECONOMY
Stop3 Set end day, period 3 --- --- 0 31 0 – 31 I R/W
Set end month, period 3 --- --- 0 12 0 - 12 I R/W
C10
Enable special days Enable special days in year for Zone 02 0 --- 0 1 0: NO
D R/W 1: YES
SD1…SD6
Set day, special day 1…6 --- --- 0 31 0 – 31 I R/W
Set month, special day 1…6 --- --- 0 12 0 - 12 I R/W
Set type of set point, special day 1…6 0 --- 0 2
0: OFF
I R/W 1: COMFORT
2: ECONOMY
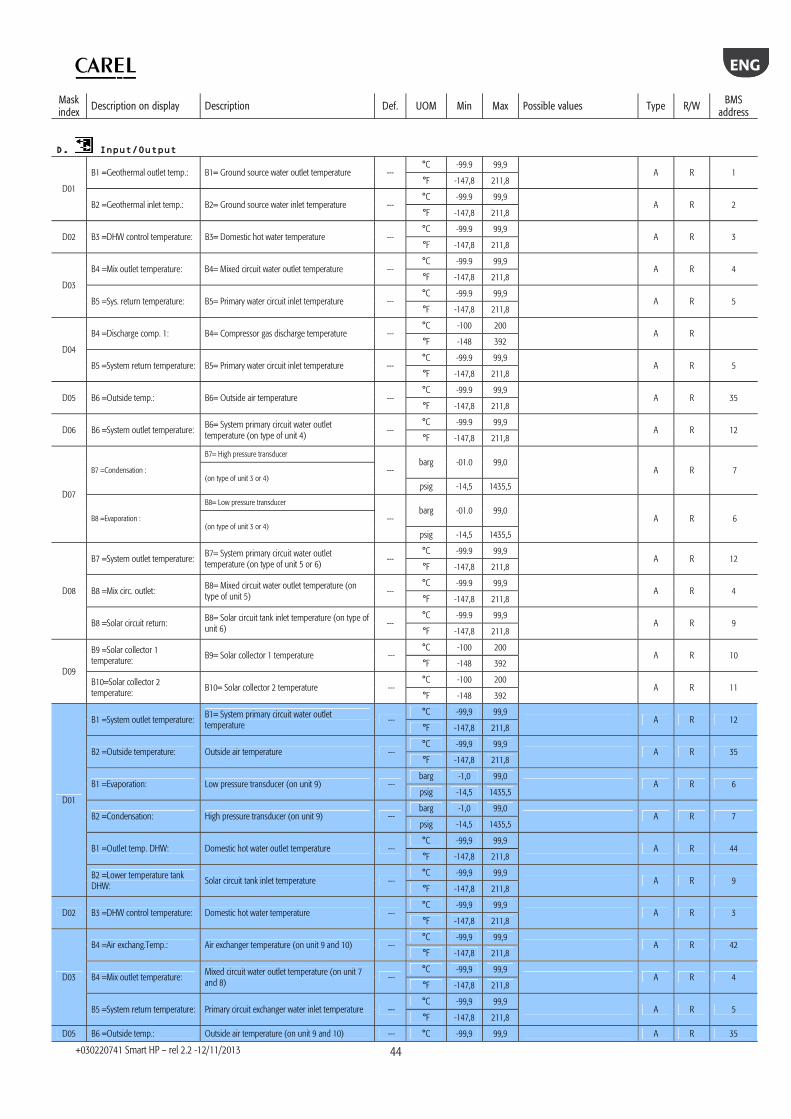
ENG
+030220741 Smart HP – rel 2.2 -12/11/2013
44
Mask index
Description on display Description Def. UOM Min Max Possible values Type R/W BMS address
D01
B1 =Geothermal outlet temp.: B1= Ground source water outlet temperature --- °C -99.9 99,9
A R 1 °F -147,8 211,8
B2 =Geothermal inlet temp.: B2= Ground source water inlet temperature --- °C -99.9 99,9
A R 2 °F -147,8 211,8
D02 B3 =DHW control temperature: B3= Domestic hot water temperature --- °C -99.9 99,9
A R 3 °F -147,8 211,8
D03
B4 =Mix outlet temperature: B4= Mixed circuit water outlet temperature --- °C -99.9 99,9
A R 4 °F -147,8 211,8
B5 =Sys. return temperature: B5= Primary water circuit inlet temperature --- °C -99.9 99,9
A R 5 °F -147,8 211,8
D04
B4 =Discharge comp. 1: B4= Compressor gas discharge temperature --- °C -100 200
A R °F -148 392
B5 =System return temperature: B5= Primary water circuit inlet temperature --- °C -99.9 99,9
A R 5 °F -147,8 211,8
D05 B6 =Outside temp.: B6= Outside air temperature --- °C -99.9 99,9
A R 35 °F -147,8 211,8
D06 B6 =System outlet temperature: B6= System primary circuit water outlet temperature (on type of unit 4)
--- °C -99.9 99,9
A R 12 °F -147,8 211,8
D07
B7 =Condensation :
B7= High pressure transducer
--- barg -01.0 99,0
A R 7 (on type of unit 3 or 4)
psig -14,5 1435,5
B8 =Evaporation :
B8= Low pressure transducer
--- barg -01.0 99,0
A R 6 (on type of unit 3 or 4)
psig -14,5 1435,5
D08
B7 =System outlet temperature: B7= System primary circuit water outlet temperature (on type of unit 5 or 6)
--- °C -99.9 99,9
A R 12 °F -147,8 211,8
B8 =Mix circ. outlet: B8= Mixed circuit water outlet temperature (on type of unit 5) ---
°C -99.9 99,9 A R 4
°F -147,8 211,8
B8 =Solar circuit return: B8= Solar circuit tank inlet temperature (on type of unit 6)
--- °C -99.9 99,9
A R 9 °F -147,8 211,8
D09
B9 =Solar collector 1 temperature:
B9= Solar collector 1 temperature --- °C -100 200
A R 10 °F -148 392
B10=Solar collector 2 temperature: B10= Solar collector 2 temperature ---
°C -100 200 A R 11
°F -148 392
D01
B1 =System outlet temperature: B1= System primary circuit water outlet temperature
--- °C -99,9 99,9
A R 12 °F -147,8 211,8
B2 =Outside temperature: Outside air temperature --- °C -99,9 99,9
A R 35 °F -147,8 211,8
B1 =Evaporation: Low pressure transducer (on unit 9) --- barg -1,0 99,0
A R 6 psig -14,5 1435,5
B2 =Condensation: High pressure transducer (on unit 9) --- barg -1,0 99,0
A R 7 psig -14,5 1435,5
B1 =Outlet temp. DHW: Domestic hot water outlet temperature --- °C -99,9 99,9
A R 44 °F -147,8 211,8
B2 =Lower temperature tank DHW: Solar circuit tank inlet temperature ---
°C -99,9 99,9 A R 9
°F -147,8 211,8
D02 B3 =DHW control temperature: Domestic hot water temperature --- °C -99,9 99,9
A R 3 °F -147,8 211,8
D03
B4 =Air exchang.Temp.: Air exchanger temperature (on unit 9 and 10) --- °C -99,9 99,9
A R 42 °F -147,8 211,8
B4 =Mix outlet temperature: Mixed circuit water outlet temperature (on unit 7 and 8) ---
°C -99,9 99,9 A R 4
°F -147,8 211,8
B5 =System return temperature: Primary circuit exchanger water inlet temperature --- °C -99,9 99,9
A R 5 °F -147,8 211,8
D05 B6 =Outside temp.: Outside air temperature (on unit 9 and 10) --- °C -99,9 99,9 A R 35
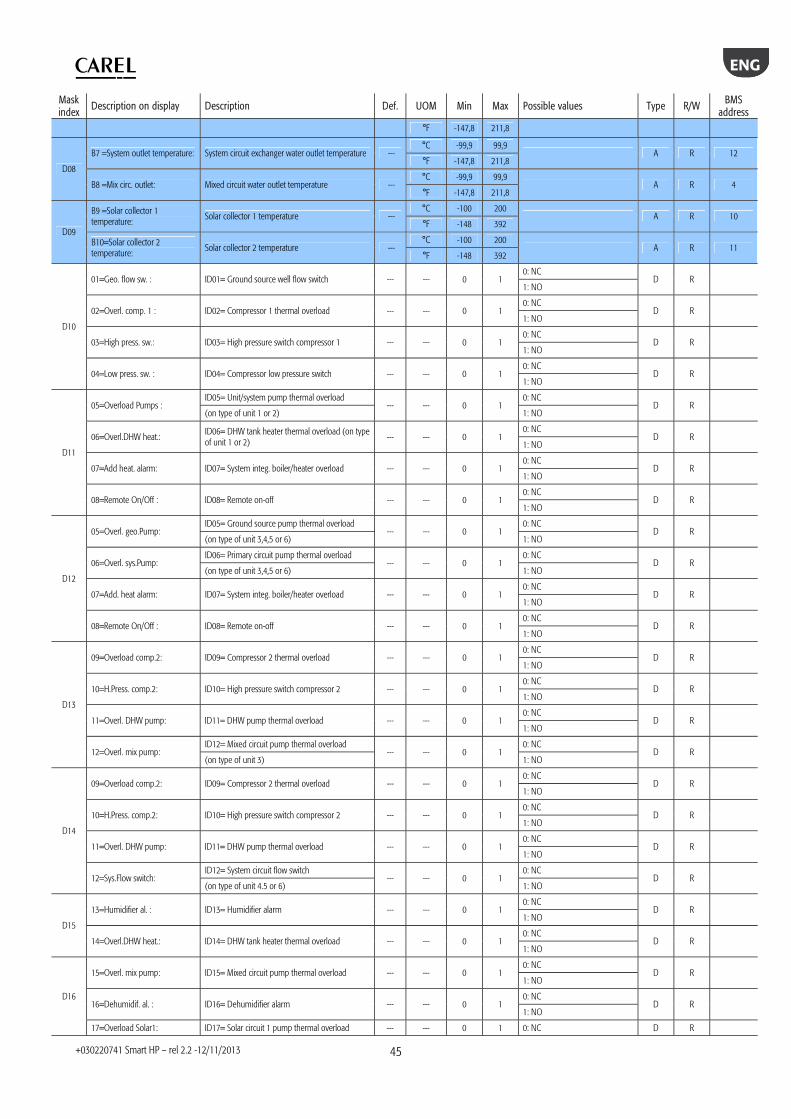
ENG
+030220741 Smart HP – rel 2.2 -12/11/2013
45
Mask index
Description on display Description Def. UOM Min Max Possible values Type R/W BMS address
°F -147,8 211,8
D08
B7 =System outlet temperature: System circuit exchanger water outlet temperature --- °C -99,9 99,9
A R 12 °F -147,8 211,8
B8 =Mix circ. outlet: Mixed circuit water outlet temperature --- °C -99,9 99,9
A R 4 °F -147,8 211,8
D09
B9 =Solar collector 1 temperature: Solar collector 1 temperature ---
°C -100 200 A R 10
°F -148 392
B10=Solar collector 2 temperature: Solar collector 2 temperature ---
°C -100 200 A R 11
°F -148 392
D10
01=Geo. flow sw. : ID01= Ground source well flow switch --- --- 0 1 0: NC
D R 1: NO
02=Overl. comp. 1 : ID02= Compressor 1 thermal overload --- --- 0 1 0: NC
D R 1: NO
03=High press. sw.: ID03= High pressure switch compressor 1 --- --- 0 1 0: NC
D R 1: NO
04=Low press. sw. : ID04= Compressor low pressure switch --- --- 0 1 0: NC
D R 1: NO
D11
05=Overload Pumps : ID05= Unit/system pump thermal overload
--- --- 0 1 0: NC
D R (on type of unit 1 or 2) 1: NO
06=Overl.DHW heat.: ID06= DHW tank heater thermal overload (on type of unit 1 or 2) --- --- 0 1
0: NC D R
1: NO
07=Add heat. alarm: ID07= System integ. boiler/heater overload --- --- 0 1 0: NC
D R 1: NO
08=Remote On/Off : ID08= Remote on-off --- --- 0 1 0: NC
D R 1: NO
D12
05=Overl. geo.Pump: ID05= Ground source pump thermal overload
--- --- 0 1 0: NC
D R (on type of unit 3,4,5 or 6) 1: NO
06=Overl. sys.Pump: ID06= Primary circuit pump thermal overload
--- --- 0 1 0: NC
D R (on type of unit 3,4,5 or 6) 1: NO
07=Add. heat alarm: ID07= System integ. boiler/heater overload --- --- 0 1 0: NC
D R 1: NO
08=Remote On/Off : ID08= Remote on-off --- --- 0 1 0: NC
D R 1: NO
D13
09=Overload comp.2: ID09= Compressor 2 thermal overload --- --- 0 1 0: NC
D R 1: NO
10=H.Press. comp.2: ID10= High pressure switch compressor 2 --- --- 0 1 0: NC
D R 1: NO
11=Overl. DHW pump: ID11= DHW pump thermal overload --- --- 0 1 0: NC
D R 1: NO
12=Overl. mix pump: ID12= Mixed circuit pump thermal overload
--- --- 0 1 0: NC
D R (on type of unit 3) 1: NO
D14
09=Overload comp.2: ID09= Compressor 2 thermal overload --- --- 0 1 0: NC
D R 1: NO
10=H.Press. comp.2: ID10= High pressure switch compressor 2 --- --- 0 1 0: NC
D R 1: NO
11=Overl. DHW pump: ID11= DHW pump thermal overload --- --- 0 1 0: NC
D R 1: NO
12=Sys.Flow switch: ID12= System circuit flow switch
--- --- 0 1 0: NC
D R (on type of unit 4.5 or 6) 1: NO
D15
13=Humidifier al. : ID13= Humidifier alarm --- --- 0 1 0: NC
D R 1: NO
14=Overl.DHW heat.: ID14= DHW tank heater thermal overload --- --- 0 1 0: NC
D R 1: NO
D16
15=Overl. mix pump: ID15= Mixed circuit pump thermal overload --- --- 0 1 0: NC
D R 1: NO
16=Dehumidif. al. : ID16= Dehumidifier alarm --- --- 0 1 0: NC
D R 1: NO
17=Overload Solar1: ID17= Solar circuit 1 pump thermal overload --- --- 0 1 0: NC D R

ENG
+030220741 Smart HP – rel 2.2 -12/11/2013
46
Mask index
Description on display Description Def. UOM Min Max Possible values Type R/W BMS address
1: NO
18=Overload Solar2: ID18= Solar circuit 2 pump thermal overload --- --- 0 1 0: NC
D R 1: NO
D10
01=Overl.Ext.Fan : ID1= Fan thermal overload --- --- 0 1 0: NC
D R 1: NO
02=Overl. comp. 1 : ID2= Compressor 1 thermal overload --- --- 0 1 0: NC
D R 1: NO
02=Al. Inverter : ID2= Alarm from inverter (if enabled) --- --- 0 1 0: NC
D R 1: NO
03=H.Press. comp.1: ID3= High pressure switch. comp. 1 --- --- 0 1 0: NC
D R 1: NO
04=Plant flowsw. : ID4= System flow switch --- --- 0 1 0: NC
D R 1: NO
04= Low press. sw. : ID4= Comp. low pressure switch. --- --- 0 1 0: NC
D R 1: NO
D11
05=Overload Pumps : ID5= System pump thermal overload (on unit 7 and 8) --- --- 0 1
0: NC D R
1: NO
06=Overl.DHW heat.: ID6= DHW heater overload (on unit 7 and 8) --- --- 0 1 0: NC
D R 1: NO
07=Add heat. alarm: ID7= System boiler/heater alarm (on unit 7 and 8) --- --- 0 1 0: NC
D R 1: NO
08=Remote On/Off : ID8= Remote on/off (on unit 7 and 8) --- --- 0 1 0: NC
D R 1: NO
D12
05=Recovery fan al.: ID5= Recovery fan alarm (on unit 8 and 10) --- --- 0 1 0: NC
D R 1: NO
06=Overl.Mix pump : ID6= Primary/mix circ. pump thermal overload (on unit 9 and 10) --- --- 0 1
0: NC D R
1: NO
07=Add heat. alarm: ID7= System boiler/heater alarm (on unit 9 and 10) --- --- 0 1
0: NC D R
1: NO
08=Remote On/Off : ID8= Remote on/off (on unit 9 and 10) --- --- 0 1 0: NC
D R 1: NO
D13
09=Overload comp.2: ID9= Compressor 2 thermal overload (on unit 9 and 10) --- --- 0 1
0: NC D R
1: NO
10=H.Press. comp.2: ID10= High pressure switch. comp. 2 (on unit 9 and 10) --- --- 0 1
0: NC D R
1: NO
11=Overl. DHW pump: ID11= DHW pump thermal overload (on unit 9 and 10) --- --- 0 1
0: NC D R
1: NO
12=Sys. flowsw. : ID12= System flow switch (on unit 9 and 10) --- --- 0 1 0: NC
D R 1: NO
D15
13=Humidif/Dehu al.: ID13= Humidifier/dehumid. alarm. (on unit 9) --- --- 0 1 0: NC
D R 1: NO
13=Humidifier al. : ID13= Humidifier alarm (on unit 10) --- --- 0 1 0: NC
D R 1: NO
14=Overl.DHW heat.: ID14= DHW heater overload (on unit 9 and 10) --- --- 0 1 0: NC
D R 1: NO
D16
15=Overl. mix pump: ID15= Mix circ. pump thermal overload (on unit 10)
--- --- 0 1 0: NC
D R 1: NO
16=Al.dehumidif.: ID16= Dehumidifier alarm (on unit 10) --- --- 0 1 0: NC
D R 1: NO
17=Overload Solar1: ID17= Solar 1 pump thermal overload (on unit 10) --- --- 0 1 0: NC
D R 1: NO
18=Overload Solar2: ID18= Solar 2 pump thermal overload (on unit 10) --- --- 0 1 0: NC
D R 1: NO
D17
01=Compressor 1 : NO1= Compressor 1 --- --- 0 1 0: OFF
D R 11 1: ON
02=Geotherm. pump : NO2= Ground source pump --- --- 0 1 0: OFF
D R 12 1: ON
03=System pump : NO3= System pump --- --- 0 1 0: OFF
D R 13 1: ON
04=DHW 3way valve : NO4= DHW circuit 3-way valve (on unit 1) --- --- 0 1 0: OFF D R 14
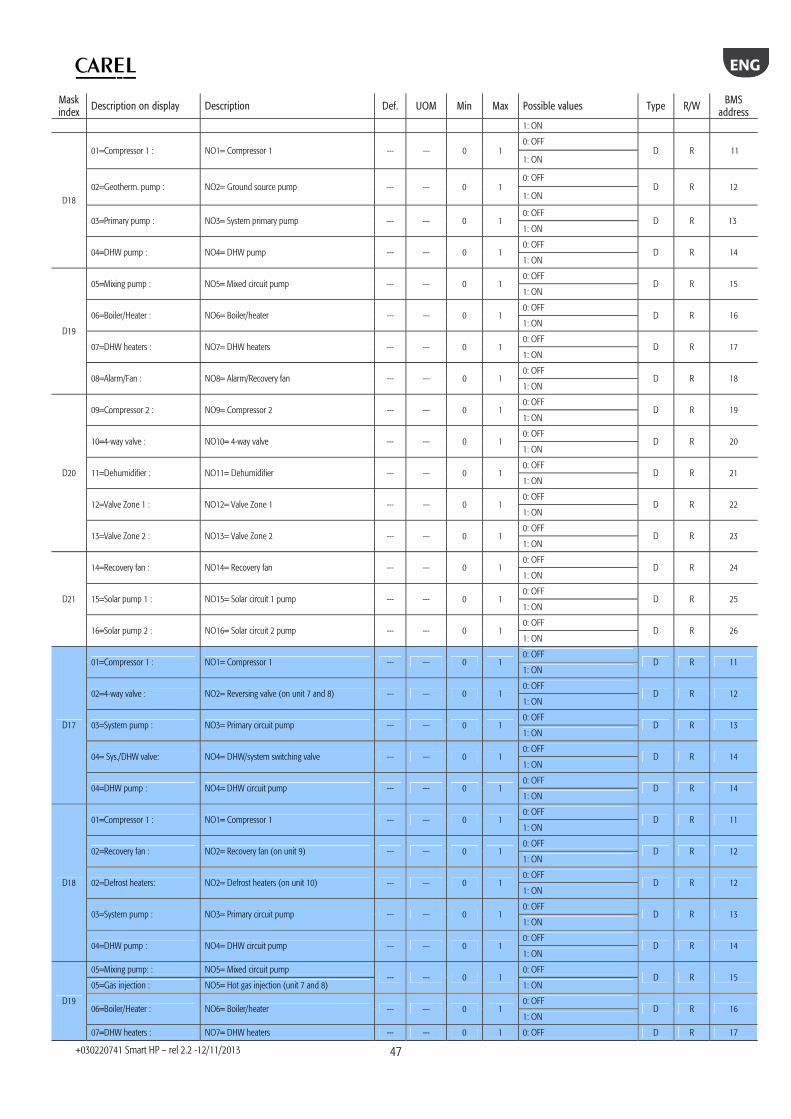
ENG
+030220741 Smart HP – rel 2.2 -12/11/2013
47
Mask index
Description on display Description Def. UOM Min Max Possible values Type R/W BMS address
1: ON
D18
01=Compressor 1 : NO1= Compressor 1 --- --- 0 1 0: OFF
D R 11 1: ON
02=Geotherm. pump : NO2= Ground source pump --- --- 0 1 0: OFF
D R 12 1: ON
03=Primary pump : NO3= System primary pump --- --- 0 1 0: OFF
D R 13 1: ON
04=DHW pump : NO4= DHW pump --- --- 0 1 0: OFF
D R 14 1: ON
D19
05=Mixing pump : NO5= Mixed circuit pump --- --- 0 1 0: OFF
D R 15 1: ON
06=Boiler/Heater : NO6= Boiler/heater --- --- 0 1 0: OFF
D R 16 1: ON
07=DHW heaters : NO7= DHW heaters --- --- 0 1 0: OFF
D R 17 1: ON
08=Alarm/Fan : NO8= Alarm/Recovery fan --- --- 0 1 0: OFF
D R 18 1: ON
D20
09=Compressor 2 : NO9= Compressor 2 --- --- 0 1 0: OFF
D R 19 1: ON
10=4-way valve : NO10= 4-way valve --- --- 0 1 0: OFF
D R 20 1: ON
11=Dehumidifier : NO11= Dehumidifier --- --- 0 1 0: OFF
D R 21 1: ON
12=Valve Zone 1 : NO12= Valve Zone 1 --- --- 0 1 0: OFF
D R 22 1: ON
13=Valve Zone 2 : NO13= Valve Zone 2 --- --- 0 1 0: OFF
D R 23 1: ON
D21
14=Recovery fan : NO14= Recovery fan --- --- 0 1 0: OFF
D R 24 1: ON
15=Solar pump 1 : NO15= Solar circuit 1 pump --- --- 0 1 0: OFF
D R 25 1: ON
16=Solar pump 2 : NO16= Solar circuit 2 pump --- --- 0 1 0: OFF
D R 26 1: ON
D17
01=Compressor 1 : NO1= Compressor 1 --- --- 0 1 0: OFF
D R 11 1: ON
02=4-way valve : NO2= Reversing valve (on unit 7 and 8) --- --- 0 1 0: OFF
D R 12 1: ON
03=System pump : NO3= Primary circuit pump --- --- 0 1 0: OFF
D R 13 1: ON
04= Sys./DHW valve: NO4= DHW/system switching valve --- --- 0 1 0: OFF
D R 14 1: ON
04=DHW pump : NO4= DHW circuit pump --- --- 0 1 0: OFF
D R 14 1: ON
D18
01=Compressor 1 : NO1= Compressor 1 --- --- 0 1 0: OFF
D R 11 1: ON
02=Recovery fan : NO2= Recovery fan (on unit 9) --- --- 0 1 0: OFF
D R 12 1: ON
02=Defrost heaters: NO2= Defrost heaters (on unit 10) --- --- 0 1 0: OFF
D R 12 1: ON
03=System pump : NO3= Primary circuit pump --- --- 0 1 0: OFF
D R 13 1: ON
04=DHW pump : NO4= DHW circuit pump --- --- 0 1 0: OFF
D R 14 1: ON
D19
05=Mixing pump: : NO5= Mixed circuit pump --- --- 0 1
0: OFF D R 15
05=Gas injection : NO5= Hot gas injection (unit 7 and 8) 1: ON
06=Boiler/Heater : NO6= Boiler/heater --- --- 0 1 0: OFF
D R 16 1: ON
07=DHW heaters : NO7= DHW heaters --- --- 0 1 0: OFF D R 17
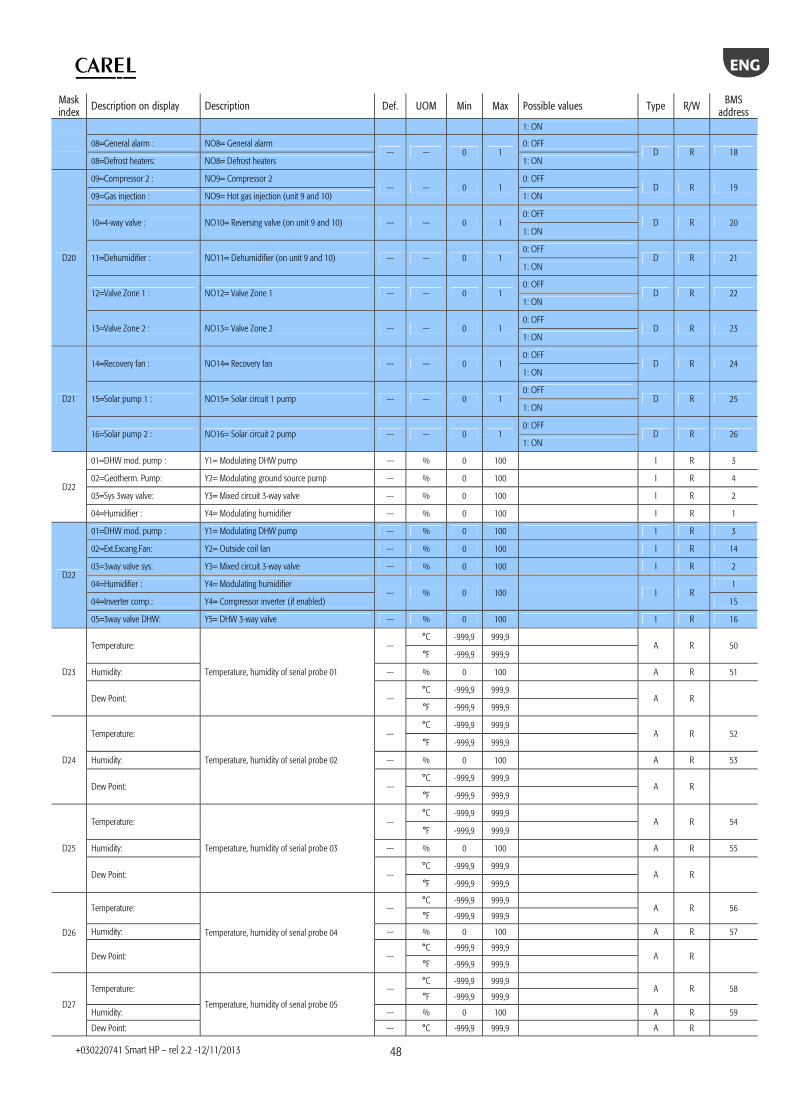
ENG
+030220741 Smart HP – rel 2.2 -12/11/2013
48
Mask index
Description on display Description Def. UOM Min Max Possible values Type R/W BMS address
1: ON
08=General alarm : NO8= General alarm --- --- 0 1
0: OFF D R 18
08=Defrost heaters: NO8= Defrost heaters 1: ON
D20
09=Compressor 2 : NO9= Compressor 2 --- --- 0 1
0: OFF D R 19
09=Gas injection : NO9= Hot gas injection (unit 9 and 10) 1: ON
10=4-way valve : NO10= Reversing valve (on unit 9 and 10) --- --- 0 1 0: OFF
D R 20 1: ON
11=Dehumidifier : NO11= Dehumidifier (on unit 9 and 10) --- --- 0 1 0: OFF
D R 21 1: ON
12=Valve Zone 1 : NO12= Valve Zone 1 --- --- 0 1 0: OFF
D R 22 1: ON
13=Valve Zone 2 : NO13= Valve Zone 2 --- --- 0 1 0: OFF
D R 23 1: ON
D21
14=Recovery fan : NO14= Recovery fan --- --- 0 1 0: OFF
D R 24 1: ON
15=Solar pump 1 : NO15= Solar circuit 1 pump --- --- 0 1 0: OFF
D R 25 1: ON
16=Solar pump 2 : NO16= Solar circuit 2 pump --- --- 0 1 0: OFF
D R 26 1: ON
D22
01=DHW mod. pump : Y1= Modulating DHW pump --- % 0 100 I R 3
02=Geotherm. Pump: Y2= Modulating ground source pump --- % 0 100 I R 4
03=Sys 3way valve: Y3= Mixed circuit 3-way valve --- % 0 100 I R 2
04=Humidifier : Y4= Modulating humidifier --- % 0 100 I R 1
D22
01=DHW mod. pump : Y1= Modulating DHW pump --- % 0 100 I R 3
02=Ext.Excang.Fan: Y2= Outside coil fan --- % 0 100 I R 14
03=3way valve sys: Y3= Mixed circuit 3-way valve --- % 0 100 I R 2
04=Humidifier : Y4= Modulating humidifier --- % 0 100 I R
1
04=Inverter comp.: Y4= Compressor inverter (if enabled) 15
05=3way valve DHW: Y5= DHW 3-way valve --- % 0 100 I R 16
D23
Temperature:
Temperature, humidity of serial probe 01
--- °C -999,9 999,9
A R 50 °F -999,9 999,9
Humidity: --- % 0 100 A R 51
Dew Point: --- °C -999,9 999,9
A R °F -999,9 999,9
D24
Temperature:
Temperature, humidity of serial probe 02
--- °C -999,9 999,9
A R 52 °F -999,9 999,9
Humidity: --- % 0 100 A R 53
Dew Point: --- °C -999,9 999,9
A R °F -999,9 999,9
D25
Temperature:
Temperature, humidity of serial probe 03
--- °C -999,9 999,9
A R 54 °F -999,9 999,9
Humidity: --- % 0 100 A R 55
Dew Point: --- °C -999,9 999,9
A R °F -999,9 999,9
D26
Temperature:
Temperature, humidity of serial probe 04
--- °C -999,9 999,9
A R 56 °F -999,9 999,9
Humidity: --- % 0 100 A R 57
Dew Point: --- °C -999,9 999,9
A R °F -999,9 999,9
D27
Temperature:
Temperature, humidity of serial probe 05
--- °C -999,9 999,9
A R 58 °F -999,9 999,9
Humidity: --- % 0 100 A R 59
Dew Point: --- °C -999,9 999,9 A R
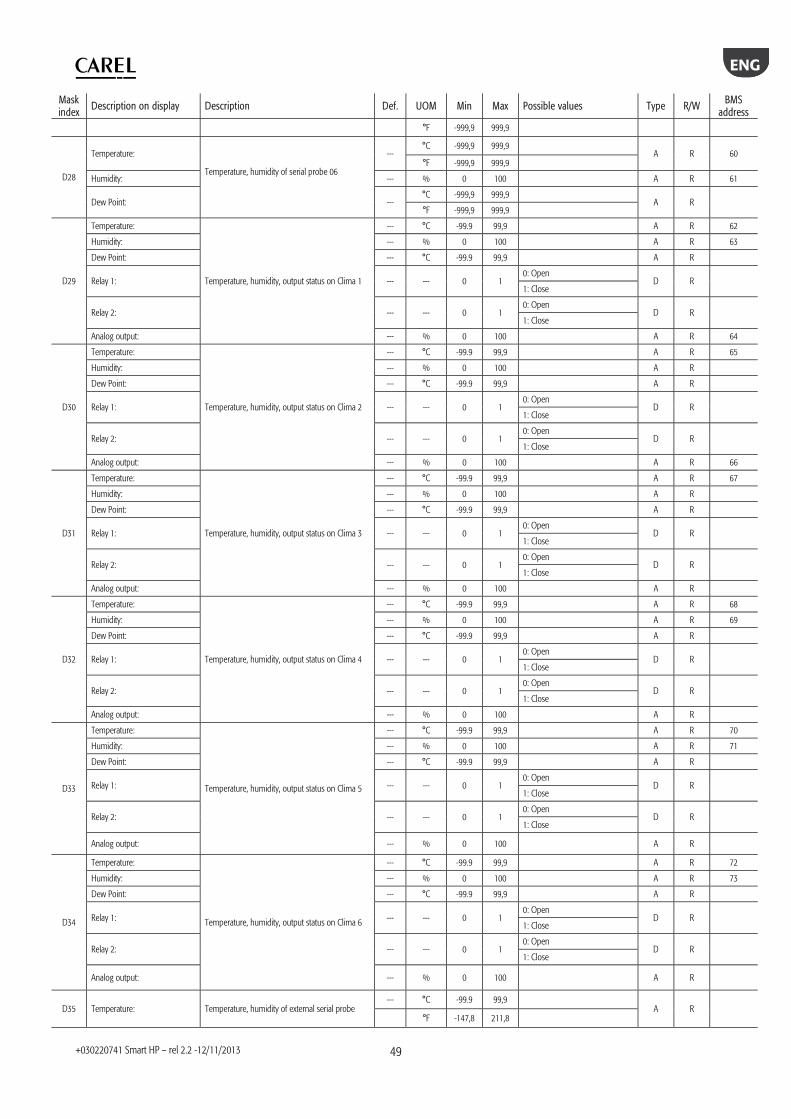
ENG
+030220741 Smart HP – rel 2.2 -12/11/2013
49
Mask index
Description on display Description Def. UOM Min Max Possible values Type R/W BMS address
°F -999,9 999,9
D28
Temperature:
Temperature, humidity of serial probe 06
--- °C -999,9 999,9
A R 60 °F -999,9 999,9
Humidity: --- % 0 100 A R 61
Dew Point: --- °C -999,9 999,9
A R °F -999,9 999,9
D29
Temperature:
Temperature, humidity, output status on Clima 1
--- °C -99.9 99,9 A R 62
Humidity: --- % 0 100 A R 63
Dew Point: --- °C -99.9 99,9 A R
Relay 1: --- --- 0 1 0: Open
D R 1: Close
Relay 2: --- --- 0 1 0: Open
D R 1: Close
Analog output: --- % 0 100 A R 64
D30
Temperature:
Temperature, humidity, output status on Clima 2
--- °C -99.9 99,9 A R 65
Humidity: --- % 0 100 A R
Dew Point: --- °C -99.9 99,9 A R
Relay 1: --- --- 0 1 0: Open
D R 1: Close
Relay 2: --- --- 0 1 0: Open
D R 1: Close
Analog output: --- % 0 100 A R 66
D31
Temperature:
Temperature, humidity, output status on Clima 3
--- °C -99.9 99,9 A R 67
Humidity: --- % 0 100 A R
Dew Point: --- °C -99.9 99,9 A R
Relay 1: --- --- 0 1 0: Open
D R 1: Close
Relay 2: --- --- 0 1 0: Open
D R 1: Close
Analog output: --- % 0 100 A R
D32
Temperature:
Temperature, humidity, output status on Clima 4
--- °C -99.9 99,9 A R 68
Humidity: --- % 0 100 A R 69
Dew Point: --- °C -99.9 99,9 A R
Relay 1: --- --- 0 1 0: Open
D R 1: Close
Relay 2: --- --- 0 1 0: Open
D R 1: Close
Analog output: --- % 0 100 A R
D33
Temperature:
Temperature, humidity, output status on Clima 5
--- °C -99.9 99,9 A R 70
Humidity: --- % 0 100 A R 71
Dew Point: --- °C -99.9 99,9 A R
Relay 1: --- --- 0 1 0: Open
D R 1: Close
Relay 2: --- --- 0 1 0: Open
D R 1: Close
Analog output: --- % 0 100 A R
D34
Temperature:
Temperature, humidity, output status on Clima 6
--- °C -99.9 99,9 A R 72
Humidity: --- % 0 100 A R 73
Dew Point: --- °C -99.9 99,9 A R
Relay 1: --- --- 0 1 0: Open
D R 1: Close
Relay 2: --- --- 0 1 0: Open
D R 1: Close
Analog output: --- % 0 100 A R
D35 Temperature: Temperature, humidity of external serial probe --- °C -99.9 99,9
A R °F -147,8 211,8
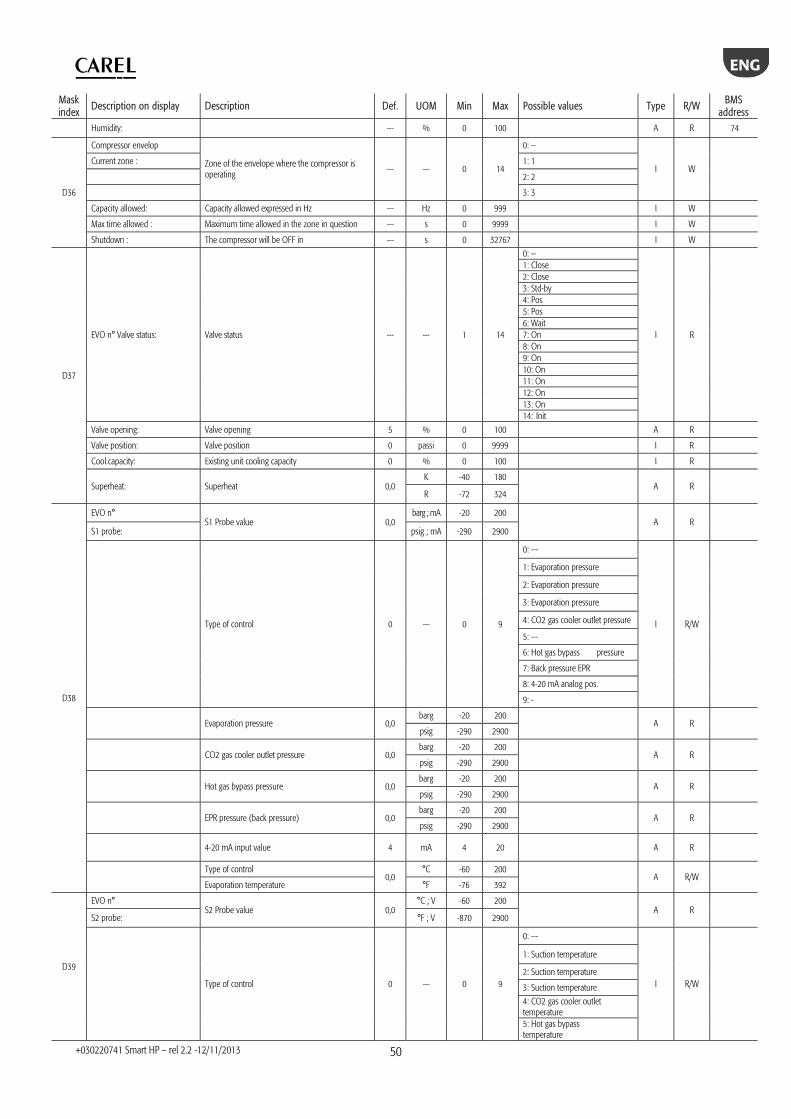
ENG
+030220741 Smart HP – rel 2.2 -12/11/2013
50
Mask index
Description on display Description Def. UOM Min Max Possible values Type R/W BMS address
Humidity: --- % 0 100 A R 74
D36
Compressor envelop
Zone of the envelope where the compressor is operating
--- --- 0 14
0: --
I W Current zone : 1: 1
2: 2
3: 3
Capacity allowed: Capacity allowed expressed in Hz --- Hz 0 999 I W
Max time allowed : Maximum time allowed in the zone in question --- s 0 9999 I W
Shutdown : The compressor will be OFF in --- s 0 32767 I W
D37
EVO n° Valve status: Valve status --- --- 1 14
0: --
I R
1: Close 2: Close 3: Std-by 4: Pos 5: Pos 6: Wait 7: On 8: On 9: On 10: On 11: On 12: On 13: On 14: Init
Valve opening: Valve opening 5 % 0 100 A R
Valve position: Valve position 0 passi 0 9999 I R
Cool.capacity: Existing unit cooling capacity 0 % 0 100 I R
Superheat: Superheat 0,0 K -40 180
A R R -72 324
D38
EVO n° S1 Probe value 0,0
barg ; mA -20 200 A R
S1 probe: psig ; mA -290 2900
Type of control 0 --- 0 9
0: ---
I R/W
1: Evaporation pressure
2: Evaporation pressure
3: Evaporation pressure
4: CO2 gas cooler outlet pressure
5: ---
6: Hot gas bypass pressure
7: Back pressure EPR
8: 4-20 mA analog pos.
9: -
Evaporation pressure 0,0 barg -20 200
A R psig -290 2900
CO2 gas cooler outlet pressure 0,0 barg -20 200
A R psig -290 2900
Hot gas bypass pressure 0,0 barg -20 200
A R psig -290 2900
EPR pressure (back pressure) 0,0 barg -20 200
A R psig -290 2900
4-20 mA input value 4 mA 4 20 A R
Type of control
0,0 °C -60 200
A R/W Evaporation temperature °F -76 392
D39
EVO n° S2 Probe value 0,0
°C ; V -60 200 A R
S2 probe: °F ; V -870 2900
Type of control 0 --- 0 9
0: ---
I R/W
1: Suction temperature
2: Suction temperature
3: Suction temperature
4: CO2 gas cooler outlet temperature 5: Hot gas bypass temperature
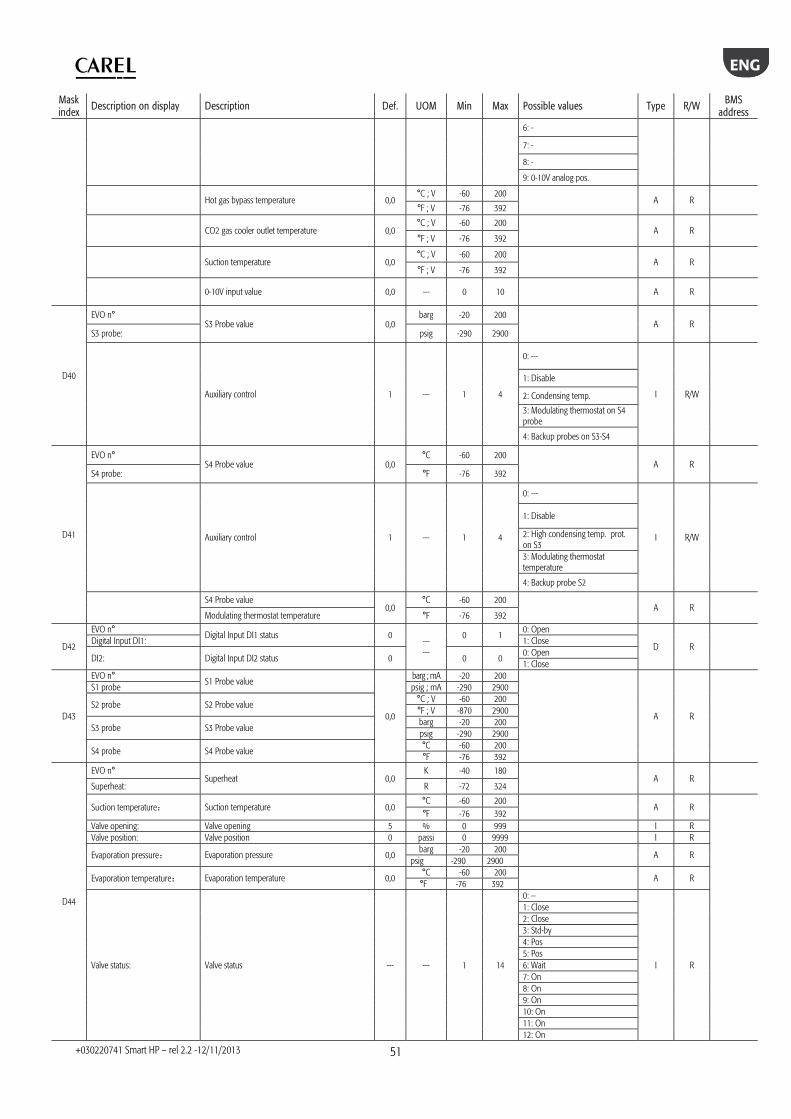
ENG
+030220741 Smart HP – rel 2.2 -12/11/2013
51
Mask index
Description on display Description Def. UOM Min Max Possible values Type R/W BMS address
6: -
7: -
8: -
9: 0-10V analog pos.
Hot gas bypass temperature 0,0 °C ; V -60 200
A R °F ; V -76 392
CO2 gas cooler outlet temperature 0,0 °C ; V -60 200
A R °F ; V -76 392
Suction temperature 0,0 °C ; V -60 200
A R °F ; V -76 392
0-10V input value 0,0 --- 0 10 A R
D40
EVO n° S3 Probe value 0,0
barg -20 200 A R
S3 probe: psig -290 2900
Auxiliary control 1 --- 1 4
0: ---
I R/W
1: Disable
2: Condensing temp.
3: Modulating thermostat on S4 probe
4: Backup probes on S3-S4
D41
EVO n° S4 Probe value 0,0
°C -60 200 A R
S4 probe: °F -76 392
Auxiliary control 1 --- 1 4
0: ---
I R/W
1: Disable
2: High condensing temp. prot. on S3 3: Modulating thermostat temperature
4: Backup probe S2
S4 Probe value
0,0 °C -60 200
A R Modulating thermostat temperature °F -76 392
D42
EVO n° Digital Input DI1 status 0
--- ---
0 1 0: Open
D R Digital Input DI1: 1: Close
DI2: Digital Input DI2 status 0 0 0 0: Open 1: Close
D43
EVO n° S1 Probe value
0,0
barg ; mA -20 200
A R
S1 probe psig ; mA -290 2900
S2 probe S2 Probe value °C ; V -60 200 °F ; V -870 2900
S3 probe S3 Probe value barg -20 200 psig -290 2900
S4 probe S4 Probe value °C -60 200 °F -76 392
D44
EVO n° Superheat 0,0
K -40 180 A R
Superheat: R -72 324
Suction temperature: Suction temperature 0,0 °C -60 200
A R
°F -76 392 Valve opening: Valve opening 5 % 0 999 I R Valve position: Valve position 0 passi 0 9999 I R
Evaporation pressure: Evaporation pressure 0,0 barg -20 200
A R psig -290 2900
Evaporation temperature: Evaporation temperature 0,0 °C -60 200
A R °F -76 392
Valve status: Valve status --- --- 1 14
0: --
I R
1: Close 2: Close 3: Std-by 4: Pos 5: Pos 6: Wait 7: On 8: On 9: On 10: On 11: On 12: On
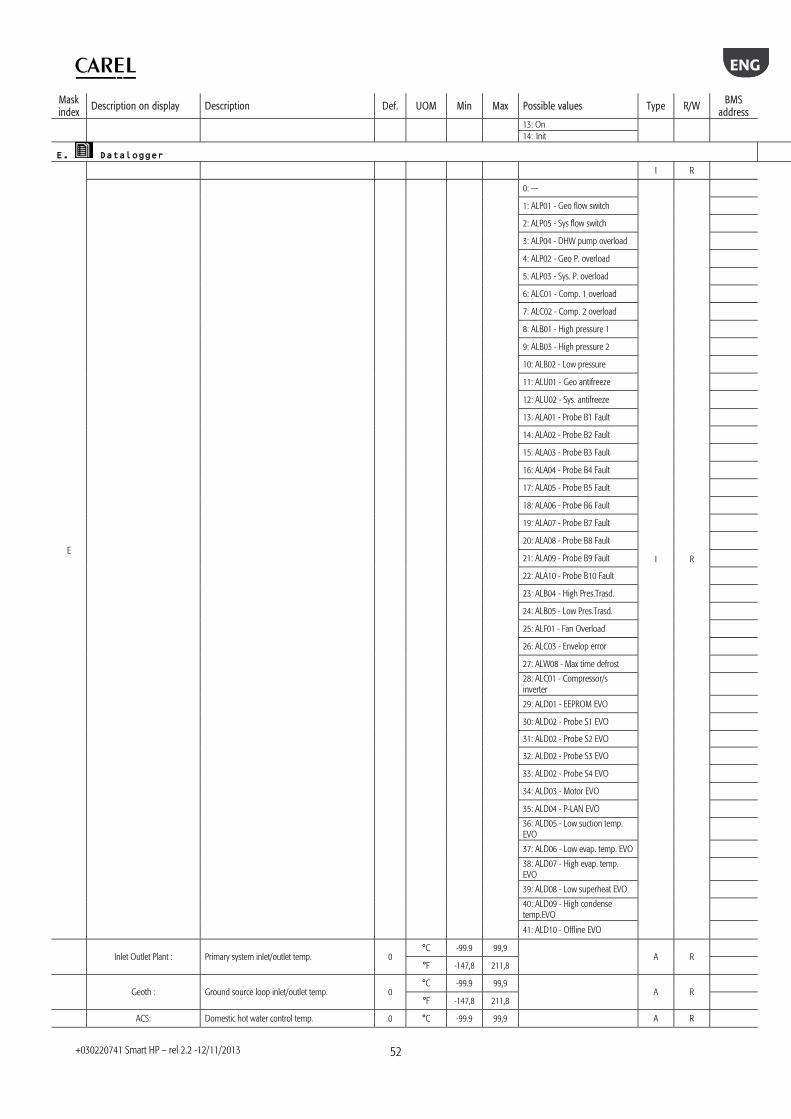
ENG
+030220741 Smart HP – rel 2.2 -12/11/2013
52
Mask index
Description on display Description Def. UOM Min Max Possible values Type R/W BMS address
13: On 14: Init
E
I R
0: ---
I R
1: ALP01 - Geo flow switch
2: ALP05 - Sys flow switch
3: ALP04 - DHW pump overload
4: ALP02 - Geo P. overload
5: ALP03 - Sys. P. overload
6: ALC01 - Comp. 1 overload
7: ALC02 - Comp. 2 overload
8: ALB01 - High pressure 1
9: ALB03 - High pressure 2
10: ALB02 - Low pressure
11: ALU01 - Geo antifreeze
12: ALU02 - Sys. antifreeze
13: ALA01 - Probe B1 Fault
14: ALA02 - Probe B2 Fault
15: ALA03 - Probe B3 Fault
16: ALA04 - Probe B4 Fault
17: ALA05 - Probe B5 Fault
18: ALA06 - Probe B6 Fault
19: ALA07 - Probe B7 Fault
20: ALA08 - Probe B8 Fault
21: ALA09 - Probe B9 Fault
22: ALA10 - Probe B10 Fault
23: ALB04 - High Pres.Trasd.
24: ALB05 - Low Pres.Trasd.
25: ALF01 - Fan Overload
26: ALC03 - Envelop error
27: ALW08 - Max time defrost
28: ALC01 - Compressor/s inverter
29: ALD01 - EEPROM EVO
30: ALD02 - Probe S1 EVO
31: ALD02 - Probe S2 EVO
32: ALD02 - Probe S3 EVO
33: ALD02 - Probe S4 EVO
34: ALD03 - Motor EVO
35: ALD04 - P-LAN EVO
36: ALD05 - Low suction temp. EVO
37: ALD06 - Low evap. temp. EVO
38: ALD07 - High evap. temp. EVO
39: ALD08 - Low superheat EVO
40: ALD09 - High condense temp.EVO
41: ALD10 - Offline EVO
Inlet Outlet Plant : Primary system inlet/outlet temp. 0 °C -99.9 99,9
A R
°F -147,8 211,8
Geoth : Ground source loop inlet/outlet temp. 0 °C -99.9 99,9
A R
°F -147,8 211,8
ACS: Domestic hot water control temp. 0 °C -99.9 99,9 A R
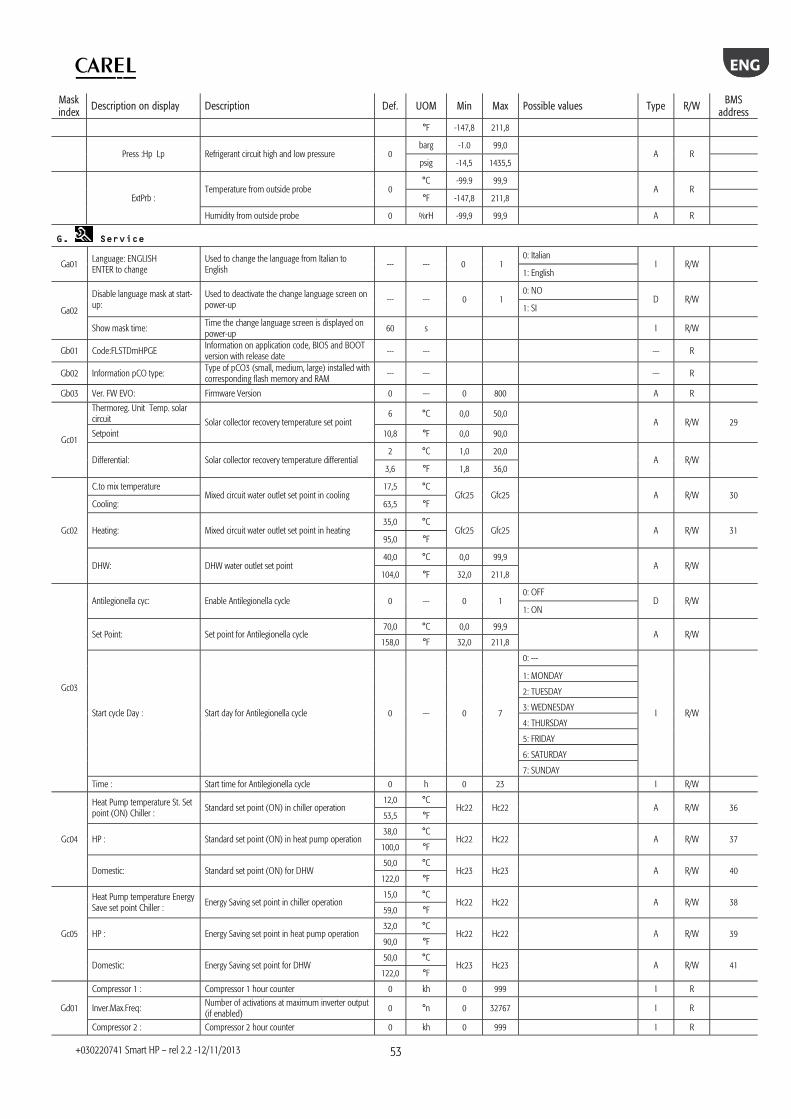
ENG
+030220741 Smart HP – rel 2.2 -12/11/2013
53
Mask index
Description on display Description Def. UOM Min Max Possible values Type R/W BMS address
°F -147,8 211,8
Press :Hp Lp Refrigerant circuit high and low pressure 0 barg -1.0 99,0
A R
psig -14,5 1435,5
ExtPrb : Temperature from outside probe 0
°C -99.9 99,9 A R
°F -147,8 211,8
Humidity from outside probe 0 %rH -99,9 99,9 A R
Ga01 Language: ENGLISH ENTER to change
Used to change the language from Italian to English --- --- 0 1
0: Italian I R/W
1: English
Ga02
Disable language mask at start-up:
Used to deactivate the change language screen on power-up
--- --- 0 1 0: NO
D R/W 1: SI
Show mask time: Time the change language screen is displayed on power-up
60 s I R/W
Gb01 Code:FLSTDmHPGE Information on application code, BIOS and BOOT version with release date --- --- --- R
Gb02 Information pCO type: Type of pCO3 (small, medium, large) installed with corresponding flash memory and RAM
--- --- --- R
Gb03 Ver. FW EVO: Firmware Version 0 --- 0 800 A R
Gc01
Thermoreg. Unit Temp. solar circuit Solar collector recovery temperature set point
6 °C 0,0 50,0 A R/W 29
Setpoint 10,8 °F 0,0 90,0
Differential: Solar collector recovery temperature differential 2 °C 1,0 20,0
A R/W 3,6 °F 1,8 36,0
Gc02
C.to mix temperature Mixed circuit water outlet set point in cooling
17,5 °C Gfc25 Gfc25 A R/W 30
Cooling: 63,5 °F
Heating: Mixed circuit water outlet set point in heating 35,0 °C
Gfc25 Gfc25 A R/W 31 95,0 °F
DHW: DHW water outlet set point 40,0 °C 0,0 99,9
A R/W 104,0 °F 32,0 211,8
Gc03
Antilegionella cyc: Enable Antilegionella cycle 0 --- 0 1 0: OFF
D R/W 1: ON
Set Point: Set point for Antilegionella cycle 70,0 °C 0,0 99,9
A R/W 158,0 °F 32,0 211,8
Start cycle Day : Start day for Antilegionella cycle 0 --- 0 7
0: ---
I R/W
1: MONDAY
2: TUESDAY
3: WEDNESDAY
4: THURSDAY
5: FRIDAY
6: SATURDAY
7: SUNDAY
Time : Start time for Antilegionella cycle 0 h 0 23 I R/W
Gc04
Heat Pump temperature St. Set point (ON) Chiller :
Standard set point (ON) in chiller operation 12,0 °C
Hc22 Hc22 A R/W 36 53,5 °F
HP : Standard set point (ON) in heat pump operation 38,0 °C
Hc22 Hc22 A R/W 37 100,0 °F
Domestic: Standard set point (ON) for DHW 50,0 °C
Hc23 Hc23 A R/W 40 122,0 °F
Gc05
Heat Pump temperature Energy Save set point Chiller :
Energy Saving set point in chiller operation 15,0 °C
Hc22 Hc22 A R/W 38 59,0 °F
HP : Energy Saving set point in heat pump operation 32,0 °C
Hc22 Hc22 A R/W 39 90,0 °F
Domestic: Energy Saving set point for DHW 50,0 °C
Hc23 Hc23 A R/W 41 122,0 °F
Gd01
Compressor 1 : Compressor 1 hour counter 0 kh 0 999 I R
Inver.Max.Freq: Number of activations at maximum inverter output (if enabled)
0 °n 0 32767 I R
Compressor 2 : Compressor 2 hour counter 0 kh 0 999 I R
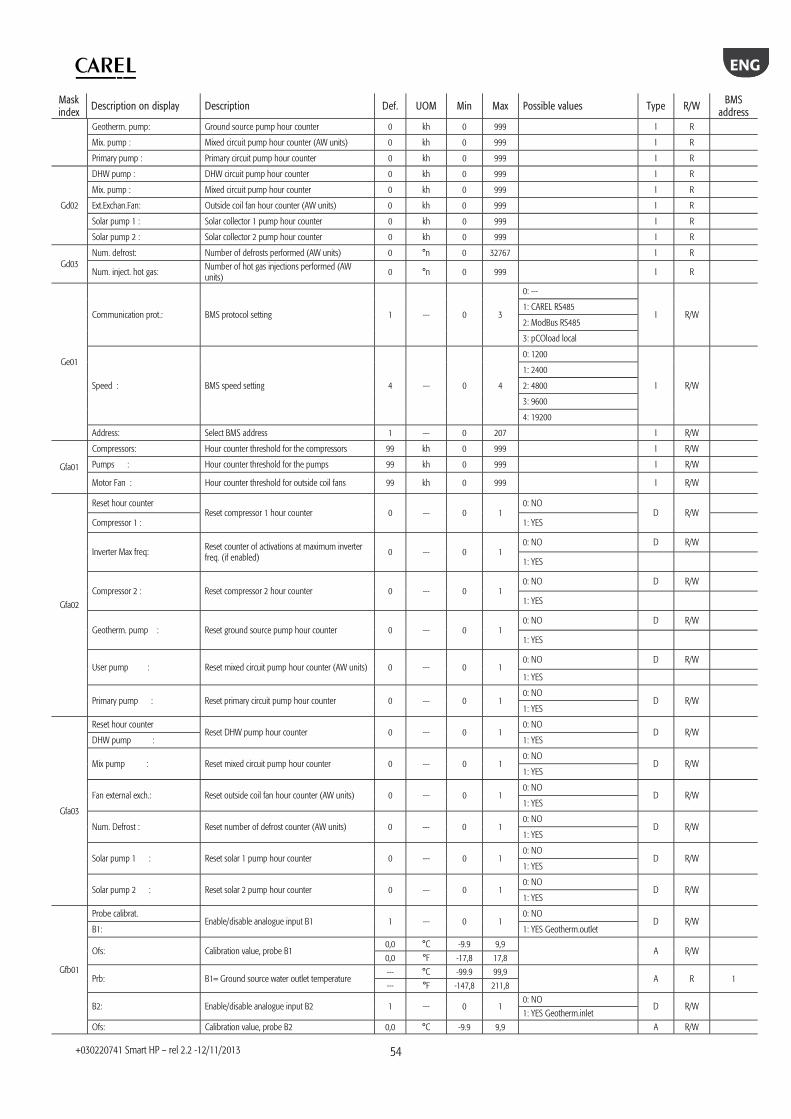
ENG
+030220741 Smart HP – rel 2.2 -12/11/2013
54
Mask index
Description on display Description Def. UOM Min Max Possible values Type R/W BMS address
Geotherm. pump: Ground source pump hour counter 0 kh 0 999 I R
Mix. pump : Mixed circuit pump hour counter (AW units) 0 kh 0 999 I R
Primary pump : Primary circuit pump hour counter 0 kh 0 999 I R
Gd02
DHW pump : DHW circuit pump hour counter 0 kh 0 999 I R
Mix. pump : Mixed circuit pump hour counter 0 kh 0 999 I R
Ext.Exchan.Fan: Outside coil fan hour counter (AW units) 0 kh 0 999 I R
Solar pump 1 : Solar collector 1 pump hour counter 0 kh 0 999 I R
Solar pump 2 : Solar collector 2 pump hour counter 0 kh 0 999 I R
Gd03 Num. defrost: Number of defrosts performed (AW units) 0 °n 0 32767 I R
Num. inject. hot gas: Number of hot gas injections performed (AW units) 0 °n 0 999 I R
Ge01
Communication prot.: BMS protocol setting 1 --- 0 3
0: ---
I R/W 1: CAREL RS485
2: ModBus RS485
3: pCOload local
Speed : BMS speed setting 4 --- 0 4
0: 1200
I R/W
1: 2400
2: 4800
3: 9600
4: 19200
Address: Select BMS address 1 --- 0 207 I R/W
Gfa01
Compressors: Hour counter threshold for the compressors 99 kh 0 999 I R/W
Pumps : Hour counter threshold for the pumps 99 kh 0 999 I R/W
Motor Fan : Hour counter threshold for outside coil fans 99 kh 0 999 I R/W
Gfa02
Reset hour counter Reset compressor 1 hour counter 0 --- 0 1
0: NO D R/W
Compressor 1 : 1: YES
Inverter Max freq: Reset counter of activations at maximum inverter freq. (if enabled)
0 --- 0 1 0: NO D R/W
1: YES
Compressor 2 : Reset compressor 2 hour counter 0 --- 0 1 0: NO D R/W
1: YES
Geotherm. pump : Reset ground source pump hour counter 0 --- 0 1 0: NO D R/W
1: YES
User pump : Reset mixed circuit pump hour counter (AW units) 0 --- 0 1 0: NO D R/W
1: YES
Primary pump : Reset primary circuit pump hour counter 0 --- 0 1 0: NO
D R/W 1: YES
Gfa03
Reset hour counter Reset DHW pump hour counter 0 --- 0 1
0: NO D R/W
DHW pump : 1: YES
Mix pump : Reset mixed circuit pump hour counter 0 --- 0 1 0: NO
D R/W 1: YES
Fan external exch.: Reset outside coil fan hour counter (AW units) 0 --- 0 1 0: NO
D R/W 1: YES
Num. Defrost : Reset number of defrost counter (AW units) 0 --- 0 1 0: NO
D R/W 1: YES
Solar pump 1 : Reset solar 1 pump hour counter 0 --- 0 1 0: NO
D R/W 1: YES
Solar pump 2 : Reset solar 2 pump hour counter 0 --- 0 1 0: NO
D R/W 1: YES
Gfb01
Probe calibrat. Enable/disable analogue input B1 1 --- 0 1
0: NO D R/W
B1: 1: YES Geotherm.outlet
Ofs: Calibration value, probe B1 0,0 °C -9.9 9,9
A R/W 0,0 °F -17,8 17,8
Prb: B1= Ground source water outlet temperature --- °C -99.9 99,9
A R 1 --- °F -147,8 211,8
B2: Enable/disable analogue input B2 1 --- 0 1 0: NO
D R/W 1: YES Geotherm.inlet
Ofs: Calibration value, probe B2 0,0 °C -9.9 9,9 A R/W
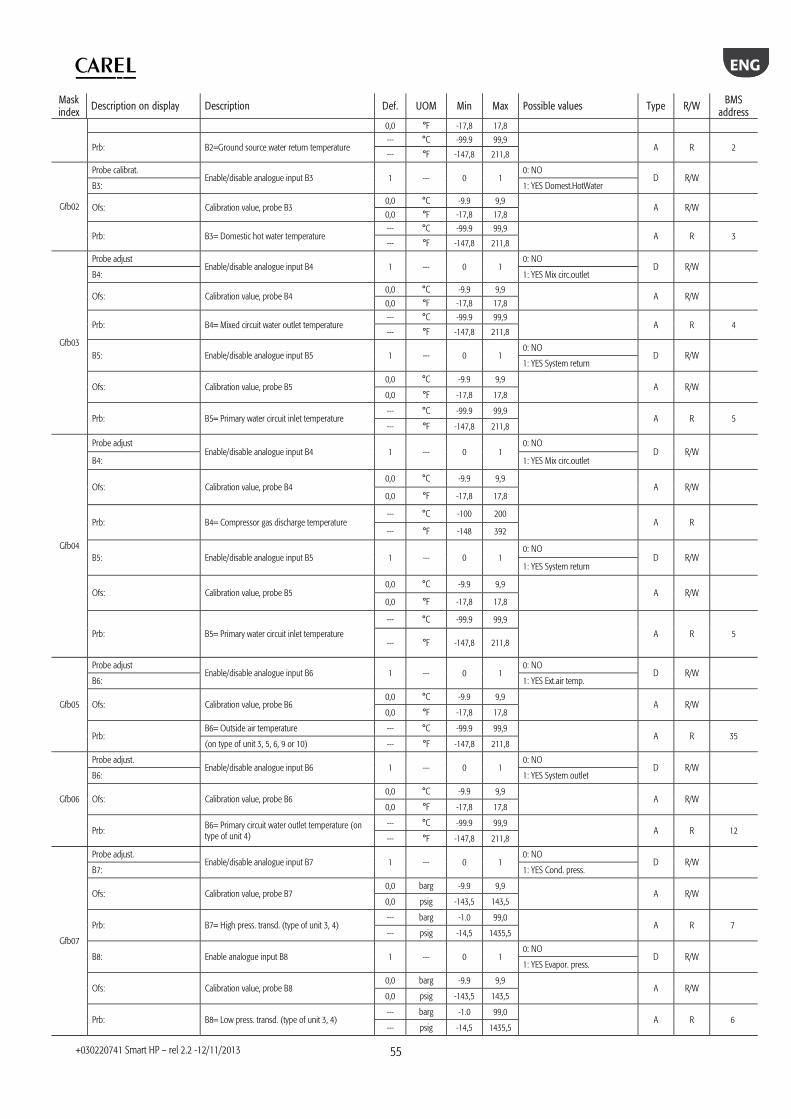
ENG
+030220741 Smart HP – rel 2.2 -12/11/2013
55
Mask index
Description on display Description Def. UOM Min Max Possible values Type R/W BMS address
0,0 °F -17,8 17,8
Prb: B2=Ground source water return temperature --- °C -99.9 99,9
A R 2 --- °F -147,8 211,8
Gfb02
Probe calibrat. Enable/disable analogue input B3 1 --- 0 1
0: NO D R/W
B3: 1: YES Domest.HotWater
Ofs: Calibration value, probe B3 0,0 °C -9.9 9,9
A R/W 0,0 °F -17,8 17,8
Prb: B3= Domestic hot water temperature --- °C -99.9 99,9
A R 3 --- °F -147,8 211,8
Gfb03
Probe adjust Enable/disable analogue input B4 1 --- 0 1
0: NO D R/W
B4: 1: YES Mix circ.outlet
Ofs: Calibration value, probe B4 0,0 °C -9.9 9,9
A R/W 0,0 °F -17,8 17,8
Prb: B4= Mixed circuit water outlet temperature --- °C -99.9 99,9
A R 4 --- °F -147,8 211,8
B5: Enable/disable analogue input B5 1 --- 0 1 0: NO
D R/W 1: YES System return
Ofs: Calibration value, probe B5 0,0 °C -9.9 9,9
A R/W 0,0 °F -17,8 17,8
Prb: B5= Primary water circuit inlet temperature --- °C -99.9 99,9
A R 5 --- °F -147,8 211,8
Gfb04
Probe adjust Enable/disable analogue input B4 1 --- 0 1
0: NO D R/W
B4: 1: YES Mix circ.outlet
Ofs: Calibration value, probe B4 0,0 °C -9.9 9,9
A R/W 0,0 °F -17,8 17,8
Prb: B4= Compressor gas discharge temperature --- °C -100 200
A R --- °F -148 392
B5: Enable/disable analogue input B5 1 --- 0 1 0: NO
D R/W 1: YES System return
Ofs: Calibration value, probe B5 0,0 °C -9.9 9,9
A R/W 0,0 °F -17,8 17,8
Prb: B5= Primary water circuit inlet temperature
--- °C -99.9 99,9
A R 5 --- °F -147,8 211,8
Gfb05
Probe adjust Enable/disable analogue input B6 1 --- 0 1
0: NO D R/W
B6: 1: YES Ext.air temp.
Ofs: Calibration value, probe B6 0,0 °C -9.9 9,9
A R/W 0,0 °F -17,8 17,8
Prb: B6= Outside air temperature --- °C -99.9 99,9
A R 35 (on type of unit 3, 5, 6, 9 or 10) --- °F -147,8 211,8
Gfb06
Probe adjust. Enable/disable analogue input B6 1 --- 0 1
0: NO D R/W
B6: 1: YES System outlet
Ofs: Calibration value, probe B6 0,0 °C -9.9 9,9
A R/W 0,0 °F -17,8 17,8
Prb: B6= Primary circuit water outlet temperature (on type of unit 4)
--- °C -99.9 99,9 A R 12
--- °F -147,8 211,8
Gfb07
Probe adjust. Enable/disable analogue input B7 1 --- 0 1
0: NO D R/W
B7: 1: YES Cond. press.
Ofs: Calibration value, probe B7 0,0 barg -9.9 9,9
A R/W 0,0 psig -143,5 143,5
Prb: B7= High press. transd. (type of unit 3, 4) --- barg -1.0 99,0
A R 7 --- psig -14,5 1435,5
B8: Enable analogue input B8 1 --- 0 1 0: NO
D R/W 1: YES Evapor. press.
Ofs: Calibration value, probe B8 0,0 barg -9.9 9,9
A R/W 0,0 psig -143,5 143,5
Prb: B8= Low press. transd. (type of unit 3, 4) --- barg -1.0 99,0
A R 6 --- psig -14,5 1435,5
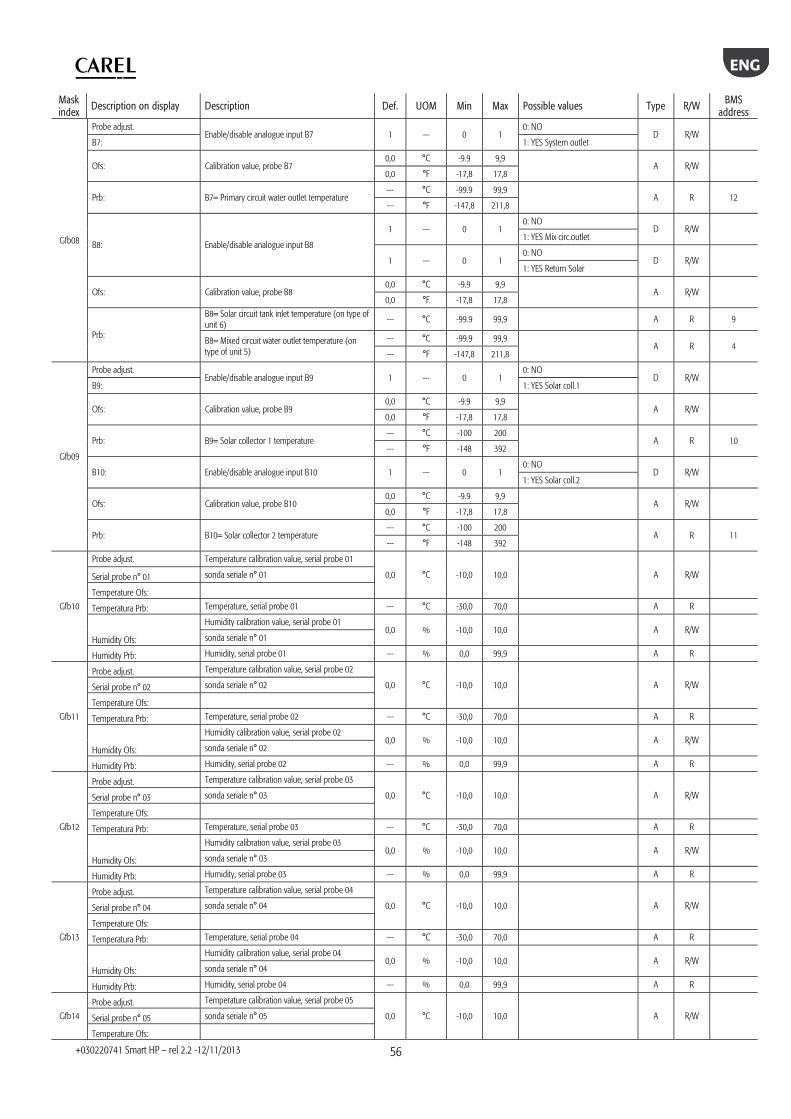
ENG
+030220741 Smart HP – rel 2.2 -12/11/2013
56
Mask index
Description on display Description Def. UOM Min Max Possible values Type R/W BMS address
Gfb08
Probe adjust. Enable/disable analogue input B7 1 --- 0 1
0: NO D R/W
B7: 1: YES System outlet
Ofs: Calibration value, probe B7 0,0 °C -9.9 9,9
A R/W 0,0 °F -17,8 17,8
Prb: B7= Primary circuit water outlet temperature --- °C -99.9 99,9
A R 12 --- °F -147,8 211,8
B8: Enable/disable analogue input B8
1 --- 0 1 0: NO
D R/W 1: YES Mix circ.outlet
1 --- 0 1 0: NO
D R/W 1: YES Return Solar
Ofs: Calibration value, probe B8 0,0 °C -9.9 9,9
A R/W 0,0 °F -17,8 17,8
Prb:
B8= Solar circuit tank inlet temperature (on type of unit 6)
--- °C -99.9 99,9 A R 9
B8= Mixed circuit water outlet temperature (on type of unit 5)
--- °C -99.9 99,9 A R 4
--- °F -147,8 211,8
Gfb09
Probe adjust. Enable/disable analogue input B9 1 --- 0 1
0: NO D R/W
B9: 1: YES Solar coll.1
Ofs: Calibration value, probe B9 0,0 °C -9.9 9,9
A R/W 0,0 °F -17,8 17,8
Prb: B9= Solar collector 1 temperature --- °C -100 200
A R 10 --- °F -148 392
B10: Enable/disable analogue input B10 1 --- 0 1 0: NO
D R/W 1: YES Solar coll.2
Ofs: Calibration value, probe B10 0,0 °C -9.9 9,9
A R/W 0,0 °F -17,8 17,8
Prb: B10= Solar collector 2 temperature --- °C -100 200
A R 11 --- °F -148 392
Gfb10
Probe adjust. Temperature calibration value, serial probe 01
0,0 °C -10,0 10,0 A R/W Serial probe n° 01 sonda seriale n° 01
Temperature Ofs:
Temperatura Prb: Temperature, serial probe 01 --- °C -30,0 70,0 A R
Humidity Ofs:
Humidity calibration value, serial probe 01 0,0 % -10,0 10,0
A R/W
sonda seriale n° 01
Humidity Prb: Humidity, serial probe 01 --- % 0,0 99,9 A R
Gfb11
Probe adjust. Temperature calibration value, serial probe 02
0,0 °C -10,0 10,0
A R/W Serial probe n° 02 sonda seriale n° 02
Temperature Ofs:
Temperatura Prb: Temperature, serial probe 02 --- °C -30,0 70,0 A R
Humidity Ofs:
Humidity calibration value, serial probe 02 0,0 % -10,0 10,0
A R/W
sonda seriale n° 02
Humidity Prb: Humidity, serial probe 02 --- % 0,0 99,9 A R
Gfb12
Probe adjust. Temperature calibration value, serial probe 03
0,0 °C -10,0 10,0
A R/W Serial probe n° 03 sonda seriale n° 03
Temperature Ofs:
Temperatura Prb: Temperature, serial probe 03 --- °C -30,0 70,0 A R
Humidity Ofs:
Humidity calibration value, serial probe 03 0,0 % -10,0 10,0
A R/W
sonda seriale n° 03
Humidity Prb: Humidity, serial probe 03 --- % 0,0 99,9 A R
Gfb13
Probe adjust. Temperature calibration value, serial probe 04
0,0 °C -10,0 10,0
A R/W Serial probe n° 04 sonda seriale n° 04
Temperature Ofs:
Temperatura Prb: Temperature, serial probe 04 --- °C -30,0 70,0 A R
Humidity Ofs:
Humidity calibration value, serial probe 04 0,0 % -10,0 10,0
A R/W
sonda seriale n° 04
Humidity Prb: Humidity, serial probe 04 --- % 0,0 99,9 A R
Gfb14
Probe adjust. Temperature calibration value, serial probe 05
0,0 °C -10,0 10,0
A R/W Serial probe n° 05 sonda seriale n° 05
Temperature Ofs:
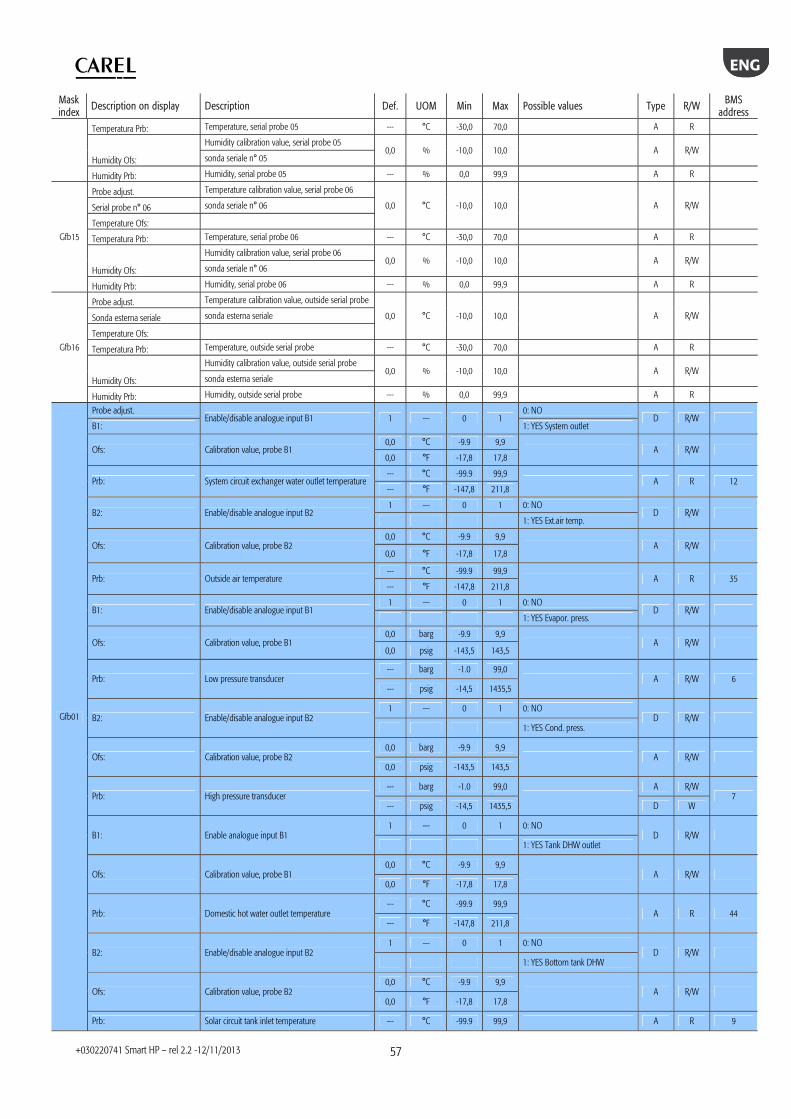
ENG
+030220741 Smart HP – rel 2.2 -12/11/2013
57
Mask index
Description on display Description Def. UOM Min Max Possible values Type R/W BMS address
Temperatura Prb: Temperature, serial probe 05 --- °C -30,0 70,0 A R
Humidity Ofs:
Humidity calibration value, serial probe 05 0,0 % -10,0 10,0
A R/W
sonda seriale n° 05
Humidity Prb: Humidity, serial probe 05 --- % 0,0 99,9 A R
Gfb15
Probe adjust. Temperature calibration value, serial probe 06
0,0 °C -10,0 10,0
A R/W Serial probe n° 06 sonda seriale n° 06
Temperature Ofs:
Temperatura Prb: Temperature, serial probe 06 --- °C -30,0 70,0 A R
Humidity Ofs:
Humidity calibration value, serial probe 06 0,0 % -10,0 10,0
A R/W
sonda seriale n° 06
Humidity Prb: Humidity, serial probe 06 --- % 0,0 99,9 A R
Gfb16
Probe adjust. Temperature calibration value, outside serial probe
0,0 °C -10,0 10,0
A R/W Sonda esterna seriale sonda esterna seriale
Temperature Ofs:
Temperatura Prb: Temperature, outside serial probe --- °C -30,0 70,0 A R
Humidity Ofs:
Humidity calibration value, outside serial probe 0,0 % -10,0 10,0
A R/W
sonda esterna seriale
Humidity Prb: Humidity, outside serial probe --- % 0,0 99,9 A R
Gfb01
Probe adjust. Enable/disable analogue input B1 1 --- 0 1
0: NO D R/W
B1: 1: YES System outlet
Ofs: Calibration value, probe B1 0,0 °C -9.9 9,9
A R/W 0,0 °F -17,8 17,8
Prb: System circuit exchanger water outlet temperature --- °C -99.9 99,9
A R 12 --- °F -147,8 211,8
B2: Enable/disable analogue input B2 1 --- 0 1 0: NO
D R/W 1: YES Ext.air temp.
Ofs: Calibration value, probe B2 0,0 °C -9.9 9,9
A R/W 0,0 °F -17,8 17,8
Prb: Outside air temperature --- °C -99.9 99,9
A R 35 --- °F -147,8 211,8
B1: Enable/disable analogue input B1 1 --- 0 1 0: NO
D R/W 1: YES Evapor. press.
Ofs: Calibration value, probe B1 0,0 barg -9.9 9,9
A R/W 0,0 psig -143,5 143,5
Prb: Low pressure transducer --- barg -1.0 99,0
A R/W 6 --- psig -14,5 1435,5
B2: Enable/disable analogue input B2 1 --- 0 1 0: NO
D R/W 1: YES Cond. press.
Ofs: Calibration value, probe B2 0,0 barg -9.9 9,9
A R/W 0,0 psig -143,5 143,5
Prb: High pressure transducer --- barg -1.0 99,0
A R/W
7 --- psig -14,5 1435,5 D W
B1: Enable analogue input B1 1 --- 0 1 0: NO
D R/W 1: YES Tank DHW outlet
Ofs: Calibration value, probe B1 0,0 °C -9.9 9,9
A R/W 0,0 °F -17,8 17,8
Prb: Domestic hot water outlet temperature --- °C -99.9 99,9
A R 44 --- °F -147,8 211,8
B2: Enable/disable analogue input B2 1 --- 0 1 0: NO
D R/W 1: YES Bottom tank DHW
Ofs: Calibration value, probe B2 0,0 °C -9.9 9,9
A R/W 0,0 °F -17,8 17,8
Prb: Solar circuit tank inlet temperature --- °C -99.9 99,9 A R 9
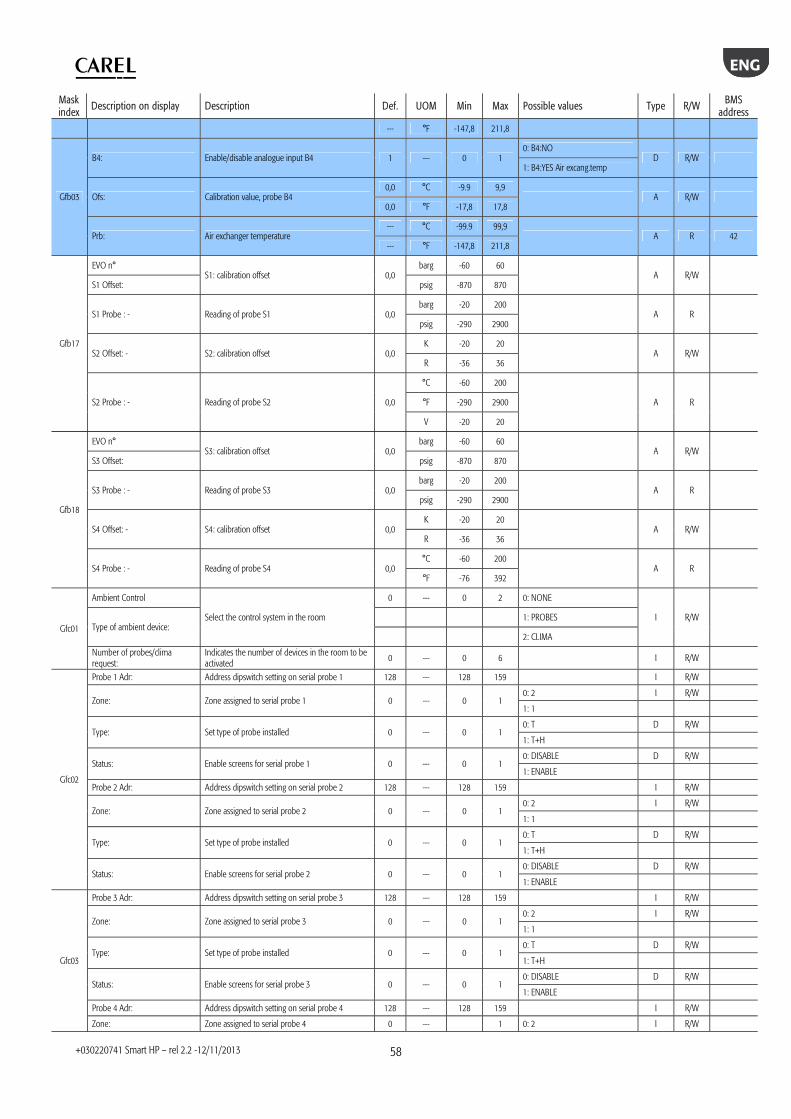
ENG
+030220741 Smart HP – rel 2.2 -12/11/2013
58
Mask index
Description on display Description Def. UOM Min Max Possible values Type R/W BMS address
--- °F -147,8 211,8
Gfb03
B4: Enable/disable analogue input B4 1 --- 0 1 0: B4:NO
D R/W 1: B4:YES Air excang.temp
Ofs: Calibration value, probe B4 0,0 °C -9.9 9,9
A R/W 0,0 °F -17,8 17,8
Prb: Air exchanger temperature --- °C -99.9 99,9
A R 42 --- °F -147,8 211,8
Gfb17
EVO n° S1: calibration offset 0,0
barg -60 60 A R/W
S1 Offset: psig -870 870
S1 Probe : - Reading of probe S1 0,0 barg -20 200
A R psig -290 2900
S2 Offset: - S2: calibration offset 0,0 K -20 20
A R/W R -36 36
S2 Probe : - Reading of probe S2 0,0
°C -60 200
A R °F -290 2900
V -20 20
Gfb18
EVO n° S3: calibration offset 0,0
barg -60 60 A R/W
S3 Offset: psig -870 870
S3 Probe : - Reading of probe S3 0,0 barg -20 200
A R psig -290 2900
S4 Offset: - S4: calibration offset 0,0 K -20 20
A R/W R -36 36
S4 Probe : - Reading of probe S4 0,0 °C -60 200
A R °F -76 392
Gfc01
Ambient Control
Select the control system in the room
0 --- 0 2 0: NONE
I R/W Type of ambient device:
1: PROBES
2: CLIMA
Number of probes/clima request:
Indicates the number of devices in the room to be activated
0 --- 0 6 I R/W
Gfc02
Probe 1 Adr: Address dipswitch setting on serial probe 1 128 --- 128 159 I R/W
Zone: Zone assigned to serial probe 1 0 --- 0 1 0: 2 I R/W
1: 1
Type: Set type of probe installed 0 --- 0 1 0: T D R/W
1: T+H
Status: Enable screens for serial probe 1 0 --- 0 1 0: DISABLE D R/W
1: ENABLE
Probe 2 Adr: Address dipswitch setting on serial probe 2 128 --- 128 159 I R/W
Zone: Zone assigned to serial probe 2 0 --- 0 1 0: 2 I R/W
1: 1
Type: Set type of probe installed 0 --- 0 1 0: T D R/W
1: T+H
Status: Enable screens for serial probe 2 0 --- 0 1 0: DISABLE D R/W
1: ENABLE
Gfc03
Probe 3 Adr: Address dipswitch setting on serial probe 3 128 --- 128 159 I R/W
Zone: Zone assigned to serial probe 3 0 --- 0 1 0: 2 I R/W
1: 1
Type: Set type of probe installed 0 --- 0 1 0: T D R/W
1: T+H
Status: Enable screens for serial probe 3 0 --- 0 1 0: DISABLE D R/W
1: ENABLE
Probe 4 Adr: Address dipswitch setting on serial probe 4 128 --- 128 159 I R/W
Zone: Zone assigned to serial probe 4 0 --- 1 0: 2 I R/W
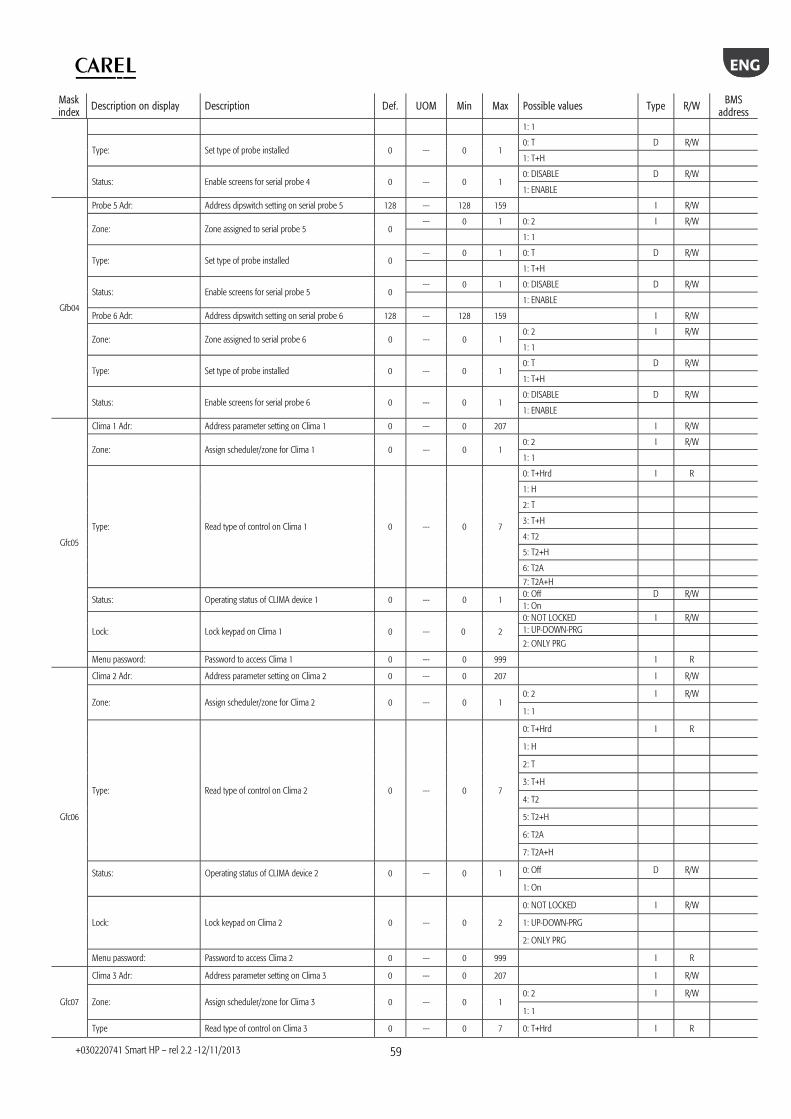
ENG
+030220741 Smart HP – rel 2.2 -12/11/2013
59
Mask index
Description on display Description Def. UOM Min Max Possible values Type R/W BMS address
1: 1
Type: Set type of probe installed 0 --- 0 1 0: T D R/W
1: T+H
Status: Enable screens for serial probe 4 0 --- 0 1 0: DISABLE D R/W
1: ENABLE
Gfb04
Probe 5 Adr: Address dipswitch setting on serial probe 5 128 --- 128 159 I R/W
Zone: Zone assigned to serial probe 5 0 --- 0 1 0: 2 I R/W
1: 1
Type: Set type of probe installed 0 --- 0 1 0: T D R/W
1: T+H
Status: Enable screens for serial probe 5 0 --- 0 1 0: DISABLE D R/W
1: ENABLE
Probe 6 Adr: Address dipswitch setting on serial probe 6 128 --- 128 159 I R/W
Zone: Zone assigned to serial probe 6 0 --- 0 1 0: 2 I R/W
1: 1
Type: Set type of probe installed 0 --- 0 1 0: T D R/W
1: T+H
Status: Enable screens for serial probe 6 0 --- 0 1 0: DISABLE D R/W
1: ENABLE
Gfc05
Clima 1 Adr: Address parameter setting on Clima 1 0 --- 0 207 I R/W
Zone: Assign scheduler/zone for Clima 1 0 --- 0 1 0: 2 I R/W
1: 1
Type: Read type of control on Clima 1 0 --- 0 7
0: T+Hrd I R
1: H
2: T
3: T+H
4: T2
5: T2+H
6: T2A
7: T2A+H
Status: Operating status of CLIMA device 1 0 --- 0 1 0: Off D R/W 1: On
Lock: Lock keypad on Clima 1 0 --- 0 2
0: NOT LOCKED I R/W 1: UP-DOWN-PRG
2: ONLY PRG
Menu password: Password to access Clima 1 0 --- 0 999 I R
Gfc06
Clima 2 Adr: Address parameter setting on Clima 2 0 --- 0 207 I R/W
Zone: Assign scheduler/zone for Clima 2 0 --- 0 1 0: 2 I R/W
1: 1
Type: Read type of control on Clima 2 0 --- 0 7
0: T+Hrd I R
1: H
2: T
3: T+H
4: T2
5: T2+H
6: T2A
7: T2A+H
Status:
Operating status of CLIMA device 2
0
---
0
1
0: Off D R/W
1: On
Lock: Lock keypad on Clima 2 0 --- 0 2
0: NOT LOCKED I R/W
1: UP-DOWN-PRG
2: ONLY PRG
Menu password: Password to access Clima 2 0 --- 0 999 I R
Gfc07
Clima 3 Adr: Address parameter setting on Clima 3 0 --- 0 207 I R/W
Zone: Assign scheduler/zone for Clima 3 0 --- 0 1 0: 2 I R/W
1: 1
Type Read type of control on Clima 3 0 --- 0 7 0: T+Hrd I R
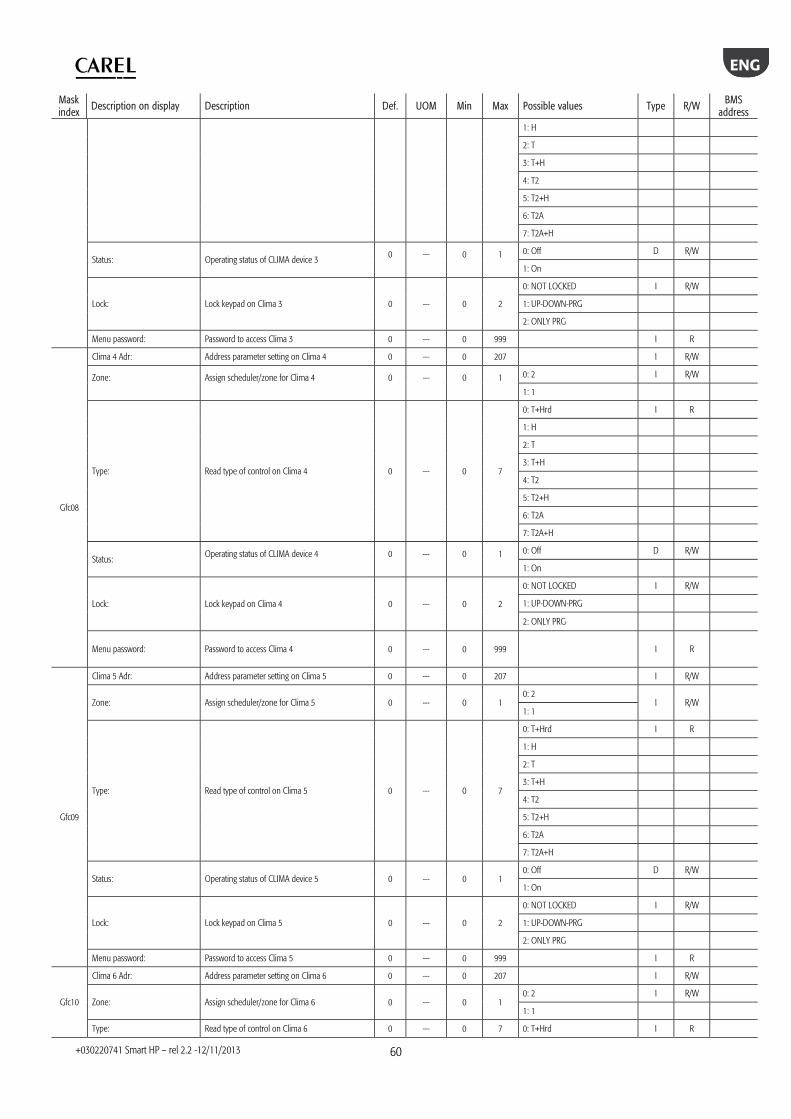
ENG
+030220741 Smart HP – rel 2.2 -12/11/2013
60
Mask index
Description on display Description Def. UOM Min Max Possible values Type R/W BMS address
1: H
2: T
3: T+H
4: T2
5: T2+H
6: T2A
7: T2A+H
Status: Operating status of CLIMA device 3 0
---
0
1
0: Off D R/W
1: On
Lock: Lock keypad on Clima 3 0 --- 0 2
0: NOT LOCKED I R/W
1: UP-DOWN-PRG
2: ONLY PRG
Menu password: Password to access Clima 3 0 --- 0 999 I R
Gfc08
Clima 4 Adr: Address parameter setting on Clima 4 0 --- 0 207 I R/W
Zone:
Assign scheduler/zone for Clima 4
0
---
0
1
0: 2 I R/W
1: 1
Type: Read type of control on Clima 4 0 --- 0 7
0: T+Hrd I R
1: H
2: T
3: T+H
4: T2
5: T2+H
6: T2A
7: T2A+H
Status: Operating status of CLIMA device 4
0
---
0
1
0: Off D R/W
1: On
Lock: Lock keypad on Clima 4 0 --- 0 2
0: NOT LOCKED I R/W
1: UP-DOWN-PRG
2: ONLY PRG
Menu password: Password to access Clima 4 0 --- 0 999 I R
Gfc09
Clima 5 Adr: Address parameter setting on Clima 5 0 --- 0 207 I R/W
Zone: Assign scheduler/zone for Clima 5 0 --- 0 1 0: 2
I R/W 1: 1
Type: Read type of control on Clima 5 0 --- 0 7
0: T+Hrd I R
1: H
2: T
3: T+H
4: T2
5: T2+H
6: T2A
7: T2A+H
Status: Operating status of CLIMA device 5 0 --- 0 1 0: Off D R/W
1: On
Lock: Lock keypad on Clima 5 0 --- 0 2
0: NOT LOCKED I R/W
1: UP-DOWN-PRG
2: ONLY PRG
Menu password: Password to access Clima 5 0 --- 0 999 I R
Gfc10
Clima 6 Adr: Address parameter setting on Clima 6 0 --- 0 207 I R/W
Zone: Assign scheduler/zone for Clima 6 0 --- 0 1 0: 2 I R/W
1: 1
Type: Read type of control on Clima 6 0 --- 0 7 0: T+Hrd I R
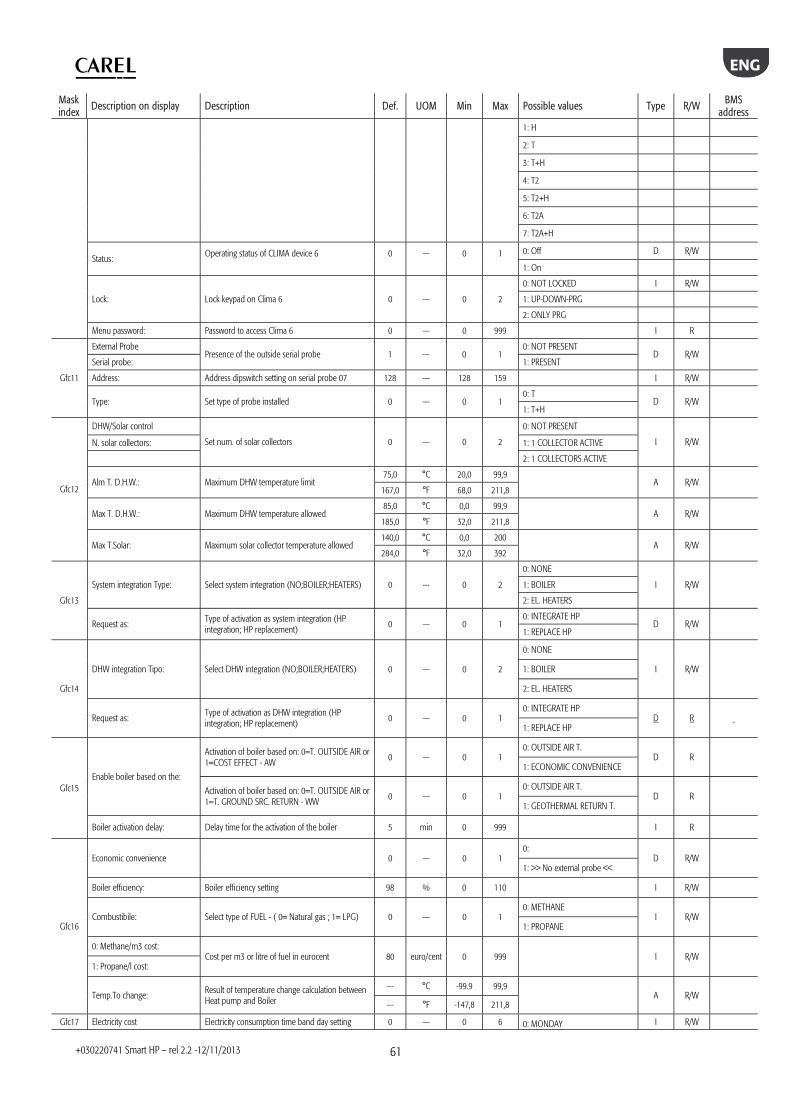
ENG
+030220741 Smart HP – rel 2.2 -12/11/2013
61
Mask index
Description on display Description Def. UOM Min Max Possible values Type R/W BMS address
1: H
2: T
3: T+H
4: T2
5: T2+H
6: T2A
7: T2A+H
Status: Operating status of CLIMA device 6
0
---
0
1
0: Off D R/W
1: On
Lock: Lock keypad on Clima 6 0 --- 0 2
0: NOT LOCKED I R/W
1: UP-DOWN-PRG
2: ONLY PRG
Menu password: Password to access Clima 6 0 --- 0 999 I R
Gfc11
External Probe Presence of the outside serial probe 1 --- 0 1
0: NOT PRESENT D R/W
Serial probe: 1: PRESENT
Address: Address dipswitch setting on serial probe 07 128 --- 128 159 I R/W
Type: Set type of probe installed 0 --- 0 1 0: T
D R/W 1: T+H
Gfc12
DHW/Solar control
Set num. of solar collectors 0 --- 0 2
0: NOT PRESENT
I R/W N. solar collectors: 1: 1 COLLECTOR ACTIVE
2: 1 COLLECTORS ACTIVE
Alm T. D.H.W.: Maximum DHW temperature limit 75,0 °C 20,0 99,9
A R/W 167,0 °F 68,0 211,8
Max T. D.H.W.: Maximum DHW temperature allowed 85,0 °C 0,0 99,9
A R/W 185,0 °F 32,0 211,8
Max T.Solar: Maximum solar collector temperature allowed 140,0 °C 0,0 200
A R/W 284,0 °F 32,0 392
Gfc13
System integration Type: Select system integration (NO;BOILER;HEATERS) 0 --- 0 2
0: NONE
I R/W 1: BOILER
2: EL. HEATERS
Request as: Type of activation as system integration (HP integration; HP replacement)
0 --- 0 1 0: INTEGRATE HP
D R/W 1: REPLACE HP
Gfc14
DHW integration Tipo: Select DHW integration (NO;BOILER;HEATERS) 0 --- 0 2
0: NONE
I R/W 1: BOILER
2: EL. HEATERS
Request as: Type of activation as DHW integration (HP integration; HP replacement) 0 --- 0 1
0: INTEGRATE HP D R
1: REPLACE HP
Gfc15 Enable boiler based on the:
Activation of boiler based on: 0=T. OUTSIDE AIR or 1=COST EFFECT - AW 0 --- 0 1
0: OUTSIDE AIR T. D R
1: ECONOMIC CONVENIENCE
Activation of boiler based on: 0=T. OUTSIDE AIR or 1=T. GROUND SRC. RETURN - WW 0 --- 0 1
0: OUTSIDE AIR T. D R
1: GEOTHERMAL RETURN T.
Boiler activation delay: Delay time for the activation of the boiler 5 min 0 999 I R
Gfc16
Economic convenience 0 --- 0 1 0:
D R/W 1: >> No external probe <<
Boiler efficiency: Boiler efficiency setting 98 % 0 110 I R/W
Combustibile: Select type of FUEL - ( 0= Natural gas ; 1= LPG) 0 --- 0 1 0: METHANE
I R/W 1: PROPANE
0: Methane/m3 cost: Cost per m3 or litre of fuel in eurocent 80 euro/cent 0 999 I R/W
1: Propane/l cost:
Temp.To change: Result of temperature change calculation between Heat pump and Boiler
--- °C -99.9 99,9 A R/W
--- °F -147,8 211,8
Gfc17 Electricity cost Electricity consumption time band day setting 0 --- 0 6 0: MONDAY I R/W
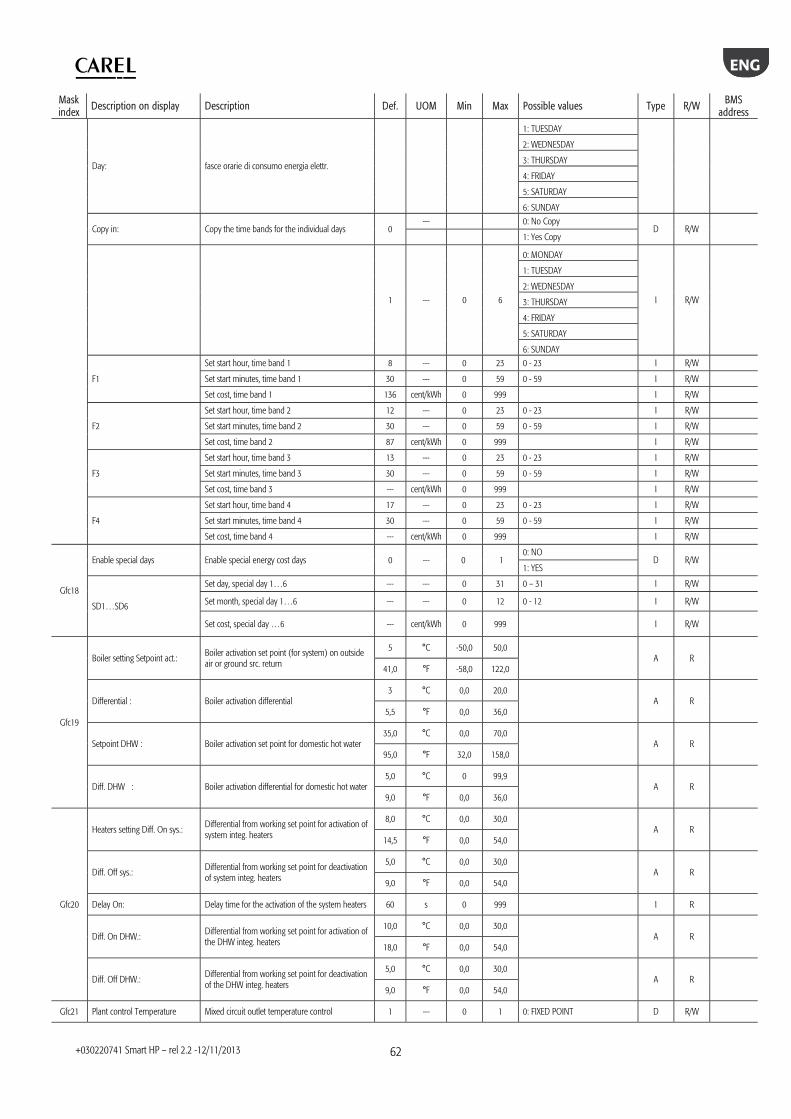
ENG
+030220741 Smart HP – rel 2.2 -12/11/2013
62
Mask index
Description on display Description Def. UOM Min Max Possible values Type R/W BMS address
Day: fasce orarie di consumo energia elettr.
1: TUESDAY
2: WEDNESDAY
3: THURSDAY
4: FRIDAY
5: SATURDAY
6: SUNDAY
Copy in: Copy the time bands for the individual days 0 --- 0: No Copy
D R/W 1: Yes Copy
1 --- 0 6
0: MONDAY
I R/W
1: TUESDAY
2: WEDNESDAY
3: THURSDAY
4: FRIDAY
5: SATURDAY
6: SUNDAY
F1
Set start hour, time band 1 8 --- 0 23 0 - 23 I R/W
Set start minutes, time band 1 30 --- 0 59 0 - 59 I R/W
Set cost, time band 1 136 cent/kWh 0 999 I R/W
F2
Set start hour, time band 2 12 --- 0 23 0 - 23 I R/W
Set start minutes, time band 2 30 --- 0 59 0 - 59 I R/W
Set cost, time band 2 87 cent/kWh 0 999 I R/W
F3
Set start hour, time band 3 13 --- 0 23 0 - 23 I R/W
Set start minutes, time band 3 30 --- 0 59 0 - 59 I R/W
Set cost, time band 3 --- cent/kWh 0 999 I R/W
F4
Set start hour, time band 4 17 --- 0 23 0 - 23 I R/W
Set start minutes, time band 4 30 --- 0 59 0 - 59 I R/W
Set cost, time band 4 --- cent/kWh 0 999 I R/W
Gfc18
Enable special days Enable special energy cost days 0 --- 0 1 0: NO
D R/W 1: YES
SD1…SD6
Set day, special day 1…6 --- --- 0 31 0 – 31 I R/W
Set month, special day 1…6 --- --- 0 12 0 - 12 I R/W
Set cost, special day …6 --- cent/kWh 0 999 I R/W
Gfc19
Boiler setting Setpoint act.: Boiler activation set point (for system) on outside air or ground src. return
5 °C -50,0 50,0 A R
41,0 °F -58,0 122,0
Differential : Boiler activation differential 3 °C 0,0 20,0
A R 5,5 °F 0,0 36,0
Setpoint DHW : Boiler activation set point for domestic hot water 35,0 °C 0,0 70,0
A R 95,0 °F 32,0 158,0
Diff. DHW : Boiler activation differential for domestic hot water 5,0 °C 0 99,9
A R 9,0 °F 0,0 36,0
Gfc20
Heaters setting Diff. On sys.: Differential from working set point for activation of system integ. heaters
8,0 °C 0,0 30,0 A R
14,5 °F 0,0 54,0
Diff. Off sys.: Differential from working set point for deactivation of system integ. heaters
5,0 °C 0,0 30,0 A R
9,0 °F 0,0 54,0
Delay On: Delay time for the activation of the system heaters 60 s 0 999 I R
Diff. On DHW.: Differential from working set point for activation of the DHW integ. heaters
10,0 °C 0,0 30,0 A R
18,0 °F 0,0 54,0
Diff. Off DHW.: Differential from working set point for deactivation of the DHW integ. heaters
5,0 °C 0,0 30,0 A R
9,0 °F 0,0 54,0
Gfc21 Plant control Temperature Mixed circuit outlet temperature control 1 --- 0 1 0: FIXED POINT D R/W
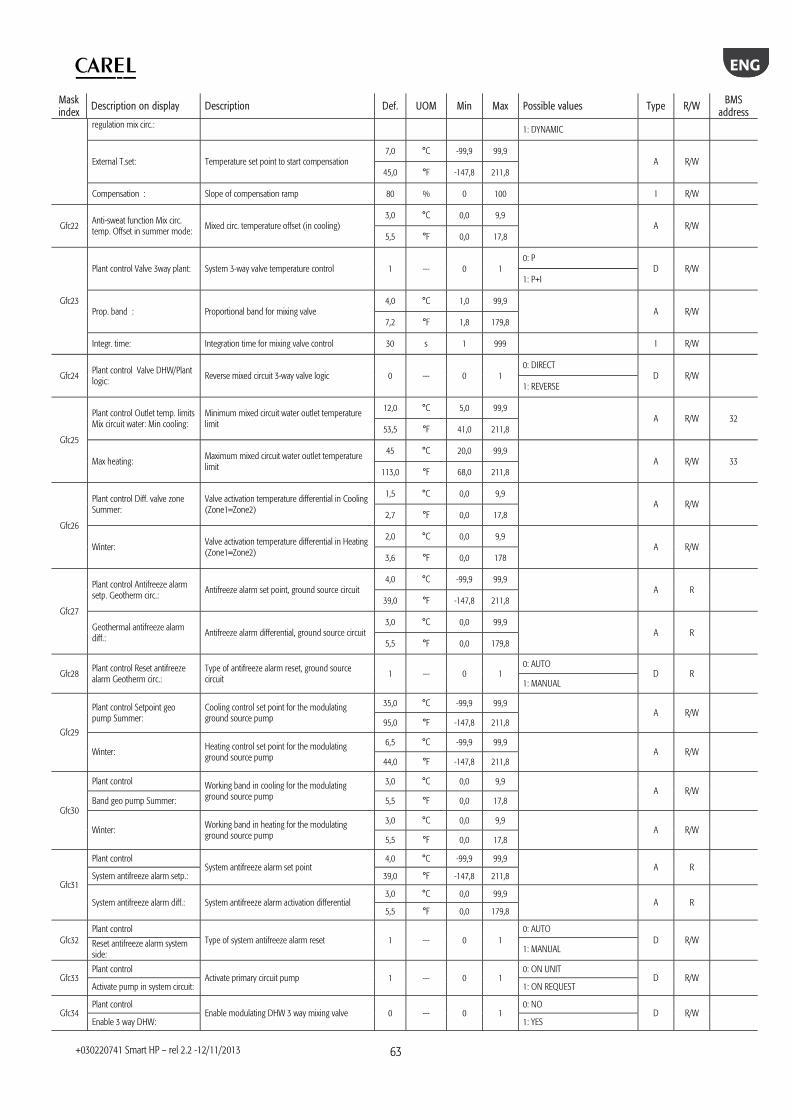
ENG
+030220741 Smart HP – rel 2.2 -12/11/2013
63
Mask index
Description on display Description Def. UOM Min Max Possible values Type R/W BMS address
regulation mix circ.: 1: DYNAMIC
External T.set: Temperature set point to start compensation 7,0 °C -99,9 99,9
A R/W 45,0 °F -147,8 211,8
Compensation : Slope of compensation ramp 80 % 0 100 I R/W
Gfc22 Anti-sweat function Mix circ. temp. Offset in summer mode:
Mixed circ. temperature offset (in cooling) 3,0 °C 0,0 9,9
A R/W 5,5 °F 0,0 17,8
Gfc23
Plant control Valve 3way plant: System 3-way valve temperature control 1 --- 0 1 0: P
D R/W 1: P+I
Prop. band : Proportional band for mixing valve 4,0 °C 1,0 99,9
A R/W 7,2 °F 1,8 179,8
Integr. time: Integration time for mixing valve control 30 s 1 999 I R/W
Gfc24 Plant control Valve DHW/Plant logic: Reverse mixed circuit 3-way valve logic 0 --- 0 1
0: DIRECT D R/W
1: REVERSE
Gfc25
Plant control Outlet temp. limits Mix circuit water: Min cooling:
Minimum mixed circuit water outlet temperature limit
12,0 °C 5,0 99,9 A R/W 32
53,5 °F 41,0 211,8
Max heating: Maximum mixed circuit water outlet temperature limit
45 °C 20,0 99,9 A R/W 33
113,0 °F 68,0 211,8
Gfc26
Plant control Diff. valve zone Summer:
Valve activation temperature differential in Cooling (Zone1=Zone2)
1,5 °C 0,0 9,9 A R/W
2,7 °F 0,0 17,8
Winter: Valve activation temperature differential in Heating (Zone1=Zone2)
2,0 °C 0,0 9,9 A R/W
3,6 °F 0,0 178
Gfc27
Plant control Antifreeze alarm setp. Geotherm circ.:
Antifreeze alarm set point, ground source circuit 4,0 °C -99,9 99,9
A R 39,0 °F -147,8 211,8
Geothermal antifreeze alarm diff.: Antifreeze alarm differential, ground source circuit
3,0 °C 0,0 99,9 A R
5,5 °F 0,0 179,8
Gfc28 Plant control Reset antifreeze alarm Geotherm circ.:
Type of antifreeze alarm reset, ground source circuit
1 --- 0 1 0: AUTO
D R 1: MANUAL
Gfc29
Plant control Setpoint geo pump Summer:
Cooling control set point for the modulating ground source pump
35,0 °C -99,9 99,9 A R/W
95,0 °F -147,8 211,8
Winter: Heating control set point for the modulating ground source pump
6,5 °C -99,9 99,9 A R/W
44,0 °F -147,8 211,8
Gfc30
Plant control Working band in cooling for the modulating ground source pump
3,0 °C 0,0 9,9 A R/W
Band geo pump Summer: 5,5 °F 0,0 17,8
Winter: Working band in heating for the modulating ground source pump
3,0 °C 0,0 9,9 A R/W
5,5 °F 0,0 17,8
Gfc31
Plant control System antifreeze alarm set point
4,0 °C -99,9 99,9 A R
System antifreeze alarm setp.: 39,0 °F -147,8 211,8
System antifreeze alarm diff.: System antifreeze alarm activation differential 3,0 °C 0,0 99,9
A R 5,5 °F 0,0 179,8
Gfc32 Plant control
Type of system antifreeze alarm reset 1 --- 0 1 0: AUTO
D R/W Reset antifreeze alarm system side: 1: MANUAL
Gfc33 Plant control
Activate primary circuit pump 1 --- 0 1 0: ON UNIT
D R/W Activate pump in system circuit: 1: ON REQUEST
Gfc34 Plant control
Enable modulating DHW 3 way mixing valve 0 --- 0 1 0: NO
D R/W Enable 3 way DHW: 1: YES
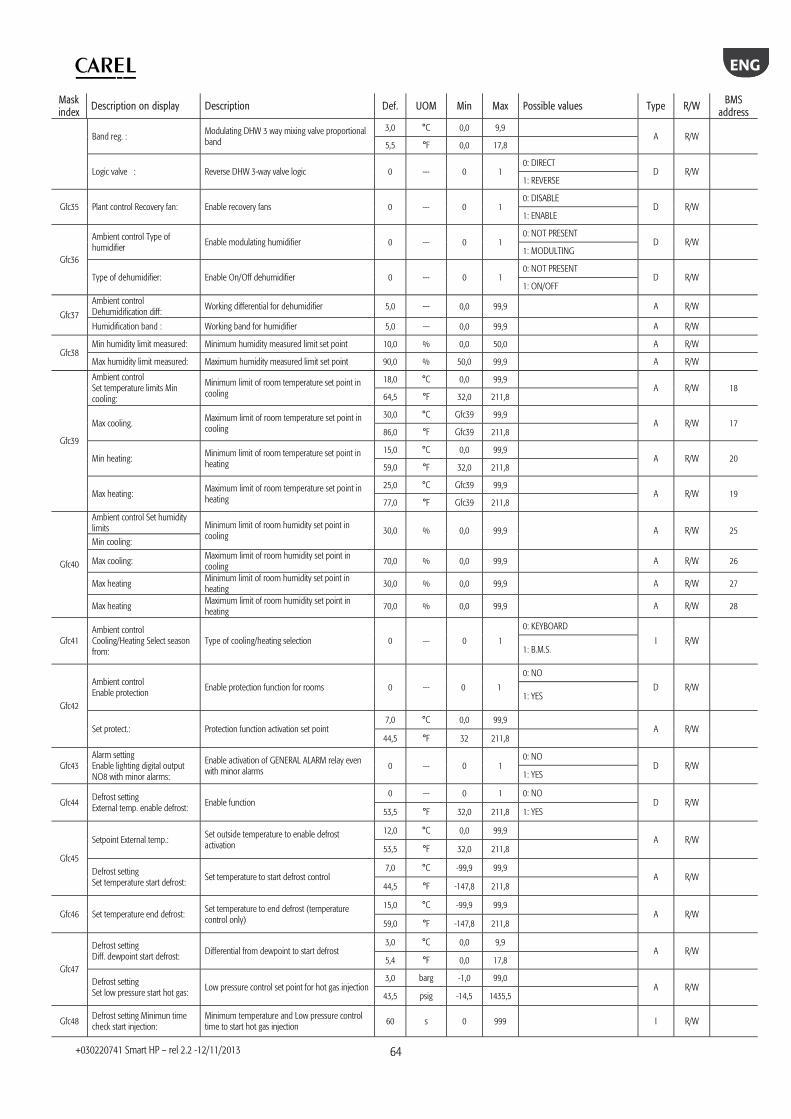
ENG
+030220741 Smart HP – rel 2.2 -12/11/2013
64
Mask index
Description on display Description Def. UOM Min Max Possible values Type R/W BMS address
Band reg. : Modulating DHW 3 way mixing valve proportional band
3,0 °C 0,0 9,9 A R/W
5,5 °F 0,0 17,8
Logic valve : Reverse DHW 3-way valve logic 0 --- 0 1 0: DIRECT
D R/W 1: REVERSE
Gfc35 Plant control Recovery fan: Enable recovery fans 0 --- 0 1 0: DISABLE
D R/W 1: ENABLE
Gfc36
Ambient control Type of humidifier Enable modulating humidifier 0 --- 0 1
0: NOT PRESENT D R/W
1: MODULTING
Type of dehumidifier: Enable On/Off dehumidifier 0 --- 0 1 0: NOT PRESENT
D R/W 1: ON/OFF
Gfc37
Ambient control Dehumidification diff:
Working differential for dehumidifier 5,0 --- 0,0 99,9 A R/W
Humidification band : Working band for humidifier 5,0 --- 0,0 99,9 A R/W
Gfc38 Min humidity limit measured: Minimum humidity measured limit set point 10,0 % 0,0 50,0 A R/W
Max humidity limit measured: Maximum humidity measured limit set point 90,0 % 50,0 99,9 A R/W
Gfc39
Ambient control Set temperature limits Min cooling:
Minimum limit of room temperature set point in cooling
18,0 °C 0,0 99,9 A R/W 18
64,5 °F 32,0 211,8
Max cooling. Maximum limit of room temperature set point in cooling
30,0 °C Gfc39 99,9 A R/W 17
86,0 °F Gfc39 211,8
Min heating: Minimum limit of room temperature set point in heating
15,0 °C 0,0 99,9 A R/W 20
59,0 °F 32,0 211,8
Max heating: Maximum limit of room temperature set point in heating
25,0 °C Gfc39 99,9 A R/W 19
77,0 °F Gfc39 211,8
Gfc40
Ambient control Set humidity limits Minimum limit of room humidity set point in
cooling 30,0 % 0,0 99,9 A R/W 25 Min cooling:
Max cooling: Maximum limit of room humidity set point in cooling
70,0 % 0,0 99,9 A R/W 26
Max heating Minimum limit of room humidity set point in heating 30,0 % 0,0 99,9 A R/W 27
Max heating Maximum limit of room humidity set point in heating
70,0 % 0,0 99,9 A R/W 28
Gfc41 Ambient control Cooling/Heating Select season from:
Type of cooling/heating selection 0 --- 0 1
0: KEYBOARD
I R/W 1: B.M.S.
Gfc42
Ambient control Enable protection
Enable protection function for rooms 0 --- 0 1
0: NO
D R/W 1: YES
Set protect.: Protection function activation set point 7,0 °C 0,0 99,9
A R/W 44,5 °F 32 211,8
Gfc43 Alarm setting Enable lighting digital output NO8 with minor alarms:
Enable activation of GENERAL ALARM relay even with minor alarms 0 --- 0 1
0: NO D R/W
1: YES
Gfc44 Defrost setting External temp. enable defrost:
Enable function 0 --- 0 1 0: NO
D R/W 53,5 °F 32,0 211,8 1: YES
Gfc45
Setpoint External temp.: Set outside temperature to enable defrost activation
12,0 °C 0,0 99,9 A R/W
53,5 °F 32,0 211,8
Defrost setting Set temperature start defrost:
Set temperature to start defrost control 7,0 °C -99,9 99,9
A R/W 44,5 °F -147,8 211,8
Gfc46 Set temperature end defrost: Set temperature to end defrost (temperature control only)
15,0 °C -99,9 99,9 A R/W
59,0 °F -147,8 211,8
Gfc47
Defrost setting Diff. dewpoint start defrost: Differential from dewpoint to start defrost
3,0 °C 0,0 9,9 A R/W
5,4 °F 0,0 17,8
Defrost setting Set low pressure start hot gas: Low pressure control set point for hot gas injection
3,0 barg -1,0 99,0 A R/W
43,5 psig -14,5 1435,5
Gfc48 Defrost setting Minimun time check start injection:
Minimum temperature and Low pressure control time to start hot gas injection 60 s 0 999 I R/W
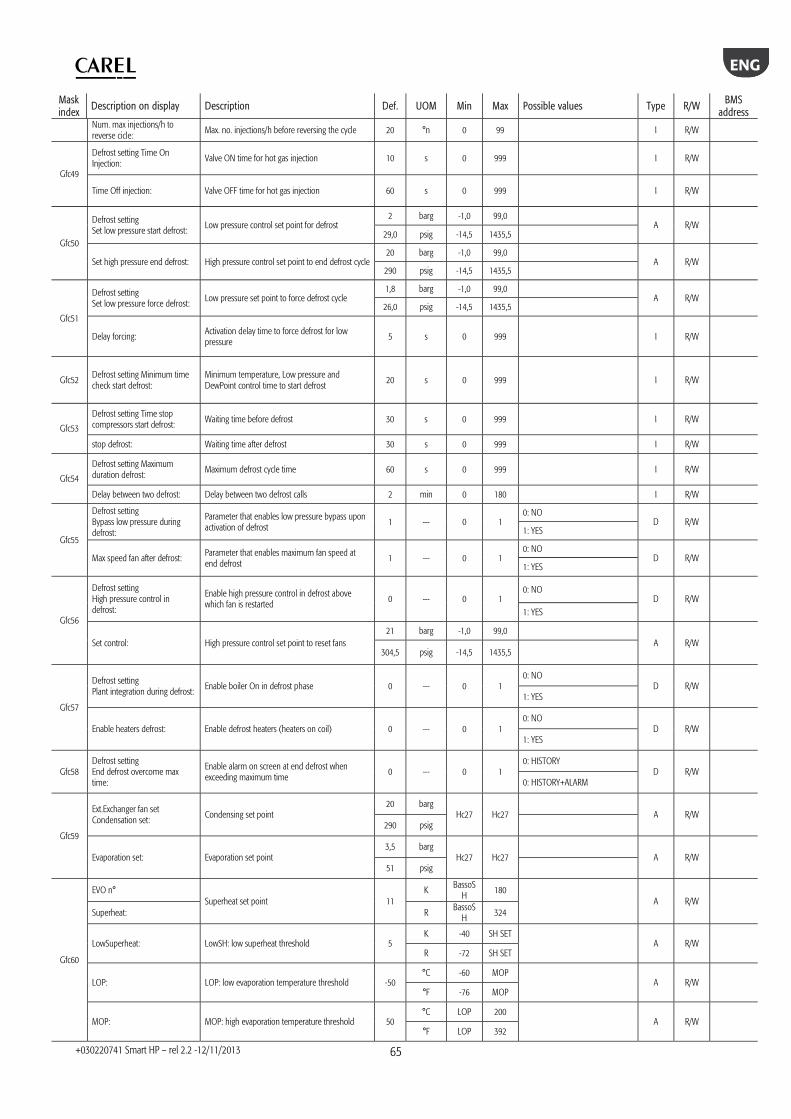
ENG
+030220741 Smart HP – rel 2.2 -12/11/2013
65
Mask index
Description on display Description Def. UOM Min Max Possible values Type R/W BMS address
Num. max injections/h to reverse cicle:
Max. no. injections/h before reversing the cycle 20 °n 0 99 I R/W
Gfc49
Defrost setting Time On Injection: Valve ON time for hot gas injection 10 s 0 999 I R/W
Time Off injection: Valve OFF time for hot gas injection 60 s 0 999 I R/W
Gfc50
Defrost setting Set low pressure start defrost:
Low pressure control set point for defrost 2 barg -1,0 99,0
A R/W 29,0 psig -14,5 1435,5
Set high pressure end defrost: High pressure control set point to end defrost cycle 20 barg -1,0 99,0
A R/W 290 psig -14,5 1435,5
Gfc51
Defrost setting Set low pressure force defrost: Low pressure set point to force defrost cycle
1,8 barg -1,0 99,0 A R/W
26,0 psig -14,5 1435,5
Delay forcing: Activation delay time to force defrost for low pressure
5 s 0 999 I R/W
Gfc52 Defrost setting Minimum time check start defrost:
Minimum temperature, Low pressure and DewPoint control time to start defrost
20 s 0 999 I R/W
Gfc53
Defrost setting Time stop compressors start defrost: Waiting time before defrost 30 s 0 999 I R/W
stop defrost: Waiting time after defrost 30 s 0 999 I R/W
Gfc54
Defrost setting Maximum duration defrost: Maximum defrost cycle time 60 s 0 999 I R/W
Delay between two defrost: Delay between two defrost calls 2 min 0 180 I R/W
Gfc55
Defrost setting Bypass low pressure during defrost:
Parameter that enables low pressure bypass upon activation of defrost
1 --- 0 1 0: NO
D R/W 1: YES
Max speed fan after defrost: Parameter that enables maximum fan speed at end defrost
1 --- 0 1 0: NO
D R/W 1: YES
Gfc56
Defrost setting High pressure control in defrost:
Enable high pressure control in defrost above which fan is restarted 0 --- 0 1
0: NO D R/W
1: YES
Set control: High pressure control set point to reset fans 21 barg -1,0 99,0
A R/W 304,5 psig -14,5 1435,5
Gfc57
Defrost setting Plant integration during defrost:
Enable boiler On in defrost phase 0 --- 0 1 0: NO
D R/W 1: YES
Enable heaters defrost: Enable defrost heaters (heaters on coil) 0 --- 0 1 0: NO
D R/W 1: YES
Gfc58 Defrost setting End defrost overcome max time:
Enable alarm on screen at end defrost when exceeding maximum time
0 --- 0 1 0: HISTORY
D R/W 0: HISTORY+ALARM
Gfc59
Ext.Exchanger fan set Condensation set:
Condensing set point 20 barg
Hc27 Hc27
A R/W 290 psig
Evaporation set: Evaporation set point 3,5 barg
Hc27 Hc27
A R/W 51 psig
Gfc60
EVO n° Superheat set point 11
K BassoSH
180 A R/W
Superheat: R BassoS
H 324
LowSuperheat: LowSH: low superheat threshold 5 K -40 SH SET
A R/W R -72 SH SET
LOP: LOP: low evaporation temperature threshold -50 °C -60 MOP
A R/W °F -76 MOP
MOP: MOP: high evaporation temperature threshold 50 °C LOP 200
A R/W °F LOP 392

ENG
+030220741 Smart HP – rel 2.2 -12/11/2013
66
Mask index
Description on display Description Def. UOM Min Max Possible values Type R/W BMS address
Gfc61 EVO n°
Hot gas bypass temperature set point --- °C -60 200
A R/W Hot gas bypass temp. set.: °F -76 392
Gfc62 EVO n°
Hot gas bypass pressure set point --- barg -20 200
A R/W Hot gas bypass press. set: psig -290 2900
Gfc63 EVO n°
EPR pressure set point --- barg -20 200
A R/W EPR Pressure setpoint: psig -290 2900
Gfc64 EVO n° CO2 pressure set point --- barg -20 200 A R/W
CO2 setpoint: psig -290 2900
Gg01
NO2 Geo circ. pump: Manual ground source pump activation 0 --- 0 1 0: AUT
D R/W 1: MAN
NO3 System pump : Manual system pump activation 0 --- 0 1 0: AUT
D R/W 1: MAN
NO4 DHW circ. pump: Manual DHW pump activation 0 --- 0 1 0: AUT
D R/W 1: MAN
NO5 Mix circ. pump: Manual mixed circuit pump activation 0 --- 0 1 0: AUT
D R/W 1: MAN
Gg02
NO15 Solar pump 1 : Manual solar circuit 1 pump activation 0 --- 0 1 0: AUT
D R/W 1: MAN
NO16 Solar pump 2 : Manual solar circuit 2 pump activation 0 ---
0 1 0: AUT
D R/W 1: MAN
Gg03 Speed motor fan : Manual outside coil fan activation (AW units) 0 --- 0 1
0: AUT D R/W
1: MAN
Request power : Fan power request in manual 0 % 0 100 I R/W
Gg04 Start defrost cycle: Start defrost cycle in manual (AW units) 0 --- 0 1 0: NO
D R/W 1: YES
Gg05
EVO n° Enable manual valve position: Enable manual valve positioning 0 --- 0 1
0: NO D R/W
1: YES
Manual valve position: Manual valve position 0 steps 0 9999 I R/W
Ha01 Unit model Type of unit:
variable to identify water-water unit 1 --- 0 1 0:
D R/W
1: Water/Water Geo unit
variable to identify air-water unit 0 --- 0 1 0:
D R/W
1: Air/Water unit
variable to identify no. of compressors 1 --- 0 1 0: One compressor
D R
1: Two compressors
Type of unit configuration 5 --- 1 10
1: Basic heating
I R/W
2: Heating + DHW
3: Heating + DHW
4: Reversing + DHW
5: Reversing+Driver+DWH
6: Rev.+Driver+DWH+Solar
7: Heating+EVO+DHW
8: Revers.+EVO+DHW
9: Revers.+EVO+DHW
10: Revers.+EVO+DHW+Solar
Ha02 Unit model Electronic valve EVO Enable EVO electronic valve driver 0 --- 0 1 0: NOT PRESENT D R/W
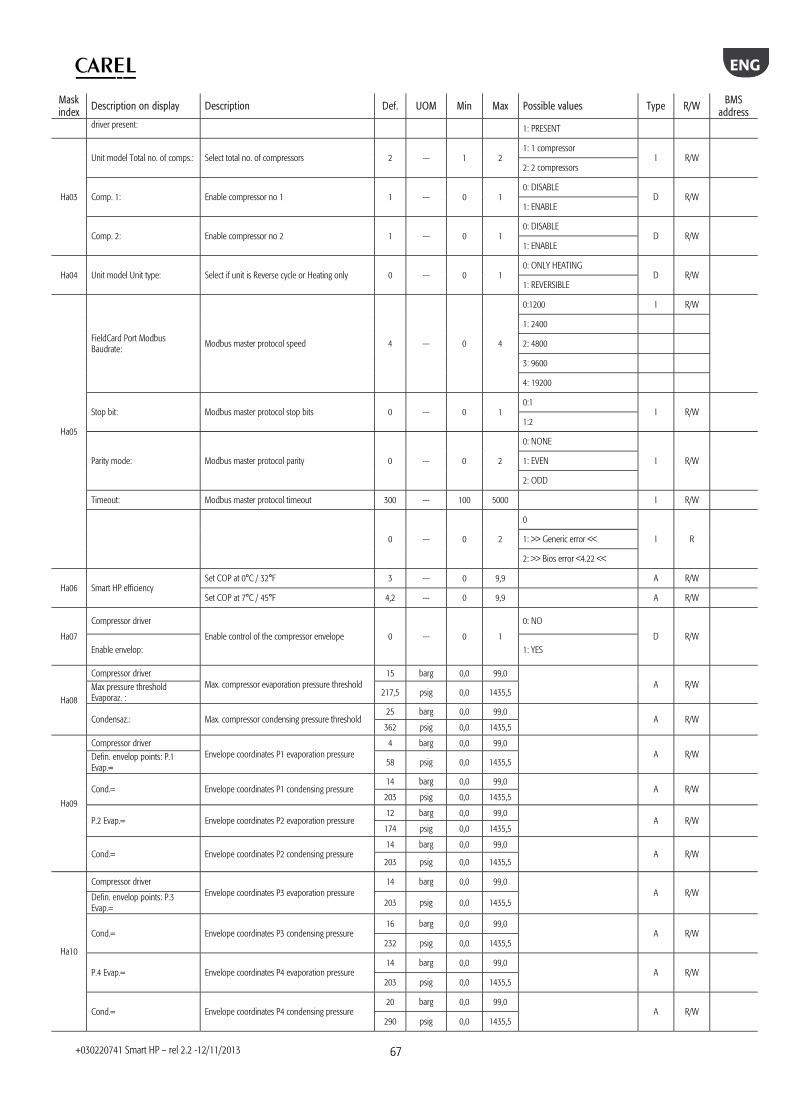
ENG
+030220741 Smart HP – rel 2.2 -12/11/2013
67
Mask index
Description on display Description Def. UOM Min Max Possible values Type R/W BMS address
driver present: 1: PRESENT
Ha03
Unit model Total no. of comps.: Select total no. of compressors 2 --- 1 2 1: 1 compressor
I R/W 2: 2 compressors
Comp. 1: Enable compressor no 1 1 --- 0 1 0: DISABLE
D R/W 1: ENABLE
Comp. 2: Enable compressor no 2 1 --- 0 1 0: DISABLE
D R/W 1: ENABLE
Ha04 Unit model Unit type: Select if unit is Reverse cycle or Heating only 0 --- 0 1 0: ONLY HEATING
D R/W 1: REVERSIBLE
Ha05
FieldCard Port Modbus Baudrate:
Modbus master protocol speed 4 --- 0 4
0:1200 I R/W
1: 2400
2: 4800
3: 9600
4: 19200
Stop bit: Modbus master protocol stop bits 0 --- 0 1 0:1
I R/W 1:2
Parity mode: Modbus master protocol parity 0 --- 0 2
0: NONE
I R/W 1: EVEN
2: ODD
Timeout: Modbus master protocol timeout 300 --- 100 5000 I R/W
0 --- 0 2
0
I R 1: >> Generic error <<
2: >> Bios error <4.22 <<
Ha06 Smart HP efficiency Set COP at 0°C / 32°F 3 --- 0 9,9 A R/W
Set COP at 7°C / 45°F 4,2 --- 0 9,9 A R/W
Ha07
Compressor driver
Enable control of the compressor envelope 0 --- 0 1
0: NO
D R/W Enable envelop: 1: YES
Ha08
Compressor driver Max. compressor evaporation pressure threshold
15 barg 0,0 99,0 A R/W Max pressure threshold
Evaporaz. : 217,5 psig 0,0 1435,5
Condensaz.: Max. compressor condensing pressure threshold 25 barg 0,0 99,0
A R/W 362 psig 0,0 1435,5
Ha09
Compressor driver Envelope coordinates P1 evaporation pressure
4 barg 0,0 99,0 A R/W Defin. envelop points: P.1
Evap.= 58 psig 0,0 1435,5
Cond.= Envelope coordinates P1 condensing pressure 14 barg 0,0 99,0
A R/W 203 psig 0,0 1435,5
P.2 Evap.= Envelope coordinates P2 evaporation pressure 12 barg 0,0 99,0
A R/W 174 psig 0,0 1435,5
Cond.= Envelope coordinates P2 condensing pressure 14 barg 0,0 99,0
A R/W 203 psig 0,0 1435,5
Ha10
Compressor driver Envelope coordinates P3 evaporation pressure
14 barg 0,0 99,0 A R/W Defin. envelop points: P.3
Evap.= 203 psig 0,0 1435,5
Cond.= Envelope coordinates P3 condensing pressure 16 barg 0,0 99,0
A R/W 232 psig 0,0 1435,5
P.4 Evap.= Envelope coordinates P4 evaporation pressure 14 barg 0,0 99,0
A R/W 203 psig 0,0 1435,5
Cond.= Envelope coordinates P4 condensing pressure 20 barg 0,0 99,0
A R/W 290 psig 0,0 1435,5
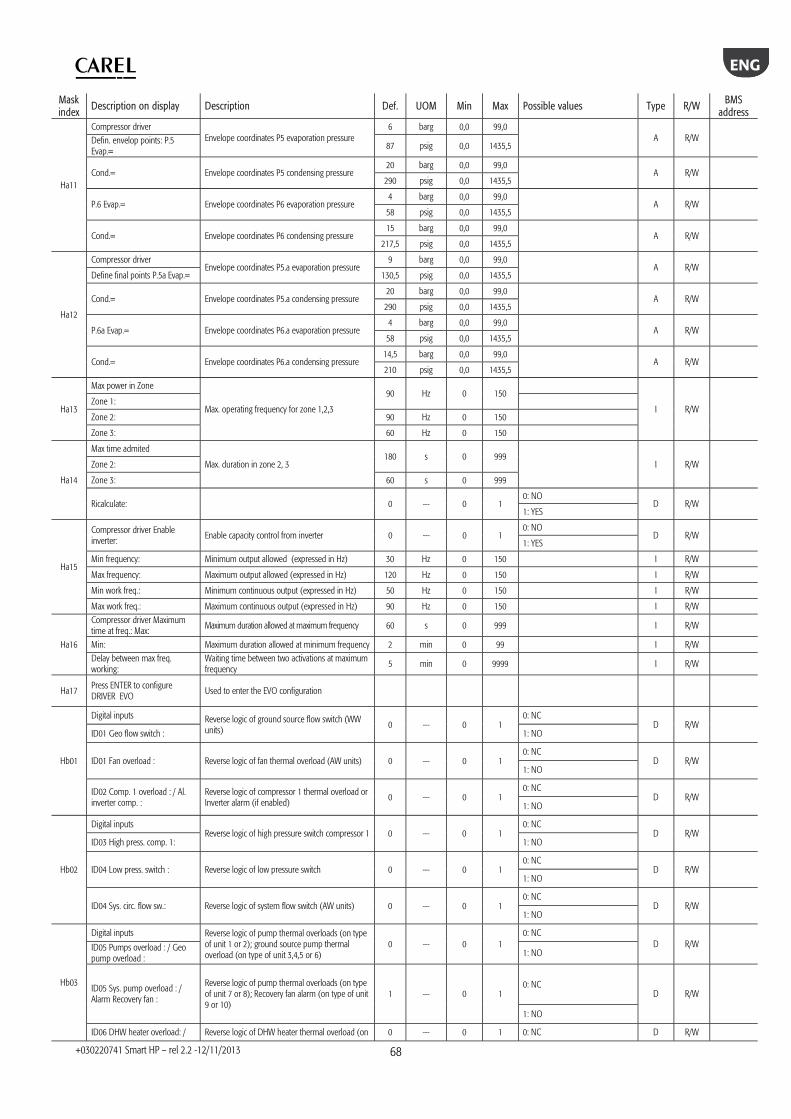
ENG
+030220741 Smart HP – rel 2.2 -12/11/2013
68
Mask index
Description on display Description Def. UOM Min Max Possible values Type R/W BMS address
Ha11
Compressor driver Envelope coordinates P5 evaporation pressure
6 barg 0,0 99,0 A R/W Defin. envelop points: P.5
Evap.= 87 psig 0,0 1435,5
Cond.= Envelope coordinates P5 condensing pressure 20 barg 0,0 99,0
A R/W 290 psig 0,0 1435,5
P.6 Evap.= Envelope coordinates P6 evaporation pressure 4 barg 0,0 99,0
A R/W 58 psig 0,0 1435,5
Cond.= Envelope coordinates P6 condensing pressure 15 barg 0,0 99,0
A R/W 217,5 psig 0,0 1435,5
Ha12
Compressor driver Envelope coordinates P5.a evaporation pressure
9 barg 0,0 99,0 A R/W
Define final points P.5a Evap.= 130,5 psig 0,0 1435,5
Cond.= Envelope coordinates P5.a condensing pressure 20 barg 0,0 99,0
A R/W 290 psig 0,0 1435,5
P.6a Evap.= Envelope coordinates P6.a evaporation pressure 4 barg 0,0 99,0
A R/W 58 psig 0,0 1435,5
Cond.= Envelope coordinates P6.a condensing pressure 14,5 barg 0,0 99,0
A R/W 210 psig 0,0 1435,5
Ha13
Max power in Zone
Max. operating frequency for zone 1,2,3
90 Hz 0 150
I R/W Zone 1:
Zone 2: 90 Hz 0 150
Zone 3: 60 Hz 0 150
Ha14
Max time admited
Max. duration in zone 2, 3 180 s 0 999
I R/W Zone 2:
Zone 3: 60 s 0 999
Ricalculate: 0 --- 0 1 0: NO
D R/W 1: YES
Ha15
Compressor driver Enable inverter: Enable capacity control from inverter 0 --- 0 1
0: NO D R/W
1: YES
Min frequency: Minimum output allowed (expressed in Hz) 30 Hz 0 150 I R/W
Max frequency: Maximum output allowed (expressed in Hz) 120 Hz 0 150 I R/W
Min work freq.: Minimum continuous output (expressed in Hz) 50 Hz 0 150 I R/W
Max work freq.: Maximum continuous output (expressed in Hz) 90 Hz 0 150 I R/W
Ha16
Compressor driver Maximum time at freq.: Max: Maximum duration allowed at maximum frequency 60 s 0 999 I R/W
Min: Maximum duration allowed at minimum frequency 2 min 0 99 I R/W Delay between max freq. working:
Waiting time between two activations at maximum frequency 5 min 0 9999 I R/W
Ha17 Press ENTER to configure DRIVER EVO Used to enter the EVO configuration
Hb01
Digital inputs Reverse logic of ground source flow switch (WW units) 0 --- 0 1
0: NC D R/W
ID01 Geo flow switch : 1: NO
ID01 Fan overload : Reverse logic of fan thermal overload (AW units) 0 --- 0 1 0: NC
D R/W 1: NO
ID02 Comp. 1 overload : / Al. inverter comp. :
Reverse logic of compressor 1 thermal overload or Inverter alarm (if enabled)
0 --- 0 1 0: NC
D R/W 1: NO
Hb02
Digital inputs Reverse logic of high pressure switch compressor 1 0 --- 0 1
0: NC D R/W
ID03 High press. comp. 1: 1: NO
ID04 Low press. switch : Reverse logic of low pressure switch 0 --- 0 1 0: NC
D R/W 1: NO
ID04 Sys. circ. flow sw.: Reverse logic of system flow switch (AW units) 0 --- 0 1 0: NC
D R/W 1: NO
Hb03
Digital inputs Reverse logic of pump thermal overloads (on type of unit 1 or 2); ground source pump thermal overload (on type of unit 3,4,5 or 6)
0 --- 0 1 0: NC
D R/W ID05 Pumps overload : / Geo pump overload : 1: NO
ID05 Sys. pump overload : / Alarm Recovery fan :
Reverse logic of pump thermal overloads (on type of unit 7 or 8); Recovery fan alarm (on type of unit 9 or 10)
1 --- 0 1 0: NC
D R/W
1: NO
ID06 DHW heater overload: / Reverse logic of DHW heater thermal overload (on 0 --- 0 1 0: NC D R/W
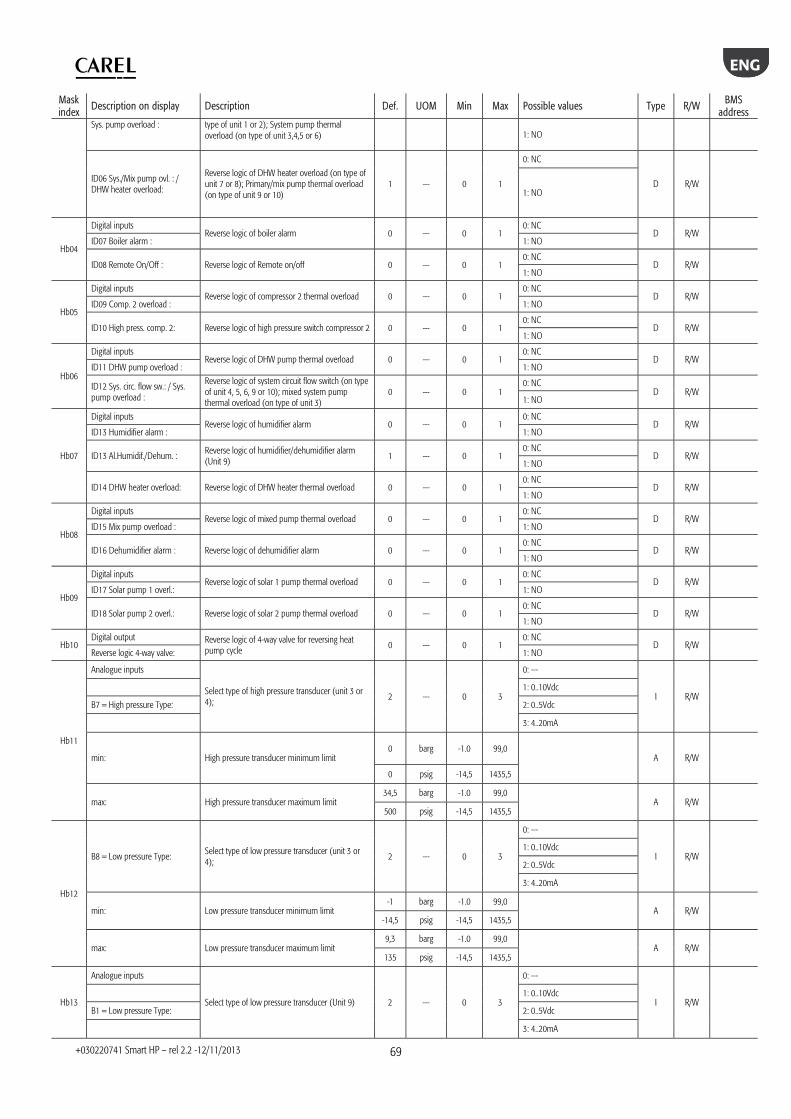
ENG
+030220741 Smart HP – rel 2.2 -12/11/2013
69
Mask index
Description on display Description Def. UOM Min Max Possible values Type R/W BMS address
Sys. pump overload : type of unit 1 or 2); System pump thermal overload (on type of unit 3,4,5 or 6) 1: NO
ID06 Sys./Mix pump ovl. : / DHW heater overload:
Reverse logic of DHW heater overload (on type of unit 7 or 8); Primary/mix pump thermal overload (on type of unit 9 or 10)
1 --- 0 1
0: NC
D R/W 1: NO
Hb04
Digital inputs Reverse logic of boiler alarm 0 --- 0 1
0: NC D R/W
ID07 Boiler alarm : 1: NO
ID08 Remote On/Off : Reverse logic of Remote on/off 0 --- 0 1 0: NC
D R/W 1: NO
Hb05
Digital inputs Reverse logic of compressor 2 thermal overload 0 --- 0 1
0: NC D R/W
ID09 Comp. 2 overload : 1: NO
ID10 High press. comp. 2: Reverse logic of high pressure switch compressor 2 0 --- 0 1 0: NC
D R/W 1: NO
Hb06
Digital inputs Reverse logic of DHW pump thermal overload 0 --- 0 1
0: NC D R/W
ID11 DHW pump overload : 1: NO
ID12 Sys. circ. flow sw.: / Sys. pump overload :
Reverse logic of system circuit flow switch (on type of unit 4, 5, 6, 9 or 10); mixed system pump thermal overload (on type of unit 3)
0 --- 0 1 0: NC
D R/W 1: NO
Hb07
Digital inputs Reverse logic of humidifier alarm 0 --- 0 1
0: NC D R/W
ID13 Humidifier alarm : 1: NO
ID13 Al.Humidif./Dehum. : Reverse logic of humidifier/dehumidifier alarm (Unit 9)
1 --- 0 1 0: NC
D R/W 1: NO
ID14 DHW heater overload: Reverse logic of DHW heater thermal overload 0 --- 0 1 0: NC
D R/W 1: NO
Hb08
Digital inputs Reverse logic of mixed pump thermal overload 0 --- 0 1
0: NC D R/W
ID15 Mix pump overload : 1: NO
ID16 Dehumidifier alarm : Reverse logic of dehumidifier alarm 0 --- 0 1 0: NC
D R/W 1: NO
Hb09
Digital inputs Reverse logic of solar 1 pump thermal overload 0 --- 0 1
0: NC D R/W
ID17 Solar pump 1 overl.: 1: NO
ID18 Solar pump 2 overl.: Reverse logic of solar 2 pump thermal overload 0 --- 0 1 0: NC
D R/W 1: NO
Hb10 Digital output Reverse logic of 4-way valve for reversing heat
pump cycle 0 --- 0 1
0: NC D R/W
Reverse logic 4-way valve: 1: NO
Hb11
Analogue inputs
Select type of high pressure transducer (unit 3 or 4); 2 --- 0 3
0: ---
I R/W 1: 0..10Vdc
B7 = High pressure Type: 2: 0..5Vdc
3: 4..20mA
min: High pressure transducer minimum limit 0 barg -1.0 99,0
A R/W
0 psig -14,5 1435,5
max: High pressure transducer maximum limit 34,5 barg -1.0 99,0
A R/W 500 psig -14,5 1435,5
Hb12
B8 = Low pressure Type: Select type of low pressure transducer (unit 3 or 4);
2 --- 0 3
0: ---
I R/W 1: 0..10Vdc
2: 0..5Vdc
3: 4..20mA
min: Low pressure transducer minimum limit -1 barg -1.0 99,0
A R/W -14,5 psig -14,5 1435,5
max: Low pressure transducer maximum limit 9,3 barg -1.0 99,0
A R/W 135 psig -14,5 1435,5
Hb13
Analogue inputs
Select type of low pressure transducer (Unit 9) 2 --- 0 3
0: ---
I R/W 1: 0..10Vdc
B1 = Low pressure Type: 2: 0..5Vdc
3: 4..20mA
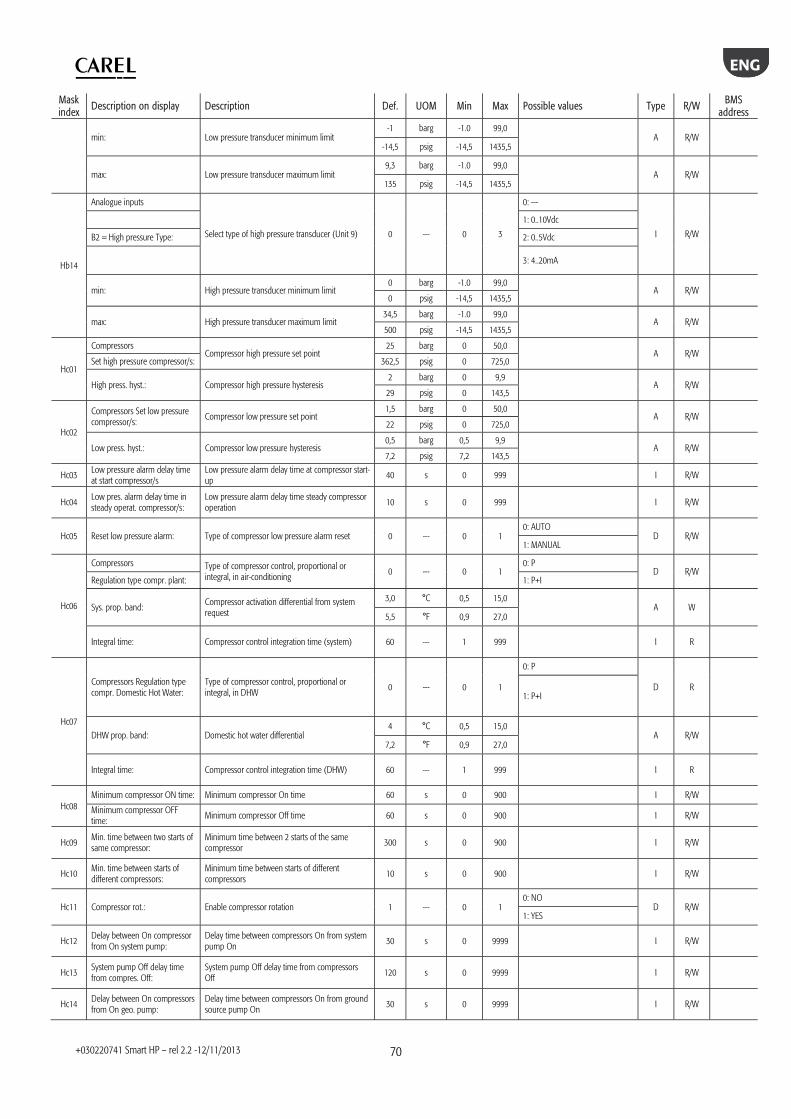
ENG
+030220741 Smart HP – rel 2.2 -12/11/2013
70
Mask index
Description on display Description Def. UOM Min Max Possible values Type R/W BMS address
min: Low pressure transducer minimum limit -1 barg -1.0 99,0
A R/W -14,5 psig -14,5 1435,5
max: Low pressure transducer maximum limit 9,3 barg -1.0 99,0
A R/W 135 psig -14,5 1435,5
Hb14
Analogue inputs
Select type of high pressure transducer (Unit 9) 0 --- 0 3
0: ---
I R/W
1: 0..10Vdc
B2 = High pressure Type: 2: 0..5Vdc
3: 4..20mA
min: High pressure transducer minimum limit 0 barg -1.0 99,0
A R/W 0 psig -14,5 1435,5
max: High pressure transducer maximum limit 34,5 barg -1.0 99,0
A R/W 500 psig -14,5 1435,5
Hc01
Compressors Compressor high pressure set point
25 barg 0 50,0 A R/W
Set high pressure compressor/s: 362,5 psig 0 725,0
High press. hyst.: Compressor high pressure hysteresis 2 barg 0 9,9
A R/W 29 psig 0 143,5
Hc02
Compressors Set low pressure compressor/s:
Compressor low pressure set point 1,5 barg 0 50,0
A R/W 22 psig 0 725,0
Low press. hyst.: Compressor low pressure hysteresis 0,5 barg 0,5 9,9
A R/W 7,2 psig 7,2 143,5
Hc03 Low pressure alarm delay time at start compressor/s
Low pressure alarm delay time at compressor start-up
40 s 0 999 I R/W
Hc04 Low pres. alarm delay time in steady operat. compressor/s:
Low pressure alarm delay time steady compressor operation
10 s 0 999 I R/W
Hc05 Reset low pressure alarm: Type of compressor low pressure alarm reset 0 --- 0 1 0: AUTO
D R/W 1: MANUAL
Hc06
Compressors Type of compressor control, proportional or integral, in air-conditioning 0 --- 0 1
0: P D R/W
Regulation type compr. plant: 1: P+I
Sys. prop. band: Compressor activation differential from system request
3,0 °C 0,5 15,0 A W
5,5 °F 0,9 27,0
Integral time: Compressor control integration time (system) 60 --- 1 999 I R
Hc07
Compressors Regulation type compr. Domestic Hot Water:
Type of compressor control, proportional or integral, in DHW
0 --- 0 1
0: P
D R 1: P+I
DHW prop. band: Domestic hot water differential 4 °C 0,5 15,0
A R/W 7,2 °F 0,9 27,0
Integral time: Compressor control integration time (DHW) 60 --- 1 999 I R
Hc08 Minimum compressor ON time: Minimum compressor On time 60 s 0 900 I R/W
Minimum compressor OFF time:
Minimum compressor Off time 60 s 0 900 I R/W
Hc09 Min. time between two starts of same compressor:
Minimum time between 2 starts of the same compressor
300 s 0 900 I R/W
Hc10 Min. time between starts of different compressors:
Minimum time between starts of different compressors
10 s 0 900 I R/W
Hc11 Compressor rot.: Enable compressor rotation 1 --- 0 1 0: NO
D R/W 1: YES
Hc12 Delay between On compressor from On system pump:
Delay time between compressors On from system pump On 30 s 0 9999 I R/W
Hc13 System pump Off delay time from compres. Off:
System pump Off delay time from compressors Off 120 s 0 9999 I R/W
Hc14 Delay between On compressors from On geo. pump:
Delay time between compressors On from ground source pump On
30 s 0 9999 I R/W
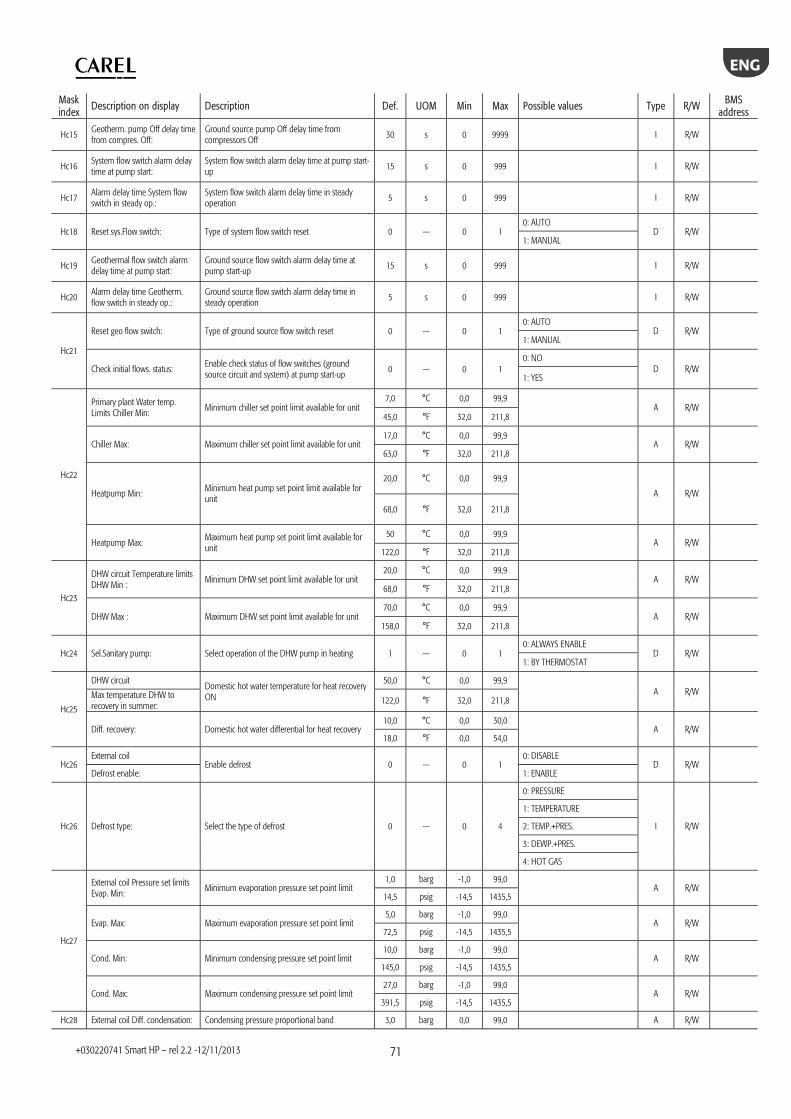
ENG
+030220741 Smart HP – rel 2.2 -12/11/2013
71
Mask index
Description on display Description Def. UOM Min Max Possible values Type R/W BMS address
Hc15 Geotherm. pump Off delay time from compres. Off:
Ground source pump Off delay time from compressors Off 30 s 0 9999 I R/W
Hc16 System flow switch alarm delay time at pump start:
System flow switch alarm delay time at pump start-up 15 s 0 999 I R/W
Hc17 Alarm delay time System flow switch in steady op.:
System flow switch alarm delay time in steady operation
5 s 0 999 I R/W
Hc18 Reset sys.Flow switch: Type of system flow switch reset 0 --- 0 1 0: AUTO
D R/W 1: MANUAL
Hc19 Geothermal flow switch alarm delay time at pump start:
Ground source flow switch alarm delay time at pump start-up
15 s 0 999 I R/W
Hc20 Alarm delay time Geotherm. flow switch in steady op.:
Ground source flow switch alarm delay time in steady operation
5 s 0 999 I R/W
Hc21
Reset geo flow switch: Type of ground source flow switch reset 0 --- 0 1 0: AUTO
D R/W 1: MANUAL
Check initial flows. status: Enable check status of flow switches (ground source circuit and system) at pump start-up
0 --- 0 1 0: NO
D R/W 1: YES
Hc22
Primary plant Water temp. Limits Chiller Min:
Minimum chiller set point limit available for unit 7,0 °C 0,0 99,9
A R/W 45,0 °F 32,0 211,8
Chiller Max: Maximum chiller set point limit available for unit 17,0 °C 0,0 99,9
A R/W 63,0 °F 32,0 211,8
Heatpump Min: Minimum heat pump set point limit available for unit
20,0 °C 0,0 99,9
A R/W
68,0 °F 32,0 211,8
Heatpump Max: Maximum heat pump set point limit available for unit
50 °C 0,0 99,9 A R/W
122,0 °F 32,0 211,8
Hc23
DHW circuit Temperature limits DHW Min :
Minimum DHW set point limit available for unit 20,0 °C 0,0 99,9
A R/W 68,0 °F 32,0 211,8
DHW Max : Maximum DHW set point limit available for unit 70,0 °C 0,0 99,9
A R/W 158,0 °F 32,0 211,8
Hc24 Sel.Sanitary pump: Select operation of the DHW pump in heating 1 --- 0 1 0: ALWAYS ENABLE
D R/W 1: BY THERMOSTAT
Hc25
DHW circuit Domestic hot water temperature for heat recovery ON
50,0 °C 0,0 99,9 A R/W Max temperature DHW to
recovery in summer: 122,0 °F 32,0 211,8
Diff. recovery: Domestic hot water differential for heat recovery 10,0 °C 0,0 30,0
A R/W 18,0 °F 0,0 54,0
Hc26 External coil
Enable defrost 0 --- 0 1 0: DISABLE
D R/W Defrost enable: 1: ENABLE
Hc26 Defrost type: Select the type of defrost 0 --- 0 4
0: PRESSURE
I R/W
1: TEMPERATURE
2: TEMP.+PRES.
3: DEWP.+PRES.
4: HOT GAS
Hc27
External coil Pressure set limits Evap. Min:
Minimum evaporation pressure set point limit 1,0 barg -1,0 99,0
A R/W 14,5 psig -14,5 1435,5
Evap. Max: Maximum evaporation pressure set point limit 5,0 barg -1,0 99,0
A R/W 72,5 psig -14,5 1435,5
Cond. Min: Minimum condensing pressure set point limit 10,0 barg -1,0 99,0
A R/W 145,0 psig -14,5 1435,5
Cond. Max: Maximum condensing pressure set point limit 27,0 barg -1,0 99,0
A R/W 391,5 psig -14,5 1435,5
Hc28 External coil Diff. condensation: Condensing pressure proportional band 3,0 barg 0,0 99,0 A R/W
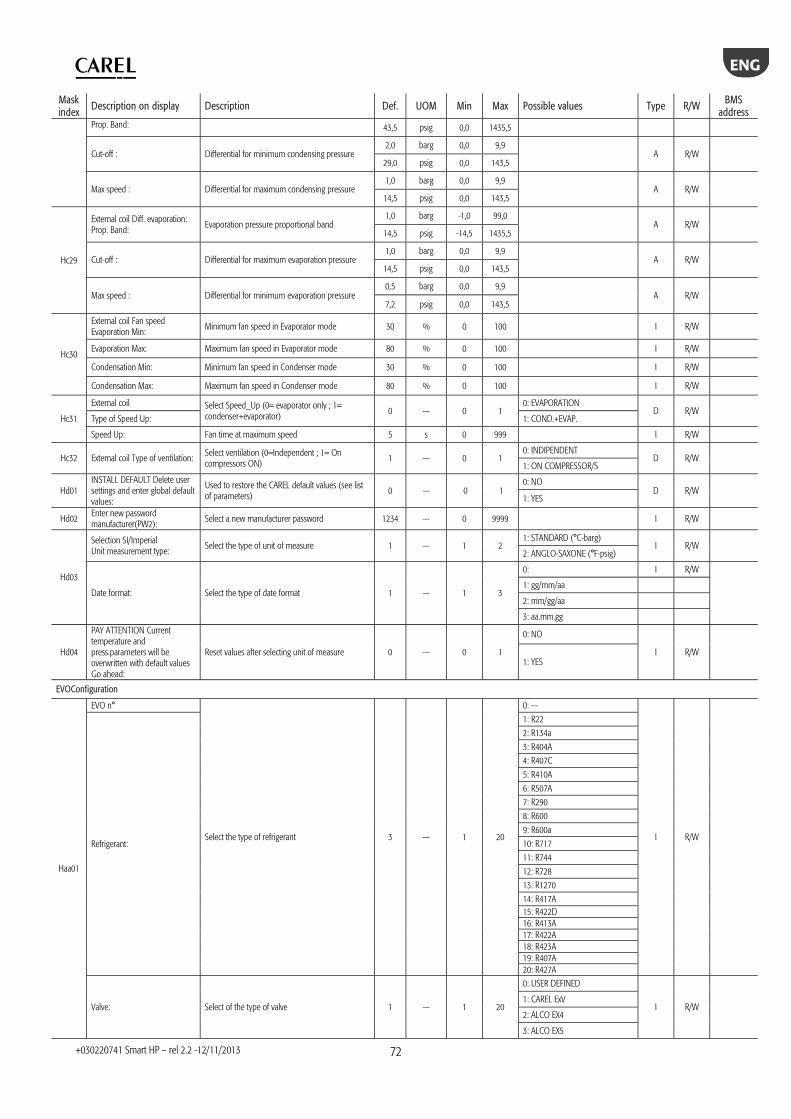
ENG
+030220741 Smart HP – rel 2.2 -12/11/2013
72
Mask index
Description on display Description Def. UOM Min Max Possible values Type R/W BMS address
Prop. Band: 43,5 psig 0,0 1435,5
Cut-off : Differential for minimum condensing pressure 2,0 barg 0,0 9,9
A R/W 29,0 psig 0,0 143,5
Max speed : Differential for maximum condensing pressure 1,0 barg 0,0 9,9
A R/W 14,5 psig 0,0 143,5
Hc29
External coil Diff. evaporation: Prop. Band: Evaporation pressure proportional band
1,0 barg -1,0 99,0 A R/W
14,5 psig -14,5 1435,5
Cut-off : Differential for maximum evaporation pressure 1,0 barg 0,0 9,9
A R/W 14,5 psig 0,0 143,5
Max speed : Differential for minimum evaporation pressure 0,5 barg 0,0 9,9
A R/W 7,2 psig 0,0 143,5
Hc30
External coil Fan speed Evaporation Min: Minimum fan speed in Evaporator mode 30 % 0 100 I R/W
Evaporation Max: Maximum fan speed in Evaporator mode 80 % 0 100 I R/W
Condensation Min: Minimum fan speed in Condenser mode 30 % 0 100 I R/W
Condensation Max: Maximum fan speed in Condenser mode 80 % 0 100 I R/W
Hc31
External coil Select Speed_Up (0= evaporator only ; 1= condenser+evaporator) 0 --- 0 1
0: EVAPORATION D R/W
Type of Speed Up: 1: COND.+EVAP.
Speed Up: Fan time at maximum speed 5 s 0 999 I R/W
Hc32 External coil Type of ventilation: Select ventilation (0=Independent ; 1= On compressors ON)
1 --- 0 1 0: INDIPENDENT
D R/W 1: ON COMPRESSOR/S
Hd01 INSTALL DEFAULT Delete user settings and enter global default values:
Used to restore the CAREL default values (see list of parameters) 0 --- 0 1
0: NO D R/W
1: YES
Hd02 Enter new password manufacturer(PW2): Select a new manufacturer password 1234 --- 0 9999 I R/W
Hd03
Selection SI/Imperial Unit measurement type:
Select the type of unit of measure 1 --- 1 2 1: STANDARD (°C-barg)
I R/W 2: ANGLO-SAXONE (°F-psig)
Date format: Select the type of date format 1 --- 1 3
0: I R/W
1: gg/mm/aa
2: mm/gg/aa
3: aa.mm.gg
Hd04
PAY ATTENTION Current temperature and press.parameters will be overwritten with default values Go ahead:
Reset values after selecting unit of measure 0 --- 0 1
0: NO
I R/W 1: YES
EVOConfiguration
Haa01
EVO n°
Select the type of refrigerant 3 --- 1 20
0: ---
I R/W Refrigerant:
1: R22
2: R134a
3: R404A
4: R407C
5: R410A
6: R507A
7: R290
8: R600
9: R600a
10: R717
11: R744
12: R728
13: R1270
14: R417A 15: R422D 16: R413A 17: R422A 18: R423A 19: R407A 20: R427A
Valve: Select of the type of valve 1 --- 1 20
0: USER DEFINED
I R/W 1: CAREL ExV
2: ALCO EX4
3: ALCO EX5
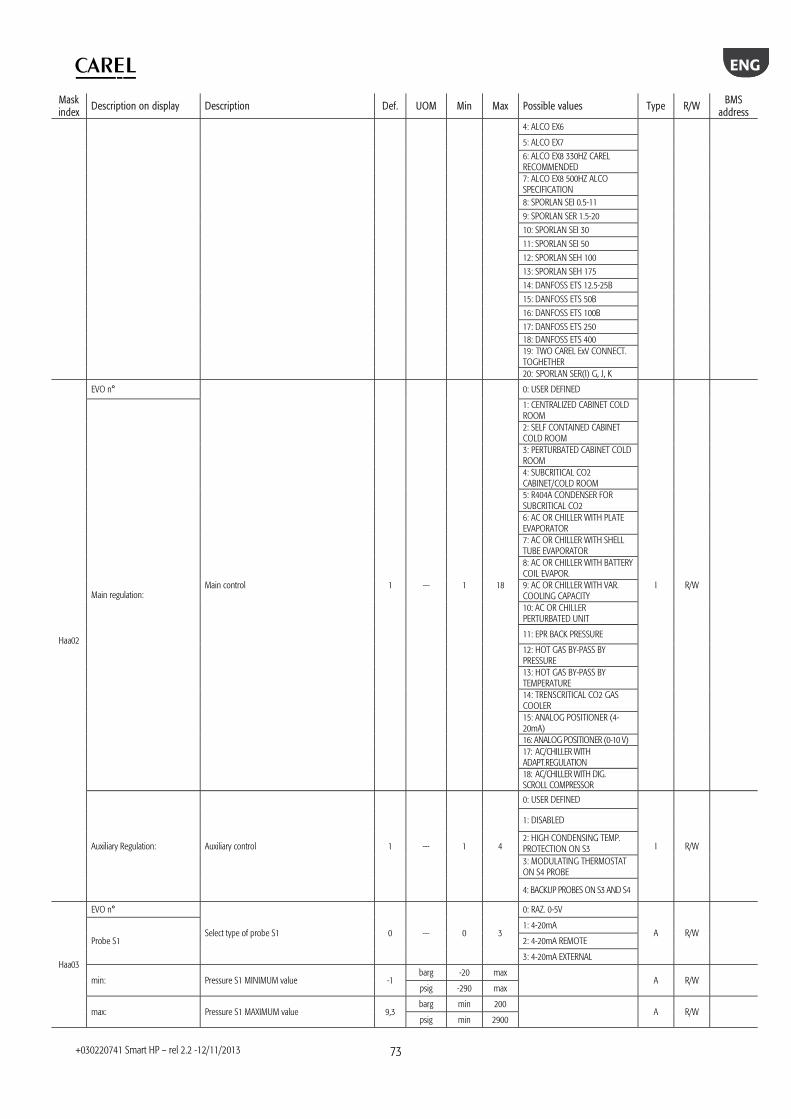
ENG
+030220741 Smart HP – rel 2.2 -12/11/2013
73
Mask index
Description on display Description Def. UOM Min Max Possible values Type R/W BMS address
4: ALCO EX6
5: ALCO EX7
6: ALCO EX8 330HZ CAREL RECOMMENDED 7: ALCO EX8 500HZ ALCO SPECIFICATION 8: SPORLAN SEI 0.5-11
9: SPORLAN SER 1.5-20
10: SPORLAN SEI 30
11: SPORLAN SEI 50
12: SPORLAN SEH 100
13: SPORLAN SEH 175
14: DANFOSS ETS 12.5-25B
15: DANFOSS ETS 50B
16: DANFOSS ETS 100B
17: DANFOSS ETS 250 18: DANFOSS ETS 400 19: TWO CAREL ExV CONNECT. TOGHETHER 20: SPORLAN SER(I) G, J, K
Haa02
EVO n°
Main control 1 --- 1 18
0: USER DEFINED
I R/W Main regulation:
1: CENTRALIZED CABINET COLD ROOM 2: SELF CONTAINED CABINET COLD ROOM 3: PERTURBATED CABINET COLD ROOM 4: SUBCRITICAL CO2 CABINET/COLD ROOM 5: R404A CONDENSER FOR SUBCRITICAL CO2 6: AC OR CHILLER WITH PLATE EVAPORATOR 7: AC OR CHILLER WITH SHELL TUBE EVAPORATOR 8: AC OR CHILLER WITH BATTERY COIL EVAPOR. 9: AC OR CHILLER WITH VAR. COOLING CAPACITY 10: AC OR CHILLER PERTURBATED UNIT
11: EPR BACK PRESSURE
12: HOT GAS BY-PASS BY PRESSURE 13: HOT GAS BY-PASS BY TEMPERATURE 14: TRENSCRITICAL CO2 GAS COOLER 15: ANALOG POSITIONER (4-20mA) 16: ANALOG POSITIONER (0-10 V) 17: AC/CHILLER WITH ADAPT.REGULATION 18: AC/CHILLER WITH DIG. SCROLL COMPRESSOR
Auxiliary Regulation: Auxiliary control 1 --- 1 4
0: USER DEFINED
I R/W
1: DISABLED
2: HIGH CONDENSING TEMP. PROTECTION ON S3 3: MODULATING THERMOSTAT ON S4 PROBE
4: BACKUP PROBES ON S3 AND S4
Haa03
EVO n°
Select type of probe S1 0 --- 0 3
0: RAZ. 0-5V
A R/W Probe S1
1: 4-20mA
2: 4-20mA REMOTE
3: 4-20mA EXTERNAL
min: Pressure S1 MINIMUM value -1 barg -20 max
A R/W psig -290 max
max: Pressure S1 MAXIMUM value 9,3 barg min 200
A R/W psig min 2900

ENG
+030220741 Smart HP – rel 2.2 -12/11/2013
74
Mask index
Description on display Description Def. UOM Min Max Possible values Type R/W BMS address
Al. min: - Pressure S1 MINIMUM alarm value -1 barg -20 Al. Max
A R/W psig -290 Al. Max
Al. max: - Pressure S1 MAXIMUM alarm value 9,3 barg Al. Min 200
A R/W psig Al. Min 2900
Haa04
EVO n°
Select type of probe S2 0 --- 0 3
0: NTC CAREL
A R/W Probe S2
1: CAREL NTC-HT
2: NTC SPKP**T0
3: 0-10V EXT. SIGNAL
Temp. min: S2 temperature: MINIMUM alarm value -50 °C -60 Temp.
Max A R/W
°F -76 Temp. Max
Temp. max: S2 temperature: MAXIMUM alarm value 105 °C Temp.
Min 200
A R/W °F
Temp. Min 392
Haa05
EVO n°
Select type of probe S3 0 --- 0 3
0: RAZ. 0-5V
A R/W Probe S3
1: 4-20mA
2: 4-20mA REMOTE
3: 4-20mA EXTERNAL
min: Pressure S3 MINIMUM value -1 barg -20 max
A R/W psig -290 max
max: Pressure S3 MAXIMUM value 9,3 barg min 200
A R/W psig min 2900
Al. min: - Pressure S3 MINIMUM alarm value -1 barg -20 Al. Max
A R/W psig -290 Al. Max
Al. max: - Pressure S3 MAXIMUM alarm value 9,3 barg Al. Min 200
A R/W psig Al. Min 2900
Haa06
EVO n°
Select type of probe S4 0 --- 0 2
0: NTC CAREL
A R/W Probe S4
1: CAREL NTC-HT
2: NTC SPKP**T0
Min temp.: S4 temperature: MINIMUM alarm value -50 °C -60
Max temp.
A R/W °F -76 Max
temp.
Max temp.: S4 temperature: MAXIMUM alarm value 105 °C
Min temp. 392
A R/W °F Min
temp. 200
Haa07
EVO n°
Relay output configuration 2 --- 1 4
0: ---
I R/W Relè config.:
1: DISABLED
2: ALARM RELAY
3: SOLENOID VALVE RELAY
4: VALVE + ALARM RELAY
DI2 configuration: Digital input ID2 configuration 0 --- 1 3
0: ---
I R/W 1: DISABLED
2: VALVE REGULATION OPT. AFTER DEFROST 3: BATTERY ALARM MNG.
Haa08
EVO n°
Probe S1: alarm management 3 --- 1 4
0: USER DEFINED
I R/W S1 probe alarm manag.
1: NO ACTION
2: VALVE FORCED CLOSED
3: VALVE AT FIXED POS.
4: USE BACKUP S3
S2 probe alarm manag. Probe S2: alarm management 3 --- 1 4
0: USER DEFINED
I R/W
1: NO ACTION
2: VALVE FORCED CLOSED
3: VALVE AT FIXED POS.
4: USE BACKUP S4
Haa09 EVO n° Probe S3: alarm management 1 --- 1 3 0: --- I R/W
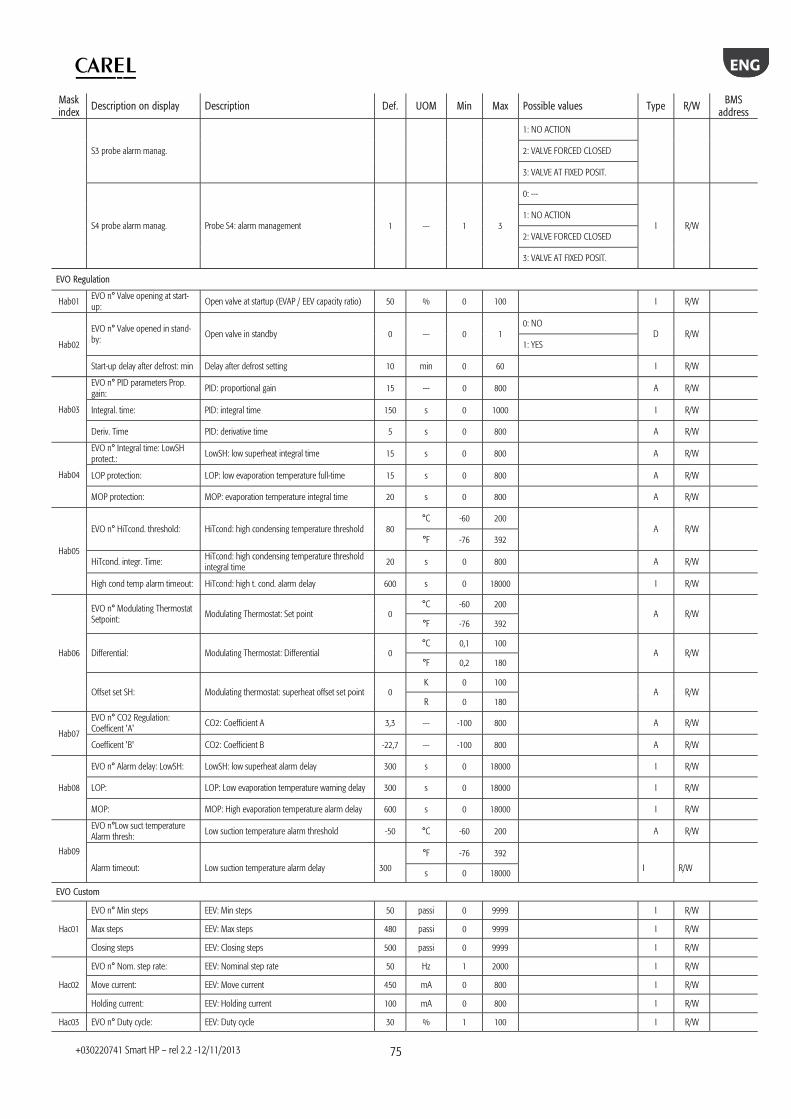
ENG
+030220741 Smart HP – rel 2.2 -12/11/2013
75
Mask index
Description on display Description Def. UOM Min Max Possible values Type R/W BMS address
S3 probe alarm manag.
1: NO ACTION
2: VALVE FORCED CLOSED
3: VALVE AT FIXED POSIT.
S4 probe alarm manag. Probe S4: alarm management 1 --- 1 3
0: ---
I R/W 1: NO ACTION
2: VALVE FORCED CLOSED
3: VALVE AT FIXED POSIT.
EVO Regulation
Hab01 EVO n° Valve opening at start-up: Open valve at startup (EVAP / EEV capacity ratio) 50 % 0 100 I R/W
Hab02
EVO n° Valve opened in stand-by:
Open valve in standby 0 --- 0 1 0: NO
D R/W 1: YES
Start-up delay after defrost: min Delay after defrost setting 10 min 0 60 I R/W
Hab03
EVO n° PID parameters Prop. gain:
PID: proportional gain 15 --- 0 800 A R/W
Integral. time: PID: integral time 150 s 0 1000 I R/W
Deriv. Time PID: derivative time 5 s 0 800 A R/W
Hab04
EVO n° Integral time: LowSH protect.:
LowSH: low superheat integral time 15 s 0 800 A R/W
LOP protection: LOP: low evaporation temperature full-time 15 s 0 800 A R/W
MOP protection: MOP: evaporation temperature integral time 20 s 0 800 A R/W
Hab05
EVO n° HiTcond. threshold: HiTcond: high condensing temperature threshold 80 °C -60 200
A R/W °F -76 392
HiTcond. integr. Time: HiTcond: high condensing temperature threshold integral time
20 s 0 800 A R/W
High cond temp alarm timeout: HiTcond: high t. cond. alarm delay 600 s 0 18000 I R/W
Hab06
EVO n° Modulating Thermostat Setpoint: Modulating Thermostat: Set point 0
°C -60 200 A R/W
°F -76 392
Differential: Modulating Thermostat: Differential 0 °C 0,1 100
A R/W °F 0,2 180
Offset set SH: Modulating thermostat: superheat offset set point 0 K 0 100
A R/W R 0 180
Hab07
EVO n° CO2 Regulation: Coefficent 'A'
CO2: Coefficient A 3,3 --- -100 800 A R/W
Coefficent 'B' CO2: Coefficient B -22,7 --- -100 800 A R/W
Hab08
EVO n° Alarm delay: LowSH: LowSH: low superheat alarm delay 300 s 0 18000 I R/W
LOP: LOP: Low evaporation temperature warning delay 300 s 0 18000 I R/W
MOP: MOP: High evaporation temperature alarm delay 600 s 0 18000 I R/W
Hab09
EVO n°Low suct temperature Alarm thresh: Low suction temperature alarm threshold -50 °C -60 200 A R/W
Alarm timeout:
Low suction temperature alarm delay
300
°F -76 392
I
R/W
s 0 18000
EVO Custom
Hac01
EVO n° Min steps EEV: Min steps 50 passi 0 9999 I R/W
Max steps EEV: Max steps 480 passi 0 9999 I R/W
Closing steps EEV: Closing steps 500 passi 0 9999 I R/W
Hac02
EVO n° Nom. step rate: EEV: Nominal step rate 50 Hz 1 2000 I R/W
Move current: EEV: Move current 450 mA 0 800 I R/W
Holding current: EEV: Holding current 100 mA 0 800 I R/W
Hac03 EVO n° Duty cycle: EEV: Duty cycle 30 % 1 100 I R/W

ENG
+030220741 Smart HP – rel 2.2 -12/11/2013
76
Mask index
Description on display Description Def. UOM Min Max Possible values Type R/W BMS address
Opening synchroniz: Synchronise valve opening position 1 --- 0 1 0: NO
D R/W 1: YES
Closing synchroniz: Synchronise valve closing position 1 --- 0 1 0: NO
D R/W 1: YES
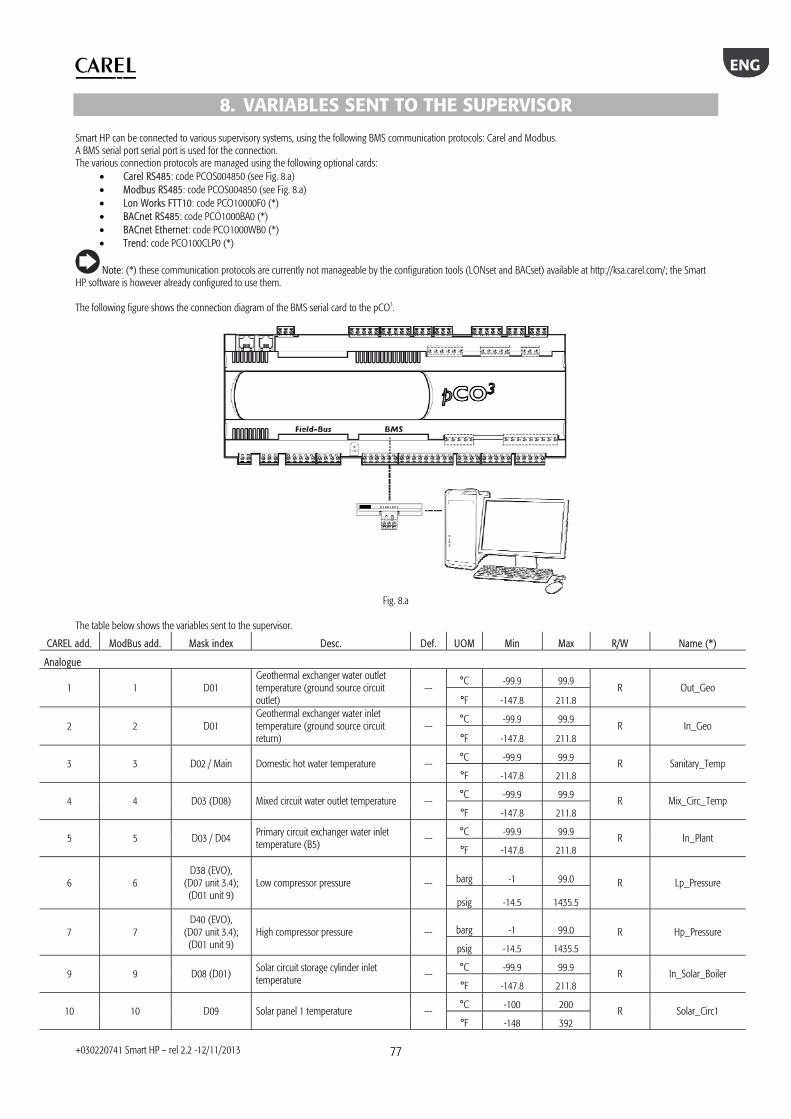
ENG
+030220741 Smart HP – rel 2.2 -12/11/2013
77
8. VARIABLES SENT TO THE SUPERVISOR Smart HP can be connected to various supervisory systems, using the following BMS communication protocols: Carel and Modbus. A BMS serial port serial port is used for the connection. The various connection protocols are managed using the following optional cards:
• Carel RS485: code PCOS004850 (see Fig. 8.a) • Modbus RS485: code PCOS004850 (see Fig. 8.a) • Lon Works FTT10: code PCO10000F0 (*) • BACnet RS485: code PCO1000BA0 (*) • BACnet Ethernet: code PCO1000WB0 (*) • Trend: code PCO100CLP0 (*)
Note: (*) these communication protocols are currently not manageable by the configuration tools (LONset and BACset) available at http://ksa.carel.com/; the Smart HP software is however already configured to use them. The following figure shows the connection diagram of the BMS serial card to the pCO3.
Fig. 8.a
The table below shows the variables sent to the supervisor.
CAREL add. ModBus add. Mask index Desc. Def. UOM Min Max R/W Name (*)
Analogue
1 1 D01 Geothermal exchanger water outlet temperature (ground source circuit outlet)
--- °C -99.9 99.9
R Out_Geo °F -147.8 211.8
2 2 D01 Geothermal exchanger water inlet temperature (ground source circuit return)
--- °C -99.9 99.9
R In_Geo °F -147.8 211.8
3 3 D02 / Main Domestic hot water temperature --- °C -99.9 99.9
R Sanitary_Temp °F -147.8 211.8
4 4 D03 (D08) Mixed circuit water outlet temperature --- °C -99.9 99.9
R Mix_Circ_Temp °F -147.8 211.8
5 5 D03 / D04 Primary circuit exchanger water inlet temperature (B5)
--- °C -99.9 99.9
R In_Plant °F -147.8 211.8
6 6 D38 (EVO),
(D07 unit 3.4); (D01 unit 9)
Low compressor pressure --- barg -1 99.0 R Lp_Pressure
psig -14.5 1435.5
7 7 D40 (EVO),
(D07 unit 3.4); (D01 unit 9)
High compressor pressure --- barg -1 99.0 R Hp_Pressure
psig -14.5 1435.5
9 9 D08 (D01) Solar circuit storage cylinder inlet temperature
--- °C -99.9 99.9
R In_Solar_Boiler °F -147.8 211.8
10 10 D09 Solar panel 1 temperature --- °C -100 200
R Solar_Circ1 °F -148 392
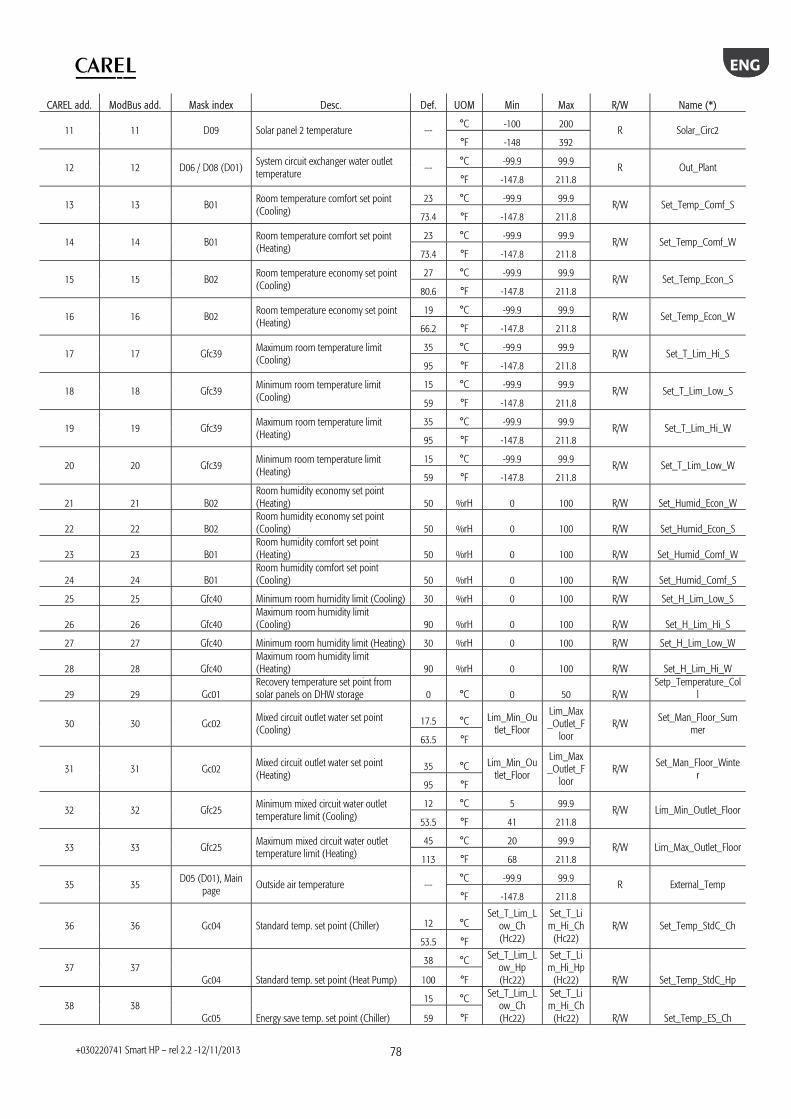
ENG
+030220741 Smart HP – rel 2.2 -12/11/2013
78
CAREL add. ModBus add. Mask index Desc. Def. UOM Min Max R/W Name (*)
11 11 D09 Solar panel 2 temperature --- °C -100 200
R Solar_Circ2 °F -148 392
12 12 D06 / D08 (D01) System circuit exchanger water outlet temperature ---
°C -99.9 99.9 R Out_Plant
°F -147.8 211.8
13 13 B01 Room temperature comfort set point (Cooling)
23 °C -99.9 99.9 R/W Set_Temp_Comf_S
73.4 °F -147.8 211.8
14 14 B01 Room temperature comfort set point (Heating)
23 °C -99.9 99.9 R/W Set_Temp_Comf_W
73.4 °F -147.8 211.8
15 15 B02 Room temperature economy set point (Cooling)
27 °C -99.9 99.9 R/W Set_Temp_Econ_S
80.6 °F -147.8 211.8
16 16 B02 Room temperature economy set point (Heating)
19 °C -99.9 99.9 R/W Set_Temp_Econ_W
66.2 °F -147.8 211.8
17 17 Gfc39 Maximum room temperature limit (Cooling)
35 °C -99.9 99.9 R/W Set_T_Lim_Hi_S
95 °F -147.8 211.8
18 18 Gfc39 Minimum room temperature limit (Cooling)
15 °C -99.9 99.9 R/W Set_T_Lim_Low_S
59 °F -147.8 211.8
19 19 Gfc39 Maximum room temperature limit (Heating)
35 °C -99.9 99.9 R/W Set_T_Lim_Hi_W
95 °F -147.8 211.8
20 20 Gfc39 Minimum room temperature limit (Heating)
15 °C -99.9 99.9 R/W Set_T_Lim_Low_W
59 °F -147.8 211.8
21 21 B02 Room humidity economy set point (Heating) 50 %rH 0 100 R/W Set_Humid_Econ_W
22 22 B02 Room humidity economy set point (Cooling) 50 %rH 0 100 R/W Set_Humid_Econ_S
23 23 B01 Room humidity comfort set point (Heating) 50 %rH 0 100 R/W Set_Humid_Comf_W
24 24 B01 Room humidity comfort set point (Cooling) 50 %rH 0 100 R/W Set_Humid_Comf_S
25 25 Gfc40 Minimum room humidity limit (Cooling) 30 %rH 0 100 R/W Set_H_Lim_Low_S
26 26 Gfc40 Maximum room humidity limit (Cooling) 90 %rH 0 100 R/W Set_H_Lim_Hi_S
27 27 Gfc40 Minimum room humidity limit (Heating) 30 %rH 0 100 R/W Set_H_Lim_Low_W
28 28 Gfc40 Maximum room humidity limit (Heating) 90 %rH 0 100 R/W Set_H_Lim_Hi_W
29 29 Gc01 Recovery temperature set point from solar panels on DHW storage 0 °C 0 50 R/W
Setp_Temperature_Coll
30 30 Gc02 Mixed circuit outlet water set point (Cooling)
17.5 °C Lim_Min_Outlet_Floor
Lim_Max_Outlet_F
loor R/W Set_Man_Floor_Sum
mer 63.5 °F
31 31 Gc02 Mixed circuit outlet water set point (Heating)
35 °C Lim_Min_Outlet_Floor
Lim_Max_Outlet_F
loor R/W
Set_Man_Floor_Winter
95 °F
32 32 Gfc25 Minimum mixed circuit water outlet temperature limit (Cooling)
12 °C 5 99.9 R/W Lim_Min_Outlet_Floor
53.5 °F 41 211.8
33 33 Gfc25 Maximum mixed circuit water outlet temperature limit (Heating)
45 °C 20 99.9 R/W Lim_Max_Outlet_Floor
113 °F 68 211.8
35 35 D05 (D01), Main
page Outside air temperature --- °C -99.9 99.9
R External_Temp °F -147.8 211.8
36 36 Gc04 Standard temp. set point (Chiller) 12 °C Set_T_Lim_L
ow_Ch (Hc22)
Set_T_Lim_Hi_Ch
(Hc22) R/W Set_Temp_StdC_Ch
53.5 °F
37 37 Gc04 Standard temp. set point (Heat Pump)
38 °C Set_T_Lim_Low_Hp (Hc22)
Set_T_Lim_Hi_Hp
(Hc22) R/W Set_Temp_StdC_Hp 100 °F
38 38 Gc05 Energy save temp. set point (Chiller)
15 °C Set_T_Lim_Low_Ch (Hc22)
Set_T_Lim_Hi_Ch
(Hc22) R/W Set_Temp_ES_Ch 59 °F

ENG
+030220741 Smart HP – rel 2.2 -12/11/2013
79
CAREL add. ModBus add. Mask index Desc. Def. UOM Min Max R/W Name (*)
39 39 Gc05 Energy save temp. set point (HP)
32 °C Set_T_Lim_Low_Hp (Hc22)
Set_T_Lim_Hi_Hp
(Hc22) R/W Set_Temp_ES_Hp 89.5 °F
40 40 Gc04 Standard DHW temp. set point
50 °C Set_Lim_HotW_Lo
Set_Lim_HotW_Hi R/W Set_HotWater_Std 122 °F
41 41 Gc05 Energy save DHW set point
50 °C Set_Lim_HotW_Lo
Set_Lim_HotW_Hi R/W Set_HotWater_E_S 122 °F
42 42 D03 Air exchanger temperature --- °C -99.9 99.9
R AW_Temp_Air_Exchan
ger °F -147.8 211.8
44 44 D01 Domestic hot water outlet temperature --- °C -99.9 99.9
R AW_Out_Tank_Dhw °F -147.8 211.8
50 50 Room:01
Temperature measured by
0 °C -99.9 99.9 R a_Temperature1 SERIAL PROBE 1
51 51 Room:01
Humidity measured by
0 %rH 0 100 R a_Humidity1 SERIAL PROBE 1
52 52 Room:02
Temperature measured by
0 °C -99.9 99.9 R a_Temperature2 SERIAL PROBE 2
53 53 Room:02
Humidity measured by
0 %rH 0 100 R a_Humidity2 SERIAL PROBE 2
54 54 Room:03
Temperature measured by
0 °C -99.9 99.9 R a_Temperature3 SERIAL PROBE 3
55 55 Room:03
Humidity measured by
0 %rH 0 100 R a_Humidity3 SERIAL PROBE 3
56 56 Room:04
Temperature measured by
0 °C -99.9 99.9 R a_Temperature4 SERIAL PROBE 4
57 57 Room:04
Humidity measured by
0 %rH 0 100 R a_Humidity4 SERIAL PROBE 4
58 58 Room:05
Temperature measured by
0 °C -99.9 99.9 R a_Temperature5 SERIAL PROBE 5
59 59 Room:05
Humidity measured by
0 %rH 0 100 R a_Humidity5 SERIAL PROBE 5
60 60 Room:06
Temperature measured by
0 °C -99.9 99.9 R a_Temperature6 SERIAL PROBE 6
61 61 Room:06
Humidity measured by
0 %rH 0 100 R a_Humidity6 SERIAL PROBE 6
62 62 Room:01 Temperature measured by CLIMA 1 0 °C -99.9 99.9 R a_Temp_Cli1
63 63 Room:01 Humidity measured by CLIMA 1 0 %rH 0 100 R a_Hum_Cli1
64 64 Room:02 Temperature measured by CLIMA 2 0 °C -99.9 99.9 R a_Temp_Cli2
65 65 Room:02 Humidity measured by CLIMA 2 0 %rH 0 100 R a_Hum_Cli2
66 66 Room:03 Temperature measured by CLIMA 3 0 °C -99.9 99.9 R a_Temp_Cli3
67 67 Room:03 Humidity measured by CLIMA 3 0 %rH 0 100 R a_Hum_Cli3
68 68 Room:04 Temperature measured by CLIMA 4 0 °C -99.9 99.9 R a_Temp_Cli4
69 69 Room:04 Humidity measured by CLIMA 4 0 %rH 0 100 R a_Hum_Cli4
70 70 Room:05 Temperature measured by CLIMA 5 0 °C -99.9 99.9 R a_Temp_Cli5
71 71 Room:05 Humidity measured by CLIMA 5 0 %rH 0 100 R a_Hum_Cli5
72 72 Room:06 Temperature measured by CLIMA 6 0 °C -99.9 99.9 R a_Temp_Cli6
73 73 Room:06 Humidity measured by CLIMA 6 0 %rH 0 100 R a_Hum_Cli6
74 74 D35 Humidity measured by
0 %rH 0 100 R a_HumidityExt OUTSIDE SERIAL SENSOR 7
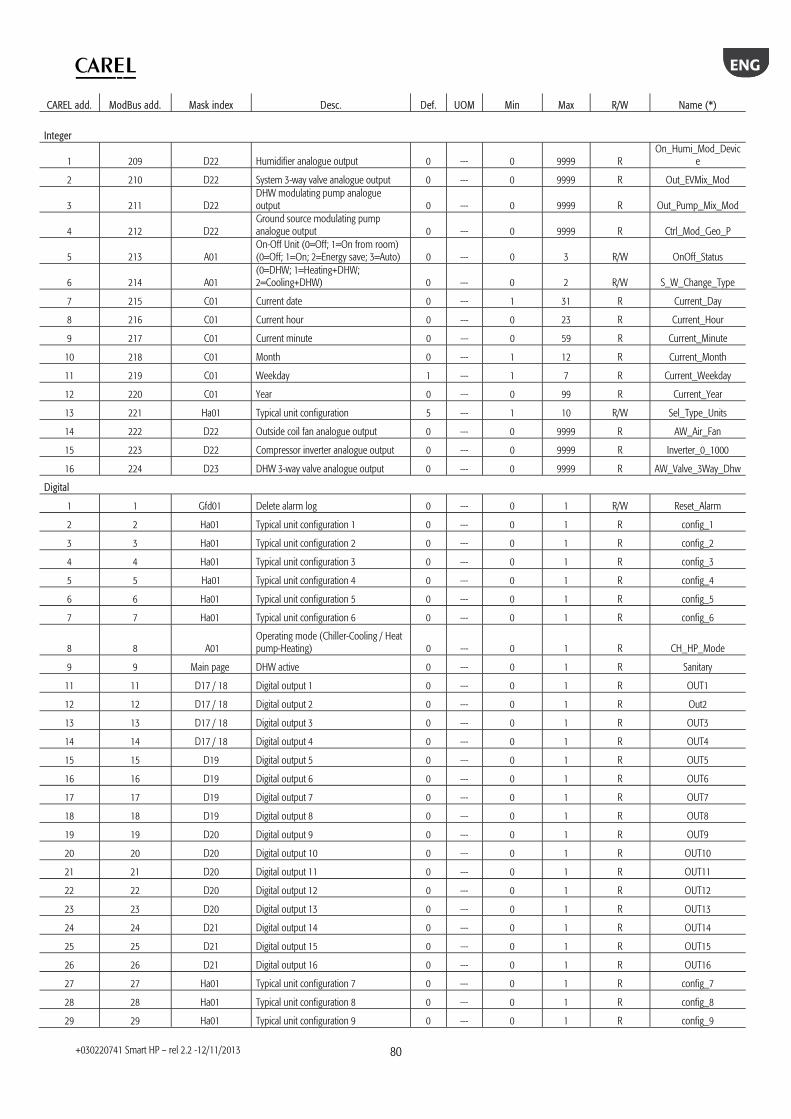
ENG
+030220741 Smart HP – rel 2.2 -12/11/2013
80
CAREL add. ModBus add. Mask index Desc. Def. UOM Min Max R/W Name (*)
Integer
1 209 D22 Humidifier analogue output 0 --- 0 9999 R On_Humi_Mod_Devic
e
2 210 D22 System 3-way valve analogue output 0 --- 0 9999 R Out_EVMix_Mod
3 211 D22 DHW modulating pump analogue output 0 --- 0 9999 R Out_Pump_Mix_Mod
4 212 D22 Ground source modulating pump analogue output 0 --- 0 9999 R Ctrl_Mod_Geo_P
5 213 A01 On-Off Unit (0=Off; 1=On from room) (0=Off; 1=On; 2=Energy save; 3=Auto) 0 --- 0 3 R/W OnOff_Status
6 214 A01 (0=DHW; 1=Heating+DHW; 2=Cooling+DHW) 0 --- 0 2 R/W S_W_Change_Type
7 215 C01 Current date 0 --- 1 31 R Current_Day
8 216 C01 Current hour 0 --- 0 23 R Current_Hour
9 217 C01 Current minute 0 --- 0 59 R Current_Minute
10 218 C01 Month 0 --- 1 12 R Current_Month
11 219 C01 Weekday 1 --- 1 7 R Current_Weekday
12 220 C01 Year 0 --- 0 99 R Current_Year
13 221 Ha01 Typical unit configuration 5 --- 1 10 R/W Sel_Type_Units
14 222 D22 Outside coil fan analogue output 0 --- 0 9999 R AW_Air_Fan
15 223 D22 Compressor inverter analogue output 0 --- 0 9999 R Inverter_0_1000
16 224 D23 DHW 3-way valve analogue output 0 --- 0 9999 R AW_Valve_3Way_Dhw
Digital
1 1 Gfd01 Delete alarm log 0 --- 0 1 R/W Reset_Alarm
2 2 Ha01 Typical unit configuration 1 0 --- 0 1 R config_1
3 3 Ha01 Typical unit configuration 2 0 --- 0 1 R config_2
4 4 Ha01 Typical unit configuration 3 0 --- 0 1 R config_3
5 5 Ha01 Typical unit configuration 4 0 --- 0 1 R config_4
6 6 Ha01 Typical unit configuration 5 0 --- 0 1 R config_5
7 7 Ha01 Typical unit configuration 6 0 --- 0 1 R config_6
8 8 A01 Operating mode (Chiller-Cooling / Heat pump-Heating) 0 --- 0 1 R CH_HP_Mode
9 9 Main page DHW active 0 --- 0 1 R Sanitary
11 11 D17 / 18 Digital output 1 0 --- 0 1 R OUT1
12 12 D17 / 18 Digital output 2 0 --- 0 1 R Out2
13 13 D17 / 18 Digital output 3 0 --- 0 1 R OUT3
14 14 D17 / 18 Digital output 4 0 --- 0 1 R OUT4
15 15 D19 Digital output 5 0 --- 0 1 R OUT5
16 16 D19 Digital output 6 0 --- 0 1 R OUT6
17 17 D19 Digital output 7 0 --- 0 1 R OUT7
18 18 D19 Digital output 8 0 --- 0 1 R OUT8
19 19 D20 Digital output 9 0 --- 0 1 R OUT9
20 20 D20 Digital output 10 0 --- 0 1 R OUT10
21 21 D20 Digital output 11 0 --- 0 1 R OUT11
22 22 D20 Digital output 12 0 --- 0 1 R OUT12
23 23 D20 Digital output 13 0 --- 0 1 R OUT13
24 24 D21 Digital output 14 0 --- 0 1 R OUT14
25 25 D21 Digital output 15 0 --- 0 1 R OUT15
26 26 D21 Digital output 16 0 --- 0 1 R OUT16
27 27 Ha01 Typical unit configuration 7 0 --- 0 1 R config_7
28 28 Ha01 Typical unit configuration 8 0 --- 0 1 R config_8
29 29 Ha01 Typical unit configuration 9 0 --- 0 1 R config_9
ENG
+030220741 Smart HP – rel 2.2 -12/11/2013
81
CAREL add. ModBus add. Mask index Desc. Def. UOM Min Max R/W Name (*)
30 30 Ha01 Typical unit configuration 10 0 --- 0 1 R config_10
31 31
Ground source circuit flow switch alarm 0 --- 0 1 R Geo_Flow_Alarm
(manual reset)
32 32
Evaporator flow switch alarm 0 --- 0 1 R Evap_Flow_Alarm
(manual reset)
33 33 Compressor 1 thermal overload alarm 0 --- 0 1 R Comp1_Ovl_Alarm
34 34 Ground source circuit pump thermal overload alarm 0 --- 0 1 R Geo_Pump_Ovl_Al
35 35 System pump thermal overload alarm 0 --- 0 1 R User_Pump_Ovl_Al
36 36 Compressor 2 thermal overload alarm 0 --- 0 1 R Comp2_Ovl_Alarm
37 37 DHW pump thermal overload alarm 0 --- 0 1 R Sanitary_Pump_Ovl_A
l
38 38 DHW storage heater thermal overload alarm 0 --- 0 1 R Heat_Boiler_Alarm
39 39 Mixed circ. pump thermal overload alarm 0 --- 0 1 R Mix_Pump_Alarm
40 40 Solar circuit 1 pump thermal overload alarm 0 --- 0 1 R SolarPump1_Ov
41 41 Solar circuit 2 pump thermal overload alarm 0 --- 0 1 R SolarPump2_Ov
42 42 Compressor 1 high pressure alarm from digital input status 0 --- 0 1 R Al_HP1_Din
43 43 High compressor pressure alarm from transducer status 0 --- 0 1 R Al_HP1_Tran
44 44 Compressor 2 high pressure alarm from digital input status 0 --- 0 1 R Al_HP2_Din
45 45 Low compressor pressure alarm from digital input 0 --- 0 1 R Al_LP_Din
46 46 Low compressor pressure alarm from transducer 0 --- 0 1 R Al_LP_Tran
47 47 Ground source antifreeze alarm 0 --- 0 1 R Al_Antif_Geo
48 48 Primary circuit antifreeze alarm 0 --- 0 1 R Al_Antif_Plant
49 49 System integ. boiler/heater thermal overload alarm 0 --- 0 1 R Boiler_Ov
50 50 Humidifier alarm 0 --- 0 1 R Humidifier_Alarm
51 51 Dehumidifier alarm 0 --- 0 1 R Dehumidifier_Alarm
52 52 Maximum system temperature threshold reached alarm 0 --- 0 1 R
Aut_Man_Al_Limit_MaxT_Floor
53 53 Minimum system temperature threshold reached alarm 0 --- 0 1 R
Aut_Man_Al_Limit_MinT_Floor
54 54 Maximum DHW temperature threshold reached alarm 0 --- 0 1 R
Aut_Man_Al_Overtemp_Boiler
55 55 Minimum DHW temperature from solar circuit threshold reached alarm 0 --- 0 1 R
Aut_Man_Al_Solar_Temp
56 56 Minimum humidity measured threshold reached alarm 0 --- 0 1 R
Aut_Man_Al_Limit_Low_Humidity
57 57 Maximum humidity measured threshold reached alarm 0 --- 0 1 R
Aut_Man_Al_Limit_High_Humidity
58 58 D12 (D11) Digital input status (remote On/Off) 0 --- 0 1 R Din_8
59 59 Compressor inverter alarm 0 --- 0 1 R Aut_Man_Al_Inverter
60 60 Alarm from envelope management 0 --- 0 1 R Aut_Man_Al_Envelop
61 61 Outside coil fan thermal overload alarm 0 --- 0 1 R Aut_Man_Al_Fan_Ovl
62 62 Recovery fan alarm 0 --- 0 1 R Aut_Man_Al_Recov_F
an
63 63 Alarm from EVO driver 0 --- 0 1 R Serious_Alarm_EVO
64 64 Hd03 Type of unit of measure selected (0=SI , 1=Imperial) 0 --- 0 1 R Unit_Meas_Type
Note: the addresses shown in the table correspond to the CAREL standard, while the second shows the Modbus address (packet); if using the ModBus communication protocol in “register” mode, the addresses shown in the table (ModBus column) must be increased by one unit, both for the digital variables (coils) and the analogue variables (registers).
Note: (*) “name” indicates the name of the variable used internally for the commissioning program.
ENG
+030220741 Smart HP – rel 2.2 -12/11/2013
82
9. ALARMS
9.1 Alarm management When an alarm is activated, Smart HP implements certain actions on the system or the unit, a message is displayed, the corresponding LED comes on and where necessary the alarm relay is activated. The alarms can be divided into three categories: serious unit alarms (these stop the unit or in any case some of the main components of the unit), alarms that stop one or more functions of the system, and other alarms (signal only or “warnings”) that do not stop any function, but rather warn the user that certain thresholds have been exceeded, for example. Then there are alarms that are not due to pCO board faults, but rather some of the connected components, such as DP probes, Clima or EVO (these may be due to communication problems between these components and the controller or actual faults on these accessories). The header of the Alarms table (paragraph 9.3) shows the alarm labels-codes: these are used to identify the origin of the alarm indicated by Smart HP.
To monitor active alarms simply press and the display will show the name (or names, if there is more than one active alarm); to scroll the list, use the and buttons.
To reset the alarms, display them and then press again. If the alarm condition no longer exists, the alarm is reset, otherwise it will be shown again.
The following figure illustrates the screen displayed when pressing : it shows 1) the position of the alarm and 2) the part of the system/unit it relates to.
Fig. 9.a
Note: with automatic reset, the system restarts operating in as, however the alarm LED and the corresponding warning string remain active until is pressed at least twice.
9.2 Alarm log From the main menu, entering the dedicated branch (E.) or at the end of the list of alarms described above, the following alarm log screen can be accessed.
Fig. 9.b The information shown on the screen relates to:
1. the chronological number of the event (this indicates the moment when the alarm was activated, that is, how “old” it is; E01 indicates the oldest alarm), 2. the time and date of the alarm, 3. the alarm code (see chap. 9.3), 4. short description of the logged alarm, 5. the inlet and outlet temperature and pressure values in.
Note: A maximum of 50 alarms can be logged, over this limit new events overwrite the older ones, which are deleted. The alarms logged are shown in the table (chap. 9.3), with the asterisk (*) next to the code; these relate to the correct operation of the unit and are therefore the most significant. One the other hand, those relating to the system/installation are not logged. Advanced log The alarm log can be configured so that the events are saved to the 2MB memory expansion connected permanently to the board. To download all the advanced log data, the Winload tool is required; see the pCO sistema manual (+030220335).
ENG
+030220741 Smart HP – rel 2.2 -12/11/2013
83
9.3 Table of alarms Code Desc. on display Reset Delay Alarm relay Note
ALA01 * Position: B1 Probe B1 faulty or disconnected alarm automatic 60 sec yes Stops the unit
ALA02 * Position: B2 Probe B2 faulty or disconnected alarm automatic 60 sec yes If modulating ground source pump fitted, this is controlled at maximum speed.
ALA03 * Position: B3 Probe B3 faulty or disconnected alarm automatic 60 sec yes Stops control of the DHW circuit
ALA04 * Position: B4 Probe B4 faulty or disconnected alarm automatic 60 sec yes Stops control of the mixed circuit (except for type 5, 9, 10)
ALA05 * Position: B5 Probe B5 faulty or disconnected alarm automatic 60 sec yes Stops the unit
ALA06 * Position: B6 Probe B6 faulty or disconnected alarm automatic 60 sec yes Stops the functions enabled by the probe same (except for type 4)
ALA07 * Position: B7 Probe B7 faulty or disconnected alarm automatic 60 sec yes If pressure probe, stops the unit.
ALA08 * Position: B8 Probe B8 faulty or disconnected alarm automatic 60 sec yes If pressure probe, stops the unit; if mixed circuit outlet probe, stops control; if DHW storage tank bottom probe stops control of the solar collector circuits.
ALA09 * Position: B9 Probe B9 faulty or disconnected alarm automatic 60 sec yes Stops operation of solar pump 1
ALA10 * Position: B10 Probe B10 faulty or disconnected alarm automatic 60 sec yes Stops operation of solar pump 2
ALB01 * Position: ID3 High pressure compressor 1 manual immediate yes Stops the compressor/compressors, the ground source, primary circuit and DHW circuit pump. Mixed circuit pump remains on.
ALB02 * Position: ID4 Low compressor pressure by parameter(Hc05)
by parameter (Hc03; Hc04) yes
Stops the compressor/compressors, the ground source, primary circuit and DHW circuit pump. Mixed circuit pump remains on.
ALB03 * Position: ID10 High pressure compressor 2 manual immediate yes Stops the compressor/compressors, the ground source, primary circuit and DHW circuit pump. Mixed circuit pump remains on.
ALB04 * Position: B7/S3 High compressor pressure from transducer (B2/S3 - air/water) manual immediate yes
Stops the compressor/compressors, the ground source pump (the fan - air/water units), primary circuit and DHW circuit pump. Mixed circuit pump remains on.
ALB05 * Position: B8/S1 Low compressor pressure from transducer (B1/S1 - air/water)
by parameter(Hc05)
by parameter (Hc03; Hc04) yes
Stops the compressor/compressors, the ground source pump (the fan - air/water units), primary circuit and DHW circuit pump. Mixed circuit pump remains on.
ALC01 * Position: ID2 Compressor 1 thermal overload or inverter alarm
manual immediate yes Stops the corresponding compressor, the unit is stopped if this is the only compressor operating.
ALC02 * Position: ID9 Compressor 2 thermal overload manual immediate yes Stops the corresponding compressor, the unit is stopped if this is the only compressor operating.
ALC03 * Envelope error manual immediate yes Stops the compressor/compressors, the ground source pump, the fan, primary circuit and DHW circuit pump. Mixed circuit pump remains on.
ALD01 * EVO driver EEPROM alarm manual immediate yes
ALD02 *
EVO driver Probe S1 alarm manual immediate yes EVO driver Probe alarm S2 manual immediate yes EVO driver Probe S3 alarm manual immediate yes EVO driver Probe S4 alarm manual immediate yes
ALD03 * EVO driver Motor alarm manual immediate yes ALD05 * EVO driver Low suction temp. alarm manual immediate yes ALD06 * EVO driver Low evap. temp. alarm (LOP) manual immediate yes ALD07 * EVO driver High evap. temp. alarm (MOP) manual immediate yes ALD08 * EVO driver Low superheat alarm manual immediate yes ALD09 * EVO driver High cond. temp. alarm manual immediate yes ALD10 * EVO driver Off-line alarm manual 6 sec yes
ALP01 * Position: ID1 Flow switch side well geothermal by parameter
(Hc21) by parameter (Hc19; Hc20) yes
Stops the compressor/compressors, the ground source, primary circuit and DHW circuit pump. Mixed circuit pump remains on.
ALP02 *
Position: ID5 Ground source pump thermal overload manual immediate yes
Stops the compressor/compressors, the ground source, primary circuit and DHW circuit pump. Mixed circuit pump remains on.
Position: ID5 Unit/system pump thermal overload manual immediate yes Stops the compressor/compressors, the fan and the system pumps.
ENG
+030220741 Smart HP – rel 2.2 -12/11/2013
84
Code Desc. on display Reset Delay Alarm relay Note
ALP03 * Position: ID6 Primary circuit pump thermal overload (/mixed - air/water)
manual immediate yes Stops the compressor/compressors, the ground source pump (the fan - air/water units), primary circuit, mixed and DHW circuit. Mixed circuit pump remains on only unit type 6.
ALP04 * Position: ID11 DHW pump thermal overload manual immediate yes Stops the DHW circuit and recovery logic.
ALP05 * Position: ID12 System water flow switch by parameter(Hc18)
by parameter (Hc16; Hc17) yes
Stops the compressor/compressors, the ground source, primary circuit and DHW circuit pump. Mixed circuit pump remains on.
ALP06 Position: ID15 Mix circuit pump thermal overload manual immediate yes Stops the mixed circuit pump and closes the 3-way valve
ALP07 Position: ID17 Pump thermal overload, solar circuit 1 manual immediate can be enabled
(Gfc43) Stops operation of solar pump 1
ALP08 Position: ID18 Pump thermal overload, solar circuit 2
manual immediate can be enabled (Gfc43)
Stops operation of solar pump 2
ALR01 Position: ID7 Integ. boiler/heater alarm automatic immediate can be enabled (Gfc43) Stops the corresponding integration system
ALR02 Position: ID13 Humidifier alarm from digital input (Type 6 and 10) Humid/dehumid alarm - Type 3, 4, 5 and 9)
automatic immediate can be enabled
(Gfc43) Stops operation of modulating humidifier or dehumidifier
ALR03 Position: ID14 DHW storage heater thermal overload alarm from digital input (Type 3, 4, 5, 6, 9 and 10) (Position: ID6 - Type 1, 2, 7 and 8)
manual immediate can be enabled (Gfc43) Stops the corresponding integration system
ALR04 Position: ID16 Dehumidifier alarm from digital input automatic immediate can be enabled
(Gfc43) Stops dehumidifier operation
ALF01 * Position: ID1 Fan thermal overload manual immediate yes Stops the compressor/compressors, the fan, primary circuit and DHW circuit pump. Mixed circuit pump remains on.
ALF02 Position: ID5 Recovery fan automatic immediate can be enabled (Gfc43) Stops the corresponding forced ventilation system
ALS01 Serial probe 01 Humidity probe fault automatic 60 sec can be enabled
(Gfc43)
The last probe in the zone with alarm activated stops the pump and closes the valve; alarm signal on dedicated screen
ALS02 Serial probe 01 Probe offline
automatic 60 sec can be enabled (Gfc43)
ALS03 Serial probe 01 Temperature probe fault automatic 60 sec can be enabled
(Gfc43)
ALS04 Serial probe 02 Humidity probe fault
automatic 60 sec can be enabled (Gfc43)
ALS05 Serial probe 02 Probe offline automatic 60 sec can be enabled
(Gfc43)
ALS06 Serial probe 02 Temperature probe fault
automatic 60 sec can be enabled (Gfc43)
ALS07 Serial probe 03 Humidity probe fault automatic 60 sec can be enabled
(Gfc43)
ALS08 Serial probe 03 Probe offline
automatic 60 sec can be enabled (Gfc43)
ALS09 Serial probe 03 Temperature probe fault automatic 60 sec can be enabled
(Gfc43)
ALS10 Serial probe 04 Humidity probe fault
automatic 60 sec can be enabled (Gfc43)
ALS11 Serial probe 04 Probe offline automatic 60 sec
can be enabled (Gfc43)
ALS12 Serial probe 04 Temperature probe fault
automatic 60 sec can be enabled (Gfc43)
ALS13 Serial probe 05 Humidity probe fault automatic 60 sec can be enabled
(Gfc43)
ALS14 Serial probe 05 Probe offline
automatic 60 sec can be enabled (Gfc43)
ALS15 Serial probe 05 Temperature probe fault automatic 60 sec
can be enabled (Gfc43)
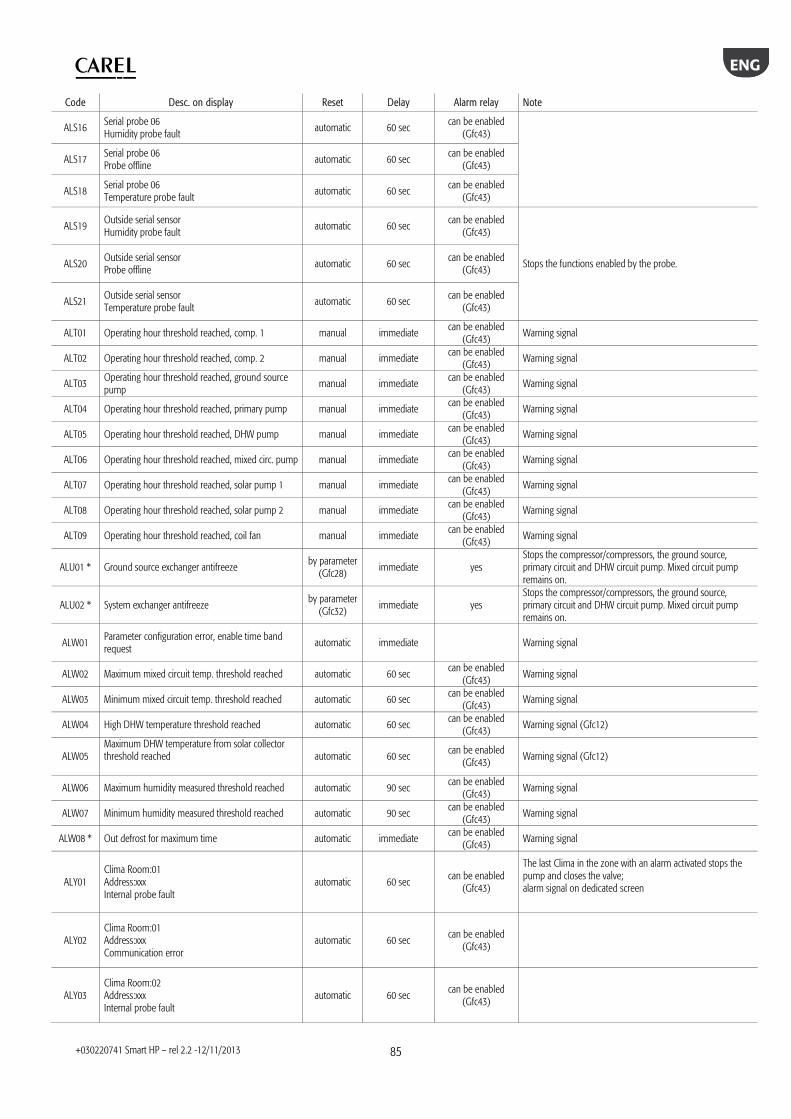
ENG
+030220741 Smart HP – rel 2.2 -12/11/2013
85
Code Desc. on display Reset Delay Alarm relay Note
ALS16 Serial probe 06 Humidity probe fault automatic 60 sec can be enabled
(Gfc43)
ALS17 Serial probe 06 Probe offline automatic 60 sec can be enabled
(Gfc43)
ALS18 Serial probe 06 Temperature probe fault
automatic 60 sec can be enabled (Gfc43)
ALS19 Outside serial sensor Humidity probe fault
automatic 60 sec can be enabled (Gfc43)
Stops the functions enabled by the probe. ALS20 Outside serial sensor Probe offline automatic 60 sec can be enabled
(Gfc43)
ALS21 Outside serial sensor Temperature probe fault
automatic 60 sec can be enabled (Gfc43)
ALT01 Operating hour threshold reached, comp. 1 manual immediate can be enabled (Gfc43)
Warning signal
ALT02 Operating hour threshold reached, comp. 2 manual immediate can be enabled (Gfc43) Warning signal
ALT03 Operating hour threshold reached, ground source pump
manual immediate can be enabled (Gfc43)
Warning signal
ALT04 Operating hour threshold reached, primary pump manual immediate can be enabled
(Gfc43) Warning signal
ALT05 Operating hour threshold reached, DHW pump manual immediate can be enabled (Gfc43)
Warning signal
ALT06 Operating hour threshold reached, mixed circ. pump manual immediate can be enabled
(Gfc43) Warning signal
ALT07 Operating hour threshold reached, solar pump 1 manual immediate can be enabled (Gfc43)
Warning signal
ALT08 Operating hour threshold reached, solar pump 2 manual immediate can be enabled
(Gfc43) Warning signal
ALT09 Operating hour threshold reached, coil fan manual immediate can be enabled (Gfc43)
Warning signal
ALU01 * Ground source exchanger antifreeze by parameter(Gfc28) immediate yes
Stops the compressor/compressors, the ground source, primary circuit and DHW circuit pump. Mixed circuit pump remains on.
ALU02 * System exchanger antifreeze by parameter(Gfc32)
immediate yes Stops the compressor/compressors, the ground source, primary circuit and DHW circuit pump. Mixed circuit pump remains on.
ALW01 Parameter configuration error, enable time band request automatic immediate Warning signal
ALW02 Maximum mixed circuit temp. threshold reached automatic 60 sec can be enabled (Gfc43)
Warning signal
ALW03 Minimum mixed circuit temp. threshold reached automatic 60 sec can be enabled (Gfc43) Warning signal
ALW04 High DHW temperature threshold reached automatic 60 sec can be enabled (Gfc43)
Warning signal (Gfc12)
ALW05 Maximum DHW temperature from solar collector threshold reached
automatic 60 sec can be enabled (Gfc43)
Warning signal (Gfc12)
ALW06 Maximum humidity measured threshold reached automatic 90 sec can be enabled (Gfc43) Warning signal
ALW07 Minimum humidity measured threshold reached automatic 90 sec can be enabled
(Gfc43) Warning signal
ALW08 * Out defrost for maximum time automatic immediate can be enabled (Gfc43) Warning signal
ALY01 Clima Room:01 Address:xxx Internal probe fault
automatic 60 sec can be enabled (Gfc43)
The last Clima in the zone with an alarm activated stops the pump and closes the valve; alarm signal on dedicated screen
ALY02 Clima Room:01 Address:xxx Communication error
automatic 60 sec can be enabled (Gfc43)
ALY03 Clima Room:02 Address:xxx Internal probe fault
automatic 60 sec can be enabled (Gfc43)
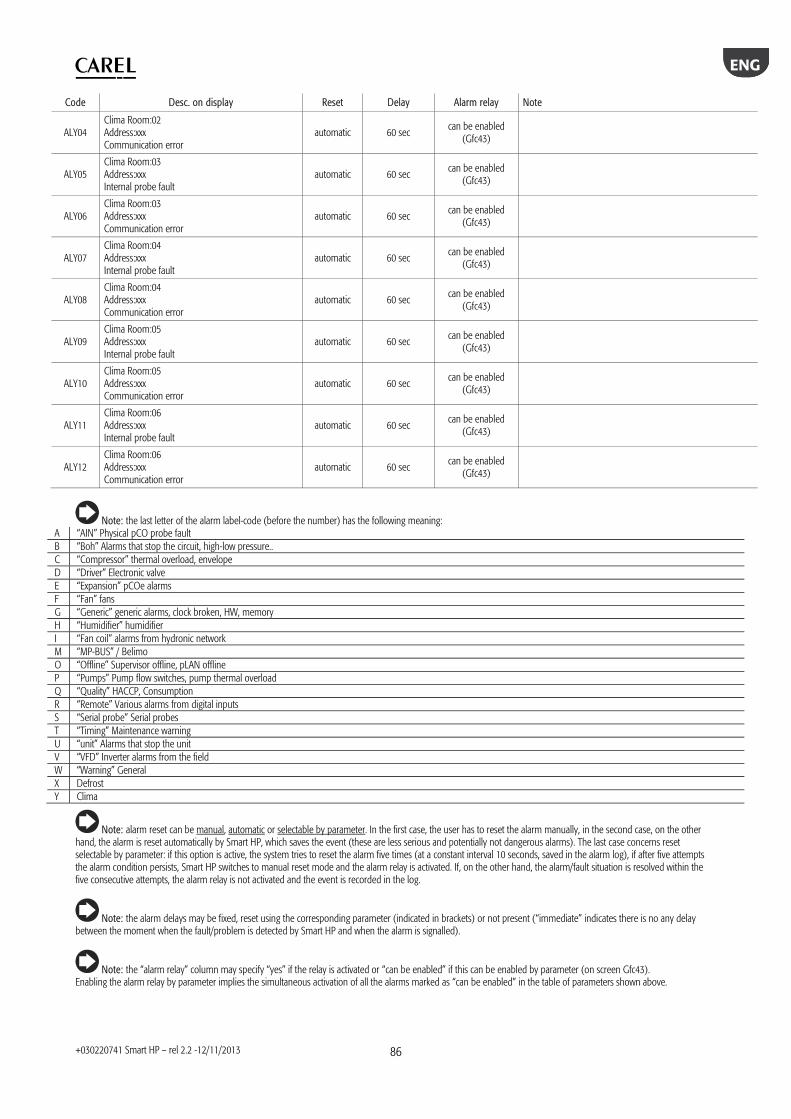
ENG
+030220741 Smart HP – rel 2.2 -12/11/2013
86
Code Desc. on display Reset Delay Alarm relay Note
ALY04 Clima Room:02 Address:xxx Communication error
automatic 60 sec can be enabled
(Gfc43)
ALY05 Clima Room:03 Address:xxx Internal probe fault
automatic 60 sec can be enabled (Gfc43)
ALY06 Clima Room:03 Address:xxx Communication error
automatic 60 sec can be enabled (Gfc43)
ALY07 Clima Room:04 Address:xxx Internal probe fault
automatic 60 sec can be enabled (Gfc43)
ALY08 Clima Room:04 Address:xxx Communication error
automatic 60 sec can be enabled (Gfc43)
ALY09 Clima Room:05 Address:xxx Internal probe fault
automatic 60 sec can be enabled (Gfc43)
ALY10 Clima Room:05 Address:xxx Communication error
automatic 60 sec can be enabled
(Gfc43)
ALY11 Clima Room:06 Address:xxx Internal probe fault
automatic 60 sec can be enabled
(Gfc43)
ALY12 Clima Room:06 Address:xxx Communication error
automatic 60 sec can be enabled (Gfc43)
Note: the last letter of the alarm label-code (before the number) has the following meaning: A “AIN” Physical pCO probe fault B “Boh” Alarms that stop the circuit, high-low pressure.. C “Compressor” thermal overload, envelope D “Driver” Electronic valve E “Expansion” pCOe alarms F “Fan” fans G “Generic” generic alarms, clock broken, HW, memory H “Humidifier” humidifier I “Fan coil” alarms from hydronic network M “MP-BUS” / Belimo O “Offline” Supervisor offline, pLAN offline P “Pumps” Pump flow switches, pump thermal overload Q “Quality” HACCP, Consumption R “Remote” Various alarms from digital inputs S “Serial probe” Serial probes T “Timing” Maintenance warning U “unit” Alarms that stop the unit V “VFD” Inverter alarms from the field W “Warning” General X Defrost Y Clima
Note: alarm reset can be manual, automatic or selectable by parameter. In the first case, the user has to reset the alarm manually, in the second case, on the other hand, the alarm is reset automatically by Smart HP, which saves the event (these are less serious and potentially not dangerous alarms). The last case concerns reset selectable by parameter: if this option is active, the system tries to reset the alarm five times (at a constant interval 10 seconds, saved in the alarm log), if after five attempts the alarm condition persists, Smart HP switches to manual reset mode and the alarm relay is activated. If, on the other hand, the alarm/fault situation is resolved within the five consecutive attempts, the alarm relay is not activated and the event is recorded in the log.
Note: the alarm delays may be fixed, reset using the corresponding parameter (indicated in brackets) or not present (“immediate” indicates there is no any delay between the moment when the fault/problem is detected by Smart HP and when the alarm is signalled).
Note: the “alarm relay” column may specify “yes” if the relay is activated or “can be enabled” if this can be enabled by parameter (on screen Gfc43). Enabling the alarm relay by parameter implies the simultaneous activation of all the alarms marked as “can be enabled” in the table of parameters shown above.

ENG
+030220741 Smart HP – rel 2.2 -12/11/2013
87
10. NEW FEATURES IN VERSION 2.0 Version 2.0, compared to version 1.0, has the following new features:
1. management of AIR-SOURCE version added, 2. management of Evolution driver (EVO) added, replacing EVD400, 3. management of inverter-controlled compressor and envelope control, 4. comparison of cost effectiveness between heat pump and boiler, 5. changed use of mask index to improve browsing. 6. management of imperial units of measure (ºC -> ºF and bar->psi)
Version 2.01 compared to version 2.0, has the following new features:
1. french and german languages, 2. new EVO module, 3. automaticlegal hour change .
CAREL reserves the right to modify or change its products without prior warning.

ENG
+030220741 Smart HP – rel 2.2 -12/11/2013
88

ENG
+030220741 Smart HP – rel 2.2 -12/11/2013
89

ENG
+030220741 Smart HP – rel 2.2 -12/11/2013
90

ENG
+030220741 Smart HP – rel 2.2 -12/11/2013
91

ENG
+030220741 Smart HP – rel 2.2 -12/11/2013
92
CAREL INDUSTRIES HQs Via dell’Industria, 11 - 35020 Brugine - Padova (Italy) Tel. (+39) 049.9716611 Fax (+39) 049.9716600 http://www.carel.com - e-mail: [email protected]
+030
2207
41 S
mar
t HP
– re
l 2.2
-12/
11/2
013