Smart Content Toolkit Getting...
26
Smart Content Toolkit Getting Started
Transcript of Smart Content Toolkit Getting...

Smart Content Toolkit GettingStarted

SMART CONTENT TOOLKIT GETTING STARTED | I
Contents
Introduction..................................................................................1The Smart Content Builder ...............................................................................1
The Smart Content Designer ............................................................................1
System requirements ...................................................................2
Preparing to deploy the Smart Content Toolkit...........................3Platform role privileges ....................................................................................3
Deploying the Smart Content Builder..........................................4
Deployment instructions ..............................................................5
Deploying the samples.................................................................8
Deploying Fonts used in samples.................................................9
Deploying the Smart Content Designer.....................................11Smart Content XTensions................................................................................11
Deploying Quark Publishing Platform Client for QuarkXPress.......................11
Working with Sample Documents ..............................................13
Working with Smart Content Builder .........................................14
Working with Smart Content Designer ......................................19
Legal notices ..............................................................................24
INTRODUCTION
SMART CONTENT TOOLKIT GETTING STARTED | 1
Introduction
The Smart Content Toolkit has everything you need to deploy the Smart Content
Builder and Smart Content Designer, including optional samples.
The Smart Content Builder
The Smart Content Builder provides a user interface which enables anyone to
quickly build, reuse, and assemble a Smart Content schema. Use the Smart Content
Builder to create content models and establish a reusable vocabulary for structure
and metadata. The publishing channel configuration features of the Smart Content
Builder also help maximize opportunities for content automation.
The Smart Content Designer
The Smart Content Designer includes a familiar QuarkXPress interface for creating
and previewing advanced Enterprise layouts without XSLT development. Use the
Designer to create Smart Content templates, eliminating the need for manual
programming in most cases.
The installers for the Smart Content Toolkit can be downloaded from the followinglocation: https://quark.app.box.com/folder/53295843505
SYSTEM REQUIREMENTS
2 | SMART CONTENT TOOLKIT GETTING STARTED
System requirements
Software
Smart Content Builder: •
Windows Server 2012/2016•
Smart Content Designer:•
macOS El Capitan (10.11.x), Sierra (10.12.x) or High Sierra (10.13.x) •
Windows 10•
Required components
Quark Publishing Platform Server 14.0 (August 2018 Release)•
Quark Publishing Platform Client 14.0 (August 2018 Release)•
QuarkXPress Server 14.0.2•
QuarkXPress 14.0.2•
JDK 1.8•
The system requirements listed in this document include the most current patchesand service packs.
PREPARING TO DEPLOY THE SMART CONTENT TOOLKIT
SMART CONTENT TOOLKIT GETTING STARTED | 3
Preparing to deploy the SmartContent Toolkit
This section lists the prerequisites needed to add the Smart Content Builder
functionality to a Quark Publishing Platform instance and the Smart Content
Designer XTensions to QuarkXPress.
Download and install the required Quark software components:
QuarkXPress Server 14.0.2•
Quark Publishing Platform Server 14.0 (Gya Release)•
QuarkXPress 14.0.2•
Quark Publishing Platform Client 14.0 (Gya Release)•
For information on installing Quark Publishing Platform server and client, followthe instructions in the Quark Publishing Platform Getting Started.
The Smart Content Toolkit consists of the following installer:
A Smart Content Builder web application installer•
Platform role privileges
A user must be assigned the following Platform role privileges in order to use Smart
Content Builder:
Users and Groups (View only)•
Content Types (View, Create/Modify)•
Attributes (View, Create/Modify)•
DEPLOYING THE SMART CONTENT BUILDER
4 | SMART CONTENT TOOLKIT GETTING STARTED
Deploying the Smart ContentBuilder
Use the Solution Configurator to simplify the deployment process.
Copy Smart Content Builder/Smart Content Builder1.
(Beta)_18090609.zip to the Quark Publishing Platform Server machine.
Extract the contents of Smart Content Builder (Beta)_18090609.zip.2.
Proceed with the Smart Content Builder deployment instructions.
DEPLOYING THE SMART CONTENT BUILDER
SMART CONTENT TOOLKIT GETTING STARTED | 5
Deployment instructions
Before you begin:
Close any open Platform server files.1.
Stop the Quark Publishing Platform Server.2.
Make a backup of existing Platform Server folders and data (recommended, but3.
optional).
Deployment steps:
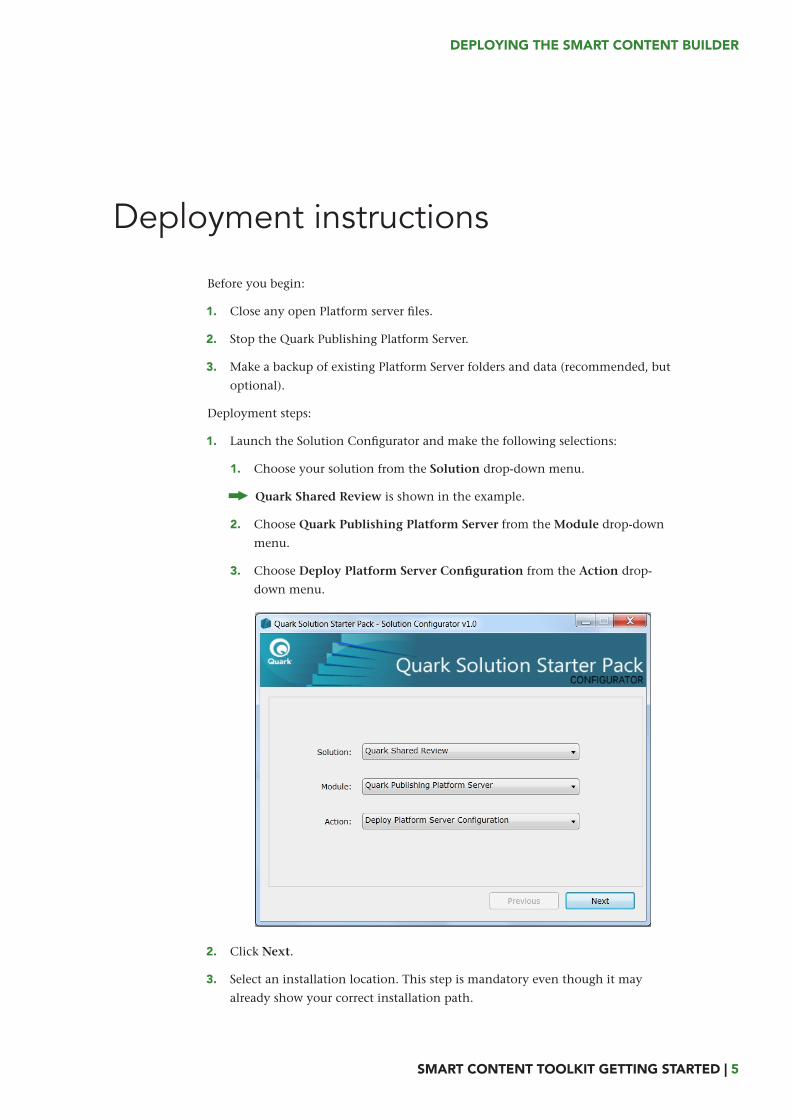
Launch the Solution Configurator and make the following selections:1.
Choose your solution from the Solution drop-down menu.1.
Quark Shared Review is shown in the example.
Choose Quark Publishing Platform Server from the Module drop-down2.
menu.
Choose Deploy Platform Server Configuration from the Action drop-3.
down menu.
Click Next.2.
Select an installation location. This step is mandatory even though it may3.
already show your correct installation path.
DEPLOYMENT INSTRUCTIONS
6 | Smart Content Toolkit Getting Started
Click … to browse the server file system.1.
Select the server installation folder for “Quark Publishing Platform.”2.
Click OK.3.
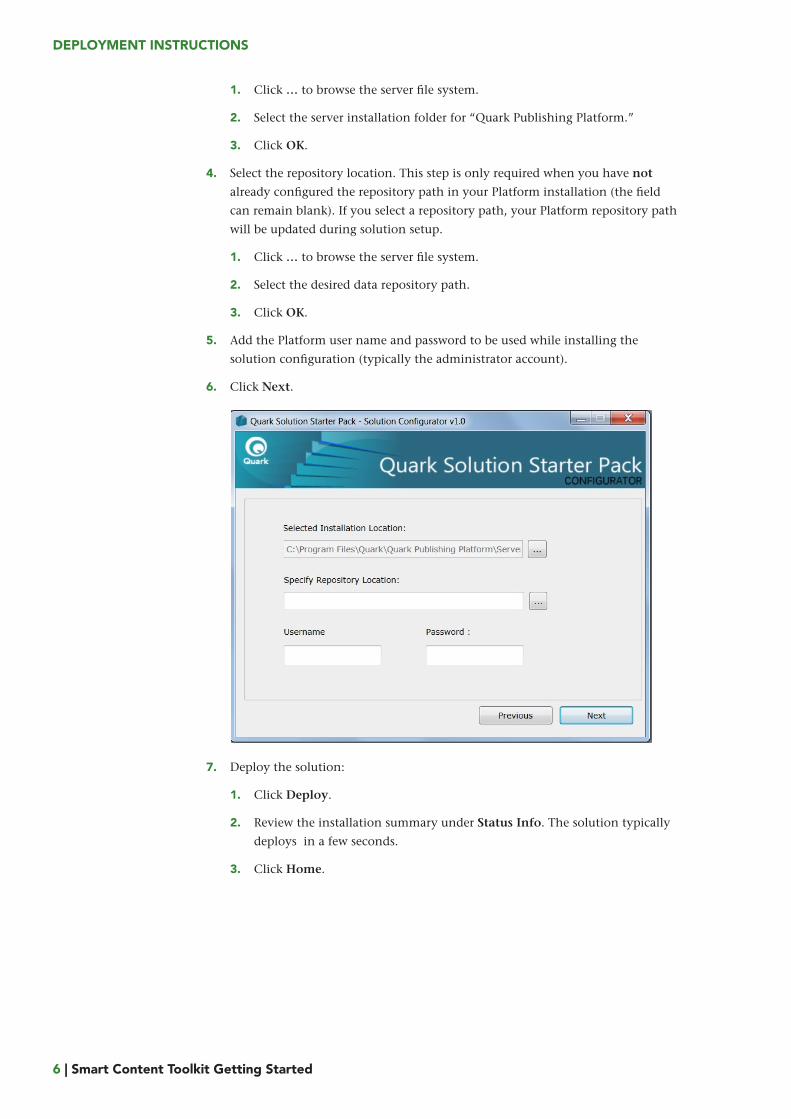
Select the repository location. This step is only required when you have not4.
already configured the repository path in your Platform installation (the field
can remain blank). If you select a repository path, your Platform repository path
will be updated during solution setup.
Click … to browse the server file system.1.
Select the desired data repository path. 2.
Click OK.3.
Add the Platform user name and password to be used while installing the5.
solution configuration (typically the administrator account).
Click Next.6.
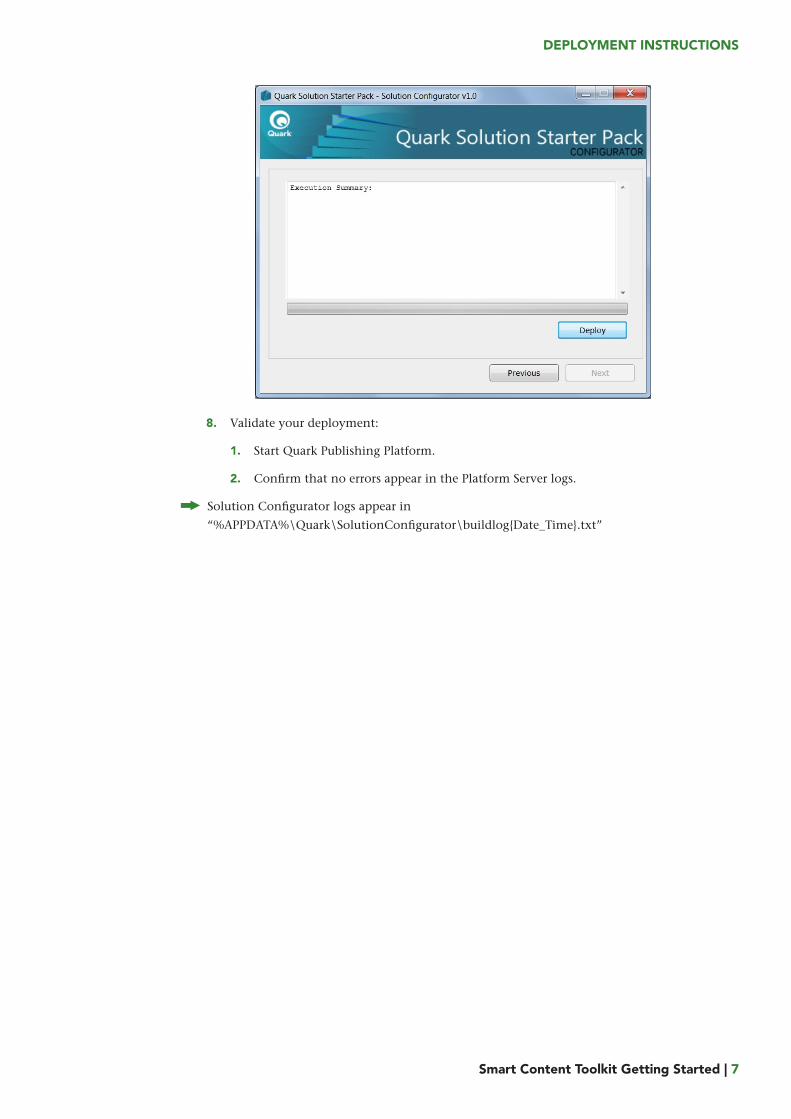
Deploy the solution:7.
Click Deploy.1.
Review the installation summary under Status Info. The solution typically2.
deploys in a few seconds.
Click Home.3.
DEPLOYMENT INSTRUCTIONS
Smart Content Toolkit Getting Started | 7
Validate your deployment:8.
Start Quark Publishing Platform.1.
Confirm that no errors appear in the Platform Server logs.2.
Solution Configurator logs appear in“%APPDATA%\Quark\SolutionConfigurator\buildlog{Date_Time}.txt”
DEPLOYING THE SAMPLES
8 | SMART CONTENT TOOLKIT GETTING STARTED
Deploying the samples
Please note that installing samples is optional and requires a clean instance ofQuark Publishing Platform Server.
Quark provides some sample documents as a part of the Smart Content Toolkit to
facilitate hands-on learning. To deploy these optional samples on Platform Server,
run the Solution Configurator as described below.
Copy Smart Content Toolkit Samples/Samples.zip to the Quark1.
Publishing Platform Server machine.
Extract Samples.zip.2.
You are now ready to proceed. To deploy the samples, repeat the steps listed in the
Deployment instructions section, only use the solution configurator located inside the
extracted Samples directory.
After deploying the samples, you can confirm they installed correctly by launching
Smart Content Builder. Restart the Quark Publishing Platform Server service and
launch Platform using this URL: http://[server-name:port]/builder
DEPLOYING FONTS USED IN SAMPLES
SMART CONTENT TOOLKIT GETTING STARTED | 9
Deploying Fonts used in samples
If you choose to install the samples supplied by Quark, please download the
following fonts used in the samples:
Roboto Condensed •
Oswald•
Ubuntu •
Raleway •
PT Serif •
Open Sans•
Installing fonts is optional, but is recommended to ensure that all required fonts
used in sample documents are available for use.
Please note that you can replace the fonts used in the samples. You may obtain free-to-use fonts from relevant sources like Google Fonts.
Installing fonts for QuarkXPress Server
Install fonts using the QuarkXPress Server Admin client:
Launch QuarkXPress Server Admin Client on a browser.1.
Click Manage Fonts.2.
Click Add Fonts.3.
Locate the fonts folder and select all files.4.
Click Open to add these fonts to the server.5.
Click Submit in the Deploy Fonts dialog box.6.
Click OK when prompted to reset all the renderers.7.
DEPLOYING FONTS USED IN SAMPLES
10 | Smart Content Toolkit Getting Started
Installing Fonts for QuarkXPress
Install fonts on the client machine where you installed QuarkXPress to properly see
the preview in the Smart Content Designer preview palette.

DEPLOYING THE SMART CONTENT DESIGNER
SMART CONTENT TOOLKIT GETTING STARTED | 11
Deploying the Smart ContentDesigner
Smart Content XTensions
The Smart Content XTensions for QuarkXPress Server are part of the QuarkXPress
Server installation. The Smart Content XTensions for QuarkXPress desktop are part
of the Quark Publishing Platform Client installation. These do not have to be
installed separately.
Deploying Quark Publishing Platform Client for QuarkXPress
For information on installing Quark Publishing Platform Client, follow the
instructions in the Quark Publishing Platform Getting Started.
Quark Publishing Platform Client for QuarkXPress is required to run Smart ContentToolkit
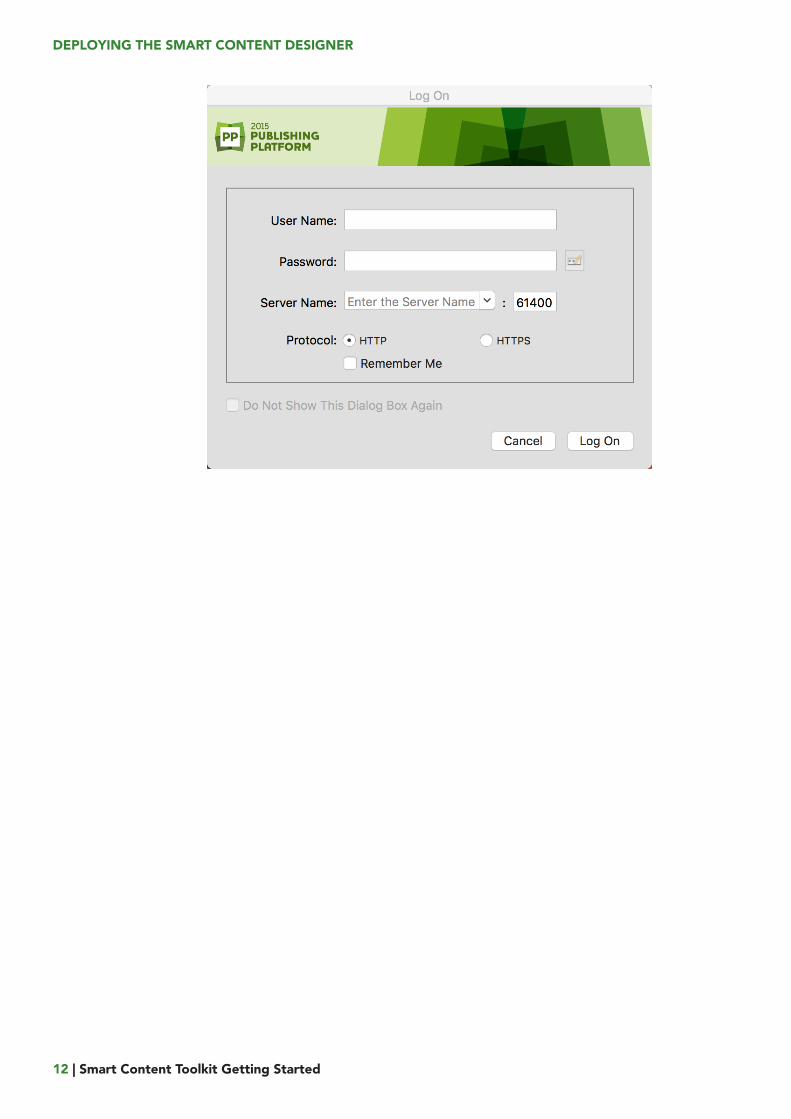
Once you launch QuarkXPress, you must provide the Quark Publishing Platform
settings needed to connect QuarkXPress to the Smart Content Builder server.
DEPLOYING THE SMART CONTENT DESIGNER
12 | Smart Content Toolkit Getting Started
WORKING WITH SAMPLE DOCUMENTS
SMART CONTENT TOOLKIT GETTING STARTED | 13
Working with Sample Documents
This section describes the optional steps to verify the sample documents and fonts
deployed earlier.
To view the document models for these sample documents, visit the following1.
URL:
http://<server name/ip>:<port>/builder
To view PDF renditions that use Smart Content Designer templates, open the2.
Quark Publishing Platform workspace and browse to any collection.
Open the Smart Content document present in the sample collections using3.
Quark Author.
In Quark Author, select renditions with the name “<Collection Name> PDF.”4.
For example, choose “QuarkXPress User Guide PDF” for a user guide document
to see the PDF rendition created using the Smart Content Designer sample
templates.

WORKING WITH SMART CONTENT BUILDER
14 | SMART CONTENT TOOLKIT GETTING STARTED
Working with Smart Content Builder
To create a Smart Content Model using Smart Content Builder:
Open the Smart Content Builder app using http://<server1.
name/ip>:<port>/builder.
Log on with user credentials.2.
This user must have permissions as described in Platform role privileges
Expand the Content Model tab.3.
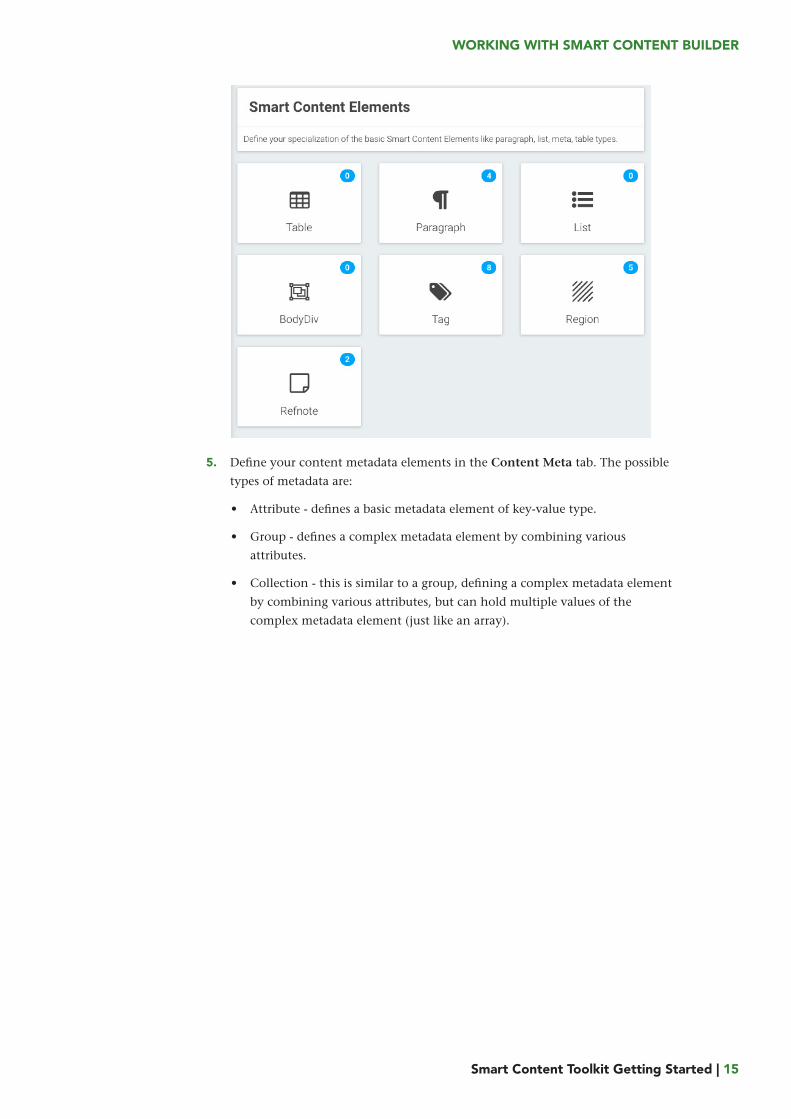
Create content elements using the Content Elements tab (Para types, Table4.
types, List types, BodyDivs, Tag types, Regions, Refnotes).
WORKING WITH SMART CONTENT BUILDER
Smart Content Toolkit Getting Started | 15
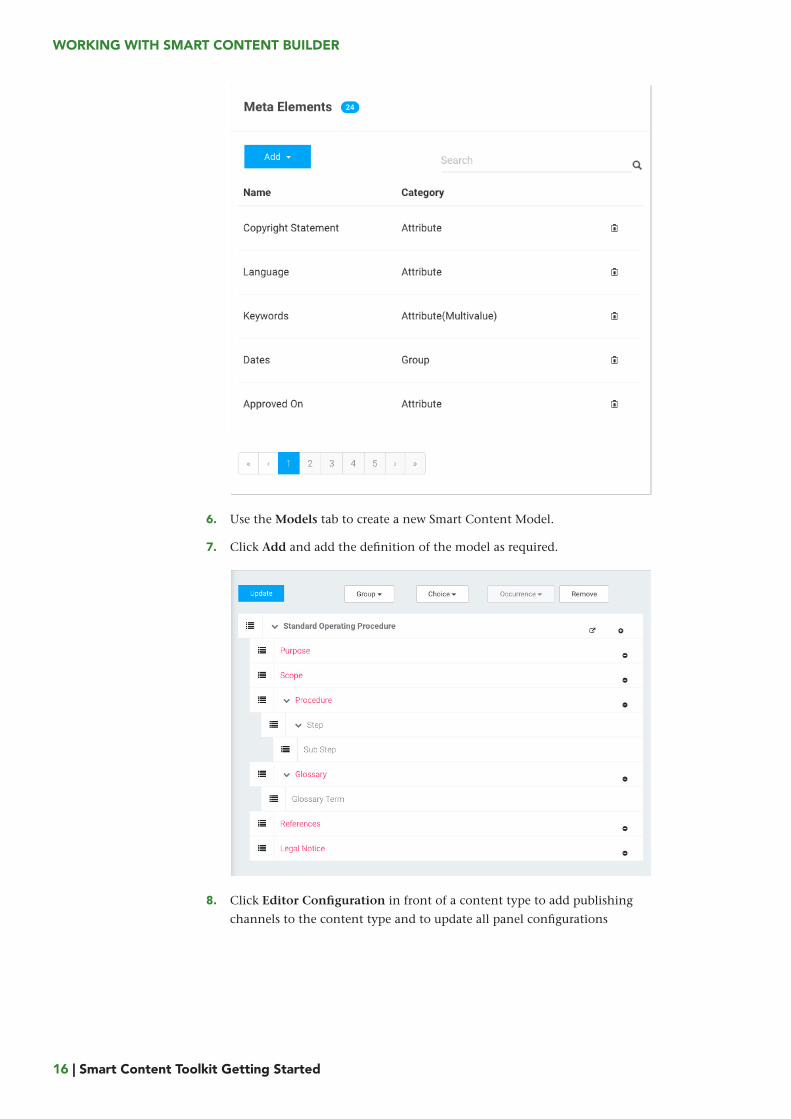
Define your content metadata elements in the Content Meta tab. The possible5.
types of metadata are:
Attribute - defines a basic metadata element of key-value type.•
Group - defines a complex metadata element by combining various•
attributes.
Collection - this is similar to a group, defining a complex metadata element•
by combining various attributes, but can hold multiple values of the
complex metadata element (just like an array).
WORKING WITH SMART CONTENT BUILDER
16 | Smart Content Toolkit Getting Started
Use the Models tab to create a new Smart Content Model.6.
Click Add and add the definition of the model as required.7.
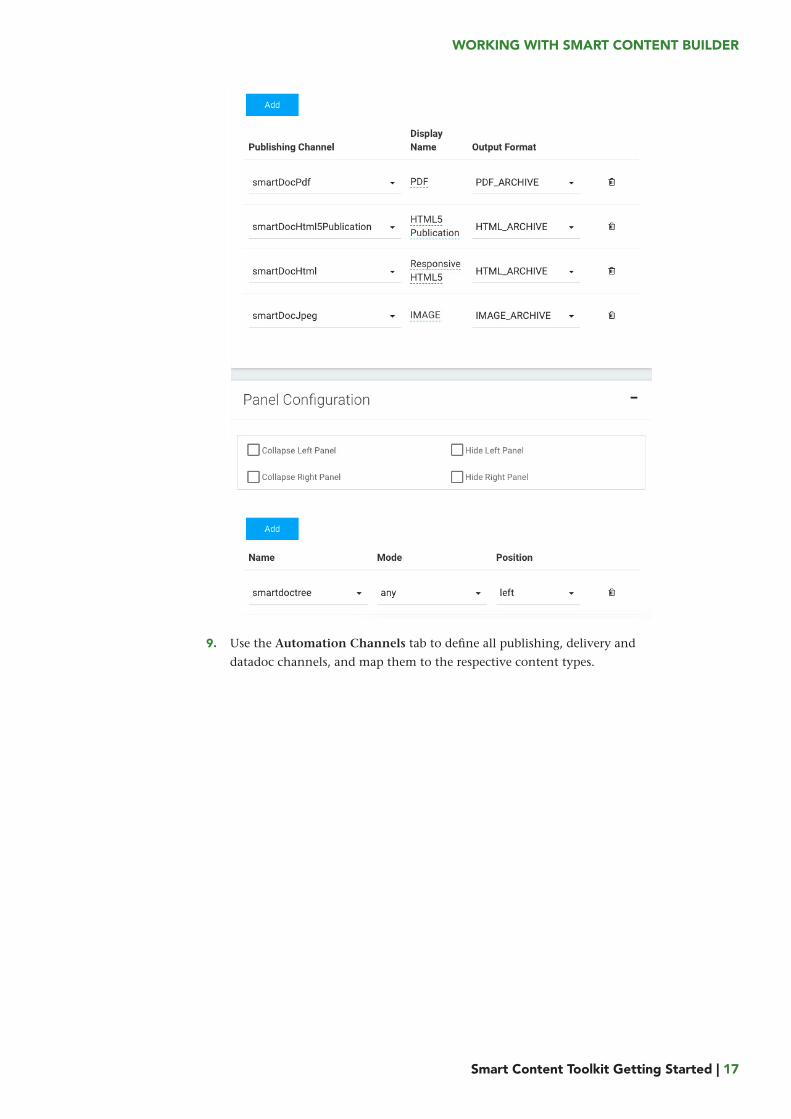
Click Editor Configuration in front of a content type to add publishing8.
channels to the content type and to update all panel configurations
WORKING WITH SMART CONTENT BUILDER
Smart Content Toolkit Getting Started | 17
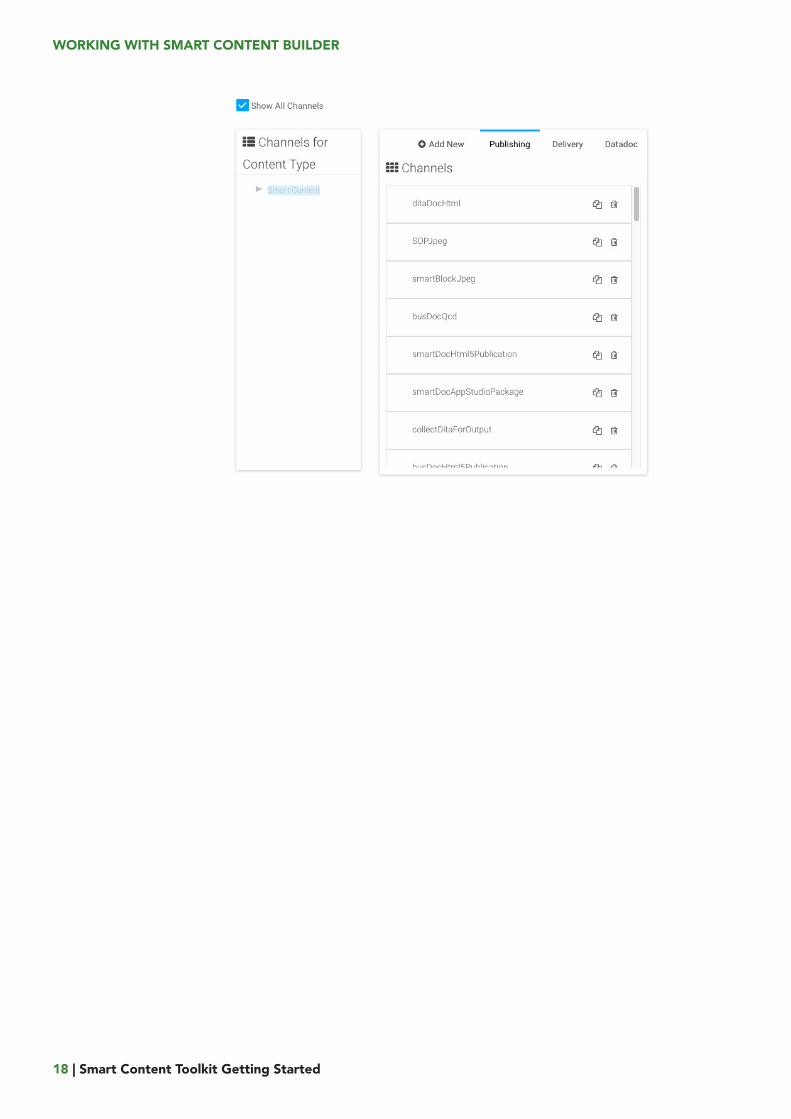
Use the Automation Channels tab to define all publishing, delivery and9.
datadoc channels, and map them to the respective content types.
WORKING WITH SMART CONTENT BUILDER
18 | Smart Content Toolkit Getting Started
WORKING WITH SMART CONTENT DESIGNER
SMART CONTENT TOOLKIT GETTING STARTED | 19
Working with Smart ContentDesigner
To design a template in Smart Content Designer:
Launch QuarkXPress. 1.
Log on to Quark Publishing Platform Server. 2.
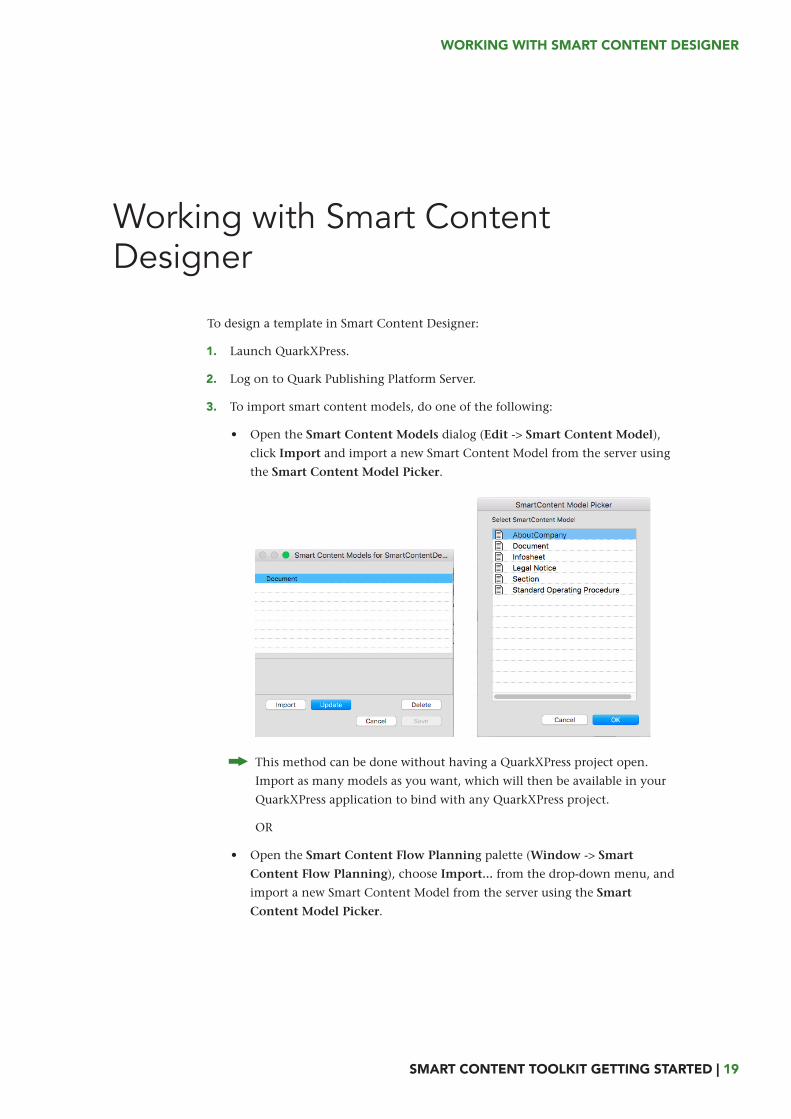
To import smart content models, do one of the following:3.
Open the Smart Content Models dialog (Edit -> Smart Content Model),•
click Import and import a new Smart Content Model from the server using
the Smart Content Model Picker.
This method can be done without having a QuarkXPress project open.Import as many models as you want, which will then be available in your
QuarkXPress application to bind with any QuarkXPress project.
OR
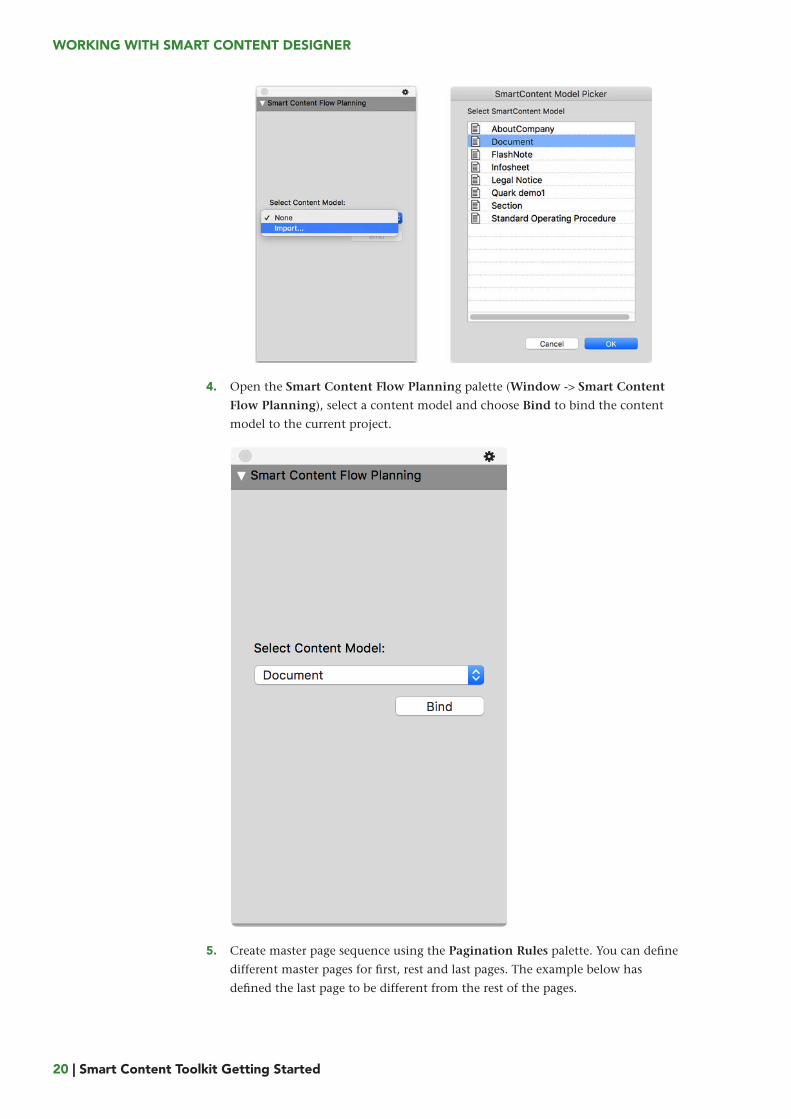
Open the Smart Content Flow Planning palette (Window -> Smart•
Content Flow Planning), choose Import... from the drop-down menu, and
import a new Smart Content Model from the server using the Smart
Content Model Picker.
WORKING WITH SMART CONTENT DESIGNER
20 | Smart Content Toolkit Getting Started
Open the Smart Content Flow Planning palette (Window -> Smart Content4.
Flow Planning), select a content model and choose Bind to bind the content
model to the current project.
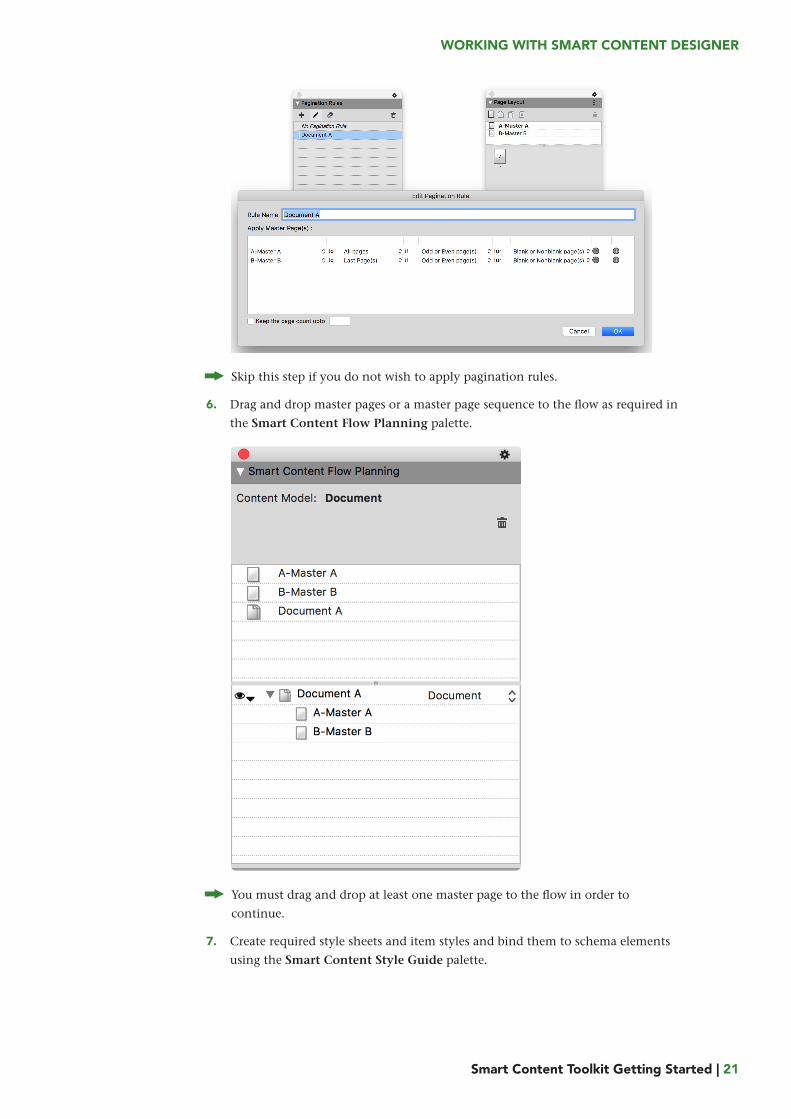
Create master page sequence using the Pagination Rules palette. You can define5.
different master pages for first, rest and last pages. The example below has
defined the last page to be different from the rest of the pages.
WORKING WITH SMART CONTENT DESIGNER
Smart Content Toolkit Getting Started | 21
Skip this step if you do not wish to apply pagination rules.
Drag and drop master pages or a master page sequence to the flow as required in6.
the Smart Content Flow Planning palette.
You must drag and drop at least one master page to the flow in order tocontinue.
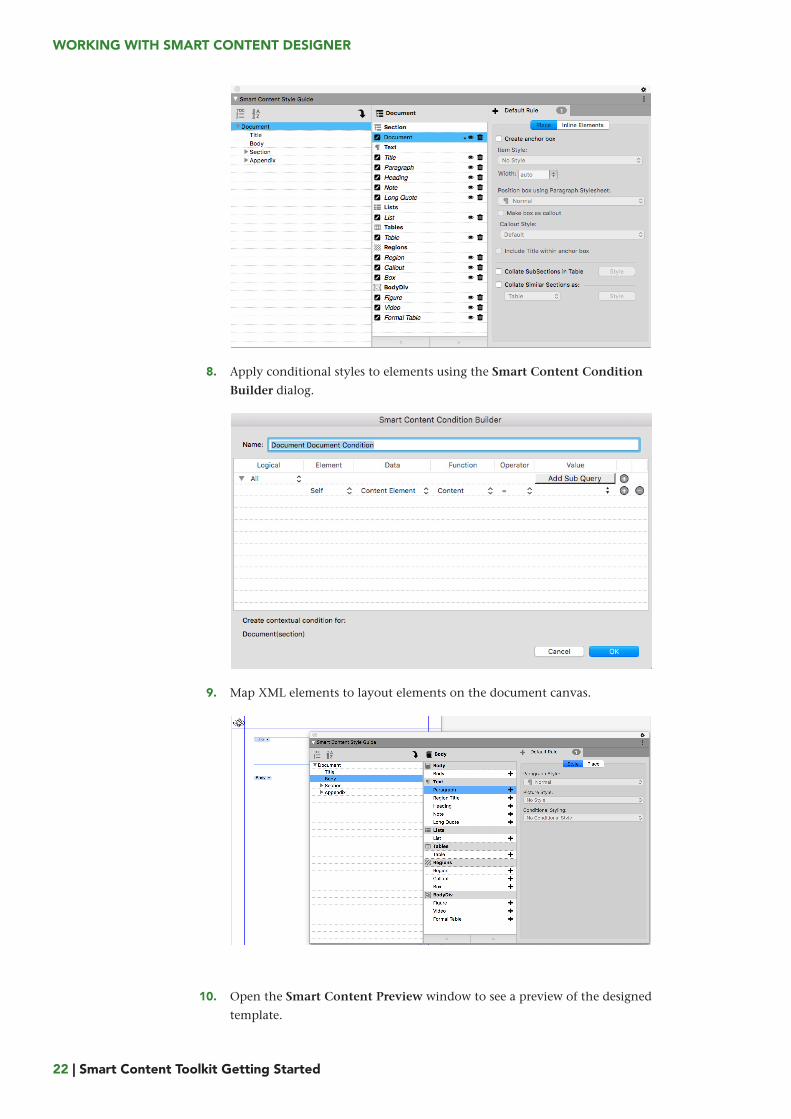
Create required style sheets and item styles and bind them to schema elements7.
using the Smart Content Style Guide palette.
WORKING WITH SMART CONTENT DESIGNER
22 | Smart Content Toolkit Getting Started
Apply conditional styles to elements using the Smart Content Condition8.
Builder dialog.
Map XML elements to layout elements on the document canvas.9.
Open the Smart Content Preview window to see a preview of the designed10.
template.

WORKING WITH SMART CONTENT DESIGNER
Smart Content Toolkit Getting Started | 23
Click Import XML and select the xml file from the server or the local file11.
system.
Click Preview/Template Layout to see a preview of the template with the12.
selected xml content.
LEGAL NOTICES
24 | SMART CONTENT TOOLKIT GETTING STARTED
Legal notices
©2018 Quark Software Inc. and its licensors. All rights reserved.
Quark, the Quark logo, QuarkXPress, and QuarkCopyDesk are trademarks or
registered trademarks of Quark Software Inc. and its affiliates in the U.S. and/or
other countries. All other marks are the property of their respective owners.