SMALLHOLDER BEST PRACTICES GUIDE Growing Peanuts in …
58
SMALLHOLDER BEST PRACTICES GUIDE Growing Peanuts in Haiti Final Draft
Transcript of SMALLHOLDER BEST PRACTICES GUIDE Growing Peanuts in …

SMALLHOLDER BEST PRACTICES GUIDE Growing Peanuts in Haiti Final Draft

Final Draft
2
TABLE OF CONTENTS ACKNOWLEDGEMENTS ................................................................................................ ............................................................... 4 1. INTRODUCTION ................................................................................................................................................................ . 5 2. PEANUT BASICS ................................................................................................................................................................ . 6 2.1 BACKGROUND ................................................................................................................................................................ . 6 2.1.1 CARTOON 1: MEET EDZAIRE AND MAKENSON ...................................................................................................................... 6 2.2 VARIETIES ................................................................................................................................................................ ....... 7 2.3 FARMING AS A BUSINESS ................................................................ ................................ .................................................. 8 2.4 QUALITY ....................................................................................................................................................................... 10 3. PWOGRAM PISTACH GROWING SYSTEM ................................ ............................................................................................ 12 3.1 CARTOON 2: SYSTEM GROWING OR BUSINESS AS USUAL ................................................................................................ ..... 12 4. PRODUCTION PLANNING .................................................................................................................................................. 13 4.1 LONG-TERM PLANNING .................................................................................................................................................. 13 4.1.1 CARTOON 3: PEANUTS ROLE IN THE BIGGER PICTURE................................................................ .......................................... 15 4.2 SHORT-TERM PLANNING ................................................................................................................................ ................. 16 4.2.1 CARTOON 4: PLANNING FOR SUCCESS ................................................................................................ .............................. 18 5. SOIL PREPARATION AND PLANTING ................................................................ ................................................................... 20 5.1 SOIL PREPARATION ................................................................................................................................ ........................ 20 5.1.1 INITIAL CLEARING .......................................................................................................................................................... 20 5.1.2 LAYOUT PLANNING ................................................................................................................................ ........................ 20 5.1.3 PRIMARY TILLAGE .......................................................................................................................................................... 21 5.1.4 SEEDBED PREPARATION .................................................................................................................................................. 22 5.1.5 PRE-PLANTING SEEDBED CHECK ....................................................................................................................................... 22 5.1.6 CARTOON 5: QUICKER, CHEAPER AND HIGHER QUALITY ...................................................................................................... 23 5.2 PLANTING ................................................................................................................................................................ ..... 23 5.2.1 SEED SOURCING ................................................................ ............................................................................................ 23 5.2.2 GERMINATION TESTING .................................................................................................................................................. 24 5.2.3 DISTRIBUTION PLANNING................................................................ ................................ ................................................ 25 5.2.4 PLANTING ................................................................................................................................................................ ..... 27 5.2.5 CARTOON 6: PRECISON MATTERS ................................................................................................ .................................... 28 6. GETTING THE MOST FROM YOUR INVESTMENT ................................................................................................................... 29 6.1 SUNLIGHT ................................................................................................................................................................ ..... 30 6.2 WATER ................................ ................................ ........................................................................................................ 30 6.3 SOIL FERTILITY ............................................................................................................................................................... 31 6.3.1 PEANUT SOIL NEEDS ................................................................................................ ................................ ....................... 31 6.3.2 GENERAL FERTILIZER INFORMATION ................................................................................................................................. 32 6.3.3 APPLICATION OF TARGETED FERTILIZERS ........................................................................................................................... 33 6.3.4 CARTOON 7: INVESTING TO MAXIMIZE RETURNS ................................ ................................ ................................................ 33 7. PREVENTING PESTS FROM REDUCING YOUR YIELDS ............................................................................................................. 35 7.1 WEEDS ................................................................ ......................................................................................................... 36 7.1.1 CARTOON 8: GET YOUR WEEDS BEFORE THEY GET YOU ....................................................................................................... 38 7.2 DISEASE ....................................................................................................................................................................... 39 7.2.1 GENERAL DISEASE INFORMATION ................................................................................................................................ ..... 39 7.2.2 METHODS TO COMBAT DISEASES ................................................................................................................................ ..... 40 7.2.3 APPLICATION OF TARGETED FUNGICIDES ........................................................................................................................... 41 7.2.4 CARTOON 9: GET TREATMENT BEFORE YOU ARE SICK................................................................ .......................................... 42 7.3 INSECTS ................................ ................................ ........................................................................................................ 43 8. HARVEST AND POST-HARVEST HANDLING ........................................................................................................................... 45 8.1 MATURITY CHECKING AND HARVESTING ........................................................................................................................... 46 8.1.1 CARTOON 10: MORE MATURE EQUALS MORE MONEY ........................................................................................................ 48 8.2 DRYING ................................ ................................ ........................................................................................................ 48 8.2.1 CARTOON 11: DRY, CLEAN AND HEALTHY ......................................................................................................................... 49 8.3 STORAGE ...................................................................................................................................................................... 49

Final Draft
3
9. RECORDING AND DOCUMENTATION ................................ .................................................................................................. 52 9.1.1 CARTOON 12: MONEY NOW VERSUS MONEY LATER ................................................................................................ ........... 52 10. CONCLUSION ................................................................................................................................................................ 56 10.1.1 CARTOON 13: SUCCESS DOESN’T HAPPEN BY CHANCE ...................................................................................................... 56 APPENDIX A ............................................................................................................................................................................ 58

Final Draft
4
ACKNOWLEDGEMENTS This guide is a product of years of experience of growing peanuts in Haiti and abroad. TechnoServe would like to thank the Abbott Fund for funding the production of this guide, as well acknowledge the following people for their help and major contributions: James Rhoads, Meds and Foods for Kids (Primary Author) Bob Kemerait, University of Georgia and Peanut CRSP Team Tim Brenneman, University of Georgia and Peanut CRSP Team Rob Hartwig (Illustrations) Additionally, TechnoServe would like to thank the following organizations for major contributions to this guide:

1. INTRODUCTION Peanuts are an important crop in Haiti. Not only does everyone love mamba and knows that it is healthy and full of protein, but peanuts are an important cash crop. Few crops offer as good an opportunity to make money over a short amount of time. They are relatively drought tolerant and require few inputs to have a reasonable harvest. However, there is great potential to increase the production of peanuts and for farmers to make even more money. And we don’t mean simply farming more land. These increases are coming from producing more peanuts on the same amount of land. To see these increases in yields and peanut income, farmers must closely follow all recommendations in this guide and grow using the benefits of a system This system, known as Pwogram Pistach, gives farmers get access to training and technical support, credit, targeted inputs and guaranteed markets for their peanuts immediately following harvest. If done correctly, farmers will see immediate and consistent results, meaning more peanuts from their fields and more money in their pockets, year in and year out. The information in the guide is based on general peanut research, research conducted in Haiti with Haitian farmers and approaching peanut farming as a business. The guide features the story of two neighboring peanut farmers in Haiti, Edzaire and Makenson. These characters will help us evaluate the technologies and techniques described in the following chapters. We encourage you to discuss each of their choices and see how you can learn from them. Finally, the producers of this guide DO NOT encourage the planting of peanuts on steep hillsides because it is a significant source of erosion. While we recognize that many farmers do not have a choice, we encourage the planting of perennial crops and trees on steep hillsides and adding anti-erosive measures like rock walls and other controls when planting on less steep hills.
640 marmites / 21,000 HTG margin per ¼ carreau
POTENTIAL
160 marmites / 550 HTG margin per ¼ carreau
CURRENT
SAME LAND MORE PEANUTS MORE MONEY

2. PEANUT BASICS 2.1 BACKGROUND The scientific name of peanuts is arachis hypogea, similar to the French word for peanuts, arachide. They are native to South America and were being grown on the island of Hispaniola by the Indians before Christopher Columbus arrived. It was from there that peanuts were taken and introduced to the world by the Spanish, which is why we have varieties of peanuts called Spanish and Valencia (a region in Spain). Peanuts are grown throughout the world and important in many cultures and cuisines. The world’s largest producers are China, India and the United States. In Haiti, peanuts are grown for many reasons, but mostly as a cash crop. Other reasons that make Haiti a great place to grow peanuts include:
Are there other reasons you grow peanuts? Peanuts are bean plants, just like pwa neg or pwa nwa, but happen to have the odd trait of pushing their fruit underground. They produce a “perfect flower” meaning that it has both male and female parts and can self-pollinate. This is important for two reasons: 1) peanuts do not need pollinators like bees, and 2) unlike corn, it is easy for farmers to get a new variety that will grow “true to type,” meaning that it will produce the same improved characteristics. This helps small farmers select and maintain improved varieties without having to buy more seed.
2.1.1 CARTOON 1: MEET EDZAIRE AND MAKENSON
WHY GROW PEANUTS? WHY GROW PEANUTS IN HAITI?
Relatively high value Cash for school fees, food, seeds, tools, etc.
Produce in marginal, sandy soil Can be grown throughout most of Haiti
Reasonable drought tolerance Most Haitian farmers depend on the rain
Fix nitrogen and improve soil fertility Great rotation crop
EXERCISE 1: Other Reasons to Grow Peanuts

2.2 VARIETIES There are four different varieties of peanuts, but really only two physical types of peanuts: prostrate and bunch. Prostrate peanuts grow low to the ground and produce peanuts along these branches. Bunch peanuts grow upright and produce most of their peanuts nearer the principle root. The four varieties of peanuts are Runner, Virginia, Spanish and Valencia. The majority of peanuts grown in Haiti are either Runner, sometimes called “four month” peanuts, related to their maturing duration, or Valencia, often called “two-month twenty day” or “three month” peanuts. In Haiti, Runner peanuts are generally preferred for mamba while Valencia are more often used for roasted peanuts. However, Valencia peanuts are also used to make quality peanut butter.
Valencia
-Easier harvesting -Shorter duration (less inputs, pest control, quicker return)
-Better drought tolerance -No seed dormancy (immediate replanting)
-Lower disease resistance -More vulnerable to rats (most pods near principle root)
-No dormancy means possible unwanted germination (prior to harvest)
-Better disease resistance -Higher yield potential -Dormancy prevents germination in field
-More difficult to harvest (limb crop)
-Dormancy requires storage for three months before replanting
-Longer maturity (more inputs, pest control, longer return)
Primary Peanut Varieties in Haiti
Variety Growth Size Positives Negatives
90–130 days
bunch
no dormancy
Small red seeds Big pods
2–4 seeds/pod
Runner
120–150 days
prostrate
3–4 month dormancy
Big tan seeds Big or small pods
2–3 seeds/pod
Bunch Prostrate

2.3 FARMING AS A BUSINESS Successful peanut farmers treat farming as a business. This means, they make more money on outputs than they spend on inputs. To know if you are making money, you need to first calculate your input costs. To calculate your input costs, you need to know the expense categories for peanut farming. What cost categories are there for growing peanuts? To better understand this input-output relationship, think of a teeter-totter. To make a profit, outputs (sales) must weigh more than inputs (costs). The bigger this difference is, the more money a farmer will make. Increasing this difference can be done in two ways, decreasing costs and increasing sales. The most successful farmers will do both these things to maximize their profits.
These same business principles apply to other peanut producing countries. The more peanuts a farmer can produce, the cheaper he can afford to sell his peanuts and still maintain a profit. You can’t change the market price of peanuts but you can change how many you are able to produce and at what cost. The figure below shows average production per ¼ carreau and average prices farmers sell their peanuts for in major producing countries, as well as for Ghana and the Dominican Republic. Notice how the prices of peanuts go down as the productivity goes up.
EXERCISE 2: Expense Categories for Peanut Farmers
INPUTS Costs
OUTPUTS Sales
SALES COSTS PROFITS
SALES COSTS PROFITS
SALES COSTS PROFITS
GOOD
BETTER
BEST
SALES
CURRENT COSTS

Final Draft
9
These production numbers present the opportunity for Haitian farmers. Yields per hectare in Haiti are very low, but that means that there is a huge potential to increase them. Local prices remain high because demand for peanuts is very high and peanut marketing is expensive. This means that farmers who can learn to produce higher volumes on the same amount of land and without adding too much cost, will make a large profit. Efficiency and productivity are far more important than quantity of land under cultivation. Local prices continue to rise because of a number of factors. A key factor behind peanut price increases in Haiti is the fact that each year less and less peanuts are produced, while population continues to grow. Are people eating fewer peanuts because they don’t want to or because they are too expensive? Again, the more farmers can increase their outputs, the less money they will need to make from each marmite of peanuts to make a profit. People can eat more peanuts at better prices and farmers can make more money.
Marmites / ¼ Carreau
Producer HTG / Marmite
1200marmites 1120marmites 480marmites 480marmites 160marmites
China Ghana Dominican Republic United States Haiti
19HTG 20HTG 33HTG 38HTG 50HTG
HTG / ¼ Carreau 22,800HTG 22,400HTG 15,840HTG 18,240HTG 8,000HTG
LESS PEOPLE
MORE PEANUTS
MORE PEOPLE
LESS PEANUTS
1980 2012
Comment [JR1]: Just curious, where is did you get the local prices for each? FAO (DR from a couple groups in PaP that buy from them)
Comment [JR2]: There may be a better way to do this, but I think it is important to hammer home the increase in efficiency, not just planting more acreage. The kneejerk for farmers is, “I can’t grow more, I don’t have any more land.” This is the place to do that. Perhaps in the cartoon? That may even be a key point in the final bullets. Totally agree. Im going to add this point in one of the first illustrations (potential vs actual, intro page)

2.4 QUALITY Beyond increasing yields, farmers must also increase the quality of their peanut production, first to benefit the health of the people who eat their products and second to be able to sell as a part of the Pwogram Pistach system, meaning selling to large, stable, domestic buyers. Selling as a part of the Pwogram Pistach system gives farmers access to key inputs, credit, services and trainings to help increase yields. But, these buyers only purchase high quality peanuts. Years of quality production and consistency can result in premiums for your products. For example, American peanuts receive premiums over Chinese and Argentine peanuts because of their quality and consistency over the years. Most all of the techniques described in this guide aimed at increasing quantity, will also result in an increase in quality and buyers will recognize this because they will get a better value for their money. For example, higher quality peanuts will make more peanut butter per marmite because they are bigger, more mature and there are fewer “pops” (faux grains) and less trash to sort out. So what does it exactly mean to have high quality peanuts? It means that the peanuts are picked at optimal maturity, well-dried following harvest (to less than 10% moisture content), and stored in a clean, dry, ventilated environment until consumption. Beyond being smaller and weighing less, low quality peanuts often have mold growing on and around them. How does this happen and what does it mean?
And what exactly is aflatoxin? Aflatoxin is a poison produced by molds called Aspergillus flavus or Aspergillus parasiticus. These molds are common in peanut and corn and found throughout the world. Aflatoxin is a concern for every peanut farmer who wants to sell a safe product or sells into a regulated market, which tests for this and only purchase alfatoxin-free peanuts. It is also important to note, aflatoxin is not a bacteria or virus, therefore it cannot be killed by heat like other contaminants (Salmonella, etc.). It can only be reduced by controlling the quality in the field and in storage. What does aflatoxin look like?
ZOOM 3x ZOOM 10x
IMMATURE
MOLD AFLATOXIN HIGH MOISTURE
POOR STORAGE

Final Draft
11
How does aflatoxin affect people and animals if consumed? 1) Immune suppression: it reduces the body’s ability to fight disease 2) Protein absorption: it reduces the body’s ability to absorb protein from the food consumed 3) Liver cancer: after many years of consuming contaminated food it can lead to liver cancer
Because of these health concerns, buyers of peanuts and peanut products must test for aflatoxin. If the peanuts are contaminated, they likely will not be able to buy them at all. In order to successfully avoid or reduce aflatoxin contamination a farmer must address all aspects of production, from planning to post-harvest handling, storage and marketing. What specific tips can be taken to decrease vulnerability?
Tip
Aflatoxin Prevention Tips
Description
1
Keep the plant healthy with adequate water and needed nutrients, as well as protect from disease or insects that may enter the pods. 2
Choose the best variety for your area and production needs that will produce a healthy plant. New varieties with resistance to disease and drought and possibly aflatoxin itself are being tested in Haiti.
3
Take care in harvesting to avoid cutting the pods with a hoe or machete. Damage to the pods will lead to mold entering and contamination. 4
Dry the peanuts as quickly and effectively as possible. Once below 10% moisture, aspergillus cannot grow. 5
Store the sorted peanuts in a well-ventilated, cool storage area that prevents rats and insects from damaging the pods. 6
Potential for aflatoxin increases in hot and dry periods. Irrigate approximately 30 days prior to harvest to reduce soil temperature and stress on the plant, and therefore potential for aflatoxin contamination.
There is a HUGE potential to increase peanut yields – this means growing more peanuts on
the same amount of land.
There is a HUGE potential for farmers to make more money from peanut crops.
There are two types of peanuts grown in Haiti – short duration bunch and long duration
prostrate – and both have positives and negatives.
Demand for peanuts in Haiti continues to rise while fewer peanuts are produced .
Farmers must treat peanut growing like a business: maximize sales and minimize costs.
Quality means harvesting mature peanuts and reducing humidity to less than 10% so that
molds cannot grow and contaminate your peanuts with aflatoxin.
Aflatoxin puts both your health and your business at risk.
PEANUT BASICS – KEY POINTS TO REMEMBER

3. PWOGRAM PISTACH GROWING SYSTEM There is power in numbers – think of how much a good football team or a productive Kombit can accomplish working together. The same applies to farming certain crops – working together, farmers can share knowledge, reduce costs, improve efficiency and gain access to key inputs and larger, higher margin markets. This is one of the main reasons American and Chinese farmers have such high yields and such good margins. It’s not that they more capable than Haitian farmers, it’s because they work together and benefit from working in organized markets. To make Haiti a more profitable place for growing peanuts, TechnoServe is helping organize peanut farmers and buyers into a growing scheme called Pwogram Pistach. Growing as a part of this scheme, farmers can overcome many of the challenges that often limit their productivity and income. Growing as a part of the Pwogram Pistach system means:
Throughout this guide, we’ll often refer to the Pwogram Pistach program. Yield and income gains will be directly linked to how closely farmers follow the instructions provided in this manual, as well as use the various other components available as a part of the Pwogram Pistach system.
3.1 CARTOON 2: SYSTEM GROWING OR BUSINESS AS USUAL
Grow high quality, aflatoxin-free peanuts
FARMERS GET:
Follow all best practices described in this manual
Trainings and technical assistance
Key fertilizers and fungicides
Specialized service providers
Guaranteed market for all your peanuts
Sell all peanuts immediately following harvest
FARMERS MUST:
High quality seed
Peanut targeted credit

4. PRODUCTION PLANNING The most successful farmers are not always the ones that have the most land or even the highest yields. The farmers who make the most money are the ones that manage their gardens like businesses. Businesses plan ahead (short and long term), track costs and yields (inputs and outputs), and make choices to maximize their profits. Think back to the goal, heavy outputs (sales) minus light inputs (costs) equals big profits.
4.1 LONG-TERM PLANNING Farmers must first think of how growing peanuts fits into the big picture – meaning, is my land good for peanuts and how should I fit them into my crop rotations? If you only plan for the current planting and neglect thinking about longer-term issues and peanuts as a part of a bigger system, you won’t be able to maximize your profits, both with peanuts and for other crops. Like all crops, peanuts do best in a rotation with other crops of different families that use difference resources and have different problems. Peanuts are best rotated with non-leguminous crops like corn, sorghum, sugar cane or hot peppers. In between each peanut growing season, farmers must grow other crops or avoid planting peanuts on the same land in consecutive seasons.
SALES COSTS PROFITS
BEST – MULTI-YEAR ROTATION
YEAR 1 YEAR 2 YEAR 3
GOOD – SIMPLE ROTATION
YEAR 1 YEAR 2 YEAR 3
Comment [JR3]: Did we have a specific table on why to do rotations? We should note things like fertilizing the corn and not peanuts, disease control… hard to explain discuss rotations without going over the principles.
Final Draft
14
What is your intended rotation? Let’s discuss.
Similar to crop rotations, seed sourcing must also be considered as a longer-term issue. Farmers must look beyond the current planting to plan how to access the highest quality seed at the lowest possible prices, year after year. In many cases, farmers are forced to buy seeds in local markets right before planting. This lowers their yields because the seed from these sources is typically low quality, and also generally increases their input costs, resulting in lower overall profits. Farmers should answer the following long-term questions each year:
1 What crops do I grow before and after peanuts? Am I rotating crops?
2 Are my yields increasing or decreasing? How can I increase my yields?
3 Are my costs increasing or decreasing? Where can I save money?
4
Is my crop infected with disease (leaf spot and peanut rust) every year? Can I afford to take a break from growing peanuts? How long should I take off?
5
What are my strategies to work with other farmers in the area? Can we work together on things like tillage and marketing?
Year 1
Oct Apr
Jan
Jul
EXERCISE 4: Long-Term Planning Questions (more than this planting)
Year 2
Oct Apr
Jan
Jul
EXERCISE 3: Crop Rotations
Final Draft
15
4.1.1 CARTOON 3: PEANUTS ROLE IN THE BIGGER PICTURE
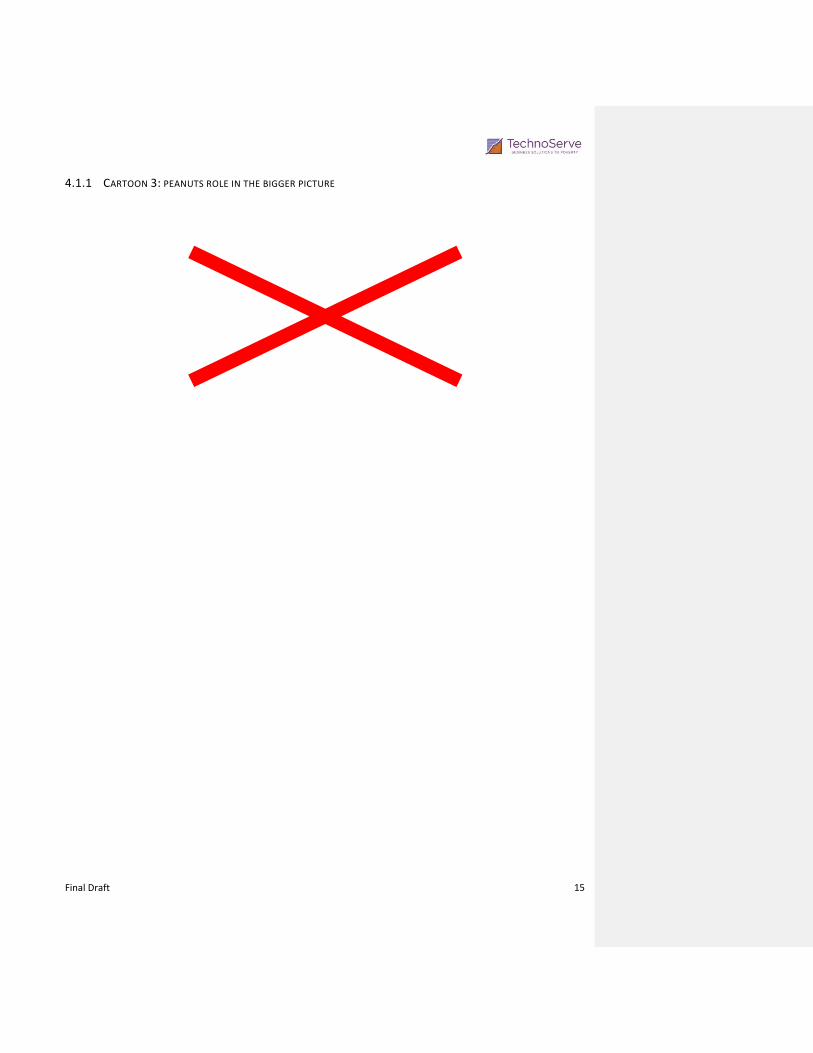
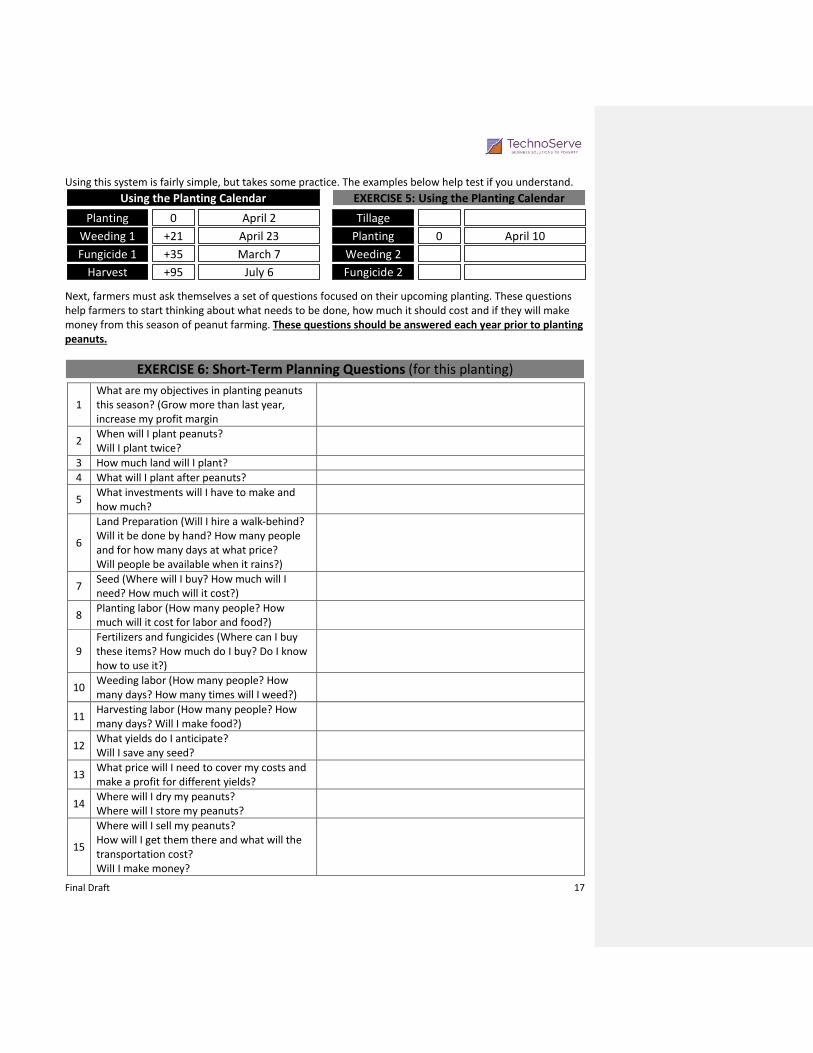
4.2 SHORT-TERM PLANNING Each time a farmer plants a garden, they are investing resources. As the peanut crop grows, a farmer must pay for weeding and then also must pay to harvest the peanuts when mature. These costs, as well as any other costs, must be planned for, recorded and analyzed so that a farmer can be sure he will be able to make a return on his investment. Combining this business approach with other components of growing as a part of system – information, training, inputs, and selling before planting – farmers can become more and more profitable, increasing the size of outputs while decreasing the size of inputs. Most farmers in Haiti are constrained by a lack of resources, knowledge and organization for increasing their production. However, if well planned and documented from start to finish, a smart farmer will be able to improve his production with the resources that are available and over time, will be able to afford more inputs and increase his production. Again, being a successful farmer doesn’t mean planting more area. It means making the most profit from the land that is being used. To start the planning process, farmers must understand what needs to be done and when. Because planting dates are often dependent on the rain, farmers should adjust their thinking to days before and after planting rather than specific dates. Planting is considered “day 0”, as shown below: Based on this thinking, we’ve developed a schedule to help farmers plan and record their activities – please review and discuss. If this is confusing, exercise 4 below will help to clarify this approach. This schedule will be used throughout the rest of the guide and farmers will document their actions based on this system. Please note, this schedule is for Valencia variety peanuts only.
Final Draft
17
Using this system is fairly simple, but takes some practice. The examples below help test if you understand. Next, farmers must ask themselves a set of questions focused on their upcoming planting. These questions help farmers to start thinking about what needs to be done, how much it should cost and if they will make money from this season of peanut farming. These questions should be answered each year prior to planting peanuts.
1 What are my objectives in planting peanuts this season? (Grow more than last year, increase my profit margin
2 When will I plant peanuts? Will I plant twice?
3 How much land will I plant?
4 What will I plant after peanuts?
5 What investments will I have to make and how much?
6
Land Preparation (Will I hire a walk-behind? Will it be done by hand? How many people and for how many days at what price? Will people be available when it rains?)
7 Seed (Where will I buy? How much will I need? How much will it cost?)
8 Planting labor (How many people? How much will it cost for labor and food?)
9 Fertilizers and fungicides (Where can I buy these items? How much do I buy? Do I know how to use it?)
10 Weeding labor (How many people? How many days? How many times will I weed?)
11 Harvesting labor (How many people? How many days? Will I make food?)
12 What yields do I anticipate? Will I save any seed?
13 What price will I need to cover my costs and make a profit for different yields?
14 Where will I dry my peanuts? Where will I store my peanuts?
15
Where will I sell my peanuts? How will I get them there and what will the transportation cost? WilI I make money?
Using the Planting Calendar
Weeding 1
Planting
Fungicide 1
Harvest
0
+21
+95
+35
April 2
April 23
July 6
March 7
Planting
Tillage
Weeding 2
Fungicide 2
0
April 10
EXERCISE 5: Using the Planting Calendar
EXERCISE 6: Short-Term Planning Questions (for this planting)

Final Draft
18
4.2.1 CARTOON 4: PLANNING FOR SUCCESS
Farming is a business – information and planning are essential for success.
Always record all costs and income to evaluate your farm: Outputs – Inputs = Profits.
Farmers can maximize profits by both increasing outputs (yields) while decreasing inputs
(costs).
Short term planning is necessary to make your farming successful.
Long term planning is necessary to make your business successful.
PRODUCTION PLANNING – KEY POINTS TO REMEMBER

Final Draft
19
EXER
CIS
E 7
: P
lan
nin
g Q
ue
stio
ns

5. SOIL PREPARATION AND PLANTING Soil preparation, seed and planting labor are three of the most expensive costs of the investing in a peanut garden. These three costs alone can account for up to 70% of total peanut farming costs. The following section will provide responses to the following questions:
5.1 SOIL PREPARATION Soil preparation is dictated by the soil type, previous uses of the land and what resources the farmer has available. At a minimum, the process includes: 1) initial clearing, 2) layout planning, 3) primary tillage, 4) seedbed preparation and 5) pre-planting seedbed check.
5.1.1 INITIAL CLEARING To make the tillage process as efficient as possible, farmers must removal all logs, stumps, plants and debris already in the field. Additionally, it is important to remove as much plant residue as possible, especially if peanuts were the previous crop. Plant residues should be burned or well decomposed before planting; otherwise they can harbor diseases that reduce yields of future crops.
5.1.2 LAYOUT PLANNING Layout refers to the organization of your planting and is typically either in rows or scatter formation. Despite scatter planting being fairly common in Haiti, farmers should plant in rows whenever possible. It is much easier to weed around peanuts when you know exactly where the plants are located rather than having to find them first. The same applies to applying fertilizers, fungicides and harvesting – it is cheaper and quicker if you use rows. The figure below compares the pluses and minuses of row planting versus scatter planting.
How can I test the quality of my seed?
What is the best way to prepare my field for planting and why?
What layout should I use for planting and why?
Soil preparation
Seed sourcing
Plant spacing
Layout
Planting Layout Options
Positives Rating
- Easier to weed by hand - Easier to apply pesticides - More efficient to harvest
Rows
Negatives
- Possibly slower to gain full ground cover to prevent weed growth
- Traditional, well-known method - More even, faster soil coverage for weed
control
Scatter (Gaye)
- Higher labor costs - Difficult to control seed spacing - Difficult to weed and apply pesticide
0 +10 +20 +30 +40 +50 +60 +80 +90 +100-10-20
TillageGermina on
Test
Plan ng
Germina onCheck
Fer lize1
Weeding1
Fungicide1
Weeding2
Fungicide2Fer lize2
MaturityCheck
Harvest
Planning
<-15
-5
0
+7
+21
+35
+40
+52
+80
+95

Final Draft
21
Optimal spacing is 20-24” between rows. This spacing is a product of the mechanical tiller and the famer should discuss the optimal orientation of the rows with the two-wheel tiller service provider. The figure below provides a diagram of this layout. If field preparation is done by hand or by ox-drawn plow, the farmer must be sure to measure and plan tillage in the desired row layout.
5.1.3 PRIMARY TILLAGE Once the field has been cleared and the farmer has planned his field layout, the tillage of the soil can be completed by hand, ox-drawn plow or two-wheel tiller. Costs, quality and required time depend on the method employed, however preparation by two-wheel tiller is the clear leader in all categories. When using two-wheel tillers, it is critical that the field is fully cleared before the service provider arrives.
Method
Soil Tillage Options
Time / ¼ carreau Cost / ¼ carreau Rating
By hand / manual +5 days +4000 HTG
Ox-drawn plow 3-4 days 3400 HTG
Two wheel tiller ¾ day 2000 HTG
Comments
- Low quality tillage (not deep enough) and extremely slow
- Medium quality tillage, must break up clods by hand
- Limited use on hard or rocky soils or irregular fields (trees, sloped)
Rows
Planting Layout Details
Row Line
Seed
24” 24” 24”
Row Line Row Line
Scatter
Seed
NO!
Comment [JR4]: I assume these ox # are from central plateau? I don’t have good # for this. Yeah, also from the south.

Final Draft
22
5.1.4 SEEDBED PREPARATION The seedbed is the area in which the seeds are planted. Another advantage of using mechanical tillage is that it creates the seedbed for the farmer. The seedbed must be well-worked, loose and friable soil without crop debris or remains of leaves and roots from the plants present before the land was cleared. The seedbed should not be allowed to flood. Additional information on seedbeds includes:
Raised beds: Tillers and ox-drawn plows typically produce raised beds that are needed for heavy, poorly draining soils.
Non-raised beds: If the soil is sandy and well drained, farmers should plant without raised beds whenever possible.
5.1.5 PRE-PLANTING SEEDBED CHECK Following the primary tillage and prior to planting, the farmer must make sure the soil remains loose, friable and clod-free, as well as ensure no weeds begin to grow. If the time between tillage and planting is longer than one week, farmers must complete a weeding prior to peanut planting.
Seedbed
Rows

Final Draft
23
5.1.6 CARTOON 5: QUICKER, CHEAPER AND HIGHER QUALITY
5.2 PLANTING While completing field preparation, farmers must concurrently be sourcing and testing the seed they intend to plant. Farmers should strive to maximize their seed quality while minimizing costs. This process includes: 1) seed sourcing, 2) germination testing, 3) optimal distribution planning and 4) planting.
5.2.1 SEED SOURCING Planting quality seed is the single most important aspect of growing peanuts. Peanut farmers must do all that they can to plant the highest quality seed and avoid buying seed at peak prices. Seed can be sourced in three main ways, using a seed credit system, farmer saving and stocking, and buying in the markets. Of these three possible sources, using seed credit provides the highest possible quality seed at the lowest cost.
Remember, you are spending a lot of money on soil preparation, so you must be sure to plant only good seed or your investment may be lost. Peanut seed is very fragile and is affected by heat and humidity. If not stored properly, the germination rate will decrease. Peanut seed is also affected by handling. Hand shelling and sorting the seed prior to testing the ideal way to prepare seed. If planting large areas, mechanical shelling may be required, but beware that damage to the seed coat (testa) can reduce germination. The peanuts should be sorted for the most mature seed, which can be determined by the color of the seed and the inside of the shell. When fully mature, the shell will be brown to black and the peanut will be full, and not wrinkled.
Method
Soil Sourcing Options
Quality Cost / ¼ carreau Rating
Purchase in market Low 2500 HTG
Farmer save/stock Varies 2000 HTG
Seed credit program High 2000 HTG
Comments
- Market seed is the lowest quality at the highest price
- Farmers rarely save high quality seed and proper storage is difficult
- High quality seeds yield more peanuts meaning more profits for farmers

Final Draft
24
Although using seed credit programs is the best option, the following provides a general procedure for farmers who select and save seed from their own plantings.
5.2.2 GERMINATION TESTING Germination is the process of a seed starting to grow into a plant. In order to maximize yields, farmers should verify that they are planting seed that will germinate. To test germination, there are two primary methods: 1) soaking the peanut seeds and wrapping them in a wet cloth, or 2) planting the peanut seeds in a small area and watering them in the ground. It is important that the peanut seed is in firm contact with the moisture. Regardless of the method, the figures below show images of peanut germination as well as provide a step-by-step germination testing procedure.
Step
Seed Selection Procedure
Description/Comments
1
Dry seed very well – a minimum of 5 days of sun. 2
Only select seed from healthy plants. This should be done during harvest.
3
Store in cool, well-ventilated area with neem leaves in sacks if insect protection is needed. 4
Shell the seed by hand if possible (mechanical shelling can cause damage). 5
Sort shelled seed for maturity and damage. 6
Sort out all the “pops” and damaged hulls.
Complete germination testing. 7
OR
Step
Germination Testing Procedure
Description/Comments
1
Sort and select 50 seeds for test. 2
Take selection of possible seeds.
3 Wrap seeds in moist
towel. Plant seeds in rows in small, protected area.
Keep seeds moist and wait 5 days. 4
Count the number of germinated seeds out of the 50 seed sample. 5
Evaluate maturity with Germination Testing Results Interpretation figure. 6
No germination
Germination

Final Draft
25
5.2.3 DISTRIBUTION PLANNING We already know that planting in rows is the best option. Next we must determine the inter-row spacing of seeds, or distribution, we will use. Among a number of other factors (variety, mechanization, seed cost and weed control), the germination test results will dictate how close we need to plant our seeds in order to maximize our yields. Use the germination test results and the figure below to select the planting distribution and seed quantities. Based on the information above, we know whether or not to plant or to plant in what distribution, based on our germination test results. The planting layout and distribution figure below provides exact spacing for either of these two recommendations, as well as number of shelled marmites per ¼ carreau.
50 Seeds
> 45 Seeds
< 45 Seeds
> 37 Seeds
< 37 Seeds Do not plant
Planting Distribution 2
Planting Distribution 1
STEP 2 STEP 3 ACTION
GERMINATE
GERMINATE
STEP 1
Germination Testing Results Interpretation
Distribution 1 Distribution 2
Planting Layout and Distribution
24” 24” 24”
9 shelled marmites per ¼ carreau
Row Line Seed
6”
24”
6”
24”
2 p
lan
ts /
fo
ot
24”
5 shelled marmites per ¼ carreau
Row Line
6” 4” 4” 4”
Seed
Number of Seeds
50
EXERCISE 8: Using the Planting Calendar
Number Germinated Planting Decision Seeds per ¼ Carreau
28 Do not plant -
50 47
50 38

Final Draft
26
The above planting layouts take a number of factors into consideration, including germination rate, variety, mechanization, seed costs and weed control. The following provides additional details on factors outside of germination rate in selecting plant layouts and distributions. Variety: Prostrate peanuts (Runner) can cover more ground than bunch varieties (Valencia) and therefore can handle wider spacing. However, a key point to remember is that all peanut varieties produce the majority of their pods near the principle root. While wider spacing may cost less in seed, you will be sacrificing some area for the more productive “taproot crop” even with runner peanuts that produce more “limb crop”. Mechanization: Machine harvesting and planting will determine row widths and the spacing control is determined by number of peanuts per row foot. Seed costs: If seed costs are high, one can consider spacing wider and the per plant production rate will be higher. However, this will reduce the yield potential for the unit area of production. Saving your own seed from your best plants, or using high quality seed from a seed credit program, are your best bets to assure your needed quantity and control costs. Weed control: Narrower spacing will create faster canopy closure and therefore more natural weed suppression.
Although we will only use two distributions and one layout method (rows), the examples below help us to better understand the reasoning behind selecting specific layouts and spacing.
TapRootCrop LimbCrop
I need more plants per foot
What variety? How will I prepare the soil? What is my germination rate?
Valencia Mechanical 2-wheel tiller < 90%
I want closer spacing because it’s a bunch variety
I will plant in rows
Rows – Distribution 2
Planting Layout Determination Example 1
I need fewer plants per foot
What variety? How will I prepare the soil? What is my germination rate?
Runner Mechanical 2-wheel tiller > 90%
I can use wider spacing because it’s a prostrate variety
I will plant in rows
Rows – Distribution 1
Planting Layout Determination Example 2
Final Draft
27
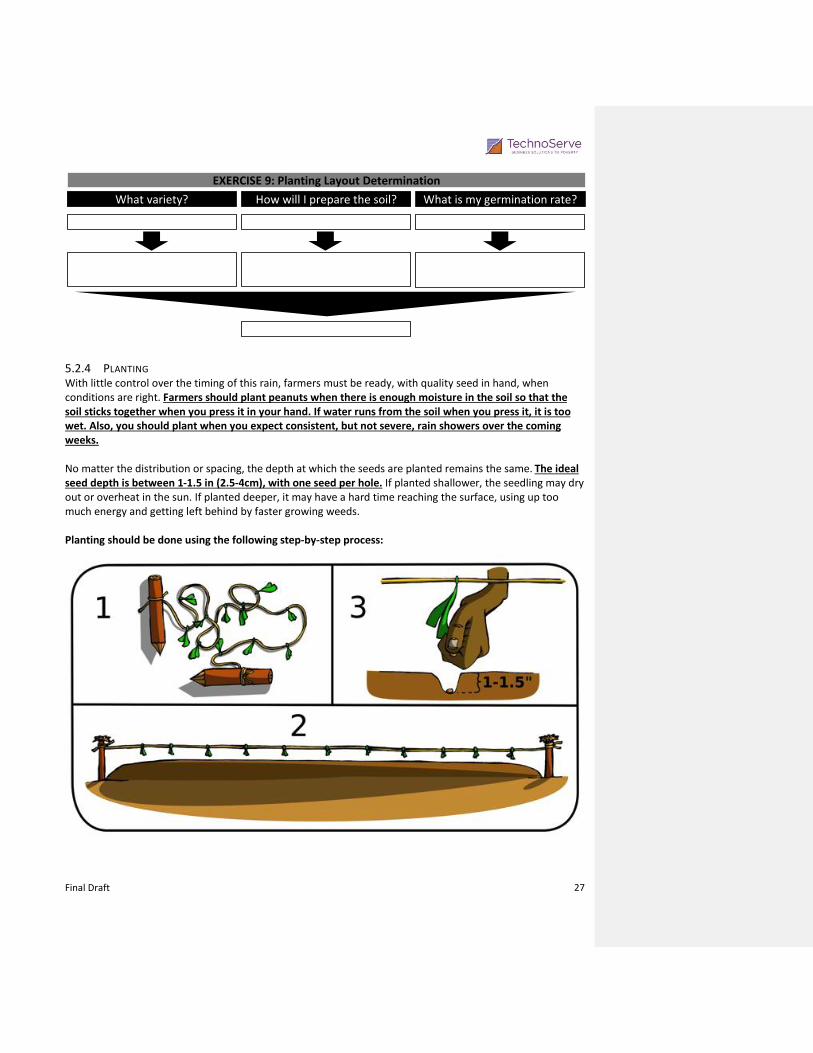
5.2.4 PLANTING With little control over the timing of this rain, farmers must be ready, with quality seed in hand, when conditions are right. Farmers should plant peanuts when there is enough moisture in the soil so that the soil sticks together when you press it in your hand. If water runs from the soil when you press it, it is too wet. Also, you should plant when you expect consistent, but not severe, rain showers over the coming weeks. No matter the distribution or spacing, the depth at which the seeds are planted remains the same. The ideal seed depth is between 1-1.5 in (2.5-4cm), with one seed per hole. If planted shallower, the seedling may dry out or overheat in the sun. If planted deeper, it may have a hard time reaching the surface, using up too much energy and getting left behind by faster growing weeds. Planting should be done using the following step-by-step process:
What variety? How will I prepare the soil? What is my germination rate?
EXERCISE 9: Planting Layout Determination

Final Draft
28
5.2.5 CARTOON 6: PRECISON MATTERS
Two-wheel tillers provide the best soil preparation at the lowest cost.
Plant quickly after soil is prepared to control weeds.
Be sure to plant the best possible seed – this will dictate your crop’s potential yield.
Always test germination rate of seed. Poor germination rate plant more seed or buy new
seed.
Always plant in rows – it will save you time and money.
Do not “stretch” seed to fit your land. Follow the recommended seed spacing to maximize yields and minimize maintenance costs.
SOIL PREPARATION & PLANTING – KEY POINTS TO REMEMBER

Final Draft
29
6. GETTING THE MOST FROM YOUR INVESTMENT
Plants, like people, need a number of different things to survive – typically a combination of sunlight, water and nutrients. We can think of this mixture like elements of good sauce creole: it needs a balance of oil, tomato, garlic, seasonings, etc., mixed and cooked at different times. Plants, like people, don’t all like the same flavors. Peanuts don’t need the same elements as corn or sweet potatoes, or prefer them at different times in their growth cycles. This section will discuss how Haitian farmers can cook up what peanuts would call “the perfect sauce creole” – the right combinations of sunlight, water and nutrients.
0 +10 +20 +30 +40 +50 +60 +80 +90 +100-10-20
TillageGermina on
Test
Plan ng
Germina onCheck
Fer lize1
Weeding1
Fungicide1
Weeding2
Fungicide2Fer lize2
MaturityCheck
Harvest
Planning
<-15
-5
0
+7
+21
+35
+40
+52
+80
+95

Final Draft
30
6.1 SUNLIGHT Like all plants, peanuts need sunlight to create energy and peanut farmers know that peanuts like full sun. They can grow in partial shade of a tree, but depending on conditions, they prefer lots of sunlight. Because Haiti is a tropical country and has adequate sunlight all year round, peanuts can be planted all year. The one thing to remember regarding sunlight – do not plant under trees.
6.2 WATER The defining limitation for most Haitian growers is water. Peanuts are more tolerant to drought than many other plants, but their production can be greatly reduced by either a lack of water or too much water. Unlike rice, peanuts cannot withstand standing water for more than a few days because their roots need to breathe and the pods will rot. Because certain periods are more important than others in terms of water needs, farmers should record when it rains to get identify yearly weather patterns. Although not nearly as consistent as controlled irrigation, farmers can use their knowledge over the years to optimally time their plantings. A simple rule of thumb is to wait until you expect consistent rain over the coming three months. Also, as mentioned before, soil should have enough moisture so that it sticks together when pressed in your hand. The table below identifies the key growth periods of a peanut plant with corresponding water needs. Using this chart, we can better understand when the plants need water the most.
Again, it is important to mention that achieving these optimal amounts of water is very difficult because you can’t control the rain. The only option for most Haitian farmers is to try to time their planting so that they have water when it is needed. This is not easy, but over time most farmers know when they can expect rain during the year and plant accordingly. The only thing farmers can control is to have their fields and seed prepared ahead of time for when they get the right rains to plant and get good germination. The only other option is irrigation. Many farmers in the countries that produce large amounts of peanuts will use irrigation, but peanuts present many challenges for irrigation. First, since they are mostly grown in sandy soil, the simplest and most common way of irrigating in Haiti, flood irrigation, is not useful. If peanuts are grown in clay soils, flood irrigation presents a risk of rotting the pods of not controlled.
Period
Water Requirement Details
Days After Planting
Water Importance
Irrigation Amount
Drought Impact
Reasons
Pre-plant -5 Moderate 0.5”
as needed Delayed planting
Compacted soils need some moisture for tillage.
Planting / germination
0 – 7 Very high 0.5”
as needed Reduced
germination Essential for germination and emergence.
Emergence 7 – 45 Moderate 0.5”
as needed Stunted growth
Can withstand some stress during this period. Excess water can lead to early disease issues.
Pegging / early pod growth
45 – 60 High 0.75-1.0” per week
Reduced fruiting
Water is needed to assure unencumbered peg entry.
Pod fill 60 – 110 Very high 1.0-1.5”
per week Reduced fill
Plant needs water to produce energy for filling pods.
Maturity 110 – 125 Moderate 0.75-1.0” as needed
Increase aflatoxin risk
Drought stress and wilting increase likelihood of aflatoxin contamination and delay maturation.

Final Draft
31
6.3 SOIL FERTILITY Our discussion of soil fertility will be broken into three sections: 1) understanding peanut soil needs, 2) general fertilizer information and 3) application of targeted fertilizers.
6.3.1 PEANUT SOIL NEEDS Peanuts are an excellent crop to grow in most Haitian soils. Peanuts generally prefer loose, sandy soils, which are well drained to prevent water logging and allow for the flowering bodies to easily penetrate the soil and produce the fruit underground. However, they can be grown on even fairly heavy soils if the soil moisture is adequate and the soils are well tilled. Another important feature to understand about soils is the amount of organic material. Soil structure, water-holding capacity and some nutrient availability are improved by organic material. Generally, it is always better to try to increase soil organic material for all crop production through adding compost and plant residues. Peanuts need 16 essential elements to produce, but we will cover only the ones that soil testing has shown to be the most essential for producing peanuts in Haiti.
Element Importance Possible Sources
Elements Critical to Peanut Growth in Haiti
Priority
Nitrogen
(N)
Because peanuts are leguminous, they typically produce their own N. If peanuts are not effectively inoculated with rhizobium bacteria, they may not produce adequate N.
If there is no nodulation, the plant is using soil N and you can add either commercial inoculant or spread green root material from an area where the peanuts are properly nodulated prior to planting.
Phosphorus
(P)
P is typically lacking in Haitian soils. Yields in similar production systems increased by 500-1000 kg/ha from P application. For farmers in Haiti, this may mean a doubling of yields.
P can be augmented naturally by adding composted manure or by adding synthetic fertilizer with a high P content like diammononium phosphate (DAP 18-46-0) or mono potassium phosphate (0-54-30).
Potassium
(K) TBC
Traditionally, K is added naturally through burned plant materials. K can be added synthetically through complete fertilizer with a higher K value, like mono potassium phosphate (0-54-30).
Boron
(B)
B is an essential element for the development of good seed. It improves yields and reduces “pops” or “hollow heart”.
B is generally added by spraying it during flowering. It can be added to most fungicide sprays to save time. Soluble B may not be available in Haiti, but it is often included in foliar fertilizers that may provide some impact.
MONITOR
FERTILIZE 50 kg P /
¼ carreau
FERTILIZE 50 kg K /
¼ carreau (above)
MONITOR
1
4
3
2
Action
0 +10 +20 +30 +40 +50 +60 +80 +90 +100-10-20
TillageGermina on
Test
Plan ng
Germina onCheck
Fer lize1
Weeding1
Fungicide1
Weeding2
Fungicide2Fer lize2
MaturityCheck
Harvest
Planning
<-15
-5
0
+7
+21
+35
+40
+52
+80
+95

Final Draft
32
6.3.2 GENERAL FERTILIZER INFORMATION Generally, synthetic fertilizers are not used on peanuts in Haiti, but it is important to understand how they may be useful as production increases. Most fertility guides discuss the “macro-elements” Nitrogen (N), Phosphorus (P) and Potassium (K): the letters that correspond to the numbers seen on fertilizer bags. For example, 20-20-10 means that the fertilizer will have 20% N, 20% P and 10% K by weight. Since it doesn’t add up to 100%, the rest is just filler… so 50% of the above fertilizer is inert ingredients. Here are a few guidelines for fertilizers: Most synthetic fertilizers in Haiti come in granular form and should be added prior to planting or shortly
thereafter. It is important to not allow the granular fertilizer to touch the seed, as the salts may burn the seed. Instead, apply it in bands on the surface above or to the side of the seed. This is a case where planting in rows will greatly affect the efficiency of your fertilizer use.
Powdered fertilizers, like Boron, are generally to be added to a sprayer tank mix and can sometimes be added to fungicides so that only one pass through the field is needed.
Calculating application rates is difficult since you must know the amount of active ingredient per unit area of land and measuring these things is not simple. The following examples provide a basic introduction to calculating how much fertilizer to use per area of land based on recommended application rates of active ingredients.
What do I want to apply?
What is the recommended application per ¼ carreau?
Response
How Much Fertilizer? Example 1
Phosphorus
21 kg of P/ ¼ carreau
What is the percent of element in the fertilizer? DAP 18-46-0 46% P Runner
How much do I need per ¼ carreau? 21 kg / 46% = 47 kg/ ¼ carreau Runner
Question
How big is my field?
½ carreau
How much do I need for my field? carreau?
2 x 47 kg = 94 kg/ ½ carreau Runner
What do I want to apply?
What is the recommended application per ¼ carreau?
Response
How Much Fertilizer? Example 2
Phosphorus
21 kg of P/ ¼ carreau
What is the percent of element in the fertilizer? MKP 0-54-30 54% P Runner
How much do I need per ¼ carreau? 21 kg / 54% = 39 kg/ ¼ carreau Runner
Question
How big is my field?
¼ carreau
How much do I need for my field? carreau?
1 x 39 kg = 39 kg/ ¼ carreau Runner
Final Draft
33
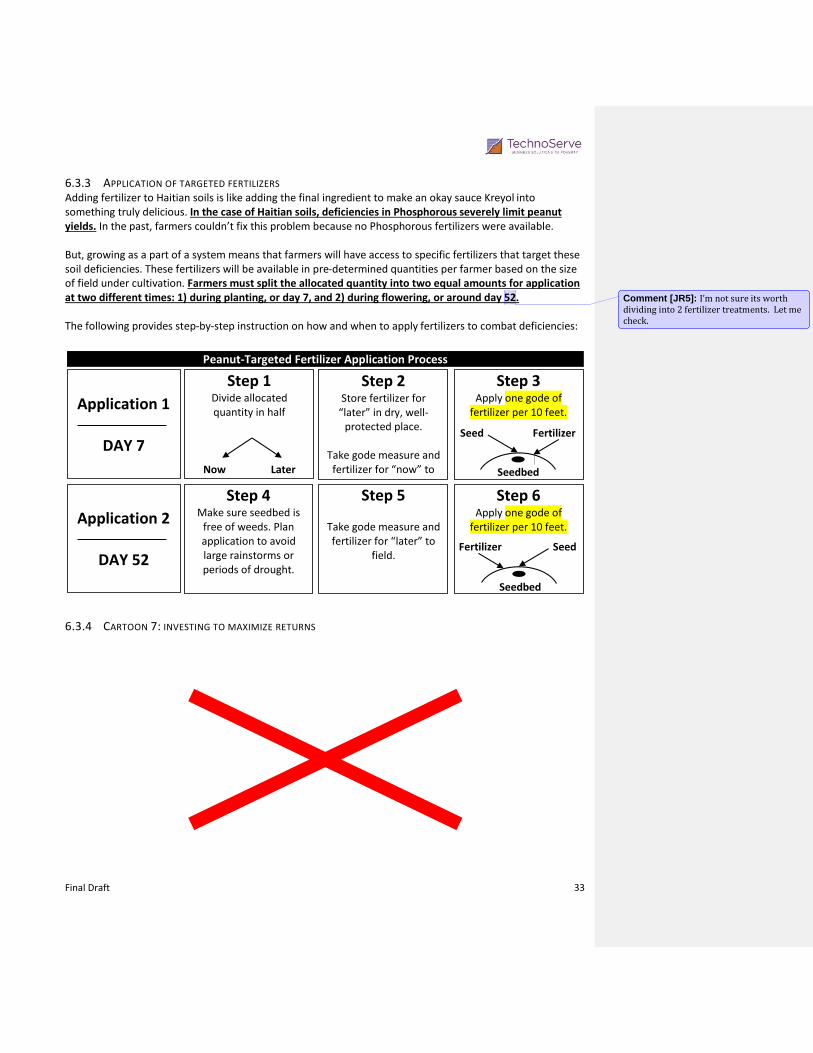
6.3.3 APPLICATION OF TARGETED FERTILIZERS Adding fertilizer to Haitian soils is like adding the final ingredient to make an okay sauce Kreyol into something truly delicious. In the case of Haitian soils, deficiencies in Phosphorous severely limit peanut yields. In the past, farmers couldn’t fix this problem because no Phosphorous fertilizers were available. But, growing as a part of a system means that farmers will have access to specific fertilizers that target these soil deficiencies. These fertilizers will be available in pre-determined quantities per farmer based on the size of field under cultivation. Farmers must split the allocated quantity into two equal amounts for application at two different times: 1) during planting, or day 7, and 2) during flowering, or around day 52. The following provides step-by-step instruction on how and when to apply fertilizers to combat deficiencies:
6.3.4 CARTOON 7: INVESTING TO MAXIMIZE RETURNS
Peanut-Targeted Fertilizer Application Process
Step 1 Divide allocated quantity in half
Now Later
Step 2 Store fertilizer for
“later” in dry, well-protected place.
Take gode measure and
fertilizer for “now” to field.
Step 4 Make sure seedbed is
free of weeds. Plan application to avoid large rainstorms or periods of drought.
Step 5
Take gode measure and fertilizer for “later” to
field.
Step 3 Apply one gode of
fertilizer per 10 feet.
Seed Fertilizer
Seedbed
Step 6 Apply one gode of
fertilizer per 10 feet.
Seed Fertilizer
Seedbed
Application 2
DAY 52
Application 1
DAY 7
Comment [JR5]: I’m not sure its worth dividing into 2 fertilizer treatments. Let me check.

Final Draft
34
Do not plant peanuts in the shade whenever possible.
Peanuts have different water needs at different times in the growth process. Time planting
to when consistent rain is expected over the coming months.
Peanuts are leguminous and don’t need additional nitrogen. Only use specific,
recommended fertilizers that combat nutrient deficiencies.
Do not apply fertilizer directly on seed row – it may burn the peanuts. Apply first to the
right of the seedbed center, and second to the left of the seedbed center.
GETTING THE MOST FROM YOUR INVESTMENT – KEY POINTS TO REMEMBER

Final Draft
35
7. PREVENTING PESTS FROM REDUCING YOUR YIELDS Planting a crop is like filling a basin that is far from the water source. You have made a big effort to fill the basin and so you try to avoid losing water through holes in the bottom or spilling out of the top. Whenever a pest is attacking your crop, it is as if the basin is getting more holes in the bottom and the water is draining out. Your objective as a farmer is to keep water in the basin as long as possible by preventing holes from appearing in the bottom, or keeping your crop as healthy as possible until harvest so that it can produce the most possible peanuts. Once the crop has been planted using high quality seed, good clearing and tillage, and ideal spacing, you want to get the most out of that investment. The holes that can appear in the basin are all the things that affect the plant’s health. The basin can better resist holes if it gets enough sunlight, water and soil nutrients. If the plant is in poor soil, suffers from drought, or is covered by weeds, it is as if the basin is much more likely to be punctured. If the plant is attacked by diseases or insects, the holes will get bigger and more numerous until there isn’t much water left. This section covers the subjects that most production guides would cover – weeds, diseases and insects. However, we will not try to be exhaustive of all detail, but will try to focus on the impacts of each of these potential “holes in the basin” and give instruction on how to best manage these challenges in Haiti.

Final Draft
36
7.1 WEEDS Weed control is important for many reasons. Weeds are like thieves, stealing water and soil nutrients, and blocking the sun from the peanuts if they get too tall. They also make harvesting peanuts harder, increasing labor and costs. Farmers need to do all that they can to control weed growth, including maximizing the peanut plant’s natural defense mechanisms as well as pulling weeds by hand. The following provides a basic explanation of possible weed control methods and how to use them effectively:
Remember the teeter-totter we used earlier to describe the relationship with inputs and outputs? We can think of weeding in this same way – inputs being the cost of labor to complete each weeding and the outputs being the increase in yield because of each weeding. We could weed once a week and we’d be sure to remove every weed from our field. This would be extremely expensive, however, and we would spend all our profits on labor for weeding. If we didn’t weed at all, we wouldn’t have to pay for weeding labor but our sales would be extremely low because weeds would overrun our field. We need to find the right balance between the two.
Method
General Weed Control Methods
How it works
Good germination and tighter plant spacing helps the peanut plants to crowd out the weeds. Once the peanut leaves cover the soil, the weeds are less likely to compete. After 50 days, peanuts will have full canopy.
Plant stand
Recommendation
Plant in dense stands and use good seed.
Most all peanuts in Haiti are weeded by hand with hoes or machetes. In order to makes this process more efficient and faster, plant in rows. It is also less likely that plants will be damaged by people working in the field.
Mechanical weeding
Plant in rows.
Keeping the field clean of weeds early in the season has a bigger improvement on yield than weeding later in the season when the weeds are big.
Timing of weeding
Weed early and often.
INPUTS Weeding Cost
OUTPUTS Yields
0 +10 +20 +30 +40 +50 +60 +80 +90 +100-10-20
TillageGermina on
Test
Plan ng
Germina onCheck,
Fer lize1
Weeding1
Fungicide1
Weeding2
Fungicide2Fer lize2
MaturityCheck
Harvest
Planning
<-15
-5
0
+7
+21
+35
+40
+52
+80
+95
Comment [JR6]: May note that we don’t discuss herbicides.

Final Draft
37
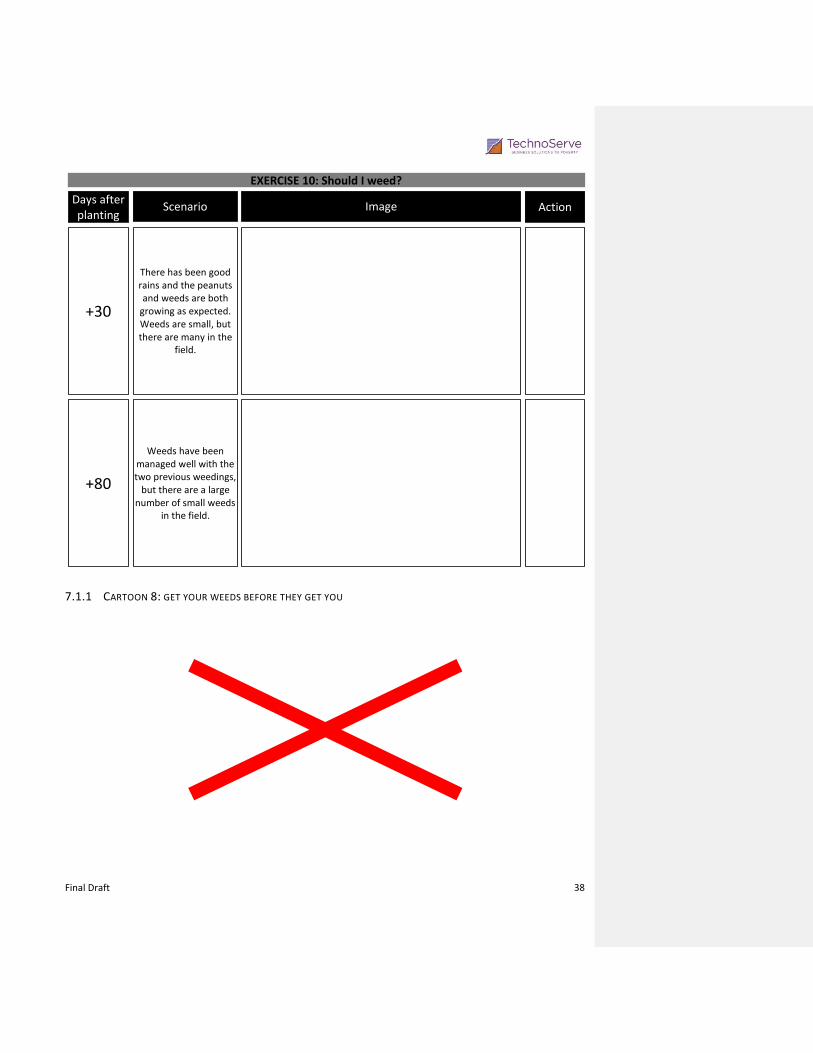
It is also important to remember that weeds must be controlled before they are allowed to take over a garden. If farmers wait too long, the damage weeds cause is irreversible, plus it takes longer and costs more to complete the weeding. Based on our research, farmers can maximize their outputs and minimize their inputs using the following weeding timeline:
COSTS SALES OPTIMUM
COSTS
SALES COSTS
SALES
PROFITS
TOO MANY
NOT ENOUGH
Weeding Timeline
Description/Comments
-10 – 0 Make sure weeds have not started to grow between tillage and planting. Weed
prior to planting.
Days
+21 It is critical that farmers weed thoroughly before weeds grow taller than 2-3”. This weeding is critical to crop health and is typically completed by paid labor.
+40 Farmers must monitor weed growth following the first weeding and complete targeted weedings as needed. This weeding is typically completed by the farmer.
Pre-plant rogueing
Task
Primary weeding
Secondary weeding
+60 If done on time and correctly, peanut plants should gain full coverage and limit weed growth. Farmers must eliminate any large weeds that happen to grow.
Targeted roguings
Final Draft
38
7.1.1 CARTOON 8: GET YOUR WEEDS BEFORE THEY GET YOU
Weeds have been managed well with the two previous weedings,
but there are a large number of small weeds
in the field.
Days after planting
Scenario Image
+30
There has been good rains and the peanuts and weeds are both
growing as expected. Weeds are small, but there are many in the
field.
EXERCISE 10: Should I weed?
Action
+80

Final Draft
39
7.2 DISEASE Our discussion of diseases affecting peanut cultivation in Haiti will consist of three main sections: 1) general disease information, 2) methods to combat these diseases and 3) specific details on application of targeted fungicides.
7.2.1 GENERAL DISEASE INFORMATION We can think of peanut diseases as holes in our basin that get bigger and bigger over time. When crops are young, the holes are small and barely noticeable. As crops mature, these holes get to be so large that we lose almost all our water before making it home. Several diseases that affect peanuts in Haiti can dramatically lower yields and cause premature harvesting. In terms of return on invested time and money, disease management should be the first place a Haitian farmer should look when considering inputs. It is common for farmers in Haiti to say that peanuts are mature when they are dry. This is not true. It does mean that they should be harvested, but in almost all cases, the peanuts are not reaching their full maturity and yield potential because they are succumbing to diseases that cause the plant to become dry and eventually die. In these cases, farmers often miss out on hundreds of marmites of peanuts because the plant never reached its maturity. There is more info about determining maturity in the next section, but it is important to know that dead leaves are not a sign of plant maturity. Much like humans, we need to understand what sickness we have before we choose how to get rid of it. To understand how to best keep our plants healthy, we need a basic introduction to the most important diseases affecting peanuts in Haiti. These diseases can be divided into 1) diseases of the leaves and 2) diseases of the stems, roots and pods. Because they are the most common and have the biggest effect on yields in Haiti, our primary focus will be on diseases caused by molds of fungi that attack peanut leaves. These diseases steal capacity of the leaves of the plant to produce energy for make more peanuts and eventually may kill the plant. Images of the two diseases with the biggest impacts on yields – peanut rust and leaf spot – are below.
PEANUT RUST LEAF SPOT
0 +10 +20 +30 +40 +50 +60 +80 +90 +100-10-20
TillageGermina on
Test
Plan ng
Germina onCheck
Fer lize1
Weeding1
Fungicide1
Weeding2
Fungicide2Fer lize2
MaturityCheck
Harvest
Planning
<-15
-5
0
+7
+21
+35
+40
+52
+80
+95

Final Draft
40
Additional details on these and other diseases that affect peanuts in Haiti are included in the table below.
7.2.2 METHODS TO COMBAT DISEASES There are several practices that can help reduce both foliar and stem diseases, including:
1) Follow a rotation program: Ideally, if a crop is infected, a farmer wouldn’t plant the same land in peanuts for four years in order to reduce the contamination potential of some diseases. Good crops to rotate peanuts are corn (without beans) or sorghum or potentially sweet potatoes. Bad rotations would be other leguminous plants, like beans. Rotations help with soil fertility and pesticide regimes as well as disease suppression.
2) Reduce field waste between plantings: If all the peanut vines are removed from the field between plantings, there is less host space for soil born diseases to live when peanuts aren’t planted. Most of the diseases discussed are “obligate feeders” meaning that they can only survive on peanuts and therefore if there are no peanut materials, they will perish too.
3) Follow a good fungicide regime: Fungicides are mostly preventative; they cannot kill a pathogen that is already taking over the plant. They can only protect newly grown parts of the plants from being
Disease Area Affected Description Recommendation
Peanut rust (Puccinia arachidis)
Leaves
Rust is a wind-born disease that greatly affects peanut production in the tropics. It forms tiny tan pustules that form on the bottom of the leaves beginning on the bottom of the plant and spread upwards. Each of the pustules can produce thousands of spores per week and so spread exponentially.
Apply fungicide
Most Common Peanut Diseases in Haiti
Leaf Spot (Early- Cercospora
arachidiola and Late-
Cercosperidium personatum)
Leaves
Leaf spots are soil-born fungi and are identified as brown lesions with yellow halo and brown/black spots on the back and also on the front of leaves. From the soil, they start at the bottom of the plant and begin forming within a month after emergence depending on conditions. Like rust, they also produce thousands spores per week.
Apply fungicide, use rotations, clean fields of
peanut residue
White mold (Sclerotium rolfsii)
Stems and roots
This white, fibrous mold is commonly found growing on the stem and branches of the peanut. It may follow a row and kill all the plants. It can be exacerbated by pushing soil around the branches of the peanut, a common practice in Haiti.
Use rotations, clean fields of peanuts
residue, do not push soil on to limbs
Aspergillus crown rot (Aspergillus
niger): Stem
When you find an isolated peanut plant that has died after reaching about 6-10” tall. It may have a ring around the base with this black mold.
Apply commercial seed fungicide treatment, use
rotations
Final Draft
41
infected. Therefore, fungicides could be sprayed as often as every two weeks for optimal disease control. However, this may not be the optimal treatment regime for controlling input costs. See the fungicide charts for specific information related to applying peanut fungicides.
4) Time your plantings: Planting during the appropriate season can also help reduce disease pressure caused by drought or too much rain. The right balance must be found between lowering plant vulnerability to disease and optimal moisture quantities for overall health.
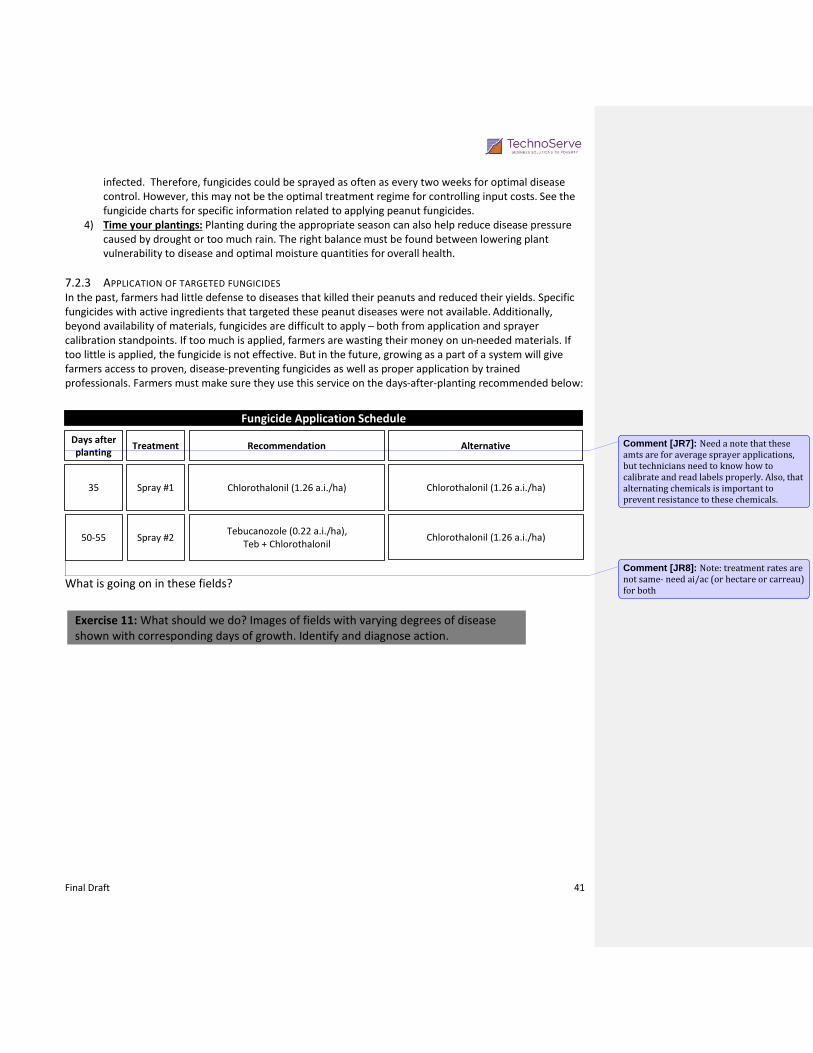
7.2.3 APPLICATION OF TARGETED FUNGICIDES In the past, farmers had little defense to diseases that killed their peanuts and reduced their yields. Specific fungicides with active ingredients that targeted these peanut diseases were not available. Additionally, beyond availability of materials, fungicides are difficult to apply – both from application and sprayer calibration standpoints. If too much is applied, farmers are wasting their money on un-needed materials. If too little is applied, the fungicide is not effective. But in the future, growing as a part of a system will give farmers access to proven, disease-preventing fungicides as well as proper application by trained professionals. Farmers must make sure they use this service on the days-after-planting recommended below:
What is going on in these fields?
Exercise 11: What should we do? Images of fields with varying degrees of disease shown with corresponding days of growth. Identify and diagnose action.
Days after planting
Fungicide Application Schedule
Treatment Recommendation Alternative
35 Spray #1 Chlorothalonil (1.26 a.i./ha) Chlorothalonil (1.26 a.i./ha)
50-55 Spray #2 Tebucanozole (0.22 a.i./ha),
Teb + Chlorothalonil Chlorothalonil (1.26 a.i./ha)
Comment [JR7]: Need a note that these amts are for average sprayer applications, but technicians need to know how to calibrate and read labels properly. Also, that alternating chemicals is important to prevent resistance to these chemicals.
Comment [JR8]: Note: treatment rates are not same- need ai/ac (or hectare or carreau) for both
Final Draft
42
7.2.4 CARTOON 9: GET TREATMENT BEFORE YOU ARE SICK

Final Draft
43
7.3 INSECTS Insects are often the first problems identified by farmers. Although it shouldn’t be ignored, most insect damage is relatively insignificant compared to other environmental and pathological issues. Research has shown that peanuts produce more leaves than are required by the plant to reach maximal yields. This means that peanuts can withstand a certain amount of insect damage to leaves with minimal impact on yields. Controlling insects is also very difficult without the use of chemical insecticides, which, if used incorrectly can be very dangerous for the applicator of the product, consumer of the peanuts and environment in which the peanuts are produced. Again applying the upside of the output – downside of the input framework, we recommend against using chemical insecticides. We do recommend using certain natural insecticides that have some effect against insects. Neem oil, made from neem leaves or seeds, is one such organic treatment. It deters sucking insects, crickets and moths and can be used preventively or curatively. It typically stays active for 6-10 days after spraying. Rain will wash the oil off the plants so re-application following rains is required. These treatments could even be done in the same tank mix as the recommended fungicides. For a step-by-step process on how to make your own neem oil, see below:
Step Description/Comments
1
Place crushed leaves in a cloth bag. 2
Crush 3 kg of neem leaves in a mortar.
3
Remove bag from the water. 4
Add the neem infusion to 30L of soapy water. Soap allows the oil to mix evenly in the water. 5
Paint or spray the crop with 3L of this mix for
every 10 square meters. 6
Place bag in 10L of water and let neem steep for 6-12 hours, until water is greenish color.
Step Description/Comments
1
Let the seeds dry in the sun, and remove the seed husk. 2
Crush a quantity of neem seeds gently in a mortar to remove the pulp.
3
Mix the powder with
ashes (1 part powder
to 4 parts ashes), and
dust onto the crop in
the early morning
when wind is low (the
dew will bind to
leaves).
4
Crush the inner seed in a mortar until it is a fine powder.
Place 330mL of
powder in a bag and
let it infuse in 10 L of
soapy water for 12
hours. Filter the
solution with a cloth
and spray it on the
crop at a dosage of
1L/10 m2.
OR
FROM LEAVES FROM SEEDS

Final Draft
44
Weed early and often, and never let the weeds get bigger than the plants.
It’s easier to attack something that you can see – planting in rows reduces weeding and
fungicide application time and costs.
Rotate crops and remove crop residues before planting to reduce disease populations in
the field.
Fungicides are preventative, not curative. Spray before you have a problem.
Insect damage is often the first thing people see, but its effect is not commensurate with
the concern.
PREVENTING PESTS FROM REDUCING YOUR YIELDS – KEY POINTS TO REMEMBER
Final Draft
45
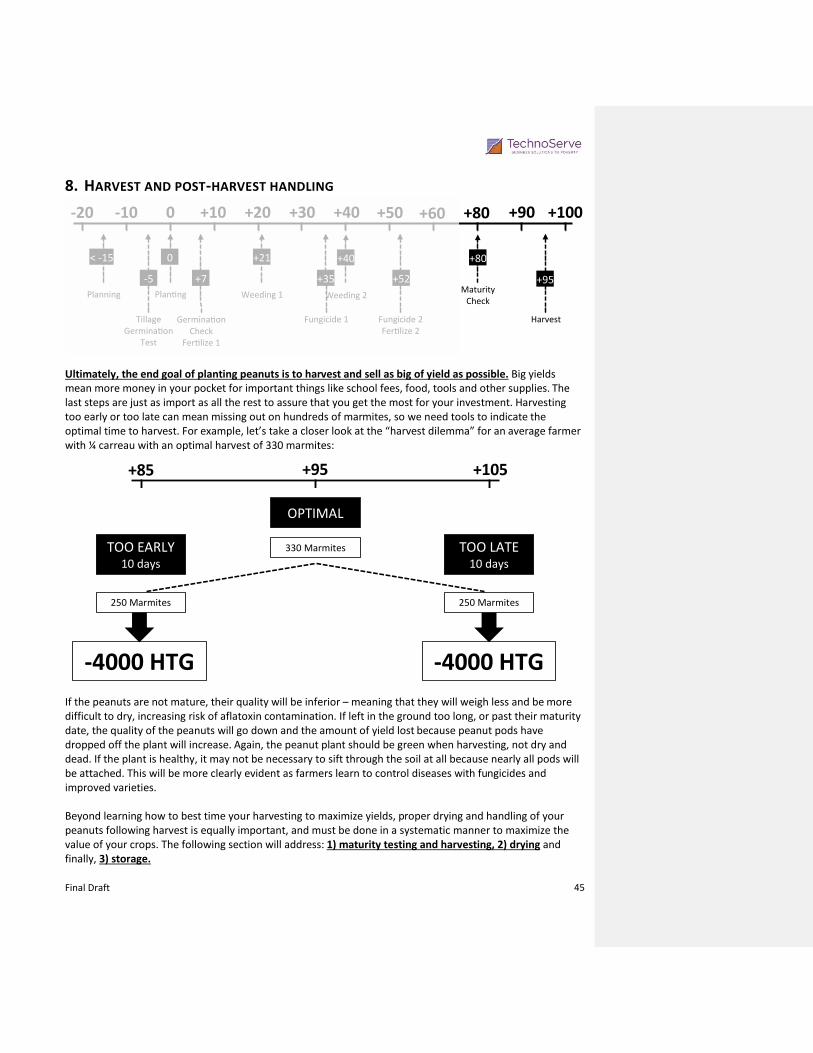
8. HARVEST AND POST-HARVEST HANDLING Ultimately, the end goal of planting peanuts is to harvest and sell as big of yield as possible. Big yields mean more money in your pocket for important things like school fees, food, tools and other supplies. The last steps are just as import as all the rest to assure that you get the most for your investment. Harvesting too early or too late can mean missing out on hundreds of marmites, so we need tools to indicate the optimal time to harvest. For example, let’s take a closer look at the “harvest dilemma” for an average farmer with ¼ carreau with an optimal harvest of 330 marmites:
If the peanuts are not mature, their quality will be inferior – meaning that they will weigh less and be more difficult to dry, increasing risk of aflatoxin contamination. If left in the ground too long, or past their maturity date, the quality of the peanuts will go down and the amount of yield lost because peanut pods have dropped off the plant will increase. Again, the peanut plant should be green when harvesting, not dry and dead. If the plant is healthy, it may not be necessary to sift through the soil at all because nearly all pods will be attached. This will be more clearly evident as farmers learn to control diseases with fungicides and improved varieties. Beyond learning how to best time your harvesting to maximize yields, proper drying and handling of your peanuts following harvest is equally important, and must be done in a systematic manner to maximize the value of your crops. The following section will address: 1) maturity testing and harvesting, 2) drying and finally, 3) storage.
TOO LATE 10 days
330 Marmites
OPTIMAL
TOO EARLY 10 days
250 Marmites 250 Marmites
-4000 HTG
+85 +95 +105
-4000 HTG
0 +10 +20 +30 +40 +50 +60 +80 +90 +100-10-20
TillageGermina on
Test
Plan ng
Germina onCheck
Fer lize1
Weeding1
Fungicide1
Weeding2
Fungicide2Fer lize2
MaturityCheck
Harvest
Planning
<-15
-5
0
+7
+21
+35
+40
+52
+80
+95

Final Draft
46
8.1 MATURITY CHECKING AND HARVESTING Peanuts are an “indeterminant” crop, which means that they continue to produce flowers and fruit throughout their lifecycle. A peanut may have flowers on it the day it is harvested. Although it keeps fruiting, you can only harvest it one time. This means that you must evaluate the maturity of the plant to determine when to harvest. Each variety has a rough guideline as to when to harvest, but a farmer shouldn’t just say, “I’m harvesting after X # of days” because the plant is influenced by many factors, such as sunlight, heat, and soil fertility for example, and that may cause significant variability to the full maturity of the plant. So, step one is preventing your plants from drying out and dying from diseases. We will combat this issue with specific fungicides and so plants will not force harvesting because of early death. Step two is learning how to maximize your yield by testing maturity prior to harvesting. We will use the “hull-scrape” method to determine maturity, on or around day 80 after planting. This simply means that the farmer will take a sample from the field (5-6 plants from different parts of the field, 100 pods) and scrape the material off the exterior of the shell. As the peanut moves from immature to mature, the shells changes from white to yellow to orange to brown and finally to black. A farmer wants to see that majority (approximately 75%)of the peanuts in the brown to black color. Follow this step-by-step procedure:
Step
Hull-Scrape Maturity Testing Procedure
Description/Comments
1
Observe the plants – are they healthy or not? 2
Gather 5-6 plants from different parts of the fields.
3 Observe the stems - are they beginning to break down, particularly those nearest to the taproot?
4
Scrape away portion of outer hull, beginning at saddle area and extending back toward the pod stem. 5
Count the number of pods with “dark” hulls (brown or black) and deep pink seed coats. 6
Remove 100 pods from the plant for testing.
Evaluate maturity Maturity Testing Results Interpretation figure. 7
IMMATURE
MATURE
“DARK”
“LIGHT”

Final Draft
47
The maturity test results will tell farmers if they should harvest or if they should wait five days and test again. Farmers will learn to better judge ideal harvest timing with increased experience. Farmers must be preparing for harvest, organizing labor, planning drying, readying sacks, etc., prior to maturity testing so that they are ready at the optimal time. Similar to weeding and fungicide spraying, harvesting is much quicker and therefore less costly if farmers plant in rows.
STEP 2 STEP 3 ACTION STEP 1
Maturity Testing Results Interpretation
5-6 Plants
No
Yes
Harvest Healthy Plants? No
Yes 100 Pods
Healthy Stems?
Dark Hulls
> 75 Pods
< 75 Pods
Harvest
Harvest
Do not harvest, recheck in 5 days
Example Number “immature” or “light” Number “mature” or “dark”
EXERCISE 12: Should I harvest?
Harvest or Wait
1 Harvest
2
3
4
10 90
43 57
79 21
18 82

Final Draft
48
8.1.1 CARTOON 10: MORE MATURE EQUALS MORE MONEY
8.2 DRYING You’ve spent a lot of time and resources walking to the source, filling your basin, preventing any holes from developing, and making sure not to spill any water on the long walk back to your house. It would be a terrible waste to spill your basin after putting in all that work. Drying peanuts well is just as important as every other step of production and must be done in a systematic way. When peanuts are harvested, they are about 30-40% water. They quickly lose this water, but it takes several days to achieve the 10% moisture that is necessary to avoid aflatoxin contamination. Many farmers will shake the peanuts, thinking that a rattle will indicate that they are adequately dry. They may be dry, but peanuts can rattle when they are still above 15% moisture. So, to make sure your peanuts are dry, make sure peanuts are left in the sun for a minimum of five days and follow the next few simple steps: Other suggestions to improve drying include:
Be certain to use a tarp or concrete slab. Don’t dry them directly on the ground. Airflow over or through the peanuts is more important that the heat of the sun. Some growers put
their peanuts on a screen that is lifted off the ground. It is also important to avoid storing the peanuts in plastic bags, such as flour sacks, between drying
(during the nighttime). The heat of the peanuts will cause them to continue transpire and a sealed bag is perfect for growing mold.
Step
Drying Procedure
Description/Comments
1
Remove pods from plants and layout in sun on tarps or other hard surfaces for three days (five if no drying time in the field). 2
Invert plants with pods attached and leave in piles in field for two days. If at risk to rodents or theft, remove pods from plants and bring home to dry on tarps or other hard surfaces.
3 After five days of drying in the sun, load peanuts into dry, cl ean sacks for short-term storage.

Final Draft
49
8.2.1 CARTOON 11: DRY, CLEAN AND HEALTHY
8.3 STORAGE Finally, the last thing that a farmer wants to do is watch his investments wasted by insects, rats or mold. The longer peanuts need to be stored, the more difficult and risky the process becomes. It is best when a farmer can transfer this risk, expense and work to the buyer, immediately following harvest. Any time peanuts are stored, whether for one night or several months, farmers must think in a three-step process: 1) peanuts, 2) sacks and 3) location. If any one of these steps is not done correctly, a farmer will likely lose peanuts to mold or rotting during storage. The following provides more detailed recommendations of specific actions farmers must take when storing peanuts:
Peanuts should be dried and sorted prior to storage and all rotten, discolored or immature peanuts should be removed.
Peanuts should not be stored in sacks that don’t allow any ventilation, such as old flour or sugar sacks. Ideally, they would be stored in breathable mesh or jute bags.
The space must have good ventilation to induce airflow and keep the peanuts as cool and dry as possible. Most depots should be designed with ventilation in mind, but this can be difficult to achieve in a balance with the rats.
It should be free of rats. Traps are ok, but avoid dangerous poisons that might contaminate the peanuts. Cats are also ok, but they should not be able to sleep or use the bathroom in the storage area.
Peanuts should be stored off the ground and not touching the walls, in order to allow space for ventilation and observing all sides for rodent or insect infestations
A small amount of dried neem leaves placed in sacks with peanuts can provide some protection against insect damage.
Peanut Storage Thought Process
Peanuts Sacks Location
Dried
Sorted
Breathable
Clean
Dry
Ventilated
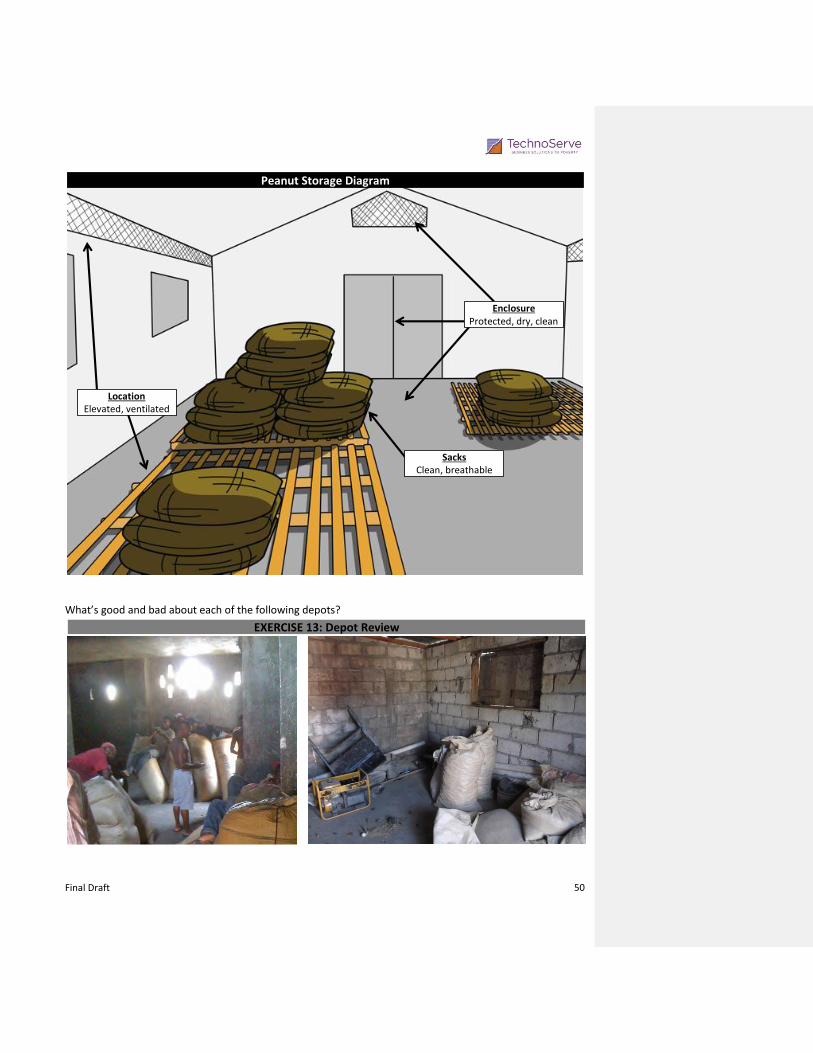
Final Draft
50
What’s good and bad about each of the following depots?
Peanut Storage Diagram
Location Elevated, ventilated
Enclosure Protected, dry, clean
Sacks Clean, breathable
EXERCISE 13: Depot Review

Peanut maturity cannot be assessed by looking at plant leaves: dry leaves ≠ maturity.
Peanut maturity is assessed by digging plants and scraping hulls .
Peanuts should be dried in the sun for a minimum of five days.
Storage for long periods is extremely risky. Farmers should transfer this risk to the buyers
whenever possible.
Do not store peanuts in plastic bags. Breathable, jute or mesh bags should be used.
Peanuts should be sorted prior to storage, and then stored in well-ventilated, cool areas
that are free of rats and insects
HARVEST & POST HARVEST HANDLING – KEY POINTS TO REMEMBER

Final Draft
52
9. RECORDING AND DOCUMENTATION Good farmers are good businessmen and good businessmen know that they must have good records. Having good records is critical to maximizing outputs and minimizing inputs, both for this year, and for future years. The first step in having good records is knowing what needs to be recorded and what doesn’t. In order to be efficient and to avoid recording a bunch of info that isn’t needed, farmers need to select key activities and specific information to record. The second step is to record what we’ve determined to be critical in an organized and useful way, so that we can use it to calculate our profits for this year, as well as use this information to better our profits in future years. Did the fertilizer I used actually increase my yields as expected? When did it rain and how did this affect my crop? Was harvesting labor more or less expensive this year? These questions can all be answered if we carefully record and document our operations. Among the many other benefits of growing peanuts as a part of a system, we’ve also simplified farmers lives related to recording and documentation. We’ve analyzed what information is important and developed specific recording tools for farmers to use, both so that they can better evaluate their own performance as well as provide valuable data to continue to improve yields throughout the country. To better understand how to use these tools, we’ll complete the recording form as a group, based on data provided from Edzaire and Makenson. We’ll see who made more money and why, as well as get some practice on how to record farming data.
9.1.1 CARTOON 12: MONEY NOW VERSUS MONEY LATER

Final Draft
53
Without recording production data (inputs and outputs), farmers don’t know if they are
making any money for all their hard work.
Projections from planning should be compared to actual data.
Records from year to year can help farmers become better at timing their plantings for
optimal rain.
Our goal is to increase yields and money in farmers’ pockets each year. Recording can help
farmers determine if they are getting better, getting worse or just staying the same.
RECORDING & DOCUMENTATION – KEY POINTS TO REMEMBER

Final Draft
54
EXER
CIS
E 1
3: P
lan
nin
g Q
ue
stio
ns
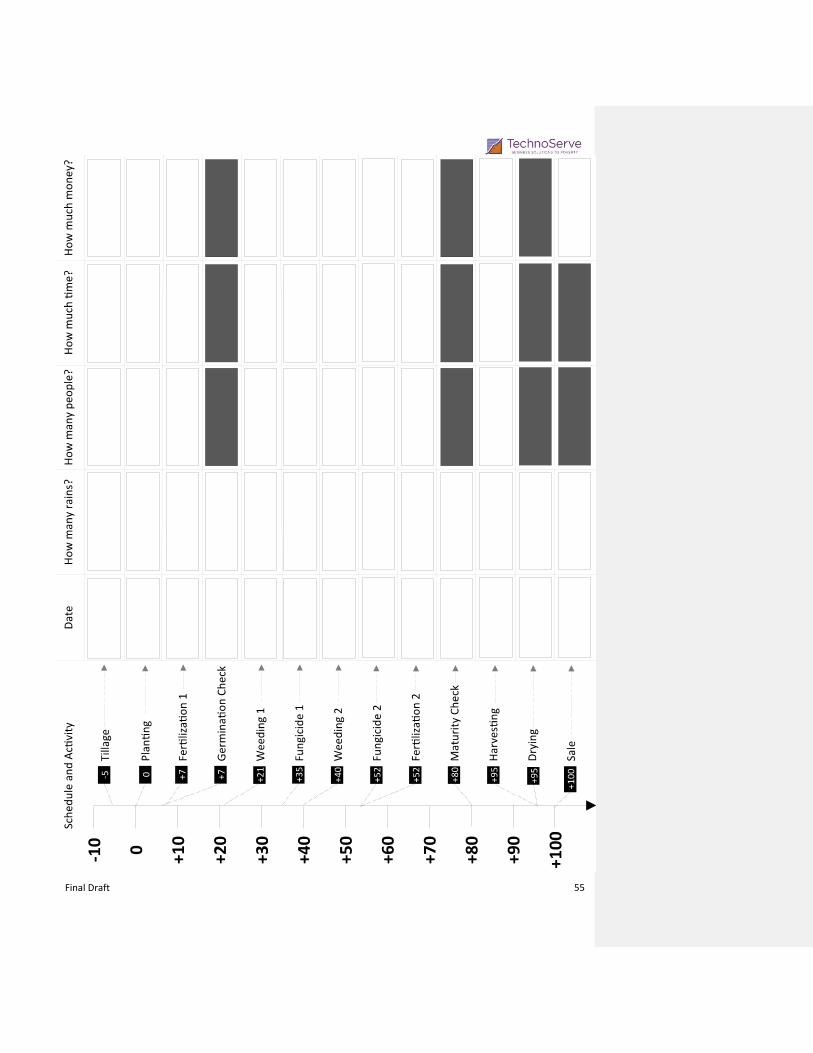
Final Draft
55

Final Draft
56
10. CONCLUSION Through this guide, we have seen that Haitian peanut farmers have many challenges, but also an enormous opportunity. Yields are currently very low, but there are many simple things that can be done to increase them, while improving production efficiency. Growing as a part of the Pwogram Pistach system will allow farmers access to key inputs, training, financing and services that will enable them to dramatically increase their peanut income.
10.1.1 CARTOON 13: SUCCESS DOESN’T HAPPEN BY CHANCE

Final Draft
57
Always record all costs and income to evaluate your farm: Sales – Costs = Profits. Make sure
you are making a profit and plan investments before planting.
Its better to plant to the right seed spacing and make sure you have the right seed quantity
than to “stretch” seed to fit your land. (Haitian proverb pennywise and pound foolish)
Applying fertilizer (natural or synthetic) to the previous rotation crop (especially if corn) is a
much more effective use of fertilizer, since peanuts will absorb what the corn doesn’t and
doesn’t need N which will be lost.
Weed early and often. Even a few weeks of weed stress can cause 20-30% yield losses.
Planting in rows reduces weeding and harvest time and costs.
Rotate crops and remove crop residues before planting to reduce disease populations in
the field.
Fungicides are preventative, not curative. Spray before you have a problem.
The best prevention of insect damage is to follow other guideline s to reduce the other
“holes in the bucket”. Don’t focus on insect damage because it is the easiest thing to see.
Peanut maturity cannot be assessed by looking at plant leaves: Dry leaves ≠ Maturity. A
few weeks in added maturity can and hundreds of pounds of yield.
Drying peanuts to <10% as fast as possible and storing them in a d ry, cool area is the best
way to assure quality and avoid aflatoxin contamination.
CONCLUSION – TOP TEN KEY POINTS TO REMEMBER
Final Draft
58
APPENDIX A Unit conversions Carreau ¼ carreau Hectare Acre Gal Liter Fluid oz Kg Lbs Oz Volume – Weight Marmit- kg of various things Gode fertilizer Barrique – marmit Appendix B Runner peanut calendar and schedule of activities.