SL-870 eARC Protocol Analyzer User Guide
31
User Guide Simplay-UG-02004-A March 2018 SL-870 eARC Protocol Analyzer
Transcript of SL-870 eARC Protocol Analyzer User Guide
User Guide
Simplay-UG-02004-A
March 2018
SL-870 eARC Protocol Analyzer
SL-870 eARC Protocol Analyzer User Guide User Guide
2 © 2018 Simplay Labs, LLC. Simplay-UG-02004-A All rights reserved. CONFIDENTIAL
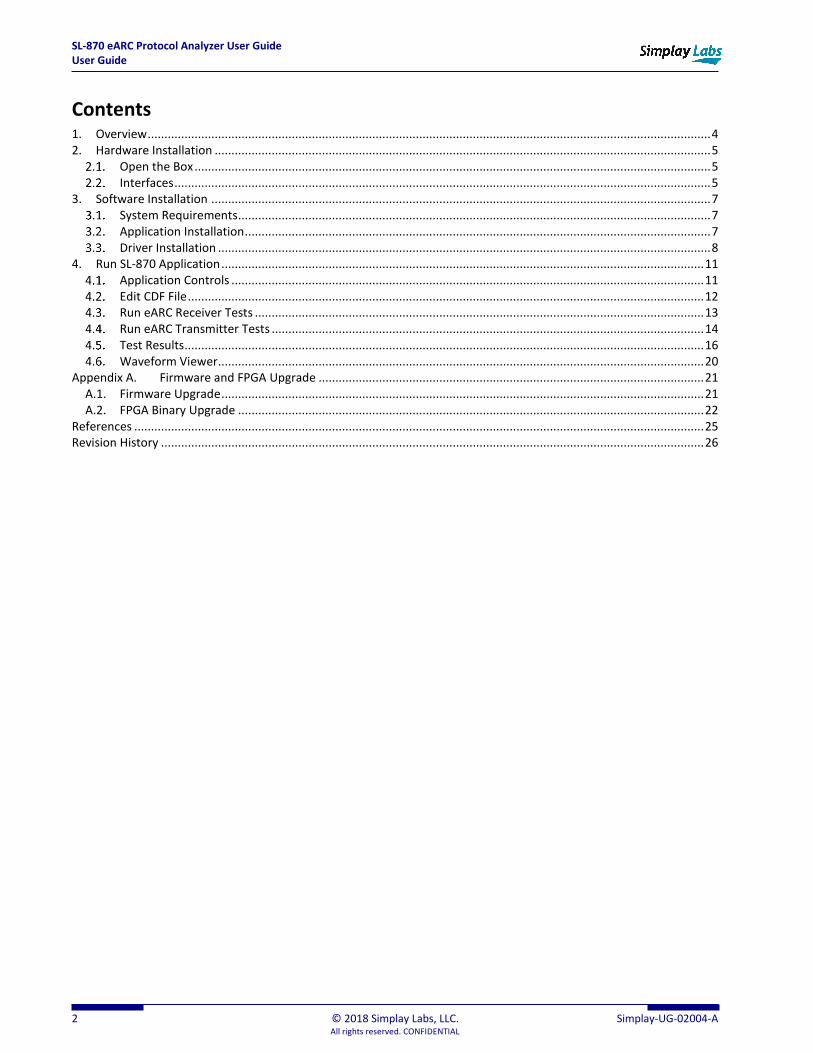
Contents 1. Overview ........................................................................................................................................................................ 4 2. Hardware Installation .................................................................................................................................................... 5
Open the Box .......................................................................................................................................................... 5 Interfaces ................................................................................................................................................................ 5
3. Software Installation ..................................................................................................................................................... 7 System Requirements ............................................................................................................................................. 7 Application Installation ........................................................................................................................................... 7 Driver Installation ................................................................................................................................................... 8
4. Run SL-870 Application ................................................................................................................................................ 11 Application Controls ............................................................................................................................................. 11 Edit CDF File .......................................................................................................................................................... 12 Run eARC Receiver Tests ...................................................................................................................................... 13 Run eARC Transmitter Tests ................................................................................................................................. 14 Test Results ........................................................................................................................................................... 16 Waveform Viewer................................................................................................................................................. 20
Appendix A. Firmware and FPGA Upgrade ................................................................................................................... 21 A.1. Firmware Upgrade ................................................................................................................................................ 21 A.2. FPGA Binary Upgrade ........................................................................................................................................... 22
References .......................................................................................................................................................................... 25 Revision History .................................................................................................................................................................. 26
SL-870 eARC Protocol Analyzer User Guide User Guide
Simplay-UG-02004-A © 2018 Simplay Labs, LLC. 3 All rights reserved. CONFIDENTIAL
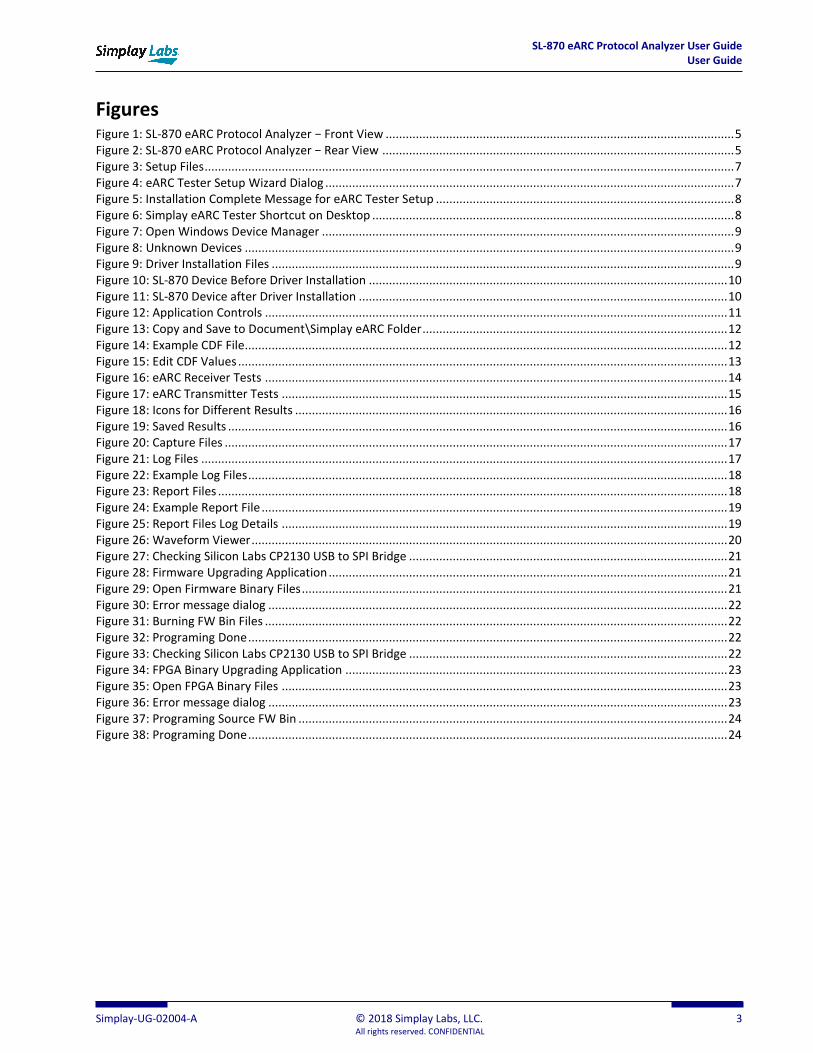
Figures Figure 1: SL-870 eARC Protocol Analyzer − Front View ........................................................................................................ 5 Figure 2: SL-870 eARC Protocol Analyzer − Rear View ......................................................................................................... 5 Figure 3: Setup Files .............................................................................................................................................................. 7 Figure 4: eARC Tester Setup Wizard Dialog .......................................................................................................................... 7 Figure 5: Installation Complete Message for eARC Tester Setup ......................................................................................... 8 Figure 6: Simplay eARC Tester Shortcut on Desktop ............................................................................................................ 8 Figure 7: Open Windows Device Manager ........................................................................................................................... 9 Figure 8: Unknown Devices .................................................................................................................................................. 9 Figure 9: Driver Installation Files .......................................................................................................................................... 9 Figure 10: SL-870 Device Before Driver Installation ........................................................................................................... 10 Figure 11: SL-870 Device after Driver Installation .............................................................................................................. 10 Figure 12: Application Controls .......................................................................................................................................... 11 Figure 13: Copy and Save to Document\Simplay eARC Folder ........................................................................................... 12 Figure 14: Example CDF File................................................................................................................................................ 12 Figure 15: Edit CDF Values .................................................................................................................................................. 13 Figure 16: eARC Receiver Tests .......................................................................................................................................... 14 Figure 17: eARC Transmitter Tests ..................................................................................................................................... 15 Figure 18: Icons for Different Results ................................................................................................................................. 16 Figure 19: Saved Results ..................................................................................................................................................... 16 Figure 20: Capture Files ...................................................................................................................................................... 17 Figure 21: Log Files ............................................................................................................................................................. 17 Figure 22: Example Log Files ............................................................................................................................................... 18 Figure 23: Report Files ........................................................................................................................................................ 18 Figure 24: Example Report File ........................................................................................................................................... 19 Figure 25: Report Files Log Details ..................................................................................................................................... 19 Figure 26: Waveform Viewer .............................................................................................................................................. 20 Figure 27: Checking Silicon Labs CP2130 USB to SPI Bridge ............................................................................................... 21 Figure 28: Firmware Upgrading Application ....................................................................................................................... 21 Figure 29: Open Firmware Binary Files ............................................................................................................................... 21 Figure 30: Error message dialog ......................................................................................................................................... 22 Figure 31: Burning FW Bin Files .......................................................................................................................................... 22 Figure 32: Programing Done ............................................................................................................................................... 22 Figure 33: Checking Silicon Labs CP2130 USB to SPI Bridge ............................................................................................... 22 Figure 34: FPGA Binary Upgrading Application .................................................................................................................. 23 Figure 35: Open FPGA Binary Files ..................................................................................................................................... 23 Figure 36: Error message dialog ......................................................................................................................................... 23 Figure 37: Programing Source FW Bin ................................................................................................................................ 24 Figure 38: Programing Done ............................................................................................................................................... 24
SL-870 eARC Protocol Analyzer User Guide User Guide
4 © 2018 Simplay Labs, LLC. Simplay-UG-02004-A All rights reserved. CONFIDENTIAL
1. Overview The SL-870 eARC Protocol Analyzer is designed for testing eARC Transmitter and Receiver devices, and is compliant to the latest High Definition Multimedia Interface (HDMI®) 2.1 Specification.
This User Guide provides details on how to setup and test eARC Transmitter and Receiver devices for compliance to the HDMI version 2.1 Specification.
For the latest updates to documentation or software updates, see online at:
http://www.simplaylabs.com/support/product_support.aspx.

SL-870 eARC Protocol Analyzer User Guide User Guide
Simplay-UG-02004-A © 2018 Simplay Labs, LLC. 5 All rights reserved. CONFIDENTIAL
2. Hardware Installation
Open the Box The SL-870 eARC Protocol Analyzer delivery includes the following items:
• 12 V power supply
• eARC HDMI cable * 1
• USB A to USB B cable * 1
• HDMI Short Cable (for internal connection between port 4,5, and 9,10) * 2
Interfaces Figure 1 and Figure 2 show the front panel view and the rear panel view of the SL-870 eARC Protocol Analyzer chassis, respectively.
Figure 1: SL-870 eARC Protocol Analyzer − Front View
Figure 2: SL-870 eARC Protocol Analyzer − Rear View
Generic Interfaces
Interfaces when running with eARC Transmitter (TX) DUT
Interfaces when running with eARC Receiver (RX) DUT
SL-870 eARC Protocol Analyzer User Guide User Guide
6 © 2018 Simplay Labs, LLC. Simplay-UG-02004-A All rights reserved. CONFIDENTIAL
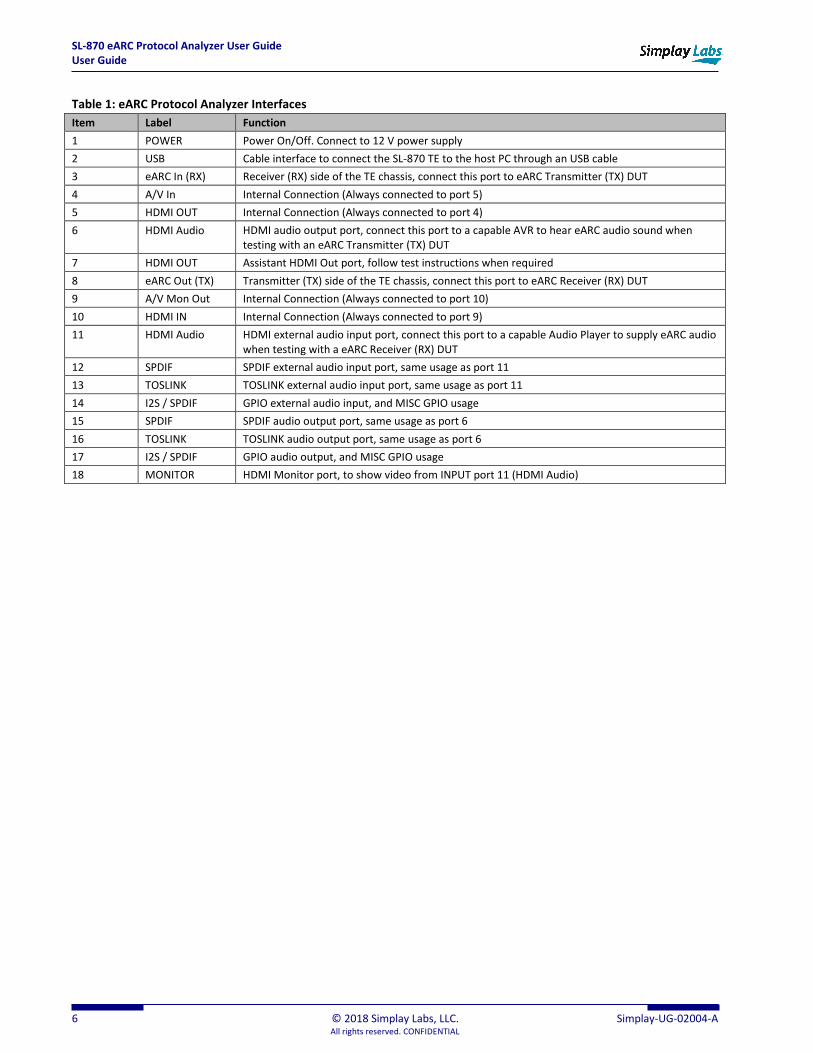
Table 1: eARC Protocol Analyzer Interfaces
Item Label Function
1 POWER Power On/Off. Connect to 12 V power supply
2 USB Cable interface to connect the SL-870 TE to the host PC through an USB cable
3 eARC In (RX) Receiver (RX) side of the TE chassis, connect this port to eARC Transmitter (TX) DUT
4 A/V In Internal Connection (Always connected to port 5)
5 HDMI OUT Internal Connection (Always connected to port 4)
6 HDMI Audio HDMI audio output port, connect this port to a capable AVR to hear eARC audio sound when testing with an eARC Transmitter (TX) DUT
7 HDMI OUT Assistant HDMI Out port, follow test instructions when required
8 eARC Out (TX) Transmitter (TX) side of the TE chassis, connect this port to eARC Receiver (RX) DUT
9 A/V Mon Out Internal Connection (Always connected to port 10)
10 HDMI IN Internal Connection (Always connected to port 9)
11 HDMI Audio HDMI external audio input port, connect this port to a capable Audio Player to supply eARC audio when testing with a eARC Receiver (RX) DUT
12 SPDIF SPDIF external audio input port, same usage as port 11
13 TOSLINK TOSLINK external audio input port, same usage as port 11
14 I2S / SPDIF GPIO external audio input, and MISC GPIO usage
15 SPDIF SPDIF audio output port, same usage as port 6
16 TOSLINK TOSLINK audio output port, same usage as port 6
17 I2S / SPDIF GPIO audio output, and MISC GPIO usage
18 MONITOR HDMI Monitor port, to show video from INPUT port 11 (HDMI Audio)
SL-870 eARC Protocol Analyzer User Guide User Guide
Simplay-UG-02004-A © 2018 Simplay Labs, LLC. 7 All rights reserved. CONFIDENTIAL
3. Software Installation
System Requirements • A PC or laptop computer with Microsoft Windows 7, 8 or 10, 32-bit or 64-bit OS
• Microsoft .NET Framework Client Profile must be present. If not already installed, download it from https://www.microsoft.com/en-us/download/details.aspx?id=24872
• Minimum 4 GB, optimum 8 GB RAM
• 500 GB hard drive
Application Installation Follow these steps to install the SL-870 eARC Protocol Analyzer application.
1. Download latest application from Simplay Labs website:https://www.simplaylabs.com/Support/
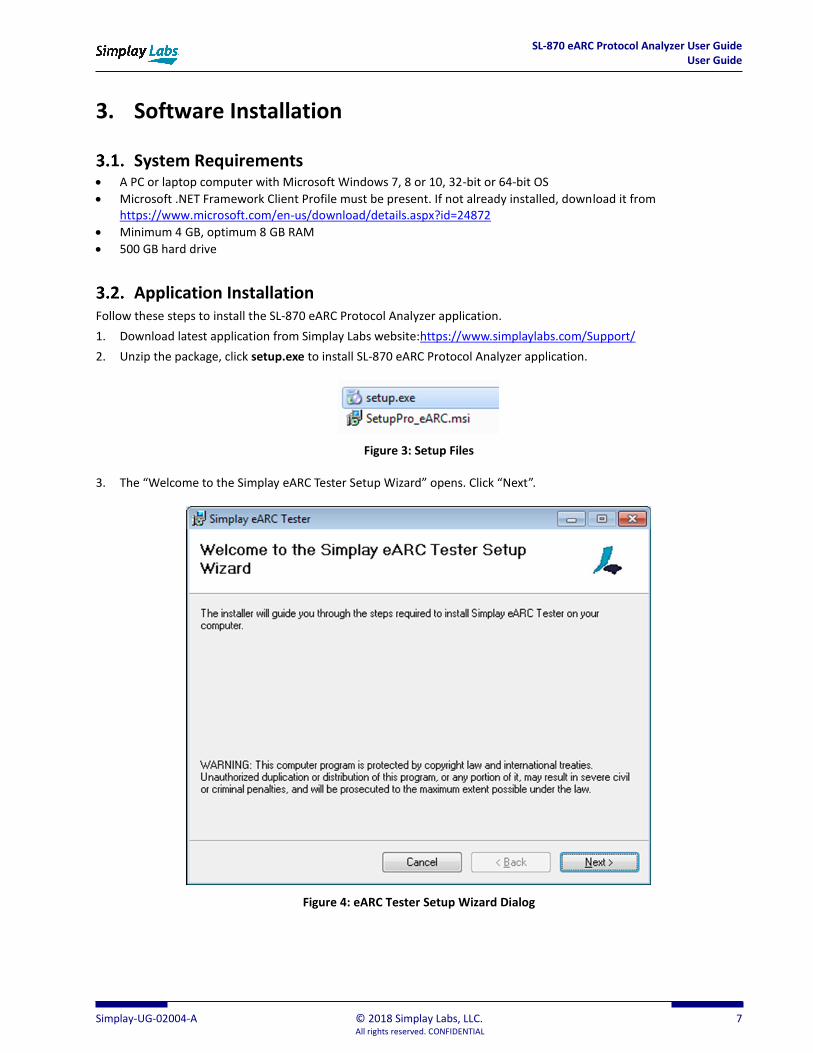
2. Unzip the package, click setup.exe to install SL-870 eARC Protocol Analyzer application.
Figure 3: Setup Files
3. The “Welcome to the Simplay eARC Tester Setup Wizard” opens. Click “Next”.
Figure 4: eARC Tester Setup Wizard Dialog
SL-870 eARC Protocol Analyzer User Guide User Guide
8 © 2018 Simplay Labs, LLC. Simplay-UG-02004-A All rights reserved. CONFIDENTIAL
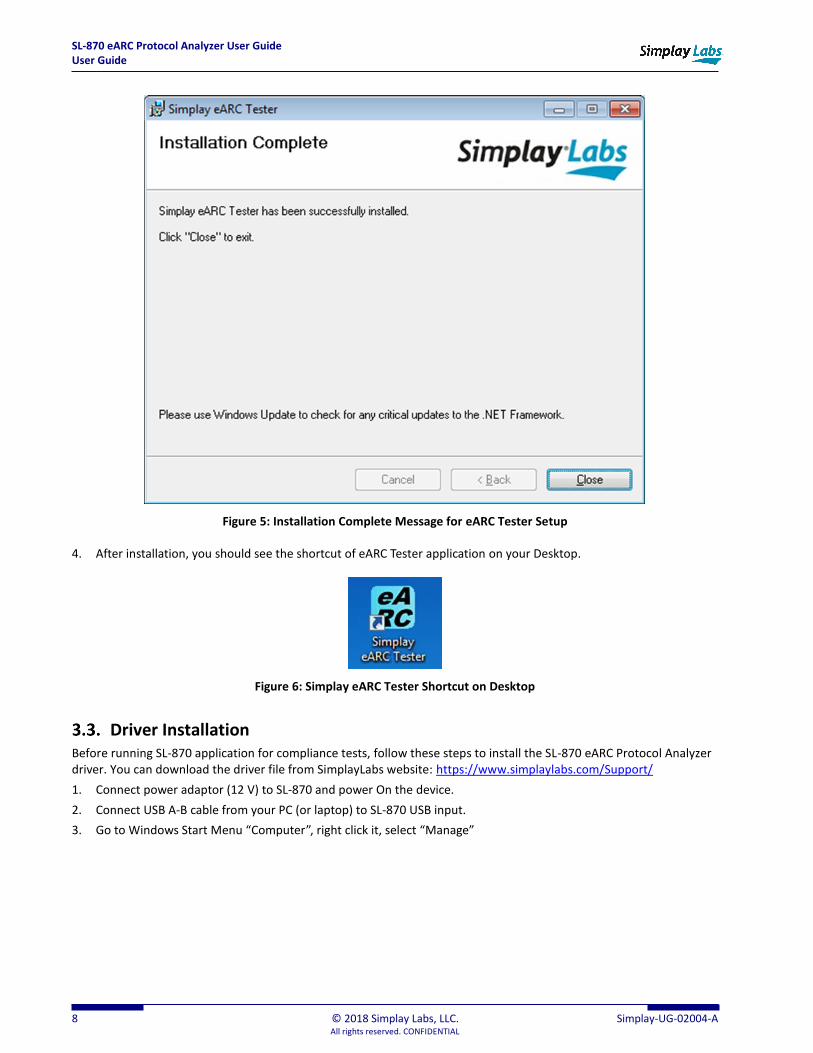
Figure 5: Installation Complete Message for eARC Tester Setup
4. After installation, you should see the shortcut of eARC Tester application on your Desktop.
Figure 6: Simplay eARC Tester Shortcut on Desktop
Driver Installation Before running SL-870 application for compliance tests, follow these steps to install the SL-870 eARC Protocol Analyzer driver. You can download the driver file from SimplayLabs website: https://www.simplaylabs.com/Support/
1. Connect power adaptor (12 V) to SL-870 and power On the device.
2. Connect USB A-B cable from your PC (or laptop) to SL-870 USB input.
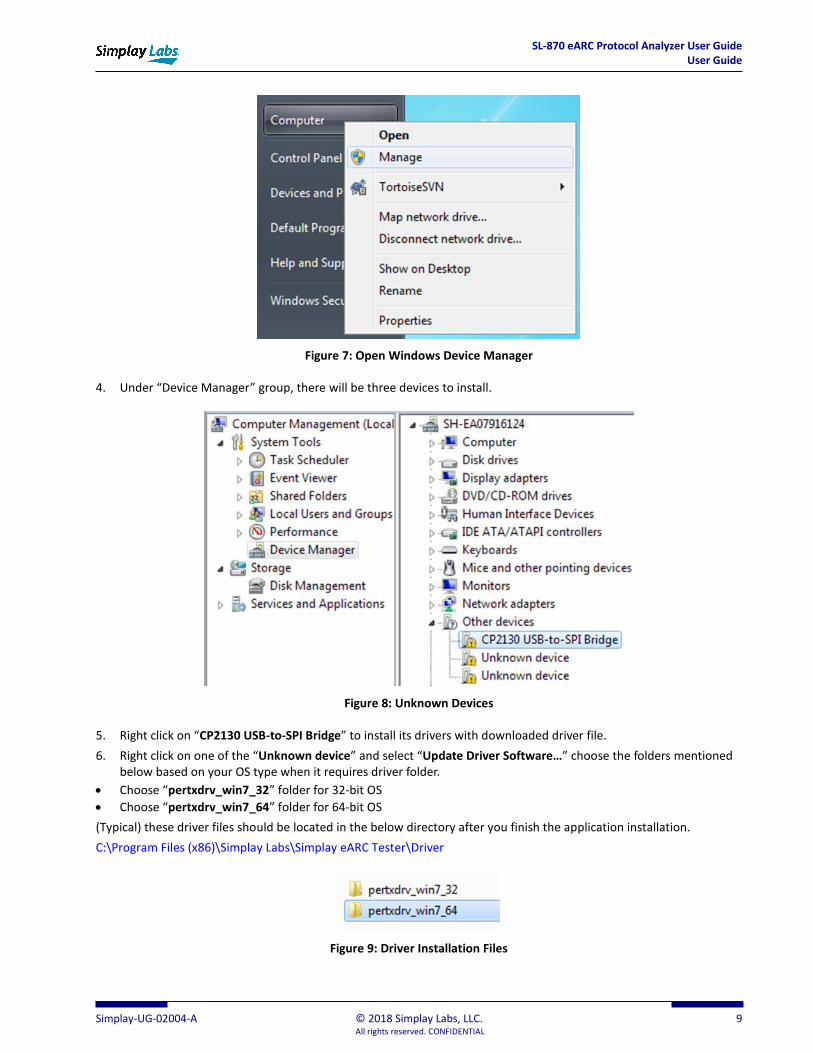
3. Go to Windows Start Menu “Computer”, right click it, select “Manage”
SL-870 eARC Protocol Analyzer User Guide User Guide
Simplay-UG-02004-A © 2018 Simplay Labs, LLC. 9 All rights reserved. CONFIDENTIAL
Figure 7: Open Windows Device Manager
4. Under “Device Manager” group, there will be three devices to install.
Figure 8: Unknown Devices
5. Right click on “CP2130 USB-to-SPI Bridge” to install its drivers with downloaded driver file.
6. Right click on one of the “Unknown device” and select “Update Driver Software…” choose the folders mentioned below based on your OS type when it requires driver folder.
• Choose “pertxdrv_win7_32” folder for 32-bit OS
• Choose “pertxdrv_win7_64” folder for 64-bit OS
(Typical) these driver files should be located in the below directory after you finish the application installation.
C:\Program Files (x86)\Simplay Labs\Simplay eARC Tester\Driver
Figure 9: Driver Installation Files
SL-870 eARC Protocol Analyzer User Guide User Guide
10 © 2018 Simplay Labs, LLC. Simplay-UG-02004-A All rights reserved. CONFIDENTIAL
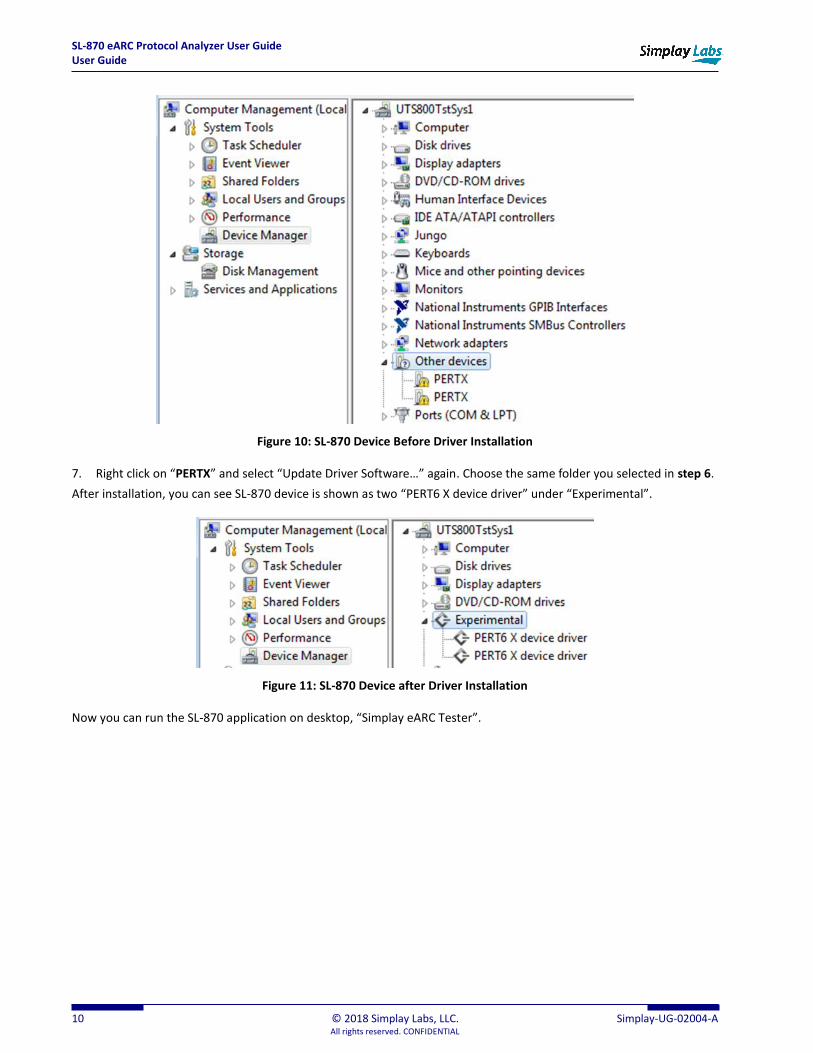
Figure 10: SL-870 Device Before Driver Installation
7. Right click on “PERTX” and select “Update Driver Software…” again. Choose the same folder you selected in step 6.
After installation, you can see SL-870 device is shown as two “PERT6 X device driver” under “Experimental”.
Figure 11: SL-870 Device after Driver Installation
Now you can run the SL-870 application on desktop, “Simplay eARC Tester”.
SL-870 eARC Protocol Analyzer User Guide User Guide
Simplay-UG-02004-A © 2018 Simplay Labs, LLC. 11 All rights reserved. CONFIDENTIAL
4. Run SL-870 Application
Application Controls
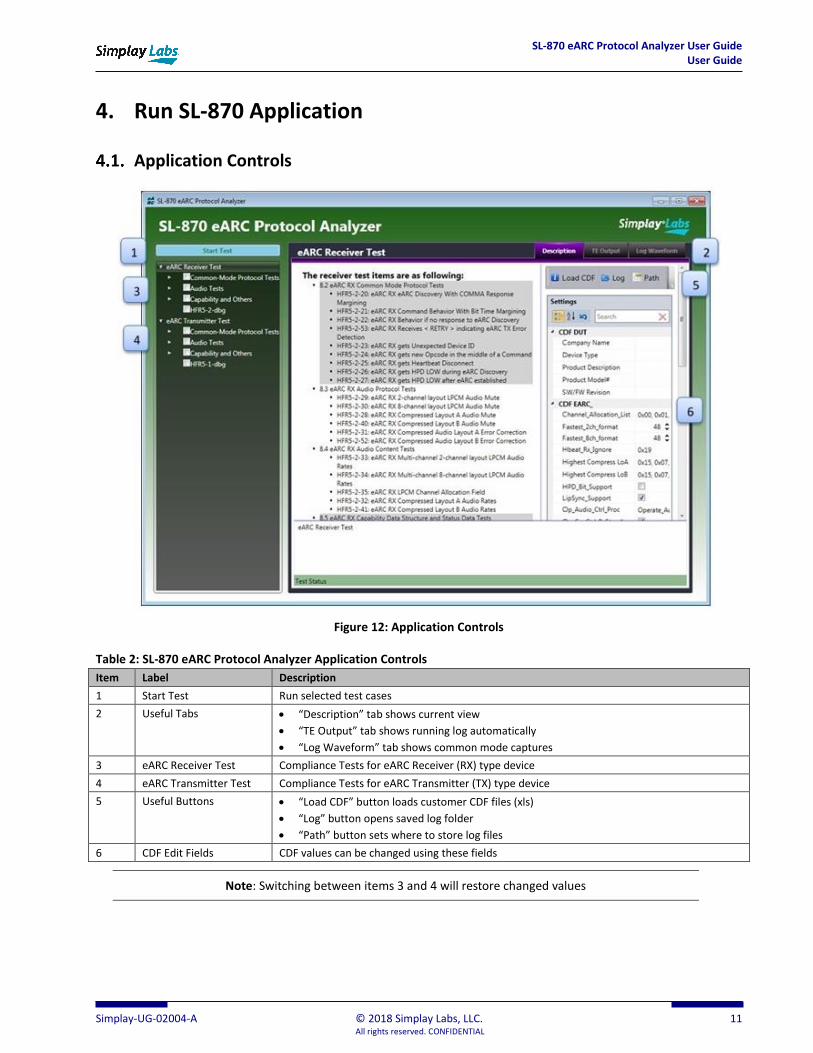
Figure 12: Application Controls
Table 2: SL-870 eARC Protocol Analyzer Application Controls
Item Label Description
1 Start Test Run selected test cases
2 Useful Tabs • “Description” tab shows current view
• “TE Output” tab shows running log automatically
• “Log Waveform” tab shows common mode captures
3 eARC Receiver Test Compliance Tests for eARC Receiver (RX) type device
4 eARC Transmitter Test Compliance Tests for eARC Transmitter (TX) type device
5 Useful Buttons • “Load CDF” button loads customer CDF files (xls)
• “Log” button opens saved log folder
• “Path” button sets where to store log files
6 CDF Edit Fields CDF values can be changed using these fields
Note: Switching between items 3 and 4 will restore changed values

SL-870 eARC Protocol Analyzer User Guide User Guide
12 © 2018 Simplay Labs, LLC. Simplay-UG-02004-A All rights reserved. CONFIDENTIAL
Edit CDF File The first time you click on “Load CDF” button, the application will navigate you to the folder where an example CDF file is located. It is recommended to copy this example CDF file under your “Document” folder, under “Simplay eARC” subfolder.
Figure 13: Copy and Save to Document\Simplay eARC Folder
For each new device under test, Simplay recommends you to make a copy to the example CDF file, and then edit the copied file.
There are three sheets in the example CDF spreadsheet file.
Figure 14: Example CDF File
After filling in the “Common” sheet, please delete sheets that are unrelated for your device:
• Delete “eARC Transmitter” sheet if your device under test is an eARC Receiver device
• Delete “eARC Receiver” sheet if your device under test is an eARC Transmitter device
Note: There could be CDF loading error if the unrelated sheet is not deleted!
SL-870 eARC Protocol Analyzer User Guide User Guide
Simplay-UG-02004-A © 2018 Simplay Labs, LLC. 13 All rights reserved. CONFIDENTIAL
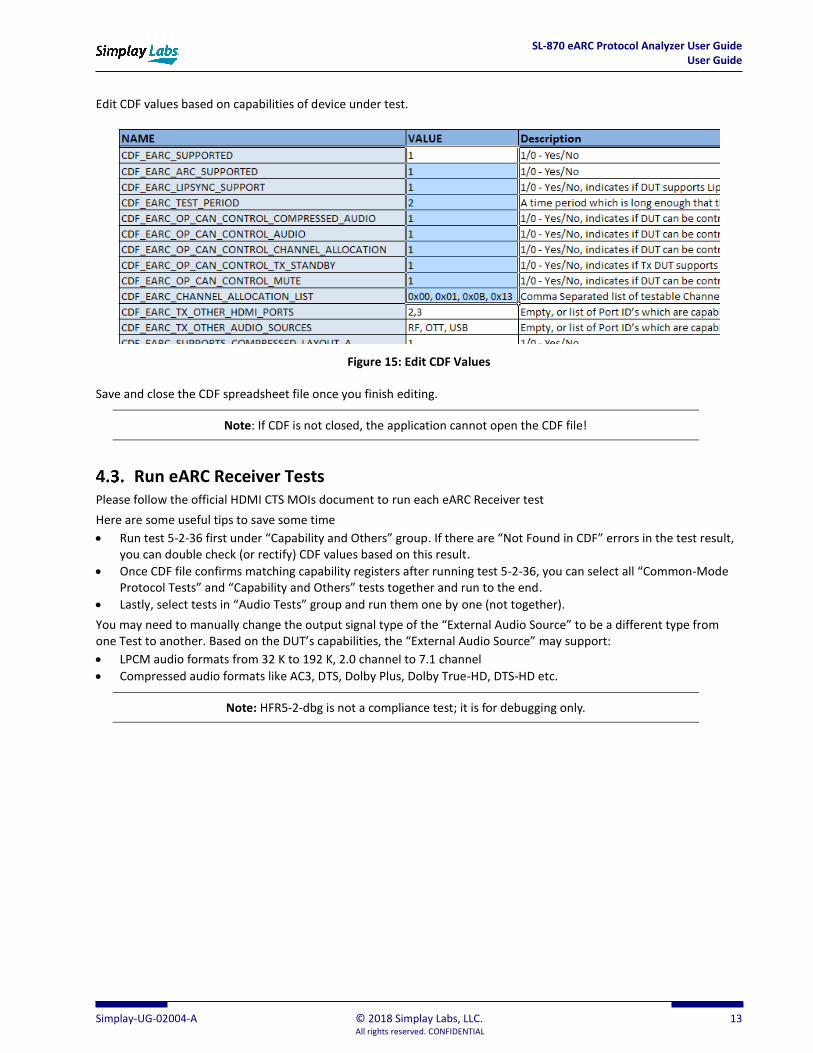
Edit CDF values based on capabilities of device under test.
Figure 15: Edit CDF Values
Save and close the CDF spreadsheet file once you finish editing.
Note: If CDF is not closed, the application cannot open the CDF file!
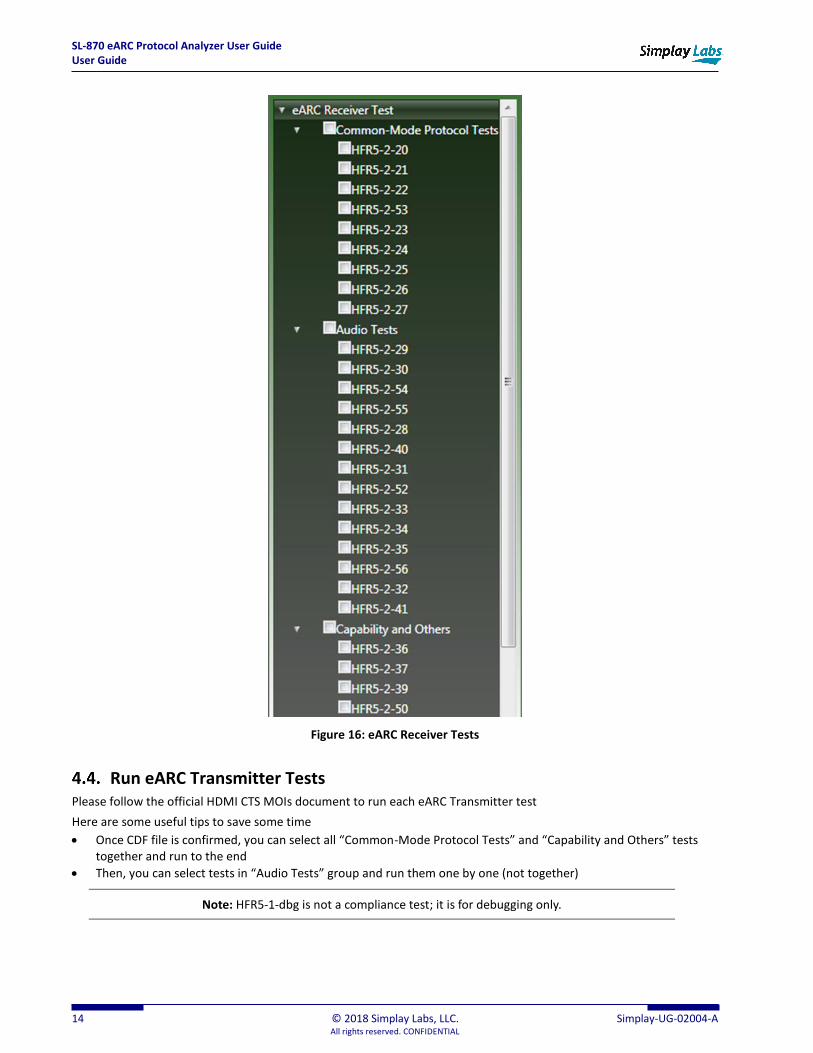
Run eARC Receiver Tests Please follow the official HDMI CTS MOIs document to run each eARC Receiver test
Here are some useful tips to save some time
• Run test 5-2-36 first under “Capability and Others” group. If there are “Not Found in CDF” errors in the test result, you can double check (or rectify) CDF values based on this result.
• Once CDF file confirms matching capability registers after running test 5-2-36, you can select all “Common-Mode Protocol Tests” and “Capability and Others” tests together and run to the end.
• Lastly, select tests in “Audio Tests” group and run them one by one (not together).
You may need to manually change the output signal type of the “External Audio Source” to be a different type from one Test to another. Based on the DUT’s capabilities, the “External Audio Source” may support:
• LPCM audio formats from 32 K to 192 K, 2.0 channel to 7.1 channel
• Compressed audio formats like AC3, DTS, Dolby Plus, Dolby True-HD, DTS-HD etc.
Note: HFR5-2-dbg is not a compliance test; it is for debugging only.
SL-870 eARC Protocol Analyzer User Guide User Guide
14 © 2018 Simplay Labs, LLC. Simplay-UG-02004-A All rights reserved. CONFIDENTIAL
Figure 16: eARC Receiver Tests
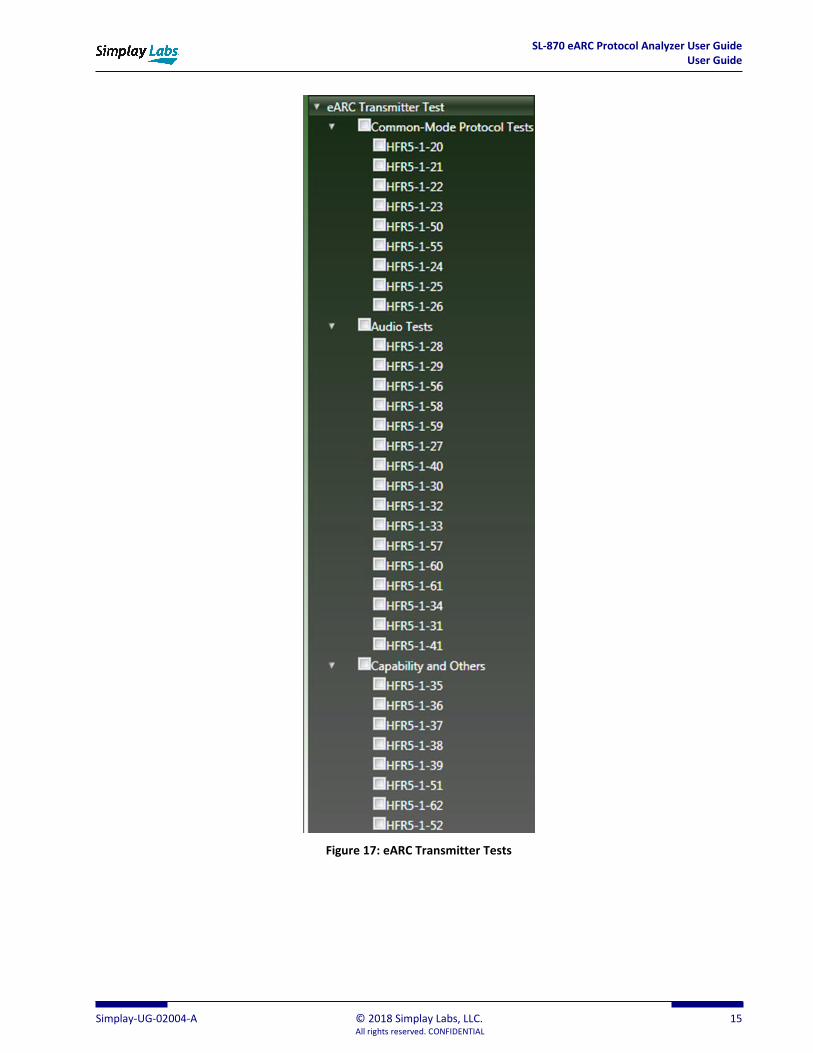
Run eARC Transmitter Tests Please follow the official HDMI CTS MOIs document to run each eARC Transmitter test
Here are some useful tips to save some time
• Once CDF file is confirmed, you can select all “Common-Mode Protocol Tests” and “Capability and Others” tests together and run to the end
• Then, you can select tests in “Audio Tests” group and run them one by one (not together)
Note: HFR5-1-dbg is not a compliance test; it is for debugging only.
SL-870 eARC Protocol Analyzer User Guide User Guide
Simplay-UG-02004-A © 2018 Simplay Labs, LLC. 15 All rights reserved. CONFIDENTIAL
Figure 17: eARC Transmitter Tests
SL-870 eARC Protocol Analyzer User Guide User Guide
16 © 2018 Simplay Labs, LLC. Simplay-UG-02004-A All rights reserved. CONFIDENTIAL
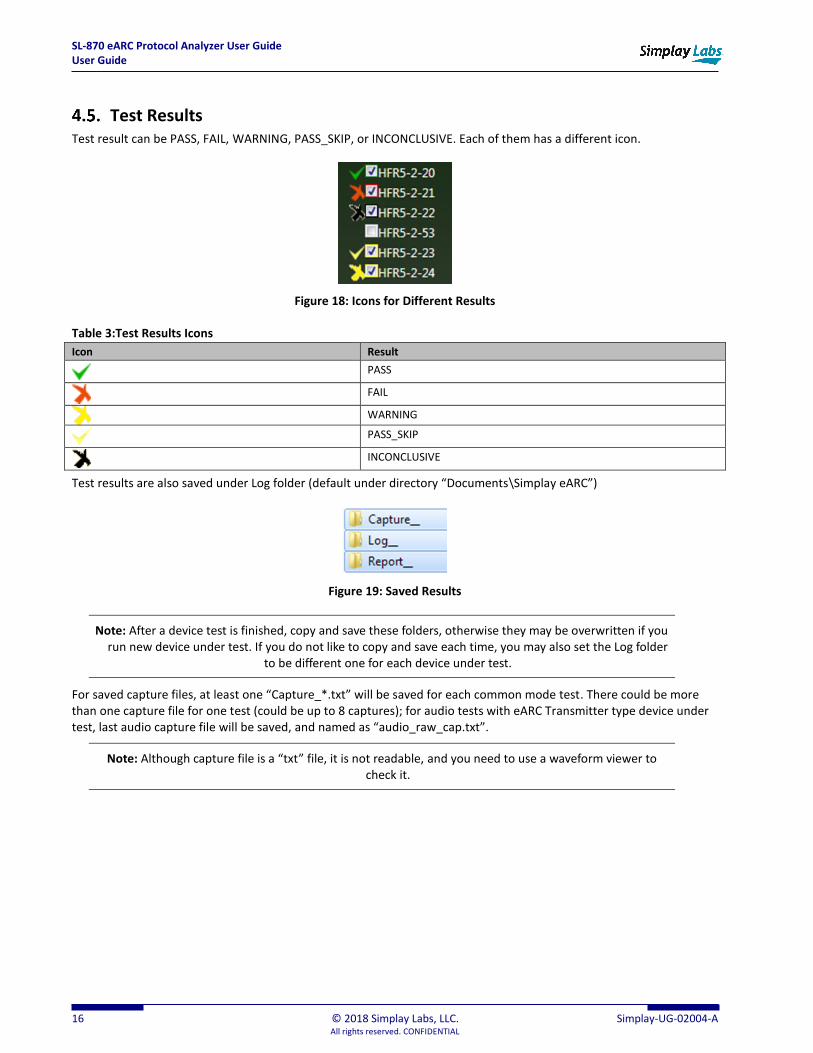
Test Results Test result can be PASS, FAIL, WARNING, PASS_SKIP, or INCONCLUSIVE. Each of them has a different icon.
Figure 18: Icons for Different Results
Table 3:Test Results Icons
Icon Result
PASS
FAIL
WARNING
PASS_SKIP
INCONCLUSIVE
Test results are also saved under Log folder (default under directory “Documents\Simplay eARC”)
Figure 19: Saved Results
Note: After a device test is finished, copy and save these folders, otherwise they may be overwritten if you run new device under test. If you do not like to copy and save each time, you may also set the Log folder
to be different one for each device under test.
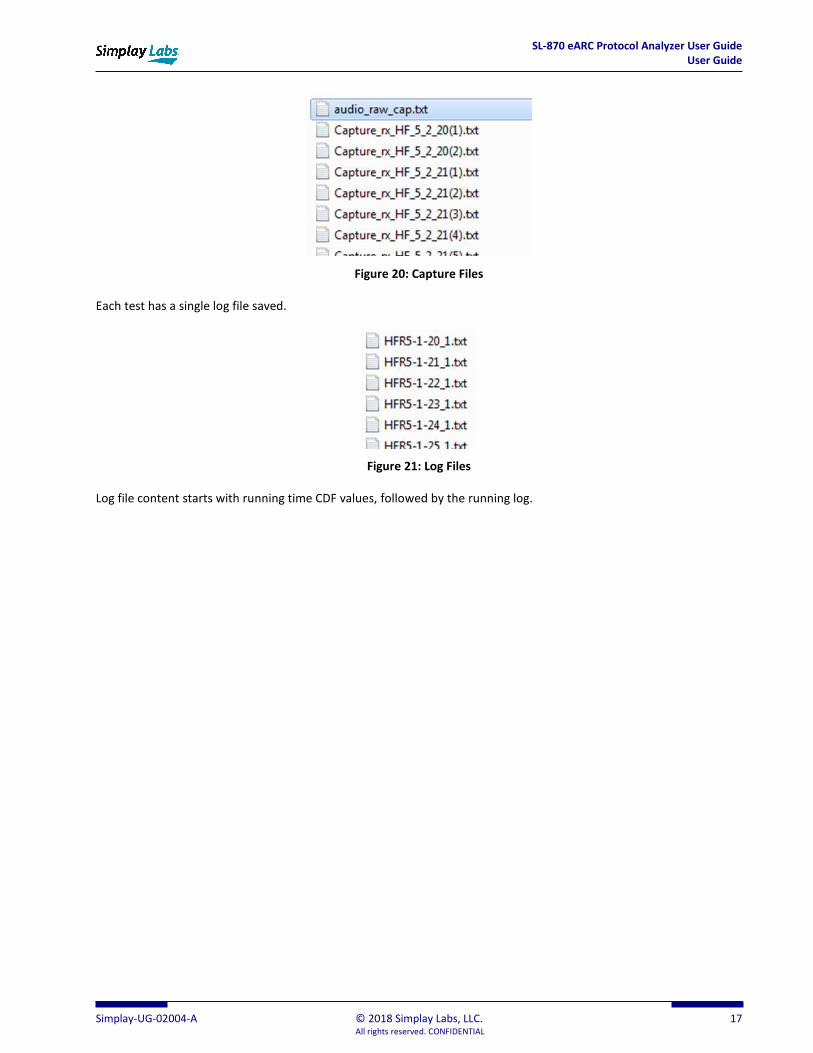
For saved capture files, at least one “Capture_*.txt” will be saved for each common mode test. There could be more than one capture file for one test (could be up to 8 captures); for audio tests with eARC Transmitter type device under test, last audio capture file will be saved, and named as “audio_raw_cap.txt”.
Note: Although capture file is a “txt” file, it is not readable, and you need to use a waveform viewer to check it.
SL-870 eARC Protocol Analyzer User Guide User Guide
Simplay-UG-02004-A © 2018 Simplay Labs, LLC. 17 All rights reserved. CONFIDENTIAL
Figure 20: Capture Files
Each test has a single log file saved.
Figure 21: Log Files
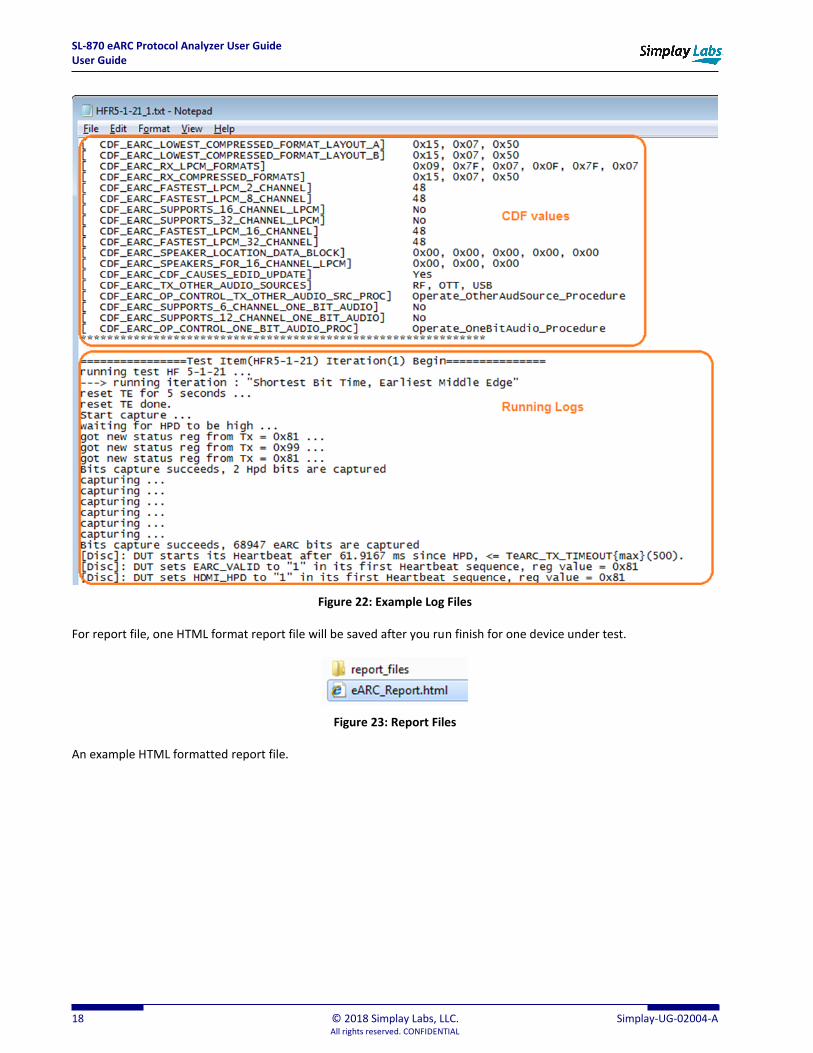
Log file content starts with running time CDF values, followed by the running log.
SL-870 eARC Protocol Analyzer User Guide User Guide
18 © 2018 Simplay Labs, LLC. Simplay-UG-02004-A All rights reserved. CONFIDENTIAL
Figure 22: Example Log Files
For report file, one HTML format report file will be saved after you run finish for one device under test.
Figure 23: Report Files
An example HTML formatted report file.

SL-870 eARC Protocol Analyzer User Guide User Guide
Simplay-UG-02004-A © 2018 Simplay Labs, LLC. 19 All rights reserved. CONFIDENTIAL
Figure 24: Example Report File
You can click on the “Trial *” field in the HTML file to see log details of the failure.
Figure 25: Report Files Log Details
SL-870 eARC Protocol Analyzer User Guide User Guide
20 © 2018 Simplay Labs, LLC. Simplay-UG-02004-A All rights reserved. CONFIDENTIAL
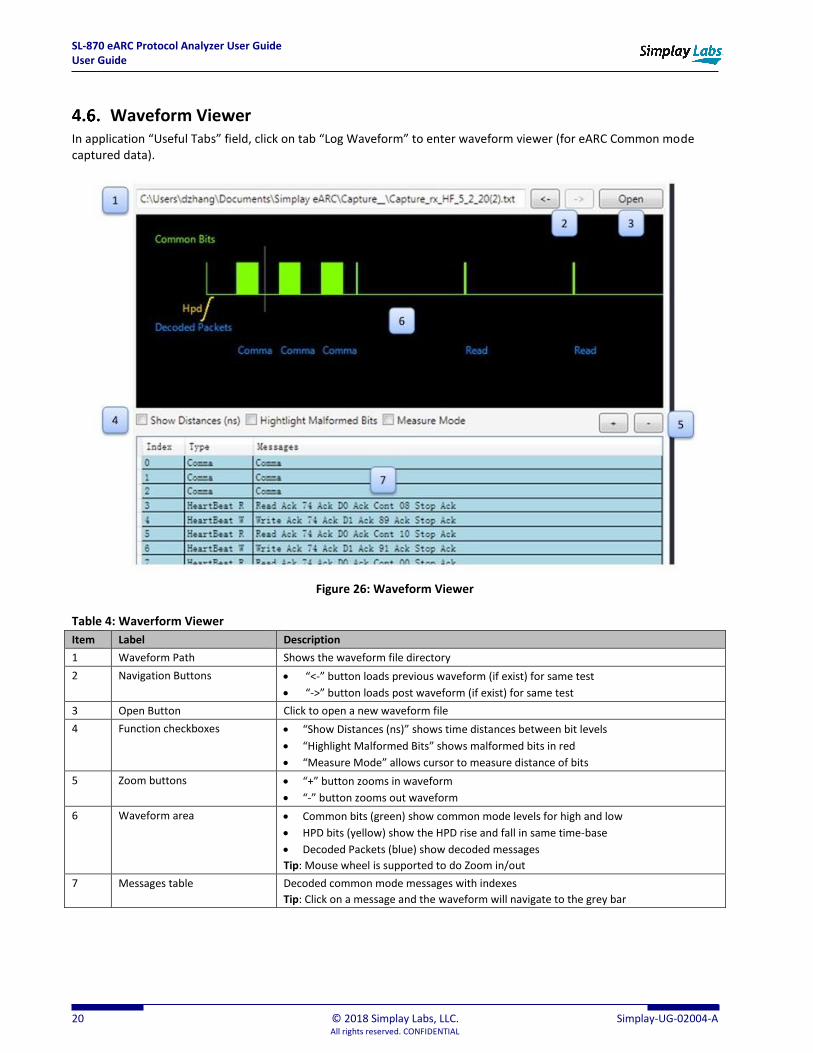
Waveform Viewer In application “Useful Tabs” field, click on tab “Log Waveform” to enter waveform viewer (for eARC Common mode captured data).
Figure 26: Waveform Viewer
Table 4: Waverform Viewer
Item Label Description
1 Waveform Path Shows the waveform file directory
2 Navigation Buttons • “<-” button loads previous waveform (if exist) for same test
• “->” button loads post waveform (if exist) for same test
3 Open Button Click to open a new waveform file
4 Function checkboxes • “Show Distances (ns)” shows time distances between bit levels
• “Highlight Malformed Bits” shows malformed bits in red
• “Measure Mode” allows cursor to measure distance of bits
5 Zoom buttons • “+” button zooms in waveform
• “-” button zooms out waveform
6 Waveform area • Common bits (green) show common mode levels for high and low
• HPD bits (yellow) show the HPD rise and fall in same time-base
• Decoded Packets (blue) show decoded messages
Tip: Mouse wheel is supported to do Zoom in/out
7 Messages table Decoded common mode messages with indexes
Tip: Click on a message and the waveform will navigate to the grey bar
SL-870 eARC Protocol Analyzer User Guide User Guide
Simplay-UG-02004-A © 2018 Simplay Labs, LLC. 21 All rights reserved. CONFIDENTIAL
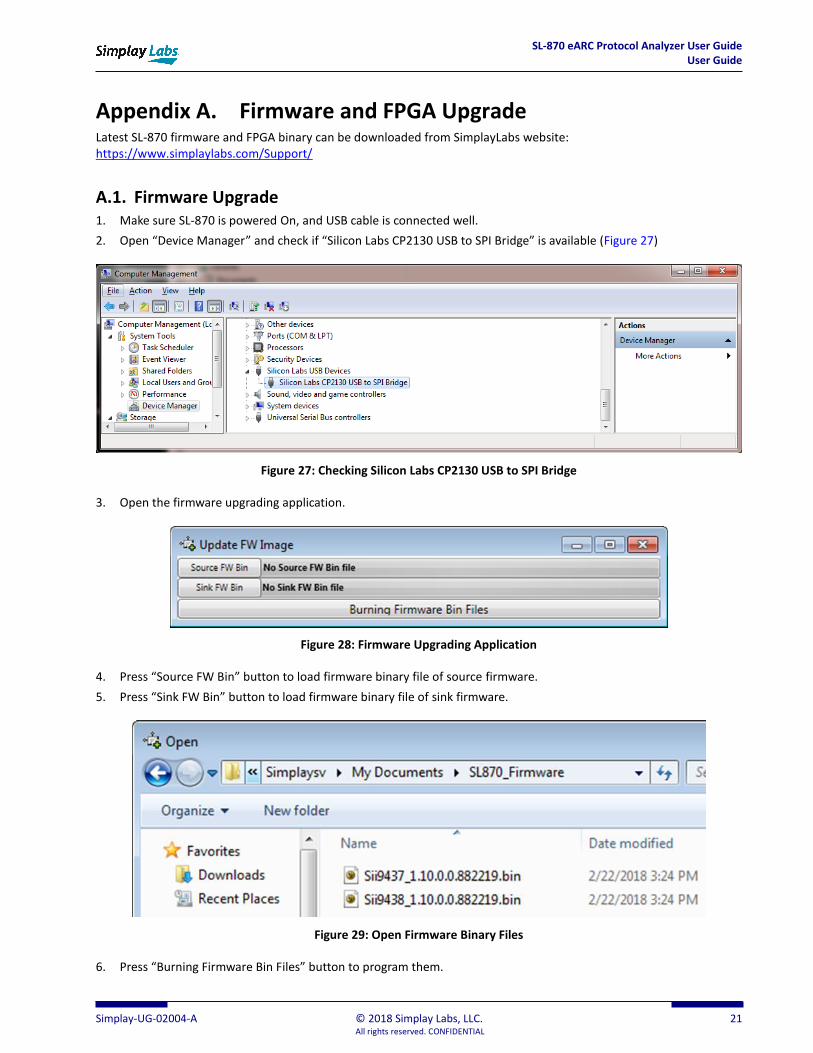
Appendix A. Firmware and FPGA Upgrade Latest SL-870 firmware and FPGA binary can be downloaded from SimplayLabs website: https://www.simplaylabs.com/Support/
A.1. Firmware Upgrade 1. Make sure SL-870 is powered On, and USB cable is connected well.
2. Open “Device Manager” and check if “Silicon Labs CP2130 USB to SPI Bridge” is available (Figure 27)
Figure 27: Checking Silicon Labs CP2130 USB to SPI Bridge
3. Open the firmware upgrading application.
Figure 28: Firmware Upgrading Application
4. Press “Source FW Bin” button to load firmware binary file of source firmware.
5. Press “Sink FW Bin” button to load firmware binary file of sink firmware.
Figure 29: Open Firmware Binary Files
6. Press “Burning Firmware Bin Files” button to program them.
SL-870 eARC Protocol Analyzer User Guide User Guide
22 © 2018 Simplay Labs, LLC. Simplay-UG-02004-A All rights reserved. CONFIDENTIAL
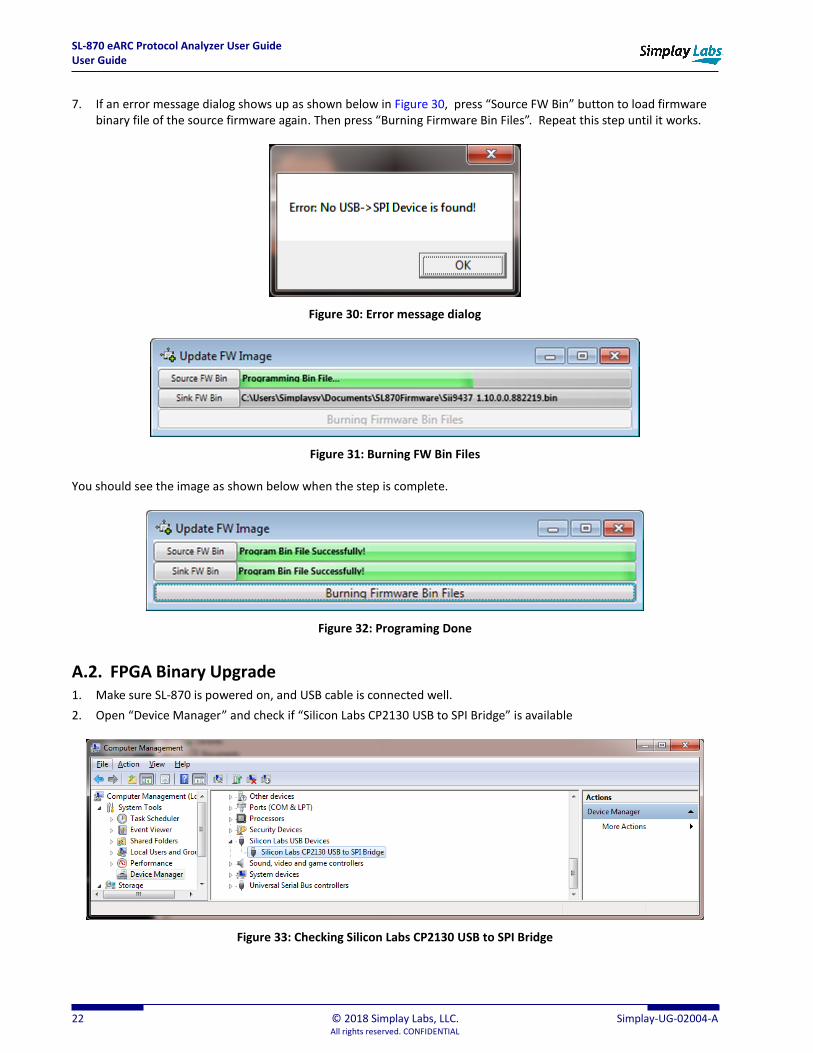
7. If an error message dialog shows up as shown below in Figure 30, press “Source FW Bin” button to load firmware binary file of the source firmware again. Then press “Burning Firmware Bin Files”. Repeat this step until it works.
Figure 30: Error message dialog
Figure 31: Burning FW Bin Files
You should see the image as shown below when the step is complete.
Figure 32: Programing Done
A.2. FPGA Binary Upgrade 1. Make sure SL-870 is powered on, and USB cable is connected well.
2. Open “Device Manager” and check if “Silicon Labs CP2130 USB to SPI Bridge” is available
Figure 33: Checking Silicon Labs CP2130 USB to SPI Bridge
SL-870 eARC Protocol Analyzer User Guide User Guide
Simplay-UG-02004-A © 2018 Simplay Labs, LLC. 23 All rights reserved. CONFIDENTIAL
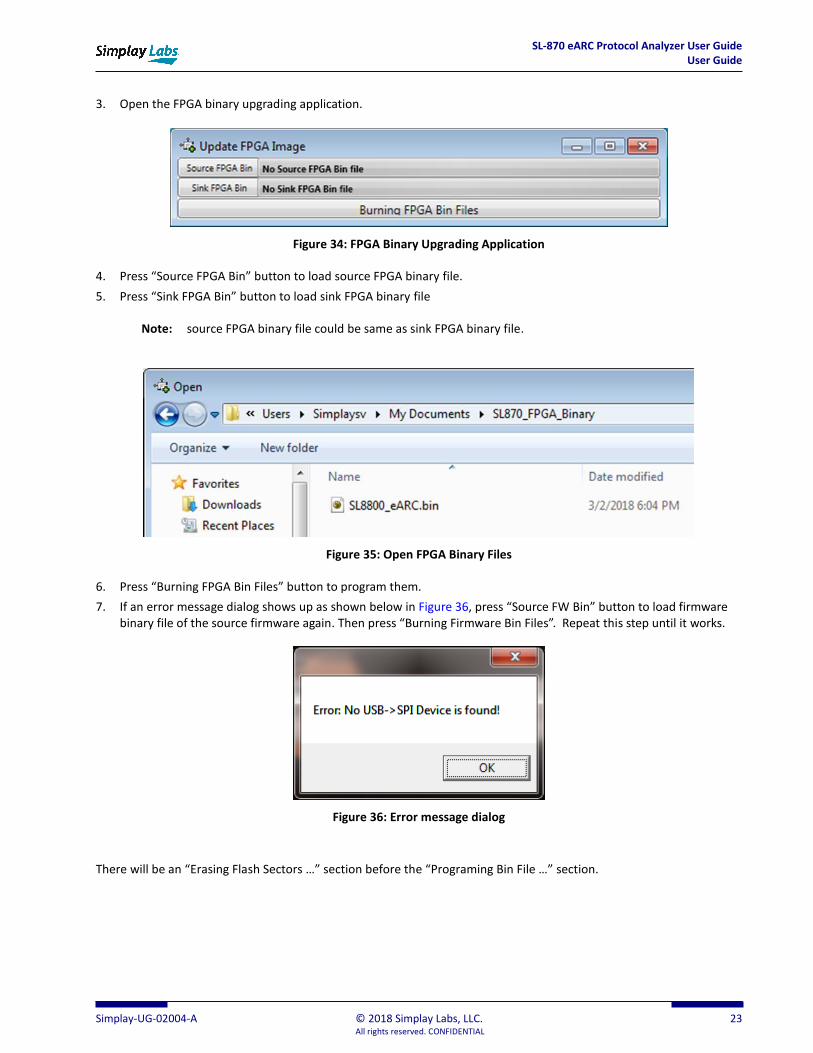
3. Open the FPGA binary upgrading application.
Figure 34: FPGA Binary Upgrading Application
4. Press “Source FPGA Bin” button to load source FPGA binary file.
5. Press “Sink FPGA Bin” button to load sink FPGA binary file
Note: source FPGA binary file could be same as sink FPGA binary file.
Figure 35: Open FPGA Binary Files
6. Press “Burning FPGA Bin Files” button to program them.
7. If an error message dialog shows up as shown below in Figure 36, press “Source FW Bin” button to load firmware binary file of the source firmware again. Then press “Burning Firmware Bin Files”. Repeat this step until it works.
Figure 36: Error message dialog
There will be an “Erasing Flash Sectors …” section before the “Programing Bin File …” section.
SL-870 eARC Protocol Analyzer User Guide User Guide
24 © 2018 Simplay Labs, LLC. Simplay-UG-02004-A All rights reserved. CONFIDENTIAL
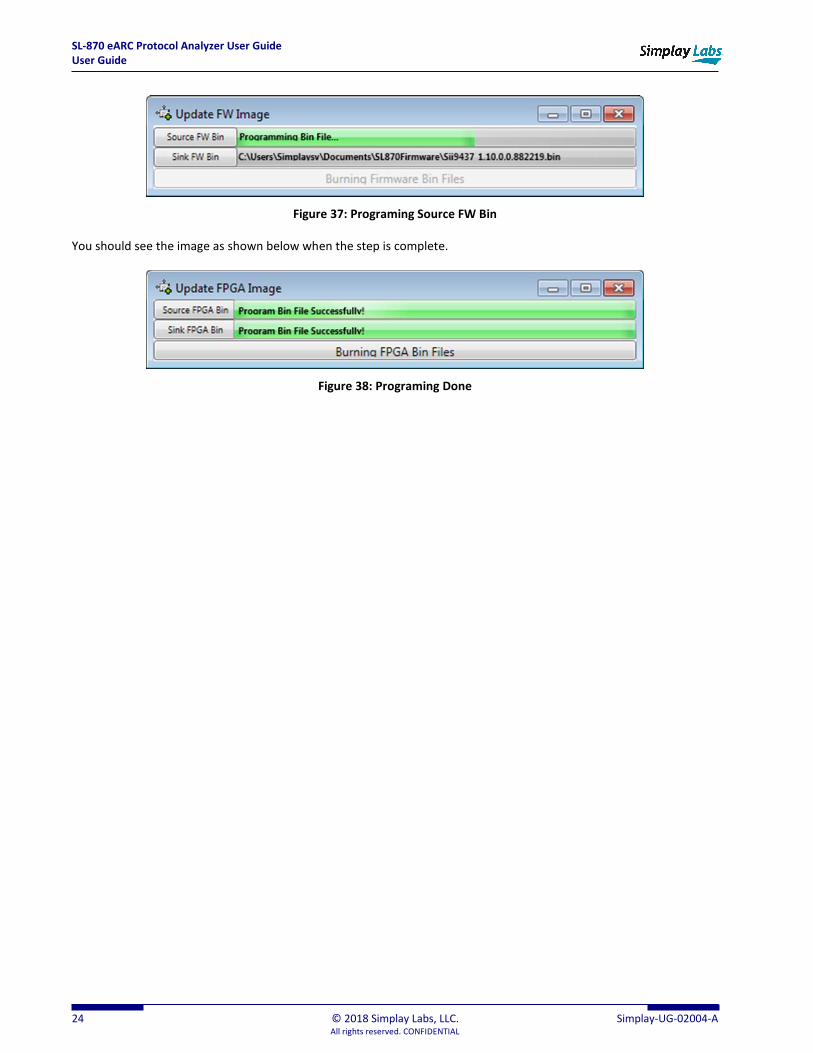
Figure 37: Programing Source FW Bin
You should see the image as shown below when the step is complete.
Figure 38: Programing Done
SL-870 eARC Protocol Analyzer User Guide User Guide
Simplay-UG-02004-A © 2018 Simplay Labs, LLC. 25 All rights reserved. CONFIDENTIAL
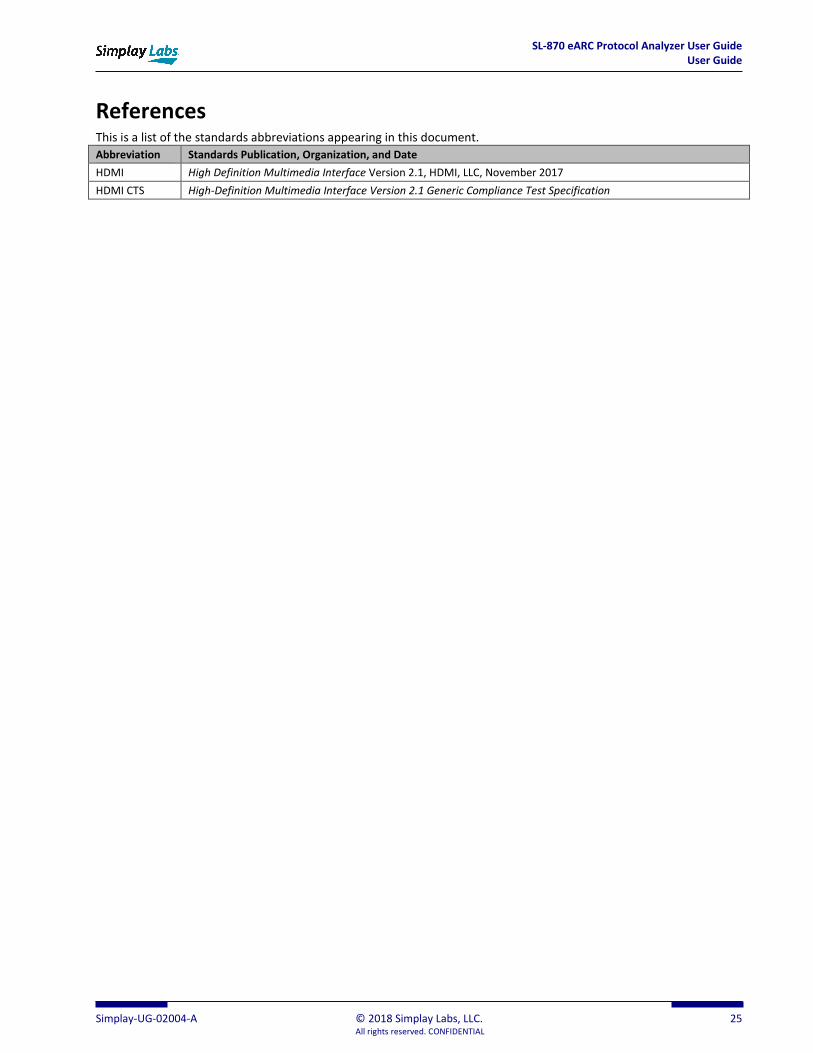
References This is a list of the standards abbreviations appearing in this document.
Abbreviation Standards Publication, Organization, and Date
HDMI High Definition Multimedia Interface Version 2.1, HDMI, LLC, November 2017
HDMI CTS High-Definition Multimedia Interface Version 2.1 Generic Compliance Test Specification
SL-870 eARC Protocol Analyzer User Guide User Guide
26 © 2018 Simplay Labs, LLC. Simplay-UG-02004-A All rights reserved. CONFIDENTIAL
Revision History
Revision A, March 2018
First production release.
SL-870 eARC Protocol Analyzer User Guide User Guide
Simplay-UG-02004-A © 2018 Simplay Labs, LLC. 27 All rights reserved. CONFIDENTIAL
General Warranty Terms
Simplay Labs, LLC., (Simplay Labs) offers a limited warranty for its Simplay Labs products. Any product first sold to your business is guaranteed to be free from defects in both components and workmanship under regular uses. The warranty period commences on the date the item ships.
Attention: Your invoice with the date of purchase, model number and serial number of the product is your proof of the date of purchase.
This International Limited Warranty is applicable and shall be honored in every country where Simplay Labs or its Authorized Service Providers offer warranty service subject to the terms and conditions provided in this International Limited Warranty Statement.
Simplay Labs Products Warranty Period
The warranty terms for Simplay Labs products are: Domestic & Asia EU & UK
1 Year 2 Year
The International Limited warranty does not affect your statutory rights.
System Warranty
During the warranty period, the defective hardware of Simplay Labs products will be either repaired or replaced, with new or like new products, at the discretion of Simplay Labs except in the cases listed in the Limitation of Liability Clause of this document.
This International Limited Warranty covers the costs of service parts and labor required to restore your product to fully functional condition. Simplay Labs will, at its discretion, repair or replace any defective products or parts thereof covered by this International Limited warranty with refurbished parts of the product that are equivalent to new or like new products in both functionality and performance. A product or part that is repaired or replaced under this International Limited warranty shall be covered for the remainder of the original warranty period applying to the product or part, or for 90-days, whichever expires last. All exchanged parts and products under this International Limited Warranty will become the property of Simplay Labs.
Software Limited Warranty
Simplay Labs offers no warranty, either explicitly expressed or implicitly implied, for any pre-installed software, its quality, performance, functionality, or compatibility for a particular purpose. Nor does Simplay Labs warrant that the functions contained in the software will meet specific requirements or that the operation of the software will be uninterrupted or error-free. Thus, the software is sold ‘as is” unless otherwise explicitly stated in writing.
Obtaining the Warranty Service
Warranty service or Returned Merchandise Authorization (RMA) under this International Limited Warranty will be honored only if claims are made within the warranty period. For notifications to Simplay Labs or products outside the warranty period, the process will be the same, but charges may apply. Contact details may be obtained on Simplay Labs website (www.simplaylabs.com/support). Customers are requested to perform the following actions before claiming Simplay Labs product as defective:
Owner must notify Simplay Labs, during the warranty period, in writing of alleged defect, and allow Simplay Labs a reasonable opportunity to inspect the allegedly defective product;
No Product may be returned without Simplay Labs’ consent, The Simplay Labs RMA# must accompany all returns, and all returns must be delivered to Simplay Labs within the warranty period;
Owner may, then at its own expense, return the allegedly defective Product, freight pre-paid and in the original packaging, accompanied by a brief statement explaining the alleged defect to Simplay Labs;
If Simplay Labs determines that any returned Product is not defective, or if Simplay Labs determines that the defect is not covered by the warranty, Simplay Labs will return the Product to the Owner at Owner’s expense, freight collect, and Owner agrees to pay Simplay Labs’ reasonable cost of handling and testing;
Upon determining that a returned product is defective, to receive warranty service Owner will need to present the invoice showing the original purchase transaction. If shipping the product, Owner will need to package it carefully and send it, transportation prepaid by a traceable, insured method, to the Simplay Labs Service Center. Package the product using adequate padding material to prevent damage in transit. The original container is ideal for this purpose. Include the RMA#, your name, return shipping address, email address and telephone number where you may be reached during business hours, inside the shipping package with the unit. Any replacement unit will be warranted under these Terms and Conditions for the remainder of the original warranty period or ninety (90) days whichever is longer.
Make sure to back up any important data and remove all confidential, proprietary information. Neither Simplay Labs nor its authorized service centers are responsible for damages to or loss of any programs, data, or other software and files in the items.
Refer to user manual enclosed within the product package and/or information on www.simplaylabs.com/support for important tips on how to operate and troubleshoot the product
International Warranty
Warranty may be valid when a Simplay Labs product is purchased in one country and transferred to another country, without voiding the warranty. Please be advised that service availability and response time may vary from country to country.
Simplay Labs is not responsible for any export and import control issues, handling fees, tariffs, import duties, and all other related fees where owner is responsible for shipping its products.
SL-870 eARC Protocol Analyzer User Guide User Guide
28 © 2018 Simplay Labs, LLC. Simplay-UG-02004-A All rights reserved. CONFIDENTIAL
Disclaimer of Warranty
THIS WARRANTY IS EXPRESSED IN LIEU OF ALL OTHER WARRANTIES, EXPRESSED OR IMPLIED, INCLUDING THE IMPLIED WARRANTY OF MERCHANTABILITY, THE IMPLIED WARRANTY OF FITNESS FOR A PARTICULAR PURPOSE AND OF ALL OTHER OBLIGATIONS OR LIABILITIES ON SIMPLAY LAB’S PART, AND IT NEITHER ASSUMES NOR AUTHORIZES ANY OTHER PARTY TO ASSUME FOR SIMPLAY LABS ANY OTHER LIABILITIES. THE FOREGOING CONSTITUTES THE BUYER’S SOLE AND EXCLUSIVE REMEDY FOR THE FURNISHING OF DEFECTIVE OR NONCONFORMING PRODUCTS AND SIMPLAY LABS WILL NOT IN ANY EVENT BE LIABLE FOR COST OF SUBSTITUTE OR REPLACEMENT, COST OF FACILITIES OR SERVICE, DOWNTIME COSTS, LOSS OF PROFITS, REVENUES OR GOODWILL, RELIANCE DAMAGES, LOSS OF DATA, LOSS OF USE IF OR DAMAGE TO ANY ASSOCIATED EQUIPMENT, OR ANY OTHER INDIRECT, INCIDENTAL, SPECIAL, OR CONSEQUENTIAL DAMAGES BY REASON OF THE FACT THAT SUCH PRODUCTS WILL HAVE BEEN DETERMINED TO BE DEFECTIVE OR NONCONFORMING.
THE RIGHTS AND OBLIGATIONS OF THE PARTIES UNDER THIS AGREEMENT SHALL NOT BE GOVERENED BY THE PROVISIONS OF THE 1980 U.S. CONVENTION ON CONTRACTS FOR THE INTERNATIONAL SALE OF GOODS OR THE UNITED NATIONS CONVENTION ON THE LIMITATION PERIOD IN THE INTERNATIONAL SALE OF GOODS, AS AMENDED (COLLECTIVELY, THE “CONVENTIONS”); RATHER, THE RIGHTS AND OBLIGATIONS OF THE PARTIES SHALL BE GOVERNED BY THE LAWS OF THE SATE OF CALIFORNIA, INCLUDING ITS PROVISIONS OF THE UNIFORM COMMERCIAL CODE. FOR THE AVOIDANCE OF DOUBT, THE CONVENTIONS ARE HEREBY EXCLUDED.
This Limited Warranty gives you specific legal rights. You may also have other rights that may vary from state to state or from country to country. You are advised to consult applicable state or country laws for full determination of your rights.
Simplay Labs products are not designed for any “critical applications.” ”Critical applications” shall mean life support systems, medical applications, connections to implanted medical devices, commercial transportation, nuclear facilities or systems or any other applications where product failure could lead to injury to persons or loss of life or property damage.
Copyright Notice
Copyright © 2018 Simplay Labs, LLC All rights reserved. The contents of these materials contain proprietary and confidential information (including trade secrets, copyright, and other Intellectual Property interests) of Simplay labs and/or its affiliates. All rights are reserved. You are permitted to use this document and any information contained therein expressly and only for bona fide non-commercial evaluation of products and/or services from Simplay labs; and only in connection with your bone fide consideration of purchase or license of products or services from Simplay Labs or its affiliates, and only in accordance with the terms and conditions stipulated. The contents, (in whole or in part) may not be reproduced, downloaded, disseminated, published, or transferred in any form or by any means, except with the prior written permission of Simplay Labs. You may not use these materials except only for your bona fide non-commercial evaluation of your potential purchase of products and/or services from Simplay Labs; and only in connection with your purchase of products or services from Simplay Labs or its affiliates, and only in accordance with the terms and conditions stipulated. Copyright infringement is a violation of federal law subject to criminal and civil penalties. You have no right to copy, modify, create derivative works of, transfer, sublicense, publicly display, create derivative works of, distribute these materials, or otherwise make these materials available, in whole or in part, to any third party. You are not permitted to reverse engineer, disassemble, or decompile any device or object code provided herewith. Simplay Labs reserves the right to revoke these permissions and require the destruction or return of any and all Simplay Labs proprietary materials and/or data.
Trademark Acknowledgment
Simplay®, Simplay HD®, Simplay HD logo, Simplay Labs™ and Simplay Labs logo are trademarks or registered trademarks of Simplay Labs in the United States and/or other countries. HDMI® and the HDMI logo are trademarks or registered trademarks of, and are used under license from, HDMI Licensing, LLC. in the United States or other countries. MHL® and the MHL logo are trademarks or registered trademarks of, and are used under license from, MHL, LLC. in the United States or other countries. All other trademarks and registered trademarks are the property of their respective owners in the United States and/or other countries.
All other trademarks and registered trademarks are the property of their respective owners in the United States or other countries. The absence of a trademark symbol does not constitute a waiver of the trademarks owner’s rights or other intellectual property rights with regard to a product name, logo or slogan.
Export Controlled Document
This document contains materials that are subject to the U.S. Export Administration Regulations and may also be subject to additional export control laws and regulations (collectively “Export Laws”) and may be used only in compliance with such Export Laws. Unless otherwise authorized by an officer of Simplay Labs in writing, this document and the information contained herein (a) may not be used in relation to nuclear, biological or chemical weapons, or missiles capable of delivering these weapons, and (b) may not be re-exported or otherwise transferred to a third party who is known or suspected to be involved in relation to nuclear, biological or chemical weapons, or missiles capable of delivering these weapons, or to any sanctioned persons or entities.
Limitation of Liability
Simplay Labs reserves the rights to refuse warranty service of products under disputable conditions. Simplay Labs also holds the rights to declare final decision whether products are within warranty conditions. The following actions and damages will result in voiding the limited warranty:
Damage caused by act of nature, such as fire, flood, wind, earthquake, lightning, etc.
Damage or incompatibility caused by failure to perform a proper installation or to provide an appropriate operational environment for the product, including but not limited to unstable wired/ wireless network connection and phone lines, bad grounding, external electro-magnetic fields, direct sunlight, high humidity and vibration.
• Damage caused by impact with other objects, dropping, falls, spilled liquids, or submersion in liquids.
• Damage caused by unauthorized repair or disassembling of the product.
SL-870 eARC Protocol Analyzer User Guide User Guide
Simplay-UG-02004-A © 2018 Simplay Labs, LLC. 29 All rights reserved. CONFIDENTIAL
• Damage caused by any other abuse, misuse, mishandling, or misapplication.
• Damage caused by third party peripherals (including but not limited to visible damages on motherboard or other electronic parts of the product such as burn spots after electric discharge, melting, fusing, splitting, etc.).
• Any unauthorized software or modification of built-in software not approved by Simplay Labs.
• The serial number of the product (or serial number stickers of its parts) has been modified, removed, blurred or damaged.
• Cracks and scratches on LCD and plastic material as well as other defects caused by transportation, handling or customer abuse.

3400 Garrett Drive
Santa Clara, CA 95054
T 669-243-3550
www.simplaylabs.com