SITHFAB005 PREPARE AND SERVE ESPRESSO COFFEE · espresso coffee beverages using commercial espresso...
77
Melbourne Training Centre Level 6, 350 Collins Street MELBOURNE VIC 3000 Phone: 1300 747 430 Email: [email protected] Web: www.shortcoursesau.edu.au Student Workbook SITHFAB005 PREPARE AND SERVE ESPRESSO COFFEE
Transcript of SITHFAB005 PREPARE AND SERVE ESPRESSO COFFEE · espresso coffee beverages using commercial espresso...

Melbourne Training Centre Level 6, 350 Collins Street MELBOURNE VIC 3000 Phone: 1300 747 430 Email: [email protected] Web: www.shortcoursesau.edu.au
Student Workbook
SITHFAB005
PREPARE AND SERVE
ESPRESSO COFFEE

SITFAB005 Prepare and serve espresso coffee V2019.02. Page | 2 Short Courses Australia RTO Provider No. 41261
Short Courses Australia All rights reserved. No part of this publication may be reproduced, repackaged, stored in a retrieval system or transmitted in any form or by any means whatsoever without the prior written permission of the copyright owner. Prepared and published by Short Courses Australia, RTO ‐ 41261 Address: Level 6, 350 Collins Street Melbourne 3000. Telephone: 1300 747 430 Email: [email protected] Website: www.shortcoursesau.edu.au Disclaimer This information should not be relied upon as a substitute for professional legal advice or reference to the actual legislation. Whilst every effort has been made to ensure the accuracy and completeness of the publication, the advice contained herein may not apply in every circumstance. Short Courses Australia cannot be held responsible and extends no warranties as to the suitability of the information for any particular purpose and actions taken by third parties as a result of information contained in this publication. Information in this workbook resource is current at the time of publication. The time of publication is indicated in the Version information printed on this page. This document: SITHFAB005 Prepare and serve espresso coffee Student Workbook Version: 2019.02
SITFAB005 Prepare and serve espresso coffee V2019.02. Page | 3 Short Courses Australia RTO Provider No. 41261
TABLE OF CONTENTS
Table of Contents .................................................................................................................................... 3
UNIT Introduction ................................................................................................................................... 8
ABOUT THIS RESOURCE ...................................................................................................................... 8
ABOUT ASSESSMENT .......................................................................................................................... 8
Elements and Performance Criteria ...................................................................................................... 10
Performance evidence and Knowledge evidence ................................................................................. 12
PERFORMANCE EVIDENCE ................................................................................................................ 12
KNOWLEDGE EVIDENCE .................................................................................................................... 13
Assessment Conditions ......................................................................................................................... 16
Pre‐Requisites ....................................................................................................................................... 17
Introduction .......................................................................................................................................... 18
History of Coffee ................................................................................................................................... 18
The History of Coffee ........................................................................................................................ 18
Characteristics of different types of beans, blends, and roasts........................................................ 19
Coffee Growth in Countries .............................................................................................................. 20
Total .............................................................................................................................................. 20
Arabica beans ................................................................................................................................ 21
Robusta beans ............................................................................................................................... 21
Blends ............................................................................................................................................ 21
Roasts ............................................................................................................................................ 21
The Flavours of Coffee ...................................................................................................................... 22
Tasting coffee (cupping) ................................................................................................................ 22
Eight Flavours of Coffee .................................................................................................................... 23
Topic 1 – Organise coffee workstation ................................................................................................. 24
Food Safety Hazards .......................................................................................................................... 24
Complete mise en place for coffee service to enable efficient workflow and easy access to
ingredients, equipment, and service‐ware ........................................................................................... 24
Mise en place requirements for preparing coffee beverages .......................................................... 24
Work Routines .................................................................................................................................. 25
Place ingredients in correct containers and conditions to maintain freshness .................................... 29
Coffee Storage Locations .................................................................................................................. 29
Coffee Container Types ..................................................................................................................... 29
Coffee's Freshness over Time ........................................................................................................... 29
Freshness of Ground Coffee vs Whole Beans ................................................................................... 29

SITFAB005 Prepare and serve espresso coffee V2019.02. Page | 4 Short Courses Australia RTO Provider No. 41261
Prepare espresso machine and grinder for service according to manufacturer instructions .............. 30
Understanding the grind ................................................................................................................... 30
Getting the right grind .................................................................................................................. 30
Set Up Grinder .................................................................................................................................. 32
Set up Coffee Machine ...................................................................................................................... 33
Topic 2 – Select and grind coffee beans ............................................................................................... 35
Select coffee beans and grind to appropriate particle size according to relevant factors ................... 35
Grinding Coffee Beans ...................................................................................................................... 35
Why does the grind of coffee change? ......................................................................................... 35
Why does humidity change the grind? ......................................................................................... 36
A good coffee grind ....................................................................................................................... 36
Scientific approach ........................................................................................................................ 36
Blade wear .................................................................................................................................... 37
Complete test extractions before service to ensure correct particle size of grind, and assess and
adjust according to relevant factors ..................................................................................................... 37
Setting the grind (step by step) ......................................................................................................... 37
Extraction test ............................................................................................................................... 37
The two part extraction test ......................................................................................................... 37
Checking the grinder ..................................................................................................................... 37
Adjusting the grind (step by step) ................................................................................................. 38
Extraction rates for the different espresso coffee beverages .......................................................... 39
Adjust grind regularly throughout the service period according to relevant factors ........................... 39
Monitor efficiency of grinder for correct dose and grind during use, and resolve or report issues .... 39
Adjusting the Dose ............................................................................................................................ 39
Clean grinder as required during or after the service period ............................................................... 40
Cleaning the grinder‐doser (step by step) ........................................................................................ 40
Topic 3 – Advise customers and take espresso coffee orders .............................................................. 41
Provide information and recommendations about types of coffee beverages and accompaniments 41
Major types and characteristics of espresso coffee beverages ........................................................ 41
Flavoured Coffee ............................................................................................................................... 45
Syrups ............................................................................................................................................ 45
Coffee with alcohol ....................................................................................................................... 45
Accompaniments used to enhance beverages ................................................................................. 45
Identify customer preferences and take orders ................................................................................... 46
Available options to meet specific customer preferences relating to: ............................................. 46
Accompaniments .......................................................................................................................... 46
SITFAB005 Prepare and serve espresso coffee V2019.02. Page | 5 Short Courses Australia RTO Provider No. 41261
Blends ............................................................................................................................................ 46
Service‐ware.................................................................................................................................. 46
Strength......................................................................................................................................... 46
Sweeteners ................................................................................................................................... 47
Type of beans and milk ................................................................................................................. 47
Sequencing orders for the preparation of coffee beverages ............................................................ 47
Topic 4 – Extract and monitor quality of espresso ............................................................................... 49
Select and prepare appropriate service‐ware ...................................................................................... 49
Mugs.............................................................................................................................................. 49
Dispensing Coffee ............................................................................................................................. 49
Select correct filter basket and clean, dry and dose it with required amount of ground coffee ......... 50
The correct action for dosing: ........................................................................................................... 50
Setting the dose (step by step) ..................................................................................................... 50
Tamp ground coffee to make even and level cake ............................................................................... 51
Tamping methods ............................................................................................................................. 51
Adjusting the tamping technique ..................................................................................................... 53
Flush group head before attaching group handle to extract espresso ................................................. 54
Flushing the group head ................................................................................................................... 54
Monitor quality of extraction during service period and make adjustments ....................................... 54
Quality indicators for espresso coffee extraction: ............................................................................ 54
Changes in colour of crema .......................................................................................................... 54
Changes in flow texture ................................................................................................................ 55
Consistency of Cake of used ground coffee .................................................................................. 55
Water pressure during extraction ................................................................................................. 55
Factors relevant to quality of espresso coffee: ................................................................................. 55
Ambient humidity ......................................................................................................................... 55
Crema on top of the espresso ....................................................................................................... 55
Quality and rate of espresso flow ................................................................................................. 55
Steam pressure during foaming and steaming of milk ................................................................. 55
Taste .............................................................................................................................................. 55
Making adjustments to the: .............................................................................................................. 56
Water flow .................................................................................................................................... 56
Water pressure ............................................................................................................................. 56
Monitor efficiency of espresso machine during service, and resolve or report issues ........................ 56
Topic 5 – Undertake milk texturing process ......................................................................................... 57
Select cold milk and appropriate milk foaming jug to fulfil customer orders ...................................... 57

SITFAB005 Prepare and serve espresso coffee V2019.02. Page | 6 Short Courses Australia RTO Provider No. 41261
Different types of milk, their characteristics and uses for different types of coffee beverages ...... 57
Milk Jugs ............................................................................................................................................ 58
Purge the steam wand every time before texturing ............................................................................ 58
Purge the system before you start steaming .................................................................................... 58
Safe operational practices and dangers of working with steam ...................................................... 59
Texture milk according to type of milk and coffee beverage ............................................................... 59
Texturing milk ................................................................................................................................... 59
Steaming and frothing milk ........................................................................................................... 59
Visually and aurally monitor and adjust the texture and temperature ................................................ 60
Measuring dose by sight, electronically, manually and mechanically .............................................. 60
Clean the steam wand on the outside and purge every time after texturing ...................................... 62
Combine foam and milk through swirling, ensuring even consistency ................................................ 62
Perfect swirling and pouring (step by step) ...................................................................................... 62
Why swirl? ......................................................................................................................................... 62
Pour milk immediately after swirling, according to the coffee beverage............................................. 63
Topic 6 – Serve espresso coffee beverages .......................................................................................... 64
Present coffee beverages attractively and without drips and spills ..................................................... 64
Pulling a perfect espresso shot ......................................................................................................... 64
Step one: pre‐warm the demitasse .............................................................................................. 64
Step two: prepare the coffee – and a note on roasting and storing ............................................ 64
Step three: grind the coffee – use a conical burr grinder ............................................................. 64
Step four: pre‐warm the espresso machine portafilter ................................................................ 64
Step five: position the demitasse .................................................................................................. 64
Step six: filling the portafilter – tamping the ground coffee ........................................................ 64
Step seven: begin the espresso brewing ...................................................................................... 65
Step eight: observe the espresso stream closely .......................................................................... 65
Step nine: try as precisely as possible to determine the optimal brewing time .......................... 65
Step ten: extract the aromatic qualities without too much bitterness ........................................ 65
Step eleven: diagnose and troubleshoot for perfect espresso shots ........................................... 65
Espresso Streaming too slow ............................................................................................................ 66
Espresso Streaming too fast ............................................................................................................. 66
Examining the espresso layer by layer .............................................................................................. 66
The espresso crema ...................................................................................................................... 66
The body of the espresso shot ...................................................................................................... 66
The heart of the espresso shot ..................................................................................................... 66
Tips on pulling the perfect espresso shot ......................................................................................... 66

SITFAB005 Prepare and serve espresso coffee V2019.02. Page | 7 Short Courses Australia RTO Provider No. 41261
Latte art ............................................................................................................................................. 67
Serve coffee beverages promptly at the required temperature and with appropriate
accompaniments ................................................................................................................................... 68
Minimise waste to maximise profitability of beverages produced ...................................................... 69
Storage .............................................................................................................................................. 69
Appropriate environmental conditions for storing coffee beans, ground coffee, milk and other
ingredients to Ensure food safety and Optimise shelf life ................................................................ 69
Topic 7 – Clean espresso equipment .................................................................................................... 70
Clean espresso machine and equipment thoroughly and safely according to organisational
procedures and manufacturer instructions .......................................................................................... 70
Cleaning and maintenance methods and procedures ...................................................................... 70
STEP‐BY‐STEP CLEANING INSTRUCTIONS .......................................................................................... 71
Time to flush and scrub ................................................................................................................. 72
Rinse water ................................................................................................................................... 72
Content of safety data sheets (SDS) for cleaning agents and chemicals, or workplace documents or
diagrams that interpret the content of SDS ...................................................................................... 73
Maintain water filtration system according to organisational procedures .......................................... 74
Refer faults and maintenance issues requiring technical specialists to supervisor ............................. 74
Symptoms of faults in espresso machines and grinders ................................................................... 74
Use energy and water resources efficiently when preparing coffee beverages and cleaning to reduce
negative environmental impacts .......................................................................................................... 75
summary ............................................................................................................................................... 76
References ............................................................................................................................................ 76

SITFAB005 Prepare and serve espresso coffee V2019.02. Page | 8 Short Courses Australia RTO Provider No. 41261
UNIT INTRODUCTION
This resource covers the unit SITHFAB005 ‐ Prepare and serve espresso coffee.
This unit describes the performance outcomes, skills and knowledge required to extract and serve
espresso coffee beverages using commercial espresso machines and grinders. It requires the ability
to advise customers on coffee beverages, select and grind coffee beans, prepare and assess espresso
coffee beverages and to use, maintain and clean espresso machines and grinders. Complex repairs of
equipment would be referred to specialist service technicians.
Preparation of coffee beverages using other methods is covered in SITHFAB004 Prepare and serve
non‐alcoholic beverages.
This unit applies to any hospitality organisation that serves espresso coffee beverages, including
cafes, restaurants, bars, clubs, function and event venues.
It applies to espresso machine operators who operate with some level of independence and under
limited supervision.
No occupational licensing, certification or specific legislative requirements apply to this unit at the
time of publication.
ABOUT THIS RESOURCE
This resource brings together information to develop your knowledge about this unit. The
information is designed to reflect the requirements of the unit and uses headings to makes it easier
to follow.
Read through this resource to develop your knowledge in preparation for your assessment. You will
be required to complete the assessment tools that are included in your program. At the back of the
resource are a list of references you may find useful to review.
As a student it is important to extend your learning and to search out text books, internet sites, talk
to people at work and read newspaper articles and journals which can provide additional learning
material.
Your trainer may include additional information and provide activities. Slide presentations and
assessments in class to support your learning.
ABOUT ASSESSMENT
Throughout your training we are committed to your learning by providing a training and assessment
framework that ensures the knowledge gained through training is translated into practical on the job
improvements.
You are going to be assessed for:
Your skills and knowledge using written and observation activities that apply to
your workplace.
Your ability to apply your learning.

SITFAB005 Prepare and serve espresso coffee V2019.02. Page | 9 Short Courses Australia RTO Provider No. 41261
Your ability to recognise common principles and actively use these on the job.
You will receive an overall result of Competent or Not Yet Competent for the assessment of this unit.
The assessment is a competency based assessment, which has no pass or fail. You are either
competent or not yet competent. Not Yet Competent means that you still are in the process of
understanding and acquiring the skills and knowledge required to be marked competent. The
assessment process is made up of a number of assessment methods. You are required to achieve a
satisfactory result in each of these to be deemed competent overall.
All of your assessment and training is provided as a positive learning tool. Your assessor will guide
your learning and provide feedback on your responses to the assessment. For valid and reliable
assessment of this unit, a range of assessment methods will be used to assess practical skills and
knowledge.
Your assessment may be conducted through a combination of the following methods:
Written Activity
Case Study
Observation
Questions
Third Party Report
The assessment tool for this unit should be completed within the specified time period following the
delivery of the unit. If you feel you are not yet ready for assessment, discuss this with your trainer
and assessor.
To be successful in this unit you will need to relate your learning to your workplace. You may be
required to demonstrate your skills and be observed by your assessor in your workplace
environment. Some units provide for a simulated work environment and your trainer and assessor
will outline the requirements in these instances.

SITFAB005 Prepare and serve espresso coffee V2019.02. Page | 10 Short Courses Australia RTO Provider No. 41261
E LEMENTS AND PERFORMANCE CR ITER IA
1. Organise coffee workstation 1.1 Complete mise en place for coffee service to enable efficient
work flow and easy access to ingredients, equipment, and
service‐ware
1.2 Place ingredients in correct containers and conditions to
maintain freshness
1.3 Prepare espresso machine and grinder for service according
to manufacturer instruction
2. Select and grind coffee beans 2.1 Select coffee beans and grind to appropriate particle size
according to relevant factors
2.2 Complete test extractions before service to ensure correct
particle size of grind, and assess and adjust according to relevant
factors
2.3 Adjust grind regularly throughout the service period
according to relevant factors
2.4 Monitor efficiency of grinder for correct dose and grind
during use, and resolve or report issues
2.5 Clean grinder as required during or after the service period
3. Advise customers and take
espresso coffee orders
3.1 Provide information and recommendations about types of
coffee beverages and accompaniments
3.2 Identify customer preferences and take orders
4. Extract and monitor quality of
espresso
4.1 Select and prepare appropriate service‐ware
4.2 Select correct filter basket and clean, dry and dose it with
required amount of ground coffee
4.3 Tamp ground coffee to make even and level cake
4.4 Flush group head before attaching group handle to extract
espresso
4.5 Monitor quality of extraction during service period and make
adjustments
4.6 Monitor efficiency of espresso machine during service, and
resolve or report issues

SITFAB005 Prepare and serve espresso coffee V2019.02. Page | 11 Short Courses Australia RTO Provider No. 41261
5. Undertake milk texturing
process.
5.1 Select cold milk and appropriate milk foaming jug to fulfil
customer orders
5.2 Purge the steam wand every time before texturing
5.3 Texture milk according to type of milk and coffee beverage
5.4 Visually and aurally monitor and adjust the texture and
temperature
5.5 Clean the steam wand on the outside and purge every time
after texturing
5.6 Combine foam and milk through swirling, ensuring even
consistency
5.7 Pour milk immediately after swirling, according to the coffee
beverage
6. Serve espresso coffee
beverages.
6.1 Present coffee beverages attractively and without drips and
spills
6.2 Serve coffee beverages promptly at the required temperature
and with appropriate accompaniments
6.3 Minimise waste to maximise profitability of beverages
produced
7. Clean espresso equipment. 7.1 Clean espresso machine and equipment thoroughly and safely
according to organisational procedures and manufacturer
instructions
7.2 Maintain water filtration system according to organisational
procedures
7.3 Refer faults and maintenance issues requiring technical
specialists to supervisor
7.4 Use energy and water resources efficiently when preparing
coffee beverages and cleaning to reduce negative environmental
impacts

SITFAB005 Prepare and serve espresso coffee V2019.02. Page | 12 Short Courses Australia RTO Provider No. 41261
PERFORMANCE EV IDENCE AND KNOWLEDGE EV IDENCE
This describes the essential knowledge and skills and their level required for this unit.
PERFORMANCE EVIDENCE
Evidence of the ability to complete tasks outlined in elements and performance criteria of this unit in
the context of the job role, and:
Prepare and present each of the following espresso‐based coffee beverages on
three different occasions within commercial timeframes:
o Caffe latte
o Cappuccino
o Espresso (short black)
o Flat white
o Long black
o Piccolo latte
o Mocha
o Ristretto
o Short and long macchiato
Monitor quality indicators for extraction as listed in the knowledge evidence
during preparation of the above espresso coffee beverages and make
adjustments to restore extraction to required standard
Present the above espresso coffee beverages and accompaniments
demonstrating consistency and quality of:
o Appearance
o Aroma
o Body
o Crema on top of the espresso
o Flavour
o Taste
o Strength
o Volume

SITFAB005 Prepare and serve espresso coffee V2019.02. Page | 13 Short Courses Australia RTO Provider No. 41261
Use the correct equipment, ingredients and measures to prepare the above
espresso coffee beverages.
KNOWLEDGE EVIDENCE
Demonstrated knowledge required to complete the tasks outlined in elements and performance
criteria of this unit:
Major types and characteristics of espresso coffee beverages specified in the
performance evidence
Different types of milk, their characteristics and uses for different types of coffee
beverages
Characteristics of different types of beans, blends and roasts
Mise en place requirements for preparing coffee beverages
Methods and techniques for preparing and serving espresso coffee beverages:
o Grinding coffee beans
o Measuring dose by sight, electronically, manually and mechanically
o Tamping
o Extracting espresso
o Texturing milk
o Sequencing orders for the preparation of coffee beverages
Quality indicators for espresso coffee extraction:
o Changes in colour of crema
o Changes in flow texture
o Cake of used ground coffee
o Water pressure during extraction
Available options to meet specific customer preferences relating to:
o Accompaniments
o Blends
o Service‐ware
o Strength
o Sweeteners
o Type of:
Beans
Milk

SITFAB005 Prepare and serve espresso coffee V2019.02. Page | 14 Short Courses Australia RTO Provider No. 41261
Factors relevant to quality of espresso coffee:
o Ambient humidity
o Consistency of used coffee grounds
o Crema on top of the espresso
o Quality and rate of espresso flow
o Steam pressure during foaming and steaming of milk
o Taste
Extraction rates for the different espresso coffee beverages specified in the
performance evidence
How and when adjustments are required to the following to ensure quality of
espresso coffee:
o Dose
o Grind
o Tamping technique
o Water flow
o Water pressure
Organisational procedures and industry standards for:
o Service‐ware used for espresso coffee beverage presentation
o Accompaniments used to enhance beverages
o Presentation of beverages:
Latte art
Appropriate environmental conditions for storing coffee beans, ground coffee,
milk and other ingredients to:
o Ensure food safety
o Optimise shelf life
Essential features and functions of different espresso machines and grinders
used to prepare espresso coffee beverages:
o Sizes and types of filter baskets and tampers
o Purging the steam wand
o Flushing the group head
o Cleaning and maintenance methods and procedures
o Symptoms of faults in espresso machines and grinders
o Safe operational practices and dangers of working with steam

SITFAB005 Prepare and serve espresso coffee V2019.02. Page | 15 Short Courses Australia RTO Provider No. 41261
Basic maintenance and cleaning methods for espresso grinders, machines and
equipment:
o Back flushing the machine
o Brushing out doser chamber
o Pouring hot water to clean drainage pipes
o Using correct and environmentally sound disposal methods for coffee making
waste
o Washing drip trays
o Washing and drying:
Bean hopper
Group handle and filter basket
o Wiping down entire machine
o Wiping outside of steam wand and nozzle and purging inside with steam
Content of safety data sheets (SDS) for cleaning agents and chemicals, or
workplace documents or diagrams that interpret the content of SDS.

SITFAB005 Prepare and serve espresso coffee V2019.02. Page | 16 Short Courses Australia RTO Provider No. 41261
ASSESSMENT CONDIT IONS
Skills must be demonstrated in an operational food and beverage outlet. This can be:
An industry workplace
A simulated industry environment.
Assessment must ensure access to:
Fixtures and large equipment:
o Workstation with industry current commercial grade espresso machine and
coffee grinders
o Bins or knock boxes for used coffee grounds
o Storage bins
Small equipment:
o Blind or blank filter basket
o Cleaning brushes
o Colour coded cleaning cloths
o Flat edge implement for levelling off dosed filter basket
o Measuring equipment:
Stopwatch or timer
Thermometer
o Milk foaming jugs
o Napkins
o Powder shakers
o Service trays
o Spoons and stirrers
o Straws
o Service‐ware for different types of coffee beverages:
Cups: espresso and standard
Saucers
Mugs
Glasses
Take‐away coffee cups and lids
Take‐away cardboard trays
o Tamp mats
SITFAB005 Prepare and serve espresso coffee V2019.02. Page | 17 Short Courses Australia RTO Provider No. 41261
o Tampers
Stock:
o Commercial range of coffee beans, ground coffee and other ingredients and
accompaniments
Organisational specifications:
o Equipment manufacturer instructions
o Cleaning and maintenance procedures for espresso coffee machines and
grinders
o Commercial beverage menus
o Organisational procedures and industry standards for presenting espresso
coffee beverages
o Price lists
o Standard recipes for coffee beverages currently used by the hospitality
industry
o SDS for cleaning chemicals or plain English workplace documents or diagrams
that interpret the content of SDS
Industry‐realistic ratio of staff to customers; these can be:
o Customers in an industry workplace during the assessment process; or
o Individuals who participate in role plays or simulated activities, set up for the
purpose of assessment, in a simulated industry environment operated within
a training organisation.
Assessors must satisfy the Standards for Registered Training Organisations’ requirements for
assessors; and:
Have worked in industry for at least three years where they have applied the
skills and knowledge of this unit of competency.
PRE‐REQUIS ITES
This unit must be assessed after the following pre‐requisite unit:
SITXFSA001 Use hygienic practices for food safety.

SITFAB005 Prepare and serve espresso coffee V2019.02. Page | 18 Short Courses Australia RTO Provider No. 41261
INTRODUCTION
The demand for high‐quality espresso based coffee has grown in recent years. Customers of
hospitality venues that serve coffee are less interested in receiving instant coffee. Being able to
prepare and serve quality espresso coffee has become an essential skill for all hospitality workers
throughout Australia.
At face value, preparing an espresso coffee is very simple with the use of modern machines,
although the Barista is still responsible for up to half of the quality. With this in mind, the same
coffee may taste different if made by a different Barista. The name ‘Barista’ is Italian for Bartender.
A Barista is a professional coffee maker. In Italy, they serve both coffee and alcoholic beverages.
In this training unit, you will learn the theory behind preparing and serving espresso coffee.
However, at the heart of this unit is your personal experience and practice of making coffee and
using espresso machines. Practice makes perfect, so grab every opportunity to make coffees and
perfect the art. Enjoy!
H ISTORY OF COFFEE
The History of Coffee
The story of coffee has all the trademarks of a bestselling novel. With research, you will find many
different stories and dates of how and when coffee came to be. Often these stories and dates will
conflict with each other.
Whatever the history may be, Coffee has become one of the most important trading commodities in
the world. It is second only to oil and has become one of the most popular beverages, along with
beer and of course, water. Coffee growing is a very labour intensive operation, and it provides
important trading income for many nations and people throughout the world.
The most well‐known story of coffee is set in the Ethiopian highlands, where the legend of Kaldi, the
goatherd, originated.
The story says that Kaldi discovered coffee by observing that after his goats had eaten berries from a
certain tree, they became so spirited and energetic that they did not want to sleep at night.
Kaldi dutifully reported his findings to the abbot of the local monastery who made a drink with the berries and discovered that it kept him alert for the long hours of evening prayer. Soon the Abbot had shared his discovery with the other Monks at the monastery, and ever so slowly knowledge of the energizing effects of the berries began to spread. As word moved east and coffee reached the Arabian Peninsula, it began a journey which would spread its reputation across the globe. ‐ "The History Of Coffee." Web. 27 Jul. 2015 <http://www.ncausa.org/i4a/pages/index.cfm?pageid=68>.
SITFAB005 Prepare and serve espresso coffee V2019.02. Page | 19 Short Courses Australia RTO Provider No. 41261
At first, coffee was looked upon with hostility. Some Christians would call it the ‘Devil’s Drink’ and
asked Pope Vincent III to ban the beverage. He tried the coffee and enjoyed it so much that he is
claimed to have said “this beverage is so delicious that it would be a sin to let only misbelievers drink
it! Let’s defeat Satan by blessing this beverage, which contains nothing objectionable to a
Christian.”1
Coffee shops began to appear in every city and became an important, social and networking place to
meet. This tradition continues today with the shops being called “cafe’s” after the French word for
coffee, café.
Today coffee is grown in a number of countries all over the world. But no matter if the coffee is
grown in Asia, Africa, Central or South America, the islands of the Caribbean or in the Pacific, they
can all trace their heritage to those trees in the ancient coffee forests on the Ethiopian plateau.
Characteristics of different types of beans, blends, and roasts
The coffee plant is a tree that is pruned to grow to a height of about three meters tall. This makes
cultivating the beans easier as they are usually handpicked.
The plant's white flowers grow in clusters and set to become red cherry‐like fruit. Beneath the red
skin are two pips. They are the coffee beans. The berries ripen at different times requiring the fruit
to be picked from the same tree many times and is very labour intensive. This is why coffee is grown
in developing countries where labour is cheaper and foreign income is needed.
Coffee plants grow best in a mountain tropical climate between the Tropic of Capricorn and the
Tropic of Cancer. The mountainous land is one of the reasons why machine picking is very difficult
and handpicking is preferred.
1 "TC Lavazza: Coffee History, Cultivation." Web. 12 Aug. 2015 <http://www.sovrana.com/libstory.htm>.

SITFAB005 Prepare and serve espresso coffee V2019.02. Page | 20 Short Courses Australia RTO Provider No. 41261
Today, there are two main species of coffee that are grown around the world. They are:
Coffee Arabica
Coffee Robusta
There are six main differences between these two species.
Robusta grows at lower altitudes and produces a larger crop. Therefore it is cheaper to
produce
Robusta is also higher in caffeine, but the flavour is not as enjoyable as the Arabica bean
Robusta is more often used as a blend with Arabica rather than a standalone coffee (used as
a filler coffee used in producing of instant or to add extra caffeine to the Arabica coffee for
the European markets)
About 75% of coffee grown is Arabica, the other 25% being Robusta
Most Robusta is grown in Asia and Africa
Arabica is the most popular and generally considered to give superior flavour
Coffee Growth in Countries
About 60 countries throughout the world produce coffee, but production is dominated by three
main countries producing approximately half the crop: Brazil, Colombia, and Vietnam.
The following are tables of the world’s ten largest coffee‐producing nations, measured in thousands
of bags, for the 2010‐2011 crop years. One bag weighs 60 kilograms (132 pounds).
Total
1) Brazil 54,500 6) Ethiopia 4,400
2) Vietnam 18,725 7) Honduras 4,000
3) Colombia 9,500 8) Peru 4,000
4) Indonesia 9,325 9) Guatemala 3,910
5) India 5,100 10) Mexico 3,700

SITFAB005 Prepare and serve espresso coffee V2019.02. Page | 21 Short Courses Australia RTO Provider No. 41261
Arabica beans
1) Brazil 41,800 6) Guatemala 3,900
2) Colombia 9,500 7) Mexico 3,500
3) Ethiopia 4,400 8) Nicaragua 2,000
4) Honduras 4,000 9) El Salvador 1,700
5) Peru 4,000 10) Costa Rica 1,575
Robusta beans
1) Vietnam 18,150 6) Uganda 1,900
2) Brazil 12,700 7) Malaysia 1,000
3) Indonesia 7,950 8) Thailand 900
4) India 3,600 9) Cameroon 525
5) Cote d’Ivoire 2,100 10) Togo 525
Blends
Coffee blends are bags of coffee beans or grind that are a mix of different types of coffee. Blends are
used to Provide a coffee flavour that is more complete or different to a flavour that has a single
origin. They are also used to help keep costs low by using more common beans and making a blend
with them.
Blends will usually be named in a way that shows what the origins of the coffee that is used in the
blend are, or the country where it was grown.
Roasts
For coffee beans to become usable for grinding to make espresso, they need to be roasted first. The
roasting process helps the beans release their flavour and become brittle, which allows for better
grinding.
The degree to which they are roasted will also have an effect on their taste.
In general, there are four levels of roast. They are categorised by the darkness of the bean after the
roasting process. The four levels of roast are:
Light roast – The lowest level of roast, these beans have a light colour and no oil
on the surface. Their taste is fairly basic, with a toasted grain flavour. Light roasts
will have a higher concentration of caffeine, as it hasn’t been roasted long
enough to dissolve it
Medium roast – The medium roast coffee have a medium brown colour, and they
have a fuller body than the light roast. Medium roast is the “regular” level for
coffee and is commonly found in almost all establishments
Medium‐dark roast – Only slightly darker than the medium roast, although their
colour is much richer than the medium roast. It is at this level that oils will start
to show on the surface of the beans. Medium‐dark roasts are rather heavy in
their body and flavour, and a spicy taste may start to show itself

SITFAB005 Prepare and serve espresso coffee V2019.02. Page | 22 Short Courses Australia RTO Provider No. 41261
Dark Roast – Dark brown, almost black colour and a sheen of surface oil are the
main points of the dark roast. The flavour of the beans becomes a smokey, bitter
taste and the origin flavour of the bean is dulled. There is a substantial amount of
caffeine lost in the dark roast beans2
The Flavours of Coffee
What does coffee taste like?
Coffee experts use the same sort of vocabulary as wine connoisseurs to describe the many flavours and aromas of coffee: different varieties may be chocolatey, full‐bodied, lively or even fruity. Be adventurous and try some different types depending on the occasion and how you like to drink your coffee ‐ why not keep notes on the coffees you like when experimenting.
When tasting coffee, taste an espresso, so the flavour and aroma are unaffected by the milk. 3
Tasting coffee (cupping)
Tasting is the essential blending. Tasting, for the purpose of blending, is a highly specialised process
this is the process that is known as cupping, which is different from the process which is used to
evaluate the espresso.
Cupping is the evaluation of the espresso flavour and the profile of those flavours so that different
blends can be compared. Professional cuppers have a highly developed sensory perception that
allows them to isolate the particular qualities of the coffee bean. This is done by using the senses
including taste, smell, feel and sight.
Coffee beans are usually evaluated using the following criteria:
Fragrance ‐ smell of the freshly roasted and ground coffee bean
Aroma ‐ the smell of freshly made coffee beverage.
Flavour ‐ the overall evaluation of the blend of coffee
Acidity ‐ the "brightness' and character of the coffee beverage
Body ‐ the 'mouthful' or fullness of feeling and viscosity of the coffee
Aftertaste ‐ the sensation experienced after the coffee has been consumed
The most powerful way that we can pick up the subtle blending of the coffee is our tongue. The
different types of taste you may discriminate are:
Acidity
Bitterness
2 http://www.coffeecrossroads.com/coffee-101/coffee-roasts-from-light-to-dark 3 “Flavours of Coffee.” Web. 28‐7‐2015
<http://www.waitrose.com/home/inspiration/about_waitrose/about_our_food/drink/tea_and_coffee/coffee/flavours_of_
coffee.html>

SITFAB005 Prepare and serve espresso coffee V2019.02. Page | 23 Short Courses Australia RTO Provider No. 41261
Saltiness
Sweetness
Eight Flavours of Coffee
SWEET Some coffees have a sweetness that is nothing to do with added sugar. Sweet coffees are smooth and mild, with a hint of caramel or fruit. CHOCOLATE It is smooth and aromatic, with an aftertaste of vanilla. Chocolate coffees are slightly bitter, reminiscent of fine dark chocolate. Drink them black, or add milk for a creamier taste. FRUIT A slightly sweet flavour with an undertone of fruit — experts can detect notes of green apples, citrus or berries. In general, fruity coffees are lively and refreshing. NUTS Coffee can have the clean, fresh flavour of newly shelled nuts. Some may be slightly almond flavoured, while others have the richer, sweeter taste of walnuts; Nutty coffees tend to be well‐balanced with a rounded texture. SPICE Spicy coffees are aromatic, with exotic undertones of cinnamon, pepper or cloves. They usually come from the Far East, but some are from India FRAGRANT/AROMATIC All roasted coffee smells good as it brews, but some varieties have aromas that you can taste as well. Aromatic coffee can be quite spicy, or it may be delicately fragrant, redolent of blossom. INTENSITY Coffees that are intense have a rich dark taste. They are often described as strong, meaning they have good depth of flavour rather than a high level of caffeine. SILKY Coffees described as silky may have elements of chocolate, sweetness or spice, but all the flavours
combine to leave a soft, rounded taste in the mouth. 4
4 “Flavours of Coffee.” Web. 28‐7‐2015
<http://www.waitrose.com/home/inspiration/about_waitrose/about_our_food/drink/tea_and_coffee/coffee/flavours_of_
coffee.html>

SITFAB005 Prepare and serve espresso coffee V2019.02. Page | 24 Short Courses Australia RTO Provider No. 41261
TOP IC 1 – ORGANISE COFFEE WORKSTATION
Food Safety and Workplace/Occupational Health and Safety (WHS/OHS) are important
considerations at a coffee workstation. At face value, coffee making is a reasonably low risk for food
safety and Workplace/Occupational Health and Safety (WHS/OHS); however, there are still things
that can go wrong that put the safety of the Barista and their clients at risk.
Food Safety Hazards
The main food safety hazards that can occur are:
Chemical contamination for chemicals used to clean and back flush the coffee
machine
Bacterial growth in milk
Contamination from foreign bodies falling into the coffee
The main Workplace/Occupational Health and Safety (WHS/OHS) hazards that may occur are:
Slipping on the floor – any liquids spilt on the floor can make it slippery and easy
to fall.
Burns – from a hot steam wand or boiling water that is 100C.
Electrical hazards – From worn or damaged electrical leads. Especially if the liquid
is spilt near it.
Machine Parts – Group heads can become hot and burn sensitive skin
Back Aches – Poor posture of constant bending over can become a long term
problem
Complete mise en place for coffee service to enable efficient workflow
and easy access to ingredients, equipment, and service‐ware
Mise en place requirements for preparing coffee beverages
'Mise en place' is the description used throughout the hospitality industry in relation organising your
workstation it comes from the French translation of "Putting everything in its place.' The principles
of 'Mise en place' are:
The four principles:
Distance ‐ reducing the amount of distance you walk in your establishment
Placement‐ everything place in a convenient, speedy and efficient positions

SITFAB005 Prepare and serve espresso coffee V2019.02. Page | 25 Short Courses Australia RTO Provider No. 41261
Planning‐ At the start of each day organise yourself so as to greet your first
customer
Customer focus‐ Be customer focused, NO obstructions, NO inconvenience, NO
awkwardness
Being well organised or having good 'Mise en place' is essential to having maximum efficiency. This
results in a better quality and higher standard of beverage, thus providing a better customer service
and therefore a happier customer. It will also promote a friendlier and harmonious workplace for all
staff. If your customers are happy, they will return, and the profits will increase.
Good organisation is particularly important for a busy establishment as the customers are waiting
while the beverage is being prepared and served.
Poor organisation/Mise en place will adversely affect:
The quality of your product
The standard of customer service you provide
The swiftness at which you perform your work
Your interaction with other staff and customers
Job satisfaction
Customer satisfaction
Safety and Hygiene
REMEMBER: It is important to consider the placement of the equipment in your workplace so as to
provide a good workflow in the interest of your safety, conserve energy, and customer’s
satisfaction.
Work Routines
Each venue has its routine they follow for operating and setting up for service. The most important
thing is to follow your enterprise's procedures. In a typical espresso establishment, there are three
different work areas that must be arranged to achieve the best possible workflow; these areas are
listed below with a description and the tasks of those areas.
Area Description Tasks
Preparation This area is the area around and including the grinder‐dose and espresso machine.
Grinding Dosing Tamping Extracting espresso Foaming and steaming milk

SITFAB005 Prepare and serve espresso coffee V2019.02. Page | 26 Short Courses Australia RTO Provider No. 41261
Assembly and service This area is where espresso beverages are finished off and presented for service Either to a waiter or directly to the customer
Taking orders Laying out Saucers Adding other ingredients (e.g. milk, chocolate, syrups, etc. ) Adding accessories (e.g. spoons napkins, straws) Presenting finished espressos Receiving payment
Cleaning and storage This area is the area around and including the sink, dishwasher and storage areas. (This includes the areas for dry and cold storages as well as cleaning supplies storage)
Rinsing and stacking Cleaning and sanitising Loading and unloading dishwasher Polishing glasses, spoons, etc. Storing equipment and cleaning supplies.
These areas can be arranged in a number of ways, which will suit the establishment's design.
See below diagram of an organised work area.
The preparation area is the nerve centre of the establishment as you can see from the diagram that
it is positioned centrally so as to be able to serve the customer and not walk all over the
establishment. Thus serving the customer without delay, as well as being able to build a rapport with
the customers as you make their espresso. Also, you will be able to keep an eye on what is
happening elsewhere in the establishment.

SITFAB005 Prepare and serve espresso coffee V2019.02. Page | 27 Short Courses Australia RTO Provider No. 41261
This design shows you where the bigger items of equipment are in relation to the espresso machine.
You will notice that the other equipment reflect the sequence that you perform, the espresso
machine, grinder and fridge have been positioned so as to use as least amount of steps to perform
the tasks.
Let's have a look at espresso sequence summary:
Take order
Lay out saucers
Get milk ready in jug
Grind, dose and tamp
Assemble group
Place cups under spouts
Extract espresso while foaming and steaming milk
Clean steam wand
Place cups near saucers
Swirl and pour milk
Finish off espresso
Present order
As you can see from the sequence and the diagram if you follow the steps needed to be taken they
are minimal.
The assembly and service area this is where you can add other ingredients to the espresso, and also
put the finishing touches on the customers’ orders and present them for service. Finally, process the
payment.
This is where the espresso lovers head towards as soon as they enter the establishment, as they take
their cue from the espresso machine. So that is why it is good to have the two areas close by.
It is important to keep the assembly and service area free of clutter and mess, as the customers will
get a bad impression of the establishment if it is untidy and messy. It is also easy to present the
beverage to the customer or waiter for service without having to move too far.
The cleaning and storage area is kept away and behind the other two areas so as the tasks that are
performed there are not as noticeable to the customers. And when the dirty dishes and cutlery are
placed there the customer does not see it as appealing. This area should still have a good workflow
so as to reduce the impact on the staff.
Before opening up for the day, it is very important that you have all your equipment and supplies
ready, and clean. Most establishments will have a setup.
Opening procedures may incorporate many of the 'Mise en place' principles that have been
discussed. These principles will help you have a stress‐free working environment and thus ensuring

SITFAB005 Prepare and serve espresso coffee V2019.02. Page | 28 Short Courses Australia RTO Provider No. 41261
that you will meet your customers with a smile and not a frown. It will also ensure that everything is
in its right place, and it is well organised.
The order in which you start the day is particularly important; example if as soon as you come in you
turn on the espresso machine this will let it build up the pressure and heat before the customers
arriving, and give you time to do a test run.
Opening checklist:
Turn on espresso machine
Assemble the group handles and attach them to the group heads
Assemble the grinder, fill the bean hopper and open the hopper gate
Turn on the grinder‐doser to half fill the doser chamber with ground coffee beans
Complete 'Mise en place' for all ingredients and other equipment
Ingredients check: Ensure that there is enough supplies of:
Whole coffee beans (in the bean hopper)
Milk, cream and ice cream (in the fridge‐freezer)
Sugar sachets (near espresso machine)
Chocolate (in chocolate shaker)
Other ingredients according to menu requirements
Equipment check: Ensure that:
Cups and glasses are on the warmer with handles facing all the same way
Saucers are sorted by size and stacked near the espresso machine
Spoons are handles up in the correct container near the espresso machine
Straws, napkins, and coasters are near the espresso machine
Trays, menus and docket books are in the service area
Jugs are clean and in the fridge
Wipes are placed in correct position
Knock box is clean and near the grinder‐doser
Dishwasher and fridge, freezer are in working order
Check that gauges on espresso machine are at correct levels
Do a test run to 'season' the espresso machine and check extraction
Make any necessary adjustment to grinder and dose
Finally take a look around and see if there is anything out of place or doing
before the first customer
SITFAB005 Prepare and serve espresso coffee V2019.02. Page | 29 Short Courses Australia RTO Provider No. 41261
Place ingredients in correct containers and conditions to maintain
freshness
Coffee Storage Locations
Coffee should always be stored in a cool, dark and dry place.
You should avoid storing coffee in fridges and freezers, as they are moist; although it is generally
considered safe, but not ideal, to store vacuum‐sealed packages of coffee in the freezer. However, if
the coffee is permitted to age before it is packaged, and therefore not at it peak freshness before
being stored in the freezer, it will not be as good as freshly roasted coffee. It is not advised to store
opened coffee in the freezer due to the damp.
You can store your coffee beans in warm spots, for example, next to the oven, or in a cabinet that
gets warm from exposure to cooking equipment or exposure to sunlight, or on countertops in
airtight containers away from direct sunlight and other sources of heat.
Coffee Container Types
Coffee loses it’s freshness quickly once it’s original packaging has been opened.
The ideal containers to store your opened coffee are glass, ceramic or non‐reactive metal containers,
that seal airtight. Coffee can also be stored in a clear glass container and clear plastic bags, if they
are then stored in a cool, dark place. If you are looking to store your coffee on the countertop,
opaque, airtight containers are best.
Coffee's Freshness over Time
Coffee begins to lose its freshness as soon as it is done roasting, and is at its peak in the
first few days after it is roasted
Ground coffee is best when consumed within one to two weeks of roasting. Whole beans
are best within one month of roasting
To keep your coffee fresh, buy just‐roasted coffee often, in quantities that will only last you
one to two weeks, and then store your coffee properly
If you want to buy a larger quantity of coffee, store the bulk of it tightly sealed in an
airtight container in a cool, dark area and keep a smaller quantity in a smaller container
for daily use. Only open the large container to refill the smaller container. Storing coffee
this way will reduce air exposure for the larger portion coffee
‐“Coffee Storage.” Web. 28‐7‐2015 <http://coffeetea.about.com/od/coffeebasics/a/HowtoStoreCoffee.htm>
Freshness of Ground Coffee vs Whole Beans
Ground coffee has much more surface area than whole beans, so it goes bad much faster

SITFAB005 Prepare and serve espresso coffee V2019.02. Page | 30 Short Courses Australia RTO Provider No. 41261
Whole beans are ideally consumed within one month of roasting
Ground beans are ideally consumed within two weeks of roasting
For optimal coffee freshness, grind your beans just before you intend to brew them
‐“Coffee Storage.” Web. 28‐7‐2015 <http://coffeetea.about.com/od/coffeebasics/a/HowtoStoreCoffee.htm>
5
Prepare espresso machine and grinder for service according to
manufacturer instructions
Understanding the grind
To prepare a perfect espresso, whole coffee beans must ground into particles, which are known as
grinding and this done with the grinder.
Reason for grinding ‐ The reason for grinding is to increase the surface area of coffee beans which is
exposed to hot, pressurised water during extraction
Getting the right grind
The consistency of the ground coffee also known as the grind is usually described by three terms
these are:
Fine
Medium
Coarse
Where there is contact between water and coffee, the coarser the grind should be, for example:
In a filter or plunger methods, the grind should be coarser than in espresso methods where the
contact time is relatively shorter.
The grind is one of the most critical of all factors in making espresso, so it is incredibly important that
you understand what is involved in getting it right.
Various coffee beans react in different ways to the grinding process, depending on their degree of
hardness and density:
Hardness is the degree of exterior resistance to the grinding process.
Density is the interior consistency of the whole bean.
Some of the things that influence hardness and density are:
The type of bean in the blend
Where the beans have been grown
5 “Coffee Storage.” Web. 28‐7‐2015 <http://coffeetea.about.com/od/coffeebasics/a/HowtoStoreCoffee.htm>

SITFAB005 Prepare and serve espresso coffee V2019.02. Page | 31 Short Courses Australia RTO Provider No. 41261
How the beans have been processed
The best indicators most baristas use for knowing whether the grind is right or not is the extraction
time. This is the time it takes for the water to flow through the cake of ground coffee beans in the
group of an espresso machine. This is done by counting the seconds that it takes from when the
extraction control is turned on until when it is turned off. One of the standard specifications of a
perfect espresso is an extraction time of 25 ‐ 30 seconds.
The grind for espresso can either be:
Too Fine
Too Coarse
Just right

SITFAB005 Prepare and serve espresso coffee V2019.02. Page | 32 Short Courses Australia RTO Provider No. 41261
Set Up Grinder
It is said that the three most important things in coffee are freshness, freshness, and freshness.
Coffee beans contain oils which disappear through evaporation as soon as you open the packet of
beans. Within a couple of hours in the bean hopper, the coffee may begin to deteriorate, especially
if it is a hot or humid day. Ground coffee can lose its freshness in 15 to 30 minutes.
The key to maximising the freshness using a coffee grinder is to not use the old, ground coffee from
the day before but instead, use new coffee beans. Below is a simple set up of a grinder (later in Topic
2 we will go into this with a bit more detail):
1. The grinder should be emptied and cleaned the night before at close of service. Coffee is
usually left in the dosing chamber which is used to start the machine. The bean hopper
should be empty, clean and washed
2. Use the coffee left in the dosing chamber to start the coffee machine then clean the dosing
chamber to remove old coffee
3. Add a small amount of beans to the bean hopper
4. Grind a small amount of fresh beans into the dosing chamber
5. Check the size of the Grind
6. Check the weight of the dose

SITFAB005 Prepare and serve espresso coffee V2019.02. Page | 33 Short Courses Australia RTO Provider No. 41261
7. Check the extraction rate
8. Make a sample coffee
Set up Coffee Machine
1. Check that the machine is on and allow about five or six minutes for the machine to warm
up
2. Check the pressure in the gauges. Individual machines may vary in pressure so check the
manufacturer’s recommended pressure levels
3. Run water through each group head to flush old water from the system
4. Run about 100ml of water through each group handle to flush them
5. Run water through the hot water outlet again to flush old water out
6. Run the steam arm for about 30 seconds to clean and release any impurities stuck inside the
wand
7. Never serve the first few coffees for each group head. Run two or three espressos through
each head first. Use the old ground coffee in the dosing chamber for the previous day

SITFAB005 Prepare and serve espresso coffee V2019.02. Page | 34 Short Courses Australia RTO Provider No. 41261
8. Clean the dosing chamber in the coffee grinder and throw away any old coffee
9. Grind a few fresh beans in the grinder
10. Check the grind by making an espresso and checking the extraction rate
11. Adjust any areas that need adjustment
We will cover the setup and extraction later in this unit.

SITFAB005 Prepare and serve espresso coffee V2019.02. Page | 35 Short Courses Australia RTO Provider No. 41261
TOP IC 2 – SELECT AND GRIND COFFEE BEANS
Select coffee beans and grind to appropriate particle size according
to relevant factors
Grinding Coffee Beans
When grinding coffee, it is important to make sure you don’t grind too much as any excess will lose it
oils and start to taste stale. Freshness is the key to grinding coffee. For the very best results, grind
your coffee moments before brewing.
The tricky thing about how to grind coffee is that it must be ground specific to your preferred
brewing method. Coarse, Medium, and Fine "grinds" are used for various brewing methods to get
the best flavour possible. The grind of the coffee will affect the extraction rate through the espresso
machine. A coffee that is too finely ground will result in longer extraction rate times and a bitter and
burnt tasting coffee. Too coarse and the extraction rate may lack body and crema.
There are five main grinds to coffee:
1. Coarse ‐ Chunky, distinct particles
2. Medium ‐ More the texture of coarse sand
3. Fine ‐ Smoother yet. More like sugar or salt when you rub it between your fingers
4. Super Fine ‐ Not as fine as flour or powdered sugar, but definitely in that ballpark. You can
still feel some grit
5. Turkish Grind ‐ Like flour, very powdery
The grind of the coffee is the main area where the skill of the Barista comes into play. An
experienced Barista will be able to notice and adjust the grind of the coffee to produce the optimum
coffee on an ongoing basis.
Why does the grind of coffee change?
The coffee company’s representative or the Senior Barista's are usually the ones to adjust and set
Espresso machines and coffee grinders. The coffee company you purchase the coffee beans from has
an interest in the standard of coffee that you serve so they will often visit on a regular basis to fine‐
tune the espresso machine and the grinder to give the optimum coffee.
Look at it this way. If you have signs in your cafe saying that you serve ABC coffee, and your machine
is out of adjustment causing the coffee to be of poor quality, it will reflect on ABC coffee to the
customers. However, the skill of the Barista is to not have to wait for the Representative to adjust
your settings and be able to do the adjustment yourself.
The Grind can change for a number of reasons:
The Blades of the grinder wear and this changes the grind of the coffee

SITFAB005 Prepare and serve espresso coffee V2019.02. Page | 36 Short Courses Australia RTO Provider No. 41261
Changes in humidity may change the grind. High humidity will make the grind finer, and low
humidity will make it coarser
Staff may make changes to the grind thinking they are improving it
A change in brands or blends of coffee
When making coffee or cleaning work areas, the adjustment can be knocked and change the
settings
Why does humidity change the grind?
Coffee is ‘Hygroscopic’. This means that coffee beans will absorb or lose moisture according to
atmospheric conditions. In general, coffee beans change moisture content as the air changes
moisture content. Coffee beans absorb moisture if the air becomes humid and lose moisture if the
air becomes dry.
A good coffee grind
To be able to tell if the grind of the coffee beans is good or not will take more than just reading this
book. It is a skill that will take the time to develop, and you will need the hands‐on demonstration of
a good Barista to mentor you to a skilful level. We can give you some things to look for from the
theoretical point of view:
Rub some ground coffee through your fingers. It should have an even feel of grit and powder. Overly
powdery may be too fine, while a gritty feel may be too coarse
Check the extraction rate. Optimum for Espressos should be about 30 seconds for a shot of
about 30‐35ml, too long and it may become overly fine. Not long enough it will be too
coarse
Look at the crema of an espresso shot. The crema should be tight, fine and a caramel colour
that fully covers the top of the coffee. A dark crema may indicate a fine grind, and a pale
crema may indicate a coarse grind
Taste the coffee. The coffee flavour should be balanced with a full body. A weak coffee will
indicate a coarse blend while a burnt flavour will indicate a fine grind
Delay – how fast does the coffee extract once the extraction button is activated? A four of
five‐second delay is about right
As with most skills, it will take practice. You must apply yourself to learn.
Scientific approach
As we have discussed, adjusting the grind is a very subjective skill. However you can use a more
scientific approach.
You can use an electronic scale to measure the exact dose that the grind of coffee gives you and
using a watch and accurate liquid measurements, you can accurately measure the extraction rate.

SITFAB005 Prepare and serve espresso coffee V2019.02. Page | 37 Short Courses Australia RTO Provider No. 41261
This approach will help you to build up data to give you the best measurements for your grinder,
your espresso machine and the blend of coffee that you use.
While this is suitable for some people, most Baristas work like Chefs and develop a feel for the
ingredients rather than strict measurements.
Blade wear
Over a period time, the blades that grind the coffee wear down lose their effectiveness. As the
blades wear, the coffee will become coarser, and you will need to adjust the grinder to a finer
setting. If the setting on the grinder is at ‘very fine’ and cannot be adjusted any further, it may mean
that you need to replace the blades.
Blades will last about 12 months if you are grinding about 1‐2kg of coffee a day but in a busy café
using more coffee, they will wear faster.
There are two main types of blades; ‘Flat blades’ and ‘Conical blades’. The conical blades last much
longer than the flat blades.
Complete test extractions before service to ensure correct particle
size of grind, and assess and adjust according to relevant factors
Setting the grind (step by step)
The procedure for setting the grind involves a step by step procedure for checking the grind and
another for the procedure for adjusting it.
When you are adjusting the grind, you are changing the distance between the burrs in the grinding
machine and making the grind either coarse or fine. But before you can adjust the grind you need to
check it by measuring the extraction time.
Extraction test
As with a medical doctor, you will need to do tests to find out the diagnosis; this can be done with
specialised equipment and procedure to check what is happening with the extraction and correcting
any problems if necessary.
The two part extraction test
As well as your espresso machine, grinder‐doser, you will need the following equipment:
A dosing spoon that measures 7 grams
A set of digital scales with a tare function and accurate to 0.1gram
A teaspoon
A lightweight container (e.g. a small plastic cup)
A small measuring cup in millilitres
A stopwatch (or wrist watch with second hand)
Checking the grinder
To check the grind by measuring the extraction time, you must use 14grams of ground coffee beans
and make two single espressos of 25‐30 millilitres each.
SITFAB005 Prepare and serve espresso coffee V2019.02. Page | 38 Short Courses Australia RTO Provider No. 41261
The first part has 13 steps to it
1. Remove any beans left in between the burrs
2. Turn the grind adjustment control as far as it will go to Zero point
3. Turn the grind adjustment control a quarter turn from zero in the direction of coarser
4. Place whole coffee beans into the bean hopper and attach it to the grinder
5. Open the hopper gate for a few seconds and close it again. This will fill the top of the
grinding mechanism with the right amount you will need for the test.
6. Grind these beans out then turn off the grinder. (the sound will change when they are
completely ground)
7. Place the container on the scale and push the tare button to reset them
8. Using the dosing spoon put the ground coffee beans into the container on the scales until
the scales register 14 grams
9. Carefully transfer all the ground coffee beans from the container to a 14‐gram filter basket
in a double group handle. Make sure that nothing is spilt or left on the sides of the container
10. Tamp the ground beans and attach the group handle to the group head
11. Place the small measuring cup under one of the spouts of the double group head. The other
will run into the drip tray as it is not required
12. With a stopwatch, turn on the extraction control and immediately start timing the extraction
process
13. Stop timing when there are 25 ‐ 30 millilitres of espresso in the measuring cup. If the
extraction time is less than 25 seconds, the ground is too coarse if it more than 30 seconds it
is too fine
Now that you have checked the extraction time, you can adjust it to achieve the correct extraction
time between 25 ‐30 seconds. The ideal is generally around 27 seconds.
Adjusting the grind (step by step)
Calculate the difference between the recorded extraction time and 27 seconds
Turn the grind adjustment control in either direction of finer or coarser as required
Check and adjust the extraction time until it is around 27 seconds
Once the extraction time is right, you can be sure the grind is also right. You may have to check and
adjust throughout the day. But with practice, you will be able to set the grind using the extraction
time test in one or two attempts.
SITFAB005 Prepare and serve espresso coffee V2019.02. Page | 39 Short Courses Australia RTO Provider No. 41261
Extraction rates for the different espresso coffee beverages
The different styles of espresso coffee will have different extraction rates. The extraction rate is the
percentage of coffee that is absorbed into the water as it is extracted.
The maximum extraction rate is about 28%, as coffee beans are about 28% water‐soluble.
The different styles of coffee all have certain extraction rates that are the ideal amount to produce
the perfect espresso shot, however, in general, this will be between 18 and 22%.
Refer to your workplace procedures and supervisor instructions on how to extract the coffee
differently for the different styles of espresso coffee.
Adjust grind regularly throughout the service period according to
relevant factors It is important that you maintain the right grind throughout the service by using micro adjustment,
which must be made according to:
Humidity (the amount of moisture in the air)
The conditions of the burrs
Coffee beans absorb moisture, so the more moisture in the air the slower the rate at which the
water can travel through the ground coffee during extraction. The humidity can change during a
season, day to day or hour by hour. When this happens, you have to make fine adjustments to the
grind.
High Humidity ‐ Coarser grind required
Low Humidity ‐ Finer grind required
It is also very important that you check the conditions of the burrs when the burrs become blunt the
grind will be coarser. If they become too blunt, then the beans will heat up in the grinder and give
the coffee a bitter taste.
Monitor efficiency of grinder for correct dose and grind during use,
and resolve or report issues
Adjusting the Dose
Monitoring the efficiency of the grinder is important in ensuring that the correct dose is given. The
dose of the coffee is the grinding of the correct amount for the filter. Too much or too little will
leave the coffee either too bitter or not strong enough.
Knowing how to adjust the dose is an important skill to have. This is done by just adding more or less
ground coffee to the filter before extracting it.
Gaining an eye for knowing the right dose is a skill that takes practice. Therefore, it is important for
you to ensure you are following standard measurements for your coffees for a while before you start
dosing by eye.

SITFAB005 Prepare and serve espresso coffee V2019.02. Page | 40 Short Courses Australia RTO Provider No. 41261
The reason that it is important to both follow standard measurements and to learn how to judge it
by eye is that coffee loses its potency as it ages, or it starts to go stale. Knowing how long coffee
beans have been sitting in the grinder is important as once you have gotten a good grasp of your
skills, you will be able to adjust the dose to make the flavour stronger to offset the staling of the
beans.
Obviously, the best course of action is to ensure that your beans are stored correctly and that you
only have what you need in the grinder for the day during your set‐up of the workstation.
Clean grinder as required during or after the service period It is important that you keep the grinder clean during the shift, and especially and the end of the
shift. This keeps the taste fresh, and it is also hygienic.
The following items are required to clean the grinder‐doser at the close of shift:
Clean, dry cloth
Clean wet cloth
Brush
Storage containers
Saucer
Cleaning the grinder‐doser (step by step)
1. Close the gate of the bean hopper and turn on the grinder
2. When the sound changes, this indicates that there are no beans left, turn off the grinder at
the on/off switch and the power source.
3. Hold the hopper gate closed, remove the bean hopper and store the leftover beans in a
container
4. Wash the bean hopper in hot soapy water; dry it and return it to the top of the grinder
5. Use a brush to remove any excess ground coffee beans trapped in the top of the grinding
mechanism
6. Empty ground coffee beans from the doser onto the saucer by pulling on the lever until
empty, and store in a container.
7. Brush down the inner sides of the doser chamber especially around the compartment where
the ground beans enter the doser chamber
8. Continue emptying and brushing to remove all ground coffee beans
9. Use the dry cloth to clean out the inside of the doser chamber
10. Use the wet cloth to clean the outside of the grinder‐doser and surrounding counter area

SITFAB005 Prepare and serve espresso coffee V2019.02. Page | 41 Short Courses Australia RTO Provider No. 41261
TOP IC 3 – ADVISE CUSTOMERS AND TAKE ESPRESSO COFFEE ORDERS
Provide information and recommendations about types of coffee
beverages and accompaniments
Major types and characteristics of espresso coffee beverages
In addition to being served alone, espresso is frequently blended, notably with milk and with hot
water.
There are 11 espresso based drinks that are commonly used. They are:
Espresso – Espresso is the base for all other espresso coffees. No milk, no cream. Just the
straight coffee extraction from the machine. 30 to 35ml extracted from the machine, should
have a rich caramel coloured ‘crema’ floating on the top.
Short Black – Another name for an espresso coffee
Doppio – A double shot of espresso coffee, made with double the amount of coffee and
about 60ml in size
Ristretto – A short pour of espresso, about 30 to 35ml from a double shot of coffee. A short
pour of about 15 seconds
Long Black – A standard serve of espresso topped up with hot water and served in a cup
Mocha – One‐third espresso, 10mls chocolate syrup or powder and two‐thirds frothed milk
Café Lungo – A ‘long pulled’ coffee with twice the amount of coffee extracted from the same
dose, as usual, i.e. 60ml in about 60 seconds
Macchiato – An espresso ‘marked’ or ‘stained’ in the centre of the crema with a dash of hot
foamed milk
Cappuccino – Should be one‐third coffee, one‐third milk, and one third thick creamy milk
froth.
Latte – One‐third espresso and two‐thirds creamy hot milk, topped with a layer of foam. A
Piccolo latte is a small latte served in a small glass.
Flat White – A shot of espresso with hot milk served in a cup.

SITFAB005 Prepare and serve espresso coffee V2019.02. Page | 42 Short Courses Australia RTO Provider No. 41261

SITFAB005 Prepare and serve espresso coffee V2019.02. Page | 43 Short Courses Australia RTO Provider No. 41261
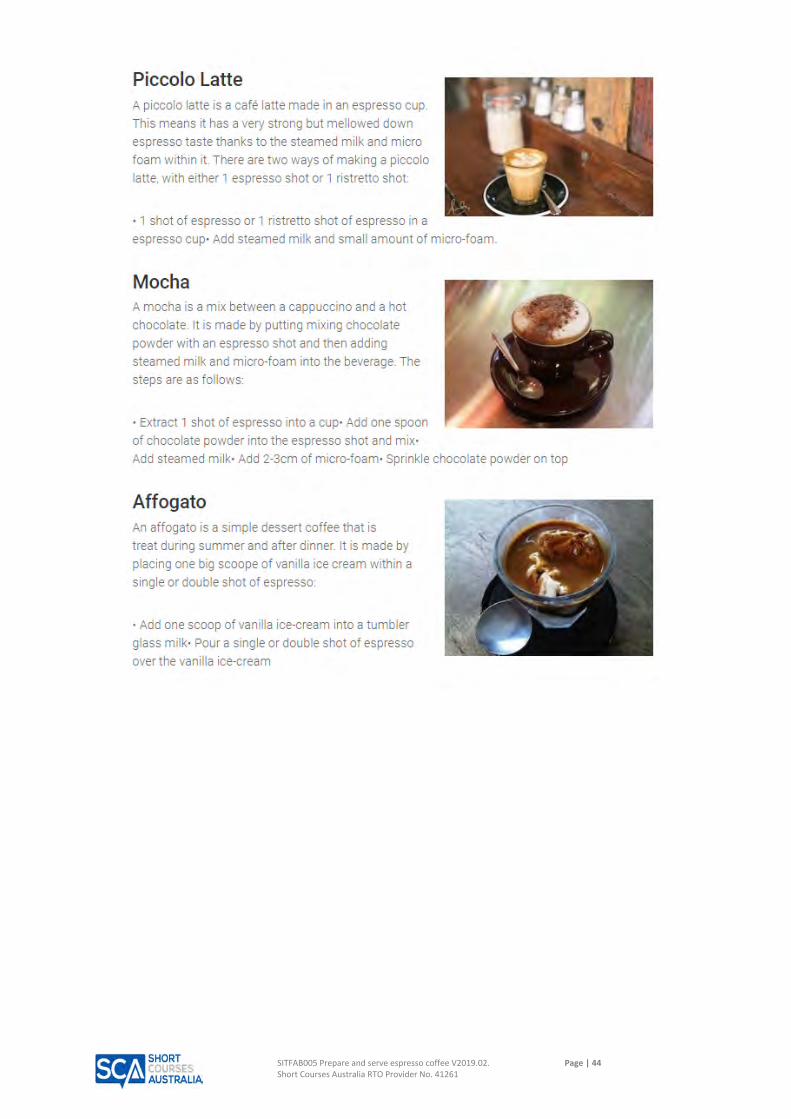
SITFAB005 Prepare and serve espresso coffee V2019.02. Page | 44 Short Courses Australia RTO Provider No. 41261
SITFAB005 Prepare and serve espresso coffee V2019.02. Page | 45 Short Courses Australia RTO Provider No. 41261
Flavoured Coffee
Coffee beverages may be flavoured using various other things like syrups or alcohols to compliment
the flavour of the coffee.
Syrups
There are many flavoured syrups which are offered by most cafés and coffee shops. The syrups are
added to a coffee beverage to give additional sweetness and flavour.
Syrup flavours that are available are:
Vanilla
Chocolate
Hazelnut
Chai
Caramel
Irish Cream
Cinnamon
Tiramisu
Coffee with alcohol
There are six main coffees with alcohol added. They are:
1. Irish Coffee – Coffee with Irish whiskey and whipped cream
2. Roman Coffee – Coffee with Galliano liqueur and cream
3. Jamaican Coffee ‐ Coffee with Tia Maria, Rum and cream
4. Amaretto Coffee – Coffee with Amaretto Liqueur
5. Mexican Coffee – Coffee with Kahlua Liqueur
6. Scotch Coffee – Coffee with Scotch Whisky
Accompaniments used to enhance beverages
The use of accompaniments with the sale of your coffee and other beverages can help to enhance
the experience for your customers.
Having a slice of cake or a cookie to go with your freshly brewed espresso coffee is like a fish in
water, it is just meant to be.
Some of the common accompaniments used to enhance espresso coffee includes:
Cake – Carrot, chocolate, marble, etc.
Cookies, preferably home‐made and fresh so they are still warm
Muffins, preferably home‐made and fresh – choc chip, blueberry, etc.
Biscotti
Chocolate
Biscuits

SITFAB005 Prepare and serve espresso coffee V2019.02. Page | 46 Short Courses Australia RTO Provider No. 41261
The use of accompaniments is a method of cross‐selling, where you sell an additional item to go with
the main purchase. The customer will also be happy with their accompaniment that enhances the
flavour of their coffee, so it is a win‐win situation.
Identify customer preferences and take orders When taking a customer’s order, ensure to listen carefully. There may be a set number of coffees
your café or restaurant sell, but customers may have variations on those coffees that you will need
to listen for.
Make sure you write it down clearly and read back the order to the customer to make sure you
haven’t made a mistake. It also helps to point out changes to the person making the coffee if it is not
you. In busy periods, most cafés will have one person serving and one person making coffees.
The person making the coffee will also often work on instinct and read the docket wrong. If you
inform them before they make it, it gives them a verbal reminder about any extra changes to the
order and can help them remember to double check the docket before making the coffee.
Available options to meet specific customer preferences relating to:
Accompaniments
As spoken about earlier, there are a wide variety of accompaniments that a customer may choose to
go with their coffee. As the barista, it will be your job to make recommendations to customers if
they are unsure about what would go well with what they are drinking, but to also respect their
preference for certain accompaniments over others.
Blends
Depending on your workplace, you will either have a single blend that you use for all your coffees or
a range of blends that customers can choose from to meet their preferences and needs.
Having a range of coffee blends is obviously a better option, as it will give your customers a better
selection to choose from, and you might even have their favourite blend in your range.
Service‐ware
A common phrase you will hear in a coffee shop or café when you order a coffee is “would you like a
cup or a mug?”
Although not a major factor in how the coffee tastes, using different service‐ware will change how
the coffee looks. Each style of coffee has its specific recommended service‐ware to serve in, for
example, a latté is commonly served in a glass.
Obviously, as with most things that present a choice, your customers’ preferences are the key thing
to take into account.
Strength
Some customers prefer their coffee stronger than normal, and others like theirs weaker than
normal. These preferences are easily met by both adjusting the size of the grind, where coarser grind
is weaker flavour, and by extracting the coffee for more or less time than normal.
SITFAB005 Prepare and serve espresso coffee V2019.02. Page | 47 Short Courses Australia RTO Provider No. 41261
For customers who like their coffee extra strong, they may order extra shots of coffee.
Sweeteners
The use of sweeteners in coffee is a touchy subject amongst the dedicated coffee drinkers of the
world. They believe that by adding sweeteners to your coffee, you are offsetting the natural flavours
of the coffee.
However, adding that extra bit of sweetness to your coffee can be just the thing to help you get on
with your day.
The most common sweeteners available are:
Sugar – Sugar is the classic sweetener. Its ability to dissolve in water is what
makes it so desirable as a sweetener, as well as our need for a certain amount of
sugar in our daily intakes. Too much sugar can lead to health complications,
though, which is why some people will prefer to use artificial sweeteners
Non‐sugar sweeteners – Artificial sweeteners are synthetic sugar substitutes, but
may be derived from naturally occurring substances, including herbs or sugar
itself. Artificial sweeteners are also known as intense sweeteners because they
are many times sweeter than regular sugar. These include Stevia, Equal,
Sweet’n’Low, Splenda, etc.
Some customers like their coffee sweet and others like theirs without any sweeteners. It is
recommended to always present the coffee without any sweeteners in it and have a range of
different sweeteners available either at the coffee station or on the tables in the service area.
Type of beans and milk
It is also important to have a range of different beans and milk available for your customers. The
different types of beans will most likely just be different levels of roast, light through to dark, that
your customers can choose a preference over.
As for the milk, it will be important to have at least normal full cream milk, low/no fat milk, and
almond milk (for those with lactose intolerance) as options for your customers.
Sequencing orders for the preparation of coffee beverages
When taking customer orders, it will be important to ensure you are listening carefully and to note
their order down exactly as they want it. Ensure you double check with them by reading back their
order to them to see if you got everything right and understood them.
Your workplace will have its specific process for taking orders, either with handwritten dockets or
through the use of electronic Point of Sale stations which print off a docket.
Regardless of the method used, it will be important to sequence the orders you get for maximum
efficiency in the preparation of the coffee beverages.

SITFAB005 Prepare and serve espresso coffee V2019.02. Page | 48 Short Courses Australia RTO Provider No. 41261
This will involve grouping similar orders together and making them at the same time, giving orders
that came in first a higher priority over newer ones. You will also need to make use of all of the
extraction points on the expresso machine to make multiple coffees at the same time. It is also
recommended to make the more complicated beverages in the order before the simpler ones.
By sequencing your orders correctly, you will save time and increase your productivity during service
times when it is busy. You will learn the best methods of sequencing from your supervisor and
through practice.

SITFAB005 Prepare and serve espresso coffee V2019.02. Page | 49 Short Courses Australia RTO Provider No. 41261
TOP IC 4 – EXTRACT AND MONITOR QUAL ITY OF ESPRESSO
Select and prepare appropriate service‐ware Coffee can be purchased as either a takeaway or dine‐in product. It stands to reason that takeaway
coffee is served in disposable paper‐based cups and dine‐in coffee is served in ceramic or glass cups
and mugs.
Below is a list of what a few different types of coffee should be served in:
Espresso ‐ Small demitasse cup
Cappuccino – Ceramic cup
Long Black – Ceramic cup
Irish Coffee – Large glass
Latte – Glass
Flat White – Ceramic cup
Macchiato – Small glass or cup
Larger sizes may be served in larger cups or glasses.
Mugs
Large franchise stores such as Gloria Jeans, Starbucks and Hudson’s usually offer larger size coffees
in large takeaway containers or large ceramic mugs. This is much more of an American trend rather
than a European trend.
Establishments such as pubs and some cafes may also use mugs, but they are often considered too
crass and homey for most restaurants.
Dispensing Coffee
A single shot of espresso is the basis for most coffee. Due to this, we will go through the steps
involved in dispensing a single shot of espresso coffee first. There are two main opinions regarding
emptying the group handle of used coffee when making coffee with an espresso machine.
One opinion is to empty and clean the group handle as soon as possible after the coffee is
made and replace it in the group head to hold the temperature of the group handle
The other opinion is to leave the used coffee in the group handle for up to 10 minutes to
help hold the temperature of the group handle. The theory is that this will help maintain
temperature and prevent a metallic taste from the group handle
Opponents of this believe that this can leave residues of burnt flavour for the next coffee. Try both
and decide for yourself.
SITFAB005 Prepare and serve espresso coffee V2019.02. Page | 50 Short Courses Australia RTO Provider No. 41261
Select correct filter basket and clean, dry and dose it with required
amount of ground coffee The right filter basket is essential as the type of filter basket matches the size of the dose.
Filter baskets come in 6, 7, 8, and 9‐gram sizes for single group handles and 12, 14, 16, 18, and 20‐
gram sizes for double group handles.
For example, if you use a 7‐gram dose in your establishment then you will need a 7‐gram basket in a
single group handle. Then you will need a 14‐gram basket in a double handle to make two espressos.
As part of the enterprise standards, it is very important to use the right size basket for the chosen
dose, as using the wrong size filter basket will seriously alter the extraction time.
The correct action for dosing:
It is very important that you use the correct action when you dose the filter basket. The spring
loaded doser lever must be firmly pulled forward with the right hand until it can't be pulled any
further. You will hear a click as the rotating doser compartment moves around one position and lock
into the next one. The ground coffee beans are released from the front compartment through the
opening in the floor of the doser into the basket below.
The spring loaded lever then releases and return to its original position.
While the procedure for dosing is relatively simple, you will only get the right dose of ground coffee
beans in the filter if the dose has been properly set.
Setting the dose (step by step)
Setting the dose involves a procedure for checking the amount being released and also for adjusting
it to the required dose.
The size of the dose released from the doser into the filter basket with each pull of the lever is set
using the dose adjustment control on the doser. This is usually a small knob attached by a spindle on
the side of the doser chamber. Adjusting the dose, in fact, is changing the height of the metal plate
covering the last two positions of the doser compartment, this either increase or decreases the
amount released.
1. Assemble the group handle with the correct filter basket locked into it. Use a single filter
basket in the handle with one spout and a double in the two spouts
2. Hold the group handle in your left hand and resit it on the group handle support. Make sure
the group handle is horizontal and under the opening of the doser chamber
3. Pull the doser lever with your right hand to release the single dose of ground coffee from the
chamber (for two doses pull the lever twice)
4. Immediately release the lever after you hear the click and allow it to spring back into
position without holding it
There may be a time when you cannot rely on the automatic doser and you have to dose by sight.

SITFAB005 Prepare and serve espresso coffee V2019.02. Page | 51 Short Courses Australia RTO Provider No. 41261
A good barista should be able to dose by sight and is required to judge by sight only; this is done
when pre‐ground coffee beans have to be spooned into the filter basket.
Dosing tips:
Match basket to doses
Always pull lever with purpose
Keep the beans topped up
Don't spill anything
Tamp ground coffee to make even and level cake Tamping is the process of pressing the ground coffee beans in the filter basket into a compact cake;
some baristas refer to this as packing.
To make a perfect espresso the ground coffee beans must be compacted by applying pressure. This
operation is known as tamping, as is done with a device called a tamp.
Most establishments have one of two types of tampers which are attached to the front of the doser,
they are:
The tamp with a fixed position tamping disc
The tamp with a movable tamping disc
There are other types of tampers which are not attached to the devices.
Hand tamp
Constant pressure tamp
Your tamping skill (or lack of) can make or break your extraction.
Hot pressure water flowing evenly through ground coffee beans = perfect espresso
Hot pressure water flowing unevenly through a week spot in a tamped cake = poor espresso
Hot pressure water flowing unevenly through a gap around the sides of the filter basket =
poor espresso
Tamping methods
The grinder tamps (fixed):
1. Hold the group handle in one hand and centre it under the tamping disc
2. Move the group handle upwards until the ground coffee beans touch the tamping disc.
Make sure to keep the basket horizontal
3. Press the ground coffee beans up against the tamping disc. At the same time push down on
the top of the disc with the other hand (this stops the grinder tipping backwards)

SITFAB005 Prepare and serve espresso coffee V2019.02. Page | 52 Short Courses Australia RTO Provider No. 41261
4. Lower the group handle and check that the tamped cake is flat and level all the way around
the fill line
5. Gently tap the group handle with the side of your hand to make sure that all loose particles
are evenly spread out, or cling to side of the basket
6. Tamp again to compact loose particles (adjust level if necessary) finish with a little twist or
polishing action
The grinder tamp (moveable):
1. Hold the group handle in one hand and rest it on the support directly under the tamping
disc, make sure it is horizontal
2. Push down the knob at the top of the mechanism with your other hand so as to press the
tamping disc down of the ground coffee beans
3. Release the know and check the surface of the tamped cake is flat and level
4. Gently tap the group handle with the side of your hand to make sure that all loose particles
are evenly spread out, or cling to side of the basket
5. Tamp again to compact loose particles (adjust level if necessary) finish with a little twist or
polishing action
The hand Tamp (is a small hand‐held tool used for tamping):
1. Hold the group handle in one hand and rest it on the counter, make sure it is horizontal
2. Fit the handle of the tamp into the palm of the other hand and curl your fingers around it
3. Press the tamp down being careful to keep it horizontal
4. Twist the tamp a little as you gently remove it from the surface of the cake
5. Gently tap the group handle with the side of your hand to make sure that all loose particles
are evenly spread out, or cling to side of the basket
6. Tamp again to compact loose particles (adjust level if necessary) finish with a little twist or
polishing action
Tamping Tips
Prepare the dose for tamping ‐ make sure that the dose is flat and even in the basket
Keep everything horizontal
Don't disturb the cake
Watch the fill line
Aim for ideal extraction time
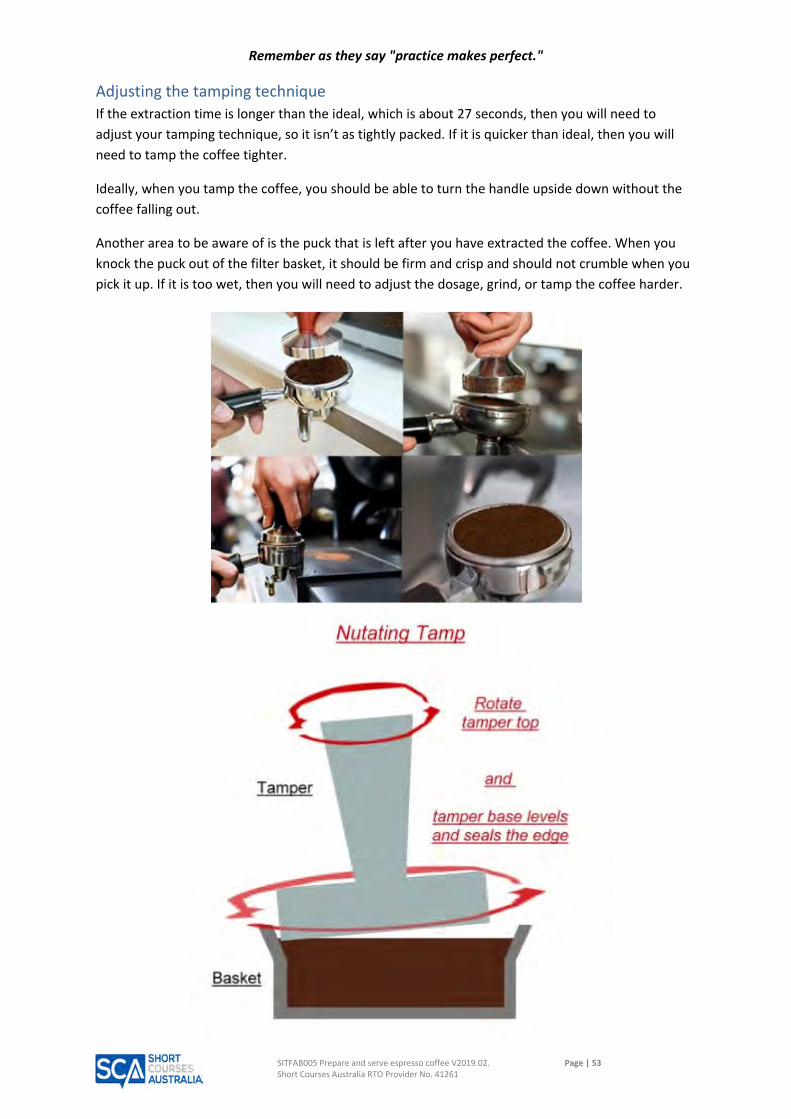
SITFAB005 Prepare and serve espresso coffee V2019.02. Page | 53 Short Courses Australia RTO Provider No. 41261
Remember as they say "practice makes perfect."
Adjusting the tamping technique
If the extraction time is longer than the ideal, which is about 27 seconds, then you will need to
adjust your tamping technique, so it isn’t as tightly packed. If it is quicker than ideal, then you will
need to tamp the coffee tighter.
Ideally, when you tamp the coffee, you should be able to turn the handle upside down without the
coffee falling out.
Another area to be aware of is the puck that is left after you have extracted the coffee. When you
knock the puck out of the filter basket, it should be firm and crisp and should not crumble when you
pick it up. If it is too wet, then you will need to adjust the dosage, grind, or tamp the coffee harder.

SITFAB005 Prepare and serve espresso coffee V2019.02. Page | 54 Short Courses Australia RTO Provider No. 41261
Flush group head before attaching group handle to extract espresso
Flushing the group head
To flush the group head, you simply turn on the extraction control for a few seconds before
attaching the group handle to make an espresso. This is a good practice to adopt especially if you
have not used an espresso machine for a while because it:
Removes coffee bean residue from the shower
Drains old, stale and cold water from the group
Brings the temperature of the group closer to the extraction temperature
By flushing the group head before every coffee you make, you are helping to reduce the amount of
cleaning that is required of the group head, ensuring that customers get great coffee, and
preventing any food safety issues.
Once you have flushed the group head and are satisfied with the result, you can now attach the
group handle and begin to extract the coffee.
Monitor quality of extraction during service period and make
adjustments It is important that you continually monitor the quality of the extraction during the service period
and make adjustments if the standard of the espresso is not right.
This is done so that you are always serving the best espresso and that your customers are always
happy with your product.
If you find that it is not up to the standard, then you will have to make a fine adjustment, either to
your grinding, tamping, temperature or extraction.
If at some point in your service you find that there is something wrong with the espresso machine,
you must report it immediately to your manager. As it may be a small thing that can easily be fixed
or it may be a major thing that needs the machine sent away.
No matter what it is not worth carrying on with a faulty machine as this will affect the standard of
your product that you are serving to your customers.
Quality indicators for espresso coffee extraction:
Changes in colour of crema
The creama is the golden layer that forms on top of the espresso after it has been extracted. You will
be monitoring the colour of the crema. If it is too dark, pale, or thin, then there is a problem, and
you will need to adjust your process and try again.
SITFAB005 Prepare and serve espresso coffee V2019.02. Page | 55 Short Courses Australia RTO Provider No. 41261
Changes in flow texture
The flow texture is the look of the coffee as it comes out of the group handle from extraction. You
are looking it to come out in a smooth, single stream. If the stream starts to break up or comes out
too fast, then you will need to adjust the grind and tamping technique used to get the right flow
texture.
Consistency of Cake of used ground coffee
As mentioned earlier, you will need to check the cake of ground coffee, known as the puck, to see
whether you need to adjust the grinder, doser, or tamping technique.
Water pressure during extraction
The water pressure will need to be kept at a constant to ensure that the crema is of high quality.
There should be a pressure gauge that shows you what the pressure is and what the correct range is,
indicated by a green area. If the pressure is too low or too high, you will need to call a technician to
have it looked at.
Factors relevant to quality of espresso coffee:
Ambient humidity
The ambient humidity in the room has an effect on the coffee beans and ground coffee that you are
using. This was discussed earlier in this resource, but to recap, if the ambient humidity is higher,
then you will need to use a coarser grind, and if there is less ambient humidity you can use a finer
grind.
Crema on top of the espresso
A good quality espresso coffee will have a layer of crema that is a golden colour and just the right
thickness. As mentioned above, if the crema is too light, too dark, or too thin then you will need to
adjust the processes used to try and improve the quality.
Quality and rate of espresso flow
The rate of flow was mentioned earlier. The quality and rate of the flow should be a consistent,
smooth, and steady stream.
Steam pressure during foaming and steaming of milk
As with the water pressure, it will be important to ensure that the steam pressure is at the right
levels when foaming and steaming milk for your coffee.
Just like the water pressure gauge, you will need to ensure that it is at the right levels, and if it isn’t
then you will need to adjust it slightly, or call a technician who can do a full check of the steam
pressure valve.
Taste
The taste of the coffee is the most important quality area that you need to ensure. Having the coffee
taste right is an exceptional way of ensuring that your customers are happy and want to return.
If the coffee tastes bitter, then it has been extracted for too long, or the ground was packed too
tightly. If it is bland, then the coffee was packed too loosely. The worst one is where the coffee has a
chemical taste, which means that the machine was cleaned, but not washed out correctly, so there
was some cleaning chemical residue left behind.
SITFAB005 Prepare and serve espresso coffee V2019.02. Page | 56 Short Courses Australia RTO Provider No. 41261
Making adjustments to the:
Water flow
Adjusting the water flow is a way to get the extraction rate to the correct time. There will be a valve
that you can turn which will either increase or decrease the water flow through the group head, and
you can use this to find the right flow to get the perfect extraction rate.
Water pressure
Adjusting the water pressure will also help with the extraction rate. The water pressure determines
the force of the water as it comes out of the group head. So similarly to the water flow, you can
adjust the valve to get it to the right pressure for the extraction.
Monitor efficiency of espresso machine during service, and resolve
or report issues Throughout the service period, you will want to be constantly monitoring the espresso machine to
determine how efficiently it is working. This means you will be checking all of the gauges, valves,
extraction rates, etc. to see if they are working as intended.
You will also need to be keeping an eye on the flow of water through the group heads and the steam
from the steam wand to determine if there are any obstructions that may be in the pipes.
Should you find any issues with the efficiency of the espresso machine, you will need to resolve
these problems if they are within the scope of your practice, or report them if they are outside of
your authorisation and job level.
Reporting issues will require you to submit a verbal report to your supervisor or manager about the
problem. They will then inspect the problem and determine the best solution. For more serious
problems, such as major malfunctions or faults, you may need to complete a written report for
documentation purposes.
SITFAB005 Prepare and serve espresso coffee V2019.02. Page | 57 Short Courses Australia RTO Provider No. 41261
TOP IC 5 – UNDERTAKE MILK TEXTURING PROCESS
Select cold milk and appropriate milk foaming jug to fulfil customer
orders Milk is as ancient as mankind itself as it is produced by all species of mammal, from man to whales as the perfect source of nourishment for their young. The first reports of human consumption of other mammalian milk date back as early as 6000‐8000 BC. At this time ancient man learned to domesticate species of animals initially for the provision of meat and then later for the provision of milk for general consumption. Mammals used for milk production included cows, buffalo, sheep, goats and camels, all of which are still used in various parts of the world for the production of milk for human consumption today.
However, a trip to the local supermarket or corner shop will show you that today there are many
different styles of milk available to customers. Not every style of milk can be made available to serve
with coffee in every establishment, but customers today have come to expect a variety of milk to be
available for use in their coffee.
Different types of milk, their characteristics and uses for different types of coffee
beverages
Common types of milk include:
Regular Milk
o On average contains 3.8% milk fat and no less than 3.2% milk fat. It’s pasteurised
and homogenised. Also known as full cream or whole milk, it has a rich and creamy
texture
Reduced Fat
o Has approximately 2% milk fat and it may have extra protein, and calcium added
Low Fat
o Have less than 1.5% milk fat and the same nutritional benefits with boosted calcium
content
Skim
o Has no more than 0.15% milk fat. Milk solids are added to optimise the taste
Modified Milk
o May be protein enriched, high in calcium, iron‐fortified or low in lactose to cater for
a range of dietary requirements
Ultrafiltration (UF) Milk
SITFAB005 Prepare and serve espresso coffee V2019.02. Page | 58 Short Courses Australia RTO Provider No. 41261
o This style of milk is also enriched with protein and calcium
Lactose Reduced or Lactose‐Free Milk
o Suitable for people who are lactose intolerant. Lactose reduced or free milk has
some or all of the lactose (the sugar found naturally in milk) removed making it
more easily digested for those that have lactose intolerance
Buttermilk or Cultured Milk
o Has a tangy flavour similar to natural yogurt and is excellent for baking. A special
starter culture is added to the pasteurised milk to develop the flavour and acidity
Milk Jugs
Espresso coffees are served to customers with the milk added by the Barista rather than served
separately and later added by the customer, such as when serving tea.
A Barista uses stainless steel jugs to steam and froth the milk with the steam wand of the espresso
machine. Milk jugs come in sizes ranging from 500ml to 2 litres depending on how busy the barista is
and how many coffees are being ordered.
To create the foam for your cappuccino, fill a small metal jug around one‐third full of requested milk. Metal jugs are best as they heat up more quickly than ceramic ones. Turn on the steam pipe and hold the jug underneath, allowing steam to blow into the milk. Then move the jug gently up and down to fold air into the milk. You’ll see the milk start to expand in size with bubbles appearing. Listen as well. You should hear a high pitched whining noise as the process continues. If you hear a growling noise, stop immediately as this signals that the milk is nearly at boiling point and will go flat. Don’t be disheartened if you don’t get a good result straight away. It can take practise but in our experience most machines do a pretty good job.
Purge the steam wand every time before texturing
Purge the system before you start steaming
The purging of the steam wand is an important take to remember before you texture milk.
This is important for several reasons. Firstly, it will remove any excess water in the system which can
inhibit the texturing process.
Secondly, it will remove any milk that was left over from the previous texturing, which can be a cross
contamination hazard.
To purge the steam wand, all you need to do is activate it for a second or two then turn it off again.
Ensure you wipe down the outside of the steam wand before and after every use as well.

SITFAB005 Prepare and serve espresso coffee V2019.02. Page | 59 Short Courses Australia RTO Provider No. 41261
Safe operational practices and dangers of working with steam
Steam is a dangerous thing if not handled correctly and safely. Steam is water that has gone beyond
boiling point, 100°C, and can cause serious burns if you are not careful.
A common misconception is that the steam is the mist that comes out of the steam wand. This is
only half true, as this is the steam that is cooling down again. The actual steam is clear and will
protrude not too far out of the nozzle of the steam wand, but this is the hottest part, reaching
temperatures of about 100‐103°C. It is not the actual temperature that will burn you, but the energy
that is stored in the steam, which is far greater than that of boiling water.
Steam can cause severe burns if it contacts skin, so it is important to ensure you are using the
machine safely, correctly, and using all safety equipment that is provided where applicable.
Texture milk according to type of milk and coffee beverage
Texturing milk
The aim of foaming, steaming, swirling and pouring is to produce milk with a particular texture
heated to a certain temperature that will maximise the flavour, aroma, and body of the beverage
when it is added to a perfect espresso.
The ideal texture for foamed and steamed milk is velvety smooth; the surface of the milk looks quite
shiny or glassy. The bubbles are very, very small ‐ the smaller, the better. There are no large bubbles
as this is known as poor foam and is quite often described as lace or sea foam, whereas the small
bubbles are described as microfoam.
Generally, after you have foamed and steamed the milk, you will have double the amount of volume
in the jug. If you start with one‐third milk in a jug, you will end up with a jug two‐thirds full of foam
and steamed milk.
Steaming and frothing milk
The process of steaming and frothing milk involves heating milk while simultaneously injecting air
into it to prepare it for use in an espresso‐based specialty coffee drink (espresso drink).
The goal of steaming milk is to create creamy milk with a rich, velvety taste. Atop the steamed milk is
the foam.
When producing high‐quality foam for espresso drinks, the art is in creating a high quality foam
which is not large‐bubbled, it also should not be dry like a meringue. The foam is not something that
just floats atop you gourmet espresso drink; it contains fine qualities that enhance and blend with
the espresso drink in a harmonious expression of the drink’s essence.
Proper steaming and aeration while steaming and frothing milk results in a silky and frothy steamed
milk as well as a smooth, high‐quality foam.
It all starts with the “very cold milk”. So to create high quality, frothy steamed milk, and foam, you
must firstly make sure to use milk that you have just taken from a sufficiently cool refrigerator.
Though you can use low fat milk, you will get a better taste with one or two per cent milk, and whole
milk creates the best foam of all.

SITFAB005 Prepare and serve espresso coffee V2019.02. Page | 60 Short Courses Australia RTO Provider No. 41261
The higher fat content (e.g. whole milk or cream) results in more of a silky texture and flavour
though less of an increase in volume while steaming. Fill up your steaming pitcher about one‐third
full with the very cold milk.
First place the steaming wand down into the steaming pitcher with the tip of the wand submerged
not too far below the surface of the milk. Now the steam power can be turned on by turning the
espresso machine’s steam knob.
Keep the steam wand tip aimed just a bit away from the milk’s centre so that the liquid start’s to
spin in a circular vortex.
Remember that the steam wand tip is not submerged too deep, but just deep enough to stay below
the surface and also prevent the tip from emerging which produces inferior frothed milk and can
also splatter hot milk around.
Bubbles produced when this happens, tend to be big rather than fine, and don’t have much taste.
You have to remember to maintain the vortex for optimal steaming and frothing.
As the vortex spins around the steaming and frothing will occur naturally as you hear a hiss that lets you know air is being properly injected into the milk to create the desired effect. It takes a bit of practice, but when you find that sweet spot, you will know you are creating some great steamed and frothed milk and foam. Keeping the steam wand in this perfect location also means that it is not necessary to raise or lower the steaming pitcher while you are steaming the milk except for the slight lowering of the pitcher that will be required as you continue the rolling action of the milk and the volume of the milk expands.
Visually and aurally monitor and adjust the texture and temperature
Measuring dose by sight, electronically, manually and mechanically
Assessing the texture and temperature of the milk is one of the most difficult espresso skills to
master.
While learning to assess the temperature, a thermometer is a useful tool that eliminates the
guesswork. It is attached to the side of the jug, and all you have to do is watch the dial at the top.
Once it reaches 65°C then you can turn off the steam, remember that the temperature in the milk
will still continue to rise due to the conduction of heat from the sides of the jug. The desired
temperature should be around 68'C.
Look at the milk as it is moving in the jug make sure that you have the steam wand tip stays just
underneath the surface of the milk, lightly kissing the surface at just the right angle and sweet spot
to maintain the rapid flow of the vortex.

SITFAB005 Prepare and serve espresso coffee V2019.02. Page | 61 Short Courses Australia RTO Provider No. 41261
If there are excess bubbles forming deepen the position of the steam wand to increase steam
pressure and then start aerating again as you hear the high‐pitched hissing noise.
It is important that you maintain proper aeration for a rich and velvety texture. This is done by
having the steaming wand at just the right angle and applying just the right amount of steam
pressure into the milk, the milk will continue to spin around and grow richer in texture, and you will
be properly aerating (injecting air) as you continue the steaming process producing a very creamy,
high‐quality milk ideal for espresso‐based specialty coffee drinks.
If you want to produce a relatively high quantity of foam, for a cappuccino for example, then you will
want to leave the steam wand near the surface of the milk for a bit longer to create this foam.
Look at the amount of steam that comes off the milk. A little steam means it is nearing the correct
temperature, too much steam means it is too hot, and no steam means that it is nowhere near the
temperature.
Look at the texture of the milk, if it is has a glossy appearance on the surface and has very fine
bubbles, then these are the signs of a perfect foam, whereas big bubbles mean poor foam.
REMEMBER: Foam first, Temperature second ‐ in using this method, focus on the right texture as
well as the required volume, then when this is right think about the temperature.

SITFAB005 Prepare and serve espresso coffee V2019.02. Page | 62 Short Courses Australia RTO Provider No. 41261
Clean the steam wand on the outside and purge every time after
texturing Once you have finished steaming and frothing the milk, then you should clean off the steaming wand
thoroughly.
Use a wet, folded towel to thoroughly wipe down the steaming wand and also turn on the steam for
just a moment to blow any milk out of the steaming wand, as described earlier in the purging
section.
Refer to the section on purging the steam wand to review the reasons and technique behind purging
the steam wand.
Combine foam and milk through swirling, ensuring even consistency The purpose of swirling is to mix the foam and milk together in the jug in preparation for pouring.
You do this by rotating the jug immediately after foaming and steaming. Rotate the jug in small
circles to make the milk swirl around vigorously inside.
The purpose of pouring is to mix the combined milk and foam with the espresso to produce the
perfect velvety smooth and evenly textured beverage. You do this by pouring the milk in the one
spot in the espresso at the correct angle and speed.
Perfect swirling and pouring (step by step)
The following step by step will help combine your perfectly foamed and steamed milk with your
espresso to achieve the perfect texture, flavour, and aroma.
Hold the jug firmly by the handle and using a rotating wrist action to cause the milk to roll
around in the jug until you achieve a glassy‐smooth texture
Stop swirling and immediately pour the milk onto the espresso through one spot in the
crema
Begin pouring slowly ‐ to cause as little disruption to the crema as possible
Tilt the jug a little more and pour a little faster ‐ the milk and foam should slide out together
Stop part‐way through pouring and swirl again, if necessary
Continue to pour until the cup or glass is full
Why swirl?
If you have been successful in producing perfect foam, you may find that it is not necessary to swirl
very much at all.
Vigorously swirling the milk and foam can improve the texture of slightly less than perfect foamed or
steamed milk.
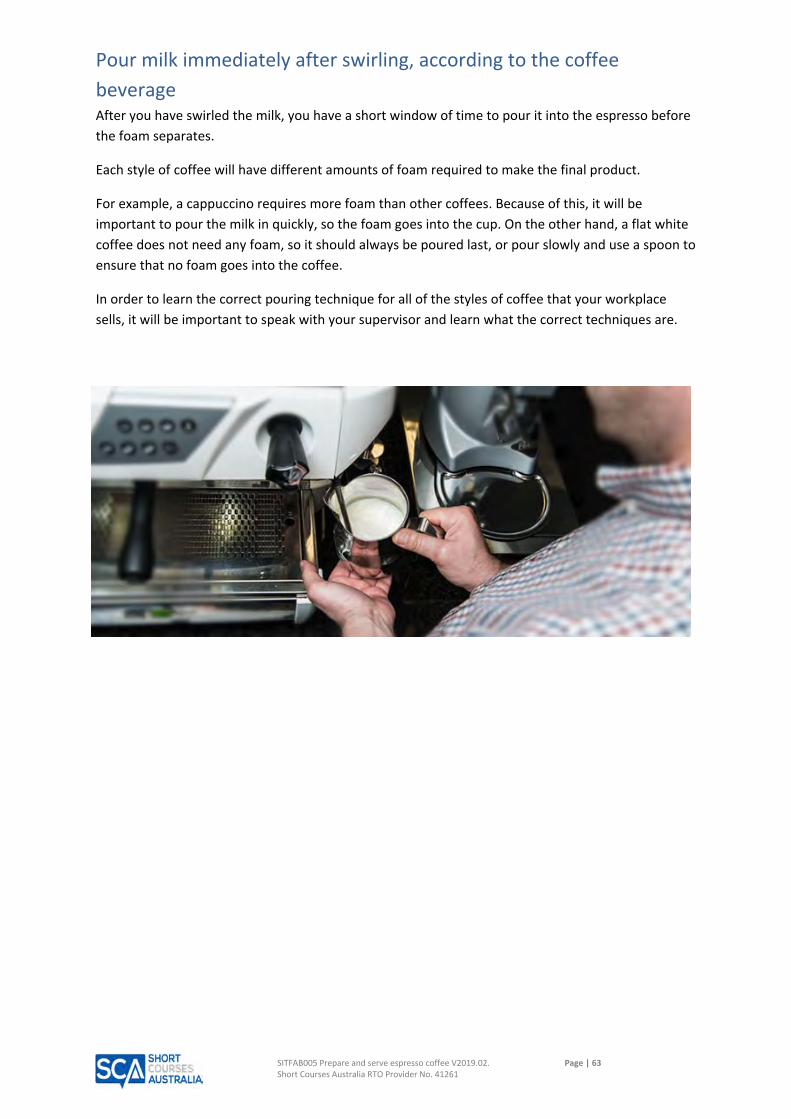
SITFAB005 Prepare and serve espresso coffee V2019.02. Page | 63 Short Courses Australia RTO Provider No. 41261
Pour milk immediately after swirling, according to the coffee
beverage After you have swirled the milk, you have a short window of time to pour it into the espresso before
the foam separates.
Each style of coffee will have different amounts of foam required to make the final product.
For example, a cappuccino requires more foam than other coffees. Because of this, it will be
important to pour the milk in quickly, so the foam goes into the cup. On the other hand, a flat white
coffee does not need any foam, so it should always be poured last, or pour slowly and use a spoon to
ensure that no foam goes into the coffee.
In order to learn the correct pouring technique for all of the styles of coffee that your workplace
sells, it will be important to speak with your supervisor and learn what the correct techniques are.

SITFAB005 Prepare and serve espresso coffee V2019.02. Page | 64 Short Courses Australia RTO Provider No. 41261
TOP IC 6 – SERVE ESPRESSO COFFEE BEVERAGES
Present coffee beverages attractively and without drips and spills
Pulling a perfect espresso shot
If you want to prepare an absolutely perfect one and one‐half ounce shot of espresso – a solo
espresso shot – then you need to follow very specific directions every step of the way.
Step one: pre‐warm the demitasse
The first thing you need to do is pre‐warm a demitasse so you can pour the espresso shot into it. Of
course, you will need an espresso machine.
Step two: prepare the coffee – and a note on roasting and storing
Now prepare your coffee, which ideally is a high‐quality coffee that has been taken care of along its
journey. In other words, the coffee should have been processed properly and then roasted the day
before it was shipped to you in a valve‐sealed bag (unless you know a roaster and then you can pick
it up directly).
Once you get the coffee make sure it is stored properly, kept dry and put in a cool place but not in
the refrigerator or freezer. It should also be kept in a dark place as sunlight can harm the coffee’s
fine flavours.
Step three: grind the coffee – use a conical burr grinder
Make sure to grind the gourmet coffee using a burr coffee grinder, and do this just before it is used.
The best type of burr grinder to use is a conical burr grinder. You will need about two tablespoons of
ground coffee, or about eight grams, for a single espresso shot.
See our section on grinding for a complete description of the proper way to grind the coffee. This is
very important to get a proper espresso. (See grinding coffee for Espresso).
Step four: pre‐warm the espresso machine portafilter
Before you start the espresso shot make sure and also pre‐warm the espresso machine’s portafilter
by running it under hot water.
Some espresso machines will heat the portafilter automatically. This is important because if it is cold,
then the metal of the portafilter can lower the espresso’s brewing temperature preventing it from
extracting properly.
Step five: position the demitasse
The best way to pour (pull) an espresso is to allow it to pour directly into the pre‐warmed demitasse
from the pour spout of the espresso machine.
Okay, now you are ready to fill the portafilter up with the ground coffee.
Step six: filling the portafilter – tamping the ground coffee
Use a very even twisting motion as you push down on the coffee grounds to tamp, or compact, the
coffee grounds using the tamper.

SITFAB005 Prepare and serve espresso coffee V2019.02. Page | 65 Short Courses Australia RTO Provider No. 41261
Step seven: begin the espresso brewing
Once everything is ready, and the portafilter is clamped into the machine, the pre‐warmed
demitasse is in place, and the portafilter has also been warmed, hit the brew button of the espresso
machine.
Step eight: observe the espresso stream closely
Within just a few seconds the brewed espresso will start to come out in a steady stream. The colour
of the espresso at this point should be very similar to maple syrup.
The art and science of espresso brewing now requires you to make a very subtle calculation and
decision on how long to brew the espresso shot.
Step nine: try as precisely as possible to determine the optimal brewing time
While a typical espresso brewing time is 27 seconds, the actual time for your perfect solo espresso
shot could vary depending on certain factors. Most importantly, end the extraction process at just
the right time to avoid an over‐extracted or under‐extracted espresso shot.
Step ten: extract the aromatic qualities without too much bitterness
The main thing to avoid is extracting too much bitterness from the ground coffee, though still
making sure to fully extract the coffee’s aromatic oils and its fine tastes.
The resulting espresso should be a very concentrated espresso shot, not watery or weak and also
not overly bitter.
The general rule is that if you brew the espresso shot for too short of a time then it will not achieve
its full flavour, though if you brew it too long you may extract too much bitterness and taint the solo
espresso.
Step eleven: diagnose and troubleshoot for perfect espresso shots
The primary factors affecting your perfect espresso shot include:
How much pressure your espresso machine is generating.
How hot the brewing temperature is.
How you ground your coffee (whether you used a burr coffee grinder rather than a blade
grinder, and how fine you ground the coffee).
The perfect amount of time for the espresso brewing depends on these factors.
Also important is the initial quality of the coffee, how fresh the coffee is, whether it was stored
properly and whether the roast master did a good job roasting the coffee for your espresso brewing.
Make sure the coffee was roasted very recently and transported in a valve sealed bag. The grinding
should occur immediately before the brewing.
Again, don’t forget to pre‐warm the demitasse and portafilter. All of these details are important for
creating a premium espresso shot.

SITFAB005 Prepare and serve espresso coffee V2019.02. Page | 66 Short Courses Australia RTO Provider No. 41261
Espresso Streaming too slow
Watch the stream of espresso as it emerges out of the spout. If the espresso is streaming out too
slowly then perhaps you ground the coffee too fine, or perhaps you compacted it too much.
Changing one or both of these items can help to fine tune the shot so it streams out properly. If you
allow it to flow very slowly the result will be an espresso shot that is over‐extracted and it will likely
be very dark and perhaps bitter.
Espresso Streaming too fast
Conversely, if the espresso is streaming too swiftly out of the spout then perhaps you did not tamp
or compact the coffee sufficiently. The other thing to check is whether you ground the coffee at too
large of a particle size.
Change one or both of these things to fine tune the espresso shot so it streams properly out of the
spout. If you allow it to stream too fast then it will result in a water or weak shot due to under
extraction.
Examining the espresso layer by layer
The espresso shot will be about one and one‐half ounces when done, but when it is just about one‐
third done or only about one‐half ounce, then you will notice that a light brown layer of crema will
start to form on top of the espresso shot.
The espresso crema
The crema of the espresso shot contains the coffee’s finest tastes and aromatic qualities so it is
important to form a proper crema, which is foam of oils that are comprised of very fine cells. When
the espresso shot is about two‐thirds complete, with about one ounce having streamed from the
espresso spout, then the layers of the espresso shot should be separating.
The body of the espresso shot
Inspect the colour of the espresso’s body and make sure it is not too dark before it has even finished
brewing because this may be a sign that the espresso will have taken on an unpleasant burnt taste
due to overly compacted grinds or too fine of a coffee grind size.
The heart of the espresso shot
The heart of the espresso shot should not be too light a colour such that it blends with the body of
the espresso shot. This is a sign that the espresso shot will be too watery and weak and can be
remedied by tamping the grounds more, and using a less course coffee grind size.
Tips on pulling the perfect espresso shot
When you experiment a bit with you particular espresso machine and control all of the variables
while following all of the other instructions from the tamping pressure to the extraction time then
you too will be able to pull a perfect espresso shot with a very intense flavour enhanced by just the
right amount of sweetness.
The caramel‐colour crema on top should exude the fine aromatic properties of the gourmet
espresso coffee. Also make sure you are using the proper espresso grind size and follow the
technical specifications for a proper espresso.

SITFAB005 Prepare and serve espresso coffee V2019.02. Page | 67 Short Courses Australia RTO Provider No. 41261
So far you have covered the details of each type of coffee and the glassware it should be served in. It
is important to remember that the extract presentation may vary from outlet to outlet and that you
should seek training from your supervisor about the extract presentation standards at your
workplace.
Apart from the standard of coffee and the glassware there are a number of common sense rules that
apply to presenting and serving coffee, these include:
Use clean crockery without chips, cracks or stains
Serve immediately
Do not overfill the cup; allow room for the customer to lift the cup without it spilling
Do not serve coffee that has been spilled onto a saucer; it looks unprofessional and may drip
onto the customers clothes
Take great care when carrying the coffee to a table as it is hot and if you spilt it on a person
it might burn them
Give the right coffee to the right person
Dust cappuccinos with chocolate powder before placing them on the saucer to keep the
saucer clean
Ensure that sugar, sweeteners and spoons are available to the customer
Latte art
A neat skill that baristas pick up from pouring milk into coffee all day every day is the ability to make
patterns in the foam of their coffees. This is known as latté art and is a difficult skill to master, but
can enhance the presentation of your coffee by an enormous margin.
These decorations can be made by using the milk and the foam to create a pattern. Some easy ones
to start off with are a heart and a leaf.
Other ways of decorating the tops of your coffees include using cocoa powder to dust the top of the
coffee, with or without a template, or by using a toothpick to make a pattern in the foam.

SITFAB005 Prepare and serve espresso coffee V2019.02. Page | 68 Short Courses Australia RTO Provider No. 41261
Serve coffee beverages promptly at the required temperature and
with appropriate accompaniments Consistency is the vital component to superior customer service. Customers expect that they are to
be served the perfect espresso every time, whether they are ordering just one, or are part of a group
placing a larger order.
Not only do they want the same consistent beverage but they also require it at the correct
temperature, as well as looking and smelling perfect. Thus a superior standard is not easy,
particularly when preparing large orders of many different types of espressos. It requires good
barista skills and an artful combination of forward planning and teamwork, as well as good timing
REMEMBER:
Planning ahead
Precision timing
Multi‐tasking
Using two hands
Working quickly
Plus no delays
= Superior Customer Service (Happy customers, Happy staff).

SITFAB005 Prepare and serve espresso coffee V2019.02. Page | 69 Short Courses Australia RTO Provider No. 41261
Minimise waste to maximise profitability of beverages produced Minimising waste in your establishment will help to maximise the profitability of your establishment.
It will also help reduce the cost of the beverages that you produce. This is done due to the reduced
cost of wastage and having to continually buy more supplies.
Therefore it is important that you try to reduce the waste buy such ways as storing unused supplies,
using the correct amount of product to make the espressos, cleaning up as you go, turning lights of
and water off when not being used, also using the FIFO (First in, First out) rule.
Storage
Remember it is very important that when you use milk that you check its expiry date. Milk can and
does deteriorate fast when out of the fridge for even short periods of time. Check the used by date
on the carton or container.
You may also smell opened carton/containers of milk; any sour milk indicates off milk and should be
discarded. Also check the milk after it has been steamed, as you may not smell the difference when
the milk is cold but when heat is applied the milk can curdle.
Milk should be stored in a refrigerator between 0C and 4C away from strong odours, e.g. cheeses,
onion and garlic as they will permeate the milk.
All ice creams should be stored in a freezer, check if the ice cream has been melted and starting to
separate, if so throw it away.
Remember:
Good storage = Freshness
Good storage = Safety
Ingredients that are stored incorrectly will go stale and you will not be able to make good espresso
coffees, therefore they will not have the desired aroma, taste that is desired. This will cause the
customers not to come back, having the effect of profit loss.
Also there is the possibility that if it is not stored correctly then there is a chance of food poisoning
Milk and ice creams are a good example of perishable goods that can be potential hazards for food
poisoning.
Appropriate environmental conditions for storing coffee beans, ground coffee, milk
and other ingredients to Ensure food safety and Optimise shelf life
Ensuring food safety through the corrct storage of your products is important. By storing your
products correctly, you are both making sure that they are safe to consume and will optimise their
shelf life.
You will need to ensure you store your coffee beans in a cool dry place, preferably with humidty
control, to prevent your beans from absorbing the ambient humidity and/or becoming stale.
Milk products will need to be kept refrigerated, between 2°C and 5°C, to help slow the growth of
bacteria and to optimise their shelf life so you can get the maximum amount of use out of them.
Always put milk back after using it, as if it sits on a bench, particularly on a hot day, it will drastically
reduce the shelf life of the milk.

SITFAB005 Prepare and serve espresso coffee V2019.02. Page | 70 Short Courses Australia RTO Provider No. 41261
TOP IC 7 – CLEAN ESPRESSO EQUIPMENT
Clean espresso machine and equipment thoroughly and safely
according to organisational procedures and manufacturer
instructions
Cleaning and maintenance methods and procedures
Exceptional espresso is the culmination of many factors. Obviously the coffee itself is first and
foremost, supported by the barista’s technique and the capabilities of the equipment.
One factor that is often overlooked in commercial establishments and homes alike is the foul
flavours that poorly maintained espresso machines can introduce to the cup. As you will read, the
sense of “clean” this article advocates doesn’t mean wiping down the drip tray and running water
over the portafilters before closing, it means a regular cleaning regime that removes impurities on
an hourly, daily and weekly basis. Don’t be put off by the detail‐oriented nature of the task – the
reward is genuinely better and more consistent espresso.
Below is a step by step of why cleaning must be a regular part of you barista duties and how to
perform them by following instructions focused on the business‐end of you espresso machine.
Discussed are outlines when these cleaning duties need to be performed.
The instructions and recommendations presented generally apply to any espresso machine with a
three‐way valve type group.
Related: Grinders are not “self‐cleaning” and can harbour rancid oils that taint your espresso. To
clean your grinder, refer to Topic two in this unit.
Why? It’s all about what’s in the cup (or not!)
The best coffee beans cannot make up for the impurities a dirty machine adds to your drinks. Coffee
beans contain essential oils. While these oils are responsible for the rich crema that tops you
espresso, it can also be responsible for a rancid off flavour that develops over time.
Those oils emulsify and cling to and behind the water screen of your espresso machine, doubly so for
brass surfaces. These oils also leave a film on the filter basket and portafilter. Over time this film will
start to plug the holes of the filter basket and create deposits inside the portafilter spout. Luckily
these impurities are relatively easy to remove IF you follow a regular cleaning schedule.
Does this sound a little excessive to you? Perhaps it will help to see what a portafilter might look like
after a hard day at a busy café if it’s not cleaned properly (shown next to new portafilter):

SITFAB005 Prepare and serve espresso coffee V2019.02. Page | 71 Short Courses Australia RTO Provider No. 41261
Poorly maintained portafilter / new portafilter
Of course nobody should ever let their portafilter reach this degree of filthiness. The results in the
cup with are dramatic and unpleasant. Even in a café this is not acceptable, though there one has
the (weak) excuse of being very busy.
Keeping your espresso machine clean will not only help maintain the quality of your espresso but
also extend the life of the machine. You should purge and wipe off you steam wand after every use
and run a water shot through your machine after every brewing session. Use a clean water back
flush every 10 to 15 shots and at the end of every session as part of your leaning routine. This
section will concentrate on the more detailed cleaning routine that should be performed every week
or 20 to 30 shots, whichever comes first.
IMPORTANT: Only machines with three‐way valves can be cleaned using methods described in this
article. If your espresso machine does not have a three‐way valve, do not attempt to back flush as
doing so can damage your espresso machine. Please consult your operator’s manual to verify the
presence of the three‐way valve (often called a three‐way solenoid).
STEP‐BY‐STEP CLEANING INSTRUCTIONS
Below we have a prime example of a dirty machine. There are milk deposits on the steam wand and
coffee residue and oils on the Water screen. You should wipe off the water screen with a moist cloth
at the end of each session and the steam wand after each use (one cloth dedicated to each task to
avoid cross‐contamination). Once a week (or more often depending on your usage), do a more
detailed cleaning as described below.
You will only need a few items to adequately perform your cleaning:
Espresso machine cleaner (back flush detergent such as Cafiza, PuroCaf or JoeGlo), Blank,
blind or back flush portafilter basket (different names for the same item).
A clean kitchen towel and a dishrag.
Green Scrubby cut into 1 inch squares.
Metal or glass bowl or container deep enough for the portafilter to soak in.
Optional components include:
Group brush
Steam wand brush
Daily cleanser
Start by simply wiping off the residue on your water screen. Now gather up your portafilter, back
lush basket and flushing detergent. Please read the instructions on your detergent and use their
recommended dosing. If using JoeGlo, they recommend using ½ teaspoon of detergent in your blind
basket. Snap the blind filter basket into your portafilter and add the recommended amount of
detergent.

SITFAB005 Prepare and serve espresso coffee V2019.02. Page | 72 Short Courses Australia RTO Provider No. 41261
Time to flush and scrub
Follow the recommended flush sequence of the detergent you are using. JoeGlo recommends
running the pump five times in 15 second start/stop intervals. Once the portafilter is locked into
place, engage the pump. You will notice a change in the pitch of your pump as the pressure
increases. Turning off the pump automatically opens a pathway from the brew group to the drip
tray: you will hear the distinctive “whoosh” as the water escapes.
This release of pressure will force the dissolved detergent back through the dispersion screen and
the three‐way valve. Flushing those spoiled essential oils out of the system will not only improve
your espresso taste, but also clean the three‐way valve of oils and grind deposits so it seals properly.
With some vibration pump machines, the pressure increase will trigger the over‐pressure valve to
vent excess pressure back into the water reservoir or drip tray. In this case, turn off the pump once
this occurs.
Rinse water
After the flush sequence and portafilter wiggle, remove your portafilter and drip tray. You may
notice small coffee particles and a dirty brown tint to the water. This is the gunk responsible for that
rancid flavour in your espresso.
Rinse out your drip tray and blank basket to remove any un‐dissolved detergent. If there is no
detergent left and the water is still brownish in colour, you need to repeat the cleanser back flush
with more detergent.
Be careful, the group head is hot!
Reinstall the drip tray and lock your clean portafilter back into the machine and repeat the back
flushing process with more water. This time you will be flushing out any remaining detergent from
the brew group. Refer to the instructions on your detergent for the recommended number of cycles
(generally the same number of cycles as for the detergent; “rinse thoroughly” is the operative
phrase).
Now that you have cleaned the internal workings via a back flush, you can now clean the exterior
surfaces. Simply wipe the shower screen with your dishrag.
Next clean the steam wand. Take the clean, wet dishrag and wipe the exterior down. If you have a
steam wand brush, clean the inside of the steaming wand (though if you need to use such a device,
it indicates that you are not purging and cleaning your wand well enough after each use). Unscrew
the tip from the steam wand, dip the brush in an appropriate cleanser and run it up the steam tube.
Note: Most back flush detergents are quite toxic and not suited for this task. It is recommended
you use clean water. Urnex does make a product specifically designed to clean steam wands called
Rinza and PuroCaf has their own dairy cleanser as well. Both of these products work very well and
are highly recommended for soaking the wand and tip.

SITFAB005 Prepare and serve espresso coffee V2019.02. Page | 73 Short Courses Australia RTO Provider No. 41261
Remember to purge the steam wand after cleaning by opening the steam valve and venting it into
an appropriate container for about 30 seconds. Soak the portafilter, basket and the steam tip in a
bowl.
Now that the espresso machine is nice and clean, turn your attention to the portafilter and basket.
First, you’ll need to wipe clean the basket. Second, you should break down your portafilter (remove
the spouts and disassemble any cover the spouts may have). Once you’ve done this, take your green
scrubby square and thoroughly scour the inside surfaces of the portafilter body and the spouts. Do
not use the scrubby on your basket as you will enlarge the holes.
Find a large container to hold them and pour enough water into the container to submerge them.
Add some of your cleaning detergent to the water and stir to dissolve. Refer to the directions on
your detergent to get the correct dosing for the volume of water, JoeGlo recommends 1 tablespoon
per quart of very hot water. Place your parts into the detergent water and allow them to soak for at
least ½ hour.
Note: it is inadvisable to allow the plastic, Bakelite or rubber handle to be submerged in the water.
Some handle materials can be damaged by the cleanser and over time all will suffer rust and damage
to the internals of the handle.
After the soak, rinse all the parts with clean water, repeat the green scrubby scour and then wipe
dry with a dishrag. If the portafilter spouts are the open‐slot type, visually confirm that there is no
trapped oils the soaking didn’t dissolve; use a small round brush to scrub it clean (don’t laugh but
the brushes designed for cleaning baby bottle nipples are cheap and work well). Reassemble.
Wipe down the exterior of the espresso machine to remove any surface dirt and reassemble. Now
you are ready to pull shots and steam milk until the next cleaning. Please note that it is always a
good idea to pull one garbage ‘seasoning’ shot at the beginning of the session that follows a full
cleaning. This assures that any residues are indeed flushed away and lubricates the surface of the
three‐way valve of lever‐type E61 groups, eliminating “lever squeak” after a chemical cleaning.
Reminder: in addition to replacing the water in the reservoirs of pour over machines every other
day, remember they need regular cleaning too!
Content of safety data sheets (SDS) for cleaning agents and chemicals, or workplace
documents or diagrams that interpret the content of SDS
All cleaning chemicals that you use will need a safety data sheet (SDS) associated with them. These
SDS’s contain all of the relevant information about the chemical, including its dangers, first aid
instructions, what to do in an emergency, and relevant phone numbers to call in the event of an
emergency involving the chemical.
These SDS’s will need to be kept in the same area as the chemicals they represent, either in a folder
or book that is placed with the chemicals, or with the use of diagrams that outline the important
information that the SDS contains.
These diagrams should be placed in easily locatable areas and in the area with the chemicals.

SITFAB005 Prepare and serve espresso coffee V2019.02. Page | 74 Short Courses Australia RTO Provider No. 41261
Maintain water filtration system according to organisational
procedures It is important that you continually maintain the water filtration system if one is installed in your
establishment, as they can make people sick, as well as taint your product thus not making the
customer happy and reducing your profits.
Water filtration systems purify water by removing impurities and debris before pumping the water
back into the system for use. Because they remove impurities, they can build up and eventually
overflow, thus tainting the filtered water and becoming a hazard.
It is important that you follow your organisations policies and procedures when it comes to the
water filtration units. This includes the cleaning of filtration systems when it is required.
Some of these units are attached to the Espresso machine and the filter can be taken apart and
cleaned quite easily, some are on the outside of the building and attached to the water system these
normally have to be maintained by a special company.
Refer faults and maintenance issues requiring technical specialists to
supervisor
Symptoms of faults in espresso machines and grinders
It is important not only for the safety of yourself and other staff members in your establishment,
that you only carry out the maintenance that you are qualified to do.
There have been some faults briefly mentioned throughout this resource. These faults must be
identified before they become serious problems or hazards.
Some of the common faults that espresso machines and grinders may develop include:
Dull blades in the grinder – dull blades wil not grind the coffee correctly, which
will lead to a lower quality product
Clogs and jams in doser mechanism, pipes in espresso machine, group head, etc.
Loose seals and fittings
Broken or missing parts
Burnt out motors
Rusted metals
If you come across any items or equipment that is broken or in need of repair it is important that you
report it straight away to a supervisor or manager, as some of the equipment might need specialist
technical support which you are not qualified at.
If you start to mess around with the equipment and you or someone else gets hurt, then you could
be in some trouble from Work Safe.

SITFAB005 Prepare and serve espresso coffee V2019.02. Page | 75 Short Courses Australia RTO Provider No. 41261
Use energy and water resources efficiently when preparing coffee
beverages and cleaning to reduce negative environmental impacts Some of you will hear over time the following comment:
“If I’ve got customers waiting and 8 espressos to get out in the next five minutes, the last thing I
want to think about is sustainability...”
Rising fuel and water costs are changing the catering landscape forever, so reducing consumption
must be integral to your sustainability strategy both from a cost and from an environmental
perspective. Its common sense!
Another question that must be asked is ‘Why bother’? It is highly likely that the government will use
a stick rather than a carrot to encourage us to reduce emissions. And catering, as a high energy user,
will be singled out for attention sooner rather than later. But if the industry can demonstrate that it
is tackling this issue, we are less likely to get clobbered by an inappropriately big stick, most likely a
doubling or trebling of our energy costs.
Put simply, saving energy and other natural resources will save you money! So what can caterers do
to help save the environment and how can we achieve it?
New espresso equipment is generally much more energy efficient than older items.
However, most barista's won’t want to change older equipment whilst it still has plenty of life in it.
Nor do they need to, as there are ways that caterers can reduce their energy consumption without
changing equipment.
Regular service and maintenance will not only minimise breakdowns but maximise cooking efficiency
and energy usage. You will also be prolonging the working life of equipment, which saves capital
expenditure and monthly operating costs.
Most commercial catering equipment is manufactured from stainless steel and other metals which
can and is easily recycled as it has a significant scrap value. There are however, some products that
at first glance do not fall into that category as they have little metal content. There are companies
that will be able to help you disposing of your old appliances in a sustainable manner and also to
advise you on other aspects of recycling.
Remember that proper handling of waste, water and energy through proper maintenance of
equipment and reporting of faulty equipment will save resources and costs to your establishment.

SITFAB005 Prepare and serve espresso coffee V2019.02. Page | 76 Short Courses Australia RTO Provider No. 41261
SUMMARY
Now that you have completed this unit, you should have the skills and knowledge to extract and
serve espresso coffee beverages using commercial espresso machines and grinders.
If you have any questions about this resource, please ask your trainer. They will be only too happy to
assist you when required.
REFERENCES
"The History Of Coffee." Web. 27 Jul. 2015
<http://www.ncausa.org/i4a/pages/index.cfm?pageid=68>.
"TC Lavazza: Coffee History, Cultivation." Web. 12 Aug. 2015
<http://www.sovrana.com/libstory.htm>.
http://www.coffeecrossroads.com/coffee‐101/coffee‐roasts‐from‐light‐to‐dark
“Flavours of Coffee.” Web. 28‐7‐2015
<http://www.waitrose.com/home/inspiration/about_waitrose/about_our_food/drink/tea_and_coff
ee/coffee/flavours_of_coffee.html>
“Coffee Storage.” Web. 28‐7‐2015
<http://coffeetea.about.com/od/coffeebasics/a/HowtoStoreCoffee.htm>

SITFAB005 Prepare and serve espresso coffee V2019.02. Page | 77 Short Courses Australia RTO Provider No. 41261