Sitara Linux Training: Hands on with the...
54
Sitara Linux Training: Hands on with the SDK 1 Sitara Linux Training: Hands on with the SDK Introduction This lab is going to give you a hands on tutorial of the Sitara Linux SDK. Each of the following sections below will walk you through a particular part of the SDK describing the actions that are about to be performed, the key points to take away, and the step-by-step instructions to complete the lab. If you have questions or feedback please e-mail the [email protected] [1] mailing list. NOTE: In this guide commands to be executed for each step will be marked in BOLD Lab Configuration The following are the hardware and software configurations for this lab. The steps in this lab are written against this configuration. The concepts of the lab will apply to other configurations but will need to be adapted accordingly. Hardware • AM335x EVM-SK (TMDSSK3358) - Order Now [2] NOTE Other target boards can be used but the steps below related to serial and ethernet connections may differ. • Router connecting AM335x EVM-SK and Linux Host (For Remote Matrix lab) • USB cable connection between AM335x EVM-SK and Linux Host using the micro-USB connector (J3/USB0) NOTE The AM335x EVM uses a standard DB9 connector and serial cable. New Win7 based Host PCs may require a USB-to-Serial cable since newer laptops do not have serial ports. • 5V power supply (typically provided with the AM335x EVM-SK) Software • A Linux host PC configured as per theLinux Host Configuration [3] page • Sitara Linux SDK installed. This lab assumes the latest Sitara Linux SDK is installed in /home/sitara. If you use a different location please modify the below steps accordingly. • SD card with Sitara Linux SDK installed. • For help creating a 2 partition SD card with the SDK conent see the create_sdcard.sh script page • CCSv5 installed. This lab assumes CCS has been installed in /home/sitara. If you use a different location please modify the below steps accordingly. • The CCS installer can be downloaded from the [http://www.ti.com/tool/linuxezsdk-sitara [4] ] page and if extracted into the same directory as the SDK installer can be installed at the same time as the Sitara Linux SDK using the SDK installer.
Transcript of Sitara Linux Training: Hands on with the...

Sitara Linux Training: Hands on with the SDK 1
Sitara Linux Training: Hands on with the SDK
Introduction
This lab is going to give you a hands on tutorial of the Sitara Linux SDK. Each of the following sections below willwalk you through a particular part of the SDK describing the actions that are about to be performed, the key points totake away, and the step-by-step instructions to complete the lab. If you have questions or feedback please e-mail [email protected] [1] mailing list.NOTE: In this guide commands to be executed for each step will be marked in BOLD
Lab ConfigurationThe following are the hardware and software configurations for this lab. The steps in this lab are written against thisconfiguration. The concepts of the lab will apply to other configurations but will need to be adapted accordingly.
Hardware• AM335x EVM-SK (TMDSSK3358) - Order Now [2]
NOTEOther target boards can be used but the steps below related to serial and ethernet connections may differ.
• Router connecting AM335x EVM-SK and Linux Host (For Remote Matrix lab)• USB cable connection between AM335x EVM-SK and Linux Host using the micro-USB connector (J3/USB0)
NOTEThe AM335x EVM uses a standard DB9 connector and serial cable. New Win7 based Host PCs may require aUSB-to-Serial cable since newer laptops do not have serial ports.
• 5V power supply (typically provided with the AM335x EVM-SK)
Software• A Linux host PC configured as per theLinux Host Configuration [3] page• Sitara Linux SDK installed. This lab assumes the latest Sitara Linux SDK is installed in /home/sitara. If you use a
different location please modify the below steps accordingly.• SD card with Sitara Linux SDK installed.
• For help creating a 2 partition SD card with the SDK conent see the create_sdcard.sh script page• CCSv5 installed. This lab assumes CCS has been installed in /home/sitara. If you use a different location please
modify the below steps accordingly.• The CCS installer can be downloaded from the [http:/ / www. ti. com/ tool/ linuxezsdk-sitara [4]] page and if
extracted into the same directory as the SDK installer can be installed at the same time as the Sitara LinuxSDK using the SDK installer.

Sitara Linux Training: Hands on with the SDK 2
Out-Of-Box Experience
DescriptionThis section will cover the steps to boot the target board and how to use the Matrix application launcher, which is thedefault application run when the board is booted.
Key Points• How to boot the target board• Navigating Matrix using the touchscreen• Navigating Matrix using the remote interface
Lab Steps1. Connect the cables to the EVM. For details on where to connect these cables see the Quick Start Guide that came
with your EVM.1. Connect the USB cable between your Linux host and the micro-USB connector of the EVM
NOTEThis will provide the serial connection. For other boards you may need to use a different cable such as astraight serial cable
2. Connect the network cableNOTETo insure you receive a valid ipaddr when using the AM335x EVM-SK, be sure to connect the ethernet cableto the port closest to the User Push Buttons.
3. Insert the provided SD card into the SD connector4. Insert the power cable into the 5V power jack
2. Power on the AM335x EVM-SK by holding down the SW5 button located on the bottom side of the board.Allow the boot process to finish. You will know when the boot process has finished when you see the Matrixapplication launcher on the LCD screen.
NOTEYou may be required to calibrate the touchscreen. If so follow the on screen instructions to calibrate thetouchscreen.
Sitara Linux Training: Hands on with the SDK 3
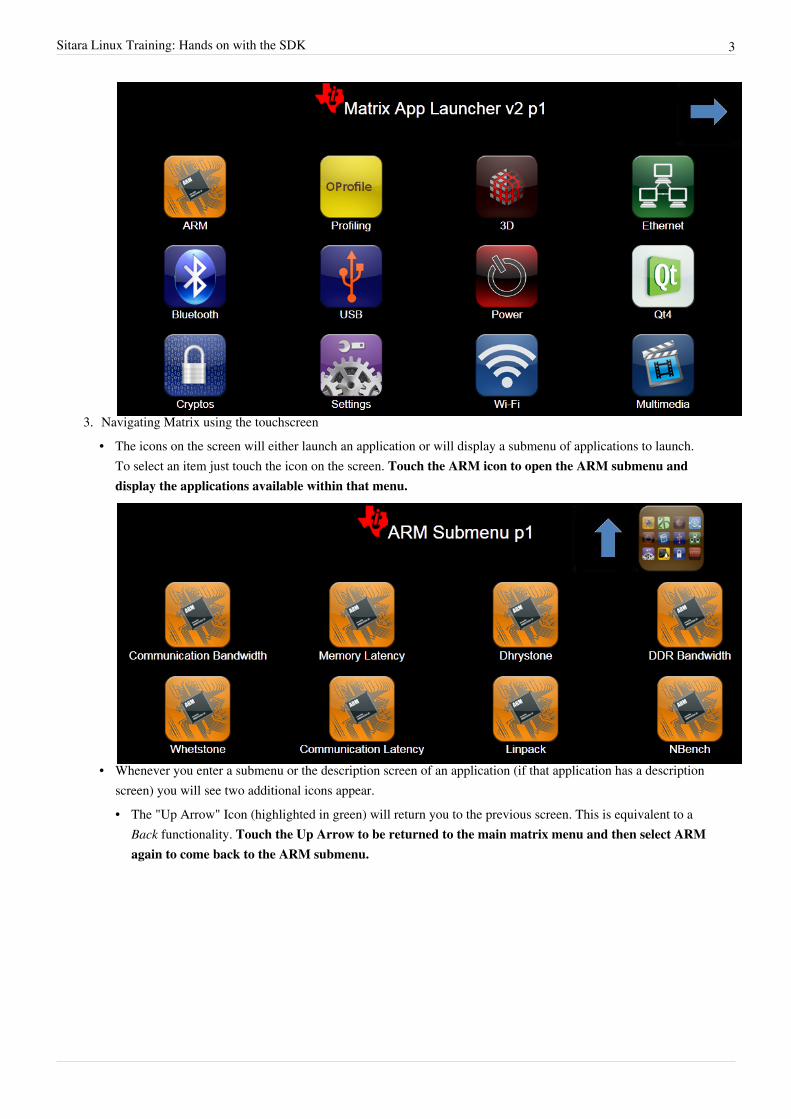
3. Navigating Matrix using the touchscreen• The icons on the screen will either launch an application or will display a submenu of applications to launch.
To select an item just touch the icon on the screen. Touch the ARM icon to open the ARM submenu anddisplay the applications available within that menu.
• Whenever you enter a submenu or the description screen of an application (if that application has a descriptionscreen) you will see two additional icons appear.• The "Up Arrow" Icon (highlighted in green) will return you to the previous screen. This is equivalent to a
Back functionality. Touch the Up Arrow to be returned to the main matrix menu and then select ARMagain to come back to the ARM submenu.

Sitara Linux Training: Hands on with the SDK 4
• The "Multi" Icon (Highlighted in green) will return you to the Matrix main menu. This is equivalent to aHome functionality.
• To run an application touch the application's icon. If the application has a description screen you will be shownthe description and given a Run button (highlighted in green). If the application does not have a descriptiontouching the application's icon will start execution of that application. Touch the Dhrystone application tosee the Dhrystone application description screen then touch the RUN button to launch the application

Sitara Linux Training: Hands on with the SDK 5
• When Dhrystone finishes running you can review the output on the LCD. Touch the Multi Icon to return tothe Matrix main menu.
• Where there are more applications available in Matrix than can be displayed on the screen you will see arrowsappear in the upper-right and upper-left corners. Touching these arrows will switch pages to the next page.Touch the Right arrow to see the next page of applications
• To return to the previous page touch the left arrow
4. Navigating Matrix using the remote interface• Navigating Matrix using the remote interface is similar to navigating Matrix with the touchscreen.
IMPORTANTDo NOT use your browser's back or home buttons as this will navigate you away from the Matrix page.NOTERefreshing the page will restart your connection with Matrix
• In order to connect to the remote Matrix interface you will need to know the IP address of your EVM. To findthis perform the following actions in MatrixIMPORTANTOn the AM335x EVM-SK, please insure the ethernet cable is plugged into the port closest to the user pushbuttons. Otherwise you will not receive a valid ipaddr for the board.• Touch the Settings icon from the Matrix main menu• Touch the Network Settings icon from the Settings Submenu• You should see output like the following. The EVM IP address has been highlighted in green

Sitara Linux Training: Hands on with the SDK 6
• To connect to Matrix you should enter the EVM IP address obtained in the previous step into yourbrowser's address bar. You can launch a browser in your Linux host by clicking the firefox icon highlightedin the image below.
• You should be prompted to select whether your EVM has a display device attached. Since the LCD is attachedto the EVM select OK.
• The reason this question is asked is because Matrix does not support shipping graphical data over the remoteinterface. Applications which are graphical such as the 3D demos will need to be viewed on the LCD attachedto the board. An answer of no (pressing Cancel) will prevent graphical applications from being launched fromremote Matrix.NOTEYou can change your selection at any time by pressing the Refresh button on your browser to re-connect toMatrix.
5. When you are finished exploring remote Matrix close the browser

Sitara Linux Training: Hands on with the SDK 7
Using the Built-in GCC Toolchain
DescriptionThis section will walk you through the location of the built-in GCC toolchain found in the SDK. You will also learnhow and when to use the environment-setup script to configure your environment to use this toolchain. Additionalinformation on using this toolchain can be found at http:/ / processors. wiki. ti. com/ index. php/Sitara_Linux_SDK_GCC_Toolchain [5]
Key Points• The cross-compiler is now located within the SDK in the linux-devkit directory• There are many libraries pre-built for the ARM core available in the linux-devkit directory as well• Sourcing the environment-setup script configures you system to use this cross-compiler and pre-built libraries• How to identify when the environment-setup script has been sources• How example applications use the envionment-setup script
Lab Steps1. Open a terminal window by double clicking the Terminal icon on the desktop2. The cross-compiler is located in the linux-devkit/bin directory of the SDK installation directory. In the terminal
window enter the following commands, replacing the <machine> and <sdk version> fields with the targetmachine you are using and the SDK version installed.
NOTE: you can use TAB completion to help with this:cd /home/sitara/ti-sdk-<machine>-<sdk version>/linux-devkit/bin
ls3. You should see a listing of the cross-compile tools available like the one below.

Sitara Linux Training: Hands on with the SDK 8
4. To locate the pre-built ARM libraries perform the following commands:cd /home/sitara/ti-sdk-<machine>-<sdk version>/linux-devkit/arm-arago-linux-gnueabi/usr/lib
ls
You should now see a listing of all the libraries (some are contained within their individualsub-directories) available as pre-built packages within the SDK.
5. In order to make it easier to perform cross-compilations and ensure linking with the proper cross-compiledlibraries instead of the host system libraries the environment-setup script has been created in the linux-devkitdirectory. This script will configure many standard variables such as CC to use the cross-compile toolchain, aswell as adding the toolchain to your PATH and configuring paths for library locations. To utilize the settingprovided by the environment-setup script you will need to source the script. Perform the following commands tosource the environment-setup script and observe the change in the CC variable:
echo $CC
cd /home/sitara/ti-sdk-<machine>-<sdk version>/linux-devkit
source environment-setup
echo $CC
You should have observed that the CC variable now contains the value of arm-arago-linux-gnueabi-gccafter the sourcing of the environment-setup script. There was also another change that occurred whichwas that your standard prompt changed from sitara@ubuntu to [linux-devkit]. The purpose of thischange is to make it easy to identify when the environment-setup script has been sourced. This isimportant because there are times when you DO NOT want to source the environment-setup script. Aperfect example is when building the Linux kernel. During the kernel build there are some applicationsthat get compiled which are meant to be run on the host to assist in the kernel build process. If theenvironment-setup script has been sourced then the standard CC variable will cause these applications tobe built for the ARM, which in turn will cause them to fail to execute on the x86 host system.
6. As mentioned above sometimes it is not appropriate to source the environment-setup script, or you only want tosource it during a particular build but not affect your default environment. The way this is done in the SDK is tosource the environment-setup script inside of the project Makefile so that it is used only during the build process.To see this perform the following actions:• Close the open terminal since it already has the environment-setup script sourced.• Open a new terminal
cd /home/sitara/ti-sdk-<machine>-<sdk version>/example-applications/matrix-gui-browser-2.0
gedit Makefile.build
In the Makefile.build file you can see that we set a variable called ENV_SETUP which points to theenvironment-setup script. In the qmake build target we perform the action "@. ${ENV_SETUP}". Thatline uses the "@" symbol, which in make says to execute a shell command, and the "." notation, which isanother way of sourcing a file, to source the environment-setup script prior to calling the qmake2command.
7. To see this work use the following commands to cross-compile the matrix-gui-browser project:• Close the gedit window if you have not already done so
make -f Makefile.build
Notice in the output that the arm-arago-linux-gnueabi-g++ compiler was called during the build.Also notice that your prompt still shows sitara@ubuntu which means that while theenvironment-setup script was sourced for the build the effects disappeared after the make wasfinished.
Sitara Linux Training: Hands on with the SDK 9
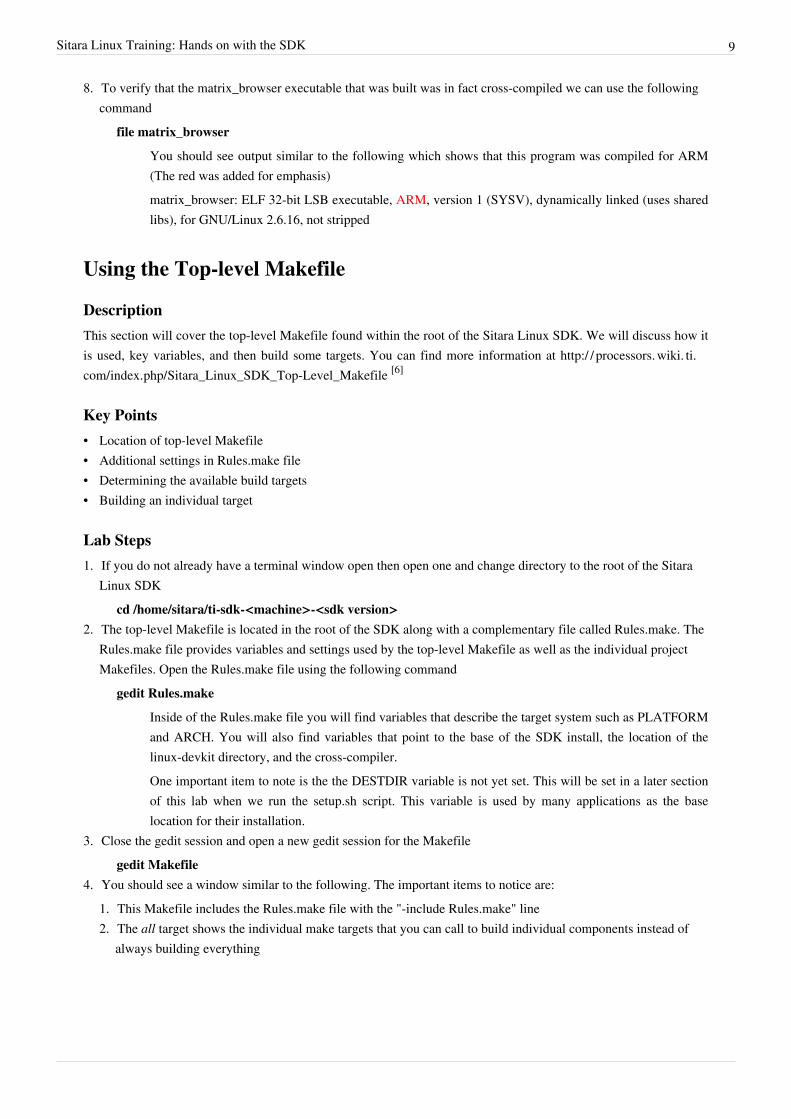
8. To verify that the matrix_browser executable that was built was in fact cross-compiled we can use the followingcommand
file matrix_browser
You should see output similar to the following which shows that this program was compiled for ARM(The red was added for emphasis)matrix_browser: ELF 32-bit LSB executable, ARM, version 1 (SYSV), dynamically linked (uses sharedlibs), for GNU/Linux 2.6.16, not stripped
Using the Top-level Makefile
DescriptionThis section will cover the top-level Makefile found within the root of the Sitara Linux SDK. We will discuss how itis used, key variables, and then build some targets. You can find more information at http:/ / processors. wiki. ti.com/ index. php/ Sitara_Linux_SDK_Top-Level_Makefile [6]
Key Points• Location of top-level Makefile• Additional settings in Rules.make file• Determining the available build targets• Building an individual target
Lab Steps1. If you do not already have a terminal window open then open one and change directory to the root of the Sitara
Linux SDKcd /home/sitara/ti-sdk-<machine>-<sdk version>
2. The top-level Makefile is located in the root of the SDK along with a complementary file called Rules.make. TheRules.make file provides variables and settings used by the top-level Makefile as well as the individual projectMakefiles. Open the Rules.make file using the following command
gedit Rules.make
Inside of the Rules.make file you will find variables that describe the target system such as PLATFORMand ARCH. You will also find variables that point to the base of the SDK install, the location of thelinux-devkit directory, and the cross-compiler.One important item to note is the the DESTDIR variable is not yet set. This will be set in a later sectionof this lab when we run the setup.sh script. This variable is used by many applications as the baselocation for their installation.
3. Close the gedit session and open a new gedit session for the Makefilegedit Makefile
4. You should see a window similar to the following. The important items to notice are:1. This Makefile includes the Rules.make file with the "-include Rules.make" line2. The all target shows the individual make targets that you can call to build individual components instead of
always building everything

Sitara Linux Training: Hands on with the SDK 10
5. To see how to build an individual component perform the following commands to only build the u-boot and SPLbootloaders
Close the gedit window if you have not already done somake u-boot-spl
NOTEWe do not build all of the targets in this lab due to time constraints, but you could also just type make tobuild all of the components.
Understanding the board-support Directory
DescriptionThis section will teach you about the key components of the board-support directory within the Sitara Linux SDK.
Key Points• Pre-built images are available which have been validated with the SDK• Linux kernel ships with a configuration file matching the configuration used for the SDK• There is no longer an x-loader program, instead MLO comes from u-boot• Additional drivers are located in the extra-drivers directory

Sitara Linux Training: Hands on with the SDK 11
Lab Steps1. If you do not already have a terminal open then open a Linux terminal.2. Change directory to the board-support directory
cd /home/sitara/ti-sdk-<machine>-<sdk version>/board-support3. List the contents of the directory
ls
4. List the contents of the prebuilt-images directory.ls prebuilt-images
These images have been pre-compiled and tested to work on the target device. They represent a known goodstarting point.
5. When building a Linux system it is often helpful to start with a kernel configuration that is known to be working,and then add and remove pieces to optimize the system. In the Sitara Linux SDK we provide the kernelconfiguration that was used to build the pre-built kernel image inside of the prebuilt-images directory. Thisconfiguration can be seen using the command below (replacing the version with the actual kernel version)
ls linux-<kernel version>/arch/arm/configs/tisdk_*
You should see a file with the format tisdk_<machine>_defconfig. You can use this configuration as the baseconfiguration for your own kernel builds.
6. In the latest SDKs there is no longer a separate code base to generate the MLO bootloader. Instead thisbootloader is now part of the u-boot code base and is generated using the second program loader (SPL)functionality of u-boot. In the previous Lab you compiled u-boot using the make u-boot command. If you look atthe contents of the u-boot directory using the command below you will notice that there exists both the MLO fileas well as the u-boot.img file. These were both built during the u-boot build operation.
ls u-boot-<uboot version>

Sitara Linux Training: Hands on with the SDK 12
In the above image the MLO and u-boot.img files were highlighted. Both of these files were created during thesingle u-boot build operation. The benefit is that you are now able to share the same u-boot code to build ainitial boot loader as well as to build the full featured u-boot boot loader.
7. For devices with out of tree modules those device drivers are located in the extra-drivers directory. This is doneto group items that require rebuilding when the kernel configuration changes into a single directory, theboard-support directory. You can see the out of tree drivers using the command below
ls extra-drivers
Preparing to Develop using the setup.sh Script
DescriptionThis section will cover how to use the setup.sh script inside of the Sitara Linux SDK to configure your board fordevelopment with TFTP and NFS. Due to time limitations some operations will be skipped since they will havealready been done for you. These operations that have been done already will be called out in the section below. Formore information see http:/ / processors. wiki. ti. com/ index. php/ Sitara_Linux_SDK_Setup_Script [7]
Key Points• Installation of required software to setup development environment• Creation of NFS file shares• Setup of TFTP for kernel transfers• Configuring the EVM using minicom scripts
Lab Steps1. The following steps will help you validate that you have a valid serial connection with your target board
IMPORTANTThese steps are written for boards like the EVM-SK and Beaglebone which use an FTDI USB-to-Serialadapter. For boards with a straight UART connection you can ignore the steps for /dev/ttyUSBx and insteadjust use the serial port on your Linux host that is connected to the board
• Connect the USB cable between your Linux host and your target boardIMPORTANTOn the AM335x EVM-SK, the USB cable enables a USB-to-serial interface to the Linux host PC. If using avirtual machine, please insure the AM335x EVM-SK is a selected USB device.NOTE If you are running your VMWare image with Windows 7 some USB-to-Serial adapters do not properly work

Sitara Linux Training: Hands on with the SDK 13
with Windows 7. Make sure that your adapter specifically says that it supports Windows 7. You may also needto install an additional driver for your adapter.
• Open a terminal and run the following command to find the USB serial adapters available on the system. TheFTDI chip used on the board presents two serial interfaces to the Linux host. The first interface is the JTAGinterface and the second one is the serial console interface.
ls /dev/ttyUSB*
You should see output like:/dev/ttyUSB0/dev/ttyUSB1
NOTEIf using VMWare you may need to pass the "Future Technology Devices" device into the VMWare image• As mentioned above since the board's serial interface is the second interface you will want to open a serial
console to the second device node. In this case that is /dev/ttyUSB1. This can be done by doing:• minicom -w -s• Select Serial port setup and press ENTER• Press A to modify the Serial Device and change the device to /dev/ttyUSB1. Press ENTER• Press ENTER to exit the serial setup• Select Exit and press ENTER
• You should now see a minicom window.• Power on the board, you should see "ccccc" being printed in the window, if so the serial connection is working
as expected. Go ahead and leave this console RUNNING in the background.NOTEFor the EVM-SK board the power button is under the board in the upper-right hand corner. You must pressand hold this button to power on the board.NOTEFor the Beaglebone the board will power on as soon as the USB cable is connected. you can reset the board bypressing the reset button which should provide you with the expected output
2. If you have not already done so close any open minicom windows using CTRL+A then Z, the press X andselect Yes to Leave minicom
3. In a terminal window execute the following commands• cd /home/sitara/ti-sdk-<machine>-<sdk version>• ./setup.sh• You will be warned that this script requires administrator priveledges (sudo access) to run. This is required to
allow installation of packages and system configuration for NFS and TFTP• Press ENTER to continue
• If you are prompted for the [sudo] password for sitara: then use password sitara or if you have a differentuser account use that user account password.NOTEYou will see the system attempt to update the host software. This step has already been done for you so thataccess to an internet connection is not required. You can review the list to see which host packages whichwere previously installed using setup.sh.
• You will now be prompted for the directory to install the target file system. The default should look like/home/sitara/ti-sdk-<machine>-<sdk version>/targetNFS.• press ENTER to take this default• press ENTER when warned about sudo permissions being required.

Sitara Linux Training: Hands on with the SDK 14
• To save extraction time for the root file system the file system may have already been extracted for you. In thiscase you will be asked if you was to rename the existing file system, overwrite the file system, or skip the filesystem extraction.• Select s and press ENTER to skip the extraction since the file system has been extracted already.
• Next the setup script will inform you that a default path for binary installation has been configured in theRules.make file.• Press ENTER to continue
• You will now be warned that sudo access is required to add the NFS file system that was just created to the/etc/exports file so that it can be used as a root file system for the target device to boot over NFS.• Press ENTER
• You will see the system stop and then start the NFS server to that the file system is exported• You will now be prompted about which directory to make your TFTP root directory
• Press ENTER to take the default of /tftpboot• You will be warned that sudo access is required to configure the TFTP server.
• Press ENTER• You will be told that the uImage file already exists. This was pre-copied to save time.
• Press s to skip copying this image again.• You will see the system setup stop and start the xinetd (TFTP server)• You will now be prompted to enter the serial port for the board so that minicom can connect to the board.
Since you are using a board with a built in USB-to-Serial adapter you do not need to enter the serial port as itwill be detected later.• Press ENTER to continue
• You will now be prompted for your host ip. This is required to configure u-boot to boot images from your hostsystem. You should take the default IP address.• Press ENTER
• Now you will select where to obtain the Linux kernel from. In this lab we will be configuring to boot fromTFTP• type 1 and press ENTER
• The next prompt will ask you where the root file system should come from. In this lab we will use NFS.• type 1 and press ENTER
4. You will now be presented with the list of kernel images available in the /tftpboot directory. You should use thedefault image for your TFTP image of uImage-am335x-evm.bin
• Press ENTER• You will notified that a Beaglebone/EVM-SK has been detected. Select yes to configure for the EVM-SK
• type y and press ENTER• You will be asked if you would like to reboot the board with these new settings
• press ENTER to reboot the boardIMPORTANTThis script expects the board to NOT be logged in. If you have logged the board in the reboot will fail. In thiscase you can reboot the board yourself manually
5. Your target device will now be booting the Linux kernel from the TFTP server on your host machine with anNFS root file system from the targetNFS directory inside of your SDK installation.• You can verify that your device is booted from NFS using the command below:
1. Login using root

Sitara Linux Training: Hands on with the SDK 15
2. cat /proc/cmdline you should see the output list the root as /dev/nfs and the nfsroot should be configured tothe NFS share you just created.
NOTEYou can also use the mount command to verify that your root partition was mounted over NFS.
6. You system is now configured. You can always re-run the setup.sh script to change your board configurationIMPORTANTIf you want to reset your u-boot environment back to the default you can do the following in minicom1. Login to the board using root2. Reboot the board using init 63. When asked to Hit any key to stop autoboot stop the boot process to enter the u-boot prompt4. Reset the default boot environment using env default -f5. You can now boot the board with the default boot arguments using the boot command.These changes will be lost on the next boot. To permanently make changes you should either delete theuEnv.txt file or re-run the setup.sh script
Working with the Example Applications
DescriptionThis lab will show you how to work with the example applications using the Linux command line. We will alsoexplore some of the techniques used in the example applications to make cross compiling easier.
Key Points• Example applications use Rules.make settings in their Makefiles• Example applications have CCS/Eclipse project files• Building example applications from the command line• Verifying the executable was built for ARM
Lab Steps1. Open a Linux terminal2. cd /home/sitara/ti-sdk-<machine>-<sdk version>/example-applications/am-benchmarks-1.33. Open the Makefile using gedit Makefile. You should see output like the following where the inclusion of the
Rules.make file has been highlighted, as well as the use of variables defined in the Rules.make file such as theARCH variable have also been highlighted. This is to show that some useful setting such as ARCH, DESTDIR,PLATFORM can be used by component Makefiles by including the Rules.make file.

Sitara Linux Training: Hands on with the SDK 16
4. Scroll down to the install target and notice that this Makefile also uses the DESTDIR variable to help install thebuilt executables.
5. Close gedit6. It is possible to rebuild the individual example applications using these Makefiles. For example to rebuild the
am-benchmarks you can use the following commands:make clean
make7. After the build has finished you can verify that the executables were build for the ARM device using the file
command.file armv7a/dhrystone/Release/dhrystone
As we saw earlier the output lists that the dhrystone executable was for an ARM device:armv7a/dhrystone/Release/dhrystone: ELF 32-bit LSB executable, ARM, version 1 (SYSV),dynamically linked (uses shared libs), for GNU/Linux 2.6.16, not stripped
8. The individual benchmarks also have CCS/Eclipse project files in them when can be used to build these projectsusing CCS. To see these project files do:
cd armv7a/dhrystone
ls -la9. You should see files like .cproject and .project listed. These files allow building the dhrystone project using CCS.

Sitara Linux Training: Hands on with the SDK 17
Importing Example Applications into CCS
DescriptionThis section will cover how you can use the CCS/Eclipse project files seen in the previous section to import theexample application projects into CCS and build them. For more information see http:/ / processors. wiki. ti. com/index. php/ Code_Composer_Studio_v5_Users_Guide [8]
Key Points• Example applications have existing CCS/Eclipse project files that can be imported.• CCSv5 can be used to compile the example applications
Lab Steps1. Launch CCSv5 using the following steps
• Double-Click the Code Composer Studio v5 icon on the desktop. You will see the CCSv5 splash screenappear while CCS loads
• The next window will be the Workspace Launcher window which will ask you where you want to locate yourCCSv5 workspace. Use the default value.

Sitara Linux Training: Hands on with the SDK 18
• CCS will load the workspace and then launch to the default TI Resource Explorer screen
• Close the TI Resource Explorer screen. This screen is useful when making TI CCS projects which use TItools. The Sitara Linux SDK uses open source tools with the standard Eclipse features and therefore does notuse the TI Resource Explorer. You will be left in the Project Explorer default view.

Sitara Linux Training: Hands on with the SDK 19
2. From the main CCSv5 window, select File -> Import... menu item to open the import dialog3. Select the General -> Existing Projects into Workspace option
4. Click Next5. On the Import Projects page click Browse
Sitara Linux Training: Hands on with the SDK 20
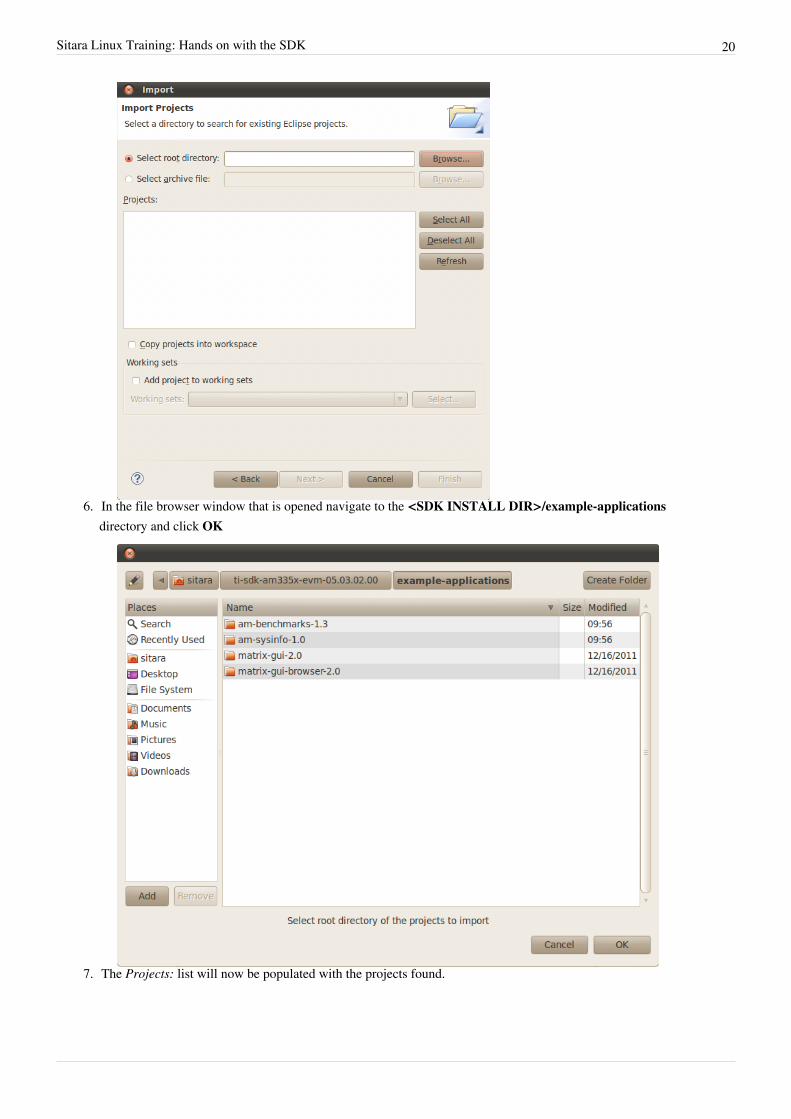
6. In the file browser window that is opened navigate to the <SDK INSTALL DIR>/example-applicationsdirectory and click OK
7. The Projects: list will now be populated with the projects found.
Sitara Linux Training: Hands on with the SDK 21
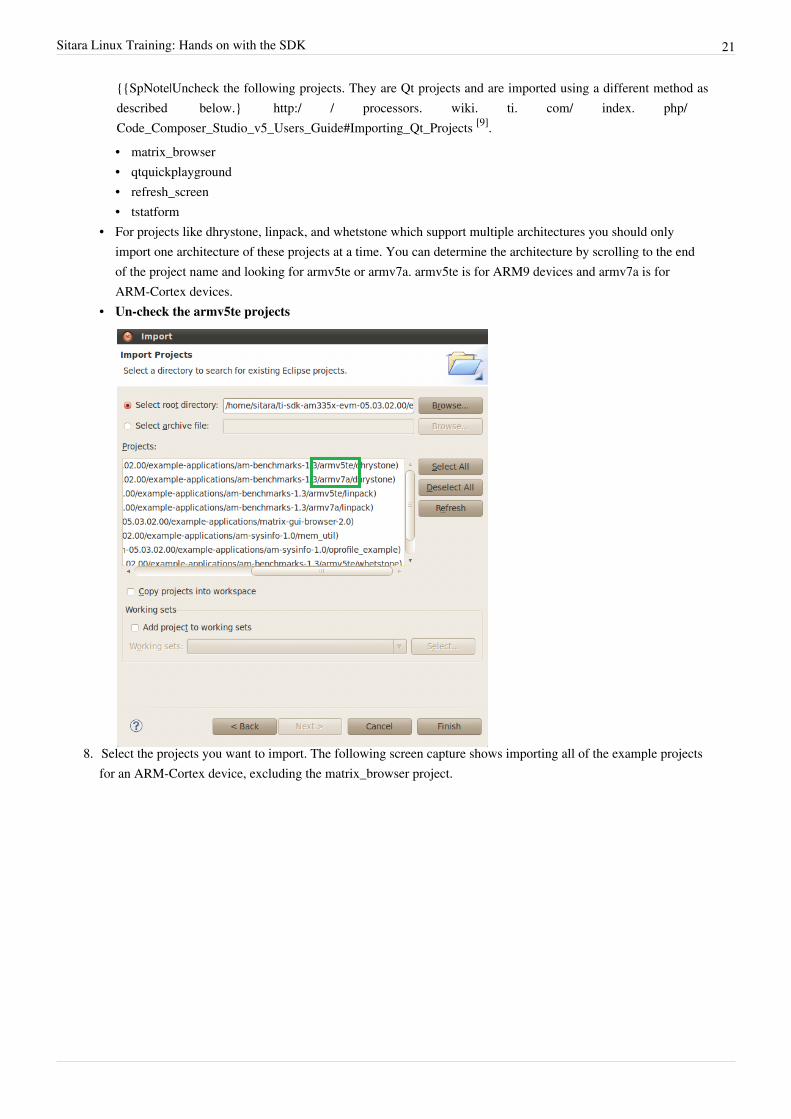
{{SpNote|Uncheck the following projects. They are Qt projects and are imported using a different method asdescribed below.} http:/ / processors. wiki. ti. com/ index. php/Code_Composer_Studio_v5_Users_Guide#Importing_Qt_Projects [9].• matrix_browser• qtquickplayground• refresh_screen• tstatform
• For projects like dhrystone, linpack, and whetstone which support multiple architectures you should onlyimport one architecture of these projects at a time. You can determine the architecture by scrolling to the endof the project name and looking for armv5te or armv7a. armv5te is for ARM9 devices and armv7a is forARM-Cortex devices.
• Un-check the armv5te projects
8. Select the projects you want to import. The following screen capture shows importing all of the example projectsfor an ARM-Cortex device, excluding the matrix_browser project.

Sitara Linux Training: Hands on with the SDK 22
9. Click Finish to import all of the selected projects.10. You can now see all of the projects listed in the Project Explorer tab.
11. In order to build one of the projects use the following steps. For this example we will use the mem-util project• Right-Click on the mem-util project in the Project Explorer• Select the build configuration you want to use

Sitara Linux Training: Hands on with the SDK 23
• For Release builds: Build Configurations -> Set Active -> Release• For Debug builds: Build Configurations -> Set Active -> Debug
• Select Project -> Build Project to build the highlighted project• Expand the mem-util project and look at the mem_util.elf file in the Debug or Release directory (depending on
which build configuration you used). You should see the file marked as an [arm/le] file which means it wascompiled for the ARM.
• NOTE: You can use Project -> Build All to build all of the projects in the Project Explorer
Creating a New CCS Project
DescriptionThis section will cover how to make a new project in CCS and cross-compile it for the ARM device. For moreinformation see http:/ / processors. wiki. ti. com/ index. php/ Code_Composer_Studio_v5_Users_Guide [8]
Key Points• How to create a new cross-compile project• How to add sources to the project and build them
Lab Steps1. From the main CCSv5 window, select File -> New -> Project... menu item2. in the Select a wizard window select the C/C++ -> C Project wizard

Sitara Linux Training: Hands on with the SDK 24
3. Click Next4. In the C Project dialog set the following values:
Project Name: helloworld
Project type: Cross-Compile Project

Sitara Linux Training: Hands on with the SDK 25
5. Click Next6. In the Command dialog set the following values:
Tool command prefix: arm-arago-linux-gnueabi-.NOTENote the the prefix ends with a "-". This is the prefix of the cross-compiler tools as will be seen when settingthe Tool command path .Tool command path: <SDK INSTALL DIR>/linux-devkit/bin.Use the Browse.. button to browse to the Sitra Linux SDK installation directory and then to thelinux-devkit/bin directory. You should see a list of tools such as gcc with the prefix you entered above.
7. Click Next8. In the Select Configurations dialog you can take the default Debug and Release configurations or add/remove
more if you want.

Sitara Linux Training: Hands on with the SDK 26
9. Click Finish10. After completing the steps above you should now have a helloworld project in your CCS Project Explorer
window, but the project has no sources.
11. From the main CCSv5 window select File -> New -> Source File menu item12. In the Source File dialog set the Source file: setting to helloworld.c

Sitara Linux Training: Hands on with the SDK 27
13. Click Finish14. After completing the steps above you will have a template helloworld.c file. Add your code to this file like the
image below:
15. Compile the helloworld project by selecting Project -> Build Project16. The resulting executable can be found in the Debug directory
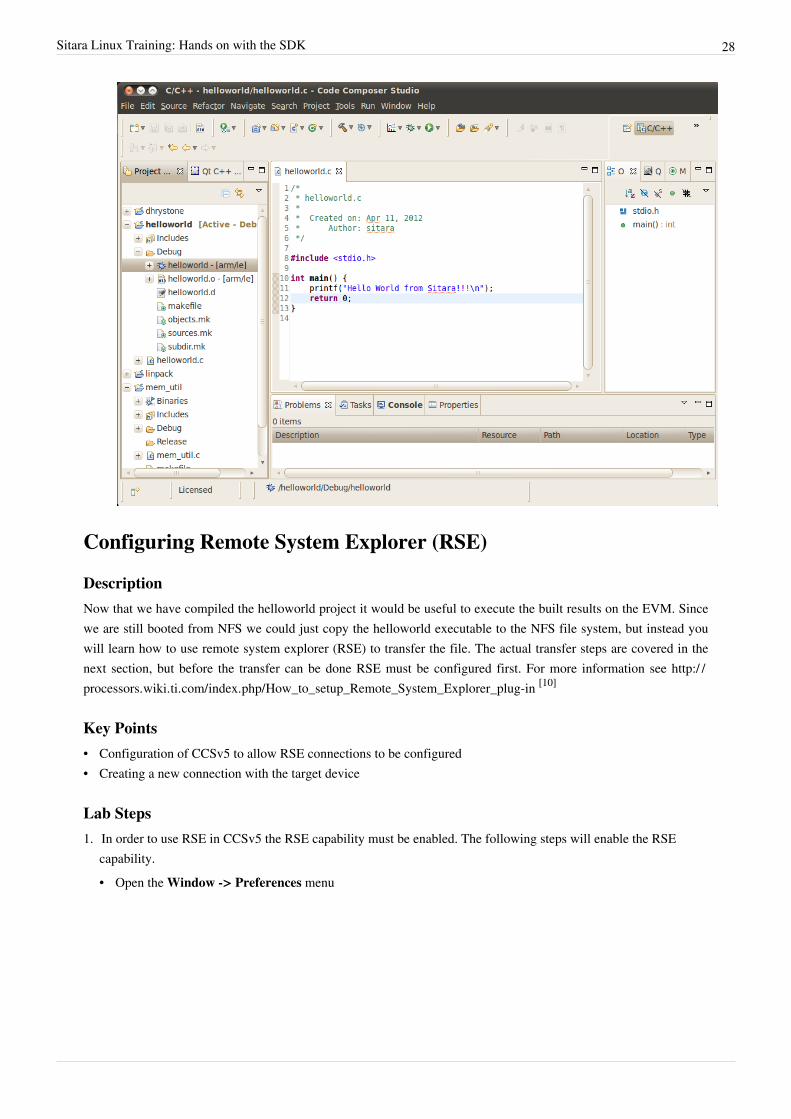
Sitara Linux Training: Hands on with the SDK 28
Configuring Remote System Explorer (RSE)
DescriptionNow that we have compiled the helloworld project it would be useful to execute the built results on the EVM. Sincewe are still booted from NFS we could just copy the helloworld executable to the NFS file system, but instead youwill learn how to use remote system explorer (RSE) to transfer the file. The actual transfer steps are covered in thenext section, but before the transfer can be done RSE must be configured first. For more information see http:/ /processors. wiki. ti. com/ index. php/ How_to_setup_Remote_System_Explorer_plug-in [10]
Key Points• Configuration of CCSv5 to allow RSE connections to be configured• Creating a new connection with the target device
Lab Steps1. In order to use RSE in CCSv5 the RSE capability must be enabled. The following steps will enable the RSE
capability.• Open the Window -> Preferences menu

Sitara Linux Training: Hands on with the SDK 29
• Go to the General -> Capabilities menu
• Select the RSE Project Capability

Sitara Linux Training: Hands on with the SDK 30
• Click Apply and then OK2. Now open the RSE perspective using the following steps
• Go to Window -> Open Perspective -> Other...• In the menu window select Remote System Explorer to open this perspective.
• Click OK• You will now have the RSE view opened

Sitara Linux Training: Hands on with the SDK 31
3. The following steps will create a new RSE connection to your target device.4. Click File -> New -> Other...
• In the Select a wizard window select Remote System Explorer -> Connection
• Click Next

Sitara Linux Training: Hands on with the SDK 32
• In the Select Remote System Type window select the Linux system type
• Click Next• In the Remote Linux System Connection window enter
Host name: Enter the IP address of your target EVM. This can be determined as detailed in the Prerequisitessection aboveConnection name: The default value is the same as the host name, but this can be changed to a more humanreadable value like My Target EVM
You can un-check Verify host name or leave it checked depending on whether you want to verify the IPaddress you entered for the Host name field.

Sitara Linux Training: Hands on with the SDK 33
• Click Next• Check ssh.files to use the Secure Shell protocol for communication
• Click Next• Check processes.shell.linux to use a shell to work with processes on the remote system

Sitara Linux Training: Hands on with the SDK 34
• Click Next• Check ssh.shells to use Secure Shell to work will shell commands
• Click Next• Check ssh.terminals to use Secure Shell to work with terminals

Sitara Linux Training: Hands on with the SDK 35
• Click Finish• You will now see your EVM configuration in the RSE view
5. When the RSE view was enabled you likely had your C/C++ view closed. In order to get that view back so thatyou can explore your project perform the following steps• Select Window -> Show View -> Other...

Sitara Linux Training: Hands on with the SDK 36
• In the Show View dialog select C/C++ -> C/C++ Projects
• Click OK
• NOTE: If you do not like the location of the C/C++ Projects view you can drag it to another location inCCS my dragging and dropping the Tab.
6. You should now be able to switch between the RSE and C/C++ Projects view using the tabs in CCS7. After the New Connection Wizard has been completed and the Remote System Explorer view has been opened,
the new connection must be configured to communicate with the target EVM.• Right-Click on the My Target EVM node and select Properties from the context menu.• In the Properties window click on Host• Change the Default User ID: to root

Sitara Linux Training: Hands on with the SDK 37
• Click OK8. The Remote System Explorer is now ready for use. The first time the target EVM file system is booted a private
key and a public key is created in the target file system. Before connecting to the target EVM the first time, thepublic key must be exported from the target EVM to the Linux host system. To configure the key do• Right-Click the My Target EVM node and select Connect• When/If you are prompted for a password leave it blank. You can also check the Save password box to not be
prompted anymore
• Click OK• A dialog like the one shown below will appear

Sitara Linux Training: Hands on with the SDK 38
• Click Yes to accept the key• If prompted that /home/sitara/.ssh/known_hosts does not exist select Yes to the dialog boxes.
Transferring Files with RSE
DescriptionNow that the RSE connection to your target device has been configured you can use RSE to transfer files to thetarget system. In this section we will cover how to transfer the helloworld executable with RSE. In later sections wewill learn how to use RSE with the CCSv5 debugging capability to automatically transfer the executables.
Key Points• RSE can be used to transfer files between the host and the target device• RSE can open terminals on the target device to allow running the executables

Sitara Linux Training: Hands on with the SDK 39
Lab Steps1. Switch back to the RSE view.2. Open the Sftp Files -> Root -> / -> home -> root
3. Switch to the C/C++ view using the tab. Expand helloworld to find the helloworld executable in the Debugdirectory

Sitara Linux Training: Hands on with the SDK 40
4. Right-Click the helloworld executable and select Copy5. Switch back to the RSE view and Right-Click on the root directory and select Paste6. You should now have the helloworld executable transferred to your target device

Sitara Linux Training: Hands on with the SDK 41
7. In order to execute the helloworld binary that was just transferred you need to open a terminal to the targetdevice. The following steps will cover opening a new terminal to the target device.• Right-Click the Ssh Terminals node under the target EVM connection• Select Launch Terminal from the context menu• A terminal window will now be open
8. To run your helloworld application use the following commands in the terminal window• chmod +x helloworld• ./helloworld

Sitara Linux Training: Hands on with the SDK 42
9. NOTE: it is also possible to make a file executable using RSE by right-clicking the file in the RSE view andselecting Properties -> Permissions and enabling the Execute permission
• Click Apply

Sitara Linux Training: Hands on with the SDK 43
Debugging with CCS and GDB
DescriptionNow that you have learned to use CCS to create a project, build your sources for the ARM, transfer the executable tothe target, and run that executable it would be useful to know what to do if there is something wrong with theexecutable. In this section you will learn how to configure CCS to debug the helloworld application.
Key Points• CCS can be configured to automatically build and transfer your project files to the target device• CCS can automatically start the gdbserver on the target and connect to it, enabling single click debugging• You can use break points to stop execution at a particular point
Lab Steps1. Switch to the C/C++ Project view2. Right-Click the Debug/helloworld executable and select Debug As -> Debug Configurations...
3. Right-Click C/C++ Remote Application and select New

Sitara Linux Training: Hands on with the SDK 44
4. By default you will have a helloworld configuration created. Change the Name to helloworld Debug
5. On the Main tab add the Remote Absolute File Path to point to /home/root/helloworld

Sitara Linux Training: Hands on with the SDK 45
6. Swith to the Debugger tab and modify the following settings:• GDB debugger: <SDK install dir>/linux-devkit/bin/arm-arago-linux-gnueabi-gdb• GDB command file: <SDK install dir>/.gdbinit
• NOTE: If you use the file browser you will need to Right-Click and select Show hidden files to find the.gdbinit file
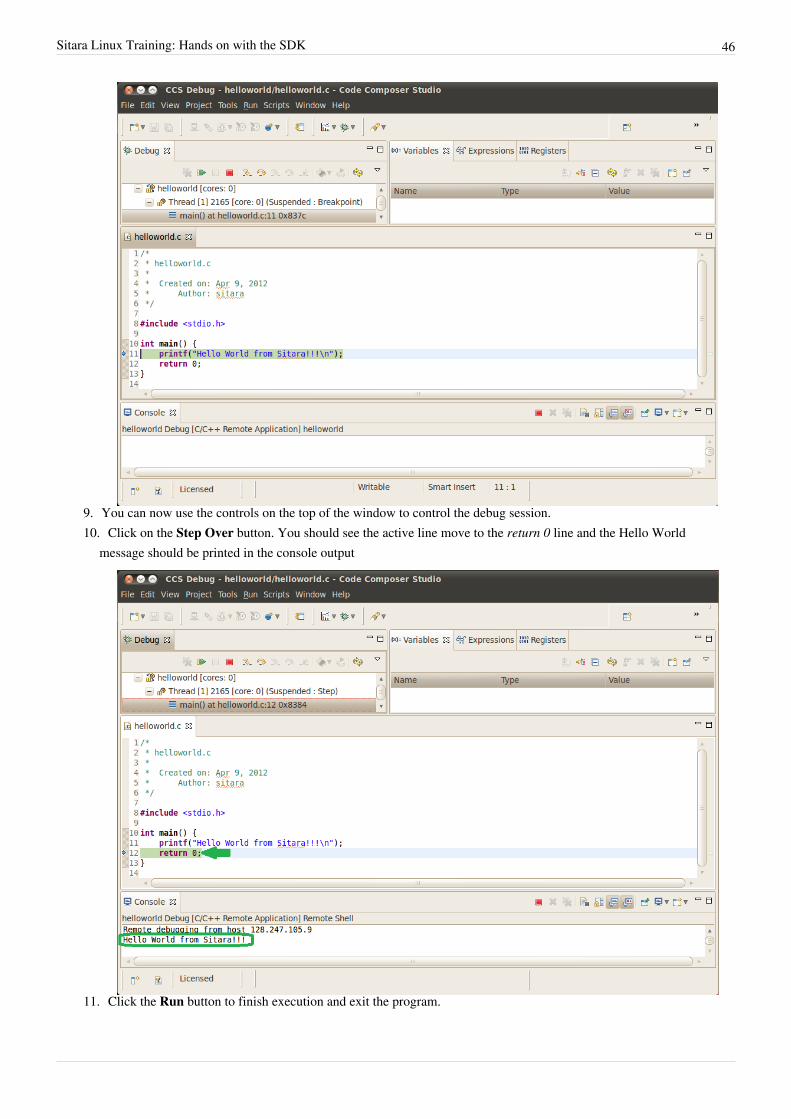
7. Click Apply8. Click Debug to compile the project and start the debug. You system should be halted at the first line of the main
function
Sitara Linux Training: Hands on with the SDK 46
9. You can now use the controls on the top of the window to control the debug session.10. Click on the Step Over button. You should see the active line move to the return 0 line and the Hello World
message should be printed in the console output
11. Click the Run button to finish execution and exit the program.

Sitara Linux Training: Hands on with the SDK 47
12. Now click on the >> Icon in the upper-right corner and select Remote System Explorer to leave the debuggerview.
13. Edit the helloworld.c file like the image shown below to add another printf line
14. Right click on the grey column to the left of the new line and select Toggle Breakpoint

Sitara Linux Training: Hands on with the SDK 48
15. Click the arrow next to the bug icon in the top toolbar and select the 1 helloworld Debug configuration
16. When prompted to save your changed to helloworld.c select OK

Sitara Linux Training: Hands on with the SDK 49
17. You will see the sources get compiled and the debug view will open automatically. Once again the currentlocation will be the first line in the main function, but this time there will be a breakpoint shown in the sources aswell
18. Click the Run icon and notice that the program automatically stops at the breakpoint. The console output shouldsay Hello World from Sitara!!!

Sitara Linux Training: Hands on with the SDK 50
19. Click the Step Over icon and notice that the second printf line which was just added is now executed, so theprogram on the target file system was updated with your changes.
20. You can now stop the debugger by pressing the Stop button.21. To restart the debugger click the Bug icon on the top toolbar to relaunch the application for debug.

Sitara Linux Training: Hands on with the SDK 51
References[1] mailto:sdk_feedback@list. ti. com[2] https:/ / estore. ti. com/ TMDSSK3358-AM335x-Starter-Kit-P3110. aspx[3] http:/ / processors. wiki. ti. com/ index. php/ Sitara_Linux_Training:_Linux_Host_Configuration[4] http:/ / www. ti. com/ tool/ linuxezsdk-sitara[5] http:/ / processors. wiki. ti. com/ index. php/ Sitara_Linux_SDK_GCC_Toolchain[6] http:/ / processors. wiki. ti. com/ index. php/ Sitara_Linux_SDK_Top-Level_Makefile[7] http:/ / processors. wiki. ti. com/ index. php/ Sitara_Linux_SDK_Setup_Script[8] http:/ / processors. wiki. ti. com/ index. php/ Code_Composer_Studio_v5_Users_Guide[9] http:/ / processors. wiki. ti. com/ index. php/ Code_Composer_Studio_v5_Users_Guide#Importing_Qt_Projects[10] http:/ / processors. wiki. ti. com/ index. php/ How_to_setup_Remote_System_Explorer_plug-in

Article Sources and Contributors 52
Article Sources and ContributorsSitara Linux Training: Hands on with the SDK Source: http://processors.wiki.ti.com/index.php?oldid=119799 Contributors: Cem8101, Fcooper, Gary, Kevinsc, Tony Tang
Image Sources, Licenses and ContributorsImage:TIBanner.png Source: http://processors.wiki.ti.com/index.php?title=File:TIBanner.png License: unknown Contributors: NsnehaprabhaImage:Sitara-linux-training-matrix-main-menu.png Source: http://processors.wiki.ti.com/index.php?title=File:Sitara-linux-training-matrix-main-menu.png License: unknown Contributors:Cem8101Image:Sitara-linux-training-matrix-arm-menu.png Source: http://processors.wiki.ti.com/index.php?title=File:Sitara-linux-training-matrix-arm-menu.png License: unknown Contributors:Cem8101Image:Sitara-linux-training-matrix-up-arrow.png Source: http://processors.wiki.ti.com/index.php?title=File:Sitara-linux-training-matrix-up-arrow.png License: unknown Contributors:Cem8101Image:Sitara-linux-training-matrix-multi-icon.png Source: http://processors.wiki.ti.com/index.php?title=File:Sitara-linux-training-matrix-multi-icon.png License: unknown Contributors:Cem8101Image:Sitara-linux-training-dhrystone-screen.png Source: http://processors.wiki.ti.com/index.php?title=File:Sitara-linux-training-dhrystone-screen.png License: unknown Contributors:Cem8101Image:Sitara-linux-training-left-arrow.png Source: http://processors.wiki.ti.com/index.php?title=File:Sitara-linux-training-left-arrow.png License: unknown Contributors: Cem8101Image:Sitara-linux-training-ipaddr.png Source: http://processors.wiki.ti.com/index.php?title=File:Sitara-linux-training-ipaddr.png License: unknown Contributors: Cem8101Image:Sitara-linux-training-remote-matrix-gui-select.png Source: http://processors.wiki.ti.com/index.php?title=File:Sitara-linux-training-remote-matrix-gui-select.png License: unknown Contributors: Cem8101Image:Sitara-linux-training-cross-tools.png Source: http://processors.wiki.ti.com/index.php?title=File:Sitara-linux-training-cross-tools.png License: unknown Contributors: Cem8101Image:Sitara-linux-training-makefile.png Source: http://processors.wiki.ti.com/index.php?title=File:Sitara-linux-training-makefile.png License: unknown Contributors: Cem8101Image:Sitara-linux-training-board-support.png Source: http://processors.wiki.ti.com/index.php?title=File:Sitara-linux-training-board-support.png License: unknown Contributors: Cem8101Image:Sitara-linux-training-prebuilt-images.png Source: http://processors.wiki.ti.com/index.php?title=File:Sitara-linux-training-prebuilt-images.png License: unknown Contributors:Cem8101Image:Sitara-linux-training-u-boot.png Source: http://processors.wiki.ti.com/index.php?title=File:Sitara-linux-training-u-boot.png License: unknown Contributors: Cem8101Image:Sitara-linux-training-am-benchmarks-makefile.png Source: http://processors.wiki.ti.com/index.php?title=File:Sitara-linux-training-am-benchmarks-makefile.png License: unknown Contributors: Cem8101Image:Sitara-Linux-CCS-splash-screen.png Source: http://processors.wiki.ti.com/index.php?title=File:Sitara-Linux-CCS-splash-screen.png License: unknown Contributors: Cem8101Image:Sitara-Linux-CCS-workspace.png Source: http://processors.wiki.ti.com/index.php?title=File:Sitara-Linux-CCS-workspace.png License: unknown Contributors: Cem8101Image:Sitara-Linux-CCS-resource-explorer.png Source: http://processors.wiki.ti.com/index.php?title=File:Sitara-Linux-CCS-resource-explorer.png License: unknown Contributors:Cem8101Image:Sitara-Linux-CCS-project-explorer.png Source: http://processors.wiki.ti.com/index.php?title=File:Sitara-Linux-CCS-project-explorer.png License: unknown Contributors: Cem8101Image:Import C projects-1.png Source: http://processors.wiki.ti.com/index.php?title=File:Import_C_projects-1.png License: unknown Contributors: Mike TadyshakImage:Sitara-Linux-CCS-import-c.png Source: http://processors.wiki.ti.com/index.php?title=File:Sitara-Linux-CCS-import-c.png License: unknown Contributors: Cem8101Image:Sitara-Linux-CCS-browse.png Source: http://processors.wiki.ti.com/index.php?title=File:Sitara-Linux-CCS-browse.png License: unknown Contributors: Cem8101Image:Sitara-Linux-CCS-import-arch.png Source: http://processors.wiki.ti.com/index.php?title=File:Sitara-Linux-CCS-import-arch.png License: unknown Contributors: Cem8101Image:Sitara-Linux-CCS-import-projects.png Source: http://processors.wiki.ti.com/index.php?title=File:Sitara-Linux-CCS-import-projects.png License: unknown Contributors: Cem8101Image:Sitara-Linux-CCS-projects-list.png Source: http://processors.wiki.ti.com/index.php?title=File:Sitara-Linux-CCS-projects-list.png License: unknown Contributors: Cem8101Image:Sitara-linux-training-ccs-mem-util.png Source: http://processors.wiki.ti.com/index.php?title=File:Sitara-linux-training-ccs-mem-util.png License: unknown Contributors: Cem8101Image:Sitara-Linux-CCS-new-c-project.png Source: http://processors.wiki.ti.com/index.php?title=File:Sitara-Linux-CCS-new-c-project.png License: unknown Contributors: Cem8101Image:Sitara-Linux-CCS-cross-compile.png Source: http://processors.wiki.ti.com/index.php?title=File:Sitara-Linux-CCS-cross-compile.png License: unknown Contributors: Cem8101Image:Sitara-Linux-CCS-command-setup.png Source: http://processors.wiki.ti.com/index.php?title=File:Sitara-Linux-CCS-command-setup.png License: unknown Contributors: Cem8101Image:Sitara-Linux-CCS-select-configurations.png Source: http://processors.wiki.ti.com/index.php?title=File:Sitara-Linux-CCS-select-configurations.png License: unknown Contributors:Cem8101Image:Sitara-Linux-CCS-empty-helloworld.png Source: http://processors.wiki.ti.com/index.php?title=File:Sitara-Linux-CCS-empty-helloworld.png License: unknown Contributors:Cem8101Image:Sitara-Linux-CCS-helloworld-c-file.png Source: http://processors.wiki.ti.com/index.php?title=File:Sitara-Linux-CCS-helloworld-c-file.png License: unknown Contributors: Cem8101Image:Sitara-Linux-CCS-helloworld.png Source: http://processors.wiki.ti.com/index.php?title=File:Sitara-Linux-CCS-helloworld.png License: unknown Contributors: Cem8101Image:Sitara-linux-training-ccs-helloworld-built.png Source: http://processors.wiki.ti.com/index.php?title=File:Sitara-linux-training-ccs-helloworld-built.png License: unknown Contributors: Cem8101Image:Sitara-Linux-CCS-window-preferences.png Source: http://processors.wiki.ti.com/index.php?title=File:Sitara-Linux-CCS-window-preferences.png License: unknown Contributors:Cem8101Image:Sitara-Linux-CCS-general-capabilities.png Source: http://processors.wiki.ti.com/index.php?title=File:Sitara-Linux-CCS-general-capabilities.png License: unknown Contributors:Cem8101Image:Sitara-Linux-CCS-enable-rse.png Source: http://processors.wiki.ti.com/index.php?title=File:Sitara-Linux-CCS-enable-rse.png License: unknown Contributors: Cem8101Image:Sitara-Linux-CCS-rse-perspective.png Source: http://processors.wiki.ti.com/index.php?title=File:Sitara-Linux-CCS-rse-perspective.png License: unknown Contributors: Cem8101Image:Sitara-Linux-CCS-rse-view.png Source: http://processors.wiki.ti.com/index.php?title=File:Sitara-Linux-CCS-rse-view.png License: unknown Contributors: Cem8101Image:New-connection.png Source: http://processors.wiki.ti.com/index.php?title=File:New-connection.png License: unknown Contributors: Mike TadyshakImage:Remote-system-type.png Source: http://processors.wiki.ti.com/index.php?title=File:Remote-system-type.png License: unknown Contributors: Mike TadyshakImage:X-New Connection.png Source: http://processors.wiki.ti.com/index.php?title=File:X-New_Connection.png License: unknown Contributors: Mike TadyshakImage:Ssh-files.png Source: http://processors.wiki.ti.com/index.php?title=File:Ssh-files.png License: unknown Contributors: Mike TadyshakImage:Processes .png Source: http://processors.wiki.ti.com/index.php?title=File:Processes_.png License: unknown Contributors: Mike TadyshakImage:Shells.png Source: http://processors.wiki.ti.com/index.php?title=File:Shells.png License: unknown Contributors: Mike TadyshakImage:Terminals.png Source: http://processors.wiki.ti.com/index.php?title=File:Terminals.png License: unknown Contributors: Mike TadyshakImage:Sitara-Linux-CCS-target-view.png Source: http://processors.wiki.ti.com/index.php?title=File:Sitara-Linux-CCS-target-view.png License: unknown Contributors: Cem8101Image:Sitara-Linux-CCS-c-view.png Source: http://processors.wiki.ti.com/index.php?title=File:Sitara-Linux-CCS-c-view.png License: unknown Contributors: Cem8101Image:X-change-user-id.png Source: http://processors.wiki.ti.com/index.php?title=File:X-change-user-id.png License: unknown Contributors: Mike TadyshakImage:Sitara-linux-training-rse-login.png Source: http://processors.wiki.ti.com/index.php?title=File:Sitara-linux-training-rse-login.png License: unknown Contributors: Cem8101Image:Setup-ssh-editted-1.png Source: http://processors.wiki.ti.com/index.php?title=File:Setup-ssh-editted-1.png License: unknown Contributors: Mike Tadyshak

Image Sources, Licenses and Contributors 53
Image:Sitara-linux-training-rse-sftp.png Source: http://processors.wiki.ti.com/index.php?title=File:Sitara-linux-training-rse-sftp.png License: unknown Contributors: Cem8101Image:Sitara-linux-training-ccs-helloworld.png Source: http://processors.wiki.ti.com/index.php?title=File:Sitara-linux-training-ccs-helloworld.png License: unknown Contributors: Cem8101Image:Sitara-linux-training-ccs-paste-helloworld.png Source: http://processors.wiki.ti.com/index.php?title=File:Sitara-linux-training-ccs-paste-helloworld.png License: unknown Contributors: Cem8101Image:Sitara-linux-training-rse-terminal.png Source: http://processors.wiki.ti.com/index.php?title=File:Sitara-linux-training-rse-terminal.png License: unknown Contributors: Cem8101Image:Sitara-linux-training-helloworld-run.png Source: http://processors.wiki.ti.com/index.php?title=File:Sitara-linux-training-helloworld-run.png License: unknown Contributors:Cem8101Image:Sitara-linux-training-rse-executable.png Source: http://processors.wiki.ti.com/index.php?title=File:Sitara-linux-training-rse-executable.png License: unknown Contributors: Cem8101Image:Sitara-linux-training-ccs-debug-conf.png Source: http://processors.wiki.ti.com/index.php?title=File:Sitara-linux-training-ccs-debug-conf.png License: unknown Contributors:Cem8101Image:Sitara-linux-training-ccs-new-conf.png Source: http://processors.wiki.ti.com/index.php?title=File:Sitara-linux-training-ccs-new-conf.png License: unknown Contributors: Cem8101Image:Sitara-linux-training-ccs-helloworld-debug.png Source: http://processors.wiki.ti.com/index.php?title=File:Sitara-linux-training-ccs-helloworld-debug.png License: unknown Contributors: Cem8101Image:Sitara-linux-training-ccs-remote-path.png Source: http://processors.wiki.ti.com/index.php?title=File:Sitara-linux-training-ccs-remote-path.png License: unknown Contributors:Cem8101Image:Sitara-linux-training-ccs-debug.png Source: http://processors.wiki.ti.com/index.php?title=File:Sitara-linux-training-ccs-debug.png License: unknown Contributors: Cem8101Image:Sitara-linux-training-ccs-debug-output.png Source: http://processors.wiki.ti.com/index.php?title=File:Sitara-linux-training-ccs-debug-output.png License: unknown Contributors:Cem8101Image:Sitara-linux-training-ccs-gdb-to-rse.png Source: http://processors.wiki.ti.com/index.php?title=File:Sitara-linux-training-ccs-gdb-to-rse.png License: unknown Contributors: Cem8101Image:Sitara-linux-training-ccs-add-line.png Source: http://processors.wiki.ti.com/index.php?title=File:Sitara-linux-training-ccs-add-line.png License: unknown Contributors: Cem8101Image:Sitara-linux-training-ccs-breakpoint.png Source: http://processors.wiki.ti.com/index.php?title=File:Sitara-linux-training-ccs-breakpoint.png License: unknown Contributors: Cem8101Image:Sitara-linux-training-ccs-debug-selection.png Source: http://processors.wiki.ti.com/index.php?title=File:Sitara-linux-training-ccs-debug-selection.png License: unknown Contributors:Cem8101Image:Sitara-linux-training-ccs-save-sources.png Source: http://processors.wiki.ti.com/index.php?title=File:Sitara-linux-training-ccs-save-sources.png License: unknown Contributors:Cem8101Image:Sitara-linux-training-ccs-breakpoint-run.png Source: http://processors.wiki.ti.com/index.php?title=File:Sitara-linux-training-ccs-breakpoint-run.png License: unknown Contributors:Cem8101Image:Sitara-linux-training-ccs-break-at-line.png Source: http://processors.wiki.ti.com/index.php?title=File:Sitara-linux-training-ccs-break-at-line.png License: unknown Contributors:Cem8101Image:Sitara-linux-training-another-line.png Source: http://processors.wiki.ti.com/index.php?title=File:Sitara-linux-training-another-line.png License: unknown Contributors: Cem8101
LicenseTHE WORK (AS DEFINED BELOW) IS PROVIDED UNDER THE TERMS OF THIS CREATIVE COMMONS PUBLIC LICENSE ("CCPL" OR "LICENSE"). THE WORK IS PROTECTED BY COPYRIGHT AND/OR OTHERAPPLICABLE LAW. ANY USE OF THE WORK OTHER THAN AS AUTHORIZED UNDER THIS LICENSE OR COPYRIGHT LAW IS PROHIBITED.BY EXERCISING ANY RIGHTS TO THE WORK PROVIDED HERE, YOU ACCEPT AND AGREE TO BE BOUND BY THE TERMS OF THIS LICENSE. TO THE EXTENT THIS LICENSE MAY BE CONSIDERED TO BEA CONTRACT, THE LICENSOR GRANTS YOU THE RIGHTS CONTAINED HERE IN CONSIDERATION OF YOUR ACCEPTANCE OF SUCH TERMS AND CONDITIONS.License1. Definitionsa. "Adaptation" means a work based upon the Work, or upon the Work and other pre-existing works, such as a translation, adaptation, derivative work, arrangement of music or other alterations of a literary or artistic work, or
phonogram or performance and includes cinematographic adaptations or any other form in which the Work may be recast, transformed, or adapted including in any form recognizably derived from the original, except that a workthat constitutes a Collection will not be considered an Adaptation for the purpose of this License. For the avoidance of doubt, where the Work is a musical work, performance or phonogram, the synchronization of the Work intimed-relation with a moving image ("synching") will be considered an Adaptation for the purpose of this License.
b. "Collection" means a collection of literary or artistic works, such as encyclopedias and anthologies, or performances, phonograms or broadcasts, or other works or subject matter other than works listed in Section 1(f) below,which, by reason of the selection and arrangement of their contents, constitute intellectual creations, in which the Work is included in its entirety in unmodified form along with one or more other contributions, each constitutingseparate and independent works in themselves, which together are assembled into a collective whole. A work that constitutes a Collection will not be considered an Adaptation (as defined below) for the purposes of this License.
c. "Creative Commons Compatible License" means a license that is listed at http:/ / creativecommons. org/ compatiblelicenses that has been approved by Creative Commons as being essentially equivalent to this License,including, at a minimum, because that license: (i) contains terms that have the same purpose, meaning and effect as the License Elements of this License; and, (ii) explicitly permits the relicensing of adaptations of works madeavailable under that license under this License or a Creative Commons jurisdiction license with the same License Elements as this License.
d. "Distribute" means to make available to the public the original and copies of the Work or Adaptation, as appropriate, through sale or other transfer of ownership.e. "License Elements" means the following high-level license attributes as selected by Licensor and indicated in the title of this License: Attribution, ShareAlike.f. "Licensor" means the individual, individuals, entity or entities that offer(s) the Work under the terms of this License.g. "Original Author" means, in the case of a literary or artistic work, the individual, individuals, entity or entities who created the Work or if no individual or entity can be identified, the publisher; and in addition (i) in the case of a
performance the actors, singers, musicians, dancers, and other persons who act, sing, deliver, declaim, play in, interpret or otherwise perform literary or artistic works or expressions of folklore; (ii) in the case of a phonogram theproducer being the person or legal entity who first fixes the sounds of a performance or other sounds; and, (iii) in the case of broadcasts, the organization that transmits the broadcast.
h. "Work" means the literary and/or artistic work offered under the terms of this License including without limitation any production in the literary, scientific and artistic domain, whatever may be the mode or form of its expressionincluding digital form, such as a book, pamphlet and other writing; a lecture, address, sermon or other work of the same nature; a dramatic or dramatico-musical work; a choreographic work or entertainment in dumb show; amusical composition with or without words; a cinematographic work to which are assimilated works expressed by a process analogous to cinematography; a work of drawing, painting, architecture, sculpture, engraving orlithography; a photographic work to which are assimilated works expressed by a process analogous to photography; a work of applied art; an illustration, map, plan, sketch or three-dimensional work relative to geography,topography, architecture or science; a performance; a broadcast; a phonogram; a compilation of data to the extent it is protected as a copyrightable work; or a work performed by a variety or circus performer to the extent it is nototherwise considered a literary or artistic work.
i. "You" means an individual or entity exercising rights under this License who has not previously violated the terms of this License with respect to the Work, or who has received express permission from the Licensor to exerciserights under this License despite a previous violation.
j. "Publicly Perform" means to perform public recitations of the Work and to communicate to the public those public recitations, by any means or process, including by wire or wireless means or public digital performances; tomake available to the public Works in such a way that members of the public may access these Works from a place and at a place individually chosen by them; to perform the Work to the public by any means or process and thecommunication to the public of the performances of the Work, including by public digital performance; to broadcast and rebroadcast the Work by any means including signs, sounds or images.
k. "Reproduce" means to make copies of the Work by any means including without limitation by sound or visual recordings and the right of fixation and reproducing fixations of the Work, including storage of a protectedperformance or phonogram in digital form or other electronic medium.
2. Fair Dealing RightsNothing in this License is intended to reduce, limit, or restrict any uses free from copyright or rights arising from limitations or exceptions that are provided for in connection with the copyright protection under copyright law or otherapplicable laws.3. License GrantSubject to the terms and conditions of this License, Licensor hereby grants You a worldwide, royalty-free, non-exclusive, perpetual (for the duration of the applicable copyright) license to exercise the rights in the Work as statedbelow:a. to Reproduce the Work, to incorporate the Work into one or more Collections, and to Reproduce the Work as incorporated in the Collections;b. to create and Reproduce Adaptations provided that any such Adaptation, including any translation in any medium, takes reasonable steps to clearly label, demarcate or otherwise identify that changes were made to the original
Work. For example, a translation could be marked "The original work was translated from English to Spanish," or a modification could indicate "The original work has been modified.";c. to Distribute and Publicly Perform the Work including as incorporated in Collections; and,d. to Distribute and Publicly Perform Adaptations.e. For the avoidance of doubt:
i. Non-waivable Compulsory License Schemes. In those jurisdictions in which the right to collect royalties through any statutory or compulsory licensing scheme cannot be waived, the Licensor reserves the exclusive rightto collect such royalties for any exercise by You of the rights granted under this License;
ii. Waivable Compulsory License Schemes. In those jurisdictions in which the right to collect royalties through any statutory or compulsory licensing scheme can be waived, the Licensor waives the exclusive right to collectsuch royalties for any exercise by You of the rights granted under this License; and,
iii. Voluntary License Schemes. The Licensor waives the right to collect royalties, whether individually or, in the event that the Licensor is a member of a collecting society that administers voluntary licensing schemes, viathat society, from any exercise by You of the rights granted under this License.
The above rights may be exercised in all media and formats whether now known or hereafter devised. The above rights include the right to make such modifications as are technically necessary to exercise the rights in other media andformats. Subject to Section 8(f), all rights not expressly granted by Licensor are hereby reserved.4. RestrictionsThe license granted in Section 3 above is expressly made subject to and limited by the following restrictions:a. You may Distribute or Publicly Perform the Work only under the terms of this License. You must include a copy of, or the Uniform Resource Identifier (URI) for, this License with every copy of the Work You Distribute or
Publicly Perform. You may not offer or impose any terms on the Work that restrict the terms of this License or the ability of the recipient of the Work to exercise the rights granted to that recipient under the terms of the License.You may not sublicense the Work. You must keep intact all notices that refer to this License and to the disclaimer of warranties with every copy of the Work You Distribute or Publicly Perform. When You Distribute or PubliclyPerform the Work, You may not impose any effective technological measures on the Work that restrict the ability of a recipient of the Work from You to exercise the rights granted to that recipient under the terms of the License.This Section 4(a) applies to the Work as incorporated in a Collection, but this does not require the Collection apart from the Work itself to be made subject to the terms of this License. If You create a Collection, upon notice fromany Licensor You must, to the extent practicable, remove from the Collection any credit as required by Section 4(c), as requested. If You create an Adaptation, upon notice from any Licensor You must, to the extent practicable,remove from the Adaptation any credit as required by Section 4(c), as requested.
b. You may Distribute or Publicly Perform an Adaptation only under the terms of: (i) this License; (ii) a later version of this License with the same License Elements as this License; (iii) a Creative Commons jurisdiction license(either this or a later license version) that contains the same License Elements as this License (e.g., Attribution-ShareAlike 3.0 US)); (iv) a Creative Commons Compatible License. If you license the Adaptation under one of thelicenses mentioned in (iv), you must comply with the terms of that license. If you license the Adaptation under the terms of any of the licenses mentioned in (i), (ii) or (iii) (the "Applicable License"), you must comply with theterms of the Applicable License generally and the following provisions: (I) You must include a copy of, or the URI for, the Applicable License with every copy of each Adaptation You Distribute or Publicly Perform; (II) You

License 54
may not offer or impose any terms on the Adaptation that restrict the terms of the Applicable License or the ability of the recipient of the Adaptation to exercise the rights granted to that recipient under the terms of the ApplicableLicense; (III) You must keep intact all notices that refer to the Applicable License and to the disclaimer of warranties with every copy of the Work as included in the Adaptation You Distribute or Publicly Perform; (IV) whenYou Distribute or Publicly Perform the Adaptation, You may not impose any effective technological measures on the Adaptation that restrict the ability of a recipient of the Adaptation from You to exercise the rights granted tothat recipient under the terms of the Applicable License. This Section 4(b) applies to the Adaptation as incorporated in a Collection, but this does not require the Collection apart from the Adaptation itself to be made subject tothe terms of the Applicable License.
c. If You Distribute, or Publicly Perform the Work or any Adaptations or Collections, You must, unless a request has been made pursuant to Section 4(a), keep intact all copyright notices for the Work and provide, reasonable to themedium or means You are utilizing: (i) the name of the Original Author (or pseudonym, if applicable) if supplied, and/or if the Original Author and/or Licensor designate another party or parties (e.g., a sponsor institute,publishing entity, journal) for attribution ("Attribution Parties") in Licensor's copyright notice, terms of service or by other reasonable means, the name of such party or parties; (ii) the title of the Work if supplied; (iii) to theextent reasonably practicable, the URI, if any, that Licensor specifies to be associated with the Work, unless such URI does not refer to the copyright notice or licensing information for the Work; and (iv) , consistent withSsection 3(b), in the case of an Adaptation, a credit identifying the use of the Work in the Adaptation (e.g., "French translation of the Work by Original Author," or "Screenplay based on original Work by Original Author"). Thecredit required by this Section 4(c) may be implemented in any reasonable manner; provided, however, that in the case of a Adaptation or Collection, at a minimum such credit will appear, if a credit for all contributing authors ofthe Adaptation or Collection appears, then as part of these credits and in a manner at least as prominent as the credits for the other contributing authors. For the avoidance of doubt, You may only use the credit required by thisSection for the purpose of attribution in the manner set out above and, by exercising Your rights under this License, You may not implicitly or explicitly assert or imply any connection with, sponsorship or endorsement by theOriginal Author, Licensor and/or Attribution Parties, as appropriate, of You or Your use of the Work, without the separate, express prior written permission of the Original Author, Licensor and/or Attribution Parties.
d. Except as otherwise agreed in writing by the Licensor or as may be otherwise permitted by applicable law, if You Reproduce, Distribute or Publicly Perform the Work either by itself or as part of any Adaptations or Collections,You must not distort, mutilate, modify or take other derogatory action in relation to the Work which would be prejudicial to the Original Author's honor or reputation. Licensor agrees that in those jurisdictions (e.g. Japan), inwhich any exercise of the right granted in Section 3(b) of this License (the right to make Adaptations) would be deemed to be a distortion, mutilation, modification or other derogatory action prejudicial to the Original Author'shonor and reputation, the Licensor will waive or not assert, as appropriate, this Section, to the fullest extent permitted by the applicable national law, to enable You to reasonably exercise Your right under Section 3(b) of thisLicense (right to make Adaptations) but not otherwise.
5. Representations, Warranties and DisclaimerUNLESS OTHERWISE MUTUALLY AGREED TO BY THE PARTIES IN WRITING, LICENSOR OFFERS THE WORK AS-IS AND MAKES NO REPRESENTATIONS OR WARRANTIES OF ANY KIND CONCERNINGTHE WORK, EXPRESS, IMPLIED, STATUTORY OR OTHERWISE, INCLUDING, WITHOUT LIMITATION, WARRANTIES OF TITLE, MERCHANTIBILITY, FITNESS FOR A PARTICULAR PURPOSE,NONINFRINGEMENT, OR THE ABSENCE OF LATENT OR OTHER DEFECTS, ACCURACY, OR THE PRESENCE OF ABSENCE OF ERRORS, WHETHER OR NOT DISCOVERABLE. SOME JURISDICTIONS DO NOTALLOW THE EXCLUSION OF IMPLIED WARRANTIES, SO SUCH EXCLUSION MAY NOT APPLY TO YOU.6. Limitation on LiabilityEXCEPT TO THE EXTENT REQUIRED BY APPLICABLE LAW, IN NO EVENT WILL LICENSOR BE LIABLE TO YOU ON ANY LEGAL THEORY FOR ANY SPECIAL, INCIDENTAL, CONSEQUENTIAL, PUNITIVEOR EXEMPLARY DAMAGES ARISING OUT OF THIS LICENSE OR THE USE OF THE WORK, EVEN IF LICENSOR HAS BEEN ADVISED OF THE POSSIBILITY OF SUCH DAMAGES.7. Terminationa. This License and the rights granted hereunder will terminate automatically upon any breach by You of the terms of this License. Individuals or entities who have received Adaptations or Collections from You under this License,
however, will not have their licenses terminated provided such individuals or entities remain in full compliance with those licenses. Sections 1, 2, 5, 6, 7, and 8 will survive any termination of this License.b. Subject to the above terms and conditions, the license granted here is perpetual (for the duration of the applicable copyright in the Work). Notwithstanding the above, Licensor reserves the right to release the Work under different
license terms or to stop distributing the Work at any time; provided, however that any such election will not serve to withdraw this License (or any other license that has been, or is required to be, granted under the terms of thisLicense), and this License will continue in full force and effect unless terminated as stated above.
8. Miscellaneousa. Each time You Distribute or Publicly Perform the Work or a Collection, the Licensor offers to the recipient a license to the Work on the same terms and conditions as the license granted to You under this License.b. Each time You Distribute or Publicly Perform an Adaptation, Licensor offers to the recipient a license to the original Work on the same terms and conditions as the license granted to You under this License.c. If any provision of this License is invalid or unenforceable under applicable law, it shall not affect the validity or enforceability of the remainder of the terms of this License, and without further action by the parties to this
agreement, such provision shall be reformed to the minimum extent necessary to make such provision valid and enforceable.d. No term or provision of this License shall be deemed waived and no breach consented to unless such waiver or consent shall be in writing and signed by the party to be charged with such waiver or consent.e. This License constitutes the entire agreement between the parties with respect to the Work licensed here. There are no understandings, agreements or representations with respect to the Work not specified here. Licensor shall not
be bound by any additional provisions that may appear in any communication from You. This License may not be modified without the mutual written agreement of the Licensor and You.f. The rights granted under, and the subject matter referenced, in this License were drafted utilizing the terminology of the Berne Convention for the Protection of Literary and Artistic Works (as amended on September 28, 1979),
the Rome Convention of 1961, the WIPO Copyright Treaty of 1996, the WIPO Performances and Phonograms Treaty of 1996 and the Universal Copyright Convention (as revised on July 24, 1971). These rights and subjectmatter take effect in the relevant jurisdiction in which the License terms are sought to be enforced according to the corresponding provisions of the implementation of those treaty provisions in the applicable national law. If thestandard suite of rights granted under applicable copyright law includes additional rights not granted under this License, such additional rights are deemed to be included in the License; this License is not intended to restrict thelicense of any rights under applicable law.