Simcon v. 1.5.4 – 10/2014 AiracSearch v. 1.0.1 – 10/2014 · Read the ATIasHld.pdf Manual. ......
25
Simcon v. 1.5.4 – 10/2014 AiracSearch v. 1.0.1 – 10/2014 Updates 2014 October 2014 ● Version 1.0.1 ● All Radar's can be switched to: (use the [N] Buttons) --- North oriented --- Map display ● ATIasHold is included with Simcon. Pls. Read the ATIasHld.pdf Manual. ● Right click on Radar = close Radar ● Mouse Enter into Radar or any ListBox = this object get's the Focus without click. Useful for scrolling listings.
-
Upload
truongminh -
Category
Documents
-
view
227 -
download
2
Transcript of Simcon v. 1.5.4 – 10/2014 AiracSearch v. 1.0.1 – 10/2014 · Read the ATIasHld.pdf Manual. ......

Simcon v. 1.5.4 – 10/2014AiracSearch v. 1.0.1 – 10/2014
Updates 2014
October 2014● Version 1.0.1
● All Radar's can be switched to: (use the [N] Buttons) --- North oriented --- Map display
● ATIasHold is included with Simcon. Pls. Read the ATIasHld.pdf Manual.
● Right click on Radar = close Radar
● Mouse Enter into Radar or any ListBox = this object get's the Focus without click. Useful for scrolling listings.
Simcon
AiracSearch v. 1.0.1. 10/2014
Freeware
Tested with Win XP, 7, 8, 8.1 … and latest Frameworks 4.5 …...(in case of Error-Advice pls. Check your System and Parameters)
This is a limited Edition of the Simcon Approach System.
As Reference pls. Read this Simcon Manual
The Approach Button ADF/VOR/FIX/RWY has this additional 'Rwy' choice.
Selected VOR-Frequencies are copied into Nav2Selected ILS-Frequencies are copied into Nav1-StbySelected ADF-Frequencies are copied into ADF1
● Click on Radar View – Increase / Decrease Radar Hight. (Range 280 nm ~)
AiracSearch is using the Simcon Views 2, 3 and Radar
AiracSearch is a Simconnect FSX program!Only the Radar is using FSUipc.
The Airport Data-Base is including most of all U.S. smaller airports.
Download the AddAirports Editor for all CockpitStatus/Simcon programs. Add + change Airport data easily. Freeware.

Simcon
Install AiracSearch (FSX)Version 1.0.1 10/2014
Unzip into a new dedicated Folder. Do NOT use any other CockpitStatus Folder! Updates can be unzipped into the existing AiracSearch-Folder.
*** You should not run AiracSearch together with other CockpitStatus programs ! ***
Make a Desktop connection for fast access for: AiracSearch.exe
If this is your first SIMCON install open the Joystick Editor and click on [Save Joystick.ini File]. (create a basic .ini file)
● Approach System based on FSX Simconnect only. Not using Fsuipc.● The new Approach Radar System is using FSUipc that must be installed for using the Radar. AiracSearch is still a Simconnect Application!
● The Program and separate Panels are staying ON TOP of the Desktop!● Program is running on 32 Bit + 64 Bit machines.● AiracSearch is working only with internal Mathematic-Formulas based on Coordinates.
● Credits to the work of Ed Williams and his Aviation Page.● Credits to Paul Henty the Author of the FSUipc Client Dll for .Net applications.
● Read about page ' Windows 7 ' appearance. Best FSX + Simcon appearance with Windows 'Classic' Theme.
● If your Autopilot is locking the Ailerons or Heading, just open + re-close the 'ALT' or 'Hdg' Button ! (this has nothing to do with Simcon itself)
● Download the AddAirports Editor for all CockpitStatus/Simcon programs. Add + change Airport data easily. Freeware.
● Write a Feedback to: [email protected]
● Check the Home-Page for updates at: http://intrasystem.it/FSX/FSX.html
Next the Simcon Configuration File

Simcon Configuration File(FSX)Simcon.cfg
Version 1.5.3 02/2014
The new Simcon Configuration File is using 3 Parameter:
1) ApproachDeviationValue=1
Value 1 is the highest Sensitivity value and the Default value. Higher you set this value, less is the Approach Sensitivity. Setting this Parameter it is possible to eventually follow different PC-Configurations. There might be a difference between a high performance Pc and a older hardware user. Approach Panel – value is shown at the bottom and can be set/changed with: Left-Click = decrease value Right-Click = increase value
2) SimconOpenViewSize=3
Simcon has 4 Panel-Sizes. Size 3 = opening with the Airport View + FlyToPanel. You can set the value to: 1,2,3,4
3) JoystickConnectionOn=0
With Value 0 Simcon is not connecting to the Joystick when opening. When you click on the ' J ' Button, view 2 nr. 2, the Joystick is connected (red color). (see View 2) With Value 1 Simcon is connecting to your Joystick on opening Simcon. As long as you don't create a valid Joystick File even with a Joystick-Connection there would be no response.
Simcon is always opening with the Basic-Joystick-File “ Joystick.ini “. Creating new Joystick-Files the FileName is attributed in automatic. Joystick_1.ini, Joystick_2.ini …..
Within the parameter string no empty space is allowed!
Next Introduction to the Simcon Approach System 2014

Simcon
Near the Runway at 0.1 nm
When you are near the Rwy DO NOT USE the Ailerons with your Joystick.
At a Rwy-Distance of 0,1 nm the automatic Approach is closing.
The aircraft is following the last Hdg-correction from the automatic system.
Before you make any final Hdg-correction for landing observe the rwy-approach and correct if necessary.
Next Introduction to the Simcon Approach System 2014

Simcon
Simcon Approach System 2014
The Simcon Features – View
1
2
12
13
14 16 17 18
1 23 4 5
6 7 8 9 10
11
12
View
View (1)
View Switch
1
2
a b
1
35
4
1 23
4
12
3
4
Mouse clicks
Change Simcon View Size,
Open Approach Panel, Button
Open Simcon Radar, Button
Open Mouse Click Interface, View 3
Open Joystick Environment, [ J ]
Open Fuel View, [Lights],
Open Wind-Drift, (View 2) left Click
Open Terrain-Radar (View 2) right Click
Open Apt,Vor,Adf,Fix (View 2) [A,V,N,I]
17
16
11
8
Simcon Views
15
15
2
3
46
7
810
13
View (2)
View (3)
Next View 1
View
8
8
95
Apt,Vor,Ndb,Fix
Rwy, Wpt, Virtual
Open Fuel View
Radar 1
1
2 3 45
6 78
10
143
1
2
3
4
4
4

Simcon
Simcon Approach System 2014
Simcon View 1 – Autopilot should be present. (read Install Autopilot)
1) Hdg – when opening click on Label (C)onnect Interrupt Simcon click on [Hdg] 2 x2) Ias – Click on, toggle between Ias + GS (Groundspeed). Below 10.000 feet Color = Red + 250 Ias.3) AP – Autopilot ALT, AP, Hdg4) HSI Diamond – GlidePath Height5) Marker – I, O, M6) Banking value – Over 25° indication is shown with Red Color.7) GlidePath Center green light – Visible when Apl is within the Rwy-Deviation-Restriction8) ILS Deviation if Frequency set. When within the Rwy-Restriction Color = Yellow else Red. Simcon is NOT using any Frequency. You can still use your Cockpit-Autopilot APPR System. You can use the Simcon [R] unway approach + the AP-APPR together; Simcon is closing the AP before Touch-Down. The AP-ILS-APPR would overwrite the Simcon automatic Approach System [R] and Simcon is closing the AP at 0,1 nm before Rwy! When you Right-Click on the [Hdg] Button you engage the AP-Cockpit-ILS-APPR system. Some Add-ons do not allow external AP commands. In that case start the AP, Alt, Hdg or V/S in the Cockpit.9) The small bar, color cyan, is indicating the Simcon-Deviation value. When right then keep left and viceversa.10) This is the HSI Horizont. Over 15° the Horizont is shown with a Red Color.11) Background Color = Green with the Gear Down. Indicate Nr. of Flap-Steps + actual Flap-Position.12) Distance to Destination selected. [R]way or [W]pt. On Ground the Mag-Variation is shown instead.13) Wind Direction and Wind-Knots14) [R] [W] [V] – You are landing on any Rwy or World-Position – Simcon is not using Ils Frequencies but you can use them. (see View 2 nr. 3) [R]unway-Approach – used at a distance of 20 nm and near the Glidepath Center (see nr. 7 – green light). Appr. closing at 0,1nm before Rwy. [W]aypoint Approach – For any Rwy or virtual Rwy Simcon is creating a virtual Waypoint at 20 nm in front of the Rwy. Flying to the Waypoint you never loose the Rwy-orientation. The automatic Hdg to the Wpt is closing at 5 nm before reaching the Wpt and the airplane is turning into the Rwy-Hdg. (AP-ALT not closing) Correct Hdg in order to reach the Glidepath. Adjust Speed! [V]irtual Runway – important feature. You create a virtual Rwy at the actual Aircraft-Position on Ground-Level. On Air, Sea or Ground. use [R]wy or [W]pt approach.15) This Button is increasing/decreasing the Simcon view-size (Panels) 1..4.16) Open the Simcon-Radar.17) Open the Simcon Approach Panel. For opening the Radar-Panel must be closed and viceversa.18) This is a emergency Apt-Rwy search next from your actual position on same Radial at a distance of 20 nm(default) or indicated (view 2 nr. 6). Simcon is changing Hdg immediately. Only Rwy's within the range of 10° degree difference relativ to current radial are searched for and found! Apt-Rwy is found in front or behind as the Radial has 2 directions!
Next View 2
1
2
12
13
14 16 17 18
11
15
46
7
81095
Radar
1
143
View Switch
1
Most of all functions can be connected to your Joystick.

Simcon
Simcon Approach System 2014
Simcon View 2
1) Your Aircraft Name2) Left mouse-click [J] is the Joystick Connection on/off Message: Open Joystick-Editor y/n Right mouse-click – Open Joystick-File selection Dialog (Read the Joystick Page)3) [N1sty] When you select a Rwy the Ils-Freq is copied into the Field 9. Click on [N1sty] – copy Freq into your Cockpit Radio – Nav1.4) Click/Toggle - Temperature 'C' + 'F'.5) Help Button – showing the actual BGL-File used by FSX and Explaining the 4 basic Airport-Search criteria.6) This is the Input Number Field for different use like distances ecc...7) This is the Data-Input-Field – Icao, Apt/Vor/Adf/Fix- by name search8) Left-Click = open Wind-Drift correction – Right Click open Terrain-Radar (read the Terrain-Radar page) Wind-Drift - (read the Wind-Drift Correction page)9) Nav1 and Nav-stby / toggle with nr. 3 [N1sty] – Frequency is copied into Nav 1.10) [A V N I] Airport, Vor, Ndb, Intersection/Fix search by Icao / Code and distance. Use the 'H'elp Button for 4 diff. Search-Criteria. Apt-Search: Left-click – selecting all Apt's within 50 nm (default) – use Field nr. 6 for different distances. Right-Click – Input Apt-Name or Partial-Name in Field nr. 7. Search-String must be more then 4 digit long. 'Graz' add 1 empty 'Graz '. Vor, Ndb, Intersections/Fix same procedure. Total Distance, Dist. To Rwy + Runway-Deviation is shown. (read the Fly-To Panel – View 3)11) Airport-Rwy Panel and Virtual Rwy Data. Click on a Rwy. Ils-Freq not used by Simcon. Wpt created at 20nm aligned with the Rwy selected.12) After selecting a Rwy the Rwy-Data is shown + the initial Heading from your actual position. Frequency into Nav1, click on nr. 3.13) The green BackGround Color is indicating “Gear Down”. On Ground the MagVariation is shown (E2,6°).
Next View 3Most of all functions can be connected to your Joystick.
1 23 4 5
6 7 8 9 10
11
12
13
Click here + select
Click here + select
There are now 13.402 Airports.Update: see Intrasystem-Web Site (Downloads).

Simcon
Simcon Approach System 2014
Default Distance from/within destination Rwy 20 nm. Use the Distance Field for different distances. - Selection by Name – specific Intersections + Fixes with a Advice Message if not within 5° Rwy-Deviation. - Selection without a Code-Name (Icao-Field) you are selecting Intersections + Fixes rwy-aligned within 5° deviation Limit. - Direct Fly-to is possible like for any VOR + ADF. - When you choose Vor, Adf or Int/Fix you see the Bearing-To and Distance-To on the Fly-To Panel View. - on the Graphic Approach View the Bearing value is visible for each selection, when selected.
- Nota: When using the direct Fly-To Vor, Adf, Int/Fixes the automatic heading is closing at 3nm before reaching that position. Heading is changing for Rwy-Heading / Radial. Correct the Heading, fly into the Glidepath and select autom. [R]unway Appr.
Intersections + Fixes
VOR + Ndb/Adf●Choose a Runway – All Frequencies only for your own use. Simcon is not using any Frequency, only Coordinates.● [ Vor ] or [ Ndb ] Selection – List all Vor/Ndb's within any distance ! Example VOR – actual aircraft position is LOWG – Destination Apt is LOWW – RWY 11 - Bearing to VOR “TUN” from actual position is 12° - Distance 82,8 nm - VOR Freq 111.40 – Distance to Rwy 11 is 24,8 nm - Tulln – Deviation factor to Rwy ~ 1° . - Click on the list-item with the Frequeny – Freq 111.40 is copied into your Nav2 Cockpit Radio. (view 2 nr. 10) - If you need the Freq click on the Label [ N1sty ] - (Toggle Freq) Example NDB – actual aircraft position is LOWG – Destination Apt is LOWW – RWY 11 - Bearing to NDB “TUN” from actual position is 12° - Distance 82.8 nm - NDB Freq 358.00 – Distance to Rwy 11 is 24.8 nm - Tulln - Deviation factor to Rwy ~ 1° - Click on the list-item with the Frequeny – Freq 358.00 is copied directly into your ADF1 Cockpit Radio. (view 2 nr. 10) VOR + NDB by distance – Default = 100 nm – Alignment with destination Rwy Input distance into Distance Field – Distance can be different for VOR + NDB. The distance x VOR or NDB is only changing when you Input a new Distance. (Doe's not interfere with the Apt-distance) Use the Data-Input-Field, Input a Vor, Adf or Intersection/Fix Code then select search with a Right-Click on “A, V, N, I” This feature is very useful x your Cockpit-Radio even if you don't use the automatic approach
Only 1 Selection Vor, Adf, Fixes is shown on the Radar when selected with the Button ( 1 )
1
Next View 4 (1)
View 3 - Simcon Fly-To Panel
Use Button (1) andchange to:
ADFVORInters./Fixes
The selected one isshown on the Radarand Approach Panel.
2) Adf Heading Deviation
3) Select Fly to>> automatic Hdg to Adf, Vor, Fixes
2
3

Simcon
Simcon Approach System 2014
Next View 4 (2)
View 4 (1) - Simcon Frequency
1) Radio Com + Nav Frequencies a) Switch/Toggle exchange Frequency b) Copy Frequency into Com1, Nav1
2) With a valid Frequency in the Input-Field nr. 5 Click on [ADF]
3) Engine Pressure for engine 1 and 2 or 1 and 4 or 1 and 5 (B52)
4) Engine Pressure in percentage.
5) Frequency Input Field The blue Frequency Buttons are used in 2 ways: - Click – that Freq. will replace the Com1 or Nav1 Value! - Click – If the Freq-Input-Field has a valid Frequency than you copy that value into the Freq-Field. Stby's, Com2, Nav2.
- When the Input-Field is empty you can't use the Com1 and Nav1 Stby-Buttons, use the Toggle/Exchange labels instead.
Nav1 Frequency. When you select a Rwy with a Ils Freq you copythe Freq into Nav1 using the N1sty switch. (View 2 nr. 3)
When you select a VOR the Vor Freq is copied directly into Nav2.
When you select a ADF the Adf Freq is copied directly into ADF.
You can save upto 4 Nav-Freq and use them separately.
The small [//] Label is the switch/Toggle exchange Freq. Button.
Input Values – only numbers allowed without the leading “1”
Example: Freq 110.90 - Input [1090] Example: Freq 115.00 - Input [1500] Example: Freq 116.20 - Input [1620] Example: Freq 108.00 - Input [0800] Example: Freq 109.25 - Input [0925]
Adf-Freq 290: Input [290] Adf-Freq 1350 - Input [1350]
Xpn-Freq: 1200 – Input 1200
The Throttle Bar (3) is divided into 2 Bars: Blue is engine 1, yellow is engine 2, 3 or 4 or engine 5 p.e. with the B-52 aircraft (8 engines).
1a b
1
b
23 4
5

Simcon
Simcon Approach System 2014
Next View 4 (3)
View 4 (2) - Simcon Autopilot
1) When you don't find a Cockpit-Switch just select the Item on this Panel.2) Click on [Trim Elev/AP] and change to [Trim AP Trim/Pitch] The selected function is also copied into the Simcon Approach Panel.3) Click on [Trim +/-] Mouse Left + Right – decrease/increase4) The actual Trim Value.
The same Joystick assignment is used for Trim + V/S speed if you use the Simcon-Joystick-Connection.
Click on [Trim Elevator or Trim AP] - Joystick is using the Trim you selected.Click on [V/S f x min] Approach Panel – Joystick is using the V/S speed.
Maybe you must click first on your AP-V/S and select any value beforeusing the v/s Joystick. This is depending on your Add-on aircraft AP.
When switching to V/S the Trim on the (Data-View) can be still used withthe Mouse (L / R).
Selection between Trim + V/S speed only on the Approach Panel!
Using Simcon with Add-On airplanes- Simcon is working with any aircraft. Some add-ons are using a own AP-System. In that case you must verify if Simcon can open the AP-Functions or you must use the AP-Buttons or other Cockpit-Switches first.- If your AP is using the V/S vertical speed knob maybe you must start it with any value, then you can use the Simcon V/S Joystick.- If your AP is engaging the ALT function in automatic and you are Landing manually just set the AP-ALT to the Rwy-AGL then use the V/S Simcon Joystick connection for a smooth descending. Same is valid when using the Aircraft-Pitch like it is for example with the 'Stratocruiser B377' that is using the Pitch after Take Off and Rwy-Approach.- For example, the Dash8 Q400 from Majestic can use All Simcon features without any problem!- When using the CS B-52 do not forget to set the FD (flight director) + the Mode Selector to 'Tacan',
1 2 3 4

Simcon
Simcon Approach System 2014
Next Approach Panel
View 4 (3) - Simcon Lights
1) When you don't find a Cockpit-Switch just select the Item on this Panel.
2) The actual Fuel-Level
3) Click on. Open the Fuel Panel
4) Click on + or - . Fuel or Dump. Stop Dump, click on '-' again.
Using Simcon with Add-On airplanes- Simcon is working with any aircraft. Some add-ons are using a own AP-System. In that case you must verify if Simcon can open the AP-Functions or you must use the AP-Buttons or other Cockpit-Switches.
●If your Autopilot is locking the Ailerons or Heading, just open + re-close the 'ALT' or 'Hdg' Button ! (this has nothing to do with Simcon itself)
12
3
4

SimconSimcon Approach System 2014
Approach Panel View
1) Range upto Rwy 22 nm Starting at 20nm from Rwy.2) Runway ID3) Rwy Heading °4) Rwy Back-Course °5) Gear-Down + Brakes6) Distance to Rwy7) GlidePath Center Light. Within Limit.8) Marker I, O, M9) Airplane Position10) ILS deviation. Not used by Simcon. Yellow = within Limit. Red = Out11) Simcon Deviation – Fly-To Hdg. Indicating HSI view 1, nr. 9 Simcon is calculating the angle from your pos to the Rwy which is different how ILS is acting (lateral alignment).12) The 15 nm Mark13) The Simcon Virtual Wpt at 20 nm.14) Latitude + Longitude15) MagVariation16) The basic Simcon Deviation value. (only a internal value for tests)17) The Simcon Approach Sensitivity value. Can be set with the new Simcon.cfg File. Left-Click = decrease value Right-Click = increase value (read the Simcon Configuration page)18) Decision Height – 200 feet19) Below 1000 feet Height/Ground-Level (Rad) the graphic-bar is opening.
12 3 4 5
67
89
10
11
12
1314
15 16 17
18
19
20
21
Button
Next Radar View
20) Left-Click select Trim Elevators Right-Click select / toggle: - Trim Elevator – show value - Trim AP Elevator – show value (read View 4 nr. 2 )
21) Left-Click select V/S feet x min
22) Vor, Adf, Intersection/Fixes If selected with View 3, nr. 1 then the Brg-Hdg is indicated but only for the one selected.
When this Panel is open the Radar-Panel is closed and viceversa!
22

Simcon
Simcon Approach System 2014
Simcon Radar View
1) Radar Range upto 280 nm ~ Zoom is automatic, Dist. to Rwy. 1a) Click on Range, the automatic Zoom is excluded (toggle) On Ground select best Zoom.2) Show multiplayer on Air.3) Show multiplayer on Ground.4) Radar on or off.5) Actual Apl-Heading6) Actual Speed – Knots or Ground-Sp7) Distance to Rwy or Virtual Wpt. The Virtual Wpt is at 20 nm on the Rwy-Radial.8) Wind-Direction + Wind-Speed9) North 360° - The Radar is always North oriented.10) The HSI Diamond Rwy-Glide-Path. (Simcon)11) The ILS lateral Deviation Bar. (Gps) Simcon is not using Ils freq.12) The Simcon Glide-Path-Center Light signal.13) Alert-Signal if a Apl is at 2nm dist.14) Multiplayer on Air. Apl-Type Height +/- Ascending / Descending Distance Speed Heading to15) Indicating Multiplayers Flight-Direction16) Your Heading Reference (Red)
1a 1 2 3 4 5 6 7
89
Alert
1516 17
1819
14
20
11 12
1310
Next Fuel View
17) Vor, Adf, Insersection/Fixes Show only the one selected with the Fly-To-Panel – View 3, nr. 1
18) The Runway-Heading
19) Airport + Rwy-ID
20) Your Airplane is here!
21) The Virtual Simcon Wpt at 20 nm aligned with the Rwy (blue Line).
22) Automatic Headings for SIMCON: Rwy Wpt Virtual Rwy Fly-To Headings: A – Adf V – Vor F – Inters./Fix
23) Rudder Center. Out of Center = Yellow L/R Useful for Pro Flight Yoke user without Pedals using Throttle 'Blue Lever' ecc... (visible also on HSI – 'cyan color')
21
22
LOWK – 28R as Virtual Rwy (Simcon)
23

Simcon
Simcon Approach System 2014
Simcon Fuel View
1) click on and change values.
2) click on – actual Measure.
Gallons, Lbs, Kg
Max / actual Fuel quantity inGallons only.
3) Add Fuel When below 50% fuel with 1 click upto 50%. When + 50% fuel with 1 click + approx. 25 % upto 100%.
4) Dump Fuel On the HSI – Dump is shown Your Aircraft.cfg file must include the Fuel-Dump Parameters. Close Dump: Click on – Dump or + Fuel
5) Close the Fuel-Panel
1 2
3
4
5
Next Terrain Radar
If your aircraft does not use the Fuel-Dump you can change the Aircraft.cfg file.Under the [fuel] section add:fuel_dump_rate = 0.00685
(the % of max Qty dump x sec)
Fuel Alert on HSI less 10 % of Total Fuel.
Open the Fuel Panel(read View 4, nr. 3)

SimconSimcon Approach System 2014
● Left Click on this Button – open the Wind Drift correction-● Right Click on this Button – Terrain Radar is opening. (for closing right-click again)
● Terrain Radar is reading Terrain Hight below the aircraft. All Tests are positive without any crash! This Radar is: - registering Terrain differences.
● Usage: - DH Button: Change Decision Hight – Left Click = increase – Right Click = decrease – Decision Hight is your security hight – if you know nothing about the Terrain/Mountains ahead increase value. 1000 feet is a good value for most of all obstacles you could encounter ahead. - TE: is indicating highest Terrain Height + actual Terrain Height - when you click on this Label the Terrain Height = equal to the actual Terrain Height. - you should not do that while flying over mountains but when Terrain is changing from Mountain to Flat Land. - Below: For sure you must keep UP until the Above indication is appearing. - Above: When above is indicated the Progressbar is indicating 3 situations with 3 different colours: - Cyan: OK - Yellow: Attention - Red: Danger
No Terrain Radar is showing the real Terrain type.To know what kind of terrain is around you just use the default FS GPS
Next Wind Drift
Simcon Terrain Radar

Simcon
Wind Drift Correction
● Click on the Button open/close - when open the Button color is red and the Wind Drift Box is visible.
● On Ground the Wind Drift is closing.
● Use the small arrows up/down
● Wind Drift correction from -20° upto 20° - from left to 0 from 0 to 20° right correction.
● When opening or closing, the Wind Drift Value is always 0 (default).
● For a initial Drift Value use the general Wind Drift Correction rule with Simcon: Wind speed Knots: 15 div 5 = 3 (if to left use -3 – to right use 3) Wind speed Knots: 43 div 5 = 8 (could be between 8 and 10)
● Use this feature mainly for a Runway Approach starting at a reasonable distance.
● You center the Rwy !
Next Joystick Environment

Simcon
The new Joystick Editor There are 38 Items you can se-lect and connect.
If you are using already a Joy-stick.ini File just click on [Save Joystick] and all new Items will be added automatically.
When you DeSelect a item the value is saved on Top and can be Re-Inserted or Re-used.
●Using the Joy-Number-Field You can use this Field andmanually Input the values youcreate by using 1 or moreJoystick-Buttons.Assign a value to 1 ItemClick on the Item until the Field-Value is copied into the Field'Actual Item Value'.Then Clear the Input-Value!Nota:when you release thosekey-combinations the valuewould get lost in Field'Joystick Button Value'.
● On the Simcon Main-View all Items are listed with the actual Joystick Button Values + the Shift value if used as Reference.
● 2 complete Joystick.ini Files are included for the Saitek X52 and Pro YOKE as example.
● You can set the Simcon Joy-stick Connection with the Sim-con, see 'Configuration File'.
● The 3 Joystick De-fault Buttons are most often already connec-ting without assigning any Key-Value. Here the Gear is connected due to a Saitek Ran-doom problem.
●If your Joystick is using a Shift-Lever you must assign the Value to the first [Shift] Item. Normally it would be the value: 32
Using a Button with the Shift-Lever you can use the [Add Shift State] button. The value 128 would then change into: 128 +Using: Shift + Joy-Button
●When using aButton + a 'Shift' Lever:Joystick usage:- 1. Shift, 2. Button release buttons:- 1. the Button- 2. the Shift Lever
Joystick file x Saitek Yoke Sys
●When Item saved you must clear the Input - value!
●The Shift-Lever can be used if not interfering.You can declare any
Joystick-Button as Shift!
Next Mouse-Click Interface
● When creating a new File the actual File-Data is saved into this new file.● Just De-Select items youdon't need and add other's.
●FileName assignment isAutomatic! Joystick_1.ini ...
●“Joystick.ini” is the Basic-Joystick File on start-up.

Simcon
Mouse-Click Interface Description
● Connect to FSX● Click on [Register Mouse]● The [ R ] Click Label must be Green. If Red, right-Click on Label. -- only when open-Green you can register one Mouse-Click. -- After a Mouse-Click, this Label is 'Red' and the Screen Coordinates are copied into the [ MP ] Field. -- The Screen Position is available until you right-click on [ R ]
+ used if you need to register different clicks on same Switch. -- see next page
● The [VP] is only a local Mouse-Position within the Simcon-View.● The [FR] is showing the registered Mouse File Screen-Resolution.● The [VR] is showing your actual Screen-Resolution.● [Click Delay] Default = 500, max = 1000, minimum = 300● [File Name] Input your Mouse-File Name – max. 15 Digit● [Create 'click' File] create your Mouse-Click-File● [Click Description] not requested but better for a visual check – Default = Click name like: [1_Left], [Up], [2_Right]
● [Click types] 1 or 2 Pos. Switch - 3 Pos. Switch - Rotate Switch – see next page
● [Save Position] save/copy Click-sequence into the Click-ListBox● [Delete] Click on a ListBox item header [Wheel] then use 'Delete' -- see next page
● [Test] [Exec] When in Register Mode the Mouse clicks are executed.● [ S ] Select Mouse-File – Mouse Files are Listed on the ListBox – Click on a Mouse-File - Click the 'Test' Button and execute.
● [ H ] is as basic Help-Button.● Clear the ListBox: Right-Click on ListBox.
● Error Control: Logical Errors and show Alert situations.
●ListBox
Simcon
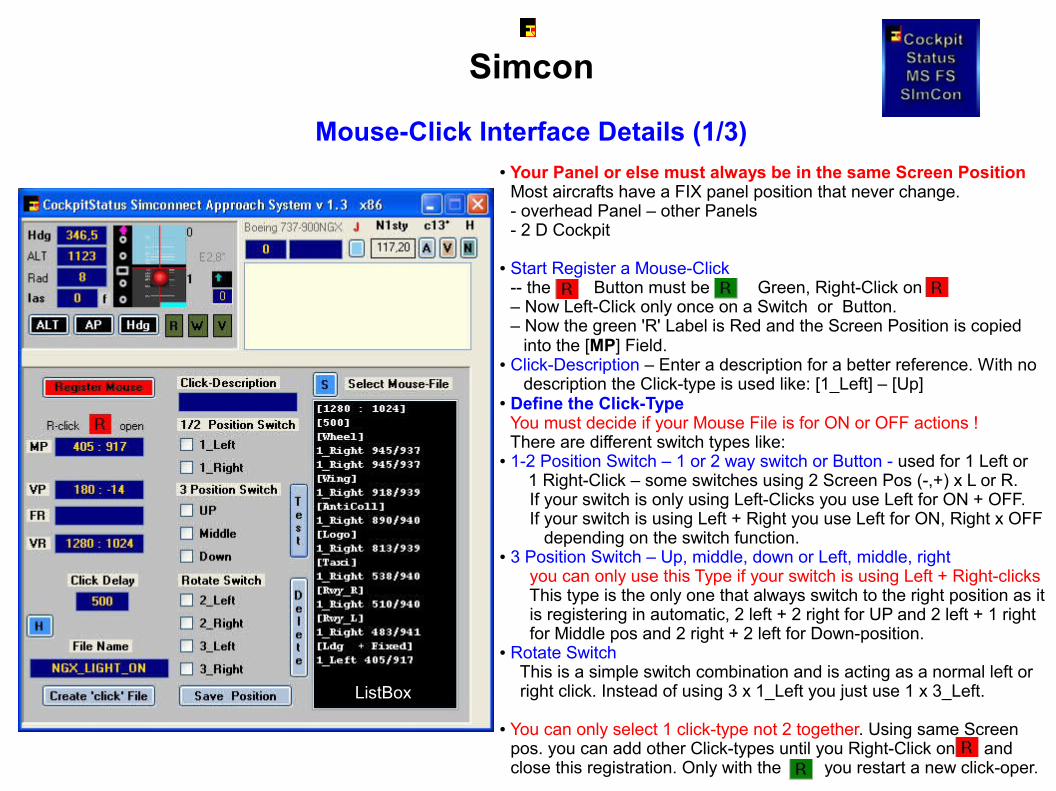
Mouse-Click Interface Details (1/3)● Your Panel or else must always be in the same Screen Position Most aircrafts have a FIX panel position that never change. - overhead Panel – other Panels - 2 D Cockpit
● Start Register a Mouse-Click -- the Button must be Green, Right-Click on – Now Left-Click only once on a Switch or Button. – Now the green 'R' Label is Red and the Screen Position is copied
into the [MP] Field.● Click-Description – Enter a description for a better reference. With no description the Click-type is used like: [1_Left] – [Up]● Define the Click-Type You must decide if your Mouse File is for ON or OFF actions ! There are different switch types like:
● 1-2 Position Switch – 1 or 2 way switch or Button - used for 1 Left or 1 Right-Click – some switches using 2 Screen Pos (-,+) x L or R. If your switch is only using Left-Clicks you use Left for ON + OFF. If your switch is using Left + Right you use Left for ON, Right x OFF depending on the switch function.
● 3 Position Switch – Up, middle, down or Left, middle, right you can only use this Type if your switch is using Left + Right-clicks This type is the only one that always switch to the right position as it is registering in automatic, 2 left + 2 right for UP and 2 left + 1 right for Middle pos and 2 right + 2 left for Down-position.
● Rotate Switch This is a simple switch combination and is acting as a normal left or right click. Instead of using 3 x 1_Left you just use 1 x 3_Left.
● You can only select 1 click-type not 2 together. Using same Screen pos. you can add other Click-types until you Right-Click on and close this registration. Only with the you restart a new click-oper.
●ListBox

Simcon
Mouse-Click Interface Details (2/3)
● Delete a Click-List-Item – Click on a ListBox item header [Wing] then use 'Delete' – You can delete the 1. Item header only if it is the last/only one ! – [Wheel] see prev. Page – this is the 1. Item header – [Wing] 1_Right 918/939 (this is the header-Item) Left Click on [Wing] then select [Delete] – You can't Re-Insert a Item-Header – Only ADD Items! – The first 2 Items are the File Header Items you can't delete. – Screen Resolution used – Click Delay
● Delete / Clear ListBox – You can delete the whole ListBox – Right click on ListBox
● Execute Mouse-Clicks when registering [Register Mouse] – When registering Mouse-Clicks just click on Button [TEST] / [Exec] – After any saved [Save Position] Mouse-click you should use [Test].
● Execute Mouse-Clicks with ready Mouse-Click-Files (this image) – ListBox must be empty – Exit [Register Mouse] Mode (blue) – Click on the [S] Button – Select the specific aircraft Panel (always in the same Position) – Left Click on a Mouse-File + Click on the [Test] button. – The example here is starting the PMDG-NGX-737 Engines – using the Fix Overhead Panel that can't be moved.
Any Panel is always at the same place as long as you don't move it!
●ListBox
2 Mouse-Click Example-Files are included

Simcon
Mouse-Click Interface Details (3/3)
● The first ListBox Item - here: [Wheel]
The 1. click (not the whole sequence) is always registered twice. The reason is that in order to start a Click sequence the program is 1. starting the Hook-procedure and 2. the click procedure.
● When you start registering one Mouse-Click you click on a switch/position or Button only once, the switch or whatever it is does not receive the click but the program is registering the screen-position in [ MP ]. Only if you click again on that switch (object) the object is receiving the click and acting accordingly. The Click Position must be valid for 2 events that is open/close on same switch or switch-cover!
● Example – Cessna 172 engine close – click on the ( - ) sign position we need 4 Left-Clicks for moving the 'Key' to the left side. [1280 : 1024] [500] [3_Left] 1_Left 168/971 - start hook 1_Left 168/971 - 1 start click 1_Left 168/971 - 2 1_Left 168/971 - 3 [1_Left] 1_Left 168/971 - 4
● You should not use the Simcon-Approach System with the [Register Mouse] Mode 'On'. When finished always close [Register Mouse] Mode 'Off'.
● You can open a 'switch-cover', click, click on the switch and reclose the 'switch-cover' if requested or leave it open.● The Mouse-Click Files ext. = *.moi
Next Add a Autopilot

Simcon
Add a Autopilot to your Aircraft
● Your aircraft must have a Autopilot – Hold [ALT] + Heading Gauge [Hdg] installed.● The aircraft.cfg file must include the following AP parameter / section
[ autopilot ] autopilot_available=1 flight_director_available=1
● If you have to install a AP gauge you can use the Default AP from the Cessna 172 – in Panel.cfg file add:
//On Top under [Window Titles] write ' Window??=AP '
[Window??] //in place of '??' in [Window??] use your own Window sequential Nr. Background_color=2,2,2
size_mm=156,48 window_size_ratio=1.000
position=8 visible=0
ident=RADIO_STACK_PANEL zorder=3 gauge00=Bendix_King_Radio!Bendix-King Radio AP, 0,0,156,48
Free the Ailerons when approaching! If your Autopilot is locking the Ailerons just open + re-close the 'ALT' Button ! Same with Hdg.

Simcon
Windows 7 Appearance
The appearance is only depending on your own local configuration.Both images are the original Win7 screen shots.
Windows XP Classic
Windows XP Default Theme
Win7 Win7
XP Theme

Simcon
ADD AirportsDownload the new ADDAirports program 09 / 2012 - Freeware Now with a complete Data Editor