Sign Panel Production Guide
18
Sign Panel Production Guide Rigid Media Done Right for Nearly 60 Years Laminators Incorporated manufactures a full line of digital print-ready sign panel products that are the industry standard for professional sign makers. Our sign boards are strong, durable, and ready to use. Available in a variety of colors, our finished surfaces are smooth and will not crack, chip, flake, or peel even under harsh weather conditions. 2021
Transcript of Sign Panel Production Guide

Sign Panel Production Guide Rigid Media Done Right for Nearly 60 Years Laminators Incorporated manufactures a full line of digital print-ready sign panel products that are the industry standard for professional sign makers. Our sign boards are strong, durable, and ready to use. Available in a variety of colors, our finished surfaces are smooth and will not crack, chip, flake, or peel even under harsh weather conditions.
2021
Laminators Incorporated Sign Panel Production Guide
3255 Penn Street · Hatfield, PA 19440 · 877.OMEGA.77 · Fax: 215-721-4678 · LaminatorsInc.com
Page 1 · July 2021
Thank you for choosing Laminators Incorporated digital print-ready sign panel
products for your graphic display applications!
Disclaimer The following recommendations and product data are based on information which is, in our opinion, reliable. However, since skill, judgment, and quality of equipment and tools are involved and since conditions and methods of using our products are beyond our control, the suggestions contained in this document are provided without guarantee. We recommend that prospective users determine the suitability of both the material and recommendations before adopting them on a commercial scale.
Table of Contents PANEL HANDLING ................................................................................................................................................................... 2
STORAGE ................................................................................................................................................................................. 2
PREP AND SET-UP .................................................................................................................................................................... 2
CLEANING PANEL .................................................................................................................................................................... 2
CUTTING .................................................................................................................................................................................. 3
ROUTING ................................................................................................................................................................................. 4
PRINTING ................................................................................................................................................................................. 6
APPLYING VINYL/FILMS ........................................................................................................................................................... 7
APPLYING PAINT ...................................................................................................................................................................... 7
LASER ENGRAVING .................................................................................................................................................................. 9
ELECTRICAL .............................................................................................................................................................................. 9
EDGE CAP .............................................................................................................................................................................. 10
SEALING FASTENER HOLES .................................................................................................................................................... 12
JOINING PANELS .................................................................................................................................................................... 13
INSTALLING/MOUNTING PANELS ......................................................................................................................................... 15
Laminators Incorporated Sign Panel Production Guide
3255 Penn Street · Hatfield, PA 19440 · 877.OMEGA.77 · Fax: 215-721-4678 · LaminatorsInc.com
Page 2 · July 2021
PANEL HANDLING o Use clean work gloves to avoid hand injury from any sharp edges and to prevent smudging of the finished
surfaces. Although panels are shipped with protective masking, always lift one panel completely off the next to prevent scratches. Do not slide one panel across another.
STORAGE o Panels are to be stored horizontally on pallets with positive slope for drainage of water and should be covered
with watertight and ventilated materials. Standing water will damage panel finish. No more than 3,000lbs should be stacked on one pallet. Depending on the type of panel and overall panel dimensions, this should be fewer than 100 panels at 30lbs per panel and less than 2 ½ feet high. Do not stack other materials on or in contact with panels to prevent staining, denting or other damage. Storage temperature must not exceed 120 degrees F (49 degrees C).
o Note: Storing panels vertically can cause warping.
PREP AND SET-UP o Deburr the Edges
o Understand, various companies use different cutting systems, circular and/or routing, and your deburring process may differ.
o After the panels are cut, it is best to deburr the edges of the aluminum-faced substrates. The edges may be deburred with a deburring tool (a curved headed tool that is drawn down the edge of the board and leaves a really nice edge), sandpaper wrapped around a block of wood or a flat file (400-grit sandpaper for aluminum faced panels or 220-grit sandpaper for vinyl faced panels.) A Rasp file is not recommended.
o Care should be taken to keep workable surfaces and between the panels clear of metal chips, shavings, etc., which could penetrate the masking and scratch or mark the panel surface.
o Masking Removal: o While the masking is UV-stable, it is recommended that it be removed as soon as possible after cutting.
Catch one end of the plastic protective sheeting and roll around a dowel (size to suit). Roll the dowel with the masking, carefully pulling the masking away from the panel surface.
CLEANING PANEL o Cleaning panels prior to graphic application:
o Clean panels with a soft, color-free and lint-free cloth moistened with 99% isopropyl alcohol prior to applying any graphics. Wipe the panel in a single (non-circular) direction. This helps to ensure that fine particles, smudges, or fingerprints do not affect your final print.

Laminators Incorporated Sign Panel Production Guide
3255 Penn Street · Hatfield, PA 19440 · 877.OMEGA.77 · Fax: 215-721-4678 · LaminatorsInc.com
Page 3 · July 2021
o Routine surface cleaning (after installation): o Panels should be washed periodically to keep them bright and dirt free. Consult with the
manufacturer(s) of the applied (ink, vinyl, paint, etc.) graphics for cleaning recommendations—it's good practice to test in an inconspicuous area before using on full scale.
CUTTING o When possible, keep the protective masking in place while cutting panels to protect the finished surface from
scratches. In addition, it is recommended to perform trial cuts first to assure accuracy and evaluate the tool setting and cutting speeds. In some cases is it best to move the saw blade rather than the substrate when sizing the panels. After panels are cut, deburr the panel edges as referenced on page 2.
o Regardless of type of saw or product(s) you’re working with, make sure your saw is properly calibrated.
o Straight Cuts: o The most common method for making a straight cut is to use a panel saw or CNC router. Straight cuts
can also be made with a radial arm saw, table saw, hand-held circular saw, or laser cutter. o To assure a straight cut, clamp a straight edge to the panel. o When clamping the panel, be sure to allow extra space between the actual cut line and the straight edge
for the blade thickness, usually 1/8” plus the saw base plate.
o Cutting Shapes: o Cutting shapes is commonly done with a CNC router, hand-held saber saw, jigsaw, band saw, or laser
cutter. However, when working with Omega-Bond, shapes can also be cut using a punch press. o When necessary, laying out a pattern on the surface of the substrate is best achieved with a soft pencil. o Due to the nature of the product, it is best to move the saw blade rather than the material to minimize
potential scratches on the panel.
o Table Saws/Circular Saws: o Use production/industrial type equipment with a 7” to 7-1/2” metal carbide blade with 36-52 teeth; the
higher the tooth number, the smoother the cut. o Blades should have angled or circular teeth, alternate beveled, triple ground with the tooth gap wall
rounded. o The chip angle should be 5 to 15 degrees with a clearance angle of 10 to 30 degrees and a tooth spacing
of 3/16” to 1”. o Cutting speeds of 5,500 RPM and feeds of 16”/second are possible. o To assure a straight cut, clamp a straight edge to the panel. o When clamping the panel, be sure to allow extra space between the actual cut line and the straight edge
for the blade thickness, usually 1/8” plus the saw base plate.
o Panel Saws: o Panel saws offer an effective cutting solution and save on space. Blade should be the same type used for
table saws.

Laminators Incorporated Sign Panel Production Guide
3255 Penn Street · Hatfield, PA 19440 · 877.OMEGA.77 · Fax: 215-721-4678 · LaminatorsInc.com
Page 4 · July 2021
o Reciprocating Saws:
o Ideal for cutouts since more than one sheet can be cut at a time by stacking panels. If center cutting is required, place a foam pad under the substrate with the reciprocating blade cutting into the foam.
o Panels may be clamped or secured with double-facing tape. When clamping between jaws, protect the panel surface against damage.
o Blades should be high speed steel, .03” to .047” thick, 3/16” to 9/16” wide, with hook or circular teeth with alternate angles, set or waved at a spacing of .010” to .250”.
o Band Saws: o Recommended for irregular shapes or curves - Blades should be tempered spring strip steel, .03” to
.047” thick, 9/16” to 1” wide, with skip teeth designed for non-ferrous and ferrous materials spaced at a minimum of 10 teeth per inch; Cutting speeds of 10,000 RPM at a cutting feed of 10”/second are possible.
o While the masking helps to protect panels, it will not protect the panel face from metal chips during the cutting process. To help avoid this, press the saw toward the unwanted edge (drop) of your cut. This may shorten the life of your blade, but save the face of your sign.
o Note: When cutting wood-core panels, fewer, larger teeth are recommended. When cutting plastic-core panels, many small teeth are recommended.
o Tip: Be creative with different corner cut-outs. If working with a damaged panel, round the corners. If the damage to the corner or edge is minimal, Edge Cap will conceal minor dings or dents. Refer to Edge Cap information on page 9.
o Safety tip: When cutting aluminum-faced substrates, the edges can be sharp. Wearing lightweight cotton gloves will help avoid cuts to your hands. Use your best judgment when using cutting equipment – follow equipment manufacturers safety guidelines.
ROUTING o Straight-Cut Routing Instructions:
o Reference the equipment manufacturing guidelines and recommendations regarding the required equipment for cutting Laminators Incorporated types of products.
o Bits should be carbide tipped single flute “up cut” (1/8” thick) or double flute “up cut” (1/4” or 1/2” thick) and kept sharp.
o Recommended Cutting Feed: • 3mm D-Lite or Omega-Bond Standard/Premium: 120”/minute • 6mm Alumalite, Econolite or Omega-Bond Standard: 120”/minute • 10mm Alumalite or ProLite: 80”/minute • ¼” LusterBoard: 80”/minute • ½” Signboard, LusterBoard or SignPly: 80”/minute
Laminators Incorporated Sign Panel Production Guide
3255 Penn Street · Hatfield, PA 19440 · 877.OMEGA.77 · Fax: 215-721-4678 · LaminatorsInc.com
Page 5 · July 2021
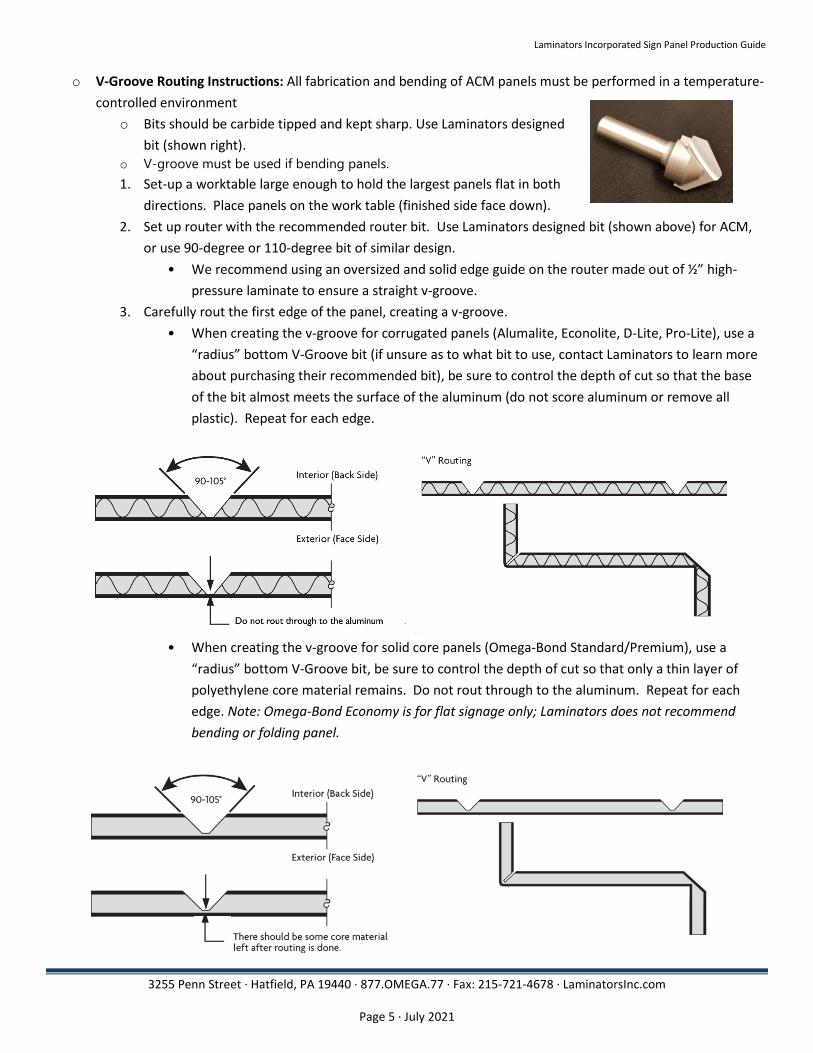
o V-Groove Routing Instructions: All fabrication and bending of ACM panels must be performed in a temperature-controlled environment
o Bits should be carbide tipped and kept sharp. Use Laminators designed bit (shown right).
o V-groove must be used if bending panels. 1. Set-up a worktable large enough to hold the largest panels flat in both
directions. Place panels on the work table (finished side face down). 2. Set up router with the recommended router bit. Use Laminators designed bit (shown above) for ACM,
or use 90-degree or 110-degree bit of similar design. • We recommend using an oversized and solid edge guide on the router made out of ½” high-
pressure laminate to ensure a straight v-groove. 3. Carefully rout the first edge of the panel, creating a v-groove.
• When creating the v-groove for corrugated panels (Alumalite, Econolite, D-Lite, Pro-Lite), use a “radius” bottom V-Groove bit (if unsure as to what bit to use, contact Laminators to learn more about purchasing their recommended bit), be sure to control the depth of cut so that the base of the bit almost meets the surface of the aluminum (do not score aluminum or remove all plastic). Repeat for each edge.
• When creating the v-groove for solid core panels (Omega-Bond Standard/Premium), use a “radius” bottom V-Groove bit, be sure to control the depth of cut so that only a thin layer of polyethylene core material remains. Do not rout through to the aluminum. Repeat for each edge. Note: Omega-Bond Economy is for flat signage only; Laminators does not recommend bending or folding panel.
Laminators Incorporated Sign Panel Production Guide
3255 Penn Street · Hatfield, PA 19440 · 877.OMEGA.77 · Fax: 215-721-4678 · LaminatorsInc.com
Page 6 · July 2021
4. Apply caulk to the v-groove to seal the joint prior to bending. Bend edge creating a 90-degree angle on all four sides. All routed and bent ACM must be caulked and taped to add rigidity to the bend.
5. Clean out excess caulk after bending the panel edges. 6. The outer side of the sheet can then be bent manually. The result is an exact and clean fold which
follows the routed groove. The whole fold should be done in one action, exceeding the desired angle by 10 degrees, meaning that the bending/folding should not be repeated as it weakens the material and could cause it to break. By bending slightly past the desired angle, it can be eased back to the correct position without repeated bending. Note: To bend a long and narrow panel, we recommend using a bending aid made from an ACM panel and a joint U or H shape profile.
o CNC Router Recommendations: o Refer to the equipment manufacturer’s guidelines for optimal settings. o Various router profiles are available on our website at http://www.laminatorsinc.com/sign-
panels/equipment-partners
PRINTING o Digital Printing:
o Before starting, refer to the printer specific Owner’s Manual, as well as recommendations from the ink manufacturer, for any instructions pertaining to the proper preparation of panels prior to print. In most cases, it’s best to run in Production or High Quality settings.
o Extra precautions should be taken when inspecting and selecting panels for print applications. Panels that are not flat or have damaged corners and ends may cause print head damage while printing.
o Panels should be shipped and stored flat to avoid bowing. Store flat, in a clean environment with the same or similar temperature and humidity as the printer for optimal results. The front and back of the panels should be clean and dry.
o Prior to printing, clean panels well with a soft, color-free and lint-free cloth moistened with 99% isopropyl alcohol prior to printing. This will remove any foreign particles that were attracted to the panels by static. Refer to American Architectural Manufacturers Association (AAMA) 609 and 610 for finished aluminum cleaning recommendations if unsure and always test a small area prior to proceeding with full print production. http://www.aamanet.org/
o If two-sided printing is required, waiting up to 24 hours for the ink on the front side to completely cure may improve substrate feed performance on the back side. Low or minimum ink usage images are recommended for two sided applications.
o The success of two-sided printing depends on the quality of the panel. The printer uses suction and friction to propel the media through the print zone, so good adhesion of the ink to the media on side one is necessary to survive the printing on side two.
o Inks: • Actual ink type depends on the printer make and model. Consult the printer’s manual for
recommendations. It’s always good practice to test ink compatibility prior to use. • In general, aqueous, solvent-based, UV-curable, and latex inks are readily accepted.
Laminators Incorporated Sign Panel Production Guide
3255 Penn Street · Hatfield, PA 19440 · 877.OMEGA.77 · Fax: 215-721-4678 · LaminatorsInc.com
Page 7 · July 2021
• Tip: For long-term outdoor durability start with a long-lasting ink like solvent or latex, then treat with a high-quality UV inhibitor.
o Screen Printing:
o Before starting, refer to the printer specific Owner’s Manual, as well as recommendations from the ink manufacturer, for any instructions pertaining to the proper preparation of panels prior to print. In most cases, it’s best to run in Production or High Quality settings.
o Panel surface should be cleaned after removing masking film to remove any adhesive residue, body oils, or other contaminants. Refer to Cleaning Panel information on page 3.
o Different inks will be required for the vinyl face if you are going to screen print on Omega Signboard. Use a vinyl-type ink or a common multi-purpose ink.
o A multi-purpose ink or synthetic gloss enamel will work well on aluminum-faced substrates. o Always confer with the ink supplier for recommended inks, and test a small area prior to printing a full
panel.
APPLYING VINYL/FILMS o Refer to the Cleaning Panel section on page 3. o The smooth, flat surface of our sign panels is perfect for all vinyl applications. Pressure-sensitive vinyls,
polyester films, intermediate/high performance films, reflective films and digital print vinyls apply to all of Laminators’ sign panels following the manufacturer’s application instructions.
o Apply vinyl with soapy water, which helps release any air trapped between the film and the panel, to make the surface smooth; or apply dry. A wet application using soapy water or an application fluid for vinyl allows you to reposition the graphic if needed.
APPLYING PAINT o Prepping Panels for Paint Graphics:
1. To prep aluminum-faced panels, lightly scuff the face using 400-grit sandpaper. For vinyl-faced panels, use 220-grit paper. Warning: Do not sand through the painted finished surface.
2. Spray 99% isopropyl alcohol on a color-free and lint-free wipe and clean the panel in a single (non-circular) direction. To spot prep an area of the panel, mask the areas of the board that are not being painted and prep the exposed area using the method above. Paint the spot area and remove the masking once dry.
o Painting on Aluminum:
o Automotive acrylic enamels, polyurethanes, and lacquers offer an excellent finish; however, lettering and bulletin enamels have difficulty adhering to aluminum and vinyl surfaces because the faces are smooth and glossy.
o In addition to scuffing the surface of the aluminum, adding a clear coat paint additive to your paint prior to application may help the paint to better adhere to the panel.
o Follow the paint manufacturers’ instructions for application recommendations, thinning requirements, and drying and cure times.
Laminators Incorporated Sign Panel Production Guide
3255 Penn Street · Hatfield, PA 19440 · 877.OMEGA.77 · Fax: 215-721-4678 · LaminatorsInc.com
Page 8 · July 2021
o Regardless of the paint selection or method of application, it is best to test for adequate adhesion. o Tip: For long-term outdoor durability start with a long-lasting paint, then treat with a high-quality UV
inhibitor.
o Painting on Vinyl: o Automotive acrylic enamels, polyurethanes, lacquers, and Krylon® sprays can be applied to vinyl
surfaces. o In addition to scuffing the surface of the vinyl, adding a clear coat paint additive to your paint prior to
application may help the paint to better adhere to the panel. o Follow the paint manufacturers’ instructions for application recommendations, thinning requirements,
and drying and cure times. o Regardless of the paint selection or method of application, it is best to test for adequate adhesion.
1. While there are several ways to apply paint, one method is to pour the paint onto the face, about 6" in
from the edge and down the middle of the board. Using a 9" foam roller, roll the paint in all directions, including the edges of the panel. Note: Painting the edges of wood core products does not seal them. Refer to Edge Cap information on page 9.
2. Bubbles may appear in the finish. After approximately 5 minutes, lightly roll again to remove the bubbles. If bubbles reappear, either the paint is still too wet or you are pressing too hard. Lighten the pressure as you re-roll. This technique will have a slight texture from the nap of the roller. For a smoother finish, mist mineral spirits into the air above the sign. The paint will spread out to a smooth finish. Note: This may take longer to dry.
o Spray Painting: o All types of spraying equipment can be used on Laminators’ panels from individual guns to pressure
pots. The best type of spray gun to use is an HVLP (High Volume Low Pressure) since it eliminates excessive spraying and environmental concerns. Vinyl-type or multi-purpose inks are recommended. A multi-purpose ink or synthetic gloss enamel will work best on aluminum-faced panels. If spraying with an automotive or polyurethane-type paint, an epoxy primer is recommended.
o Follow the paint manufacturers’ instructions for application recommendations, thinning requirements, and drying and cure times.
o Regardless of the paint selection or method of application, it is best to test for adequate adhesion. 1. While there are several spray painting techniques, one is to pour paint into spray gun or pressure pot for
lettering enamels to be sprayed. 2. After the base color is applied and dries, apply any remaining lettering and/or graphics. 3. Apply clear coat over the entire finished surface to extend the life of the sign. A primary mist coat is
recommended. Allow mist coat to reach tack before applying additional coats.
Laminators Incorporated Sign Panel Production Guide
3255 Penn Street · Hatfield, PA 19440 · 877.OMEGA.77 · Fax: 215-721-4678 · LaminatorsInc.com
Page 9 · July 2021
o Touch-Up Paint: 1. Sand problem area with 400-grit sandpaper, followed by 1200-grit sandpaper with or without water,
depending on the sandpaper. 2. Spray 99% isopropyl alcohol on a color-free and lint-free cloth and clean the panel in a single (non-
circular) direction. 3. Spray or apply 2 coats of paint over sanded area with matching paint. Allow to dry. 4. If looking to achieve a glossy surface: When dry, apply an automotive rubbing compound and buff panel.
LASER ENGRAVING o Laser engraving works best with aluminum-faced panels since they offer a flat, smooth surface. o Prolonged exposure to heat in excess of 250° is not recommended. o Follow the manufacturer’s recommended procedures for covering a wax and silicone free, polyester paint
surface.
ELECTRICAL o Note: Refer to UL files (UL 48; File #E60612) for current standards, requirements and restrictions as their criteria
may change. o Alumalite, Econolite, LusterBoard, Omega-Bond and SignPly can be used as part of the sign body and for
decorative applications, as well as for use in terminating conduit runs. o Note: These panels cannot be used to enclose bare live parts or wiring. All bare live parts or wiring must
be enclosed in a wire raceway as defined and approved by Underwriter’s Laboratory (UL)’s Standard for Electric Signs.
o Metal faces of the approved panels must be grounded in accordance with the Standard for Electric Signs (UL 48; File #E60612). Separate grounding straps must be used as necessary.
o Enclosures, plastic faces, and molding may rely on these panels for support as long as each component is securely fastened to the panel and weighs less than 7.5 lbs (3.4kg).
o If metal screws are used, they should not strip when tested as described in the Standard for Electric Signs (UL 48).
o Panels are acceptable for use in dry, damp, and wet locations; however water exclusion must be determined in the end product only.
o Minimum of 5cm (2”) spacing between the approved panels and heat-producing components of the sign. o All exposed panel edges, including drill holes, must be treated with two coats of asphalt-based paint or R/C Sign
Accessory wood coating (UYMR2) to comply with UL’s standard. o Recommendations:
o Router Recommendations: Refer to page 4 o Recommended Fasteners:
• Staple: 18-gauge stainless steel metal stitching wire • Rivet:
• Stainless steel 4-4 or 4-6, round • Tube Supports – large flange, 4-2 aluminum rivet
Laminators Incorporated Sign Panel Production Guide
3255 Penn Street · Hatfield, PA 19440 · 877.OMEGA.77 · Fax: 215-721-4678 · LaminatorsInc.com
Page 10 · July 2021
o Notes: • One 4x8 sheet of material yields approximately (10-12) 24”-high letters. • For fastening with blind rivets, do not drill through both sides of Alumalite, and use stainless
steel 4-2 rivets.
EDGE CAP o Panel edges can be finished with Laminators’ plastic “U” channel Edge Cap which helps protect and seals the
panel edges. Omega SignBoard, LusterBoard and SignPly have wood cores that require Edge Cap to achieve exterior durability. If the edges are not properly sealed, water can seep inside and damage the wood core. For wood core panels, we recommend DAP® AlexPlus® or comparable acrylic latex and silicone caulk or a high-quality urethane caulk as a sealant and adhesive.
o When using Alumalite, Econolite and Pro-Lite, Edge Cap can help to create a more “finished” appearance. In this application, we recommend using Liquid Nails® Heavy Duty for Construction or DAP® AlexPlus® as an adhesive. For a polished look, used color-matched or clear caulk.
o Note: When using Omega SignBoard, LusterBoard and SignPly for exterior applications, the warranty is void if Edge Cap from Laminators Incorporated and proper sealant is not used correctly to seal the wood core edges.
1. When wrapping edges with Edge Cap, it is important to plan the seams. A 4’ x 8’ panel will typically have four seams. The goal is to have Edge Cap ends (cut to 45°) join in corners much like a picture frame. Using Laminators’ notching tool, notch the edge cap at the corners allowing an extra 1/16” at each corner for the sealant to be placed inside the cap. Notch each leg of the cap independently, but the notches must align for a clean corner.
2. Bend the Edge Cap into a 90° corner then bend it back against itself in the notch and cut with a sharp utility knife. Filing the edge of the panel with a flat file can make it easier to apply the Edge Cap, but be sure to apply Edge Cap in the same direction the panel was filed. Dry fit the cap around the sign prior to applying the sealant inside the cap.
3. For best adhesion and to remove all foreign matter and dust, remove the masking and wipe panel edges and the interior of the Edge Cap with a dry cloth. For ½” Edge Cap, run a bead of caulk approximately ¼” thick through the Edge Cap (slightly less for ¼” Edge Cap). Caulk should fill the Edge Cap to the extent it is squeezed out on both sides to ensure the plywood edge is completely sealed.
4. Note: Exposed edges or corners will allow water to seep inside and eventually destroy the sign panel and invalidate the warranty on Omega SignBoard, LusterBoard, and SignPly.
5. When applying Edge Cap, start at the corner and work outward. Catch the bottom leg of the Edge Cap on the panel edge and stretch the legs apart to fit the top edge over the panel face. Press on face of Edge Cap until the legs are against panel edges and proceed down the panel.
6. Butt edges of the next piece tightly against the one already applied, and continue application. Seams should be tight which will force excel caulk to squeeze out. Wipe away excess. Allow the caulk to dry 3-4 hours (or per caulk manufacturer’s instructions) before handling the board.

Laminators Incorporated Sign Panel Production Guide
3255 Penn Street · Hatfield, PA 19440 · 877.OMEGA.77 · Fax: 215-721-4678 · LaminatorsInc.com
Page 11 · July 2021
o How to Heat and Form Edge Cap on Curved Panel Edges: o This technique typically requires practice to master. Test on scrap or leftover pieces of Edge Cap. o Typically a ¼” Edge Cap looks more professional on special shapes than the ½”. o Never heat or melt Edge Cap with sealant in it.
1. Set heat gun on high and wait a few moments for it to heat up.
Keep heat gun moving or it will burn and blacken the Edge Cap. Never let one area of Edge Cap take full heat longer than a moment. Apply heat evenly to each plane of Edge Cap rotating surfaces in this order: side, side, base and repeat, five or six times until you see the cap soften and become more pliable.
2. Work soft area of Edge Cap slowly onto panel edge, moving heated area forward as Edge Cap is softened into place. Do not heat Edge Cap on vinyl-faced Omega SignBoard panels. Applying heat to the surface vinyl will damage the finish. Cut a form out of plywood or LusterBoard to melt Edge Cap around then apply to vinyl faced sign panel.
3. When Edge Cap is snug all the way around and still hot, pinch Edge Cap and run fingers along softened areas while wearing gloves or use a cloth to protect fingers from heat. Blow to cool Edge Cap in place and smooth until cool.
• Note: 1/2” Edge Cap must always be molded while in contact with host edge. 1/4” Edge Cap should be melted held upward and let gravity bend it.
4. Remove cap from panel and pinch sides of Edge Cap closed to prevent them from bowing outward at the curved area. This will give your cap a better finished look.
5. Remove masking from panel surface, apply sealant inside formed Edge Cap and replace on panel edges, positioning it carefully. Wipe away any excess squeeze out of caulk.
• Tip: Allow excess squeeze out in Edge Cap seams to harden before wiping away since this will prevent dust accumulating and sticking to wet seams.
Laminators Incorporated Sign Panel Production Guide
3255 Penn Street · Hatfield, PA 19440 · 877.OMEGA.77 · Fax: 215-721-4678 · LaminatorsInc.com
Page 12 · July 2021
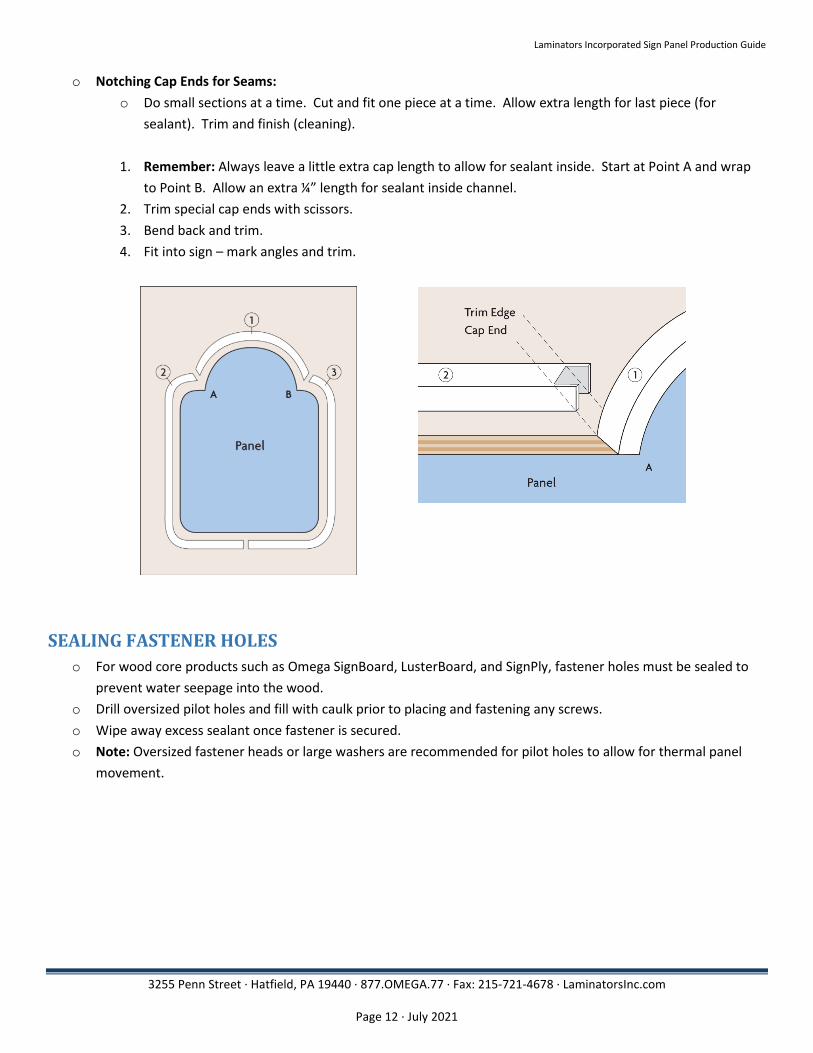
o Notching Cap Ends for Seams: o Do small sections at a time. Cut and fit one piece at a time. Allow extra length for last piece (for
sealant). Trim and finish (cleaning).
1. Remember: Always leave a little extra cap length to allow for sealant inside. Start at Point A and wrap to Point B. Allow an extra ¼” length for sealant inside channel.
2. Trim special cap ends with scissors. 3. Bend back and trim. 4. Fit into sign – mark angles and trim.
SEALING FASTENER HOLES o For wood core products such as Omega SignBoard, LusterBoard, and SignPly, fastener holes must be sealed to
prevent water seepage into the wood. o Drill oversized pilot holes and fill with caulk prior to placing and fastening any screws. o Wipe away excess sealant once fastener is secured. o Note: Oversized fastener heads or large washers are recommended for pilot holes to allow for thermal panel
movement.
Laminators Incorporated Sign Panel Production Guide
3255 Penn Street · Hatfield, PA 19440 · 877.OMEGA.77 · Fax: 215-721-4678 · LaminatorsInc.com
Page 13 · July 2021
JOINING PANELS o Rout & Return Method
o When joining panels with the Rout & Return technique, panels can also be panned on top and bottom edges and mounted by fastening through the top and bottom returns instead of aluminum angle clips.
o When using Rout & Return, the proper router bit must be used to achieve a clean 90 degree bend.
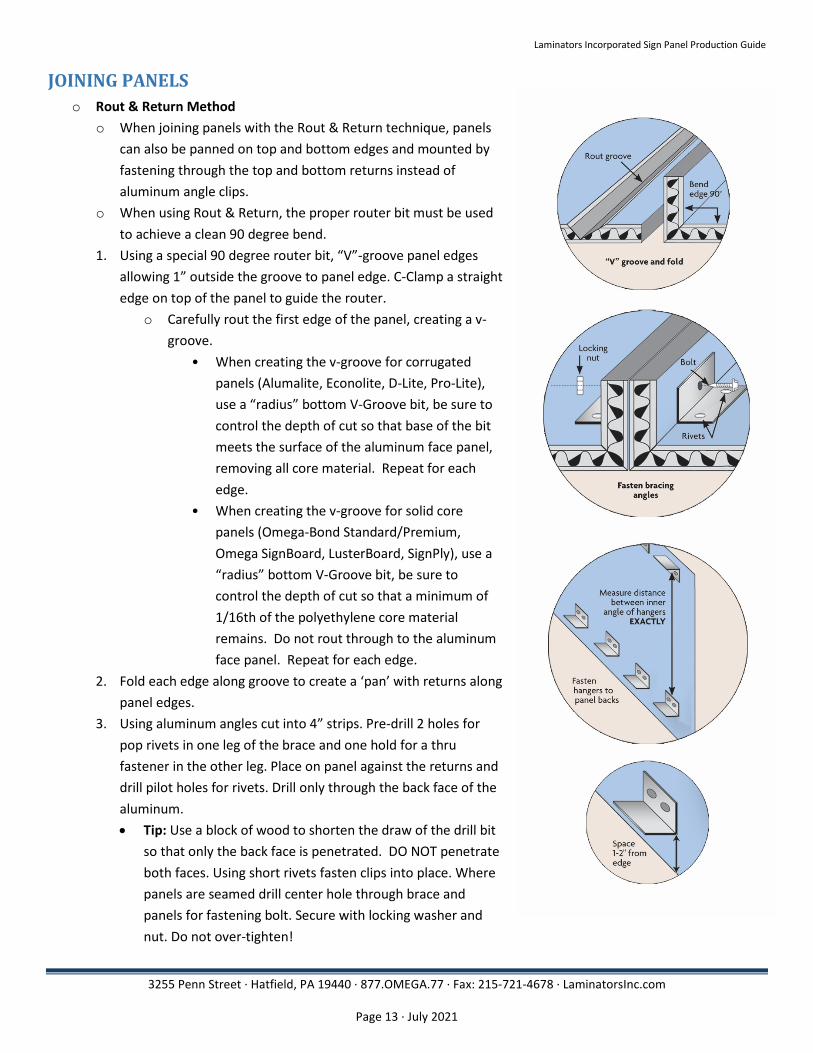
1. Using a special 90 degree router bit, “V”-groove panel edges allowing 1” outside the groove to panel edge. C-Clamp a straight edge on top of the panel to guide the router.
o Carefully rout the first edge of the panel, creating a v-groove.
• When creating the v-groove for corrugated panels (Alumalite, Econolite, D-Lite, Pro-Lite), use a “radius” bottom V-Groove bit, be sure to control the depth of cut so that base of the bit meets the surface of the aluminum face panel, removing all core material. Repeat for each edge.
• When creating the v-groove for solid core panels (Omega-Bond Standard/Premium, Omega SignBoard, LusterBoard, SignPly), use a “radius” bottom V-Groove bit, be sure to control the depth of cut so that a minimum of 1/16th of the polyethylene core material remains. Do not rout through to the aluminum face panel. Repeat for each edge.
2. Fold each edge along groove to create a ‘pan’ with returns along panel edges.
3. Using aluminum angles cut into 4” strips. Pre-drill 2 holes for pop rivets in one leg of the brace and one hold for a thru fastener in the other leg. Place on panel against the returns and drill pilot holes for rivets. Drill only through the back face of the aluminum. • Tip: Use a block of wood to shorten the draw of the drill bit
so that only the back face is penetrated. DO NOT penetrate both faces. Using short rivets fasten clips into place. Where panels are seamed drill center hole through brace and panels for fastening bolt. Secure with locking washer and nut. Do not over-tighten!
Laminators Incorporated Sign Panel Production Guide
3255 Penn Street · Hatfield, PA 19440 · 877.OMEGA.77 · Fax: 215-721-4678 · LaminatorsInc.com
Page 14 · July 2021
4. Pre-drill angle clips with 2 holes in one leg and a third hole in opposite leg. Blind-rivet angles on panel back approximately 1” from top and bottom edges. Be sure each angle is the same distance from panel edge. Remove seam fasteners prior to handling to avoid undue stress on seams. Refasten at installation site.
5. Measure distance from inside top angle hanger to inside bottom hanger. Carefully plan installed position of sign on wall. Bolt top row of 2x4 furring strips to wall and measure for placement of bottom furring strips. Mark wall with chalk line and fasten furring strips.
6. Reassemble panels face down at job site. Fasten seams with bolts. Carefully lift panels into place, hanging the angle attached on panel back on top and below the furring strips. Fasten hangers to furring with nails or galvanized wood screws.
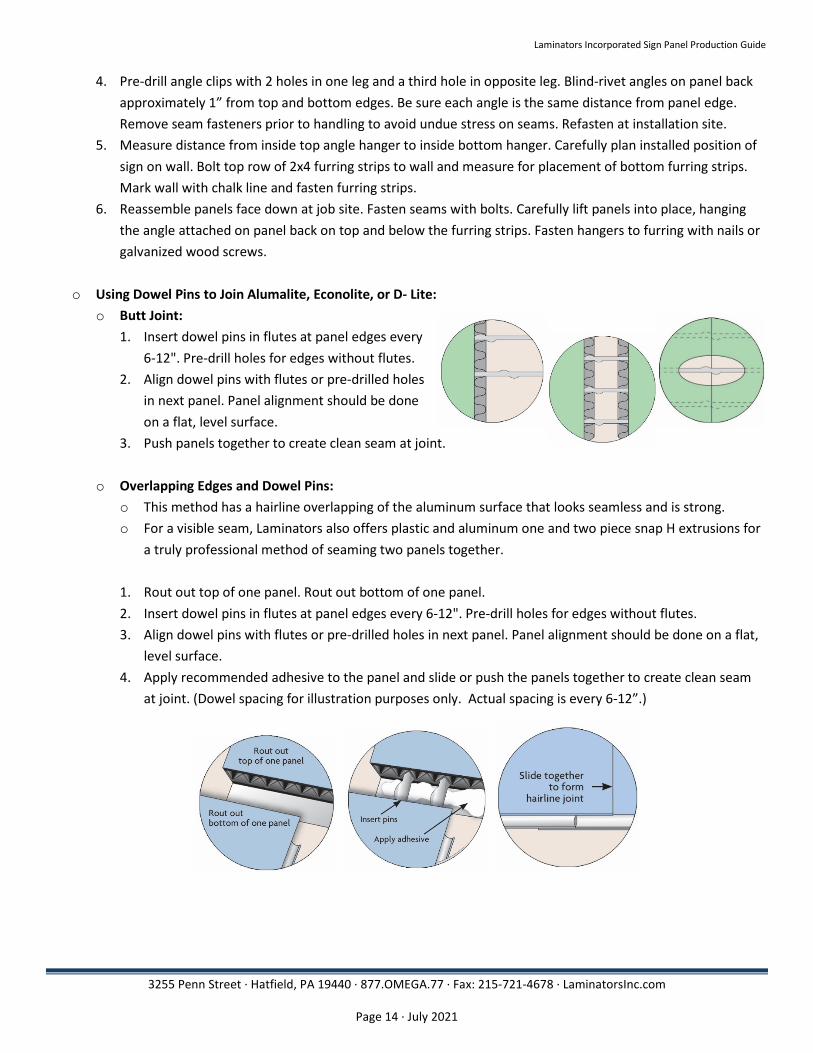
o Using Dowel Pins to Join Alumalite, Econolite, or D- Lite: o Butt Joint:
1. Insert dowel pins in flutes at panel edges every 6-12". Pre-drill holes for edges without flutes.
2. Align dowel pins with flutes or pre-drilled holes in next panel. Panel alignment should be done on a flat, level surface.
3. Push panels together to create clean seam at joint.
o Overlapping Edges and Dowel Pins: o This method has a hairline overlapping of the aluminum surface that looks seamless and is strong. o For a visible seam, Laminators also offers plastic and aluminum one and two piece snap H extrusions for
a truly professional method of seaming two panels together.
1. Rout out top of one panel. Rout out bottom of one panel. 2. Insert dowel pins in flutes at panel edges every 6-12". Pre-drill holes for edges without flutes. 3. Align dowel pins with flutes or pre-drilled holes in next panel. Panel alignment should be done on a flat,
level surface. 4. Apply recommended adhesive to the panel and slide or push the panels together to create clean seam
at joint. (Dowel spacing for illustration purposes only. Actual spacing is every 6-12”.)
Laminators Incorporated Sign Panel Production Guide
3255 Penn Street · Hatfield, PA 19440 · 877.OMEGA.77 · Fax: 215-721-4678 · LaminatorsInc.com
Page 15 · July 2021
INSTALLING/MOUNTING PANELS o Regardless of the installation method used to attach the panels, pre-drill all holes slightly oversized to allow for
expansion and contraction. Galvanized, stainless steel or aluminum bolts, nuts and washers should be used to avoid dissimilar metal contact and minimize corrosion. Include washers or spacers between the panel and mounted surface so water does not get trapped behind the panel. Use lock nuts or double nuts with washers to prevent the nuts from loosening over time. Take care to avoid over-tightening screws or bolts, especially when installing plastic core panels, as over-tightening can deform the panel and/or panel surface.
o Color variation is a characteristic of aluminum composite panels with brushed aluminum and metallic paint finishes, and can vary on material purchased from different lots. In addition, grain direction of brushed aluminum and metallic paint finishes must be considered in the design of the panel installation. Opposing grain directions may create visible patterns and may not be acceptable in the finished project. Be sure to install panels with arrows facing in the same direction and on the same plane. Laminators does not warrant a color match for these panels.
o Face-Fastening: o Galvanized, stainless steel or aluminum bolts, nuts and washers should be used to avoid dissimilar metal
contact. Use caution when tightening the nut into the bolt and use lock nuts or double nuts with washers to prevent the nut from loosening over time.
o Wall-Mount: o For safety and ease of installation, pre-drill all holes slightly oversize to allow for expansion. o Be careful not to over-tighten fasteners as this will cause unsightly dimples in panels which may not be
covered by framing. o Always keep a small amount of paint and Q-tips or small paintbrushes to paint the screw heads when
finished.
o Brick or Concrete: o Installation is basically the same for both. The two most common types of anchors used are lag
screws inserted into lead anchors or expanding plastic inserts. 1. Pre-drill mounting holes at ground level first, then anchor and drill a single corner-mounting
hole into the wall. Insert caulk into the corner-mounting hole. 2. Hang the sign by one corner and level it. For a brick wall, use brick mortar lines for level. For
concrete, snap or draw a line ahead of time. 3. Level the sign again and place second anchor. The sign is now supported by the top corner
screws. Drill the bottom holes, caulk, and insert anchors.
o Simple Frames with Hidden Fasteners: o 1-Piece Extrusions
1. Carefully measure and cut aluminum caps to proper size for sign. Miter-cut corners are not necessary, but they improve the appearance of the sign.
Laminators Incorporated Sign Panel Production Guide
3255 Penn Street · Hatfield, PA 19440 · 877.OMEGA.77 · Fax: 215-721-4678 · LaminatorsInc.com
Page 16 · July 2021
2. If preferred, Paint aluminum to desired color with Krylon, Rustoleum, or automotive spray paints (follow paint supplier recommendations).
3. Install 3 sides of J channel on wall (we recommend starting with two sides and bottom extrusions) and screw back leg of channel to wall with low profile pan-head screws every 16 – 24”.
4. Insert sealant inside all 3 extrusions to completely cover panel edges once inserted for proper seal.
5. Slide panel into installed channels. 6. Fill last extrusion with sealant and insert extrusion into panel on wall to finish framed
look (fasteners not required on last extrusion).
o 10Wood and Sheet Metal Walls – Unframed: o The same method is used for sheet metal walls as wood walls. The main difference is that a
sheet metal building has ribs. Consider this when drilling holes and mounting screws. Sheet metal screws are the fastest way to anchor Laminators’ panels to a wood or sheet metal wall.
1. Place support blocks on the wall. Screw one or two short 2x4s at the bottom of where the sign will go. Make sure they are level.
2. Place the sign on top of the 2x4s. This will support the sign while you screw it in place. 3. Before securing the sign, check to see if it is level with a 2' level. A small torpedo level will also
work well. 4. Insert caulk into the fastener holes prior to installing screws. Caulking all holes will help keep
water out. 5. Now insert fasteners into caulked holes. Touch up the screw heads after installation.
o Post and Panel:
o Post systems can be very elaborate or very simple to install. The following are general guidelines are recommended:
• Take all materials out to the job site and assemble. Use a carpenter’s square when assembling the framework.
• In most cases, post and panel supports are 3' into the ground, 3' above the ground, and 4' for the sign. Do not extend sign beyond post and panel supports in excess of 9" for plastic core products and 12" for wood core products.
• Fasten 2x4 stringers to two 4x4 pretreated posts, putting them into the ground and attach the sign to the stringers.
1. Paint two 2x4s and two 4x4 pieces with exterior latex paint. 2. Screw the 2x4s to the 4x4s. This stabilizes the framework. 3. Mount your sign while the framework is flat on the ground. 4. Dig post holes. Note: Reference local ordinance codes for proper post depth. 5. Set sign in place.

Laminators Incorporated Sign Panel Production Guide
3255 Penn Street · Hatfield, PA 19440 · 877.OMEGA.77 · Fax: 215-721-4678 · LaminatorsInc.com
Page 17 · July 2021
Your Trusted Sign Panel Manufacturer!
Strong, durable, and made to last, our
digital print-ready sign panel products are the industry standard for professional
sign makers
©2021 Laminators Inc. All rights reserved. (07/21)