Sierra Wireless AirCard ® Hub - CrowdSupport
64
User Guide Sierra Wireless AirCard® Hub 2400164 Rev 1
Transcript of Sierra Wireless AirCard ® Hub - CrowdSupport

User Guide
Sierra Wireless AirCard® Hub
2400164 Rev 1

2 2400164
AirCard Hub User Guide

Preface
Rev 1 Feb. 2012 3
Important Notice Due to the nature of wireless communications, transmission and reception of data can never be guaranteed. Data may be delayed, corrupted (i.e., have errors) or be totally lost. Although significant delays or losses of data are rare when wireless devices such as the Sierra Wireless AirCard Hub are used in a normal manner with a well-constructed network, the Sierra Wireless AirCard Hub should not be used in situations where failure to transmit or receive data could result in damage of any kind to the user or any other party, including but not limited to personal injury, death, or loss of property. Sierra Wireless accepts no responsibility for damages of any kind resulting from delays or errors in data transmitted or received using the Sierra Wireless AirCard Hub, or for failure of the Sierra Wireless AirCard Hub to transmit or receive such data.
Safety and Product Care of AirCard Hub With reference to unpacking, installation, use and maintenance of your electronic device, the following basic guidelines are recommended:
• Do not use or install this product near water to avoid fire or shock hazard. For example, do not use or install this product near a bathtub, kitchen sink, laundry tub, or near a swimming pool. Also, do not expose the equipment to rain or damp areas (for example a wet basement).
• Do not connect the power supply cord on elevated surfaces. Allow it to lie freely. There should be no obstructions in its path and no heavy items should be placed on the cord. In addition, do not walk on, step on or mistreat the cord.
Warning : Disconnect the power line from the device before servicing.
• To safeguard the equipment against overheating, make sure that all openings in the unit that offer exposure to air are unobstructed.
Safety and Hazards of AirCard Mobile Hotspot The AirCard mobile hotspot MUST BE POWERED OFF in all areas that may be susceptible to radio interference, in particular:
• Prohibited areas Obey all signs and notices and follow all rules and regulations. Power off the mobile hotspot when instructed to do so or when you suspect that it may cause interference or danger.
• In areas where blasting is in progress
• Where explosive atmospheres may be present Areas with a potentially explosive atmosphere are not always clearly marked. Such areas include gas stations, fuel depots, chemical transfer or storage facilities, areas where blasting is in progress, areas where the air contains chemicals or particles such as grain, dust, or metal powders, and any other area where you would normally be advised to turn off your cellular phone or vehicle engine.
• Near medical or life-support equipment Medical equipment may be susceptible to any form of radio interference. In such areas the mobile hotspot can transmit signals that could interfere with this equipment.
• On board aircraft

4 2400164
AirCard Hub User Guide
In addition to Federal Aviation Authority (FAA) requirements, many airline regulations state that you must suspend wireless operations before boarding an aircraft. The mobile hotspot is capable of transmitting signals that could interfere with various onboard systems and controls. Failure to observe this instruction may lead to suspension or denial of cellular telephone services to the offender, legal action, or both. Some airlines may permit the use of cellular phones while the aircraft is on the ground and the door is open. The mobile hotspot may be used normally at this time.
• While operating a vehicle The driver or operator of any vehicle should not use a wireless data device while in control of a vehicle. Doing so detracts from the driver or operator's ability to control and operate the vehicle. In some countries, using such communications devices while in control of a vehicle is an offence.
Caution: Unauthorized modifications or changes not expressly approved by Sierra Wireless, Inc. could void compliance with regulatory rules, and thereby your authority to use this device.
Limitation of Liability The information in this manual is subject to change without notice and does not represent a commitment on the part of Sierra Wireless. SIERRA WIRELESS AND ITS AFFILIATES SPECIFICALLY DISCLAIM LIABILITY FOR ANY AND ALL DIRECT, INDIRECT, SPECIAL, GENERAL, INCIDENTAL, CONSEQUENTIAL, PUNITIVE OR EXEMPLARY DAMAGES INCLUDING, BUT NOT LIMITED TO, LOSS OF PROFITS OR REVENUE OR ANTICIPATED PROFITS OR REVENUE ARISING OUT OF THE USE OR INABILITY TO USE ANY SIERRA WIRELESS PRODUCT, EVEN IF SIERRA WIRELESS AND/OR ITS AFFILIATES HAS BEEN ADVISED OF THE POSSIBILITY OF SUCH DAMAGES OR THEY ARE FORESEEABLE OR FOR CLAIMS BY ANY THIRD PARTY. Notwithstanding the foregoing, in no event shall Sierra Wireless and/or its affiliates aggregate liability arising under or in connection with the Sierra Wireless product, regardless of the number of events, occurrences, or claims giving rise to liability, be in excess of the price paid by the purchaser for the Sierra Wireless product.
Patents This product may contain technology developed by or for Sierra Wireless Inc.
Copyright ©2012 Sierra Wireless. All rights reserved. The information contained herein is proprietary to Sierra Wireless. No part of this document may be translated, transcribed, reproduced, in any form, or by any means without prior written consent of Sierra Wireless.
Trademarks AirCard® is a registered trademark of Sierra Wireless. Sierra Wireless™, and the Sierra Wireless logo are trademarks of Sierra Wireless. Other trademarks are the property of their respective owners.
Preface
Rev 1 Feb. 2012 5
Save Our Environment When this equipment has reached the end of its useful life, it must be taken to a recycling centre and processed separately from domestic waste. The cardboard box, the plastic contained in the packaging, and the parts that make up this device can be recycled in accordance with regionally established regulations. Never dispose of this electronic equipment along with your household waste. You may be subject to penalties or sanctions under the law. Instead, ask for disposal instructions from your municipal government. Please be responsible and protect our environment.
Transport and Handling When transporting the AirCard Hub, it is recommended to return the product in the original packaging. This ensures the product will not be damaged.
Note: Ensure the AirCard Hub is securely packaged with appropriate padding to prevent damage during courier transport.
Contact Information
Sales Desk: Phone: 1-604-232-1488
Hours: 8:00 AM to 5:00 PM Pacific Time
E-mail: [email protected]
Post: Sierra Wireless 13811 Wireless Way Richmond, BC Canada V6V 3A4
Fax: 1-604-231-1109
Web: [email protected]
Consult our website for up-to-date product descriptions, documentation, application notes, firmware upgrades, troubleshooting tips, and press releases: www.sierrawireless.com.

6 2400164
AirCard Hub User Guide

Rev 1 Feb. 2012 7
Contents
Introduction ............................................................................................................... 11 Prerequisites ........................................................................................................................................ 11
Target Users ........................................................................................................................................ 11
Product Overview ................................................................................................................................. 11
Package Contents ................................................................................................................................ 12
Product Features .................................................................................................................................. 12
LED Indicators ...................................................................................................................................... 13
Interfaces.............................................................................................................................................. 14
Default Settings .................................................................................................................................... 15
Get Started ................................................................................................................. 17
Placement of your AirCard Hub ........................................................................................................... 17
Avoid Obstacles and Interference ........................................................................................................ 17
Cordless Phones .................................................................................................................................. 18
Choose the “Quietest” Channel for your Wireless Network ................................................................. 18
Hardware Installation ........................................................................................................................... 19
Connecting Wirelessly .......................................................................................................................... 20
Quick Wi-Fi Setup ................................................................................................................................ 20
Connecting via a Cable ........................................................................................................................ 20
Accessing Storage Devices ................................................................................................................. 21
Operating Modes ....................................................................................................... 23
Easy Mode ........................................................................................................................................... 24
Small Office / Home Office ................................................................................................................... 26
Power User........................................................................................................................................... 28
Login Tab ......................................................................................................................................... 29
Wireless Tab .................................................................................................................................... 30
LAN 1 / WAN Tab ............................................................................................................................. 31
Advanced Settings .................................................................................................... 35
Home .................................................................................................................................................... 35
Status ................................................................................................................................................... 35
Internet Settings ................................................................................................................................... 36
LAN Configuration ............................................................................................................................ 36

8 2400164
AirCard Hub User Guide
WAN Configuration .......................................................................................................................... 38
Wireless LAN (WLAN) .......................................................................................................................... 40
Configuration .................................................................................................................................... 40
Wi-Fi Protected Setup (WPS) .......................................................................................................... 43
Services................................................................................................................................................ 44
Routing ............................................................................................................................................. 44
DDNS ............................................................................................................................................... 48
NTP .................................................................................................................................................. 49
System Monitor ................................................................................................................................ 50
System ................................................................................................................................................. 51
Log ................................................................................................................................................... 51
Settings ............................................................................................................................................ 52
Update Firmware .............................................................................................................................. 53
Administration .................................................................................................................................. 54
System Configuration ....................................................................................................................... 55
Logoff ............................................................................................................................................... 55
Reboot .............................................................................................................................................. 55
Specifications ............................................................................................................ 57
Technical Specifications ....................................................................................................................... 57
Mechanical Specifications .................................................................................................................... 58
FAQ ............................................................................................................................. 59
Regulatory Information ............................................................................................. 61
Regulatory Information for North America ........................................................................................... 61
Regulatory Information for EU countries .............................................................................................. 62
Regulatory Information for Australia .................................................................................................... 63

Contents
Rev 1 Feb. 2012 9
List of Figures
Figure 1: AirCard Hub Homepage – Basic Status Page .......................................................................... 23
Figure 2: Easy mode – Status Tab .......................................................................................................... 24
Figure 3: Easy Mode – AirCard Hub Docked/Undocked Scenarios ........................................................ 25
Figure 4: SOHO Mode – Basic Status Page ............................................................................................ 26
Figure 5: SOHO Mode – AirCard Hub Docked/Undocked Scenarios ...................................................... 27
Figure 6: Power User – Basic Status Page .............................................................................................. 28
Figure 7: Power User – Login Tab ........................................................................................................... 29
Figure 8: Power User – Switch to Advanced View................................................................................... 29
Figure 9: Power User – Wireless Tab ...................................................................................................... 30
Figure 10: Advanced View - Status .......................................................................................................... 31
Figure 11: Power User - LAN1/WAN Tab ................................................................................................ 32
Figure 12: Power User Mode – AirCard Hub docked/undocked scenario ............................................... 33
Figure 13: Advanced View - LAN Settings ............................................................................................... 36
Figure 14: DHCP Settings ........................................................................................................................ 37
Figure 15: DHCP Settings – Address Reservation List ........................................................................... 37
Figure 16: WAN – STATIC (Fixed IP) Settings ........................................................................................ 38
Figure 17: WAN - DHCP Settings ............................................................................................................ 38
Figure 18: WAN – Fail-over Settings ....................................................................................................... 39
Figure 19: Advanced View – Wi-Fi Settings ............................................................................................. 40
Figure 20: Wi-Fi Security Settings - WPA1/WPA2 ................................................................................... 41
Figure 21: Wi-Fi Security Settings - WPA-PSK/WPA2-PSK .................................................................... 42
Figure 22: Wi-Fi Security Settings - 802.1x ............................................................................................. 42
Figure 23: Wi-Fi Protected Setup (WPS) ................................................................................................. 43
Figure 24: Advanced View - Wi-Fi Station List......................................................................................... 44
Figure 25: Static Route Settings .............................................................................................................. 44
Figure 26: RIP Settings ............................................................................................................................ 45
Figure 27: NAT Settings ........................................................................................................................... 46
Figure 28: Advanced View - DMZ Settings .............................................................................................. 47
Figure 29: DDNS Settings ........................................................................................................................ 48
Figure 30: NTP Settings ........................................................................................................................... 49
Figure 31: System Monitor Settings ......................................................................................................... 50
Figure 32: System Log ............................................................................................................................. 51

10 2400164
AirCard Hub User Guide
Figure 33: Load / Save Configuration Page ............................................................................................. 52
Figure 34: Advanced View - Firmware Update ........................................................................................ 53
Figure 35: Administration Configuration Items ......................................................................................... 54
Figure 36: System Configuration Items .................................................................................................... 55
Figure 37: Logoff ...................................................................................................................................... 55
Figure 38: Reboot AirCard Hub ............................................................................................................... 55

Rev 1 Feb. 2012 11
1: Introduction This User Guide provides you all the information you need to set up, configure, and use the AirCard® Hub.
Prerequisites Before continuing with the installation of your AirCard Hub, please confirm that you comply with the minimum system requirements listed below.
AirCard 76xS mobile hotspot activated on a 3G/4G network.
Device with a working Ethernet or wireless (802.11b/g/n) network adapter.
A Web browser such as Internet Explorer, Netscape Navigator, Mozilla Firefox, Opera, Safari.
Target Users The AirCard Hub provides 3 levels of operation modes that allow users access to exactly the features they need. This User Guide is intended for users who prefer single click, easy setup, as well as for advanced users who understand telecommunications terminology and concepts.
Product Overview 3 x 10/100 LAN Ethernet port
1 x 10/100 LAN / WAN Ethernet port for optional alternate Internet connectivity (ADSL/Cable/Satellite)
802.11n / 300 Mbps wireless1 (backward compatible with 802.11b/g)
Browser-based interface for configuration and management
Wireless security options: WEP, WPA, WPA2
2 x USB ports for attaching USB storage devices to share with connected clients
1 Speeds are dependent on network coverage. See your 3G/4G provider coverage maps for more details. The total number of Wi-Fi users can also affect data speeds. Maximum wireless signal rate and coverage values are derived from IEEE Standard 802.11g and 802.11n specifications. Actual wireless speed and coverage are dependent on network and environmental conditions included but not limited to volume of network traffic, building materials and construction/layout.

12 2400164
AirCard Hub User Guide
Package Contents The AirCard Hub package consists of:
AirCard Hub
12V/2A power supply
Two 3G/4G dipole antennas
Ethernet cable
Quick Start Guide
If any of these items are missing or damaged, please contact Sierra Wireless Support immediately by visiting the Sierra Wireless Support website at: www.sierrawireless.com/Support.
Product Features The AirCard Hub creates a secure Wi-Fi network, providing Internet access for up to 16 users using the 3G/4G network. With quick and easy setup the AirCard Hub provides a landline experience without the need for fixed line connections. Simply plug the AirCard Hub into a power outlet, and then dock the AirCard mobile hotspot to access a 3G/4G Internet connection within minutes. The AirCard Hub incorporates a WLAN 802.11b/g/n access point, four 10/100 Mbps Ethernet ports, with one able to act as a 10/100 Mbps Ethernet WAN port. Two USB ports provide connectivity to attached USB storage for connected clients. The AirCard Hub features the latest security options, such as WPA and WPA2 data encryption.
Introduction
Rev 1 Feb. 2012 13
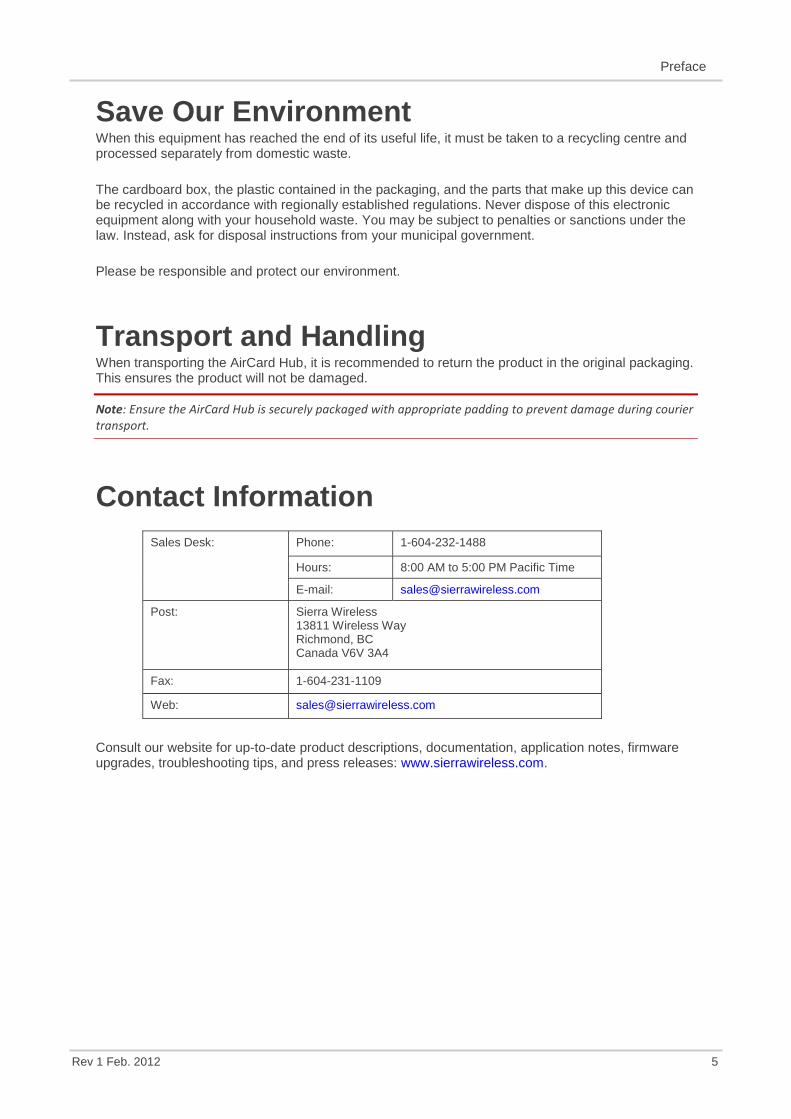
LED Indicators The AirCard Hub is designed to be placed on a desk top. All of the cables exit from the rear for better organization. The display (visible on the top of the AirCard Hub) provides information about network activity and the device status. See below for an explanation of each of the indicator lights.
Led Indicator Definition
Power Power status indicator:
Off = No Power
On = Power
WLAN Wi-Fi status indicator:
Off = Wi-Fi Off
Solid = Wi-Fi On, no traffic
Flash = Wi-Fi On, data traffic
WWAN Internet WAN indicator:
Off = No Internet connection
Solid = Internet connected, no traffic
Flash = Internet connected, data traffic
LAN1 / WAN LAN1/WAN Port connection status indicators:
Off = No cable connection
Solid = Cable connection established
Flash = Data traffic
LAN2
LAN3
LAN4
LAN 2-4 Port connection status indicators:
Off = No cable connection
Solid = Cable connection established
Flash = Data traffic

14 2400164
AirCard Hub User Guide
Interfaces The following interfaces are available on the rear panel of the AirCard Hub:
Interface Function
3G/4G antenna connectors Attach external 3G/4G antennas
LAN 1 / WAN LAN or WAN port for wired Ethernet clients or bridged devices (for example, ADSL modem)
LAN 2 - 4 LAN Port for wired Ethernet clients (computers, laptops, etc.)
USB ports Connect a USB storage device to share content with connected clients
Power connector Connects to a DC 12V/2A power adapter
Reset Hold this button down for over 12 seconds to reset to factory defaults

Introduction
Rev 1 Feb. 2012 15
Default Settings The following tables list the default settings for the AirCard Hub. Note that these default settings may change, once the AirCard mobile hotspot is docked in. LAN (Management)
Easy mode Small Home / Office mode Power User mode
Static IP Address 192.168.1.254 192.168.2.1 192.168.2.1
Subnet Mask 255.255.255.0 255.255.255.0 255.255.255.0
Default Gateway 192.168.1.1 192.168.2.1 192.168.2.1
Wireless LAN (Wi-Fi)
SSID (AirCard Hub) Displayed on AirCard mobile hotspot’s LCD screen. Security Key (AirCard Hub)
Web interface access (Power User mode only)
Username admin
Password admin

16 2400164
AirCard Hub User Guide

Rev 1 Feb. 2012 17
2: Get Started
Placement of your AirCard Hub Just like your mobile phone, the AirCard Hub’s location will affect its signal strength to the 3G/4G base station (cell tower). The data speed achievable from the AirCard Hub is dependent on this signal strength, which is affected by many environmental factors. When choosing a location for your AirCard Hub, keep in mind that the AirCard Hub needs adequate signal strength to provide Internet connectivity. Similarly, the wireless connection between your AirCard Hub and your Wi-Fi devices is stronger the closer your devices are to your AirCard Hub. Your wireless connection and performance will degrade as the distance between your AirCard Hub and devices increases. This may or may not be directly noticeable, and is greatly affected by the individual installation environment. If you have concerns about your network’s performance that might be related to range or obstruction factors, try moving the devices to a position between three to five meters from the AirCard Hub to see if distance is the problem. If you experience difficulties connecting wirelessly between your Wi-Fi devices and your AirCard Hub, try the following steps:
In multi-story homes, place the AirCard Hub on a floor that is as close to the centre of the home as possible. This may mean placing the AirCard Hub on an upper floor.
Avoid placing the AirCard Hub near a cordless telephone that operates at the same radio frequency as the AirCard Hub (2.3 GHz / 4 GHz).
Avoid Obstacles and Interference Avoid placing your AirCard Hub near devices that may emit radio “noise,” such as microwave ovens. Dense objects that can inhibit wireless communication include:
Refrigerators
Washers and dryers
Metal cabinets
Large aquariums
Metallic-based, UV-tinted windows
Note: While some of the items listed above can affect network performance, they will not prohibit your wireless network from functioning; if you are concerned that your network is not operating at its maximum effectiveness avoid placing your AirCard Hub near the devices listed. Please ensure that your AirCard Hub’s 3G/4G external antenna is positioned vertically (toward the ceiling).

18 2400164
AirCard Hub User Guide
If your wireless signal seems weak in some spots, make sure that objects such as those listed above are not blocking the signal’s path (between your devices and the AirCard Hub).
Cordless Phones If the performance of your wireless network is impaired after considering the above issues, and you have a cordless phone:
Try moving cordless phones away from your AirCard Hub and your wireless-enabled computers.
Unplug and remove the battery from any cordless phone that operates on the 2.3 GHz / 4 GHz band (check manufacturer’s information). If this fixes the problem, your phone may be interfering with the AirCard Hub.
If your phone supports channel selection, change the channel on the phone to the farthest channel from your wireless network. For example, change the phone to channel 1 and move your AirCard Hub to channel 11. See your phone’s user manual for detailed instructions. If necessary, consider switching to a 900 MHz or 5 GHz cordless phone.
Choose the “Quietest” Channel for your Wireless Network In locations where homes or offices are close together, such as apartment buildings or office complexes, there may be wireless networks nearby that can conflict with your wireless network. Use the Site Survey capabilities found in the software provided with your wireless adapter to locate any other wireless networks that are available (see your wireless adapter’s user manual), and switch your AirCard Hub and computers to a channel as far away from other networks as possible. Refer to section Wireless LAN (WLAN) on page 40. Experiment with more than one of the available channels, to find the clearest connection and to avoid interference from neighbouring cordless phones or other wireless devices.
Get Started
Rev 1 Feb. 2012 19
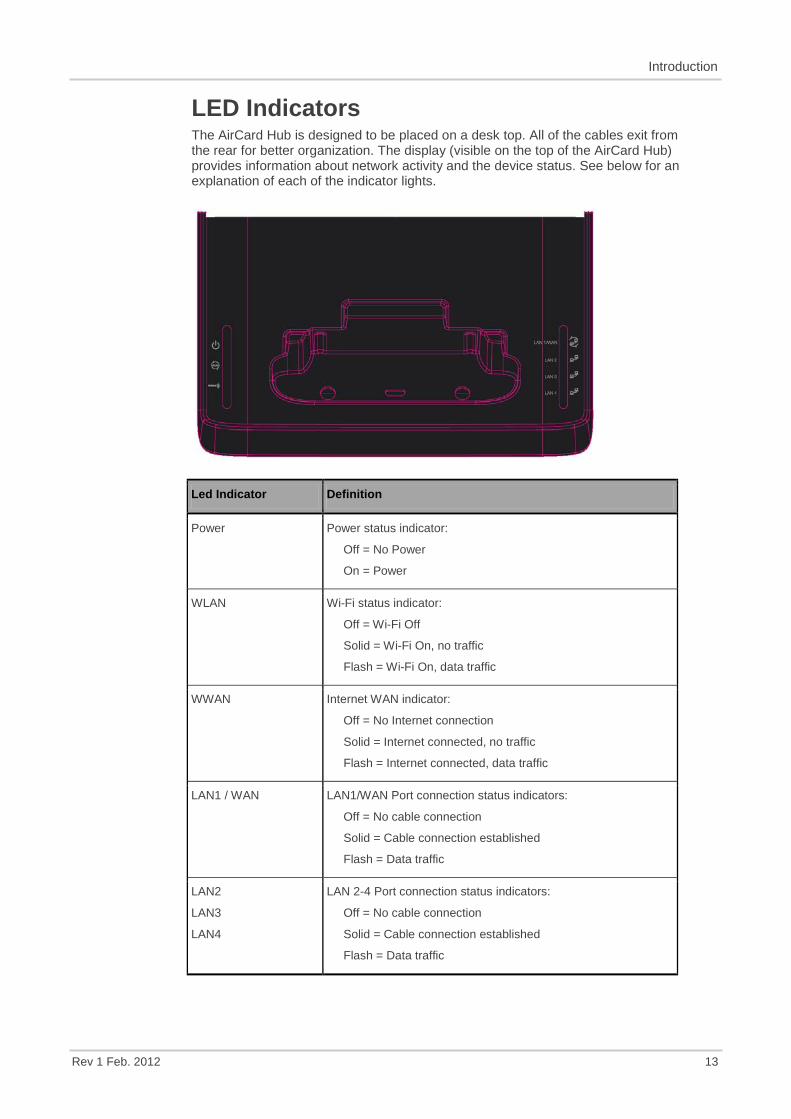
Hardware Installation 1. Attach the supplied antennas to the ports marked “3G/4G ANTENNA”. [Attach in
a clockwise direction, as shown by the red arrow in the photo below.]
2. Turn the metal part to screw in the antenna until it tightens, then hold the metal part while turning the antenna to a vertical position.
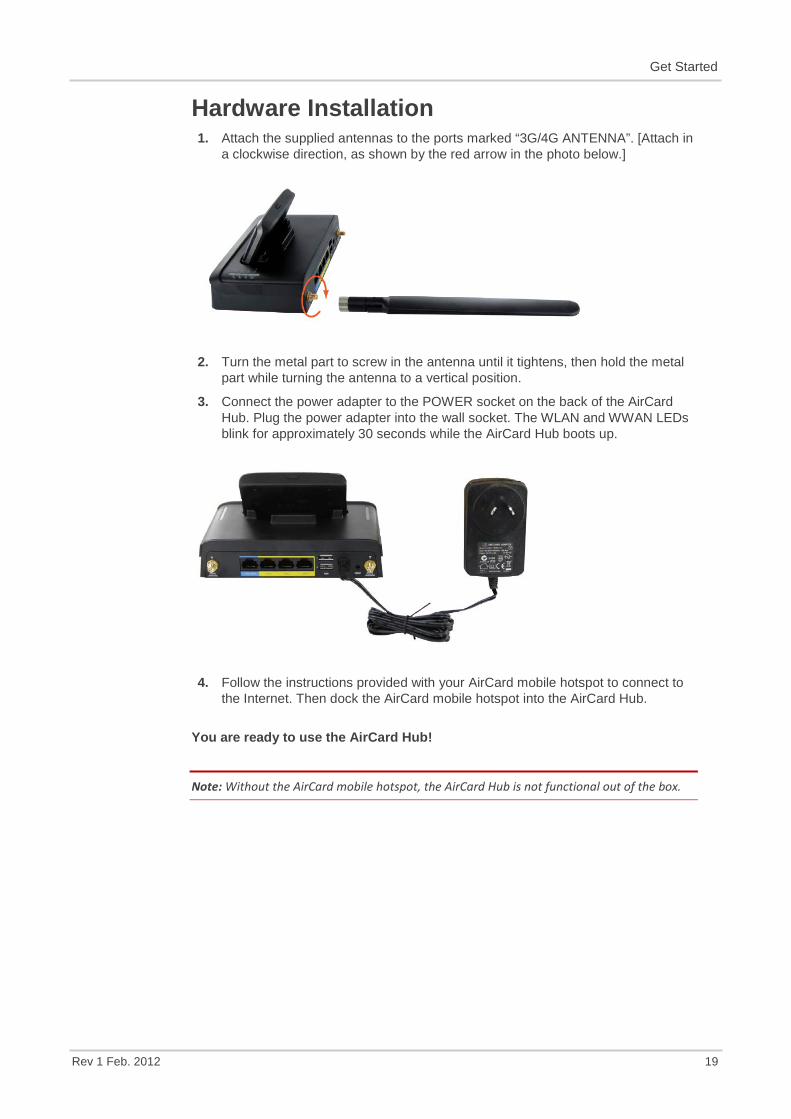
3. Connect the power adapter to the POWER socket on the back of the AirCard Hub. Plug the power adapter into the wall socket. The WLAN and WWAN LEDs blink for approximately 30 seconds while the AirCard Hub boots up.
4. Follow the instructions provided with your AirCard mobile hotspot to connect to the Internet. Then dock the AirCard mobile hotspot into the AirCard Hub.
You are ready to use the AirCard Hub!
Note: Without the AirCard mobile hotspot, the AirCard Hub is not functional out of the box.

20 2400164
AirCard Hub User Guide
Connecting Wirelessly 1. Ensure Wi-Fi is enabled on your device (for example,
computer/laptop/smartphone/printer/camera).
2. Open the wireless network manager on your device and connect to the network name shown on the LCD screen of your AirCard mobile hotspot.
3. When prompted for your wireless security settings, enter the Security Key shown on the LCD screen of the AirCard mobile hotspot.
4. Wait approximately 30 seconds for the connection to establish.
After the setup process is completed, you will be connected to the Internet. You can connect up to 16 Wi-Fi devices to your AirCard Hub.
Quick Wi-Fi Setup Quick Wi-Fi Setup allows users to quickly connect to a Wi-Fi network without the use of a keyboard. This is sometimes referred to as Wi-Fi Protected Setup (WPS). The feature is available on many more recent products such as cameras, printers, smart phones, and laptops.
1. Press the WPS button on your AirCard mobile hotspot docked in the AirCard Hub until the WLAN LED on the AirCard Hub starts flashing.
2. Within 2 minutes press the WPS button on the wireless device you want to connect or select the WPS-related option in the device’s software.
The AirCard Hub and your wireless device will communicate and establish the connection.
Connecting via a Cable 1. Connect the provided Ethernet cable to the port marked LAN1/WAN, LAN 2,
LAN3 or LAN4 at the back of the AirCard Hub.
2. Connect the other end of the Ethernet cable to your computer.
3. Wait approximately 30 seconds for the connection to establish.
After the setup process is completed, you will be connected to the Internet. You can connect up to 4 devices via Ethernet cable to the ports marked LAN1/WAN or LAN 2-4.

Get Started
Rev 1 Feb. 2012 21
Accessing Storage Devices The AirCard Hub provides access to the connected USB storage devices on USB ports 1 and 2, as well as the microSD card in the AirCard mobile hotspot.
Note: The microSD card in the AirCard mobile hotspot can be accessed via the AirCard Hub only if the file sharing option in the AirCard mobile hotspot is configured for USB Tethered mode. See the AirCard mobile hotspot’s user guide for configuring the file sharing option.
To access your storage devices:
1. Plug in your USB storage device.
2. If accessing the microSD card in the AirCard mobile hotspot, configure the file sharing option to USB Tethered mode.
3. Make sure you are connected to the AirCard Hub via Ethernet LAN ports or via Wi-Fi.
4. The method used to read/write the files in the storage devices depends on your computer's operating system.
Windows
1. Open Windows Explorer.
2. Type the network address \\swi.hub in the address bar to see the connected storage devices. The storage devices will be labelled Disk A, Disk B or Disk C for each of the connected devices.
You can now drag and drop (copy and paste) your files from or to the storage devices. Mac
1. In Mac, open up a Finder window.
2. Select Go -> Connect to Server.
3. Enter server address smb://swi.hub.
4. Select the volumes you want to mount on “swi.hub”. The storage devices will be labelled Disk A, Disk B or Disk C.
Linux In Linux machine, you can see the storage devices (SMB shares) using smbclient program (for example, smbclient –L swi.hub command will list the shares available).
Smartphones Several Samba client applications are available for accessing the connected storage devices. You can download and install them; please see the manual or the manufacturer's web site of the storage device.

22 2400164
AirCard Hub User Guide

Rev 1 Feb. 2012 23
3: Operating Modes The AirCard Hub has 3 operating modes offering varying levels of function and configuration options.
Easy (default)
Small Office / Home Office
Power User You can select the operating mode from the AirCard Hub homepage. Regardless of the operating mode selected, any device connected to the AirCard Hub can access it by using the address http://swi.hub. This opens the management console, where you can:
View the status of the AirCard Hub.
Make changes to the AirCard Hub, including changing the operating mode.
Access the AirCard mobile hotspot’s homepage.
Note: Refer to the Default Settings (page15) for the default IP Address in use in each of the operating modes.
Figure 1: AirCard Hub Homepage – Basic Status Page

24 2400164
AirCard Hub User Guide
Easy Mode Easy mode uses the settings of the docked AirCard mobile hotspot. In this mode you are only able to view the status of the Internet connection through the hotspot. The status tab provides basic connection related information, such as AirCard mobile hotspot dock status, WWAN connection status, 3G/4G signal strength (dBm), current 3G/4G provider, the SIM status.
Figure 2: Easy mode – Status Tab
The AirCard Hub also provides access to any connected USB storage devices. These can be accessed by using the network address: \\swi.hub. In Easy mode, the Ethernet LAN ports are activated only when the AirCard mobile hotspot is docked.
Note: In Easy mode, the Wireless Network SSID is the same as the SSID of the AirCard mobile hotspot. Connecting to this wireless network provides access to the Internet connection through the docked AirCard mobile hotspot. The IP Address assigned to the AirCard Hub is in the same subnet as that of the AirCard mobile hotspot.

Operating Modes
Rev 1 Feb. 2012 25
Figure 3: Easy Mode – AirCard Hub Docked/Undocked Scenarios

26 2400164
AirCard Hub User Guide
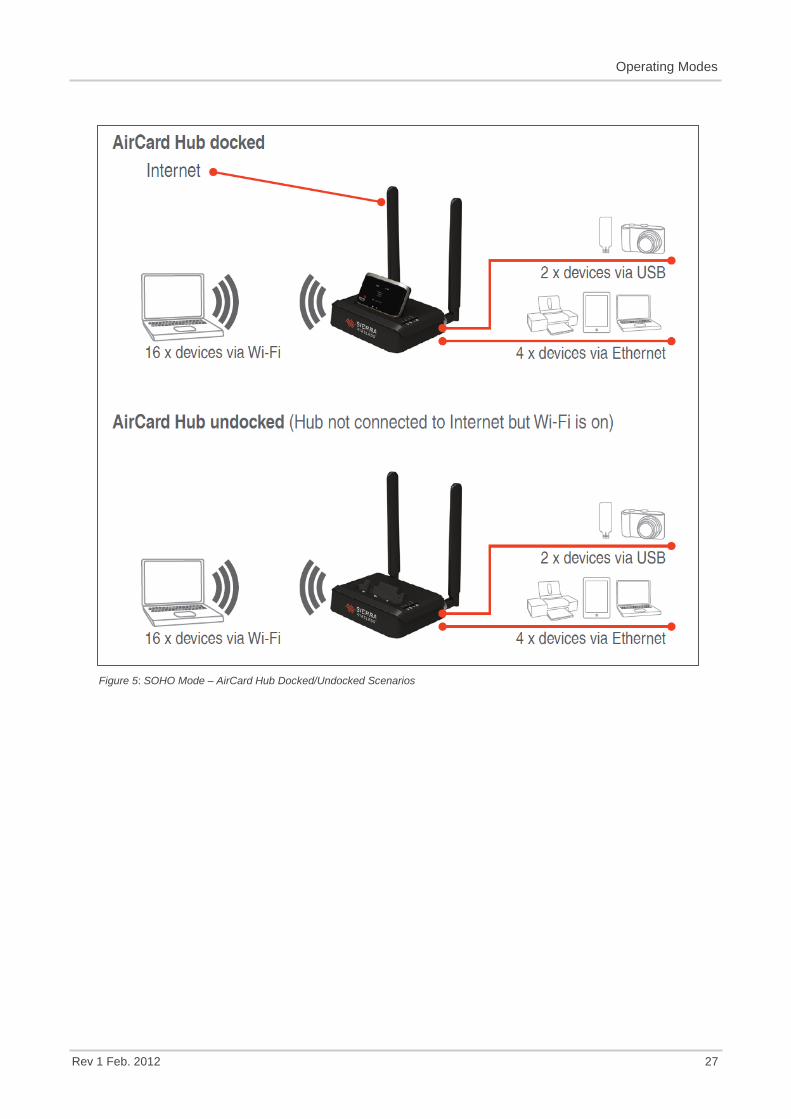
Small Office / Home Office Small Office / Home Office (SOHO) mode also uses the settings on the docked AirCard mobile hotspot. In Small Office / Home Office mode, the AirCard Hub also offers a standalone wireless network that provides access to any connected USB storage devices. These can be accessed by both Ethernet and wireless users by using the network address: \\swi.hub.
Figure 4: SOHO Mode – Basic Status Page
Note: In Small Office / Home Office mode, the wireless network SSID of the AirCard Hub is the AirCard mobile hotspot’s SSID with ‘-C’ or ‘_C’ added at the end. The IP Address assigned to the AirCard Hub is based on the AirCard mobile hotspot’s IP address, with the subnet incremented by 1.
Connecting to this wireless network provides access to the attached USB storage devices. Internet access is provided by the docked AirCard mobile hotspot. If the AirCard mobile hotspot is undocked, Internet access is only available by connecting to the AirCard mobile hotspot’s SSID.
Operating Modes
Rev 1 Feb. 2012 27
Figure 5: SOHO Mode – AirCard Hub Docked/Undocked Scenarios

28 2400164
AirCard Hub User Guide
Power User Power User mode also uses the settings on the docked mobile hotspot. In this mode, however, you can also configure the basic wireless network settings, WAN port function as well as in-depth configuration options for the AirCard Hub. You can use the WAN port to connect the AirCard Hub to an ADSL modem or other xDSL device to provide access to the Internet.
Figure 6: Power User – Basic Status Page
Note: In Power User mode, the wireless network SSID of the AirCard Hub is the AirCard mobile hotspot’s SSID with ‘-C’ or ‘_C’ added at the end. The IP Address assigned to the AirCard Hub is based on the AirCard mobile hotspot’s IP address, with the subnet incremented by 1.
Connecting to this wireless network provides access to the attached USB storage devices. Internet access is provided by the docked AirCard mobile hotspot. If the AirCard mobile hotspot is undocked, Internet access is available by connecting to the AirCard mobile hotspot’s SSID. Alternatively, LAN1/WAN port can be configured as WAN port to connect to an ADSL modem or other xDSL device.

Operating Modes
Rev 1 Feb. 2012 29
Login Tab In Power User mode, you will see the Login tab next to the Status tab. Click the Login tab to access and configure advanced settings. Unless the administrator Username and Password were previously changed, you can login with the default Username and Password provided in Default Settings (page 15).
Figure 7: Power User – Login Tab
Alternatively, you can switch to the advanced view by clicking the “Switch to advanced view” link that is displayed after you select Power User.
Figure 8: Power User – Switch to Advanced View

30 2400164
AirCard Hub User Guide
Wireless Tab This tab allows you to configure basic Wi-Fi settings for this device, such as changing the Wi-Fi Network Name (SSID) and Password.
Figure 9: Power User – Wireless Tab Basic View - Wi-Fi settings
Field Definition
Wi-Fi Network Name (SSID) The SSID (Service Set Identifier) is the name of your wireless network. Use a unique name to identify your wireless device so that you can easily connect to it from your wireless clients. This field is case sensitive and can be up to 32 characters.
Wi-Fi Password Enter the password you would like to use.
Confirm Password Retype the Wi-Fi password to confirm.

Operating Modes
Rev 1 Feb. 2012 31
LAN 1 / WAN Tab This tab allows you to configure the WAN port function. You can select from the following types of WAN connection:
• DHCP (Automatic Configuration – default)
• Static (fixed IP)
Unless the LAN1/WAN port was previously configured as WAN port, you will be prompted with the following warning message.
Click OK to continue; the System Status page will open. From this page, in the Ethernet Port Status section, you can select LAN1/WAN port to be a LAN port or WAN port. Then click Home to go back to the basic status page and to continue configuring your LAN1/WAN port.
Figure 10: Advanced View - Status

32 2400164
AirCard Hub User Guide
DHCP The default setting is DHCP mode. In this mode network settings are automatically configured via DHCP protocol for the existing connection offered by an ADSL modem or xDSL device. To use this, select DHCP from the WAN Connection Type drop-down menu and click Save.
STATIC (Fixed IP) With Static (Fixed IP) mode, you must enter the network information for the connection. To use this, select STATIC (fixed IP) from the WAN Connection Type drop-down menu, enter the required IP Networking information, and then click Save.
Figure 11: Power User - LAN1/WAN Tab
Field Definition
IP Address Enter the IP Address the AirCard Hub will use for the WAN port connection.
Subnet Mask Enter the Subnet Mask the AirCard Hub will use for the WAN port connection.
Gateway Enter the Gateway IP Address the AirCard Hub will use for the WAN port connection.
Primary / Secondary DNS Server Enter the DNS Server IP Addresses the AirCard Hub will use for the WAN port connection.
In Power User mode, the AirCard Hub also offers a standalone wireless network that provides access to any connected USB storage devices. These can be accessed by both Ethernet and wireless users by using the network address: \\swi.hub.

Operating Modes
Rev 1 Feb. 2012 33
Figure 12: Power User Mode – AirCard Hub Docked/Undocked Scenarios

34 2400164
AirCard Hub User Guide

Rev 1 Feb. 2012 35
4: Advanced Settings The advanced settings pages are displayed only when the AirCard Hub is in “Power User” mode. These pages provide a more in-depth ability to configure the AirCard Hub.
Home Click the Home menu item to return you to the basic status page.
Status The status page as shown in Figure 10 on page 31 provides system related information of the AirCard Hub. By default, the status page shows System Information, WAN, LAN and Ethernet Port Status. Each section shows information relevant to the connection type or function. If the LAN, WAN or Ethernet Port status is hidden, click the relevant link below the menu bar. To view all the status page items, click the All Status button.
LAN1/WAN port The LAN1/WAN port can also operate as a WAN port for connecting to a bridged Ethernet device, such as an xDSL modem. Use the drop-down menu to select the LAN or WAN mode applicable for your environment.

36 2400164
AirCard Hub User Guide
Internet Settings Select the Internet Settings menu to configure LAN or WAN settings.
LAN Configuration The LAN drop-down menu item allows you to display the IP Setup and DHCP settings.
IP Setup From this page you can configure the LAN functionality of the AirCard Hub. You can change the LAN IP Address, LAN Subnet Mask and DNS Masquerading options.
Figure 13: Advanced View - LAN Settings
Name Description
IP Address The local IP address of AirCard Hub
Subnet Mask The subnet mask for the local network.
DNS Masquerade Select to enable or disable DNS masquerading for connected clients.
Click Save to save the settings.
DHCP From the DHCP page you can adjust the DHCP settings used by the AirCard Hub. The DHCP settings are then passed onto any device connecting via DHCP. You can manually set the following settings:
• DHCP Start Range
• DHCP End Range
• DHCP Lease time
• Default Domain Name Suffix
• Primary and Secondary DNS Server
• Primary and Secondary WINS Server
Advanced Settings
Rev 1 Feb. 2012 37
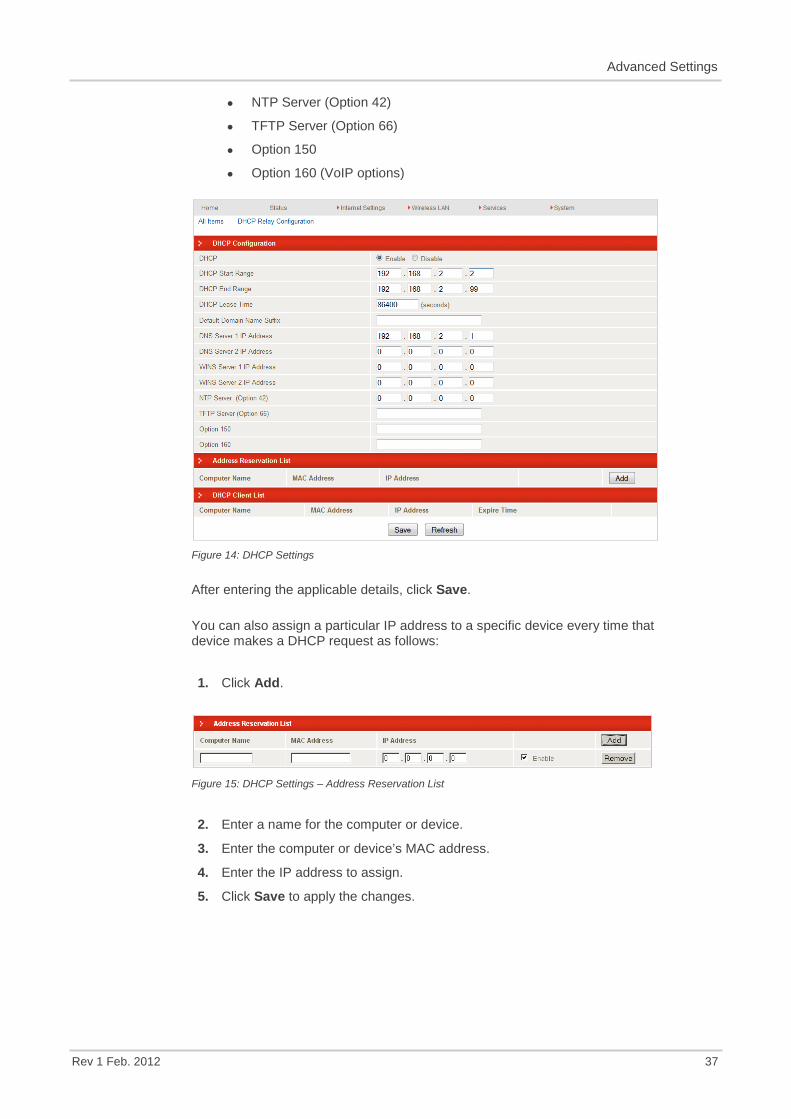
• NTP Server (Option 42)
• TFTP Server (Option 66)
• Option 150
• Option 160 (VoIP options)
Figure 14: DHCP Settings
After entering the applicable details, click Save. You can also assign a particular IP address to a specific device every time that device makes a DHCP request as follows:
1. Click Add.
Figure 15: DHCP Settings – Address Reservation List
2. Enter a name for the computer or device.
3. Enter the computer or device’s MAC address.
4. Enter the IP address to assign.
5. Click Save to apply the changes.

38 2400164
AirCard Hub User Guide
WAN Configuration The WAN page allows you to configure the optional WAN Ethernet port. Select the WAN connection type suitable for your environment and configure parameters according to the selected connection type.
STATIC (Fixed IP) If your WAN connection uses a static IP address, please select “STATIC (Fixed IP)” and fill in the required information in the fields provided.
Figure 16: WAN – STATIC (Fixed IP) Settings
Name Description
IP Address Enter the IP address assigned by your Internet Service Provider (ISP)
Netmask Enter the Subnet mask assigned by your ISP
Gateway Enter the WAN Gateway assigned by your ISP
Primary/ Secondary DNS Server Enter the DNS address assigned by your ISP
Click Save to save the settings.
DHCP This connection will get the IP address from the Internet service provider. Leave everything as default unless instructed by your Internet Service Provider.
Figure 17: WAN - DHCP Settings
Field Description
Hostname Enter the host name of your computer. This is optional, and only required if your service provider asks you to do so.
Click Save to apply the settings.

Advanced Settings
Rev 1 Feb. 2012 39
Fail-over Settings If the LAN1/WAN port is configured in WAN mode, you can select WAN port or WWAN port to access the Internet connection.
Figure 18: WAN – Fail-over Settings
When both WAN and WWAN connections are available, the AirCard Hub uses the WAN connection as the primary connection and the WWAN connection as the backup connection. In this case you can select one of the four connection types:
Connection Type Description
WAN The failover function is disabled and the AirCard Hub will use WAN connection only.
WWAN The AirCard Hub will use WWAN connection only. AirCard mobile hotspot will be required for Internet connection.
WWAN Failover if WAN link down
The AirCard Hub uses WAN connection as a primary connection and WWAN connection as a backup connection. When the WAN connection is physically disconnected, the AirCard Hub will start using WWAN connection for Internet access.
WWAN Failover with WAN ping
The AirCard Hub uses WAN connection as a primary connection and WWAN connection as a backup connection. The AirCard Hub will periodically ping the assigned servers. When none of the servers respond to the ping message, the AirCard Hub will switch to use WWAN connection for Internet access.
The periodic ping settings can be configured by opening the System Monitor page under Services menu.
Click Save to apply the settings.

40 2400164
AirCard Hub User Guide
Wireless LAN (WLAN) Select Wireless LAN menu to open wireless network configuration pages. You can open up pages to configure WLAN configuration, to configure WPS setup, or to view WLAN station information.
Configuration On this page you can define the wireless settings for the AirCard Hub.
Figure 19: Advanced View – Wi-Fi Settings
Wireless Setup
Option Definition
Radio On/Off Wi-Fi is turned on by default. Changing this option to OFF will turns OFF the wireless functionality on the AirCard Hub; you will not be able to connect to your AirCard Hub wirelessly.
Country Select your country.
Network Mode
There are 5 modes to select from:
• 11b/g mixed mode • 11b only • 11g only • 11n only • 11b/g/n mixed mode
Frequency (Channel) This setting configures the frequency that the wireless radio uses for wireless connectivity.

Advanced Settings
Rev 1 Feb. 2012 41
The Security Settings section allows you to configure the wireless security for your AirCard Hub. Setting up sufficient wireless security can prevent unauthorized access to your wireless network.
Security Settings
Option Definition
Network Name (SSID): The SSID (Service Set Identifier) is the name of your wireless network. Use a unique name to identify your wireless device so that you can easily connect to it from your wireless clients. This field is case sensitive and can be up to 32 characters. You should change the default SSID for added security.
Network Authentication You can choose from the following wireless security options:
• Disabled • Open • Shared • WPA • WPA-PSK • WPA2 • WPA2- PSK • WPA-PSK-WPA2-PSK • WPA1-WPA2 • 802.1x.
See the next page for an explanation of the different security types available.
WDS Mode: WDS (Wireless Distribution System) is a feature that enables the wireless interconnection of access points, and allows a wireless network to be expanded using multiple access points without a wired backbone to link them. Each WDS Access Point needs to be set with the same channel and encryption type.
Network Authentication Options
WPA1/WPA2
WPA (Wi-Fi Protected Access) authentication is suitable for enterprise applications. It must be used in conjunction with an authentication server, such as RADIUS, to provide centralized access control and management. It provides a stronger encryption and authentication solution.
Figure 20: Wi-Fi Security Settings - WPA1/WPA2

42 2400164
AirCard Hub User Guide
WPA-PSK/WPA2-PSK
WPA-PSK (TKIP) and WPA2-PSK (AES) are newer types of security. These types of security give a more secure network compared to WEP. Enter the key in the WPA Pre-Shared Key field. The key needs to be more than 8 characters and less than 63 characters and it can be any combination of letters and numbers.
Figure 21: Wi-Fi Security Settings - WPA-PSK/WPA2-PSK
Note: The configuration for WPA-PSK and WPA2-PSK is also identical. Your AirCard Hub uses WPA2-PSK by default.
802.1x
To use 802.1x security, you need to have a RADIUS server on your network that acts as the authentication server. Please type in the details for your RADIUS server in the fields required.
Figure 22: Wi-Fi Security Settings - 802.1x
Most wireless adapters in computers and laptops support at least WEP and WPA.
Note: After configuring wireless security, you also need to configure your wireless adapter to use the same security settings before you can connect wirelessly. Not all wireless adapters support WPA-PSK/WPA2-PSK/WPA/WPA2 security; please refer to your wireless adapter user guide for more details. It is strongly recommended to set up a simple wireless security such as WPA-PSK (when the wireless client supports WPA-PSK) in order to secure your network.

Advanced Settings
Rev 1 Feb. 2012 43
Wi-Fi Protected Setup (WPS) The AirCard Hub supports the WPS feature that allows users with suitable devices to quickly connect to a Wi-Fi network without the use of a keyboard.
Figure 23: Wi-Fi Protected Setup (WPS)
If the WPS is enabled by selecting Enable, then WPS Summary and WPS Progress sections are displayed, as shown in Figure 23 above. You can select either PIN mode or PBC mode.
WPS mode Definition
PIN When this mode is selected, you need to enter a PIN on both the wireless client and your AirCard Hub to enable a secure wireless connection. For instructions on displaying the PIN, see the user manual of your wireless device.
PBC When the PBC (Push Button Configuration) mode is enabled you need to press the WPS button on the AirCard mobile hotspot to initiate the process to enable a secure wireless connection.
Note: The WPS feature is available on many more recent products, such as cameras, printers, smart phones, and laptops. Check the user guide that came with your device to find out if this feature is supported and to configure your device.

44 2400164
AirCard Hub User Guide
Station Info The Station List shows the wireless clients currently associated with your AirCard Hub.
Figure 24: Advanced View - Wi-Fi Station List
Services Select the Services menu to configure Routing, DDNS, NTP and System Monitor settings.
Routing From this menu, you can open the Static Routes, RIP Routing, NAT settings, or DMZ settings page.
Static The Static Routes page is used to add or delete static routes. Static routes are used to facilitate communication between devices on different networks.
Figure 25: Static Route Settings

Advanced Settings
Rev 1 Feb. 2012 45
Some routes are added by default by the AirCard Hub on initialization such as the Ethernet subnet route for routing to a device on the Ethernet subnet. A PPP route is also added upon obtaining a WAN PPP connection.
To add static routes:
1. Enter the required values in the fields for the route being added.
2. Click Add.
Note: You must increment the “Route no” by 1 for each route in the “Route no” field; otherwise that route will be overwritten.
The Active Routing table at the bottom will then show the new route added. To delete Static Routes, click the “Delete Entry” text (in blue).
RIP RIP (Routing Information Protocol) is used for advertising routes to other routers. Thus, all the routes in the AirCard Hub’s routing table are advertised to other nearby routers. For example, the route for the AirCard Hub’s Ethernet subnet could be advertised to a router on the PPP interface side, so that a router on this network will know how to route to a device on the AirCard Hub’s Ethernet subnet. You will need to add the routes appropriately in the Static Routes section on page 44.
Figure 26: RIP Settings
To configure RIP Settings:
1. Select Enable on the RIP Page.
2. Select RIP version.
3. Click Save.
Note: Some routers ignore RIP.

46 2400164
AirCard Hub User Guide
NAT The NAT page is used to configure the Network Address Translation rules currently in use on the AirCard Hub. The AirCard Hub is in NAT mode by default.
Figure 27: NAT Settings
This is only needed if you need to map inbound requests to a specific port on the WAN IP address to a device connected on the Ethernet interface, for example, a web camera.
Option Definition
Mapping no For each mapping you’re defining, enter a unique number, and then enter the details in the following fields.
Protocol Specify the protocol to use for the port mapping (TCP, UDP, All protocols).
Source IP Address
Specifies either a “Friendly” IP address that is allowed to access the AirCard Hub, or a wildcard IP address of 0.0.0.0 that allows all IP addresses to access the AirCard Hub.
Incoming Port Range Specify the external port(s) to listen to.
Destination IP Address Local Area Network address of the device to forward inbound requests to.
Destination Port Range Local Area Network port(s) to forward connections to.
To configure Port Forwarding:
1. Enter the IP Mapping configuration information as appropriate.
2. Click Save NAT.
Note: If the “Incoming Port Range” specifies a single port, then the destination port can be set to any port. If the “Incoming Port Range” specifies a range of port numbers then the “Destination Port Range” MUST be the same as the “Incoming Port Range”.
To delete a port forwarding rule, click the corresponding “Delete Entry” link from the list of IP Mappings.

Advanced Settings
Rev 1 Feb. 2012 47
DMZ If you have a client PC that cannot run an Internet application (for example, games) properly from behind the NAT firewall, then you can open up the firewall restrictions to allow unrestricted two-way Internet access by defining a DMZ Host. The DMZ function allows you to re-direct all packets going to your WAN port IP address, to a particular IP address in your LAN. The difference between the virtual server and the DMZ function is that the virtual server re-directs a particular service/Internet application (for example FTP, websites) to a particular LAN client/server, whereas DMZ re-directs all packets (regardless of services) going to your WAN IP address to a particular LAN client/server.
Figure 28: Advanced View - DMZ Settings
Option Definition DMZ Settings: Enable/disable DMZ.
DMZ IP Address: Fill in the IP address of a particular host in your LAN network that will receive all the packets originally going to the WAN port/Public IP address of your AirCard Hub.
To configure DMZ Settings:
1. For DMZ Settings, click Enable.
2. Enter DMZ IP Address.
3. Click Save.

48 2400164
AirCard Hub User Guide
DDNS The DDNS page is used to configure the Dynamic DNS feature of the AirCard Hub. You can select from a number of dynamic DNS hosts.
Figure 29: DDNS Settings Dynamic DNS provides a method for the AirCard Hub to update an external name server with the current WAN IP address. The following DDNS Providers are available:
• www.dhs.org
• www.dyndsn.org
• www.dyns.cx
• www.easydns.com
• www.justlinux.com
• www.ods.org
• www.tzo.com
• www.zoneedit.com
To configure dynamic DNS:
1. Select DDNS Configuration Enable.
2. Select the Dynamic DNS service that you wish to use. Enter your dynamic DNS account credentials.
3. Click Save.

Advanced Settings
Rev 1 Feb. 2012 49
NTP The NTP page is used to select the NTP server used for network time synchronization.
Figure 30: NTP Settings
The NTP (Network Time Protocol) settings allow your AirCard Hub to synchronize its internal clock with a global Internet Time server. This setting affects functions such as System Log entries and Firewall settings, where the current system time is displayed. You can use the default NTP server or enter one manually if required.
To configure NTP Settings:
1. Select Enable for Enable NTP server.
2. Enter NTP Server Address.
3. Click Save.

50 2400164
AirCard Hub User Guide
System Monitor The System Monitor page is used to configure the behaviour of the Periodic Ping monitor function.
Figure 31: System Monitor Settings
The Periodic Ping Reset Monitor configures the AirCard Hub to transmit controlled ping packets to 2 specified IP addresses. If the AirCard Hub does not receive responses to the pings, the AirCard Hub reboots. This works as follows:
1. After every “Periodic PING Timer” configured interval, the AirCard Hub sends 3 consecutive pings to the “Destination Address”.
2. If all 3 pings fail, the AirCard Hub sends 3 consecutive pings to the “Second Address”.
3. The AirCard Hub then sends 3 consecutive pings to the “Destination Address” and 3 consecutive pings to the “Second Address” every “Periodic PING Accelerated Timer” configured interval.
4. If all accelerated pings in step 3 above fail, the number of times configured in “Fail Count”, the AirCard Hub reboots.
Note: Do not set the “Periodic PING Timer” to a value less than 60 seconds; this is to allow the AirCard Hub time to reconnect to the 3G/4G network following a reboot.
5. If any ping succeeds, the AirCard Hub returns to step 1 and does not reboot.
To disable the Periodic Ping Reset Monitor set “Fail Count” to 0.
Note: The traffic generated by the periodic ping feature is counted as chargeable usage; please keep this in mind when selecting how often to ping.
Configure a Forced Reset The AirCard Hub can optionally be configured to automatically reboot after a period of time specified in minutes. This ensures that the AirCard Hub will restart if some anomaly occurs. This is useful in remote installations. This feature is available by clicking Services > System Monitor. The default value is 0, which disables the Forced Reset Timer. The maximum value is 65535 minutes.

Advanced Settings
Rev 1 Feb. 2012 51
System Select the System menu to view system information or to configure system level settings.
Log The Log page is used to download or display the current System Log of the AirCard Hub.
Figure 32: System Log
The System Log enables you to troubleshoot any issues you may be experiencing with your AirCard Hub. You can specify the level of detail (types of messages) to display, as shown in the following table.
Display Level Definition
All Display all system log messages.
Debug Show extended system log messages with full debugging level details.
Info Show informational messages only.
Notice Show normal system logging information.
Warning Show warning messages only.
Error Show error condition messages only.
You can also download the current System Log to your computer for off-line viewing. To do this, click the Download Log File link at the bottom of the page.

52 2400164
AirCard Hub User Guide
Settings The settings page is used to back up or restore the AirCard Hub’s configuration or to reset it to factory defaults.
Figure 33: Load / Save Configuration Page
Note: To perform an update, you must be logged into the AirCard Hub as the root user (see the Administration section on page 54 for more details).
To save a copy of the AirCard Hubs configuration:
1. Enter the root manager Password and click Save. This will download a copy of the AirCard Hub’s current settings to your PC.
Note: Do NOT edit the contents of the file downloaded file; if you modify it, you might not be able to use it to restore the AirCard Hub’s configuration later.
You can change the name of the file but the filename extension must remain “.cfg”.
To restore the AirCard Hub’s configuration using downloaded file:
1. Click Browse.
2. Select the configuration file you wish to restore.
3. Click Restore under Restore saved settings.
To restore the AirCard Hub’s configuration to the factory defaults:
1. Click Restore under RESTORE FACTORY DEFAULTS.
The AirCard Hub will then restart.

Advanced Settings
Rev 1 Feb. 2012 53
Update Firmware
This page allows you to upgrade the AirCard Hub’s internal software (firmware). The upgrade process takes approximately 4 minutes. During the firmware upgrade process, all the lights on the front of the AirCard Hub will flash.
Figure 34: Advanced View - Firmware Update
Warning: Do NOT turn off the AirCard Hub during the firmware upgrade process. It is recommended to use Ethernet LAN interface for firmware upgrades.
To upgrade the firmware of your AirCard Hub:
1. Download the upgrade image file from the Sierra Wireless support site www.sierrawireless.com/Support/Downloads.aspx
2. Click the Browse button and navigate to the location of the firmware file that you've downloaded.
3. Click Apply to start the upgrade process.
4. Follow the on-screen prompts.
Once completed, your AirCard Hub will reboot to the Easy mode operation.

54 2400164
AirCard Hub User Guide
Administration The Administration page is used to enable or disable remote administration and set the username / password required to access the AirCard Hub remotely.
Figure 35: Administration Configuration Items
Option Definition
Remote Administration Enable or disable remote HTTP access to the AirCard Hub.
Remote Administration Port Set the port to use for remote HTTP access.
Admin Password Enter the new password for the selected user account.
Confirm Password Re-enter the new password for the selected user account.
Note: It is not necessary to change the password if you are only changing the incoming port number.
To access the AirCard Hub’s configuration pages remotely:
1. Open a browser window (for example Internet Explorer, Firefox, Safari).
2. In the address bar, enter the AirCard Hub’s WAN IP address and assigned port number, for example “10.10.10.10: 8080”.
Note: You can find the AirCard Hub’s WAN IP address by clicking the “Status” menu. The Local field in the WWAN section shows the AirCard Hub’s WAN IP address.
3. Click Login and type “admin” in the Username and “admin” in the Password fields (without quotes). Then click on Submit.
Advanced Settings
Rev 1 Feb. 2012 55
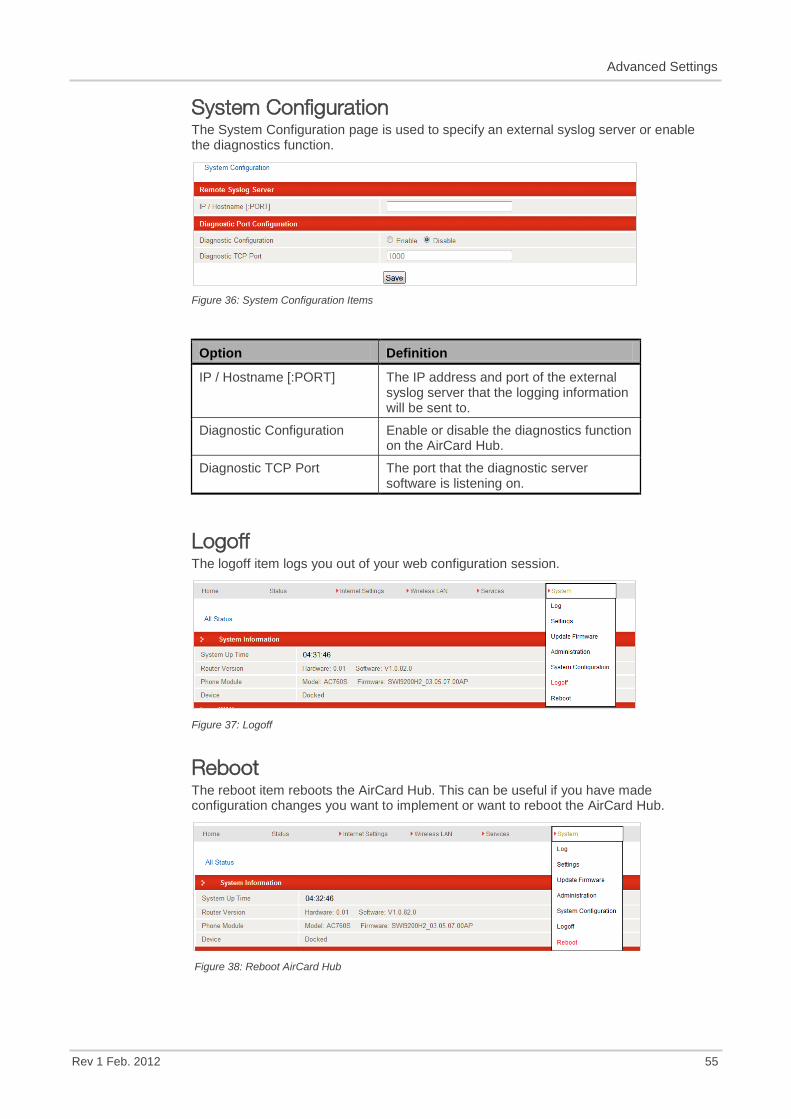
System Configuration The System Configuration page is used to specify an external syslog server or enable the diagnostics function.
Figure 36: System Configuration Items
Option Definition
IP / Hostname [:PORT] The IP address and port of the external syslog server that the logging information will be sent to.
Diagnostic Configuration Enable or disable the diagnostics function on the AirCard Hub.
Diagnostic TCP Port The port that the diagnostic server software is listening on.
Logoff The logoff item logs you out of your web configuration session.
Figure 37: Logoff
Reboot The reboot item reboots the AirCard Hub. This can be useful if you have made configuration changes you want to implement or want to reboot the AirCard Hub.
Figure 38: Reboot AirCard Hub

56 2400164
AirCard Hub User Guide

Rev 1 Feb. 2012 57
5: Specifications
Technical Specifications
Model Description
CPU Ralink RT3352F
Connectivity
3x 10/100 Ethernet LAN,
1x 10/100 Ethernet LAN/WAN,
WLAN (up to 16 connections)
2x USB ports
Antenna connector 2 x SMA (female connector)
LED indicators
Power
WLAN
WWAN,
LAN1/WAN
LAN2
LAN3
LAN4
Operating temperature 0 ~ 50 degrees Celsius
Storage temperature -20 to 65 degrees Celsius
Power input 12VDC – 2A
Wi-Fi antennas 802.11 b/g/n - 2.4 GHz, 2x2 MIMO internal antennas
3G/4G antennas Multi band dipole
698‐960/1710‐2170/2500‐2700MHz

58 2400164
AirCard Hub User Guide
Mechanical Specifications
AirCard Hub dimensions
Length (l) 160 mm
Height (h1)
Height (with antennas) (h2)
30 mm
200 mm
Width (w1)
Width (with antennas) (w2)
105 mm
150 mm
Weight
Weight (with antennas)
322 g
416 g
w2
h2
w1
h1
l

Rev 1 Feb. 2012 59
6: FAQ
Does the AirCard Hub require any configuration out of the box?
No; the AirCard Hub is a plug-and-play device. Plug the device into an electrical outlet and, once the WLAN and WWAN indicator lights stop flashing, you can use the device. For Wi-Fi connectivity, the SSID (Service Set Identifier) and network key (password) are displayed on the AirCard mobile hotspot’s LCD screen. If you would like to customize your settings you can enter http://swi.hub into your Web browser to access the AirCard Hub’s homepage.
The AirCard Hub was connected but cannot get back online. What should I do?
You may need to enable the periodic ping timer using the System Monitor feature (see page 50). This ensures that, if the connection drops (that is, outage on the network), that the AirCard Hub will reboot after a number of failed pings and then force a re-connect. A timer setting of around 15 minutes should be sufficient.
Note: The traffic generated by the periodic ping feature is counted as chargeable usage; please keep this in mind when selecting how often to ping.
What should I do if the AirCard Hub is rebooting frequently?
Check the Services > System Monitor settings (see page 50) on the AirCard Hub homepage and see if the “Force Reset every” timeout is set to a value other than 0. A value of 1, for example means the unit will reboot every minute regardless of what happens. Reset it to 0 if you don’t want this feature, or set it to a larger value if you don’t want the AirCard Hub to reboot so often.
Can I change the name and password of my wireless network?
Yes, but the AirCard Hub uses the wireless network credentials from your AirCard mobile hotspot. You can modify these settings by logging in to your AirCard mobile hotspot’s homepage. If you are operating in Power User mode, you can change your AirCard Hub settings from the AirCard Hub’s homepage (http://swi.hub) and switching to advanced view. You can change the SSID (Service Set Identifier), the security standard (WPA, WPA2, WEP) and your Wi-Fi password.

60 2400164
AirCard Hub User Guide
How do I share my Internet connection with other users?
Give the SSID (Service Set Identifier) and Wi-Fi network password for your AirCard Hub to all users you want to share your Wi-Fi Internet connection with. Each user will need to select the AirCard Hub SSID, on their Wi-Fi enabled computer or device and enter the Wi-Fi network password you provide. Alternatively, users can use the WPS feature, if their devices support it. See Quick Wi-Fi Setup on page 20.
I forgot my Management Console password. What can I do?
If you have forgotten your Management Console password and cannot log in as administrator, reset your AirCard Hub back to default settings. To reset your device, press and hold the reset button on the back of your AirCard Hub for more than 12 seconds, until all the indicator lights on the unit will flash. After a reset, the AirCard Hub will boot up into Easy mode.
Note: Resetting the AirCard Hub using the RESET button will also reset any custom settings and passwords you may have already set up.

Rev 1 Feb. 2012 61
7: Regulatory Information
Regulatory Information for North America
Caution: The antennas of AirCard Hub must be 20 cm or more from users during operation, to satisfy FCC / IC RF exposure requirements.
Where appropriate, the use of the equipment is subject to the following conditions: If this equipment does cause harmful interference to radio or television reception, which can be determined by turning the equipment off and on, the user is encouraged to try to correct the interference by one or more of the following measures:
Increase the separation between the equipment and receiver
Connect the equipment into an outlet on a circuit different from that to which the receiver is connected
Consult the dealer or an experienced radio/TV technician for help
Note: (EMI) – United States FCC Information – This equipment has been tested and found to comply with the limits pursuant to Part 15 of the FCC Rules. These limits are designed to provide reasonable protection against harmful interference in an appropriate installation. This equipment generates, uses, and can radiate radio frequency energy and, if not installed and used in accordance with the instructions, may cause harmful interference to radio communication. However, there is no guarantee that interference will not occur in a particular installation.
If you have purchased this product under a United States Government contract, it shall be subject to restrictions as set forth in subparagraph (c)(1)(ii) of Defense Federal Acquisitions Regulations (DFARs) Section 252.227-7013 for Department of Defense contracts, and as set forth in Federal Acquisitions Regulations (FARs) Section 52.227-19 for civilian agency contracts or any successor regulations. If further government regulations apply, it is your responsibility to ensure compliance with such regulations.
This device complies with Industry Canada licence-exempt RSS standard(s). Operation is subject to the following two conditions:
(1) this device may not cause interference, and (2) this device must accept any interference, including interference that may cause undesired operation of the device.
Le présent appareil est conforme aux CNR d'Industrie Canada applicables aux appareils radio exempts de licence. L'exploitation est autorisée aux deux conditions suivantes :
(1) l'appareil ne doit pas produire de brouillage, et (2) l'utilisateur de l'appareil doit accepter tout brouillage radioélectrique subi, même si le brouillage est susceptible d'en compromettre le fonctionnement.
62 2400164
AirCard Hub User Guide
Regulatory Information for EU countries To ensure safe use, the AirCard Hub must be 20 cm or more from users during operation. Sierra Wireless hereby declares that the Sierra Wireless AirCard Hub conforms to all the essential requirements of Directive 1999/5/EC:
The Declaration of Conformity made under Directive 1999/5/EC is available for viewing at the following location in the EU community: Sierra Wireless (UK) Limited Suite 5, the Hub Fowler Avenue Farnborough Business Park Farnborough, United Kingdom GU14 7JP
Notice: User restrictions for Wi-Fi operation apply in France. Please check with French authorities before using this device in France.

Regulatory Information
Rev 1 Feb. 2012 63
Regulatory Information for Australia
To ensure safe use, the modem must be 20 cm or more from users during operation. The Australian Communications & Media Authority (ACMA) requires you to be aware of the following information and warnings:
1. This unit may be connected to the Telecommunication Network through a line cord which meets the requirements of the AS/CA S008-2011 Standard.
2. This equipment has been tested and found to comply with the Standards for C-Tick as set by the ACMA. These standards are designed to provide reasonable protection against harmful interference in a residential installation. This equipment generates, uses, and can radiate radio noise and, if not installed and used in accordance with the instructions detailed within this manual, may cause interference to radio communications. However, there is no guarantee that interference will not occur with the installation of this product in your home or office. If this equipment does cause some degree of interference to radio or television reception, which can be determined by turning the equipment off and on, we encourage the user to try to correct the interference by one or more of the following measures:
• Change the direction or relocate the receiving antenna.
• Increase the separation between this equipment and the receiver.
• Connect the equipment to an alternate power outlet on a different power circuit from that to which the receiver/TV is connected.
• Consult an experienced radio/TV technician for help.
3. The power supply that is provided with this unit is only intended for use with this product. Do not use this power supply with any other product or do not use any other power supply that is not approved for use with this product by Sierra Wireless. Failure to do so may cause damage to this product, fire or result in personal injury.