Siebel Content Publishing Guide - Oracle · Siebel Content Publishing Guide Version 8.0 11 2...
136
Siebel Content Publishing Guide Version 8.0 December 2006
Transcript of Siebel Content Publishing Guide - Oracle · Siebel Content Publishing Guide Version 8.0 11 2...

Siebel Content Publishing Guide
Version 8.0December 2006

Copyright © 2005, 2006, Oracle. All rights reserved.
The Programs (which include both the software and documentation) contain proprietary information; they are provided under a license agreement containing restrictions on use and disclosure and are also protected by copyright, patent, and other intellectual and industrial property laws. Reverse engineering, disassembly, or decompilation of the Programs, except to the extent required to obtain interoperability with other independently created software or as specified by law, is prohibited.
The information contained in this document is subject to change without notice. If you find any problems in the documentation, please report them to us in writing. This document is not warranted to be error-free. Except as may be expressly permitted in your license agreement for these Programs, no part of these Programs may be reproduced or transmitted in any form or by any means, electronic or mechanical, for any purpose.
PRODUCT MODULES AND OPTIONS. This guide contains descriptions of modules that are optional and for which you may not have purchased a license. Siebel’s Sample Database also includes data related to these optional modules. As a result, your software implementation may differ from descriptions in this guide. To find out more about the modules your organization has purchased, see your corporate purchasing agent or your Siebel sales representative.
If the Programs are delivered to the United States Government or anyone licensing or using the Programs on behalf of the United States Government, the following notice is applicable:
U.S. GOVERNMENT RIGHTS. Programs, software, databases, and related documentation and technical data delivered to U.S. Government customers are "commercial computer software" or "commercial technical data" pursuant to the applicable Federal Acquisition Regulation and agency-specific supplemental regulations. As such, use, duplication, disclosure, modification, and adaptation of the Programs, including documentation and technical data, shall be subject to the licensing restrictions set forth in the applicable Oracle license agreement, and, to the extent applicable, the additional rights set forth in FAR 52.227-19, Commercial Computer Software--Restricted Rights (June 1987). Oracle USA, Inc., 500 Oracle Parkway, Redwood City, CA 94065.
The Programs are not intended for use in any nuclear, aviation, mass transit, medical, or other inherently dangerous applications. It shall be the licensee's responsibility to take all appropriate fail-safe, backup, redundancy and other measures to ensure the safe use of such applications if the Programs are used for such purposes, and we disclaim liability for any damages caused by such use of the Programs.
Oracle, JD Edwards, PeopleSoft, and Siebel are registered trademarks of Oracle Corporation and/or its affiliates. Other names may be trademarks of their respective owners.
The Programs may provide links to Web sites and access to content, products, and services from third parties. Oracle is not responsible for the availability of, or any content provided on, third-party Web sites. You bear all risks associated with the use of such content. If you choose to purchase any products or services from a third party, the relationship is directly between you and the third party. Oracle is not responsible for: (a) the quality of third-party products or services; or (b) fulfilling any of the terms of the agreement with the third party, including delivery of products or services and warranty obligations related to purchased products or services. Oracle is not responsible for any loss or damage of any sort that you may incur from dealing with any third party.

Siebel Content Publishing Guide Version 8.0 3
Contents
Siebel Content Publishing Guide 1
Chapter 1: What’s New in This Release
Chapter 2: Content CenterAbout Content Center 11
Content Center Job Roles and Terms 13
Scenario for Using Content Center 15
Process of Setting Up and Using Content Center 16
Setting Up a Content Staging Environment 17
Configuring Content Objects for Content Center 19Modifying Business Components for Content Center 19Creating Integration Objects for Content Center 21Modifying Integration Objects for Content Center 22
Setting Up Content Center Approval Workflows 22
Setting Up Content Center Publication Workflows 25
About the Content Project Business Service 26
Setting Up Content Types 27
Setting Up Contributors and Approvers 28
Creating Content Projects 28
Contributing and Approving Content (End User) 30
Publishing Content Projects 31
Chapter 3: Content Asset ManagementAbout Content Assets 33
Scenario for Content Asset Management 33
Process of Managing Content Assets 34
Defining Content Sets to Contain Content Assets 34
Adding Content Assets to a Content Set 35
Setting the Home Page for a Content Set 36

Siebel Content Publishing Guide Version 8.0
Contents ■
4
Viewing and Editing Content Asset Properties 37
Checking Content Assets In and Out 38
Editing HTML Content 40
About the Content Asset Types View 40
About Configuring Content Asset Management 40
Chapter 4: Microsite ManagementAbout Microsite Management 43
Scenario for Microsite Management 47
Process of Microsite Management 48
Viewing and Editing Page Information 48
Creating a Root-Level Page 50
Using the Page Designer and Its Tools 51Using the Create New Page Tool 52Using the Insert Template Tool 54Using the Create Menu Tool 55Using the Link Existing Page Tool 57Using the Link App View Tool 58Using the Add Web Link Tool 59Using the Create Content Tool 61Using the Insert Content Tool 61Using the Insert File and the Insert Image Tools 62Editing Page Item Properties 64Deleting Page Items 65Saving and Canceling Changes to the Page Layout 65
Managing Groups of Page Items 66
Previewing a Page 66
Publishing a Page 67
Deleting a Page 68
Creating and Applying Templates 68
About Creating Search Indexes 70
About Configuring Microsite Management 70Configuring Microsite Caching 70Adding New View Layouts to the mmlayout.txt File 71Configuring Menu Colors and Icons for Hierarchical Menus 72Changing the Navigation Bar Style in Microsite Pages 73

Contents ■
Siebel Content Publishing Guide Version 8.0 5
Chapter 5: Usage CollectionAbout Usage Collection 75
Scenario for Usage Collection 76
Process of Usage Collection 76
Setting Up the Run-Time Event to Collect Usage Data for Views 76
Setting System Preferences for Usage Collection 77
Reviewing the Usage-Tracking Log Files 78
Chapter 6: Managing Group NewsScenario for Group News 81
Process of Managing Group News 82
Setting Up News Administrators, Authors, and Approvers 83
Setting Up the Group News Approver Workflow 84
Creating a Content Path 85
Creating Stages for a Group News Content Path 86
Designating Group News Approvers 87
Setting Up Access to Group News 87
Managing Versions and Publishing from the All News Stories List 88
Creating a News Story (End User) 88Creating Content for a News Story 90Importing a News Story 91
Previewing a News Story (End User) 92
Submitting a News Story for Approval (End User) 92
Approving a News Story (End User) 92
Chapter 7: Setting Up Content ServicesScenario for Content Services 95
Process of Setting Up Content Services 96
Assignment of News Topic Administrator Responsibilities 97
Creation of Access Groups for Content News Services 97
Setting Up Content Services Host and Authentication Credentials 98
Creating a News Package 99
Management of News Topics 100

Siebel Content Publishing Guide Version 8.0
Contents ■
6
Creating a News Topic 100Editing a News Topic 101Deactivating a News Topic 102
Retrieving Account and Competitor News for Briefings 102
Associating Accounts and Competitors with News Topics 103
Associating Your Company with a News Topic 104
D & B Account Rationalization Services and News Topics 105
Viewing a Tracking Profile Summary for News (End User) 105
Creating a User-Defined News Topic (End User) 106
Previewing a News Topic (End User) 107
Resolving Problems with Content Services 107External News and Data Do Not Appear on Home Page 107News Does Not Appear in the Our Company Section 109Not Found Error in the Siebel Mobile Web Client 109Users Receive Too Much News 109Literature and Bulletins Are Out of Date 110
Appendix A: Content Center ReferencePrebuilt Content Objects for Content Center 111
Catalog Content Object 112Catalog Category Content Object 113ContentBase Content Asset Content Object 113ContentBase Content Set Content Object 114ContentBase Content Type Content Object 115ERM Group News Item Content Object 116Literature Content Object 117Microsite Management Page Content Object 117Price List Content Object 119Product Content Object 120Product Class Content Object 120Product Feature Content Object 121Product Line Content Object 121Resolution Item Content Object 122Solution Content Object 122Volume Discount Content Object 122
Content Project Business Service 123AddContentItem Method 123AddProject Method 124Export Method 124

Contents ■
Siebel Content Publishing Guide Version 8.0 7
Import Method 124PublishProject Method 125RemoveContentItem Method 125RemoveProject Method 125StartProject Method 126UpdateContentItem Method 126UpdateProject Method 127
Index

Siebel Content Publishing Guide Version 8.0
Contents ■
8

Siebel Content Publishing Guide Version 8.0 9
1 What’s New in This Release
What’s New in Oracle’s Siebel Content Publishing Guide, Version 8.0This guide has been updated to reflect product name changes. It was previously published as Siebel Content Publishing Guide, Version 7.8.

Siebel Content Publishing Guide Version 8.0
What’s New in This Release ■
10
Siebel Content Publishing Guide Version 8.0 11
2 Content Center
This chapter describes the features of Content Center. It includes the following topics:
■ “About Content Center” on page 11
■ “Content Center Job Roles and Terms” on page 13
■ “Scenario for Using Content Center” on page 15
■ “Process of Setting Up and Using Content Center” on page 16
■ “Setting Up a Content Staging Environment” on page 17
■ “Configuring Content Objects for Content Center” on page 19
■ “Modifying Business Components for Content Center” on page 19
■ “Creating Integration Objects for Content Center” on page 21
■ “Modifying Integration Objects for Content Center” on page 22
■ “Setting Up Content Center Approval Workflows” on page 22
■ “Setting Up Content Center Publication Workflows” on page 25
■ “About the Content Project Business Service” on page 26
■ “Setting Up Content Types” on page 27
■ “Setting Up Contributors and Approvers” on page 28
■ “Creating Content Projects” on page 28
■ “Contributing and Approving Content (End User)” on page 30
■ “Publishing Content Projects” on page 31
About Content CenterContent Center allows you to create and manage authored content, which includes items such as price lists, service solutions, and static Web site content, for Siebel Business Applications.
Content Center features include:
■ Preview and simulation. You can use a content staging environment to preview and test content before you publish it to your production environment. The staging environment displays content exactly as it will appear to customers, employees, and partners in your production environment. The staging environment runs on a separate database from the production environment.
Siebel Content Publishing Guide Version 8.0
Content Center ■ About Content Center
12
■ Content projects. You can group a set of content items into one content project, so that related changes can be made together. For example, you can create a content project to manage the products, catalog categories, price lists, and marketing literature for your company’s summer catalog.
■ Approval processes. You can use Siebel Business Process Designer to design approval processes that allow team members to review a content item before it is published. Siebel Business Process Designer allows you to assign tasks based on a predefined list of content contributors and approvers.
■ Publishing. After content is approved, Content Center uses Siebel Business Process Designer to publish it to a production environment. The XML-based publication business service can handle both complex database content and unstructured content that is stored in the file system. This component helps maintain transactional integrity between all the items in a content project.

Content Center ■ Content Center Job Roles and Terms
Siebel Content Publishing Guide Version 8.0 13
Content Center Job Roles and TermsDescriptions of Content Center job roles are in Table 1, and terms are defined in Table 2.
Table 1. Content Center Job Roles
Position Responsibilities
Content Administrator One or more people in your business who are authorized to administer content. These people need to understand your business requirements in order to know what types of content and content items need to be managed and the appropriate contributor and approver workflows.
Depending on your business requirements, one or more of these people may also be responsible for selecting and possibly configuring the appropriate business components, content objects, and content types. Alternatively, this may be done by an application developer.
Content Contributor A person in your business who is authorized to contribute content items. Examples are technical writers, Web designers, and graphic artists.
Content Approver A person in your business who is authorized to approve content posted to your company’s Web site. Examples are managers and your company’s attorneys.

Siebel Content Publishing Guide Version 8.0
Content Center ■ Content Center Job Roles and Terms
14
Table 2. Content Center Terms
Term Description
Content The components of the application that are authored, as opposed to application code. Siebel applications recognize the following classes of content:
■ Business rules, such as personalization rules and assignment rules.
■ Application content, such as product catalog, price lists, and product promotions.
■ Web content, such as Web templates and static Web pages, typically stored as HTML, XML, and image files.
■ Documentation, such as product data sheets, forms, and white papers.
Content Center provides content production services for three of the classes listed above: application content, Web content, and documentation; content asset management only applies to Web content and documentation.
Content Asset An instance of content managed within Content Center and stored in the content asset repository. Content assets are typically comprised of unstructured markups and can be related to other content assets. For example, an HTML content asset can link to other pages or reference images. For more information, see Chapter 3, “Content Asset Management.”
Content Item Represents a transaction (add, update, delete) stored and associated with a piece of content.
Content Object Specifies the information that will be transferred from the staging environment to the production environment when the content is published. Each content object is composed of a business object and an integration object.
Content Center ■ Scenario for Using Content Center
Siebel Content Publishing Guide Version 8.0 15
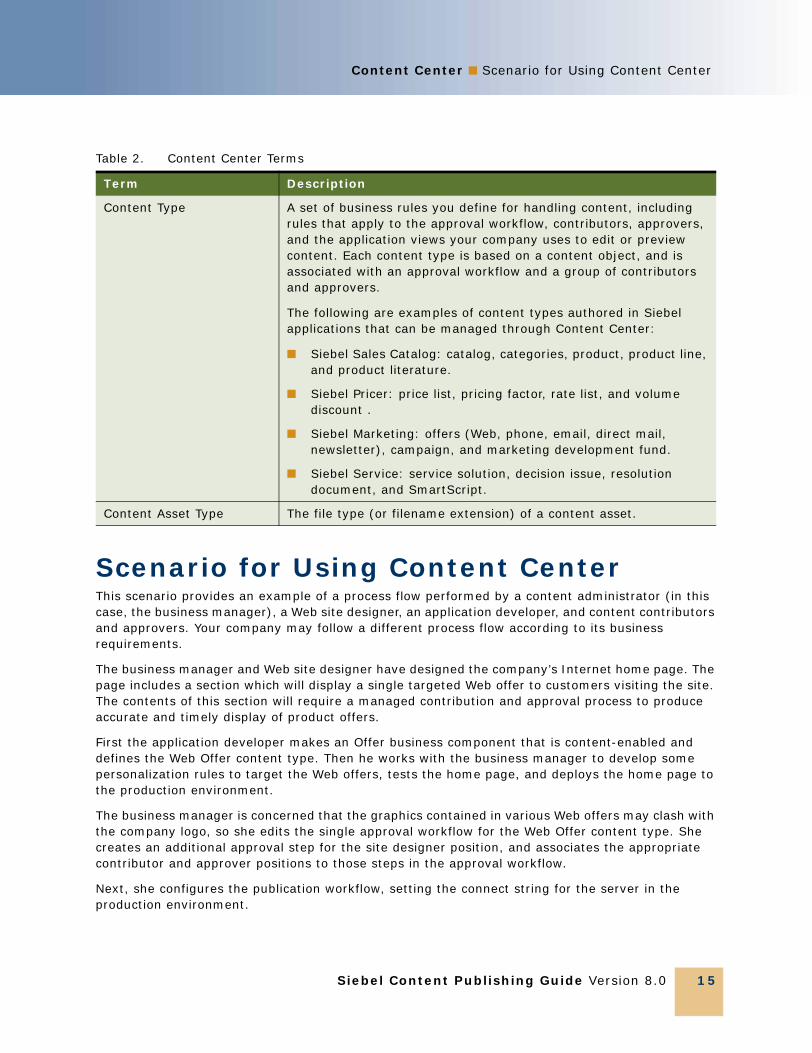
Scenario for Using Content CenterThis scenario provides an example of a process flow performed by a content administrator (in this case, the business manager), a Web site designer, an application developer, and content contributors and approvers. Your company may follow a different process flow according to its business requirements.
The business manager and Web site designer have designed the company’s Internet home page. The page includes a section which will display a single targeted Web offer to customers visiting the site. The contents of this section will require a managed contribution and approval process to produce accurate and timely display of product offers.
First the application developer makes an Offer business component that is content-enabled and defines the Web Offer content type. Then he works with the business manager to develop some personalization rules to target the Web offers, tests the home page, and deploys the home page to the production environment.
The business manager is concerned that the graphics contained in various Web offers may clash with the company logo, so she edits the single approval workflow for the Web Offer content type. She creates an additional approval step for the site designer position, and associates the appropriate contributor and approver positions to those steps in the approval workflow.
Next, she configures the publication workflow, setting the connect string for the server in the production environment.
Content Type A set of business rules you define for handling content, including rules that apply to the approval workflow, contributors, approvers, and the application views your company uses to edit or preview content. Each content type is based on a content object, and is associated with an approval workflow and a group of contributors and approvers.
The following are examples of content types authored in Siebel applications that can be managed through Content Center:
■ Siebel Sales Catalog: catalog, categories, product, product line, and product literature.
■ Siebel Pricer: price list, pricing factor, rate list, and volume discount .
■ Siebel Marketing: offers (Web, phone, email, direct mail, newsletter), campaign, and marketing development fund.
■ Siebel Service: service solution, decision issue, resolution document, and SmartScript.
Content Asset Type The file type (or filename extension) of a content asset.
Table 2. Content Center Terms
Term Description

Siebel Content Publishing Guide Version 8.0
Content Center ■ Process of Setting Up and Using Content Center
16
She then sets up the content project, adding the content items that make up tasks required to create the Web offer. These will be routed to the Content Inboxes of the content contributors and approvers as set up in the approval workflow.
After the content items have been completed and approved, she publishes the project to the production environment.
Process of Setting Up and Using Content CenterThis example process represents the tasks that are carried out in the “Scenario for Using Content Center” on page 15. Typically Step 1 to Step 6 are carried out once and Step 7 to Step 9 are carried out many times.
1 “Setting Up a Content Staging Environment” on page 17
2 “Configuring Content Objects for Content Center” on page 19
3 “Setting Up Content Center Approval Workflows” on page 22
4 “Setting Up Content Center Publication Workflows” on page 25
5 “Setting Up Content Types” on page 27
6 “Setting Up Contributors and Approvers” on page 28
7 “Creating Content Projects” on page 28
8 “Contributing and Approving Content (End User)” on page 30
9 “Publishing Content Projects” on page 31
Content Center ■ Setting Up a Content Staging Environment
Siebel Content Publishing Guide Version 8.0 17
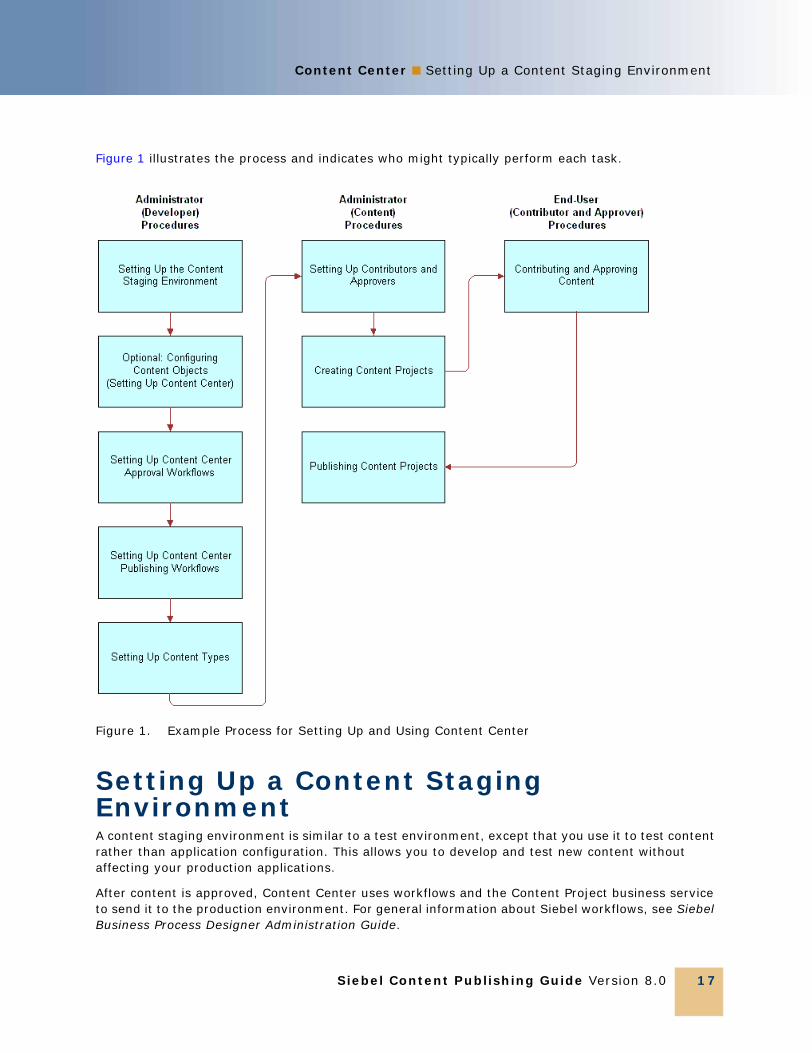
Figure 1 illustrates the process and indicates who might typically perform each task.
Setting Up a Content Staging EnvironmentA content staging environment is similar to a test environment, except that you use it to test content rather than application configuration. This allows you to develop and test new content without affecting your production applications.
After content is approved, Content Center uses workflows and the Content Project business service to send it to the production environment. For general information about Siebel workflows, see Siebel Business Process Designer Administration Guide.
Figure 1. Example Process for Setting Up and Using Content Center

Siebel Content Publishing Guide Version 8.0
Content Center ■ Setting Up a Content Staging Environment
18
Required Components for a Content Staging Environment
Content Center requires a separate Siebel Business Applications installation for your content staging environment. The physical hardware for this environment should be the appropriate size for supporting the number of content center administrators, contributors, and approvers who manage your business content.
For more information about installing Siebel Business Applications, see the Siebel Installation Guide for the operating system you are using.
Your staging environment should contain the following components:
■ Database
■ Siebel Gateway Name Server
■ Siebel Server
■ File System
■ Web Server and Siebel Web Extension
Maintaining Consistency Between Staging and Production EnvironmentsIt is important that the staging and production environments are consistent when Content Center is implemented.
The most important element to keep synchronized is the Siebel repository (SRF) file. This file defines the structure of the application data, for example, the business components and the integration objects.
Keeping the data synchronized is not relevant, with the exception of content and related data. For example, if you use Content Center to manage product literature, then Content Center synchronizes the content by publishing it from staging to the production environment. In this case, products could be related data that also need to be kept synchronized. Although you may have chosen not to manage products through Content Center, nevertheless you must have a user key, such as product ID, that exists in both the staging and production environments so that the association of a piece of literature to a product can be made in the staging area and reproduced in the production environment.
The following are some tips to help you maintain consistency between your staging and production environments.
■ If your production environment has not yet been installed, the database administrator should install two separate database instances (one for staging and one for production) using an identical Siebel repository (SRF) file, and initialize both instances with the same seed data. This makes sure that the content object definitions in your staging and production environments are the same.
For more information, see the Siebel Installation Guide for the operating system you are using.
Content Center ■ Configuring Content Objects for Content Center
Siebel Content Publishing Guide Version 8.0 19
■ If your production environment is already active, the database administrator should install the staging environment using the same Siebel repository (SRF) file as used for the production environment. Make a copy of your database and use the copy to initialize your staging environment.
■ Because you perform most or all content administration tasks in your staging environment, you should either disable or limit access to the appropriate content administration views in your production environment. This helps prevent administrators from accidentally making updates in the production environment.
Configuring Content Objects for Content CenterThe content object definition specifies the information that is transferred from the staging environment to the production environment when the content is published.
Content objects are based on business objects and integration objects. Siebel Systems provides some prebuilt content objects which you can use, or configure to meet your business needs. See Appendix A, “Content Center Reference” for details about the prebuilt content object definitions.
You use content objects to create one or several content types. Each content type is based on a content object, and is associated with an approval workflow and a group of contributors and approvers. For example, from the Product content object, you might create two different content types: Software Products and Hardware Products. These two content types may have different approval workflows, as well as different contributors and approvers. For more information, see “Setting Up Content Types” on page 27.
To set up content objects
1 Use Siebel Tools to identify or define the business object on which you base the content object. For more information on configuring business objects, see Configuring Siebel Business Applications.
2 Modify the business components to meet the content object requirements. For instructions, see “Modifying Business Components for Content Center” on page 19.
3 Use the Integration Object Builder wizard in Siebel Tools to create an integration object. For instructions, see “Creating Integration Objects for Content Center” on page 21.
4 Modify the integration object to meet the content object requirements. For instructions, see “Modifying Integration Objects for Content Center” on page 22.
NOTE: You do not need to create content objects for content assets. These are provided with the preconfigured product.
Modifying Business Components for Content CenterNOTE: This step is potentially recursive. Complete this step before using the Integration Object Builder wizard in Siebel Tools to create integration objects.

Siebel Content Publishing Guide Version 8.0
Content Center ■ Configuring Content Objects for Content Center
20
After you have identified or defined the business object on which your content object is based, check its business components for underlying tables that contain foreign keys to other tables. If there are business components with foreign keys, you must modify them to assure the integrity of foreign keys when these objects are published.
Typically, you need to follow one of the following two processes to modify the business components.
To modify the business components containing foreign keys
1 Create a join in the business component from each foreign key column to the row_id of the foreign key’s table.
2 Create fields in the business component for all user key columns in the foreign key's table. If any of these columns are foreign keys, repeat Step 1.
3 Assign a PickList and fill the PickMap with the foreign key and all related user key fields, including any intermediate foreign key fields.
4 Add Pick Map UpdOnlyIfNull columns for each Id type column in the Pick Map.
The UpdOnlyIfNull column should be the same one as its parent on the Pick Map.
Or, if the business component table contains a foreign key to a child (or other descendent) object in the business object, complete the following process.
To modify the business components where the business component table contains a foreign key to a child object
1 Create a Multi Value Link to the business component on the foreign key table.
2 Include the entire foreign user key as multi-value fields. Expand foreign keys in the user key by joining and adding fields to the Multi Value Link business component.
3 Set the Primary Id field of the Multi Value Link to the foreign Key column.
NOTE: To resolve foreign keys to child (descendent) objects in the correct order, you must specify a sequence number and XML sequence number for the resulting integration object.

Content Center ■ Configuring Content Objects for Content Center
Siebel Content Publishing Guide Version 8.0 21
If two business components joined by a foreign key contain user key columns of the same name, create different field names for each user key column. Table 3 shows an example.
NOTE: Later, you disable all other user keys, so you only need to check for duplicate names in your business component’s _U1 table user key.
Creating Integration Objects for Content CenterIntegration objects are sometimes called EAI objects, because they use Enterprise Application Integration (EAI) technology. You use the Integration Object Builder wizard in Siebel Tools to create integration objects. For more information, see Integration Platform Technologies: Siebel Enterprise Application Integration.
To create an integration object
1 In Siebel Tools, select File > New Object.
2 From the dialog box, select Integration Object.
The Integration Object Builder wizard guides you through the process of setting up an integration object.
Table 3. Example: How to Handle Identical User Key Column Names
Business Component User Key Columns Comments
Internal Product Sales Tool BU_ID This is a foreign key from the Internal Product Sales Tool business component to the Organization business component.
NAME This is a _U1 user key column in the Internal Product Sales Tool business component.
This user key column name is identical to the one in the Organization business component described below.
In the Internal Product Sales Tool, create a field called Name to map to this column.
Organization NAME This is a user key column in the Organization business component.
This user key column name is identical to the one in the Internal Product Sales Tool business component described above.
In the Internal Product Sales Tool, create a field called Organization Name to join to this column.

Siebel Content Publishing Guide Version 8.0
Content Center ■ Setting Up Content Center Approval Workflows
22
After you create the integration object, you need to modify it to meet the requirements for a content object. For instructions, see “Modifying Integration Objects for Content Center” on page 22.
Modifying Integration Objects for Content CenterUse the following guidelines to modify integration objects to meet content object requirements.
To modify integration objects■ In the integration object, make sure that the link that defines the parent to child relationships
allows update and delete. If the link does not allow those operations, replace it with a link that does.
■ In the integration object user properties, add AdminMode, value Y. This gives the EAI Siebel Adapter permissions to do synchronization against a Siebel database.
■ Disable these types of integration components:
❏ All integration components created from Multi-Value Link (MVL) components, unless your business requires that you transfer those multi-values to your production environment.
❏ If more than one field is mapped to a table column, all fields except one.
❏ For integration components that have file attachments, the field that stores the file revision number. For example, in the Admin Sales Tool integration component, disable the LitFileRev field.
■ In the integration component, disable:
❏ All calculated fields.
❏ The NoDelete, NoInsert, and NoUpdate user properties.
❏ All user keys except the one that is based on the _U1 table user key, which is used for integration between the two Siebel databases.
❏ All identification (Id) fields. (Make sure that each field is listed in the Pick Map UpdOnlyIfNull list of its entry in the pickmap for the user key of its join table.)
Setting Up Content Center Approval WorkflowsYou can use Siebel Business Process Designer to manage workflows for the content item approval process. When the Start Project or Request Start Project action is invoked on a content project, the approval workflows associated with each content item in the project are instantiated.
Approval workflows allow you to specify the structure for contributing, reviewing, and approving content. The designated contributors and approvers are notified by new records in their Content Inbox at the appropriate step in the content production and approval process. For more information about designating contributors and approvers, see “Setting Up Content Types” on page 27.

Content Center ■ Setting Up Content Center Approval Workflows
Siebel Content Publishing Guide Version 8.0 23
A state model and some workflows are associated with the approval workflow included in the seed data that is provided in Siebel applications. You can use these processes in your deployment, modify them to meet the needs of your business, or use them as a guide for creating your own approval workflows.
For more information on creating or modifying workflows, see Siebel Business Process Framework: Workflow Guide.
NOTE: All Content Center workflows should be placed into the Content Center group.
About the Content Item State ModelA state model, called Content Item Status, controls the status changes of a content item.
Table 4 describes each of the content item states.
Table 4. Content Item Status
State Description
Pending Submit Applied by the workflow process.
If the current task in the workflow is a Contribute task, the workflow process applies the Pending Submit state to indicate that an end user is expected to perform some action on the content item.
Submitted Applied by an end user.
A content contributor applies the Submitted state to indicate that the actions associated with this content item have been completed.
Pending Approval Applied by the workflow process.
If the current task in the workflow is an Approval task, the workflow process applies the Pending Approval state to indicate that an end user is expected to review the content item.
Approved Applied by an end user.
A content approver applies the Approved state to indicate that the content item has been reviewed and approved.
Rejected Applied by an end user.
A content approver applies the Rejected state to indicate that the content item has been reviewed and disapproved.

Siebel Content Publishing Guide Version 8.0
Content Center ■ Setting Up Content Center Approval Workflows
24
About the Content Approval (Single Approver) WorkflowThe Content Approval (Single Approver) workflow is a simple workflow that demonstrates a single approver approval process. You can use this workflow with or without modification.
The Content Approval (Single Approver) workflow uses these step types to construct the business logic for content item approval:
■ Content Task Subprocess. This step type is used to indicate that the Content task assigns the content item to an end user to perform some action. Each Content task has a type and a sequence number. The task type is either contribution or approval. The task sequence indicates the Siebel position to which the content item should be assigned, as specified on the content item. This step calls the Content task workflow subprocess. For more details about the subprocess, see “About the Content Task Subprocess” on page 24.
■ State Decision Point. This step type performs branching logic in the approval process. The branching logic is based on the state that is applied to the content item after a Content task. For example, a decision point is used to reassign a content item to the originator after it is rejected.
■ State Update Siebel Operations. This step type is used to make updates to the content item state.
You can use these workflow components to create new approval workflows or to modify the Content Approval (Single Approver) workflow for your business. For example, if you require two approval tasks, you can add two Content Task Subprocesses and State Decision Points.
About the Content Task SubprocessThe Content Task Subprocess contains the common logic of assigning a content item and waiting for a user action. The parent approval process calls this subprocess each time a content item is assigned to an end user. Calling this task causes the content item to appear in the Content Inboxes for those users associated with the current sequence (TaskSeq).
Canceled Applied by an end user.
A content contributor or approver applies the Canceled state to indicate that the content item should no longer be included in the current content project.
Completed Applied by the workflow process.
This is a terminal state that indicates that the workflow approval process has been completed for the content item. A content item must be in the Completed state before it can be published.
Table 4. Content Item Status
State Description

Content Center ■ Setting Up Content Center Publication Workflows
Siebel Content Publishing Guide Version 8.0 25
The parent business process must pass in the input arguments shown in Table 5.
The Content Task Subprocess performs these actions:
■ Sets the content item state to either Pending Submit or Pending Approve, depending on the TaskType for the current task.
■ Sets the content item Current Approval Sequence Number field to the TaskSeq value. This makes the content item visible to the appropriate end users in the Content Inbox view.
■ Waits for the end user to take action on the content item and make a state change to the item. When this occurs, the workflow process resumes and returns control to the parent approval process.
About the Auto Complete WorkflowAn approval workflow must be run for each content item before a content project can be published. (See “To start the project approval workflow” on page 29.) To publish content without routing it through approvers and contributors, use the Auto Complete workflow. The Auto Complete workflow is a simple workflow, provided with the seed data. It sets the status of a content item to Completed immediately so that the project is ready for publication.
Setting Up Content Center Publication WorkflowsThe Content Project business service publishes content projects. It can transfer any data that can be accessed through a business component: both complex database content and unstructured content. Transactional integrity is maintained between all the items in a content project.
Project publishing is controlled by workflows. This provides flexibility in the publishing process. When a business manager invokes either the Publish or Request Publish action for a project, the publication workflow associated with the project is instantiated.
Siebel applications provide two predefined publication workflows in the standard product:
Table 5. Parent Approval Process Input Arguments
Input Argument Description
Object Id The content item ID from the parent (Content Approval) to the child (Content Task) Subprocess.
TaskSeq Passes the sequence number of the current task.
TaskType Indicates that the current task is either type Contribute or type Approve.

Siebel Content Publishing Guide Version 8.0
Content Center ■ About the Content Project Business Service
26
■ Content Publish workflow
This workflow publishes a content project from a staging environment to a production environment. There is only one step in this workflow, which calls the Content Project business service. You may extend this process to meet your specific business requirements. For example, you may create additional workflow steps to integrate with other systems or wait for a specified period of time before publishing.
■ Content Publish to Files workflow
This workflow is similar to the Content Publish workflow, except that the content project is published to XML files in a specified directory instead of to the production environment.
You can use these processes in your deployment, modify them to meet the needs of your business, or simply use them as a guide for creating your own publication workflows.
For more information on creating or modifying workflows, see Siebel Business Process Framework: Workflow Guide.
NOTE: All Content Center workflows should be placed into the Content Center group.
About the Content Project Business ServiceThe Content Project business service is designed to publish a content project from the staging environment to the production environment or to publish the content items as XML files. In the publication workflow, the Export method of this business service is called, indicating that the content items in the project will be exported from the staging environment. The publishing target is set using two method arguments, specified as workflow properties:
■ Connect String. A Siebel connect string, specified as:
siebel://namesrvr:2321/enterprise/objmgr
For example: siebel://siqalab4:2321/siqalab4/SCCObjMgr_enu
(The exact connect string can be picked up from the eapps.cfg of the publishing target server.) The Content Project business service connects to the specified object manager, such as SCCObjMgr for Siebel Call Center, as the current user and makes the appropriate updates, inserts, and deletes for each content item in the project. These changes are made by the content object in the sequence specified in Siebel Tools for each content object.
■ Export Directory. The name of a file system directory into which the XML should be placed. For example, C:\temp or \\fileserver\publish\export. The directory must exist and be accessible to the object manager. Specifying this property exports the content items within the project as a series of Siebel XML files. The files use the naming convention:
■ Upload content object name.xml—for content items that are to be added.
■ Delete content object name.xml—for content items that are to be deleted in the target system.
NOTE: Detailed information about the other methods in this business service are given in Appendix A, “Content Center Reference.”
Content Center ■ Setting Up Content Types
Siebel Content Publishing Guide Version 8.0 27
Setting Up Content TypesContent types define the business rules for managing a class of content through the creation and approval process.
Each content item is assigned a content type. The content type determines the following for the content item:
■ The approval workflows.
■ Which views are used to preview or edit the content.
A set of predefined content types are provided. You can also create new content types according to your business process, as described in the following procedure.
NOTE: Do not confuse content types with content asset types. For information about content asset types, see “About the Content Asset Types View” on page 40.
To set up content types
1 Navigate to the Administration - Content Center screen > Content Types view.
2 Create a new record and complete the necessary fields.
Some fields are described in the following table.
Field Comments
Name Unique name of the content type.
Content Object The object chosen from this dialog box specifies the information that is transferred during publishing.
For more information, see “Configuring Content Objects for Content Center” on page 19.
Approval Workflow
Defines the content contribution, review, and approval process for this content type. For more information, see “Setting Up Content Center Approval Workflows” on page 22.
Content Type Views
A list of the views used to administer or preview content of this type. These views determine the end-user navigation from the Content Inbox. Examples are the destination views for the Item Reference hyperlink, in Step 2 in the “To contribute (create or edit) a content item” procedure on page 30 and the Action hyperlink in Step 3 in the “To contribute (create or edit) a content item” procedure on page 30.
Picklist Determines the drop-down list used to select content of this type.
Pick Applet Determines the pick applet used to select content of this type.

Siebel Content Publishing Guide Version 8.0
Content Center ■ Setting Up Contributors and Approvers
28
Setting Up Contributors and ApproversAfter you set up approval workflows for content objects, you must specify contributors and approvers for the content.
When you create a content type, you assign default contributors and approvers to each sequence number. If necessary, these defaults can be overridden (Content Item detail view) when the content item is created.
To set up a contributor or approver
1 Navigate to the Administration - Content Center screen > Content Types view.
2 Select the content type for which you would like to create a list of contributors and approvers.
3 Click the Contributors and Approvers view tab.
4 In the Contributors and Approvers list, create a new record.
5 In the Position field, select a position from the Pick Position dialog box.
6 In the Sequence field, specify a sequence number for the selected position.
You can specify multiple positions for the same sequence number. Doing so places the content item into multiple Content Inboxes for this task; however, only one individual is able to complete the task.
7 In the Comment field, add a default comment for each position.
Comments are visible to users when they receive the content item in their Content Inbox.
Creating Content ProjectsYou can use a Content Project to manage the process of creating, editing, and deleting application content. The Content Project provides a virtual folder through which a set of related content item changes can be managed. You use the Content Projects view to create projects, start the project approval workflows, and review content project status.
To create a content project
1 Navigate to the Administration - Content Center screen > Content Projects view.
2 In the Content Projects list, create a new record, specifying a name and description.
3 In the More Info form fill in the Plan Publication Date field—the date you plan to publish this project.
This date does not automatically publish the project.
4 In the Publication Workflow field, select the publication workflow that you want to use for this project.
5 Click the Content Items view tab.
Content Center ■ Creating Content Projects
Siebel Content Publishing Guide Version 8.0 29
6 In the Content Items list, create a new record and complete the necessary fields.
For each content item, you must specify a descriptive name, a content type, a description of the work to be performed, and a status (Add, Update, or Delete). If the item has a status of Update or Delete, you can also specify the item reference, which allows you to select the specific piece of content that should be changed.
NOTE: You can change any contributors or approvers for a content item by editing the Contributors and Approvers list.
To start the project approval workflow
1 Navigate to the Administration - Content Center screen > Content Projects view.
2 From the Content Projects list, select the appropriate content project.
3 In the More Info form, do one of the following:
■ Click Start Project. This changes the state of the project from Draft to In Process and instantiates the approval workflows synchronously. This means that users must wait for all workflow processes to begin before regaining control of the user interface. For large projects, this could take several minutes.
■ Select Request Start Project from the Menu button drop-down list. This changes the state of the project from Draft to In Process and instantiates the approval workflows asynchronously on a separate server component, which returns control to users more quickly. This is the recommended method to use for projects that contain thirty or more items. This method requires that the Content Project Start server component is online. (See Siebel System Administration Guide for information about starting server components.)
NOTE: If you add more content items to the project after it is in the In Process state, invoke the Start Project or Request Start Project action again to start the approval workflows for the new content items.
To review status of content project and content items
1 Navigate to the Administration - Content Center screen > Content Projects view.
2 From the Content Projects list, select the appropriate content project.
The status of the project is given in the More Info form. The following table explains the Project Status values.
Project Status Description
Draft The project has been created and the approval workflow has not been started.
In Process The approval workflow has been started.
Published The project has been published.

Siebel Content Publishing Guide Version 8.0
Content Center ■ Contributing and Approving Content (End User)
30
3 Click the Content Items view tab.
You can review the status of each content item, and check or change its assignment. By clicking the Item Reference for a content item, you can preview the current state of the content. See Table 4 on page 23 for possible status values.
Contributing and Approving Content (End User)The Content Inbox is the screen that Content Contributors and Approvers use to interact with the approval workflow. In the My Content Items view users see any content item currently assigned to their position by the approval workflow, and are able to drill down on hyperlinks to the appropriate views to contribute, edit, preview, and approve content.
To contribute (create or edit) a content item
1 Navigate to the Content Inbox screen > My Content Items view.
The Content Items list contains all of the content items currently assigned to you by the approval workflow.
Items that require contribution can be identified by the status Pending Submit.
2 Drill down on an item and do any of the following:
■ Click the Contributors and Approvers view tab to see the users assigned to the contribution and approval process.
■ Click the History view tab to review actions taken on the item to date.
■ Drill down on the Item Reference hyperlink to preview the content item.
3 Drill down on the Action hyperlink and use the associated administration view to create or edit content.
This link dynamically takes you to the Add/Edit view associated with the content type. If the action is Delete, this link is not active. Instead, completion of a deletion task indicates approval to delete the referenced item.
For more information about editing content assets, see Chapter 3, “Content Asset Management.”
4 Return to the Content Inbox using the back button.
5 If the content item is an Add action, update the Item Reference field on the content item to reference the content you just created. Clicking the Item Reference pop-up displays a pick list from which you can select the content record that you just created.
6 Click on the Item Reference link to view the item and verify that it is complete and accurate.
Return to the Content Inbox using the back button.
7 Add comments as needed to the content item, and change the status of the item as appropriate. For example, change the status from Pending Submit to Submitted.

Content Center ■ Publishing Content Projects
Siebel Content Publishing Guide Version 8.0 31
To approve content
1 View all content items in the Content Inbox and select an item to work on.
Items that require approval can be identified by the status Pending Approval.
2 Drill down on an item and do any of the following:
■ Click the Contributors and Approvers view tab to see the positions assigned to the contribution and approval process.
■ Click the History view tab to review actions taken on the item to date.
■ Drill down on Item Reference hyperlink to preview the content item.
3 Make any comments to the content item, and change the status of the item as appropriate.
For example, change the status from Pending Approval to Approved or Rejected.
Publishing Content ProjectsAfter the content for a project has been added and approved, use the Content Center publication workflow to publish to your production environment.
Make sure that:
■ The correct publication workflow for the project has been specified. (See Step 4 in the “To create a content project” procedure on page 28.)
■ The status of the project is In Process and the status of each item in the project is Completed.
To publish a content project
1 Navigate to the Administration - Content Center screen > Content Projects view.
2 From the Content Projects list, select the appropriate content project.
3 Do one of the following:
■ Click Publish. This changes the state of the project to Published and instantiates the publication workflow synchronously. This means that users must wait for all workflow processes to begin before regaining control of the user interface. For large projects, this could take several minutes.
■ Select Request Publish from the Menu button drop-down list. This instantiates the publication workflow asynchronously on a separate server component, which returns control to users more quickly. This is the recommended method to use for projects that contain thirty or more items. This method requires that the Content Project Publish server component is online. (See Siebel System Administration Guide for information about starting server components.)
4 If you selected Request Publish in Step 3:
a Navigate to the Administration - Server Management screen > Components view.

Siebel Content Publishing Guide Version 8.0
Content Center ■ Publishing Content Projects
32
b In the Components list, select the Content Project Publish record, and check the State field in the Tasks list.
If publication fails, the task's state is “Exit with Error.”
NOTE: A content project cannot be republished, except by creating a new content project, for example by copying the published project.
Siebel Content Publishing Guide Version 8.0 33
3 Content Asset Management
This chapter describes setting up, creating, and managing content assets. It includes the following topics:
■ “About Content Assets” on page 33
■ “Scenario for Content Asset Management” on page 33
■ “Process of Managing Content Assets” on page 34
■ “Defining Content Sets to Contain Content Assets” on page 34
■ “Adding Content Assets to a Content Set” on page 35
■ “Setting the Home Page for a Content Set” on page 36
■ “Viewing and Editing Content Asset Properties” on page 37
■ “Checking Content Assets In and Out” on page 38
■ “Editing HTML Content” on page 40
■ “About the Content Asset Types View” on page 40
■ “About Configuring Content Asset Management” on page 40
You can use the content asset repository for storing and managing unstructured content such as assets and sets of assets. Content Asset Management establishes check-out and check-in procedures to serialize access to content, and prevent changes from being lost by users trying to update content simultaneously. Content can be rolled back to earlier versions if the changes made were unsatisfactory.
About Content AssetsYou can use the content asset repository for storing and managing unstructured content as assets and sets of assets. Content assets are typically unstructured data such as Web pages, images, Microsoft Office documents, and text files.
Content Asset Management establishes check-out and check-in procedures to serialize access to content, and prevent changes from being lost by users trying to update content simultaneously. Content can be rolled back to earlier versions if the changes made were unsatisfactory.
Scenario for Content Asset ManagementContent Asset Management is typically used in conjunction with other screens in the Siebel Business Application, for example Microsite Management, Group News, and Info Center. For a sample scenario where Content Asset Management is used, see “Scenario for Microsite Management” on page 47.

Siebel Content Publishing Guide Version 8.0
Content Asset Management ■ Process of Managing Content Assets
34
Process of Managing Content AssetsThis example process represents the typical tasks for creating and managing content assets:
■ “Defining Content Sets to Contain Content Assets” on page 34
■ “Adding Content Assets to a Content Set” on page 35
■ “Setting the Home Page for a Content Set” on page 36
■ “Viewing and Editing Content Asset Properties” on page 37
■ “Checking Content Assets In and Out” on page 38
■ “Editing HTML Content” on page 40
Defining Content Sets to Contain Content AssetsContent sets are collections of content assets. Every content asset must belong to a content set and should have a unique name within that set. In addition to content assets, content sets can contain other content sets.
After a content set is defined, you can:
■ Add content assets to the set.
■ Add other content sets to it.
■ Preview the home page asset of the set.
■ Review the history of the set.
■ Establish the locks on content assets in the set.
This task is a step in “Process of Managing Content Assets” on page 34.
To create a content set
1 Navigate to the Administration - Content Center screen > Content Sets view.
2 In the Content Sets list, create a new record and complete the necessary fields.
Some fields are described in the following table.
Field Comments
Name A unique name for the content set record.
Title A short descriptive title for the content set.
Description Text describing the content set.

Content Asset Management ■ Adding Content Assets to a Content Set
Siebel Content Publishing Guide Version 8.0 35
Adding Content Assets to a Content SetContent assets can only be created as child records of a content set.
This task is a step in “Process of Managing Content Assets” on page 34.
To add content assets to a content set
1 Navigate to the Administration - Content Center screen > Content Sets view.
2 In the Content Sets list, select the content set to which you want to add an asset.
3 Click Add Content.
4 Do either of the following actions:
■ Click the File Options button and specify a local file.
■ Type in a URL or network path.
5 If you typed in a URL or network path, click the URL Options button and set the URL and network file options in the dialog box.
Some fields are described in the following table.
Home Page This field cannot be filled in until there are content assets in the content set. See “Setting the Home Page for a Content Set” on page 36.
Parent The name of an existing content set that contains this new content set.
Field Comments
Follow Links Select to have the pages that are linked-to from the specified Web page are copied, and, in turn, links to those pages copied as well.
Max Depth Indicates the level to which links are copied. For example, if Max Depth = 1, pages that are linked-to from the specified page are copied, but not pages that they link to.
Restrict to Subdirectory
Select so that, if links are followed, only links to pages within the same directory as the specified page are copied.
Retrieve Graphics
Select to have graphics on the specified Web page copied along with the text.
Preserve Path When a secondary file is imported (using Follow Links or Wildcard subdirectories), this option retains the path hierarchy in the asset's name. For example, if the linked file /img/foo.jpg is imported, and this option is selected, the asset will be named img/foo.jpg, If this option is not selected, the asset will be named foo.jpg.
URL options
Field Comments
Siebel Content Publishing Guide Version 8.0
Content Asset Management ■ Setting the Home Page for a Content Set
36
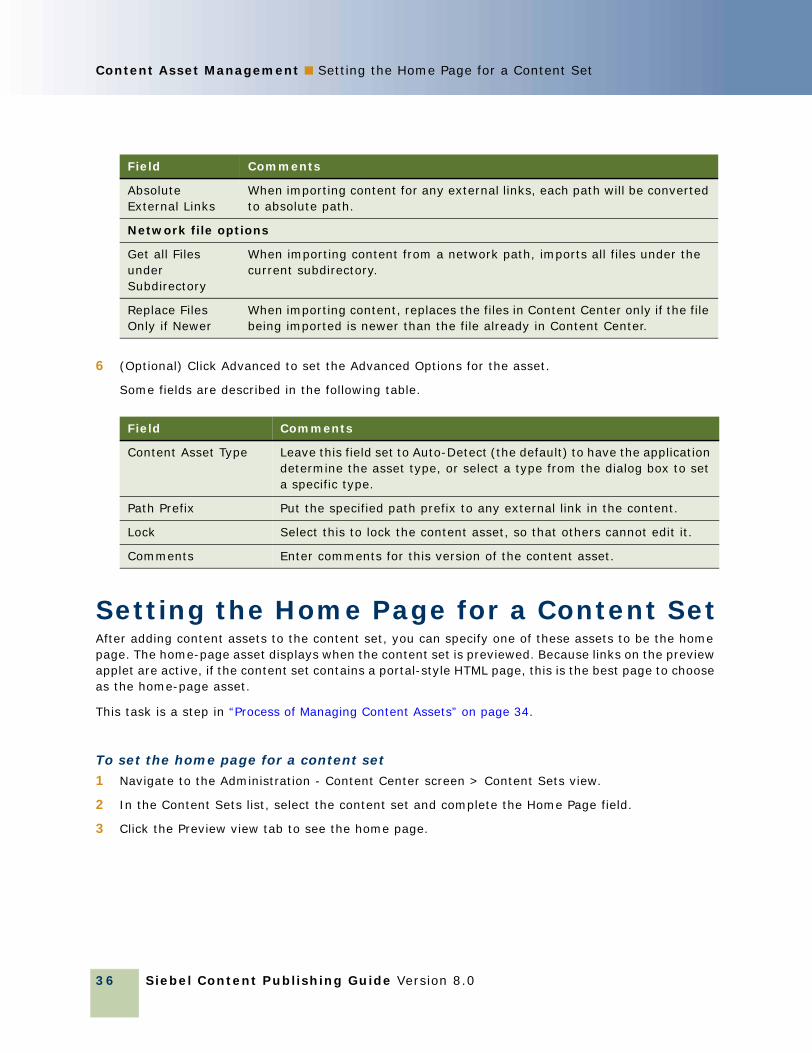
6 (Optional) Click Advanced to set the Advanced Options for the asset.
Some fields are described in the following table.
Setting the Home Page for a Content SetAfter adding content assets to the content set, you can specify one of these assets to be the home page. The home-page asset displays when the content set is previewed. Because links on the preview applet are active, if the content set contains a portal-style HTML page, this is the best page to choose as the home-page asset.
This task is a step in “Process of Managing Content Assets” on page 34.
To set the home page for a content set
1 Navigate to the Administration - Content Center screen > Content Sets view.
2 In the Content Sets list, select the content set and complete the Home Page field.
3 Click the Preview view tab to see the home page.
Absolute External Links
When importing content for any external links, each path will be converted to absolute path.
Network file options
Get all Files under Subdirectory
When importing content from a network path, imports all files under the current subdirectory.
Replace Files Only if Newer
When importing content, replaces the files in Content Center only if the file being imported is newer than the file already in Content Center.
Field Comments
Content Asset Type Leave this field set to Auto-Detect (the default) to have the application determine the asset type, or select a type from the dialog box to set a specific type.
Path Prefix Put the specified path prefix to any external link in the content.
Lock Select this to lock the content asset, so that others cannot edit it.
Comments Enter comments for this version of the content asset.
Field Comments
Content Asset Management ■ Viewing and Editing Content Asset Properties
Siebel Content Publishing Guide Version 8.0 37
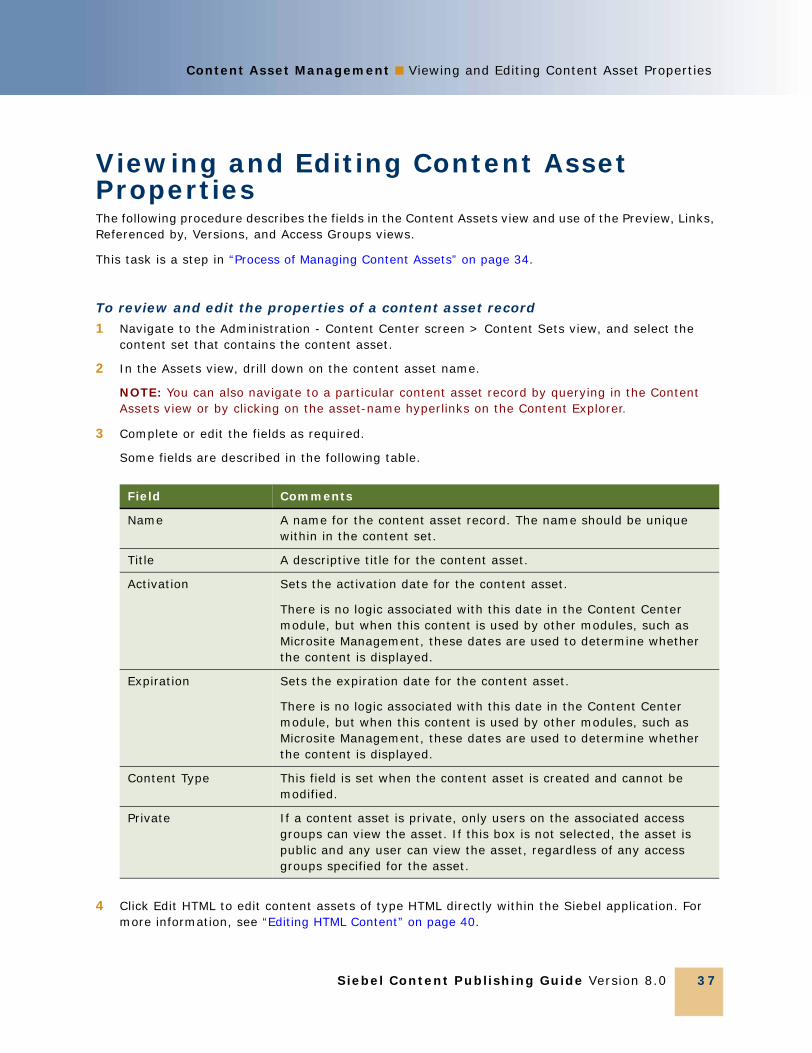
Viewing and Editing Content Asset PropertiesThe following procedure describes the fields in the Content Assets view and use of the Preview, Links, Referenced by, Versions, and Access Groups views.
This task is a step in “Process of Managing Content Assets” on page 34.
To review and edit the properties of a content asset record
1 Navigate to the Administration - Content Center screen > Content Sets view, and select the content set that contains the content asset.
2 In the Assets view, drill down on the content asset name.
NOTE: You can also navigate to a particular content asset record by querying in the Content Assets view or by clicking on the asset-name hyperlinks on the Content Explorer.
3 Complete or edit the fields as required.
Some fields are described in the following table.
4 Click Edit HTML to edit content assets of type HTML directly within the Siebel application. For more information, see “Editing HTML Content” on page 40.
Field Comments
Name A name for the content asset record. The name should be unique within in the content set.
Title A descriptive title for the content asset.
Activation Sets the activation date for the content asset.
There is no logic associated with this date in the Content Center module, but when this content is used by other modules, such as Microsite Management, these dates are used to determine whether the content is displayed.
Expiration Sets the expiration date for the content asset.
There is no logic associated with this date in the Content Center module, but when this content is used by other modules, such as Microsite Management, these dates are used to determine whether the content is displayed.
Content Type This field is set when the content asset is created and cannot be modified.
Private If a content asset is private, only users on the associated access groups can view the asset. If this box is not selected, the asset is public and any user can view the asset, regardless of any access groups specified for the asset.

Siebel Content Publishing Guide Version 8.0
Content Asset Management ■ Checking Content Assets In and Out
38
5 Click the Preview view tab to preview the content asset.
If the content asset is an HTML file or an image, the asset displays directly in the Preview applet. For other types of content assets, the title of the asset appears as a hyperlink, from which you can open the asset in the application that you choose.
6 Click the Links view tab to review the links within a content asset.
These may be links to graphics, to HTML pages, or to email addresses. They may be external links or they may be links to other assets within the content asset repository (internal).
If the link is internal, Content Center checks whether the link is valid.
7 Click the Referenced by view tab to review the other content assets that contain links to this content asset.
8 Click the Versions view tab to view information about the versions of the asset stored in the content asset repository.
9 Click the Access Groups view tab to view who has read and write access to the content asset:
■ Read access. If the Private check box was selected in the Asset form above the Access Groups view, only those groups listed have read access. If the Private check box was not selected, there are no restrictions on who has read access to the asset.
■ Write access. If any access groups have the Allow to Edit check box selected, only they have write access. If the Allow to Edit check box is clear for all, there are no write restrictions on the asset.
For information about creating access groups, see Siebel Security Guide.
Checking Content Assets In and OutChecking out a content asset downloads the asset file and locks the asset so that others cannot make changes to it.
Checking in a content asset uploads a new version of the content asset and unlocks the asset.
This task is a step in “Process of Managing Content Assets” on page 34.
To check out a content asset
1 Navigate to the Administration - Content Center screen > Content Sets view, and select the content-asset record to check out.
To... Select It and Click...
Roll back to a previous version Restore
Download a version to file Save to File
Preview a version Preview

Content Asset Management ■ Checking Content Assets In and Out
Siebel Content Publishing Guide Version 8.0 39
2 Click Check Out.
The file is saved locally for editing, other users cannot modify the file until it is checked in, and your user ID appears in the Locked by field.
To check in a content asset
1 Navigate to the Administration - Content Center screen > Content Sets view, and select the content-asset record to check in.
2 Click Check In.
3 The Check In Content dialog box appears.
4 Do either of the following actions:
■ Click the File Options button and specify a local file.
■ Type in a URL or network path.
5 If you typed in a URL or network path, click the URL Options button and set the URL and network file options in the dialog box.
Some fields are described in the table in Step 5 in the “To add content assets to a content set” procedure on page 35.
6 (Optional) Click Advanced to set the Advanced Options for the asset.
Some fields are described in the table in Step 6 in the “To add content assets to a content set” procedure on page 36.
About the Content Asset Commands on the Menu ButtonMost users only need to use the Check Out and Check In buttons. However, other content asset commands are available on the menu button of the Asset Detail form in the Content Assets view:
■ Lock. Locks the content asset by the current user.
■ Unlock. Unlocks the content asset. For example, you can use this command if you check out an asset, but then decide that you do not want to make any changes to it.
■ Save to File. Downloads the content asset to a file, but does not lock the asset.
■ Replace. Creates a new version of the content asset. The Replace command is available only when the asset is locked.
■ Copy. Copies the content asset. This gives you two content asset records that are the same.
■ Delete. Deletes the content asset record and is equivalent to the Delete Record command. This soft delete keeps past versions of the asset in the content asset repository. Deleted assets can be accessed through the Contents Sets History view.

Siebel Content Publishing Guide Version 8.0
Content Asset Management ■ Editing HTML Content
40
Editing HTML ContentYou can edit content assets of type HTML directly within the Siebel application using the integrated HTML editor.
NOTE: To edit large or complex HTML files, you may prefer to use a third-party HTML or text editing application.
This task is a step in “Process of Managing Content Assets” on page 34.
To edit HTML content using the integrated HTML editor
1 Navigate to the Administration - Content Center screen > Content Sets view, and select an HTML content-asset record to edit.
2 Click Edit HTML.
The content asset is automatically checked out, and the integrated HTML editor opens.
3 Click the edit area, and make changes as required.
For general information about the integrated HTML editor, see Siebel Fundamentals.
4 Click Save.
The content asset is automatically checked in.
About the Content Asset Types ViewThe Content Asset Types view contains the file types, and associated DTR (document type rules) files, extensions, and MIME types, that are recognized by Content Asset Management.
Although you can add new content asset types if necessary, it is unlikely that you will need to. Many file types are provided with the preconfigured Siebel application.
CAUTION: It is recommended that you do not edit or delete records in this view and that you do not delete any DTR files from your Siebel installation.
About Configuring Content Asset ManagementContent assets can be added to the Content Center repository by specifying a filename on a shared directory or by specifying a URL. In both cases, files that are linked-to from the specified file or URL can be imported by selecting to Follow Links.
When shared network files are imported to the Content Center repository in this way, the permissions for the directory access are those of the server process account. Because the server process account typically has more extensive privileges than the user, there is a security risk of users importing content from directories to which they do not have access.
Content Asset Management ■ About Configuring Content Asset Management
Siebel Content Publishing Guide Version 8.0 41
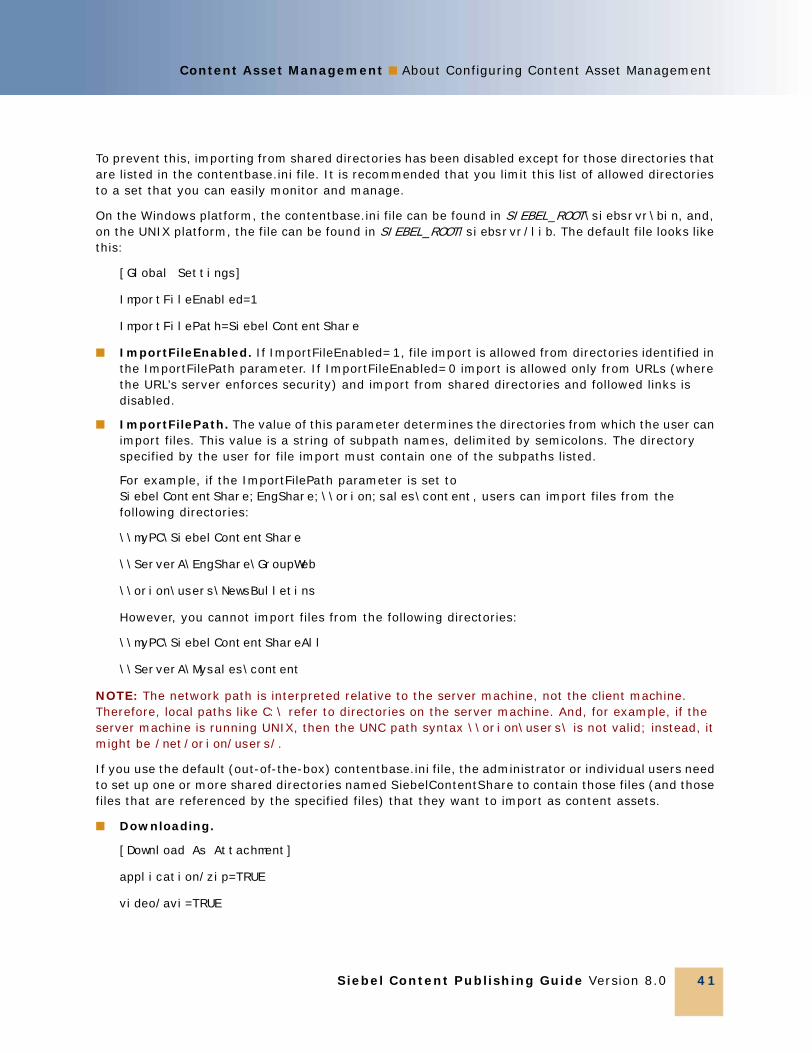
To prevent this, importing from shared directories has been disabled except for those directories that are listed in the contentbase.ini file. It is recommended that you limit this list of allowed directories to a set that you can easily monitor and manage.
On the Windows platform, the contentbase.ini file can be found in SIEBEL_ROOT\siebsrvr\bin, and, on the UNIX platform, the file can be found in SIEBEL_ROOT/siebsrvr/lib. The default file looks like this:
[Global Settings]
ImportFileEnabled=1
ImportFilePath=SiebelContentShare
■ ImportFileEnabled. If ImportFileEnabled=1, file import is allowed from directories identified in the ImportFilePath parameter. If ImportFileEnabled=0 import is allowed only from URLs (where the URL’s server enforces security) and import from shared directories and followed links is disabled.
■ ImportFilePath. The value of this parameter determines the directories from which the user can import files. This value is a string of subpath names, delimited by semicolons. The directory specified by the user for file import must contain one of the subpaths listed.
For example, if the ImportFilePath parameter is set to SiebelContentShare;EngShare;\\orion;sales\content, users can import files from the following directories:
\\myPC\SiebelContentShare
\\ServerA\EngShare\GroupWeb
\\orion\users\NewsBulletins
However, you cannot import files from the following directories:
\\myPC\SiebelContentShareAll
\\ServerA\Mysales\content
NOTE: The network path is interpreted relative to the server machine, not the client machine. Therefore, local paths like C:\ refer to directories on the server machine. And, for example, if the server machine is running UNIX, then the UNC path syntax \\orion\users\ is not valid; instead, it might be /net/orion/users/.
If you use the default (out-of-the-box) contentbase.ini file, the administrator or individual users need to set up one or more shared directories named SiebelContentShare to contain those files (and those files that are referenced by the specified files) that they want to import as content assets.
■ Downloading.
[Download As Attachment]
application/zip=TRUE
video/avi=TRUE

Siebel Content Publishing Guide Version 8.0
Content Asset Management ■ About Configuring Content Asset Management
42
When downloading some file types, Internet Explorer looks at the extension .swe and is not able to invoke the correct application even though the Content Type headers being passed to Internet Explorer are correct. Set the values of those MIME types here as true. The name/ext in the Internet Explorer pop-up will show up correctly.

Siebel Content Publishing Guide Version 8.0 43
4 Microsite Management
This chapter describes how to use Microsite Management to create Web pages and manage Web page content.
It includes the following topics:
■ “About Microsite Management” on page 43
■ “Scenario for Microsite Management” on page 47
■ “Process of Microsite Management” on page 48
■ “Viewing and Editing Page Information” on page 48
■ “Using the Page Designer and Its Tools” on page 51
■ “Managing Groups of Page Items” on page 66
■ “Previewing a Page” on page 66
■ “Publishing a Page” on page 67
■ “Deleting a Page” on page 68
■ “Creating and Applying Templates” on page 68
■ “About Creating Search Indexes” on page 70
■ “About Configuring Microsite Management” on page 70
About Microsite ManagementMany companies have multiple content managers whose responsibilities include adding and modifying data on Web pages. The layout and maintenance of data and hypertext links must be done as efficiently as possible, without requiring IT resources. The Microsite Management module is designed to simplify creation and maintenance of Web pages. Everything from site organization and creation of new pages through to editing text and graphics is carried out from the Microsite Management screen.
Unstructured and Structured Content DefinitionsBoth structured and unstructured page items can be included on pages created within the Microsite Management module:
■ Unstructured Content. Such as HTML files, graphics, and links to documents. Unstructured content can be authored in a variety of environments, including Microsoft FrontPage, PowerPoint, and Word and the integrated HTML editor within the Siebel applications. Placement of unstructured content on pages is carried out using Page Designer in the Microsite Manager screen.

Siebel Content Publishing Guide Version 8.0
Microsite Management ■ About Microsite Management
44
■ Structured Content. Such as product catalogs and lists of opportunities. In general, structured content is authored in the Siebel application environment. Placement of structured content on pages is carried out in Siebel Tools, by editing applets on views.
Key FeaturesKey features of Microsite Management are:
■ Page Administrator Explorer Tree. Gives a hierarchically organized view of all the pages in your Web site.
■ Page Designer. A graphical drag-and-drop page layout tool that allows page designers and content managers to create different types of content anywhere on a page.
■ Preview. Allows you to preview pages according to content status (for example, approved or draft) and according to release and expiration dates.
■ Templates. Grouped page items (unstructured items) that can be placed on multiple pages and updated for all pages at once.
■ Access Control. Is set at both the page and page item level so you can control which access groups can see and edit content.
■ Transparent Integration with Content Center. Allows setting up and routing the tasks of creating, editing, and approving with Siebel Content Center. When a link to a file is added to a page, that file is added to the Siebel content repository as a content asset, and can be version-controlled with Content Center. For more information, see Chapter 2, “Content Center.”
■ One-Click Publishing. Publishes directly from the Microsite Management screen, creating a content project and automatically approving the page content.
■ Usage Collection. Ability to monitor users’ visits to microsite pages. For more information, see Chapter 5, “Usage Collection.”

Microsite Management ■ About Microsite Management
Siebel Content Publishing Guide Version 8.0 45
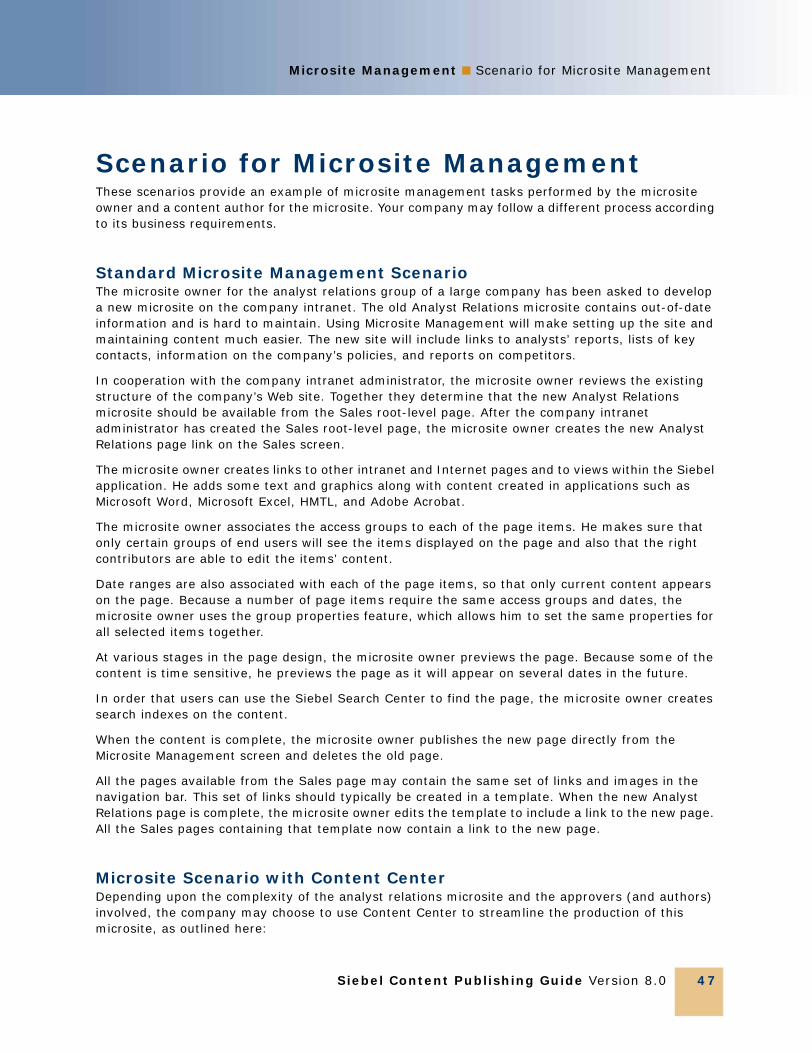
The Page Designer and the Finished PageFigure 2 and Figure 4 show the relationship between a finished page and Microsite Management’s Page Designer layout tool that was used to create the page. The content on the page is indicated by page item icons in Page Designer. The areas of the page, such as the navigation bar, are indicated schematically in Page Designer.
Figure 2. Microsite Page
Siebel Content Publishing Guide Version 8.0
Microsite Management ■ About Microsite Management
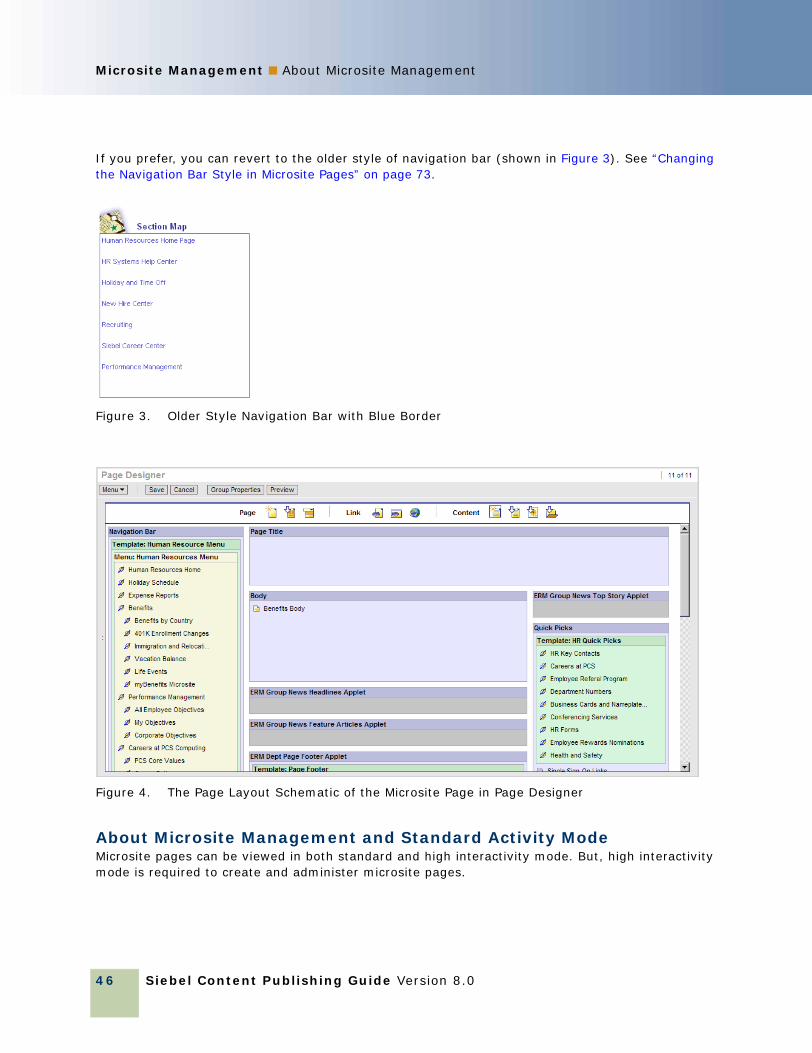
46
If you prefer, you can revert to the older style of navigation bar (shown in Figure 3). See “Changing the Navigation Bar Style in Microsite Pages” on page 73.
About Microsite Management and Standard Activity ModeMicrosite pages can be viewed in both standard and high interactivity mode. But, high interactivity mode is required to create and administer microsite pages.
Figure 3. Older Style Navigation Bar with Blue Border
Figure 4. The Page Layout Schematic of the Microsite Page in Page Designer
Microsite Management ■ Scenario for Microsite Management
Siebel Content Publishing Guide Version 8.0 47
Scenario for Microsite ManagementThese scenarios provide an example of microsite management tasks performed by the microsite owner and a content author for the microsite. Your company may follow a different process according to its business requirements.
Standard Microsite Management ScenarioThe microsite owner for the analyst relations group of a large company has been asked to develop a new microsite on the company intranet. The old Analyst Relations microsite contains out-of-date information and is hard to maintain. Using Microsite Management will make setting up the site and maintaining content much easier. The new site will include links to analysts’ reports, lists of key contacts, information on the company’s policies, and reports on competitors.
In cooperation with the company intranet administrator, the microsite owner reviews the existing structure of the company’s Web site. Together they determine that the new Analyst Relations microsite should be available from the Sales root-level page. After the company intranet administrator has created the Sales root-level page, the microsite owner creates the new Analyst Relations page link on the Sales screen.
The microsite owner creates links to other intranet and Internet pages and to views within the Siebel application. He adds some text and graphics along with content created in applications such as Microsoft Word, Microsoft Excel, HMTL, and Adobe Acrobat.
The microsite owner associates the access groups to each of the page items. He makes sure that only certain groups of end users will see the items displayed on the page and also that the right contributors are able to edit the items’ content.
Date ranges are also associated with each of the page items, so that only current content appears on the page. Because a number of page items require the same access groups and dates, the microsite owner uses the group properties feature, which allows him to set the same properties for all selected items together.
At various stages in the page design, the microsite owner previews the page. Because some of the content is time sensitive, he previews the page as it will appear on several dates in the future.
In order that users can use the Siebel Search Center to find the page, the microsite owner creates search indexes on the content.
When the content is complete, the microsite owner publishes the new page directly from the Microsite Management screen and deletes the old page.
All the pages available from the Sales page may contain the same set of links and images in the navigation bar. This set of links should typically be created in a template. When the new Analyst Relations page is complete, the microsite owner edits the template to include a link to the new page. All the Sales pages containing that template now contain a link to the new page.
Microsite Scenario with Content CenterDepending upon the complexity of the analyst relations microsite and the approvers (and authors) involved, the company may choose to use Content Center to streamline the production of this microsite, as outlined here:

Siebel Content Publishing Guide Version 8.0
Microsite Management ■ Process of Microsite Management
48
■ The corporate marketing director in charge of analyst relations creates a content project that her team uses to create the analyst relations microsite; in the project she specifies the tasks involved in producing the microsite.
■ The Content Center workflow routes these tasks to the designated microsite owner who views them in his Content Inbox.
■ The microsite owner drills down on the content task and creates the new analyst relations microsite.
■ After content has been drafted, the microsite owner submits them for approval to the designated reviewers in the project’s approval workflow.
■ When the microsite and its contents have been approved, the microsite is published from the Content Center’s staging environment to the production environment.
Process of Microsite ManagementThis is an example of a simple process flow for Microsite Management. Your company may follow a different process according to its business requirements.
1 “Viewing and Editing Page Information” on page 48 (to review the existing structure of the Web site)
2 “Creating a Root-Level Page” on page 50 (to create a root-level page, if necessary)
3 “Using the Create New Page Tool” on page 52 (to create a new page linked to the root-level page)
4 “Using the Page Designer and Its Tools” on page 51 (to edit the page, and add links and other content)
5 “Managing Groups of Page Items” on page 66 (to set access groups and activation dates for content)
6 “Previewing a Page” on page 66 (to preview the new page)
7 “Publishing a Page” on page 67 (to publish the new page)
8 “Deleting a Page” on page 68 (to delete the old page)
9 “Creating and Applying Templates” on page 68 (to edit templates used on multiple pages)
Viewing and Editing Page InformationThe Page Administration view includes:
■ The Page Administration Explorer tree.
■ A list of pages, displaying those pages at the level selected on the tree.
■ A More Info form displaying fields associated with the page selected in the page list.
■ A templates list displaying the templates associated with a page.
The root-level pages are the top level of the page hierarchy. All other pages are children of a root-level page or another page.

Microsite Management ■ Viewing and Editing Page Information
Siebel Content Publishing Guide Version 8.0 49
This structure helps you organize the pages. However, there are no requirements for, or restrictions on, hypertext links between child and parent pages.
The position of a page in the hierarchy is determined by the Parent Page field and the Order field.
Figure 5 shows the Page Administration Explorer tree and the Page list of the Page Administration view.
This task is a step in the “Process of Microsite Management” on page 48.
To find a page in the tree and modify its properties
1 Navigate to the Microsite Management (or Administration - Microsite) screen > Page Administration > More Info view.
2 Use the Page Administration Explorer tree to find and select the page whose properties you want to modify.
3 In the More Info form, edit fields as required.
Some fields are described in the following table.
Figure 5. Page Administration Explorer Tree and Page List Applets
Field Comments
Page Title A title for the page, up to 90 characters long. This title is used to identify the record but does not appear on the microsite.
Parent Page The parent page determines where the page is nested in the page hierarchy.
View Determines the Siebel view that the page is based on. For information about creating new views, see Configuring Siebel Business Applications.
Order Determines the sequence of the page in its level of the Page Administration Explorer tree.

Siebel Content Publishing Guide Version 8.0
Microsite Management ■ Creating a Root-Level Page
50
Creating a Root-Level PageThe root-level pages are those pages that appear at the top of the Page Administration Explorer tree. Typically only a few employees should have the responsibilities required to access the Portal Screen Administration view where root-level pages can be created.
In general, you have a screen tab for each of the root-level pages. You can use Siebel Tools to create a screen tab for a new root-level page. For information, see the page tabs topic in Configuring Siebel Business Applications.
Best practice is to standardize on a limited number of these pages in order to keep the top root-level of the explorer tree uncluttered and to restrict the number of screen tabs in the application.
This task is a step in the “Process of Microsite Management” on page 48.
To create a root-level page
1 Navigate to the Microsite Management (or Administration - Microsite) screen > Portal Screen Administration view.
2 In the Portal Screen list, create a new record and complete the necessary fields.
Some fields are described in the following table.
Access Groups Use this field to restrict read and read-write (select Editor field) access to this page.
If this field is blank, there are no restrictions on who can view and edit this page, provided they have the view responsibilities for the template view and the Page Designer view.
If no editor is specified, all the access groups can edit this page.
If you do not have access to this page, the Page Title hyperlink is unavailable in the Page list.
Item Approvers If one or more access groups are specified for this field, only users who belong can set the status of page items to approved.
Description Typically used to describe the page.
Comments Typically used to enter comments about changes made to the page.
Field Comments
Screen Name for the root-level page.
Default View Name
Determines the Siebel view that the page is based on. For information about creating new views, see Configuring Siebel Business Applications.
The view that determines the Web template used by this page.
Field Comments

Microsite Management ■ Using the Page Designer and Its Tools
Siebel Content Publishing Guide Version 8.0 51
Using the Page Designer and Its ToolsThe Page Designer view is the center of the Microsite Management module. The Page Designer applet contains a graphical drag-and-drop page layout and tools for adding unstructured content, such as text, graphics, links to Siebel views, and links to other pages, to the designated sections of your page.
In the Page Designer UI, applets that contain structured content (such as an Activities, Opportunities, or Calendar applet on an employee’s page) are indicated by the words “Not Editable.”
These sections describe the tools that you use to place page items (content and links):
■ “Using the Create New Page Tool” on page 52
■ “Using the Insert Template Tool” on page 54
■ “Using the Create Menu Tool” on page 55
■ “Using the Link Existing Page Tool” on page 57
■ “Using the Link App View Tool” on page 58
■ “Using the Add Web Link Tool” on page 59
■ “Using the Create Content Tool” on page 61
■ “Using the Insert Content Tool” on page 61
■ “Using the Insert File and the Insert Image Tools” on page 62
These sections describe tasks you can do in the Page Designer:
■ “Editing Page Item Properties” on page 64
■ “Deleting Page Items” on page 65
■ “Saving and Canceling Changes to the Page Layout” on page 65
Access Groups Use this field to restrict read and read-write (select Editor field) access to this page.
If this field is blank there are no restrictions on who can view and edit this page, provided they have the view responsibilities for the template view and the Page Designer view.
If no editor is specified, all the access groups can edit this page.
Order Determines the sequence of the page at the top level of the Page Administration Explorer tree.
Inactive If the root-level page is inactive, the root-level page and its child pages do not appear in the Page Administration view
Field Comments

Siebel Content Publishing Guide Version 8.0
Microsite Management ■ Using the Page Designer and Its Tools
52
Using the Create New Page ToolThere are two ways to create a new page:
■ Using the Create New Page button in the Page Administration view.
■ Using the Create New Page tool in the Page Designer (see the following procedure).
When using the Create New Page tool, you choose a parent page where you want to create a link to the new child page. This places the page properly in the page hierarchy and makes sure that you do not create an orphan page (a page that is not accessible from any other page).
When you create a new page, it is likely that you want the page to look much like the parent page. For example, you might want to keep the same copyright information in the footer and the same list of links in the navigation bar. When you create the new page, you can select what content you want to copy from the parent to the child page.
Similarly, you can have the child page inherit the same access controls as the parent.
NOTE: If you want to create a new root-level page, see “Creating a Root-Level Page” on page 50.
This task is part of Step 4 in the “Process of Microsite Management” on page 48.
To create a new page
1 Navigate to the Microsite Management (or Administration - Microsite) screen > Page Administration view.
2 In the Page list, click the Page Title hyperlink for the page that will contain a link to the new page.
3 From the Page Designer toolbar, drag the Create New Page tool to the position on the layout where you want the new page link to appear.

Microsite Management ■ Using the Page Designer and Its Tools
Siebel Content Publishing Guide Version 8.0 53
4 Complete the fields in the Create New Page dialog box.
Some fields are described in the following table.
Field Comments
Name This is the text that appears as the navigation link to the new page.
Release Date Specifies the date when the link becomes active.
The link appears when the date is between the release date and the expiration date and the status is Approved.
Expiration Date Specifies the date when the link is no longer active.
Access Group Use this field to restrict read and read-write (select Editor field) access to the navigation link.
If this field is blank there are no restrictions on who can view and edit this navigation link.
If no editor is specified, all the access groups can edit this navigation link.
Status The status of the link: Approved, Designed, Draft, Final, Printed, Shipped, or Submitted.
The Approved and Draft status fields determine what content is displayed in the page preview. See “Previewing a Page” on page 66.
If access groups are specified for Item Approvers field (Page Administration > More Info view), then only users who belong can set the status to Approved.
Title A title for the page, up to 90 characters long. This title is used to identify the record but does not appear on the microsite.
Order Determines the sequence of the page in its level of the Page Administration Explorer tree.
■ Page Title
■ Navigation Bar
■ Body
■ Quick Picks
■ Page Footer
A check mark in these boxes indicates the content in the sections of the current page which are copied into the new page. Sections must exist on the selected page if they are to be copied to the new page.
■ All Other Sections
If you have used Siebel Tools to configure views with new applet types that contain unstructured content, then checking All Other Sections copies content from those sections to the new page.
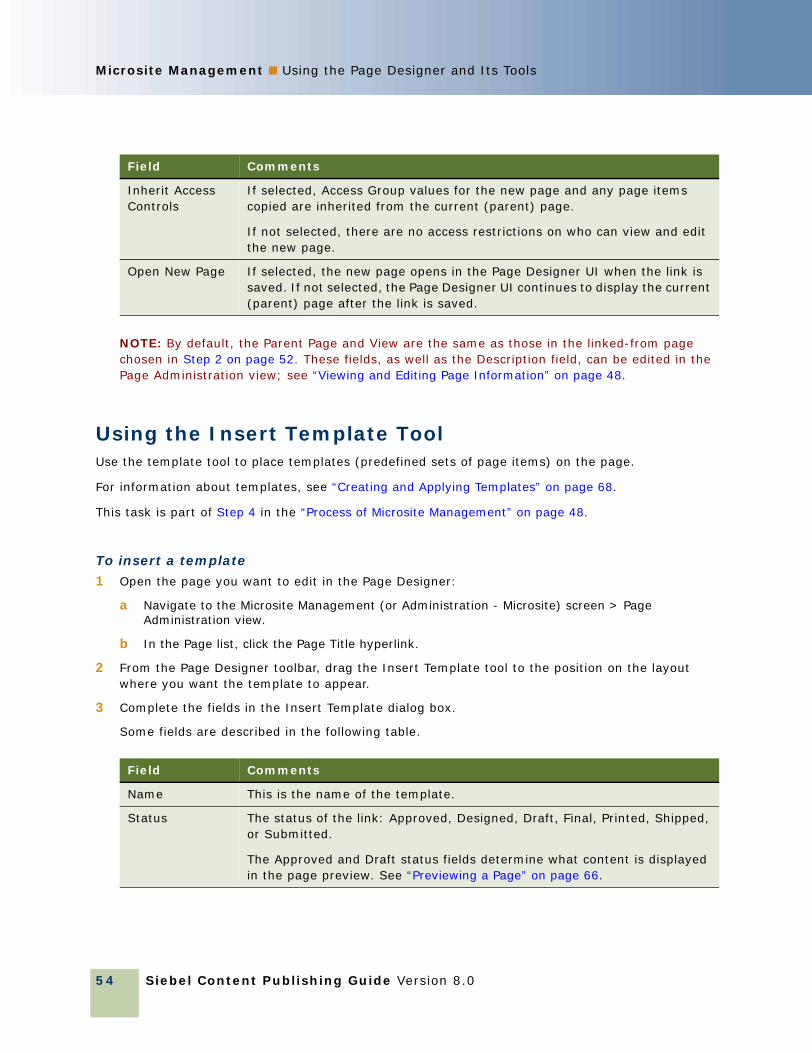
Siebel Content Publishing Guide Version 8.0
Microsite Management ■ Using the Page Designer and Its Tools
54
NOTE: By default, the Parent Page and View are the same as those in the linked-from page chosen in Step 2 on page 52. These fields, as well as the Description field, can be edited in the Page Administration view; see “Viewing and Editing Page Information” on page 48.
Using the Insert Template ToolUse the template tool to place templates (predefined sets of page items) on the page.
For information about templates, see “Creating and Applying Templates” on page 68.
This task is part of Step 4 in the “Process of Microsite Management” on page 48.
To insert a template
1 Open the page you want to edit in the Page Designer:
a Navigate to the Microsite Management (or Administration - Microsite) screen > Page Administration view.
b In the Page list, click the Page Title hyperlink.
2 From the Page Designer toolbar, drag the Insert Template tool to the position on the layout where you want the template to appear.
3 Complete the fields in the Insert Template dialog box.
Some fields are described in the following table.
Inherit Access Controls
If selected, Access Group values for the new page and any page items copied are inherited from the current (parent) page.
If not selected, there are no access restrictions on who can view and edit the new page.
Open New Page If selected, the new page opens in the Page Designer UI when the link is saved. If not selected, the Page Designer UI continues to display the current (parent) page after the link is saved.
Field Comments
Name This is the name of the template.
Status The status of the link: Approved, Designed, Draft, Final, Printed, Shipped, or Submitted.
The Approved and Draft status fields determine what content is displayed in the page preview. See “Previewing a Page” on page 66.
Field Comments

Microsite Management ■ Using the Page Designer and Its Tools
Siebel Content Publishing Guide Version 8.0 55
Using the Create Menu ToolMenus are containers for links. Menus format links in three ways, as shown in Figure 6:
■ Hierarchical menus
■ Dropdown menus
■ List menus
Most typically, you want to add menus to the navigation bar of your page, but menus can be added to any page section.
This task is part of Step 4 in the “Process of Microsite Management” on page 48.
To create a menu of links
1 Open the page you want to edit in the Page Designer:
a Navigate to the Microsite Management (or Administration - Microsite) screen > Page Administration view.
b In the Page list, click the Page Title hyperlink.
2 From the Page Designer toolbar, drag the Create Menu tool to the position on the layout where you want the menu to appear.
Figure 6. Types of Menu
List (Menu Size = 10)DropdownHierarchical

Siebel Content Publishing Guide Version 8.0
Microsite Management ■ Using the Page Designer and Its Tools
56
3 Complete the fields in the Create Menu dialog box.
Some fields are described in the following table.
4 Create links for the menu using the link tools described in the following topics.
5 If you are creating a hierarchical menu, indent links to create the hierarchy:
■ To indent one link, right-click the link and choose Increase Indent or Decrease Indent.
Field Comments
Name This is the name of the menu.
Menu Type See Figure 6 on page 55.
Release Date Specifies the date when the menu becomes active.
The menu appears when the date is between the release date and the expiration date and the status is Approved.
Expiration Date Specifies the date when the menu is no longer active.
Menu Size Only applies to menus of type Menu List. Enter the number of menu items to show in the list at one time.
Status The status of the link: Approved, Designed, Draft, Final, Printed, Shipped, or Submitted.
The Approved and Draft status fields determine what content is displayed in the page preview. See “Previewing a Page” on page 66.
Access Group Use this field to set access groups while creating page items.

Microsite Management ■ Using the Page Designer and Its Tools
Siebel Content Publishing Guide Version 8.0 57
■ To indent multiple links, see “Managing Groups of Page Items” on page 66.
This is the indentation used to produce the hierarchical menu shown in Figure 6 on page 55.
If indentation is incorrect, menu creation will not function properly and the menu rendered will be incorrect. A page item’s indent level difference between the page item above and the page item below should always be +/- 1. It should never be greater than 1 or the menus will not get created and rendered properly.
For more information about configuring hierarchical menus, see “Configuring Menu Colors and Icons for Hierarchical Menus” on page 72.
Using the Link Existing Page ToolUsing the Link Existing Page tool, you can create navigation links to other pages within the Microsite Management system.
If you want to create navigation links to external pages, see “Using the Add Web Link Tool” on page 59.
This task is part of Step 4 in the “Process of Microsite Management” on page 48.
To create a navigation link between Microsite Management pages
1 Open the page you want to edit in the Page Designer:
a Navigate to the Microsite Management (or Administration - Microsite) screen > Page Administration view.
b In the Page list, click the Page Title hyperlink.

Siebel Content Publishing Guide Version 8.0
Microsite Management ■ Using the Page Designer and Its Tools
58
2 From the Page Designer toolbar, drag the Link Existing Page tool to the position on the layout where you want the new page navigation link to appear.
3 Complete the fields in the Link Existing Page dialog box.
Some fields are described in the following table.
Using the Link App View ToolUsing the Link App View tool, you can create links from a page to a particular view in the Siebel application.
For example, you might want to create a link from your sales representatives’ home page to the My Expense Reports view on the Expense Reports screen.
This task is part of Step 4 in the Process of Microsite Management on page 48.
To create a link from a page to a view in the Siebel application
1 Open the page you want to edit in the Page Designer:
a Navigate to the Microsite Management (or Administration - Microsite) screen > Page Administration view.
b In the Page list, click the Page Title hyperlink.
Field Comments
Name This is the text that appears as the navigation link to the new page.
View-Page Select the target page for the navigation link. You can select any page in the application from the Pick Parent Page dialog box.
Release Date Specifies the date when the navigation link becomes active.
The link appears when the date is between the release date and the expiration date and the status is Approved.
Expiration Date Specifies the date when the navigation link is no longer active.
Access Group Use this field to restrict read and read-write (select Editor field) access to this page.
If this field is blank there are no restrictions on who can view and edit this page, provided they have the view responsibilities for the template view and the Page Designer view.
If no editor is specified, all the access groups can edit this page item.
Status The status of the link, for example Approved, Designed, Draft, Final, Printed, Shipped, or Submitted.
The Approved and Draft status fields determine what content is displayed in the page preview. See “Previewing a Page” on page 66.
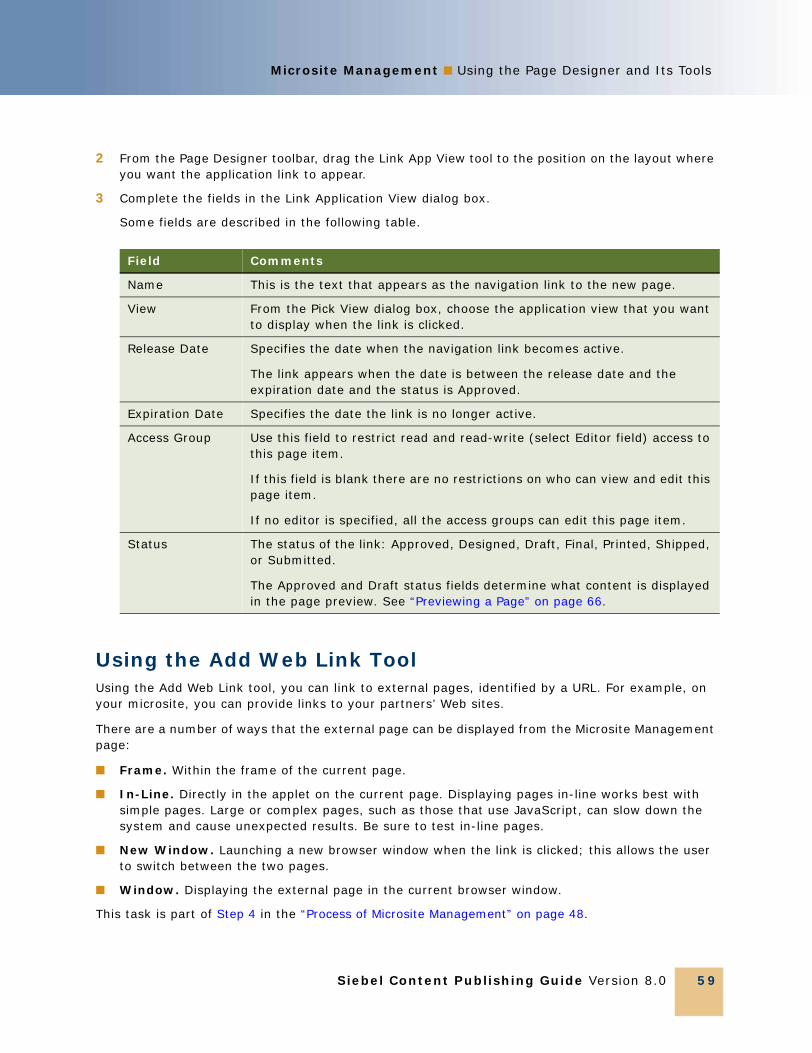
Microsite Management ■ Using the Page Designer and Its Tools
Siebel Content Publishing Guide Version 8.0 59
2 From the Page Designer toolbar, drag the Link App View tool to the position on the layout where you want the application link to appear.
3 Complete the fields in the Link Application View dialog box.
Some fields are described in the following table.
Using the Add Web Link ToolUsing the Add Web Link tool, you can link to external pages, identified by a URL. For example, on your microsite, you can provide links to your partners’ Web sites.
There are a number of ways that the external page can be displayed from the Microsite Management page:
■ Frame. Within the frame of the current page.
■ In-Line. Directly in the applet on the current page. Displaying pages in-line works best with simple pages. Large or complex pages, such as those that use JavaScript, can slow down the system and cause unexpected results. Be sure to test in-line pages.
■ New Window. Launching a new browser window when the link is clicked; this allows the user to switch between the two pages.
■ Window. Displaying the external page in the current browser window.
This task is part of Step 4 in the “Process of Microsite Management” on page 48.
Field Comments
Name This is the text that appears as the navigation link to the new page.
View From the Pick View dialog box, choose the application view that you want to display when the link is clicked.
Release Date Specifies the date when the navigation link becomes active.
The link appears when the date is between the release date and the expiration date and the status is Approved.
Expiration Date Specifies the date the link is no longer active.
Access Group Use this field to restrict read and read-write (select Editor field) access to this page item.
If this field is blank there are no restrictions on who can view and edit this page item.
If no editor is specified, all the access groups can edit this page item.
Status The status of the link: Approved, Designed, Draft, Final, Printed, Shipped, or Submitted.
The Approved and Draft status fields determine what content is displayed in the page preview. See “Previewing a Page” on page 66.
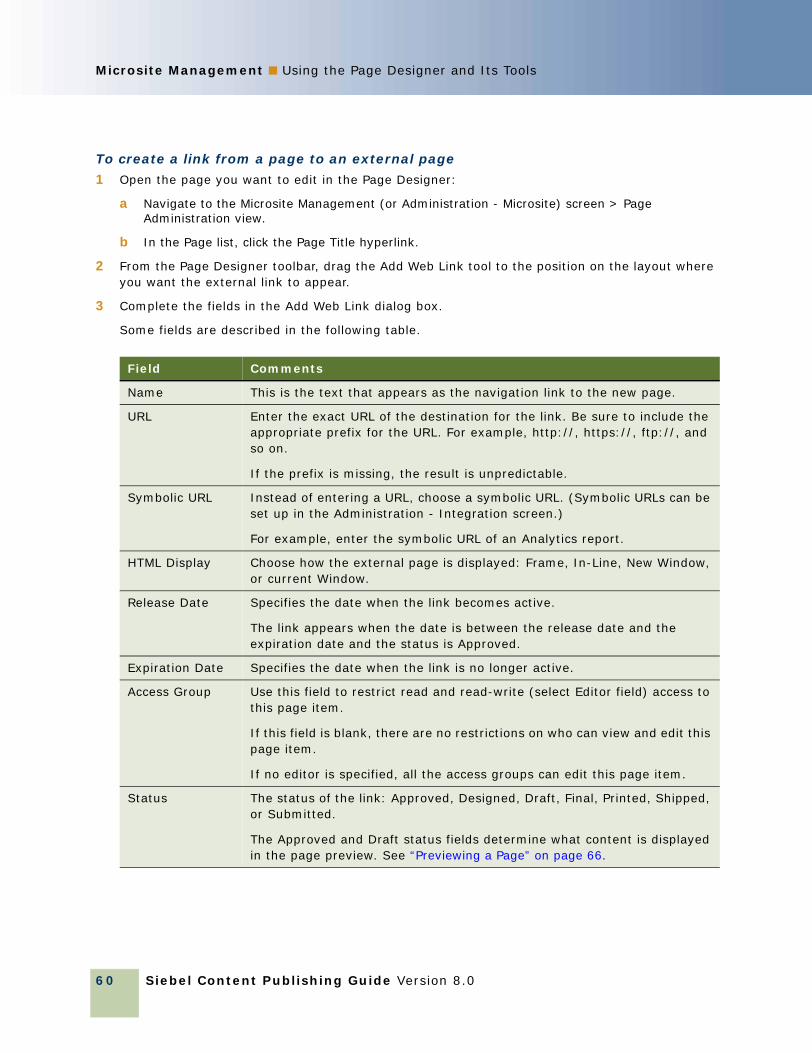
Siebel Content Publishing Guide Version 8.0
Microsite Management ■ Using the Page Designer and Its Tools
60
To create a link from a page to an external page
1 Open the page you want to edit in the Page Designer:
a Navigate to the Microsite Management (or Administration - Microsite) screen > Page Administration view.
b In the Page list, click the Page Title hyperlink.
2 From the Page Designer toolbar, drag the Add Web Link tool to the position on the layout where you want the external link to appear.
3 Complete the fields in the Add Web Link dialog box.
Some fields are described in the following table.
Field Comments
Name This is the text that appears as the navigation link to the new page.
URL Enter the exact URL of the destination for the link. Be sure to include the appropriate prefix for the URL. For example, http://, https://, ftp://, and so on.
If the prefix is missing, the result is unpredictable.
Symbolic URL Instead of entering a URL, choose a symbolic URL. (Symbolic URLs can be set up in the Administration - Integration screen.)
For example, enter the symbolic URL of an Analytics report.
HTML Display Choose how the external page is displayed: Frame, In-Line, New Window, or current Window.
Release Date Specifies the date when the link becomes active.
The link appears when the date is between the release date and the expiration date and the status is Approved.
Expiration Date Specifies the date when the link is no longer active.
Access Group Use this field to restrict read and read-write (select Editor field) access to this page item.
If this field is blank, there are no restrictions on who can view and edit this page item.
If no editor is specified, all the access groups can edit this page item.
Status The status of the link: Approved, Designed, Draft, Final, Printed, Shipped, or Submitted.
The Approved and Draft status fields determine what content is displayed in the page preview. See “Previewing a Page” on page 66.

Microsite Management ■ Using the Page Designer and Its Tools
Siebel Content Publishing Guide Version 8.0 61
Using the Create Content ToolUsing the Create Content tool, you can create rich-text content directly to the page through the integrated HTML editor.
Typically, you would use the Create Content Tool for creating short or simple content, such as captions or labels.
NOTE: To create complex HTML or large amounts of text, you may prefer to use a third-party HTML or text editing application to create an HTML file, and then place the file’s contents on the page using the Insert File tool. See “Using the Insert File and the Insert Image Tools” on page 62.
The formatted text entered and saved in the editor is saved as a content asset in the Content Asset Management’s repository. For more information about the content assets, see Chapter 3, “Content Asset Management.”
For general information about the integrated HTML editor, see Siebel Fundamentals.
This task is part of Step 4 in the “Process of Microsite Management” on page 48.
To add HTML directly to a page
1 Open the page you want to edit in the Page Designer:
a Navigate to the Microsite Management (or Administration - Microsite) screen > Page Administration view.
b In the Page list, click the Page Title hyperlink.
2 From the Page Designer toolbar, drag the Create Content tool to the position on the layout where you want the new content type to appear.
3 In the Create Content dialog box, enter a name for the content in the Name field and then click Edit HTML.
4 In the editor, type and format text, and add links and graphics.
5 Click Save to save the HTML to the content asset repository and close the HTML Editor.
6 Complete the fields in the Create Content dialog box.
Some of the fields are described in the table in Step 3 in the “To create a link from a page to an external page” procedure on page 60.
Using the Insert Content ToolUsing the Insert Content tool, you can add to your page content assets that stored in the content asset repository. For more information about the content assets, see Chapter 3, “Content Asset Management.”
For example, there may be a content asset that is a GIF image of your corporate logo, which you want to use to brand your page. Or, a content asset may be an Adobe Acrobat file, describing departmental policies, that you want to link to your page.
This task is part of Step 4 in the “Process of Microsite Management” on page 48.
Siebel Content Publishing Guide Version 8.0
Microsite Management ■ Using the Page Designer and Its Tools
62
To add content assets to a page
1 Open the page you want to edit in the Page Designer:
a Navigate to the Microsite Management (or Administration - Microsite) screen > Page Administration view.
b In the Page list, click the Page Title hyperlink.
2 From the Page Designer toolbar, drag the Insert Content tool to the position on the layout where you want to add the content asset.
3 In the Insert Content dialog box, click the select button in the Asset Name field and use the Pick Content dialog box to select the content asset you want to add.
The Pick Content dialog box filters the content assets:
■ The default filter shows assets in the content set for the current page.
■ Click the ellipsis button to select a different content set.
■ Click Find All to list content assets in all content sets.
4 Complete the fields in the Insert Content dialog box.
Some of the fields are described in the table in Step 3 in the “To create a link from a page to an external page” procedure on page 60.
Using the Insert File and the Insert Image ToolsUsing these tools, you can insert files (such as HTML files, MS Word files, and Adobe Acrobat files) and graphics files from your local file system, from shared networks and from the Web.
The difference between using the Insert File tool and the Insert Image tool is that the HTML display for the Insert Image tool is always set to In-Line.
When these files are added to your page, they are also stored as content assets in the content asset repository. For more information about the content assets, see Chapter 3, “Content Asset Management.”
This task is part of Step 4 in the “Process of Microsite Management” on page 48.
To add a file or graphic to a page
1 Open the page you want to edit in the Page Designer:
a Navigate to the Microsite Management (or Administration - Microsite) screen > Page Administration view.
b In the Page list, click the Page Title hyperlink.
2 From the Page Designer toolbar, drag the Insert File (or the Insert Image) tool to a position on the layout.
The Insert File (or the Insert Graphic) dialog box appears.
3 Do either of the following actions:
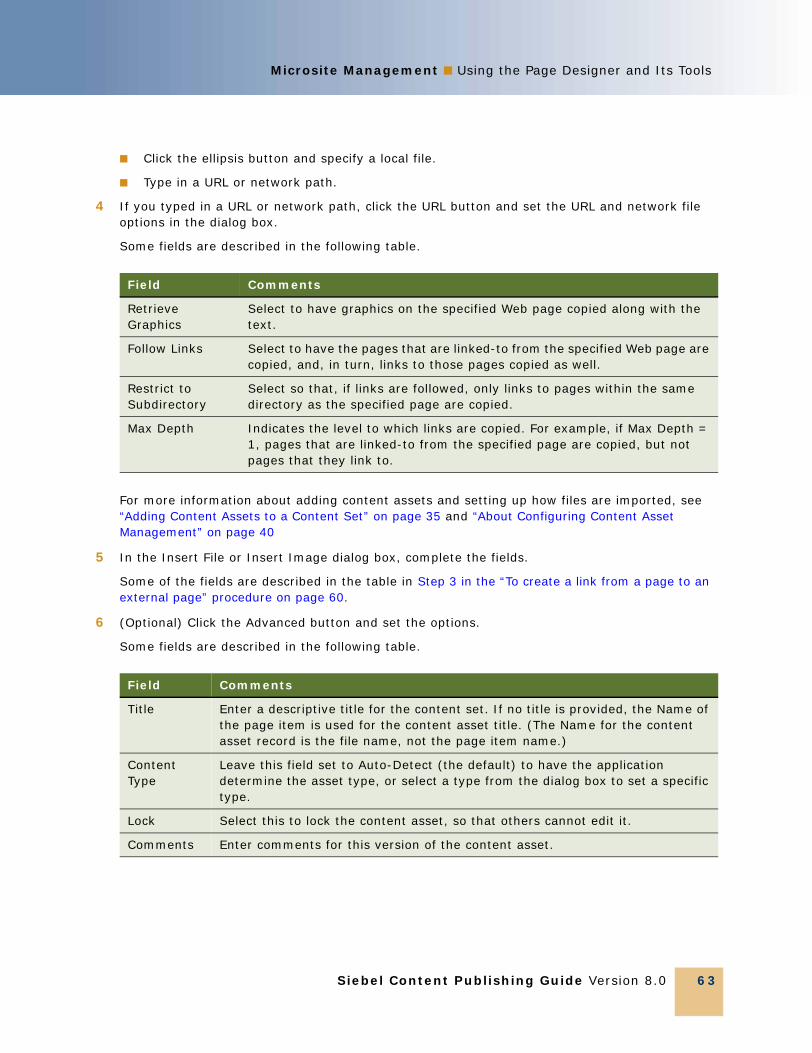
Microsite Management ■ Using the Page Designer and Its Tools
Siebel Content Publishing Guide Version 8.0 63
■ Click the ellipsis button and specify a local file.
■ Type in a URL or network path.
4 If you typed in a URL or network path, click the URL button and set the URL and network file options in the dialog box.
Some fields are described in the following table.
For more information about adding content assets and setting up how files are imported, see “Adding Content Assets to a Content Set” on page 35 and “About Configuring Content Asset Management” on page 40
5 In the Insert File or Insert Image dialog box, complete the fields.
Some of the fields are described in the table in Step 3 in the “To create a link from a page to an external page” procedure on page 60.
6 (Optional) Click the Advanced button and set the options.
Some fields are described in the following table.
Field Comments
Retrieve Graphics
Select to have graphics on the specified Web page copied along with the text.
Follow Links Select to have the pages that are linked-to from the specified Web page are copied, and, in turn, links to those pages copied as well.
Restrict to Subdirectory
Select so that, if links are followed, only links to pages within the same directory as the specified page are copied.
Max Depth Indicates the level to which links are copied. For example, if Max Depth = 1, pages that are linked-to from the specified page are copied, but not pages that they link to.
Field Comments
Title Enter a descriptive title for the content set. If no title is provided, the Name of the page item is used for the content asset title. (The Name for the content asset record is the file name, not the page item name.)
Content Type
Leave this field set to Auto-Detect (the default) to have the application determine the asset type, or select a type from the dialog box to set a specific type.
Lock Select this to lock the content asset, so that others cannot edit it.
Comments Enter comments for this version of the content asset.

Siebel Content Publishing Guide Version 8.0
Microsite Management ■ Using the Page Designer and Its Tools
64
Editing Page Item PropertiesThe preceding topics explained how to use the Page Designer UI to create new page items, for example, links to pages and graphics.
To edit page item properties, you select a page item on the Page Designer UI and modify its properties in the Page Item Properties form. The fields and buttons that are available in the Page Item Properties view depend upon the type of page item selected.
Items of type HTML, Web Content, Graphics, and File are content assets and are stored in the content asset repository. Details about these content assets can be viewed in the Asset Detail view, and these content assets can also be checked out for editing.
Some items can be edited using the integrated HTML Editor, launched from the Edit HTML button on the Page Item Properties form.
This task is part of Step 4 in the “Process of Microsite Management” on page 48.
To edit a page item
1 Open the page you want to edit in the Page Designer:
a Navigate to the Microsite Management (or Administration - Microsite) screen > Page Administration view.
b In the Page list, click the Page Title hyperlink.
2 In the Page Designer UI, select the page item whose properties you want to edit.
3 In the Page Item Properties form, edit the fields.
NOTE: Those fields and buttons that are not appropriate for the selected page item are unavailable.
4 Use the Check Out, Check In, Lock, and Unlock buttons to open and edit content. (For more information about checking out content assets and locking content assets, see Chapter 2, “Content Center.”)
5 Click Asset Details to open the Content Assets view and to:
a See information about the selected item.
b Roll-back to a previous version of the content asset.
c Review the content asset for broken links.
For more information about the Content Assets view, see Chapter 2, “Content Center.”
6 To edit HTML content, click Edit HTML.
For more information about the integrated HTML editor, see Siebel Fundamentals.

Microsite Management ■ Using the Page Designer and Its Tools
Siebel Content Publishing Guide Version 8.0 65
Deleting Page ItemsDeleting items from a page is done through the Web Designer UI.
NOTE: Any item that has been saved in the content asset repository remains there even after the associated page item is deleted.
This task is part of Step 4 in the “Process of Microsite Management” on page 48.
To delete a page item
1 Open the page you want to edit in the Page Designer:
a Navigate to the Microsite Management (or Administration - Microsite) screen > Page Administration view.
b In the Page list, click the Page Title hyperlink.
2 In the Page Designer UI, select the page item and press CTRL + DEL.
Saving and Canceling Changes to the Page LayoutIn the Page Designer view, page records are saved in the same way that other records are saved in the application.
Use the Cancel button to return page items to their last-saved positions, removing any just-created page items and adding back any just-deleted page items.
However, changes made to the page item properties (such as Status) are not lost when Cancel is clicked.
For example, if you move a link from the navigation bar to quick picks, change its status from Draft to Approved, and then click Cancel, the link returns to the navigation bar but its status remains Approved.
This task is part of Step 4 in the “Process of Microsite Management” on page 48.
To save a page record■ In the Page Designer view, do one of the following:
■ Click Save.
■ Click Preview.
■ Select another page.
■ Navigate to a different view.
To cancel changes to the page layout■ After making changes to the page layout in the Page Designer UI, click Cancel.
The layout reverts to how it was when the record was last saved.

Siebel Content Publishing Guide Version 8.0
Microsite Management ■ Managing Groups of Page Items
66
Managing Groups of Page ItemsTo make page management easier, page items can be grouped and common properties assigned to them. For example, use grouping to:
■ Set the indent level for a group of menu items.
■ Set a release date for a group of page items.
This task is a step in the Process of Microsite Management on page 48.
To group page items
1 Open the page you want to edit in the Page Designer:
a Navigate to the Microsite Management (or Administration - Microsite) screen > Page Administration view.
b In the Page list, click the Page Title hyperlink.
2 Select all of the page items you want to manage as a group.
Hold the SHIFT key while clicking on the page items to select multiple items.
3 Click Group Properties.
4 Complete the fields as required in the Page Items Group dialog box.
Only those properties that are common to all types of page items appear in this dialog box: Increase Indent, Decrease Indent, Release Date, Expiration Date, Access Group, and Status.
Previewing a PageAfter laying out the content on the Page Designer UI, you can preview the page.
Whether or not content appears on the displayed page depends upon the page item’s release date, expiration date, and status.
The preview feature in Page Designer allows you to:
■ Set a date for the preview (content inactive on that date does not appear).
■ Choose to display only approved content, only draft content, both approved and draft content, or all content regardless of status.
This task is a step in the “Process of Microsite Management” on page 48.
To preview a page
1 Open the page you want to preview in the Page Designer:
a Navigate to the Microsite Management (or Administration - Microsite) screen > Page Administration view.
b In the Page list, click the Page Title hyperlink.
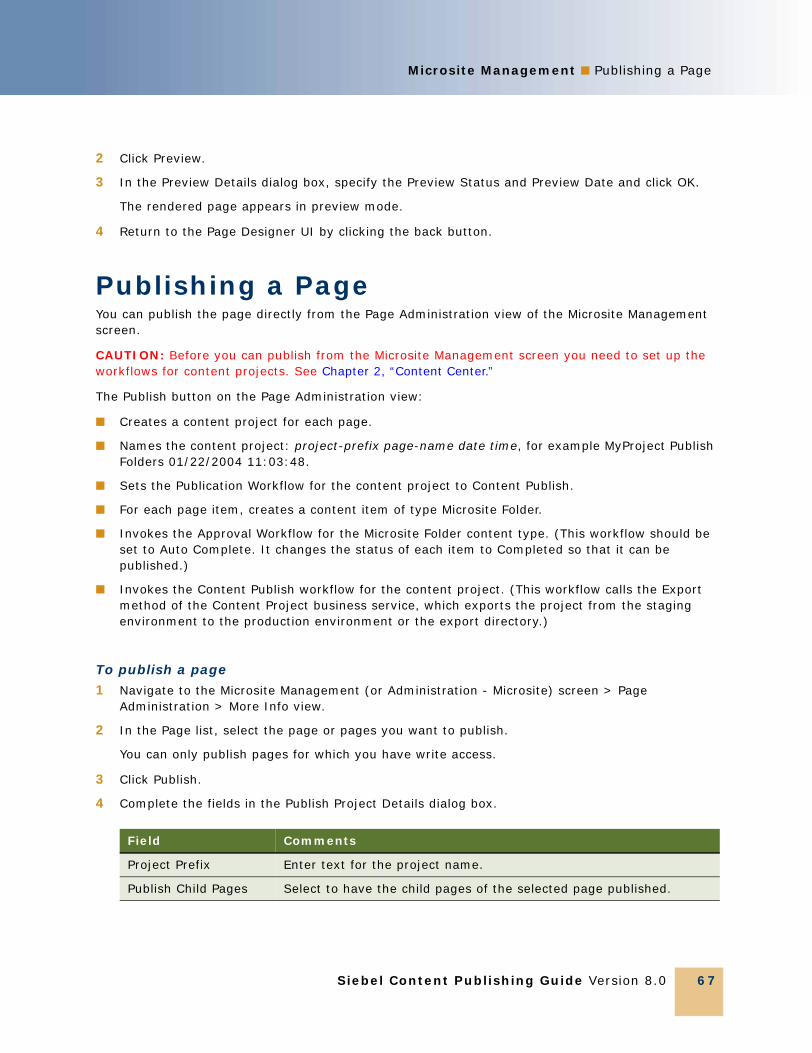
Microsite Management ■ Publishing a Page
Siebel Content Publishing Guide Version 8.0 67
2 Click Preview.
3 In the Preview Details dialog box, specify the Preview Status and Preview Date and click OK.
The rendered page appears in preview mode.
4 Return to the Page Designer UI by clicking the back button.
Publishing a PageYou can publish the page directly from the Page Administration view of the Microsite Management screen.
CAUTION: Before you can publish from the Microsite Management screen you need to set up the workflows for content projects. See Chapter 2, “Content Center.”
The Publish button on the Page Administration view:
■ Creates a content project for each page.
■ Names the content project: project-prefix page-name date time, for example MyProject Publish Folders 01/22/2004 11:03:48.
■ Sets the Publication Workflow for the content project to Content Publish.
■ For each page item, creates a content item of type Microsite Folder.
■ Invokes the Approval Workflow for the Microsite Folder content type. (This workflow should be set to Auto Complete. It changes the status of each item to Completed so that it can be published.)
■ Invokes the Content Publish workflow for the content project. (This workflow calls the Export method of the Content Project business service, which exports the project from the staging environment to the production environment or the export directory.)
To publish a page
1 Navigate to the Microsite Management (or Administration - Microsite) screen > Page Administration > More Info view.
2 In the Page list, select the page or pages you want to publish.
You can only publish pages for which you have write access.
3 Click Publish.
4 Complete the fields in the Publish Project Details dialog box.
Field Comments
Project Prefix Enter text for the project name.
Publish Child Pages Select to have the child pages of the selected page published.

Siebel Content Publishing Guide Version 8.0
Microsite Management ■ Deleting a Page
68
Deleting a PagePages can be deleted from the Page Administration view. Root-level pages can also be deleted from the Portal Screen Administration view.
When a page is deleted:
■ The status of any navigation links to that page (on other pages within Microsite Management) is changed to Draft. This prevents broken links from appearing on displayed pages.
■ The Access Group field for any navigation links to the page are reset (no access restrictions).
■ The target page (View-Page) for the link is set to NULL. When you edit a link where the View-Page is NULL, you must specify a valid View-Page before you can save changes to the link.
To delete a page
1 Navigate to the Microsite Management (or Administration - Microsite) screen > Page Administration view.
The hierarchical structure of screens and subordinate pages appears on the left, and the page list and detail form appear on the right. Click the + sign to expand a folder.
2 Select the page you want to delete, and delete the record.
Creating and Applying TemplatesTemplates are sets of page items that are created in the Template Designer and can be placed on page sections. Templates are best used for content that appears on multiple pages and that may require updating.
The advantages of templates are as follows:
■ Templates can be applied to many pages at once.
■ When a template is updated, the updated content appears on all pages referencing that template.

Microsite Management ■ Creating and Applying Templates
Siebel Content Publishing Guide Version 8.0 69
Figure 7 shows the Template Administration view. Templates can be organized into folders.
The templates you create can be added to:
■ Individual pages in the Page Designer, see “Using the Insert Template Tool” on page 54.
■ Many pages at once, see “To add a templates to multiple pages” on page 70.
To create a template
1 Navigate to the Microsite Management (or Administration - Microsite) screen > Template Administration view.
2 In the Template list, create a new record and complete the necessary fields.
Some fields are described in the following table.
3 Drill down on the template name.
4 Use the Template Designer to add and edit items on the template.
The tools on the Template Designer work the same way as the tools on the Page Designer. (See “Using the Page Designer and Its Tools” on page 51.)
Figure 7. Template Administration View
Field Comments
Folder Flag Leave blank.
(Select the folder flag to create a folder to contain template items.)
Order Determines the sequence of the template at the top level of the Portal Template Explorer tree.
Active If the template is active it can be added to pages (using the Insert Template tool).

Siebel Content Publishing Guide Version 8.0
Microsite Management ■ About Creating Search Indexes
70
To add a templates to multiple pages
1 Navigate to the Microsite Management (or Administration - Microsite) screen > Template Administration > Pages view.
2 In the Templates list, select the template you want to add.
3 In the Pages list, click Add to Pages.
4 Complete the fields and follow the directions given in the Add Template to Pages dialog box.
About Creating Search IndexesContent assets on microsite pages can be integrated with the Siebel Search Center. This allows users to find pages by searching for keywords. For information about creating indexes for Search Center, see Siebel Search Administration Guide.
About Configuring Microsite ManagementThere are a number of aspects of Microsite Page Management that you can configure:
■ “Configuring Microsite Caching” on page 70
■ “Adding New View Layouts to the mmlayout.txt File” on page 71
■ “Configuring Menu Colors and Icons for Hierarchical Menus” on page 72
■ “Changing the Navigation Bar Style in Microsite Pages” on page 73
Configuring Microsite CachingBy default, page caching of microsite pages and content is turned on. However, you can configure the caching behavior of microsite pages by editing the application’s CFG file.
The advantage of caching is that microsite pages are rendered faster.
The disadvantage of page caching is that if you make a change to a page using Page Designer, the updated page is not displayed until the caching time-out has expired.
TIP: If you have both a staging and a production environment, consider using page caching in the production environment, but not in the staging environment.

Microsite Management ■ About Configuring Microsite Management
Siebel Content Publishing Guide Version 8.0 71
To configure caching for microsite pages■ Create or edit the [ERM Page Rendering] section in your application’s CFG file.
See Table 6 for information about the page caching parameters.
NOTE: Set time outs according to how often pages and contents are updated. If pages are updated frequently, set time outs low.
Adding New View Layouts to the mmlayout.txt FileThe mmlayout.txt file is used by Page Designer to schematically represent the layout of the applets in the view (Figure 4 on page 46). The file contains layout information for each Siebel preconfigured view designed to contain unstructured content.
Table 6. Microsite Caching Parameters
Parameter Name Comments Default
EnablePageCache Page cache caches Microsite page contents including Microsite applets and Group News applets on a per AOM (Application Object Manager) basis.
TRUE
EnableDefaultViewPageCache The default-view page cache caches the default Microsite page for a view on a per AOM basis.
TRUE
EnablePageAccessCache The page-access cache caches whether a page is private or public on a per AOM basis.
TRUE
EnableUserPageAccessCache The user-page access cache caches whether a given user has access to a particular page on a per user session basis.
TRUE
EnableUserPageItemAccessCache The user-page item access cache caches whether a given user has access to a particular page item on a per user session basis.
TRUE
PageCacheSize Size of page cache in pages.
CAUTION: If PageCacheSize > 256, make sure to monitor the memory usage of the AOM.
Setting to 0 disables page caching.
256
PageCacheTimeout Lifetime, in minutes, of page cache entries. Setting to 0 disables page caching.
5
DefaultViewPageCacheTimeout Lifetime, in minutes, for default-view page cache entries. Setting to 0 disables default-view page caching.
10
PageAccessCacheTimeout Lifetime, in minutes, for page-access cache entries. Setting to 0 disables page-access caching.
10
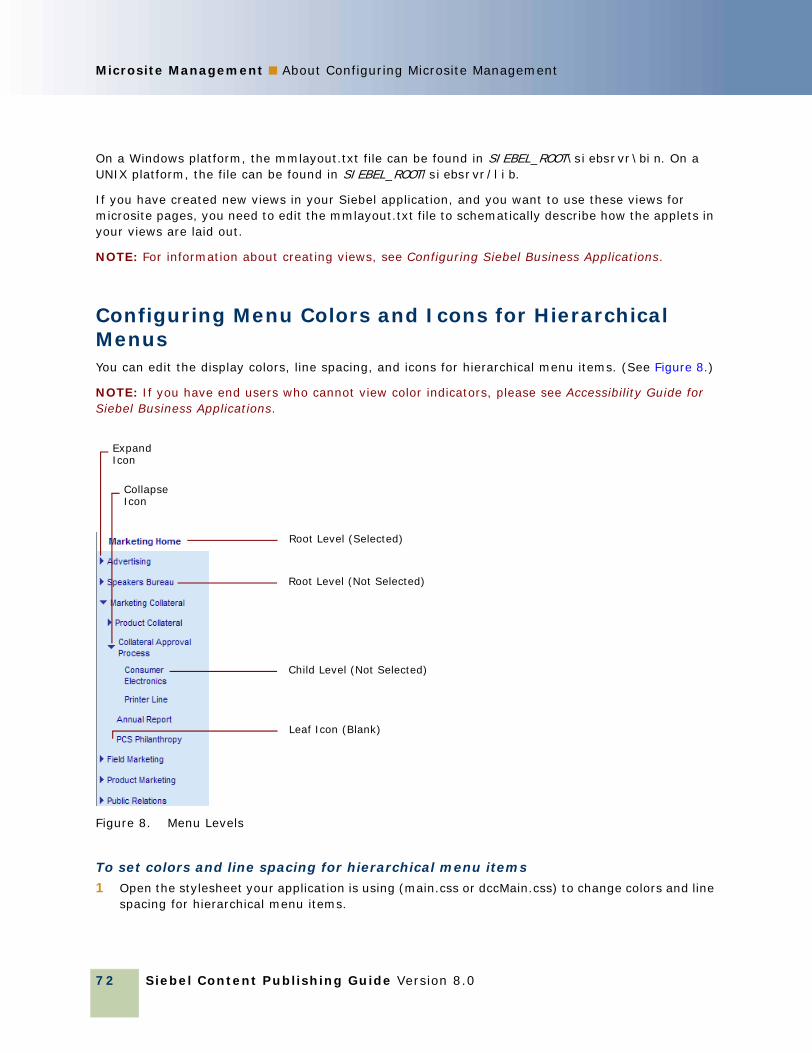
Siebel Content Publishing Guide Version 8.0
Microsite Management ■ About Configuring Microsite Management
72
On a Windows platform, the mmlayout.txt file can be found in SIEBEL_ROOT\siebsrvr\bin. On a UNIX platform, the file can be found in SIEBEL_ROOT/siebsrvr/lib.
If you have created new views in your Siebel application, and you want to use these views for microsite pages, you need to edit the mmlayout.txt file to schematically describe how the applets in your views are laid out.
NOTE: For information about creating views, see Configuring Siebel Business Applications.
Configuring Menu Colors and Icons for Hierarchical MenusYou can edit the display colors, line spacing, and icons for hierarchical menu items. (See Figure 8.)
NOTE: If you have end users who cannot view color indicators, please see Accessibility Guide for Siebel Business Applications.
To set colors and line spacing for hierarchical menu items
1 Open the stylesheet your application is using (main.css or dccMain.css) to change colors and line spacing for hierarchical menu items.
Figure 8. Menu Levels
Root Level (Not Selected)
Child Level (Not Selected)
Root Level (Selected)
Collapse Icon
Expand Icon
Leaf Icon (Blank)
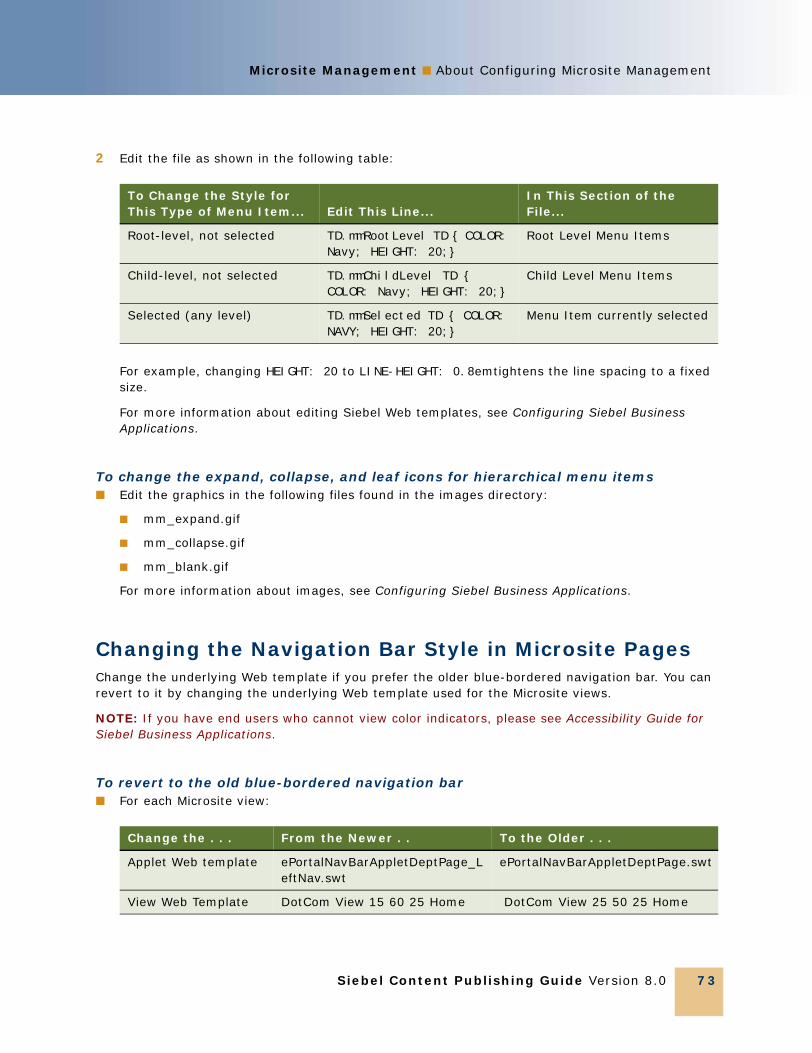
Microsite Management ■ About Configuring Microsite Management
Siebel Content Publishing Guide Version 8.0 73
2 Edit the file as shown in the following table:
For example, changing HEIGHT: 20 to LINE-HEIGHT: 0.8em tightens the line spacing to a fixed size.
For more information about editing Siebel Web templates, see Configuring Siebel Business Applications.
To change the expand, collapse, and leaf icons for hierarchical menu items■ Edit the graphics in the following files found in the images directory:
■ mm_expand.gif
■ mm_collapse.gif
■ mm_blank.gif
For more information about images, see Configuring Siebel Business Applications.
Changing the Navigation Bar Style in Microsite PagesChange the underlying Web template if you prefer the older blue-bordered navigation bar. You can revert to it by changing the underlying Web template used for the Microsite views.
NOTE: If you have end users who cannot view color indicators, please see Accessibility Guide for Siebel Business Applications.
To revert to the old blue-bordered navigation bar■ For each Microsite view:
To Change the Style for This Type of Menu Item... Edit This Line...
In This Section of the File...
Root-level, not selected TD.mmRootLevel TD { COLOR:
Navy; HEIGHT: 20;}
Root Level Menu Items
Child-level, not selected TD.mmChildLevel TD {
COLOR: Navy; HEIGHT: 20;}
Child Level Menu Items
Selected (any level) TD.mmSelected TD { COLOR:
NAVY; HEIGHT: 20;}
Menu Item currently selected
Change the . . . From the Newer . . To the Older . . .
Applet Web template ePortalNavBarAppletDeptPage_LeftNav.swt
ePortalNavBarAppletDeptPage.swt
View Web Template DotCom View 15 60 25 Home DotCom View 25 50 25 Home

Siebel Content Publishing Guide Version 8.0
Microsite Management ■ About Configuring Microsite Management
74
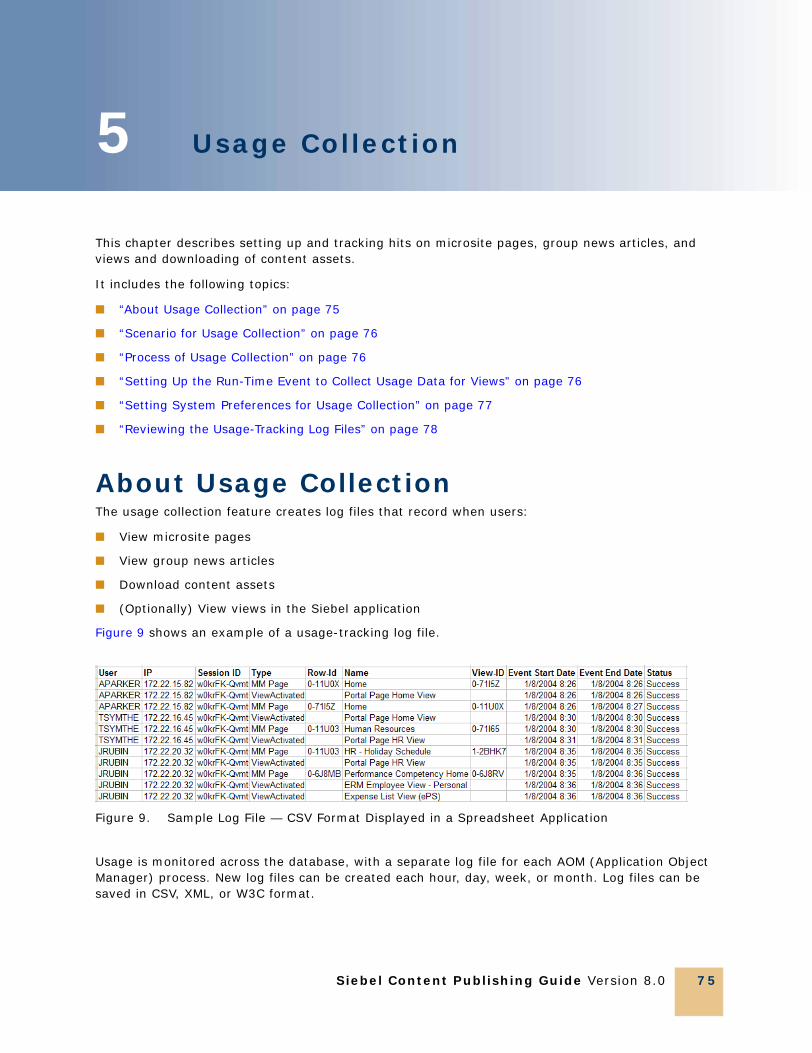
Siebel Content Publishing Guide Version 8.0 75
5 Usage Collection
This chapter describes setting up and tracking hits on microsite pages, group news articles, and views and downloading of content assets.
It includes the following topics:
■ “About Usage Collection” on page 75
■ “Scenario for Usage Collection” on page 76
■ “Process of Usage Collection” on page 76
■ “Setting Up the Run-Time Event to Collect Usage Data for Views” on page 76
■ “Setting System Preferences for Usage Collection” on page 77
■ “Reviewing the Usage-Tracking Log Files” on page 78
About Usage CollectionThe usage collection feature creates log files that record when users:
■ View microsite pages
■ View group news articles
■ Download content assets
■ (Optionally) View views in the Siebel application
Figure 9 shows an example of a usage-tracking log file.
Usage is monitored across the database, with a separate log file for each AOM (Application Object Manager) process. New log files can be created each hour, day, week, or month. Log files can be saved in CSV, XML, or W3C format.
Figure 9. Sample Log File — CSV Format Displayed in a Spreadsheet Application
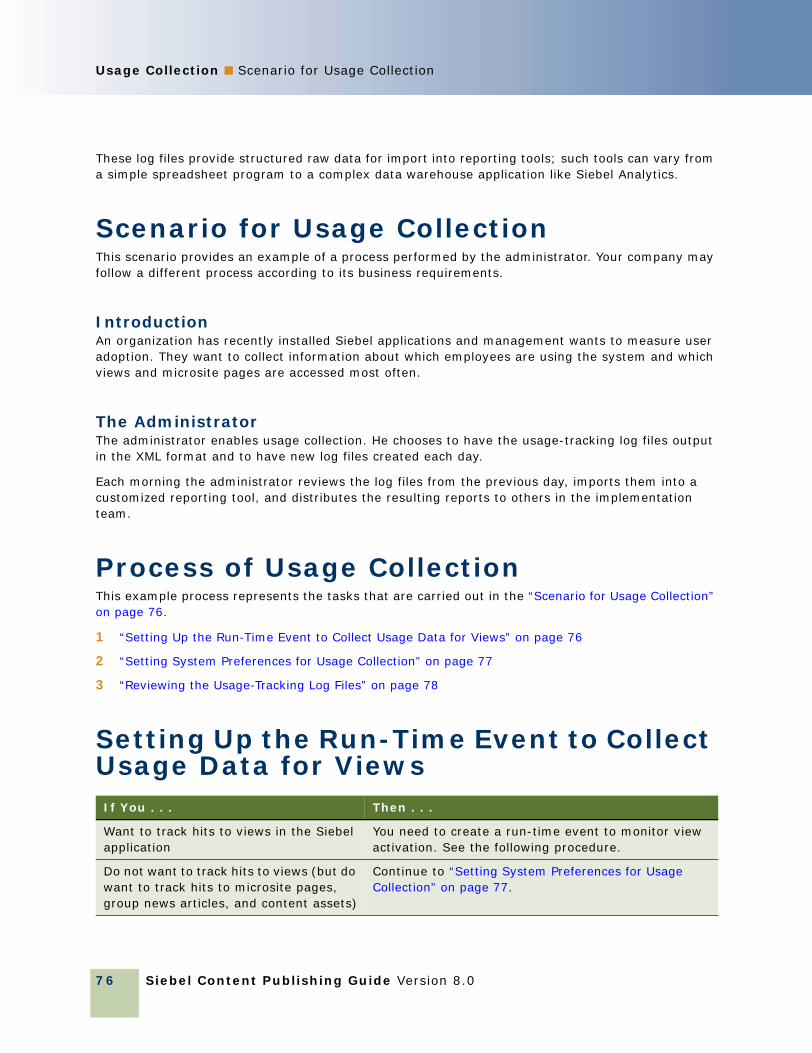
Siebel Content Publishing Guide Version 8.0
Usage Collection ■ Scenario for Usage Collection
76
These log files provide structured raw data for import into reporting tools; such tools can vary from a simple spreadsheet program to a complex data warehouse application like Siebel Analytics.
Scenario for Usage CollectionThis scenario provides an example of a process performed by the administrator. Your company may follow a different process according to its business requirements.
IntroductionAn organization has recently installed Siebel applications and management wants to measure user adoption. They want to collect information about which employees are using the system and which views and microsite pages are accessed most often.
The AdministratorThe administrator enables usage collection. He chooses to have the usage-tracking log files output in the XML format and to have new log files created each day.
Each morning the administrator reviews the log files from the previous day, imports them into a customized reporting tool, and distributes the resulting reports to others in the implementation team.
Process of Usage CollectionThis example process represents the tasks that are carried out in the “Scenario for Usage Collection” on page 76.
1 “Setting Up the Run-Time Event to Collect Usage Data for Views” on page 76
2 “Setting System Preferences for Usage Collection” on page 77
3 “Reviewing the Usage-Tracking Log Files” on page 78
Setting Up the Run-Time Event to Collect Usage Data for ViewsIf You . . . Then . . .
Want to track hits to views in the Siebel application
You need to create a run-time event to monitor view activation. See the following procedure.
Do not want to track hits to views (but do want to track hits to microsite pages, group news articles, and content assets)
Continue to “Setting System Preferences for Usage Collection” on page 77.

Usage Collection ■ Setting System Preferences for Usage Collection
Siebel Content Publishing Guide Version 8.0 77
This task is a step in Process of Usage Collection on page 76.
For information about how to create run-time events, see Siebel Personalization Administration Guide.
To create a run-time event to collect usage data for views
1 Create an action set.
2 Create an action, setting these fields as follows:
3 Associate an event with the action set, setting these fields as follows:
Setting System Preferences for Usage CollectionThe system preferences for enabling and configuring usage collection are described in Table 7.
Field Name Value
Action Type BusService
Business Service Name Usage Tracking Service
Business Service Method EventType=Runtime Event
Field Name Value
Object Type Application
Event ViewActivated
Action Set Name Name of the action set created in Step 1
Table 7. System Preferences for Usage Collection
System Preference Default Description
UsageTracking Enabled
FALSE Set to TRUE to turn on Usage Collection.
UsageTracking Log Time Period
Hourly Specify how often a new log file is created.
Allowed values: Hourly, Daily, Weekly, and Monthly.
CAUTION: Set this according to the usage levels you expect. Monthly may create excessively large log files for a high-usage application.
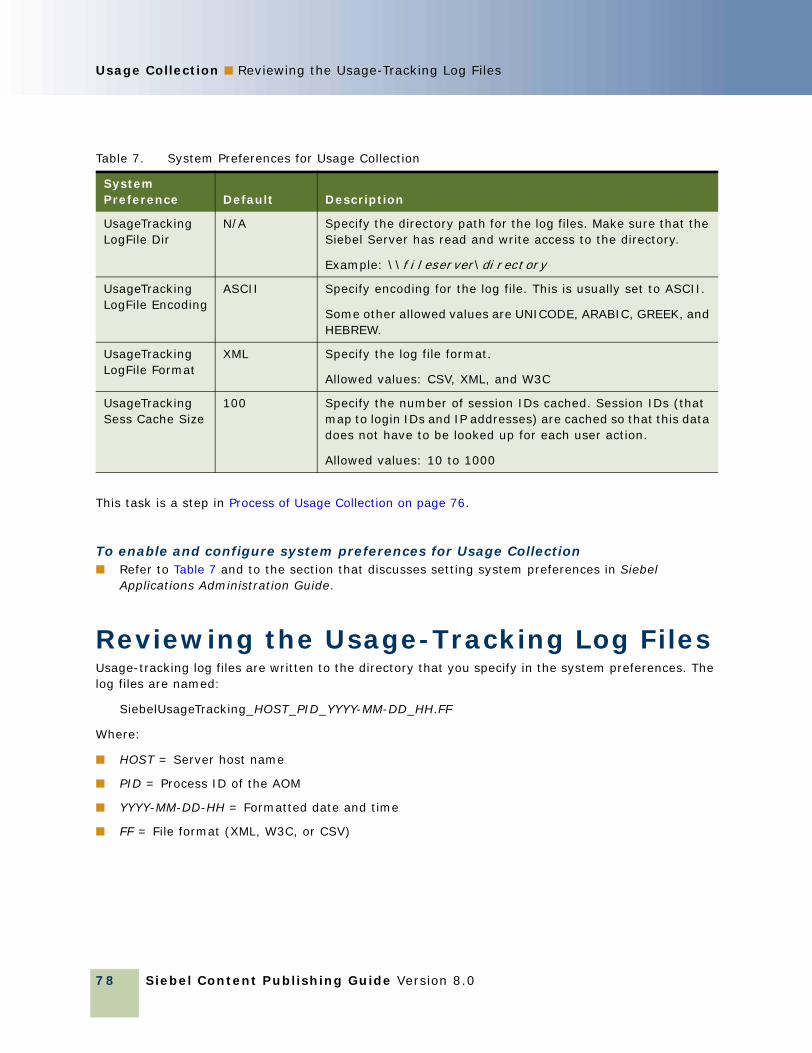
Siebel Content Publishing Guide Version 8.0
Usage Collection ■ Reviewing the Usage-Tracking Log Files
78
This task is a step in Process of Usage Collection on page 76.
To enable and configure system preferences for Usage Collection■ Refer to Table 7 and to the section that discusses setting system preferences in Siebel
Applications Administration Guide.
Reviewing the Usage-Tracking Log FilesUsage-tracking log files are written to the directory that you specify in the system preferences. The log files are named:
SiebelUsageTracking_HOST_PID_YYYY-MM-DD_HH.FF
Where:
■ HOST = Server host name
■ PID = Process ID of the AOM
■ YYYY-MM-DD-HH = Formatted date and time
■ FF = File format (XML, W3C, or CSV)
UsageTracking LogFile Dir
N/A Specify the directory path for the log files. Make sure that the Siebel Server has read and write access to the directory.
Example: \\fileserver\directory
UsageTracking LogFile Encoding
ASCII Specify encoding for the log file. This is usually set to ASCII.
Some other allowed values are UNICODE, ARABIC, GREEK, and HEBREW.
UsageTracking LogFile Format
XML Specify the log file format.
Allowed values: CSV, XML, and W3C
UsageTracking Sess Cache Size
100 Specify the number of session IDs cached. Session IDs (that map to login IDs and IP addresses) are cached so that this data does not have to be looked up for each user action.
Allowed values: 10 to 1000
Table 7. System Preferences for Usage Collection
System Preference Default Description

Usage Collection ■ Reviewing the Usage-Tracking Log Files
Siebel Content Publishing Guide Version 8.0 79
For example, SiebelUsageTracking_sshost_2624_2004-03-15_16.XML is the log file begun at 4 P.M. on March 15, 2004.
NOTE: Log files are not created for periods when there is no activity. For example, if UsageTracking Log Time Period = Hourly but there are no users from 1:15 A.M. to 4:55 A.M., log files are not created for the 2 A.M. or 3 A.M. hours.
This task is a step in Process of Usage Collection on page 76.
To review usage-tracking log files
1 Open or import the log files in your reporting tool of choice.
2 Purge log files when necessary.
Table 8. Data Written to Usage-Tracking Log Files
Data Column Comments
User User’s login ID
IP IP address of the session
Session ID Unique ID for the session
Type Four possible values:
■ MM Page — Indicates viewing of a microsite page
■ GN Article — Indicates viewing of a group news article
■ CB Asset — Indicates downloading of a content asset
■ ViewActivated — Indicates viewing a view in the Siebel application
Row ID Data row ID of the microsite page, group news article, or content asset
Name The name of the microsite page, group news article, content asset, or view
Event Start Date Time The time the user clicked on the item
Event End Date Time The time of the user’s next event
Status Indicates success

Siebel Content Publishing Guide Version 8.0
Usage Collection ■ Reviewing the Usage-Tracking Log Files
80

Siebel Content Publishing Guide Version 8.0 81
6 Managing Group News
This chapter describes the how to set up and manage Group News authoring. Using Group News, an organization’s news authors and content managers can create, edit, approve, preview, and publish real-time news content within the Siebel application.
This chapter includes the following topics:
■ “Scenario for Group News” on page 81
■ “Process of Managing Group News” on page 82
■ “Setting Up News Administrators, Authors, and Approvers” on page 83
■ “Setting Up the Group News Approver Workflow” on page 84
■ “Creating a Content Path” on page 85
■ “Creating Stages for a Group News Content Path” on page 86
■ “Designating Group News Approvers” on page 87
■ “Setting Up Access to Group News” on page 87
■ “Managing Versions and Publishing from the All News Stories List” on page 88
■ “Creating a News Story (End User)” on page 88
■ “Previewing a News Story (End User)” on page 92
■ “Submitting a News Story for Approval (End User)” on page 92
■ “Approving a News Story (End User)” on page 92
Scenario for Group NewsThis scenario provides an example of a process performed by the Group News administrator, content manager, and approver. Your company may follow a different process according to its business requirements.
AdministratorThe top executive at an organization decides that important company news stories should originate in the Top Story section on the company’s Home Page and then move to the Feature Articles section on day two and the Archive section on day three.
This business requirement is communicated to the Group News administrator responsible for creating content paths. As part of the content path creation process, the news administrator designates authors and approvers through responsibilities, determines the approver workflow, the set of approvers, and the employee access groups that have visibility rights to the news story.

Siebel Content Publishing Guide Version 8.0
Managing Group News ■ Process of Managing Group News
82
After the content paths are created, the news administrator defines three stages, one for each of the sections in which a news story associated with this content path is published—Top Story, Feature Articles, and News Archive.
Content ManagerAn Alliances Content Manager has been asked to write a news story describing an important new partnership. To publish a news story, the content manager creates the news story record and selects a content path. The author then creates the news story content, previews the content, and submits the story for approval. On the go-live date, the story appears in the Top Story section on the Alliance Microsite and then in the Feature Articles section on the Sales Microsite.
ApproverThe Vice President of Alliances is the first approver in the Alliances content path selected by the content manager. After the manager submits the news story, the Vice President of Alliances receives it in her inbox. The approver reviews the news story, makes edits as appropriate (edits and comments are automatically cataloged in Version Control) and submits it for the second approver's review. If the second approver approves the story and the go-live date associated with the news article has passed, the story is immediately published and visible to employees.
EmployeeAn employee visits the Sales Microsite. The employee sees only those articles that are approved and for which the employee has been given visibility rights. In the Top Story section, the employee clicks on the link to the full story and reads the latest news about the new partnership.
Process of Managing Group NewsThe following list shows the procedures that administrators and employees typically perform to set up and use Group News. Your company may follow a different process according to its business requirements.
Administrator ProceduresTo set up Group News, perform the following procedures:
1 “Setting Up News Administrators, Authors, and Approvers” on page 83
2 “Setting Up the Group News Approver Workflow” on page 84
3 “Creating a Content Path” on page 85
4 “Creating Stages for a Group News Content Path” on page 86
5 “Designating Group News Approvers” on page 87
6 “Setting Up Access to Group News” on page 87
7 “Managing Versions and Publishing from the All News Stories List” on page 88

Managing Group News ■ Setting Up News Administrators, Authors, and Approvers
Siebel Content Publishing Guide Version 8.0 83
End-User ProceduresTo use Group News, perform the following procedures:
1 “Creating a News Story (End User)” on page 88
2 “Previewing a News Story (End User)” on page 92
3 “Submitting a News Story for Approval (End User)” on page 92
4 “Approving a News Story (End User)” on page 92
Setting Up News Administrators, Authors, and ApproversAs an administrator, you assign responsibilities to other administrators, content managers and authors, allowing these users to author and approve news stories and access views.
Your Siebel application is preconfigured with several responsibilities specific to Group News, which organizations can use to set up Group News users. Table 9 describes the preconfigured Group News responsibilities.
This task is a step in “Process of Managing Group News” on page 82.
Table 9. Preconfigured Group News Responsibilities
Responsibility Comments
ERM Group News Administrator
Users with the Group News Administrator responsibility can access the Group News Administration views and can perform the following procedures:
■ Create a content path, which includes selecting an approver workflow, defining content stages, assigning approvers, and designating access groups.
■ Edit submitted or completed news stories.
Content Manager Users with the Content Manager responsibility can access the Group News Authoring views and can author and approve news stories. An ERM Content Manager can approve a specific news story only if the manager is designated as an approver for the content path associated with the news story.
ERM Manager Users with the ERM Manager or ERM User responsibility can access the News Archive on myPage and departmental portal pages.
ERM User Users with the ERM Manager or ERM User responsibility can access the News Archive on myPage and departmental portal pages.

Siebel Content Publishing Guide Version 8.0
Managing Group News ■ Setting Up the Group News Approver Workflow
84
To set up Group News responsibilities
1 From the application-level menu, choose Navigate > Site Map > Administration - Application > Responsibilities.
2 In the Responsibilities list, select the responsibility.
NOTE: The Views and Users lists at the bottom of the screen list users assigned to the selected responsibility, and the views the user can access. You can add or remove views associated with a responsibility according to your organization’s needs, or you can create a new responsibility. For more information on creating and modifying responsibilities, see the Siebel Security Guide.
3 In the Users list, click Add, and query to find the user you want to add.
The user you add is associated with the Group News responsibility you selected.
4 In the Views list, review the list of views that the user can access, and modify as needed.
For example, you can remove views by selecting the view and clicking delete or designate the views as read-only by selecting the Read-Only View check box.
Setting Up the Group News Approver WorkflowYou can define approver workflow processes for Group News content. The approver workflow process determines the way the Siebel application handles content associated with the workflow. Siebel Group News is preconfigured with a Group News workflow that has two approval levels. This workflow allows Siebel to automatically send content from the creator, to the first-level approver, then to the second-level approver, and finally to the appropriate page views for publishing. At each point in the workflow process the content can be modified or approved. Approver workflows streamline the approval process, helping news authors to publish time-sensitive content for immediate employee review.
You can use the preconfigured workflow titled Group News Approver Workflow or you can create a new workflow. For more information about workflow modification and creation, see Siebel Business Process Framework: Workflow Guide.
This task is a step in “Process of Managing Group News” on page 82.
To set up a Group News workflow
1 From the application-level menu, choose Navigate > Site Map > Administration - Business Process > Workflow Processes.
2 In the Workflow Processes list, query to find *Group News*.
3 Select the Group News approver workflow process you want to use.
(For example, Group News Multiple Approver Workflow.)

Managing Group News ■ Creating a Content Path
Siebel Content Publishing Guide Version 8.0 85
4 In the Status field, verify that the workflow is Active.
NOTE: To create a workflow with additional levels of approval, copy the existing Group News Approver Workflow and add the additional business processes as needed. For more information about creating and modifying workflows, see Siebel Business Process Framework: Workflow Guide.
Creating a Content PathSetting up a Content Path allows news authors to automate many of the processes associated with publishing a news story. Group News administrators create content paths in the Group News Administration views; news authors associate content paths with news stories.
A Content Path defines a set of attributes for the news stories associated with the Content Path. These attributes include:
■ Where and when the news story is published (stages).
■ The individuals responsible for editing and approving the news story (approvers workflow).
■ The business process that automates the approval process (approver workflow).
■ The groups of users that have visibility rights to the news story (access groups).
■ The format in which the news story is published.
■ Whether the news story should be archived.
This task is a step in “Process of Managing Group News” on page 82.
To create a content path
1 From the application-level menu, choose Navigate > Site Map > Administration - Group News > Content Path.
2 In the Content Path list, add a new record, complete the fields, and save the record.
Some fields are described in the following table.
Field Comments
Name The name of the content path.
Workflow The appropriate Group News workflow approver process. When selecting the workflow process, make sure its status is Active. If the workflow process is not active, authors cannot select it when creating a news story. For more information, see Siebel Business Process Framework: Workflow Guide.
Status The status of a new content path is automatically set to Inactive. Setting the status to Active allows authors to select the content path when they create a story.
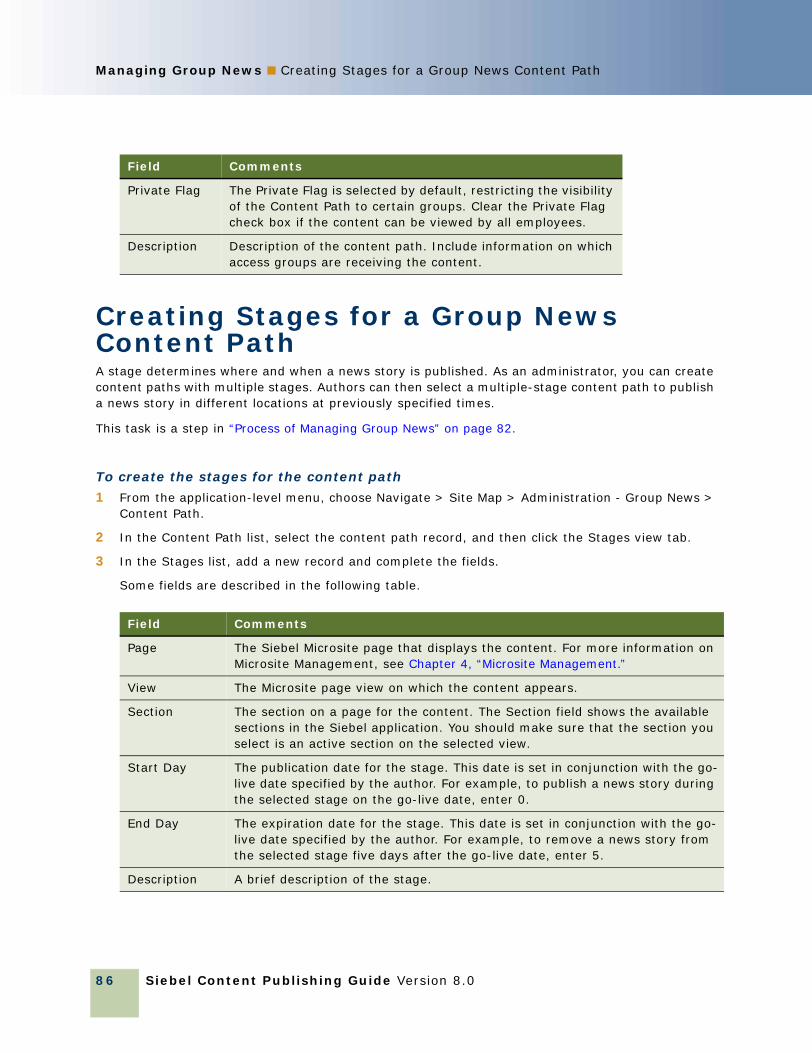
Siebel Content Publishing Guide Version 8.0
Managing Group News ■ Creating Stages for a Group News Content Path
86
Creating Stages for a Group News Content PathA stage determines where and when a news story is published. As an administrator, you can create content paths with multiple stages. Authors can then select a multiple-stage content path to publish a news story in different locations at previously specified times.
This task is a step in “Process of Managing Group News” on page 82.
To create the stages for the content path
1 From the application-level menu, choose Navigate > Site Map > Administration - Group News > Content Path.
2 In the Content Path list, select the content path record, and then click the Stages view tab.
3 In the Stages list, add a new record and complete the fields.
Some fields are described in the following table.
Private Flag The Private Flag is selected by default, restricting the visibility of the Content Path to certain groups. Clear the Private Flag check box if the content can be viewed by all employees.
Description Description of the content path. Include information on which access groups are receiving the content.
Field Comments
Page The Siebel Microsite page that displays the content. For more information on Microsite Management, see Chapter 4, “Microsite Management.”
View The Microsite page view on which the content appears.
Section The section on a page for the content. The Section field shows the available sections in the Siebel application. You should make sure that the section you select is an active section on the selected view.
Start Day The publication date for the stage. This date is set in conjunction with the go-live date specified by the author. For example, to publish a news story during the selected stage on the go-live date, enter 0.
End Day The expiration date for the stage. This date is set in conjunction with the go-live date specified by the author. For example, to remove a news story from the selected stage five days after the go-live date, enter 5.
Description A brief description of the stage.
Field Comments

Managing Group News ■ Designating Group News Approvers
Siebel Content Publishing Guide Version 8.0 87
Designating Group News ApproversThe Group News Approver workflow that you create allows you to automatically send content from the creator to the first-level approver, and then to the second-level approver.
When setting up approvers, make sure that the number of approvers entered in the Approvers list equals the number of approvers required by the selected approver workflow. If you select fewer approvers than required by the approver workflow, the news story is not routed for approvals or published. If you select more approvers than required by the approver workflow, the news story is not routed to all of the approvers.
This task is a step in “Process of Managing Group News” on page 82.
To select the Group News approvers
1 From the application-level menu, choose Navigate > Site Map > Administration - Group News > Content Path.
2 In the Content Path list, select the content path, and then click the Approvers view tab.
3 In the Approvers list, add a new record, and then complete the fields.
a In the Position field, query for the position associated with the employee designated as an approver.
b In the Sequence Number field, enter a sequence number for the approver.
The sequence number indicates the order in which approvers approve the news story. The first approver has a sequence number of 1.
Repeat this procedure for each approver level in the selected workflow.
Setting Up Access to Group NewsYou can establish which employee groups have visibility rights to the news story using the Content Path screen’s Access Groups view tab.
This task is a step in “Process of Managing Group News” on page 82.
To set up access to news
1 From the application-level menu, choose Navigate > Site Map > Administration - Group News > Content Path.
2 In the Content Path list, query to find the content path you want to modify.
3 In the content path record, verify that the Private Flag field check box is selected and in the Status field, select Active from the drop-down list.
A status of Active allows news authors to access the content path.
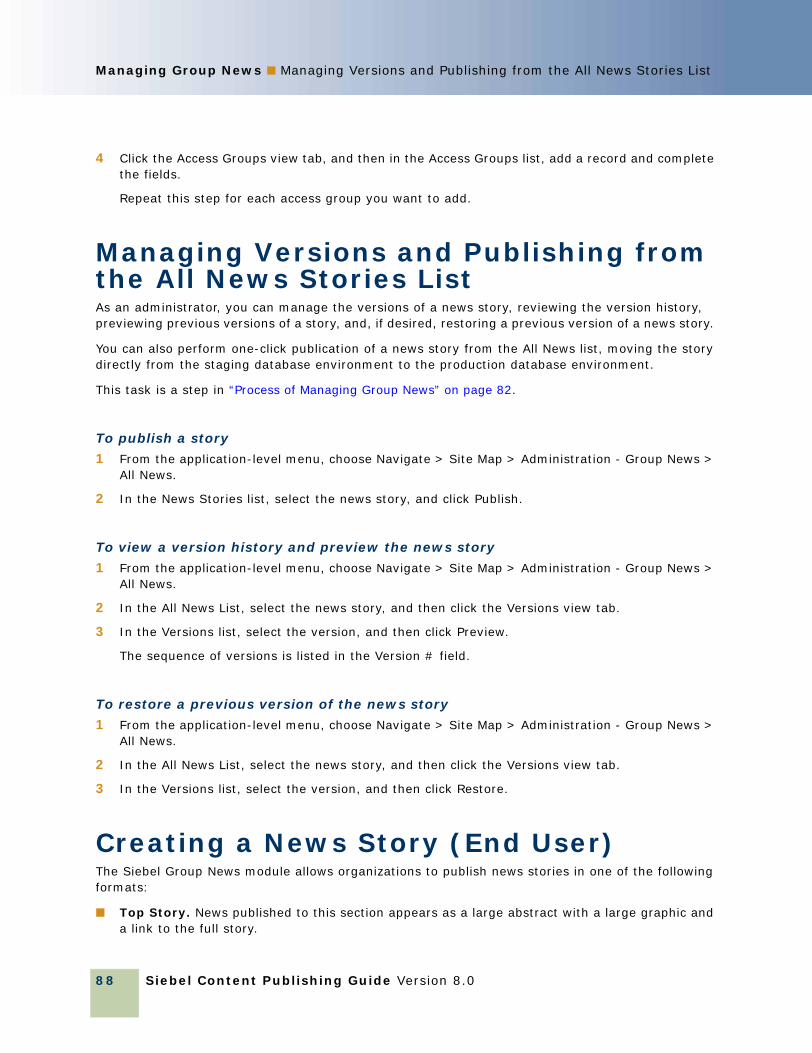
Siebel Content Publishing Guide Version 8.0
Managing Group News ■ Managing Versions and Publishing from the All News Stories List
88
4 Click the Access Groups view tab, and then in the Access Groups list, add a record and complete the fields.
Repeat this step for each access group you want to add.
Managing Versions and Publishing from the All News Stories ListAs an administrator, you can manage the versions of a news story, reviewing the version history, previewing previous versions of a story, and, if desired, restoring a previous version of a news story.
You can also perform one-click publication of a news story from the All News list, moving the story directly from the staging database environment to the production database environment.
This task is a step in “Process of Managing Group News” on page 82.
To publish a story
1 From the application-level menu, choose Navigate > Site Map > Administration - Group News > All News.
2 In the News Stories list, select the news story, and click Publish.
To view a version history and preview the news story
1 From the application-level menu, choose Navigate > Site Map > Administration - Group News > All News.
2 In the All News List, select the news story, and then click the Versions view tab.
3 In the Versions list, select the version, and then click Preview.
The sequence of versions is listed in the Version # field.
To restore a previous version of the news story
1 From the application-level menu, choose Navigate > Site Map > Administration - Group News > All News.
2 In the All News List, select the news story, and then click the Versions view tab.
3 In the Versions list, select the version, and then click Restore.
Creating a News Story (End User)The Siebel Group News module allows organizations to publish news stories in one of the following formats:
■ Top Story. News published to this section appears as a large abstract with a large graphic and a link to the full story.
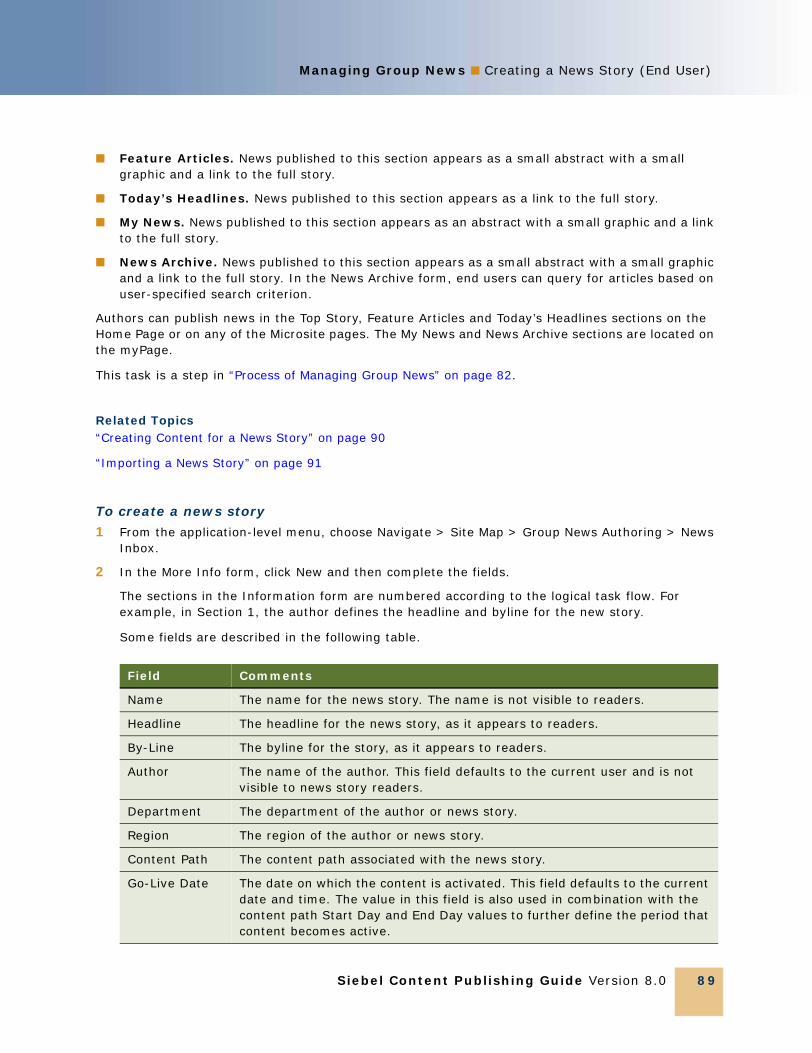
Managing Group News ■ Creating a News Story (End User)
Siebel Content Publishing Guide Version 8.0 89
■ Feature Articles. News published to this section appears as a small abstract with a small graphic and a link to the full story.
■ Today’s Headlines. News published to this section appears as a link to the full story.
■ My News. News published to this section appears as an abstract with a small graphic and a link to the full story.
■ News Archive. News published to this section appears as a small abstract with a small graphic and a link to the full story. In the News Archive form, end users can query for articles based on user-specified search criterion.
Authors can publish news in the Top Story, Feature Articles and Today’s Headlines sections on the Home Page or on any of the Microsite pages. The My News and News Archive sections are located on the myPage.
This task is a step in “Process of Managing Group News” on page 82.
Related Topics“Creating Content for a News Story” on page 90
“Importing a News Story” on page 91
To create a news story
1 From the application-level menu, choose Navigate > Site Map > Group News Authoring > News Inbox.
2 In the More Info form, click New and then complete the fields.
The sections in the Information form are numbered according to the logical task flow. For example, in Section 1, the author defines the headline and byline for the new story.
Some fields are described in the following table.
Field Comments
Name The name for the news story. The name is not visible to readers.
Headline The headline for the news story, as it appears to readers.
By-Line The byline for the story, as it appears to readers.
Author The name of the author. This field defaults to the current user and is not visible to news story readers.
Department The department of the author or news story.
Region The region of the author or news story.
Content Path The content path associated with the news story.
Go-Live Date The date on which the content is activated. This field defaults to the current date and time. The value in this field is also used in combination with the content path Start Day and End Day values to further define the period that content becomes active.

Siebel Content Publishing Guide Version 8.0
Managing Group News ■ Creating a News Story (End User)
90
Creating Content for a News StoryAfter the news story is created, authors can enter and edit content for the story, or import content that was previously created in an external HTML editor.
This task is a step in “Process of Managing Group News” on page 82.
To create the content for the news story
1 From the application-level menu, choose Navigate > Site Map > Group News Authoring > News Inbox.
2 In the News Stories list, select a news story, and then click the Content Editing view tab.
3 In the Content Editing form, enter the news story content, and set the status.
When you click in the Content Editor field, the integrated HTML editor toolbar appears at the bottom of the field. The toolbar provides special editing controls, which allow you to use supported HTML formatting and standard editing features. For more information, see Siebel Fundamentals.
4 Complete the remaining fields as needed.
Depending on the content path selected for the news story, some fields may not be required. A Top Story, for example, uses the Long Abstract and Large Image fields. Feature Articles and My News stories use the Small Image and Short Abstract fields. Today’s Headlines stories do not use the abstract or image fields.
Some fields are described in the following table.
Approver Name The approver field is automatically populated when there is an approver specified by the content path. The user sees the current pending approver.
Content Type The priority of the news story. The content type can be used internally to help categorize news stories by priority level. The content type does not affect the appearance of the news story to readers.
Field Comments
Large Image A large image for news stories that are published in the Top Story section.
Long Abstract A long abstract for news stories that are published in the Top Story section.
Short Abstract A short abstract for news stories that are published in the Feature Articles or My News sections.
Small Image A small image for news stories that are published in the Feature Articles or My News sections.
Field Comments

Managing Group News ■ Creating a News Story (End User)
Siebel Content Publishing Guide Version 8.0 91
Related Topic“Creating a News Story (End User)” on page 88
Importing a News StoryAuthors and approvers can import news stories and associated graphics at the same time, and then modify the content using the Content Editor.
You can use the Insert File and the Insert Image tools to insert files (such as HTML files, MS Word files, and Adobe Acrobat files) and graphics files from your local file system, from shared networks and from the Web. For more information, see Chapter 4, “Microsite Management.”
This task is a step in “Process of Managing Group News” on page 82.
To import a news story
1 From the application-level menu, choose Navigate > Site Map > Group News Authoring > News Inbox.
2 In the More Info form, click New and then complete the fields.
3 Click the Content Editing view tab, and then in the Content Editing form, click Import Article.
4 In the Pick Content dialog box, click New.
5 In the Insert Content dialog box, complete the fields and then click Advanced to see more fields.
Some fields are described in the following table.
6 Click OK in the Insert Content dialog box, and then click OK again in the Pick Content dialog box.
Related Topics“Creating Content for a News Story” on page 90
“Creating a News Story (End User)” on page 88
Field Comments
Comments Type additional comments to describe the content.
Content Type Specify the type of content you are adding. A list of available types appears when you click the select button.
Filename Browse to the content you want to import.
Lock A check mark in this field indicates that the content cannot be edited.
Name Specify the name to use to be saved in Siebel Content Base.
Title Specify the title to be saved in Siebel Content Base.
URL Specify the URL that references the content you are importing.

Siebel Content Publishing Guide Version 8.0
Managing Group News ■ Previewing a News Story (End User)
92
Previewing a News Story (End User)To view the news story before routing it for approval, use the Preview view tab in the Group News Authoring screen.
This task is a step in “Process of Managing Group News” on page 82.
To preview the news story
1 From the application-level menu, choose Navigate > Site Map > Group News Authoring > News Inbox.
2 In the News Stories list, select the news story, and then click the Preview view tab.
3 In the Preview view, click the news story headline link to view the content.
Submitting a News Story for Approval (End User)After a news story is complete, the news author submits it for approval. The news story immediately appears in the first approver's News Inbox according to the approver workflow associated with the news story.
This task is a step in “Process of Managing Group News” on page 82.
To submit a news story for approval
1 From the application-level menu, choose Navigate > Site Map > Group News Authoring > News Inbox.
2 In the News Stories list, select the news story you want to submit, and then click the Content Editing view tab.
3 In the Content form, change the value in the Status field to Submitted.
Approving a News Story (End User)News approvers must have the Content Manager responsibility. Approvers access news stories that require their approval by navigating to their news inboxes in the Group News Authoring screen.
This task is a step in “Process of Managing Group News” on page 82.
To approve a news story
1 From the application-level menu, choose Navigate > Site Map > Group News Authoring > News Inbox.
2 In the News Stories list, select the news story you want to approve.
Managing Group News ■ Approving a News Story (End User)
Siebel Content Publishing Guide Version 8.0 93
3 Click the Content Editing view tab, and change the value in the Status field to Approved.

Siebel Content Publishing Guide Version 8.0
Managing Group News ■ Approving a News Story (End User)
94
Siebel Content Publishing Guide Version 8.0 95
7 Setting Up Content Services
Siebel Content Services is a news and company information subscription service that is already integrated with Siebel ERM.
Siebel Content Services presents personalized external news about selected accounts, competitors, industries, and customizable subscription topics that are most relevant to your business and each individual employee’s job. Business news and company profiles are integrated, filtered, and presented in context for each employee and combined with relevant company internal data drawn from the Siebel customer database. Using a process that maps businesses directly to news sources, Content Services provides only the relevant news topics for businesses, such as your customers, competitors, prospects, and partners.
This chapter describes the administration procedures necessary to add industry news content to a Siebel application. It includes the following topics:
■ “Scenario for Content Services” on page 95
■ “Process of Setting Up Content Services” on page 96
■ “Assignment of News Topic Administrator Responsibilities” on page 97
■ “Creation of Access Groups for Content News Services” on page 97
■ “Setting Up Content Services Host and Authentication Credentials” on page 98
■ “Creating a News Package” on page 99
■ “Management of News Topics” on page 100
■ “Retrieving Account and Competitor News for Briefings” on page 102
■ “Associating Accounts and Competitors with News Topics” on page 103
■ “Associating Your Company with a News Topic” on page 104
■ “D & B Account Rationalization Services and News Topics” on page 105
■ “Viewing a Tracking Profile Summary for News (End User)” on page 105
■ “Creating a User-Defined News Topic (End User)” on page 106
■ “Previewing a News Topic (End User)” on page 107
■ “Resolving Problems with Content Services” on page 107
Scenario for Content ServicesThis scenario provides an example of a process typically performed by an administrator, a topic manager, and end users. Your company may follow a different process according to its business requirements.

Siebel Content Publishing Guide Version 8.0
Setting Up Content Services ■ Process of Setting Up Content Services
96
AdministratorA financial organization using Siebel ERM has signed a contract with a new client, a large software company. The representatives in client services, who are responsible for supporting the new client, send a request to the news topic manager to create a news topic for the client.
Because the new client is a computer software company, the administrator creates the news topic within the High Technology news package. The administrator also creates a new access group and assigns the appropriate client service representatives to the group.
End UserAfter the account topic is created, the client service representatives modify their tracking profiles to include the newly created news topic.
Process of Setting Up Content ServicesThis section lists procedures typically performed by administrators and end users to set up and use Content Services. Your company may follow a different process according to its business requirements.
Administrator ProceduresTo set up content services, perform the following procedures:
1 “Assignment of News Topic Administrator Responsibilities” on page 97
2 “Creation of Access Groups for Content News Services” on page 97
3 “Setting Up Content Services Host and Authentication Credentials” on page 98
4 “Creating a News Package” on page 99
5 “Management of News Topics” on page 100
6 “Retrieving Account and Competitor News for Briefings” on page 102
7 “Associating Accounts and Competitors with News Topics” on page 103
8 “Associating Your Company with a News Topic” on page 104
9 “Resolving Problems with Content Services” on page 107
End-User ProceduresTo use content services, perform the following procedures:
1 “Viewing a Tracking Profile Summary for News (End User)” on page 105
2 “Creating a User-Defined News Topic (End User)” on page 106
Setting Up Content Services ■ Assignment of News Topic Administrator Responsibilities
Siebel Content Publishing Guide Version 8.0 97
Assignment of News Topic Administrator ResponsibilitiesBefore a topic manager can administer the user- or administrator-defined content in Siebel Content Services, the employee must be associated with the appropriate responsibilities. You can assign employees additional responsibilities that allow the employees to administer news topics.
To set up a news topic administrator, create a responsibility that provides access to the News Topics Manager screen, and associate it with the appropriate employee. For more information on creating employee responsibilities, see Siebel Security Guide and Siebel Applications Administration Guide.
Related Topic“Process of Setting Up Content Services” on page 96
Creation of Access Groups for Content News ServicesBefore you configure or create a news topic, consider which groups within your organization should have access to news services provided by Content Services. For example, if your organization has purchased seats of Content Services for a subset of employees, only those employees should have access to the external content.
In addition, depending on the employee’s role in an organization or the types of clients with which the employee works, an employee may need access to certain industry sources and content topics. Rather than configure topics within Content Services so that the topics are visible to any user, you can configure content so that it is visible to specific groups of users.
You must associate an access group with a news package when you set up the package. As a result, you should create the appropriate access groups for your topics before you set up Content Services.
You should complete the following general procedures before setting up Content Services:
1 Make a list of each organization requesting access to each news package. For example, specific industry sources and content topics.
2 Create an access group for each news package, unless an appropriate group already exists.
3 Associate employees with the access groups used for Content Services.
NOTE: When setting up a news package, use these access groups to target the package to a specific group of users.
For more information about setting up access groups, see Siebel Security Guide.
Related Topic“Process of Setting Up Content Services” on page 96
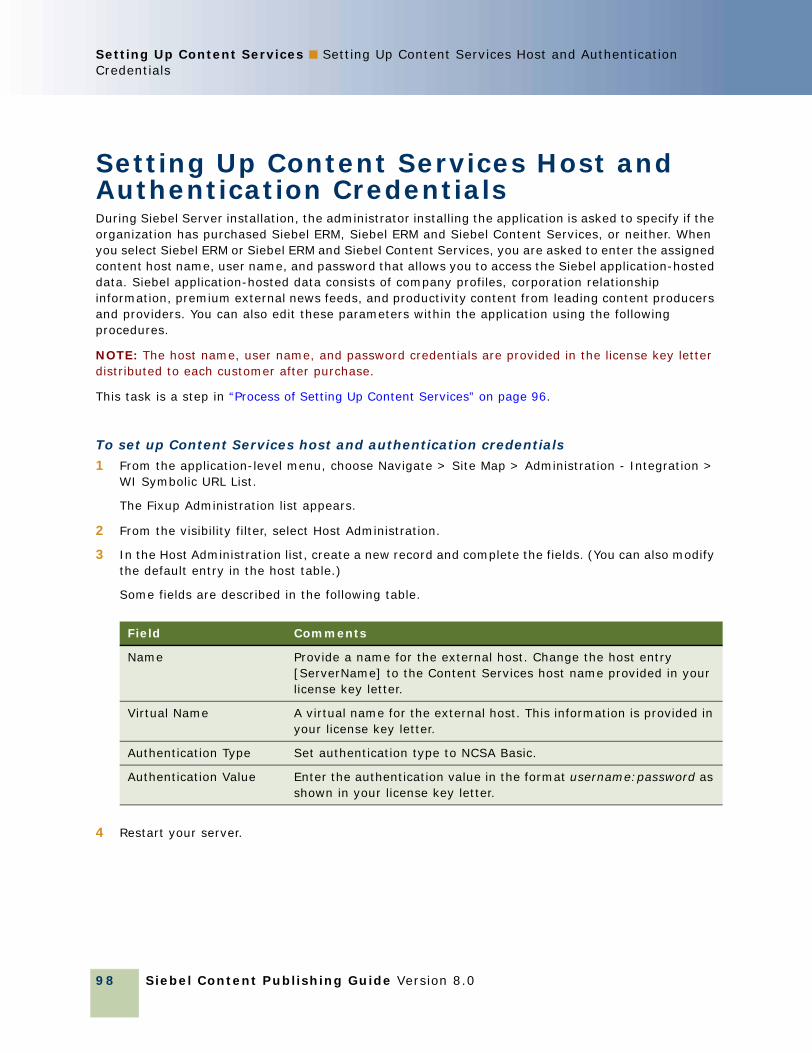
Siebel Content Publishing Guide Version 8.0
Setting Up Content Services ■ Setting Up Content Services Host and Authentication Credentials
98
Setting Up Content Services Host and Authentication CredentialsDuring Siebel Server installation, the administrator installing the application is asked to specify if the organization has purchased Siebel ERM, Siebel ERM and Siebel Content Services, or neither. When you select Siebel ERM or Siebel ERM and Siebel Content Services, you are asked to enter the assigned content host name, user name, and password that allows you to access the Siebel application-hosted data. Siebel application-hosted data consists of company profiles, corporation relationship information, premium external news feeds, and productivity content from leading content producers and providers. You can also edit these parameters within the application using the following procedures.
NOTE: The host name, user name, and password credentials are provided in the license key letter distributed to each customer after purchase.
This task is a step in “Process of Setting Up Content Services” on page 96.
To set up Content Services host and authentication credentials
1 From the application-level menu, choose Navigate > Site Map > Administration - Integration > WI Symbolic URL List.
The Fixup Administration list appears.
2 From the visibility filter, select Host Administration.
3 In the Host Administration list, create a new record and complete the fields. (You can also modify the default entry in the host table.)
Some fields are described in the following table.
4 Restart your server.
Field Comments
Name Provide a name for the external host. Change the host entry [ServerName] to the Content Services host name provided in your license key letter.
Virtual Name A virtual name for the external host. This information is provided in your license key letter.
Authentication Type Set authentication type to NCSA Basic.
Authentication Value Enter the authentication value in the format username:password as shown in your license key letter.

Setting Up Content Services ■ Creating a News Package
Siebel Content Publishing Guide Version 8.0 99
Creating a News PackageA news package is a subscription to a collection of third-party content sources offered by Siebel Content Services. Your organization may subscribe to several news packages in several different languages. For example, your organization may subscribe to general sources in French, English, or Spanish languages or to specific sources for your industry, such as Finance, High Technology, and Life Sciences. You must set up your Siebel application to include content from the news packages to which you subscribe.
This task is a step in “Process of Setting Up Content Services” on page 96.
To create a news package
1 From the application-level menu, choose Navigate > Site Map > Administration - Briefings > News Topic Manager.
2 In the News Packages list, create a news package record, and complete the fields.
Some fields are described in the following table.
After you set up a news package, you can create the news topics. For more information on creating a news topic, see “Management of News Topics” on page 100.
Field Comments
Name The name for the external news package. It is recommended that you use the package name provided in your license key letter.
Inactive A check mark in this field indicates that the news package is not available to employees.
Parameter This parameter indicates to the Siebel Server the precise content to retrieve. Enter the parameter exactly as it is provided in your license key letter.
Access Group The groups that have access to the news package.
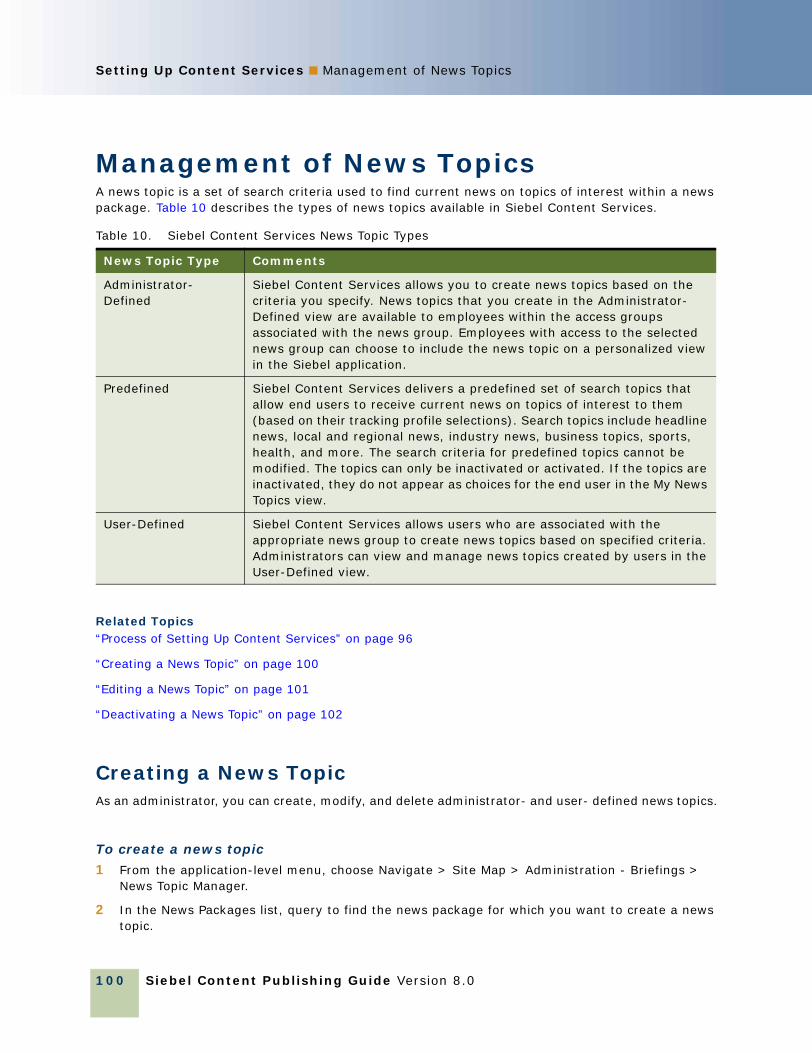
Siebel Content Publishing Guide Version 8.0
Setting Up Content Services ■ Management of News Topics
100
Management of News TopicsA news topic is a set of search criteria used to find current news on topics of interest within a news package. Table 10 describes the types of news topics available in Siebel Content Services.
Related Topics“Process of Setting Up Content Services” on page 96
“Creating a News Topic” on page 100
“Editing a News Topic” on page 101
“Deactivating a News Topic” on page 102
Creating a News TopicAs an administrator, you can create, modify, and delete administrator- and user- defined news topics.
To create a news topic
1 From the application-level menu, choose Navigate > Site Map > Administration - Briefings > News Topic Manager.
2 In the News Packages list, query to find the news package for which you want to create a news topic.
Table 10. Siebel Content Services News Topic Types
News Topic Type Comments
Administrator-Defined
Siebel Content Services allows you to create news topics based on the criteria you specify. News topics that you create in the Administrator-Defined view are available to employees within the access groups associated with the news group. Employees with access to the selected news group can choose to include the news topic on a personalized view in the Siebel application.
Predefined Siebel Content Services delivers a predefined set of search topics that allow end users to receive current news on topics of interest to them (based on their tracking profile selections). Search topics include headline news, local and regional news, industry news, business topics, sports, health, and more. The search criteria for predefined topics cannot be modified. The topics can only be inactivated or activated. If the topics are inactivated, they do not appear as choices for the end user in the My News Topics view.
User-Defined Siebel Content Services allows users who are associated with the appropriate news group to create news topics based on specified criteria. Administrators can view and manage news topics created by users in the User-Defined view.

Setting Up Content Services ■ Management of News Topics
Siebel Content Publishing Guide Version 8.0 101
3 Click one of the following view tabs:
■ Administrator-Defined
■ User-Defined
4 In the News Topics list, add a new record and complete the fields.
Some fields are described in the following table.
5 Click Preview to see the topic’s final format.
Related Topic“Management of News Topics” on page 100
Editing a News TopicUse the following procedure to edit a news topic.
To edit a news topic
1 From the application-level menu, choose Navigate > Site Map > Administration - Briefings > News Topic Manager.
2 In the News Packages list, query to find the news package associated with the news topic.
3 Click one of the following view tabs:
■ Administrator-Defined
Field Comments
Name Enter an identifying name for the topic. Users see this text description in the Add News Topics form. If the user selects this news topic, this text also appears as a section heading in the My News section of the user’s My Briefing page.
Query Enter the query to be submitted in the news topic search. Queries can be expressed as simple words or strings, as is customary with advanced search syntaxes in most search engines. Multiple terms that do not contain a Boolean expression (AND, OR) are treated as a phrase. Boolean operators (AND, OR) are recognized. Quote marks can be used to demark a phrase. When an operator occurs within quotes it is treated as part of the phrase. For more information about how to query, see Siebel Fundamentals.
Inactive The check box is used to deactivate or activate the selected news topic. A check mark appears in this column when the news topic is inactive. Users can only select active news topics in their tracking profile.
If you later mark a user-subscribed news topic as inactive, the user no longer sees news for that topic.

Siebel Content Publishing Guide Version 8.0
Setting Up Content Services ■ Retrieving Account and Competitor News for Briefings
102
■ User-Defined
4 In the news topics list, query to find the news topic.
5 In the news topic record, modify the fields as needed.
Related Topic“Management of News Topics” on page 100
Deactivating a News TopicNews topics are preconfigured as active. You can use the News Topic Manager screen to deactivate or activate news topics.
To deactivate a news topic
1 From the application-level menu, choose Navigate > Site Map > Administration - Briefings > News Topic Manager.
2 In the News Packages list, query to find the news topic.
3 Click one of the following view tabs:
■ Administrator-Defined
■ Predefined
■ User-Defined
4 In the news topics list, query to find the news topic.
5 In the Inactive field, select the check box.
Related Topic“Management of News Topics” on page 100
Retrieving Account and Competitor News for BriefingsSiebel Content Services allows you to include briefings about your accounts, competitors, other organizations, and so on, in your Siebel application. These briefings are retrieved from data within your Siebel application, as well as from external news sources based on your organization’s subscriptions with Siebel Content Services.
As an administrator you can create account topics, which are used to associate your Siebel accounts and competitors with external content. You also can associate your organization with a news topic to display company news on the My Briefings page.
Setting Up Content Services ■ Associating Accounts and Competitors with News Topics
Siebel Content Publishing Guide Version 8.0 103
Your Siebel application can use the account topics you create to search Siebel Content Services for information about your accounts and competitors.
Your Siebel application uses D&B as its standard for company topics. You use the Account Topic Manager to associate accounts and competitors to D-U-N-S numbers. D-U-N-S numbers are a standard way for external content providers to index company information. If you search using an indexed term, such as the D-U-N-S number, rather than a more generic search term, such as company name, then your search results are more likely to be accurate and relevant.
NOTE: D-U-N-S numbers that have been assigned and populated to an account do not always appear. To find out if the D-U-N-S has been assigned, click the drop-down list for the DUNS field. If the D-U-N-S record has already been assigned, it appears in this drop-down list. Click OK and the D-U-N-S record appears in the field.
By associating your accounts and competitors with topics, you also gain access to Siebel Company Vocabulary, which provides access to other common company identifiers, such as its stock ticker symbol. This gives you the ability to configure portal agents to submit different search terms to different content providers—for example, the D-U-N-S number to one content provider or the stock ticker symbol to another.
You can associate multiple accounts from your Siebel database to a single topic. This is an appropriate section when external content services consider several accounts in your Siebel database as a single entity. For example, you can have several divisions of Acme, Inc. (Acme West, Acme East, and Acme South) listed as unique accounts in your Siebel database, while an external content provider may index news based on the parent company, Acme, Inc.
For more information about portal agents, see Siebel Portal Framework Guide. For more information about D-U-N-S numbers, see Siebel Applications Administration Guide.
Related Topic“Process of Setting Up Content Services” on page 96
Associating Accounts and Competitors with News TopicsFor news and company information to appear on the My Briefing page, you must link accounts and competitors in your Siebel database to a topic. D-U-N-S numbers are the standard topics used by Siebel Content Services to identify companies. You link accounts and competitors to topics using the Account Topic Manager.
This task is a step in “Process of Setting Up Content Services” on page 96
Siebel Content Publishing Guide Version 8.0
Setting Up Content Services ■ Associating Your Company with a News Topic
104
To create or change a topic association
1 From the application-level menu, choose Navigate > Site Map > Administration - Briefings > Account Topic Manager.
The accounts and competitors from your Siebel database appear in the Accounts list. Name and Location are read-only. If the company is marked as a Competitor in your Siebel database, there is a check mark in the Competitor column.
2 In the Accounts list, query for and select the account or competitor you want to associate with a topic.
3 In the Company Search form, query for the account or competitor name in the Company Name field.
Matching records from the Siebel Content Services company database (or your selected external content provider database) appear. For example, you might see multiple listings of a company because each location or subsidiary might have its own D-U-N-S number assigned to allow specific searches on that location or subsidiary.
4 In the search results list, choose the specific company you want to define for your account or competitor, and click Assign DUNS.
The corresponding company name and D-U-N-S number are entered in the Accounts list for the record that was previously selected.
NOTE: If your company has purchased Siebel Content Services, you can click the Company Briefing button on the Company Search form to retrieve a briefing on the selected company.
Associating Your Company with a News TopicTo be able to receive news about your own company in the Our Company section of the My Briefing page, you must associate your company with a topic. To perform this procedure using the Account Topic Manager, you associate a record called Our Company with your company’s D-U-N-S number.
This task is a step in “Process of Setting Up Content Services” on page 96.
To associate a topic with your company
1 From the application-level menu, choose Navigate > Site Map > Administration - Briefings > Account Topic Manager.
2 In the Accounts list, query for and select the account or competitor you want to associate with a topic.
3 In the Company Search list, query for the account or competitor name in the Company Name field.

Setting Up Content Services ■ D & B Account Rationalization Services and News Topics
Siebel Content Publishing Guide Version 8.0 105
4 In the search results list, choose the specific company you want to define for your account or competitor, and then click Assign DUNS.
The corresponding company name and D-U-N-S number are entered in the Accounts list for the record that was previously selected.
NOTE: If there is no company news available, the Our Company in the News section does not appear.
D & B Account Rationalization Services and News TopicsThe D&B Account Rationalization Services automates the association of accounts and topics by matching your account records to D-U-N-S numbers in batch. A link to D&B’s Web site appears on the Account Topic Manager view.
For more information, see Siebel Applications Administration Guide.
Related Topic“Process of Setting Up Content Services” on page 96
Viewing a Tracking Profile Summary for News (End User)Users can view a summary of the tracking profile that determines what news they see.
This task is a step in “Process of Setting Up Content Services” on page 96.
To view a tracking profile summary
1 Navigate to the Profile screen > Summary page.

Siebel Content Publishing Guide Version 8.0
Setting Up Content Services ■ Creating a User-Defined News Topic (End User)
106
2 On the Summary page, view news selections.
The following figure shows an example of a tracking profile summary, with the left navigation bar showing links to news topics, weather, accounts, competitors and so on.
3 Click the links in the navigation bar to view additional information.
Creating a User-Defined News Topic (End User)Users can customize the news topics that appear on their Home Page.
This task is a step in “Process of Setting Up Content Services” on page 96.
To create user-defined news topics
1 Navigate to the Profile screen > Summary page.
2 From the Summary page, click the News Topics link in the navigation bar.
3 From the News Packages form, click the User Defined view tab, and then click New.
4 Enter a name for the query and the query string.
For example, enter the name UAN, and the Universal Application Network query string.
5 In the list, select the news topic, and then click Select Topic to move the topic to the My Selected News Topic section.
The user-defined news topic appears the next time the user logs in.
Setting Up Content Services ■ Previewing a News Topic (End User)
Siebel Content Publishing Guide Version 8.0 107
Previewing a News Topic (End User)After a news topic has been defined, the user can preview the news topic.
This task is a step in “Process of Setting Up Content Services” on page 96.
To preview a news topic
1 Navigate to the Profile screen > Summary page.
2 From the tracking profile Summary, click the News Topics link in the navigation bar.
3 Click either the User Defined view tab, or the Predefined and Administrator Defined view tab.
4 Click Preview to view the news.
The previewed news also appears by default on the Home Page when the user logs into the application.
Resolving Problems with Content ServicesThe topics in this section provide information that may lead to a resolution when investigating problems with Content Services.
■ “External News and Data Do Not Appear on Home Page” on page 107
■ “News Does Not Appear in the Our Company Section” on page 109
■ “Not Found Error in the Siebel Mobile Web Client” on page 109
■ “Users Receive Too Much News” on page 109
■ “Literature and Bulletins Are Out of Date” on page 110
Related Topic“Process of Setting Up Content Services” on page 96
External News and Data Do Not Appear on Home PageYour company has purchased Siebel Content Services and you are able to access the Web from your workstation, but you do not receive external news and data on the home page. In this example, the problem may be that a proxy server is being used to insulate your network from the Internet and is not allowing the Siebel application to pass requests through and return data to the application.
Related Topic“Resolving Problems with Content Services” on page 107
Siebel Content Publishing Guide Version 8.0
Setting Up Content Services ■ Resolving Problems with Content Services
108
Verifying Connectivity with Siebel Content Services Data HostVerify connectivity with the Siebel Content Services data host using network utilities, such as ping, nslookup, and tracert.
If you do not know the name of the Siebel Content Services data host, you can find it in the license key letter that Oracle sent to your company.
Verifying Your Web Connection and User CredentialsVerify that you have a valid Web connection and that your Siebel Content Services credentials are valid.
To verify your Web connection and credentials
1 Open a Web browser on your Siebel server.
2 Enter one of the following URLs:
■ for Content customers:
http://{eContent_hostname}/eContent/GetCompanyNames?FIND=Siebel
Change {eContent_hostname} to the name of your content host.
■ for ContentBroker customers:
http://{ContentBroker_hostname}/eContent/GetCompanyMID?FIND=Siebel
Change {ContentBroker_hostname} to the name of your content host.
A dialog box appears prompting you for your Siebel Content Services user credentials. You can find your user credentials in the license key letter that Oracle sent to your company.
3 Enter your user credentials.
Company information about Oracle should appear. If it does, your user credentials are valid. Skip the next step.
If you receive an Access Denied message or other type of message, the proxy server may not be allowing access to the Internet.
4 If you have received an error message, try to access the URL using a browser on a machine that does not go through the proxy server or firewall and repeat Step 1 through Step 3.
If company information about Oracle appears, then the problem lies with the Siebel server passing through the proxy server to retrieve data through the Internet. Contact your network administrators to resolve the issue.
Verifying Server ConfigurationIf you could access the Siebel company information using the previous procedure, then the problem may be in the configuration settings for the proxy server or in the Siebel ERM server configuration files.

Setting Up Content Services ■ Resolving Problems with Content Services
Siebel Content Publishing Guide Version 8.0 109
To test your configuration settings
1 Start the Siebel developer Web client in your browser.
2 Open a second browser window at the same time and enter the following URL:
http://localhost/start.swe?SWECmd=GotoView&SWEView=SI+Com+Company+Briefing+View&MID=808856512
NOTE: URLs are case-sensitive.
3 Enter valid login credentials, and then click Login.
If external content does not appear, this indicates a configuration problem, either with the proxy server or within the server configuration file.
News Does Not Appear in the Our Company SectionIf news does not appear in the Our Company In The News section of the home page, but it does appear in other news sections, it is likely that you did not assign an account topic to the special “_Our Company_” record.
Related Topics“Resolving Problems with Content Services” on page 107
“Retrieving Account and Competitor News for Briefings”
Not Found Error in the Siebel Mobile Web ClientIf users receive a “404 Not Found” error after clicking Company Lookup in the Account Topic Manager, then the constructed external URL went to a valid host name but specified a URL path that does not exist. This usually indicates that a Symbolic URL is not correctly defined.
Related Topic“Resolving Problems with Content Services” on page 107
“Setting Up Content Services Host and Authentication Credentials” on page 98
Users Receive Too Much NewsIf the amount of news and data that is published on a regular basis in the Siebel application becomes too large, you can change the number of days that news and data are published by changing the argument values in the Administration - Integration > Symbolic URL view. This reduces the amount of information that appears by removing older items.

Siebel Content Publishing Guide Version 8.0
Setting Up Content Services ■ Resolving Problems with Content Services
110
The number of days for which articles are published is controlled by the HIST argument value in content agents. Table 11 provides an example of the Symbolic URL HIST argument values.
The default setting for HIST is 90 days.
You can also change the number of articles that appear. The number of articles that appear is controlled by the MAX argument value in content agents. Table 12 provides an example of the Symbolic URL MAX argument values.
The default setting for MAX is 20 days.
If users are receiving news and information about too many accounts or competitors, they can reduce their list of tracked accounts and competitors by modifying their tracking profiles.
Related Topic“Resolving Problems with Content Services” on page 107
Literature and Bulletins Are Out of DateIf a literature item or bulletin is no longer useful or it is replaced by a more recent version and the original item has not yet reached its expiration date, you can change the item’s expiration date to the current date. This removes the item from the home page.
Related Topic“Resolving Problems with Content Services” on page 107
Table 11. Symbolic URL HIST Argument
Symbolic URL Name URL
Argument Name Required
Sequence Number
Argument Type
Argument Value
CompanyNews http://datahost/eContent/GetHeadlines
HIST N 1 Constant 90
Table 12. Symbolic URL MAX Argument
Symbolic URL Name URL
Argument Name Required
Sequence Number
Argument Type
Argument Value
CompanyNews http://datahost/eContent/GetHeadlines
MAX N 1 Constant 20

Siebel Content Publishing Guide Version 8.0 111
A Content Center Reference
This appendix provides detailed information on two subjects:
■ “Prebuilt Content Objects for Content Center” on page 111
■ “Content Project Business Service” on page 123
Prebuilt Content Objects for Content CenterEach Content Object is based on a business object that was derived from an existing business object by removing unnecessary fields. You can modify these content objects according to your business needs.
Table 13 lists each content object, the primary business object on which it is based, and its primary business component.
Table 13. Prebuilt Content Objects
Content Object Business Object Primary Business Component
Catalog Content Object Product Catalog
(Content Management)
Product Catalog
Catalog Category Content Object
Catalog Category
(Content Management)
Catalog Category Admin
ContentBase Content Asset Content Object
ContentBase Asset EAI ContentBase Asset (Content Management)
ContentBase Content Set Content Object
ContentBase Content Set EAI ContentBase Content Set (Content Management)
ContentBase Content Type Content Object
ContentBase Content Type EAI ContentBase Content Type (Content Management)
ERM Group News Item Content Object
ERM Group News Item EAI ERM Group News Item EAI
Literature Content Object Admin Sales Tool
(Content Management)
Admin Sales Tool
Microsite Management Page Content Object
ePortal MM Page EAI ePortal MM Page EAI

Siebel Content Publishing Guide Version 8.0
Content Center Reference ■ Prebuilt Content Objects for Content Center
112
The tables below describe the data that is transferred for each business component that is included in the content object.
Catalog Content ObjectCatalog is a prebuilt content object based on the business object Product Catalog (Content Management). Table 14 lists the business components for the prebuilt content object Catalog.
Price List Content Object ePortal MM Page Item EAI ePortal MM Page Item EAI
Price List Content Object Price List (Content Management)
Price List
Product Content Object Product Admin Definition
(Content Management)
Internal Product
Product Class Content Object XA Authoring Object XA Class
Product Feature Content Object Product Feature
(Content Management)
Product Feature
Product Line Content Object Admin Product Line
(Content Management)
Admin Product Line
Resolution Item Content Object Resolution Item SR Resolution Item
Solution Content Object Solution Solution
Volume Discount Content Object
Volume Discount
(Content Management)
Volume Discount
Table 14. Prebuilt Content Object: Catalog
Business Components Transferred Data Links
Product Catalog Catalog Information Primary
Product Catalog Translation
Language Translations of Catalog Information
Product Catalog/Product Catalog Translation
Table 13. Prebuilt Content Objects
Content Object Business Object Primary Business Component

Content Center Reference ■ Prebuilt Content Objects for Content Center
Siebel Content Publishing Guide Version 8.0 113
Catalog Category Content ObjectCatalog Category is a prebuilt content object based on the business object Catalog Category. Table 15 lists the business components for the prebuilt content object Catalog Category.
ContentBase Content Asset Content ObjectContentBase Content Asset is a prebuilt content object based on the business object ContentBase Asset EAI. Table 16 lists the business components for the prebuilt content object Content Asset.
Table 15. Prebuilt Content Object: Catalog Category
Business Components Transferred Data Links
Catalog Category Catalog Category Primary
Catalog Subcategory Association relationships Catalog Category/Catalog Subcategory
Internal Product Association relationships Catalog Category/Internal Product
Table 16. Prebuilt Content Object: ContentBase Content Asset
Business Components Transferred Data Links
ContentBase Asset (Content Management)
ContentBase Asset identity Primary
ContentBase Asset (Content Management)_Access Group
ContentBase Access Group relationship
ContentBase Asset (Content Management)_Current Version
ContentBase Asset current version identification
ContentBase Version (Content Management)
Asset revision information ContentBase Asset (Content Management)/ContentBase Version (Content Management)
ContentBase Data (Content Management)
Content stored in database repository
ContentBase Version (Content Management)/ContentBase Data (Content Management)
ContentBase Namespace Aliases (Content Management)
XML namespace information
ContentBase Version (Content Management)/ContentBase Namespace Aliases (Content Management)

Siebel Content Publishing Guide Version 8.0
Content Center Reference ■ Prebuilt Content Objects for Content Center
114
ContentBase Content Set Content ObjectContentBase Content Set is a prebuilt content object based on the business object ContentBase Content Set EAI. Table 17 lists the business components for the prebuilt content object ContentBase Content Set.
ContentBase Version File Attachment (Content Management)
Content stored in file system
ContentBase Version (Content Management)/ContentBase Version File Attachment (Content Management)
ContentBase Version for Version Children
Asset version interrelations ContentBase Asset (Content Management)/ContentBase Version for Version Children
ContentBase Ref (Content Management)
Links to other assets ContentBase Version for Version Children/ContentBase Ref (Content Management)
Table 17. Prebuilt Content Object: ContentBase Content Set
Business Components Transferred Data Links
ContentBase Content Set (Content Management)
Set identity Primary
ContentBase Content Set (Content Management)_Pr. Asset
Home page identification
ContentBase Asset (Content Management)
Asset identity ContentBase Content Set (Content Management)/ContentBase Asset (Content Management)
ContentBase Asset (Content Management)_Access Group
ContentBase Access Group relationship
ContentBase Asset (Content Management)_Current Version
ContentBase Asset current version identification
ContentBase Version (Content Management)
Asset revision information
ContentBase Asset (Content Management)/ContentBase Version (Content Management)
Table 16. Prebuilt Content Object: ContentBase Content Asset
Business Components Transferred Data Links

Content Center Reference ■ Prebuilt Content Objects for Content Center
Siebel Content Publishing Guide Version 8.0 115
ContentBase Content Type Content ObjectContentBase Content Type is a prebuilt content object based on the business object ContentBase Content Type EAI. Table 18 lists the business components for the prebuilt content object ContentBase Content Type.
ContentBase Data (Content Management)
Content stored in database repository
ContentBase Version (Content Management)/ContentBase Data (Content Management)
ContentBase Namespace Aliases (Content Management)
XML namespace information
ContentBase Version (Content Management)/ContentBase Namespace Aliases (Content Management)
ContentBase Version File Attachment (Content Management)
Content stored in file system
ContentBase Version (Content Management)/ContentBase Version File Attachment (Content Management)
ContentBase Version for Version Children
Asset version interrelations
ContentBase Content Set (Content Management)/ContentBase Version for Version Children
ContentBase Ref (Content Management)
Links to other assets ContentBase Version for Version Children/ContentBase Ref (Content Management)
Table 18. Prebuilt Content Object: ContentBase Content Type
Business Components Transferred Data Links
ContentBase Content Type (Content Management)
ContentBase Asset data type
Primary
ContentBase DocType (Content Management)
SGML document type ContentBase Content Type (Content Management)/ContentBase DocType (Content Management)
ContentBase Namespace (Content Management)
XML namespace information ContentBase Content Type (Content Management)/ContentBase Namespace (Content Management)
ContentBase NS Node Type (Content Management)
Namespace node information
ContentBase Namespace (Content Management)/ContentBase NS Node Type (Content Management)
Table 17. Prebuilt Content Object: ContentBase Content Set
Business Components Transferred Data Links

Siebel Content Publishing Guide Version 8.0
Content Center Reference ■ Prebuilt Content Objects for Content Center
116
ERM Group News Item Content ObjectERM Group News Item is a prebuilt content object based on the business object ERM Group News Item EAI. Table 19 lists the business components for the prebuilt content object ERM Group News Item.
Table 19. Prebuilt Content Object: ERM Group News Item
Business Components Transferred Data Links
ERM Group News Item EAI
News Item identity, content references
Primary
ERM Group News Content Path EAI
Publication stages for news item
ERM Group News Item EAI/ERM Group News Content Path EAI
ERM Group News Content Path Stages EAI
Publication stage details ERM Group News Content Path EAI/ERM Group News Content Path Stages EAI
ERM Group News Position EAI
Publication approvers for news item
ERM Group News Content Path EAI/ERM Group News Position EAI
Access Group Contentbase Asset access groups
ContentBase Asset (Content Management)/Access Group
ERM Group News Access Group Member EAI
Group News access group information
Access Group/ERM Group News Access Group Member EAI
ContentBase Content Set (Content Management)
Set identity ERM Group News Item EAI/ContentBase Content Set (Content Management)
ContentBase Content Set (Content Management)_Pr. Asset
Home page identification
ContentBase Asset (Content Management)
Asset identity ContentBase Content Set (Content Management)/ContentBase Asset (Content Management)
ContentBase Asset (Content Management)_Access Group
ContentBase Access Group relationship
ContentBase Asset (Content Management)_Current Version
ContentBase Asset current version identification
ContentBase Version (Content Management)
Asset revision information ContentBase Asset (Content Management)/ContentBase Version (Content Management)

Content Center Reference ■ Prebuilt Content Objects for Content Center
Siebel Content Publishing Guide Version 8.0 117
Literature Content ObjectLiterature is a prebuilt content object based on the business object Admin Sales Tool. Table 20 lists the business components for the prebuilt content object Literature.
Microsite Management Page Content ObjectMicrosite Management Page is a prebuilt content object based on the business object ePortal MM Page EAI. Table 21 lists the business components for the prebuilt content object Microsite Management Page.
Views associated with this content object are:
■ Add/Edit - ePortal MM Page Administration
ContentBase Data (Content Management)
Content stored in database repository
ContentBase Version (Content Management)/ContentBase Data (Content Management)
ContentBase Namespace Aliases (Content Management)
XML namespace information ContentBase Version (Content Management)/ContentBase Namespace Aliases (Content Management)
ContentBase Version File Attachment (Content Management)
Content stored in file system
ContentBase Version (Content Management)/ContentBase Version File Attachment (Content Management)
ContentBase Version for Version Children
Asset version interrelations ContentBase Content Set (Content Management)/ContentBase Version for Version Children
ContentBase Ref (Content Management)
Links to other assets ContentBase Version for Version Children/ContentBase Ref (Content Management)
Table 20. Prebuilt Content Object: Literature
Business Components Transferred Data Links
Admin Sales Tool Literature record and associated files
Primary
Literature Item Detailed relationships Admin Sales Tool/Literature Item
Literature Component Item
Association relationships Literature Item/Literature Component Item - Admin
Table 19. Prebuilt Content Object: ERM Group News Item
Business Components Transferred Data Links

Siebel Content Publishing Guide Version 8.0
Content Center Reference ■ Prebuilt Content Objects for Content Center
118
■ Preview - ePortal MM Page Designer View
Table 21. Prebuilt Content Object: Microsite Management Page
Business Components Transferred Data Links
ePortal MM Page Access Group Intersection
ePortal MM Page EAI/ePortal MM Page Access Group Intersection
ePortal MM Item Access Group Intersection
ePortal MM Page Item EAI/ePortal MM Item Access Group Intersection
ePortal MM Page EAI Page identity Primary
ePortal MM Page Section EAI
Page layout information ePortal MM Page EAI/ePortal MM Page Section EAI
ePortal MM Page Template Section EAI
ePortal MM Page Section EAI/ePortal MM Page Template Section EAI
ePortal MM Template Access Group EAI
ePortal MM Template EAI/ePortal MM Template Access Group EAI
ePortal MM Template EAI ePortal MM Page Template Section EAI/ePortal MM Template EAI
ePortal MM Page Item EAI Page Item display information
ePortal MM Page Section EAI/ePortal MM Page Item EAI
ePortal MM Template Item Access Group Intersection
ePortal MM Template Page Item EAI/ePortal MM Template Item Access Group Intersection
ePortal MM Template Page Item EAI
ePortal MM Template EAI/ePortal MM Template Page Item EAI
ContentBase Content Set (Content Management)
Set identity ePortal MM Page EAI/ContentBase Content Set (Content Management)
ContentBase Content Set (Content Management)_Pr. Asset
Home page identification
ContentBase Asset (Content Management)
Asset identity ContentBase Content Set (Content Management)/ContentBase Asset (Content Management)
ContentBase Asset (Content Management)_Access Group
ContentBase Access Group relationship
ContentBase Asset (Content Management)_Current Version
ContentBase Asset current version identification

Content Center Reference ■ Prebuilt Content Objects for Content Center
Siebel Content Publishing Guide Version 8.0 119
Price List Content ObjectPrice List is a prebuilt content object based on the business object Price List. Table 22 lists the business components for the prebuilt content object Price List.
ContentBase Asset Access Group Intersection
ContentBase Asset (Content Management)/ContentBase Asset Access Group Intersection
ContentBase Version (Content Management)
Asset revision information ContentBase Asset (Content Management)/ContentBase Version (Content Management)
ContentBase Data (Content Management)
Content stored in database repository
ContentBase Version (Content Management)/ContentBase Data (Content Management)
ContentBase Namespace Aliases (Content Management)
XML namespace information ContentBase Version (Content Management)/ContentBase Namespace Aliases (Content Management)
ContentBase Version File Attachment (Content Management)
Content stored in file system
ContentBase Version (Content Management)/ContentBase Version File Attachment (Content Management)
ContentBase Version for Version Children
Asset version interrelations ContentBase Content Set (Content Management)/ContentBase Version for Version Children
ContentBase Ref (Content Management)
Links to other assets ContentBase Version for Version Children/ContentBase Ref (Content Management)
Table 22. Prebuilt Content Object: Price List
Business Components Transferred Data Links
Price List Price List
Association relationships to Organizations
Primary
Table 21. Prebuilt Content Object: Microsite Management Page
Business Components Transferred Data Links

Siebel Content Publishing Guide Version 8.0
Content Center Reference ■ Prebuilt Content Objects for Content Center
120
Product Content ObjectProduct is a prebuilt content object based on the business object Product Admin Definition. Table 23 lists the business components for the prebuilt content object Product.
Product Class Content ObjectProduct Class is a prebuilt content object based on the business object XA Authoring Object. Table 24 lists the business components for the prebuilt content object Product Class.
Table 23. Prebuilt Content Object: Product
Business Components Transferred Data Links
Internal Product Internal Product Primary
Admin Product Definition (Content Management)
Association relationships
Defined in the intersection table: Rank column; Value column
Internal Product/Admin Product Comparison - Admin (Content Management)
Component Product Association relationships
Defined in the intersection table: Relation Type
Internal Product/Component Product - Admin
FS Inventory Options Association relationships Internal Product/FS Inventory Options
FS Product Measurement Characteristics
Association relationships Internal Product/FS Product Measurement Characteristics
Internal Product Sales Tool
Association relationships Internal Product/Internal Product Sales Tool - Admin
Key Feature Association relationships Internal Product/Key Feature - Admin
Price List Association relationships
Defined in the intersection table: some columns
Internal Product/Price List - Admin
Table 24. Prebuilt Content Object: Product Class
Business Components Transferred Data Links
XA Class Product Class Primary
XA Class Translation Product Class Language Translations
XA Class/XA Class Translation

Content Center Reference ■ Prebuilt Content Objects for Content Center
Siebel Content Publishing Guide Version 8.0 121
Product Feature Content ObjectProduct Feature is a prebuilt content object based on the business object Product Feature (Content Management). Table 25 lists the business components for the prebuilt content object Product Feature.
Product Line Content ObjectProduct Line is a prebuilt content object based on the business object Admin Product Line (Content Management). Table 26 lists the business components for the prebuilt content object Product Line.
XA Attribute Product Class Child Attributes
XA Class/XA Attribute
XA Attribute Translation Product Class Child Attribute Language Translations
XA Attribute/XA Attribute Translation
Table 25. Prebuilt Content Object: Product Feature
Business Components Transferred Data Links
Product Feature Product Feature Primary
Product Feature_Product Line Association of Features to Product Line
N/A
Table 26. Prebuilt Content Object: Product Line
Business Components Transferred Data Links
Admin Product Line Product Line Primary
Admin Product Line_Position Association to Position N/A
Table 24. Prebuilt Content Object: Product Class
Business Components Transferred Data Links
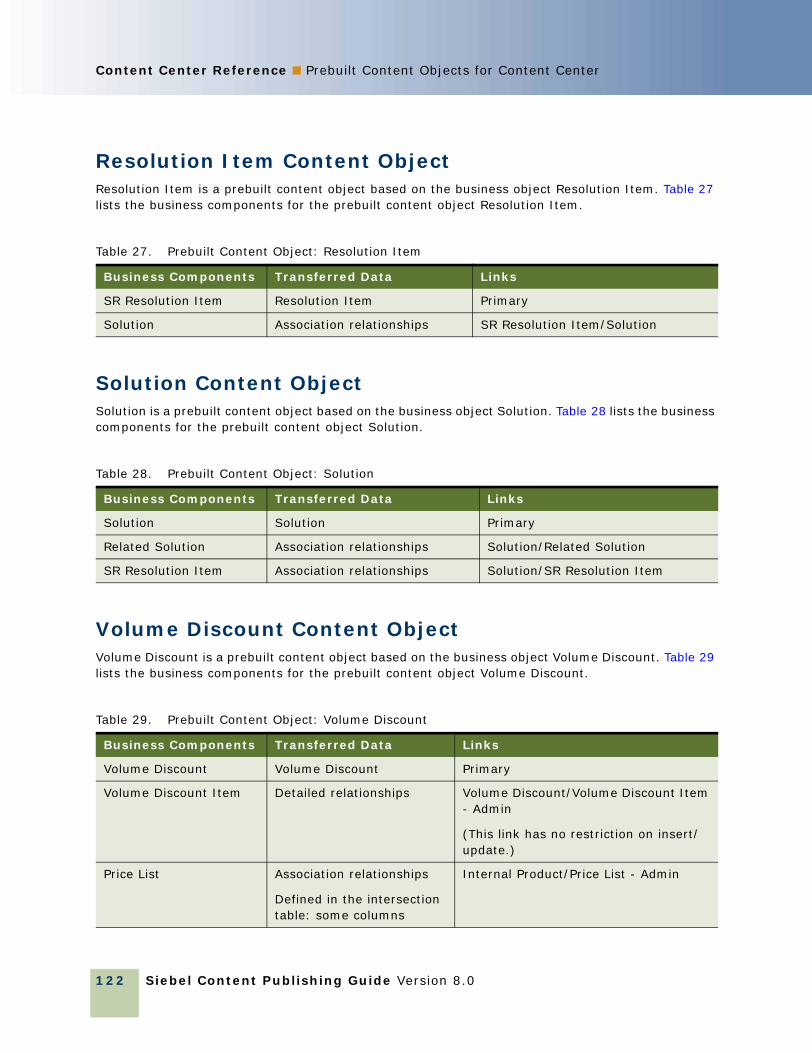
Siebel Content Publishing Guide Version 8.0
Content Center Reference ■ Prebuilt Content Objects for Content Center
122
Resolution Item Content ObjectResolution Item is a prebuilt content object based on the business object Resolution Item. Table 27 lists the business components for the prebuilt content object Resolution Item.
Solution Content ObjectSolution is a prebuilt content object based on the business object Solution. Table 28 lists the business components for the prebuilt content object Solution.
Volume Discount Content ObjectVolume Discount is a prebuilt content object based on the business object Volume Discount. Table 29 lists the business components for the prebuilt content object Volume Discount.
Table 27. Prebuilt Content Object: Resolution Item
Business Components Transferred Data Links
SR Resolution Item Resolution Item Primary
Solution Association relationships SR Resolution Item/Solution
Table 28. Prebuilt Content Object: Solution
Business Components Transferred Data Links
Solution Solution Primary
Related Solution Association relationships Solution/Related Solution
SR Resolution Item Association relationships Solution/SR Resolution Item
Table 29. Prebuilt Content Object: Volume Discount
Business Components Transferred Data Links
Volume Discount Volume Discount Primary
Volume Discount Item Detailed relationships Volume Discount/Volume Discount Item - Admin
(This link has no restriction on insert/update.)
Price List Association relationships
Defined in the intersection table: some columns
Internal Product/Price List - Admin

Content Center Reference ■ Content Project Business Service
Siebel Content Publishing Guide Version 8.0 123
Content Project Business ServiceThe Content Project business service allows clients to perform various operations on Oracle’s Siebel Content Projects. Business service scripts, workflow-driven services, and business components can call the Content Project business service methods to manipulate Content Projects. It can be used to start and publish a content project and to add, delete, and update a content project or a content item. It includes the following methods:
■ “AddContentItem Method” on page 123
■ “AddProject Method” on page 124
■ “Export Method” on page 124
■ “Import Method” on page 124
■ “PublishProject Method” on page 125
■ “RemoveContentItem Method” on page 125
■ “RemoveProject Method” on page 125
■ “StartProject Method” on page 126
■ “UpdateContentItem Method” on page 126
■ “UpdateProject Method” on page 127
AddContentItem MethodThis method adds a content item to the specified project. First it searches the project in the Content Project business component, and then it searches content type name, pick applet, picklist name, and source field name in the Content Type business component.
Table 30 lists the arguments for the AddContentItem method.
Table 30. Arguments for the AddContentItem Method
Argument Type Description Required
ProjectId Input The project ID to add a content item X
ItemName Input The item name to add X
ItemAction Input The action for item to perform X
ItemDescription Input The description for the item
ItemTypeId Input Type ID for the item X
ItemReference Input The reference for the item
ItemId Output The item ID for the added item

Siebel Content Publishing Guide Version 8.0
Content Center Reference ■ Content Project Business Service
124
AddProject MethodThis method creates a new content project.
Table 31 lists the arguments for the AddProject method.
Export MethodIf Connect String is not empty, this method exports the project from the staging environment to the production environment. If Connect String is empty and Export Directory is not empty, the method exports the project to the export directory. The method fails if both Connect String and Export Directory are empty.
Table 32 lists the arguments for the Export method.
Import MethodThis method imports a project which has been exported using Export method.
Table 31. Arguments for the AddProject Method
Argument Type Description Required
ProjName Input The project name to create X
ProjectDescription Input The description for the project
ProjectOwnerId Input The owner ID for the project
ProjectPlanPublicationDate Input The planning publication date for the project
ProjectPublicationWorkflowId Input The publication workflow ID for the project
ProjectId Output The project ID for the created project
Table 32. Arguments for the Export Method
Argument Type Description Required
Content Project Id Input The project ID to export X
Connect String Input Connect string to export
Export Directory Input The directory to export
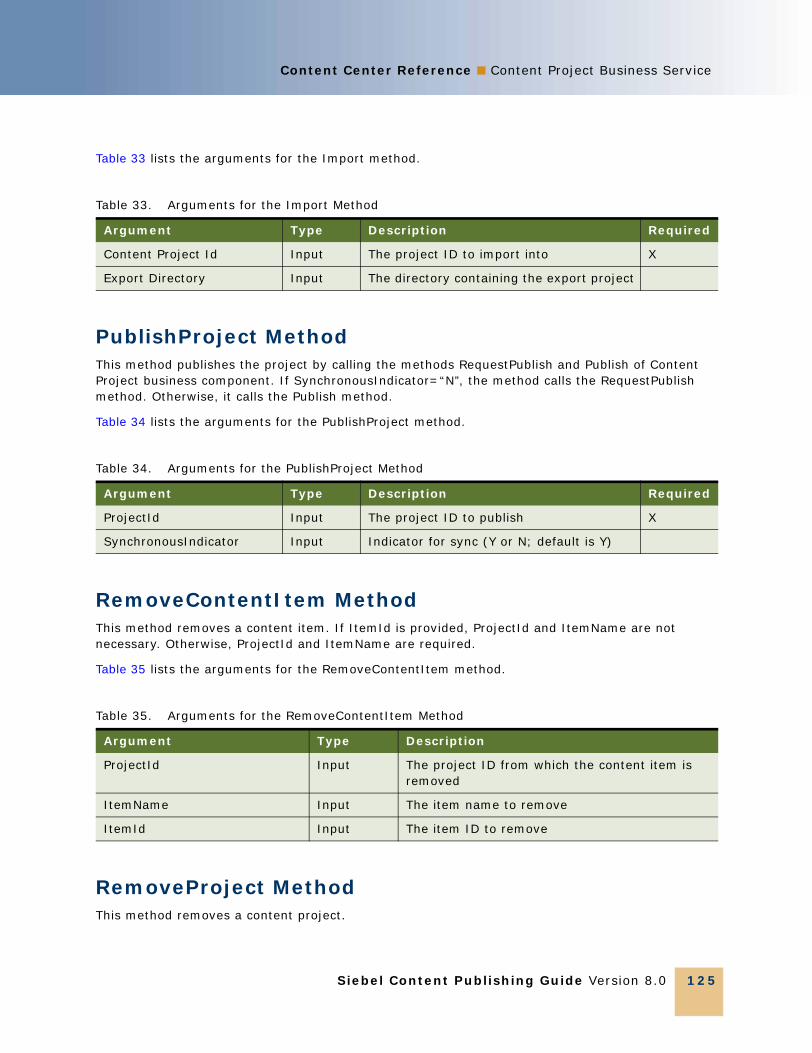
Content Center Reference ■ Content Project Business Service
Siebel Content Publishing Guide Version 8.0 125
Table 33 lists the arguments for the Import method.
PublishProject MethodThis method publishes the project by calling the methods RequestPublish and Publish of Content Project business component. If SynchronousIndicator=“N”, the method calls the RequestPublish method. Otherwise, it calls the Publish method.
Table 34 lists the arguments for the PublishProject method.
RemoveContentItem MethodThis method removes a content item. If ItemId is provided, ProjectId and ItemName are not necessary. Otherwise, ProjectId and ItemName are required.
Table 35 lists the arguments for the RemoveContentItem method.
RemoveProject MethodThis method removes a content project.
Table 33. Arguments for the Import Method
Argument Type Description Required
Content Project Id Input The project ID to import into X
Export Directory Input The directory containing the export project
Table 34. Arguments for the PublishProject Method
Argument Type Description Required
ProjectId Input The project ID to publish X
SynchronousIndicator Input Indicator for sync (Y or N; default is Y)
Table 35. Arguments for the RemoveContentItem Method
Argument Type Description
ProjectId Input The project ID from which the content item is removed
ItemName Input The item name to remove
ItemId Input The item ID to remove
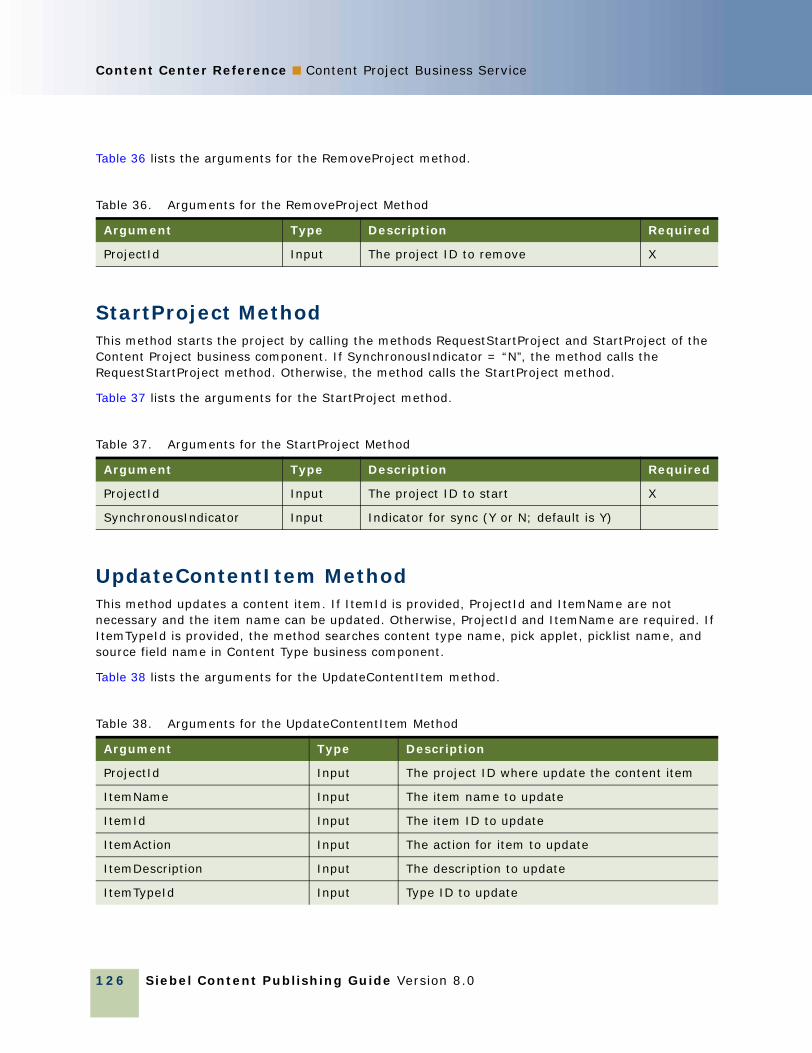
Siebel Content Publishing Guide Version 8.0
Content Center Reference ■ Content Project Business Service
126
Table 36 lists the arguments for the RemoveProject method.
StartProject MethodThis method starts the project by calling the methods RequestStartProject and StartProject of the Content Project business component. If SynchronousIndicator = “N”, the method calls the RequestStartProject method. Otherwise, the method calls the StartProject method.
Table 37 lists the arguments for the StartProject method.
UpdateContentItem MethodThis method updates a content item. If ItemId is provided, ProjectId and ItemName are not necessary and the item name can be updated. Otherwise, ProjectId and ItemName are required. If ItemTypeId is provided, the method searches content type name, pick applet, picklist name, and source field name in Content Type business component.
Table 38 lists the arguments for the UpdateContentItem method.
Table 36. Arguments for the RemoveProject Method
Argument Type Description Required
ProjectId Input The project ID to remove X
Table 37. Arguments for the StartProject Method
Argument Type Description Required
ProjectId Input The project ID to start X
SynchronousIndicator Input Indicator for sync (Y or N; default is Y)
Table 38. Arguments for the UpdateContentItem Method
Argument Type Description
ProjectId Input The project ID where update the content item
ItemName Input The item name to update
ItemId Input The item ID to update
ItemAction Input The action for item to update
ItemDescription Input The description to update
ItemTypeId Input Type ID to update

Content Center Reference ■ Content Project Business Service
Siebel Content Publishing Guide Version 8.0 127
UpdateProject MethodThis method updates a content project.
Table 39 lists the arguments for the UpdateProject method.
ItemReference Input The reference to update
ItemStatus Input The item status to update
Table 39. Arguments for the UpdateProject Method
Argument Type Description Required
ProjectId Input The project ID for updating X
ProjName Input The project name to update
ProjectDescription Input The description to update
ProjectOwnerId Input The owner ID to update
ProjectPlanPublicationDate Input The planning publication date to update
ProjectPublicationWorkflowId Input The publication workflow ID to update
Table 38. Arguments for the UpdateContentItem Method
Argument Type Description

Siebel Content Publishing Guide Version 8.0
Content Center Reference ■ Content Project Business Service
128
Siebel Content Publishing Guide Version 8.0 129
Index
Numerics404 Not Found error 109
Aaccess groups, creating for content 97account news
associating with news topics 103retrieving 102
Add Web Link toolexternal page, creating a link to 60using, about 59
AddContentItem method 123AddProject method 124administrator
assigning news topic administrator responsibilities 97
All News Stories List, managing versions and publishing from 88
approversand contributors, setting up 28content item, adding or editing 30content, approving 31designating for group news 87setting up for group news 84setting up workflow for group news 84
approvingnews story 92submitting news story 92
authentication credentials, setting up 98authors
creating news story 88preconfigured group news responsibilities 83setting up group news 84
BBriefing pages
retrieving account and competitor news 102bulletins, out of date bulletins 110business components
foreign keys to child object, modifying 20foreign keys, modifying 19identical user key column names, example of
handling 21primary business components 111
business objectsprebuilt content objects, relation to 111
business serviceContent Project, about 26Content Project, list of services 123
Ccaching
hierarchical menus, configuring colors and icons 72
microsite caching, configuring 70mmlayout.txt File, adding new view
layouts 71canceling
page layout changes 65catalog category content object
about and business components 113catalog content object
about and business components 112company, associating with a news topic 104competitor news
associating with news topics 103retrieving 102
contentcontent item, adding or editing 30content, approving 31defined 14
content asset managementconfiguring 40content asset properties, viewing and
editing 37Content Asset Types view, about 40content asset, checking in and out 38content assets defined 33content sets, adding content assets to 35content sets, defining to contain content
assets 34home page, setting for a content set 36HTML content, editing 40scenario 33
Content Asset Types viewabout 40
content assetsContent Asset commands on menu
button 39content asset management, configuring 40content asset properties, viewing and
editing 37Content Asset Types view, about 40

Siebel Content Publishing Guide Version 8.0
Index ■ C
130
content asset, checking in and out 38content sets, adding to 35content sets, defining to contain content
assets 34content sets, setting home page 36defined 14, 33HTML content, editing 40page, adding to 61scenario 33search indexes, about creating 70
Content Centerabout and features 11auto complete workflow 25business components containing foreign keys
to child object, modifying 20business components containing foreign keys,
modifying 19business components, handling identical user
key column names 21content approval process (single approver)
workflow 24content assets, adding to Content Center 40content item approval process, about setting
up workflows 22content item state model 23content item, adding or editing 30content objects, setting up 19Content Project business service, about and
arguments 26content project status, reviewing 29content projects approval workflow,
starting 29content projects, creating 28content projects, publishing 31content staging environment, setting up 17Content Task Subprocess 24content types, setting up 27content, approving 31contributors and approvers, setting up 28integration objects, creating 21integration objects, modifying 22job roles and terms, table of 13process flow example 17process of setting up and using 16publication workflows, setting up 25scenario 15staging and production environment,
maintaining consistency 18terminology table 14
content item approval process, setting upabout 22auto complete workflow 25content approval (single approver)
workflow 24
Content Task Subprocess 24state model 23
content item, defined 14content objects
catalog category content object 113catalog content object 112content center, setting up for 19ContentBase Asset content object 113ContentBase Set content object 114ContentBase Type content object 115defined 14ERM Group News Item content object 116integration objects, creating for content
center 21literature content object 117microsite management page content
object 117prebuilt content objects 111price list content object 119product class content object 120product content object 120Product Feature content object 121product line content object 121resolution item content object 122solution content object 122volume discount content object 122
content pathcreating 85creating stages 86
Content Project business service 26AddContentItem method 123AddProject method 124Export method 124Import method 124PublishProject method 125RemoveContentItem method 125RemoveProject method 125StartProject method 126UpdateContentItem method 126UpdateProject method 127
content projectsapproval workflow, starting 29creating 28project status, reviewing 29publishing 31
Content Services, setting upabout 95assigning news topic administrator
responsibilities 97associating accounts and competitors with
news 103associating your company with a news
topic 104creating a News Package 99
Index ■ D
Siebel Content Publishing Guide Version 8.0 131
creating a news topic 100creating access groups 97creating user-defined new topics 106D&B Account Rationalization Services 105deactivating a news topic 102editing a news topic 101managing of new topics 100previewing a news topic 107process workflow example 96resolving problems 107retrieving account and competitor news 102scenario 95setting up host and authentication
credentials 98viewing a tracking profile summary 105
content setscontent assets, adding to content set 35defining to contain content assets 34home page, setting for a content set 36
content staging environment, setting upabout and required components 17staging and production environments,
maintaining consistency 18content types
defined 15setting up 27
ContentBase Content Asset content objectabout and business components 113
ContentBase Content Typeabout and business components 115
ContentBase Set content objectabout and business components 114
contributorsand approvers, setting up 28content item, adding or editing 30content, approving 31
Create Content tooladding HTML to a page 61
create menu toolmenu of links, creating 55using, about 55
credentials, verifying 108customizing
creating news topics 106
DD&B Account Rationalization Services 105Delete command 39deleting
page items 65pages and root-level pages 68
DTR files, caution about deleting 40D-U-N-S numbers, about and using for
account topics 102
EEAI objects
See integration objectsEnterprise Application Integration (EAI)
See integration objectsERM Group News Item
about and business components 116Export method 124external pages
link, creating to 60linking to, about 59
FFeature Articles news story format 88file
adding to a page 62foreign keys
foreign key to child object, modifying 20modifying business components with 19
Ggroup news
See news, managing group news
Hhierarchical menus
configuring colors and icons 72high interactivity mode
microsite pages, using in 46HIS argument value, changing to limit the
amount of news 109home page
setting content set for 36troubleshooting, news does not appear 107
host credentials, setting up 98HTML
adding to a page 61content assets, editing content 40
Iimage
adding to a page 62Import method 124ImportFileEnabled parameter 40ImportFilePath parameter 40importing
news story 91Insert Content tool
adding content assets 61Insert File tool

Siebel Content Publishing Guide Version 8.0
Index ■ L
132
using 62Insert Image tool
using 62Insert Template tool
using 54integration objects
creating 21modifying 22
LLink App View tool
using 58Link Existing Page tool
using 57literature
See Siebel Literaturetroubleshooting, out of date 110
literature prebuilt content objectabout and business components 117
Lock command 39log files
usage-tracking log files, reviewing 78
MMAX argument, about using to limit the
amount of news 109microsite management
content assets, adding to a page 61Content Center, about using with 47create menu tool, about using 55external pages, about linking to 59external pages, creating a link to 60features 44hierarchical menus, configuring colors and
icons 72HTML, adding to a page 61insert template tool, using 54inserting files and graphics 62menu of links, creating 55microsite caching, configuring 70microsite management page content
object 117microsite management page, creating
navigation links between 57mmlayout.txt File, adding new view
layouts 71multiple pages, adding templates to 70navigation bar style, changing 73new page, creating using Page Designer
view 52Page Administration view, about 48Page Designer and finished page, relationship
to 45
Page Designer, about 51page in the tree, finding and modifying its
properties 49page item, deleting 65page item, editing 64page items, about managing groups 66page items, grouping 66page layout, saving and canceling
changes 65page, deleting 68page, previewing 66page, publishing 67process flow example 48root-level page, creating 50scenario 47search indexes, about creating 70Siebel application, creating a link from a page
to a view 58standard and high interactivity mode, using
in 46structured content, about 43templates, about and creating 68templates, creating 69unstructured content, about 43
microsite management pagecreating navigation links between 57
mmlayout.txt Fileadding new view layouts 71
mobile Web client404 Not Found error 109
multiple pagesadding templates to 70
My News news story format 88
Nnavigation bar style
changing 73New Archive news story format 88news
news does not appear in Our Company section 109
news does not appear on home page 107troubleshooting, users receive too much
news 109viewing a tracking profile 105
news administratorsetting up group news 84setting up group news approver workflow 84
News Package, creating 99news story
approving 92creating 89creating content 90

Index ■ O
Siebel Content Publishing Guide Version 8.0 133
importing 91list of formats 88previewing 92restoring previous version 88setting up access 87submitting for approval 92viewing version history and previewing 88
news topicsassociating accounts and competitors
with 103associating your company with a news
topic 104creating 100creating user-defined topics 106D&B Account Rationalization Services 105deactivating 102editing 101managing 100news does not appear in Our Company
section 109previewing 107
news topics administrator, assigning responsibilities 97
news, managing group newsapproving news story 92creating content path 85creating stages for content path 86designating group news approvers 87managing versions and publishing 88news story, submitting for approval 92preconfigured group news responsibilities 83process workflow example 82scenario 81setting up access 87setting up group news approver workflow 84setting up group news responsibilities 84
OOur Company section, news does not
appear 109
Ppage
content assets, adding to a page 61content assets, inserting files and
graphics 62create menu tool, about using 55external pages, about linking to 59external pages, creating a link to 60HTML, adding to a page 61insert template tool, using 54menu of links, creating 55microsite management page, creating
navigation links between 57multiple pages, adding templates to 70new page, creating 52page items, about managing 66page items, deleting 65page items, editing 64page items, grouping 66page layout, saving and canceling
changes 65page, deleting 68page, previewing 66page, publishing 67Siebel application, creating a link from a page
to a view 58Page Designer
about 51content assets, adding to a page 61create menu tool, about using 55external pages, about linking to 59external pages, creating a link to 60finished page, relationship to 45HTML, adding to a page 61insert template tool, using 54inserting files and graphics 62menu of links, creating 55microsite management page, creating
navigation links between 57new page, creating 52page item, deleting 65page item, editing 64page items, about managing 66page items, grouping 66page layout, saving and canceling
changes 65page, deleting 68page, previewing 66page, publishing 67Siebel application, creating a link from a page
to a view 58page information
Page Administration view, about 48page in the tree, finding and modifying its
properties 49page items
grouping 66managing, about 66page, deleting 68page, previewing 66page, publishing 67
page layoutsaving and canceling page layout
changes 65prebuilt content objects
about and business components 111

Siebel Content Publishing Guide Version 8.0
Index ■ R
134
previewing a page 66price lists
price list content object 119pricing
volume discount content object 122problems
See troubleshootingProduct Feature
about and business components 121products
product class content object 120product content object 120product line content object 121
publishingstory 88
publishing a page 67PublishProject method 125
RRemoveContentItem method 125RemoveProject method 125Replace command 39resolution item content object 122root-level page
about 48creating 50deleting 68
Run-time Eventsetting up to collect usage data for views 76
SSave to File command 39saving
page layout changes 65search indexes
about creating 70server configuration, verifying 108Siebel application
link, creating from a page to a view 58Siebel Company Vocabulary, about and
accessing 102Siebel Content Services data host, verifying
connection 107Siebel eContent Services
See Content Services, setting upSiebel mobile Web client, 404 Not Found
error 109Siebel XML-based publication service
setting up Content Center publication workflows 25
solutionprebuilt content object 122
standard mode
using microsite pages in 46StartProject method 126structured content about 43submitting
news story for approval 92Symbolic URL HIST argument, about using to
limit news 109Symbolic URL MAX, about using to limit
news 109system preferences
usage tracking, enabling and configuring 77
Ttemplates
about and applying 68creating 69insert template tool, using 54multiple pages, adding templates to 70
Today’s Headlines news story format 88Top Story news story format 88tracking profile
viewing summary 105troubleshooting
404 Not Found error 109literature and bulletins are out of date 110news does appear in Our Company
section 109news does not appear on home page 107users receive too much news 109verifying data host connection 107verifying server connection 108verifying Web connection and
credentials 108
UUnlock command 39unstructured content, about 43UpdateContentItem method 126UpdateProject method 127usage collection
about 75example process tasks 76scenario 76system preferences, enabling and
configuring 77terminology and style table 76usage data, collecting for views 76usage-tracking log files, reviewing 78
user-defined news topics, creating 106
Vversion
restoring previous version 88

Index ■ W
Siebel Content Publishing Guide Version 8.0 135
viewing history and previewing 88volume discount content object
about and business components 122
WWeb connection, verifying and
credentials 108Web pages, managing
See microsite managementworkflows
auto complete 25
content approval (single approver) workflow 24
content item approval process, about setting up 22
content item state model 23Content Task Subprocess 24publication workflows, setting up 25
Yyour company, associating with a news
topic 104

Siebel Content Publishing Guide Version 8.0
Index ■ Y
136


![Configuring Siebel Open UI - Oracle · 1[]Siebel CRM Configuring Siebel Open UI Siebel Innovation Pack 2015 E52417-01 May 2015](https://static.fdocuments.net/doc/165x107/5f0d0b457e708231d438667d/configuring-siebel-open-ui-oracle-1siebel-crm-configuring-siebel-open-ui-siebel.jpg)