
Shopping – Contract Order - Texas A&M University · Shopping – Contract Order . Table of...
15
Shopping – Contract Order Table of Contents How to create a Contract Order ................................................................................................. 1 Quick Steps ......................................................................................................................... 1 Adding Contract items to your cart ................................................................................... 1-2 Shopping Cart Header...................................................................................................... 3-5 Required Fields .............................................................................................................. 3 Shopper View ................................................................................................................ 4 Shopper Extended View ................................................................................................ 5 Department Allocator View ............................................................................................ 5 Shopping Cart Review......................................................................................................... 6 Checkout Summary Page .............................................................................................. 7-12 Billing Address ............................................................................................................... 7 Shipping Address ........................................................................................................... 8 Account Codes.......................................................................................................... 9-10 Internal Notes and Attachments................................................................................... 11 External Notes and Attachments ................................................................................. 12 Submitting Order .......................................................................................................... 13-14
Transcript of Shopping – Contract Order - Texas A&M University · Shopping – Contract Order . Table of...

Shopping – Contract Order
Table of Contents How to create a Contract Order ................................................................................................. 1
Quick Steps ......................................................................................................................... 1
Adding Contract items to your cart ................................................................................... 1-2
Shopping Cart Header ...................................................................................................... 3-5
Required Fields .............................................................................................................. 3
Shopper View ................................................................................................................ 4
Shopper Extended View ................................................................................................ 5
Department Allocator View ............................................................................................ 5
Shopping Cart Review ......................................................................................................... 6
Checkout Summary Page .............................................................................................. 7-12
Billing Address ............................................................................................................... 7
Shipping Address ........................................................................................................... 8
Account Codes.......................................................................................................... 9-10
Internal Notes and Attachments ................................................................................... 11
External Notes and Attachments ................................................................................. 12
Submitting Order .......................................................................................................... 13-14

Back to Table of Contents
1
How to Order from a Contract Quick steps:
1. Enter Contract Number, Supplier Name, or Keyword in shop search box (pg. 1) 2. Enter Quantity next to the item (pg. 2) 3. Click “Add to Cart” (pg. 2) 4. Repeat steps 2 & 3 until all items are added to cart (pg. 2) 5. Click on your shopping cart (pg. 2) 6. Click “View My Cart” (pg. 2) 7. Enter Header Information (pg. 3-5) 8. Click “Save” (pg. 6) 9. Review items and confirm the Supplier information (pg. 6) 10. Click “Proceed to Checkout” (pg. 6) 11. Check the General and Shipping information (pg. 7-8)
a. Correct information if needed 12. Click “Edit” in the Accounting Codes section (pg. 9-10)
a. Enter or correct accounting codes b. Click “Recalculate and Save”
13. Enter Internal Notes and Attachments (pg. 11) 14. Enter External Notes and Attachments (pg. 12) 15. After everything has been entered click “Submit Order” (pg. 13)
A contract has been set up by Procurement Services and you need to purchase items from this contract. You or someone in your department should know the contract number (contracts were call the Master Orders in FAMIS).
Enter the contract number in the Shop “Everything” blank. Then click “Go”.

Back to Table of Contents
2
Click “View My Cart”.
Click the Shopping Cart.
All the items for the contract entered will show up. Enter in the quantity. Click “Add to Cart”. Repeat on each line item that needs to be ordered.
Here it shows the item was added to your cart.
To see complete terms and other details about the contract, click “more info” on any line item.
NOTE: Using Supplier Name or Keyword for your search may produce results not associated with the contract. The Contract Number will not appear with non-associated items.

Back to Table of Contents
3
Depending on your Role your Shopping Cart might look different than the cart below, that is, it may have fewer header fields. For the different Role-specific Cart views see pages 4-5.
Required Fields Shopper: The only field that is Required to be filled in by the Shopper is “Order Category”. Department Allocator: “Order Category”, “Fund Type”, “Ship To” and “Bill To” are Required
fields if you are a Department Allocator.
Here is your cart number. This will become the Requisition number when the cart is submitted.
The cart amount and how many items are in your cart is shown here at the top.

Back to Table of Contents
4
Shopper View
Change the Cart Name to something that makes sense to you or what your department prefers. Ex. YourInitials-Company-Item Type
Cart Description/Purpose: Enter what the item is for or whom it is for. Ex. Chairs for Lab 201
Order Category is a required field for all roles. Click on “Select from all values…” then select either “Regular” or “Confirming – Do Not Distribute”. Regular-Supplier will receive a copy of the Purchase Order. Confirming-Do Not Distribute-PO will be created but the supplier will not receive a copy.
Fund Type is designated by the account number(s) used. Shoppers might not know what the Fund Type is but Department Allocators will know and will select this information. Click on “Select from all values…” and select Federal, Local, or State.
Report Reference A & B are alpha-numeric and can be used to enter a second set of books number, Project Name, or anything else you would like. What is nice about using these is you can search by them in the Advanced Document Search page.
Click on the box next to “Pre-Pay & Add” if your department allows the supplier to charge shipping on this particular order, but could not provide an estimate or exact shipping amount. If you receive a quote that shows estimated shipping costs add it as a line item in lieu of using “Pre-Pay & Add”. When Pre-Pay & Add is checked FMO will automatically pay the amount of freight charges on the invoice.
Contract orders can either be Regular or Confirming. If you mark this as a Confirming Order you will need to attach the Invoice on the next screen under Internal Attachments.

Back to Table of Contents
5
Shopper-Extended View
Department Allocator View
Fund Type is required if you are a Department Allocator.
Check the “Bypass Dept Allocator” box if you do not need it to go to another Department Allocator. If you do not check this box it will go into the Department Allocator step and you will not be able to approve it. NOTE: Only users with the Department Allocator role will see this box.
If you have an order that is less than $10K and you want Procurement Services to bid the item(s) out or otherwise determine a source this box will need to be checked.
Enter in the start and end date if this requisition will is for a contract or copier order.
Enter the AggieBuy Contract Number or, if still valid, the FAMIS Master Order.
Rush the Pymt Process: Check this box if you need the Payment Process to be rushed. This will not rush the requisition through just the payment. Also, enter into “Internal Notes” the reason the payment needs to be rushed.
If the requisition is an Emergency or Sole Source you will need to check the appropriate box. The applicable form will need to be filled out and attached in “Internal Notes and Attachments”. The forms are located may be accessed by hovering your mouse over the field name or from: AggieBuy.tamu.edu/forms/
Only check “Do Not Encumber” if this requisition is going to be turned into a contract.
Check the “Item for Resale” box if you intend to resell all the items on this requisition.
If there is a Special Payment Method you will click on “Select from all values…” and choose the correct one. Also, in Internal Notes you will enter the information needed to fulfill the request.
Values:
Accounting Only Enclosure (copy) to accompany Check Enclosure (original) to accompany Check Foreign Bank Draft Manual Check Request Overnight Check Pick-up Check Wire Transfer – Foreign Currency Wire Transfer – US Dollar

Back to Table of Contents
6
Once the Header information is entered and you have clicked “Save” you can add or edit your items.
Contract orders can either be Regular or Confirming. If you mark this as a Confirming Order you will need to attach the Invoice on the next screen under Internal Attachments.
When the Header information is filled out and the items look correct click “Proceed to Checkout”.
Be sure to click “Save” before doing anything else.
The contract number for the item(s) selected will show in the Contract Number area and with each line item.
If you would like to add more contract items click the “Home” icon and follow the instructions on page 1.
Back to Table of Contents
7
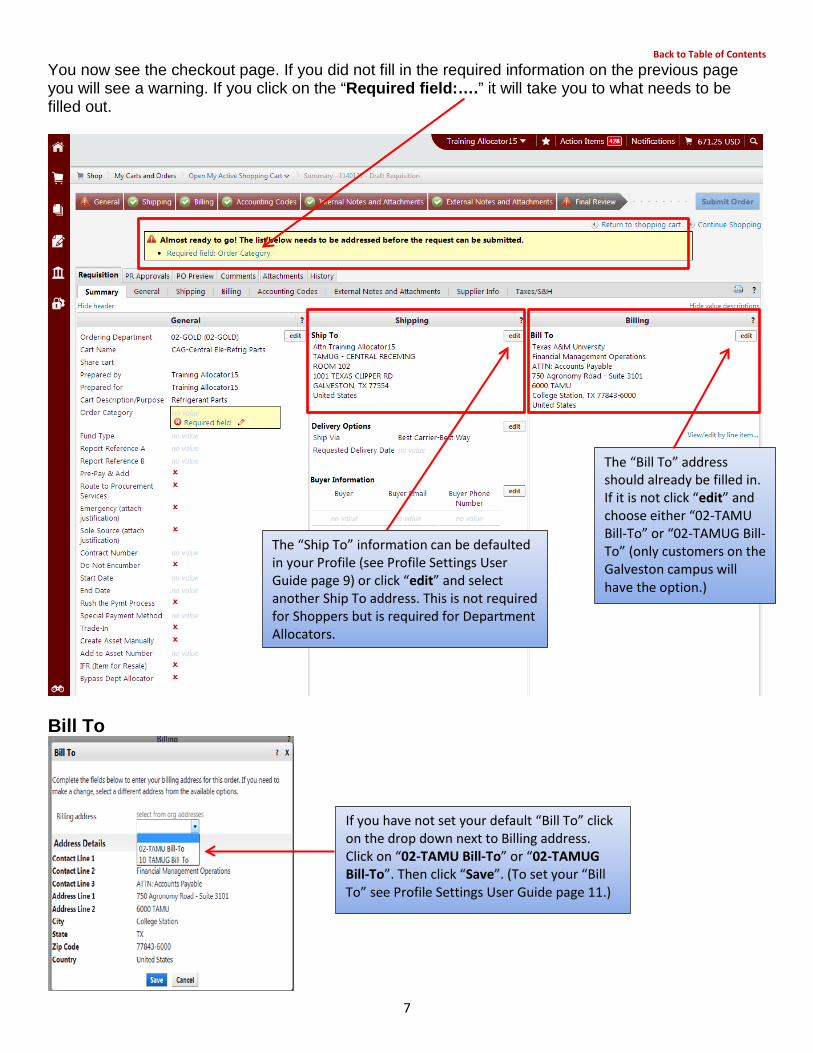
You now see the checkout page. If you did not fill in the required information on the previous page you will see a warning. If you click on the “Required field:….” it will take you to what needs to be filled out.
Bill To
The “Ship To” information can be defaulted in your Profile (see Profile Settings User Guide page 9) or click “edit” and select another Ship To address. This is not required for Shoppers but is required for Department Allocators.
The “Bill To” address should already be filled in. If it is not click “edit” and choose either “02-TAMU Bill-To” or “02-TAMUG Bill-To” (only customers on the Galveston campus will have the option.)
If you have not set your default “Bill To” click on the drop down next to Billing address. Click on “02-TAMU Bill-To” or “02-TAMUG Bill-To”. Then click “Save”. (To set your “Bill To” see Profile Settings User Guide page 11.)

Back to Table of Contents
8
Ship To
3. Enter in “02-“ followed by your FAMIS 3 digit address code. If you do not know your address code you can enter in your department name or mail stop. Then click “Search”.
4. Locate the address you are looking for and click “select”.
5. The Attn information and Room information can be modified. If you would like to save this address for future use click on the check box next to “Save this address for future use”. Click “Save”.
When you click “Save this address for future use” you will see a check box to make the address the default address. Do Not change the Name of the address.
If your profile has more than one Ship To click on the drop down and choose the one you want to use.
“Attn”and “Room” lines can be changed.
1. To find other Ship To addresses click on “click here”.
2. Now click “select from org addresses”.

Back to Table of Contents
9
Accounting Codes
Will show the current Fiscal Year.
Member ID is the campus code.
Click “Edit” to enter/change the Department and Account Codes.
If your Department Code is not set-up as a default in your Profile you need to either “Select from Profile values…” or “Select from all values…”. You cannot type it in the blank.
If you have multiple Department Codes in your profile click on “Select from profile values…” Then click the dropdown and select the code you need.
To find a Department Code click not in your profile “Select from all values…” enter the 4 to 5 alpha department code preceded by the campus code. Click “Search”.
When the correct Department Code is found click “select”.

Back to Table of Contents
10
If you have multiple Account Codes in your profile click “Select from profile values…” Then click the dropdown and click the code you need.
To find an Account Code not in your profile click “Select from all values…” and enter the 6 digit account code preceded by the campus code. Click “Search”.
When the desired Account Code is found click “select”.
When everything is filled in click “Recalculate and Save”. Double check that it saved the information you selected.
If your Account Code is not set-up as a default in your Profile you need to either “Select from Profile values…” or “Select from all values…”. If you enter in the account code be sure to check the account after you click “Recalculate and Save”.
If you have 10 or fewer accounts a dropdown box will appear allowing you to click on the account number you want.

Back to Table of Contents
11
Internal Notes and Attachments
Now you can see the note you entered and the file(s) you attached. To view the attachment, click the file name. The file can also be removed if it incorrect.
Internal Notes are used for: 1. New Supplier information 2. Trade in information 3. Suggested Supplier list 4. Reason for Rushed Payment 5. Information for Special Payment
Method 6. Any other notes that are pertinent
to the requisition
Enter in the information and click “Save”. Once you hit Save the information you entered is permanently saved in the document’s history for anyone to view.
1. Click “Add Attachment”
2. Click “Select files…”
3. Select one or multiple files. Click the first file then hold the Ctrl key down and choose others. Then click “Open”.
4. Your files will show up and then you click “Save Changes”.
Once the attachments are present you can Remove or Move them to the External Attachment side.
Back to Table of Contents
12
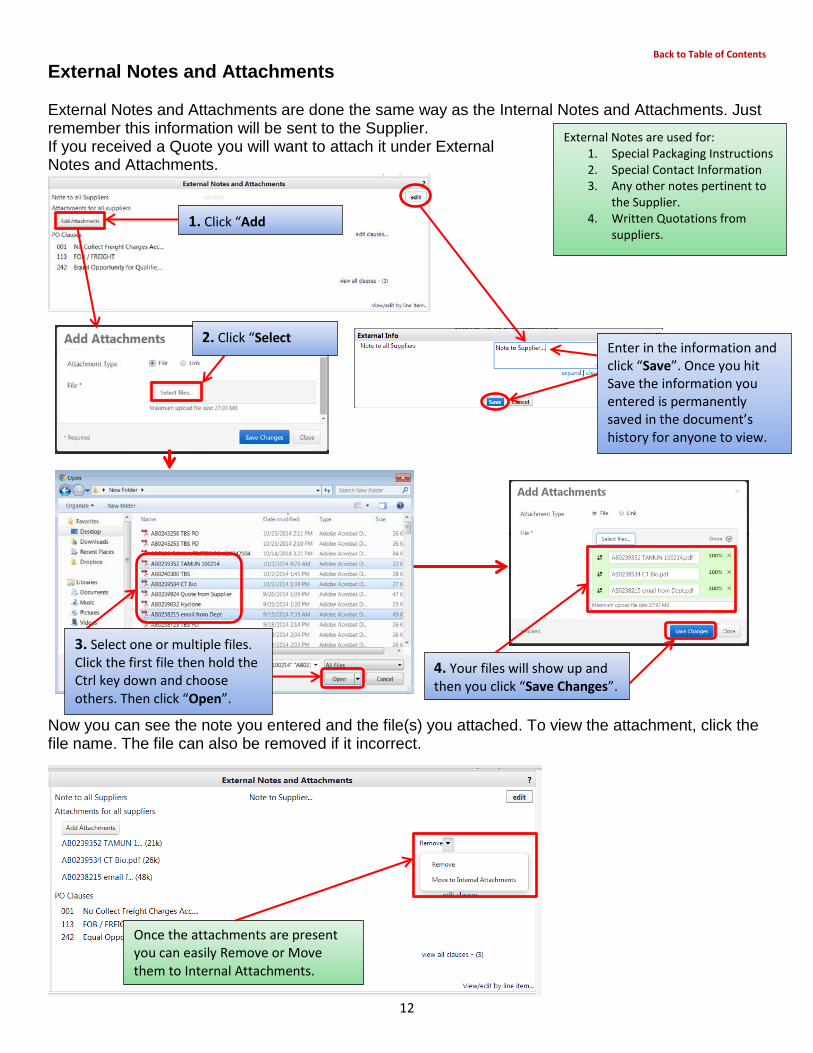
External Notes and Attachments External Notes and Attachments are done the same way as the Internal Notes and Attachments. Just remember this information will be sent to the Supplier. If you received a Quote you will want to attach it under External Notes and Attachments.
Now you can see the note you entered and the file(s) you attached. To view the attachment, click the file name. The file can also be removed if it incorrect.
External Notes are used for: 1. Special Packaging Instructions 2. Special Contact Information 3. Any other notes pertinent to
the Supplier. 4. Written Quotations from
suppliers.
Enter in the information and click “Save”. Once you hit Save the information you entered is permanently saved in the document’s history for anyone to view.
1. Click “Add
2. Click “Select
3. Select one or multiple files. Click the first file then hold the Ctrl key down and choose others. Then click “Open”.
4. Your files will show up and then you click “Save Changes”.
Once the attachments are present you can easily Remove or Move them to Internal Attachments.

Back to Table of Contents
13
After you have everything filled out and attached click “Submit Order”.

Back to Table of Contents
14
After clicking Submit Order you will see the “Congratulations!” page. This lets you know the requisition has been sent to the next step in the approval workflow.


