Setup and use of New MRP - olesendata.dkolesendata.dk/DropBox/NewMRP/NewMRP_SetupAndUse_en.pdf ·...
45
Setup and use of New MRP This document describes how New MRP is installed, initiated and used. Date May 1 2013.
Transcript of Setup and use of New MRP - olesendata.dkolesendata.dk/DropBox/NewMRP/NewMRP_SetupAndUse_en.pdf ·...
Setup and use of New MRP
This document describes how New MRP is installed, initiated and used. Date May 1 2013.
Setup and use
2 / 45
Table of Content Introduction ....................................................................................................................................................... 4
Implementation strategy ............................................................................................................................... 4
Initiation and start-up of New MRP................................................................................................................... 5
Activation of companies ................................................................................................................................ 6
Setup of transfer times between companies ................................................................................................ 7
Setup of parameters ...................................................................................................................................... 8
Integration level......................................................................................................................................... 8
Setup of concurrency ............................................................................................................................... 10
Runtime execution of Master scheduling ................................................................................................ 11
Advanced parameter setup ..................................................................................................................... 11
Setup number sequence .................................................................................................................................. 13
Activation of master plans ............................................................................................................................... 13
Extended setup of master plans .................................................................................................................. 14
The tab page ”Setup” .............................................................................................................................. 14
Advanced setup ....................................................................................................................................... 16
Family planning setup .............................................................................................................................. 19
Tab page ”Action message” ..................................................................................................................... 20
Tab page ”Last update” ........................................................................................................................... 21
Inquiries and functions related to master plan activation .......................................................................... 21
Sourcing setup ................................................................................................................................................. 25
Sourcing groups ........................................................................................................................................... 26
Sourcing items ............................................................................................................................................. 26
Copy requirements .......................................................................................................................................... 27
Periods ............................................................................................................................................................. 28
Family groups .................................................................................................................................................. 29
Defining family groups ................................................................................................................................. 31
User access security setup ............................................................................................................................... 33
Start background Master scheduling engine ................................................................................................... 33
Startup remarks and database statistics ......................................................................................................... 34
Monitoring the online Master scheduling ....................................................................................................... 35
Regenerative Master scheduling ............................................................................................................. 36
New MRP compared to the standard Master scheduling ............................................................................... 36
Setup and use
3 / 45
Comparing performance ......................................................................................................................... 37
Static and dynamic master plans ............................................................................................................. 37
Planned order firming and handling ................................................................................................................ 37
Planned order view ...................................................................................................................................... 37
Planned order dialog box......................................................................................................................... 41
Firming log ................................................................................................................................................... 45
Setup and use
4 / 45
Introduction The document describes how the New MRP module is set up and used after installation. For a description
of the technical installation, please refer to the installation document. The description applies to all
versions of Dynamics Ax, unless stated otherwise.
Implementation strategy The module allows different implementation methods. Primarily, an implementation strategy must be
defined; this strategy correlates completely with the specific situation.
For an existing installation, i.e. an installation that already uses standard Master scheduling in one or more
companies, a suitable approach would generally be to use a duplicate strategy – meaning that standard
Master scheduling and New MRP Master scheduling are used simultaneously for a period of time.
Initially, New MRP can be setup to run just one company even though the installation contains many
companies. In addition, the setup options make it possible to give access to individually selected users only,
in respect to the Master scheduling, net requirements and planned orders coming from the New MRP
module.
The users´ everyday lives are thus not directly affected by the New MRP module installation. The New MRP
module is designed as a 100% "add-on" module, located on the side of the existing installation. In this way
the introduction of the New MRP can be controlled and managed individually and adapted to the specific
needs and requirements of the company implementing New MRP.
New MRP contains a number of extended configuration options compared to standard Master scheduling.
A duplicate strategy allows the super user, for a trial period, to "experiment" with the setup and test
different setups while continuously having the possibility to compare the New MRP result with the result
calculated by the standard Master scheduling.
When the first company is up and running, the super user can change the setting, making New MRP visible
to all users in the company, but still use the existing standard Master scheduling calculation as Master for
new purchases and productions.
New MRP runs "silently" in the background while users are able to view the New MRP result and thus
become familiar with the New MRP Master scheduling.
After a period of time, when all users feel comfortable with the new MRP result, the setup can be changed
making the New MRP the primary Master scheduling and setting standard Master scheduling to run
"silently" in the background
As long as either standard Master scheduling or New MRP Master scheduling as a minimum runs "silently"
in the background, it is possible to continuously change the primary Master scheduling.
This means that you stepwise can apply the New MRP module company by company. All in all, New MRP
consequently supports the possibility of a secure implementation strategy. All companies and countries
will not be “hit” all at once. The module can be applied one company at the time without any rush.
Setup and use
5 / 45
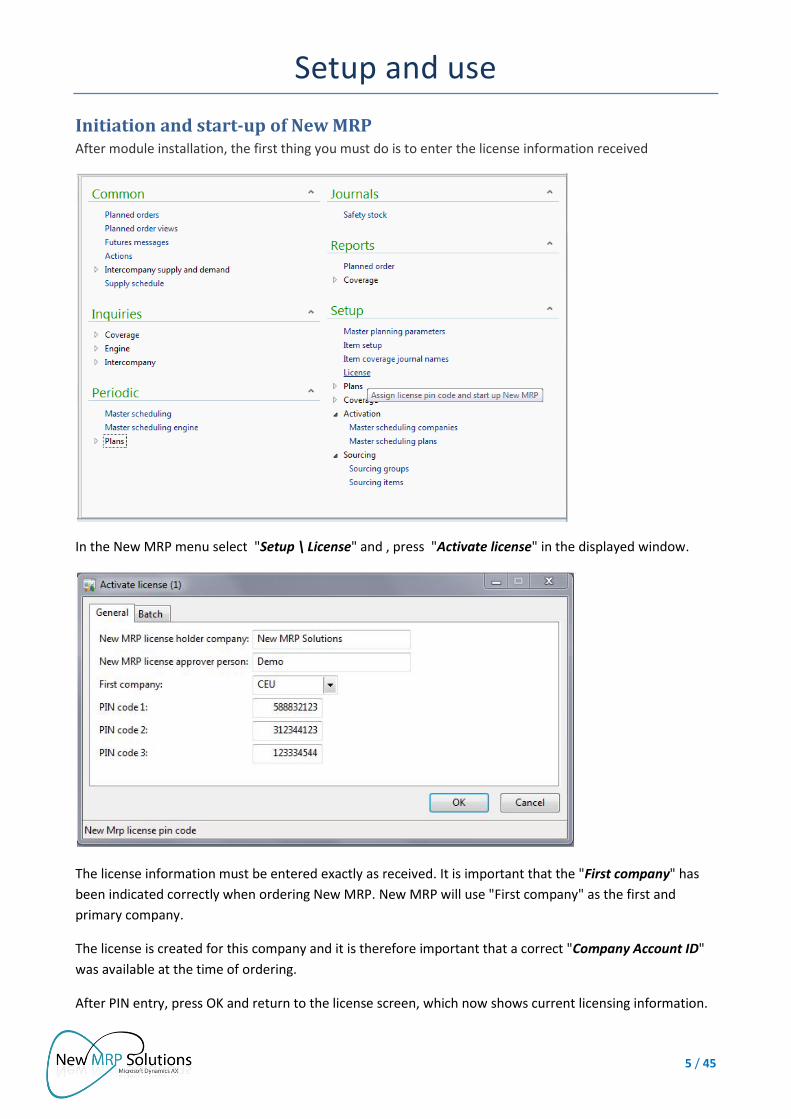
Initiation and start-up of New MRP After module installation, the first thing you must do is to enter the license information received
In the New MRP menu select "Setup \ License" and , press "Activate license" in the displayed window.
The license information must be entered exactly as received. It is important that the "First company" has
been indicated correctly when ordering New MRP. New MRP will use "First company" as the first and
primary company.
The license is created for this company and it is therefore important that a correct "Company Account ID"
was available at the time of ordering.
After PIN entry, press OK and return to the license screen, which now shows current licensing information.
Setup and use
6 / 45
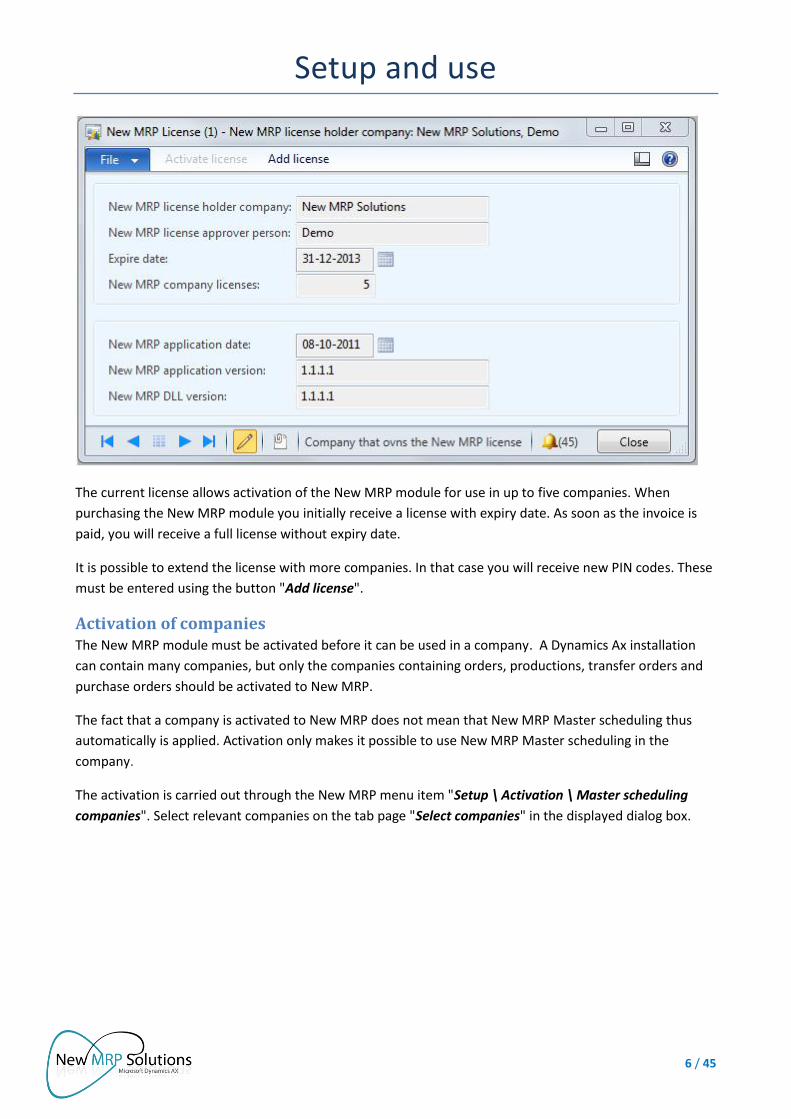
The current license allows activation of the New MRP module for use in up to five companies. When
purchasing the New MRP module you initially receive a license with expiry date. As soon as the invoice is
paid, you will receive a full license without expiry date.
It is possible to extend the license with more companies. In that case you will receive new PIN codes. These
must be entered using the button "Add license".
Activation of companies The New MRP module must be activated before it can be used in a company. A Dynamics Ax installation
can contain many companies, but only the companies containing orders, productions, transfer orders and
purchase orders should be activated to New MRP.
The fact that a company is activated to New MRP does not mean that New MRP Master scheduling thus
automatically is applied. Activation only makes it possible to use New MRP Master scheduling in the
company.
The activation is carried out through the New MRP menu item "Setup \ Activation \ Master scheduling
companies". Select relevant companies on the tab page "Select companies" in the displayed dialog box.
Setup and use
7 / 45
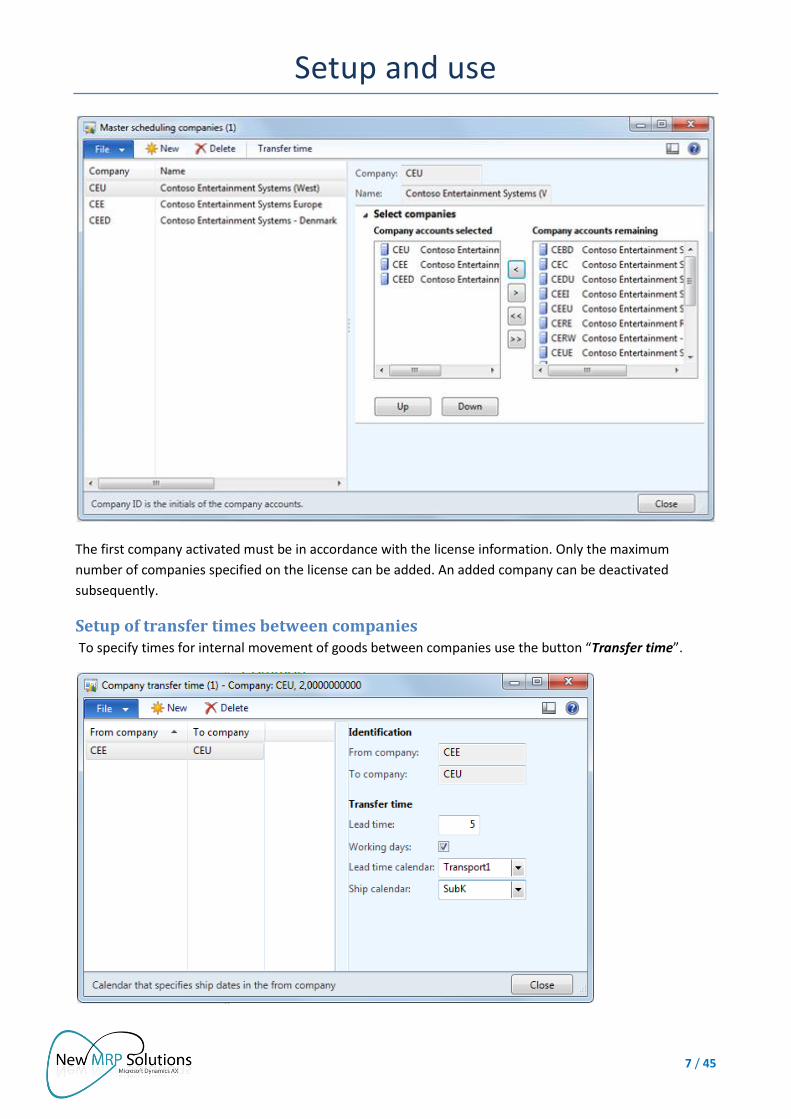
The first company activated must be in accordance with the license information. Only the maximum
number of companies specified on the license can be added. An added company can be deactivated
subsequently.
Setup of transfer times between companies To specify times for internal movement of goods between companies use the button “Transfer time”.
Setup and use
8 / 45
Two calendars can be specified. The table containing transfer times is a global table and it is therefore
necessary to insure that the specified calendars exist and are maintained in all relevant companies.
It is possible to specify: From company: The company from where the goods are moved. To company: The company to where the goods are moved.
Lead time: Transfer time in days.
Working days: Specifies whether the transfer time is specified in calendar days or working days.
Lead time calendar: Here a calendar for planning the lead time can be specified. In case no calendar is
specified, the system uses the calendar from the items coverage group or warehouse.
Ship calendar: Here a specific shipment calendar can be specified. After the planning of ”Lead time”, the
system will search backwards in this calendar to determinate a possible shipment date in the “From
company”. If no calendar is specified, the system uses the calendar from the items coverage group or
warehouse.
The transfer time is used to calculate the requirement date in the company that is fulfilling the demand.
The latest order date in the company that generated the demand is calculated as if it was an ordinary
planned purchase order.
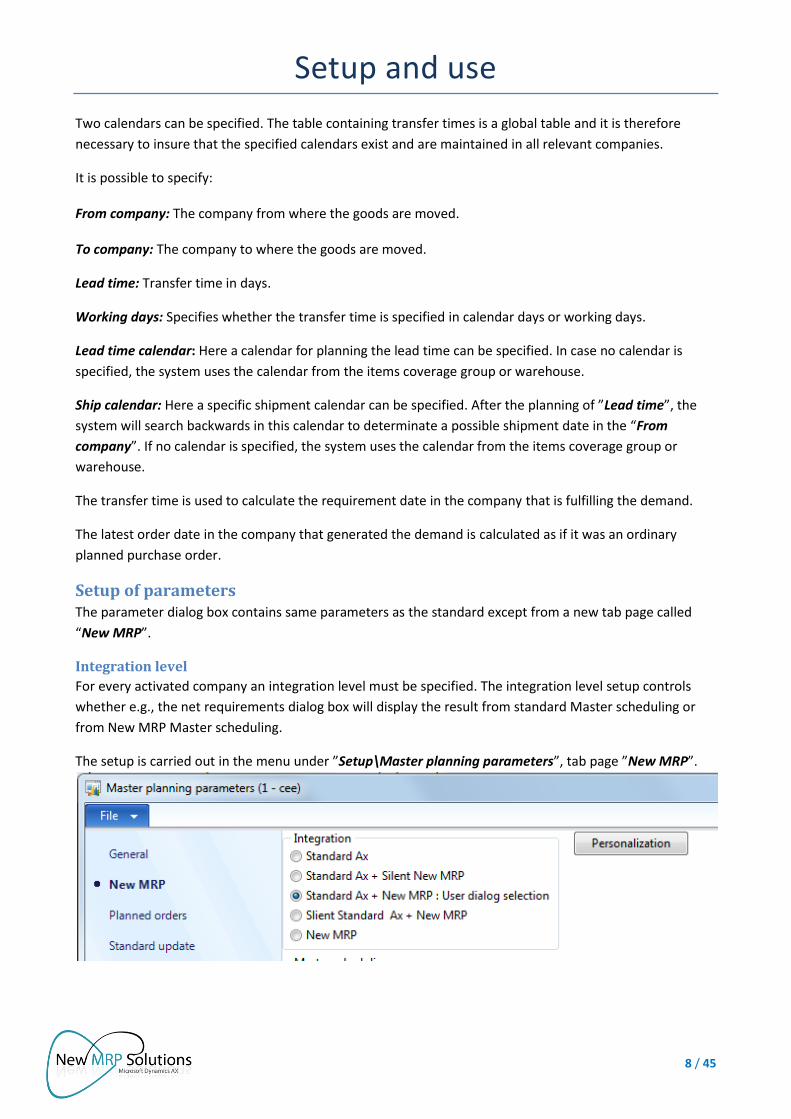
Setup of parameters The parameter dialog box contains same parameters as the standard except from a new tab page called
“New MRP”.
Integration level
For every activated company an integration level must be specified. The integration level setup controls
whether e.g., the net requirements dialog box will display the result from standard Master scheduling or
from New MRP Master scheduling.
The setup is carried out in the menu under ”Setup\Master planning parameters”, tab page ”New MRP”.
Setup and use
9 / 45
Integration level must be specified in the box ”Integration”. The parameter can be changed subsequently.
The New MRP module will not affect the standard Dynamics Ax installation as long as the parameter is
”Standard Ax”. Only when the parameter is set to ”New MRP”, the standard Master scheduling can no
longer be used in the current company.
If ”Standard Ax” is selected, New MRP cannot be used in the current company.
If ”Standard Ax + Silent New MRP” is selected, the result from the standard Dynamics Ax is shown and
used, but New MRP is updated in the background and the result can be viewed from the New MRP main
menu. This option is typically selected for the start-up phase.
If ”Standard Ax + New MRP : User dialog selection” is selected, it is up to the user to decide whether the
result from the standard Master scheduling or New MRP should be shown. This setup can with advantage
be used in a running installation, as it will enable the use of two master plans at the same time.
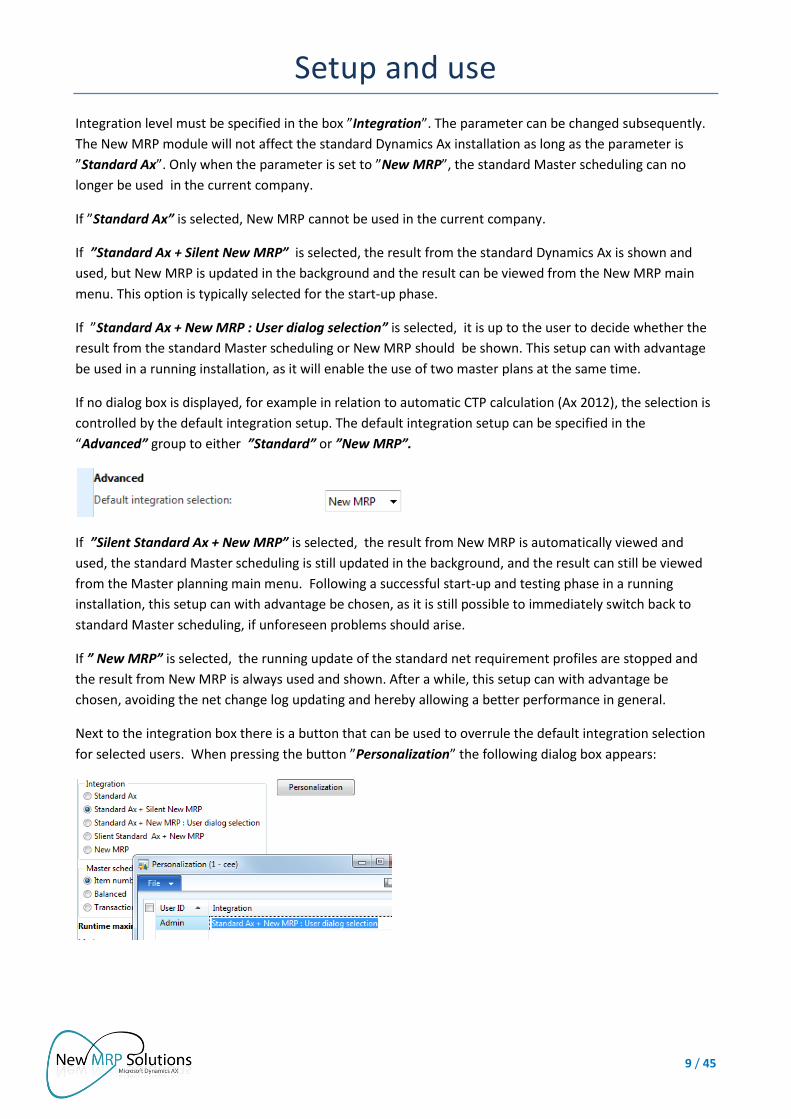
If no dialog box is displayed, for example in relation to automatic CTP calculation (Ax 2012), the selection is
controlled by the default integration setup. The default integration setup can be specified in the
“Advanced” group to either ”Standard” or ”New MRP”.
If ”Silent Standard Ax + New MRP” is selected, the result from New MRP is automatically viewed and
used, the standard Master scheduling is still updated in the background, and the result can still be viewed
from the Master planning main menu. Following a successful start-up and testing phase in a running
installation, this setup can with advantage be chosen, as it is still possible to immediately switch back to
standard Master scheduling, if unforeseen problems should arise.
If ” New MRP” is selected, the running update of the standard net requirement profiles are stopped and
the result from New MRP is always used and shown. After a while, this setup can with advantage be
chosen, avoiding the net change log updating and hereby allowing a better performance in general.
Next to the integration box there is a button that can be used to overrule the default integration selection
for selected users. When pressing the button ”Personalization” the following dialog box appears:
Setup and use
10 / 45
The integration selection can be differentiated for specific users compared with the general setup. In a
start-up phase, this setup can be used with advantage, presenting one or more super users for this dialog
box:
The setup specified in the parameter dialog box will be shown to all other users.
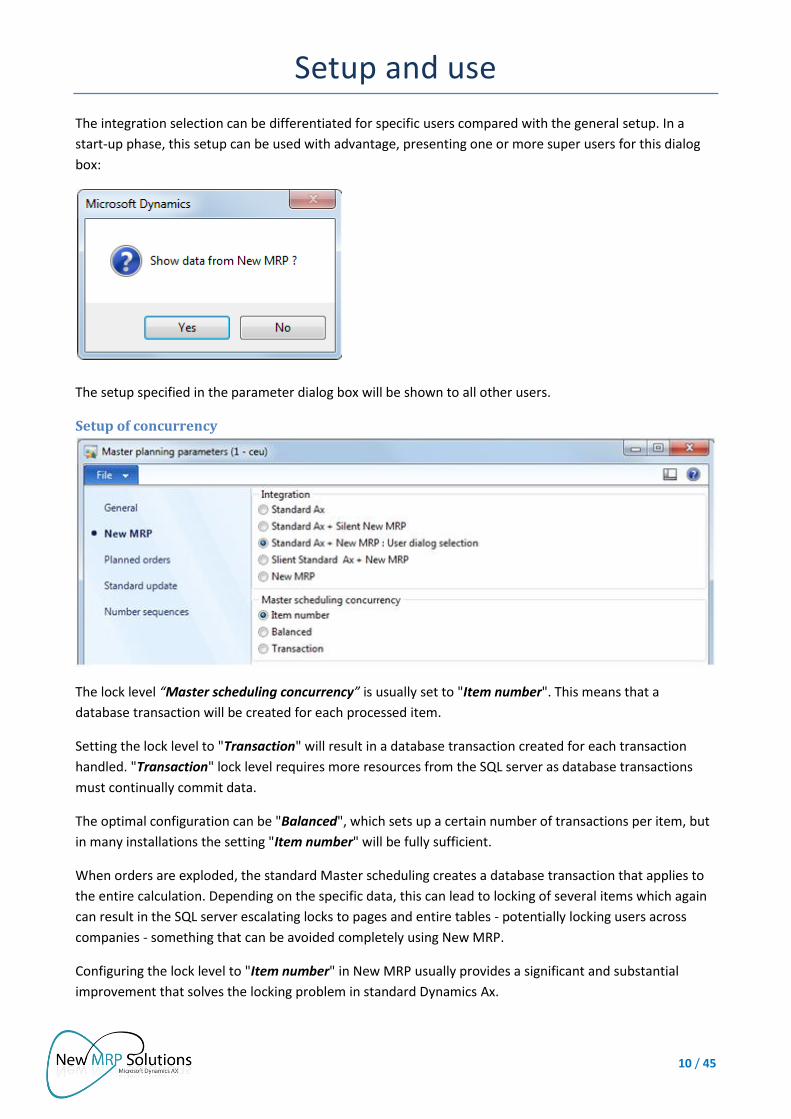
Setup of concurrency
The lock level “Master scheduling concurrency” is usually set to "Item number". This means that a
database transaction will be created for each processed item.
Setting the lock level to "Transaction" will result in a database transaction created for each transaction
handled. "Transaction" lock level requires more resources from the SQL server as database transactions
must continually commit data.
The optimal configuration can be "Balanced", which sets up a certain number of transactions per item, but
in many installations the setting "Item number" will be fully sufficient.
When orders are exploded, the standard Master scheduling creates a database transaction that applies to
the entire calculation. Depending on the specific data, this can lead to locking of several items which again
can result in the SQL server escalating locks to pages and entire tables - potentially locking users across
companies - something that can be avoided completely using New MRP.
Configuring the lock level to "Item number" in New MRP usually provides a significant and substantial
improvement that solves the locking problem in standard Dynamics Ax.
Setup and use
11 / 45
Runtime execution of Master scheduling
The New MRP online Master scheduling will re-calculate all items where the demands have changed. This is
handled by running the Master scheduling engine in batch; this process can be a couple of minutes delayed.
Therefore, the batch execution cannot be used for ad hoc calculations and queries.
When the dialog box for order explosion is called in New MRP, the Master scheduling is therefore executed
directly for the current item. If the calculation creates requirements for the derived item, these can also be
addressed directly and immediately.
In the parameter dialog box you can set up parameters for the direct calculation of derived item
requirements.
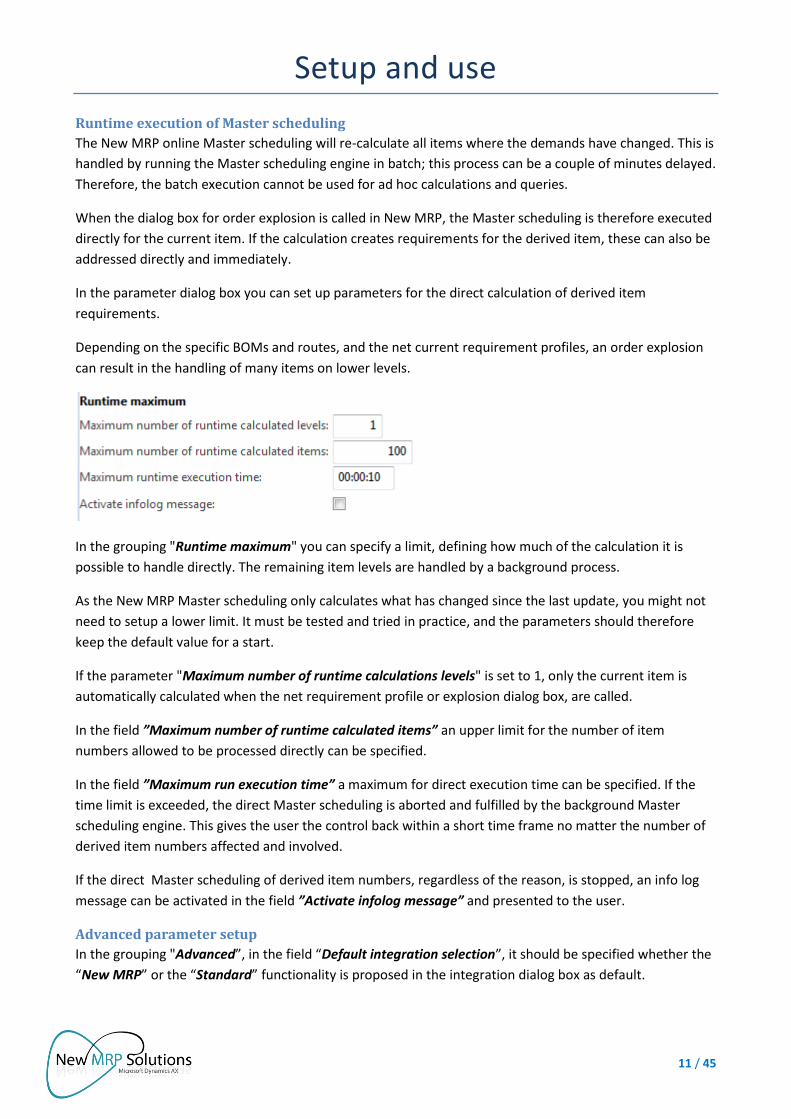
Depending on the specific BOMs and routes, and the net current requirement profiles, an order explosion
can result in the handling of many items on lower levels.
In the grouping "Runtime maximum" you can specify a limit, defining how much of the calculation it is
possible to handle directly. The remaining item levels are handled by a background process.
As the New MRP Master scheduling only calculates what has changed since the last update, you might not
need to setup a lower limit. It must be tested and tried in practice, and the parameters should therefore
keep the default value for a start.
If the parameter "Maximum number of runtime calculations levels" is set to 1, only the current item is
automatically calculated when the net requirement profile or explosion dialog box, are called.
In the field ”Maximum number of runtime calculated items” an upper limit for the number of item
numbers allowed to be processed directly can be specified.
In the field ”Maximum run execution time” a maximum for direct execution time can be specified. If the
time limit is exceeded, the direct Master scheduling is aborted and fulfilled by the background Master
scheduling engine. This gives the user the control back within a short time frame no matter the number of
derived item numbers affected and involved.
If the direct Master scheduling of derived item numbers, regardless of the reason, is stopped, an info log
message can be activated in the field ”Activate infolog message” and presented to the user.
Advanced parameter setup
In the grouping "Advanced”, in the field “Default integration selection”, it should be specified whether the
“New MRP” or the “Standard” functionality is proposed in the integration dialog box as default.

Setup and use
12 / 45
The setup is also used to select functionality when the integrating dialog box is not displayed and presented
to the user.
The parameter "Sum Up derived demands" determines if unfolded phantom items should be summed up
before the creation of planned orders.
If the same raw materials are used more than once in a BOM hierarchy, the Master scheduling can merge
these into one requirement. This reduces the number of requirements to be dealt with, resulting in better
performance.
A raw material used in several phantom BOM items is typically consumed at different operation numbers. It
is therefore possible to specify whether it is appropriate to maintain the operation number in the field
“Assign BOM line oper.no”. When the operation number is retained, it decreases the chance of
requirements being merged. The following selections exist:
”If route exists”: The operation number is only assigned if a production route has been defined for the
current phantom item.
”Never”: Operation numbers are never assigned on derived item demands. All derived demands for the
same item number can be summed up and merged.
”Always”: Operation numbers are always assigned on derived and exploded item demands. If the phantom
items have been linked to different operations, update of summation and merging will not be possible as all
items are consumed under different operation numbers.
In relation to this setup, it is important to note that the requirement date on derived demands are
calculated based on the lead time specified in the item master for the phantom item unless the exploded
item demands are connected to a scheduled operation in a route.
In some situations, if dealing with many phantom items, it is therefore necessary to set the parameter to
”Always” to get the dates on derived demands correct.
In New MRP there is a significant difference between how movements are linked together through pegging
when the coverage code is ”Period” compared to the coverage code ”Requirement”.
Items that are covered by the coverage code ”Period” are calculated in buckets according to the
accumulated stock quantity. The precise receipt used in a pegging link can therefore originate from a period
much sooner that the one issued. As a consequence, it is difficult to see exactly which receipt is going to
fulfill a particular issue.
Setup and use
13 / 45
But with a check mark in the parameter ”Period coverage as requirement coverage”, all movements are
linked together in detail as if the coverage rule was ”Requirement” also when the coverage code is
“Period”.
However, the best performance is achieved using the coverage code ”Period”, resulting in the accumulated
date by date on-hand being calculated in buckets without specific pegging – i.e. leaving out the check mark
in the specific parameter.
New MRP operates with an internal global number sequence for intercompany (IC) planned orders and the
template for IC planned order numbers must be specified in the field ”Intercompany Planned order
number format”.
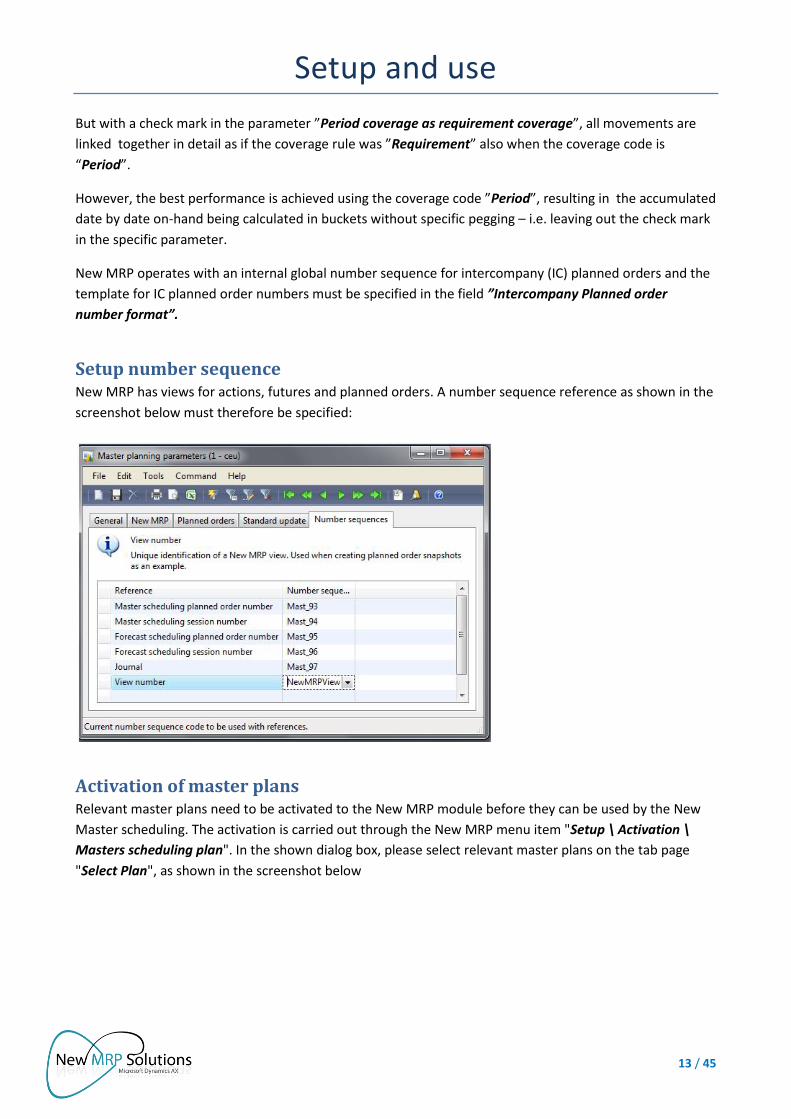
Setup number sequence New MRP has views for actions, futures and planned orders. A number sequence reference as shown in the
screenshot below must therefore be specified:
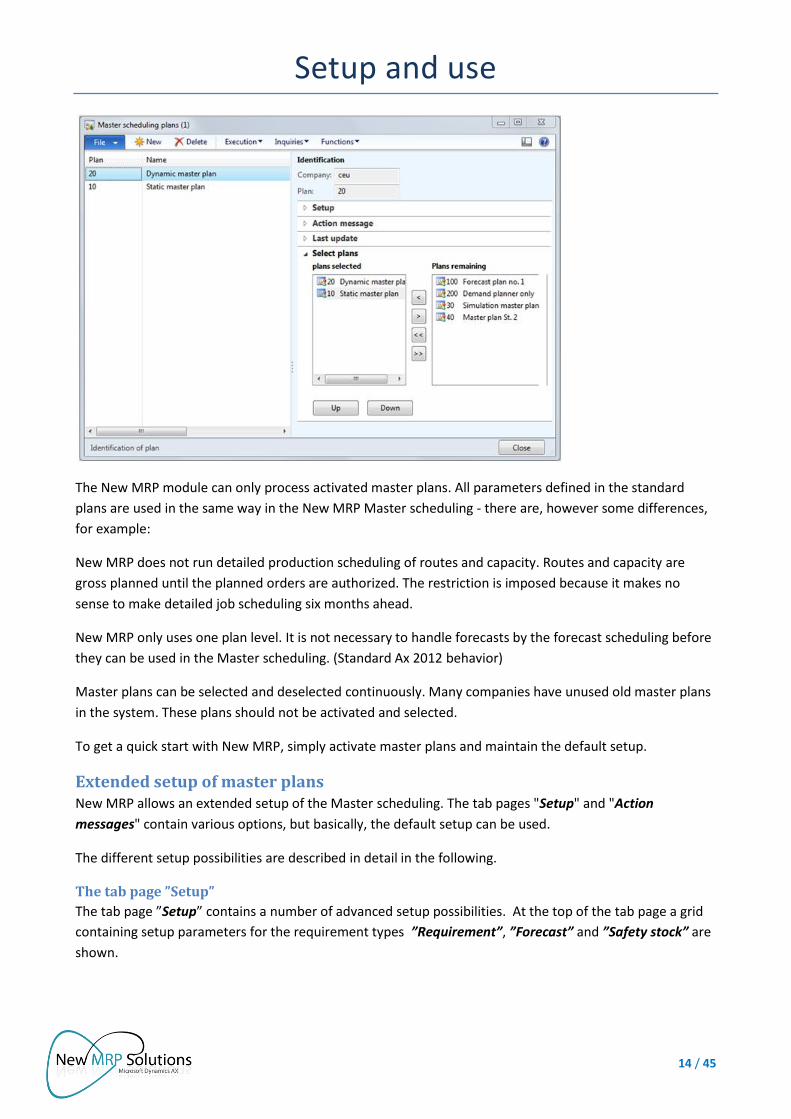
Activation of master plans Relevant master plans need to be activated to the New MRP module before they can be used by the New
Master scheduling. The activation is carried out through the New MRP menu item "Setup \ Activation \
Masters scheduling plan". In the shown dialog box, please select relevant master plans on the tab page
"Select Plan", as shown in the screenshot below
Setup and use
14 / 45
The New MRP module can only process activated master plans. All parameters defined in the standard
plans are used in the same way in the New MRP Master scheduling - there are, however some differences,
for example:
New MRP does not run detailed production scheduling of routes and capacity. Routes and capacity are
gross planned until the planned orders are authorized. The restriction is imposed because it makes no
sense to make detailed job scheduling six months ahead.
New MRP only uses one plan level. It is not necessary to handle forecasts by the forecast scheduling before
they can be used in the Master scheduling. (Standard Ax 2012 behavior)
Master plans can be selected and deselected continuously. Many companies have unused old master plans
in the system. These plans should not be activated and selected.
To get a quick start with New MRP, simply activate master plans and maintain the default setup.
Extended setup of master plans New MRP allows an extended setup of the Master scheduling. The tab pages "Setup" and "Action
messages" contain various options, but basically, the default setup can be used.
The different setup possibilities are described in detail in the following.
The tab page ”Setup”
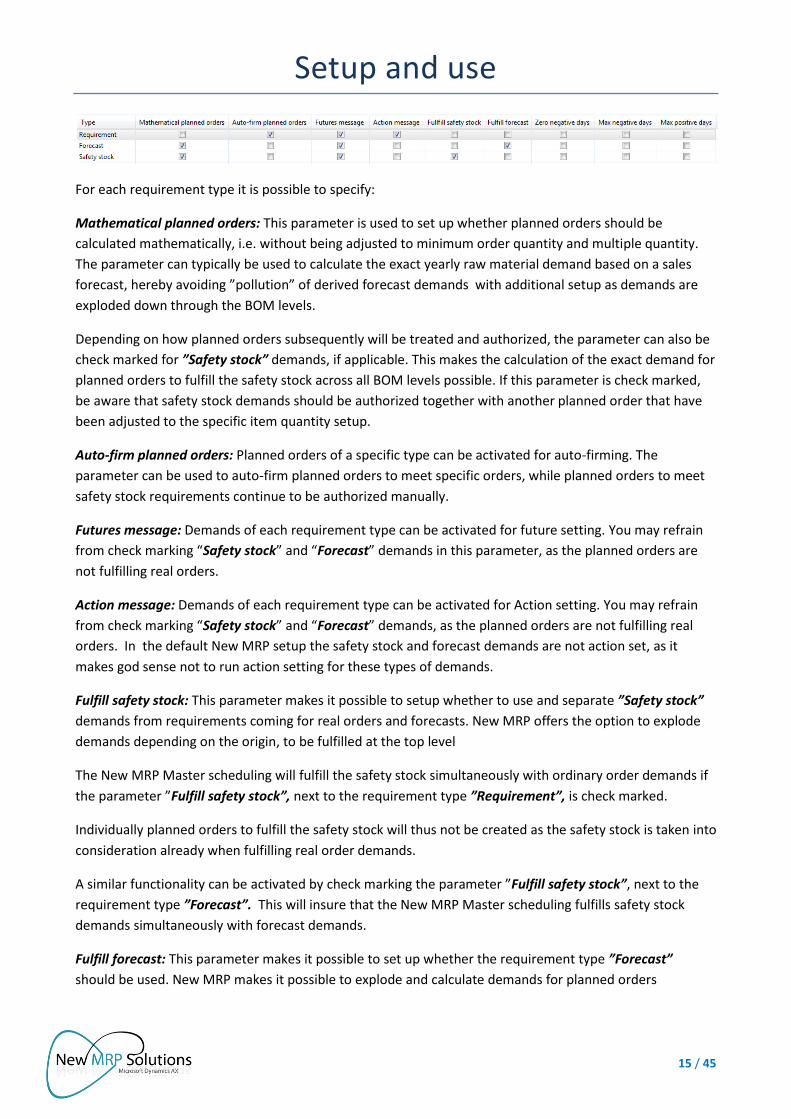
The tab page ”Setup” contains a number of advanced setup possibilities. At the top of the tab page a grid
containing setup parameters for the requirement types ”Requirement”, ”Forecast” and ”Safety stock” are
shown.
Setup and use
15 / 45
For each requirement type it is possible to specify:
Mathematical planned orders: This parameter is used to set up whether planned orders should be
calculated mathematically, i.e. without being adjusted to minimum order quantity and multiple quantity.
The parameter can typically be used to calculate the exact yearly raw material demand based on a sales
forecast, hereby avoiding ”pollution” of derived forecast demands with additional setup as demands are
exploded down through the BOM levels.
Depending on how planned orders subsequently will be treated and authorized, the parameter can also be
check marked for ”Safety stock” demands, if applicable. This makes the calculation of the exact demand for
planned orders to fulfill the safety stock across all BOM levels possible. If this parameter is check marked,
be aware that safety stock demands should be authorized together with another planned order that have
been adjusted to the specific item quantity setup.
Auto-firm planned orders: Planned orders of a specific type can be activated for auto-firming. The
parameter can be used to auto-firm planned orders to meet specific orders, while planned orders to meet
safety stock requirements continue to be authorized manually.
Futures message: Demands of each requirement type can be activated for future setting. You may refrain
from check marking “Safety stock” and “Forecast” demands in this parameter, as the planned orders are
not fulfilling real orders.
Action message: Demands of each requirement type can be activated for Action setting. You may refrain
from check marking “Safety stock” and “Forecast” demands, as the planned orders are not fulfilling real
orders. In the default New MRP setup the safety stock and forecast demands are not action set, as it
makes god sense not to run action setting for these types of demands.
Fulfill safety stock: This parameter makes it possible to setup whether to use and separate ”Safety stock”
demands from requirements coming for real orders and forecasts. New MRP offers the option to explode
demands depending on the origin, to be fulfilled at the top level
The New MRP Master scheduling will fulfill the safety stock simultaneously with ordinary order demands if
the parameter ”Fulfill safety stock”, next to the requirement type ”Requirement”, is check marked.
Individually planned orders to fulfill the safety stock will thus not be created as the safety stock is taken into
consideration already when fulfilling real order demands.
A similar functionality can be activated by check marking the parameter ”Fulfill safety stock”, next to the
requirement type ”Forecast”. This will insure that the New MRP Master scheduling fulfills safety stock
demands simultaneously with forecast demands.
Fulfill forecast: This parameter makes it possible to set up whether the requirement type ”Forecast”
should be used. New MRP makes it possible to explode and calculate demands for planned orders
Setup and use
16 / 45
depending on whether the original top level demand originates from a real order, a forecast, or a safety
stock demand.
If the ”Fulfill forecast”, next to requirement type ”Requirement”, is check marked, the New MRP Master
scheduling will fulfill forecast demands in conjunction with ordinary order demands. This avoids the
creation of individually planned orders fulfilling the forecast.
If you wish to explode and calculate all demands as one joint requirement type then you should check
mark ”Fulfill forecast” and ”Fulfill safety stock” as shown below:
Zero negative days: This parameter can set negative days to zero for all demands of the current
requirement type regardless of the item setup. The use of this parameter is e.g., to wait for item receipts
only when fulfilling real orders while safety stock demands always are fulfilled on the requirement date,
even when the required items are received at a later date.
Max negative days: This parameter can make an infinite number of negative days active for all demands of
the current type regardless of the item setup. The parameter can e.g., be used to insure that the Master
scheduling always waits for later receipts when fulfilling real orders.
Max positive days: This parameter can make an infinite number of positive days active for all demands of
the current type regardless of the item setup. The parameter will insure that available receipts received
earlier are always used.
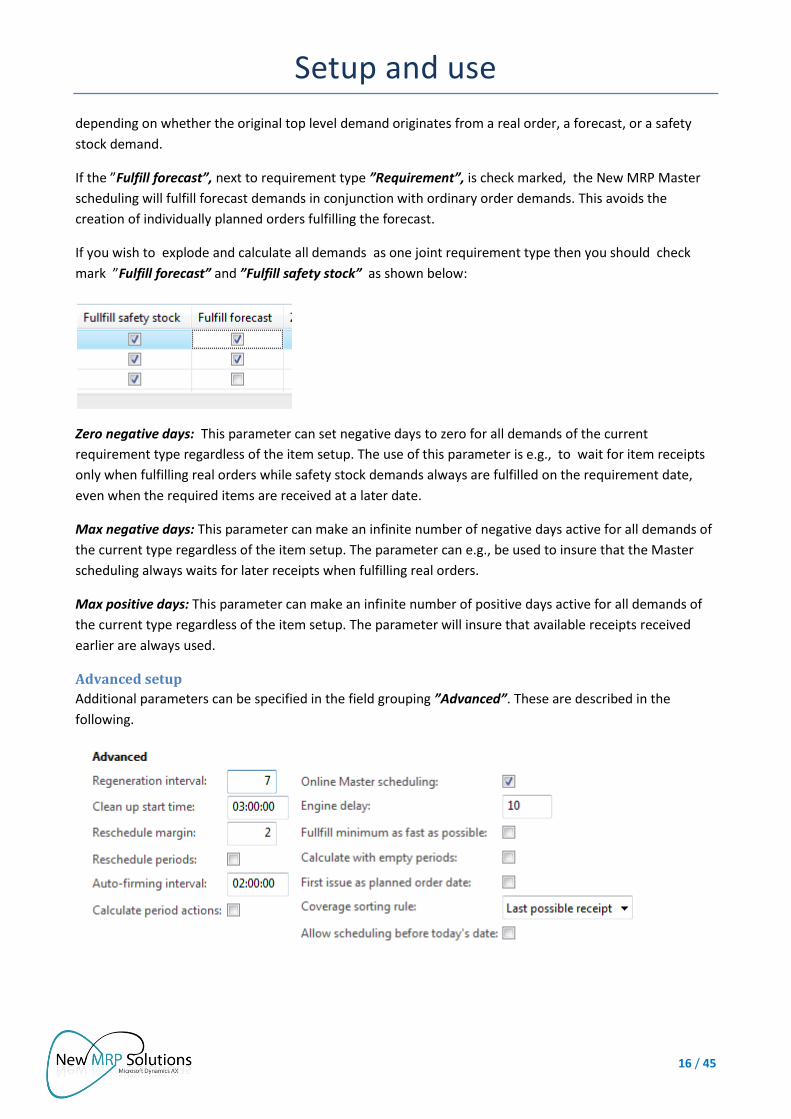
Advanced setup
Additional parameters can be specified in the field grouping ”Advanced”. These are described in the
following.

Setup and use
17 / 45
Regeneration interval:
The online Master scheduling ensures that new orders and production orders will be Master scheduled
immediately. If the basic setup of a plan is modified or if a product e.g. changes coverage group, it is
necessary to rebuild the net requirement profile.
This can be done in two ways. You can either run the Master scheduling directly for the item in question, or
alternatively, let it be handled automatically by the background process.
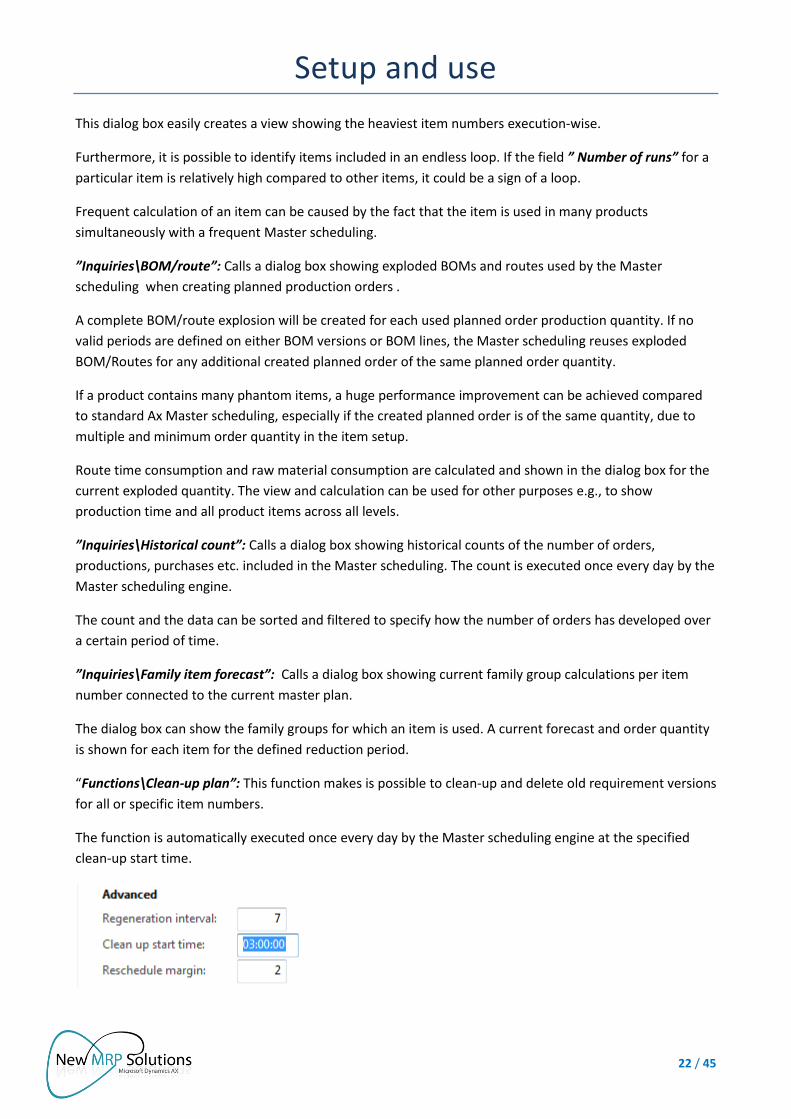
The parameter "Regeneration interval" determines the maximum number of days before an item has to be
rebuilt. Seven days are used as default. This means, if the actual item setup is changed and it is not Master
scheduled directly, it can take up to seven days before the change is fully implemented.
Clean-up start time: The background process carries out a continuous clean-up in old versions and data.
The starting time for the execution of this task can be specified in the parameter ”Clean-up start time”. It is
recommended to choose a time of low system activity.
Reschedule margin: When planned orders are rescheduled a triviality limit can be specified. Two days are
used as default. The parameter is used to decide whether planned production orders should be moved in
case the corresponding demand has been moved, i.e. if the requirement date on the issue has been pushed
and moved to a later date.
Only if the issue in days is placed later that the specified triviality limit, the planned production orders will
be rescheduled. The setup is used to lower the rescheduling frequency as this may burden the system
heavily.
Reschedule periods: The parameter "Reschedule Periods" determines if planned orders in a coverage
period should be moved forward according to the first issue date in the same period. The setup is only
relevant for items handled by the coverage rule "Period". The parameter will typically make sense when
operating for longer periods of time.
Auto-firming interval: The auto-firming process runs as a separate process in intervals of two hours in the
default New MRP module setup. The automatic authorization carried out by the Master scheduling engine
can be disabled by setting the value to zero.
Instead, the auto-firming function can be called by the batch system at selected times using the function
”Auto-firming”. The function is described later under ”Functions\Auto-firming”.
Calculate period actions: For items covered by coverage code ”Period” or ”Min/Max” planned orders are
calculated based on a period sum. The receipt date of the planned order will in the default setup case be
the first date of the period, even when the concrete item demand has a requirement date a couple of days
later. Read more about this in the description of the parameter ”First issue as planned order date”.
If you wish to calculate actions for every date, independent of the used period, when calculating planned
orders, this parameter should be check marked. The action taking place within each period will then also be
calculated.
Setup and use
18 / 45
Include IC demands: This parameter specifies whether intercompany requirements should be included in
the Master scheduling. (Exists as standard setup parameter in Ax 2012)
Online Master scheduling: New MRP supports several dynamic master plans. All plans with a check mark in
the parameter ”Online Master scheduling” are online Master scheduled. It only requires the setup of one
or more background Master scheduling engines to handle them.
Engine delay: It is possible to setup a delay to avoid that the background engine starts calculating a new
demand immediately when entered. In this manner, new orders can be exploded and simulated directly by
an order taker, without having to wait for the background engine to calculate all derived item levels
Fulfill minimum as fast as possible: Using the parameter “Fulfill minimum as fast as possible", it is
possible, irrespective of the item setup, to operate with today´s date as the date for fulfilling the safety
stock.
Planned orders for fulfilling the safety stock are then calculated as of today´s date even when it is not
possible, but the user will be notified that a safety stock is missing.
Calculate with empty periods: When the coverage codes “Period” and “Min/Max” are used, New MRP
calculates items in periods. Negative days are converted into a number of periods and the parameter
controls whether all periods or only used periods are taken into consideration when calculating if we
should wait for item receipt instead of creating new planned orders. Basically, the parameter only has
influence on items with relatively few requirements.
First issue as planned order date: When using period coverage in weeks, the planned order receipt date is
usually the first date of the period.
If the parameter ”First issue as planned order date” is check marked, the planned order receipt date is
equated with the first issue date in the period instead.
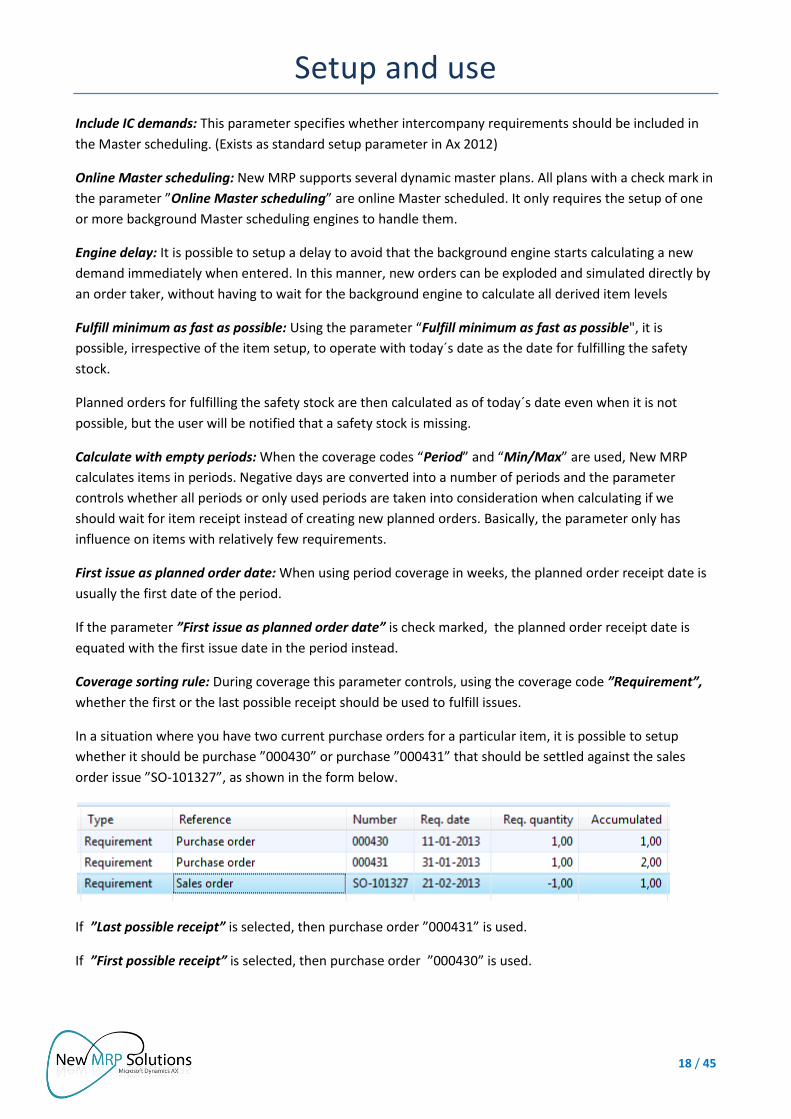
Coverage sorting rule: During coverage this parameter controls, using the coverage code ”Requirement”,
whether the first or the last possible receipt should be used to fulfill issues.
In a situation where you have two current purchase orders for a particular item, it is possible to setup
whether it should be purchase ”000430” or purchase ”000431” that should be settled against the sales
order issue ”SO-101327”, as shown in the form below.
If ”Last possible receipt” is selected, then purchase order ”000431” is used.
If ”First possible receipt” is selected, then purchase order ”000430” is used.
Setup and use
19 / 45
For master plans used for ATP/CTP calculation in relation to order intake ”Last possible receipt” is usually
chosen, as the current stock then will be available for other short term orders.
For master plans primarily used for purchase coverage based on forecasts, ”First possible receipt” is
typically selected, using existing purchase orders first before ordering new.
Allow scheduling before today’s date: Activating this parameter makes it possible to schedule planned
orders with receipt before today´s date. As default the production order scheduling does not allow for
receipt dates before the current date. This parameter can disable that rule.
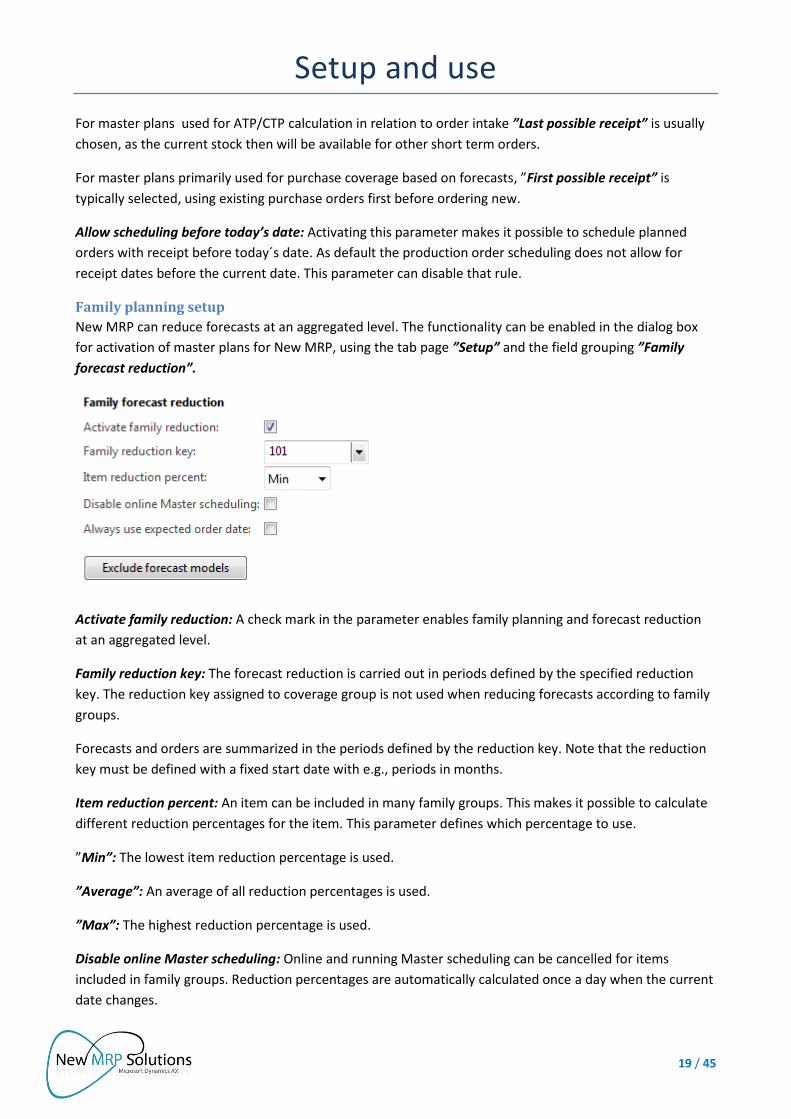
Family planning setup
New MRP can reduce forecasts at an aggregated level. The functionality can be enabled in the dialog box
for activation of master plans for New MRP, using the tab page ”Setup” and the field grouping ”Family
forecast reduction”.
Activate family reduction: A check mark in the parameter enables family planning and forecast reduction
at an aggregated level.
Family reduction key: The forecast reduction is carried out in periods defined by the specified reduction
key. The reduction key assigned to coverage group is not used when reducing forecasts according to family
groups.
Forecasts and orders are summarized in the periods defined by the reduction key. Note that the reduction
key must be defined with a fixed start date with e.g., periods in months.
Item reduction percent: An item can be included in many family groups. This makes it possible to calculate
different reduction percentages for the item. This parameter defines which percentage to use.
”Min”: The lowest item reduction percentage is used.
”Average”: An average of all reduction percentages is used.
”Max”: The highest reduction percentage is used.
Disable online Master scheduling: Online and running Master scheduling can be cancelled for items
included in family groups. Reduction percentages are automatically calculated once a day when the current
date changes.
Setup and use
20 / 45
The calculated reduction percentage is then used for the next 24 hours to reduce the forecast. If a relatively
large new order for an item included in a family group is received the next day, it is important to be aware
that, in relation to the forecast reduction, the order will not be taken into consideration until the following
day as forecast reduction percentages are calculated at midnight only.
If the order is online Master scheduled immediately after order intake, there is a risk of having an increased
demand in a day´s time, unless the online master scheduling is disabled for items included in family groups.
To avoid a temporal increase of derived demands, an alternative solution would be to cancel online Master
scheduling or to use static planned order views during the day without updating the system. In this way
new orders are not reflecting planned orders and online Master scheduling can be enabled without
negative impact.
Always use expected order date: When family planning has been enabled, forecasts are reduced at an
aggregated level. If an order is received for delivery in September, the order will be included in the
calculation of family percentages for the month of September. However, if the order for some reason
misses the delivery in September, the parameter ”Always use expected order date” defines whether the
order should reduce the forecast for the next month or be excluded from the reduction percentages
calculation.
The original delivery date will always be used in relation to the forecast reduction, regardless of the actual
delivery date.
Orders not delivered will be pushed forward and included in the next month´s calculation of reduction
percentage if the parameter is not activated. The actual delivery date then defines the reduction period
regardless of the original delivery date.
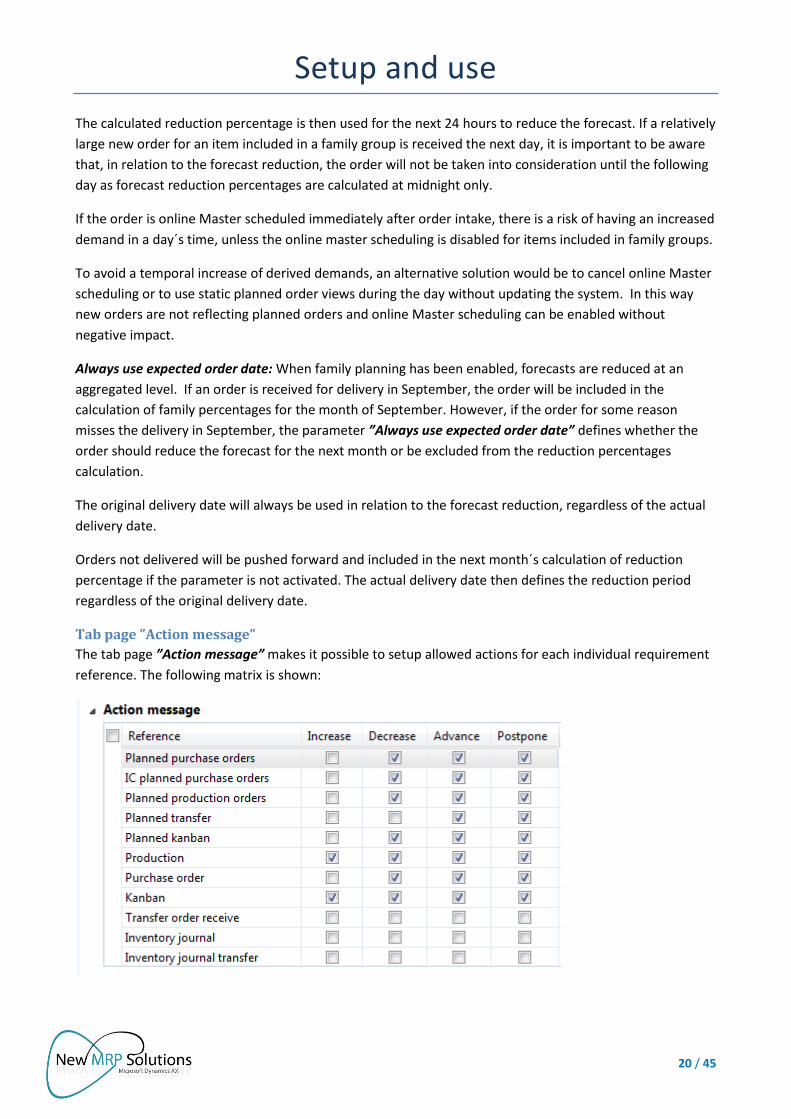
Tab page ”Action message”
The tab page ”Action message” makes it possible to setup allowed actions for each individual requirement
reference. The following matrix is shown:
Setup and use
21 / 45
The setup must be seen in conjunction with the coverage group setup. If ”increase” actions are allowed for
purchase orders, then the parameter ”Increase” must be activated on the coverage group and ”Increase”
must be activated in the matrix above for ”Purchase order”.
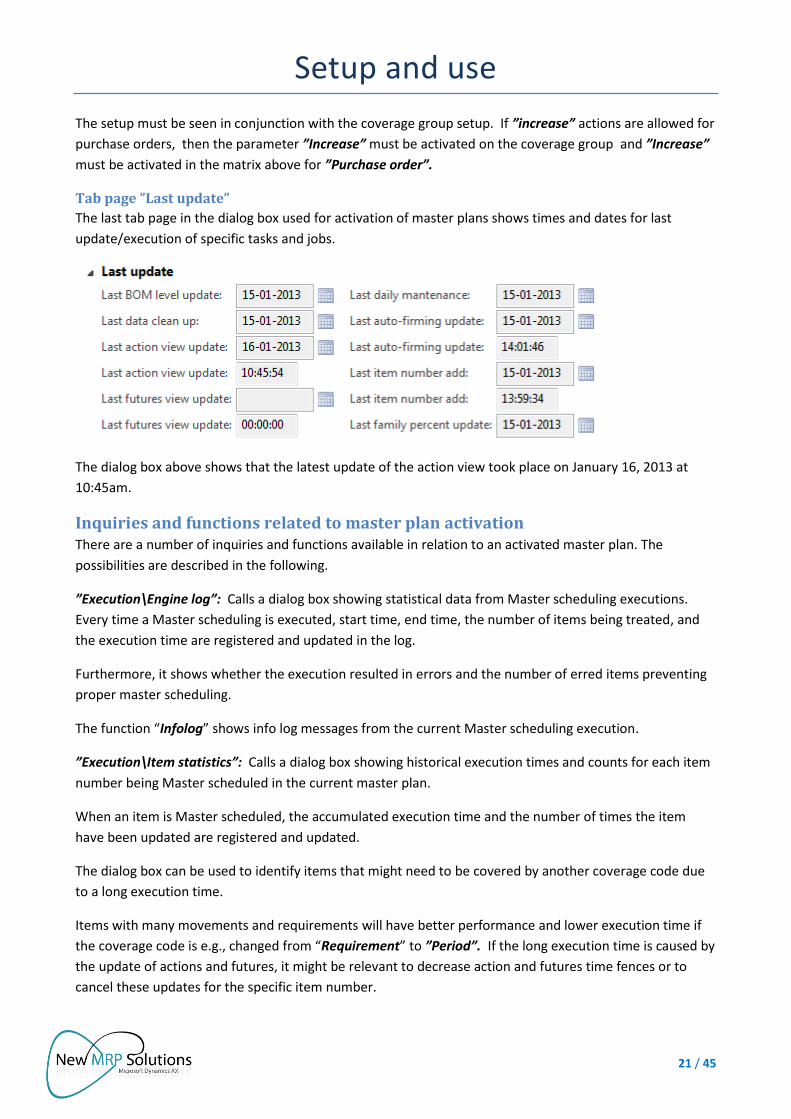
Tab page ”Last update”
The last tab page in the dialog box used for activation of master plans shows times and dates for last
update/execution of specific tasks and jobs.
The dialog box above shows that the latest update of the action view took place on January 16, 2013 at
10:45am.
Inquiries and functions related to master plan activation There are a number of inquiries and functions available in relation to an activated master plan. The
possibilities are described in the following.
”Execution\Engine log”: Calls a dialog box showing statistical data from Master scheduling executions.
Every time a Master scheduling is executed, start time, end time, the number of items being treated, and
the execution time are registered and updated in the log.
Furthermore, it shows whether the execution resulted in errors and the number of erred items preventing
proper master scheduling.
The function “Infolog” shows info log messages from the current Master scheduling execution.
”Execution\Item statistics”: Calls a dialog box showing historical execution times and counts for each item
number being Master scheduled in the current master plan.
When an item is Master scheduled, the accumulated execution time and the number of times the item
have been updated are registered and updated.
The dialog box can be used to identify items that might need to be covered by another coverage code due
to a long execution time.
Items with many movements and requirements will have better performance and lower execution time if
the coverage code is e.g., changed from “Requirement” to ”Period”. If the long execution time is caused by
the update of actions and futures, it might be relevant to decrease action and futures time fences or to
cancel these updates for the specific item number.
Setup and use
22 / 45
This dialog box easily creates a view showing the heaviest item numbers execution-wise.
Furthermore, it is possible to identify items included in an endless loop. If the field ” Number of runs” for a
particular item is relatively high compared to other items, it could be a sign of a loop.
Frequent calculation of an item can be caused by the fact that the item is used in many products
simultaneously with a frequent Master scheduling.
”Inquiries\BOM/route”: Calls a dialog box showing exploded BOMs and routes used by the Master
scheduling when creating planned production orders .
A complete BOM/route explosion will be created for each used planned order production quantity. If no
valid periods are defined on either BOM versions or BOM lines, the Master scheduling reuses exploded
BOM/Routes for any additional created planned order of the same planned order quantity.
If a product contains many phantom items, a huge performance improvement can be achieved compared
to standard Ax Master scheduling, especially if the created planned order is of the same quantity, due to
multiple and minimum order quantity in the item setup.
Route time consumption and raw material consumption are calculated and shown in the dialog box for the
current exploded quantity. The view and calculation can be used for other purposes e.g., to show
production time and all product items across all levels.
”Inquiries\Historical count”: Calls a dialog box showing historical counts of the number of orders,
productions, purchases etc. included in the Master scheduling. The count is executed once every day by the
Master scheduling engine.
The count and the data can be sorted and filtered to specify how the number of orders has developed over
a certain period of time.
”Inquiries\Family item forecast”: Calls a dialog box showing current family group calculations per item
number connected to the current master plan.
The dialog box can show the family groups for which an item is used. A current forecast and order quantity
is shown for each item for the defined reduction period.
“Functions\Clean-up plan”: This function makes is possible to clean-up and delete old requirement versions
for all or specific item numbers.
The function is automatically executed once every day by the Master scheduling engine at the specified
clean-up start time.

Setup and use
23 / 45
The function should not be executed manually in the typical installation, as clean-up is carried out by the
background engine. If a Master scheduling engine has been started without setting recurrent execution in
batch, the next Master scheduling will automatically perform the missing clean-up before initiating the
actual calculation.
In such situations, manual execution at a specific time could be of relevance to avoid the Master scheduling
spending time on updating.
“Functions\Auto-firming”: In the standard New MRP setup this function is executed automatically by the
background Master scheduling engine every second hour.
The frequency of the Master scheduling auto-firming can be specified on the activated master plan.
The background engine´s automatic auto-firming is stopped if a zero time is specified as ”Auto-firming
interval” .
Specification of individual execution times for the automatic firming is set in the function “Auto-firming”.
This function can e.g., be used for automatic firming of new transfer planned orders at optimal times
according to the warehouse capacity.
Setup and use
24 / 45
Specification of for which item groups, warehouse etc. to run the auto-firming are also set in the dialog box.
The background engine´s automatic firming is executed without any criteria. If the automatic firming
resulted in errors, the system will create a planned order view where the errors can be viewed and
corrected.
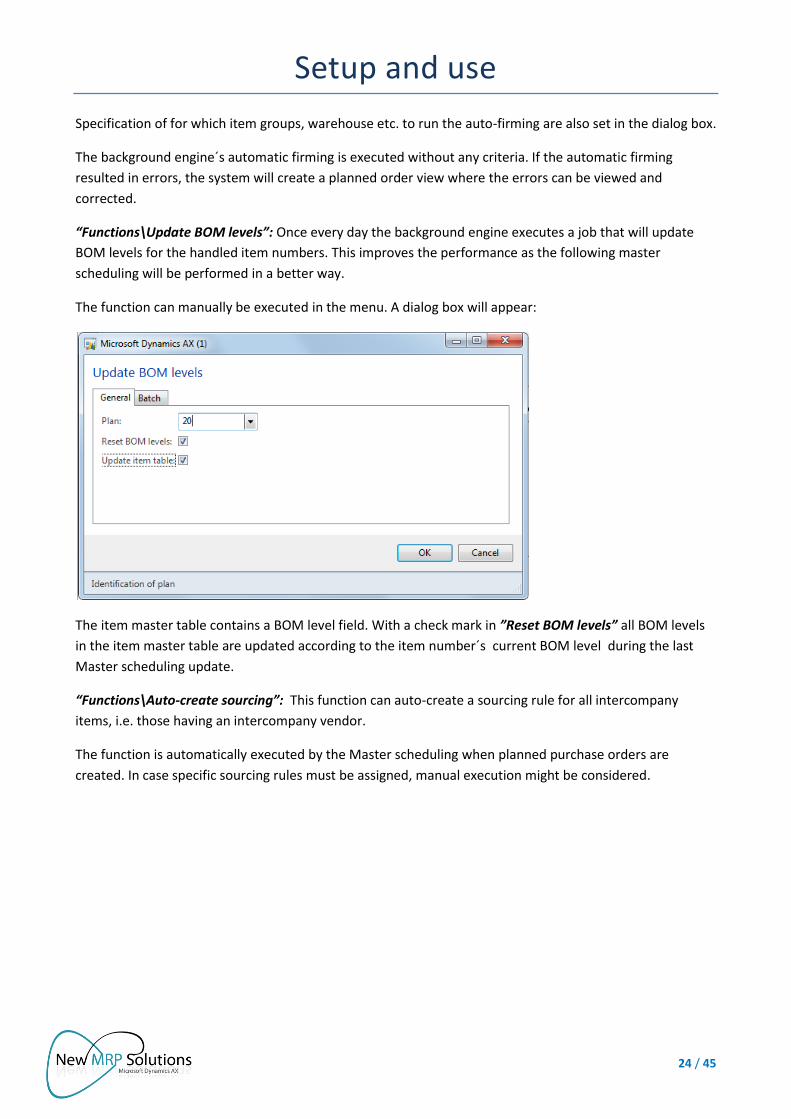
“Functions\Update BOM levels”: Once every day the background engine executes a job that will update
BOM levels for the handled item numbers. This improves the performance as the following master
scheduling will be performed in a better way.
The function can manually be executed in the menu. A dialog box will appear:
The item master table contains a BOM level field. With a check mark in ”Reset BOM levels” all BOM levels
in the item master table are updated according to the item number´s current BOM level during the last
Master scheduling update.
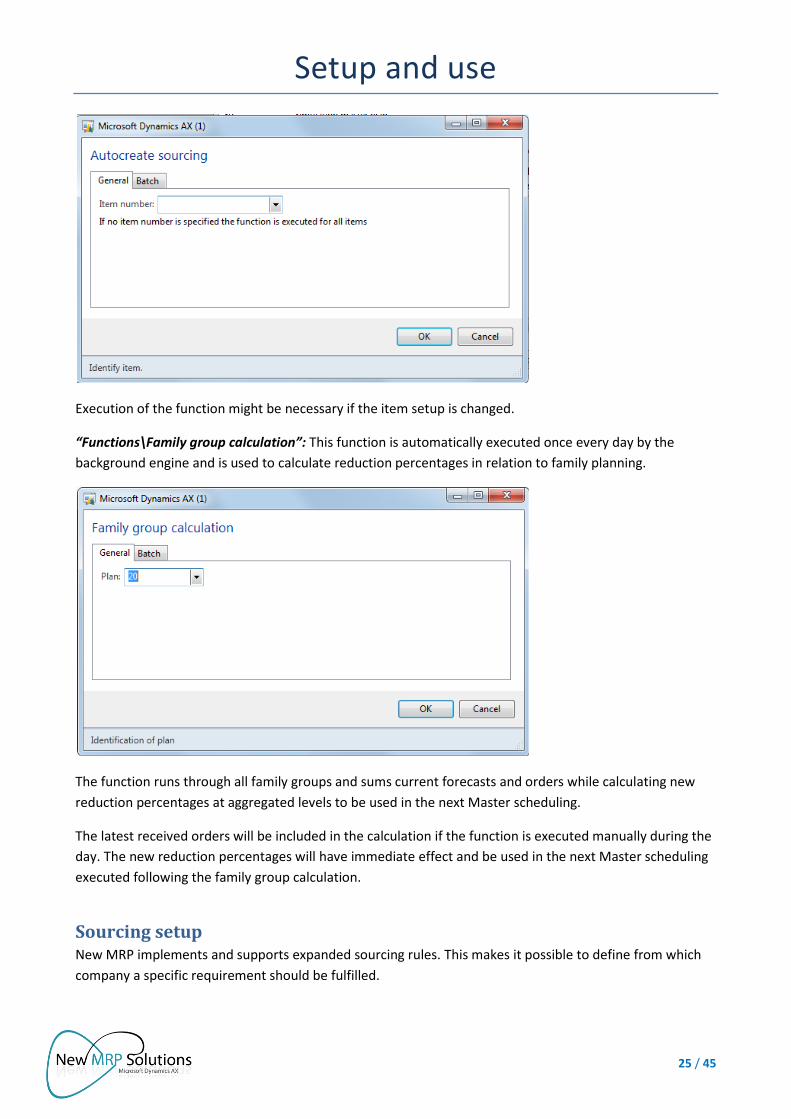
“Functions\Auto-create sourcing”: This function can auto-create a sourcing rule for all intercompany
items, i.e. those having an intercompany vendor.
The function is automatically executed by the Master scheduling when planned purchase orders are
created. In case specific sourcing rules must be assigned, manual execution might be considered.
Setup and use
25 / 45
Execution of the function might be necessary if the item setup is changed.
“Functions\Family group calculation”: This function is automatically executed once every day by the
background engine and is used to calculate reduction percentages in relation to family planning.
The function runs through all family groups and sums current forecasts and orders while calculating new
reduction percentages at aggregated levels to be used in the next Master scheduling.
The latest received orders will be included in the calculation if the function is executed manually during the
day. The new reduction percentages will have immediate effect and be used in the next Master scheduling
executed following the family group calculation.
Sourcing setup New MRP implements and supports expanded sourcing rules. This makes it possible to define from which
company a specific requirement should be fulfilled.
Setup and use
26 / 45
The sourcing setup works together with the running Master scheduling and it is possible in direct relation to
the order intake to send requirements to other relevant companies.
This makes calculation and simulation of delivery dates possible, even if the selling product first needs to be
manufactured in another company.
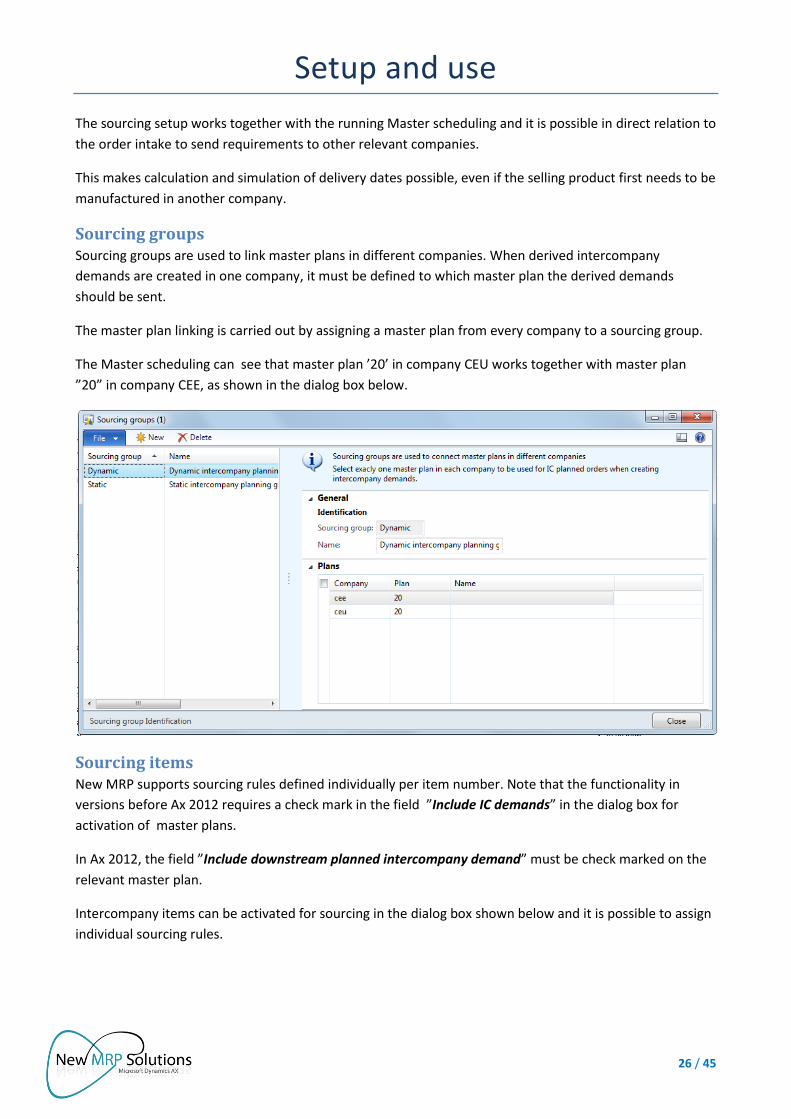
Sourcing groups Sourcing groups are used to link master plans in different companies. When derived intercompany
demands are created in one company, it must be defined to which master plan the derived demands
should be sent.
The master plan linking is carried out by assigning a master plan from every company to a sourcing group.
The Master scheduling can see that master plan ’20’ in company CEU works together with master plan
”20” in company CEE, as shown in the dialog box below.
Sourcing items New MRP supports sourcing rules defined individually per item number. Note that the functionality in
versions before Ax 2012 requires a check mark in the field ”Include IC demands” in the dialog box for
activation of master plans.
In Ax 2012, the field ”Include downstream planned intercompany demand” must be check marked on the
relevant master plan.
Intercompany items can be activated for sourcing in the dialog box shown below and it is possible to assign
individual sourcing rules.
Setup and use
27 / 45
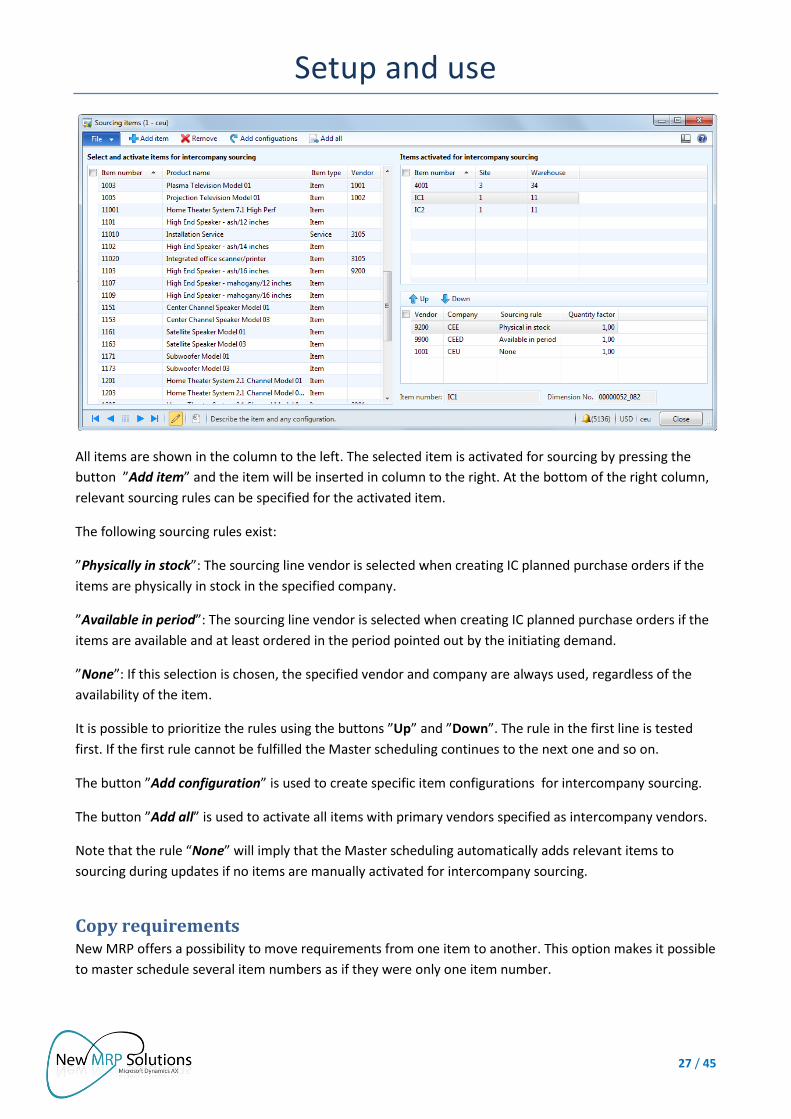
All items are shown in the column to the left. The selected item is activated for sourcing by pressing the
button ”Add item” and the item will be inserted in column to the right. At the bottom of the right column,
relevant sourcing rules can be specified for the activated item.
The following sourcing rules exist:
”Physically in stock”: The sourcing line vendor is selected when creating IC planned purchase orders if the
items are physically in stock in the specified company.
”Available in period”: The sourcing line vendor is selected when creating IC planned purchase orders if the
items are available and at least ordered in the period pointed out by the initiating demand.
”None”: If this selection is chosen, the specified vendor and company are always used, regardless of the
availability of the item.
It is possible to prioritize the rules using the buttons ”Up” and ”Down”. The rule in the first line is tested
first. If the first rule cannot be fulfilled the Master scheduling continues to the next one and so on.
The button ”Add configuration” is used to create specific item configurations for intercompany sourcing.
The button ”Add all” is used to activate all items with primary vendors specified as intercompany vendors.
Note that the rule “None” will imply that the Master scheduling automatically adds relevant items to
sourcing during updates if no items are manually activated for intercompany sourcing.
Copy requirements New MRP offers a possibility to move requirements from one item to another. This option makes it possible
to master schedule several item numbers as if they were only one item number.
Setup and use
28 / 45
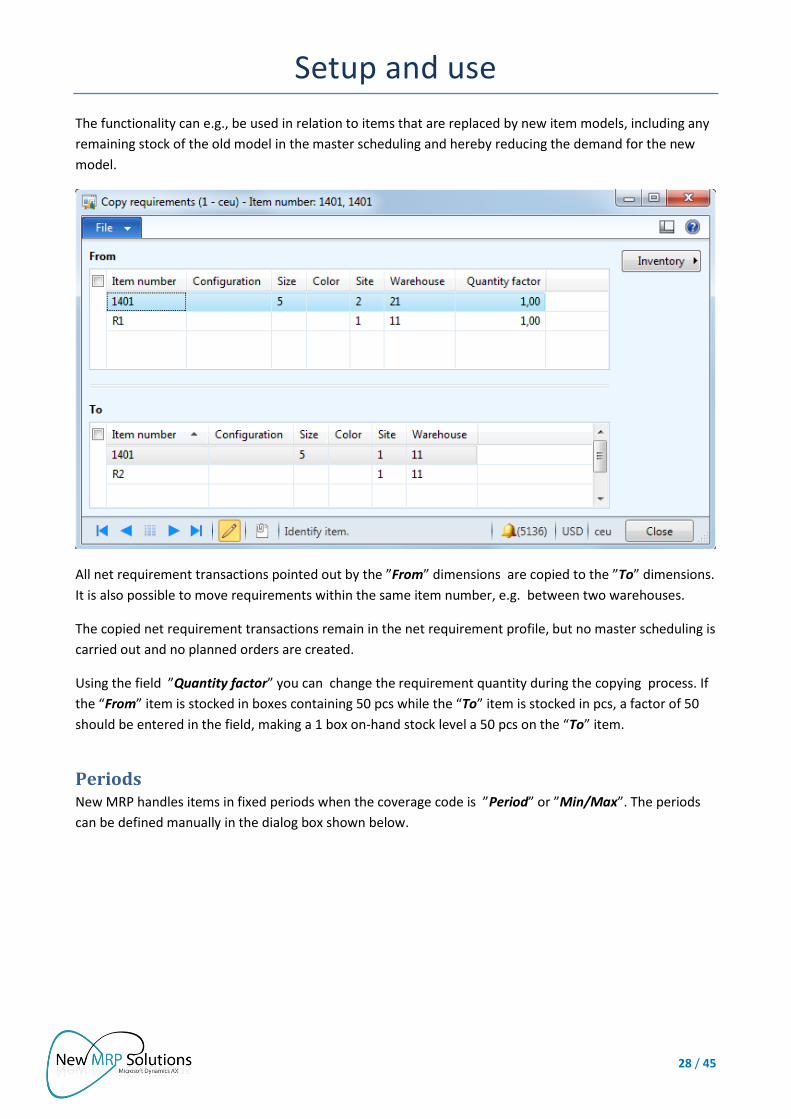
The functionality can e.g., be used in relation to items that are replaced by new item models, including any
remaining stock of the old model in the master scheduling and hereby reducing the demand for the new
model.
All net requirement transactions pointed out by the ”From” dimensions are copied to the ”To” dimensions.
It is also possible to move requirements within the same item number, e.g. between two warehouses.
The copied net requirement transactions remain in the net requirement profile, but no master scheduling is
carried out and no planned orders are created.
Using the field ”Quantity factor” you can change the requirement quantity during the copying process. If
the “From” item is stocked in boxes containing 50 pcs while the “To” item is stocked in pcs, a factor of 50
should be entered in the field, making a 1 box on-hand stock level a 50 pcs on the “To” item.
Periods New MRP handles items in fixed periods when the coverage code is ”Period” or ”Min/Max”. The periods
can be defined manually in the dialog box shown below.
Setup and use
29 / 45
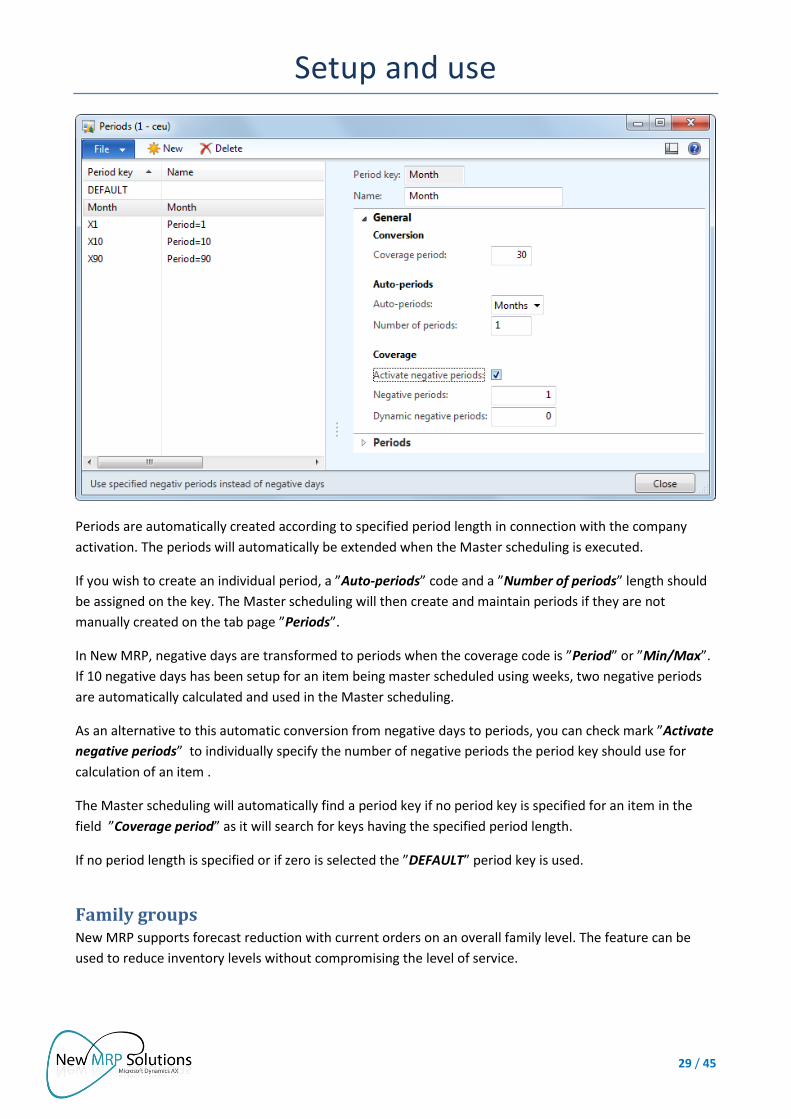
Periods are automatically created according to specified period length in connection with the company
activation. The periods will automatically be extended when the Master scheduling is executed.
If you wish to create an individual period, a ”Auto-periods” code and a ”Number of periods” length should
be assigned on the key. The Master scheduling will then create and maintain periods if they are not
manually created on the tab page ”Periods”.
In New MRP, negative days are transformed to periods when the coverage code is ”Period” or ”Min/Max”.
If 10 negative days has been setup for an item being master scheduled using weeks, two negative periods
are automatically calculated and used in the Master scheduling.
As an alternative to this automatic conversion from negative days to periods, you can check mark ”Activate
negative periods” to individually specify the number of negative periods the period key should use for
calculation of an item .
The Master scheduling will automatically find a period key if no period key is specified for an item in the
field ”Coverage period” as it will search for keys having the specified period length.
If no period length is specified or if zero is selected the ”DEFAULT” period key is used.
Family groups New MRP supports forecast reduction with current orders on an overall family level. The feature can be
used to reduce inventory levels without compromising the level of service.

Setup and use
30 / 45
Over-ordering / overproduction due to unforeseen changes in the sales pattern should be avoided. The
problem is best described by a simple example.
A manufactured product is available in two variants, for example, a red (5F-RED) and blue (5F-BLUE).
Both top products consume a common raw material component, namely (5COM) and a variant-specific raw
material called (5RAW-RED) or (5RAW-BLUE).
In a hypothetical example the sales department expects primarily to sell the red variant, but unfortunately
it turns out that the blue variant is much more popular than the red one.
Forecast, current sales, the reduced forecast and the derived requirements will then look as follows:
When the Master scheduling is executed, the requirement for derived products is calculated from a total
demand of 180 pieces which is significantly more than predicted by the original forecast.
If we assume that the forecasted sales of 5F products overall is correct in relation to the total sales, the
Master scheduling will suggest an over-ordering of the shared component 5COM.
Family planning in New MRP is all about grouping products that are using the same incoming raw materials.
The groups are used to reduce forecasts at an aggregated level. The described problem can then be
avoided and the Master scheduling will not suggest over-ordering.
Setup and use
31 / 45
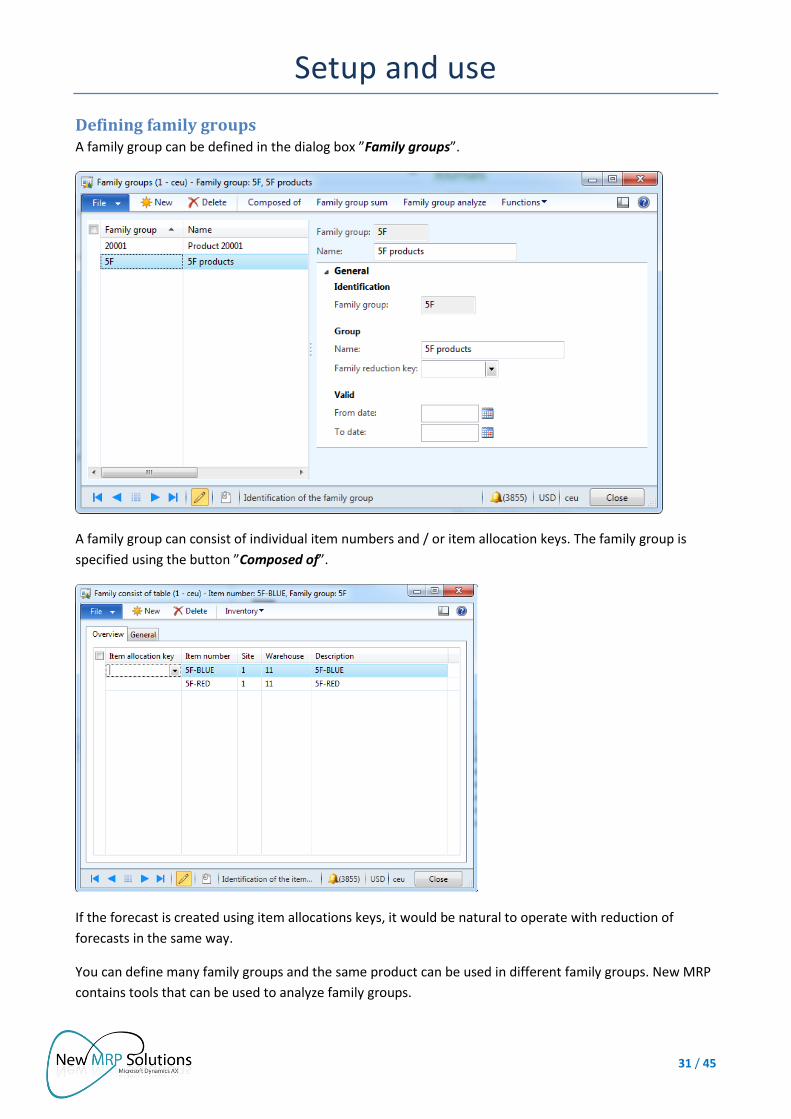
Defining family groups A family group can be defined in the dialog box ”Family groups”.
A family group can consist of individual item numbers and / or item allocation keys. The family group is
specified using the button ”Composed of”.
If the forecast is created using item allocations keys, it would be natural to operate with reduction of
forecasts in the same way.
You can define many family groups and the same product can be used in different family groups. New MRP
contains tools that can be used to analyze family groups.

Setup and use
32 / 45
Whether a family group is appropriate depends on many factors. The number of unique incoming
components is an essential part of this analysis.
The last forecast reduction calculation can be viewed using the button ”Family group sum”.
The button ”Family item forecast” shows the forecast and sales numbers used for the calculation.
Reduction percentages are calculated once every day by the back ground engine, but can also be
calculated on demand by the function ”Family group calculation”.
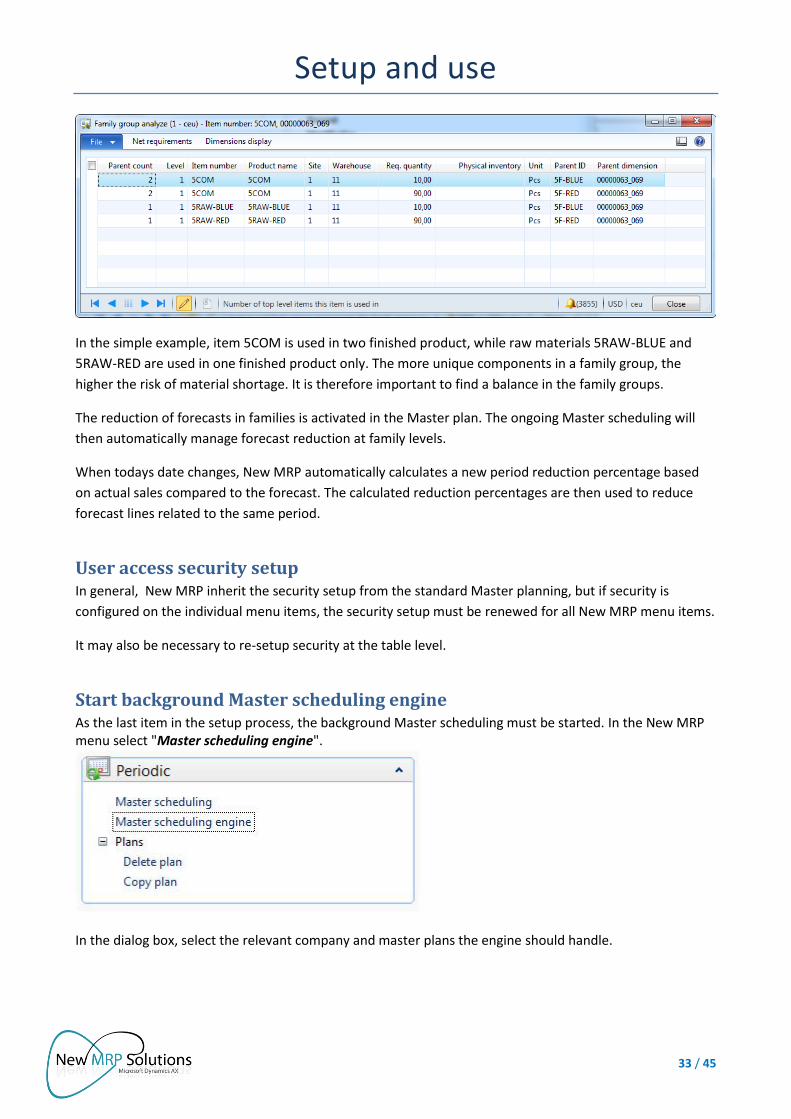
A family group analysis can be performed using the button ”Family group analyze”. The dialog box below
shows in how many finished products an incoming component is used across all item levels.
Setup and use
33 / 45
In the simple example, item 5COM is used in two finished product, while raw materials 5RAW-BLUE and
5RAW-RED are used in one finished product only. The more unique components in a family group, the
higher the risk of material shortage. It is therefore important to find a balance in the family groups.
The reduction of forecasts in families is activated in the Master plan. The ongoing Master scheduling will
then automatically manage forecast reduction at family levels.
When todays date changes, New MRP automatically calculates a new period reduction percentage based
on actual sales compared to the forecast. The calculated reduction percentages are then used to reduce
forecast lines related to the same period.
User access security setup In general, New MRP inherit the security setup from the standard Master planning, but if security is
configured on the individual menu items, the security setup must be renewed for all New MRP menu items.
It may also be necessary to re-setup security at the table level.
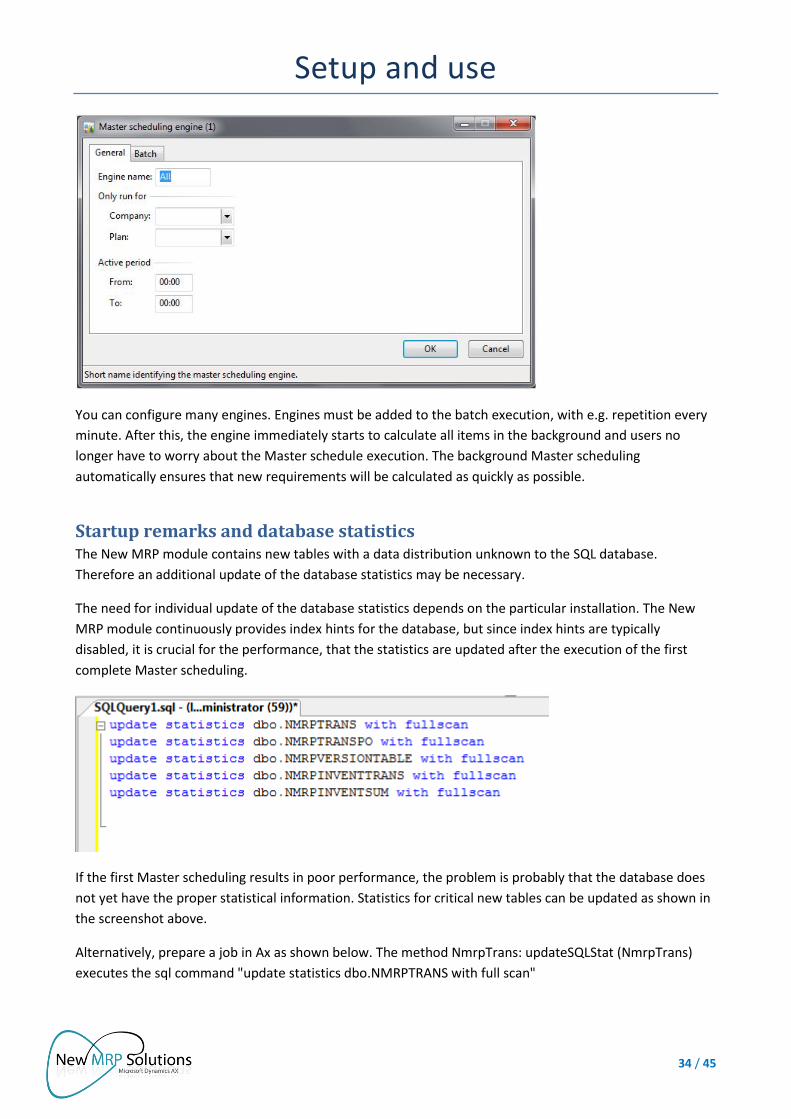
Start background Master scheduling engine As the last item in the setup process, the background Master scheduling must be started. In the New MRP menu select "Master scheduling engine".
In the dialog box, select the relevant company and master plans the engine should handle.
Setup and use
34 / 45
You can configure many engines. Engines must be added to the batch execution, with e.g. repetition every
minute. After this, the engine immediately starts to calculate all items in the background and users no
longer have to worry about the Master schedule execution. The background Master scheduling
automatically ensures that new requirements will be calculated as quickly as possible.
Startup remarks and database statistics The New MRP module contains new tables with a data distribution unknown to the SQL database.
Therefore an additional update of the database statistics may be necessary.
The need for individual update of the database statistics depends on the particular installation. The New
MRP module continuously provides index hints for the database, but since index hints are typically
disabled, it is crucial for the performance, that the statistics are updated after the execution of the first
complete Master scheduling.
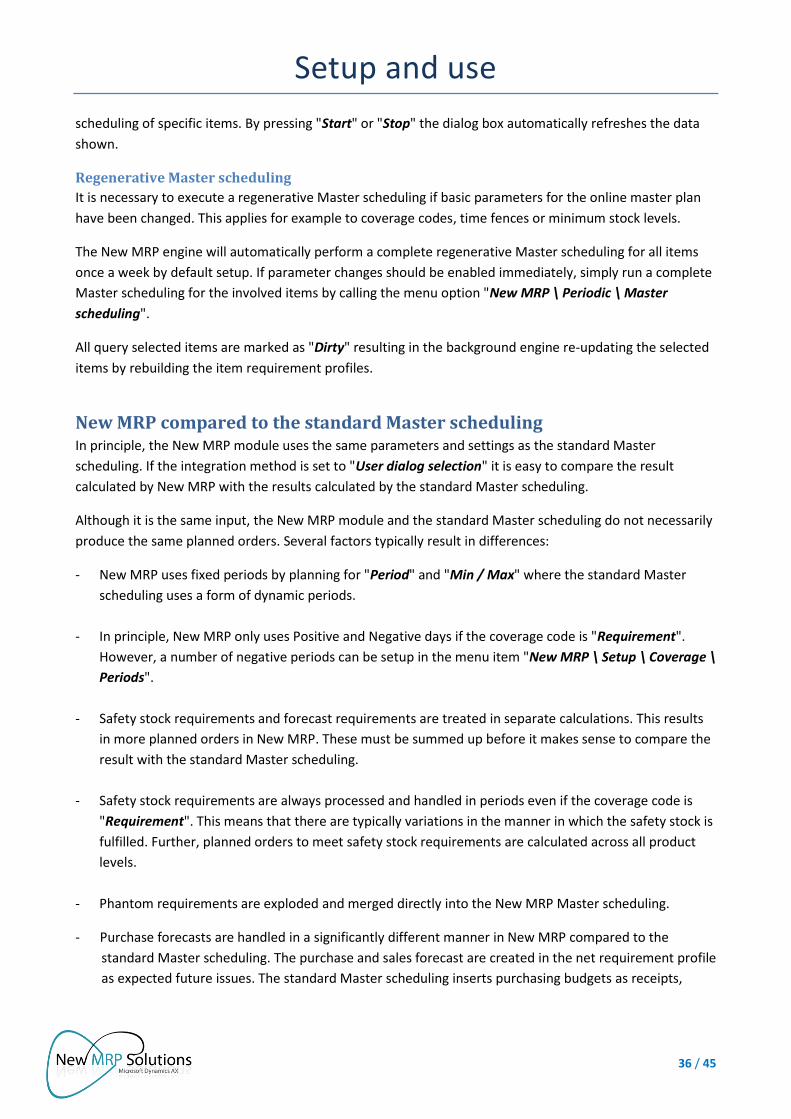
If the first Master scheduling results in poor performance, the problem is probably that the database does
not yet have the proper statistical information. Statistics for critical new tables can be updated as shown in
the screenshot above.
Alternatively, prepare a job in Ax as shown below. The method NmrpTrans: updateSQLStat (NmrpTrans)
executes the sql command "update statistics dbo.NMRPTRANS with full scan"

Setup and use
35 / 45
Monitoring the online Master scheduling Master scheduling runs continuously and online in the New MRP module. Current status can be monitored
and followed in the dialog box "New MRP \ Inquiries \ Engine activity".
The tab "Execution" shows the items currently being calculated. The "Engine log" shows details for the
current background engine executions, while the "Item statistics" provides information on specific Master
Setup and use
36 / 45
scheduling of specific items. By pressing "Start" or "Stop" the dialog box automatically refreshes the data
shown.
Regenerative Master scheduling
It is necessary to execute a regenerative Master scheduling if basic parameters for the online master plan
have been changed. This applies for example to coverage codes, time fences or minimum stock levels.
The New MRP engine will automatically perform a complete regenerative Master scheduling for all items
once a week by default setup. If parameter changes should be enabled immediately, simply run a complete
Master scheduling for the involved items by calling the menu option "New MRP \ Periodic \ Master
scheduling".
All query selected items are marked as "Dirty" resulting in the background engine re-updating the selected
items by rebuilding the item requirement profiles.
New MRP compared to the standard Master scheduling In principle, the New MRP module uses the same parameters and settings as the standard Master
scheduling. If the integration method is set to "User dialog selection" it is easy to compare the result
calculated by New MRP with the results calculated by the standard Master scheduling.
Although it is the same input, the New MRP module and the standard Master scheduling do not necessarily
produce the same planned orders. Several factors typically result in differences:
- New MRP uses fixed periods by planning for "Period" and "Min / Max" where the standard Master
scheduling uses a form of dynamic periods.
- In principle, New MRP only uses Positive and Negative days if the coverage code is "Requirement".
However, a number of negative periods can be setup in the menu item "New MRP \ Setup \ Coverage \
Periods".
- Safety stock requirements and forecast requirements are treated in separate calculations. This results
in more planned orders in New MRP. These must be summed up before it makes sense to compare the
result with the standard Master scheduling.
- Safety stock requirements are always processed and handled in periods even if the coverage code is
"Requirement". This means that there are typically variations in the manner in which the safety stock is
fulfilled. Further, planned orders to meet safety stock requirements are calculated across all product
levels.
- Phantom requirements are exploded and merged directly into the New MRP Master scheduling.
- Purchase forecasts are handled in a significantly different manner in New MRP compared to the
standard Master scheduling. The purchase and sales forecast are created in the net requirement profile
as expected future issues. The standard Master scheduling inserts purchasing budgets as receipts,
Setup and use
37 / 45
while New MRP creates proposals to cover the purchase budget. In practice, the result is the same -
but not if you operate with the same product in both purchase and sales budgets.
- New MRP inserts and registers the sales forecast in reduction periods even if the date of the forecast
line is before today’s date. The standard Master scheduling does not include sales forecast lines if the
start date exceeds today´s date.
- It is possible in standard Dynamics Ax to set the reservation of an order line to be executed
automatically in "Explosion". This feature is not supported directly in New MRP. If reservations are
required, you should run an order explosion instead.
Comparing performance
Performance improvement in New MRP comes in connection with the ongoing online Master scheduling.
New MRP is designed to reuse the net requirement profile when items are calculated. This means that the
online Master scheduling will not have to delete and recreate all movements in the profile and only the
periods and movements that have changed since last calculation needs to be handled in New MRP. This
results in the ”warp” speed in the New MRP Master scheduling compared to the standard Master
scheduling.
In this relation, it is important to mention that New MRP calculates heavy items, i.e. items with many open
transactions, with significantly better performance than the standard Ax, if the coverage rule is ”Period”
instead of ”Requirement”.
Static and dynamic master plans
New MRP handles the concept of static and dynamic master plans in a new way. A 2-plan strategy in the
standard Master Scheduling is handled by updating the static master plan and subsequently copying it to
the dynamic plan.
In New MRP this is handled in reverse. The dynamic plan is constantly updated and calculated. The static
plan can be updated any time by copying the dynamic plan.
In general, the 2-plan concept is actually unnecessary when using New MRP. Instead of updating two more
or less equal master plans, purchasers and production planners can instead achieve the same static
function by simply taking a snapshot of the current planned orders from the dynamic plan. A planned order
snapshot is static and does not change even if the items get recalculated due to the arrival of new orders.
Planned order firming and handling In principle, planned order firming and handling are carried out as in standard Ax. However, there are some
differences which are described in the following.
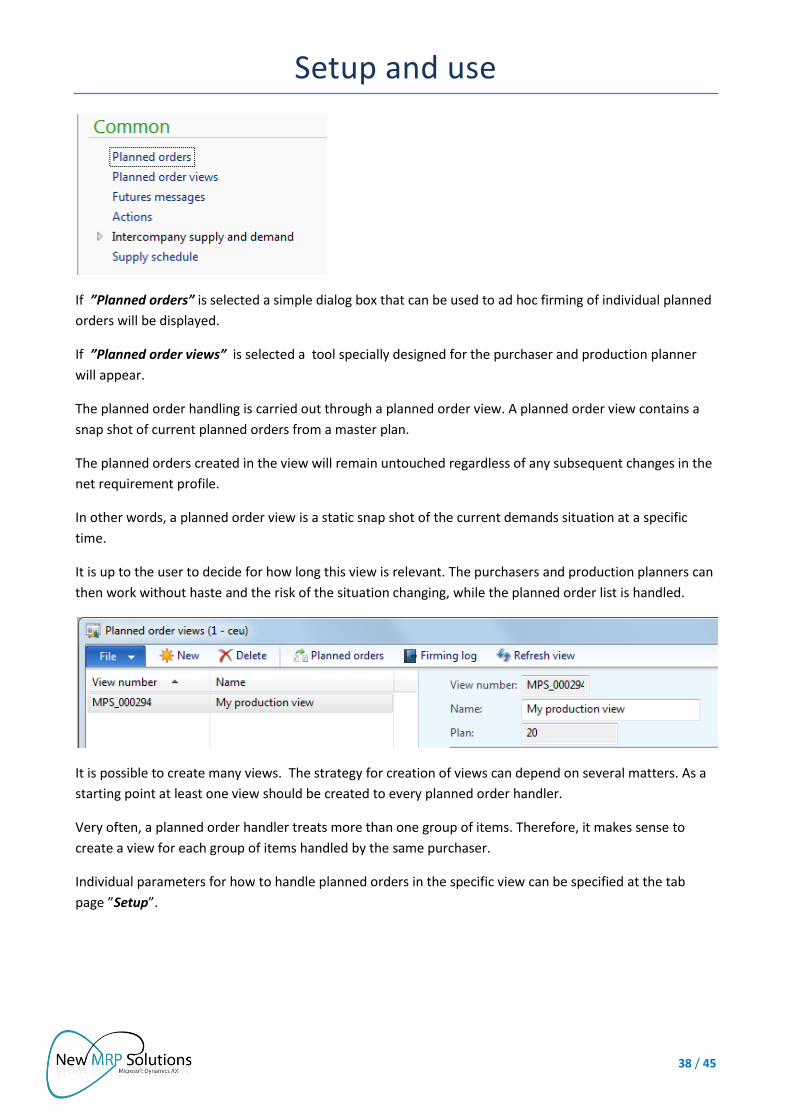
Planned order view New MRP uses predefined filters named by the users´ choice when handling planned orders. There are two
planned order dialog boxes, ”Planned orders” and ”Planned order views”.
Setup and use
38 / 45
If ”Planned orders” is selected a simple dialog box that can be used to ad hoc firming of individual planned
orders will be displayed.
If ”Planned order views” is selected a tool specially designed for the purchaser and production planner
will appear.
The planned order handling is carried out through a planned order view. A planned order view contains a
snap shot of current planned orders from a master plan.
The planned orders created in the view will remain untouched regardless of any subsequent changes in the
net requirement profile.
In other words, a planned order view is a static snap shot of the current demands situation at a specific
time.
It is up to the user to decide for how long this view is relevant. The purchasers and production planners can
then work without haste and the risk of the situation changing, while the planned order list is handled.
It is possible to create many views. The strategy for creation of views can depend on several matters. As a
starting point at least one view should be created to every planned order handler.
Very often, a planned order handler treats more than one group of items. Therefore, it makes sense to
create a view for each group of items handled by the same purchaser.
Individual parameters for how to handle planned orders in the specific view can be specified at the tab
page ”Setup”.

Setup and use
39 / 45
In the field ”Update marking” you can set up whether firmed orders should be marked, equivalent to
standard Ax.
In the field ”Summarize rule” you can specify how planned orders should be summed up in relation to
selection . New MRP gives the possibility to create planned orders divided into whether the planned order
should full fill a real order, a forecast or a safety stock demand.
When planned orders are divided into requirement types, a number of planned orders can be created for
the same period or date.
Under ”Summarize rule” you can setup a field to specify how planned orders should be summed up,
avoiding that three purchase order lines are created because the planned orders originally was created to
fulfill three different requirement types.
You have the following options:
”Standard”: Planned orders with requirement type ”Requirement” and ”Forecast” are summed up if they
relate to the same period, while planned orders with the requirement type ”Safety stock” are summed
with already selected planned orders regardless of the current period.
”Same period date”: Selected planned orders are summed up if they relate to the same period
independent of the requirement type.
”Same requirement date”: Selected planned orders are summed up if they have the same requirement
date.
The fields ”Finite capacity”, “Finite material” and “Finite property” are used when the production
scheduling is executed following a planned production order firming.
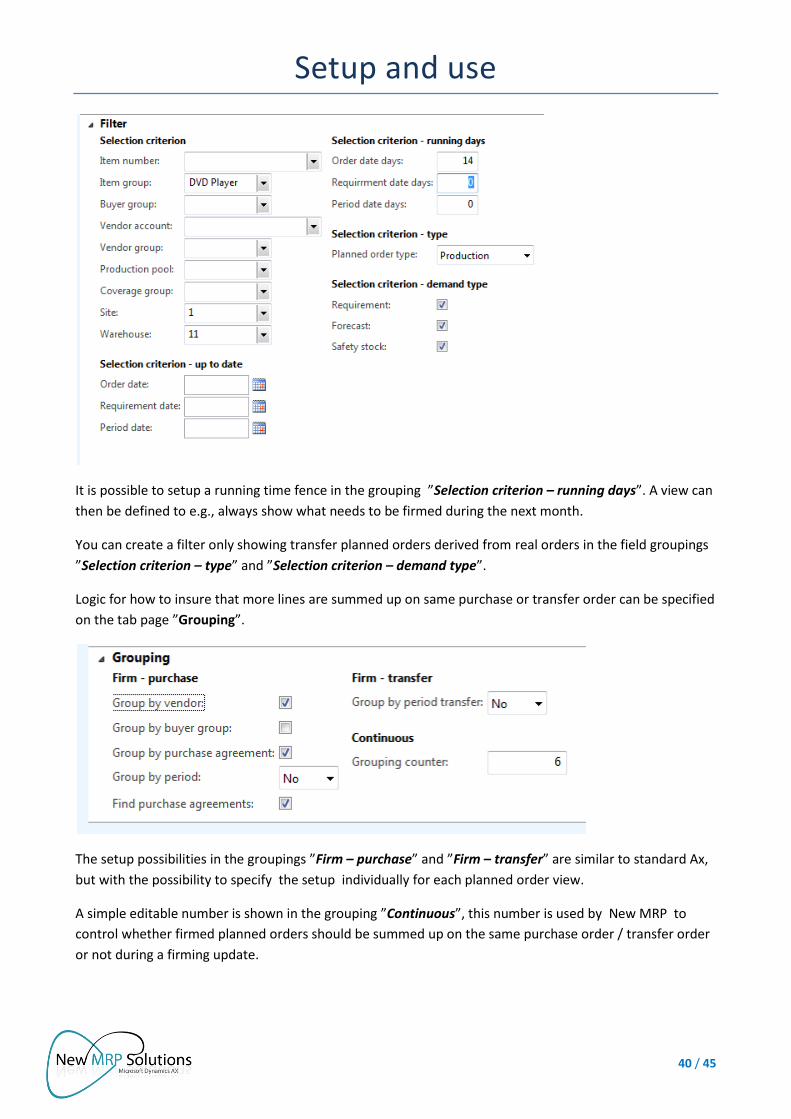
Simple filters and fixed criteria are specified at the tab page ”Filter” as shown below:
Setup and use
40 / 45
It is possible to setup a running time fence in the grouping ”Selection criterion – running days”. A view can
then be defined to e.g., always show what needs to be firmed during the next month.
You can create a filter only showing transfer planned orders derived from real orders in the field groupings
”Selection criterion – type” and ”Selection criterion – demand type”.
Logic for how to insure that more lines are summed up on same purchase or transfer order can be specified
on the tab page ”Grouping”.
The setup possibilities in the groupings ”Firm – purchase” and ”Firm – transfer” are similar to standard Ax,
but with the possibility to specify the setup individually for each planned order view.
A simple editable number is shown in the grouping ”Continuous”, this number is used by New MRP to
control whether firmed planned orders should be summed up on the same purchase order / transfer order
or not during a firming update.
Setup and use
41 / 45
The number can be changed at any time. It is used when a planned order is selected for firming to decide
whether the selected planned order should be firmed to a new purchase order or not.
If selecting several planned orders for the same vendor, all orders will be assigned the same number if the
general grouping setup specifies that they should be firmed to the same purchase order by a check mark in
the field ”Group by vendor”.
Selected planned orders with the same number will be created on the same purchase order during firming.
Before the firming, the user can then manually change the number and also control individually for each
line whether the selected planned order should be summed up on the same purchase order or not.
The general setup is only used as a proposal and can be changed by the user afterwards during the planned
order handling.
Planned order dialog box
When pressing the button ”Planned orders” a dialog box showing planned orders according to the specified
view filter setup appears.
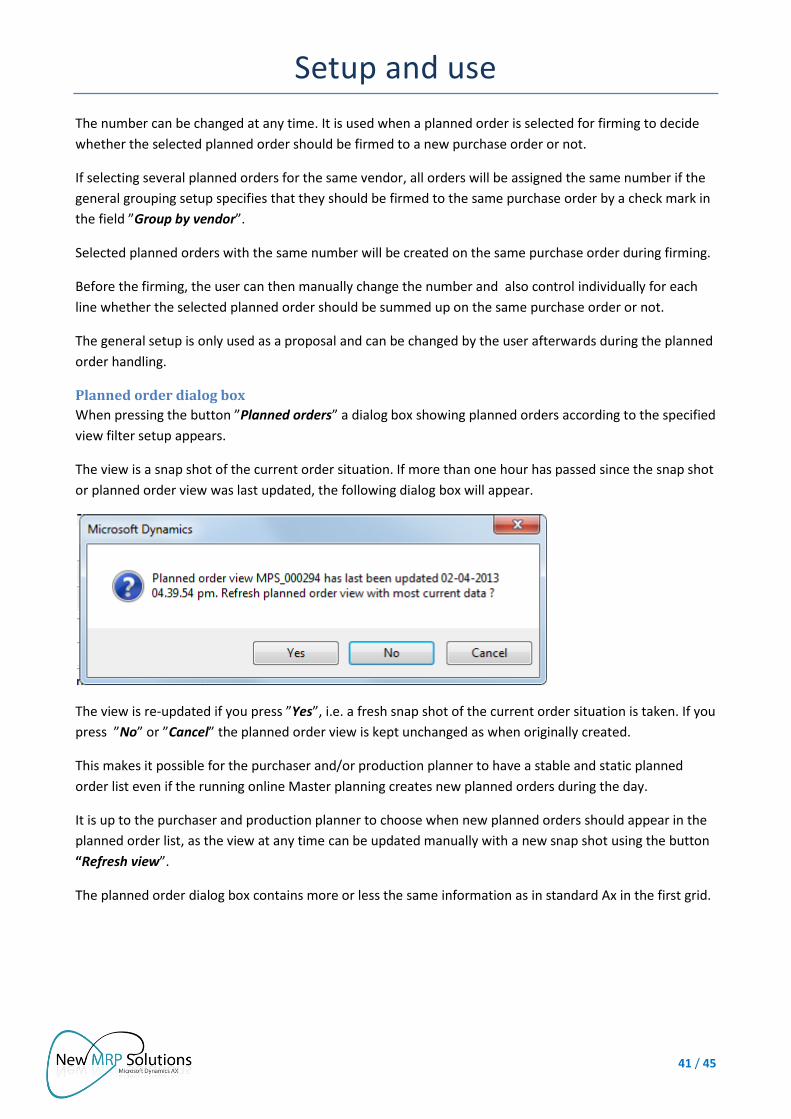
The view is a snap shot of the current order situation. If more than one hour has passed since the snap shot
or planned order view was last updated, the following dialog box will appear.
The view is re-updated if you press ”Yes”, i.e. a fresh snap shot of the current order situation is taken. If you
press ”No” or ”Cancel” the planned order view is kept unchanged as when originally created.
This makes it possible for the purchaser and/or production planner to have a stable and static planned
order list even if the running online Master planning creates new planned orders during the day.
It is up to the purchaser and production planner to choose when new planned orders should appear in the
planned order list, as the view at any time can be updated manually with a new snap shot using the button
“Refresh view”.
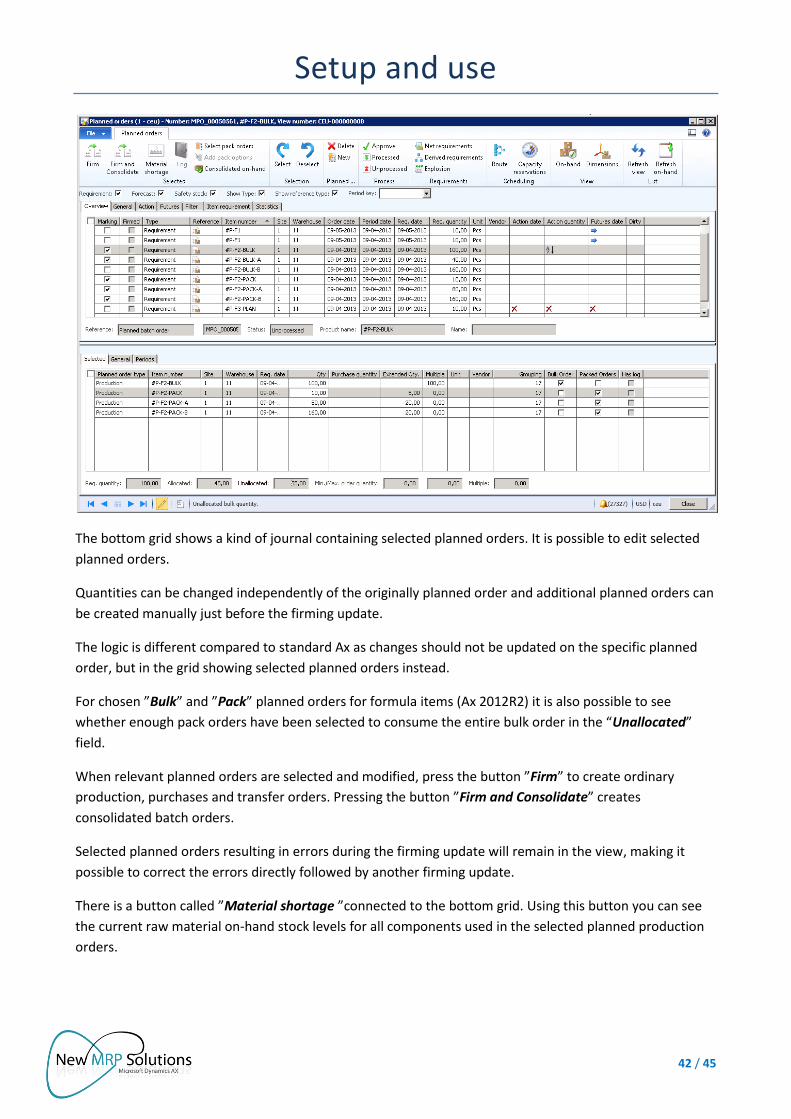
The planned order dialog box contains more or less the same information as in standard Ax in the first grid.
Setup and use
42 / 45
The bottom grid shows a kind of journal containing selected planned orders. It is possible to edit selected
planned orders.
Quantities can be changed independently of the originally planned order and additional planned orders can
be created manually just before the firming update.
The logic is different compared to standard Ax as changes should not be updated on the specific planned
order, but in the grid showing selected planned orders instead.
For chosen ”Bulk” and ”Pack” planned orders for formula items (Ax 2012R2) it is also possible to see
whether enough pack orders have been selected to consume the entire bulk order in the “Unallocated”
field.
When relevant planned orders are selected and modified, press the button ”Firm” to create ordinary
production, purchases and transfer orders. Pressing the button ”Firm and Consolidate” creates
consolidated batch orders.
Selected planned orders resulting in errors during the firming update will remain in the view, making it
possible to correct the errors directly followed by another firming update.
There is a button called ”Material shortage ”connected to the bottom grid. Using this button you can see
the current raw material on-hand stock levels for all components used in the selected planned production
orders.

Setup and use
43 / 45
The dialog box shows, across all BOM levels independent of whether BOMs have been created as phantom
lines, a complete explosion to the raw material level with exact calculations of consumption quantities.
Furthermore, it is possible to perform an inquiry for several planned production orders simultaneously. All
selected planned production orders with the same grouping number are exploded and subsequently shown
with the summed raw material consumption.
It is hereby possible in a simple manner to examinate whether all parts are in the house before firming any
planned orders.
Wanted production order status after a firming update can individually be specified for each selected
planned order on the tab page ”General” in the field grouping ”Planned production orders”.
You can select ”Created” and make it possible to fix potential route errors before cost estimation and
production planning.
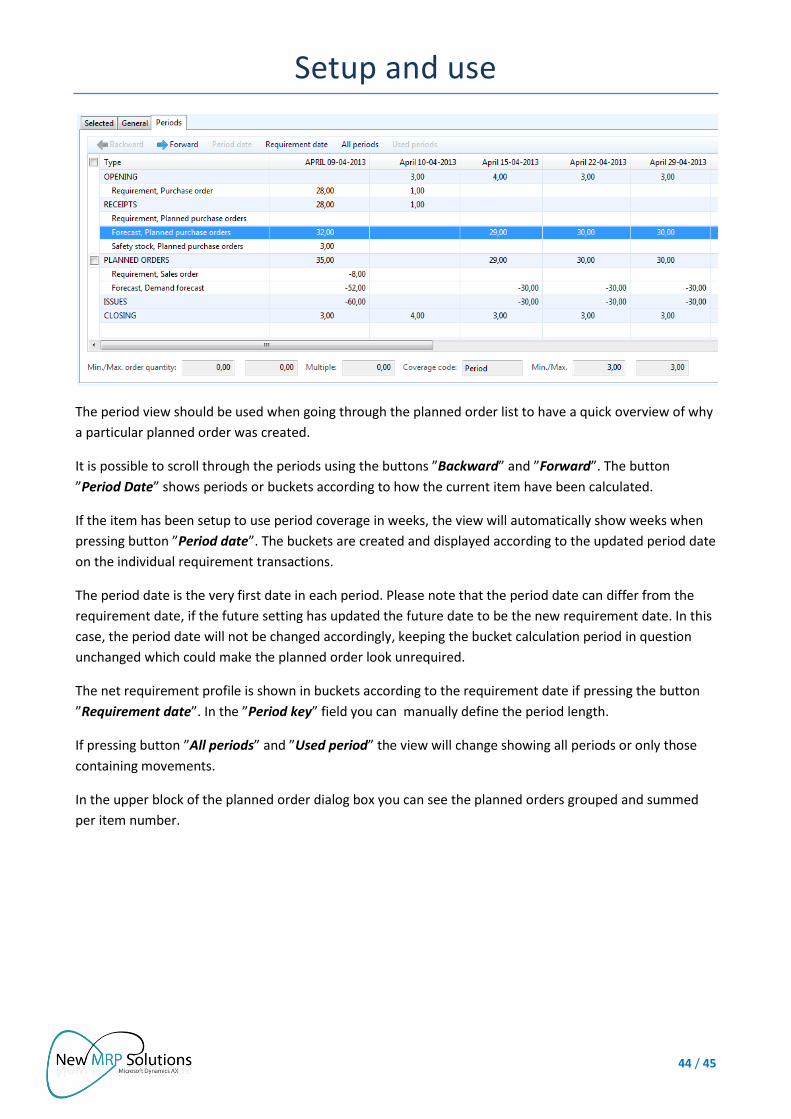
The tab page ”Periods” in the bottom grid shows how the inventory level develops in periods or buckets.
The blue marked line follows the current selected planned order in the first block.
Setup and use
44 / 45
The period view should be used when going through the planned order list to have a quick overview of why
a particular planned order was created.
It is possible to scroll through the periods using the buttons ”Backward” and ”Forward”. The button
”Period Date” shows periods or buckets according to how the current item have been calculated.
If the item has been setup to use period coverage in weeks, the view will automatically show weeks when
pressing button ”Period date”. The buckets are created and displayed according to the updated period date
on the individual requirement transactions.
The period date is the very first date in each period. Please note that the period date can differ from the
requirement date, if the future setting has updated the future date to be the new requirement date. In this
case, the period date will not be changed accordingly, keeping the bucket calculation period in question
unchanged which could make the planned order look unrequired.
The net requirement profile is shown in buckets according to the requirement date if pressing the button
”Requirement date”. In the ”Period key” field you can manually define the period length.
If pressing button ”All periods” and ”Used period” the view will change showing all periods or only those
containing movements.
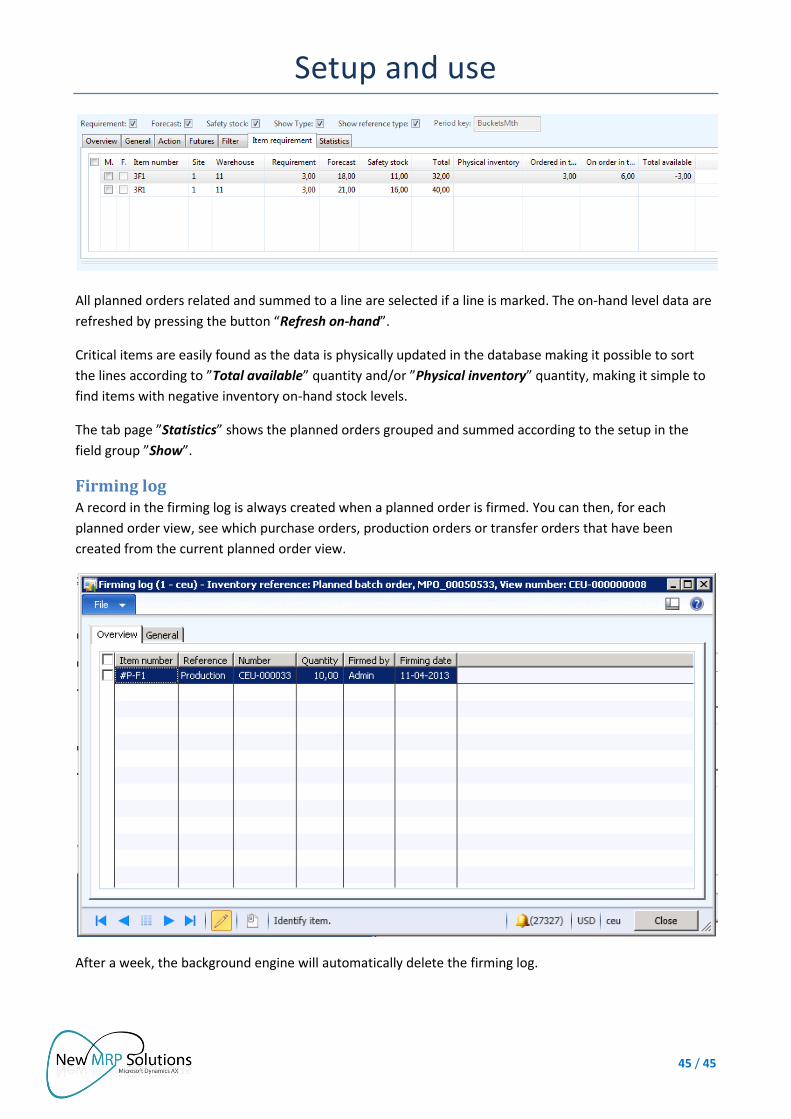
In the upper block of the planned order dialog box you can see the planned orders grouped and summed
per item number.
Setup and use
45 / 45
All planned orders related and summed to a line are selected if a line is marked. The on-hand level data are
refreshed by pressing the button “Refresh on-hand”.
Critical items are easily found as the data is physically updated in the database making it possible to sort
the lines according to ”Total available” quantity and/or ”Physical inventory” quantity, making it simple to
find items with negative inventory on-hand stock levels.
The tab page ”Statistics” shows the planned orders grouped and summed according to the setup in the
field group ”Show”.
Firming log A record in the firming log is always created when a planned order is firmed. You can then, for each
planned order view, see which purchase orders, production orders or transfer orders that have been
created from the current planned order view.
After a week, the background engine will automatically delete the firming log.