Settings and Youresources.avid.com/SupportFiles/attach/Settings_and_You_R2.pdf · Settings and You...
22
Settings and You An Informative Guide to Settings Within Avid Editor Products Contents Avid Settings File Familiarize Yourself With The Settings Tab Renaming an Avid User Profile Types of Settings Files Location of Commonly Used Settings Files Saving Settings Deleting Settings Do not X out the Settings folder Recovering From An X’ed Out Settings folder Backing Up Settings Settings Quick Reference Guide Streamlining Workflow Avid Settings File From the Settings list in the Project window, you can view, select, open, and alter various User, Project, and Site settings. Familiarize Yourself With The Settings Tab Within your Avid editing application is the Settings tab. The Settings tab is located within the Project window. If you’re having trouble locating your Project window or the Settings tab, either can be quickly located by going to the Edit menu and choosing Preferences. When chosen the Settings tab should flash several times, identifying its location. The Settings tab is broken up into four columns, Active Setting, Settings Type, Settings Name, and Settings Identifier each with its own unique function within the Avid editing application. If you’re unable to see all four columns within the Project window, the horizontal scroll bar at the bottom or expanding the window will display them. Active Setting: The Active Setting column is illustrated below by the highlighted region. Any setting denoted with a check mark is an active setting. The Active Setting column is primarily used in conjunction with duplicate settings.
Transcript of Settings and Youresources.avid.com/SupportFiles/attach/Settings_and_You_R2.pdf · Settings and You...
Settings and YouAn Informative Guide to Settings Within Avid Editor Products
ContentsAvid Settings FileFamiliarize Yourself With The Settings TabRenaming an Avid User ProfileTypes of Settings FilesLocation of Commonly Used Settings FilesSaving SettingsDeleting Settings
Do not X out the Settings folderRecovering From An X’ed Out Settings folder
Backing Up SettingsSettings Quick Reference GuideStreamlining Workflow
Avid Settings File
From the Settings list in the Project window, you can view, select, open, and alter various User, Project, and Site settings.
Familiarize Yourself With The Settings Tab
Within your Avid editing application is the Settings tab. The Settings tab is located within the Project window. If you’re having trouble locating your Project window or the Settings tab, either can be quickly located by going to the Edit menu and choosing Preferences. When chosen the Settings tab should flash several times, identifying its location.
The Settings tab is broken up into four columns, Active Setting, Settings Type, Settings Name, and Settings Identifier each with its own unique function within the Avid editing application. If you’re unable to see all four columns within the Project window, the horizontal scroll bar at the bottom or expanding the window will display them.
Active Setting:
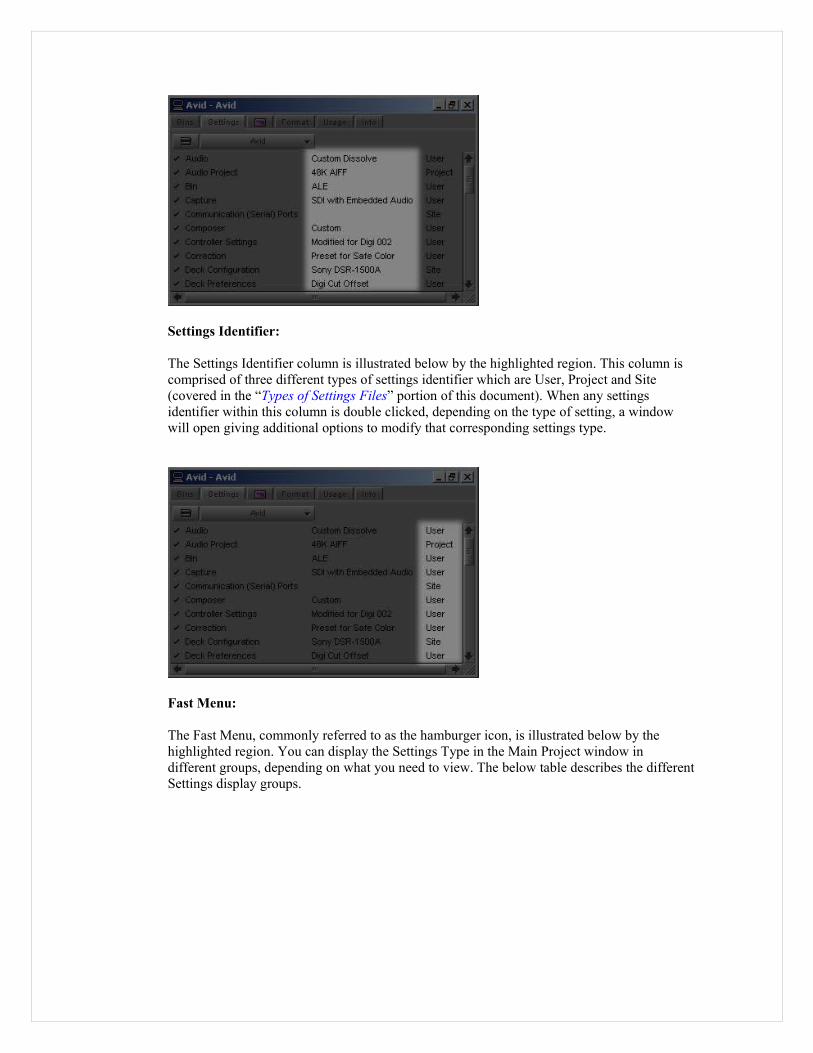
The Active Setting column is illustrated below by the highlighted region. Any setting denoted with a check mark is an active setting. The Active Setting column is primarily used in conjunction with duplicate settings.

Settings Type:
The Settings Type column is illustrated below by the highlighted region. This column gives a brief description of the options that will change within the Avid editor application if modified. When any setting type within this column is double clicked, depending on the type of setting, a window will open giving additional options to modify that setting.
Settings Name:
The Settings Name column is illustrated below by the highlighted region and allows for user input. Some common uses for this column include noting the type of customized settings within the Settings Type (illustrated below) and using the Activate Settings Linked By Name function within the Workspace settings or Link Current to… within the Toolset menu (covered in the “Streamlining Workflow” portion of this document).
Settings Identifier:
The Settings Identifier column is illustrated below by the highlighted region. This column is comprised of three different types of settings identifier which are User, Project and Site (covered in the “Types of Settings Files” portion of this document). When any settings identifier within this column is double clicked, depending on the type of setting, a window will open giving additional options to modify that corresponding settings type.
Fast Menu:
The Fast Menu, commonly referred to as the hamburger icon, is illustrated below by the highlighted region. You can display the Settings Type in the Main Project window in different groups, depending on what you need to view. The below table describes the different Settings display groups.

Settings Display Groups:
Option Description
Active Settings
Displays currently active settings
All Settings Displays all settings available
Base Settings Displays Project, User, and Site settings only; no views are displayed
Bin Views Displays all the Bin View settings created
Export Settings
Displays all the Export settings
Import Settings
Displays all the Import settings
Timeline Views
Displays all the Timeline View settings created
Title Styles Displays all the templates created for the Title tool
Workspaces Displays all the Workspace settings created
Workspace Linked
Displays only the linked workspaces
User Profile Selection:
The User Profile Selection is illustrated by the highlighted region below. This drop down menu allows the changing between user accounts without having to exit the project. This drop down menu also allows you to import and export existing user profiles for quick customization. The Update User Profile is covered later in the “Recovering From An X’ed Out Settings folder” portion of this document.

Renaming an Avid User Profile
To rename a user account within your Avid editing application:
1. Close the Avid editing application.
2. Follow the below chart for your respective operating system and Avid editing version to locate and rename each of the sections labeled as Avid user name.
Example:
Old .ave name: Avid.aveNew .ave name: Editor.ave
Old .avs name: Avid Settings.avs*New .avs name: Editor Settings.avs*
*Note it is required to maintain the space between the “Name” and “Settings.avs”

Settings identifier
Avid Release Path File Names To
Change
User
Windows Vista:
3.x / 7.x and above
C:\Users\Public\Documents\Avid Media Composer\Avid Users\Avid user name\
Avid user name Settings.avs
Avid user name.ave
*Rename “Avid user name” to your choice of name
Windows XP:
All releases C:\Program Files\Avid\Avid editing application\Avid Users\Windows login\Avid user name\
Avid user name Settings.avs
Avid user name.ave
*Rename “Avid user name” to your choice of name
Mac OS X:
All releases MacHD\Users\Shared\Avid editing application\Avid Users\Avid user name\
Avid user name Settings.avs
Avid user name.ave
*Rename “Avid user name” to your choice of name
3. Launch the Avid editing application.
NOTE:This change can only be applied to User Profiles created within the root Avid User. The root Avid User Profile is derived from the operating system login. To change the root Avid User Profile create a new operating system user.
Types of Settings Files
There are three different types of settings (Project, Site and User) as indicated in the Settings Identifier field within your settings tab (covered in the “Familiarize Yourself With The Settings Tab” portion of this document).
Project:
Project settings are directly related to individual projects. When you change a Project setting, it affects all editors working on the project. Specific Project settings are stored in each individual project folder in their respective locations (covered in the “Location of Commonly Used Settings Files” portion of this document).

Site:
Site settings establish default parameters for all new users and projects on a particular system. They can apply to particular configurations of equipment installed at the site (for example, specification and node settings for an external switcher). They can also include other User or Project settings that you copy into the Site Settings window. Site settings are stored in a separate Settings folder in the root folder of the Avid editing application (covered in the “Location of Commonly Used Settings Files” portion of this document).
User:
User settings are specific to a particular editor. User settings reflect individual preferences for adjusting the user interface in the Avid application. Individual User settings are stored in each user folder (covered in the “Location of Commonly Used Settings Files” portion of this document).
Additional Settings Files
Specific plug-ins for Avid editing applications contain their own respective configuration settings, typically appended with .ini. These files are located in the C:\WINDOWS directory. The most common of these files are:
AvidFX5.X.iniBorisRed3.0.iniBorisFX BCC.ini
NOTE:When faced with potentially corrupted effects within the Effects Palette the above files can be deleted. On subsequent launches of the corresponding application/plug- in the file will return.
Location of Commonly Used Settings Files
The below table illustrates the location for the individual Types of Settings Files within your Avid editing application and the operating system file(s) associated with them.

PC Settings identifier
Avid Release Path File Name
Project
Windows Vista:
3.x / 7.x and above
Shared Projects:C:\Users\Public\Documents\Shared Avid Projects
Private Projects:C:\Users\ Windows login \Documents\Avid Projects
Avid project name settings.avs
Windows XP:
x.5.x and above
Shared Projects:C:\Documents and Settings\All Users\Shared Documents\Shared Avid Projects\Avid project name\
Private Projects:C:\Documents and Settings\Windows login\My Documents\Avid Projects\Avid project name\
Avid project name settings.avs
x.2.x and below
C:\Program Files\Avid\Avid editing application\Avid Projects\Avid project name\
Avid project name settings.avs
Site
Windows Vista:
3.x / 7.x and above
C:\Users\Public\Documents\Avid editing application\Settings\
MCStateSite_AttributesSite_Settings.avs
Windows XP:
3.x / 7.x and above
C:\Documents and Settings\All Users\Documents\Avid editing application\Settings
x.8.x and below
C:\Program Files\Avid\Avid editing application\Settings\
MCStateSite_AttributesSite_Settings.avs
User
Windows Vista:
3.x / 7.x and above
C:\Users\Public\Documents\Avid Media Composer\Avid Users
Avid user name Settings.avs
Windows XP:
3.x / 7.x and above
C:\Documents and Settings\All Users\Documents\Avid editing application\Avid user name
x.8.x and below
C:\Program Files\Avid\Avid editing application\Avid Users\Windows login\Avid user name\
Avid user name Settings.avs
MAC Settings identifier
Avid Release Path File to delete
Project All releases
Shared Projects:MacHD\Users\Shared\Avid editing application\Avid Projects\Avid project name\
Avid project name settings.avs

Private Projects:MacHD\Users\Mac login\Documents\Avid Projects\Avid project name\
Site All releases
MacHD\Applications\Avid editing application\Settings
MCStateSite_AttributesSite_Settings.avs
User All releases
MacHD\Users\Shared\Avid editing application\Avid Users\Avid user name\
Avid user name Settings.avs
Saving Settings
Within the Avid editing application are multiple ways to back up, save, auto save, export, and overwrite your settings and configurations for use with subsequent launches or archival purposes. All Settings identifiers, whether Project, Site, or Users, are saved or backed up in three primary ways. They are closing the Avid editing application, Save All, and the Site_Settings window.
Close Avid:This unbeknownst form of saving is the most common way of saving settings within the Avid editing application. Closing either the Avid editing application or the project window will force an auto save of the Avid User Profile and the Project settings. File -> Save All:This method will force an auto save of Avid User Profile and the Project settings without having to exit the Avid editing application or project.
Site_Settings window:All settings can be saved individually and independently from one another from within the Site Settings window (covered in the “Backing Up Settings” portion of this document).
Additional Methods
Toolset:
To save window placement within Avid editing applications:
1.) First select the Toolset you would like to change.
2.) Make your adjustments to window placement and size.
3.) Return to the Toolset menu and select Save Current.
Once selected the specific active Toolset will save your window placement to your Avid user profile for the next time you launch.
Export User or User Profile:
Located within the Settings tab drop down menu (Cover in the “User Profile Selection” potion of this document) you can create a user profile on one system,

export it to a server, and then import the same user profile from another system to the new system. Export the user profile as a Personal or Group profile.
When you select Personal, the user profile performs an auto-load and an auto-save every time you open a project. Every time the user profile is updated, it saves the new profile information. For example, you can create the user profile Jennie on one system, export it to another location (a server), and then import it to a different system. Any time you change the Jennie user profile, it updates to the server and when you open the Jennie user profile on either system, it uses the most updated Jennie user profile.
When you select Group, the user profile auto-loads but it does not auto-save.
Changes made to the user profile only affect the system on which the changes were made. The changes do not update to the server.
To export user settings to another user or user profile:
1. Click the Settings tab in the Project window.
2. Click the User Profile Selection menu, and select Export User or User Profile.
3. Select Personal or Group.
4. Navigate to the location where you want to place the user or user profile.
5. Click OK.
Deleting Settings
When faced with potentially problematic settings files within your Avid editing application it is a common practice to remove the associating files to the potentially bad setting. The following chart, covered in the “Location of Commonly Used Settings Files” portion of this document, illustrates not only the directory for potentially corrupt settings but also the file name of that setting. The below files in the File Name column when deleted will rebuild and default any attribute in the Settings tab appended with that particular Settings identifier (covered in the “Settings Identifier” portion of this document.

PC Settings identifier
Avid Release Path File Name
Project
Windows Vista:
3.x / 7.x and above
Shared Projects:C:\Users\Public\Documents\Shared Avid Projects
Private Projects:C:\Users\ Windows login \Documents\Avid Projects
Avid project name settings.avs
Windows XP:
x.5.x and above
Shared Projects:C:\Documents and Settings\All Users\Shared Documents\Shared Avid Projects\Avid project name\
Private Projects:C:\Documents and Settings\Windows login\My Documents\Avid Projects\Avid project name\
Avid project name settings.avs
x.2.x and below
C:\Program Files\Avid\Avid editing application\Avid Projects\Avid project name\
Avid project name settings.avs
Site
Windows Vista:
3.x / 7.x and above
C:\Users\Public\Documents\Avid Media Composer\Settings\
MCStateSite_AttributesSite_Settings.avs
Windows XP:
3.x / 7.x and above
C:\Documents and Settings\All Users\Documents\Avid Media Composer\Settings
x.8.x and below
C:\Program Files\Avid\Avid editing application\Settings\
MCStateSite_AttributesSite_Settings.avs
User
Windows Vista:
3.x / 7.x and above
C:\Users\Public\Documents\Avid Media Composer\Avid Users
Avid user name Settings.avs
Windows XP:
All releases
C:\Program Files\Avid\Avid editing application\Avid Users\Windows login\Avid user name\
Avid user name Settings.avs
MAC Settings identifier
Avid Release Path File to delete
Project All releases
Shared Projects:MacHD\Users\Shared\Avid editing application\Avid Projects\Avid project name\
Private Projects:
Avid project name settings.avs

MacHD\Users\Mac login\Documents\Avid Projects\Avid project name\
Site All releases
MacHD\Applications\Avid editing application\Settings
MCStateSite_AttributesSite_Settings.avs
User All releases
MacHD\Users\Shared\Avid editing application\Avid Users\Avid user name\
Avid user name Settings.avs
NOTE:To narrow down exactly what will be defaulted once a setting has been deleted please refer to the “Settings Quick Reference Guide” portion of this document.
Do Not X Out The Settings Folder
When troubleshooting possible corrupt user settings within Avid editing applications a common practice is to X out the Settings folder from the editing applications root directory. When X’ed out, the settings folder is no longer read by the editing application, forcing the program to generate a new Settings folder with fresh settings potentially correcting the immediate problem. All-be-it an effective troubleshooting step, this technique can potentially cause more problems resulting in unnecessary down time.
To examine the full extent of X’ing out the Settings folder two factors need to be taken into account; the contents of the Settings folder and the repercussions of hiding them. The following list explains the contents of the Settings folder, the files purpose, and common problems from an X’ed out Settings folder.
Avid License Data:
What does it do?This file contains the licensee information of the Avid editing application. The information compiled within this file is displayed on both the launch screen and Help -> About Avid editing application areas.
Common Problems:On the initial launch of the Avid editing application, after X’ing out the Settings folder, the program will look for the license data file in order to display its compiled information. If this file is missing the application will read “This software is unregistered” and prompt the user to agree to the license information. If this process is not done properly* the Avid editing application will continually prompt the user to agree to the license agreement often times resulting in unnecessary troubleshooting, down time and even a call into technical support.
*Click here for more information on how to properly register your Avid editing application
NOTE:The Avid License Data can be removed at any time in order to change the information on both the launch screen and the Help -> About Avid editing application areas. If the Avid License Data file is modified

within Notepad or Text Edit the Avid editing application will no longer read the file and will prompt the user to agree to the license information.
AvidDefaultPrefs.avs:
What does it do?This file contains vital custom bin views, export setting, and toolset information. The AvidDefaultPrefs is primarily used in conjunction with any Send To operations within Avid editing applications. To preview a list of AvidDefualtPrefs settings please refer to the “Saving Settings” portion of this document.
Common Problems:If the AvidDefaultPrefs are not recognized during the launch process the Avid editing application will default all bin views, export settings, and window positioning to “untitled”. Since specific functions within the Avid editing application rely on the AvidDefaultPrefs to operate, tasks such as Send To and Export will error resulting in unnecessary troubleshooting, down time and even a call into technical support.
NOTE:The AvidDefaultPrefs(MSPT, NC, XP).avs are the only files within the Settings folder that will not rebuild themselves. They can be recovered so long as the file is not deleted. For more information on recovering from an X’ed out Settings Folder please refer to the “Recovering From An X’ed Out Settings Folder ” portion of this document.
MCState:
What does it do?This file contains saved program and user configurations such as last window positioning and configuration (without an active Toolset present), last project type, last format type, last Avid user account, default project location, and forward and backward compatibility with Avid editing products.
The MCState is read and/or written during the launch process of Initializing AVX2 Host or by saving the Project window.
Common Problems:If the MCState file is missing the Select Project screen within the Avid editing application will default back to its original configuration. Most commonly Avid projects not saved in their respective locations (please refer to the “Location of Commonly Used Settings Files” portion of this document), particularly External projects, will not be displayed within the Select Project window.
SendToData:
What does it do?The SendToData file contains a list of programs available for sending data within Avid editing applications to third party programs. Adding applications within the Auto Launch drop down menu also adds them to the SendToData.
Common Problems:

If the SendToData file missing during the launch process the Auto Launch menu will not contain any programs. If the Send To function is executed, the Avid editing application will not auto launch/auto load the exported files until the third party program is added to the Auto Launch drop down menu.
Site_Attributes:
What does it do?This settings file keeps an inventory of what devices are potentially attached to the Avid editing system for example the type of DNA (Adrenaline, Mojo); external audio devices (Mbox, Digi 002), attached drive list, what model was last launched, whether AV2 effects were enabled, default and max stream count, machine automap enabled, and debug information.
This file is written/saved during the initialization of Macro Manager which is part of the internal scripting and debug support that is initialized just before the splash screen says ‘Reading Available Resolutions’.
Common Problems:Unknown.
Site_Settings.avs:
What does it do?When the Avid editing application opens a new project, it first searches the Site_Settings file and loads any settings (Site, User, or Project) placed here. The system then proceeds to load any Project and User settings not included in the Site_Settings file.
Common Problems:In some instances, particularly in shared storage environments, users will save customized configurations within the Site_Settings.avs file. These settings are vital particularly when in an Interplay environment as the Site_Settings.avs file can contain Interplay Folder, Server and User information. Most commonly if these customized configurations are missing during the launch process, customers will not be able to log into Interplay and could potentially have media that is offline.
NOTE:If you are using a user profile other than the default and you change to another project, the default user settings are loaded, even though the Project window still displays your non-default user profile name. You must reselect the user profile you want to have active.
Recovering From An X’ed Out Settings folder
If faced with any of the common problems listed in the “Do Not X Out The Settings folder” portion of this document, recovering lost settings is a relatively simple task.
1. Close out of your Avid editing application and navigate to the programs root level.
Example: C:\Program Files\Avid\Avid editing application MacHD\Applciations\Avid editing application
2. Within the root level of your Avid editing application drag your existing Settings folder to the desktop.
3. Un-x the xSettings folder and launch the Avid editing application.
4. Within the Avid editing application, go to the Settings tab within the Project window, click the drop down menu and select Update User Profile.
Once completed the Avid editing application should import the missing settings into your existing user profile.
NOTE:If any additional settings are missing from within the Settings tab they can be reincorporated into the user profile via the Site Settings window (covered in the “Troubleshooting Techniques” portion of this document).
Backing Up Settings
Using Site Settings:
When the Avid editing application opens a new project, it first searches the Site_Settings.avs file and loads site settings and any settings within the file. The system then proceeds to load any Project and User settings not included in the Site_Settings.avs file.
The Site_Settings file is located in the following folder:
drive:\Program Files\Avid\Avid editing application\Settings
Adding settings to the site settings files is useful if you need to establish global settings for all new users and projects, such as switcher settings, a specific start timecode for all sequences, or various customized features of the interface.
To load settings into the Site_Settings file:
1. Open a project with the settings you want to establish as Site settings. If a project does not already exist with the settings you want, create a project and make adjustments to the default settings as needed.
2. With the Settings tab active in the Project window, select the Site Settings from the Special menu at the top of the Avid editing application.
The Site_Settings window opens.
3. Click a Project or User setting in the Settings list in the Project window, or Ctrl+click multiple settings.
4. Drag and drop the selected setting to the Site Settings window.
Copies appear in the Site Settings window.
5. Close the Site Settings window.

All new users and projects opened from the Select Project dialog box use these settings as the default settings.
To back these files up to a specific directory choose Save Copy of File As… from the File menu instead of closing the Site_Settings window. Choose the destination for the saved settings and click Save. The resulting file will be a back up copy of specified settings with the Settings tab.
Settings Quick Reference Guide
Setting Type Setting Identifier Description
Audio User Sets the default audio pan; contains audio scrub options.
Audio Project Project Defines the audio settings for the project and defines the audio input and output methods.
Bin UserSets the auto-save interval, double-click preferences for bins, edit clips from bins parameters, and enables SuperBins.
Bin View User Selects and formats the information displayed in bins.
Capture User Defines how the Avid system captures and batch captures in specific situations.
Communication (Serial) Ports Site Sets a port for Remote Play and Capture.
Composer User Configures the display and behavior of buttons and information in the Playback, Source, and Record monitors.
Controller Settings User Sets the default controller, port selection, and custom controller buttons.
Correction User Sets the parameters for the Color Correction tool.
Deck Configuration Site Configures channels and decks into the system.
Deck Preferences User Sets preferences that affect all decks configured into the system.
Desktop Play Delay Site Opens the Video Display Settings.
Digital Cut User Appears in the Settings list to facilitate copying settings.
Dynamic Relink ProjectSets parameters that determine to which media files your clips should be linked when you are working in a MultiRez environment.
Effect Editor User Changes effect parameters by adjusting the appearance and operation of effects.
Export User Sets parameters for file export.
Film and 24p Project Sets parameters for edit play rate, ink number format, and transfer rate.
Full Screen Playback User Sets parameters for viewing your video on a full-screen monitor.
General Project Defines default values such as the default starting timecode and temporary file location for your project.

Grid User Defines the grid to use when you create effects.
Import User Sets parameters for file import.
Interface User Defines the appearance and function of certain interface elements.
Interplay Folder Project Allows you to specify a project directory on the asset manager to use for checking in media objects.
Interplay Server Site Allows you to specify the Avid Interplay Server location on the network.
Interplay User User Allows you to set the preference for accessing Avid asset manager.
Keyboard User Used to map commands from the Command palette to the keyboard.
Marquee Title User Allows you to select the Title tool for creating titles and provides options for promoting titles.
Media Creation ProjectSets parameters for video resolution and selects the drives for capturing, creating titles, importing, performing audio and video mixdown, and motion effects.
Media Services User Configures your Avid editing application to work with the Avid Interplay Media Services Broker.
Mouse User Allows you to set the speed of scrolling with the mouse wheel within the editing application.
Passthrough Mix Tool Project Opens the Passthrough Mix Tool
Port Server Site Sets up the LANshare client so its workspaces are recognized.
Remote Play and Capture Site Lets you use your editing application like a videotape recorder.
Render User Controls the size of imported graphics and rendered effects to ensure that the graphic or effect will be playable.
Safe Colors Project Sets the safe color parameters for the Color Correction tool.
Script User Sets the default display options for scripts imported using script integration.
Sound Card Configuration Site Configures Input and Output in Software only mode.
Timecode Window User Displays various timecodes in an adjustable window. Appears in the Settings list to facilitate copying settings.
Timeline User Contains general Timeline preferences.
Trim User Customizes the Trim mode environment.
Video Display ProjectAllows digital camera video input; enables support of cameras with video input; sets the mode and source for desktop video; enables Client monitor; sets effects preview options.
Video Input Project Opens the Video Input tool.

Video Output Project Opens the Video Output tool.
Workspace User Allows you to associate settings and windows with a workspace.
Troubleshooting Techniques
When facing possible corrupt user settings a common troubleshooting technique is to “trash settings”. The process of trashing settings is necessary to determine if the program will function in its default configuration without error. From that point it can be determined what the problematic setting is through following the steps listed below.
Throughout the entirety of this document we have analyzed what each individual settings function is within the Avid editing application. Using that knowledge the process of trashing settings should be relatively strait forward as to the why of narrowing down settings corruption.
Trash settings:
1.) Close the Avid editing application.
2.) Navigate to:
PC: C:\Program Files\Avid\Avid editing application\Settings MAC: MacHD\Applications\Avid editing application\Settings
Once there, delete the MCState, Site_Attributes, and Site_Settings. The function of these files is covered in the “Do Not X Out The Settings Folder” portion of this document.
3.) Launch the Avid editing application and stop on the Select Project screen.
Create a new test user and project:
4.) On the Select Project screen click the drop down menu next to User Profile and select Create User Profile. Type in a name and click OK.
5.) Back on the Select Project screen, click the New Project button. Type in a name for the new project, select a project format, and click OK.
Test the new settings:
6.) Launch the new project. Within the new project test to see if the problem has been fixed.
If the problem does not persist with the new settings, switch to the old user account via the settings tab. Test within the old user.*
If the problem does not persist with the old user settings, switch to the old project. Test within the old project.*
If the problem is still not present the problem is fixed.
*If any problem reoccurs during the testing process the problematic setting can be identified by opening the test “User name settings.avs” or “Project name settings.avs” file from the File -> Open Settings File menu. Once the list of settings is populated within the Site Settings

window, drag and drop a setting to the Settings tab within the Project window. A prompt window will appear giving you the option to Add or Replace. Either can be used. Once the setting has been replaced test to see if the problem has been fixed.
NOTE:The process of trashing settings does remove any original Avid user settings and or interface customizations.
Streamlining Workflow
Workspace:
A workspace is the arrangement and size of tool windows displayed on your Avid system. If you are accustomed to working with a particular group of windows arranged and sized in a particular setup, you can assign them to a workspace setting that you can then recall with a workspace button. For example, during capture you might want to display the Capture tool and Video Input tool in specific locations. During effects editing, you might want to display the Effect Palette and Effect Editor in particular locations and sizes.
While in a workspace, you can move tool windows or open and close tool windows. The next time you select that workspace, the tool windows appear with either:
• The arrangement from the last time you left the workspace
• The arrangement you set for the workspace, regardless of any changes you made
You can select your preference in the Workspace Settings dialog box.
You can assign up to eight buttons that allow you to switch between user-customized workspaces. This is useful if there is more than one user accessing the same Avid system. Each user can assign up to eight workspaces by using the workspace buttons. The buttons are assigned to the workspaces in the Settings list in the Project window in the order that they appear. For example, the W1 button is assigned to the first workspace that appears in the Settings list; W2 is assigned to the second workspace that appears in the Settings list; and so forth.
Linking User Settings and Workspaces:
User settings can be linked to a workspace. You can create a customized workspace, set up specific options in any Settings dialog box, and link them together by name.
For example, you can create an Audio workspace that opens the Audio Mixer tool and Audio tool. This workspace can also open a customized Timeline (with enlarged audio tracks and rubberbanding displays). You can also link this workspace to a Settings dialog box with customized options selected. You do this by creating a setting and giving it the same name in the Settings list in the Project window as the name of the workspace (covered in the “Familiarize Yourself With The Settings Tab” portion of this document”).
To link user settings and a workspace:
1. Create a new workspace setting.
2. Give the workspace a custom name.

3. Click a setting in the Settings list that you want to link to the new workspace. For example, click Timeline View. Adjust the Timeline to how you want it displayed (enlarged tracks, audio waveform, and so forth).
4. Give this Timeline View setting the same name you gave the workspace in step two.
5. Double-click another setting, (for example, Audio). Select the new options, (for example, Default Pan), and close the dialog box.
6. Give this setting the same name you gave the workspace in step 2.
7. Double-click the workspace you just created.
The Workspace Settings dialog box opens.
8. Click Activate Settings Linked By Name.
9. Click OK.
All the settings and the new workspace you created are activated.
Toolset:
You can use predesigned work environments (toolsets) that are suited to your most common tasks:
• Color Correction
• Source/Record Editing
• Effects Editing
• Audio Editing
• Capture
The Toolset menu provides you with five environments, or special-purpose workspaces, that include the following:
• Tools appropriate for the task
• A screen optimized for the task, screen resolution, and number of monitors
• A neatly organized workspace without overlapping windows

You can change the toolset workspace, restore it to the default arrangement, or link it to other settings. For example, you might want each toolset to appear with a different color scheme.
Customizing Toolsets:
To customize the toolset workspace:
1. Select Toolset > toolset (the toolset you want to customize).
2. Open other tools with which you want to work, and position them where you want them.
3. Select Toolset > Save Current.
The next time you select the customized toolset, it appears with your changes.
To remove your customizations:
Select Toolset > Restore Current to Default.
Linking Toolsets to Other Settings:
You can link the current toolset to custom User settings.
To link a toolset to another setting:
1. Select Toolset > toolset (the toolset you want to link).
2. Select Toolset > Link Current to.
The Link Toolset dialog box opens.
3. Click the Links to Current Toolset menu, and select Link to Named Settings.
4. Type the name of the other setting to which you want to link the toolset. For more information about creating and naming custom settings, see Working with Settings.
You can link toolsets only to User settings.
5. Click OK.
The active toolset is linked to the custom setting you specified.

You might want to link several toolsets to named settings but leave the other toolsets linked to a default, unnamed setting.
To link a toolset to an unnamed setting:
1. Select Toolset > toolset (the toolset you want to link).
2. Select Toolset > Link Current to.
The Link Toolset dialog box opens.
3. Click the Links to Current Toolset menu, and select Link to Unnamed Settings.
4. Click OK.
The active toolset is linked to all the unnamed settings in the Settings list.


![ADDITIONAL INFORMATION…2-4 [Additional Information] 2 Deleting Cookies 2.3 2.3 Deleting Cookies To delete cookies, tap [Menu] - [Settings] - [Delete Cookies] on the toolbar of the](https://static.fdocuments.net/doc/165x107/604f5d4f3a561b5e4e702299/additional-information-2-4-additional-information-2-deleting-cookies-23-23-deleting.jpg)