Setting up a SIP provider on a Siemens HiPath 3000...
10
Setting up a SIP provider on a Siemens HiPath 3000 PBX Pre requirements: - HiPath 3000 V6.0 / V7.0 / V8.0 PBX - HXG 1500 card - Broadband Internet Access - A sip provider account (sipgate, qsc...) - HiPath 3000 Manager E - About 10 minutes time to set it up First logon to the HXG 1500 and authenticate.
Transcript of Setting up a SIP provider on a Siemens HiPath 3000...

Setting up a SIP provider on a Siemens HiPath 3000 PBX
Pre requirements:
- HiPath 3000 V6.0 / V7.0 / V8.0 PBX
- HXG 1500 card
- Broadband Internet Access
- A sip provider account (sipgate, qsc...)
- HiPath 3000 Manager E
- About 10 minutes time to set it up
First logon to the HXG 1500 and authenticate.

Now select the Explorers tab, hit Voice Gateway and Internet Telephony Service Provider.
Rightclick your Provider and hit Edit Internet Telephony Service Provider.

Tick the Enable Provider check box and select the Provider Identifier (Provider 1) and verify that all those settings are
correct.

Now you have to setup your SIP logon, right click your created provider and hit Add Internet Telephony Station.
Enter your account details and press Apply.

Next you have to add an MSN which is the number that is sent out to your provider as caller number and used for
inbound calls.
Right click MSN and hit Add MSN. Insert your number the destination that will ring when this number is dialled and
press Apply.

Next right click Sip Parameters and select Edit Sip Parameters and change the maximum possible provider calls to a
valid number (calculate about 80kbit/s for one SIP call).
This is the HXG part finished press the Save button on the bottom of the window and close the explorer.

On the Manager E, select Lines/Networking and hit IP Trunks. In there create the same amount of B-Channels that
you have selected on the HXG card and select the same provider as in the network card and hit Add.
Under Routes rename the Trk Group 12 to your provider name.

Select the Routing Parameters tab and change the settings according to the picture.
Browse to least cost routing and activate it and set it to en-bloc sending.
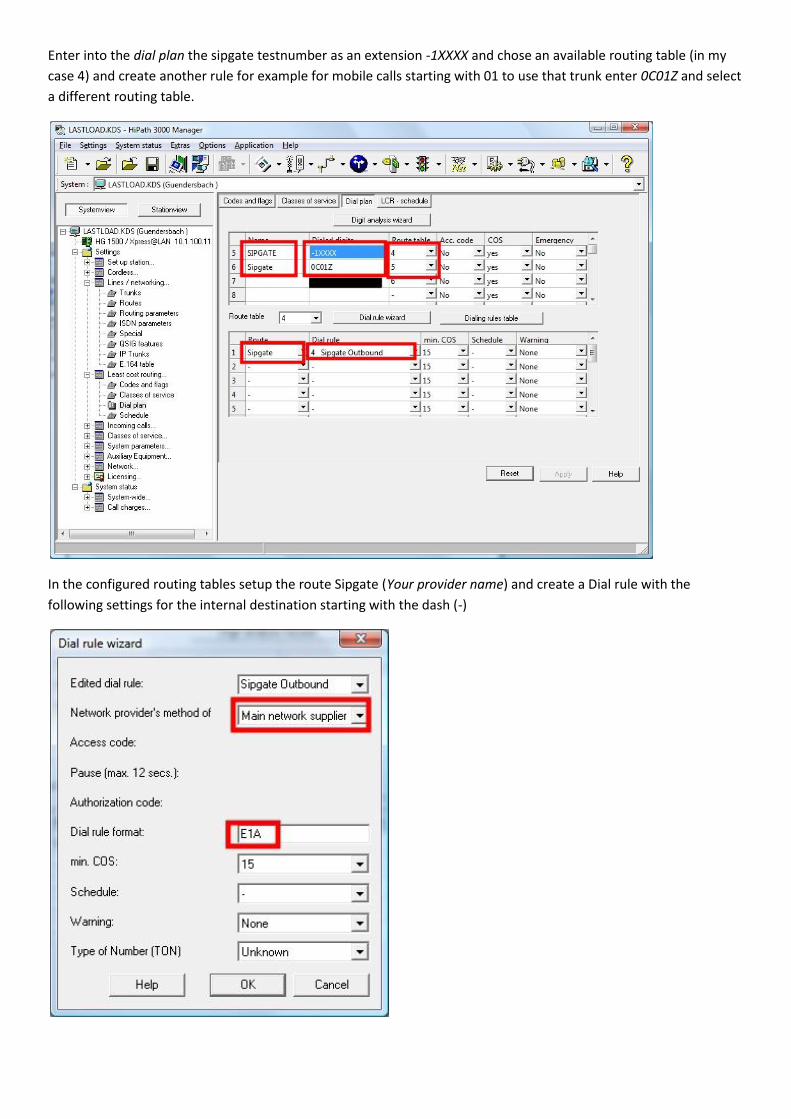
Enter into the dial plan the sipgate testnumber as an extension -1XXXX and chose an available routing table (in my
case 4) and create another rule for example for mobile calls starting with 01 to use that trunk enter 0C01Z and select
a different routing table.
In the configured routing tables setup the route Sipgate (Your provider name) and create a Dial rule with the
following settings for the internal destination starting with the dash (-)

For the mobile calls (external numbers) simply set the Dial rule format to A because it should send out every
information you dial
That’s it happy testing and phoning ;)


![HiPath Cordless Office for the HiPath 500 and HiPath …1].pdf · HiPath Cordless Office for the HiPath 500 and HiPath 3000 Series HiPath Cordless Office is the integrated cordless](https://static.fdocuments.net/doc/165x107/5b94e0d409d3f272648ba064/hipath-cordless-office-for-the-hipath-500-and-hipath-1pdf-hipath-cordless.jpg)