Servlets HTTP is used by the browsers to communicate with the web servers. In place of browser we...
43
Servlets Servlets HTTP is used by the browsers to communicate with the web servers. In place of browser we can develop our own programs using Socket API to communicate with a web server. According to HTTP the user agent/http client/browser sends a request for a resource and gets back response. According to the protocol the web server/http server sends the response with a status code. Most of the web servers are configured not to list the contents of a directory. Almost every web server provides an option of defining a list of files as welcome files. TOMCAT : Tomcat_home is a directory in which TOMCAT is installed. Ex: C:\Tomcat\Tomcat5.0 (most it look like C:\ jakarta- tomcat-5.0.19 /jakarta-tomcat-5.0.19 when you extracted zip file to C drive) Introduction to web applications
-
Upload
rhoda-king -
Category
Documents
-
view
216 -
download
2
Transcript of Servlets HTTP is used by the browsers to communicate with the web servers. In place of browser we...

ServletsServlets
HTTP is used by the browsers to communicate with the web servers. In place of browser we can develop our own programs using Socket API to communicate with a web server.
According to HTTP the user agent/http client/browser sends a request for a resource and gets back response. According to the protocol the web server/http server sends the response with a status code.
Most of the web servers are configured not to list the contents of a directory. Almost every web server provides an option of defining a list of files as welcome files.
TOMCAT :
Tomcat_home is a directory in which TOMCAT is installed. Ex: C:\Tomcat\Tomcat5.0 (most it look like C:\ jakarta-tomcat-5.0.19 /jakarta-tomcat-5.0.19 when you extracted zip file to C drive)
Introduction to web applications
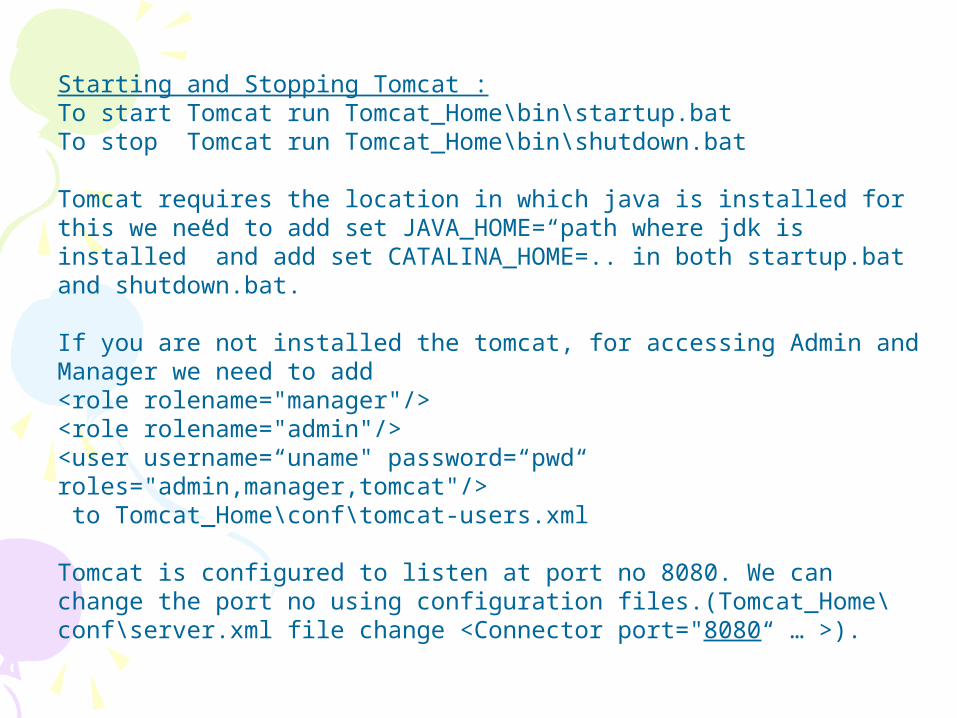
Starting and Stopping Tomcat :To start Tomcat run Tomcat_Home\bin\startup.batTo stop Tomcat run Tomcat_Home\bin\shutdown.bat
Tomcat requires the location in which java is installed for this we need to add set JAVA_HOME=“path where jdk is installed” and add set CATALINA_HOME=.. in both startup.bat and shutdown.bat.
If you are not installed the tomcat, for accessing Admin and Manager we need to add <role rolename="manager"/><role rolename="admin"/><user username=“uname" password=“pwd“ roles="admin,manager,tomcat"/> to Tomcat_Home\conf\tomcat-users.xml
Tomcat is configured to listen at port no 8080. We can change the port no using configuration files.(Tomcat_Home\conf\server.xml file change <Connector port="8080“ … >).

Request and Response formats :
Request format:
Initial request line header1 header2 header3 . . .
Body (optional)
Most of the browsers either implements http 1.0 or 1.1 protocol.
According to http initial request line contains
•Request method
•Requested resource
•Protocol version

Header is split into (1)Header name (2)Header value Ex: User-Agent : MSIE
Response Format:
Initial response line header1 header2 header3 . . . Body
In the response the server sets several heads like
• Server ----- Name of the server
•Content length ----- Length of the content
MIME is standard format in which different types of contents can be placed sdtandard format used by e-mail clients

Status codes:
1xx Informational message only
2xx Success of some find
3xx Redirects the client to another URL
4xx Error on clients part
5xx Error on servers part
Standard Request Methods:
•GET Used to request a resource
•HEAD Used to request only header part
•POST Used to send the data from client to server ex: when
we will fill the form the browser may send the data
•OPTIONS Used to identify the options supported by the browser
•PUT Used by the clients to ask the server to store the
content on it
•DELETE Used to ask the server to delete a file

Diff Btw Get and Post :
In our programs most of the time we will use GET or POST methods.
In HTML forms we can specify the method as POST or GET
When we use GET method the browser appends the form data to the URL but when we use POST method the data will not appended to the URL. Data will be placed as part of request body.
In order to upload files from browser to web server we can use <INPUT Type= “file”> for these types of forms we need to use POST instead of GET.
Web-Containers:
Java soft has released Servlet and JSP specifications publicly. There are so many vendors who has provided the implementation of these specifications. All these products are known as web containers.
A web application developer develops a web application using different resources like html pages, image files, servlets, jsp pages, ……………..

Configuring web applications:Configuring web applications:
Java soft has defined a standard approach for configuring web applications. Once the web application is configured we can deploy it on any of the available web containers.
Steps:
• Create WEB_APP_ROOT directory
• Under WEB_APP_ROOT create WEB_INF
• Create classes and lib directories under WEB_INF ( place java classes in classes directory and .jar files in lib directory)
• Create web.xml and place it under WEB_INF
•Create a WAR (Web Application Archive) file using java tool
for this move to WEB_APP_ROOT dir and use
jar cvf webapp.war .
Above command places all files in webapp.war

We use content paths to identify the web applications. Ex: http://localhost:8080/myweebapp1/index.html By default index.html is consider as a welcomefile. According to our application we can configure a different set of welcome files. Ex: <welcome-file-list> <welcome-file>index.jsp</welcome-file> <welcome-file>index.html</welcome-file> <welcome-file>index.htm</welcome-file> </welcome-file-list>
The web containers will not be sending the information about WEB_INF directory to the user agent.
Even though we can place all the files under the root it is not recommended.It is not recommended to use the absolute paths of the resource in a web application. We have to use relative paths.

Managing web applications in web containers:Managing web applications in web containers:
Most of the vendors provides the tools to manage the web applications. We can use these tools to upload our war files to the server and deploy them.
Ex: In Tomcat
•Use the URL http://localhost:8080
•Choose Tomcat Manager (by using uname and pwd given in config file)
•Choose the war file to be uploaded choose install
In Web Logic
•Login to web logic server using admin uname and pwd
•Choose deployments web applications node
•Choose configure a new application.
•Choose upload the war files
•Select the war file place it on server , configure and deploy it

Today most of the websites generates the content dynamically (when a request is send the web server, the content is generated)
First generation web servers are designed to serve the static content. Later on the web servers provided an option of extending its capability using CGI
A CGI program or script is the one that runs external to a web server.
Earlier most of the programmers has used CGI programs to generate content dynamically. The main problems with this approach are
•Server has to spend some time in starting a new process
•As web server gets too many requests the server has to create more no of processes and this reduces the performance.
As scripting languages are easier than programming languages most of the web developers has started writing web applications using scripting languages.
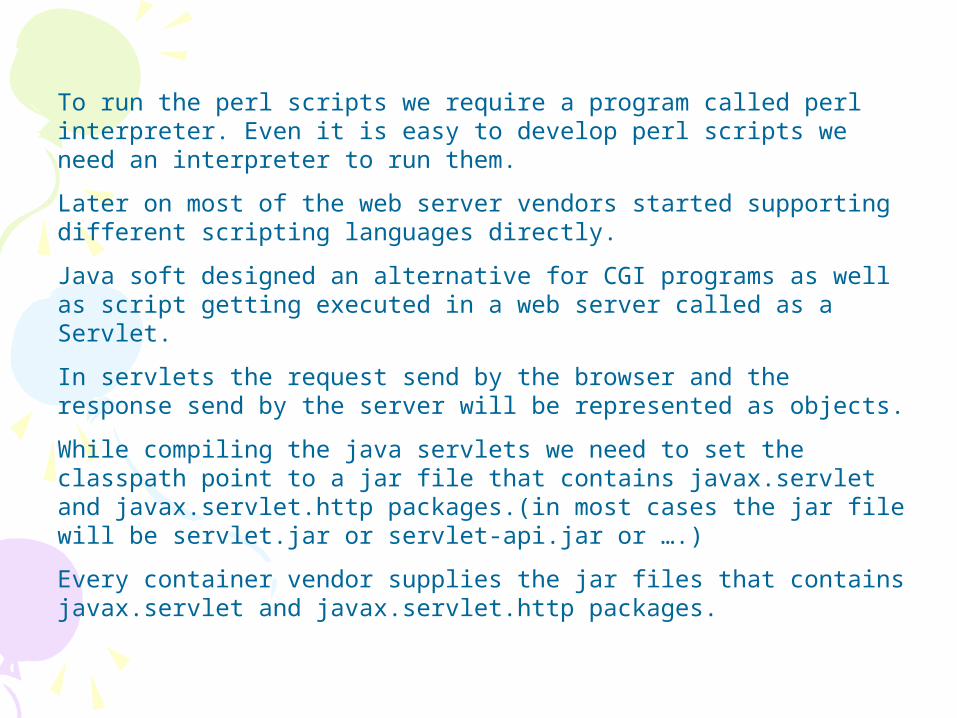
To run the perl scripts we require a program called perl interpreter. Even it is easy to develop perl scripts we need an interpreter to run them.
Later on most of the web server vendors started supporting different scripting languages directly.
Java soft designed an alternative for CGI programs as well as script getting executed in a web server called as a Servlet.
In servlets the request send by the browser and the response send by the server will be represented as objects.
While compiling the java servlets we need to set the classpath point to a jar file that contains javax.servlet and javax.servlet.http packages.(in most cases the jar file will be servlet.jar or servlet-api.jar or ….)
Every container vendor supplies the jar files that contains javax.servlet and javax.servlet.http packages.

Deploying servlets:
After developing the servlet classes to deploy the servlets,
•Copy the servlet classes under WEB_APP_ROOT/WEB-INF/classes
•Modify web.xml by adding the information about the servlet element as <servlet> <servlet-name>servlet1</servlet-name> <servlet-class>class of servlet</servlet-class> </servlet> <!-- mapping our servlet --> <servlet-mapping> <servlet-name>servlet1</servlet-name> <url-pattern>/serv1</url-pattern> </servlet-mapping>
We can use any url pattern like * or *.do or *.xyz etc…
ex: <url-pattern>/*</url-pattern>

To get the name of the user agent we can use
stringbuffer = request.getHeader(“USER_AGENT”);
We can get the list of all headers using
Java.util.Enumuration list = request.getHeaderNames
To invoke a servlet from our applications ( standalone java apps/applets/servlet/ejb …)
• Establish a socket connection with web server
• Send http request to the server
• Read the response
Servlets are initially designed to extend any type of server (web server/ ftp server / smtp …) but almost all the companies has implemented this technology to extend http servers.
In object oriented projects to eliminate redundancy we will be using class hierarchy as,

server
Code applicable to all servers
ftp server
Code applicable to ftp servers
http server
Code applicable to http servers
X server
Code applicable to x servers
…..
In above ex, code specific to web server in http server class, code specific to ftp server in ftp server class … and code that is common to all the servers is implemented in server class.
Servlet class hierarchy:
javax.servlet.Servlet
javax.servlet.GenericServlet
Javax.servlet.http.HttpServlet
implements
extends
i
c
c

A servlet is an object that provides the implementation of javax.servlet.Servlet interface.
Web app1
sc
sc
Web app2
sc
sc
Web app n
Our servlets
Servlet context
Servlet config
Web container
. . . . . . . . . . . .
Web container must provide one ServletConfig object to a servlet.
ServletContext is also called as application object.

javax.servlet.Servlet has the following methods
• init – called by the web container after our servlet object is created.
• service – called when the client sends the request.
• destroy – called before our servlet object is removed.
A servlet life cycle has 3 stages, (a) servlet is created (b) servlet will provide the service (c) servlet will be destroyed.
getServletInfo() must return a string describing the purpose of our servlet.
getServletConfig() method must return the servlet config associated with the servlet.
It is the responsibility of servlet containers to create the servlet objects and destroy.
<load-on-startup>10</load-on-startup> where 10 is the priority.
If we use it, the web container will be created our servlet object when our application is deployed.

A servlet object is created
• At the startup if we use load-on-startup
• When the initial request is send and the servlet is not yet available or
• Whenever it is required.
Servlet object will be destroyed
• When the web application is undeployed
• Whenever the server wants to remove.
The GenericServlet implemented as part of javax.servlet package provides the implementation of init method and getServletConfig method that fits almost all the servlets.
javax.servlet.http.HttpServlet provides the implementation of service method.
We can implement a servlet as a sub class of GenericServlet.

service method of GenericServlet takes ServletRequest and ServletResponce as parameters.
HttpServletRequest and HttpServletResponce contains methods specific to http and same as with ftp.
If we create a servlet as subclass of GenericServlet we may need to write common code like converting the reference of type ServletRequest, ServletResponce to HttpServletRequest and HttpServletResponce.
This can be eliminated by creating our servlet as a subclass of javax.servlet.http.HttpServlet.
ServletRequest ServletResponce
HttpServletRequest
FtpServletRequest
HttpServletResponce
FtpServletResponce

Inside the servlet containers our servlets are pointing by using reference of type javax.servlet.Servlet.
Whenever a method is called on an object the JVM will start searching for the method from the class based on which the object is created. If it is not available then the method will be searched in the super class.
The containers always calls the methods exposed by Servlet interface.
init(ServletConfig) { init() }
service(ServletRequest, ServletResponce) {service(HttpServletRequest,HttpServletResponce) }
service(HttpServletRequest,HttpServletResponce) {doXXX() }
The implementation of doXXX methods of HttpServlet sends an error to the user agent.

To report an error from our servlets we can use response.SendError(“status code”)
Before we start development of any solution we need to understand the business requirements and functional specifications.
We can use request.getParameter to get values sumbitted using a form.
Instead of using System.out for debugging its better to use log method. The data will be stored in a destination like in a log file or as database.
To know the location of log file we need to read the documentation of the container.
Typical sequence of steps we carry out in a servlet to process the form (a) Read the i/p params (b) validate the i/p (c) process the i/p (d) generate the view.

Instead of hard coding we can place the information as servlet initialization parameters or context parameters.
driverManager.registerDriver(driver); con=DriverManager.getConnection(url,dbuser,dbpass);In above ex, instead of hard code we have used variables. Values of these variables can be picked up from web.xml file.
ServletConfig provides the methods getInitparameter() and getInitParameterNames(). As this is implementation of GenericServlet we can call these methods in our servlet.
String driver = getInitParameter("driver");String url = getInitParameter("dburl");
Above code reads the initialization parameters.
In web.xml we can add the names of initialization parameters,

<init-param><param-name>driver</param-name><param-value>oracle.jdbc.driver.OracleDriver</param-value></init-param><init-param><param-name>dburl</param-name><param-value>jdbc:oracle:thin:@localhost:1521:orcl</param-value></init-param>
If multiple servlets uses the same set of parameters instead of placing them as servlet initialization parameters we can use context parameters.<context-param> <param-name>name1</param-name> <param-value>value1</param-value> </context-param>
getInitparameter() available in ServletContext will be getting the initialization parameters configured as context parameters.

ServletContext scon = getServletContext();
url = scon.getInitParameter(“dburl”)
1st line gets the reference of servlet context
2nd line gets context parameter.
We can add any no of context parameters in web.xml file.
The web container is responsible for reading context parameters from web.xml and place them in ServletContext. For every servlet the container is responsible for creating ServletConfig and store the init parameters in this object.
public class init extends HttpServlet {
public void doGet(…) {
HttpServletRequest req;
HttpServletResponce res;
out.getInitParameters(“name”);
}

public void init(ServletConfig config) throws ServletException{
System.out.println(ServletConfig.getInitParameter(“name”);
}
Above code in doGet() will be failing to get the initial parameters. To avoid this failure we need to add super.init(config) if init method is overridden.
Methods like getInitParameter, getServletConfig, getServletContext, log available in GenericServlet will fail if we write code with calling super.init().
Instead of overriding init(ServletConfig) we can override init()
We can store the strings as resource bundles instead of hard coding the strings in source code.
Its very common to submit the information using multiple forms ex: user registration form can be split-up into multiple forms.

page1 page3 page2
In above ex information is gathered from the user using 3 different forms. Once the user fills the 1st page he gets the 2nd page after it is filled he gets 3rd page. Once the 3rd page filled, information will be saved in database.
If the protocol is designed to remember what is done earlier by the client then it is called as stateful protocol otherwise it is called as stateless protocol.
Http 1.0 as well as Http 1.1 are stateless protocols.
If we have application with multiple forms the web server will be able to give the information submitted in the current form, it will not be able to give us the info submitted earlier.

A web application can use following techniques to remember the state of the client.
(a) Hidden Fields (b) Cookies (c) Sessions using cookies (d) Sessions using URL rewriting.
We can use <input type= hidden name=“n1” value=“v1”> as part of our html forms. Browser will not be developing the info about the hidden fields.
If there are too many no of forms more amount of N/W traffic will be generated if we use hidden fields.
Cookie is a piece of info set by the server on the client using http.
We can use response.setCookie() to set a cookie on a browser, to get the cookies we can use request.getCookie()
Steps to set cookie:
• Create a cookie object cookie c1 = new cookie(name, value)
• Add the cookie response.addCookie(name)

Cookies are mainly used to serve personalized content according to user requirement.
Problems:
• If used heavily this generate more N/W traffic
• There are some limitations in some browsers in maximum no of cookies per domain.
It is not advisable to store sensitive info using cookie.
When we execute response.addCookie(), it adds set-cookie header to the response.
Browser sends back the cookie as part of request header as, cookies name1=value1&name2=value2
Most of the browsers provides an option of allowing or denying the cookies.
Most of web application developers displays a message saying that their web application works properly if the cookies are allowed.

The cookie class provides the methods setMaxAge, setDomain, setPath … In most of he cases we may not use these methods.
We can store any java object using session.setAttribute(key, java object) , request.setAttribute, ServletContext.setAttribute( key, jo)…
We can retrieve the objects by using session.getAttribute(key) request.getAttribute(key) ServletContext.getAttribute(key)
To remove the java object we can use xxx.removeAttribute(key)
The web containers can create the session objects on behalf of a client. For accessing the session object we use,
request.getSession(true/false). For every session object that is created a session id will be generated.
request.getSession(true) creates a session object if it is not already exists.

We can remove the session objects by using session.invalidate(). As the server can’t detect the closure of browser, the server deletes the session object after inactivatetimeout which can be configured in web.xml or we can use session.setMaxInactiveInterval(int)
session.setAttribute(“key1”,”value1”); session.setAttribute(“key1”,”value2”); session.getAttribute(“key1”); session.getAttribute(“key2”);
When 1st stmt executed value1 will be stored using key1 and when 2nd stmt executed value1 is removed and value2 is stored in key1. 3rd stmt gets value2 and 4th line gets null.
A web application based on session using cookie to carry session id may failed( if user doesn’t accept cookies). To overcome this we can use sessions maintain using URL rewriting technique.

To use URL rewriting in our servlets, we need to use response.encodeURL(string) instead of directly writing the URL.
When we use response.encodeURL, the URL will rewritten as, /xyz/abc + session id
This technique places a bit of burden on server ( server has to spend some time in writing URLs with session id).
To upload the files we have to use post method. In the form we can use any no of inputs. For files the input type must be specified as file.
There are so many file uploading components available in the market one such component is javazoom file upload component. You can see details at http://www.javazoom.net/jzservlets/uploadbean/uploadbean.html

To deals with upload files
• Create a newreq object using the class javazoom
• To get the list of the files we can use getFiles() – uses a list of files in a hash table.
To store the files:
• Create uploadBean
• Set the folder
• Set override policy
• Execute store method with newreq as parameter.
To read the parameter submitted as part of the form we can use newreq.getParameter()
Ex: book store provided by java soft

We can consider deploying a web application, un-deploying a web application, creating a session, adding an attribute, removing an attribute from ServletContext, HttpSession as events. We can write the code by implementing the listeners interface provided as part of javax.servlet.http package.
Names of the listener interface,
ServletContextListener, HttpSessionListener, ServletContextAttributeListener and HttpSessionAttributeListener
ContextInitialized is called when the application is deployed.
ContextDestroyed is called when the application is undeployed.
We can implement the above listeners and configure them as listeners in web.xml file as,
<listener><listener-class> Class Name</listener-class> </listener>

SessionListener interface has (a) sessionCreated – called when the session is created (b) sessionDestroyed – called when session is destroyed.
Whenever we need to add an object as soon as the session object is created. We can write the code in sessionCreated of HttpSessionListener.
Along with the cookie we can pass a comment indicating the purpose of the cookei using cookie.setComment()
Netscape 4.75 (old versions) stores the cookies in cookies.txt file and IE uses multiple files.
When we specify the age of the cookie the browser stores the info about the cookie in a file, (a) Name of the cookie (b) Value of the cookie (c) Path of cookie (d) Domain of the cookie and (e) Expire time of the cookie.

In most of the applications the parameters will not setting the path explicitly using setPath() In such case path of the cookie will be set to the path of resource.
It is very rare to use setDomain() on a cookie. By default domain value will be set to the domain name where the cookie is set ex: http://localhost or www.yahoo.com
A servlet running at www.domain1.com can’t set a cookie specifying the domain name of the cookie as www.domain2.com.
If the cookies are set by hotmail.com the browser will send back to hotmail.com only. This is why the browser stores the domain of a cookie.
While sending back the cookies, browser will check whether the path of requested resource is matching with the path of the cookie or not.
If we are running 2 web applications in same server one servlet in application1 can set a cookie that can be reuse by servlet in application2.
We can remove the cookie that is set earlier by setting its MaxAge to 0, if we have not used setMaxAge -1 will be used as default.
If MaxAge is -1 the browser will not storing the cookie in file, cookie will held in memory and its get deleted when the browser is closed.
We need to pass the no of seconds the cookie has to live. Ex: setMaxAge(600) – cookie will live 10 min.
We can assign multiple names like a.com, b.com, www.a.com … to the same machine. On the global internet the N/W administrators will be configuring the DNS servers with this mapping.
We can place the mapping between the name and ip address in C:/winnt/system32/drivers/etc (in 2000/NT) C:/windows/system32/drivers/etc (in win Xp). Ex: 102.54.94.97 xyz.com
abc.com

Http 1.1 supports virtual hosting – hosting the web site with different domain names on a single sever. This is supported by using the Host header.
According to Http 1.1 Host header is mandatory.
Using this header the web server will be able to identify the resource that has to be served.
It is very common to refer images, applets, activex controls in a webpage.
In older Http protocol the browsers used to establish a connection, sends the request, get the response, disconnect the connection. If we have a html file with 10 images embedded inside it. The browser has to repeat the same steps for 11 times. This may reduce the performance of browser as establishing a connection is time consuming process.
Browsers can send connection keep alive header asking the web browser to keep the connection alive. The server may or may not keep the connection alive.

Most of the web administrators either disable keep alive request or disable persistent connection or set the connection timeout to a small value.
If we expect too many concurrent users then to improve the performance of web server. We use small value for no of connections that are kept alive or we can total disable persistent connection.
Irrespective of the type of connection http is stateless.
Front Controller:
browsers1
s2 s3
FC
s1 s2 s3
The above web application uses Front Controller design pattern

In this design pattern we use one servlet to act as a controller sitting in front of other resources. In this design pattern all the requests will be first handled by FC then it dispatches the request to the appropriate resource.
The servlet engine internally uses RequestDispatcher to dispatch the request to the appropriate servlet or jsp. We can use ServletContext.getRequestDispatcher() to get the request dispatcher.
There are two methods (a) forward (b) include
Its very common to develop a web application with more servlets processing the same request.
We can use both include and forward to dispatch the request to other servlets. When we use include the outputs generated by both the servlets will be sent to the client when forward is used the output generated by 1st servlet will be discarded and only 2nd servlet output will be send to the client.

Difference between Request Forward and Redirect :
When we forward method only one request will be send by the browser and it is processed by two servlets/jsps. But when we SendRedirect method two requests will be send by the browser.
Ex:
class s2 { service() { ……………….. }
}
class s1 { service() { rd= sc.getRequestDispatcher(“/two”); ………… rd.forward(“req,resp); }
browsers2
s11
3
2
In this case browser sends the request to the resource s1, this will forward to s2 finally the browser will getting the response.

class s2 {
service() { ……… }
}
class s1 {
service() {
resp.sendRedirect(http://..../two); …..
}
browsers1
s2
12
34
In this case two different requests will send by the browser and it will get two responses.

Filters:
We can setup the files to perform the operations like logging, gathering performance statistics, user authentication, authorization of user to carryout some operation, compressing the output generated by servlet. We can also configure chain of filters.
A filter is a class that provides the implementation of javax.servlet.Filter. Life cycle methods of a filter are defined in this interface.
• When filter object is created by web container it calls init()
•Whenever there is a request that ha to be processed by the filter the container will call the method doFilter()
•When web container decides to remove the filter object then it will call destroy()
Filter chain object holds the details of objects (filter & resources like servlet/jsp/…)

We need to configure the web application with the info about the filters in web.xml as,
<filter> <filter-name> name </filter-name> <filter-class> class name <filter-class> </filter>
<filter-mapping> <filter-name> name </filter-name> <url-pattern> /* </url-pattern> </filter-mapping>
Most of the web containers creates the filter object and calls init() when the web application is deployed. When we undeploy the web application destroy() will be called and the filter object will be deleted.
See the URLs for more info on filters,
http://www.onjava.com/pub/a/onjava/2003/11/19/filters.html http://www.informit.com/guides/content.asp?g=java&seqNum=95

In most of the applications which generates content dynamically we need to set the expiry time. If the expiry time is not set, the browser assumes that the content will never expire. To set the expiry time we can use the,
Date d= new Date();
long l = d+6000;
response.setDateHeader(“Expires”,l);
When we use response.setDateHeader(“Expires”,l) a response header with name Expires will be added. It looks like,
Expires: Tue, 15 Nov 1994 08:22:31 GMT
Date: Tue, 15 Nov 1994 08:12:31 GMT
Every database driver sets a value for Fetchsize. In our programs we can use getFetchSize and setFetchSize. You can see more details at http://javaalmanac.com/egs/java.sql/GetFetchSize.html