Serial Communication between Arduino and LabVIEW
47
Serial Communication between Arduino and LabVIEW Using LabVIEW as a Graphical User Interface
Transcript of Serial Communication between Arduino and LabVIEW
Hans-Petter Halvorsen
https://www.halvorsen.blog
Serial Communication between
Arduino and LabVIEWUsing LabVIEW as a Graphical User Interface

• Introduction to Serial Communication with Arduino• Serial Monitor• Serial Plotter• Serial Monitor and Serial Plotter is nice to use since Arduino programs have no
GUIs– Note! Typically, you use Serial Monitor to present values for different variables– Send Data: You can also use the Serial Monitor to update variables, etc.– Examples
• In stead of using Serial Monitor and Plotter you can create similar (or better) functionality using LabVIEW– Create Serial Plotter in LabVIEW– Create LabVIEW GUI Interface that Communicates with the Arduino Code– Examples
• LabVIEW LINX
Contents

Hans-Petter Halvorsen
https://www.halvorsen.blog
Serial Communication with Arduino
Table of Contents

• Arduino is a Microcontroller• Arduino is an open-source platform
with Input/Output Pins (Digital In/Out, Analog In and PWM)• Price about $20• Arduino Starter Kit ~$40-80
Arduino UNO
with Cables, Wires, Resistors, Sensors, etc.
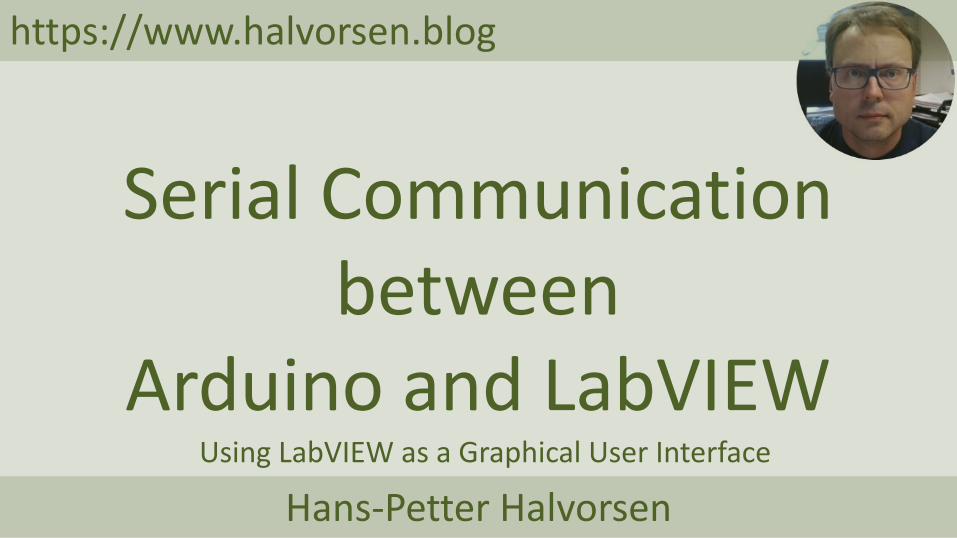
Configuration
Sensors
ArduinoPC
USB cable Type A-B
Arduino IDE
PC with the Arduino Programming Environment

Arduino Programming Environment
In this window you create your
Program
Compile and Check if Code is OK
Creates a New Code Window
Open existing Code
Upload Code to Arduino Board Save
Open Serial Monitor
Error Messages can be seen herewww.arduino.cc
The software can be downloaded for free:

• Serial.begin(9600)–Open the Serial Port and set Baud rate
• Serial.print(“Hello”)• Serial.println(“Hello”)• https://www.arduino.cc/reference/en/lan
guage/functions/communication/serial/
Serial CommunicationSpeed: Baud Rate in bits per second

Arduino Exampleint x = 0;void setup() {Serial.begin(9600);
}
void loop() {Serial.print(x);x++;delay(1000);
}

Hans-Petter Halvorsen
https://www.halvorsen.blog
Serial Monitor
Table of Contents

Serial Monitor

xxx

Arduino Exampleint x = 0;void setup() {Serial.begin(9600);
}
void loop() {Serial.println(x);x++;delay(1000);
}

xxx

Hans-Petter Halvorsen
https://www.halvorsen.blog
Serial Plotter
Table of Contents

Serial Plotter

xxx

Arduino Examplefloat x = 0;float y;
void setup() {Serial.begin(9600);
}
void loop() {
y = sin(x);Serial.println(y);
x = x + 0.1;delay(100);
}

Arduino Examplefloat x = 0;float y;
void setup() {Serial.begin(9600);
}
void loop() {y = sin(x);Serial.print(y);
y = cos(x);Serial.print("\t");Serial.println(y);
x = x + 0.1;delay(100);
}

Hans-Petter Halvorsen
https://www.halvorsen.blog
Send Serial Data
Table of Contents
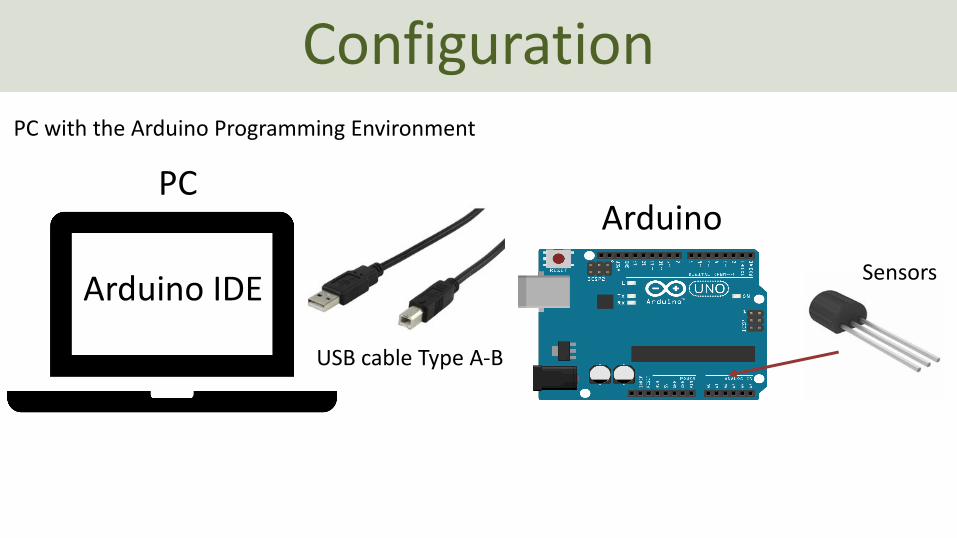
Send Serial DataWe can also send Serial Data using the Serial Monitor or the Serial Plotter

Examplechar input;
void setup() {Serial.begin(9600);Serial.println("Are you ready (Y/N)?");
}
void loop() {if (Serial.available()>0){input = (byte)Serial.read();
if (input == 'Y'){Serial.println("Great. You are ready");
}else if (input == 'N'){Serial.println("Let me know when you are ready");
}}delay(100);
}
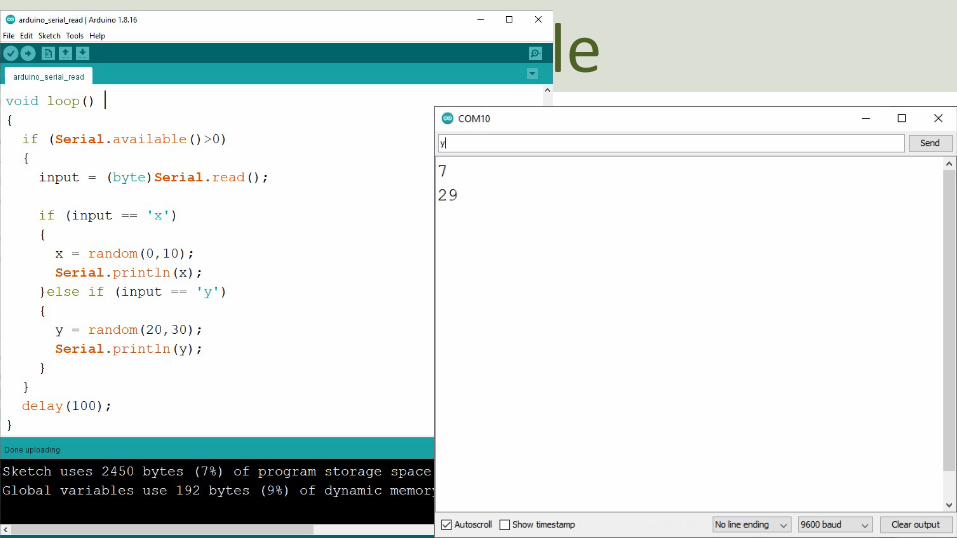
Example

Examplechar input;int x;int y;
void setup() {
Serial.begin(9600);}
void loop() {
if (Serial.available()>0){
input = (byte)Serial.read();
if (input == 'x'){
x = random(0,10);Serial.println(x);
}else if (input == 'y'){
y = random(20,30);Serial.println(y);
}}delay(100);
}

Hans-Petter Halvorsen
https://www.halvorsen.blog
LabVIEW Serial Arduino Plotter
Table of Contents

• LabVIEW is Graphical Software• LabVIEW has powerful features for
simulation, control and DAQ applications
LabVIEW
Basic LabVIEW Example:

Configuration
Sensors
ArduinoPC
USB cable Type A-B
LabVIEW

Arduino Code float x = 0;float y;
void setup() {Serial.begin(9600);
}
void loop() {y = sin(x);Serial.println(y);
x = x + 0.1;delay(100);
}
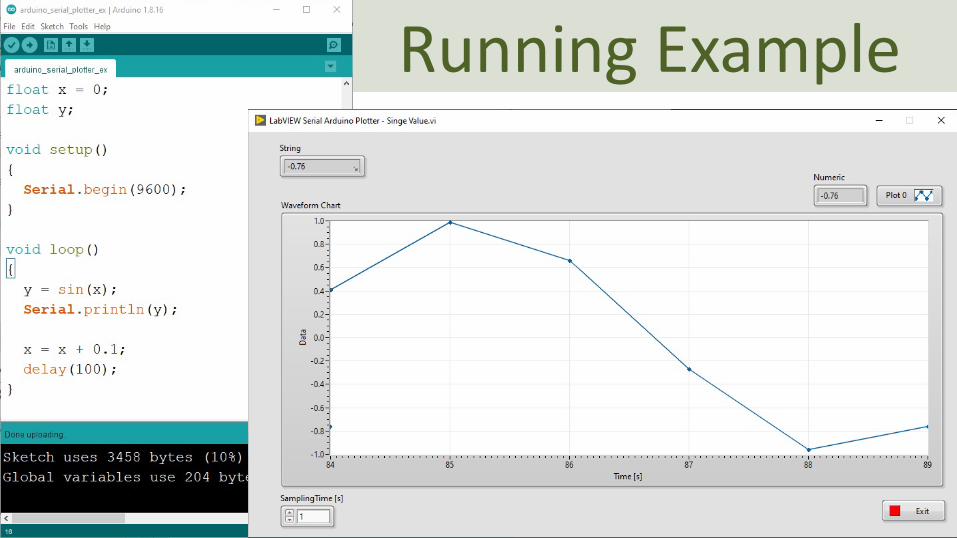
Running Example

LabVIEW Code

LabVIEW Code

LabVIEW Code

Multiple Data

Arduino Code double x = 5;void setup() {
Serial.begin(9600);}
void loop() {
x = random(1,100)/10.0;Serial.print(x);
x = random(1,100)/10.0;Serial.print("\t");Serial.print(x);
x = random(1,100)/10.0;Serial.print("\t");Serial.println(x);delay(1000);
}

LabVIEW Code

Hans-Petter Halvorsen
https://www.halvorsen.blog
LabVIEW GUI Interface
Table of Contents
LabVIEW GUI Interface that Communicates with the Arduino Code

xxx

Running Example

Arduino float a=1.0;float x;float y;
void setup() {Serial.begin(9600);
}
void loop() {if (Serial.available()>0){a = Serial.parseFloat();
}
x = random(0,100)/10.0; //Random Value between 0-10y = a*x;Serial.println(y);delay(1000);
}

LabVIEW Code

LabVIEW Code

LabVIEW Code

Hans-Petter Halvorsen
https://www.halvorsen.blog
LabVIEW LINX
Table of Contents

• The LabVIEW LINX Toolkit adds support for Arduino• This means we use LabVIEW Programming instead of
Arduino Programming• In this Tutorial we have just used LabVIEW as an interface for
communication with your existing Arduino code• If use want to use LabVIEW 100% in your application,
LabVIEW LINX is a good alternative to the examples provided in this Tutorial
• I have made several other Tutorials and Videos where I introduce and use LabVIEW LINX– https://www.youtube.com/IndustrialITandAutomation– https://www.halvorsen.blog
LabVIEW LINX

LabVIEW LINX Example
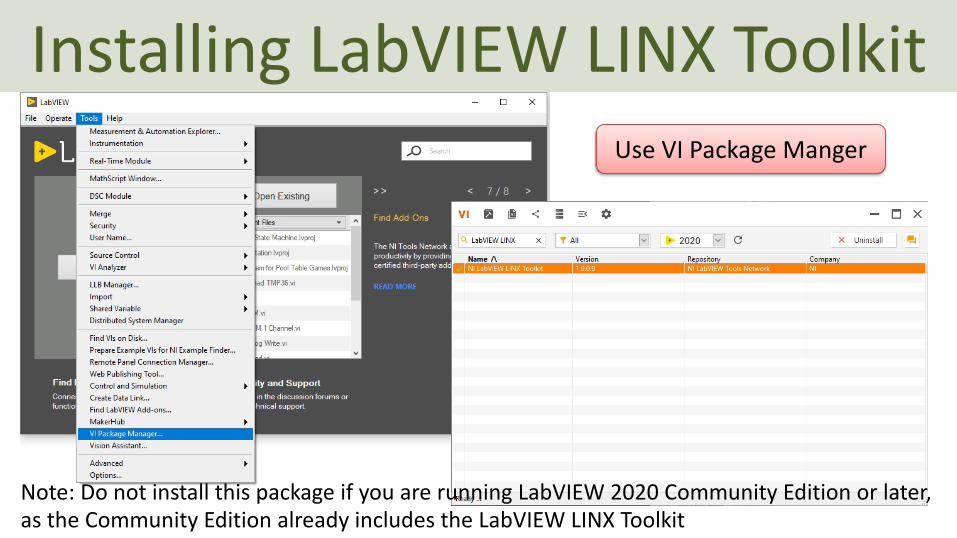
Installing LabVIEW LINX ToolkitUse VI Package Manger
Note: Do not install this package if you are running LabVIEW 2020 Community Edition or later, as the Community Edition already includes the LabVIEW LINX Toolkit

• Arduino is great, but it lacks a Graphical User Interface (GUI)
• We have the Serial Monitor and Serial Plotter, but they are very limited
• I this Tutorial LabVIEW has been used to extend the Arduino by creating a GUI in LabVIEW, both for view/plotting data and for updating variables
• An even more flexible extension can be to use LabVIEW LINX, which I demonstrate and use in many other Tutorials and Videos
Summary

Hans-Petter Halvorsen
University of South-Eastern Norwaywww.usn.no
E-mail: [email protected]: https://www.halvorsen.blog


![Pediatric Gait Trainer using LabVIEW VI and Arduino - …ijetch.org/vol7/846-W042.pdf · From LabVIEW VI to Arduino Sketch ... LabVIEW Interface For Arduino toolkit or LIFA [8] is](https://static.fdocuments.net/doc/165x107/5bb52d4c09d3f2213f8b8faa/pediatric-gait-trainer-using-labview-vi-and-arduino-from-labview-vi-to-arduino.jpg)
