Sequence Clip Reporter - Helpassistedediting.intelligentassistance.com... · Sequence Clip Reporter...
8
Sequence Clip Reporter Sequence Clip Reporter creates an Excel spreadsheet report about the video clips, audio clips and markers you've used in your edited sequence or bins. The report includes sheets for: • Clips, • Sequence Markers, • Clip Markers • Generators • Transitions • Clip Filters • Motion Tab settings and • Reels. You can choose which tracks of clips to include in the report, and Preferences lets you choose whether durations are reported as seconds (for easier spreadsheet calculations), frames or HH:MM:SS:FF timecode format. Please use Email Support under the Help menu for bug reports, feature requests or support. Loading your project into Sequence Clip Reporter From Final Cut Pro 7 automatically 1. Open your project if it isn’t already open in Final Cut Pro. 2. Run Sequence Clip Reporter. The last opened project will be imported automatically. 3. To switch to another project, open it in Final Cut Pro and switch back to Sequence Clip Reporter. The new project will be imported for you. From Final Cut Pro or Premiere Pro using XML export 1. Open your project if it isn’t already open in your editing application. 2. Choose the File menu and select Export > XML… (Final Cut Pro) or Export > Final Cut Pro XML… (Premiere Pro). 3. In Sequence Clip Reporter, click the Open XML file… button or choose the File menu and select Open... to open the exported XML; or drag-and-drop the XML file to the dock tile. 4. To switch to another project, open it in your editing application and export a new XML file for opening into Sequence Clip Reporter.
Transcript of Sequence Clip Reporter - Helpassistedediting.intelligentassistance.com... · Sequence Clip Reporter...

Sequence Clip ReporterSequence Clip Reporter creates an Excel spreadsheet report about the video clips, audio clips and markers you've used in your edited sequence or bins. The report includes sheets for:
• Clips, • Sequence Markers, • Clip Markers• Generators• Transitions• Clip Filters• Motion Tab settings and • Reels.
You can choose which tracks of clips to include in the report, and Preferences lets you choose whether durations are reported as seconds (for easier spreadsheet calculations), frames or HH:MM:SS:FF timecode format.
Please use Email Support under the Help menu for bug reports, feature requests or support.
Loading your project into Sequence Clip ReporterFrom Final Cut Pro 7 automatically
1. Open your project if it isn’t already open in Final Cut Pro.2. Run Sequence Clip Reporter. The last opened project will be imported automatically.3. To switch to another project, open it in Final Cut Pro and switch back to Sequence
Clip Reporter. The new project will be imported for you.
From Final Cut Pro or Premiere Pro using XML export1. Open your project if it isn’t already
open in your editing application.2. Choose the File menu and select
Export > XML… (Final Cut Pro) or Export > Final Cut Pro XML… (Premiere Pro).
3. In Sequence Clip Reporter, click the Open XML file… button or choose the File menu and select Open... to open the exported XML; or drag-and-drop the XML file to the dock tile.
4. To switch to another project, open it in your editing application and export a new XML file for opening into Sequence Clip Reporter.

Analyzing your Bins or Sequences1. In Sequence Clip Reporter choose the sequence (or Bin Clips) you want to analyze
from the Report popup menu, then click the Analyze button; or, if your project has only one sequence or only bin clips, it is automatically analyzed for you.Tip: If you need to report video only or audio only, you can set a preference to analyze only the track types you want (see Preferences). Analyzing only video or only audio is faster than analyzing both.
2. Click the checkboxes 'on' for each video and audio track you want to include in the report.
3. To leave out audio in clips that also contain video, click the Ignore audio in clips with video checkbox 'on'.
4. To add optional information to the report for thumbnails, markers, text generators, transitions, filters, motion tab settings or reels, click the appropriate checkboxes 'on'.
5. If you want the spreadsheet to open after the file is saved, click the Open the spreadsheet after saving checkbox 'on'.
6. Click the Save spreadsheet… button. Name and save the spreadsheet.
The spreadsheet can then be rearranged and customized, or the content of the spreadsheet copied and pasted into a pre-made template.
You can create reports for another sequence in your project by selecting it from the Sequence popup menu and clicking the Analyze button.
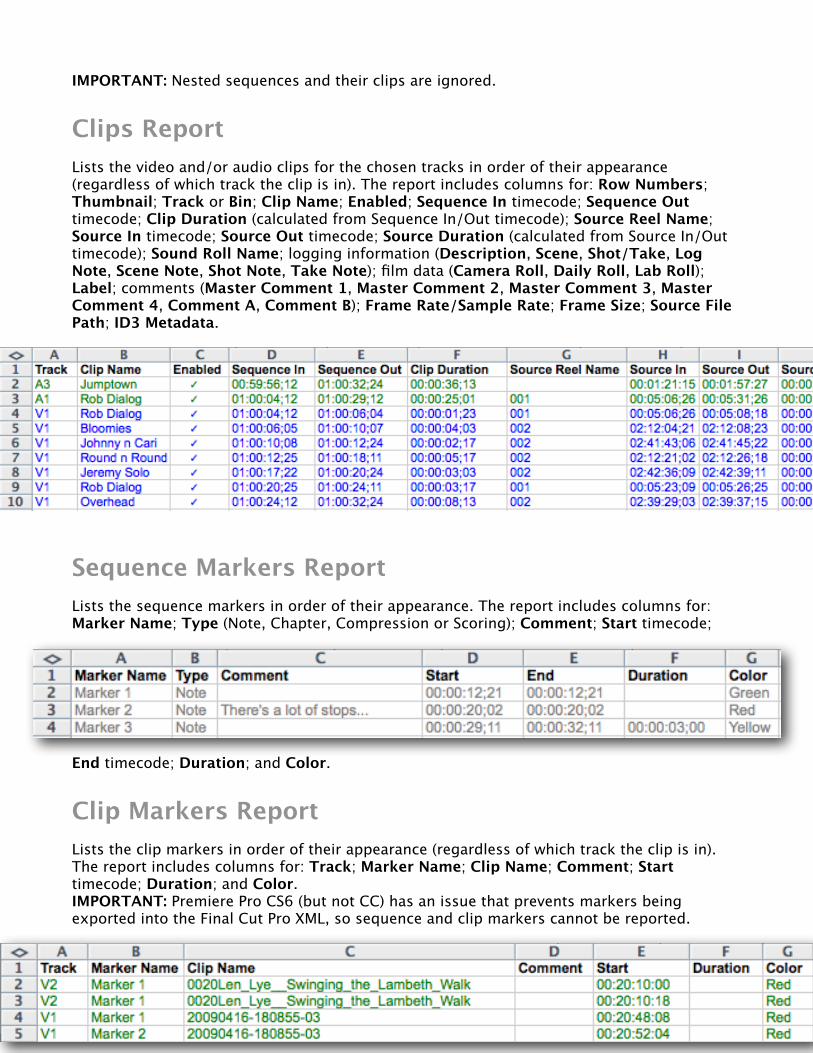
IMPORTANT: Nested sequences and their clips are ignored.
Clips ReportLists the video and/or audio clips for the chosen tracks in order of their appearance (regardless of which track the clip is in). The report includes columns for: Row Numbers; Thumbnail; Track or Bin; Clip Name; Enabled; Sequence In timecode; Sequence Out timecode; Clip Duration (calculated from Sequence In/Out timecode); Source Reel Name; Source In timecode; Source Out timecode; Source Duration (calculated from Source In/Out timecode); Sound Roll Name; logging information (Description, Scene, Shot/Take, Log Note, Scene Note, Shot Note, Take Note); film data (Camera Roll, Daily Roll, Lab Roll); Label; comments (Master Comment 1, Master Comment 2, Master Comment 3, Master Comment 4, Comment A, Comment B); Frame Rate/Sample Rate; Frame Size; Source File Path; ID3 Metadata.
Sequence Markers ReportLists the sequence markers in order of their appearance. The report includes columns for: Marker Name; Type (Note, Chapter, Compression or Scoring); Comment; Start timecode;
End timecode; Duration; and Color.
Clip Markers ReportLists the clip markers in order of their appearance (regardless of which track the clip is in). The report includes columns for: Track; Marker Name; Clip Name; Comment; Start timecode; Duration; and Color.IMPORTANT: Premiere Pro CS6 (but not CC) has an issue that prevents markers being exported into the Final Cut Pro XML, so sequence and clip markers cannot be reported.
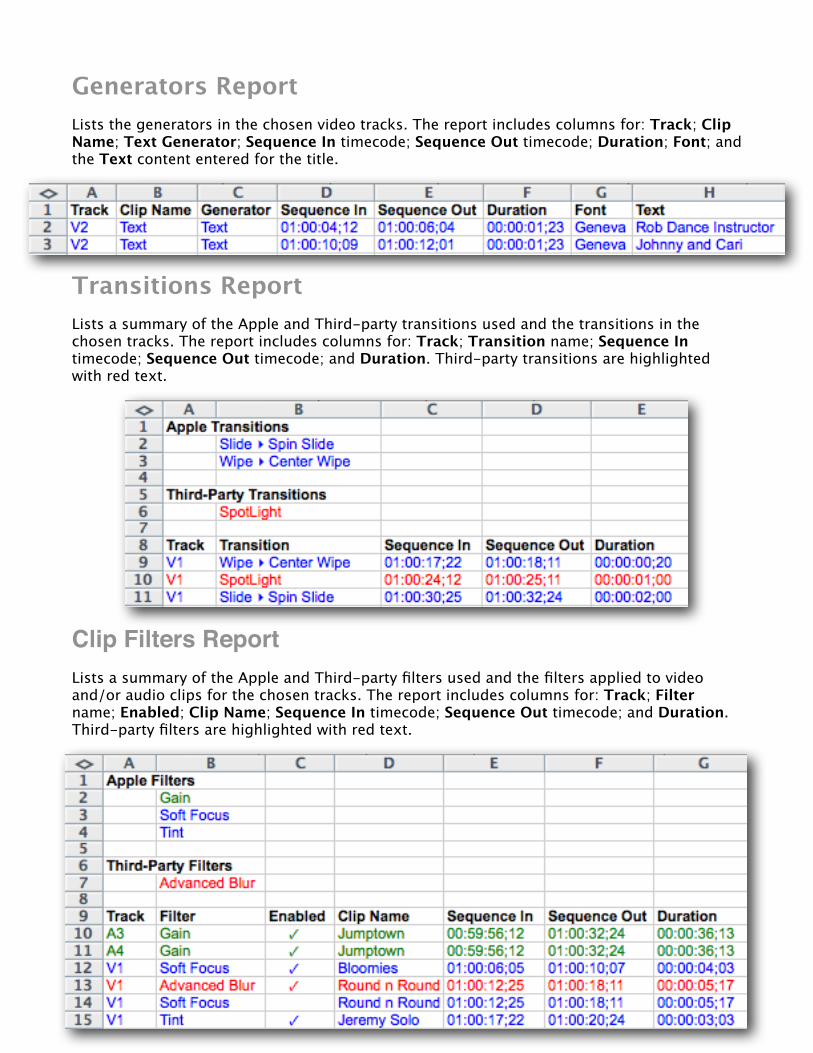
Generators ReportLists the generators in the chosen video tracks. The report includes columns for: Track; Clip Name; Text Generator; Sequence In timecode; Sequence Out timecode; Duration; Font; and the Text content entered for the title.
Transitions ReportLists a summary of the Apple and Third-party transitions used and the transitions in the chosen tracks. The report includes columns for: Track; Transition name; Sequence In timecode; Sequence Out timecode; and Duration. Third-party transitions are highlighted with red text.
Clip Filters ReportLists a summary of the Apple and Third-party filters used and the filters applied to video and/or audio clips for the chosen tracks. The report includes columns for: Track; Filter name; Enabled; Clip Name; Sequence In timecode; Sequence Out timecode; and Duration. Third-party filters are highlighted with red text.
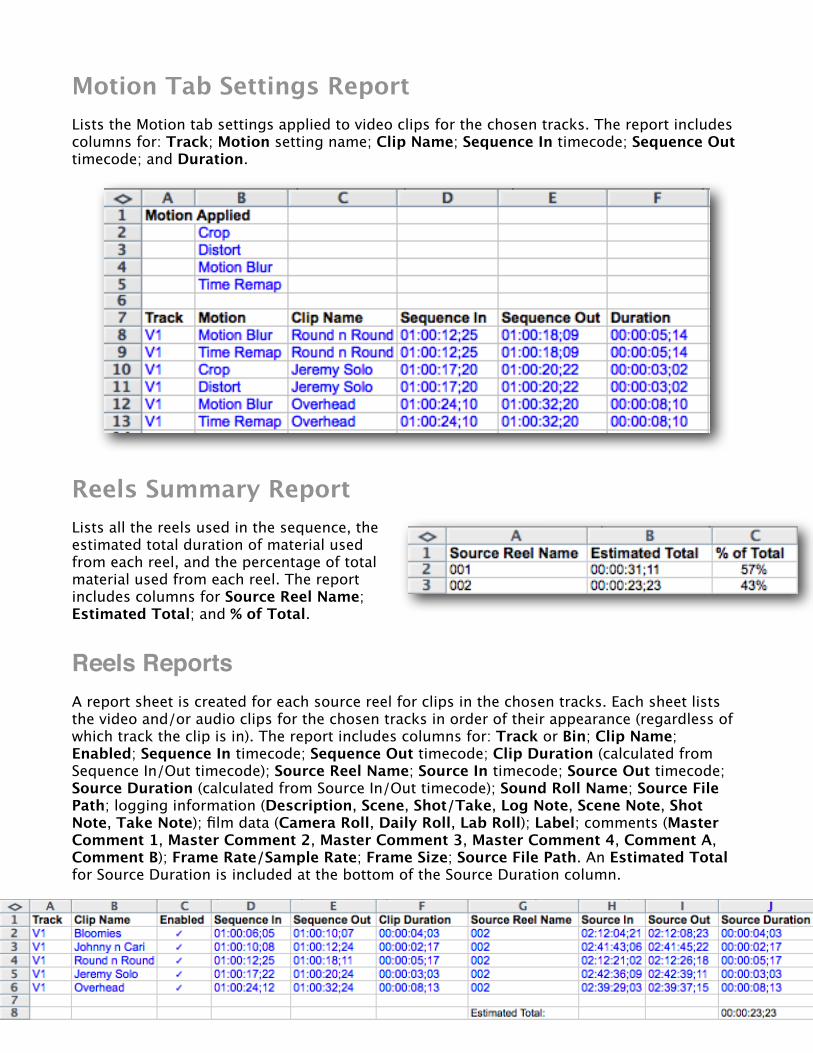
Motion Tab Settings ReportLists the Motion tab settings applied to video clips for the chosen tracks. The report includes columns for: Track; Motion setting name; Clip Name; Sequence In timecode; Sequence Out timecode; and Duration.
Reels Summary ReportLists all the reels used in the sequence, the estimated total duration of material used from each reel, and the percentage of total material used from each reel. The report includes columns for Source Reel Name; Estimated Total; and % of Total.
Reels ReportsA report sheet is created for each source reel for clips in the chosen tracks. Each sheet lists the video and/or audio clips for the chosen tracks in order of their appearance (regardless of which track the clip is in). The report includes columns for: Track or Bin; Clip Name; Enabled; Sequence In timecode; Sequence Out timecode; Clip Duration (calculated from Sequence In/Out timecode); Source Reel Name; Source In timecode; Source Out timecode; Source Duration (calculated from Source In/Out timecode); Sound Roll Name; Source File Path; logging information (Description, Scene, Shot/Take, Log Note, Scene Note, Shot Note, Take Note); film data (Camera Roll, Daily Roll, Lab Roll); Label; comments (Master Comment 1, Master Comment 2, Master Comment 3, Master Comment 4, Comment A, Comment B); Frame Rate/Sample Rate; Frame Size; Source File Path. An Estimated Total for Source Duration is included at the bottom of the Source Duration column.
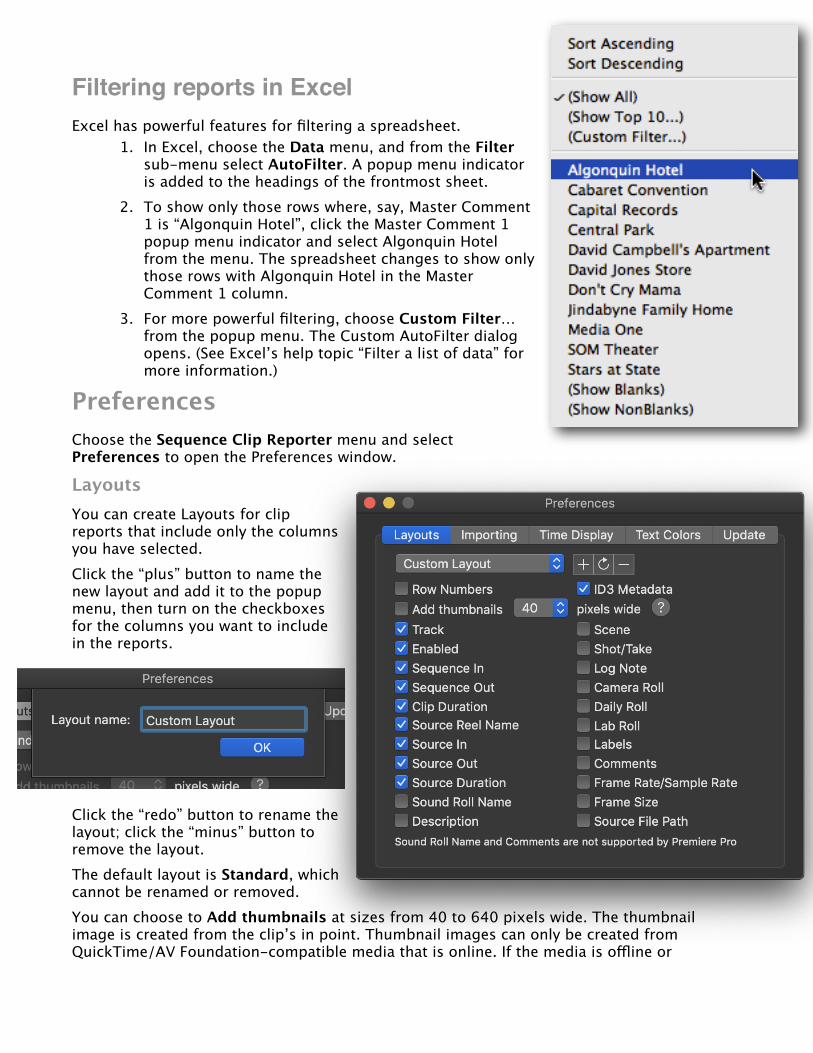
Filtering reports in ExcelExcel has powerful features for filtering a spreadsheet.
1. In Excel, choose the Data menu, and from the Filter sub-menu select AutoFilter. A popup menu indicator is added to the headings of the frontmost sheet.
2. To show only those rows where, say, Master Comment 1 is “Algonquin Hotel”, click the Master Comment 1 popup menu indicator and select Algonquin Hotel from the menu. The spreadsheet changes to show only those rows with Algonquin Hotel in the Master Comment 1 column.
3. For more powerful filtering, choose Custom Filter… from the popup menu. The Custom AutoFilter dialog opens. (See Excel’s help topic “Filter a list of data” for more information.)
PreferencesChoose the Sequence Clip Reporter menu and select Preferences to open the Preferences window.
LayoutsYou can create Layouts for clip reports that include only the columns you have selected. Click the “plus” button to name the new layout and add it to the popup menu, then turn on the checkboxes for the columns you want to include in the reports.
Click the “redo” button to rename the layout; click the “minus” button to remove the layout. The default layout is Standard, which cannot be renamed or removed.You can choose to Add thumbnails at sizes from 40 to 640 pixels wide. The thumbnail image is created from the clip’s in point. Thumbnail images can only be created from QuickTime/AV Foundation-compatible media that is online. If the media is offline or
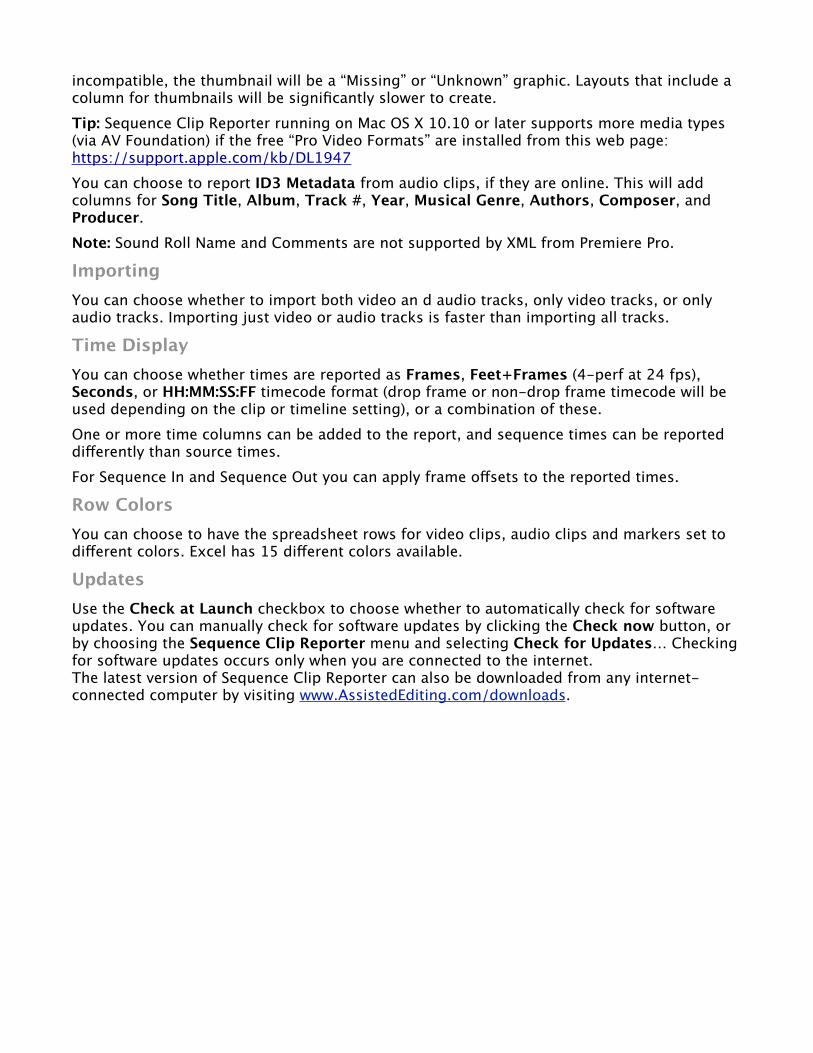
incompatible, the thumbnail will be a “Missing” or “Unknown” graphic. Layouts that include a column for thumbnails will be significantly slower to create. Tip: Sequence Clip Reporter running on Mac OS X 10.10 or later supports more media types (via AV Foundation) if the free “Pro Video Formats” are installed from this web page: https://support.apple.com/kb/DL1947You can choose to report ID3 Metadata from audio clips, if they are online. This will add columns for Song Title, Album, Track #, Year, Musical Genre, Authors, Composer, and Producer.Note: Sound Roll Name and Comments are not supported by XML from Premiere Pro.
ImportingYou can choose whether to import both video an d audio tracks, only video tracks, or only audio tracks. Importing just video or audio tracks is faster than importing all tracks.
Time DisplayYou can choose whether times are reported as Frames, Feet+Frames (4-perf at 24 fps), Seconds, or HH:MM:SS:FF timecode format (drop frame or non-drop frame timecode will be used depending on the clip or timeline setting), or a combination of these. One or more time columns can be added to the report, and sequence times can be reported differently than source times.For Sequence In and Sequence Out you can apply frame offsets to the reported times.
Row ColorsYou can choose to have the spreadsheet rows for video clips, audio clips and markers set to different colors. Excel has 15 different colors available.
UpdatesUse the Check at Launch checkbox to choose whether to automatically check for software updates. You can manually check for software updates by clicking the Check now button, or by choosing the Sequence Clip Reporter menu and selecting Check for Updates… Checking for software updates occurs only when you are connected to the internet. The latest version of Sequence Clip Reporter can also be downloaded from any internet-connected computer by visiting www.AssistedEditing.com/downloads.

Activating Sequence Clip ReporterAfter you install Sequence Clip Reporter onto a computer, it will need to be activated with a Serial Number before it can be used. Each serial number can be used to activate only one computer at a time. If you want to activate the software on another computer, you’ll need to deactivate it first. See Moving Sequence Clip Reporter to another computer for details.You’ll temporarily need internet access for the activation so that the software can connect to our server and confirm the serial number.
• When the software is first run it will display a Software License Agreement. Scroll down to read through the license agreement and click the I Agree button at the bottom of the page.
• Enter the Serial Number that was given to you and click the Activate button. The software will send the serial number to our server for confirmation.
• You’ll get a message in green saying that you’ve successfully activated your license. Click the Continue button.
If the software could not be activated with the Serial Number, you’ll get a message in red explaining the reason, such as:
• This is not a valid Serial Number — check to make sure you have entered the serial number correctly;
• This is not a Serial Number for Sequence Clip Reporter — make sure you’re entering a serial number that can be used to activate Sequence Clip Reporter;
• The Serial Number has already been activated — if you want to activate Sequence Clip Reporter on this computer you'll need to deactivate the other installation before activating this one, or purchase another serial number.
Moving Sequence Clip Reporter to another computerTo move Sequence Clip Reporter from one computer to another, you'll deactivate it on the first computer, then activate the installation on the second computer.To deactivate the software on one computer and activate it on a different computer, both computers will temporarily need internet access.
• On the first computer, choose Deactivate from the application menu.• Confirm that you want to deactivate the software by clicking the Deactivate button.• You’ll receive a message in green saying that you’ve successfully deactivated your
license.• On the second computer, run Sequence Clip Reporter, and follow the instructions for
Activating Sequence Clip Reporter.