Separation Science Extraction of Caffeine Laboratory Protocol
11
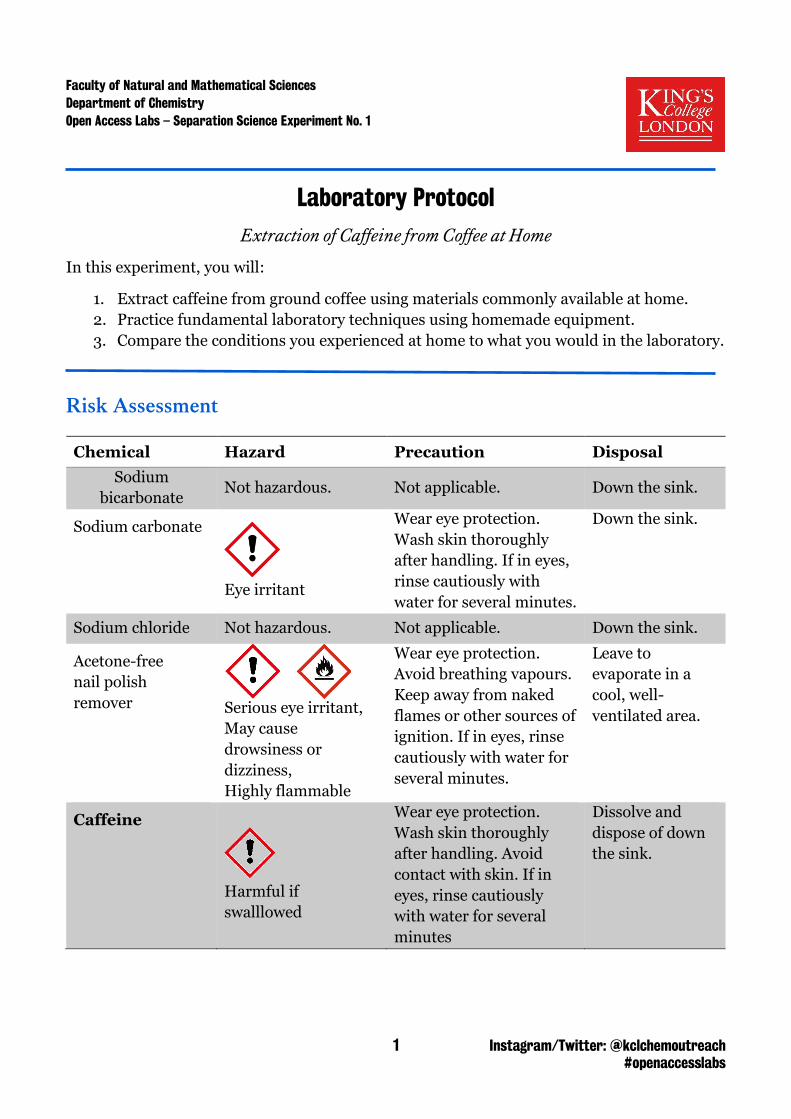
1 Instagram/Twitter: @kclchemoutreach #openaccesslabs Faculty of Natural and Mathematical Sciences Department of Chemistry Open Access Labs – Separation Science Experiment No. 1 Laboratory Protocol Extraction of Caffeine from Coffee at Home In this experiment, you will: 1. Extract caffeine from ground coffee using materials commonly available at home. 2. Practice fundamental laboratory techniques using homemade equipment. 3. Compare the conditions you experienced at home to what you would in the laboratory. Risk Assessment Chemical Hazard Precaution Disposal Sodium bicarbonate Not hazardous. Not applicable. Down the sink. Sodium carbonate Eye irritant Wear eye protection. Wash skin thoroughly after handling. If in eyes, rinse cautiously with water for several minutes. Down the sink. Sodium chloride Not hazardous. Not applicable. Down the sink. Acetone-free nail polish remover Serious eye irritant, May cause drowsiness or dizziness, Highly flammable Wear eye protection. Avoid breathing vapours. Keep away from naked flames or other sources of ignition. If in eyes, rinse cautiously with water for several minutes. Leave to evaporate in a cool, well- ventilated area. Caffeine Harmful if swalllowed Wear eye protection. Wash skin thoroughly after handling. Avoid contact with skin. If in eyes, rinse cautiously with water for several minutes Dissolve and dispose of down the sink.
Transcript of Separation Science Extraction of Caffeine Laboratory Protocol
1 Instagram/Twitter: @kclchemoutreach #openaccesslabs
Faculty of Natural and Mathematical Sciences
Department of Chemistry
Open Access Labs – Separation Science Experiment No. 1
Laboratory Protocol
Extraction of Caffeine from Coffee at Home
In this experiment, you will:
1. Extract caffeine from ground coffee using materials commonly available at home.
2. Practice fundamental laboratory techniques using homemade equipment.
3. Compare the conditions you experienced at home to what you would in the laboratory.
Risk Assessment
Chemical Hazard Precaution Disposal
Sodium
bicarbonate Not hazardous. Not applicable. Down the sink.
Sodium carbonate
Eye irritant
Wear eye protection.
Wash skin thoroughly
after handling. If in eyes,
rinse cautiously with
water for several minutes.
Down the sink.
Sodium chloride Not hazardous. Not applicable. Down the sink.
Acetone-free
nail polish
remover Serious eye irritant,
May cause
drowsiness or
dizziness,
Highly flammable
Wear eye protection.
Avoid breathing vapours.
Keep away from naked
flames or other sources of
ignition. If in eyes, rinse
cautiously with water for
several minutes.
Leave to
evaporate in a
cool, well-
ventilated area.
Caffeine
Harmful if
swalllowed
Wear eye protection.
Wash skin thoroughly
after handling. Avoid
contact with skin. If in
eyes, rinse cautiously
with water for several
minutes
Dissolve and
dispose of down
the sink.
2 Instagram/Twitter: @kclchemoutreach #openaccesslabs
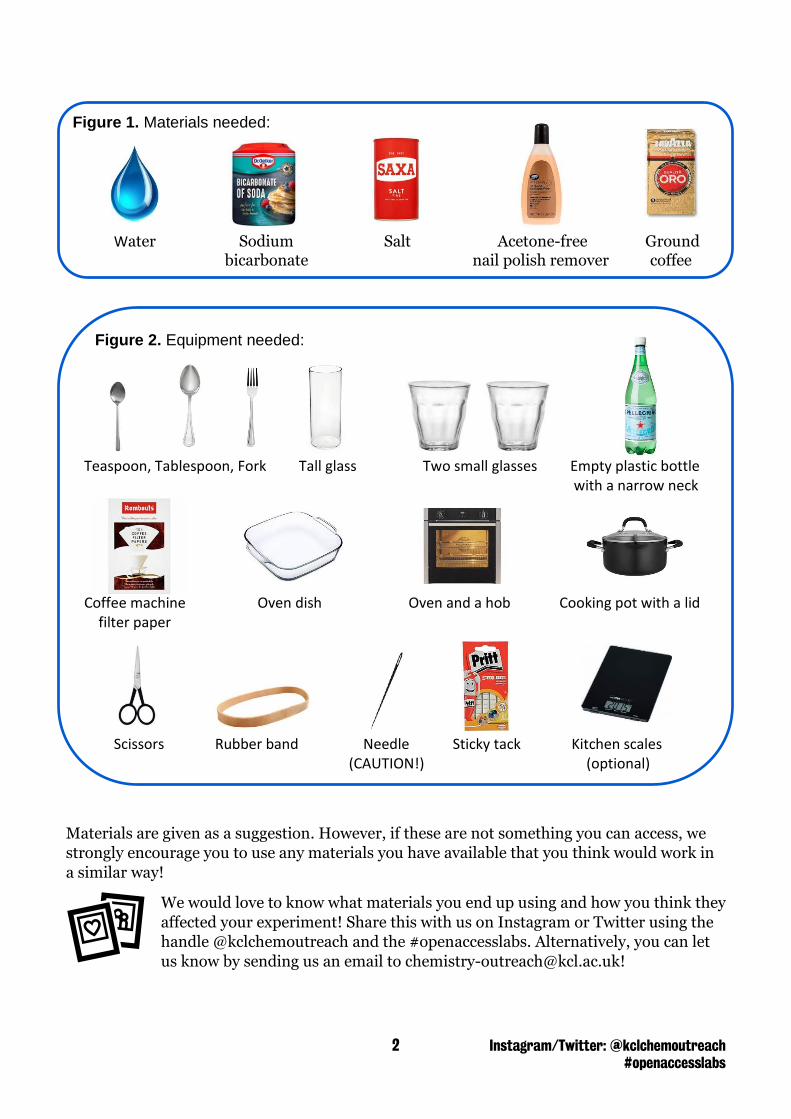
Figure 1. Materials needed:
Water Sodium Salt Acetone-free Ground
bicarbonate nail polish remover coffee
Figure 2. Equipment needed:
Teaspoon, Tablespoon, Fork Tall glass Two small glasses Empty plastic bottle with a narrow neck
Coffee machine Oven dish Oven and a hob Cooking pot with a lid filter paper
Scissors Rubber band Needle Sticky tack Kitchen scales (CAUTION!) (optional)
Materials are given as a suggestion. However, if these are not something you can access, we
strongly encourage you to use any materials you have available that you think would work in
a similar way!
We would love to know what materials you end up using and how you think they
affected your experiment! Share this with us on Instagram or Twitter using the
handle @kclchemoutreach and the #openaccesslabs. Alternatively, you can let
us know by sending us an email to [email protected]!

3 Instagram/Twitter: @kclchemoutreach #openaccesslabs
Open Access Labs Open access labs are part of the King’s College London annual outreach programme which
aims to make science, in particular chemistry, available to students who are interested in
pursuing a career in STEM. In the last three years, several events have been organised and
>400 prospective scientists were able to experience a real chemistry lab. They made aspirin,
investigated the chemistry of water, changed states of matter, or used analytical methods
such as infrared spectroscopy, thin-layer chromatography and proton NMR spectroscopy,
that are normally only covered in their textbooks.
The Open Access Labs programme is supported by RSC and is available for pupils from non-
selective schools. At King’s, we want to welcome a diverse range of students into our inclusive
department. We have gender parity at undergraduate (UG) level with more than 70% of our
students identifying as BAME. We want to establish close collaborations with local schools
and form lasting relationships with students to support them on their academic journeys.
In response to COVID-19 making our UG teaching
inaccessible, we have created online content that
will enable you to perform an Open Access Lab day
remotely. This resource has been developed by Dr
Filip Sebest in collaboration with Dr Helen Coulshed
and Dr Grace Walden.
We hope you enjoy it as much as we have enjoyed
creating it!
1. Learning Outcomes By the end of this practical, you should be able to:
1. Give examples of liquid-liquid and solid-liquid separation techniques.
2. Recognise the importance of understanding the chemistry of each step in a procedure.
3. Perform simple chemical calculations.
4. Realise that chemistry is all around us!
Transferable skills you will practice during this experiment:
○ Manual dexterity ○ Time management
○ Critical thinking ○ Decision making
○ Numeracy skills ○ Observation skills
○ Safe working ○ Following instructions
Before you start you can watch our instructional video which demonstrates the key
techniques that you will be using during the experiment.
media.kcl.ac.uk/media/1_2kd6r2zn
Dr Filip Sebest
Chemistry Teaching
Technician
Dr Helen Coulshed
Lecturer in Chemical
Education

4 Instagram/Twitter: @kclchemoutreach #openaccesslabs
2. Introduction Caffeine is a bitter, white crystalline alkaloid present in around 60 plant
species, most commonly coffee beans (Figure 3), tea leaves and kola nuts.
In plants, it acts as a natural pesticide because it can paralyse or even kill
insects feeding on the plant.
Caffeine is the world’s most widely consumed psychoactive drug;
however, it is legal and unregulated in nearly all parts of the world. It
stimulates the central nervous system reducing fatigue and drowsiness.
It improves reaction time, wakefulness, concentration, and motor coordination. It can also
improve athletic performance, muscular strength, and power. Medically, caffeine is used to
treat certain types of lung diseases as well as postural hypotension (having low blood pressure
when you stand up from sitting or lying down). However, overconsumption of caffeine can
lead to a mild form of drug dependence associated with withdrawal symptoms such as
headache, sleepiness, or irritability. The maximum recommended daily intake of caffeine
depends on the age of an individual (Table 1). For adults, up to 400 mg a day is considered
safe while a lethal dose would equal to approximately 10 g a day. For reference, one cup of
coffee contains 80–175 mg of caffeine while one cup of black tea contains 47–90 mg.
Interestingly, one cup of decaffeinated coffee or tea can still contain up to 10 mg of caffeine!
Table 1. Maximum recommended daily intake of caffeine based on age.
Age of an individual Maximum recommended daily intake of caffeine
4–6 years 45 mg
7–9 years 62.5 mg
10–12 years 85 mg
13–18 years 2.5 mg/kg of body weight but no more than 100 mg
Adults 400 mg
3. Background Theory Caffeine was first isolated from coffee in 1819 by a German chemist, Friedlieb Ferdinand
Runge. In its pure form, it is an odourless white solid with a melting point of 235–238 °C.
Caffeine is classified as a heterocycle (Figure 4): a cyclic compound that has two or more
different elements in its ring(s) (in this case nitrogen and carbon).
Caffeine is weakly basic and its solubility in water at room
temperature is quite low (2 g/100 mL) but increases dramatically in
boiling water (66 g/100 mL)! Nowadays, it is usually extracted from
coffee filtrate using ethyl acetate; this organic solvent (an ester)
presents considerably lower health and environmental hazards than
the chlorinated and aromatic organic solvents used formerly. Besides
caffeine, coffee also contains other chemicals such as tannins. To
separate them from caffeine, and to increase the purity of the
caffeine product, tannins are converted into their sodium salt
derivatives by the action of an inorganic base. Since tannins are
polyphenols, a common choice of an inorganic base is either sodium carbonate or sodium
hydroxide as these are strong enough to deprotonate phenolic hydroxyl groups. When
tannins become ionic, they remain dissolved in water while caffeine gets extracted by the
organic solvent during the water-ethyl acetate liquid-liquid extraction.
Figure 3. Coffee plant.
Figure 4. Chemical
structure of caffeine.

5 Instagram/Twitter: @kclchemoutreach #openaccesslabs
4. Procedure
Stage 1: preparation a) Preheat your oven to 100 °C.
b) Weigh out 5 g of sodium bicarbonate (~1 heaped teaspoon), spread it evenly onto a
glass oven dish or an oven tray, then heat it at 100 °C in the oven for 1 hour (Figure 5).
Take it out and let it cool down completely.
100 °C, 1 h
Figure 5. Conversion of sodium bicarbonate to sodium carbonate.
c) Weigh out 30 g of ground coffee (~6 levelled tablespoons) and place it into a cooking
pot. Add 150 mL of cold water and stir thoroughly with a tablespoon. Cover with a lid.
d) Create a home-made separating funnel from a plastic bottle with tall narrow neck:
More information can be found in Figure 6 and at media.kcl.ac.uk/media/1_2kd6r2zn
CAUTION: involves a needle and open flame. Carefully pierce a small hole into the
centre of the bottle lid as well as the bottom of the bottle using a needle – it helps to
pre-heat the needle on a hob for ~5 seconds and to pierce the hole within the next 5
seconds while it is still hot (keep the bottle nearby). Make sure you only hold the
needle at the very end, so you do not burn your fingers, and do not forget to switch off
the hob after use. Double check that the plastic was pierced through and seal both
holes tightly with a piece of white tack or another type of a sticky adhesive.
Reheat the needle Seal
Figure 6. Preparation of a home-made separating funnel.

6 Instagram/Twitter: @kclchemoutreach #openaccesslabs
* If you prefer not to use a naked flame, or if you don’t have a gas hob, you can try to
heat the tip of the needle to a sufficiently high temperature by submerging it in boiling
water (this may or may not work depending on the thickness of the plastic bottle).
Alternatively, you can use a push cap bottle such as a travel bottle and avoid piercing a
hole altogether. The larger the hole the harder the extraction will be.
e) Prepare a saturated solution of salt (~3 levelled teaspoons; ~17 g) in water (50 mL)
and pour approximately half of it into the separating funnel you have just created
(double check the bottom hole of the bottle is tightly sealed). If it is leaking, make sure
the hole is sealed more tightly. Save the second half of this solution for later.
Note: It is difficult to prepare saturated solutions exactly, especially at home. If you
cannot dissolve all the solid even after 2 min of stirring with a spoon, add a teaspoon of
water and stir again. Repeat this process until you dissolve all the solid (Figure 7).
Figure 7. Preparing a saturated solution of salt in water.
f) Add the whole volume of nail polish remover (200 mL) into the bottle
and close it with a sealed lid. You should see two layers (Figure 8).
g) Holding the bottle with both hands and pressing on the adhesives,
shake it for ~5 s. Carefully open the lid to vent off the pressure which
has built up, then close the lid. Repeat twice more, then shake for
another ~30 s, vent the pressure, and leave it to stand for ~2 min
during which two layers will form. Carefully invert the bottle and hold
it above a small empty glass (Figure 9).
Figure 9. Liquid-liquid extraction.
Remove both sticky adhesives, starting with the top one. You may need to use a needle
to clear the hole if pieces of the sticky adhesive got pushed into it. Once the holes are
free, liquid will start to trickle/flow from the bottle into the glass. If, at any point, the
Figure 8.
Two layers
in the bottle.

7 Instagram/Twitter: @kclchemoutreach #openaccesslabs
flow slows down significantly or stops, gently squeeze the bottle to let some more air
in. If this does not work, try squeezing slightly harder.
Let the bottom layer flow into the glass, making sure you cover the top hole as the
separation line approaches the bottle lid. Then, as soon as the top layer starts to drip
(you may notice a slightly faster rate of dripping), double check the top hole is sealed
and invert the bottle. Pour the contents into an empty clean cup (Figure 10).
Figure 10. Liquid-liquid separation.
h) Pour the clear liquid from the cup back to the empty nail
polish remover bottle, making sure no water droplets (if
present) go through (Figure 11). Close the nail polish remover bottle and
wash the “separating funnel” with water: you will need it later.
Stage 2: extraction
a) Add all the sodium carbonate to the pot containing your coffee
mixture, stir with a spoon until it is dissolved, and gently bring to a boil. Lower the
heat and simmer for 30 mins, covered by a lid. Then let it cool
down to room temperature.
Note: Make sure the water does not evaporate or else you will burn
your coffee mixture!
b) In the meantime, set up your gravity filtration. Using a tall
cup/glass and one piece of coffee machine filter paper, bend the
edges of the filter paper and secure them to the cup with a rubber
band to create a pouch (Figure 12). Aim for the filter paper to
touch at least one side of the glass to speed up the filtration.
c) Once the coffee mixture has cooled down, transfer the contents of the pot into the filter
paper pouch. Be careful not to tear the paper as that would allow ground coffee to pass
through. If the coffee water does not all fit in one go, wait for enough liquid to pass
through the paper until there is enough space for the rest of the coffee water. Allow to
stand until you can see ground coffee in the filter paper and there is not a layer of
water above it (Figure 13, picture #3), or if it is taking longer than 1 hour. At this
Figure 11. Pure
organic layer.
Figure 12. Gravity
filtration setup

8 Instagram/Twitter: @kclchemoutreach #openaccesslabs
point, carefully remove the rubber band, fold the filter paper to contain the ground
coffee in the pouch and – into a separate cup – gently squeeze the residual coffee water
through the paper. This will maximise the amount of caffeine we can extract but it is
likely to force some of the ground coffee through as well.
Figure 13. Performing gravity filtration.
d) Perform gravity filtration with the residual coffee water into a new glass. If it is taking
longer than 30 mins, gently press on the side of the filter paper pouch to speed up the
process, however, make sure no ground coffee passes through this time. Combine the
two filtrates to obtain the final filtrate (Figure 14).
Figure 14. Gravity filtration of residual coffee water.
e) Into your washed and sealed “separating funnel”, slowly add the coffee filtrate (making
sure that no ground coffee, if present, gets into the separating funnel), then add your
organic solvent. Close the bottle and shake for 2 mins, ensuring that the pressure
build-up is regularly vented off during the first 20 s. Let it stand until two layers form
(Figure 15).
Figure 15. Caffeine extraction.
Next, carefully invert the bottle and separate the two layers into two glasses using the
same principle as Stage 1f. There should be one glass with a dark brown/black aqueous
layer and one glass with an orange organic layer (Figure 16).

9 Instagram/Twitter: @kclchemoutreach #openaccesslabs
Note: Ensure that when you are pouring your organic extract out of the bottle, none of
the residual water or water droplets go through, even if some of the organic solvent is
left behind (Figure 16, picture #3). Wash your bottle thoroughly with water.
Figure 16. Separation of organic layer containing caffeine.
f) Water is slightly soluble in your organic solvent and hence the orange organic extract
will still contain some moisture. This effect demonstrates itself by the slight cloudiness
of the organic layer (Figure 17, picture #1).
Into your sealed and clean “separating funnel”, add the orange organic extract and the
remainder of the saturated solution of salt in water that you prepared in Stage 1d.
First, shake carefully for 1 min while venting off the pressure build-up regularly, then,
separate the two layers into two dry glasses in the same way as you did before (Stages
1f and 2e).
Note: Take extra care not to pour any water droplets into the final organic layer
(beware water that is stuck on the sides of the bottle). Your organic layer should now
be clear without any cloudiness (Figure 17, picture #3)
Cloudy Clear
Figure 17. Brine wash of the organic extract.
* Did you know? The saturated solution of salt in water not only removes water from
the organic layer but the highly ionic nature of this solution also prevents caffeine from
partially dissolving back into the aqueous layer, hence no product is lost in this step.

10 Instagram/Twitter: @kclchemoutreach #openaccesslabs
Stage 3: isolation
a) Place the glass with your organic extract into a well-ventilated area (preferably outside
your window if it is not raining) and let all the organic solvent slowly evaporate.
Note: This may take several hours/overnight, please be patient. Once there is no
noticeable change in the volume of the liquid left in the glass over a longer period of
time (allow at least 1–2 hours between each check), have a look at the glass:
o If you do not see much/any solid, proceed with Stage 3b.
o If you obtain solid with no/very little liquid remaining (Figure 18),
carefully pour the liquid away and proceed with Stage 3c.
b) Place the glass into an oven dish/onto an oven tray and heat it at 75 °C for 1–2 hours.
Make sure the room is well ventilated during this process. Ideally, after this time,
the product would have crystallised at the bottom/on the sides of the glass as the
residual liquid evaporated (if not, see page 11). It is possible that some liquid
remained at the bottom of the glass as well, and if so, tilt the glass and carefully pour it
away (Figure 19).
Figure 19. Evaporation of residual liquid.
c) Using a spoon, transfer the solid from the glass onto a filter paper and let it dry in air
or in the oven at 75 °C for 30 min (Figure 20). This is your caffeine, well done!
Figure 20. Caffeine powder.
Figure 18. Caffeine
crystallisation.
11 Instagram/Twitter: @kclchemoutreach #openaccesslabs
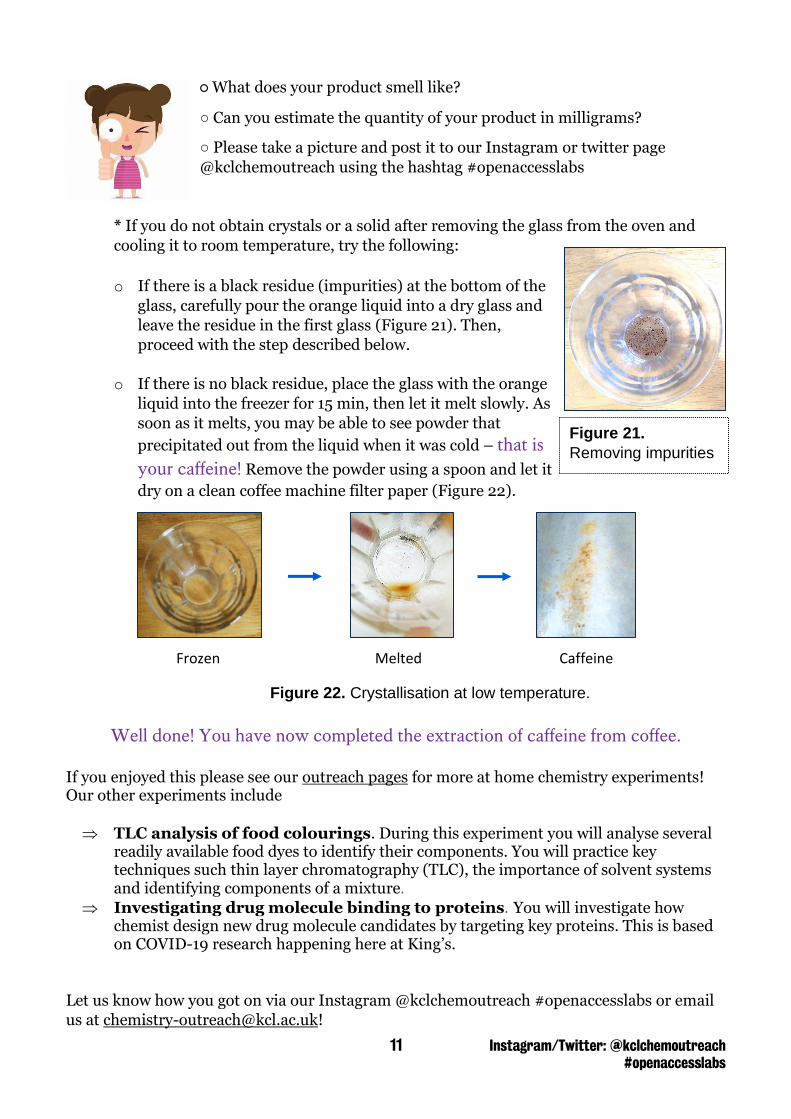
○ What does your product smell like?
○ Can you estimate the quantity of your product in milligrams?
○ Please take a picture and post it to our Instagram or twitter page
@kclchemoutreach using the hashtag #openaccesslabs
* If you do not obtain crystals or a solid after removing the glass from the oven and
cooling it to room temperature, try the following:
o If there is a black residue (impurities) at the bottom of the
glass, carefully pour the orange liquid into a dry glass and
leave the residue in the first glass (Figure 21). Then,
proceed with the step described below.
o If there is no black residue, place the glass with the orange
liquid into the freezer for 15 min, then let it melt slowly. As
soon as it melts, you may be able to see powder that
precipitated out from the liquid when it was cold – that is
your caffeine! Remove the powder using a spoon and let it
dry on a clean coffee machine filter paper (Figure 22).
Frozen Melted Caffeine
Figure 22. Crystallisation at low temperature.
Well done! You have now completed the extraction of caffeine from coffee.
If you enjoyed this please see our outreach pages for more at home chemistry experiments! Our other experiments include
TLC analysis of food colourings. During this experiment you will analyse several readily available food dyes to identify their components. You will practice key techniques such thin layer chromatography (TLC), the importance of solvent systems and identifying components of a mixture.
Investigating drug molecule binding to proteins. You will investigate how chemist design new drug molecule candidates by targeting key proteins. This is based on COVID-19 research happening here at King’s.
Let us know how you got on via our Instagram @kclchemoutreach #openaccesslabs or email
us at [email protected]!
Figure 21.
Removing impurities


![Preliminary study of caffeine extraction from leaves using ...extraction of caffeine from green tea leaves was modelling based on mass transfer and time optimization [27]. So far,](https://static.fdocuments.net/doc/165x107/60b860faa0ab822bfc457be0/preliminary-study-of-caffeine-extraction-from-leaves-using-extraction-of-caffeine.jpg)