Sentiment Analysis App with DevOps Services
29
SENTIMENT-ANALYSIS-APP With Bluemix DevOps Services Sheetal Sharma Internship at IBM Innovation
-
Upload
sheetal-sharma -
Category
Technology
-
view
48 -
download
5
Transcript of Sentiment Analysis App with DevOps Services

SENTIMENT-ANALYSIS-APPWith Bluemix DevOps Services
Sheetal SharmaInternship at IBM Innovation Centre, Bangalore

Select ‘LOG IN’ then enter your log in information and press ‘Sign In’. You should be seeing your dashboard view
Register for Bluemix by link- https://console.ng.bluemix.net/

On the Bluemix Dashboard,click CREATE AN APP

Select the Web title:
select the tile for SDK for Node.js.
Click the CONTINUE button when prompted

Enter a unique name in the APP NAME field
• Click the FINISH button after entering the name.

On the Start Coding page, scroll down and click VIEW APP OVERVIEW.

On the Bluemix app Dashboard, create a Git-hosted project for the app by clicking ADD GIT

Make sure that the "Populate the repository with the starter app package and enable Delivery Pipeline (Build & Deploy)" check box is selected and then click CONTINUE

After your Git repository is created, click CLOSE. The ADD GIT link is replaced by an EDIT CODE link and your Git URL
On the Bluemix app Dashboard, click ADD A SERVICE OR API. For the category, select DevOps, and from the catalog, click Track & Plan.
On the Track & Plan page, select a plan and click CREATE.

change the state for the Track & Plan service by clicking the current state, which in this case is OFF
The Project Settings page opens in IBM Bluemix DevOps Services.Select the option to enable the Track & Plan service. If necessary, update your region, organization, or space.Click SAVE.

Return to the Bluemix Dashboard and click the Track & Plan service tile. The state for the Track & Plan service is changed to ON for your app.

Explore and clone the sample project
Create your own copy of the Sentiment Analysis project by copy the following link in new browser, When you copy the link, the project is cloned to a new, private project that you own, and then the new project is deployed to Bluemix
https://bluemix.net/deploy?repository=https://hub.jazz.net/git/ibmdevopsservices/Sentiment.Analysis.App
• If you are prompted to log in to Bluemix, log in.• Click DEPLOY.

After the project is cloned and the deployment is complete, click EDIT CODE to continue.

Enable the Track & Plan feature
On the project's Overview page, click the Project settings icon.
Open the Options page.Select Enable Track & Plan.Click Save.

Explore the Track & Plan views
Click TRACK & PLAN
• Enter the Lanes view by clicking Display as lanes

Create a task
In the Create a work item field, type Update default search topic, then deploy
app you can also assign other information to the work
itemAssign the "task“, type a space and then
type *task
Assign the work item to yourself by typing @:<Your Username>
Assign a high priority to the work item by typing $high
Click CREATE
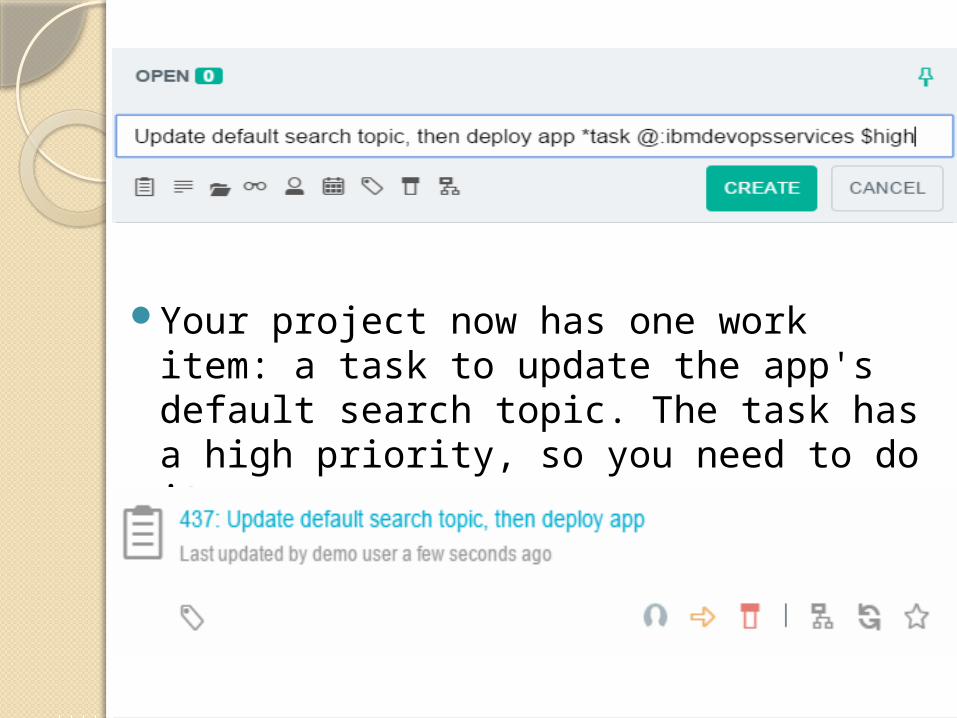
Your project now has one work item: a task to update the app's default search topic. The task has a high priority, so you need to do it soon.

Change the status of the task
On the task, click the Status icon.Click Start Working. The task moves
from the OPEN lane to IN PROGRESS lane
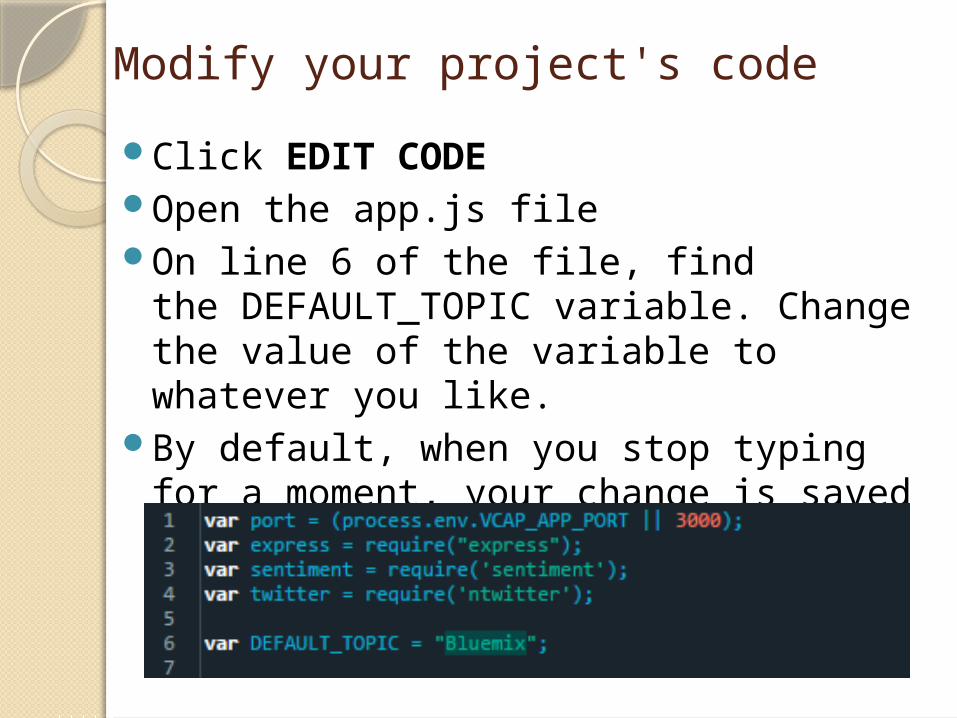
Modify your project's code
Click EDIT CODEOpen the app.js fileOn line 6 of the file, find
the DEFAULT_TOPIC variable. Change the value of the variable to whatever you like.
By default, when you stop typing for a moment, your change is saved automatically
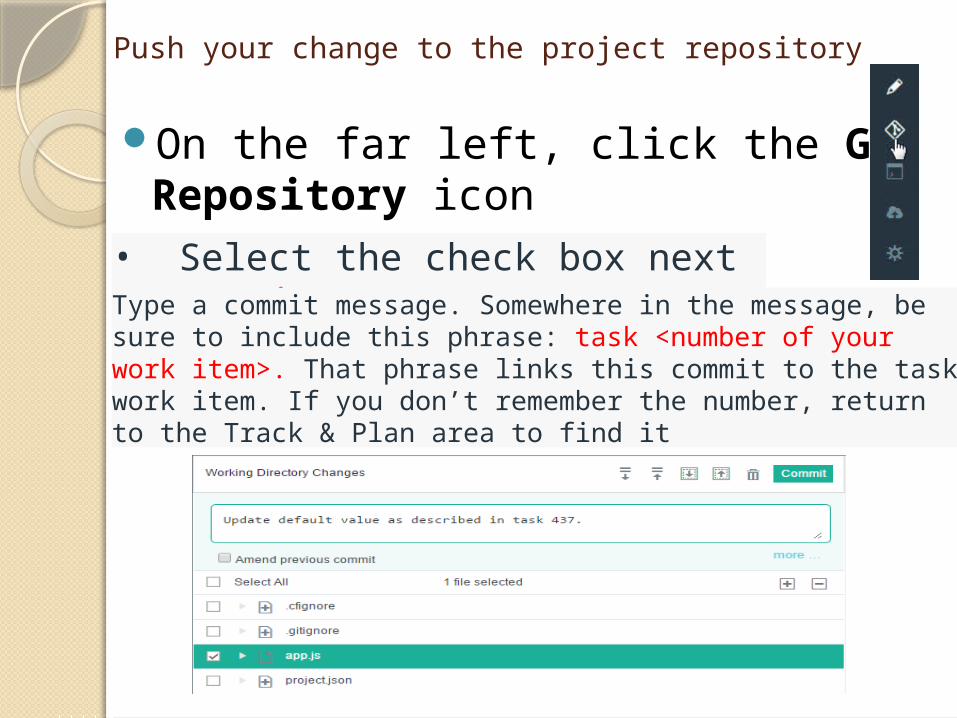
Push your change to the project repository
On the far left, click the Git Repository icon
• Select the check box next to app.js. Type a commit message. Somewhere in the message, be sure to include this phrase: task <number of your work item>. That phrase links this commit to the task work item. If you don’t remember the number, return to the Track & Plan area to find it

Click COMMIT. Your change is shown in the Active Branch section.Click PUSH. Your local master branch is pushed to the remote master branch.

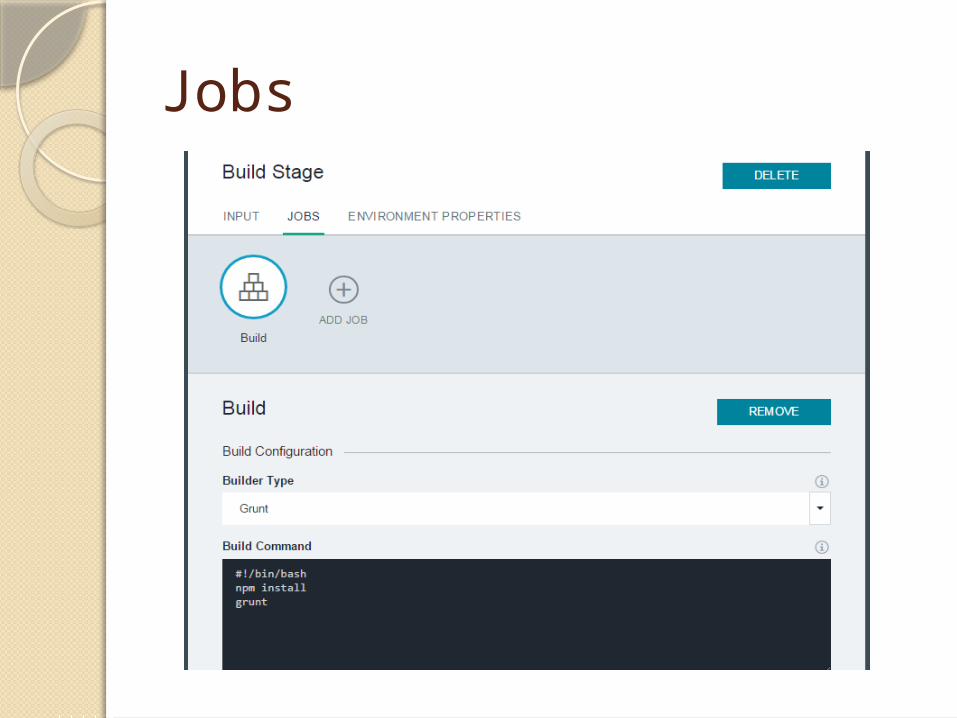
Explore builds and deployments
Explore the build stage Click BUILD & DEPLOYOn the Build stage tile, click the Stage
Configuration icon and then click Configure Stage
a. On the INPUT tab, note this information: The input for the build is the master branch of the Git
repository.
The Build stage runs automatically every time a change is pushed to
the repository.
b. Click the JOBS tab The builder type is Grunt.

Input
Jobs

Deploy the app and verify your change
On the Build stage tile, click the Run Stage icon. The build is added to the queue, is run, and then is deployed to Bluemix

Complete the work item On the navigation bar at the top of the page, click TRACK &
PLAN. In the IN PROGRESS lane, find the task that you created earlier. Open the task in the work item editor by clicking the task's
summary. Click the LINKS tab. DevOps Services linked your change to
this work item automatically by using the commit ID. Return to the view that you started in by clicking Back to My
Work. Click the Status icon on the task. Select Complete. The task
disappears. Scroll to the rightmost lane and verify that your newly resolved
task is in the RESOLVED section.

My App After deployed Click on the link
which is in the Deploy Stage.

App running with Alias name ”letsplan”
By default it is “Bluemix”.You can change it and click GO
It will be refresh at each second andanalyzed the tweets behavior and count also.