
Sekonic Zoom Master L-508
16
SEKONIC Zoom Master L-508 Operating Manual
Transcript of Sekonic Zoom Master L-508
SEKONIC Zoom Master L-508
Operating Manual

Congratulations on your purchase of a Sekonic Zoom Master L-508 Exposure Meter.
The Zoom Master L-508 is the latest addition to the extensive line of Sekonic Exposure Meters which have been market leaders for over four decades.
It was designed to be the ultimate meter, a do-all instrument for the most demanding pros. It is the first zoom spot meter on the market. Nine camera-quality lens elements
are required to accomplish its 1° to 4° zoom range. Its sealed housing and controls make it water and moisture resistant. Yes, you can use it in the rain, but it is not an underwater meter.
Its large LCD display makes readings easy and lights up automatically in dark surroundings. In order not to crowd the controls, four functions which are less frequently used,
are confined to DIP switches, located in the battery compartment. Because of its many features, the L-508 requires this rather extensive manual. But since you will never use them all at the same time, once you have learned all
about it, it is simple and its use will become second nature. The Zoom Master L-508 has undergone extensive quality controls at every step of manufacture. Please read this instruction manual thoroughly, to be able to take
advantage of its many features and to obtain the long service life it is designed for. Thank you for your confidence in Sekonic.
Table of Contents
1. Parts Designation .................................................................................................... 1
2. Explanation of the Liquid Crystal Display (LCD) ......................................................... 2-3
3. Before Using ........................................................................................................ 4-5
1. Attach the strap .................................................................................................... 4 2. Inserting the battery ..............................................................................................4 3. Checking battery capacity ...................................................................................... 4 4. Replacing battery during measurement or when using the memory function ......................................................................... 5 5. Auto Power Off function ........................................................................................ 5 6. Setting main ISO film speed ................................................................................... 5 7. Setting second ISO film speed (ISO 2) ..................................................................... 5
4. Basic Operation ................................................................................................... 6-9
1. Incident or Reflected Spot Measuring ...................................................................... 6 2. Setting measuring mode ........................................................................................ 7 3. Setting DIP switches .............................................................................................8 4. When set for incident light ...................................................................................... 8 5. When set for reflected light (spot metering) . ..............................................................9
5. Measurment ..................................................................................................... 10-18
1. Measuring Ambient Light ..................................................................................... 10 1-1 Shutter Speed Priority mode ........................................................................... 10 1-2 Aperture Priority mode ................................................................................... 10 1-3 EV mode ...................................................................................................... 11 1-4 Cinematography ........................................................................................... 12 2. Measuring Flash Light ......................................................................................... 13 2-1 Cord Flash mode . ......................................................................................... 13 2-2 Auto Reset Cordless Flash mode ..................................................................... 15 2-3 Cord Multiple Flash (cumulative) mode ............................................................. 16 2-4 Cordless Flash Cumulative mode .................................................................... 17
6. Advanced Functions .......................................................................................... 19-24
1. Memory function ................................................................................................. 19 2. Averaging function .............................................................................................. 19 3. Brightness Difference function ............................................................................... 20 4. How to use the L508 as an incident Illuminance (LUX) Meter ..................................... 22 5. How to use a reflected luminance (cd/mz) meter ...................................................... 23 6. How to change the compensating function .............................................................. 24
7. Accessories .......................................................................................................... 25 8. Technical Data .................................................................................................. 26-27 9. Safety Guide ........................................................................................................ 27 10.Care and Maintenance .......................................................................................... 28

1. Parts Designation
16. Zoom Lens Ring
15. Zoom Lens Protective Glass
14. Memory button
13. Memory Clear button
12. Booster Outlet
11. ISO (main) button
10. Mode set button
9. Strap eyelet
1. Lumisphere UP/DOWN ring
2. Lumisphere
3. Liquid Crystal Display (LCD)
4. Average/
rEV (Brightness Difference) button
5. Set/change Dial
6. ISO 2 button
7. Power button (ON/OFF switch)
8. Synchro terminal
22. DIP Switches
23. Battery Compartment
17. Incident /Reflected
Spot Selector Switch
18. Viewfinder Eyepiece
19. Measuring button
20. Battery
Compartment Cover
¼” Tripod Socket
24. Zoom Lens Cap
25. Synchro Terminal Cap
-1-
2. Explanation of the Liquid Crystal Display
NOTE: For explanation purposes, the display illustrated here shows all icons and readouts simultaneously. Actual display will never show as above.
Auto Electro-Luminescent Display In low light (EV 3 or less), a blue backlight will automatically illuminate the entire LCD. When using the Mini Light Receptor or a Booster (optional accessories) the LCD will be illuminated after measuring, regardless of the ambient light level. The LCD will not be automatically illuminated during measuring, or in Cordless Flash mode. The Electro-luminescent backlight will automatically turn off 10 seconds after last operation.
-2-

2.Explanation of the Liquid Crystal Display [1] Measuring Mode Icons
Ambient (see page 10) Auto-Reset Cordless Flash (see page 15) Cord Flash (see page 13)
[2] Incident/ Reflected Spot Function Icons (see page 6)
Lights when in Incident mode Lights when in Reflected Spot mode
[3] ISO Display ISO Displays ISO film setting
Displays second ISO film setting when ISO 2 button is depressed
[4] +/- Compensation Indicator Lights when +/- Compensation is set
[5] Digital aperture value, Aperture Priority, EV Brightness Difference, Average function, EV display
lights when in Aperture Priority (f/stop) mode (see page 10) lights When Using brightness difference function (See Page 20) lights when using Averaging function (see page 19) lights when using EV mode (see page 11)
[6] Analog Aperture and Memory Scale Displays marks at apertures indicating full or half f/stop values for measurement, memory, average values
[8] Battery Power Indicator (see page 4)
[9] Memory / Multiple Flash Indicator Display
lights when reading is memorized (see page 19) lights when in Multi (cumulative) flash measurement mode (see page 16)
-3-
3. Before Using
1. Attach the strap Attach the Strap 26 by passing the small end loop through the
eyelet 9 and passing the other end of strap through it.
WARNING
•Please place in a location where an infant cannot reach and accidentally get the strap wrapped around his neck. There is danger of strangulation.
2. Inserting the battery • Requires one 1.5 v AA size battery. Accepts any of the following types:
Manganese battery (R6P) Alkaline battery (LR6) Lithium battery (FR6)
1. Open the Battery compartment cover latch 21, and re- move the Battery compartment cover 20 . 2. Insert the battery, observing the polarity with the +,- marks in the battery chamber. 3. Align the tabs of the Battery compartment cover with the
notches in the back of the meter, and press down to close the Battery cover latch.
NOTE: •Nickel cadmium (NiCad) and nickel hydroxide (NiH) rechargeable batteries cannot be used. •To prevent loss of All-weather seal, be careful that dirt does not get stuck on the rubber seal and that the seal is not damaged. •Remove battery if meter is not used for an extended period. Batteries can leak and damage the exposure meter. Dispose of used batteries properly. If the LCD does not light, check that the battery capacity is sufficient, and check that the battery positive and negative terminals are not reversed.
3. Checking battery capacity • When the Power button 7 is ON, the battery power indicator on the LCD is lit.
(Lit) Battery power level is good.
(Lit) Battery power level is low. Have a spare battery ready.
(Blinking) Replace battery immediately.
Reference: • If the Measuring Button is pressed continuously, the battery life at normal room
temperature will be as follows: Manganese battery approximately 10 hours Alkaline battery approximately 20 hours Lithium battery approximately 35 hours
We recommend you always have a spare battery on hand.

3. Before Using
4. Replacing battery during measurement or when using the memory function • Always turn the power OFF before replacing batteries. If batteries are removed with the power ON, measurements and settings in memory can no longer be recalled. • If after replacing the battery, or during measurements, strange screens (displays that have
not been set) appear in the LCD, or nothing happens, no matter what button is pushed, remove the battery and wait at least ten seconds and then replace the battery. This allows the software to automatically reset, and is not a malfunction.
WARNING: • Never place batteries in fire, short, disassemble, or heat them. The batteries might break down, and cause an accident, injury or pollute the environment.
5. Auto Power Off function • To conserve battery power, the meter will turn off about twenty minutes after last use. • Whether the Auto Power Saving feature turns the power off or the Power button 7 is pressed,
the settings and measured values remain stored in memory. When the Power button is pressed again the last settings are displayed.
6. Setting main ISO film speed • Hold down the ISO button 11 and turn the Set/change dial 5 to select ISO speed for the film being used. • You can also change the ISO film speed after taking
measurements. The new value is automatically displayed.
7. Setting second ISO film speed • This feature is useful when using a second film with
different ISO speed, using Polaroid™ proofing film, or for exposure correction (when using a filter, close-up photography, etc.).
1. Hold down the ISO 2 button 6 and turn the Set/change dial to select ISO speed of the film being used. 2. Once this is set, after taking a measurement, the
measured value for the second film speed will be displayed when the ISO 2 button is depressed.
3. You can also change the second ISO film speed after taking measurements. The new value is automatically is displayed.
-5-
4. Basic Operation

4. Basic Operation 2. Setting measuring mode
• Hold down the Mode set button 10 and turn the
Set/change dial 5 to select the desired mode. The mode switching sequence is shown in the chart below:
4. Basic Operation 3. Setting DIP Switches
•Switches for setting modes that are used infrequently are housed in the Battery compartment 23 of the meter. Select the mode you want prior to beginning measurements. •The DIP switches can be set by sliding the DIP switch 22 for the mode you want to select in the ON position.
* TIME 0.5 If DIP switch 1 is ON, the shutter speed will be displayed in half steps. If DIP switch 1 is OFF, the shutter speed is displayed in full steps. * F NO. If DIP switch 2 is ON, Aperture Priority mode (ambient light) can be set. * EV If DIP switch 3 is ON, EV (exposure value) mode (ambient light) can be set. * MULTI If DIP switch 4 is ON, Multiple Flash mode (cumulative) can be set.
4. When set for Incident light • Measurement of incident light uses Lumisphere or recessed Lumisphere. You can switch
between Lumisphere and recessed function by firmly rotating the Lumisphere UP/DOWN ring 1 until it clicks.
•When the Lumisphere is raised This is used to photograph people, buildings, and other three dimensional objects. •When the Lumisphere is lowered (flat diffuser function) This is used to photograph manuscripts, paintings or other flat copy. It can also be used for measuring illumination contrast (see page 20) or illumination levels (see page 22), or brightness difference (see page 20).
NOTE: •If the device is used with the UP/DOWN ring in a middle position, distributed light quality will change, and suitable measurements cannot be made. •Do not push the Lumisphere down manually.
-8-

4. Basic Operation
5. When set for reflected light (spot metering) • This method measures the brightness (luminance) of the light reflected from the subject. It is
useful for distant objects such as landscapes, when you cannot go to the position of the subject, or for metering subjects that generate light (neon signs, etc.), highly reflective surfaces or translucent subjects (stained glass, etc.).
• The spot metering area can be selected by turning the Zoom Lens ring 16 while looking through the viewfinder from the camera position.
• Take the measurement by aligning the circle inside
the viewfinder with the subject area to be measured.
CAUTION: •Do not look directly at the sun through the viewfinder, to prevent eye injury.
NOTE: •Do not attempt to take a direct meter reading off the sun, because it may cause damage to the photo cell. •If bright light enters through the eyepiece, an accurate exposure cannot be obtained, so place your eye as close to the eyepiece as possible. •For correct exposure take measurements of objects beyond 1 meter (3.3 feet).
Reference: •If the reading will not stabilize because your hands are shaking when taking measurements, we recommend you place the meter on a tripod. •If you cannot clearly see the spot circle in the finder, we recommend you select a Diopter correction lens suited to your own eyesight. (see page 25)
-9-
5. Measurement
1. Measuring ambient light In this measurement mode, we have the choice of shutter priority mode, aperture priority mode and EV mode. Hold down the Mode set button 10 and turn the Set/chanpe dial 5 to select ambient
measurement mode
1-1 Shutter Speed Priority mode 1. Hold down the Mode set button 10 and turn the
Set/change dial to select shutter Speed Priority mode.
2. Turn the Set/change dial to set the desired shutter
speed. 3. Press the Measuring button 19 to make a
measurement. Release the Measuring button to complete the measurement. The measured value (aperture value) at that time will be displayed.
While pressing the Measuring button, the meter measures continuously until it is released.
Reference: • You can set shutter speeds from 30 minutes to 1/8000 seconds. After 1/8000 the shutter speeds of 1/200 and 1/400 can be set. • By moving the DIP switch Time 0.5 up or down (see page 8), the shutter speed can
be set in 1.0 or 0.5 (full or half) steps. • "E.u" (Exposure under) or "E.o" (Exposure over) appears when the combination of
shutter speed and aperture is not possible for the measured light level. Changing the shutter speed and or aperture with the Set/change dial will allow you to find a combination that is possible.
• If the "E.u" or "E.o" readout blinks, this indicates that the light level is beyond the measurement range of the light meter.
1-2 Aperture Priority mode Open the Battery compartment cover 20 and slide the F No. DIP switch (see page 8) to the ON position. 1. Hold down the Mode set button and turn the Set/ change dial to select aperture priority mode. 2. Turn the Set/change dial to set the desired f stop value.
-10-

5. Measurement 3. Press the Measuring button 19 to make a measurement. Release the Measuring button to complete the measurement. The measured value (shutter speed) at the time will be displayed.
While pressing the Measuring button, the meter measures continuously until it is released.
Reference: •You can set f stops from F1.0 to F128 (full f stops) •Even after taking the measurement, you can change the f stop value by turning the Set/ change dial, to display a new measured value (shutter speed).
1-3 EV mode Open the Battery compartment cover 20 and slide the EV DIP switch (see page 8) to the ON
position. 1. Hold down the Mode set button 10 and turn the Set/change dial 5 to select EV value mode. 2. Press the Measuring button to make a
measurement. Release the Measuring button to complete the measurement. The measured value (EV value) at that time will be displayed.
At the same time, the shutter speed will be displayed in the digital display area, and the corresponding f stop will be displayed in the analog display area.
While pressing the measuring button, the meter measures continuously until it is released.
Reference: •"E.u" (Exposure under) or "E.o" (Exposure over) appears when the combination of shutter speed and aperture is not possible for the measured light level. Changing the shutter speed and or aperture with the Set/change dial will allow you to find a combination that is possible. If the "E.u" or "E.o" readout blinks, this indicates that the light level is beyond the measurement range of the light meter.
-11-
5. Measurement 1-4 Cinematography
1. Hold down the Mode set button 10 and turn the Set/change dial 5 to select ambient light shutter speed priority mode.
2. Turn the Set/change dial to select the Cine Speed for the camera that will be used. Cine Speed is displayed after 1/8000, 1/200, 1/400 and the unit are in frames per second (FPS). The following Cine Speeds will display: 2, 3, 4, 6, 8, 12, 16, 18, 24, 25, 30, 32, 36, 40, 48, 60, 64, 72, 96, 120, 128, 150, 200, 240, 256, 300 and 360 FPS.
• The shutter opening angle that these speeds are based on, is 180 degrees. For other angles make the following ISO film speed corrections.
* Example of correction value -1/3: Decrease ISO film speed by 1/3 stop, example: ISO 100 -1/3 stop = ISO 80 +1/3: Increase ISO film speed by 1/3 stop, example: ISO 100 +1/3 stop = ISO 125
4. Press the Measuring button 19 to make a measurement. Release the Measuring button to complete the measurement. The measured value (f stop value) will be displayed.
While pressing the measuring button, the meter measures continuously until it is released.
-12-

5. Measurement
2. Measuring flash light This method of measurement can be done in the following modes; with cord, without cord, multiple flash with cord, and multiple flash without cord. The measured value displayed is the sum of the flash portion and the ambient light portion.
2-1 Cord Flash mode The most positive method to assure proper synchronization and measurement of flash units. Connect the meter with the flash with a synchronization cord. Be sure to replace Synchro terminal cap after your measurement.
1. Connect the flash synchro cord to the Synchro terminal 8 on the exposure meter.
2. Hold down the Mode set button 10 and turn the Set/change dial 5 to select flash measurement with cord mode.
3. Turn the Set/change dial to set shutter speed.
When setting shutter speed, first check the settings to confirm that they correspond to the settings on the camera.
4. Press the Measuring button 19 to trigger the flash. The measured value (f stop value) will be displayed.
5. Measurement
CAUTION: • There is danger of electric shock if the meter is handled with wet hands, during rain, in
areas splashed by water or where there is a lot of moisture, if you use cord synchronized flash.
• Under such conditions, it is recommended that you use the meter in the flash cordless mode, and keep the Synchro terminal cap in place.
NOTE:
• The electronic fire unit may fire when you connect the Synchro cord or operate the POWER Switch.
• For flash units with extremely low electric trigger voltage, the flash may not fire. In this case, make measurements in flash mode without cord (see page 15).
Reference:
• The shutter speed can be set in single or half steps from 1 second to 1/1000 of a second. After 1/1000 sec, the meter can be set at the following intermediate speeds: 1/ 75, 1 /80, 1 /90, 1 /100, 1 /200, or 1 /400.
• If the film speed is changed after the measurement is taken, the new converted measured value (f stop value) will be displayed.
• If the shutter speed is changed after the measurement is taken, the measurement (f stop) is cleared to 0 and you must take the measurement again.
• E.u" (Exposure under) or "E.o" (Exposure over) appears when the combination of shutter speed and aperture is not possible for the measured light level. Change the shutter speed with the Set/change dial and take measurements again.
• If the "E.u" or "E.o" readout blinks, this indicates that the light level is beyond of the measurement range of the light meter.

5. Measurement
2-2 Auto-reset cordless flash mode Measurements are made by the meter receiving the light from the flash. This measurement mode is used when the Synchro cord will not reach because of the distance between the flash and meter or when use of the Synchro cord is inconvenient.
2. Turn the Set/change dial to set shutter speed. When setting shutter speed, first check the settings to confirm that they correspond to the settings available on the camera.
4. If the 90 second period is exceeded and the blinking mark stops, press the Measuring button again to return to ready to measure.
NOTES: • If the shutter speed is changed after measurement, the measure (f stop) is cleared to 0 and you must take the measurement again. • When firing a flash, if the flash brightness is low compared to the ambient light, the
meter may fail to detect the light. In this case, make measurements using the flash with cord mode.
• Rapid start fluorescent lamps and special lighting are sometimes mistaken for flash, and
accidentally measured. In this case, make measurements using the flash with cord mode.
• The meter's tripod socket permits mounting it to a tripod or light stand and placing it strategically when using cordless flash mode.
-15-
5. Measurement Reference:
• Setting the shutter speed is the same as measurement (see page 14) of "Flash mode with cord" of section 2-1 . • A new converted value is displayed when the film speed is changed after taking the measurement. • Readings over and under the measuring range are the same as measurement (see page 14) of "Cord Flash mode" of section 2-1 .
2-3 Cord multiple flash (cumulative) mode These measurements are used when the light generated by the flash is inadequate for proper exposure. The repeated flash pops can be accumulated until the desired aperture is displayed.
The accumulation can be repeated up to nine times. 1. Slide DIP switch to MULTI (see page 8) to the ON position. Hold down the Mode set button 10 and turn the Set/change dial 5 to select flash measurement with cord cumulative mode (MLT will display on the LCD).
2. Turn the Set/change dial 5 to set shutter speed. When setting shutter speed, first check the settings to confirm that they correspond to the settings available on the camera.
3. Connect the Flash synchro cord to the meter's synchro terminal 8.
4. Press the Measuring button 19 to trigger a flash. The measured f stop value at that time will be displayed. Each time this is repeated, the accumulated f stop value and the number of cumulative flashes is displayed.
CAUTION: • There is danger of electric shock if the meter is handled with wet hands, during rain, in
areas splashed by water or where there is a lot of moisture. Under such conditions, it is recommended that you use the meter in the flash cordless mode, and keep the Synchro terminal cap in place.
-16-

5. Measurement
NOTE: • The flash unit may flash when you connect the synchro cord or operate the POWER switch. • When firing a flash to make measurements, check the camera's synchronizing range and set the proper shutter speed. • For flash units with low electric trigger voltage, the flash may not fire. In this case, make
measurements in flash mode without cord (see page 15). • A new converted f stop is displayed when the film speed is changed after taking the measurement. • If the shutter speed is changed after measurement, the number of cumulative flashes and the f stop value are cleared to 0 and you must take the measurement again.
Reference:
• Setting the shutter speed as measurement (see page 14) of "Flash mode with cord" of Section 2-1. • Readings over and under the measuring range, are the same as measurement (see page 14) of "Flash mode with cord" of section 2-1.
2-4 Cordless flash cumulative mode These measurements are used when the light generated by the flash is inadequate for proper exposure. The repeated flash pops can be accumulated until the desired aperture is displayed. The accumulation can be repeated up to nine times.
1. Slide DIP switch to MULTI (see page 8) to the ON position.
2. Hold down the Mode set button 10 and turn the
Set/change dial 5 to select flash measurement without cord cumulative measurement mode. (MLT will display on the LCD). Turn the Set/change dial to set shutter speed. When setting shutter speed, first change the settings to confirm that they correspond to the settings available on the camera.
3. When the light from the flash is received, the measured value (f stop) is displayed. Each time this is repeated, the accumulated value for the aperture and the number of cumulative flashes is displayed.
-17-
5. Measurement
4. The ready to measure mode will be displayed for approximately 90 seconds. If the 90 second period is exceeded and the blinking mark stops, press the Measuring button 19 again. The measured value (f stop) of the previous time reverts to 0 and the meter is in ready to measure mode.
NOTE: • If the shutter speed is changed after measurement, the (f stop) value and the number of cumulative flashes are cleared to 0 and you must take the measurement again. • When firing a flash, if the flash brightness is low compared to the ambient light, the
meter may fail to detect the light. In this case, make measurements using the flash with cord mode.
• Rapid start fluorescent lamps and special lighting are sometimes mistaken for flash and accidentally measured. In this case, make measurements using the flash with cord mode.
Reference:
• Setting the shutter speed is the same as measurement (see page 14) of "Flash mode with cord" of Section 2-1. • "E.u" (Exposure under) or "E.o" (Exposure over) appears when the combination of
shutter speed and aperture is not possible for the measured light level. Change the shutter speed with the Set/change dial and take measurements again.
• If the "E.u." or "E.o" readout blinks, this indicates that the light level is beyond of the measurement range of the light meter.
-18-

6. Advanced Functions
1. Memory function This meter can store up to three measured values in memory for each measurement mode. (incident light mode, -3 values, reflected light mode, -3 values). This feature can be used in the following modes: ambient light (shutter speed priority only) EV, flash (with and without cord).
1. Press the Measuring button 19 and take a measure- ment. 2. Press the Memory button 14 placing the measured value in memory. The number of values in memory is displayed on the LCD. The f stop value corresponding to the measured value is displayed in the analog section. By repeating this operation, up to three values can be stored in memory.
• Memory can be cleared by pressing the Memory clear button 13 or changing measurement mode.
NOTE: • The memory function cannot be used in "ambient light aperture priority mode" or "flash cumulative mode." • Measured values for the fourth and subsequent times will be displayed but cannot be stored in memory. • When the incident / reflected selection dial is moved, the memory remains on the analog display, but when you press Memory clear button all values in memory are erased.
2.Averaging function This displays the average of two or three of the values in memory.
1. Press the Measuring button 19 and take a measurement.
2. Press the Memory button placing the measured value in memory.
-19-
6. Advanced Functions
3. When the Ave/r EV button 4 is pressed, an average value for the two or three measurements display on the LCD. The value in memory and the average values are displayed on the analog scale. An "A" appears in LCD to indicate this is an average.
• The average mode can be canceled by pressing the Ave/ r EV button.
3. Brightness difference function This function is useful for evaluating studio lighting and checking the evenness of the lighting set-up across the subject area. Take a measured value at a certain point as a standard value. The difference between the standard value and a new measured value is displayed as EV and the f-stop in analog scale. Example of adjusting lights using brightness measurement with shutter speed priority mode.
1. Turn the Lumisphere UP/DOWN ring 1 to lower it to the DOWN position. 2. Turn any secondary light source off. Point the
Lumisphere toward the main light source, from the position of the subject and take a measurement. Press the Memory button 14 and store the value in memory.
3. Press the Average/ r EV button and display the "A" mark on the LCD.
-20-

6. Advanced Functions
4. Turn the main lighting off. Now, point the Lumisphere toward the secondary light source. While the Measuring button 19 is depressed and held down, the indicated difference between the main and auxiliary light sources is displayed in EV values and in bars in analog scale of memory value. A lighting ratio (contrast ratio) can be found in the scale below.
Reference: • To determine exposure after adjusting lights, turn both main and auxiliary light sources
on, raise the Lumisphere to the UP position, then take a reading along the camera light axis.
6. Advanced Functions
4. How to use the L508 as an Incident Illuminance (LUX) meter
1. Turn the Lumisphere UP/DOWN ring 1 to lower it to the DOWN position.
3. Set the meter to EV mode (DIP switch) and ISO 100. 4. Place meter parallel to the subject and take a measurement. 5. Convert the measured EV with a conversion table or calculation formula to find the brightness level.
-22-
6. Advanced Functions
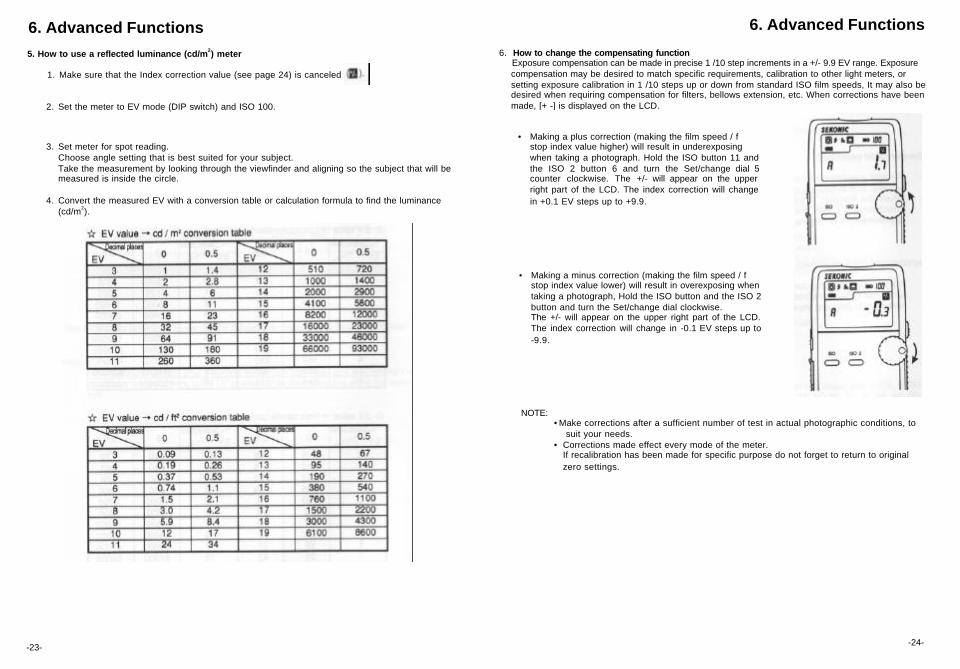
5. How to use a reflected luminance (cd/m2) meter
1. Make sure that the Index correction value (see page 24) is canceled
2. Set the meter to EV mode (DIP switch) and ISO 100.
3. Set meter for spot reading. Choose angle setting that is best suited for your subject. Take the measurement by looking through the viewfinder and aligning so the subject that will be measured is inside the circle. 4. Convert the measured EV with a conversion table or calculation formula to find the luminance (cd/m2).
-23-
6. Advanced Functions
6. How to change the compensating function Exposure compensation can be made in precise 1 /10 step increments in a +/- 9.9 EV range. Exposure
compensation may be desired to match specific requirements, calibration to other light meters, or setting exposure calibration in 1 /10 steps up or down from standard ISO film speeds, It may also be desired when requiring compensation for filters, bellows extension, etc. When corrections have been made, [+ -] is displayed on the LCD.
• Making a plus correction (making the film speed / f stop index value higher) will result in underexposing
when taking a photograph. Hold the ISO button 11 and the ISO 2 button 6 and turn the Set/change dial 5 counter clockwise. The +/- will appear on the upper right part of the LCD. The index correction will change in +0.1 EV steps up to +9.9.
• Making a minus correction (making the film speed / f stop index value lower) will result in overexposing when taking a photograph, Hold the ISO button and the ISO 2 button and turn the Set/change dial clockwise. The +/- will appear on the upper right part of the LCD. The index correction will change in -0.1 EV steps up to -9.9.
NOTE: • Make corrections after a sufficient number of test in actual photographic conditions, to suit your needs. • Corrections made effect every mode of the meter. If recalibration has been made for specific purpose do not forget to return to original zero settings.
-24-

7. Accessories
Mini Light Receptor (Sold separately)
• Incident light receiving unit with a compact 12mm diameter light receiving surface. • For measuring narrow areas used for photographing small subjects or copy work.
Booster (Sold separately)
• For light measuring on camera ground glass, focusing screens, SLR eyepieces, microscope eyepiece. • When the Booster is used without any accessory
attachments, it can measure reflected light over approximately a 60 degree angle of field.
Synchro cord (Sold separately) • This is a five-meter long cord with three plugs. An exposure meter, a camera, and a flash can all
be connected at the same time., This is convenient when measurements are made, because it is not necessary to plug and unplug the synchro cord.
18% Gray Card (Sold separately)
• 18% gray card with cover (110mm x 102mm, 4 1/4" x 3 1/ 2"), folds to 2 3/4" x 4 3/4", and fits in a shirt pocket.
Diopter Eye Correction Lenses (Sold separately) • Uses Nikon diopter lenses (-5Dp - +3Dp), for the Nikon
F801S/F-801. The eyepiece adapter DK-7 is required for the diopters to attach and can be used as an eyecup for eyeglass wearers.
-25-
8. Technical Data • Type : Digital exposure meter for ambient and flash meter with built-in 1° to 4° nine lens elements, zoom lens • Light receiving method : Incident light and reflected Incident light : Convertible to flat diffuser (Lumisphere in down position) Reflected light : 1° to 4° nine element Zoom Metering distance 1m - infinity • Light Receptors : 2-Silicon photo diodes (incident and reflected) • Metering modes : Ambient light : Aperture priority metering Shutter priority metering EV metering value Flash : With synchro cord (cumulative, non-cumulative) Without synchro cord (cumulative, non-cumulative) • Measuring Range (ISO 100) Ambient light : Incident light EV-2 to EV 19.9 (in 0.1 steps) Reflected light EV 3 to EV 19.9 (in 0.1 steps) Flash : Incident light f1.0 to f128 +0.9 stop (in 0.1 steps) Reflected light f5.6 to f128 +0.9 stop (in 0.1 steps) • Repeat Accuracy : +/- 0.1 EV or less • Calibration Constant Incident light metering : Lumisphere C = 340 Flat diffuser C = 250 Reflected light metering : K = 12.5 • Display Range
Film speed : ISO 3 to 8000 (in 1/3 steps) Shutter Speeds Ambient light : 30 minutes to 1/8000 seconds (single or half steps) also 1/200, 1/400 Cine speeds- 2, 3, 4, 6, 8, 12, 16, 18, 24, 25, 30, 32, 36, 40 ,48, 60, 64, 72, 96, 120, 128, 150, 200, 240, 256, 300, 360 frames per second (at a 180 degree shutter angle) Flash : 1 second to 1/1000 second (single or half steps) also 1/75, 1/80, 1/90, 1/100, 1/200, 1/400 Aperture : f/1.0 to f128 +0.9 stop (in 0.1 steps) EV : EV -9.9 to EV 36.1 (in 0.1 steps) Analog display : f/1.0 to f128 (in 0.5 steps)
• Other features All-weather feature : JIS standard water resistance class 4, splash-proof type Memory function : 3 readings in each incident mode (3 with Lumisphere Up and, 3 with Lumisphere Down) and 3 in reflected spot mode Multiple Flash function : Up to 9 flash readings Average function Brightness Difference function
Exposure Out of Range : Eu (underexposure) or Eo (overexposure) indication Exposure index correction : +/- 9.9 EV (in 0.1 steps) Battery Power Indicator display Auto Power Off : approx. 20 minutes
-26-

8. Technical Data
Auto illumination : EV 3 and under DIP switch mode selection ¼”Tripod socket : For placing meter in subject area for cordless flash measuring. Diopter correction : Accepts Nikon™ screw in diopters Second ISO film speed setting • Battery used : one type AA battery (manganese, alkaline, or lithium dry cell)
• Operating temperature range : -10 – 50°C
• Storage temperature range : -20 – 60°C
• Dimensions : 84 w X 156 h X 40 d mm
• Weight : 210 g (without battery)
• Standard accessories supplied : Soft case, strap, lens cap, synchro terminal cap, AA battery
Nikon is trademark of the owner. Features and specifications are subject to change without notice.
9. Safety Guide
Please keep in a location where an infant cannot reach and accidentally
get the strap wrapped around his neck. There is danger of strangulation.
Never place batteries in fire, short, disassemble, or heat them. The
batteries might break down, and cause injury or pollute the environment.
Do not look directly at the sun through the viewfinder, because of
potential eye injury.
If you are operating the exposure meter in areas under wet conditions or high humidity, keep the sync post covered. If you are using flash in
these conditions, Cordless Flash mode is recommended.
10. Care and Maintenance
Maintenance Notes • If your meter is splashed with water, wipe immediately with a soft dry cloth. • Avoid applying excessive force on the rubber seal of the battery compartment cover. Do not attempt to remove the rubber seal of the battery compartment cover.
• If the rubber seal's surface is damaged, water or moisture may enter and damage the meter. If this has happened, you must send your meter to the Sekonic Sevice Center in your country.
• Keep the surface of the Lumisphere and the front and rear surface of the Zoom lens free from dust, dirt, and scratches, which could affect accuracy. • Never use organic cleaners (like thinner or benzene). Clean with soft dry cloth.
-28-