Section 1 - Taco del Mardownload.tacodelmar.com/downloads/IT/Wand/Wand... · When you click on F3,...
87
Section 1 WAND PRE INSTALL
-
Upload
truongkien -
Category
Documents
-
view
212 -
download
0
Transcript of Section 1 - Taco del Mardownload.tacodelmar.com/downloads/IT/Wand/Wand... · When you click on F3,...

Section 1
WAND PRE INSTALL

WAND Install instructions for pre – training day activities:
1. Remove Wand system, key board, mouse and surge protector from the shipping
container
2. Place your Wand system, keyboard and mouse on a clean surface or work area and
plug in the keyboard (purple connector into purple socket on the back of the Wand)
and the mouse (green connector into the green socket on the back of the Wand).
3. Plug in the surge protector.
4. Plug in your Wand system into surge protector (all cords and cables will be
attached) only plug in the power cord.
5. Turn on the Surge Protector
6. Turn on the Wand by lifting the small plastic cover located on the front of the unit
under the monitor screen. You will have to tilt the screen up. Wait for Window’s to
Load. Two programs will open up; the Menu Keys Layout and the Wand Back
Office.
7. Locate the window’s icon on the keyboard (lower left hand side in between the cntl
and alt keys. Press it once.
8. Both programs that are running will be present in the tool bar at the bottom of the
monitor screen. Touch the Fork, Knife and Spoon-Wand POS button. The back
office will now show on the monitor screen.
9. Enter in your Mgr ID and Password (1 enter and 1 enter or 800 enter 801 enter)
The Back Office Menu will now be displayed. Follow the preceding instructions to enter
your employees into the Wand POS System. You will need their 1-9 and W-4 forms for this
exercise.
If the Wand System is not loading or responding to your commands please try the
following: Call the Wand Help Desk at 1.952.361.625

Wand Pre – Install Procedures Completed – After Section 2 is done.
After all your employees have been entered, please shut your Wand system
down until the first day of training, when at that time, your Master Developer
or FOM will finish the installation
of the remaining Wand components.
To shut down your Wand system, do the following
1. Locate the window’s icon on the keyboard (lower left hand side in
between the cntl and alt keys) Press it once.
2. Locate the Shut Off button on the monitor screen (should be just
above the start button and a little to the right, next to the log off
button). Press it once. A pop up will be displayed on the monitor
screen.
3. Touch the Turn Off button on the monitor screen and the Wand
system will shut down the window’s program.
4. After Window’s shuts down a message will appear on the monitor
screen that states it is now safe to turn off your computer. Press and
Hold the power button until system shuts off (it acts as a toggle switch
and if you only press it once without holding it down, the Wand
system will restart) if this happens simply follow the previous steps
again.
Note: If you log off the computer by mistake, just sign back in by
entering the password (WAND)

Section 2
EMPLOYEE FILE AND PAYROLL PROCEDURES

This section is used for initial employee file and payroll set up and is completed before the training of a new crewmember begins. ENTERING EMPLOYEE FILE AND PAYROLL INFORMATION At the back office computer, select Edit Emp. File from the Main Menu.
The Employee Information Center will appear.
You are now going to add your employees to this data base. Remember to have the employees I-9 and W-4 form ready for this task.

Select F2 if you wish to add an employee. The screen (as seen below) will appear with all fields blank. The Emp ID field will automatically prompt you with the next chronological number available in the system. You can choose to keep it, or simply enter a new number. (We recommend using the last four digits of their social security number)
After entering data into a specified field, you can advance to the next field by pressing the Tab key or by moving your curser to the next field and clicking once.
When you “Tab” to the next field or select the next field with your mouse, all previously-entered data is automatically saved.
You can enter/edit data for the employee at any time. Once you have selected the Add Employee F2 button and entered data of any kind, the record is opened in the system and will be available to edit whenever you wish. It will remain in the system until you do a Delete Employee F3 function. USE THIS SECTION IF YOU NEED TO DELETE AN EMPLOYEE
If you wish to delete an employee, first use the scrolling list on the left side of the Employee Information Center window to find and click once on the employee to be deleted. Make sure that the employee is displayed in detail on the right side of the Employee Information Center window. When you click on F3, the employee will be deleted from the system. As a precaution, you will be asked to confirm your selection before the actual deletion is complete.
Select Yes to delete the employee and No to cancel the action.
Note: Be sure the employee you are deleting is not clocked in at the time of
deletion. When you delete an employee, you are deleting your access to the
employee only. Even when deleted, the employee is still in the database and, if the deletion was done with the employee still clocked in, the employee’s hours will continue to accumulate even though there is no longer a way to clock the employee out.
As general rule of practice, it is wise to wait at least two-three weeks after an employee quits before deleting. Also, an employee may change his/her mind and
return to work, making the reinstatement process much easier. If you have deleted an employee, and then find you need to reinstate him/her, or simply need access to a deleted employee, call Wand Help Desk for assistance.

NOW YOU NEED TO ASIGN YOUR EMPLOYEE A JOB TITLE AND ENTER THEIR PAYRATE
Select F5 to assign a pay rate and job function.
1. First enter the hourly pay rate into the “pay rate” field. 2. Click on a job type/function. 3. Finish by clicking on the “Add >>” button. Note: Disregard the Security Level Box To remove a job type from the right column (active) and return it to the left column (inactive), select the job and click on the “<< Remove” button. The list of job types/functions is set up initially as part of the “Set-up Menu – Departments F” which is found in the “Set-up Menu O” on the Main Menu. Standard or “typical” job functions may have been pre-loaded by Wand. To add, delete, or change job functions, go to the Main Menu and select “Set-up Menu O”, then “Departments F”. You may add multiple departments with different pay rates.
NOTE: Employee Security Levels listed in this section are Zero - this will be the defaulted level and should not be changed in this section.
Click ESC to get back to the Employee Information Center
USE THIS SECTION IF YOU NEED TO ADJUST AN EMPLOYEES TIME PUNCHES
Select F6 if you wish to make manual adjustments to an employee’s time clock data.
The time clock adjustment window will pop up with the employee’s most recent entries first (current work week). If you wish to make adjustments to prior dates, you can go back in time by selecting F3. Each time you click on the F3 button you will go back one more week. Go forward (up to the current week), by clicking on F4. All manual adjustments made to an employee’s time clock data will be stored and reported on a separate report called Manual Adjustments found in Labor Reports.

If an employee is absent for a period of time, you may wish to select a reason from the drop-down menu called “Reason for Absence”. This information is for display
purposes only. It does not appear on any reports but can be helpful in applications where more than one person is responsible for viewing employee time clock data. Tip: You can use the Page Up and Page Down keys on your computer keyboard to
scroll through the employee file.
Go back in time. Go forward in time.
Notes on Manual Adjustments
Manual adjustments must be done in “military” time only.
A “job code” is mandatory for every clock in and clock out sequence. The system
will not accept the entry without a valid job code. The available job codes for each employee is displayed at the top of the Manual Adjustment screen.
Most manual adjustments are done to correct the common mistake of “forgetting to clock in”. A typical operational error made by many managers is to advise the forgetful employee that “I’ll take care of it later”, while the employee remains not
clocked in. It is true that making a manual adjustment later will correct the problem, but by allowing the employee to remain “off the clock” until you find time to do the adjustment, you have inadvertently created a Manual Adjustments Report that will
require more explanation than if you would have had the employee clock in immediately upon noticing the error. If you mistakenly leave an employee clocked in, he/she will be automatically clocked out at 3:00 A.M. (system “new day”) and then automatically clocked back in at 3:01 A.M. This will result in a display of Labor figures on the lower portion of the Main Menu screen the next
morning when the store is re-opened. Normally, when the store is opened at the beginning of a new day, the labor figures (and all other figures) will show zeros. If there are numbers other than zeros displayed in the Labor categories, it means someone was not properly
clocked out the night before. A manual adjustment will have to be made to the affected employee’s time clock data.

Employee File Changes – BACK OFFICE
DAY ONE OF TRAINING / EVER DAY
Week in and week out, you will need to make changes to your employee records. Every time a new employee starts or an employee quits, you will make edits in the Employee Information Center. This is also the access point for correcting time clock log in errors made by your crew and creating management reports by individual employees.
To make employee file changes, select Edit Emp. File D from the Main Menu screen.
The Employee Information Center will appear.
From the Employee Information Center, you can:
o View current Employee data. o Edit current Employee data. o Add an Employee – F2 o Delete an Employee – F3 o Assign pay rates for Departments and job functions – F5 o Make adjustments to Employee “Clock in & Out” data – F6 o Request individual reports by Employee – F7
Select the employee you wish to view/edit from the list on the left side of the screen.
If you would like to make changes to the employee’s current data, place your curser in the appropriate data field and click once. You can now make the changes.
Note: If you are using “magnetic stripe cards” for employee/manager log in, the card’s number will appear on this screen. It is entered via the cash register terminal as part of a separate set up function.

SETTING UP MANAGER PASSWORDS – BACK OFFICE
DAY ONE OF TRAINING / EVERY DAY
From the back office computer select “Edit Pswd” from the main menu
The following screen will appear.
For new passwords, you want to select “NO”
The following screen will appear
Select the “Add” button and choose a “Mgr ID” number Use the Tab Key to scroll to the next information box. You will need to assign a security level of at least (1) so that most manager functions can be accessed by leads and supervisors. Level 15 is the highest level and it is recommended that all Owners and Managers be set at that level. Hit the “ESC” button when all information has been entered. To “Delete” a person, simply highlight their name and hit the “Delete” button

“Clock In” all present employees – POS DAY ONE OF TRAINING / EVERY DAY
At the beginning of each day, your POS terminals should be at their “default” screen as seen below. Wand typically uses the “purple” screen as default. An exception to this is the screensaver, if enabled on the system. To disable the screensaver, just touch the screen one time. From the default screen, you can advance to the “Clock In” screen by touching the “Clock In” button.
The “blue Clock In” screen will appear.
Using the numeric keypad, enter the employee ID and touch “Enter” on the numeric keypad or swipe the employee’s personal mag-stripe card (if applicable).

The following screen will appear for a short time confirming the employee is clocked into the system. Then, the system will return to the default screen where you can either repeat the Clock In process for additional employees (usually enter the entire shift) or do a Log In process for the employee you wish to assign to the terminal you are working on.

Section 3
LOGGING IN EMPLOYEES, ASSIGNING CASH DRAWERS, CASH DRAWER RECONCILIATON, COUPONS, DISCOUNTS, VOIDS AND MEALS

Log In/Log Out Functions – POS
DAY ONE OF TRAINING / EVERY DAY
At the beginning of each day, shift, or sale (depending upon the specific programming on your system), you will need to provide a proper Log In before operating the point of sale. A Log In can be provided either manually or by swiping an authorized employee card through the magnetic stripe reader (if equipped and programmed on your system). Because we only have one Terminal most restaurants do not use the Card Swipe Option.
Log Into the System – Beginning of the Day or Shift
After properly Clocking In, the purple Log In screen will appear.
.
Using the numeric keypad, enter your employee ID and touch the “Enter” button on the numeric keypad. The following red Password screen will appear.
Enter your employee password and touch the “Enter” button on the numeric keypad. You will now be Logged and Clocked into the system and can begin processing orders. The cash that is in the till is now assigned to whomever is logged in and may be their responsibility. As an owner, you must have a clear policy on cash control. Consult your MD or Operations person for recommendations.

New Shift – Log Off Current Employee/Log On New Employee - POS
As your shifts change, you will typically want to log off the current cashier, do a drawer pull, and then “Clock In” and “Log In” a new cashier. The first thing to do is a Pull Drawer. Select the Manager Menu button on the active POS screen and Log In at the Manager Log In screen. Select Pull Drawer from the Manager Functions Menu. The drawer will open, allowing you to remove its contents, and the system will automatically Log Off the current cashier and bring you to the default Log In screen.
Current Shift – Log Off/Log On Current Employee
Occasionally, the cashier may wish to temporarily leave the POS terminal without permanently Logging Off. The terminal should not be left in an operational mode when this happens. To temporarily Log Off the system, just touch the Log Off Register button on the active POS screen.
You will be asked to confirm your selection.
If you select Yes, the current cashier will be Logged Off and the system will display the default Log In screen until the current or new cashier logs into the system.

Pull Drawer – POS DAY ONE OF TRAINING / EVERY DAY The “Pull Drawer” function can be done anytime you feel it is necessary. Typically, you will do it at shift changes and at the end of each day.
Manager Menu on Register
From the active POS screen, select Manager Menu. After Logging On, you will see the following Manager Functions screen. Select Pull Drawer to:
1 Automatically Log Off the current cashier. 2 Pop the cash drawer open, allowing you to remove its contents.
After replacing the cash drawer till with a new one (including a bank), take the “pulled” till(s) to the back office for counting and declaring.
Pull Drawer on Back Office – Back Office
At the back office computer, select Pull Drawers from the Main Menu.

The following screen will pop up. It lists all the “pulls” done on the system since the last “new day” (automatic clearing) has been done.
Click on (highlight) the drawer you wish to count and then click on F1 - Cash Out. The following screen will pop up next.
From this screen, you can count and declare the various media found in the drawer. As you enter into each “Declared” field, an over/short calculation will occur automatically. Note: Entries must include the decimal (eg. 73.72 is entered 73.72). Also, if you make an entry into the declared field of only one media type (example cash), and then depress ESC to exit, your declared entry will not be saved. Making a declaration in each of the available declared fields will cause an automatic save of your entries. But, to save an entry made into only one or two fields, you must click on the F1 button at the bottom of the screen.
Coupon Details – Back Office DAY ONE OF TRAINING / EVERDAY IF APPLICABLE
If coupons have been accepted during the shift, their total will appear on this screen. You can view details of all coupon activity by clicking on the Coupon Details button. A nice feature of the Coupon Details function is the ability to “check off” each individual coupon as you find it in the drawer. The “Declared” field will update automatically along with the Over/Short field.

An alternative to “checking off” each coupon is to count the total and make an entry in the “Declared” field. Each “type” of coupon is tabbed across the top of this screen. Click on a tab to view a list of all transactions for each coupon type.
If you have found the coupon (in this case, Free Chalupa) in the drawer and confirmed its authenticity, click on the “check-off” box next to the transaction. You might save time by sorting your coupons prior to “checking them off”. By sorting, you can finish each type before moving on to the next. When finished, click on exit. All appropriate calculations on the “declaration” screen will be complete.

Skims – POS
DAY ONE OF TRAINING / EVERDAY
At various times during the day, you SHOULD “skim” the cash drawers on your system to prevent overfilling. This is not the same as a drawer pull, where the entire drawer is pulled and counted. Skims are used to control the amount of cash (and other media) in the drawer between pulls. To do a Skim, touch the Manager Menu button on the top of the POS terminal screen and then do your manager Log On. The following screen will pop up.

Touch the “Skims” button to access the following screen.
You can use this screen three different ways. First, you can click on each of the denominations - one time for each bill skimmed. The “Quantity” and “Amount Skimmed” fields will update automatically. Next, you can use the numeric keypad to enter a “quantity” for a particular denomination. Just enter the quantity on the keypad and then select the denomination. The “Quantity” and “Amount Skimmed” fields will update automatically. Finally, you can count the skim, enter the total on the keypad, and finish by touching “Submit”. All three methods will properly record the “Skim”. If you make a mistake at any time during the process, simply touch “Clear All” and start over. If you change your mind about doing the skim, touch “Cancel” and the system will return to the Manager Functions Menu.
Skim Details – Back Office
Details of each “Skim” are recorded and made available on the “Declaration” screen when you do a “Pull Drawer”. They may also be accessed from the Skims Report, which is available on the Main Report Screen.
Click on the “Skim Details” button to view the following report.

Skim Detail Report – Back Office
The Skims Report will list all skims done on the system since its last “new day”.
Manager/Employee Meals – POS
DAY ONE OF TRAINING / EVER DAY
Your system may have been programmed to transact Manager and/or Employee meals. Both are typically set up to perform a discount function and each is tracked on a special report to provide accountability. The Manager Meal is usually a 100% discount and the Employee Meal is usually a 50% discount, although they can each be set to any percent or HALO amount (high amount lock out) you wish. To access the Manager or Employee meal discount buttons, touch the Meals button on the active POS screen anytime before closing the sale. A screen similar to this will display.

Touch the appropriate meal button and then the terminal will automatically return to the active POS screen and the discount will be applied.
Notice the tax has been adjusted. The transaction is finalized on the Cash Out Order button, just like a normal sale.

Discounts/Coupons – POS DAY ONE OF TRAINING / EVERY DAY
Discounts and Coupons are transacted by selecting the DISCOUNT $ or DISCOUNT % buttons. When selected, these buttons will bring up a screen which asks for either a dollar or percentage amount to subtract from the meal price. For those requiring a manager’s approval, the Manager Log On screen will appear automatically. Others may not require an approval.
This example shows a 20% discount applied to the whole order. Discounts can be programmed for percentages, amounts, open, preset, for specific items only, or for whole transactions. The system can accommodate as many different discounts as you wish.

Over-rings/Voids – POS DAY ONE OF TRAINING / EVERY DAY
Orders that have been finalized and cashed out are still accessible by doing a “Review Orders” routine. You can make changes to completed orders (referred to as Item Voids) or back out an entire transaction, as in the case of an Over-ring.
Touch the Review Orders button. The following screen will appear.
Touch the arrow keys to “page” to the transaction you wish to change. When you find the transaction, touch Modify. The 10-key pad and cash register function buttons will re-appear to allow your modifications. A “Receipt” function is also available to print a receipt on a prior order should such a request be made.

Touch (highlight) the item(s) you wish to cancel or replace. When you touch the Cancel Item(s) button, the Manager Log On screen will appear and prompt you to Log On with your Manager’s I.D.
With the Manager Logged On, you can cancel items, cancel the entire transaction, or add items to the transaction. The key sequences, including finalizing, are the same as in the active POS mode. When finished, the terminal will automatically return to the active POS mode.

Section 4
FOOD DELIVERIES, TRANSFERS AND WASTE

Deliveries/Transfers – BACK OFFICE
DAY TWO OF TRAINING / EVERY DAY
In order to properly maintain the accuracy of your Wand inventory system, deliveries and transfers should be done the same day they occur. Failure to account for deliveries and transfers in a timely manner will cause inaccuracies in your Food Theoretical report as well as any customized daily reports such as the DOC or other similar spreadsheets.
Deliveries
When receiving a delivery, you are given a delivery receipt (manifest) that should coincide with the order placed with that vendor. Because of a number of factors such as back ordered items, damage in shipment or loading mistakes, your manifest will most likely not coincide exactly with the inventory received. Over the next few pages you will learn how to handle all of the possible variables associated with receiving inventory. To record a delivery on the Wand server, first click on Food Inventory F from the Main Menu screen.
The following “Inventory Management” screen will appear.

Click on Data Entry Z to enter data.
Then, select Deliveries L to open the following “Deliveries Maintenance” screen.
This is the main screen for managing deliveries. From here, you can:
Check on an older delivery to verify information or correct mistakes that have been found.
Sort or group previous deliveries by vendor, chronology (dates), value of order, etc.
Produce hard copy (reports) on individual or groups of deliveries.
Receive a new delivery and post it to your permanent records. To fully understand the power and flexibility of this screen, we will look at the different components (sections of the screen) and discuss their features.

To “exit” or “go back” through any of the delivery screens, select File and Exit. You will always revert back to the last screen on your path. Selecting and Sorting
This screen will "default" to showing the last two-week's deliveries unless a specific date range has been requested. A specific date range can be requested in one of two ways. First, when selecting Deliveries L from the Raw Products screen, you can also click on F1 – Calendar (first) to choose a date range other than the default “two-week” range.
Next, if you have already selected Deliveries L from the Raw Products screen, you can click on the Calendar icon at the top left corner of the Deliveries screen to access the Calendar function.

Placing your curser on a specific line and clicking once will “highlight” the order you wish to view or work on. To open the order and view its details, you must double click on the line. The yellow highlight is provided for easy reference only. It will remain in affect until you place your curser on a different line or open a different order.
This screen will always sort and display in the default order of “by vendor/by date”. Another sort you can do is “by vendor” for the date range requested. To view just the orders from one particular vendor, select the vendor from the listing on the left side of the screen. A screen similar to the one below will appear.
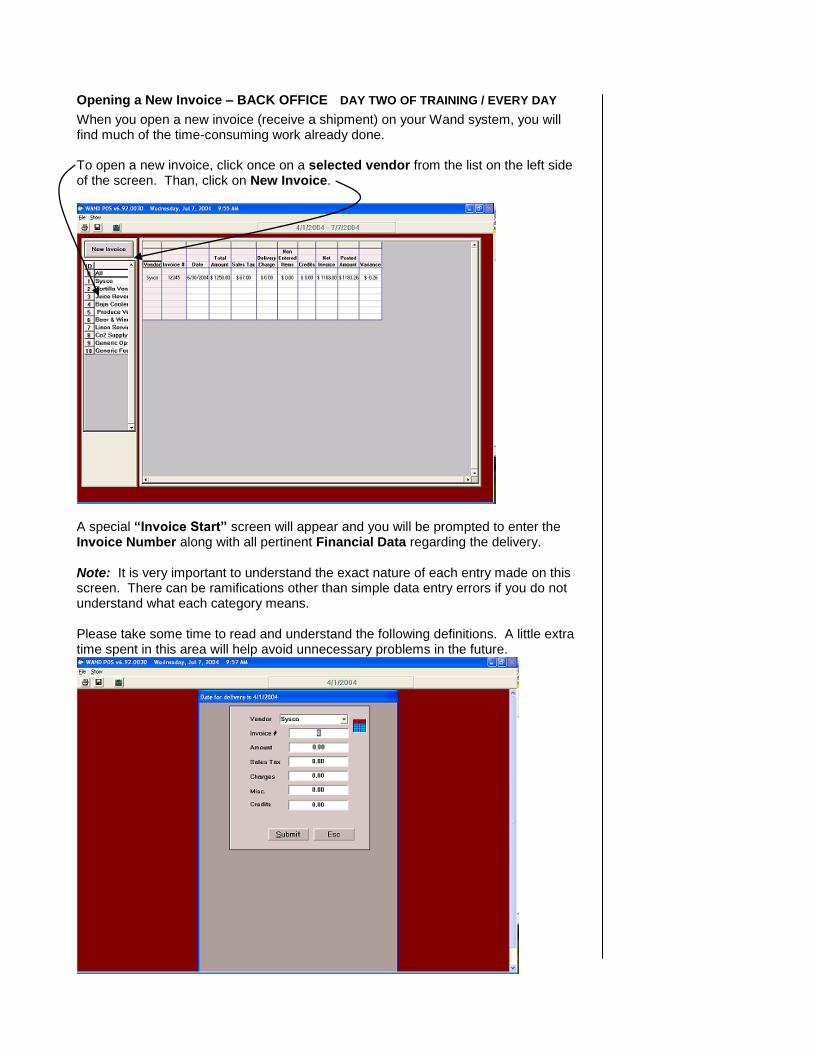
Opening a New Invoice – BACK OFFICE DAY TWO OF TRAINING / EVERY DAY
When you open a new invoice (receive a shipment) on your Wand system, you will find much of the time-consuming work already done. To open a new invoice, click once on a selected vendor from the list on the left side of the screen. Than, click on New Invoice.
A special “Invoice Start” screen will appear and you will be prompted to enter the Invoice Number along with all pertinent Financial Data regarding the delivery. Note: It is very important to understand the exact nature of each entry made on this screen. There can be ramifications other than simple data entry errors if you do not understand what each category means. Please take some time to read and understand the following definitions. A little extra time spent in this area will help avoid unnecessary problems in the future.

Vendor - Self-explanatory. If the appropriate vendor is not displayed in this field, you can select another vendor from the drop-down list.
Invoice Number - Self-explanatory. Enter the appropriate number found on the delivery manifest document.
Amount - This is the “total” total amount of the invoice – usually referred to as the “grand total” or “total payable” of the invoice.
Sales Tax - Self-explanatory. This is any sales tax applied to the shipment or any specific item on the shipment.
Charges - This is where you enter any “add on” charges to the shipment such as:
delivery charges
restocking fees (from previous shipments)
special handling fees
extra charges of any kind
Misc. - This is where you enter any items that are included as part of the shipment, but are normally not carried as an inventory item. Example; new straw dispensers.
Credits - This is where you enter the value of items that are listed on the delivery receipt but “not received” for a variety of reasons such as:
back ordered
missing (lost/stolen/not loaded)
damaged
wrong item
Typing errors made during entry in these fields can be easily corrected by re-typing the correct data. If you begin entering data and then get interrupted, you can click on ESC and come back to the task later. Data entered into this screen will not update until you click on Submit.
When you have completed all entries, click on Submit. The following screen will appear. Notice the invoice totals have been calculated and displayed. The “Entered Total” and “Difference” categories will automatically update as specific item entries are made.
Notice the display of all current items supplied by this vendor to your store. Notice also that the items are listed in a format similar to the listing on your delivery manifest. This has been set up by Wand or your authorized Wand dealer prior to installation of your system and is meant to save you time and reduce entry errors.

With this screen displayed, you can now make entries from the delivery manifest that accompanied your shipment.
The only two fields “active for entry” on this screen are the Delivered and Purch Unit Cost fields. Both sets of data are pertinent to your delivery and should be confirmed for each specific item. The Delivered quantity is obviously important and needs to be entered correctly. And the Current Purchase Price of the item may or may not have changed since the last shipment from this vendor, so it is very important to compare the current (manifest) cost with the displayed cost. Pay close attention to both sets of data and make your entries accordingly. To make an entry, first double-click on the appropriate field. Then type the data and select Enter. Verify total against invoice – be sure to adjust purchase cost if needed
. In this case, we typed the quantity 4 into “Delivered”. The extended price was calculated automatically based upon the current cost ($52.50 per case) and the appropriate subtotals were each updated. If the cost on the manifest were different

from our displayed cost, we would also double-click on the “Cost” field and make any change(s) accordingly. This sequence is repeated item-by-item until you have entered the entire shipment. If you make an error, go back to the item and correct it. Your final totals will not be saved until you do a “File/Save” and exit the screen. If you exit the screen without doing a “File/Save”, all of your prior entries will be lost.
At Taco Del Mar, we do not inventory items such as vinyl gloves, toilet paper etc., or cleaning supplies. Items that fall into this category are listed below. To insure that the invoices match up to the Wand delivery program you will need to total up the dollar amount for all the items in each category. Write those totals down on a piece of scratch paper with the unit count of (1) in front of each total dollar amount.
OPERATING SUPPLIES:
Vinyl Gloves
Toilet Tissue, Dispensers and Seat Covers
Paper Towels and Dispensers
Garbage Liners
Disposable Cloth Towels
Cash Register Tape – Thermal and Two Ply
Red Baskets and All Small wares
PVC Roll (Plastic Wrap)
Napkin Dispensers CLEANING SUPPLIES:
All Detergents, Degreasers and Sanitizers
Bathroom Air Fresheners and Dispensers Scroll down to the end of the this screen until you find the categories Z – Cleaning Supplies, Z – Operating Supplies
In Z – Cleaning supplies enter the amount delivered as (1) and then enter the total dollar amount for this category. In Z – Operating Supplies enter the amount delivered as (1) and then enter the total dollar amount for this category.

This will now allow your invoice to balance. The difference between the amount of the invoice and items entered should be zero, if it is not, review all entries and make the appropriate changes so that the invoice total dollar amount and the dollar amount of the items entered, matches.
Hard Copy – Total Deliveries Report
At any time, you may request a report of the deliveries made during the date range selected. To view a report, select Reports and Delivery Totals from the upper left corner of the screen. Note Delivery Detail is for future use only.
A report similar to the following will appear.

Hard Copy – Current Delivery Report When you have completed all entries and are satisfied with their accuracy, you should print a hard copy of the delivery for your files. To do a printing of the delivery, select Reports/Delivery Detail from the Delivery screen.
The following report will be generated.
A summary of the delivery appears at the top of the report followed by a detailed listing of the items delivered, grouped by product type. Note: The accuracy of your inventory control system can be affected by a variety of things in the Wand system, including Deliveries. It is important to make sure you understand how to enter deliveries and make changes if or when errors are found. Make sure you spend enough time learning this important aspect of the system, and do not be afraid to contact your authorized Wand dealer or the Wand Help Desk for further instructions, if necessary.

Opening a Previous Delivery
Using your mouse left click once over invoice to highlight it, then right click to choose edit invoice or delete invoice. When opened, you can view complete details of the delivery and make changes, if you wish.
When the delivery screen opens, it will display just those items that were received and originally accounted for. Note the Net Invoice, Entered Total and Difference information at the top of the screen. These are fields that update automatically as entries are made line by line.

The only fields that are able to accept entries are the Delivered and Purch Unit Cost fields. All others are either display only (set up in the raw products editor) or calculation fields (automatic calculations made as entries are made). To edit (change) an entry, you must double-click on either the Delivered or Purch Unit Cost fields, then type in the information accordingly. If you wish close (hide) information on any product or product group, you can either click on the “up-pointing arrow” at the top left corner of the screen, or click on the individual +/- buttons next to each of the product groups. You can also choose ALL at the top the screen to view all products in each category, not simply those products that were entered. If you click the “up-pointing arrow” once, it will change to “down-pointing” and hide all detail information except totals. If you click it again, it will display all items available from that vendor by group (not just the items delivered).
Just the items delivered.
Totals only.

Closed detail information for all but a select number of items. Experimenting a little with the “up/down arrow” and the “+/- buttons” on this screen will provide a much better understanding of the flexibility and usefulness of these features. Another convenient way to save time when editing a previous delivery is to use the easy search functions (binoculars).
By clicking on either of these binoculars, you will activate a search function that will take you quickly to the specific item name or vendor product I.D. you are looking for. When you click on a binocular, a drop-down box will open at the top of the screen and provide a complete list of either current product names or current vendor product I.D.’s. To speed things up even more, just type the first letter of the item you are looking for into the text field of the box, and the exact item or one with the same first letter will appear. When there is a match, it will display at the top of the screen for your review or editing.

Transfers – BACK OFFICE DAY THREE OF TRAINING / EVERY DAY
Inventory transfers between stores are an important part of your operation. Whether you are transferring in (from another store) or transferring out, it is very important that the transfer be done accurately and (if at all possible) the same day the physical transfer takes place. The reason you should enter your transfers the same day they occur is that much of your inventory will be counted at the end of each week. And, if a transfer is not entered, there will most likely be a variance between your physical inventory count and the inventory amounts kept by the system. If you are too busy to get your transfers entered the same day they occur, it is not an irretrievable situation, as you can use the “calendar function” to “go back” and enter a transfer at any time. Just keep in mind that your reports may be a bit “skewed” on those days when you do not get around to entering the day’s transfers.
Transfers In
To receive a transfer “In” from another store, first select Food Inventory F from the Main Menu screen.
Next, select Data Entry Z to open the right side of the Raw Products entry screen.
Select Trans In to open the main Transfers In screen. Note: If you are doing a transfer for a date other than “today’s date”, click on the F1 Calendar button first and select the date you wish to enter the transfer under.

The Transfers In screen will open to the following “default” view, which will display just those inventory items designated to be counted on a daily basis. This format is taken directly from the system’s Daily Inventory Count sheet. As you can see, there are no items at this time that are counted daily. Switching to another view (Weekly or Monthly) will display those items counted in those fashions.
Following are some things to know about the Transfers In screen:
You can view your inventory items based upon the three different lists that are automatically maintained in the system – Daily, Weekly or Monthly. Just click on the corresponding button.
The screen will open with today’s date unless you select a different date using the Calendar function.
The inventory item drop-down box is available to help you find a specific item quickly.

A convenient drop-down box is also available to help you identify the location and number of the store from which the inventory is coming. Notice how the name of the store automatically converts to the store’s number when selected.
There are only three columns for entry on this screen.
They are Trans In, Store No. and Price.
When you select an inventory item, it will be highlighted. To make an entry into one of the three available fields, click its box once. It will then be ready to receive a numeric entry only (alpha entries are not accepted).
For Store No., a drop-down box is available. It will automatically display a list of other stores operated by your management team. When you click on a store name (location), its number will automatically appear in the Store No. field.

This list is generated and maintained at the central office computer and is set up originally by Wand or your authorized Wand dealer.
All three fields must be filled in to finish the inventory transfer. As you make entries in the Transfers In screen, the total value of the transfer is calculated and updated automatically for you.
Transfers Out
Transfers Out are done almost the exact same way as Transfers In. They are different only in that there is no “Price” column on the Transfers Out screen. This is because the inventory being transferred out is automatically “priced” at the value it was originally received at. To learn about doing Transfers Out, please refer to the section entitled “Transfers In”. WASTE Recording Waste is extremely important so that food inventories are maintained correctly. The three most frequent things wasted on a daily basis in Taco Del Mar restaurants are Fish, Guacamole and Rice. You should have a waste tracking sheet available daily and all fish pieces, containers of Guac and Rice should be recorded daily in your waste log and then entered into the Food Cost program on a weekly basis. Typically the morning that weekly inventory takes place. To enter waste, go to the following screen in the back office
Select the Food Inventory button to open program

Next, select Data Entry Z to open the right side of the Raw Products entry screen.
Select Waste to open the main Waste Screen screen. Note: If you are entering waste on a daily basis on a day other than “today’s date”, click on the F1 Calendar button first and select the date you wish to enter waste under. Because waste is entered weekly and typically on the morning of weekly inventory the previous days date should be selected as that indicates the end of the week. At Taco Del Mar the week starts on Wednesday and ends on Tuesday. The waste screen will open a default view similar to the “transfer in” default view. Select weekly to open up the list of products. Under the column waste, enter each item total according to the count size listed on the left. For instance, gauc and rice will be wasted in lbs and fish by each piece. When completed hit the save icon in the upper left hand corner of the window and exit.

Section 5
FOOD INVENTORY

WEEKLY INVENTORY – BACK OFFICE DAY THREE OF TRAINING / EVERY WEDNESDAY MORNING
To Print Inventory Count Forms and Enter Inventory Totals go to the following screen in the back office and select food inventory
The following screen will appear
Then, select Print Forms P from the Raw Products screen to open the right side window.

You can select the appropriate count sheet to print at this time. It will consist of just those items (determined ahead of time) to be counted either daily, weekly or monthly. Each sheet will also be printed in a format that makes your counting as easy as possible.
You will find the inventory items “grouped” by product storage location and by type. Other important information such as I.D. data, pack size and inventory unit size will be listed to help with counting accuracy. Following is an example of a daily count sheet.

With your weekly inventory count sheet in hand, you can go and physically count the items on the list and record them in the “On Hand” column of the sheet. When finished, you can return to the server to enter your counts. At the server, select Food Inventory F from the Main Menu screen.
Then, select Data Entry Z to open the right side of the Raw Products screen.
Select On Hand O to open the following inventory count entry screen.
Notice the similarities between this screen and the daily count sheet you’ve just filled out. The style and format of this screen should match the count sheet exactly. If you have just completed a “weekly” or “monthly” inventory count, you can select accordingly from the three options at the top of the screen.
Note: Daily Inventory is typically not used in our restaurants, but items can be set up to be counted daily if there is a serious variance between high cost items such as Meats or Sauces
The “active entry” fields on this screen are “On Hand”, “Waste”, “LftOver” and “Scrap”. As you can see, not all inventory items need an entry field for Left Over and Scrap. These are typically used only in applications that use chicken products.

As you make your entries in this screen, be sure to use the Inventory Count Sheet already filled out. It is important that the count sheet be filled out exactly. Pay particular attention to the Pack Size and Inv Unit detailed on the count sheet, and make sure your count is calculated to reflect the total Inventory Units on hand.
A very helpful feature to guide you in how much inventory to keep on hand and to provide you with a crosscheck on your inventory counts is the Historical Inventory On Hand Report available from this screen. It will provide a recap of your last seven day’s of inventories left on hand. To request the report, click on the “silverware” icon at the top left corner of the screen.
The following report will display. If there are no Daily inventory items, the Historical Inventory On Hand Report is not available. Below is a sample from a concept that has daily items.
Use the slide bar to view all seven previous days on hand. It can be very helpful to view this report on a regular basis. You will see if on hand inventories are consistent or not. And, if you notice a consistent over-abundance of “on hand” in any one category, you can make adjustments accordingly. There may not be a need to inventory quite as much of the item.
Also, if there is a glaring difference between the average on hand on this report for a particular item and the on hand you have just entered, you may wish to re-confirm your Pack Size, Inv Unit and Count to make sure that you have not made a mistake. See Next Page.
To return to the inventory entry screen, just click on the “silverware” icon again.
When all of the items on your Inventory Count Sheet have been entered, you can close the screen by selecting File and Exit. Your entries have been automatically saved as they were entered.

RAW PRODUCT, VENDOR, AND INVENTORY COUNT FREQUENCY CHANGES
Although all of our items should be standardized from restaurant to restaurant occasionally an item number, pack size or delivery vendor might have to be changed because the food vendors in your market may be a bit different from another market. Changing Vendor Information: You may get your tortillas from a local tortilla vendor or from Sysco our national food purveyor. If this is the case in your market, you need to change the default vendor from Tortilla Vendor to Sysco. At the back office computer, select Food Inventory from the main menu
Now Select Raw Products & Recipe Editor

The following screen will appear.
In this area, you can make all changes necessary for Vendor Companies, pack sizes, item numbers and whether to count an inventory item daily, weekly or monthly.
Please keep logbooks noting all changes as twice a year a new update may be sent to your location from corporate and any changes you made will have to be made again. As there are very few products that should need to be adjusted this should take you no more than 30 minutes with the correct notes.
To change Vendor information: find heading named vendor, find the product you want to change and using your mouse left click on the arrow next to what vendor is listed. A menu will pop up and will allow you to choose the appropriate vendors, left click over that vendor to make the change. To change Vendor Item Number: using your mouse left click on the item number listed to highlight it, then simply type the new number in and hit enter. To change an Inventory Count Frequency (daily, weekly, monthly): scroll right until you get to the heading that says Inventory, find the product that you want to change and left click on the arrow next to the inventory count frequency that is listed. Choose the appropriate frequency by using your mouse left click over it to make the change.

Food Theoretical
With your inventory on hand counts complete, it is suggested that you run a Food Theoretical Report next to get a quick look at any glaring variances that might be fixed quickly and easily. Of course, you can run a Food Theoretical Report at any time and for any “time period”, but running one as part of your closing procedure is always a good habit to get into. Start by generating an Ideal. To generate an Ideal, select Generate Ideal I from the Raw Products entry screen. An Ideal will be generated for today’s date (or the date you have requested).
Then click on Reports U to open the right side of the Raw Products entry screen.
Select Food Theoretical Y to access the main Food Theoretical report selection screen. You will notice there are three different ways to view your Food Theoretical data. They are:
From the Food Theoretical summary screen
A horizontal view
A vertical view

Food Theoretical Summary Screen
From this screen, you can:
Select Daily – Weekly – All
Select print options
Select view options
Shrink the columns to maximize the viewable data
All data used to generate the Food Theoretical is viewable on this screen. Data categories are listed on the left side of the table – inventory materials are listed across the top. The top half of the left side is devoted to “inventory units” and the bottom half of the left side to “inventory dollars”. Select Shrink to maximize the number of viewable columns. Use the scroll bar to access the entire list of inventory materials.
Normally, this screen will provide a quick and easy way to identify any obvious problems with your inventory. Just look at the variance categories (units & dollars) on the left side of the screen and span to the right across your inventory items.
Variance (by itself) is not necessarily what you’re looking for at this time. Slight variances simply mean there is additional fine-tuning to be done with recipes or shrinkage factors. What you are mostly looking for is an item (or items) with a large variance – suggesting that there may have been an error in inventory receipts, transfers, waste or counts.
When you are satisfied with the data and you feel confident no entry errors have been made, it is prudent to print a “Vertical View” hard copy before leaving the store. Select Vertical View and then click on the Print icon at the upper left corner of the report.
The “Vertical View” Food Theoretical Report will be used the next morning as a comparison for the “beginning” Food Theoretical Report (see page 56).

Food Theoretical Report Styles
Select the View Horizontal option to generate the following version of the Food Theoretical Report. Pay particular attention to the “Variance” categories on the report to identify possible errors in your inventory counts.
Horizontal View
Vertical View
Select the View Vertical option to generate the following version of the Food Theoretical Report.

Food Theoretical - Actual vs. Ideal
The concept of a Food Theoretical Report is: A comparison of “actual” (counted) inventory usage, including waste and transfers, to the “ideal” (should have been), based upon sales. In other words, if
All raw products are put into the system properly, and
Inventory shipments are received and counted properly, and
Transfers in and out are recorded properly, and
All sales are accounted for, and
All waste and leftovers are accounted for, and
No one “over or under” portioned, and
No one ate any of the raw or finished products, and
The inventory count was done correctly at the end of the day,
Then, your variance numbers will be zero. Your Food Theoretical can be a powerful tool for identifying problem areas of your operation. Used properly, it can address and improve:
Food cost in general
Specific food cost problems associated with a particular item
Shrinkage and theft problems
Portion control problems Learning to use the Food Theoretical is important because of its obvious benefits to the efficiency of your operation. But it will only be useful to the extent of your ability to learn and master the other facets of inventory management that have impact on the Food Theoretical Report. Those include the tasks and routines found in the Raw Products & Recipe Editor and Data Entry found under Food Inventory on the Main Menu. To help you better understand the concept of “actual” compared to “ideal”, just think of it in these terms. “Actual” inventory usage is calculated as: Beginning inventory count + Deliveries + Transfers In
- Transfers Out - Waste (only if required by management – some don’t)
- Ending inventory count = Actual Usage (units and dollars)
“Ideal” is simply your sales data, which is automatically recorded and stored for you in the Food Theoretical database.

So if you have set up your Raw Materials & Recipes correctly, then the weekly “to do” list to effectively manage your Food Theoretical will be:
1. Confirm the beginning inventory count (last weeks closing “On Hand” – now this morning’s “Beginning”). Vertical View – Food Theoretical
2. Confirm daily deliveries. Data Entry – Deliveries 3. Confirm daily transfers in and out. Data Entry – Transfers In and
Out 4. Record daily waste. Data Entry – Waste 5. Do another inventory count. Data Entry – On Hand 6. Generate an “Ideal”. Generate Ideal 7. Generate your Food Theoretical Report. Reports – Food
Theoretical In simple terms, this is the step-by-step process required to effectively manage your inventory at store level. As habits develop, you will find these tasks easier and easier to do. As part of the daily closing procedure, they will not slow you down if deliveries and transfers were done earlier in the same day. On a normal day, with a minimum amount of variance found on the Food Theoretical Report, your total closing time should not exceed 30-40 minutes. As time passes, if you experience problems with understanding the Food Theoretical Report or if you encounter a particularly troublesome part of the report, your authorized Wand Dealer or the Wand Help Desk is available to help.

Section 6
PROJECTED
SALES

Projected Sales The Projected Sales screen shows one of the many “foundational” databases of the Wand System. First, it is a report that provides important information on its own, but also accepts user input to create “what if” sales projection scenarios. It can also be altered and “fine tuned” to increase the accuracy of its reporting characteristics.
When it has been fine-tuned to your specific application, it will become the foundation for calculating your “Prep-to & Build-to” charts along with Labor Scheduling functions.
Some functional characteristics of this screen are:
Sales projections are always calculated and displayed for 24 hours and 7 days.
The top sales numbers are “computer generated” and will not change when you manually alter the table data for a given day. This is to give you a way to compare your own projections against those generated by the system.
If you make a change to the Proj. Sales category of any day, it will automatically re-calculate each of the corresponding hours and display new totals. If you change an hour, it will automatically re-calculate the Proj. Sales total.
Whenever you wish to return to the original “computer generated” projections for any given day, you can select Restore Day F3 and the numbers will automatically reset to their original projections.
When choosing to view the Projected Sales screen, it will always display the current week (default) unless another week is selected first.

How Projected Sales Works
As historical sales data is accumulated in the system’s memory, the report will start providing valuable sales projection information. The basic method used is to look back at the last 4 week’s sales data (by period-of-day and in total) and then make projections for the current and upcoming week (day-by-day and period-by-period).
You will find that the system will not let you request “future” (next week’s) sales projections unless you have projected the “current” week first. Once you have calculated the current week and saved it to memory, you can use the Select Week F2 button to request a projection for next week. It will always appear at the bottom of the Select Week box.
The Weight Factor
Each of the previous 4 weeks is given a predetermined “weight factor” that provides influence in the calculation method. The most recent week normally carries the heaviest weight (factor) and the other 3 weeks less, according to their position, 2, 3 & 4. The result is usually a very accurate forecast of sales activity for the upcoming week.
Because the accuracy of this projection relies heavily upon “weighted historical data”, it is important to place the proper weight (as much as possible) on the historical data. This can be done by changing the weight factors yourself, if necessary.
You can change the weight factors by clicking on the F8 button. The following window will appear.
Highlight the box you wish to change and type the desired value. The 4
th week is
not available to receive an open entry. Instead, it will automatically calculate the value necessary to equal 100 based upon the entries made in each of the other three boxes.

Anytime you change the weight percentages, you change the calculations of all previous and future Projected Sales Reports. “Weight” changes, therefore, are not done very often. They may be most appropriate for the effective management of seasonal conditions such as returning students to a college community, summer or winter tourism traffic, etc.
If you are aware of a pending event (sports, convention) or other factor (weather, holiday, etc.) that you feel will influence your sales up or down, you can manually alter any cell of data on the report and it will recalculate the entire column for you automatically.
Finally, the F2 button (Select Week) stores a list of the previous ten weeks in consecutive order for quick reference.
You can select any of these weeks to view and compare with actual sales data from your Accounting Report or Hourly Report to confirm the accuracy of your weight factoring. This “fine tuning” will aid in the creation of the highly accurate database from which other reports will be generated.
It is advisable to use historical data as much as possible to compare against your “computer generated” projections. Just take a quick Accounting Report from the same date, one year ago. You may be reminded of some valid reason to alter your current projections. If so, do not be afraid to make the alterations accordingly.

Prep-To / Build-To One of the key applications for the use of our Projected Sales database is to provide useful advice in the areas of:
What food should I prepare ahead of time to increase efficiency (Prep-To).
How much of any particular menu item should I cook during each ½-hour of the day in order to keep up with anticipated sales (Build-To).
When your Raw Materials and Recipes were created, there was an optional provision to “include” the item on either the Prep-To or Build-To charts, whenever they are calculated. If an item is selected to appear on these charts, it will be listed and “factored” into the chart according to its individual recipe characteristics.
Raw Products & Recipe Editor Screen
Items to appear on the Build To Chart
Items to appear on the Prep To Chart

The Prep-To and Build-To functions are both accessible from the Projected Sales screen and are usually generated right after doing a sales projection.
Prep-To Chart
A Prep-To Chart uses the Projected Sales database to list the total “preparation requirement” day-by-day for items you have determined necessary to know their usage forecast ahead of time.
Some items are good to know about simply for purposes of “being prepared”. Others, by knowing their usage forecast, allow you to “Prep” the appropriate amount in the morning for use all day (Cole Slaw).

Build-To Chart
The Build-To Chart lists those menu items predetermined by you as being helpful to know their usage forecast ahead of time. It prompts you to cook/build/prep a representative quantity of each item for every 30-minute increment of each day of the week. This “Build” forecast is based upon Projected Sales and the relationship of the individual items to overall sales – with historical period-by-period usage factored in. It can easily become a very useful management tool.

Section 7
CLOSING
PROCEDURES

Closing Closing procedures vary from operator to operator. Some companies are more concerned with inventory issues – some less. In any case, there are a few mandatory procedures necessary to ensure a proper closing sequence for the Wand System. They are:
Make sure all Employees are Clocked Out.
Pull Drawers.
Do a Deposit – if applicable
Do Your Inventory Counts – if applicable
Run a Food Theoretical – if applicable
Clock Out Employees
It is best to get into the habit of confirming for yourself that all employees have been properly clocked out before you close the store. To confirm your clock data, select Labor Reports L from the Main Menu screen. Then, select Clock In-Out C. A detailed report will indicate if there are employees still clocked in or not.
If you mistakenly leave an employee clocked in, he/she will be automatically clocked out at 3:00 A.M. (system “new day”) and then automatically clocked back in at 3:01 A.M. This will result in a display of Labor figures on the lower portion of the Main Menu screen the next morning when the store is re-opened. Normally, when the store is opened at the beginning of a new day, the labor figures (and all other figures) will show zeros. If there are numbers other than zeros displayed in the Labor categories, it means someone was not properly clocked out the night before. A manual adjustment will have to be made to the affected employee’s time clock data. (See Employee File Changes – page 41)
This is how the lower portion of the Main Menu screen should look (all zeros) each morning if the system’s “new day” function occurred properly and all employees were properly clocked out the night before.
Pull Drawers
Please refer to the Pull Drawer instructions in this handbook.
Do a Deposit – if applicable
Please refer to the Deposits instructions in this handbook.
One note of caution regarding credit card deposits; Do only one “total” deposit each day for credit cards. Do not do multiple small deposits throughout the day. Instead, it is better to wait and do one “total” for all credit cards at the end of the day. This will be more consistent with the requirements of your credit card processing partner.
Inventory Counts – if applicable
Most companies prefer to have [at least] a limited number of main inventory items counted and reconciled on a daily basis. This is to make sure that the time-lapse between shrinkage (if any) and the knowledge of it is kept to a minimum. There may also be a requirement in your store to count additional inventory items on a weekly basis and still more items on a monthly basis.

Your Wand System has been designed to accommodate all of these tasks with ease and efficiency. Daily, weekly and monthly count sheets are available, and can be printed on demand. There are also corresponding (matching) entry screens to expedite the process.
To prepare for the inventory counting process, first make sure you have correctly entered into the system, all of the day’s inventory receipts. Failure to do this properly will result in inaccurate inventory totals.
Next, determine if you are doing a “daily”, “weekly” or “monthly” count and print the appropriate “count sheet” to use as a counting aid. To print your count sheet(s), first select Food Inventory F from the Main Menu screen. Note: As an owner you will have to determine if inventory counts are done nightly, weekly, or montly.

Section 8
Sales and Labor Reports

DOC or Other Customized Spreadsheet Report
Day four of training / every Wednesday
Select DOC Sheet H from the Main Menu screen. Then, select DOC Sheet D from the DOC Sheet screen.
A hallmark of the Wand System is its ability to provide “customized” spreadsheet data that’s specific to your quick-serve operation. These special reports are usually designed for daily use and tend to combine pertinent data from a variety of reports into a consolidated spreadsheet format.
The example on the next page is a DOC (daily operational control) report used by TDM operators. This report is run once a week on Wednesday mornings. Daily / Weekly Operational Control Report Example

Weekly Sales Report or DOC report
Franchise Sales Section of WSR The numbers that are reported on the weekly sales report or DOC sheet come directly off the accounting report. Adj. Net Sales – taken from accounting report and is determined by Net Sales (-) Gift Certificates Sold (Net (-) GC Sold) (+) Discounts and Coupons (includes employee/manager meals). Tax – taken from the accounting report and is determined by a percentage of all taxable items sold. Gift Cert.’s Sold – taken from accounting report and is determined by the number or gift certificate dollars sold. Adj. Gross Sales – is determined by adding the Adj. Net Sales total (+) Tax total (+) the Gift Certificates sold total. Cash Deposit – taken from the accounting report and is determined by actual cash deposit imputed in the deposit or altar past data function in the back office of the Wand POS System. Credit Card – taken from accounting report and is determined by actual batch total imputed in the deposit or altar past data section in the back office of the Wand POS System. (for restaurants using running credit cards through their Wand POS system, this total is imputed by the system itself). Gift Certificates Redeemed – taken from the accounting report and is determined by the number of gift certificates that were recorded as redeemed in the order total section of the Wand POS System (menu item screen) Paid – Outs – taken from the accounting report and is determined by a specific dollar amount taken out of the cash drawer to pay for a needed item, for example, paying cash for lettuce at an approved produce vendor. This must be imputed in the deposit or altar past data section in the back office of the Wand POS System. In effect, this is a petty cash function without needing to keep separated funds for such transactions. Coupons – taken from the accounting report and is determined by how many discounts or coupons were entered into the Wand POS System (menu item screen). Employee Meals – taken from the accounting report (under the Discounts heading) and is determined by how many employee or manager meals were entered into the Wand POS System (menu item screen). Sub Total = Adj. Gross Sales – is determined by adding the Cash Deposit (+) Credit Card (+) Gift Cert.’s Redeemed (+) Paid Outs (+) Coupon’s (+) Employee Meals. Over Short – is taken of the accounting report and is determined by subtracting Sub Total = Adj. Gross Sales from the Adj. Gross Sales. Royalty Sales Section of the WSR Adj. Gross Sales – taken from the accounting report and is determined by adding Adj. Net Sales (+) Tax (+) GC Sold.

Tax – taken from the accounting report and is determined by a percentage of all taxable items sold. Coupons – taken from the accounting report and is determined by how many discounts or coupons were entered into the Wand POS System (menu item screen). Employee Meals – taken from the accounting report (under the Discounts heading) and is determined by how many employee or manager meals were entered into the Wand POS System (menu item screen). Gift Cert.’s Sold – taken from accounting report and is determined by the number or gift certificate dollars sold. Net Royalty Sales – taken from the accounting report (Net (-) GC Sold) and is determined by taking Adj. Gross Sales (-) Tax (-) Coupons (-) Employee Meals (-) Gift Cert.’s Sold

Reports – Day four of training / Everyday
The reports you need to take on a daily basis will vary from operator to operator and concept to concept. There are, however, some reports that can help considerably in the day-to-day operations of every quick-serve restaurant.
Hourly Report
Select Reports from the Main Menu screen. Then, select Hourly H.
Hourly selection H is a period-by-period recap of the store’s sales activity. It is useful for daily management and can also be used as a historical database for forecasting and scheduling labor and other store resources. Take an Hourly Report at key times during the day such as after lunch, after dinner and at closing.
Clock In-Out Report
Select Labor reports L from the Main Menu screen. Then, select Clock In-Out C.
Clock in – out C is a summary, by employee, of the clock in and out activities for the day or the period requested. This is an especially good report to take at various times during the day to ensure that none of your employees have forgotten to clock out at the end of their shift.
Productivity Report
Select Reports from the Main Menu screen. Then, select Productivity P.
Productivity selection P is a powerful report that can be used as a tool for managing labor cost compared with sales. Not only does it provide a total and percentage of labor compared to sales, but it also reports each category of data on an hour-by-hour basis.
The Accounting Report is a one stop shopping report. It records all the pertinent data that is
important for you to know information such as sales, coupons, taxes, etc. whether it is daily, weekly, monthly or yearly.
In addition to sales information, this report lists banking deposits and cash over short totals.
Accounting Report

Food Theoretical Report
Select Food Inventory F from the Main Menu screen. Then, select Reports U to open the right side of the Raw Products screen. Then, select Food Theoretical Y.
Food Theoretical Y is explained in detail in the Food Theoretical section of this booklet. Its usefulness as a management tool is limited only to your own creative application of its data. One way to use it as a security aid is this: If you suspect a shrinkage problem and would like to pin it down to a specific shift, the Food Theoretical Report taken at the end of each shift will show which shift is most likely causing the problem. The only prerequisite on your part is to make sure you have entered all inventory receipts (if any) and done your inventory counts before running the Food Theoretical.
Bottom Of Screen Stuff (BOSS) Report Day four of training / Everyday
The BOSS Report is the lower portion of your Main Menu screen. It is a nice little “running summary” of the productivity of your restaurant.
Note: When the system is left for a period of time with the Main Menu displaying, a timer will automatically “blank out” the screen and log you off the system. This is to prevent someone from gaining access to the system while you are not around. This “timer” feature is programmable as to how long it will allow the Main Menu to sit in a “rest mode” (no selections made) before it does the “log off” sequence. It can be set up for increments of 1 to 99 “30-second” intervals. Example; 10 “30-second” increments equals 300 seconds, or 5 minutes.
The BOSS Report will automatically update its data fields every 40 minutes, or whenever you exit the Main Menu screen and return. Therefore, if you wish to view the most accurate, up-to-the-minute productivity data select one of the menu items on the Main Menu screen and then return to the Main Menu by clicking on ESC.
The information on this little report can be quite useful. Each category is provided in two forms – total for the day and a comparison to the previous full hour.
Here are the calculations generated on this automatic report.
Productivity – Net Sales divided by Man Hours.
Cust. Count – Self-explanatory.
Net Sales – Sales - excluding tax. It may or may not include coupons depending on how your system has been set up.
Labor percentage – Labor Dollars divided by Net Sales.
Labor $ – Total Labor Dollars accumulated in the system since its last “new day” (reset).
Labor Hrs. – Total Labor Hours accumulated in the system since its last “new day” (reset).

Manager & Employee Meal Reports
A report of all Manager and Employee meals is available from the main report menu under:
Void Reports - Server
Void transactions are reported in three basic categories on the Wand System. They are:
Total Voids for the system – Accounting Report
Total listing of all Voids – Voids Report
Listing of all Voids by employee – Employee Reports
Accounting Report
Total Voids for the system.

Voids Report Day Three
Total listing of all Voids.
Employee Reports
Listing of all Voids by employee. To take a listing of all Voids by employee, select Edit Emp. File from the Wand Main Menu screen. Then find (highlight) the employee on the left side of the Employee Information Center and select Reports for [employee] F7. Finally, select Voids from the Reports for [employee] screen. Note: You can also select a date range from this screen.

Menu Mix Reports This report is available in the report section of the back office and will list how many of each menu item product you sold on any given day, week, month or year. This report is an excellent source to research food ordering patterns in your restaurant so you can determine if one product needs more emphasis by being suggested more often to the customer by your employees.

Labor Reports Labor reports are available in the labor reports section of the back office. This report can be customized to give you reports daily, weekly, monthly, or by pay periods. Each report lists the employee’s name, pay rate, hours worked and overtime hours worked if applicable. It will also keep track of the percentage of sales that labor is costing you.
Hard Copy – Employee List
If you wish to print a current list of your employees, select Labor Reports L from the Main Menu screen.
The following screen will appear.
From the Labor Reports screen, select Employee File. The following Employee List will be generated.

Section 9
BANK DEPOSITS & CASH RECONCILIATION

Deposits on Back Office – BACK OFFICE Day Four of training / Every Day
Typically, in the morning before opening you will count, prepare and record a deposit from the previous day’s sales. Deposits and Bank Runs should be completed by 10AM. To record your previous days deposit you must go to the “Altar Past Data” section of the back office, this is accessed from the Wand Main Menu screen.
The “Altar Past Data Deposit” screen is provided as a way to record the exact date and time for each deposit. It also provides a place to record miscellaneous sales transactions such as “selling” inventory or supplies to another store (Paid In).

Deposits on Back Office – Back Office
For busier restaurants, deposits should be made more than once a day. This first deposit would be counted, recorded and dropped at the bank in the afternoon of the current day, before dark. To record your afternoon deposit you must go to the “Deposit” section of the back office. This is accessed from the Wand Main Menu screen.
The “Deposit” screen is provided as a way to record the exact date and time for each deposit. The afternoon deposit would be recorded in the 1
st Deposit slot.
The final deposit, which will be counted, dropped at the bank and recorded the following morning, will be entered into the 2
nd Deposit slot.

Other important features of the Deposit screen are:
Cash Responsibility
Deposits and Paid Ins balanced against total sales.
Credit Card and Other Deposits
Separate entry lines for Credit Cards and Other (miscellaneous) Deposits balanced against the system’s records of such transactions (over/short). If you run credit cards through the Wand system you will find this total on the Accounting Report, if not, put in the batch total from your previous day’s receipts.
Gift Certificates Redeemed
Separate (automatic) accounting for Gift Certificates Redeemed balanced against those declared in the Pull Drawer routine.
Paid Outs
Separate screen for the recording of Paid Outs done from the back office (not the cash register terminals). Click on Paid Outs to make the following screen appear. Drop-down menus provide easy reference for accounting “chart-of-account” categories and numbers.

Paid Outs done at the cash register will be listed on this report too.
Paid Outs (from the register) – POS Paid Outs can be done directly from the cash register, or from the back office safe, whichever is preferred or allowed by policy. Paid Outs from the cash register are done by touching the Manager Menu button in the active POS mode and Logging On at the Manager Functions screen. From the Manager Functions screen, select Paid Outs.
The following Paid Out entry screen will appear.
Your specific GL “chart-of-account” categories will appear on the left side of the screen. Select (highlight) the appropriate account and then enter the amount to be paid out. Finalize by touching Submit. If you make a mistake during the entry process, touch the Clear button and start over. A record of the Paid Out will be kept on the server in the back office.

Paid Outs (from the safe) – Back Office Paid Outs from the safe are done by take money from the safe and then recording the transaction at the Wand Server. Paid Outs can be done directly from the cash register terminals, or from the back office safe, whichever is preferred or allowed by policy. In either case, the transaction will be recorded and made available for viewing on the following screens From the Main Menu, select Deposits S:
The Deposits screen will appear. This screen also provides access to the system’s Paid Out function for both recording new data and viewing previously recorded data.

Next, click on the Paid Outs button, the following screen will appear.
This screen provides the ability to enter Paid Out data when money has been taken from the safe. To simplify the process, use the convenient drop-down menus for selecting a “G/L chart of accounts” category description. Previously recorded Paid Outs are displayed on this screen until the next “new day” has been completed. Paid Outs displayed include (both) those done from the cash register terminals and those done from the safe. To finalize and update system totals, click on ESC. The total of all Paid Outs is displayed on the Deposits screen.
Paid Ins (from the safe) – Back Office The Paid In function is performed at the server only. It is typically associated with the need to take in (receive) money without an associated retail transaction. Some examples are; pay telephone receipts, grease purchases, vending machine receipts, etc. You can make Paid In entries on the Deposits screen.

SECTION 10
MENU PRICE CHANGES

HOW TO CHANGE PRICING ON YOUR
POS SYSTEM
Open the designer menu in the back office.
(This will look like your POS layout). 1. Using your mouse, right click the menu item you want to change A pop up menu will appear scroll down to highlight “sales item”. Select “sales item”. 2. A new pop up should now be displayed. Enter your new price in the pricing window. 3. Click update button in the upper right corner. 4. Close this items pop up menu by clicking on the X in the upper right corner. 5. Follow steps 1-6 until all pricing is updated. 6. To Exit, right click on mouse. Scroll down, highlight and select “exit”**. 7. For pricing to take effect, you must restart your POS program. To do this, hit the manager button at the top of the POS Screen (where you ring in orders) Punch in your manager id and password. A black screen will appear with several choices. You want to pick the “Turn POS Off Button”. 8. To turn the POS Program back on Hit the “Window Icon” on your key board and touch the lightning bolt (touch screen) button and your POS will load. Your changes are now in effect. **Please note: A message may appear asking if you want your changes saved. Hit yes and PRICE CHANGE IS NOW COMPLETE

Section 11
Wand Troubleshooting and Help

To Get Help To receive help with any aspect of the Wand System, you can do the following:
Refer to this document or others provided by Wand and TDMFC.
Contact the designated Wand help person within your organization – possibly a District Supervisor or someone from the Central Office that has received training on the system.
Call your authorized Wand Dealer if that was how the system was purchased. A local number was probably provided for your convenience.
Call the Wand Help Desk in Minneapolis – 952-361-6250. It is our desire to provide the utmost in customer service at all times, and to that extent, we will always do our best to answer your questions about the Wand System. It is important for you to learn as much about the operation and application of your Wand System as possible. If you have searched the documentation and asked for assistance internally, and still need help, please feel free to call either your local dealer or our help desk.