SDS Electrophoresis with the SDS DryGel Kit · flatbed IEF professional ... SDS DryGel Kit 12.5%...
6
EDC Electrophoresis Development & Consulting, manuals: www.electrophoresis-development-consulting.de —-> downloads 1 The following equipment is recommended: Electrophoretic Hardware: flatbed IEF professional (edc-prof-2836) Multiphor (GE-18-1018-06) Consumables: SDS DryGel Kit 12.5% 24S (edc-4002) 4 gels with 24 slots à 12 µl gel, anode and cathode buffer, drying cardboards, electrode wicks SDS/2D, cooling fluid SDS DryGel Kit 12.5% 52S (edc-4003) 4 gels with 52 slots à 5 µl gel, anode and cathode buffer, drying cardboards, electrode wicks SDS/2D, cooling fluid SDS Buffer Kit (without DryGels) (edc-5002) Additionally necessary: DryPool Combi (edc-me-d ) Tray for rehydration of dry gels (normal size) and soaking electrode strips V24 08/15 SDS Electrophoresis with the SDS DryGel Kit General: „DryGels Elpho“ are designed for horizontal electrophoresis with diverse buffer systems. The mostly used electrophoretic method for proteins is the SDS-electrophoresis. Because here the migration speed of the applied protein-SDS-mycells is relative to the molecular-weight. All proteins are running in the same direction (to the anode), and also the lipophylic proteins are soluble as SDS-mycells. In vertical-systems the Laemmli -system (1,2) is used but the gel-buffer pH-value is very high (8.9 pH). To perform the electrophoretic separation at a neutral pH-value, a special SDS Buffer Kit Neutral was developed. Using the normal polyester support film a „Hot Coomassie“ staining (Fig.1), silver- stainings and fluorescent visualizations in the green, red and infra-red channel can be performed (Fig.2). Fig.1: Different SDS-samples (serum, pig, standard) run on SDS DryGel 24S. Hot Coomassie
Transcript of SDS Electrophoresis with the SDS DryGel Kit · flatbed IEF professional ... SDS DryGel Kit 12.5%...
EDC Electrophoresis Development & Consulting, manuals: www.electrophoresis-development-consulting.de —-> downloads 1
The following equipment is recommended:
Electrophoretic Hardware:
flatbed IEF professional (edc-prof-2836) Multiphor (GE-18-1018-06) Consumables: SDS DryGel Kit 12.5% 24S (edc-4002) 4 gels with 24 slots à 12 µl gel, anode and cathode buffer, drying cardboards, electrode wicks SDS/2D, cooling fluid SDS DryGel Kit 12.5% 52S (edc-4003) 4 gels with 52 slots à 5 µl gel, anode and cathode buffer, drying cardboards, electrode wicks SDS/2D, cooling fluid SDS Buffer Kit (without DryGels) (edc-5002) Additionally necessary: DryPool Combi (edc-me-d ) Tray for rehydration of dry gels (normal size) and soaking electrode strips
V24 08/15 SDS Electrophoresis with the SDS DryGel Kit
General: „DryGels Elpho“ are designed for horizontal electrophoresis with diverse buffer
systems. The mostly used electrophoretic method for proteins is the SDS-electrophoresis. Because here the migration speed of the applied protein-SDS-mycells is relative to the
molecular-weight. All proteins are running in the same direction (to the anode), and also the lipophylic proteins are soluble as SDS-mycells.
In vertical-systems the Laemmli -system (1,2) is used but the gel-buffer pH-value is very
high (8.9 pH). To perform the electrophoretic separation at a neutral pH-value, a special SDS Buffer Kit Neutral was developed.
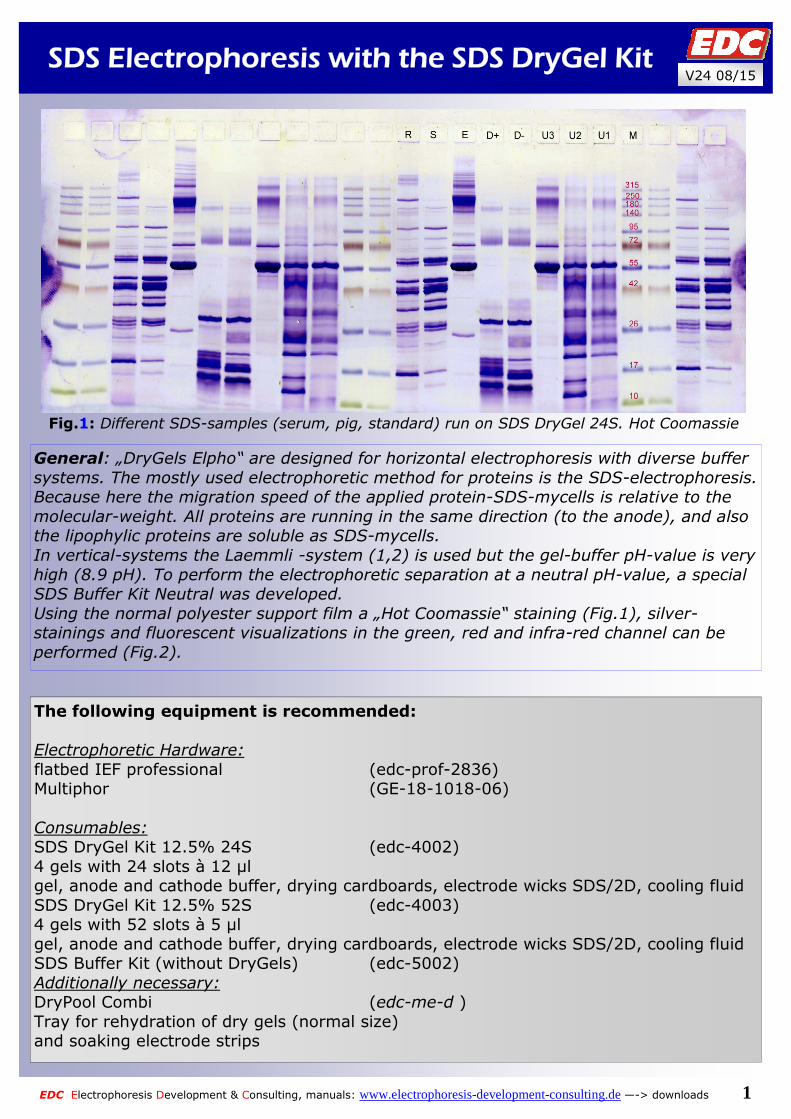
Using the normal polyester support film a „Hot Coomassie“ staining (Fig.1), silver-stainings and fluorescent visualizations in the green, red and infra-red channel can be
performed (Fig.2).
Fig.1: Different SDS-samples (serum, pig, standard) run on SDS DryGel 24S. Hot Coomassie
EDC Electrophoresis Development & Consulting, manuals: www.electrophoresis-development-consulting.de —-> downloads 2
Sample preparation
Sample buffer: 15 ml rehydration buffer + 10 ml H2O bidest + 500 mg SDS + 80 µl Orange G solution (1%) + 60 µl bromophenol blue solution (1%) Sample extraction: Extraction Buffer: 250 mM TRIS + 190 mM Glycine + 1 mM EDTA, gives pH of 9.2 10 mg E.coli + 1 mL Extraction Buffer + 180 mg Urea (3M, freshly added!) 15 min Ultraso-nic treatment, centrifuge 5 min. Sample treatment: Dilute the samples with the sample buffer at least 1 + 1. Dilute as much as possible,to reach the upper nonogramm region, this gives best results. To control the samples concentrations: Take Lonza´s “Molecular Weight” standard 5 - 225 kD (Lonza 50547 ) add the same volume sample buffer and run at least one lane per gel. After staining procedure, the samples should appear in the same state than this standard lane. Apply 13 (25S)-5 µl (52S) of each sample, don´t leave sample slots unfilled. After the samples dilution is done add 5% (v/v) DTT-solution (1% w/v) to the vials (reduction!) and heat 10 min at 70°C. After the vials are cooled down add 5% (v/v) IAA so-lution (4% w/v) to the samples (alkylation!).
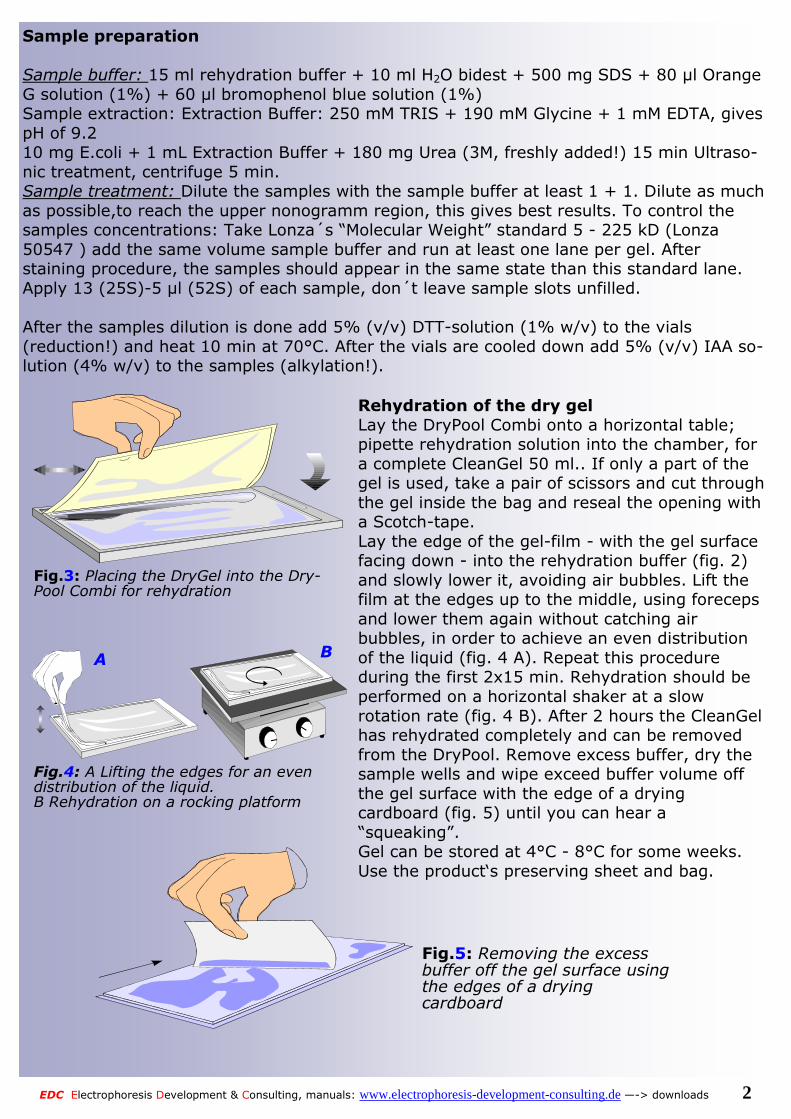
Fig.3: Placing the DryGel into the Dry-Pool Combi for rehydration
Fig.4: A Lifting the edges for an even distribution of the liquid. B Rehydration on a rocking platform
A B
Fig.5: Removing the excess buffer off the gel surface using the edges of a drying cardboard
Rehydration of the dry gel
Lay the DryPool Combi onto a horizontal table; pipette rehydration solution into the chamber, for a complete CleanGel 50 ml.. If only a part of the gel is used, take a pair of scissors and cut through the gel inside the bag and reseal the opening with a Scotch-tape. Lay the edge of the gel-film - with the gel surface facing down - into the rehydration buffer (fig. 2) and slowly lower it, avoiding air bubbles. Lift the film at the edges up to the middle, using foreceps and lower them again without catching air bubbles, in order to achieve an even distribution of the liquid (fig. 4 A). Repeat this procedure during the first 2x15 min. Rehydration should be performed on a horizontal shaker at a slow rotation rate (fig. 4 B). After 2 hours the CleanGel has rehydrated completely and can be removed from the DryPool. Remove excess buffer, dry the sample wells and wipe exceed buffer volume off the gel surface with the edge of a drying cardboard (fig. 5) until you can hear a “squeaking”. Gel can be stored at 4°C - 8°C for some weeks. Use the product‘s preserving sheet and bag.
EDC Electrophoresis Development & Consulting, manuals: www.electrophoresis-development-consulting.de —-> downloads 3
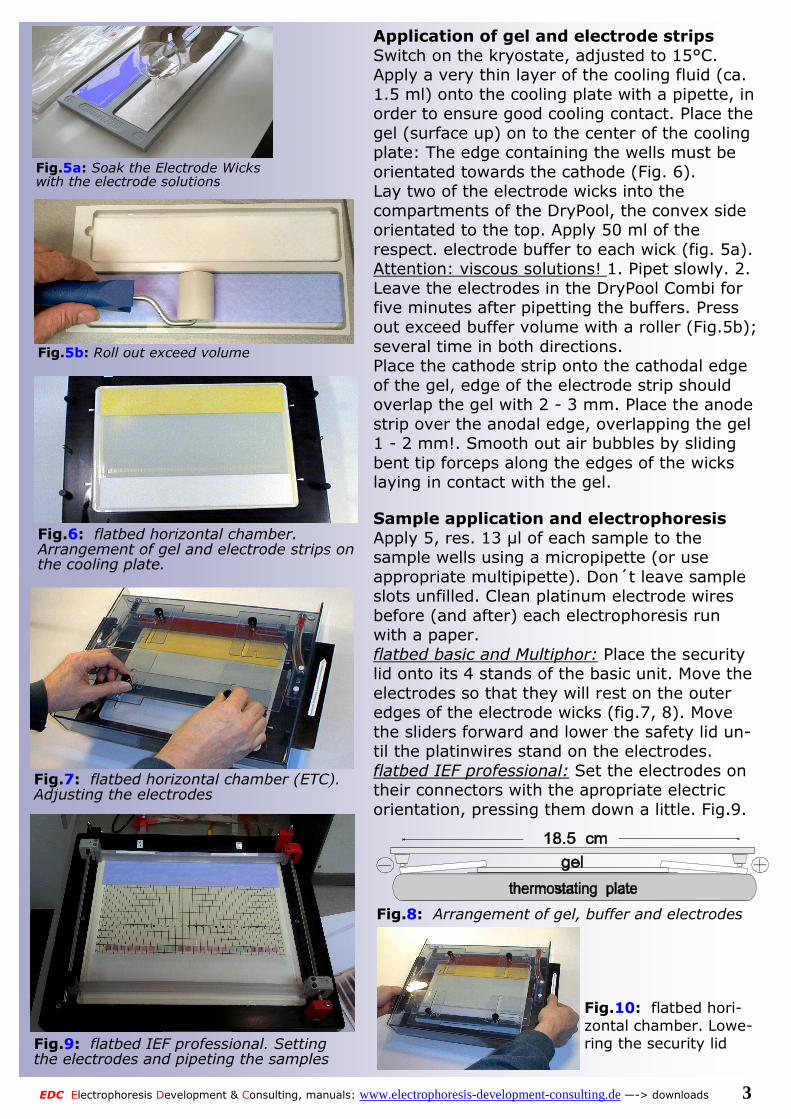
Application of gel and electrode strips
Switch on the kryostate, adjusted to 15°C. Apply a very thin layer of the cooling fluid (ca. 1.5 ml) onto the cooling plate with a pipette, in order to ensure good cooling contact. Place the gel (surface up) on to the center of the cooling plate: The edge containing the wells must be orientated towards the cathode (Fig. 6). Lay two of the electrode wicks into the compartments of the DryPool, the convex side orientated to the top. Apply 50 ml of the respect. electrode buffer to each wick (fig. 5a). Attention: viscous solutions! 1. Pipet slowly. 2. Leave the electrodes in the DryPool Combi for five minutes after pipetting the buffers. Press out exceed buffer volume with a roller (Fig.5b); several time in both directions. Place the cathode strip onto the cathodal edge of the gel, edge of the electrode strip should overlap the gel with 2 - 3 mm. Place the anode strip over the anodal edge, overlapping the gel 1 - 2 mm!. Smooth out air bubbles by sliding bent tip forceps along the edges of the wicks laying in contact with the gel.
Fig.6: flatbed horizontal chamber. Arrangement of gel and electrode strips on the cooling plate.
Sample application and electrophoresis
Apply 5, res. 13 µl of each sample to the sample wells using a micropipette (or use appropriate multipipette). Don´t leave sample slots unfilled. Clean platinum electrode wires before (and after) each electrophoresis run with a paper. flatbed basic and Multiphor: Place the security lid onto its 4 stands of the basic unit. Move the electrodes so that they will rest on the outer edges of the electrode wicks (fig.7, 8). Move the sliders forward and lower the safety lid un-til the platinwires stand on the electrodes. flatbed IEF professional: Set the electrodes on their connectors with the apropriate electric orientation, pressing them down a little. Fig.9.
Fig.8: Arrangement of gel, buffer and electrodes
Fig.7: flatbed horizontal chamber (ETC). Adjusting the electrodes
Fig.9: flatbed IEF professional. Setting the electrodes and pipeting the samples
Fig.10: flatbed hori-zontal chamber. Lowe-ring the security lid
Fig.5a: Soak the Electrode Wicks with the electrode solutions
Fig.5b: Roll out exceed volume

EDC Electrophoresis Development & Consulting, manuals: www.electrophoresis-development-consulting.de —-> downloads 4
Running conditions (15°C): Power supply settings for normal proteins (all DryGels SDS normal size)
*Stopping the electrophoresis: Run time is variable due to different salt loading of the samples. Stopping by time and Vh, or better control with the red Conchenille, supplied with the sample buffer: When the red dye (Conchenille (CON), behind the SDS-zone) is just before the anodal strip. This means: the Bromophenolblue (BPB) incl. the SDS-zone have to leave the gel!, see below. The run should then be stopped and the gels must be placed immediately into the fixing solution.
Optimal shutdown
The (andodal ion) SDS should be completely in the anodal strip! In EDC’s SDS buffer-system the SDS runs behind the Bromophenolblue. This means: Stopping the run with the BPB will left ~1.5 cm SDS in the separation gel. Remedy: Let the SDS run out of the gel and use the separation distance for your proteins by opti-mized shutdown: See next page
Power supply settings for complicated, unknown proteins (all DryGels SDS normal size)
1 Gel:
half gel: half mA , half W Set V
Start
Value SET mA Set W Time Comment
Phase 1 120 V (~70 V) 8 mA 2 W 75 min slow sample entrance
Phase 3 600 V (~350 V) 35 mA 24 W 100-105 min* Stopping the elctropho-
resis: see below
Phase 2 300 V (~190 V) 20 mA 10 W 15 min sample concentration
Bio-Rad Power Pac HV:
type in this parameter as constant —->
(Select „BASIC“ mode) type in the other settings as limits —->
n mA
n V
1 Gel:
half gel: half mA , half W Set V
Start
Value SET mA Set W Time Comment
Phase 1 250 V (~150 V) 20 mA 10 W 30 min sample entrance
Phase 2 550 V (~340 V) 40 mA 22 W 110-120 min* Stopping the elctropho-
resis: see below
Total: 2h 10-30 min

EDC Electrophoresis Development & Consulting, manuals: www.electrophoresis-development-consulting.de —-> downloads 5
Detection of protein bands
1. Hot Coomassie R-350 staining: This hot Coomassie-staining is staining and fixing simultanuously! The acetic acid for staining and destaining can be of technical quality.
Stock solutions: staining solution: 0.03 % (w/v) Coomassie R-350 (GE 17-0518-01), 1 tablet (corresponds to 0.4 g dye substance) in 1250 ml 12.5 % acetic acid. destaining solution: 12.5 % acetic acid impregnating solution: 10% (v/v) glycerol Staining programme: 30 min fresh staining solution at 60 - 70 °C (exhauster) while stirring, fig. 11). 3 x 20 min destaining solution in a tray on a rocking platform, see fig.12 20 min impregnating solution (tray), figure 12. roll on the preserving sheet (Optimal staining: can be achieved when the gel is placed in the staining solution/10% Hac=1+9 overnight at ambient temperature)
Fig.11: Hot Coomassie-staining Fig.12: Destaining in a tray
SDS is in the anodal strip and the 10 kDa is just before the strip
SDS-zone is still in the gel
17 kDa
SDS
BPB
CON
10 kDa
run
a) You can see the backside of the SDS-zone, marked red by the Conchenille dye from EDC‘s Sample Buffer. Let this zone out in the anodal strip, then shutdown. b) Use a prestained standard and run it till the 10 kDa stays just before the anodal strip.

EDC Electrophoresis Development & Consulting, manuals: www.electrophoresis-development-consulting.de —-> downloads 6
2. Silver-staining:
Should be 50 times more sensitive than the Coomassie staining. Recipe: http://www.electrophoresis-development-consulting.de/html/sdssilver.html
3. Fluorescence-staining:
Should be 100 times more sensitive than the Coomassie staining. Using the normal polyester support-film the green, red and infrared channel can be use.
Fig.14: Proteins were prelabeled with T-Rex in the red and green channel
Fig.13: Silver-staining